Pinnacle Administrator Guide - Vircosoft Administrator Guide.pdf · About this Manual 3 The...
85
Adminstrator’s Manual
Transcript of Pinnacle Administrator Guide - Vircosoft Administrator Guide.pdf · About this Manual 3 The...
Adminstrator’s
Manual
About this Guide……..3
Getting Help……..3
Welcome to Pinnacle……..4
Introduction……..7
Organizational Hierarchy……..7
Permissions……..7
Administrator Mode……..9
Pinnacle Config.ini……..10
Enabling Anonymous Login……..17
Logging Into the Web Interface……..17
Disabling the AJAX Dashboard……..17
Managing Pinnacle Through the Web Interface……..19
Browse Documents……..23
Editing Folder Permissions……..24
Allocating / Editing Roles……..25
Import from Server Location……..26
Bulk Import……..27
Working with Documents……..27
DMS Administration……..28
Users & Groups……..30
Security Management……..40
Document Storage……..45
Document Metadata and Workflow Configuration……..47
Miscellaneous……..69
Reporting……..74
Glossary……..79
Table of Contents

About this Manual 3 The Pinnacle™ Administrator Manual is a comprehensive guide to managing the Pinnacle Knowledge
Management System. These instructions are intended for use by an experienced system administrator.
Please Note:
This document is a working draft that is continually being updated. We welcome your contributions to
help us document Pinnacle. Please post your comments and suggestions by creating a 'Documentation'
ticket for the Pinnacle project on http://support.vircosoft.com.
Getting Help
PinnacleTM
Commercial Editions - SMB, and Enterprise - receive priority commercial support from
Pinnacle support staff via your authorized dealer or at http://support.vircosoft.com
Welcome to Pinnacle 4 Pinnacle™ is business knowledge management made simple - easily share, track, secure, and manage
the documents and records your organization depends on.
By partnering with an active and innovative open source developer, Pinnacle provides an easy-to-use,
production-ready, enterprise document management solution for use by corporations, government
institutions, medium or small businesses, and many other organizations. Pinnacle’s open source archi-
tecture allows organizations to easily customize and integrate the document management system with
their existing infrastructure, providing a more flexible, cost-effective alternative to proprietary
applications.
Pinnacle is available in two editions:
• Pinnacle SMB Edition (20 user annual license)
• Pinnacle Enterprise Edition (unlimited annual license)
Pinnacle SMB and Enterprise Edition are known collectively as Pinnacle Commercial Editions.
Pinnacle Commercial Editions are the certified versions of KnowledgeTree Open Source Edition, and
are sold with commercial support and extended functionality that provides access to the Pinnacle
document repository from within Windows® Explorer and Microsoft® Office® applications.
To learn more about Pinnacle, call +1 703-385-0101, email [email protected], or visit http://
www.vircosoft.com. For detailed information about installing and working with Pinnacle, please see
the Pinnacle User Manual, and the Pinnacle Installation Guide.
Pinnacle Integtration Server (KTIS)
PinnacleTM
Integration Server (KTIS) is a server-side component for the Pinnacle Commercial
Editions that provides a standards-based WebDAV interface into the Pinnacle Document Management
System.
Pinnacle Integration Server is complemented by Pinnacle Tools for Windows - a set of client-side tools
for Windows - plus a number of plugin products that extend the utility of the server for specific tasks.
Pinnacle Commercial Editions subscribers are able to log in to the Web-based repository through Pin-
nacle Explorer - a component of the Pinnacle Tools for Windows toolset.
Note: Pinnacle Integration Server and Pinnacle Tools for Windows are provided with a Pinnacle Commer-cial Editions subscription - SMB, or Enterprise.
Note: The Enterprise Edition subscription allows permissions-based access to the repository (via Pinnacle Explorer
or via the Web Interface) to an unlimited number of users, including the default admin user, and, if configured in
the system, to any anonymous user. The SMB Edition subscription allows permissions-based access to the reposi-
tory (via Pinnacle Explorer or via the Web Interface) to a maximum of 20 named, active users, plus the default
admin user, and, if configured in the system, to any anonymous user.
Note: The default admin user is created during the installation, but it should be reset immediately after the in-
stallation is complete. The admin user can configure the system to allow or disallow anonymous users, and de-
fines permissions that protects content in the repository from unauthorized viewing.
Pinnacle Client Tools for Windows 5
PinnacleTM
Client Tools for Windows is a set of client-side tools that leverage the functionality of
the Pinnacle Integration Server to provide alternate methods of working with the Pinnacle server.
Note: Pinnacle Tools is only available with the Pinnacle Commercial Editions - Pinnacle SMB Edition and Pinnacle Enterprise Edition.
Pinnacle Tools comprises:
• Pinnacle Explorer for Windows - an Explorer-type application that provides a file browser view of
the document repository.
• Pinnacle Office Add-in for Microsoft Office - a Microsoft Office add-in that adds a button to the tool-
bar in Microsoft Office, in order to provide access to Pinnacle functionality from within Microsoft Of-
fice applications.
• Pinnacle Desktop Imaging - a tool that allows you to scan documents directly into the Pinnacle re-
pository from within Pinnacle Explorer.
• Pinnacle Outlook Integration - allows saving of incoming and outgoing emails and attachments
directly to the Pinnacle repository; files are selected from within Microsoft Outlook to send as at-
tachments with outgoing messages.
Note: Pinnacle Tools for Windows is installed on each client machine.
For more information about using Pinnacle Tools for Windows, see the Pinnacle User Manual, or find
out more at the Pinnacle website.
Features
PinnacleTM
Client Tools for Windows allows you to:
• open files within the Pinnacle file repository, using the Pinnacle Explorer and Windows Explorer,
and still retain control of document versions and metadata.
• copy files or entire folder trees from or to the repository, using your operating system's 'drag and
drop' functionality.
• control all aspects of a document, including workflow, directly from your desktop.
• browse, check out, or check in Pinnacle managed documents from within Microsoft Office XP/2003
applications, using an easy to use Office Toolbar plugin.
Pinnacle is administered in the DMS Administration section of Pinnacle's Web-interface.
Note: Pinnacle Tools for Windows is only available in Pinnacle Commercial Editions - Pinnacle SMB Edition and Pinnacle Enterprise Edition.

3rd Party WebDAV Clients 6 At the time of writing (November 2006), Pinnacle Explorer for Windows is the only native client
for Pinnacle Integration Server.
Warning
Access is provided to the following 3rd Party WebDAV clients; however, levels of performance and
functionality are not verified. To protect your repository, we recommend a cautionary approach when
using these clients with the Pinnacle Integration Server.
• Windows XP Explorer WebDAV
• KDE Konqueror
• Novel NetDrive
• cadaver
Important
• 3rd Party WebDAV clients are limited to read-only mode in the default installation. To enable
write mode, edit the baobab.conf file in the Pinnacle var folder and turn off SafeMode. The file is
created the first time Pinnacle Integration Server is used.
• Windows users - Web Folders Update
Windows users who want to use Windows Explorer WebDAV must install the Web
folders update, available at http://support.microsoft.com/?kbid=892211.
Note: Authentication under Windows XP requires that you append the port to the hostname - e.g. http://www.hostname.com:80/kt3/baobab/
3rd Party Client Functionality
We are continually extending the functionality of 3rd Party Clients for Pinnacle Integration Server and
Pinnacle Tools for Windows. For more information on the various WebDAV clients, go to:
http://www.greenbytes.de/tech/webdav/webfolder-client-list.html

Introduction 7 Organizational Hierarchy
PinnacleTM
is a goal and task-oriented environment. Users are organized into Groups and Units, with
Roles as a key task-driver. Workflow tasks are typically assigned to specific Roles (e.g. Manager, Editor,
etc).
• Group level - a group contains one or more users
• Unit level - Units are the top level folders that model your organization's business units, e.g. Quality
Assurance, or Human Resources.
Groups and Units are most directly involved in knowledge processes. These groupings may exist in mul-
tiple combinations - for example, different Groups (e.g. Staff, Finance Staff, etc.) may have some Users
in common, and one or more Groups may be contained in a single Unit.
Note: Only the system administrator is allowed to create, modify, or delete these groupings. The Unit Administrator has administrative privileges on the Unit/s where they have been assigned administrative privileges.
Note: Some default entries are created during installation; you may need to change these before you start using Pinnacle.
Permissions
The PinnacleTM
repository is secured through the system's Permissions mechanism. Pinnacle provides a
set of default permissions, and allows the configuration of additional customized permissions. Customized
permissions are useful where an additional permissions set is required for plugin functionality.
A user will only be allowed to perform an action in the system where they have the appropriate permis-
sion on the document or folder. This includes the ability to 'view' the folder or document in the folder
structure.

Permissions 8
The PinnacleTM
repository is secured through the system's Permissions mechanism. Pinnacle provides
a set of default permissions, and allows the configuration of additional customized permissions. Custom-
ized permissions are useful where an additional permissions set is required for plugin functionality.
A user will only be allowed to perform an action in the system where they have the appropriate permis-
sion on the document or folder. This includes the ability to 'view' the folder or document in the folder
structure.
Default Permissions
Pinnacle includes the following set of standard, core, permissions:
Permission description
Read Allows the user to view a document and its metadata. The Search
and Browse functions do not list a document in search results, or in
the folder view, to users who do not have the 'read' permission on
the document.
Write Allows the user to change the content of a document and its meta
data, to perform the check out / check in action, and to create new
documents in folders where they have the 'write' permission.
Add Folder Allows the user to create and edit folders where they have this per
mission on the parent folder.
Manage Security Allows the user to configure and edit security options on the folder
and on its' content, including edit permission and role allocations.
Delete Allows the user to delete any file or folder where they have this per
mission on the parent folder.
Note: The Administrative user won't be able to delete immutable docu ments using the Delete button in Browse Documents, even when they're working in Administrator mode. Immutable documents can only be deleted
when using the Delete action from the immutable document's Document
Detail page. This ensures that immutable documents are only deleted one at a time, and avoids the mistaken deletion of an immutable document in a
mass action delete.
Manage Workflow Allows the user to change the workflow settings on a document (e.g.
perform a transition).
View Folder Details Allows the user to see the name of the folder, the transaction his
tory, and other details linked to the folder name.
Viewing Permissions, or Adding New Permissions
The system administrator uses the Security Management link on the Administration menu in DMS
Administration to create new permissions, or to delete permissions. Non-administrative users use the
Permissions link on the Folder Actions menu in Browse Documents to view permissions set up for
specific folders.
Note: Whereas document permissions are used in Pinnacle, file permissions are an operating system construct - file permissions control which files the operating system users can access on the file-system. File permissions do not
map to document permissions within Pinnacle - there is no relation between these two concepts.

Assigning Permissions 9
Permissions are allocated by group, by role, and by folder.
Permission assigned on this level Description
Folder Permissions Assigned to the creator of a folder, and to the Pinna-
cle administrator Permissions that have been granted
to the parent folder are applied by default to the sub
folders and documents in the parent folder. When a
new folder is created, it will always default to the per-
missions of its parent folder. Any changes to the per-
missions of the parent folder are passed down to the
sub folders.
Users can override the parent permissions, but when
changes are made to the permissions of the parent
folder, those changes are no longer passed down to
the sub folder. The parent permissions can also be
re-applied at any time, and this will override the
custom permissions that may exist for the sub folder.
Role Permissions Permissions may be assigned to the Role -
e.g. developer. Groups are then added to the Role to
allocate permissions of the Role to one or more
groups. Role permissions are useful for workflows,
because workflows are typically created for the role,
and not for the group.
Group Permissions Folder permissions are granted by group.
Administrator Mode Administrator mode allows Pinnacle system and unit administrators to view and manage all docu-
ments in the system, or, for Unit administrators, in their Unit, including those documents where they
are normally denied access.
Administrators may be denied access to certain documents in the repository - for example, manage-
ment level documents containing classified information. However, administrators must be granted a
way of overriding the controls for secure documents in order to fix problems that may occur with these
documents.
Note: An Administrative user will not be allowed to delete immutable documents using the Delete button in Browse Documents, even if they're working in Administrator mode. To delete an immutable document, you will
need to use the Delete action from that immutable document's Document Detail page. This ensures that immu-table documents are only deleted one at a time, and avoids the mistaken deletion of an immutable document in a
mass action delete.
Figure: Enable or Disable Administrator mode via the menu in Browse Documents
Enabling/Disabling Administrator Mode 10 This procedure enables or disables Administrator mode.
Perform the following steps:
1. Use your administrative credentials to log in to the system.
2. Click Browse Documents.
3. Click to expand the Administrator mode menu.
4. Do you want to ...
• enable administrator mode? Click Enable Admin Mode.
• disable administrator mode? Click Disable Admin Mode.
Pinnacle Config.ini The config.ini file (located in the Pinnacle folder) contains configuration information for all Pinnacle
Document Management System installations (for Windows or Linux).
You can change the settings in config.ini in any text editor, such as Notepad. All values in the file are
editable.
Note: We recommend that only authorized, experienced administrative users should attempt to change variables in config.ini. Incorrect configurations may introduce errors in your system.
Configuration Variables
[db]
You will need to change at least some of these settings (such as the default username and password
that is created during installation).
• Database type
Note: At the time of writing (July 2006), mysql is the only supported database type.
dbType = mysql
• Database Login Details Note: These are the MySQL database usernames and passwords. You may need this information when backing up your database or upgrading.
dbHost = localhost dbName = dms dbUser = dms dbPass = admin dbPort = default dbAdminUser = dmsadmin dbAdminPass = admin
[Pinnacle]
Pinnacle automatically detects the default settings for these variables.
• The path to the install location for Pinnacle on your system Note: Leave the default to have this automatically detected.
fileSystemRoot = default
• The Web server name (host name) 11
Note: Leave the default to have this automatically detected.
• Defines whether or not SSL is enabled
Note: Leave the default to have this automatically detected.
• The path to the web application from the root of the web site -
i.e. if Pinnacle is at http://example.org/foo/, then rootUrl should be /foo Note: Leave the default to have this automatically detected.
• Defines whether the platform supports PATH_INFO
The current default is true.
• The location of binaries on your system
The default is to the path set for your Web server; this works for Unix-like
systems, but may require configuration for Windows systems.
• Defines the level of logging to use - DEBUG, INFO, WARN, ERROR
The default is INFO.
[storage]
Important: Do not change the default.
• The plugin that manages storage of documents on the file system
The default is KTOnDiskHashedStorageManager
serverName = default
sslEnabled = default
rootUrl = default
pathInfoSupport = default
execSearchPath = default
logLevel = INFO
manager = KTOnDiskHashedStorageMan-ager manager = default

[ui] 12
These variables define the custom logo you add to the interface.
• Logo requirements
The Logo must be 50px tall, on a white background
• The width of the logo, in pixels
• Alternative text for the logo, for accessibility purposes
• IE-specific GIF theme overrides
You can use the additional IE-specific GIF theme overrides, but this may prevent
arbitrary theme packs from working without having GIF versions available.
• Do not restrict to searches on users and groups pages
e.g. always show_all
• Automatically Refresh the Page Set to true to automatically refresh the page after the session would have expired.
• Defines whether to use a condensed admin user interface
Note: The condensed administrative interface is a more compact version of the administrative interface.
companyLogo = ${rootUrl}/resources/companylogo.png
companyLogoWidth = 313px
companyLogoTitle = ACME Corpora-tion
ieGIF = true ieGIF = default
alwaysShowAll = false alwaysShowAll = default
automaticRefresh = de-fault
condensedAdminUI = default

[i18n] 13
• Internationalization
Defines the language for the interface. Default is English.
• Search Ideographic Language
If your language does not have distinguishable words (typically, there is no space
character), you need to set useLike to true to enable the Search function capable
of dealing with this issue - please note that this Search is effective, but slower.
[tweaks]
• Enabling PHP Error Logging
Change this variable to true to enable PHP error logging to the
log/php_error_log file.
• The default displays the root folder (first unit) as soon as the user clicks Browse Docu-
ments
- i.e. the user is taken directly to their unit folder
• Whether bulk operations should generate a transaction notice on each item, or only on the
folder.
The default (false) indicates that only the folder transaction should occur.
[email]
Defines email settings and enables the email feature for your installation of Pinnacle.
• Your mail server address
The default is none.
defaultLanguage = en
useLike - default
phpErrorLogFile = false
browseToUnitFolder = default
noisyBulkOperations = false
emailServer = none

• The mail port for your Server 14
The default is 25.
• Whether authentication is required for connecting to SMPT
Note: Setting this variable to true forces the user to log in using a user name and
password, and requires that you configure this setting.
• The user name and password required for authentication
(see emailAuthentication)
• Sending attachments from the DMS
Set this variable to true to allow users to send attachments from the document
management system.
• Allow sending of emails to any email address
Set this variable to true to allow Pinnacle system users to send email to any email address - to
other Pinnacle users and to external users.
• Always send mail from ...
Set this variable to true to always send email from the emailFrom address listed above, even if the
sending user is unidentifiable.
• Users sending email only in their group
Set to true to enable onlyOwnGroups.
emailPort = default
emailFrom = [email protected] emailFromName = Pinnacle Document Management System
emailAuthentication = false
emailUsername = username emailPassword = password
allowAttachment = default
allowEmailAddresses = default
sendAsSystem = default
onlyOwnGroups = default
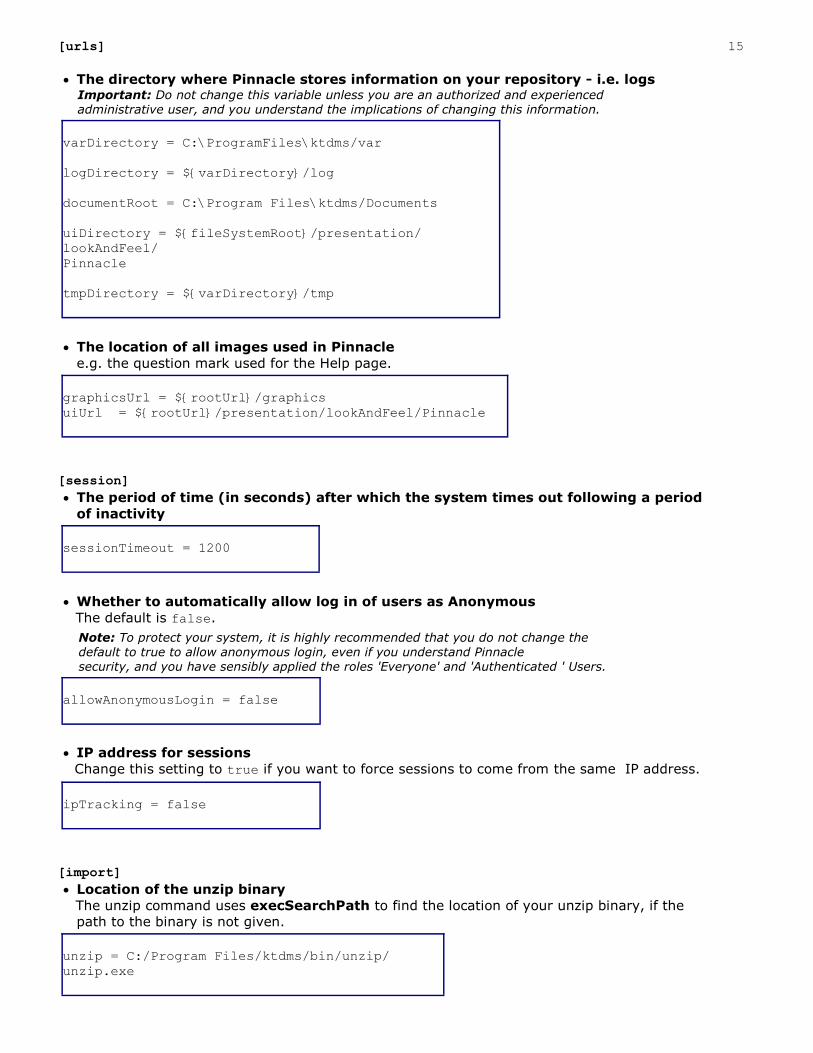
[urls] 15
• The directory where Pinnacle stores information on your repository - i.e. logs Important: Do not change this variable unless you are an authorized and experienced administrative user, and you understand the implications of changing this information.
• The location of all images used in Pinnacle
e.g. the question mark used for the Help page.
[session]
• The period of time (in seconds) after which the system times out following a period
of inactivity
• Whether to automatically allow log in of users as Anonymous
The default is false.
Note: To protect your system, it is highly recommended that you do not change the default to true to allow anonymous login, even if you understand Pinnacle
security, and you have sensibly applied the roles 'Everyone' and 'Authenticated ' Users.
• IP address for sessions
Change this setting to true if you want to force sessions to come from the same IP address.
[import]
• Location of the unzip binary
The unzip command uses execSearchPath to find the location of your unzip binary, if the
path to the binary is not given.
varDirectory = C:\ProgramFiles\ktdms/var logDirectory = ${varDirectory}/log documentRoot = C:\Program Files\ktdms/Documents uiDirectory = ${fileSystemRoot}/presentation/lookAndFeel/ Pinnacle tmpDirectory = ${varDirectory}/tmp
graphicsUrl = ${rootUrl}/graphics uiUrl = ${rootUrl}/presentation/lookAndFeel/Pinnacle
sessionTimeout = 1200
allowAnonymousLogin = false
ipTracking = false
unzip = C:/Program Files/ktdms/bin/unzip/unzip.exe

[export] 16
• Location of the zip binary
The zip command uses execSearchPath to find the location of your zip binary, if the path to
the binary is not given.
[indexer]
• Location of 3rd party indexer binaries
Indexer commands use execSearchPath to find the location of 3rd party indexer binaries, if
the path to the binary is not given.
[user_prefs]
• The minimum length on password-setting
• Length of password for admin user
Defines whether to apply the minimum password length to administrative users who are cre-
ating / editing accounts. The default is false, which allows administrative users to create
users with shorter passwords.
• Whether to restrict users from accessing their Preferences menus
[builtinauth]
Configures the built-in authentication provider.
• The number of days after which users who use the built-in authentication provider are
forced to change their password.
zip = C:/Program Files/ktdms/bin/zip/zip.exe
xls2csv = C:/Program Files/ktdms/bin/catdoc/xls2csv.exe pdftotext = C:/Program Files/ktdms/bin/xpdf/pdftotext.exe catppt = C:/Program Files/ktdms/bin/catdoc/catppt.exe pstotext = pstotext catdoc = C:/Program Files/ktdms/bin/catdoc/catdoc.exe antiword = C:/Program Files/ktdms/bin/antiword/antiword.exe
passwordLength = 6
restrictAdminPasswords = default
restrictPreferences = false
password_change_interval = 30

[cache] 17
• The location of the cache, and whether or not caching is enabled.
[BaobabSettings]
• The configuration options used by the Pinnacle Integration Server (KTIS). Note: KTIS also includes built-in settings, which it uses if there are no settings provided in the config.ini file.
Enabling Anonymous Login Pinnacle may be configured to allow anonymous users to log in to the system. Anonymous login is enabled
and disabled in the config.ini file. The default is set to disallow anonymous login; changing this setting is
not recommended unless Pinnacle's security features are well understood, and the following roles are sensi-
bly applied: 'Everyone' and 'Authenticated Users'.
Perform the following steps:
1. Open the config.ini file in the Pinnacle folder.
2. Locate the following settings: allowAnonymousLogin = false
3. Change this setting to true. allowAnonymousLogin = true
Disabling the Ajax Dashboard Pinnacle's Ajax Dashboard may be disabled in the config.ini file, located in the Pinnacle folder. The de-
fault is true. Change this setting to false to disable the new-look Dashboard.
useNewDashboard = default
Note: The default is true.
cacheDirectory = ${varDirectory}/cache cacheEnabled = true
debug = off profile = off safemode = on rootfolder = Root Folder

Login 18 Login Restrictions
PinnacleTM
can be set up to use the organization’s central authentication infrastructure to control access
to the repository, or it can use its own internal database to allow users to log in.
The authentication process checks and verifies a user's details in order to allow or disallow access to vari-
ous parts of the DMS, and to enable or disable permissions-based functionality on content in the reposi-
tory for the user.
Pinnacle allows the administrative user to set up the maximum concurrent login for a user by editing the
user's details in the Users and Groups section of DMS Administration. This prevents a single account
from being used to log into the system from different computers.
Note: By default, a user is logged out of the system after a period of inactivity. When the user logs in again, the sys-tem re-opens at the location where it logged the user out.
Logging in via the Web-Interface This procedure logs in a user and opens the Dashboard of the Web-interface of the Pinnacle Document
Management System.
Note: Only users who have been added to the system and enabled in the Users and Groups section of DMS Ad-ministration are able to login to the DMS. Users are enabled by default when they're added to the system. A Pinna-cle SMB Edition subscription enables a maximum of 20 users at any one time. The administrator can enable and dis-
able user profiles to allow access to different users. A Pinnacle Enterprise Edition subscription provides access to an
unlimited number of enabled users.
Perform the following steps:
1. Use your browser to navigate to the Login page for the Pinnacle Document Management System.
2. Enter your administrative login details in the Username and Password fields. Note: Your username and your password are case-sensitive. Note: If you have forgotten your admin login credentials, see Manually Restoring the Default Admin Password.
4. Click login to open Pinnacle at the Dashboard.
Figure: Login Page
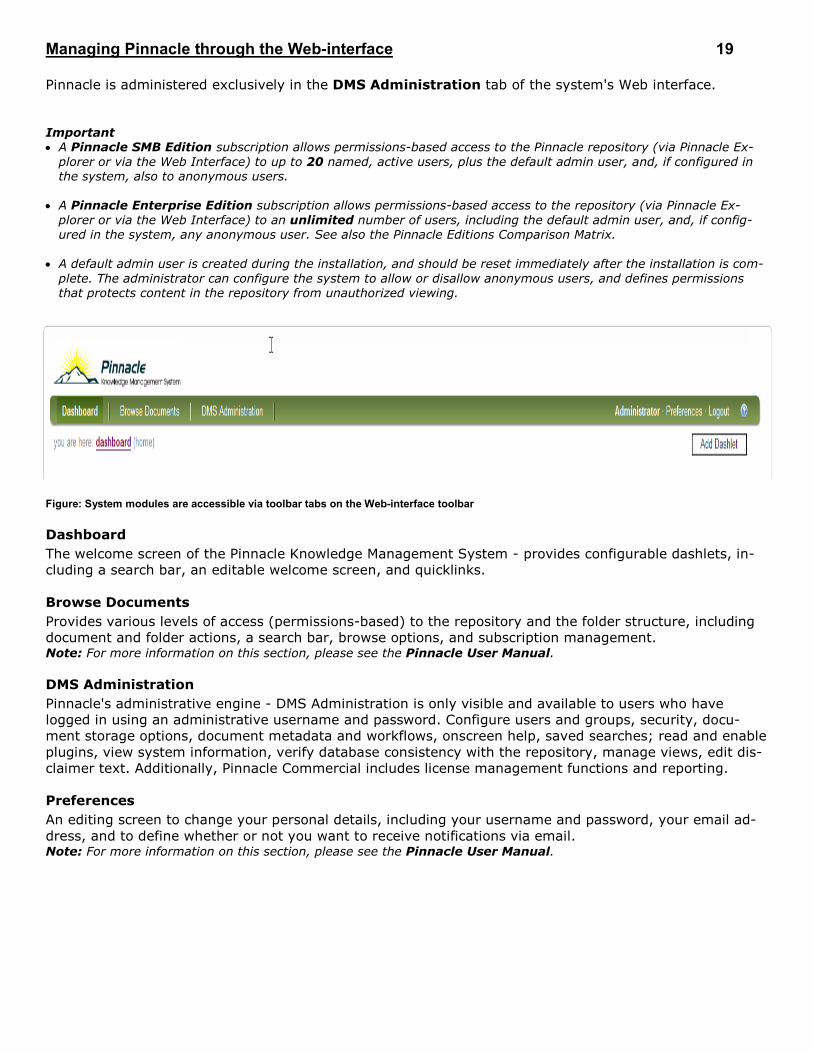
Managing Pinnacle through the Web-interface 19 Pinnacle is administered exclusively in the DMS Administration tab of the system's Web interface.
Important • A Pinnacle SMB Edition subscription allows permissions-based access to the Pinnacle repository (via Pinnacle Ex-
plorer or via the Web Interface) to up to 20 named, active users, plus the default admin user, and, if configured in the system, also to anonymous users.
• A Pinnacle Enterprise Edition subscription allows permissions-based access to the repository (via Pinnacle Ex-
plorer or via the Web Interface) to an unlimited number of users, including the default admin user, and, if config-ured in the system, any anonymous user. See also the Pinnacle Editions Comparison Matrix.
• A default admin user is created during the installation, and should be reset immediately after the installation is com-
plete. The administrator can configure the system to allow or disallow anonymous users, and defines permissions
that protects content in the repository from unauthorized viewing.
Figure: System modules are accessible via toolbar tabs on the Web-interface toolbar
Dashboard
The welcome screen of the Pinnacle Knowledge Management System - provides configurable dashlets, in-
cluding a search bar, an editable welcome screen, and quicklinks.
Browse Documents
Provides various levels of access (permissions-based) to the repository and the folder structure, including
document and folder actions, a search bar, browse options, and subscription management. Note: For more information on this section, please see the Pinnacle User Manual.
DMS Administration
Pinnacle's administrative engine - DMS Administration is only visible and available to users who have
logged in using an administrative username and password. Configure users and groups, security, docu-
ment storage options, document metadata and workflows, onscreen help, saved searches; read and enable
plugins, view system information, verify database consistency with the repository, manage views, edit dis-
claimer text. Additionally, Pinnacle Commercial includes license management functions and reporting.
Preferences
An editing screen to change your personal details, including your username and password, your email ad-
dress, and to define whether or not you want to receive notifications via email. Note: For more information on this section, please see the Pinnacle User Manual.

Pinnacle's Web-interface opens at the Dashboard. 20
Dashboard Features
PinnacleTM
uses the currently logged in user's login credentials to determine the items that display on
the Dashboard, which may include:
• welcome message
• the user's currently checked out documents, with links to their repository location
• notifications (if applicable) - these are alerts that inform a user when documents or folders have been
added, checked in, deleted, and so on, on folders where they have notifications set up
• news
• top downloads
• quick access dialog - go directly to a document by typing in the document id
• quicklinks to frequently used items (e.g. a telephone list, or some other frequently used documents)
• the search bar
• orphaned folders (if any) - including a direct link to these items in the repository
Note: Orphaned folders are sub folders of parent folders for which the currently logged-in user does not have the appropriate view or other permissions. The user has permissions on the orphan folder, but not to the parent folder.
The Dashboard provides a direct link to the orphaned folder, because this user will not be able to navigate to the
folder through the folder structure.
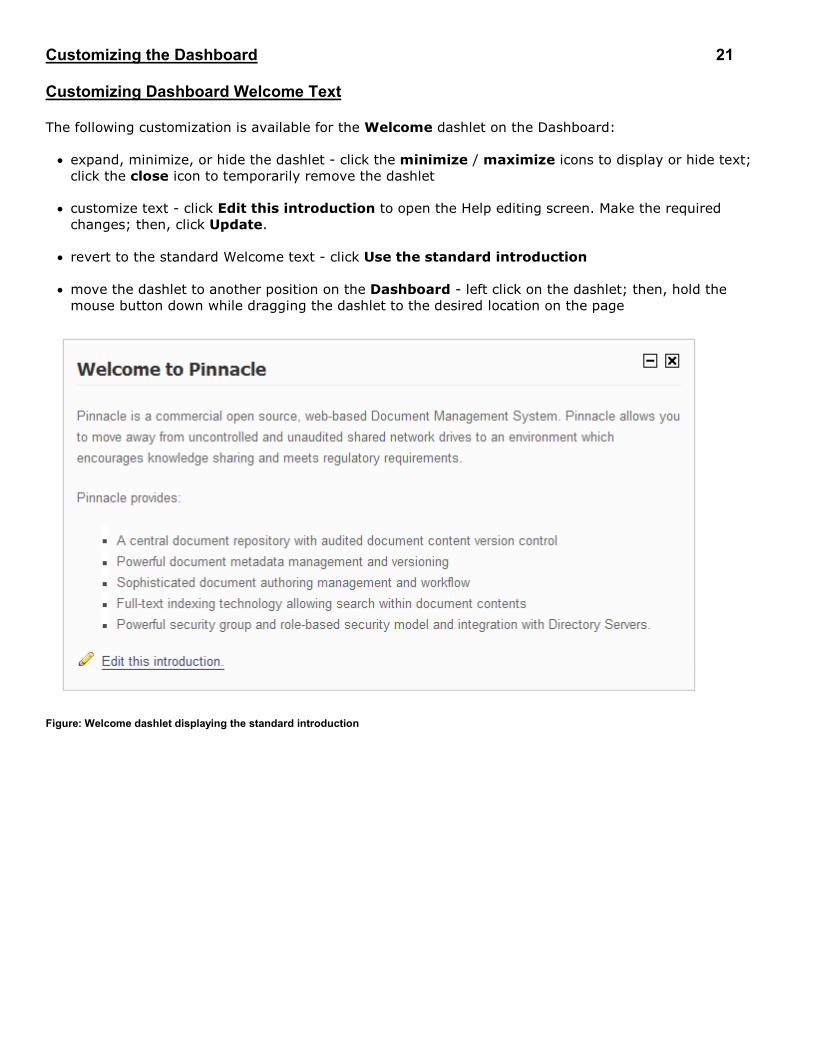
Customizing the Dashboard 21 Customizing Dashboard Welcome Text The following customization is available for the Welcome dashlet on the Dashboard:
• expand, minimize, or hide the dashlet - click the minimize / maximize icons to display or hide text;
click the close icon to temporarily remove the dashlet
• customize text - click Edit this introduction to open the Help editing screen. Make the required
changes; then, click Update.
• revert to the standard Welcome text - click Use the standard introduction
• move the dashlet to another position on the Dashboard - left click on the dashlet; then, hold the
mouse button down while dragging the dashlet to the desired location on the page
Figure: Welcome dashlet displaying the standard introduction
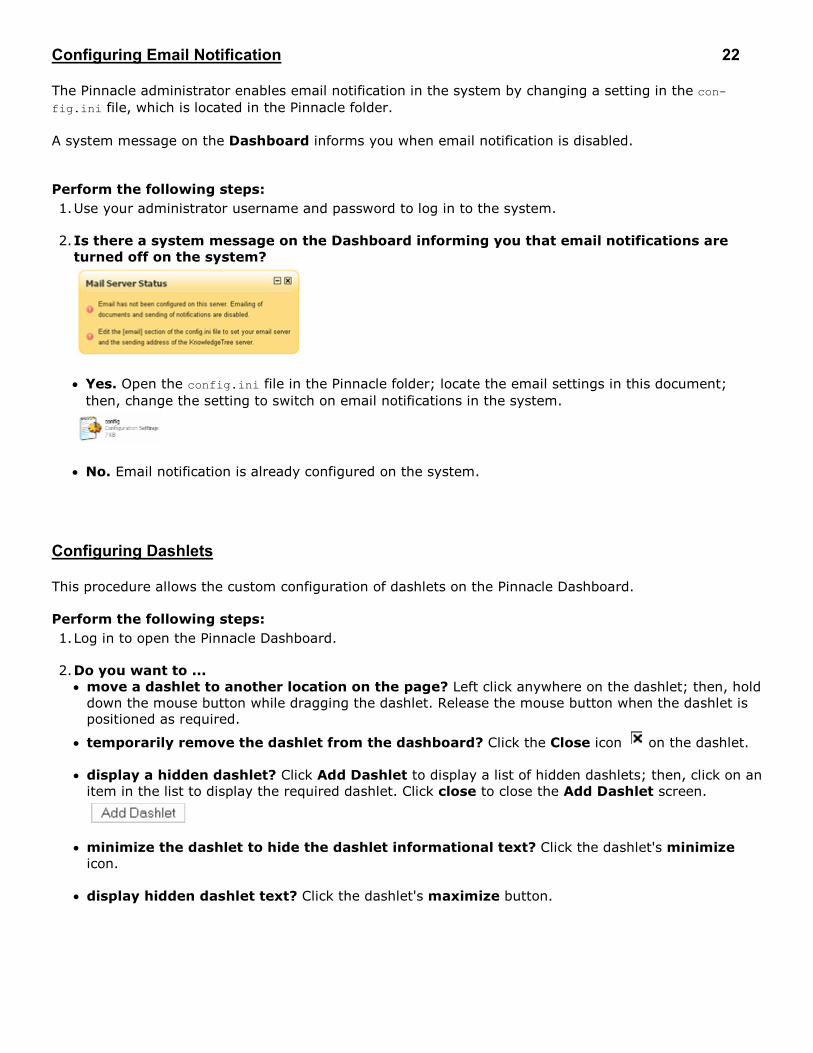
Configuring Email Notification 22 The Pinnacle administrator enables email notification in the system by changing a setting in the con-
fig.ini file, which is located in the Pinnacle folder.
A system message on the Dashboard informs you when email notification is disabled.
Perform the following steps:
1. Use your administrator username and password to log in to the system.
2. Is there a system message on the Dashboard informing you that email notifications are
turned off on the system?
• Yes. Open the config.ini file in the Pinnacle folder; locate the email settings in this document;
then, change the setting to switch on email notifications in the system.
• No. Email notification is already configured on the system.
Configuring Dashlets This procedure allows the custom configuration of dashlets on the Pinnacle Dashboard.
Perform the following steps:
1. Log in to open the Pinnacle Dashboard.
2. Do you want to ...
• move a dashlet to another location on the page? Left click anywhere on the dashlet; then, hold
down the mouse button while dragging the dashlet. Release the mouse button when the dashlet is
positioned as required.
• temporarily remove the dashlet from the dashboard? Click the Close icon on the dashlet.
• display a hidden dashlet? Click Add Dashlet to display a list of hidden dashlets; then, click on an
item in the list to display the required dashlet. Click close to close the Add Dashlet screen.
• minimize the dashlet to hide the dashlet informational text? Click the dashlet's minimize
icon.
• display hidden dashlet text? Click the dashlet's maximize button.
Managing Quicklinks 23 This procedure configures the quicklinks display on the Dashboard.
Perform the following steps:
1. Log in to Pinnacle to open the Dashboard.
2. Locate the Quicklinks dashlet; then, click Manage Quicklinks to open the Quicklinks configuration
screen.
3. Do you want to ...
• add new quicklinks? Click Create a new quicklink to open the New Quicklink page. Navigate
the folder collection to find the target folder or document for this quicklink. When you're done, click
Link. The quicklink displays on the Manage Quicklinks page, and on the Dashboard.
• change the list order of existing quicklinks? Click Re-order quicklinks to open the Re-order
Quicklinks page. View the current order of links; then, use the up and down arrows in the table to
change the list order or links that are listed in the Item column. When you're done, click Re-order.
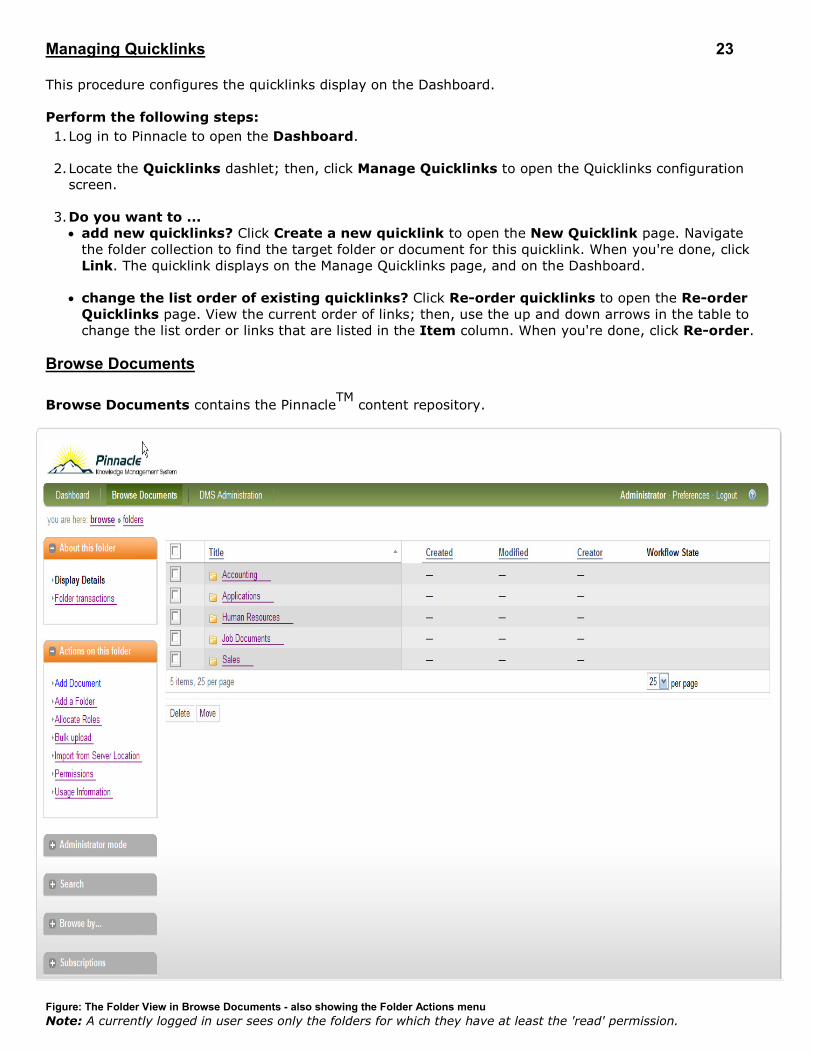
Browse Documents
Browse Documents contains the PinnacleTM
content repository.
Figure: The Folder View in Browse Documents - also showing the Folder Actions menu
Note: A currently logged in user sees only the folders for which they have at least the 'read' permission.
Administrative users have access to the following functionality in Browse Documents: 24
• work with documents and folders
• define permissions
• enable/disable Administrator mode (in special circumstances, where you need free access to all functions
and content in the DMS)
• search
• browse filtered content in the repository (by folder, by document type, or by lookup value)
• create and manage subscriptions
Note: For more information on Browse Documents, see the Pinnacle User Manual.
Editing Folder Permissions By default, permissions that are granted on a parent folder are also granted on the child folders - the child
folders are said to 'inherit permissions' from the parent.
The parent folder's permissions may be overridden, in order to define a custom permissions set for the child
folder. In this case, when subsequent changes are made to permissions on the parent folder; such changes
no longer pass to the child folder, unless you reinstate the inherit permissions feature.
Note: Typically, only the administrator is allowed to edit permissions on folders in Pinnacle, but users may also be granted permissions to do so.
Perform the following steps:
1. Login; then, click Browse Documents to enter the folder structure.
2. Search or navigate to the folder where you want to edit permissions.
3. Click Permissions in the Actions on this folder menu to open the View Permissions for [folder
name] page.
4. Does this folder inherit permissions, and you want to override those permissions?
• Yes. Click Override permissions to update permissions for this folder. Note: A system message in the grey bar above the table of permissions advises that this folder now defines its own permissions. To cancel this action, click Inherit permissions.
• No. Go to step 5.
5. Does this folder define its own permissions and you want to...
• reinstate the parent permissions? Click Inherit permissions. Click OK.
• change the permissions currently displayed in the table? Click Edit permissions to open the
permissions editing screen. Add or remove roles and/or groups from the Assigned Entities field to
define the groups and roles for whom you are configuring permissions on this folder. Select or deselect
check boxes in the table for each permission (relevant to the role or group) to define permissions on
the folder. Click Update Permission Assignments.
• add or remove dynamic permissions on this folder? Select a group and condition in the Add a
new dynamic permission section; then, select the relevant permissions check boxes; to remove a
dynamic permission, click the delete icon in the Remove column for the relevant Group in the Dy-
namic permissions table.
Allocating / Editing Roles 25 This procedure allocates and edits roles.
PinnacleTM
allows the administrative user to allocate permissions to a role, and then to allocate the role to
one or more groups. The group is then granted the permissions of the role.
Although child folders typically inherit the role permissions of the parent folder, inherited role allocations
can be overridden in order to define custom role allocations for a child folder. The role allocations of a par-
ent folder may be reinstated at any time.
Prerequisite:
• Pre-defined roles should exist - see Adding New Roles.
Perform the following steps:
1. Login; then, click Browse Documents to enter the folder structure.
2. Locate the folder where you want to allocate roles; then, click Allocate Roles in the Actions on this
folder menu to open the Allocate Roles for [folder name] page.
3. Do you want to...
• remove the parent allocation on a role? Click Override Parent Allocation for the relevant role. Note: This action creates a new, editable, role allocation - i.e. the Edit icon displays in the Edit Users column, and in the Edit Groups column.
• reinstate the parent allocation on a role? Click in the Use Parent column, for the relevant
role. Click OK on the system verification message.
• add or remove users for this role? Click in the Edit Users column for the role to open the Al-
locate User to Role page; then, populate the Member users field with one or more users from the
Available Users field; remove users from the role by moving their user name to the Available Us-
ers field. Click save changes when you're done.
Note: To find relevant users fast, enter criteria in the Filter fields (i.e. type a letter, or a word, or the first part of a word) to display names matching the criteria at the top of
the display field.
Note: To select several names at once, hold down the keyboard Ctrl key while selecting names; then, to populate the other field, you can either double
click on your selection or use the arrows to move the names.
• add or remove groups for this role? Click in the Edit Groups column for the role to open the
Allocate Groups to Role page; then, populate the Member groups field with one or more users
from the Available Groups field; remove groups from the role by moving the group name to the
Available Groups field from the Member groups field. Click save changes when you're done.
Note: To find relevant groups fast, enter criteria in the Filter fields (i.e. type a letter, or a word, or the first part of a word) to display the names matching the specified
criteria at the top of the display field.
Note: To select several names at once, hold down the keyboard Ctrl key while selecting names; then, to populate the other field, you can either double click on your selection
or use the arrows to move the names.

Import from Server Location 26 This procedure performs a bulk upload of all content at a specified server location.
Note: Only administrative users have access to this functionality in the DMS.
Perform the following steps:
1. Use your administrator login details to open Browse Documents.
2. Navigate to the destination folder for imported content; then, click Import from Server Location in the
Actions on this folder menu to open the Import files into [folder] page.
3. Specify the path to the source server for the content you're importing.
4. Select a document type; then, click Add.
5. Complete the metadata fields that display for the selected document type - e.g. author, category, key-
words etc. Note: The administrator defines custom fieldsets and fields for document types.
6. Click Import. Note: Having uploaded the document, the system opens the new document's Document Detail page.
Bulk Export Pinnacle's Bulk Export function is only available to an administrative user. This feature allows the adminis-
trator to download the entire contents of a folder in one zipped file. The zipped file is saved to the user's
computer and may be opened locally for viewing.
Note: Activate Bulk Export by enabling the plugin in the Miscellaneous section of DMS Administration. See Manage Plugins for more information.
Perform the following steps:
1. Login; then, click Browse Documents to enter the folder structure.
2. Search or browse to locate the folder to export.
3. Click Bulk Export in the Actions on this folder menu. Note: This menu item does not display if you do not have permissions for this action on the folder.
4. A system dialog asks you to choose whether to open the zipped file, or save it to your local computer -
select either the Open with or Save to Disk radio button. Click OK.

Bulk Upload 27 Pinnacle's Bulk Upload function allows the upload of multiple documents in a zipped folder.
Note: Activate the Bulk Upload feature by enabling the plugin in the Miscellaneous section of DMS Administration. See Manage Pluginsfor more information.
You also need to have UnZip installed on the Pinnacle server in order to use Bulk Upload. Note:
Windows: http://www.info-zip.org/
Unix / Linux: unzip
Perform the following steps:
1. Login; then, click Browse Documents to enter the folder structure.
2. Search or browse to locate the destination folder in the repository.
3. Click Bulk upload in the Actions on this folder menu. Note: This menu item does not display if you do not have permissions for this action on the folder.
4. Specify the path to the file in the Archive file field; or, click Browse to navigate to the archive file.
5. Select a document type; then, click Add.
6. Metadata fields relevant to the document type display on the page; complete these fields; then, click Up-
load.
Working with Documents The Document Actions menu in Browse Documents provides document level functionality for working
with content in the Pinnacle repository.
To ensure that all functionality is enabled, please read the plugins from the file system after upgrading or
installing Pinnacle. See Manage Plugins for more information.
For more information on using the various Document Actions, please refer to the Pinnacle User Manual.

DMS Administration 28 The Pinnacle administrative user uses the functionality in the DMS Administration tab to manage Pinnacle.
The table summarizes the administrative tasks that are configurable in the various sections of
DMS Administration:
Users and Groups Authentication adding a new authentication source
editing/deleting an existing authentication source
Managing users finding/viewing user details
enabling/disabling users
editing user details
changing a user's group membership
changing user's passwords
adding users - manually, or importing from an external
authentication source
Managing groups adding new groups
finding/viewing groups
editing/deleting groups
adding/removing group members
adding/deleting subgroups
Controlling Units adding new Units
viewing/editing/deleting Units
opening the Unit at its folder location
Security Management Permissions view/delete permissions
adding new permissions
Roles viewing/editing/deleting Roles
adding new Roles
Dynamic what are dynamic conditions?
Conditions viewing/editing dynamic conditions
adding dynamic conditions
Roles viewing/editing/deleting Roles
adding new Roles
Dynamic what are dynamic conditions?
Conditions viewing/editing dynamic conditions
adding dynamic conditions
assigning/unassigning dynamic conditions
running dynamic conditions
Document Storage forcing document check in
restoring archived documents
restoring/expunging deleted documents
Document Metadata Document Types viewing/adding document types
and Workflow editing document types
Configuration enabling/disabling document types
associating/disassociating fieldsets and document types
viewing/adding fieldsets
29
Document Fieldsets editing/deleting fieldsets
viewing/adding fields (lookup and tree fields)
editing/deleting fields
Email Document Types what are email document types?
configuring email document types
Workflows viewing/adding workflows
editing basic workflow details: name, start state,
enable/disable
configuring workflow process: connecting
transitions and states
adding states to workflows
editing states
configuring system security by workflow state
configuring notifications for states
adding new transitions to existing workflows
editing transitions
configuring transition requirements
what are guard triggers?
adding new transition restrictions
viewing/editing/deleting transition restrictions
configuring transition effects
adding new transition actions
viewing/editing/deleting transition actions
Link Type Management adding document link types
viewing/editing/deleting link types
Automatic Workflow configuring workflow assignment
Assignments
Workflow Allocation configuring workflow allocation by document types
by Document Types
Edit Help Files customizing onscreen help
viewing/editing/deleting/ onscreen help
Saved Searches adding new saved searches
viewing/editing/deleting/running saved searches
Manage Plugins re-reading/enabling plugins
Support and viewing support and system information
System Information
Verify Document verifying database/repository consistency
Storage
Manage Views view existing/adding new customized views
Edit Disclaimers customizing disclaimer text
Extended Transaction generating transaction reports
Information
Edit Quicklinks adding/editing/removing quicklinks
KTIS Administration view existing/adding new keys
Reporting generating user activity reports

Users and Groups 30 The Users and Groups section of DMS Administration provides access to the following configuration
tasks:
• Authentication
• Managing Users
• Managing Groups
• Controlling Units
Authentication
PinnacleTM
provides an inbuilt authentication method - Database Authentication. The system uses this
default authentication to control access to users and groups in its database.
Pinnacle provides the ability to add external authentication sources that allow the organization to maintain
its own list of the users and groups requiring controlled access to the repository. External authentication
sources and authentication provider information may be edited or deleted in the DMS Administration sec-
tion of Pinnacle.
Note: The credentials of each user from the external authentication source is added to Pinnacle to allow the system to use their details to control access to the repository.
Cannot change the authentication method
There is currently no way to convert a user's predefined authentication source. After adding a user, and
selecting a particular authentication source - e.g. LDAP - it is not possible to change the authentication
source for this user. To allow this user to log in using an alternative authentication source, such as the
normal database, the user will need to be added to the system a second time, under a new username,
and with the preferred authentication source selected. This is because users cannot be deleted in Pinna-
cle; they can only be disabled.
See Also:
Managing Users
Managing Groups
Adding New Authentication Sources This procedure adds a new external authentication source.
Perform the following steps:
1. Use your administrator login credentials to open DMS Administration; then click Users and Groups
in the Administration menu to open the Users and Groups page.
2. Click Authentication to open the Authentication Sources page.
3. Click Add a new authentication source to open the Add an authentication source page.
4. Type a name for the new authentication source in the Name field.
5. Select the type of authentication source from the Authentication Provider pick list. Note: By default, this pick list contains the standard options - LDAP Authentication, and Active Directory Authentication. You can add additional authentication sources to this list.
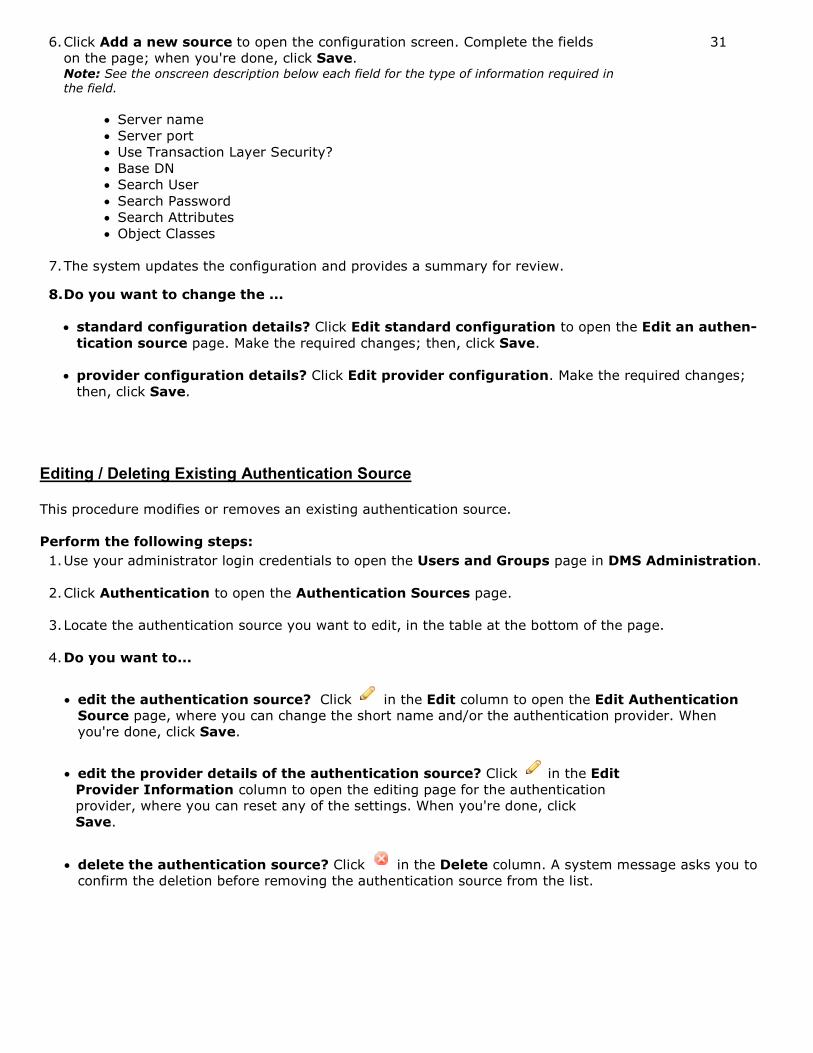
6. Click Add a new source to open the configuration screen. Complete the fields 31
on the page; when you're done, click Save. Note: See the onscreen description below each field for the type of information required in the field.
• Server name
• Server port
• Use Transaction Layer Security?
• Base DN
• Search User
• Search Password
• Search Attributes
• Object Classes
7. The system updates the configuration and provides a summary for review.
8. Do you want to change the ...
• standard configuration details? Click Edit standard configuration to open the Edit an authen-
tication source page. Make the required changes; then, click Save.
• provider configuration details? Click Edit provider configuration. Make the required changes;
then, click Save.
Editing / Deleting Existing Authentication Source This procedure modifies or removes an existing authentication source.
Perform the following steps:
1. Use your administrator login credentials to open the Users and Groups page in DMS Administration.
2. Click Authentication to open the Authentication Sources page.
3. Locate the authentication source you want to edit, in the table at the bottom of the page.
4. Do you want to...
• edit the authentication source? Click in the Edit column to open the Edit Authentication
Source page, where you can change the short name and/or the authentication provider. When
you're done, click Save.
• edit the provider details of the authentication source? Click in the Edit
Provider Information column to open the editing page for the authentication
provider, where you can reset any of the settings. When you're done, click
Save.
• delete the authentication source? Click in the Delete column. A system message asks you to
confirm the deletion before removing the authentication source from the list.

Manage Users 32 The following tasks are performed in the Manage Users section of Users and Groups in DMS Admini-
stration.
• viewing user details
• enabling/disabling users
• adding users
• editing users
• changing a user's group membership
• changing a user password
Note: Users cannot be deleted in Pinnacle. Inactive users can only be disabled.
Finding/Viewing User Details This procedure searches for specific users, and displays a list of all system users.
Perform the following steps:
1. Use your administrator login credentials to open Users and Groups in DMS Administration; then,
click Manage Users to open the User Management page.
2. Do you want to...
• find a specific user? Enter the username - or part of the username - in the Username field;
then, click Search for Users to display the user matching the criteria you specified - the system
displays all users that match the criteria you specified.
• No. Click view all users to display a list of all system users.
Enabling/Disabling Users This procedure enables or disables users.
Perform the following steps:
1. Use your administrator login to open Users and Groups in DMS Administration; then, click Man-
age Users to open the User Management page.
2. Search for a user, or display a list of all system users. For more information about this procedure, go
to Finding/Viewing User Details
3. Do you want to...
• disable a user? Select the Disable check box for the relevant user; then,
click Apply Changes. Note: New users are enabled by default. Users are disabled to prevent them from
accessing the system.
• enable a user? Select the Enable check box for the relevant user; then, click Apply Changes. Note: New users are enabled by default. You will only need to enable a user that has been disabled.
Managing the User Base for Pinnacle SMB Edition 33 Important information regarding Pinnacle Commercial Editions Subscription Manage-
ment
Pinnacle only allows enabled users to access the DMS. Users are enabled by default when you first add
them to the system.
Pinnacle SMB Edition license holders manage their user base (limited to 20 named, active users - i.e.
'enabled' users) by enabling and disabling users in Users and Groups. When disabling a user that no
longer requires access to the system, you free up that user slot to allow access to another user - limited to
the 20 user maximum for your Pinnacle SMB Edition subscription.
Pinnacle Enterprise Edition allow access to the DMS to an unlimited number of enabled users.
The number of user-slots available (maximum 20 for SMB subscription) is determined by the key with the
soonest expiry date. For example, if you have one SMB subscription that is due to expire in 7 days, and
you have another SMB subscription expiring in one year; you will only be allowed to allocate free slots
(currently disabled user slots) based on the number of users enabled for the subscription expiring in 7
days.
A new subscription is only activated after the older subscription has expired. This allows you to add a new
key on your system before the older key expires.
When a user who has not been enabled in the system logs in, a system message advises that their account
has been disabled, and they will need to contact the system administrator to enable their user account be-
fore they will be allowed to access the repository.
Editing User Details This procedure modifies the user profile.
Perform the following steps:
1. Use your administrator login to open Users and Groups in DMS Administration; then, click Man-
age Users to open the User Management page.
2. Search for the user's details, or display a list of all system users. For more information about this pro-
cedure, go to Finding/Viewing User Details.
3. Click the Edit icon for the relevant user to open the Edit User Details page.
4. Do you want to change:
• the user's details? Go to step 5.
• the user's password? Scroll down the page to the Authentication section; then, click Change
[user name] password. Complete the required fields; then, click change password. Note: For more information about this procedure, go to Changing User Passwords.
5. Make the required changes on the page. The following information is editable:
• username
• name
• email address
• email notifications - defines whether notifications are sent to the user by email, or displayed on the
Dashboard
• mobile number
• maximum sessions
6. Click save changes.

Changing a User's Group Membership 34 This procedure modifies the user's current group membership profile.
Perform the following steps:
1. Use your administrator login to open Users and Groups in DMS Administration; then, click Man-
age Users to open the User Management page.
2. Search for the user's details, or display a list of all system users. For more information about this pro-
cedure, go to Finding/Viewing User Details.
3. Click the Manage Groups link for the relevant user to open the Change [username] Groups page.
4. Do you want to ...
• add the user to a group? Populate the Available Groups field - filter or show all; then select
groups for this user. Click the right-pointing arrow to populate the Assigned Groups field. Click
save changes.
• remove this user from a group? Select the relevant group in the Assigned Groups field; then,
click the left-pointing arrow to remove the group from the Assigned Groups field. Click save
changes.
Changing User Passwords This procedure changes a user's password.
Perform the following steps:
1. Use your administrator login to open Users and Groups in DMS Administration; then, click Man-
age Users to open the User Management page.
2. Search for the user's details, or display a list of all system users. For more information about this pro-
cedure, go to Finding/Viewing User Details.
3. Click the Edit icon for the relevant user to open the Edit User Details page.
4. Locate the Authentication section; then, click Change [user name] password.
5. Do you want to ...
• force this user to change their password the next time they log in? Click change password.
• change the user's password? Define a new password in the Password field and repeat the pass-
word in the Confirm Password field. When you're done, click change password.

Adding Users 35 Users are created using Pinnacle's default authentication provider. When using an external authentication
provider - such as LDAP - you need to ensure that the provider's plugin is registered and enabled. For more
information, see Adding a New Authentication Source.
There are two ways to create new users:
• from an external authentication source
• manually within Pinnacle
Adding New Users Manually This procedures adds new users manually to the Pinnacle Document Management System.
Perform the following steps:
1. Use your administrator login credentials to open the Users and Groups page in DMS Administration;
then, click Manage Users to open the User Management page.
2. Click Add a new user to open the Add a user page.
3. Are you creating the new user...
• from an external authentication source that has already been configured for Pinnacle? See
Adding a User From an External Authentication Source.
• from an external authentication source that has not yet been configured for Pinnacle? Per-
form the procedure for adding a new authentication source to enable the authentication provider's
plugin; then, return to this procedure to add the user from the external authentication source.
• manually, within Pinnacle? Go to step 4.
4. Type the user's login name in the Username field; then, type the user's full name in the Name field.
5. Type the user's email address in the Email Address field.
6. Do you want to enable notifications and alerts to be sent to the email address you specified in
the Email Address field?
• Yes. Select the Email Notifications check box.
• No. Leave the Email Notifications check box de-selected.
7. Type the user's password in the Password field; then, re-enter the password in the Confirm Password
field.
8. Type the user's mobile phone number in the Mobile Number field (if the system is configured to send
notifications to cellphones).
9. In the Maximum Sessions field, define a maximum number of times you will
allow this user to log in to the system without having used the Logout button
to exit their working session. Note: By default, the system logs you out automatically after a period of inactivity. When you login again, it re-opens the page where you ended your last working
session. However, you will only be allowed to access the system without using
the Logout button for the maximum number of times you set in this field. This is to prevent multiple users logging in on the same account.
10. Click create user to re-open the User Management page.
Note: A system message confirms that the new user has been added to the system.
Adding One or More Users from an External Authentication Source 36 This procedure adds new users from an external authentication source.
Note: When using an external authentication provider - such as LDAP - you need to ensure that the provider's plugin is registered and enabled. For more information, see Adding a New Authentication Source, and Manage Plugins.
Perform the following steps:
1. Use your administrator login credentials to open Users and Groups in DMS Administration; then,
click Manage Users to open the User Management page.
2. Click Add a new user to open the Add a user page.
3. Are you creating the new user...
• from an external authentication source that has already been configured for Pinnacle? Go
to step 4.
• from an external authentication source that has not yet been configured for Pinnacle?
Perform the procedure for adding a new authentication source to enable the authentication pro-
vider's plugin; then, return to this procedure to add the user from the external authentication
source.
• manually, within Pinnacle? Go to Adding a User Manually.
4. Select the authentication source you want to use from the pick list in the Add a user from an au-
thentication source section. Note: It is not possible to convert a user from one authentication source to another.
6. Click Add from source to open the Search for user page for the authentication source you selected.
7. Do one of the following:
• Type part or all of the user's name in the User's name field; then, go to step 8.
• Select the Mass import check box to add all users from the authentication source you specified;
then, go to step 8. Note: The system does not allow you to verify the details of each individual user that
is included in the mass import.
8. Click search for users.
Manage Groups Only a User who has been assigned to a Group is allowed to access Pinnacle's document management sys-
tem.
Note: Groups can be members of other groups, and can have other groups as members. These memberships pass the permissions set on to the parent group to user members of the member groups, possibly along a few chains.
Example:
Let’s say you create a new Group called Testers. Having created the group, you must assign the group
(Testers) Group to a Unit, and you name the Unit 'Quality Assurance'. So, the group named Testers is part
of the unit Quality Assurance.
Group: Testers
Unit: Quality Assurance
Adding New Groups 37 This procedure creates a new group in Pinnacle.
Perform the following steps:
1. Login using your administrative credentials to open DMS Administration; then, click Manage Groups
to open Group Administration.
2. Click Add a new group to open the Add a new Group page.
3. Define a name for the group in the Group Name field.
4. Do you want to assign system administrative privileges to all members of this group?
• Yes. Select the System Administrators check box.
• No. Leave the System Administrators check box unselected.
5. Click Create group. Note: A system message informs you that the new group has been created.
Finding / Viewing Groups This procedure locates a specified group, and displays a list of all groups in the system.
Perform the following steps:
1. Use your administrator login credentials to open Users and Groups in DMS Administration; then,
click Manage Groups to open the Group Administration page.
2. Do you know the name of the group?
• Yes. Enter part or all of the group name in the Group Name field; then, click search for groups to
display details for any group matching the criteria you specified.
• No. Click view all groups to display all a list of groups that exist in the system. The following infor-
mation is provided for each group: group name, unit name (if the group belongs to a unit); sub
groups (if any); plus, links to the following functionality - edit, manage users, manage sub-groups
Editing/Deleting Existing Groups This procedure modifies and deletes a group.
Perform the following steps:
1. Use your administrator login to open Users and Groups in DMS Administration; then, click Manage
Groups to open the Group Administration page.
2. Search for the group, or display a list of all groups in the system. For more information about this pro-
cedure, go to Finding/Viewing Groups.
3. Do you want to...
• change the details for this group? click in the Edit column for the group to open the Edit
Group Details page. Go to step 4.
• delete a group? Click the Delete icon in the table for the relevant group. Note: A system message informs you that the group has been deleted.
4. The following details are editable on the Edit Group Details page: name of the group; whether or not
all members of the group are assigned Unit administration privileges; whether or not all members of
the group are assigned system administration privileges; the Unit to which this group belongs.
5. Make the required changes; then, click save changes to group.
Adding / Removing Group Members 38 This procedure manages the users in a group by adding one or more users, or by removing users.
Perform the following steps:
1. Use your administrator login to open Users and Groups in DMS Administration; then, click Man-
age Groups to open the Group Administration page.
2. Search for the group, or display a list of all groups in the system. For more information about this pro-
cedure, go to Finding/Viewing Groups.
3. Click the Manage Users link for the relevant group to open the Manage Users in [group name]
page.
4. Do you want to ...
• assign users to the group? Go to step 5.
• remove users from the group? Select users - one or more - in the Assigned Users field; then,
click the adjacent left-pointing arrow to move these users to the Available Users field. Go to step 7.
5. Populate the Available Users field, using any of the following methods:
• Filter the available users by entering criteria in the Filter text field. The system returns results that
match the specified criteria - e.g inserting 'b' to only display usernames that start with 'b'.
• Click Show All to display all available users.
6. Select users in Available Users - one or more; then, click the adjacent right-pointing arrow to add
these users to the Assigned Users field.
7. Click save changes.
Adding/Deleting Sub Groups This procedure creates new sub-groups in a group, and removes sub-groups that were previously added to
a group.
Perform the following steps:
1. Use your administrator login to open Users and Groups in DMS Administration; then, click Man-
age Groups to open the Group Administration page.
2. Search for the group, or display a list of all groups in the system. For more information about this pro-
cedure, go to Finding/Viewing Groups.
3. Click the Manage sub-groups link for the relevant group to open the Manage Sub-Groups in
[group name] page.
4. Do you want to ...
• add new sub-groups to the group? Go to step 5.
• remove sub-groups from the group? Select groups - one or more - in the Assigned Groups
field; then, click the adjacent left-pointing arrow to move these users to the Available Groups field.
Go to step 7.
5. Populate the Available Groups field, using any of the following methods:
• Filter the available users by entering criteria in the Filter text field. The system returns results that
match the specified criteria - e.g inserting 'b' to only display group names that start with 'b'.
• Click Show All to display all available groups.

39
6. Select groups in Available Users - one or more; then, click the adjacent right-pointing arrow to add
these users to the Assigned Users field.
7. Click save changes.
Control Units
The Unit concept in PinnacleTM
is a method of organizing the repository into two or more separate entities.
The Unit entities may model the organization's business divisions - e.g. different departments, or offices in dif-
ferent cities or countries. Each Unit is assigned its own administrative user - the Unit administrator. Each Unit
administrator only has administrative privileges for their Unit. The system remains centrally administered by a
Pinnacle system administrator.
Adding New Units This procedure creates a new Unit.
Perform the following steps:
1. Login as the system administrator to Users and Groups in DMS Administration; then, click Control
Units to open the Unit Administration page.
2. Click Add a new unit to open the Add a new unit page.
3. Type the name for the new unit in the Unit Name field; then, click Next to open the next page of the Add
a new unit page, where you can choose a folder location.
4. Navigate the folder structure to select the folder location for the new unit; then, click create unit. Note: The system re-opens the Unit Administration page, where a system message informs you that the new unit has been created. The list of units at the bottom of this
page now includes the new unit.
Viewing / Editing / Deleting Existing Units This procedure displays Units that exist in the system, and modifies or deletes Units.
Perform the following steps:
1. Login as the system administrator to open Users and Groups in DMS Administration; then, click Con-
trol Units to open the Unit Administration page.
2. Do you want to...
• view all Units that currently exist in the system? Existing Units, including their folder locations, are
displayed at the bottom of the page.
• edit a Unit? Click in the Edit column for the relevant Unit to open the Edit Unit Details page. Define
a new short name for the unit in the Unit Name field; then, click save changes to unit.
• delete a unit from the system? Click in the Delete column for the relevant Unit to permanently re-
move this unit from the system.
• open the folder location where you saved this unit? Click the link in the Folder column for the unit to
navigate to the folder location.

Opening a Unit at its Folder Location 40 This procedure opens the system at the Unit's folder location.
Perform the following steps:
1. Login as the system administrator to open Users and Groups in DMS Administration; then, click Con-
trol Units to open the Unit Administration page.
2. View the list of Units at the bottom of the page.
3. Click the link in the Folder column for the relevant unit to navigate directly to its' folder location in the
system.
Security Management The Security Management section in Pinnacle's DMS Administration tab provides the following administra-
tive functions:
• configuring permissions
• configuring roles
• configuring dynamic permissions - these are criteria used to determine whether or not a user is allowed to
perform certain actions in the system
Permissions
PinnacleTM
provides several inbuilt permissions - Read, Write, Add Folder, Manage Security, Delete,
Manage workflow, and Folder Details.
The system allows the creation of additional, customized permissions. This is useful where the organization
needs to control access to plugins, or to allocate a Guard permission for workflow transitions.
What is a Guard Permission?
A Guard Permission, also known as a 'workflow trigger' is an optional permission assignment that may be
assigned to a user who performs a transition in a workflow. Guard permissions are configured within the
workflow configuration.
View Existing/Deleting Permissions This procedure displays all permissions that exist in the system - inbuilt, and customized - and allows the
removal of any customized permissions that are no longer required in the system.
Perform the following steps:
1. Use your administrator login credentials to open DMS Administration; then, click Security Manage-
ment to open the Security Management page.
2. Click Permissions to open the Existing permissions page.
3. Do you want to...
• view all the permissions that exist in the system? Scroll down to the bottom of the page to view
a list of permissions configured for Pinnacle - both inbuilt and customized. Note: Pinnacle's default permissions display at the top of this list, and cannot be deleted. They are recognizable by their system name, 'ktcore'.
• delete a permission in the list? Click in the Delete column for the relevant permission. Note: Only custom permissions may be deleted.
Adding New Permissions 41 This procedure allows you to add customized permissions in Pinnacle. Custom permission can be assigned
for accessing the organizations plugins.
Perform the following steps:
1. Use your administrator login credentials to open DMS Administration.
2. Click Security Management in the Administration menu to open the Security Management
page.
3. Click Permissions to open the Existing permissions page.
4. Define a permanent name for the new permission type in the System Name field - e.g
'ktcustom.permissions.download_plugin'.
5. Define a short name in the Display Name field - e.g. 'Download Plugin'.
6. Click Create. Note: A system message informs you that the new permission has been created. View the list of permission types at the bottom of this page to see the new permission
added to the list.
Roles Pinnacle Roles may include: document creator, reviewer, publisher, writer, editor, secretary, developer,
manager, or secretary, and so on.
Workflow actions - e.g. review, or publish - are typically assigned to a specific role. Permissions are added
to the role, and the user is assigned to the Role to perform the action required in the system.
View / Edit / Delete Existing Roles This procedure modifies or removes existing Roles, and explains how to view a list of Roles that exist in
the system.
Perform the following steps:
1. Use your administrator login credentials to open DMS Administration; then, click Security Manage-
ment to open the Security Management page.
2. Click Roles to open the Role Administration page.
3. Do you want to...
• view Roles that have been configured for the repository? Scroll down to the bottom of the
page to view a list of existing roles.
• edit - i.e. change the name of - an existing Role? Click in the Edit column for the relevant
Role to open the editing page. Specify the new name for the Role in the Name field; then, click up-
date role information.
• delete an existing role? Click in the Delete column for the relevant Role. Note: A system message confirms the removal of the Role.
Adding New Roles 42 This procedure creates a new Role.
Perform the following steps:
1. Use your administrator login credentials to open DMS Administration; then, click Security Manage-
ment to open the Security Management page.
2. Click Roles to open the Role Administration page.
3. Define a descriptive name for the role in the Name field - e.g. Editor; then, click create new role. Note: A system message confirms the Role creation. View the list of roles at the bottom of this page to see the new role added to the list of existing roles.
Dynamic Conditions What are Dynamic Conditions? A dynamic condition may be defined as a system rule that is configured to allow or disallow a specific
action on documents and folders in the repository that match a set of predefined criteria.
Dynamic Conditions and Saved Searches
A dynamic condition is similar to Pinnacle's Saved Search function - the system activity that occurs is es-
sentially the same. In both cases - for dynamic conditions and saved searches – a set of criteria is defined,
and the system performs a search for content matching this criteria.
Why is this condition referred to as 'dynamic'?
Dynamic conditions are based on editable criteria, and the content where the condition is applied
(documents and folders) is not static. Pinnacle runs a dynamic condition on all content in the repository
that currently matches the criteria of the condition. Results include recently added content, and exclude
content that no longer exists, or that no longer matches the criteria.
Dynamic conditions are thus only implemented on a selection of documents in the repository, and these
documents are mapped to the dynamic condition through the criteria currently configured for the condition.
Why use Dynamic Conditions?
A dynamic condition - for example, preventing certain documents from being moved or copied to other lo-
cations in the repository - either allows or disallows a specific action, on a range of documents, and also in
a Workflow. Instead of allowing or disallowing an action – through a permission – to a specific user
group, or on a specific folder – the ability to apply a condition more widely throughout the repository pro-
vides greater control and security in the system.
How are Dynamic Conditions Configured and Applied?
A dynamic condition is configured globally through Pinnacle's DMS Administration module - in the Dy-
namic Conditions page of the Security Management section. Dynamic conditions are assigned, and un-
assigned, on the folder level, when setting up permissions on the folder. Dynamic conditions are also as-
signed in the Workflow configuration task, where they are applied as a Guard permission - e.g. any
user who wants to transition the workflow to a new state must be assigned a guard permission to do so. A
dynamic condition is used to create a Guard permission for transitioning a Workflow to its next state.
At which level of repository content is a Dynamic Condition applied?
Dynamic condition criteria includes the following parameters:
• document metadata - name, type, author, publish date, etc.
• the content within the document
• transactional information for a document - check outs / check ins / moves / copy actions / etc

Tasks for configuring Dynamic Conditions 43
• Add New Dynamic Condition
• View/Edit Existing Dynamic Condition
• Running Dynamic Conditions
• Assigning/Unassigning Dynamic Conditions
See Also:
Configuring Workflows
Editing Folder Permissions
Viewing/Editing Existing Dynamic Conditions This procedure displays all existing dynamic conditions, and modifies or deletes an existing dynamic condi-
tion.
Perform the following steps:
1. Use your administrator login credentials to open DMS Administration; then, click Security Manage-
ment to open the Security Management page.
2. Click Dynamic Conditions to open the Dynamic Conditions page.
3. Do you want to...
• view existing dynamic conditions? All dynamic conditions that have been configured in the system
are displayed at the bottom of this page.
• edit a dynamic condition? Click in the Edit column for the relevant condition to open the Edit an
existing condition page. Make the required changes - the following information is editable: name, edit/
add/remove criteria and criteria groups. When you're done, click Update Dynamic Condition.
• delete a dynamic condition? Click in the Delete column for the relevant condition. A system mes-
sage requires confirmation of the deletion. Read the warning message, which explains that deleting a
dynamic condition may change the permissions structure, causing the inappropriate removal of permis-
sions in the system. Click Cancel, or Delete.
Adding Dynamic Conditions This procedure creates a new dynamic condition.
Perform the following steps:
1. Use your administrator login credentials to open DMS Administration; then, click Security Manage-
ment in the Administration menu to open the Security Management page.
2. Click Dynamic Conditions to open the Dynamic Conditions page.
3. Click New to open the Create a new condition page.
4. Define a name for the new dynamic condition in the Name of condition field.
5. Select any or all from the Return items which match [all/any] of the criteria groups specified
pick list to define how search results should match to criteria groups defined.
6.3. Complete the Values field/s for the selected query.
6. Define the first criteria group in the Criteria Group section: 44
6.1. Select any or all from the Return items which match [all/any] of the criteria specified below
pick list to define how search results should match this criteria.
6.2. Select a query type from the Criteria pick list; then, click Add to display the Values field for the cri-
teria type you selected.
6.3. Complete the Values field/s for the selected query.
7. Do you want to add another query type for this criteria group?
• Yes. Go back to step 6.2.
• No. Go to step 8.
8. Do you want to add another criteria group for this dynamic condition?
• Yes. Click Add another set of criteria; then, go back to step 6.1.
• No. Go to step 10.
9. Click Save. Note: A system message confirms that the dynamic condition has been created. Note: Dynamic conditions are assigned to folders, and are unassigned when they're no longer required for the folder.
See Also:
Assigning / Unassigning Dynamic Conditions
Assigning / Unassigning Dynamic Conditions This procedure associates a dynamic condition with permissions - one or more - and defines the group - one
or more - where the dynamic condition applies, on a currently selected folder.
Perform the following steps:
1. Use your administrator login credentials to open Browse Collections.
2. Navigate to the folder where you want to assign or unassign dynamic conditions.
3. Click Permissions in the Actions on this folder menu to open the View permissions for [folder
name] page.
4. Click Override permission to open the Folder permissions for [folder name] page; then, scroll
down to the Dynamic permissions section on this page.
5. Do you want to:
• assign a dynamic condition to this folder? Go to step 5.1.
• unassign a dynamic condition from this folder? Click in the Remove column for the relevant
dynamic condition. Repeat this step for each dynamic condition you're removing; then, go to step 8 to
exit this procedure.
Note: A system message asks you to confirm the removal of the condition.
5.1. click the Group pick list down-arrow; then, select a group for whom this dynamic condition applies.
5.2. select the Condition pick list down-arrow to select a dynamic condition for this group on the folder.
5.3. select the Permissions check boxes - one or more - that will be associated with this dynamic condi-
tion on the folder.

6. Click Add. 45
7. Do you want to assign another dynamic condition on this folder?
• Yes. Go to step 6.1.
• No. Go to step 9.
8. Click View permissions overview to return to the View permissions for [folder name] page.
Running Dynamic Conditions This procedure runs the dynamic condition to find content that matches its criteria.
Perform the following steps:
1. Use your administrator login credentials to open DMS Administration; then, click Security Manage-
ment to open the Security Management page.
2. Click Dynamic Conditions to open the Dynamic Conditions page.
3. View the currently configured dynamic conditions in the Existing Conditions section on this page.
4. Click Run Condition in the View Results column for the relevant dynamic condition to open the
[dynamic condition name] page.
5. Do you want to ...
• view search criteria for this dynamic condition? Click to expand the Parameters section.
• view documents and folders returned in this search? Search results are displayed beneath the
Parameters section on the page.
• modify the search criteria and rerun the search? Click Edit to open the Edit an existing condi-
tion page. Change the criteria, and/or add additional criteria; then, click Search. The revised results
display on the Search Results page.
• save this search? Define a name for the search; then, click Save.
Document Storage The administrator uses the Document Storage section of DMS Administration to:
• force a document check in by overriding its current checked out status
• restore archived documents
• restore documents that were previously deleted, or to permanently expunge (remove) those documents
from the repository

Forcing a Document Check In 46 This procedure overrides the currently checked out status of a document.
The Pinnacle administrator can force check in a document where a checked out document is urgently required
back in the repository, but the user who checked the document out is not available to check the document in.
Note: The document is checked back in to the repository without saving any changes that may have been made to it
while it was checked out.
Perform the following steps:
1. Use your administrator login credentials to open DMS Administration; then, click Document Storage
to open the Document Storage page.
2. Click Checked Out Document Control to open the Checked Out Documents page.
3. Click force checkin for the relevant document you want to check in, to open the Confirm Forced
Check-in page.
4. Verify that you're forcing a check in on the correct document; then, click the Force Check in button Note: The system re-opens the Checked Out Documents page, where a system message confirms that the document has been checked in.
Restoring Archived Documents This procedure restores a previously archived document.
Note: By default, documents are restored to the folder location where they were originally archived. If that folder no longer exists on the system, the document is restored to the root directory in the repository.
Perform the following steps:
1. Use your administrator login credentials to open DMS Administration; then, click Document Stor-
age to open the Document Storage page.
2. Click Archived Document Restoration to open the Archived Documents page.
3. Navigate through the folder structure to locate the folder containing the document/s requiring restora-
tion; then, click on the folder to display its content.
4. Select the check box for the document you want to restore; then, click Restore to open the Confirm
De-archival page.
5. Verify that you're restoring the correct document; then, click Confirm De-archival. Note: The system re-opens the Archived Documents page and displays a message
informing you that the document is active (restored).
Restoring / Expunging Deleted Documents This procedure permanently deletes documents, and restores previously deleted documents.
Note: Expunging saves disk space by permanently deleting documents that are no longer useful or required.
Note: By default, documents are restored to the folder location where they were originally deleted. If that folder no longer exists on the system, the document is restored to the root directory in the repository.

Perform the following steps: 47
1. Use your administrative login credentials to open DMS Administration; then, click Document Storage
to open the Document Storage page.
2. Click Restore or Expunge Deleted Documents to open the Deleted Documents page.
3. View the list of deleted documents.
4. Do you want to...
• restore any documents in the list? Select the check box adjacent to each document you want to re-
store; then, click Restore to open the Confirm Restore page. Verify that you're restoring the correct
document/s; then, click Confirm Restore to re-open the Deleted Documents page. Note: A system message confirm the restoration of the document in the system.
• permanently remove any of the documents in the list? Select the check box adjacent to each
document that must be permanently removed from the system; then, click Expunge to open the Con-
firm Expunge page. Verify that you're removing the correct document/s; then, click Confirm Ex-
punge. Note: A system message confirms the permanent deletion of the document from the system.
Document Metadata and Workflow Configuration
Metadata is an important component of the PinnacleTM
Document Management System.
Adding relevant metadata to the system improves the efficiency of the Search function, which ensures that
content is easily retrieved from the repository.
Metadata is added in the Document Metadata and Workflow Configuration section in DMS Administra-
tion.
The following configuration is available in this section:
• Document Types - manage the classes of documents that can be added to Pinnacle
• Document Fieldsets - manage the types of information that can be associated with classes of documents
• Email Document Types - add email document types used to store emails from Microsoft Outlook with Pin-
nacle's Outlook Integration
• Workflows - configure document workflows
• Link Type Management - manage the different ways in which documents can be associated with one an-
other
• Automatic Workflow Assignments - configure the allocation of documents to workflows
• Workflow allocation by document type
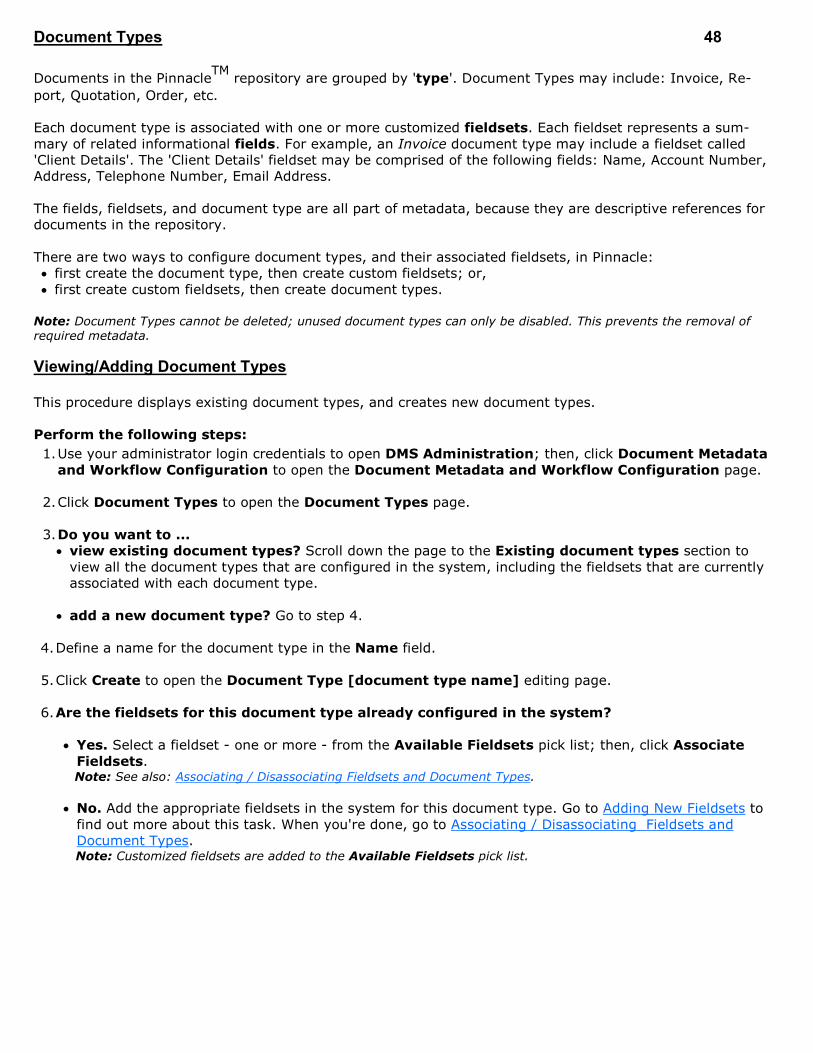
Document Types 48
Documents in the PinnacleTM
repository are grouped by 'type'. Document Types may include: Invoice, Re-
port, Quotation, Order, etc.
Each document type is associated with one or more customized fieldsets. Each fieldset represents a sum-
mary of related informational fields. For example, an Invoice document type may include a fieldset called
'Client Details'. The 'Client Details' fieldset may be comprised of the following fields: Name, Account Number,
Address, Telephone Number, Email Address.
The fields, fieldsets, and document type are all part of metadata, because they are descriptive references for
documents in the repository.
There are two ways to configure document types, and their associated fieldsets, in Pinnacle:
• first create the document type, then create custom fieldsets; or,
• first create custom fieldsets, then create document types.
Note: Document Types cannot be deleted; unused document types can only be disabled. This prevents the removal of required metadata.
Viewing/Adding Document Types This procedure displays existing document types, and creates new document types.
Perform the following steps:
1. Use your administrator login credentials to open DMS Administration; then, click Document Metadata
and Workflow Configuration to open the Document Metadata and Workflow Configuration page.
2. Click Document Types to open the Document Types page.
3. Do you want to ...
• view existing document types? Scroll down the page to the Existing document types section to
view all the document types that are configured in the system, including the fieldsets that are currently
associated with each document type.
• add a new document type? Go to step 4.
4. Define a name for the document type in the Name field.
5. Click Create to open the Document Type [document type name] editing page.
6. Are the fieldsets for this document type already configured in the system?
• Yes. Select a fieldset - one or more - from the Available Fieldsets pick list; then, click Associate
Fieldsets. Note: See also: Associating / Disassociating Fieldsets and Document Types.
• No. Add the appropriate fieldsets in the system for this document type. Go to Adding New Fieldsets to
find out more about this task. When you're done, go to Associating / Disassociating Fieldsets and
Document Types. Note: Customized fieldsets are added to the Available Fieldsets pick list.
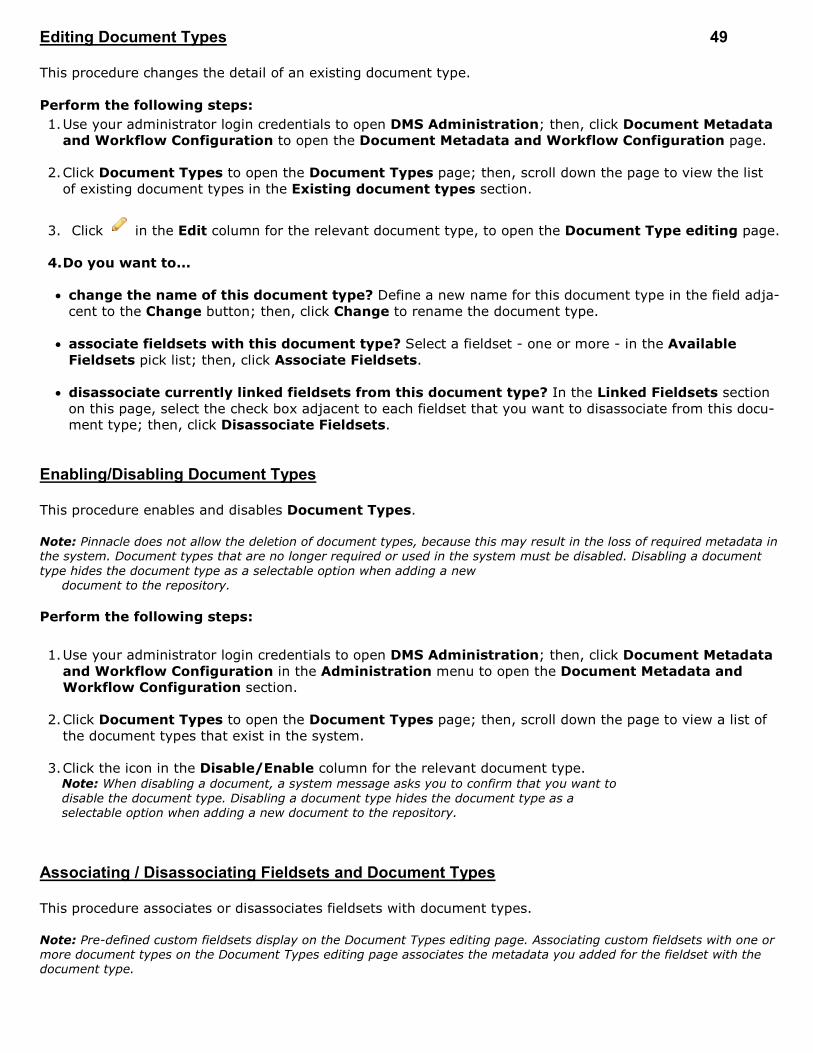
Editing Document Types 49 This procedure changes the detail of an existing document type.
Perform the following steps:
1. Use your administrator login credentials to open DMS Administration; then, click Document Metadata
and Workflow Configuration to open the Document Metadata and Workflow Configuration page.
2. Click Document Types to open the Document Types page; then, scroll down the page to view the list
of existing document types in the Existing document types section.
3. Click in the Edit column for the relevant document type, to open the Document Type editing page.
4. Do you want to...
• change the name of this document type? Define a new name for this document type in the field adja-
cent to the Change button; then, click Change to rename the document type.
• associate fieldsets with this document type? Select a fieldset - one or more - in the Available
Fieldsets pick list; then, click Associate Fieldsets.
• disassociate currently linked fieldsets from this document type? In the Linked Fieldsets section
on this page, select the check box adjacent to each fieldset that you want to disassociate from this docu-
ment type; then, click Disassociate Fieldsets.
Enabling/Disabling Document Types This procedure enables and disables Document Types.
Note: Pinnacle does not allow the deletion of document types, because this may result in the loss of required metadata in the system. Document types that are no longer required or used in the system must be disabled. Disabling a document
type hides the document type as a selectable option when adding a new
document to the repository.
Perform the following steps:
1. Use your administrator login credentials to open DMS Administration; then, click Document Metadata
and Workflow Configuration in the Administration menu to open the Document Metadata and
Workflow Configuration section.
2. Click Document Types to open the Document Types page; then, scroll down the page to view a list of
the document types that exist in the system.
3. Click the icon in the Disable/Enable column for the relevant document type. Note: When disabling a document, a system message asks you to confirm that you want to
disable the document type. Disabling a document type hides the document type as a
selectable option when adding a new document to the repository.
Associating / Disassociating Fieldsets and Document Types This procedure associates or disassociates fieldsets with document types.
Note: Pre-defined custom fieldsets display on the Document Types editing page. Associating custom fieldsets with one or more document types on the Document Types editing page associates the metadata you added for the fieldset with the
document type.

Perform the following steps: 50
1. Use your administrator login credentials to open Document Metadata and Workflow Configuration in
DMS Administration; then, click Document Types to open the Document Types page.
2. Scroll down the page to the Existing document types section to view a tabled list of the document types
that exist in the system.
3. Click the Edit link for the relevant document type (the document type where you want to associate or dis-
associate fieldsets) to open the Document Type: [document type name] editing page.
Note: The fieldsets currently associated with this document type are displayed in the Linked Fieldsets section on this page.
4. Do you want to...
• disassociate one or more currently linked fieldsets with the document type? In the Linked Field-
sets section on this page, select the check box adjacent to each fieldset that you want to disassociate
from this document type; then, click Disassociate Fieldsets.
Note: A system message verifies the disassociating of the selected fieldsets from this document type.
• associate fieldsets with this document type? Select fieldsets - one or more - in the Available Field-
sets pick list; then, click Associate Fieldsets. Note: Hold down the keyboard Ctrl key while selecting menu options to multi-select from this menu.
Note: A system message verifies the association of the fieldset/s with this document type.
Document Fieldsets Fieldsets are a type of metadata that allow the association of custom metadata with documents in the reposi-
tory. Fieldsets, which are comprised of one or more fields, are associated with document types.
There are two types of fieldsets:
• Normal - these fieldsets are associated with one or more specific document types.
• Generic - these fieldsets may be associated with any document type in the system.
Note: Pinnacle auto-generates an editable system name (namespace) for every fieldset. Plugins use this namespace to call the fieldset, and to control how the fieldset works. For more information on developing Plugins for Pinnacle, see the Pinna-
cle Wiki at http://support.Pinnacle.com/confluence/
Viewing/Adding Fieldsets This procedure displays existing fieldsets, and creates new fieldsets in Pinnacle.
Perform the following steps:
1. Use your administrator login credentials to open DMS Administration; then, click Document Metadata
and Workflow Configuration to open the Metadata and Workflow Configuration page.
2. Click Document Fieldsets to open the Document Fieldset management page.
3. Do you want to ...
• view existing fieldsets in the system? Scroll down on this page to the Existing document fieldsets
section to view a tabled list of the custom fieldsets that have been defined in Pinnacle. The table provides
the following information about each fieldset: fieldset name; whether the fieldset is a generic or system
fieldset; the fields that are defined for each fieldset; the document type/s with which the fieldset is cur-
rently associated.
• add a new fieldset? Go to step 4.

4. Click Create New Fieldset to open the Create New Fieldset page. 51
5. Define a name for the document fieldset in the Fieldset Name field; then, provide a brief description for
the information that will be stored in this fieldset, in the Description field.
6. Is this a generic fieldset?
• Yes. Select the Generic check box.
• No. Go to step 7.
7. Click Create Fieldset to open the Edit Fieldset: [fieldset name] page.
8. Do you want to…
• change any of the fieldset details that were configured when adding the fieldset? Click Edit
these details to open the Edit Fieldset page. Editable details include: fieldset name, description, and
whether or not the fieldset is generic. Make the required changes; then, click Update Fieldset.
• add fields for this fieldset? Click Add New Field; then, go to Go to Adding New Fields for more infor-
mation about this task.
• remove an existing document fieldset? Go to Editing/Deleting Existing Fieldsets.
Editing/Deleting Existing Fieldsets This procedure modifies or deletes and existing custom fieldset.
Perform the following steps:
1. Use your administrator login credentials to open DMS Administration; then, click Document Metadata
and Workflow Configuration to open the Metadata and Workflow Configuration page.
2. Click Document Fieldsets to open the Document Fieldset management page.
3. View the list of document fieldsets that have been defined for your organization, in the Existing docu-
ment fieldsets section on this page.
4. Do you want to…
• remove a fieldset? Click the icon in the Delete column for the relevant fieldset. Click OK on the sys-
tem message that asks you to confirm the deletion.
• edit a fieldset? Click in the Edit column for the relevant document type, to open the Edit Field-
set: [fieldset name] page. Click Edit these details to open the Edit Fieldset page. The following in-
formation is editable: fieldset name; description, and whether or not the fieldset is generic. When you're
done, click Update Fieldset.
• add fields? Go to Adding New Fields.
• edit or delete fields in this fieldset? Go to Editing/Deleting Fields.

Fields 52
Fields are the smallest metadata collection point in PinnacleTM
. Fields include the text fields, pick lists and
menus that allow a user to provide information about the content that is uploaded to the repository.
Pinnacle uses fields to group sets of related information into one or more fieldsets. The fieldsets are associ-
ated with document types in the system. The collection of fields, fieldsets, and document types - plus the
folder structure and, optionally, permissions - comprise the system's metadata structure.
Pinnacle's Search function operates on this metadata layer. metadata works on the search function. Search
relies on the addition of appropriate metadata in the system to locate and retrieve content in the repository.
There are three classes of custom fields in Pinnacle:
• Normal - stores text metadata, such as an invoice code
• Lookup - allows the selection of appropriate information from a predefined set of options
• Tree - allows the selection of a metadata value by browsing a tree structure
Viewing/Adding Fields This procedure displays fields that currently exist in each fieldset in the system, and it adds new fields.
Note: Fields are configurable and editable only within the fieldset where they exist.
Perform the following steps:
1. Use your administrator login credentials to open the Document Metadata and Workflow Configura-
tion page in DMS Administration; then, click Document Fieldsets to open the Document Fieldsets
management page.
2. Do you want to ...
• view fields that are currently defined for each fieldset in the system? Scroll down this page to
the tabled information in the Existing document fieldsets section. The system displays the following
information for each fieldset: whether this is a generic or system fieldset; the fields that are members
of the fieldset; the document type/s with which the fieldset is associated. The table also provides func-
tionality that allows editing or deletion of the fieldset.
• add a new field for an existing fieldset? Locate the fieldset in the table in the Existing document
fieldsets section; then, click in the Edit column for the relevant fieldset to open the Edit Fieldset: [fieldset name] page. Go to step 3.
3. Click Add New Field to open the Add New Field page.
4. Define a name for the field in the Field name field; then, in the Description field, provide a short, para-
graph that clearly explains the type of information required in the field.
5. Select the Field Type radio button. Is this a ...
• normal text input field? Select the Normal (String) radio button; then, go to step 9.
• lookup field? Select the Lookup radio button; then, go to
• Tree field?
6. Does this field represent information that must be provided?
• Yes. Select the Required check box.
• No. Leave the Required check box unselected.
53
7. Click Add Field to open the Manage Field: [field name] page, where you can change any of the detail
you defined when creating the field. Click Update Field to save the changes.
8. Do you want to add another field for this fieldset?
• Yes. Click on the fieldset name in the bread-crumb navigation at the top of the page to re-open the
Edit Fieldset: [fieldset name] page. Go to step 4.
• No. Exit this procedure.
Adding Lookup Fields This procedure adds a Lookup field in a fieldset.
Note: Fields are configurable and editable only within the fieldset where they exist. Tree fields and Lookup fields require additional configuration steps to Normal (String) fields.
Perform the following steps:
1. Use your administrator login credentials to open the Document Metadata and Workflow Configura-
tion page in DMS Administration; then, click Document Fieldsets to open the Document Fieldsets
management page.
2. Locate the fieldset in the table in the Existing document fieldsets section; then, click in the Edit
column for the relevant fieldset to open the Edit Fieldset: [fieldset name] page.
3. Click Add New Field to open the Add New Field page.
4. Define a name for the field in the Field name field; then, in the Description field, provide a short para-
graph that clearly explains the type of information required in the field.
5. Select the Lookup radio button in the Field Type section.
6. Is this a required field?
• Yes. Select the Required check box.
• No. Leave the Required check box unselected.
7. Click Add Field to open the Manage Field: [field name] page; then, click Add Lookup Values in the
Extra Options section to open the Add Lookup Values page.
8. In the Lookup Values field, define lookup values - one or more; then, click Add Lookups to save this
information and to re-open the Manage Field: [field name] page.
9. In the Extra Options section, click Manage Lookup Values to open the Manage Lookups for [lookup
field name] page.
10. Select the check box adjacent to each lookup value you're managing. The following options are config-
urable:
• click Toggle enabled state to enable or disable the lookup value as a selectable option when editing
or adding documents to the repository
• click Toggle stickiness to define the lookup value as 'sticky' or 'non-sticky'.
Note: Any external plugin that controls the lookup set cannot remove a lookup value that has been configured on this page as 'sticky'.
• click the Delete button to remove a selected lookup value
54
11. To exit this procedure, click the fieldset name in the bread-crumb navigation at the top of the page.
Adding Tree Fields This procedure adds a Tree field in a fieldset.
Note: Fields are configurable and editable only within the fieldset where they exist. Tree fields and Lookup fields require additional configuration steps to Normal (String) fields.
Perform the following steps:
1. Use your administrator login credentials to open the Document Metadata and Workflow Configura-
tion page in DMS Administration; then, click Document Fieldsets to open the Document Fieldsets
management page.
2. Locate the fieldset in the table in the Existing document fieldsets section; then, click in the Edit column for the relevant fieldset to open the Edit Fieldset: [fieldset name] page.
3. Click Add New Field to open the Add New Field page.
4. Define a name for the field in the Field name field; then, in the Description field, provide a short para-
graph that clearly explains the type of information required in the field.
5. Select the Tree radio button in the Field Type section.
6. Is this a 'required' field?
• Yes. Select the Required check box.
• No. Leave the Required check box unselected.
7. Click Add Field to open the Manage Field: [field name] page.
8. Click Add Lookup Values to open the Add Lookup Values page. In the Lookup Values field, define
lookup values - one or more; then, click Add Lookups to save this information and to re-open the Man-
age Field: [field name] page.
9. Click Manage Lookup Values to open the Manage Lookups for [lookup field name] page; then, se-
lect the check box adjacent to each lookup value you're managing. The following options are configurable:
• click Toggle enabled state to enable or disable the lookup value as a selectable option when editing or
adding documents to the repository.
• click Toggle stickiness to define the lookup value as 'sticky' or 'non-sticky'.
Note: Any external plugin that controls the lookup set cannot remove a lookup value
that has been configured on this page as 'sticky'.
• click the Delete button to remove a selected lookup value
10. Click the fieldset name in the bread-crumb navigation at the top of the page to return to the Manage
Field: [field name] page.
11. Click Manage Lookup Tree Structure to open the Edit Lookup Tree: [lookup tree field name]
page.
12. Do you want to ...
• define a subcategory for the root? Click attach keywords adjacent to the Root in the Preview
section. Define a subcategory for the root; then, click add new subcategory. Repeat this step for
each additional subcategory you're adding to the Root.
55
• define a subcategory in a subcategory? Click attach keywords adjacent to the relevant subcategory
below the Root. Repeat this step for each additional subcategory you're adding in another subcategory.
Note: Expand the root or a subcategory to display the configured options.
Editing/Deleting Fields This procedure edits an existing field, or removes a field from a fieldset.
Perform the following steps:
1. Use your administrator login credentials to open the Document Metadata and Workflow Configuration
page in DMS Administration; then, click Document Fieldsets to open the Document Fieldsets manage-
ment page.
2. In the Existing document fieldsets section on this page, locate the fieldset that contains the field/s you
want to edit or delete; then, click in the Edit column for the relevant fieldset to open the Edit Fieldset: [fieldset name] editing page.
3. Scroll down the page to the Additional Information section to view fields that exist for this fieldset. The
table provides the following information about each field: field name; type of field (whether normal, lookup,
or tree). This section also provides access to field management functionality - Edit, and Delete.
4. Do you want to ...
• change any information in the field? Click in the Edit column for the relevant field to open the
Manage Field: [field name] page. Make the required changes; then, click Update Field. Note: For more information about the configuration options on the field editing pages, see Adding Fields.
• remove this field as a member of this fieldset? Click in the Delete column for the relevant field.
Click OK on the system message that asks you to confirm the field deletion.
Email Document Types What are Email Document Types?
PinnacleTM Outlook Integration is a component in the Pinnacle Client Tools for Windows toolset, which is
available in the Pinnacle Commercial Editions - SMB and Enterprise.
Pinnacle Outlook Integration allows Pinnacle Commercial users to save emails and attachments from Microsoft
Outlook to the Pinnacle repository, and to attach files directly from the repository to outgoing email messages.
The Pinnacle system administrator configures email document types on the Email Document Types page in
the Document Metadata and Workflow Configuration section of DMS Administration. When configuring
email document types, all email document type names must end with the word 'email' - e.g. Order Email, or Re-
cords Email.
Default Fieldset for Email Document Types 56
When adding document types in the Email Document Types section, a default fieldset is added to the email
document type. This email fieldset includes the following set of predefined metadata fields:
• Sender Email
• Sender Name
• Cc
• Send Date
• Subject
• Size
The system uses the email fieldset to gather standard, email-related metadata, which it saves to Pinnacle when
storing the email.
Important
Although the metadata fields in the email fieldset are editable in DMS Administration, we strongly recommend
that you do not change these settings, including field names. Changing the defaults will prevent the Pinnacle
Outlook Integration tool from successfully gathering the metadata that is used for the efficient storage and re-
trieval of emails in the repository.
Configuring Email Document Types This procedure displays existing email document types and adds a new email document type.
Perform the following steps:
1. Use your administrator credentials to log in to DMS Administration; then, click Document Metadata and
Workflow Configuration.
2. Click Email Document Types to open the configuration screen.
3. Do you want to ...
• view existing email document types? Scroll down to the Existing document types section at the
bottom of this page to view a list of the email document types that exist in the system.
• add a new email document type? Define a name for the new email document type in the Name field;
then, click Create.

Workflows 57 A workflow may be defined as the set of tasks that must be performed on a document during its lifecycle - e.g.
an invoice is created, distributed, then paid; a report may be created, reviewed, edited, and then published.
States and Transitions
Workflows consist of states and transitions. A state may be defined as a stage in a document’s lifecycle, such
as billed or draft. Each workflow has a starting state, which is the initial state for any document in a workflow.
Transitions define how documents move from state to state in the workflow. Each state can have one or more
transitions, depending on the workflow topography.
Example
Each state is reached via a transition ...
• Starting state - invoice created
transition: send to client
• new State: Distributed
transition: Await payment
• new State: Paid
Figure: A typical document workflow
Workflow Configuration
Pinnacle workflows are configurable to various levels of granularity - it is possible for the workflow to be in
more than one state at any time. Also, it is not necessary to move the document in a linear, unbroken fashion,
from one state to a logical subsequent state. The workflow configuration pages in DMS Administration allows
the arrangement of states and transitions in any order.
Note: Some documents, such as tenders, may have complex workflows, requiring input from several people within and out-side of your organization before the work is complete.

58
Figure: Step 2 in Workflow Configuration allows the arrangement of States and Transitions in any order
Viewing/Adding Workflows This procedure displays existing workflows, and adds new workflows in Pinnacle.
Perform the following steps:
1. Use your administrator login credentials to open the Document Metadata and Workflow Configuration
section in DMS Administration; then click Workflows to open the Workflow Admin page.
2. Do you want to:
• view existing workflows? Scroll down the page to the Existing workflows section. The following in-
formation is displayed for each workflow: workflow name, and workflow status (whether the workflow is
enabled or disabled).
• add a workflow? Go to step 3.
3. Click Create New Workflow to open Step 1: Basic Workflow Details.
4. Complete step 1 of the workflow creation process: Define basic workflow details:
4.1. Define a name for this workflow in the Name field.
4.2. Define workflow states in the States field - add unique state names, one per line. Note: A workflow State is a point in a document lifecyle when the previous task is complete, and the next task is ready to start - i.e. when a document review is
complete, it may reach a State called 'Reviewed'; the next workflow task may
be 'edit'; when this task is complete, the document reaches the 'Edited' state,
and so on.
4.3. Define workflow transitions in the Transitions field - add unique transition names, one per line; then,
click Next to open Step 2: Connect transitions to States Note: A workflow transition refers to the action that moves a document in a workflow from one state to the next state in a workflow.
5. Complete step 2 of the workflow creation process: Connect transitions to states:
5.1. for each transition listed in the table, perform the following tasks:
5.1.1. Click the down arrow at the Leads to state pick list; then, select a starting state for the transi-
tion listed in the adjacent Transition column.
5.1.2. Select source State check boxes - one or more - to define the state that precedes this transition. Note: Pinnacle allows a document in a workflow to move to the next state from one or more source states.
5.2. Click Create Workflow. Note: The system opens the Workflow: [workflow name] page, where you can edit the basic details of the workflow, or access workflow management functions
in the Workflow Administration menu.
Editing Basic Workflow Details: name, start state, enable/disable 59 This procedure modifies the name of the workflow, enables the selection of an initial starting state for the
workflow, and enables or disables the workflow.
Perform the following steps:
1. Use your administrator login credentials to open the Document Metadata and Workflow Configuration
section in DMS Administration; then click Workflows to open the Workflow Admin page.
2. Scroll down to the Existing workflows section to view the workflows that exist in the system; then, click
the Edit icon for the workflow you're configuring, to open the Workflow: [workflow name] page. Note: This is also the Overview page for the Workflow Administration section.
3. Click Edit Workflow Details to open the Edit Workflow Details: [workflow name] page.
4. Do you want to:
• change the name of this workflow? Define a new name for the workflow in the Workflow Name field.
• choose a starting state for this workflow? Select one of the radio buttons in the Starting State sec-
tion.
• enable or disable this workflow? Select the Enabled check box to enable the workflow; deselect this
check box to disable the workflow.
5. Click Update Workflow Details to save your changes.
Configuring Workflow Process: connecting transitions and states This procedure connects predefined transitions, from one or more source states, to a destination state.
Perform the following steps:
1. Use your administrative login credentials to open the Document Metadata and Workflow Configuration
section in DMS Administration; then, click Workflows to open the Workflows main page.
2. In the Existing workflows section, locate the workflow you're configuring; then, click the Edit icon for
this workflow to open the Workflow: [workflow name] page.
3. Click States and Transitions in the Workflow Administration menu to open the States and Transi-
tions: [workflow name] page.
4. Click Configure Workflow Process to open the workflow configuration page.
5. Locate the transition you're configuring, in the Transition column in the table; then, click the down arrow
at the adjacent Leads to state pick list to select a destination state for this transition.
6. Select source State check boxes - one or more - to define the state/s that precedes this transition. Note: Pinnacle allows a document in a workflow to move to the next state from one or more source states.
7. Click Update Process to re-open the States and Transitions:[workflow name] page

Configuring States 60 Adding New States to Existing Workflows This procedure adds new (additional) states to an existing, pre-configured workflow.
Perform the following steps:
1. Use your administrative login credentials to open the Document Metadata and Workflow Configura-
tion section in DMS Administration; then, click Workflows to open the Workflows main page.
2. In the Existing workflows section, locate the workflow you're configuring; then, click the Edit icon for
this workflow to open the Workflow: [workflow name] page.
3. Click States and Transitions in the Workflow Administration menu to open the States and Transi-
tions: [workflow name] page.
4. Click Add New States to open the Add States to Workflow page.
5. Define new states for this workflow - one per line - in the text field. Note: Any new state that you add to this workflow must be given a unique name - the system does not accept state names that are already in use in the workflow.
6. Click Add States.
7. The system re-opens the States and Transitions: [workflow name] page, where you can view, edit, or
delete existing states,
Editing States This procedure edits a state within a currently selected workflow.
Perform the following steps:
1. Use your administrative login credentials to open the Document Metadata and Workflow Configura-
tion section in DMS Administration; then, click Workflows to open the Workflows main page.
2. In the Existing workflows section, locate the workflow you're configuring; then, click the Edit icon for
this workflow to open the Workflow: [workflow name] page.
3. Click States and Transitions in the Workflow Administration menu to open the States and Transi-
tions: [workflow name] page.
4. In the States section, locate the state you're configuring; then, click the Edit icon for this state to open
the Manage State page.
5. Do you want to change the name of this State?
• Yes. Define a new name for the state in the State Name field; then, click Update State.
• No. Go to step 6
6. Do you want to configure ...
• security settings for this state? Go to Configuring System Security by Workflow State. Note: Pinnacle's workflow tool allows the admin user to control permissions
and block specified document actions through the Workflow State.
• notifications? Go to Configuring Workflow State Notifications. Note: The administrative user configures the system to send notifications to specified users when a document reaches a certain state in the workflow.
Configuring System Security by Workflow State 61 This procedure displays the current configuration for state-controlled permissions. It also assigns or removes a
State's control over permissions, and it assigns the document actions that are blocked when a document is in a
specific state in the workflow.
This procedure provides instructions for the following tasks:
• view permissions currently controlled by a state in a workflow
• assign or remove a state's control of permissions
• allocate state-controlled permissions to groups and roles
• view blocked actions currently configured for a specific state in a workflow
• block or unblock document actions in a workflow state
Note: Permissions that are granted or denied through a Workflow State override permissions that are configured elsewhere in the system.
Perform the following steps:
1. Use your administrative login credentials to open the Document Metadata and Workflow Configuration
section in DMS Administration; then, click Workflows to open the Workflows main page.
2. In the Existing workflows section, locate the workflow you're configuring; then, click the Edit icon for this
workflow to open the Workflow: [workflow name] page.
3. Click States and Transitions in the Workflow Administration menu to open the States and Transi-
tions: [workflow name] page.
4. In the States section, locate the state you're configuring; then, click the Edit icon for this state to open the
Manage State page.
5. Click Security in the State Effects section to open the Security Overview: [workflow name] page.
6. Do you want to ...
• view the permissions currently controlled by the states in this workflow? Click Document Permis-
sions to open the Permissions Overview page. The table displays whether or not permissions are con-
trolled by each state in the workflow (a tick in the Control column for each state confirms a state's control
over permissions), and defines the permissions that the state controls (controlled permissions for the state
are indicated by a tick in the column).
• assign or remove control of permissions for this state? Click Document Permissions to open the
Permissions Overview page. Click on the name of the state in the State column in the table to open the
Manage Permissions: [state name] page. Select a permissions check box - one or more - to define the
permissions this state should control; then, click Set controlled permissions. Note: Having set controlled permissions for the state, you need to allocate these
permissions to groups and roles.
• allocate state-controlled permissions to groups and roles? Click Document Permissions to open the
Permissions Overview page. Click on the name of the state in the State column in the table to open the
Manage Permissions: [state name] page. Click Allocate permissions. Populate the Assigned enti-
ties field by adding groups and roles from the Available Entities field. Remove permissions from groups
and roles by moving these groups and roles from the Assigned Entities field to the Available Entities
field. Roles and groups added to the Assigned Entities field are displayed in the table at the bottom of this
page. For each role and group where state controlled permissions are allocated, select the check box - one
or more - to define the permission allocated to the role or group. When you're done, click Update Work-
flow Permissions.

Note: To populate the Available Entities field, use the Show All button, or enter 62
criteria to filter the data returned. To populate the Assigned Entities field, select groups and roles in Available Entities; then, click the right-pointing arrow to move these entities to the Assigned Entities field. To remove groups and roles from the
Assigned Entities field to the Available Entities field, select groups and roles in Assigned Entities; then, click the left-pointing arrow to move these entities to the Available Entities field.
• view blocked actions currently configured for each state in this workflow? Click Action Re-
strictions to open the Actions Overview page. A table on the page lists all the available document actions
in Pinnacle, and it lists the states in this workflow; in each state row, any document action displaying this
icon is blocked (unavailable) on a document that reaches this state in the workflow.
• block or unblock document actions in a workflow state? Click Action Restrictions to open the Ac-
tions Overview page. Click Edit Actions to open the Assign blocked actions page. For each state in the
table, select the check box for each document action that you want to block (make unavailable) on a docu-
ment that reaches this state in the workflow; then, deselect the check box for each document action that
you want to unblock (make available) on a document that has reached this state in the workflow. When
you're done, click Block actions.
Configuring Notifications for States This procedures defines the recipients that are notified when a document reaches the currently selected state in
the workflow, and it edits notifications that exist for this workflow state.
Perform the following steps:
1. Use your administrative login credentials to open the Document Metadata and Workflow Configuration
section in DMS Administration; then, click Workflows to open the Workflows main page.
2. In the Existing workflows section, locate the workflow you're configuring; then, click the Edit icon for this
workflow to open the Workflow: [workflow name] page.
3. Click States and Transitions in the Workflow Administration menu to open the States and Transi-
tions: [workflow name] page.
4. In the States section, locate the state you're configuring; then, click the Edit icon for this state to open the
Manage State page.
5. Click Notifications to open the Edit State Notifications page.
6. Populate the Assigned field with the names of system users that are displayed in the Available field, and
who require notification when a document in the workflow is in this state. Note: Populate the Available field by clicking Show All to display all users, or define filter criteria to sort users. Use the right-pointing and left-pointing arrows adjacent to this field
to move user names from Available to Assigned, or from Assigned to Available.
7. When you're done, click Update Notifications. The system opens the Workflow Notifications page,
where you can view a list of all states configured for this workflow, including the notifications that exist for
each state.
8. Do you want to edit notifications on any state in the workflow?
• Yes. Locate the state in the table; click the Edit icon to open the Edit State Notifications page. Go to
step 6.
• No. Exit this procedure.

Configuring Transitions 63 Adding New Transitions to Existing Workflows This procedure adds new (additional) transitions to an existing, pre-configured workflow.
Perform the following steps:
1. Use your administrative login credentials to open the Document Metadata and Workflow Configuration
section in DMS Administration; then, click Workflows to open the Workflows main page.
2. In the Existing workflows section, locate the workflow you're configuring; then, click the Edit icon for this
workflow to open the Workflow: [workflow name] page.
3. Click States and Transitions in the Workflow Administration menu to open the States and Transi-
tions: [workflow name] page.
4. Click Add New Transitions to open the Add Transitions to Workflow page.
5. Define new transitions for this workflow - one per line - in the text field. Note: Any new transition that you add to this workflow must be given a unique name - the system does not accept names that are already in use in the workflow.
6. Click Add Transitions.
7. The system re-opens the States and Transitions: [workflow name] page, where you connect the transi-
tion to a destination state (the next state after this transition), and to one or more source states (the states
that lead to this transition).
See also:
Configuring Workflow Process: connecting transitions and states
Editing Transitions This procedure edits a transition within the currently selected workflow.
Perform the following steps:
1. Use your administrative login credentials to open the Document Metadata and Workflow Configuration
section in DMS Administration; then, click Workflows to open the Workflows main page.
2. In the Existing workflows section, locate the workflow you're configuring; then, click the Edit icon for this
workflow to open the Workflow: [workflow name] page.
3. Click States and Transitions in the Workflow Administration menu to open the States and Transi-
tions: [workflow name] page.
4. In the Transitions section, locate the transition you're configuring; then, click the Edit icon for this transi-
tion to open the Manage Transition page.
5. Do you want to change the name of this Transition?
• Yes. Define a new name for the transition in the Transition Name field; then, click Update Transition.
• No. Go to step 6
6. Do you want to configure ...
• restrictions (guards) on this transition? Click Transition Requirements to open the Transition Re-
strictions: [transition name] page. For more information on configuring guards, see the section on
Transition Requirements. Note: Transition restrictions are a restrictive setting that defines when the transition can be performed, and by whom.
• transition effects? Go to Configuring Transition Effects.
Editing Transitions 64 This procedure edits a transition within the currently selected workflow.
Perform the following steps:
1. Use your administrative login credentials to open the Document Metadata and Workflow Configuration
section in DMS Administration; then, click Workflows to open the Workflows main page.
2. In the Existing workflows section, locate the workflow you're configuring; then, click the Edit icon for this
workflow to open the Workflow: [workflow name] page.
3. Click States and Transitions in the Workflow Administration menu to open the States and Transi-
tions: [workflow name] page.
4. In the Transitions section, locate the transition you're configuring; then, click the Edit icon for this transi-
tion to open the Manage Transition page.
5. Do you want to change the name of this Transition?
• Yes. Define a new name for the transition in the Transition Name field; then, click Update Transition.
• No. Go to step 6
6. Do you want to configure ...
• restrictions (guards) on this transition? Click Transition Requirements to open the Transition Re-
strictions: [transition name] page. For more information on configuring guards, see the section on
Transition Requirements. Note: Transition restrictions are a restrictive setting that defines when the transition can be performed, and by whom.
• transition effects? Go to Configuring Transition Effects.
Adding New Transition Restrictions This procedure adds a restriction to the currently selected transition.
Perform the following steps:
1. Use your administrative login credentials to open the Document Metadata and Workflow Configuration
section in DMS Administration; then, click Workflows to open the Workflows main page.
2. In the Existing workflows section, locate the workflow you're configuring; then, click the Edit icon for this
workflow to open the Workflow: [workflow name] page.
3. Click States and Transitions in the Workflow Administration menu to open the States and Transi-
tions: [workflow name] page.
4. In the Transitions section, locate the transition you're configuring; then, click the Edit icon for this transi-
tion to open the Manage Transition page.
5. Click Transition Requirements to open the Transition Restrictions: [transition name] page.
6. Click the down arrow at the Restriction Type drop down menu; then, select a restriction.
7. Click Add Restriction. The system opens the Guard Roles for Transition page.
8. Is this a ...
• permission restriction? Select permissions check boxes - one or more. Only users who have all of these
permissions will be allowed to perform the transition.
• role restriction? Click a role radio button. Only users who have this role will be allowed to perform this
transition.
65
• group restriction? Click a group radio button. Only users belonging to this group will be allowed to per-
form this transition.
• conditional restriction? Select a dynamic permission radio button. The transition is only available once
this condition is met. Note: For more information about configuring dynamic conditions, go to What are Dynamic Conditions?
• checkout guard? This restriction does not require additional configuration. Exit this procedure.
9. Click Save Trigger. The system re-opens the Transition Restrictions: [transition name] page, where
you can view the restriction and its configuration.
See Also:
What are Guard Triggers?
Viewing/Editing/Deleting Existing Transition Restrictions
Viewing/Editing/Deleting Existing Transition Restrictions This procedure displays restrictions that are currently configured for a transition, and it edits or deletes existing
restrictions for the currently selected transition.
Perform the following steps:
1. Use your administrative login credentials to open the Document Metadata and Workflow Configuration
section in DMS Administration; then, click Workflows to open the Workflows main page.
2. In the Existing workflows section, locate the workflow you're configuring; then, click the Edit icon for this
workflow to open the Workflow: [workflow name] page.
3. Click States and Transitions in the Workflow Administration menu to open the States and Transi-
tions: [workflow name] page.
4. In the Transitions section, locate the transition you're configuring; then, click the Edit icon for this transi-
tion to open the Manage Transition page.
5. Click Transition Requirements to open the Transition Restrictions: [transition name] page.
6. Do you want to ...
• view all the restrictions (guards) that are currently configured for this transition? A table on this
page provides a list of restrictions that are set up for this transition, including the configuration for each
restriction.
• modify an editable restriction? Click for the relevant restriction to open the editing screen for the re-
striction. Make the required changes; then, click Save Trigger.
Note: Only transition restrictions that display this icon are editable.
• delete a transition restriction? Click in the Delete column for the relevant restriction.
• add a new restriction? Go to Adding New Transition Restrictions.
Configuring Transition Effects 66 Adding New Transition Actions This procedure adds a new transition action for the currently selected transition.
Perform the following steps:
1. Use your administrative login credentials to open the Document Metadata and Workflow Configuration
section in DMS Administration; then, click Workflows to open the Workflows main page.
2. In the Existing workflows section, locate the workflow you're configuring; then, click the Edit icon for this
workflow to open the Workflow: [workflow name] page.
3. Click States and Transitions in the Workflow Administration menu to open the States and Transi-
tions: [workflow name] page.
4. In the Transitions section, locate the transition you're configuring; then, click the Edit icon for this transi-
tion to open the Manage Transition page.
5. Click Transition Effects to open the Transition Effects page.
6. Click the down arrow at the Action/Effects Type drop down menu; then, select an action/effect.
7. Click Add Action to open the [action/effect name] for Transition page.
8. Select configuration options for the action/effect; then, click Save Trigger to re-open the Transition Ef-
fects page, where you can view the transition action/effect you added, and its configuration.
Viewing/Editing/Deleting Transition Actions This procedure displays the actions/effects that are currently set up on this transition. It also allows you to edit
or delete existing actions/effects.
Perform the following steps:
1. Use your administrative login credentials to open the Document Metadata and Workflow Configuration
section in DMS Administration; then, click Workflows to open the Workflows main page.
2. In the Existing workflows section, locate the workflow you're configuring; then, click the Edit icon for this
workflow to open the Workflow: [workflow name] page.
3. Click States and Transitions in the Workflow Administration menu to open the States and Transi-
tions: [workflow name] page.
4. In the Transitions section, locate the transition you're configuring; then, click the Edit icon for this transi-
tion to open the Manage Transition page.
5. Click Transition Effects to open the Transition Effects page.
6. Do you want to ...
• view the actions/effects that exist for this transition? A table on this page lists actions/effects that
are currently set up on this transition, including configuration information for each action/effect.
• modify an action/effect? View existing actions/effects in the table; then, select the Edit icon for the
relevant action/effect to open the [action/effect name] for Transition page; change the configuration
options on the page as required; then, select Save Trigger.
• remove an action/effect? Click the Delete icon for the relevant action/effect.
Link Type Management 67 Document links allow users to establish associations between documents in the repository.
When creating a document link, it is necessary to specify the type of relationship that the link implies between
the linked documents – i.e. ‘associated with’, or ‘duplicated by’.
Adding New Document Link Types This procedure adds new document link types.
Perform the following steps:
1. Use your administrator login credentials to open DMS Administration; then, click Document Metadata
and Workflow Configuration.
2. Click Link Type Management to open the Document Link Type Management page.
3. Define a name for the link type in the Name field; then, provide a brief description of the link in the De-
scription field.
4. Click Add Link Type.
Viewing/Editing/Deleting Existing Link Types This procedure adds new document link types.
Perform the following steps:
1. Use your administrator login credentials to open DMS Administration; then, click Document Metadata
and Workflow Configuration.
2. Click Link Type Management to open the Document Link Type Management page.
3. Do you want to ...
• view existing link types? The Manage Existing Link Types section at the bottom of this page displays
a list of existing link types.
• edit an existing link type? View the list of existing link types; then, click the Edit icon for the relevant
link type to open the link type editing screen. Make the required changes (change the name or descrip-
tion); then, click Change Link Type.
• delete an existing link type? Locate the link type in the Manage Existing Link Types section at the
bottom of the page; then, click the Delete icon for the relevant link.
Automatic Workflow Assignments Pinnacle allows new or modified documents to be automatically associated with a predefined workflow.
Documents are associated with a workflow based on either their document type, or on their folder - one or the
other are selected as the default workflow assignment mechanism in the system.
To set up automatic workflow assignment, the administrative user selects the appropriate plugin to define
whether workflow assignment is based on the folder or on the document type.

Configuring Workflow Assignment 68 This procedure enable the automatic association of a workflow with new or modified documents - either by
document type, or by folder.
Perform the following steps:
1. Use your administrator login credentials to open the Document Metadata and Workflow Configuration
page in DMS Administration; then, click Automatic Workflow Assignments to open the Automatic
Workflow Selection page.
2. Click the down-arrow at the Workflow Plugins drop down menu; then, select one of the following options:
• DocumentTypeWorkflowAssociator (assigns workflows by document type)
• FolderWorkflowAssociator - (assigns workflows by folder)
• No automatic assignment - (disables automatic workflow assignment)
3. Click Update.
Workflow Allocation by Document Types When configuring automatic workflow assignment by document type, the system provides an additional con-
figuration section in the Document Metadata and Workflow Configuration page in DMS Administration.
The administrative user configures automatic workflow assignment, by each available document type, in the
Workflow Allocation by Document Types section in DMS Administration. This section is only available
when workflow allocation by document type is selected.
Configuring Workflow Allocation by Document Types This procedure assigns a default workflow for each document type in the system.
Perform the following steps:
1. Use your administrator login credentials to open the Document Metadata and Workflow Configuration
page in DMS Administration; then, click Workflow Allocation by Document Types to open the Work-
flow Allocation by Document Type page.
2. In the Workflow Allocations section on this page, locate the document type where you want to configure
automatic workflow allocation.
3. Having located the relevant document type, click the down arrow at the adjacent Workflow drop down
menu; then, select a workflow to assign by default to documents of this type.
4. Do you want to assign automatic workflow allocation to another document type in the system?
• Yes. Go to step 2.
• No. Go to step 5.
5. Click Apply.

Miscellaneous 69 Use the Miscellaneous section of DMS Administration to perform the following administrative functions:
• edit Pinnacle's onscreen help
• manage saved searches
• manage plugins
• view support and system information
• compare the database with the content in the repository
• add or remove columns to configure views
• customize disclaimer information that displays on the interface
• generate transaction reports of activity in the DMS
• Define and arrange your system's Dashboard quicklinks
Figure: Miscellaneous Section of DMS Administration
Edit Help Files
PinnacleTM
contains several built-in system help files. Click this icon to open the onscreen help file relevant
to your current location in the system.
The administrative user is allowed to customize the default help files. Customizing a help file overwrites the de-
fault system help file. Deleting the customized file reinstates the system help.
Note: Non-administrative Pinnacle users have view-only access to onscreen help files. Only a Pinnacle system administrator is able to create new customized help files.
Customizing Onscreen Help Files 70 This procedure creates a new customized help file.
Perform the following steps:
1. Use your administrative login credentials to open any page in the system where you want to customize a
help file; then, click to open the file.
2. Click Edit this help page to open the help file editing page.
3. Make the changes to the system help page to customize the file; then, click Update.
Viewing/Editing/Deleting Help Files This procedure displays the collection of customized help files in the system, and allows the administrative user
to edit or delete the customized files.
Perform the following steps:
1. Use your administrator login credentials to open DMS Administration; then, click Miscellaneous.
2. Click Edit Help Files to open the Current help assignments page.
3. Do you want to ...
• view all customized help files? View the list of files in the Existing customized help pages section
on this page.
• edit a help file? Click on the help file name in the Name column in the table. Make the required
changes; then, click Update.
• delete a help file? Click Delete in the Action column for the relevant help file. Note: When deleting a customized help file, Pinnacle reinstates the default help information that existed on the system before you edited the file, and the file is removed
from the list in Existing customized help pages.
Saved Searches Adding New Saved Searches This procedure creates a new saved search.
Perform the following steps:
1. Use your administrator credentials to open DMS Administration; then, click Miscellaneous in the Ad-
ministration menu to open the Miscellaneous section.
2. Click Saved Searches to open the Saved searches page.
3. Click New to open the Create a new condition page.
4. Define a name for the saved search in the New Saved Search field; then, select any or all from the Re-
turn items which match _ of the criteria groups specified pick list.

5. Define the first set of criteria in the Criteria Group section. To do this … 71
5.1. Select any or all from the Return items which match _ of the criteria specified below pick list.
5.2. Select a query type from the Criteria pick list; then, click the adjacent Add button to display the Val-
ues field for this query type.
5.3. Do you want to select another query type in this criteria group?
• Yes. Go to step 5.2.
• No. Go to step 6.
6. Do you want to create another criteria group for this saved search?
• Yes. Click Add another set of criteria; then, go back to step 5.
• No. Click Save to create the saved search.
Viewing/Editing/Deleting/Running Saved Searches This procedure displays existing saved searches, and it edits or deletes saved searches.
Perform the following steps:
1. Use your administrator login credentials to open the Miscellaneous section of DMS Administration; then,
click Saved Searches.
2. Do you want to...
• view existing saved searches? View the list of existing searches in the Existing Searches section on
this page.
• edit a saved search? Click in the Edit column for the relevant search, to open the Edit an existing
condition page. Make the required changes; then, click Update Saved Search.
• delete a saved search? Click in the Delete column for the search.
• run a saved search? Click the Run Search link in the View Results column for the relevant saved
search. The system runs the search and returns a list of files and folders. Search results include the fol-
lowing information: Document or folder title; create date; last modified date; name of file or folder crea-
tor; workflow state.
• create a new saved search? Go to Creating New Saved Searches.
Manage Plug-ins Plugins are third party programs that interact with Pinnacle to provide extended functionality to the document
management system.
Note: Click here to view a list of the plugins that have been developed by the Pinnacle community.
The plugins list must be read from the file system whenever Pinnacle is installed or upgraded. This ensures that
the latest functionality is available to system users.
Plugins are read and enabled on the Plugins page in the Manage Plugins section of DMS Administration.

Re-reading Plugins from the File System 72 This procedure re-reads plugins from the file system in order to locate any new plugins that have been copied to
the Pinnacle plugin directory since the last install or upgrade of the system.
Note: Having copied a new plugin to the plugin directory, the system needs to re-read the plugin list in the directory to add the plugin to the list on the Plugins page in the Miscellaneous section of DMS Administration.
Perform the following steps:
1. Use your administrator credentials to open DMS Administration; then, click Miscellaneous in the Admini-
stration menu to open the Miscellaneous page.
2. Click Manage plugins to open the Plugins page.
3. Click Reread plugins to add any new plugins to the list.
4. Select the relevant check box for each plugin that you want to enable in the system.
5. Deselect the relevant check box for each plugin that must be disabled - if any. Note: Disabled plugins remain on the list and may be enabled at any time, provided the plugin file is not removed from the plugin directory. If the plugin file is removed from the
directory, the plugin will be removed from the list the next time plugins are read in the
directory.
6. Click Update.
Support and System Information The Support and System Information page in the Miscellaneous section of DMS Administration provides
information that allows the Pinnacle administrator and developers to troubleshoot problems in the system.
The output of a php_info command is displayed in a scrollable window on the page - this information may be
sent to Pinnacle support staff for further assistance with an issue.
Clicking the Download PHP Information link on this page automatically runs php_info and prints the results
to Pinnacle's document management system. Note: If you are concerned that distributing this information represents a security risk for your organization, we recommend that you sanitize the output before copying and sending it. Alternatively, please enquire about sending the information di-
rectly to the developer dealing with your issue.
This page also provides a link to the Pinnacle Issue Tracker, where you can:
• report bugs
• view known issues
• find out whether fixes have already been applied for your problem in a new version of Pinnacle
Viewing Support and System Information This procedure provides access to system and support information.
Perform the following steps:
1. Use your administrator credentials to open DMS Administration; then, click Miscellaneous.

2. Click Support and System information. 73
3. Here you can ...
• follow the link to the Pinnacle Issue Tracker
• download php information
Verify Document Storage This document storage verification feature allows you to check that the content of the repository is consistent
with content in the database.
It is essential that this task is always performed after upgrading Pinnacle.
Verifying Database / Repository Consistency This procedure verifies the consistency between data in the database and in the repository.
Perform the following steps:
1. Use your administrator credentials to log in to Pinnacle's Web interface; then, open the Miscellaneous
page in DMS Administration.
2. Click Verify Document Storage to launch the verification process.
3. View the results of the verification on the Document Storage Verification page.
Manage Views View Existing/ Adding New Customized Views This procedure displays existing customized views of the repository, and it allows you to edit customized views,
or create new views.
Perform the following steps:
1. Use your administrator details to login to the Miscellaneous section of DMS Administration.
2. Click Manage Views to open the Select View page.
3. Do you want to view ...
• existing views? The views that are configured in the system are listed on this page.
• edit an existing view? Click on the view to open the Edit View page. Go to step 4.
4. Do you want to ...
• add a column to the currently configured view? Click the down arrow at the Columns drop down
menu; then, select a column. Click Add Column to View.
• remove a column from the currently configured view? Click the Delete icon - - adjacent to the
column you want to remove.

Edit Disclaimers 74 Customizing Disclaimer Text This procedure modifies the disclaimer notice that displays on the login page and in footer text in the system.
Perform the following steps:
1. Use your administrator login to open the Miscellaneous section of DMS Administration; then, click Edit
Disclaimers to open the Disclaimers page.
2. Do you want to ...
• change the current disclaimer text? Click Edit in the Actions column for the disclaimer you're editing
to open the Disclaimer editing screen. Make the required changes; then, click Update.
• remove current disclaimer text? Click Clear in the Actions column for the relevant disclaimer. The
text is immediately removed.
Extended Transaction Information Generating Transaction Reports This procedure generates reports on activity in the DMS - by user, or by date and type of transaction.
Perform the following steps:
1. Use your administrative credentials to log in to the Web interface of the DMS; then, click pen the Miscella-
neous page in DMS Administration.
2. Click Extended Transaction Reporting to open the Extended Transaction Reporting page.
3. Do you want to generate a transaction report ...
• by user? Click User Activity Information to open the Select User page. Type the user's name or part
of the name in the Username field; then, click search for users to display search results. Click the View
Transactions link for the relevant user to further define the following criteria for this user on the User
Information page: Date Range, Transaction Type, Show Items (maximum number of items to dis-
play). When you're done, click show transactions.
• by date and transaction type? Click Global Activity Information to open the Global Activity page.
Define the following criteria on this page: Date Range, Transaction Type; Show Items (maximum
number of transactions). When you're done, click show transactions.
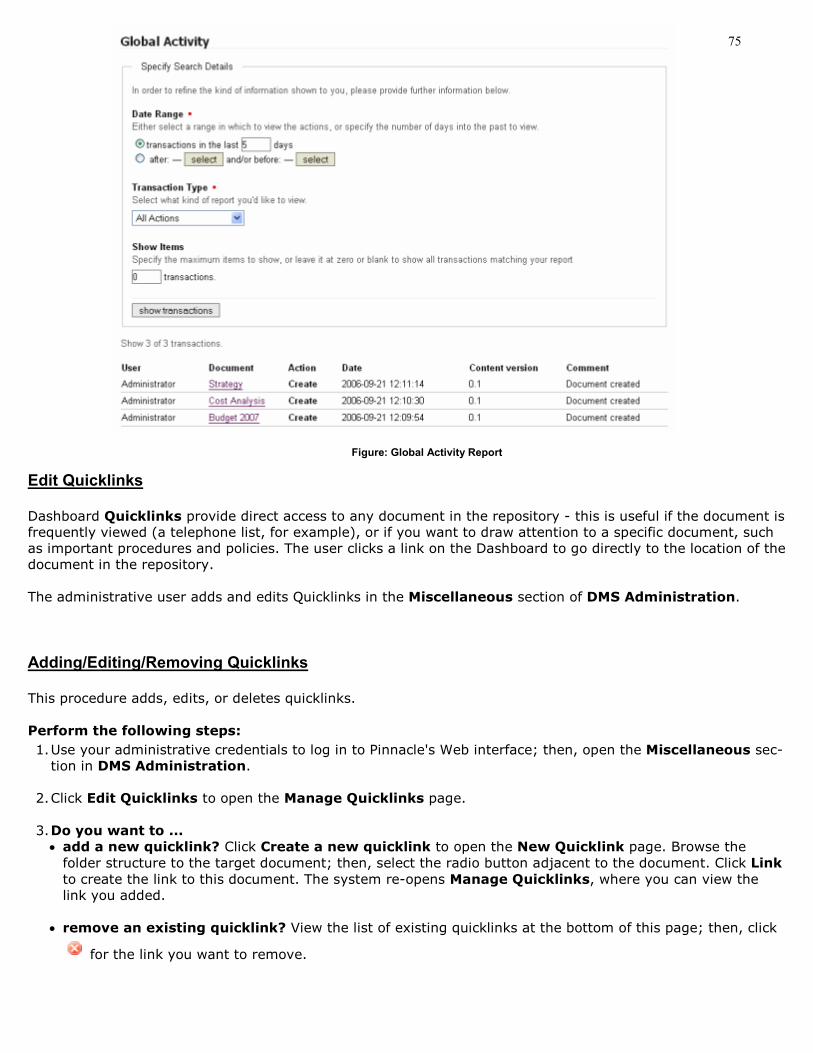
75
Figure: Global Activity Report
Edit Quicklinks Dashboard Quicklinks provide direct access to any document in the repository - this is useful if the document is
frequently viewed (a telephone list, for example), or if you want to draw attention to a specific document, such
as important procedures and policies. The user clicks a link on the Dashboard to go directly to the location of the
document in the repository.
The administrative user adds and edits Quicklinks in the Miscellaneous section of DMS Administration.
Adding/Editing/Removing Quicklinks This procedure adds, edits, or deletes quicklinks.
Perform the following steps:
1. Use your administrative credentials to log in to Pinnacle's Web interface; then, open the Miscellaneous sec-
tion in DMS Administration.
2. Click Edit Quicklinks to open the Manage Quicklinks page.
3. Do you want to ...
• add a new quicklink? Click Create a new quicklink to open the New Quicklink page. Browse the
folder structure to the target document; then, select the radio button adjacent to the document. Click Link
to create the link to this document. The system re-opens Manage Quicklinks, where you can view the
link you added.
• remove an existing quicklink? View the list of existing quicklinks at the bottom of this page; then, click
for the link you want to remove.
76
• change the way existing links are currently arranged on the Dashboard? Click Re-order quick-
links to open the Re-order Quicklinks page. View the displayed list of existing links; then, use the Up
and Down arrow keys to change the order of links. Click Re- order to save your changes.
KTIS Administration KTIS Administration is used to install and manage the license keys for Pinnacle Commercial Editions - 20
active users for Pinnacle SMB, or unlimited users for Pinnacle Enterprise.
Note: This section is only visible to users of Pinnacle Commercial Editions.
Managing keys involves:
• adding / uploading new keys
• viewing key expiry information
• enabling / disabling users (for the Pinnacle SMB subscription) in Users and Groups
View Existing/Adding New Keys This procedure displays information for existing keys, and adds new keys.
Managing keys involves:
• adding / uploading new keys
• viewing key expiry information
• enabling / disabling users (for the Pinnacle SMB subscription) in Users and Groups
Pinnacle SMB Edition and Pinnacle Enterprise Edition are licensing options for Pinnacle Commercial Edi-
tions - the certified version of KnowledgeTree Open Source Edition.
Note: To find out more about the Pinnacle Editions, see the product comparison matrix.
Perform the following steps:
1. Use your administrator login credentials to open DMS Administration.
2. Click KTIS Administration in the Administration menu to open KTIS Administration.
3. Click Manage Keys to open the Manage Keys page.
4. Do you want to …
• view currently active keys - including expiry dates? View licensing information in the table at the
bottom of this page. Details include: number of licenses, expiry date, number of days to expiry, name of
the organization owning this license. A Delete link allows you to remove the license key.
• add new keys for your organization from your local computer, or from the Pinnacle website?
Click Browse in the Add new key section to locate and upload the license key from your local server;
then, click Add License. The new key is added to the table of existing keys.
• enable or disable users to manage user numbers for a Pinnacle Commercial SMB subscription?
Go to Enabling/Disabling Users.

Reporting 77 The Reporting section of DMS Administration allows you to create user activity reports.
Note: Reporting is only available with the Pinnacle Commercial Editions - SMB and Enterprise.
User Reports
Pinnacle's User Reports allow the administrative user to track user activity in the Document Management Sys-
tem. Reports can be filtered to list only those users who have logged in to the system over a predefined period,
and from a specified start date - i.e. over a number of weeks, months, or years back, to the current date.
The Reporting function also provides a view of the full login history of any specific user, or of all system users.
Generating User Activity Reports This procedure generates user reports.
Note: Reporting is only available with the Pinnacle Commercial Editions - SMB and Enterprise.
Perform the following steps:
1. Use your administrator login credentials to open DMS Administration; then, click Reporting in the Ad-
ministration menu to open Reporting.
2. Click User reports to open the User Reporting page.
3. Do you want to generate ...
• login reports that includes all system users over a specific time period? Go to step 4.
• a full login history for a specific user? Go to step 5.
4. Do you want to view a report on ...
• the last login performed by all system users? Click the Show all users radio button in the Last login
information section; then, click Show to generate the report.
• the last login performed by users within a specified past number of days, weeks, months, or
years? Click the Show users that radio button in the Last login information section; then, select have
from the adjacent pick list. Specify a numeric quantity of the period in the adjacent number field; then, se-
lect a time frame - either day(s), week(s), month(s), or year(s). Click Show to generate the report.
• users who have not logged in to the system within a specified past number of days, weeks,
months, or years? Click the Show users that radio button in the Last login information section; then,
select have not from the adjacent pick list. Specify the numeric quantity of this period in the adjacent
number field; then, select a time frame - either day(s), week(s), month(s), or year(s). Click Show to
generate the report.
• all login activity over a specified past number of days, weeks, months, or years? Click the Show
login activity over the last _ radio button; then, specify the quantity of the period in the adjacent num-
ber field. Select a time frame in the adjacent pick list - either day(s), week(s), month(s), or year(s).
Click Show to generate the report.
• all login activity between a specific start and end date? Click the Show login activity between
[start date and time] radio button; then, click on the start period select button to display the pop up
calendar. Select a start date on the calendar. Click the end period select button to display the pop up cal-
endar. Select an end date on the calendar. Click Show to generate the report.

78
Figure: User Reporting Configuration Screen
5. Do you know the users full name or part of the name?
• Yes. Specify the username, or part of the name in the Username field; then, click search for users. All
users matching the Username information you specified are listed in a table at the bottom of the page.
Locate the user for whom you wish to generate a report; then, click View in the Login history column
for the relevant user to generate the report. The report opens on the Login history for [username]
page. The following information is included: date and time of system activity; action, comments (e.g.
server address where user logged in; or, if the session timed out etc).
• No. Click view all users to display a list of all system users. Locate the user for whom you require a re-
port; then, click View in the Login history column to generate the report. The user activity report opens
on the Login history for [username] page.
Glossary 79
A
ADF - short for Automatic Document Feeder. A component on the scanner hardware that feeds paper for the
digital imaging process.
AD Server - short for Active Directory Server; Pinnacle provides the ability to import and authenticate users
from Active Directory.
Advanced Search - A search for documents in the Pinnacle DMS, by generic metadata, and by type-specific
metadata. See also Boolean Search.
Anonymous - A default user login for Pinnacle Document Management System. This user is granted limited ac-
cess to the repository; 'anonymous' is allowed to browse the directory structure, and to view public folders. The
anonymous user can be also be given other permissions like write and delete – this can be dangerous.
API - short for Application Programmer Interface.
Archiving - The process of storing inactive documents in the Pinnacle repository. Documents can be archived
automatically, or manually.
Automatic Document Feeder - See ADF.
Top
B
Boolean Search - An advanced, optimized search of content in the repository that allows the inclusion of the
terms 'and', 'or', and 'not', when specifying search parameters. See also Advanced Search.
Browse Path - Also known as a breadcrumb path; the active path to a document or a folder that displays as a
series of links above the main pane. Clicking on a section of the link - on a document or folder name, for exam-
ple - allows you to navigate through the path.
Bulk Import - A Pinnacle feature that allows you to import documents and folders from a zip archive.
Top
C
Client server architecture - An application software architecture that allows CPU intensive processes, such as
search and indexing, to occur on the server, whereas processes such as image viewing and OCR occur on the
client.
COM - short for Component Object Model.
Top
D
Dashboard - The name of the Pinnacle Document Management System home page. This page displays: organi-
zation-wide content, such as a search bar, Recently Added/Changed Documents, Top Downloads, and ad-
ministrator-defined Quicklinks; collaborative content, such as Items that require your attention; and con-
tent that is specific to the currently logged in, authorized DMS user -
80
such as, Your Checked-out Documents, Orphaned Folders, Recently Viewed Items, and personalized
Quicklinks.
Dashboard Quicklinks - The name for a set of links that display on the Dashboard, and which can be clicked
to directly open the folder location or the document location in the repository to which they refer. This feature
is a useful mechanism for quickly navigating to frequently used content.
Default Email Address - The outgoing email address used by Pinnacle Document Management System to
send email notifications to system users who have subscribed to this DMS service.
Default Email Name - The name used to identify the source of emails sent from the Pinnacle DMS notifica-
tions system.
Default Language - The language used for the Pinnacle document management system GUI (graphical user
interface), if no alternative is specified. (Other options, if available, display in the Language pick list on the
Pinnacle Login page.) The current default, English (United States), is the only supported language. Language
packs for other languages are available for download from KTForge. See also: Forge.
Deleted Documents - Documents that have been removed from the user-accessible section of the Pinnacle
repository. Documents that are deleted are moved to an administrative location in the repository, from where
they can be restored, or expunged (permanently removed from the repository).
Desktop Imaging - Pinnacle Desktop Imaging; a component of the Pinnacle Tools for Windows toolset that
allows you to scan documents directly into the Pinnacle Document Management System repository.
DMS - Document management system; a computer system used to track and store electronic documents and/
or images of paper documents, providing storage, versioning, metadata, auditing tools, security, indexing, re-
trieval capabilities, and collaboration tools. Pinnacle is a Web-based document management system.
Document Type - Also known as Document Type Metadata; A group of metadata fieldsets used to organize
documents across organizational structures. Examples of Document Types used in Pinnacle may include: case
studies, contracts, best practice templates, publications, marketing material.
Document Type Metadata - A type of metadata that applies to all document types. See also: Document
Type, Metadata, and Generic Metadata.
Document Root - The directory in which the document tree resides.
E
Email Server - The SMTP server used for all outgoing emails.
Enterprise - License type for the Pinnacle Commercial edition of Pinnacle Document Management System.
Explorer - The main window in Microsoft Outlook.
Expunge - An administrative function that completely removes a document that has been Deleted from the
Pinnacle repository. A document that has been expunged cannot be recovered.
F 81
File System Root - The directory in which the document management system is installed.
G
Generic Metadata - A type of metadata; searchable metadata fields, which are assigned to all documents
and document types in the repository.
GIF - short for Graphics Interchange Format. A file format for storing images.
Graphics URL - The Web address for the location of the graphics files used by Pinnacle Document Manage-
ment System.
Group - The name for one or more Pinnacle users who share the same system permissions for accessing and/
or modifying particular Units and Folders. In Pinnacle, permissions are assigned for a Unit or a Folder to specific
Groups, and not to individual users.
H
I
Inspector Window - The name of the window that opens when you open an item in Outlook.
Integration Server - A server component for the Pinnacle Document Management System that provides a
WebDAV interface to the documents in the repository, allowing applications to interact easily with the organiza-
tion's assets. The Integration Server requires a Web server, the PHP programming environment, and a data-
base. The Integration server uses the same configuration details you use for Pinnacle. Pinnacle Tools for Win-
dows uses the Integration server to access documents.
J
JPEG - short for Joint Photographic Experts Group (JPEG or JPG). An image compression format used for stor-
ing color photographs and images.
K
Pinnacle Client Tools for Windows - Also known as Pinnacle Tools, a set of client-side tools that allow ac-
cess to the repository via the Pinnacle Integration Server. The toolset includes Pinnacle Outlook Integration,
Pinnacle Desktop Imaging, and Pinnacle Office Add-in.
Pinnacle Commercial - The licensed version of KnowledgeTree Open Source
Pinnacle Integration Server (KTIS) - A server component for the Pinnacle Document Management System
that enables Desktop Integration with the Web-based Pinnacle Document Management System.
L 82
LAMP - short for Linux, Apache, MySQL, PHP.
LDAP - short for Lightweight Directory Access Protocol; an open set of protocols for accessing information di-
rectories.
LDAP Root DN - The 'distinguished name' (DN) of the root where Pinnacle users are found on the LDAP
Server.
LDAP Server - The LDAP server used to authenticate Pinnacle users.
Language Directory - The directory, in Pinnacle, that contains all the system's language resource templates.
Left Menu Bar - The menu bar that displays on the left of the browser page in Pinnacle. This menu displays
context-sensitive links to Pinnacle functionality.
Linked Document - The name for a document in the repository that is linked to another document in the re-
pository, specifically because the content of the linked document is relevant to the content of the document to
which it is linked. For example, a general human resources policy document may be linked to a document de-
tailing specific annual leave procedures, and to a document that details the organization's employee benefits
scheme.
Lookup - A list of available options for a field.
M
Manual Install - Installation of the open source edition of Pinnacle Document Management System, using the
Source Only package. The alternative to the manual installation is the Stack Install. Pinnacle provides a stack
installer for its open source edition, and for its commercial edition.
Metadata - A structured set of information (data) about information (data), which provides a context for the
unit of information requiring classification; typically used to facilitate the optimal management, especially stor-
age and retrieval, of the information that is described by the metadata - i.e. the repository's Search function
works on the metadata level. See also: Generic Metadata, and Document Type Metadata.
Migrating - The process of moving Pinnacle from a Windows platform to Linux platform and vice versa; or, for
moving Pinnacle from Windows to Windows, or from Linux to Linux in different locations.
MySQL - The database component of the Pinnacle Document Management System LAMP stack.
N
O 83
OCR - short for Optical Character Recognition. A software process that recognizes printed text as alphanumeric
characters.
Office Add-in - A component of the Pinnacle Tools for Windows toolset that allows you to work with content in
the repository from within Office applications.
Organization - Also known as Organizational Unit; the organization, which is the largest Unit used in Pinnacle,
houses all document structures in the DMS. Currently, the Open Source version of Pinnacle supports only one
organization.
Organizational Unit - The name of the largest Unit in Pinnacle, which houses all document structures in the
DMS.
Outlook Integration - A component of the Pinnacle Tools for Windows toolset that provides integration be-
tween Microsoft Outlook and the Pinnacle Document Management System repository. This feature allows you to
save emails and attachments to the repository, and to attach documents that are located in the repository, to
outgoing emails.
P
Permissions - The set of rules that define the level of security applied to a document or folder in the reposi-
tory. Pinnacle includes a set of default permissions - read, write, etc. The Pinnacle administrator is also allowed
to define additional permissions. Permissions are assigned to a user at folder level, on a per group basis.
Q
R
Root URL - The Web address for an organization's installation of Pinnacle Document Management System.
S
SMB - License type for the Pinnacle Commercial edition of Pinnacle Document Management System, targeted
at small to medium size businesses.
Search - A feature that allows you to find content in the repository. Pinnacle offers three search options: sim-
ple search; advanced search, saved searches.
Search Bar - The name of the text field that displays above the main page in the Browse Collections tab of
the Web-interface of Pinnacle Document Management System; used to perform Simple Searches - i.e. to
search for text within documents, and within the document title.
Session Timeout - A feature that automatically logs out a Pinnacle user after an administrator-defined period
of inactivity in the DMS. The user will need to login again in order to resume their work session. The system re-
opens at the page where the session timeout occurred.
Simple Search - A high level method of retrieving content in the DMS. Simple search does not use metadata
to search within documents.

84
Sysadmin - The administrative login role, defined for a general administrator group, for administering the en-
tire Pinnacle repository. This role supports the default login, Admin.
T
TIFF - short for Tagged Image File Format. A non-proprietary image format that allows several types of com-
pression. TIFFs may be either single or multi-page files. A single-page TIFF is a single image of one page of a
document; a multi-page TIFF is a large, single file comprising multiple document pages.
Taxonomy - A division of entities into ordered groups and categories. Describes the particular structure em-
ployed to classify content, by type, in a way that assists navigation and flexible information retrieval in a sys-
tem. A taxonomy is created by defining methods of classification (metadata) - either hierarchical categorization,
or through association between terms.
Type Specific Metadata - Also known as Document Type Metadata, a form of metadata (search parameter)
that is specific to some document types. See also: Metadata, and Document Type Metadata.
U
Unit - The name assigned to organizational structures, one or more (typically just one), that form the high-
level folders in the document taxonomy (folder structure). User Groups may be assigned access rights to access
or modify documents for particular Units. Units are specifically employed to give administrative rights to Unit
administrators.
Unit Admin - An administrative login role that is predefined as an intermediary administrator group to specific
Units in Pinnacle. The administrator for a particular Unit (the Unit Admin) has administrative access and author-
ity only for a particular Unit, and not for the entire document management system.
User Account - A profile created by the Pinnacle administrator to provide a specific Pinnacle user with access to
the repository.
User Interface Directory - The location of the presentation and business logic files.
User Interface URL - The location of the presentation and business logic pages accessible via the Web server.
Users - A person who has been granted authority to access the Pinnacle Document Management System.
V
W
WebDAV - short for Web-based Distributed Authoring and Versioning; WebDAV, an extension of the Hypertext
Transfer Protocol (HTTP), is an Internet standard that is supported by major operating systems for file manage-
ment over the base web standards. WebDAV provides a standard, browsing interface on Linux, MacOS X, and
Windows XP and over. WebDAV allows you to use third-party clients
85
for Pinnacle because it is well-supported in most development environments. It also allows custom clients to
manage Pinnacle data via the Pinnacle Integration server.
Workflow - a pre-configured series of steps that route documents to various users.
X
Y
Z