PICS in Am Radio Andy Talbot G4JNT. SO what is this magic device ? The PIC processor is a Single...
19
PICS in Am Radio Andy Talbot G4JNT
-
Upload
miles-oneal -
Category
Documents
-
view
219 -
download
0
Transcript of PICS in Am Radio Andy Talbot G4JNT. SO what is this magic device ? The PIC processor is a Single...

PICS in Am Radio
Andy Talbot G4JNT
SO what is this magic device ?

How are they used ?
With a few programming tools Use code written by others for specific jobs Programme your own from first principles Mixture of both
Wide Range of device families Basic Digital / analogue signal handling TO Advanced Digital Signal Processing

The Hardware
All depends on the chip type I/O lines (Pins)
Digital 5V, source / sink 20mA Some Schmitt trigger inputs Analogue Inputs
Peripherals (use some dedicated pins) A/D Converter Comparator Timer / Counter

Contd.........
UART (serial Comms) Pulse Width Modulation
A few specialist ones USB Core I2C Bus CAN Bus

How the code works
A sequence of instructions are stored in Programme Memory that work on Data stored in user memory
User memory includes all the peripherals and I/O lines
The data is swappd about, moved, manipulated - and conditionally tested
The programme sequence can be interrupted and flow changed depending on the outcome of those tests

--- and that is all they do ----
35 Basic instructions in the baseline 16F family (and of those, about half are used most of the
time) The peripherals are the complicated bits,
and need the data sheets. but for now..... A bit of code....

A few ground rules All PICs need some setup instructions
Peripherals need initialising (some even if not used - a very sore point indeed! RTFM with an unfamiliar device)
I/O lines defined – • direction, type – or just for for best PCB layout
Peripherals have dedicated pins allocated – and may default!
Clock Oscillator (int / ext, speed, type) All these depend on the processor Copy from other previous working code – for
that device type• Some early 1996 vintage initialisation code by G0IAY, when he
introduced me to PICs can still be seen in some of the latest stuff on the website.
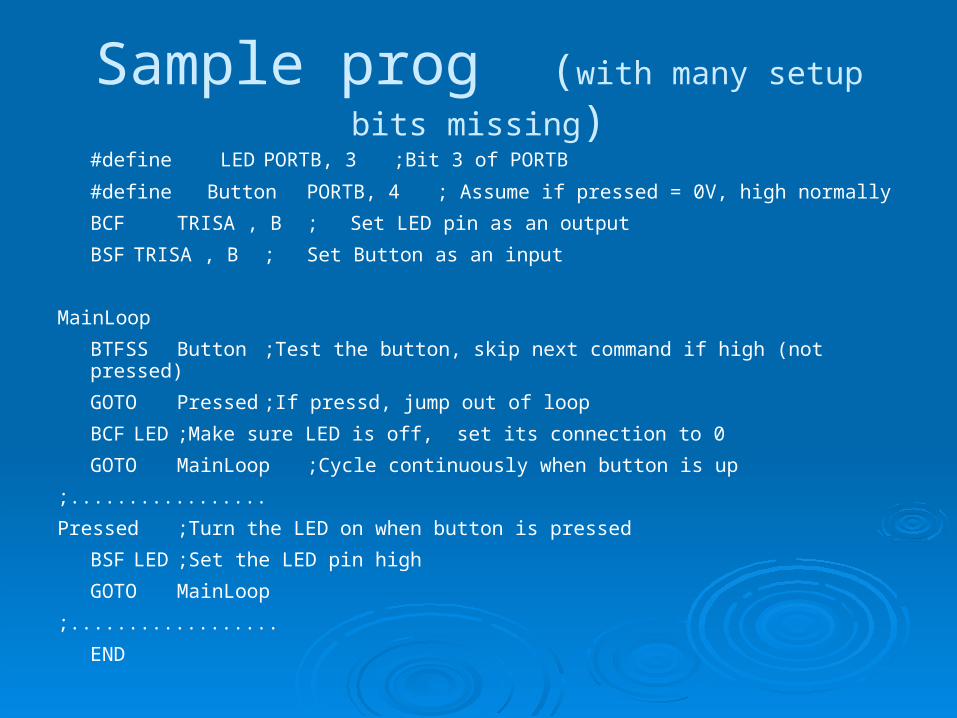
Sample prog (with many setup bits missing)
#define LED PORTB, 3 ;Bit 3 of PORTB
#define Button PORTB, 4 ; Assume if pressed = 0V, high normally
BCF TRISA , B ; Set LED pin as an output
BSF TRISA , B ; Set Button as an input
MainLoop
BTFSS Button ;Test the button, skip next command if high (not pressed)
GOTO Pressed ;If pressd, jump out of loop
BCF LED ;Make sure LED is off, set its connection to 0
GOTO MainLoop ;Cycle continuously when button is up
;.................
Pressed ;Turn the LED on when button is pressed
BSF LED ;Set the LED pin high
GOTO MainLoop
;..................
END

Practicalities Write the Source code –
use any text editor like Wordpad, Notepad, or a custom one - part of programing suite Generate .ASM file
Assemble it I Use MPASM (from Microchip) Any errors are flagged with line number
• (so make sure the text editor shows line numbers!!)
If all is (eventually) correct – no assembly errors – a .HEX file will be generated
This will look meaningless

Blowing the Chip PIC programmers are rife. There are dozens
of different ones Many homebrew, simple, PC software based
ones. They probably mostly work..... BUT Get a proper one
Microchip PicKit 2 • (or PicKit 3, nothing extra for basic jobs)
Will do every (modern) device they make And often comes bundled with freebies There are others (Asix Presto) – I need for legacy
devices

(Install the programmer Software) Connect programmer to PC
For the PicKit – connect a blank device first Use chip adapter,
• or connect the 5 programming wires PicKit reads the device type automatically
• Other programmers have to be set
Load in the .HEX file generated earlier Click / Press / Hit the programme button
Remove chip, solder into circuit

In Circuit Programming
Two I/O lines dedicated to programming, along with PGM pin (also device reset) Bring out to connection header on the PCB, Allows chip programmer to re-prog chip on the
final board The header may conveniently allow an
external user interface to be connected, so pins aren’t wasted – like RS232
As in the Beacon Keyer module No spare I/O pins there with its 8 pin PIC

The ‘JNT Board
Specifically designed as a user I/O interface for analogue and digital tasks

Circuit Diagram

Details
16F628 or 16F819 Processor Socket & In-Circuit Programming
LCD Module Rotary Encoder with built in pushbutton Up to 5 User I/O lines (analogue or digital) Precision voltage reference Expandable, development module

Uses
Analogue Monitor several channels and display voltages
- accurately Calculate VSWR and Power from ext head ?????????????????
Digital Control serial synthesizer chips Frequency Counter ?????????????????

Ready-To-Go Solutions
4 Channel Voltmeter 4 voltages on LCD, use rotary control to set and store
decimal point position VSWR Indicator
Feed in FWD and RTN voltages from SWR head, calculate VSWR independent of power
Feed in a calibration voltage, use to allow accurate power display
Frequency Counter Up to ~ 50MHz Rotary control to set and store IF offsets

.... Contd...... Synth Controller
Control a pair of MFG modules, or similar synth chips, over dual I2C interface
Requires PIC programmer if frequencies / IFs need to be changed
-------------------------------- The module will form the basis of future
microwave synthesizer controllers Designs based around the LMX family are
rising up the do-list ........