PIAA Hummer H2 600 H.I.D. Lamp Kit
2
PIAA Hummer H2 600 H.I.D. Lamp Kit http://www.thehummerclubinc.com/~thehumme/abouttheclub/article... 1 of 2 4/30/08 10:47 AM Nestled into the front bumper of your H2 are two innocuous looking lamps – daytime running lights. H2 owners looking for serious off-road lighting should look to PIAA, the well-regarded aftermarket lighting company (www.piaa. com ). PIAA recently introduced a complete H.I.D. driving light kit that replaces the daytime running lights with a pair of PIAA 600 H.I.D. lamps. PIAA’s Hummer H.I.D. offering is a wellthought- out, vehicle-specific kit that includes two race-proven PIAA 600 H.I.D. driving lights, two ballasts, two igniter units, mounting hardware, relay wiring harness, dual-connection battery terminals, switch assembly, wiring diagram, and complete instructions, including a list of required tools. The heart of the kit is the proven PIAA 600 H.I.D. lamp, which features a scientifically designed housing that is both lightweight and highly resistant to extreme environments. At about five inches in diameter, the 600 utilizes a PIAA 35W H.I.D. bulb. The lamps are fully adjustable for aim. Installation of the PIAA kit is as simple as such a project can possibly be, well within the skill-set of the average shade-tree mechanic. Minimal cutting is required, and PIAA supplies a template to make even that task easy and accurate. The job requires simple hand tools, common sense, and a modicum of smarts about automotive electricity. A partner is recommended as well. We recently watched and took notes while PIAA technicians installed the Hummer H2 H.I.D. kit on a customer’s vehicle. Follow along with the accompanying photos, as we detail what it takes to upgrade an H2’s lighting system with PIAA H.I.D.s. For more information on the PIAA H2 600 H.I.D. driving light kit, or their complete line of halogen and H.I.D. lamps and bulbs, contact PIAA Corporation, 503-643-7422 or visit the PIAA website at www.piaa.com . 1. The PIAA Hummer H2 600 H.I.D. lamp kit, complete in the box 2. The powerful PIAA 600 H.I.D. lamps, with ballasts. 3. The complete kit, with 600 H.I.D. lamps, igniters, ballasts and wiring harnesses. 4. After disconnecting both the positive and negative battery terminals, snap off the middle grille facia above the bumper. 5. Remove the hidden bumper bolts, above and below the bumper. 6. After unplugging the daytime running light plugs, with the help of a friend, remove the bumper. Have a blanket on the ground to set it on to protect its finish. 7. Remove the series of bolts that attach the bumper valance to the bumper and skid plate. 8. Separating the valance from the skid plate and bumper. 9. PIAA supplied a template for the correct lamp opening and mounting holes. 10. Close-up of undoing side valances and internal side supports. 11. Next, remove retaining nuts that hold
Transcript of PIAA Hummer H2 600 H.I.D. Lamp Kit
PIAA Hummer H2 600 H.I.D. Lamp Kit http://www.thehummerclubinc.com/~thehumme/abouttheclub/article...
1 of 2 4/30/08 10:47 AM
Nestled into the front bumper of your H2 are two innocuous looking lamps – daytime running lights.
H2 owners looking for serious off-road lighting should look to PIAA, the well-regarded aftermarket lighting company(www.piaa. com). PIAA recently introduced a complete H.I.D. driving light kit that replaces the daytime running lightswith a pair of PIAA 600 H.I.D. lamps.
PIAA’s Hummer H.I.D. offering is a wellthought- out, vehicle-specific kit that includes two race-proven PIAA 600 H.I.D.driving lights, two ballasts, two igniter units, mounting hardware, relay wiring harness, dual-connection batteryterminals, switch assembly, wiring diagram, and complete instructions, including a list of required tools.
The heart of the kit is the proven PIAA 600 H.I.D. lamp, which features a scientifically designed housing that is bothlightweight and highly resistant to extreme environments. At about five inches in diameter, the 600 utilizes a PIAA 35WH.I.D. bulb. The lamps are fully adjustable for aim.
Installation of the PIAA kit is as simple as such a project can possibly be, well within the skill-set of the averageshade-tree mechanic. Minimal cutting is required, and PIAA supplies a template to make even that task easy andaccurate. The job requires simple hand tools, common sense, and a modicum of smarts about automotive electricity. Apartner is recommended as well.
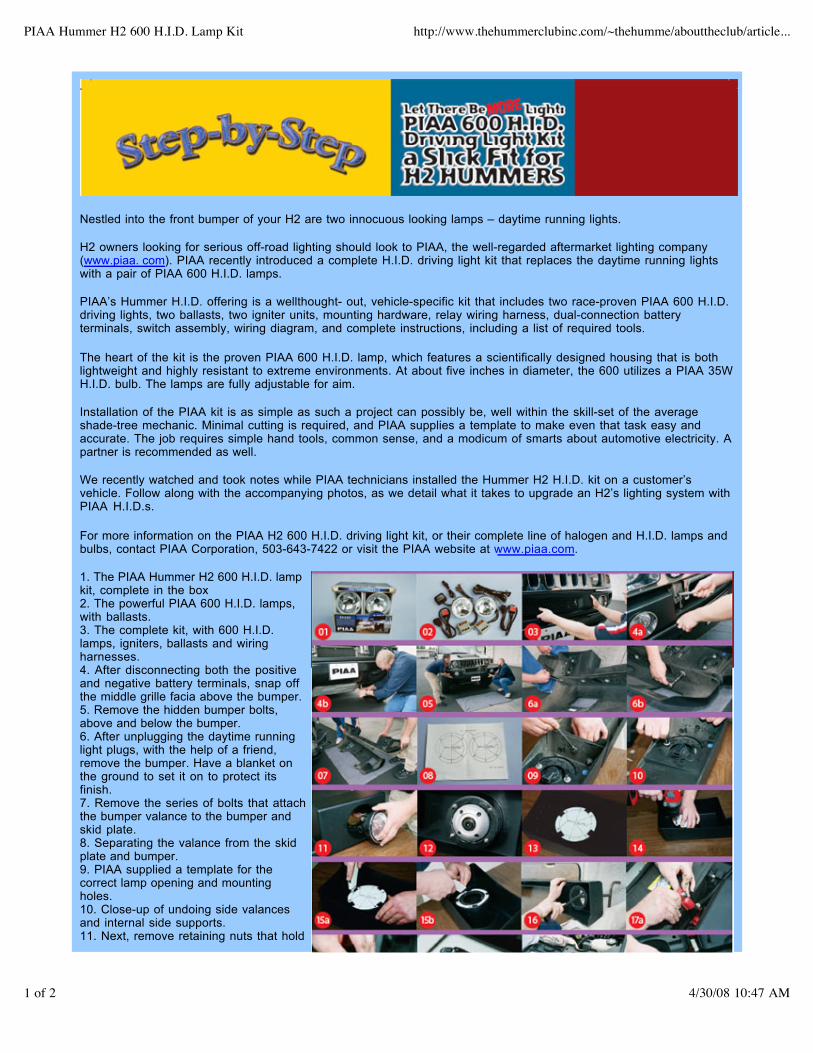
We recently watched and took notes while PIAA technicians installed the Hummer H2 H.I.D. kit on a customer’svehicle. Follow along with the accompanying photos, as we detail what it takes to upgrade an H2’s lighting system withPIAA H.I.D.s.
For more information on the PIAA H2 600 H.I.D. driving light kit, or their complete line of halogen and H.I.D. lamps andbulbs, contact PIAA Corporation, 503-643-7422 or visit the PIAA website at www.piaa.com.
1. The PIAA Hummer H2 600 H.I.D. lampkit, complete in the box 2. The powerful PIAA 600 H.I.D. lamps,with ballasts. 3. The complete kit, with 600 H.I.D.lamps, igniters, ballasts and wiring harnesses. 4. After disconnecting both the positiveand negative battery terminals, snap offthe middle grille facia above the bumper. 5. Remove the hidden bumper bolts,above and below the bumper. 6. After unplugging the daytime runninglight plugs, with the help of a friend,remove the bumper. Have a blanket on the ground to set it on to protect itsfinish. 7. Remove the series of bolts that attachthe bumper valance to the bumper andskid plate. 8. Separating the valance from the skidplate and bumper. 9. PIAA supplied a template for thecorrect lamp opening and mounting holes. 10. Close-up of undoing side valancesand internal side supports. 11. Next, remove retaining nuts that hold
PIAA Hummer H2 600 H.I.D. Lamp Kit http://www.thehummerclubinc.com/~thehumme/abouttheclub/article...
2 of 2 4/30/08 10:47 AM
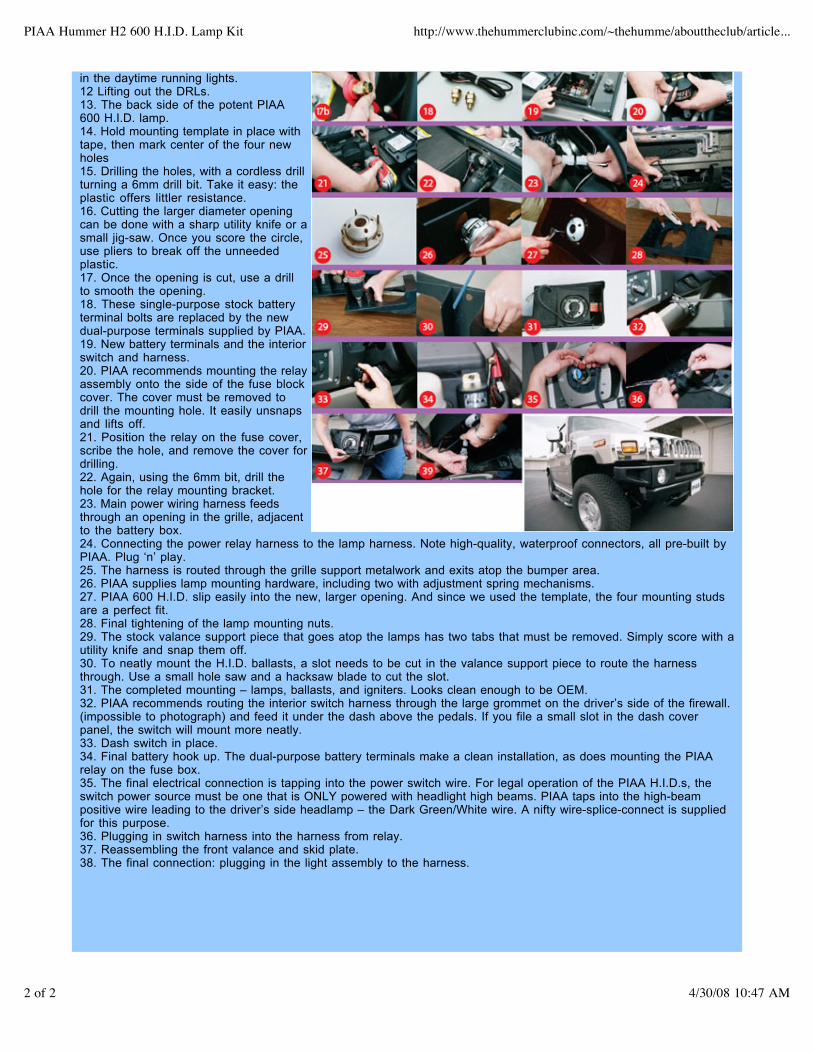
in the daytime running lights. 12 Lifting out the DRLs. 13. The back side of the potent PIAA600 H.I.D. lamp.14. Hold mounting template in place withtape, then mark center of the four newholes 15. Drilling the holes, with a cordless drillturning a 6mm drill bit. Take it easy: theplastic offers littler resistance. 16. Cutting the larger diameter openingcan be done with a sharp utility knife or asmall jig-saw. Once you score the circle, use pliers to break off the unneededplastic. 17. Once the opening is cut, use a drillto smooth the opening. 18. These single-purpose stock batteryterminal bolts are replaced by the newdual-purpose terminals supplied by PIAA. 19. New battery terminals and the interiorswitch and harness. 20. PIAA recommends mounting the relayassembly onto the side of the fuse blockcover. The cover must be removed to drill the mounting hole. It easily unsnapsand lifts off. 21. Position the relay on the fuse cover,scribe the hole, and remove the cover fordrilling. 22. Again, using the 6mm bit, drill thehole for the relay mounting bracket. 23. Main power wiring harness feedsthrough an opening in the grille, adjacentto the battery box.24. Connecting the power relay harness to the lamp harness. Note high-quality, waterproof connectors, all pre-built byPIAA. Plug ‘n’ play. 25. The harness is routed through the grille support metalwork and exits atop the bumper area.26. PIAA supplies lamp mounting hardware, including two with adjustment spring mechanisms. 27. PIAA 600 H.I.D. slip easily into the new, larger opening. And since we used the template, the four mounting studsare a perfect fit. 28. Final tightening of the lamp mounting nuts. 29. The stock valance support piece that goes atop the lamps has two tabs that must be removed. Simply score with autility knife and snap them off. 30. To neatly mount the H.I.D. ballasts, a slot needs to be cut in the valance support piece to route the harnessthrough. Use a small hole saw and a hacksaw blade to cut the slot. 31. The completed mounting – lamps, ballasts, and igniters. Looks clean enough to be OEM. 32. PIAA recommends routing the interior switch harness through the large grommet on the driver’s side of the firewall.(impossible to photograph) and feed it under the dash above the pedals. If you file a small slot in the dash coverpanel, the switch will mount more neatly.33. Dash switch in place. 34. Final battery hook up. The dual-purpose battery terminals make a clean installation, as does mounting the PIAArelay on the fuse box. 35. The final electrical connection is tapping into the power switch wire. For legal operation of the PIAA H.I.D.s, theswitch power source must be one that is ONLY powered with headlight high beams. PIAA taps into the high-beampositive wire leading to the driver’s side headlamp – the Dark Green/White wire. A nifty wire-splice-connect is suppliedfor this purpose. 36. Plugging in switch harness into the harness from relay. 37. Reassembling the front valance and skid plate. 38. The final connection: plugging in the light assembly to the harness.