Physician Training Workbook - WATCHMAN Uwatchmanuniversity.com/EContent/Resources/SH... ·...
33
WATCHMAN TM TRAINING AND EDUCATION LAA CLOSURE TECHNOLOGY Physician Training Workbook
Transcript of Physician Training Workbook - WATCHMAN Uwatchmanuniversity.com/EContent/Resources/SH... ·...

WATCHMANTM TRAINING AND EDUCATIONLAA CLOSURE TECHNOLOGY
Physician Training
Workbook
Contents
InstructionsModule 1: WATCHMANTM LAA Closure Technology Module 2: WATCHMANTM Imaging Guidelines Study Guide: WATCHMANTM LAA Closure Technology
IMPORTANT INFORMATION: These materials are intended to describe typical considerations and procedural steps that reflect current standards of care. Patients and their medical circumstances vary and the information and procedural steps described may not be appropriate for every patient or case. As always, decisions surrounding procedural care must be made at the physician’s discretion in light of all available information and the patient’s best interests. Similarly, BSC product considerations are based solely on the author’s experience and may not be interpreted or relied upon to support clinical or competitive product claims. The experiences of other users may vary.
Note: All images have been sourced from the PROTECT AF trial.
LAA CLOSURE TECHNOLOGY MODULE 1

SH-135103-AB
WATCHMANTM LAA Closure Technology Instructions
This workbook describes the WATCHMANTM LAA closure technology and imaging guidelines at baseline, during the closure procedure, and at follow-up.
To use this workbook:
• Study the illustration as you read the description written here.
• Fill in the blanks to review the Key Concept listed in the righthand column.
• Refer to More information in the righthand column to learn more about the topic.
• Complete the Applications in the Study Guide that accompanies this workbook.
Key Concept: This workbook describes WATCHMAN and related imaging.
LAA closure technology
Instructions
More information...
• Read this information to find out more about the topic.

Module 1: WATCHMANTM LAA Closure Technology
LAA Closure Components Patient Indications WATCHMANTM Device WATCHMANTM Access System (WAS) WATCHMANTM Delivery System (WDS) LAA Closure Procedure Basic Steps Cross Interatrial Septum (IAS) Introduce WAS Introduce Pigtail Catheter Introduce WDS Deploy WATCHMAN Device Confirm Device Release Criteria (DRC) Release Device
Device Modifications Partial Device Recapture Full Device Recapture
Patient Management Guidelines
Reference Summary of LAA Closure
LAA CLOSURE TECHNOLOGY MODULE 1
SH-135103-AB
LAA Closure Components Patient Indications
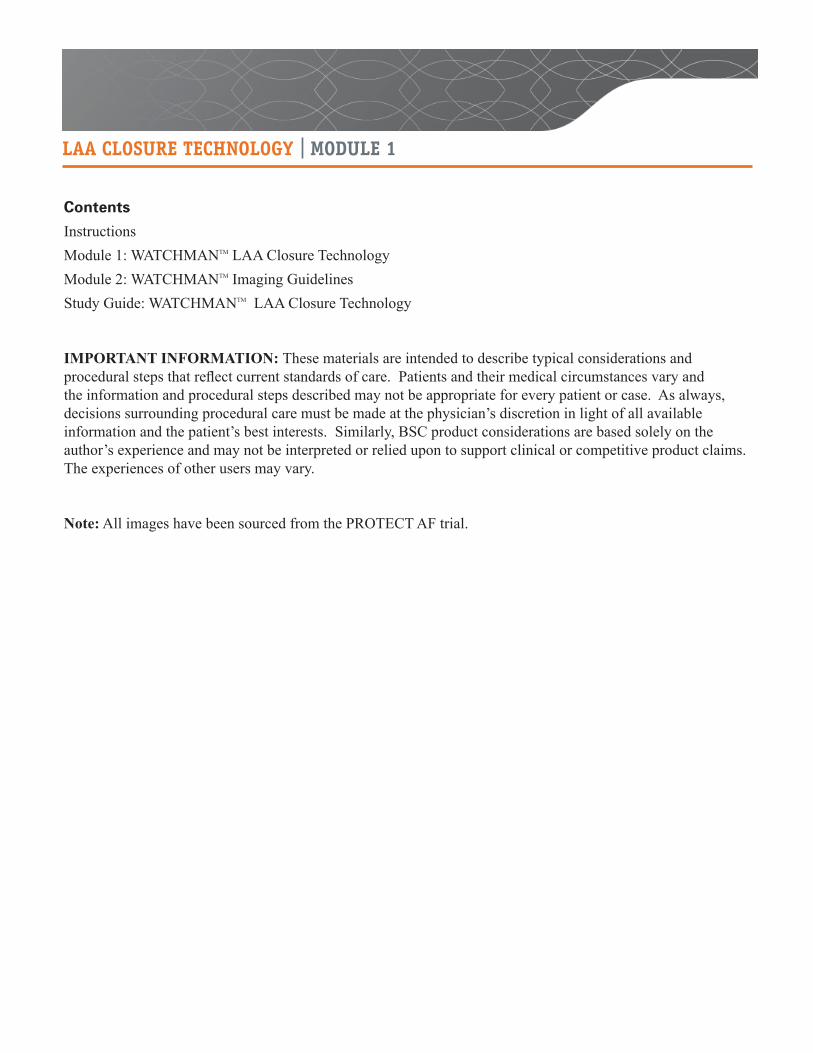
WATCHMAN LAA closure technology is designed to prevent the embolization of thrombi that may form in the left atrial appendage (LAA). It may protect patients from ischemic stroke or systemic embolism and eliminate the need for long-term anticoagulation therapy.* • The WATCHMAN Device is indicated to reduce the risk of
thromboembolism from the left atrial appendage in patients with non-valvular atrial fibrillation who:
– Are at increased risk for stroke and systemic embolism based on CHADS2 or CHA2DS2-VASc scores and are recommended for anticoagulation therapy;
– Are deemed by their physicians to be suitable for warfarin; and – Have an appropriate rationale to seek a non-pharmacologic
alternative to warfarin. In considering the use of the WATCHMAN Device, the
rationale for seeking an alternative to long-term warfarin therapy and the safety and effectiveness of the device compared to warfarin should be taken into account.
• Clinical study data show that patients with AF are at significantly higher risk for ischemic stroke or systemic embolism than patients who do not have AF. Studies also show that 91% of NVAF-related LA thrombi were isolated to, or originated in, the LAA (SPAF III).
*Note: A thrombus is a blood clot. An embolus is a thrombus that breaks free from the site of formation and circulates in the bloodstream until it becomes lodged in a blood vessel. A stroke – also called cerebrovascular accident (CVA) – occurs when the vessels of the brain are occluded (plugged) by an embolus.
Key Concept: WATCHMAN LAA closure may eliminate the need for therapy in patients with non-valvular .
anticoagulation, atrial fibrillation
Workbook • Module 1 • Page 2
More information...
• Chronic anticoagulation presents problems of safety and tolerability, especially in patients older than 75, an age group that includes about half of AF-associated stroke patients.
Age groups
Figure A: WATCHMAN Device Figure B: SPAF III study results (Blackshear 1996)
Age
SH-135103-AB
LAA Closure Components WATCHMANTM Device
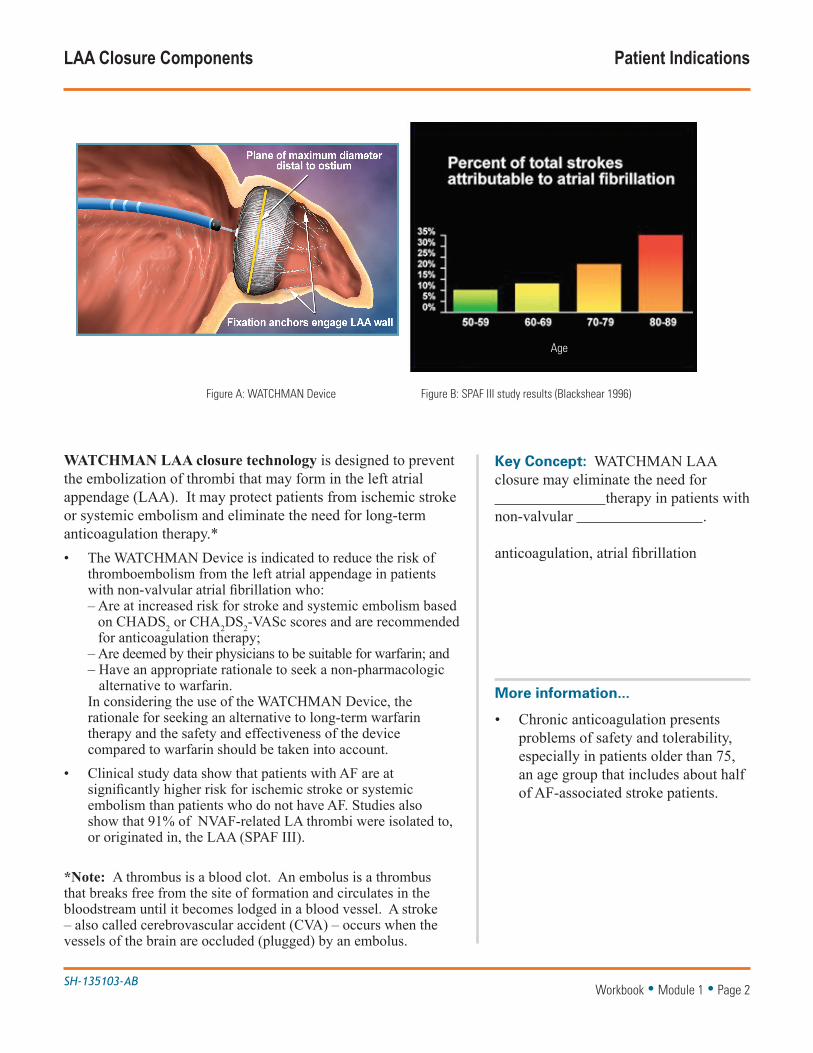
The WATCHMAN Device is a self-expanding nitinol structure with a polyethylene terephthalate (PET) porous membrane on the proximal face..
• The device is constrained within the Delivery System until deployment in LAA.
• Appropriate device sizing is determined by using fluoroscopy (fluoro) and transesophageal echocardiography (TEE).
• Available sizes are listed in the following table:
WATCHMAN Size Options
Access sheath Marker band
Loaded device length
21mm 20.2mm
24mm 22.9mm
27mm 26.5mm
30mm 29.4mm
33mm 31.5mm
Key Concept: The device is constrained within the Delivery System until deployment in .
thrombi, LAA
Workbook • Module 1 • Page 3
WATCHMAN Device
SH-135103-AB
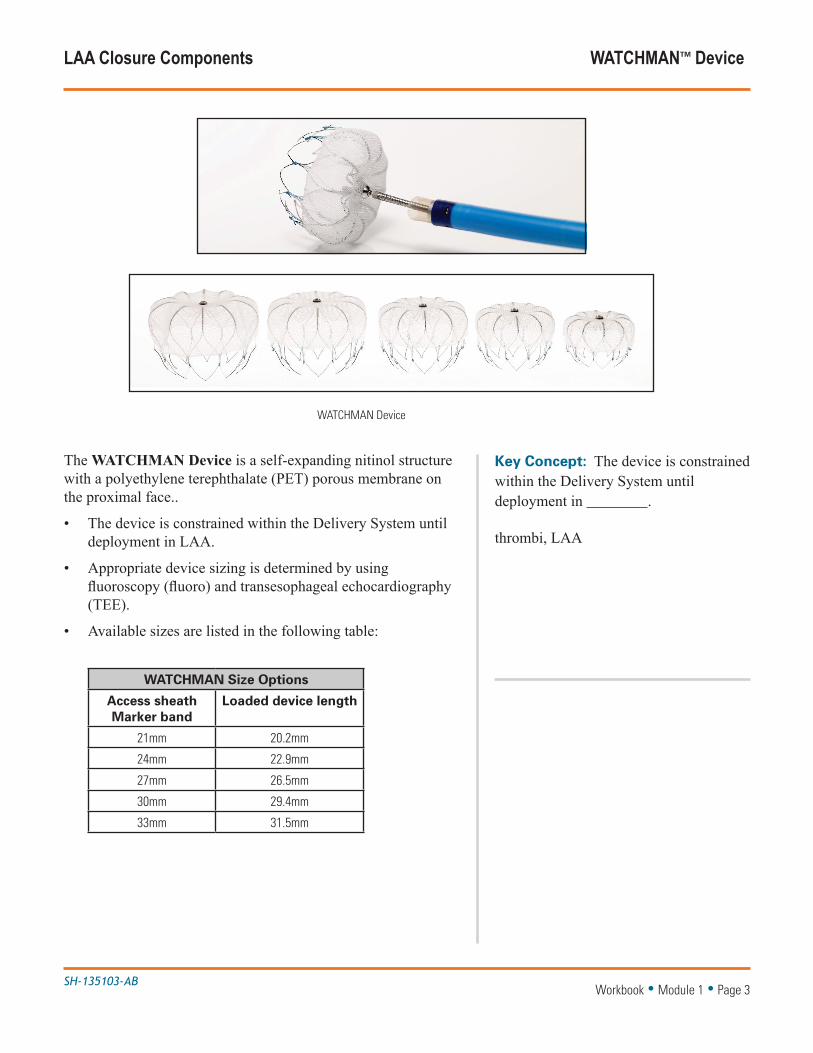
LAA Closure Components WATCHMANTM Access System (WAS)
Key Concept: The access sheath (AS) is a conduit for of the WATCHMAN Device. It is available in single, anterior and curve configurations.
catheter delivery, double
Workbook • Module 1 • Page 4
More information...
• Selection of an access sheath (AS) curve is based on LAA assessment using fluoro and TEE images.
• The double curve AS is used most often.
WATCHMAN Access Sheath (AS)
The WATCHMAN Access System (WAS) consists of an access sheath (AS) and vessel dilator. The AS provides a conduit for catheter delivery of the WATCHMAN Device.
• The access sheath (AS) has a 12 French inner diameter, 14 French outer diameter, 75cm working length, and sideport for flushing the system. Other AS features are as follows:
– Radiopaque marker bands to position the AS in the LAA. The distal marker band is used to guide the AS into the distal LAA. The proximal marker bands correspond to device size (maximum device diameter) and are positioned at or just distal to the LAA ostium.
– Vent holes to reduce pressure at the AS tip when injecting contrast
– Soft radial tip to reduce tissue trauma
• The access sheath (AS) is available in three curve configurations. The single curve accommodates an LAA curved in an anterior direction. The double curve accommodates an LAA curved in an anterior then superior direction. The anterior curve accommodates an LAA curved in a more extreme anterior then superior direction.
Single Curve Double Curve Anterior Curve

SH-135103-AB
LAA Closure Components
The WATCHMAN Delivery System (WDS) consists of a delivery catheter (DC) and the preloaded WATCHMAN Device. The DC constrains the WATCHMAN Device until it is deployed.
• The delivery catheter has a 12 French outer diameter, sideport, and deployment knob attached to a core wire. The control handle is used to deploy and release the device.
• In addition to the WDS and WAS, the following implant equipment is recommended, but not included.
– Venous introducer – Standard transseptal access system (TAS) – 0.35”guidewire (exchange length / extrasupport)– 4 to 6 French pigtail catheter– Intravascular radiocontrast agent – 60cc syringe and 3-way stopcock to flush system– Pressurized saline bag with a drip chamber and sterile
line to prevent the introduction of air – Pericardiocentesis tray – 14 to 16 French sheath for device retrieval (loop,
bioptome)
Key Concept: The WDS constrains the until it is deployed in the .
WATCHMAN Device, LAA
Workbook • Module 1 • Page 5
More information...
• If using a power contrast injector, ensure the maximum pressure does not exceed 100 psi.
WATCHMAN Delivery System (WDS) with preloaded device
WATCHMANTM Delivery System (WDS)Dual Catheter Delivery: One Access Sheath Fits All Device Sizes
Deployment Knob
Y-Adapter
Hemostasis Valve
WATCHMAN Delivery Catheter
One-Step Deployment: Recaptureable and Repositionable
Distal TipFull Deployment
Distal TipPre-Deployment
Designed to be repositioned if neccessary
33 mm 27 mm 21 mm
30 mm 24mmSide Holes
Allows multi-directionalcontrast for LAA visualization
Radiopaque Marker BandsHelp guide precise sheath placement
Double AnteriorSingle
12F inner, 14F outer diameter; 75 cm working length
Tri-Cut TipFacilitates recapture andmaintains sheath integrity
Visualization AidRadiopaque marker band guides placement
Flexible Core WireProvides for naturalposition post-deployment
Pre-loaded Delivery SystemReduces procedure prep time
Sheath Options Facilitate Access to the LAA
Hemostasis Valve
Sideport
WATCHMAN Access Sheath
WA
TC
HM
AN
Acc
ess
and
Del
iver
y S
tyst
em
Pre-loaded Delivery SystemWATCHMANTM is approved in more than 70 countries, with over 10,000 implants
performed worldwide.

SH-135103-AB
LAA Closure Procedure Basic Steps
Transseptal catheterization is used to place the WATCHMAN Device at or distal to the LAA ostium. Basic steps are listed below and described in detail on the next several pages.*
1. Cross interatrial septum (IAS)
2. Introduce WATCHMAN Access System (WAS)
3. Introduce pigtail catheter (PC)
4. Introduce WATCHMAN Delivery System (WDS)
5. Deploy WATCHMAN Device in LAA
6. Confirm device release criteria (DRC); then release device
*Note: Module 2 of this workbook provides image acquisition guidelines.
Key Concept: The WATCHMAN Device is placed at or distal to the .
LAA ostium
Workbook • Module 1 • Page 6
More information...
• Use fluoro and multiple TEE views (0o, 45o, 90o, 135o) to visualize procedural maneuvers.
Implanted WATCHMAN Device

SH-135103-AB
LAA Closure Procedure Cross Interatrial Septum (IAS)
To cross the interatrial septum (IAS):
1. Access the heart: – Puncture femoral vein using standard percutaneous
technique.– Insert standard transseptal access system (TAS), 0.032 to
0.035” guidewire, and vessel dilator.
Some experienced implanters suggest a posterior transseptal puncture for LAA occlusion. Too anterior a puncture can result in failure to insert the AS in the LAA.
Key Concept: Some implanters suggest a transseptal puncture for LAA occlusion.
posterior
Workbook • Module 1 • Page 7
More information...
• Provide systemic heparin to ensure the activated clotting time (ACT) is maintained between 200 to 300 seconds for the duration of the LAA closure procedure.
Cross interatrial septum (IAS)

SH-135103-AB
LAA Closure Procedure Cross Interatrial Septum (IAS)
To cross the interatrial septum (IAS):
2. Cross IAS– Use standard transseptal technique to cross the IAS.– Exchange the crossing sheath with an exchange length
extra support guidewire.– Advance guidewire into left upper pulmonary vein
(LUPV) or loop in the left atrium.– Remove TAS and dilator. – Use standard techniques to confirm entry into LA.
It may be helpful to acquire mid-esophageal (ME) bicaval and AV short axis (ME AV SAX) TEE views to guide the IAS puncture location and obtain a coaxial trajectory into the LAA.
Key Concept: Use standard transseptal technique to cross the .
interatrial septum (IAS)
Workbook • Module 1 • Page 8
ME bicaval TEE view
ME AV SAV TEE view

SH-135103-AB
Closure Procedure Introduce WAS
To introduce the WATCHMAN Access System (WAS):
1. Prepare access sheath (AS) and dilator– Confirm patient’s LAA angle and select AS curve (single
or double). – Inspect the WAS and its packaging to ensure neither is
damaged. Remove packaging under sterile conditions. – Flush sheath and dilator with saline.– Insert dilator into AS via hemostasis valve (Touhy).
2. Advance access sheath (AS) to initial position – Insert the AS and dilator over guidewire, then carefully
advance toward the center of left atrium (LA). – Hold dilator and guidewire in place and continue
advancing AS to its initial position in the LA or LUPV ostium. Avoid advancing the dilator as doing so could damage cardiac structures.
– Remove dilator and guidewire, leaving AS at initial position.*
*Note: Most implanters prefer to retain the guidewire for pigtail catheter placement.
Key Concept: Advance the access sheath to its initial position in the or ostium of the .
LA, LUPV
Workbook • Module 1 • Page 9
More information...
• Avoid using any WATCHMAN component if the sterile packaging has been compromised.
• Use standard air management techniques.
Select access sheath curve; then advance access sheath to initial position in LA or LUPV ostium

SH-135103-AB
To introduce the pigtail catheter (PC):
1. Prepare PC- Inspect and flush PC.
2. Advance PC – Carefully advance PC through AS to distal LAA, using
cine with contrast for visualization. Rotate to desired orientation.
2. Advance access sheath (AS) into LAA– Use TEE and two orthogonal fluoro views to confirm the
LAA dimensions acquired during baseline imaging. – Use distal marker band to guide AS over PC to distal
LAA. Continue advancing AS until the proximal marker band that corresponds to the maximum device diameter is at or just distal to the LAA ostium.
– Carefully remove PC.
Key Concept: When the AS is at the LAA ostium, confirm baseline LAA , then guide the AS into the distal LAA.
dimensions
Workbook • Module 1 • Page 10
More information...
• Use orthogonal fluoro and multiple TEE views to observe the distal tip of the access sheath when advancing. Stop advancing if resistance is felt.
• Avoid manipulating the access sheath in the LAA without a pigtail catheter.
Guide access sheath over pigtail catheter (PC) into distal LAA
LAA Closure Procedure Introduce Pigtail Catheter
SH-135103-AB
LAA Closure Procedure Introduce WDS
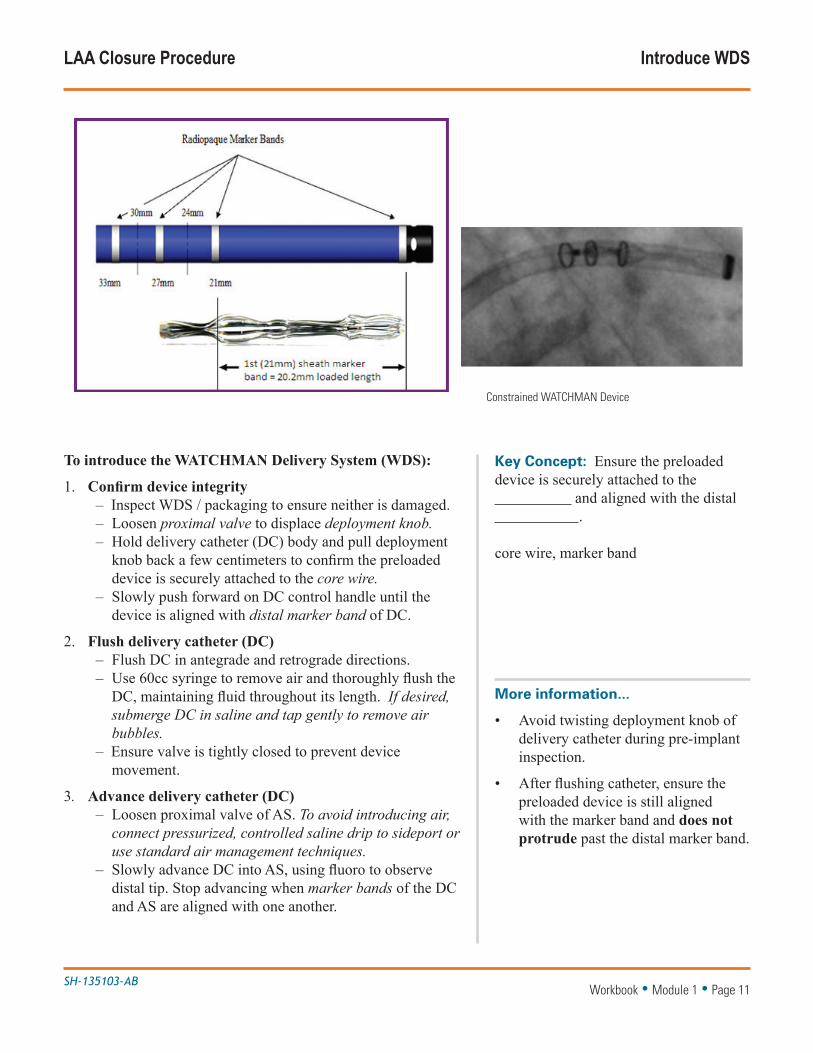
To introduce the WATCHMAN Delivery System (WDS):
1. Confirm device integrity – Inspect WDS / packaging to ensure neither is damaged. – Loosen proximal valve to displace deployment knob. – Hold delivery catheter (DC) body and pull deployment
knob back a few centimeters to confirm the preloaded device is securely attached to the core wire.
– Slowly push forward on DC control handle until the device is aligned with distal marker band of DC.
2. Flush delivery catheter (DC)– Flush DC in antegrade and retrograde directions. – Use 60cc syringe to remove air and thoroughly flush the
DC, maintaining fluid throughout its length. If desired, submerge DC in saline and tap gently to remove air bubbles.
– Ensure valve is tightly closed to prevent device movement.
3. Advance delivery catheter (DC) – Loosen proximal valve of AS. To avoid introducing air,
connect pressurized, controlled saline drip to sideport or use standard air management techniques.
– Slowly advance DC into AS, using fluoro to observe distal tip. Stop advancing when marker bands of the DC and AS are aligned with one another.
Key Concept: Ensure the preloaded device is securely attached to the and aligned with the distal .
core wire, marker band
Workbook • Module 1 • Page 11
More information...
• Avoid twisting deployment knob of delivery catheter during pre-implant inspection.
• After flushing catheter, ensure the preloaded device is still aligned with the marker band and does not protrude past the distal marker band.
Constrained WATCHMAN Device
SH-135103-AB
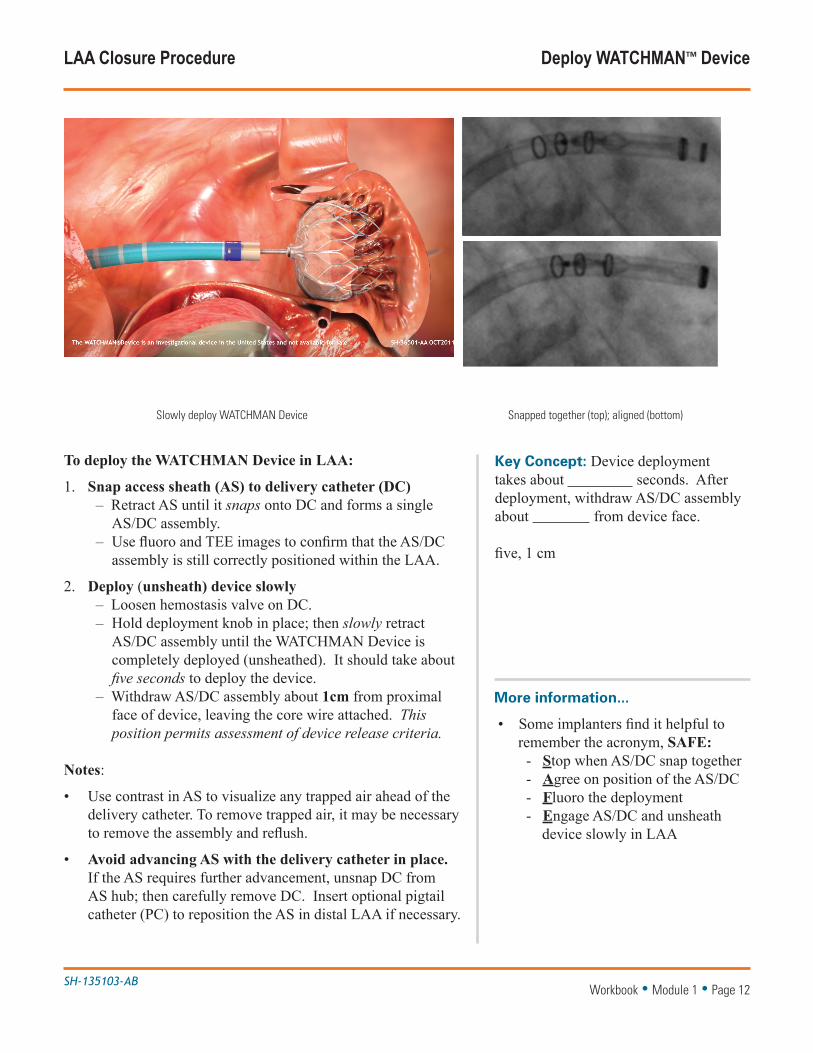
LAA Closure Procedure Deploy WATCHMANTM Device
To deploy the WATCHMAN Device in LAA:
1. Snap access sheath (AS) to delivery catheter (DC)– Retract AS until it snaps onto DC and forms a single
AS/DC assembly. – Use fluoro and TEE images to confirm that the AS/DC
assembly is still correctly positioned within the LAA.
2. Deploy (unsheath) device slowly – Loosen hemostasis valve on DC. – Hold deployment knob in place; then slowly retract
AS/DC assembly until the WATCHMAN Device is completely deployed (unsheathed). It should take about five seconds to deploy the device.
– Withdraw AS/DC assembly about 1cm from proximal face of device, leaving the core wire attached. This position permits assessment of device release criteria.
Notes:
• Use contrast in AS to visualize any trapped air ahead of the delivery catheter. To remove trapped air, it may be necessary to remove the assembly and reflush.
• Avoid advancing AS with the delivery catheter in place. If the AS requires further advancement, unsnap DC from AS hub; then carefully remove DC. Insert optional pigtail catheter (PC) to reposition the AS in distal LAA if necessary.
Key Concept: Device deployment takes about seconds. After deployment, withdraw AS/DC assembly about from device face.
five, 1 cm
Workbook • Module 1 • Page 12
More information...
• Some implanters find it helpful to remember the acronym, SAFE:
- Stop when AS/DC snap together - Agree on position of the AS/DC - Fluoro the deployment - Engage AS/DC and unsheath
device slowly in LAA
Slowly deploy WATCHMAN Device Snapped together (top); aligned (bottom)

SH-135103-AB
LAA Closure Procedure Confirm Device Release Criteria (DRC)
To confirm device release criteria (DRC):
1. Perform a stability tug– While injecting contrast, gently retract and release the
DC control handle. Observe the proximal movement of device and LAA. The device is stable when it moves in unison with the LAA on both TEE and fluoro.
2. Check device position – Use fluoro and all TEE views (0o, 45o, 90o, 135o) to
measure the device depth relative to the ostial plane of the LAA. When optimally positioned, the device spans the entire LAA ostium, the maximum device diameter is at or distal to the LAA ostium, and the device does not protrude too far into the left atrium (LA).
The following table lists the acceptable amount of protrusion into the LA for either shoulder of the device.
Original size Acceptable protrusion
21mm ≤ 4.2mm
24mm ≤ 4.8mm
27mm ≤ 5.4mm
30mm ≤ 6.0mm
33mm ≤ 6.6mm
Workbook • Module 1 • Page 13
More information...
• Double-check all images to confirm device release criteria (DRC) have been met.
• Proper positioning prevents dislodgement and potential embolization of the device.
Optimum device position Acceptable protrusion into LA
Key Concept: When optimally positioned, the device moves in unison with the , is positioned at or distal to the , and protrudes only slightly into the .
LAA, LAA ostium, LA
≤ 4.8mm for 24mm device
SH-135103-AB
LAA Closure Procedure Confirm Device Release Criteria (DRC)
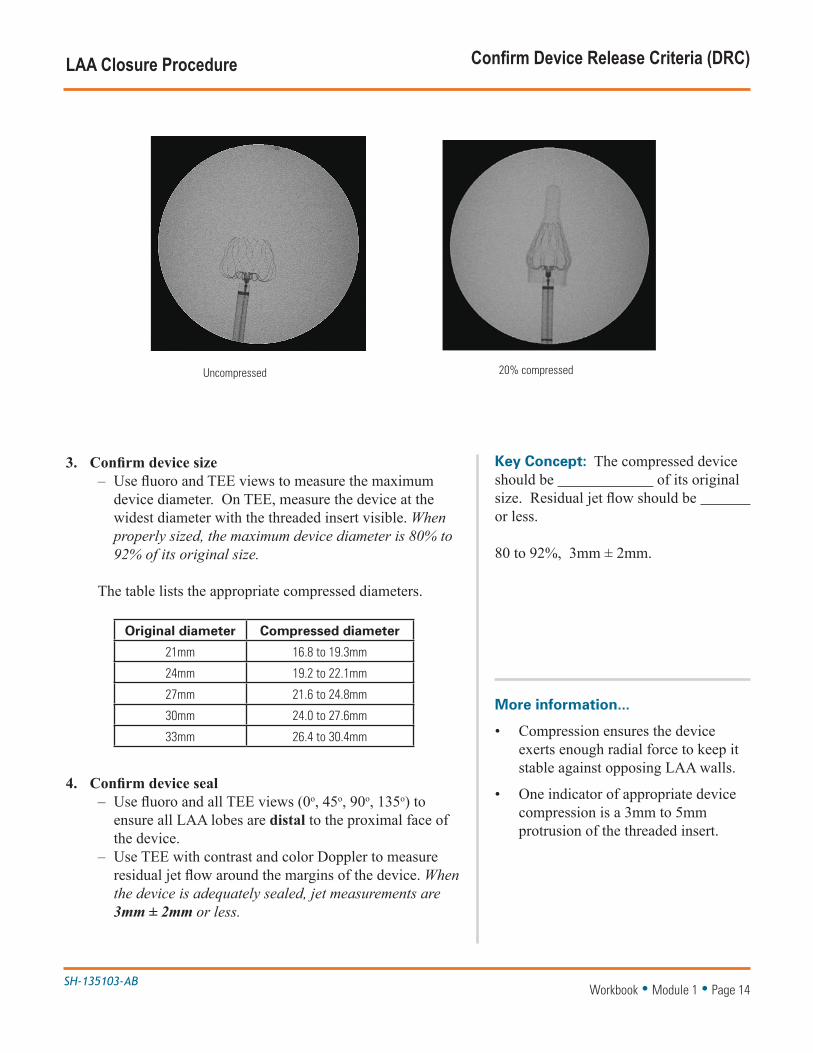
3. Confirm device size– Use fluoro and TEE views to measure the maximum
device diameter. On TEE, measure the device at the widest diameter with the threaded insert visible. When properly sized, the maximum device diameter is 80% to 92% of its original size.
The table lists the appropriate compressed diameters.
Original diameter Compressed diameter
21mm 16.8 to 19.3mm
24mm 19.2 to 22.1mm
27mm 21.6 to 24.8mm
30mm 24.0 to 27.6mm
33mm 26.4 to 30.4mm
4. Confirm device seal – Use fluoro and all TEE views (0o, 45o, 90o, 135o) to
ensure all LAA lobes are distal to the proximal face of the device.
– Use TEE with contrast and color Doppler to measure residual jet flow around the margins of the device. When the device is adequately sealed, jet measurements are 3mm ± 2mm or less.
Key Concept: The compressed device should be of its original size. Residual jet flow should be or less.
80 to 92%, 3mm ± 2mm.
Workbook • Module 1 • Page 14
More information...
• Compression ensures the device exerts enough radial force to keep it stable against opposing LAA walls.
• One indicator of appropriate device compression is a 3mm to 5mm protrusion of the threaded insert.
Uncompressed 20% compressed
SH-135103-AB
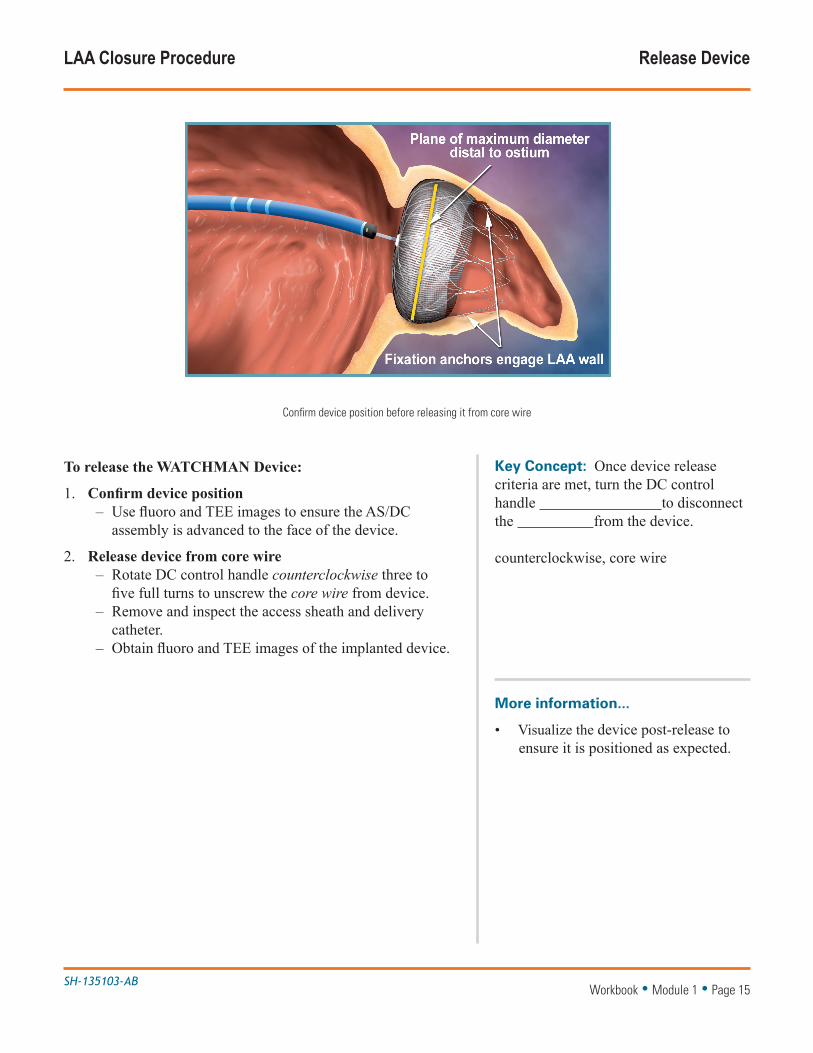
LAA Closure Procedure Release Device
To release the WATCHMAN Device:
1. Confirm device position – Use fluoro and TEE images to ensure the AS/DC
assembly is advanced to the face of the device.
2. Release device from core wire– Rotate DC control handle counterclockwise three to
five full turns to unscrew the core wire from device. – Remove and inspect the access sheath and delivery
catheter. – Obtain fluoro and TEE images of the implanted device.
Key Concept: Once device release criteria are met, turn the DC control handle to disconnect the from the device.
counterclockwise, core wire
Workbook • Module 1 • Page 15
More information...
• Visualize the device post-release to ensure it is positioned as expected.
Confirm device position before releasing it from core wire

SH-135103-AB
Device Modifications Partial Device Recapture
A WATCHMAN Device placed too distal (too deep within the LAA) requires partial recapture and repositioning before release. A device placed too distal may not meet all device release criteria and may leave thrombogenic areas exposed.
To partially recapture and reposition the device:
1. Advance AS/DC assembly– Loosen hemostasis valve on DC. – Fix deployment knob with right hand to stabilize device.
Use thumb to stabilize the DC hub.– Slowly advance AS/DC assembly while maintaining
backward pressure on deployment knob. Resistance is felt as the device collapses.
2. Withdraw AS/DC assembly– Advance DC up to, but not beyond, the level of the
fixation anchors. – Tighten hemostasis valve; then withdraw the entire AS/DC
to the desired position.
3. Reposition, redeploy, and release device – Reposition AS/DC assembly in the LAA. – Open hemostasis valve. Hold DC deployment knob in
place; then slowly retract AS/DC assembly until device is completely deployed.
– Withdraw AS/DC assembly 1cm, leaving core wire attached.
– Reconfirm device release criteria; then release the device by disconnecting it from the core wire.
Key Concept: If the closure device is placed too deep in the LAA and repositioning is necessary.
partial recapture
Workbook • Module 1 • Page 16
More information...
• If the device is inadvertently captured beyond the fixation anchors, it is necessary to fully recapture the device and start again with a new delivery catheter. See Full Device Recapture on the next page.
Partial recapture (device too distal)

SH-135103-AB
Device Modifications Full Device Recapture
A WATCHMAN Device placed too proximal (protrudes too far into the left atrium) requires full recapture and placement of a new device. A device placed too proximal does not meet device release criteria.
To fully recapture the device:
1. Advance AS/DC assembly – Loosen hemostasis valve on DC. – Fix DC deployment knob with right hand to stabilize
device. Use thumb to stabilize DC hub.– Slowly advance AS/DC assembly while maintaining
backward pressure on deployment knob. Resistance is felt as the device collapses.
– Advance DC past the fixation anchors. Resistance is felt again when the anchors enter the DC.
– Withdraw device until its distal tines are proximal to the marker band.
– Tighten hemostasis valve.
2. Remove device and replace WDS – Unsnap DC from AS hub; then carefully remove the DC. – Insert pigtail catheter to reposition the AS in distal LAA
if necessary. – Introduce a new WDS and continue.
Key Concept: If the closure device protrudes too far into the left atrium, and device replacement is necessary.
full recapture
Workbook • Module 1 • Page 17
More information...
• When replacing the WDS, double-check all device release criteria and visualize the device post-release to ensure it is properly positioned.
Full recapture (device too proximal)

SH-135103-AB
Patient Management Guidelines
Post Procedure Information: Post-procedure warfarin therapy is required in ALL patients receiving a WATCHMAN Device.
• Patients should remain on 81-100 mg of aspirin and warfarin for a minimum of 45 days post-implant (INR 2.0-3.0).
• At 45 days (±15 days) post-implant perform WATCHMAN Device assessment with TEE. Cessation of warfarin is at physician discretion provided that any peri-device flow demonstrated by TEE is ≤ 5mm. Subsequent warfarin cessation decisions are contingent on demonstrating adequate seal (flow ≤ 5mm).
• At the time patients cease warfarin, patients should begin clopidogrel 75 mg daily and increase aspirin dosage to 300-325 mg daily. This regimen should continue until 6 months have elapsed after implantation. Patients should then remain on aspirin 300-325 mg indefinitely. If a patient remains on warfarin and aspirin 81-100mg for at least 6 months after implantation, and then ceases warfarin, the patient should not require clopidogrel, but should increase to aspirin 300-325mg indefinitely.
Key Concept: Patients remain on warfarin until TEE measurement of residual jet flow is less than or equal to .
3mm ± 2mm
Workbook • Module 1 • Page 18
More information....
•
Implanted device
45 days
The WATCHMAN Device typically endothelializes within 45 to 60 days of implant, as shown in this canine heart.
Complete LAA seal Inadequate seal (jet > 3mm ± 2mm)

SH-135103-AA
Reference Summary of LAA Closure
Pre-procedure • Obtain baseline TEE/TTE images• Start 81mg ASA 1 day before (continue through 45 day follow-up)
1. Cross interatrial septum (IAS) • Access heart via femoral vein • Use standard technique to cross IAS: Advance GW into LUPV or loop in LA • Remove TAS and dilator
Maintain ACT of 200 to 300 seconds throughout procedure.
2. Introduce WATCHMAN Access System (WAS) • Select AS curve (double or single):, inspect and flush WAS • Advance AS to initial position in LA or LUPV ostium • Remove dilator and guidewire, leaving AS in place
3. Introduce pigtail catheter (PC) • Inspect and flush PC • Advance PC to distal LAA • Confirm LAA dimensions (TEE, fluoro) • Use distal marker band to guide AS over PC to distal LAA. Continue advancing until proximal marker band corresponding to maximum device diameter is at or distal to LAA ostium. • Remove PC
4. Introduce WATCHMAN Delivery System (WDS) • Inspect, loosen valve, pull knob back to confirm device is attached • Align device with distal marker band of DC, flush throughout • Loosen AS valve, advance DC into AS observing distal tip • Stop advancing when distal DC and AS marker bands meet
For air management, attach pressurized saline drip to AS sideport.
5. Deploy WATCHMAN Device • Snap AS onto DC, confirm AS/DC is centered in LAA • Loosen DC valve, fix knob, slowly unsheath device (5-7 seconds) • Withdraw AS/DC 1 cm from device face, leave core wire attached
SAFE: Stop, Agree, Fluoro, Engage
6. Confirm device release criteria (DRC); release device • Perform stability tug to confirm device moves with LAA • Check device position to confirm max diameter is at or distal to LAA • Check device size to confirm proper compression (80%-92%) • Check device seal to confirm jet flow is 3mm ± 2mm or less • Release device: advance AS/DC to face, rotate DC control handle counterclockwise 3-5 turns to unscrew core wire, remove/inspect AS/DC • Obtain final images
A device placed too distal requires partial recapture and repositioningA device placed too proximal requires full recapture and replacement
Workbook • Module 1 • Page 19

Module 2: WATCHMANTM Imaging Guidelines
Overview Imaging Guidelines Echo Exclusion Criteria
TTE Imaging TTE Acquisition Guidelines TEE Imaging TEE Acquisition Guidelines Baseline TEE Intraoperative TEE
Typical TEE Work-up LAA Perspective
Follow-up Imaging TEE Guidelines
IMAGING GUIDELINES WORKBOOK MODULE 2
SH-135103-AB
Key Concept: TEE exams are required at , , and at .
baseline. intra-operatively, follow-up
Workbook • Module 2 • Page 2
Overview Imaging Guidelines
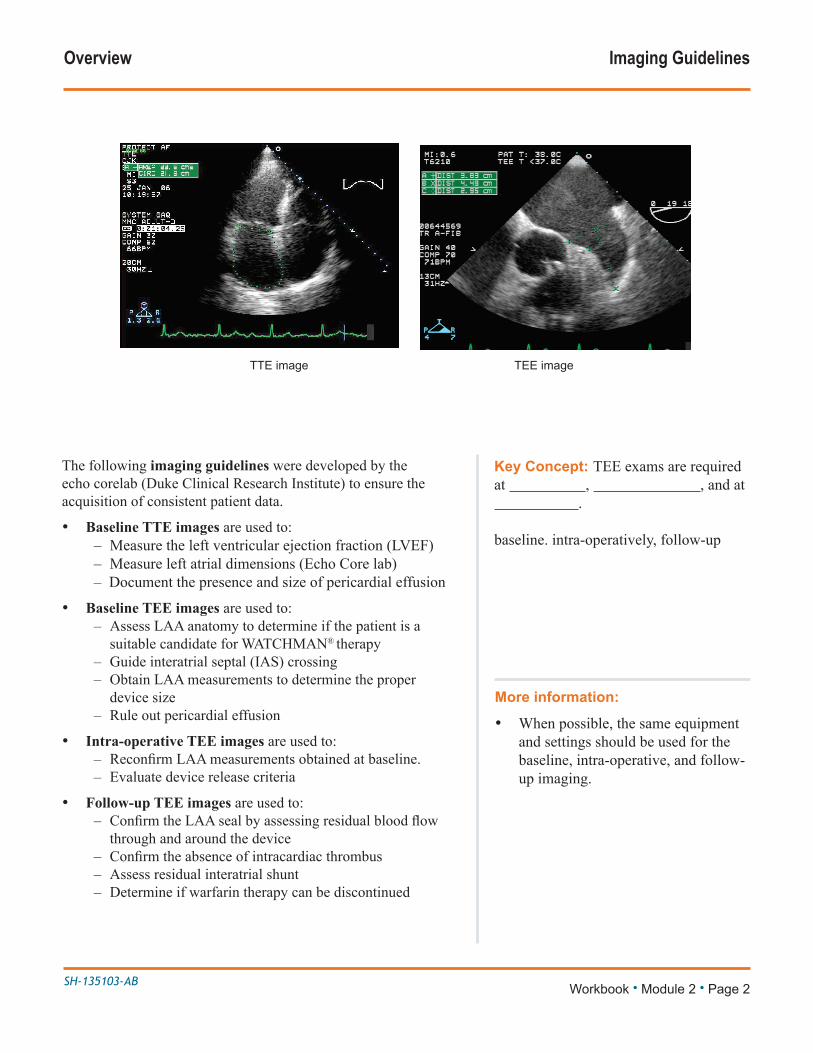
The following imaging guidelines were developed by the echo corelab (Duke Clinical Research Institute) to ensure the acquisition of consistent patient data.
• Baseline TTE images are used to: – Measure the left ventricular ejection fraction (LVEF)– Measure left atrial dimensions (Echo Core lab)– Document the presence and size of pericardial effusion
• Baseline TEE images are used to: – Assess LAA anatomy to determine if the patient is a
suitable candidate for WATCHMAN® therapy – Guide interatrial septal (IAS) crossing – Obtain LAA measurements to determine the proper
device size – Rule out pericardial effusion
• Intra-operative TEE images are used to: – ReconfirmLAAmeasurementsobtainedatbaseline.– Evaluate device release criteria
• Follow-up TEE images are used to: – ConfirmtheLAAsealbyassessingresidualbloodflow
through and around the device – Confirmtheabsenceofintracardiacthrombus– Assess residual interatrial shunt– Determine if warfarin therapy can be discontinued
More information:
• When possible, the same equipment and settings should be used for the baseline, intra-operative, and follow-up imaging.
TTE image TEE image

SH-135103-AB
Overview Echo Exclusion Criteria
Patients who meet any one of the following echo exclusion criteria, assessed with TEE and TTE, or any one of the other criteria listed, are ineligible for a WATCHMAN Device.
Do not use the WATCHMAN Device if:
• Intracardiac thrombus is visualized by echocardiographic imaging.
• An atrial septal repair or closure device is present.
• The LAA anatomy will not accommodate a device. See Table 41 in the DFU.
• Any of the customary contraindications for other percutaneous catheterization interventions (e.g., patient size too small to accommodate TEE probe or required catheters) or conditions (e.g., active infection, bleeding disorder, untreated ulcer) are present.
• There are contraindications to the use of warfarin, aspirin, or clopidogrel.
• Use of the WATCHMAN Device is contraindicated in patients with known hypersensitivity to any device material or their individual components (see Device Description section in the DFU).
Key Concept: Echo exclusion criteria for a WATCHMAN Device are assessed with and .
TEE, TTE
Workbook • Module 2 • Page 3
More information:
• If pericardial effusion or cardiac perforation should occur intra-operatively, the procedure should be discontinued and the complication promptly and aggressively managed.
Thrombus in LAA Cardiac tumor
SH-135103-AB
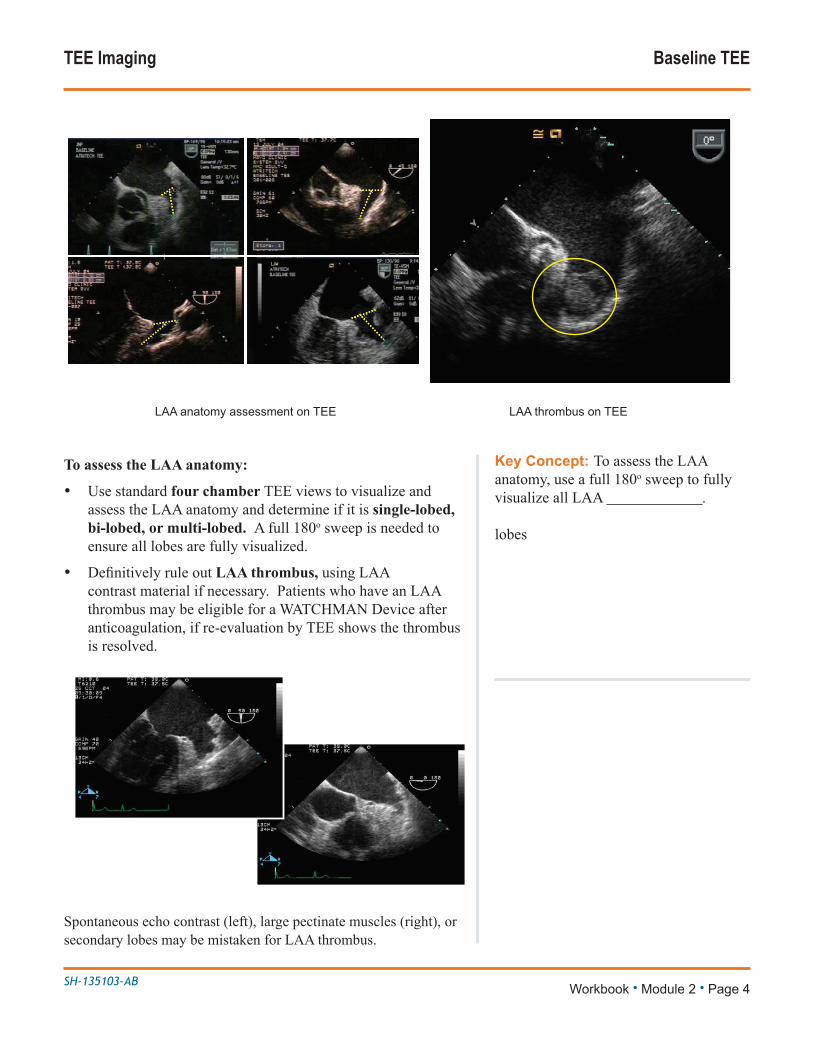
To assess the LAA anatomy:
• Use standard four chamber TEE views to visualize and assess the LAA anatomy and determine if it is single-lobed, bi-lobed, or multi-lobed. A full 180o sweep is needed to ensure all lobes are fully visualized.
• DefinitivelyruleoutLAA thrombus, using LAA contrast material if necessary. Patients who have an LAA thrombus may be eligible for a WATCHMAN Device after anticoagulation, if re-evaluation by TEE shows the thrombus is resolved.
Spontaneous echo contrast (left), large pectinate muscles (right), or secondary lobes may be mistaken for LAA thrombus.
TEE Imaging Baseline TEE
Key Concept: To assess the LAA anatomy, use a full 180o sweep to fully visualize all LAA .
lobes
Workbook • Module 2 • Page 4
LAA anatomy assessment on TEE LAA thrombus on TEE

SH-135103-AB
TEE Imaging Baseline TEE
To obtain baseline LAA measurements:
• Perform a slow 180o sweep, stopping at 0o, 45o, 90o, and 135o to record measurements of the maximum LAA ostium diameter and length of the primary LAA lobe.
• At 0o, measure in a plane from the left coronary artery to about 1 to 2cm from the tip of the left upper pulmonary vein (LUPV) limbus. See Figure.
• At other angles, measure in a plane from the top of the mitral valve annulus to about 1 to 2cm from the tip of the LUPV limbus.* See Figure.
*Note: The location of the LUPV limbus varies from one LAA anatomy to another.
Key Concept: Record baseline LAA measurements at angles of , , , and .
0o, 45o, 90o, 135o
Workbook • Module 2 • Page 5
More information:
• The maximum LAA ostium width is often obtained at 135o. However, a full 180o sweep is recommended to determine the number of LAA lobes and fully assess LAA dimensions.
LAA measured at 0o, 45o, 90o , and 135o on TEE

SH-135103-AB
TEE Imaging Intraoperative TEE
To confirm LAA measurements taken at baseline:
• Just as for baseline measurements, perform a slow 180o sweep, stopping at 0o, 45o, 90o, and 135o to record measurements of the maximum LAA ostium diameter and length of the primary LAA lobe.
• At 0o, measure in a plane from the left coronary artery to about 1 to 2cm from the tip of the LUPV limbus. See Figure.
• At other angles, measure in a plane from the top of the mitral valve annulus to about 1 to 2cm from the tip of the LUPV limbus. See Figure.
Key Concept: Record LAA measurements at angles of , , and .
0o, 45o, 90o, 135o
Workbook 2 • Module 2 • Page 6
LAA measured at 0o, 45o, 90o , and 135o on TEE

SH-135103-AB
TEE Imaging Intraoperative TEE
To assess device stability and position:
• Stability: Gently pull back; then release the deployment knob. Observe the proximal movement of the deployed device and LAA. The device is stable if it moves in unison with the LAA and returns to its original position.
– Ensure the access sheath is at least 1cm from the face of the device before performing the stability tug.
– Inject contrast into LAA to better visualize movement.
• Position: Visualize the device from all angles to ensure that its maximum diameter is at or distal to the LAA ostial plane in the majority of views. Measure and record how distal the maximum diameter is from the LAA ostium.
Note: Avoid pushing the deployment knob when assessing device stability.
Key Concept: The device is stable if it moves in with the LAA. It is optimally positioned if the maximum diameter is the ostial plane in the majority of views.
unison, at or distal to
Workbook • Module 2 • Page 7
More information:
• Use echo landmarks to ensure the device is optimally placed.
Device stability and position assessment on TEE
Device stability and position assessment on TEE
SH-135103-AB
TEE Imaging Intraoperative TEE
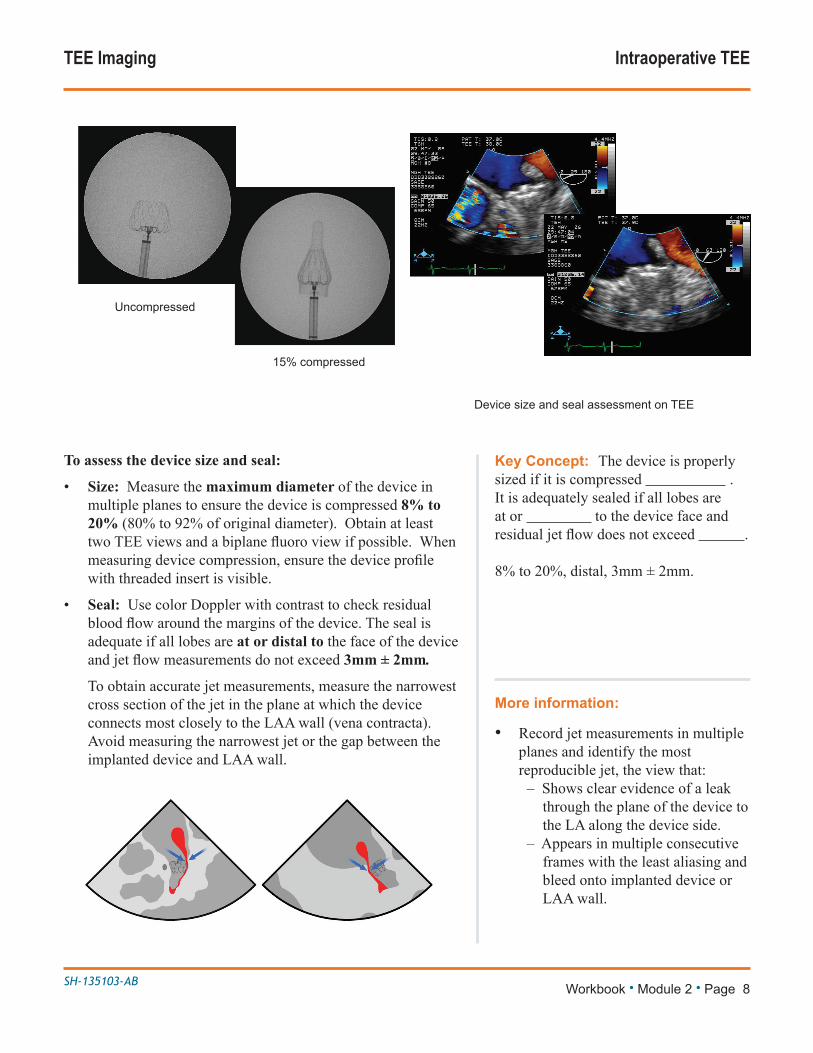
To assess the device size and seal:
• Size: Measure the maximum diameter of the device in multiple planes to ensure the device is compressed 8% to 20% (80% to 92% of original diameter). Obtain at least twoTEEviewsandabiplanefluoroviewifpossible.Whenmeasuringdevicecompression,ensurethedeviceprofilewith threaded insert is visible.
• Seal: Use color Doppler with contrast to check residual bloodflowaroundthemarginsofthedevice.Thesealisadequate if all lobes are at or distal to the face of the device andjetflowmeasurementsdonotexceed 3mm ± 2mm.
To obtain accurate jet measurements, measure the narrowest cross section of the jet in the plane at which the device connects most closely to the LAA wall (vena contracta). Avoid measuring the narrowest jet or the gap between the implanted device and LAA wall.
Key Concept: The device is properly sized if it is compressed . It is adequately sealed if all lobes are at or to the device face and residualjetflowdoesnotexceed .
8% to 20%, distal, 3mm ± 2mm.
Workbook • Module 2 • Page 8
More information:
• Record jet measurements in multiple planes and identify the most reproducible jet, the view that:
– Shows clear evidence of a leak through the plane of the device to the LA along the device side.
– Appears in multiple consecutive frames with the least aliasing and bleed onto implanted device or LAA wall.
Device size and seal assessment on TEE
Uncompressed
15% compressed

SH-135103-AB
Typical TEE Work-up LAA Perspective
Workbook • Module 2 • Page 9
Implant
Implant
Implant Baseline Implant 45 days
Baseline Implant 45 days

SH-135103-AB
Typical TEE Work-up LAA Perspective
Workbook • Module 2 • Page 10
Baseline Implant 45 days
Implant
Implant
Baseline Implant 45 days

SH-135103-AB
At 45 days and 12 months: assess WATCHMAN Device with TEE.
• Confirm absence of intra-cardiac thrombus.
• Perform color Doppler assessment to include the device/LAA border at the following approximate TEE angles (0°, 45°, 90°and 135°). Measure any residual leak around the device if necessary.
• If thrombus is observed on the device, warfarin therapy is recommended until resolution of thrombus is demonstrated by TEE.
Indications for useThe WATCHMAN Device is indicated to reduce the risk of thromboembolism from the left atrial appendage in patients with non-valvular atrial fibrillation who:• Are at increased risk for stroke and systemic embolism based on CHADS2 or CHA2DS2-VASc scores and are recommended for anticoagulation therapy;• Are deemed by their physicians to be suitable for warfarin; and• Have an appropriate rationale to seek a non-pharmacologic alternative to warfarin, taking into account the safety and effectiveness of the device compared to warfarin. The WATCHMAN Access System is intended to provide vascular and transseptal access for all WATCHMAN Left Atrial Appendage Closure Devices with Delivery Systems.
ContraindicationsDo not use the WATCHMAN Device if:• Intracardiac thrombus is visualized by echocardiographic imaging.• An atrial septal defect repair or closure device or a patent foramen ovale repair or closure device is present.• The LAA anatomy will not accommodate a device. See Table 46 in the DFU.• Any of the customary contraindications for other percutaneous catheterization procedures (e.g., patient size too small to accommodate TEE probe or required catheters) or conditions (e.g., active infection, bleeding disorder) are present.• There are contraindications to the use of warfarin, aspirin, or clopidogrel.• The patient has a known hypersensitivity to any portion of the device material or the individual components (see Device Description section) such that the use of the WATCHMAN Device is contraindicated.
Warnings• Device selection should be based on accurate LAA measurements obtained using fluoro and ultrasound guidance (TEE recommended) in multiple angles (e.g., 0º, 45º, 90º, 135º). • Do not release the WATCHMAN Device from the core wire if the device does not meet all release criteria.• If thrombus is observed on the device, warfarin therapy is recommended until resolution of thrombus is demonstrated by TEE.• The potential for device embolization exists with cardioversion <30 days following device implantation. Verify device position post-cardioversion during this period.• Administer appropriate endocarditis prophylaxis for 6 months following device implantation. The decision to continue endocarditis prophylaxis beyond 6 months is at physician discretion.• For single use only. Do not reuse, reprocess, or resterilize.
Precautions• The safety and effectiveness (and benefit-risk profile) of the WATCHMAN Device has not been established in patients for whom long-term anticoagulation is determined to be contraindicated.• The LAA is a thin-walled structure. Use caution when accessing the LAA and deploying the device.• Use caution when introducing the WATCHMAN Access System to prevent damage to cardiac structures.• Use caution when introducing the Delivery System to prevent damage to cardiac structures.• To prevent damage to the Delivery Catheter or device, do not allow the WATCHMAN Device to protrude beyond the distal tip of the Delivery Catheter when inserting the Delivery System into the Access Sheath.• If using a power injector, the maximum pressure should not exceed 100 psi.• In view of the concerns that were raised by the RE-ALIGN1 study of dabigatran in the presence of prosthetic mechanical heart valves, caution should be used when prescribing oral anticoagulants other than warfarin in patients treated with the
WATCHMAN Device. The WATCHMAN Device has only been evaluated with the use of warfarin post-device implantation.
ADVERSE EVENTSPotential adverse events (in alphabetical order) which may be associated with the use of a left atrial appendage closure device or implantation procedure include but are not limited to:Air embolism, Airway trauma, Allergic reaction to contrast media/medications or device materials, Altered mental status, Anemia requiring transfusion, Anesthesia risks, Angina, Anoxic encephalopathy, Arrhythmias, Atrial septal defect, AV fistula, Bruising, hematoma or seroma, Cardiac perforation, Chest pain/discomfort, Confusion post procedure, Congestive heart failure, Contrast related nephropathy, Cranial bleed, Decreased hemoglobin, Deep vein thrombosis, Death, Device embolism, Device fracture, Device thrombosis, Edema, Excessive bleeding, Fever, Groin pain, Groin puncture bleed, Hematuria, Hemoptysis, Hypotension, Hypoxia, Improper wound healing, Inability to reposition, recapture, or retrieve the device, Infection / pneumonia, Interatrial septum thrombus, Intratracheal bleeding, Major bleeding requiring transfusion, Misplacement of the device / improper seal of the appendage / movement of device from appendage wall, Myocardia erosion, Nausea, Oral bleeding, Pericardial effusion / tamponade, Pleural effusion, Prolonged bleeding from a laceration, Pseudoaneurysm, Pulmonary edema, Renal failure, Respiratory insufficiency / failure, Surgical removal of the device, Stroke – Ischemic , Stroke – Hemorrhagic, Systemic embolism, TEE complications (throat pain, bleeding, esophageal trauma), Thrombocytopenia, Thrombosis, Transient ischemic attack (TIA), Valvular damage, Vasovagal reactions.
There may be other potential adverse events that are unforeseen at this time.
CAUTION: Federal law (USA) restricts this device to sale by or on the order of a physician. Rx only. Prior to use, please see the complete “Directions for Use” for more information on Indications, Contraindications, Warnings, Precautions, Adverse Events, and Operator’s Instructions.
© 2015 Boston Scientific Corporation or its affiliates. All rights reserved.
1Eikelboom JW, Connolly SJ, Brueckmann M, et al. N Engl J Med 2013;369:1206-14.