Photoshop DTP Version - DIGITAL PHOTOGRAPHY DTP Versi… · An eye dropper tool can be used to...
21
Transcript of Photoshop DTP Version - DIGITAL PHOTOGRAPHY DTP Versi… · An eye dropper tool can be used to...


( 2 )

( 3 )
Contents:
Sizing an Image..........................................................................................................................4 RAW File Conversion................................................................................................................4 Selection Tools ...........................................................................................................................5 Colour Range..............................................................................................................................5 Quick Mask.................................................................................................................................6 Extract Tool...............................................................................................................................7 Adding a Layer Style.................................................................................................................7 Adjustment Layer......................................................................................................................8 Adding a gradient to an Adjustment Layer.................................................................................8
Layer Blending Modes...............................................................................................................9 Creating a Line Drawing .........................................................................................................10 Infra Red ..................................................................................................................................11 Sharpening Techniques............................................................................................................12 Unsharp Mask ..........................................................................................................................12 LAB sharpening.......................................................................................................................13 Editable Sharpening Layer .....................................................................................................14 Techniques in CS2 or later versions ........................................................................................15 Shadow / Highlight Adjustment.............................................................................................15 Attaching text to a Path ................................................................................................... 15/16 Optical Lens Correction...........................................................................................................16 RAW FILE WORKFLOW (Precis).................................................................................... 17/19
Bibliography:
The brilliant series – Adobe Photoshop CS2 – Andy Anderson & Steve Johnson
Adobe Photoshop CS2 User Guide – Adobe
Adobe Photoshop CS5 for Photographers-Martin Evening
Digital Photo Magazine
( 4 )
Sizing an image:
When a file is imported from a camera, it comes in to the editing application at a Screen
Resolution of 72 ppi, and has to be resized to 300 ppi to achieve an image of photographic
quality. This produces a limit on image size unless the image is re-sampled and pixels
interpolated to produce the new image size. If imported via a raw file conversion it can be
imported directly at 300 dpi with a size of approximately 10” x 8” for a 5.1 megapixel
image.
Raw File Conversion:-
An important point to watch when using the image size command is to decide whether to
resample or not to achieve the correct dimensional size. When using the crop tool it
automatically re-samples the image based on the selected settings in the toolbar.
It is always better to sample the size down (reduce) rather than up (enlarge). This means for
optimum print quality a different file is needed for each print size required from the same
original.
( 5 )
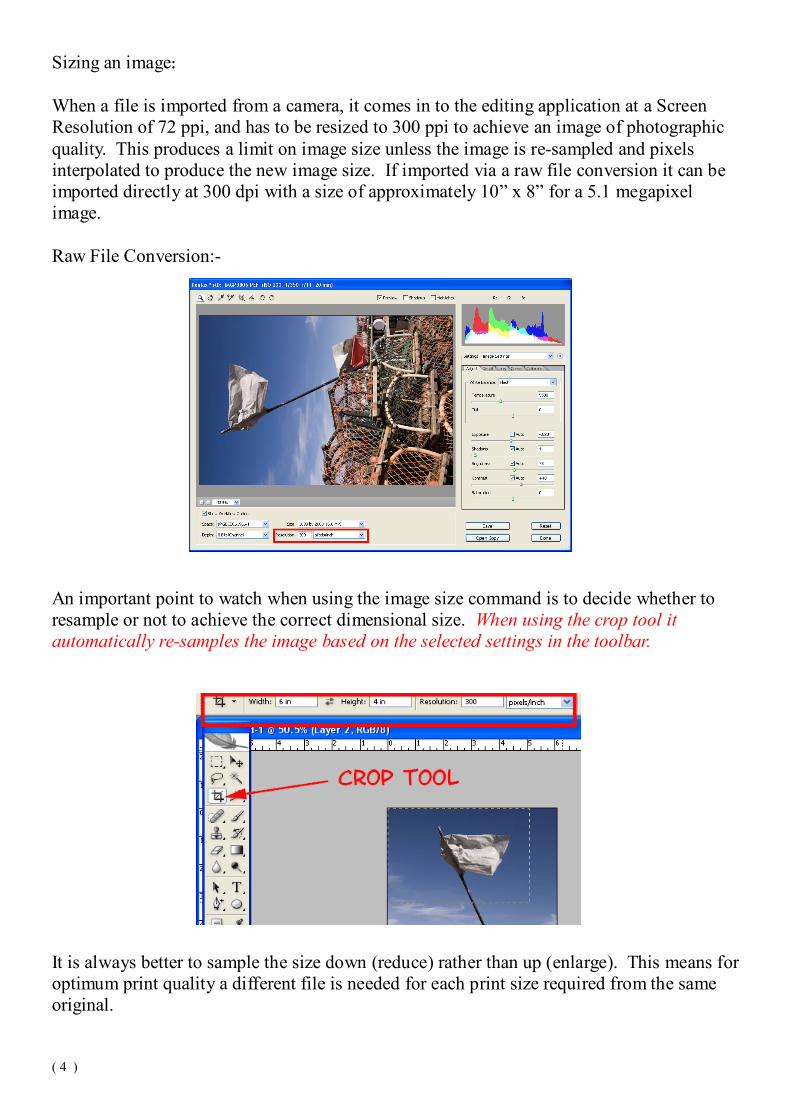
Selection Tools:
Accurate selection of parts of an image is very important in digital manipulation. To achieve
this, predefined selection tools can be selected by hitting M on the keyboard and selecting
the required shape. To achieve a circle or a square hold the Ctrl key as you drag the shape.
If you select L a range of tools become available to select more complex shapes. The buttons
highlighted in the diagram indicate a further option by selecting a button a new selection can
be made, a current selection can be added to, or deleted from, or the intersection of two areas
can be selected.
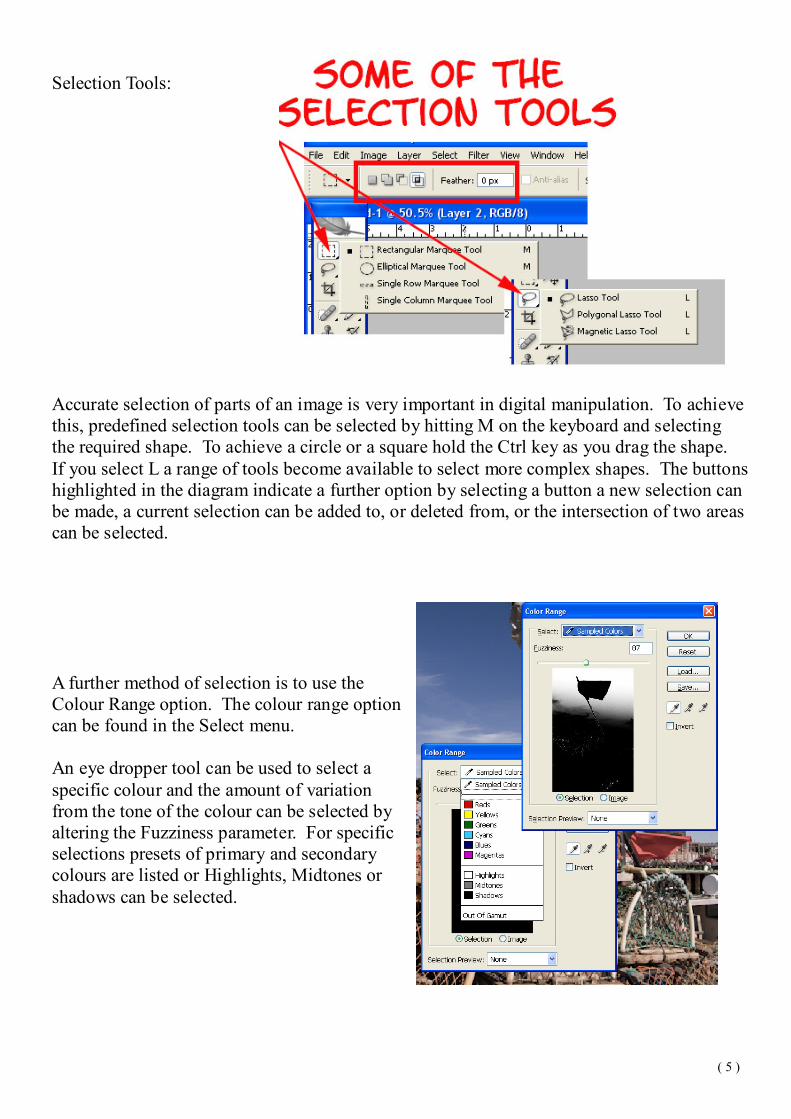
A further method of selection is to use the
Colour Range option. The colour range option
can be found in the Select menu.
An eye dropper tool can be used to select a
specific colour and the amount of variation
from the tone of the colour can be selected by
altering the Fuzziness parameter. For specific
selections presets of primary and secondary
colours are listed or Highlights, Midtones or
shadows can be selected.
( 6 )
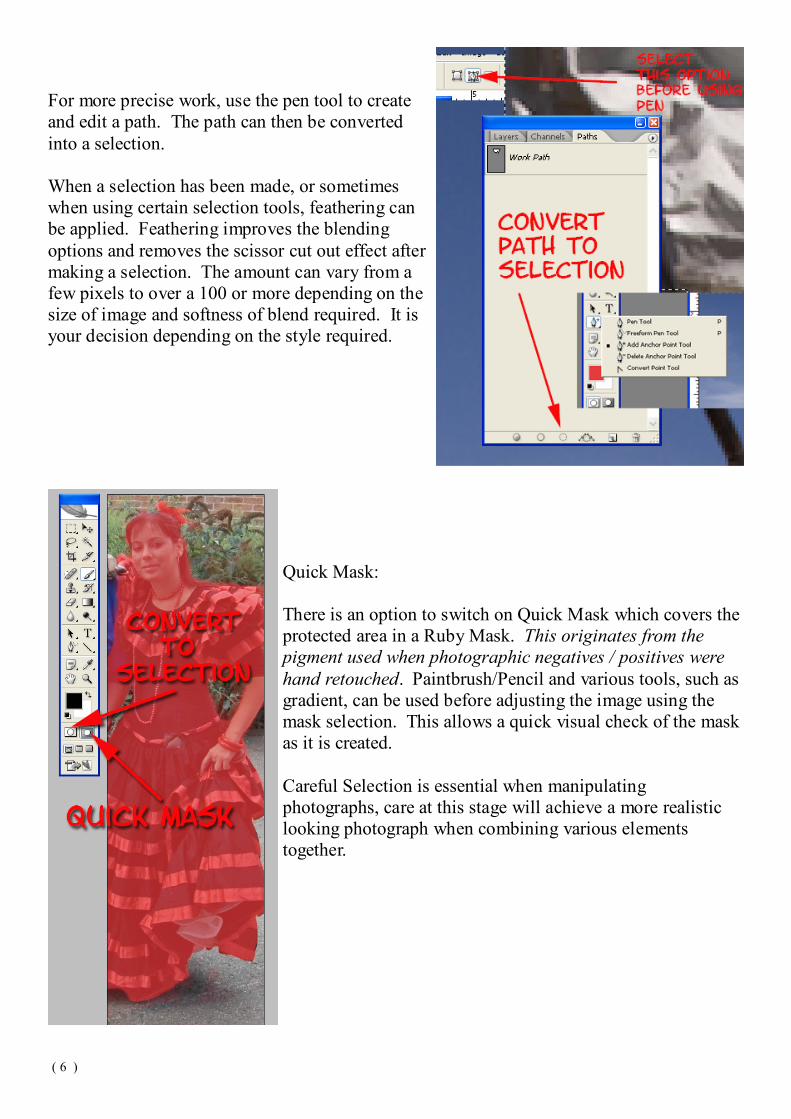
For more precise work, use the pen tool to create
and edit a path. The path can then be converted
into a selection.
When a selection has been made, or sometimes
when using certain selection tools, feathering can
be applied. Feathering improves the blending
options and removes the scissor cut out effect after
making a selection. The amount can vary from a
few pixels to over a 100 or more depending on the
size of image and softness of blend required. It is
your decision depending on the style required.
Quick Mask:
There is an option to switch on Quick Mask which covers the
protected area in a Ruby Mask. This originates from the
pigment used when photographic negatives / positives were
hand retouched. Paintbrush/Pencil and various tools, such as
gradient, can be used before adjusting the image using the
mask selection. This allows a quick visual check of the mask
as it is created.
Careful Selection is essential when manipulating
photographs, care at this stage will achieve a more realistic
looking photograph when combining various elements
together.

( 7 )
Extract Tool:
Photoshop allows the extraction of objects onto part of
the image to a separate layer. This has now been replaced
in later versions by selection and the use of refine edge.
The selection is then ‘extracted’ to another layer.
Adding a Layer Style:
To
add
a
layer style to a text layer (or any picture layer) select the layer, click the layer style button
at the base of the Layer palette. Select Drop Shadow, and adjust the Distance, Spread
and Size to suit your requirements. Opacity can be adjusted, I prefer about 50%, note the
blend mode is defaulted to multiply. To add Bevel and Emboss, Colour and Texture to the
text click the appropriate boxes and select Textures and Contours to suit your artwork. This
gives a limitless choice of text styles to suit your projects.

( 8 )
To copy the same style to another layer select the style you have created using Ctrl + Left
Mouse Button and drag to a new Layer (Photoshop 7) or use Ctrl + Alt + Left Mouse Button
in CS2 or later versions of Photoshop. This simple technique saves having to memorise
settings and gives the composite picture a more uniform look.
Adjustment Layers:
An adjustment layer affects all layers
beneath it, unless linked specifically
to the layer beneath it. It is a non
destructive layer so the original pixels
are not affected, and it takes up less
space than duplicating a layer. The
picture above shows the range of
options available and the specific
example shows the addition of a
levels adjustment layer to control
exposure. It can be altered at any
time to get a perfect match of
exposure.
Adding a gradient mask to the adjustment layer produces a more controlled effect.

( 9 )
Application of a Layer Mask: A layer mask can be applied by clicking on button at the base
of the layer palette – this applies a default reveal all option which can be painted
through by using a black brush. In this example for softening skin tone a hide all layer mask
has been chosen.
Changing Layer Blending Modes
The example illustrated over the page shows the pen tool being used to make an accurate
selection of the teeth area, applying feathering, and after copying the selection changing the
blend mode to ‘screen’ and reducing the opacity until the correct balance is achieved.

( 10 )
Pen Tool for Selection, Blending Mode - Screen could be used for whitening of teeth.
Creating a Line Drawing -
experimenting with Poster Edge, Unsharp Mask and Threshold, to produce a line drawing.
The Line Process:-
1. Crop to size
2. Apply poster
edges
3. Apply unsharp
mask – 200%
with a radius of
4 pixels
4. Apply
Threshold
to a level to suit
your design.
( 11 )
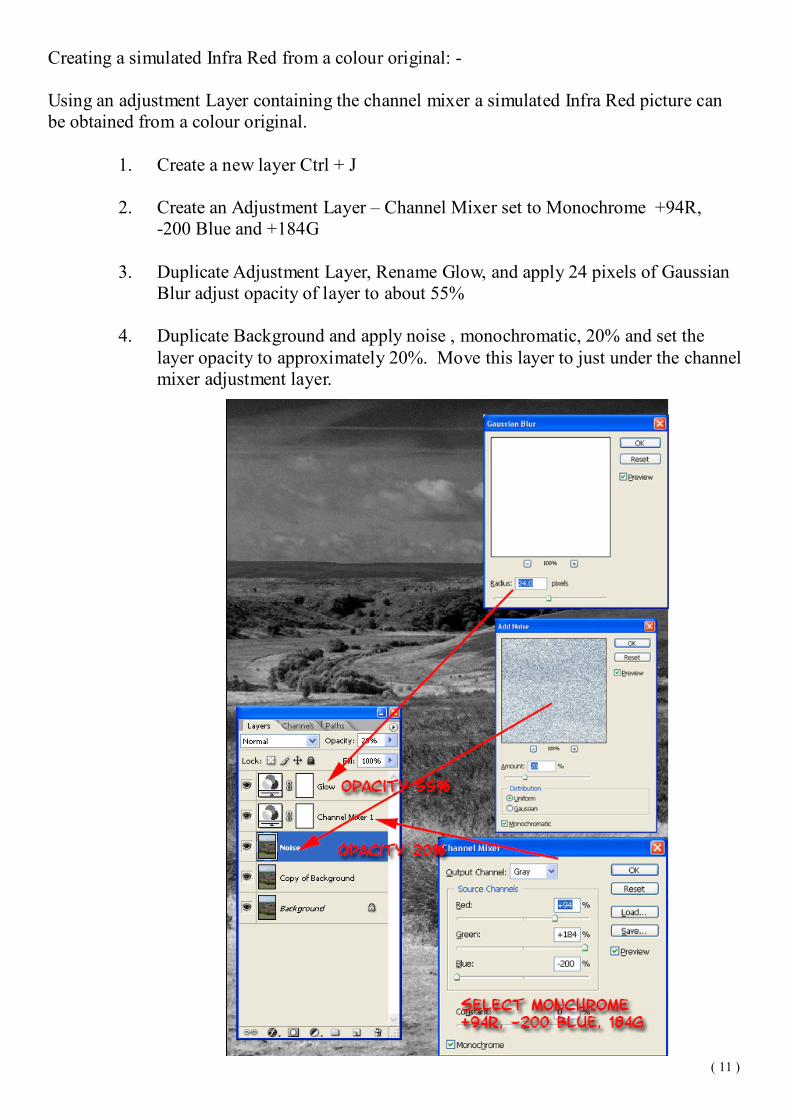
Creating a simulated Infra Red from a colour original: -
Using an adjustment Layer containing the channel mixer a simulated Infra Red picture can
be obtained from a colour original.
1. Create a new layer Ctrl + J
2. Create an Adjustment Layer – Channel Mixer set to Monochrome +94R,
-200 Blue and +184G
3. Duplicate Adjustment Layer, Rename Glow, and apply 24 pixels of Gaussian
Blur adjust opacity of layer to about 55%
4. Duplicate Background and apply noise , monochromatic, 20% and set the
layer opacity to approximately 20%. Move this layer to just under the channel
mixer adjustment layer.

( 12 )
Sharpening Techniques: (generally done last of all in the editing process)
Unsharp Mask:
The most common method used for sharpening is the unsharp mask filter, which allows a
large range of sharpening to be applied. Remember no sharpening is applied when importing
from Raw Files but may already have been applied when using .jpeg files saved in the
camera. Normally a radius of between .6 and 2 pixels is required with an amount of between
20 – 100%, an increase in threshold tends to undo all the effect you are attempting to
achieve!!! But is used if a halo begins to appear around elements of your picture a level of 1
or 2 is usually sufficient - it is important not to over-sharpen the image unless you are
attempting to achieve a specific effect, and sharpening is usually the last thing you do in the
creative process. The above pictures attempt to illustrate some of the control achievable.
This technique often increases colour artefacts and is a destructive technique if applied to the
original image i.e. always apply to a duplicate layer of the image.
( 13 )
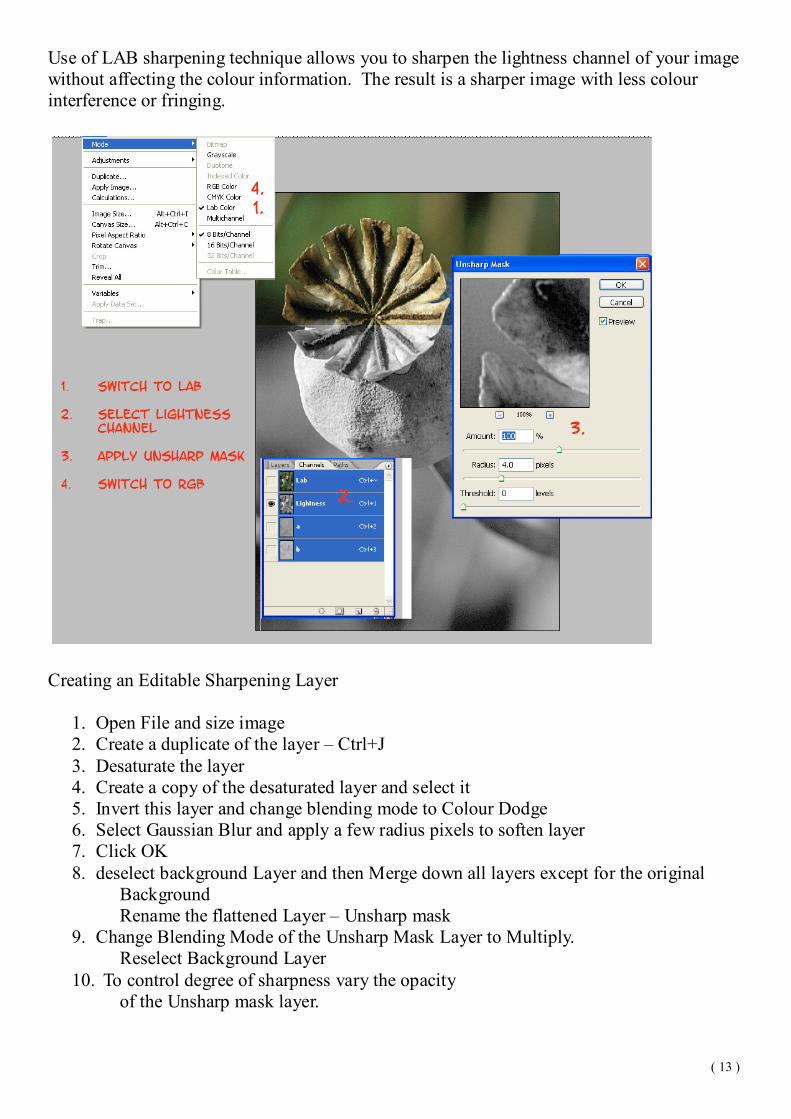
Use of LAB sharpening technique allows you to sharpen the lightness channel of your image
without affecting the colour information. The result is a sharper image with less colour
interference or fringing.
Creating an Editable Sharpening Layer
1. Open File and size image
2. Create a duplicate of the layer – Ctrl+J
3. Desaturate the layer
4. Create a copy of the desaturated layer and select it
5. Invert this layer and change blending mode to Colour Dodge
6. Select Gaussian Blur and apply a few radius pixels to soften layer
7. Click OK
8. deselect background Layer and then Merge down all layers except for the original
Background
Rename the flattened Layer – Unsharp mask
9. Change Blending Mode of the Unsharp Mask Layer to Multiply.
Reselect Background Layer
10. To control degree of sharpness vary the opacity
of the Unsharp mask layer.
( 14 )
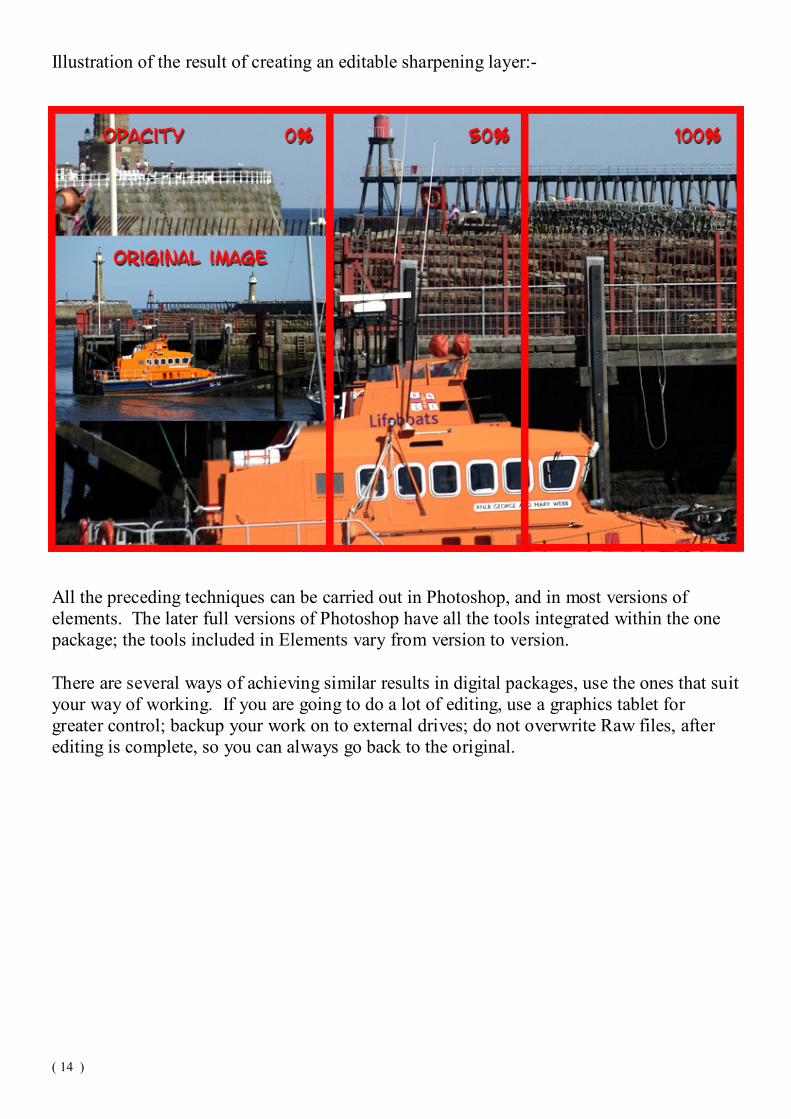
Illustration of the result of creating an editable sharpening layer:-
All the preceding techniques can be carried out in Photoshop, and in most versions of
elements. The later full versions of Photoshop have all the tools integrated within the one
package; the tools included in Elements vary from version to version.
There are several ways of achieving similar results in digital packages, use the ones that suit
your way of working. If you are going to do a lot of editing, use a graphics tablet for
greater control; backup your work on to external drives; do not overwrite Raw files, after
editing is complete, so you can always go back to the original.
( 15 )
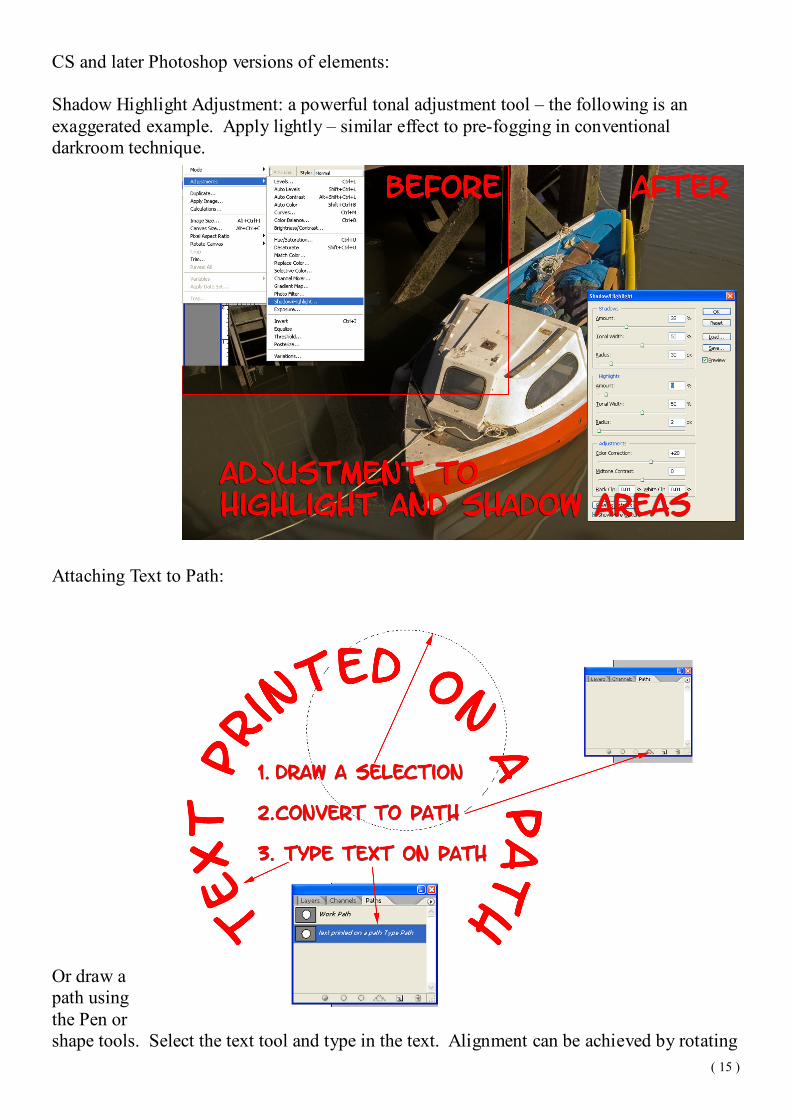
CS and later Photoshop versions of elements:
Shadow Highlight Adjustment: a powerful tonal adjustment tool – the following is an
exaggerated example. Apply lightly – similar effect to pre-fogging in conventional
darkroom technique.
Attaching Text to Path:
Or draw a
path using
the Pen or
shape tools. Select the text tool and type in the text. Alignment can be achieved by rotating

( 16 )
Ctrl+T or dragging with the path selection tool.
This enables a more precise/creative method of placing text.
Or on a curve inside
Optical Lens Correction:
Defects such as Barrel or Pincushion distortion,
chromatic aberration or vignetting, can be
corrected/ modified by selecting Lens
Correction in the Filter Menu.
This can also be done in the Raw File
Converter see notes on page 17-21.

( 17 )
Suggested workflow for RAW Files
� Set the White point
� Apply a camera profile calibration adjustment
� Compensate for missing highlights using Recovery
� Compensate for hidden shadow detail using Fill Light
� Make basic brightness and contrast adjustments
� Boost the mid tone contrast (Clarity)
� Fine tune the Tone Curve Contrast
� Fine tune the Colour saturation / Vibrance
� Compensate for Chromatic Aberration and Vignetting
� Retouch spots using the Clone or Heal brush
� Make localized adjustments (Brush / Graduated filter)
� Full Capture sharpening and Noise reduction
� Apply a crop and or rotation
� Open image in Photoshop for further editing
( 18 )
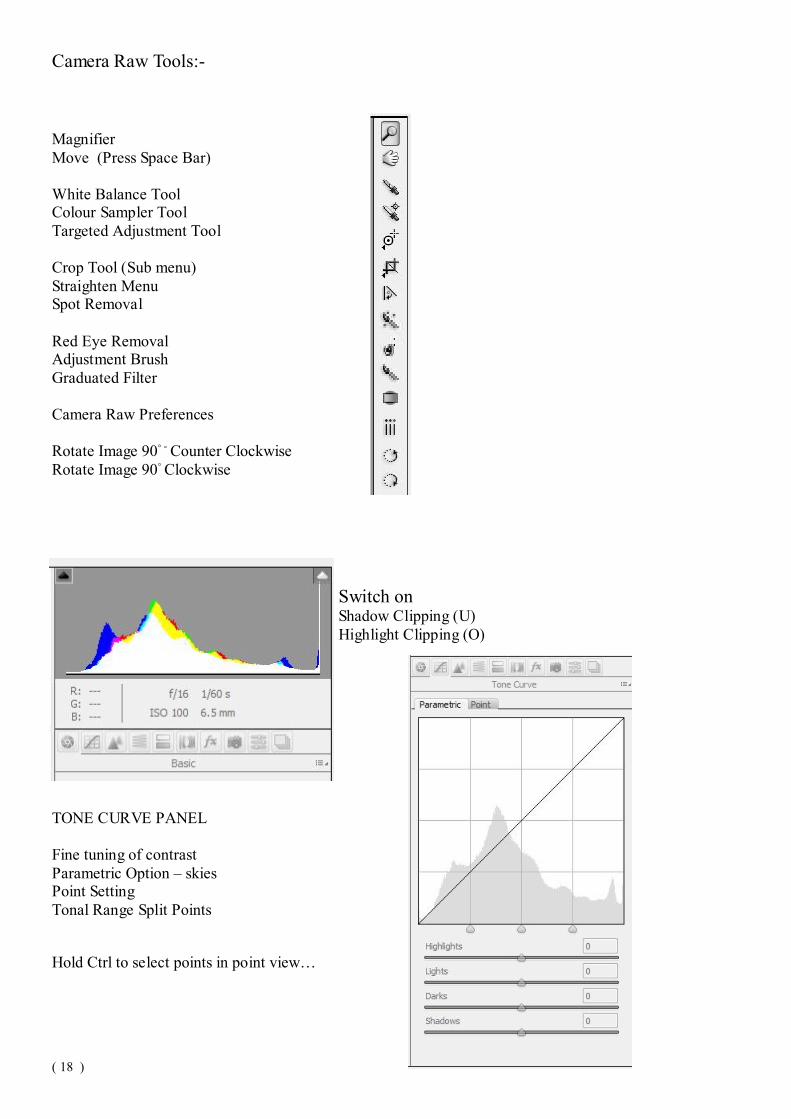
Camera Raw Tools:-
Magnifier
Move (Press Space Bar)
White Balance Tool Colour Sampler Tool
Targeted Adjustment Tool
Crop Tool (Sub menu)
Straighten Menu Spot Removal
Red Eye Removal Adjustment Brush
Graduated Filter
Camera Raw Preferences
Rotate Image 90◦ - Counter Clockwise
Rotate Image 90◦ Clockwise
Switch on Shadow Clipping (U)
Highlight Clipping (O)
TONE CURVE PANEL
Fine tuning of contrast
Parametric Option – skies Point Setting
Tonal Range Split Points
Hold Ctrl to select points in point view…

( 19 )
White Balance RAW AWB or preset Adjust from
list or slide or use White Balance Tool on a light gray area.
Tone Adjustment Controls
Auto/ Default
Exposure Recovery (about a stop)
Soften Midtones (Fill Light)
(to clip position) Shadow clipping helps remove shadow noise
Brightness (as compared to exposure) - used for
fine tuning – gamma control – Darken (compresses
shadows) Lighten (compresses highlights) Contrast applies an S shape curve
PRESENCE CONTROLS Clarity – adds mid tone contrast (applies an un-
sharp mask) +positive
-tive – kind of soft focus used in portraiture
Vibrance
Saturation Hold Alt as you move sliders to show threshold preview
ORDER
Exposure
Recovery
Black Slider
Fill Light
Fine Tune
Brightness
Contrast

( 20 )
LENS CORRECTION PANEL
Used for correction of:-
Lens aberrations.
Chromatic abberation
Lens Vignetting
Lens Distortions
Fx—Effects
Used for:-
- Post Crop Vignetting Control
- simulating grain

( 21 )
Better methods of achieving an artistic result
USING LAYERS and BLENDING MODES AND
CURVES.
Select options you wish to
synchronise.
(Caution if you select more than
one image any adjustment will
affect all)
e.g a portrait session.
I hope these notes will introduce you to some of the
techniques within Photoshop and will inspire you to
experiment and explore the other 80% of the package.
Remember you cannot make a silk purse out of a sow’s ear –
always have in mind what you are going to do with a picture
from the moment you press the shutter.