PHOTOELECTRIC SMOKE ALARM - Cavius
14
PLEASE READ THIS USER GUIDE CAREFULLY PHOTOELECTRIC SMOKE ALARM THE WORLD’S SMALLEST
Transcript of PHOTOELECTRIC SMOKE ALARM - Cavius

PLEASE READ THIS USER GUIDE CAREFULLY
PHOTOELECTRIC SMOKE ALARM
THE WORLD’S SMALLEST
PLEASE READ THE USER GUIDE CAREFULLY BEFORE INSTALLATION AND RETAIN FOR FUTURE USE.
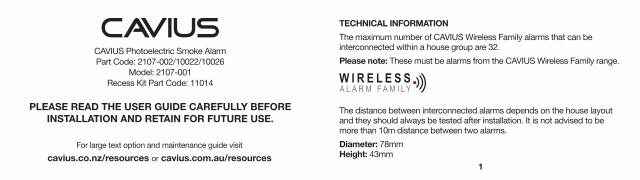
CAVIUS Photoelectric Smoke AlarmPart Code: 2107-002/10022/10026
Model: 2107-001Recess Kit Part Code: 11014
For large text option and maintenance guide visitcavius.co.nz/resources or cavius.com.au/resources
1
TECHNICAL INFORMATIONThe maximum number of CAVIUS Wireless Family alarms that can be interconnected within a house group are 32.Please note: These must be alarms from the CAVIUS Wireless Family range.
The distance between interconnected alarms depends on the house layout and they should always be tested after installation. It is not advised to be more than 10m distance between two alarms.Diameter: 78mm Height: 43mm
2 3
The alarm is powered by two 3v CR123A lithium batteries.Interconnected by RF: 926.365 MHzComplies to standards: AS3786:2014/RCM
Alarm condition aural signal pattern according to ISO 8201.
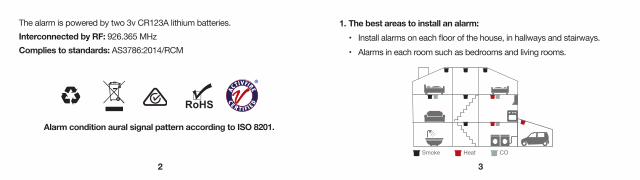
1. The best areas to install an alarm: • Installalarmsoneachfloorofthehouse,inhallwaysandstairways. • Alarmsineachroomsuchasbedroomsandlivingrooms.
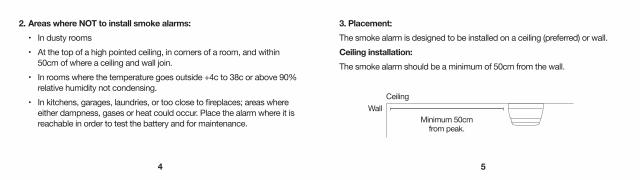
2. Areas where NOT to install smoke alarms: • Industyrooms • Atthetopofahighpointedceiling,incornersofaroom,andwithin 50cm of where a ceiling and wall join. • Inroomswherethetemperaturegoesoutside+4cto38corabove90% relative humidity not condensing. • Inkitchens,garages,laundries,ortooclosetofireplaces;areaswhere eitherdampness,gasesorheatcouldoccur.Placethealarmwhereitis reachable in order to test the battery and for maintenance.
4 5
3. Placement:The smoke alarm is designed to be installed on a ceiling (preferred) or wall.Ceiling installation:The smoke alarm should be a minimum of 50cm from the wall.
Minimum 50cmfrom peak.
CeilingWall
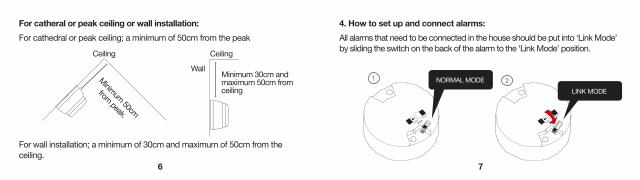
For catheral or peak ceiling or wall installation:Forcathedralorpeakceiling;aminimumof50cmfromthepeak
6 7
Minimum 50cm
from peak.
Ceiling Ceiling
Forwallinstallation;aminimumof30cmandmaximumof50cmfromtheceiling.
Minimum 30cm and maximum 50cm from ceiling
Wall
4. How to set up and connect alarms:All alarms that need to be connected in the house should be put into ‘Link Mode’ by sliding the switch on the back of the alarm to the ‘Link Mode’ position.
LINK MODENORMAL MODE
8 9
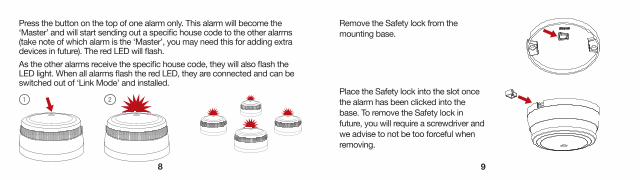
Press the button on the top of one alarm only. This alarm will become the ‘Master’andwillstartsendingoutaspecifichousecodetotheotheralarms(takenoteofwhichalarmisthe‘Master’,youmayneedthisforaddingextradevicesinfuture).TheredLEDwillflash.Astheotheralarmsreceivethespecifichousecode,theywillalsoflashtheLEDlight.WhenallalarmsflashtheredLED,theyareconnectedandcanbeswitched out of ‘Link Mode’ and installed.
Remove the Safety lock from the mounting base.
Place the Safety lock into the slot once the alarm has been clicked into the base. To remove the Safety lock in future,youwillrequireascrewdriverandwe advise to not be too forceful when removing.
10 11
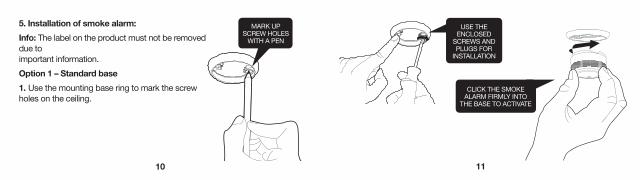
MARK UP SCREW HOLES
WITH A PEN
5. Installation of smoke alarm:Info: The label on the product must not be removed due to important information.Option 1 – Standard base 1. Use the mounting base ring to mark the screw holes on the ceiling.
USE THE ENCLOSED
SCREWS AND PLUGS FOR
INSTALLATION
CLICK THE SMOKE ALARM FIRMLY INTO
THE BASE TO ACTIVATE
12 13
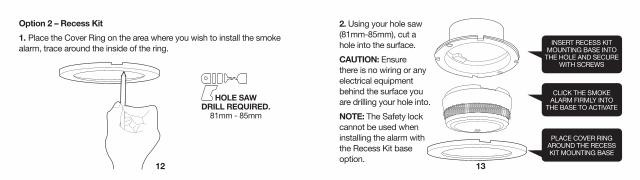
Option 2 – Recess Kit 1. Place the Cover Ring on the area where you wish to install the smoke alarm,tracearoundtheinsideofthering.
HOLE SAWDRILL REQUIRED.
81mm - 85mm
INSERT RECESS KIT MOUNTING BASE INTO
THE HOLE AND SECUREWITH SCREWS
PLACE COVER RING AROUND THE RECESS KIT MOUNTING BASE
CLICK THE SMOKE ALARM FIRMLY INTO
THE BASE TO ACTIVATE
2. Using your hole saw (81mm-85mm),cutahole into the surface. CAUTION: Ensure there is no wiring or any electricalequipmentbehind the surface you are drilling your hole into.NOTE: The Safety lock cannot be used when installing the alarm with the Recess Kit base option.
1514
6. Test function:Afterinstallation,andatleastonceperquarter,testallofyouralarmstoensurethey are operating correctly and are within range of each other.ItisrecommendedtocheckvisuallyeveryweekiftheLEDflashescorrectly(every 48sec.)Press the test button on any alarm for at least 6.5 seconds (count 2 sets of 3soundsweeps).Thiswillsendoutatestsignalfromthealarm;allotherconnected alarms should receive the signal within a short time. The alarms will emitashortbeepandtheLEDwillflashevery8secondsfor2minutes.
When the test signal is sent out, the alarms will respond in two ways:1. A single beep every 8 seconds indicates that the alarms are connected and functioning.2. Three short beeps every 8 seconds indicates a smoke sensor fault. The alarm should be cleaned by running the vacuum (on a low setting) around the smoke alarm chamber and tested again.Oncethealarmshaveindicatedtheyareinterconnected;thebeepscanbestopped on each alarm with a short press of the test button. TIP:Itissafetocoverthesoundoutputholewithyourfingerduringthetesting to minimise the sound level emitted. Ifanyproblemsoccurduringtesting,visitwww.cavius.co.nzor www.cavius.com.au for further trouble shooting.
16 17
7. Normal mode:InnormalmodetheLEDwillflashevery48secondstoshowthealarmisfunctioning.8. Alarm mode:Whenaconcentrationofsmokeisdetected,thesmokealarmwillgointo‘AlarmMode’.ItwillsoundthealarmsignalandtheLEDwillflash.Pleasenotethatonlythesourcealarm’sLEDwillflash,soitcanbeidentified.The smoke alarm will also transmit the alarm signal to the other connected alarms,whichwillalsosoundthealarmsignalafterashortdelay.
9. Hush function:Ifthesmokealarmsaretosetintoafalsealarmbycooking,fireplace,etc.all of them can be paused for 10 minutes by pressing the test button on the originatingsmokealarmonly(indicatedbytheflashingLED).Youcanhusheachalarmindividually,howeverthesourcealarmwillcontinueto sound until hushed.The reason for this is that it is necessary to locate the source of the alarm before using the hush function. This is to make sure that it is not a life threat ening situation.

10. Add extra device:All CAVIUS interconnected alarms within the
rangecanbeaddedtothesystemastheyrunonthesamefrequencyandusethe same data protocol. This means that the wireless system can consist of a combination of smoke alarms and heat alarms.Justplacethe‘Master’andnewdeviceinto‘LinkMode’,repeatSection4.Always test connection to all devices by repeating the test function (Section 7) after adding alarms.
1918
Low battery indicator: A short acoustic “beep” will sound and the LED will flashevery48secondswhenthebatteryisneartheendofitslife.Inthisstageit will continue for a minimum of 30 days.Youmustreplacethesmokealarmafter10yearsofuse,orifthesmokealarmhassufferedanydamage.Thesmokealarmisnotactiveunlessitisclickedinto the mounting base.Alwaystestthesmokealarmafterclickingintothemountingbase,allow5seconds before testing.
20 21
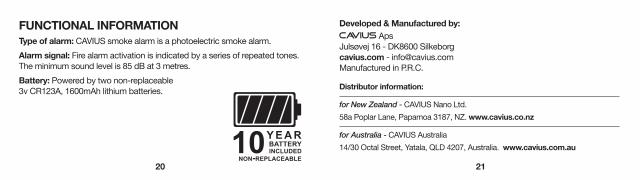
FUNCTIONAL INFORMATIONType of alarm: CAVIUS smoke alarm is a photoelectric smoke alarm.Alarm signal: Fire alarm activation is indicated by a series of repeated tones. The minimum sound level is 85 dB at 3 metres.Battery: Powered by two non-replaceable 3vCR123A,1600mAhlithiumbatteries.
Developed & Manufactured by: Aps Julsøvej 16 - DK8600 Silkeborg cavius.com - [email protected] Manufactured in P.R.C.
Distributor information:
for New Zealand - CAVIUS Nano Ltd.58aPoplarLane,Papamoa3187,NZ. www.cavius.co.nz
for Australia - CAVIUS Australia14/30OctalStreet,Yatala,QLD4207,Australia.www.cavius.com.au
22 23
Warranty:CAVIUS provides a 10-year warranty against defect in faulty material and workmanship from thedateofpurchase,onalldevices.The warranty applies to reasonable and normal conditions of use only. It does not include damageasaresultofmisuse,incorrectinstallation,accidentaldamage,neglect,unauthoriseddeconstruction or dismantling and any airborne or other contamination however this may have occurred.If this product has an acknowledged defect it must be returned to the national CAVIUS Distributor at the purchasers cost with the proof of purchase.Iftheproducthasbecomedefectivewithinthe10-yearwarranty,CAVIUSAPS,Denmarkwillrepairorreplacetheunitwithoutchargeandsendbacktothepurchaser,viathenationalDistributor at the Distributors cost.
Theguaranteeexcludeslabourcosts,freightcosts,servicecostsandanyincidentalandconsequentialdamages.Donotattempttorepairorservicethisproductasthiswillinvalidatethe warranty.Under some unusual circumstances the presence of high levels of radio spectrum pollution may result in the batteries within the CAVIUS device not lasting as indicated in the product sheet. Radio spectrum pollution comprises transmissions inside the band allocated for alarm devices such as the CAVIUS devices. Such transmissions may activate the receiver inside the devices for a longer time than is normal in standby.ThisisnotaspecificproblemforCAVIUSdevicesbutforallsimilarradiolinkedtechnologypowered by batteries. The limited warranty will not cover the battery life period indicated in the product sheet in these situations.This warranty is in lieu of any other warranty either expressed or implied.You can register your CAVIUS devices on our website.
127483 rev3

PLEASE READ THIS USER GUIDE CAREFULLY
PHOTOELECTRIC SMOKE ALARM
THE WORLD’S SMALLEST