Photo Booth Manual - Complete · ___ Set up Photo Booth (with Trainer assistance) ___ Discuss Photo...
44
Photo Booth Manual
Transcript of Photo Booth Manual - Complete · ___ Set up Photo Booth (with Trainer assistance) ___ Discuss Photo...

Photo Booth Manual

Ph
oto
Bo
oth
Man
ual
Cut to fit the spine title label.

Photo Booth Manual
Training

Table of Contents
1.0 Photo Booth Training
1.1 Introduction…………………………………………………………………………….5
1.2 Training Overview…………………………………………………………………..6
1.3 Advancement Levels……………………………………………………………..7
1.4 Phase Training………………………………………………………………………..8 Phase 1: In-House Training Phase 1: On-Site Training Phase 1: Review In-House Training
1.5 Photo Booth Certification Exam..………………………………………..11
2.0 Photo Booth Event Quality
2.1 Standard Operating Procedures………………………………………...13
2.2 Pre-Call………………………………………………………………………………….14
2.3 Booking Sheet……………………………………………………………………….15
2.4 Planning Sheet……………………………………………………………………...17
3.0 Quick Reference Guide
3.1 Big Idea Book……………….………………………………………………………..20
3.2 Troubleshooting…………………………………………………………………...22

5
Photo Booth We Do Fun props and a friendly Photo Booth Operator lead to a party in the box. Grab a hat, boa, glasses or one of many other fun props and make some memories. You Do Giving the customer Be Awesome starts with your first impression. It’s the Pre-Call that sets the tone and relaxes the client. After you have the details, confirming with the office, checking your equipment and arriving early and dressed just right, are second nature. You create lifelong memories. Glossy Strips of Evidence Each guest enjoys a high quality print of their booth experience, as well as placing one in the client’s scrapbook with their well wishes. To cap it off, we deliver all the image and video confessions on a USB drive at the end of the night.
Delivering BE AWESOME ::: Choose Your Attitude ::: Be There ::: Make Their Day ::: Have Fun

6 Delivering BE AWESOME ::: Choose Your Attitude ::: Be There ::: Make Their Day ::: Have Fun

7
Photo Booth Advancement Levels
Photo Booth Advancement Levels
Photo Booth Level*
Event Wage Range**
N.P.S. Generated Bookings
Generated Bonus
Compliance
Photo Booth Certified
Photo Booth Professional
Photo Booth Veteran
Photo Booth Platinum
Photo Booth Expert
*Photo Booth Level: Before advancing to the next Photo Booth level, the employee must maintain
their NPS Score and have met their generated bookings. The employee must also be present at the next quarterly meeting, to management satisfaction, before advancing.
**Event Wage Range: An employee review may be scheduled every six months, based on hire date, to set goals and discuss performance within a Photo Booth level. All raises are subject to management discretion.
Other Pay Rates
Rate Type Rate Notes
Training Rate Training pay is paid upon the satisfactory completion of training. Training includes a minimum of one in-house and on-site training session; it may also include additional training and review as needed.
Overtime Rate At the conclusion of the contracted time with COMPLETE Weddings + Events, the Photo Booth Operator may charge up to $100.00 per hour for additional overtime.
Mileage Rate Reimbursement may apply for specific events only
Mileage rates are reviewed periodically and adjusted accordingly. Alternate mileage for promotional event, etc. must be agreed upon by management.
Booking Fee Bonus Booking Fee bonuses are paid at each quarterly meeting for the quarter
in which the event was booked with an agreement and deposit received.
Booking FeePlus Bonus
Booking FeePlus bonuses are paid at each quarterly meeting for the quarter in which the event was performed. Specific employee requirements apply.
COMPLETE Weddings + Events offers a lot of opportunity for advancement. Photo Booth Operators are rewarded for generating bookings and being available to be scheduled often. We allow newly-hired Photo Booth Operators to move up quickly and generate more income based on N.P.S. Scores.
Payroll notes are calculated on the first business day following each weekend. Any gratuity or changes reported after that day will be reflected on the next payroll period. Payroll distribution is subject to hold based on compliance requirements..
Delivering BE AWESOME ::: Choose Your Attitude ::: Be There ::: Make Their Day ::: Have Fun

Phase Training
We attest the above items were completed as prescribed by COMPLETE Weddings + Events’ training program. Trainee’s Signature _______________________________________ Date ________________ Trainer's Signature _______________________________________ Date ________________
Any item not checked must indicate why it was omitted in comments above.
Photo Booth
Training Focal Points
___ Watch training video
___ Overview layout of Booking Sheet and Planning Sheet paperwork (reference page 15-18)
___ Overview Standard Operating Procedures (reference page 13)
___ Review Pre-Call specifics (reference page 14)
___ Discuss Photo Booth set up and flow of guests
___ Discuss prop use and organization
___ Discuss equipment and scrapbook placement
___ Set up Photo Booth (with Trainer assistance)
___ Discuss Photo Booth Big Idea Book and Troubleshooting (reference pages 20-44)
___ Take some Photo Booth shots
___ Discuss ways Photo Booth Operators can implement the Be Awesome
___ Tear down Photo Booth and discuss care of equipment, props and facade (with Trainer assistance as needed) Comments:
Phase 1: In-House Training Name of Trainee ________________________________________________________________ Name of Trainer ________________________________________________________________

Phase Training
We attest the above items were completed as prescribed by COMPLETE Weddings + Events’ training program. Trainee’s Signature _______________________________________ Date ________________ Trainer's Signature _______________________________________ Date ________________
Any item not checked must indicate why it was omitted in comments above.
Photo Booth
Training Focal Points
___ Load vehicle with Photo Booth equipment (with minimal Trainer assistance as needed)
___ Meet venue staff and figure out placement of Photo Booth
___ Set up Photo Booth (with minimal Trainer assistance as needed)
___ Test all equipment
___ Review work area for clean organization and flow
___ Greet guests as they arrive
___ Operate all aspects of the Photo Booth (with minimal Trainer assistance as needed)
___ Remind Bride + Groom and/or Guests of Honor to participate
___ Do “last call” for Photo Booth at least 30 minutes before ending
___ Tear down and return Photo Booth equipment to COMPLETE Weddings + Events storage facility (with Trainer assistance)
___ Fill out Booking Sheet paperwork (reference page 15-16) and thank you card after the event Comments:
Phase 1: On-Site Training Name of Trainee ________________________________________________________________ Name of Trainer ________________________________________________________________
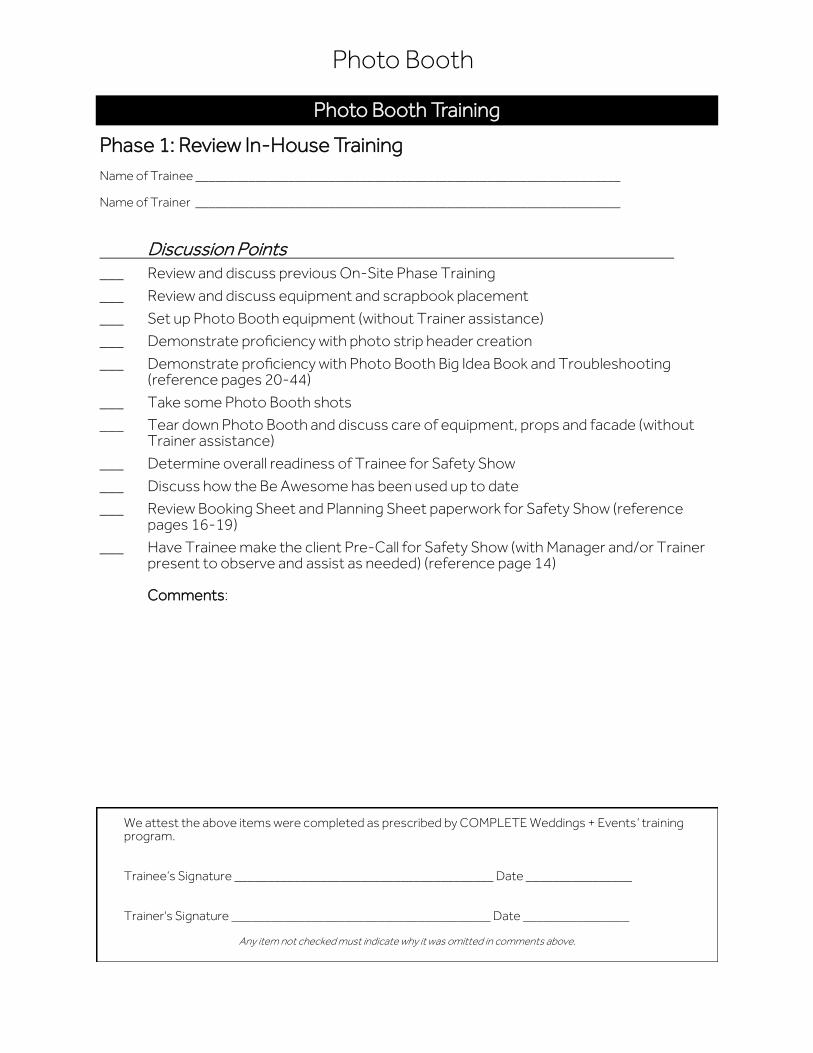
Photo Booth Training
We attest the above items were completed as prescribed by COMPLETE Weddings + Events’ training program. Trainee’s Signature _______________________________________ Date ________________ Trainer's Signature _______________________________________ Date ________________
Any item not checked must indicate why it was omitted in comments above.
Photo Booth
Discussion Points
___ Review and discuss previous On-Site Phase Training
___ Review and discuss equipment and scrapbook placement
___ Set up Photo Booth equipment (without Trainer assistance)
___ Demonstrate proficiency with photo strip header creation
___ Demonstrate proficiency with Photo Booth Big Idea Book and Troubleshooting (reference pages 20-44)
___ Take some Photo Booth shots
___ Tear down Photo Booth and discuss care of equipment, props and facade (without Trainer assistance)
___ Determine overall readiness of Trainee for Safety Show
___ Discuss how the Be Awesome has been used up to date
___ Review Booking Sheet and Planning Sheet paperwork for Safety Show (reference pages 16-19)
___ Have Trainee make the client Pre-Call for Safety Show (with Manager and/or Trainer present to observe and assist as needed) (reference page 14) Comments:
Phase 1: Review In-House Training Name of Trainee ________________________________________________________________ Name of Trainer ________________________________________________________________

11
Photo Booth Certification Exam
1. Name the four parts of COMPLETE Weddings + Events’ BE AWESOME philosophy: 1. ____________________________________________ 2. ____________________________________________ 3. ____________________________________________ 4. ____________________________________________
2. When should you plan to arrive at the event? A. An hour and a half before the event starts B. At the start of the event - no need to arrive early C. During Toasts D. None of the above
3. What is the standard dress code for COMPLETE Weddings + Events Photo Booth op-erators:
A. Tuxedo or suit B. COMPLETE Weddings + Events logo shirt, black slacks, belt and dress shoes C. Jeans and t-shirt
4. Which items should be included in the Scrapbook Area? A. Scrapbook pages B. Pens/Sharpie markers C. Glue tape D. All of the above
5. What does N.P.S. stand for in regards to COMPLETE Weddings + Events’ Customer Review Process with Listen 360?
A. Non-Point Source B. Network Policy Server C. Net Promoter Score D. National Provider System E. Non-Personal Services
6. What should you do if someone wants to book you at the event you’re shooting? A. Quote a price, collect a deposit and give them your business card B. Tell them to contact the local COMPLETE Weddings + Events franchise C. Get as much information as possible, list it on the Booking Sheet and give them a
business card D. Inform them that you do have your own business on the side and give them your personal cell phone number
7. What is COMPLETE Weddings + Events’ policy on drinking during an event? A. Only if approved by the host B. Only if there is an open bar C. Only if approved by the bartender D. Never
8. What is COMPLETE Weddings + Events policy on smoking during an event? A. Smoking is acceptable anytime B. Only outside, during a couple of times such as Dollar Dance or Dinner C. Only outside, while guests are arriving D. Smoking is not permitting while working
9. True or False: To keep Booth from freezing after sitting unused, go to LiveView tab and change “When to show LiveView window” to “After a session has started”.
True False
10. What is the Shortcut Key to Switch to Color? A. Alt R B. Ctrl T C. Esc D. Ctrl C

Photo Booth Manual
Event Quality
13
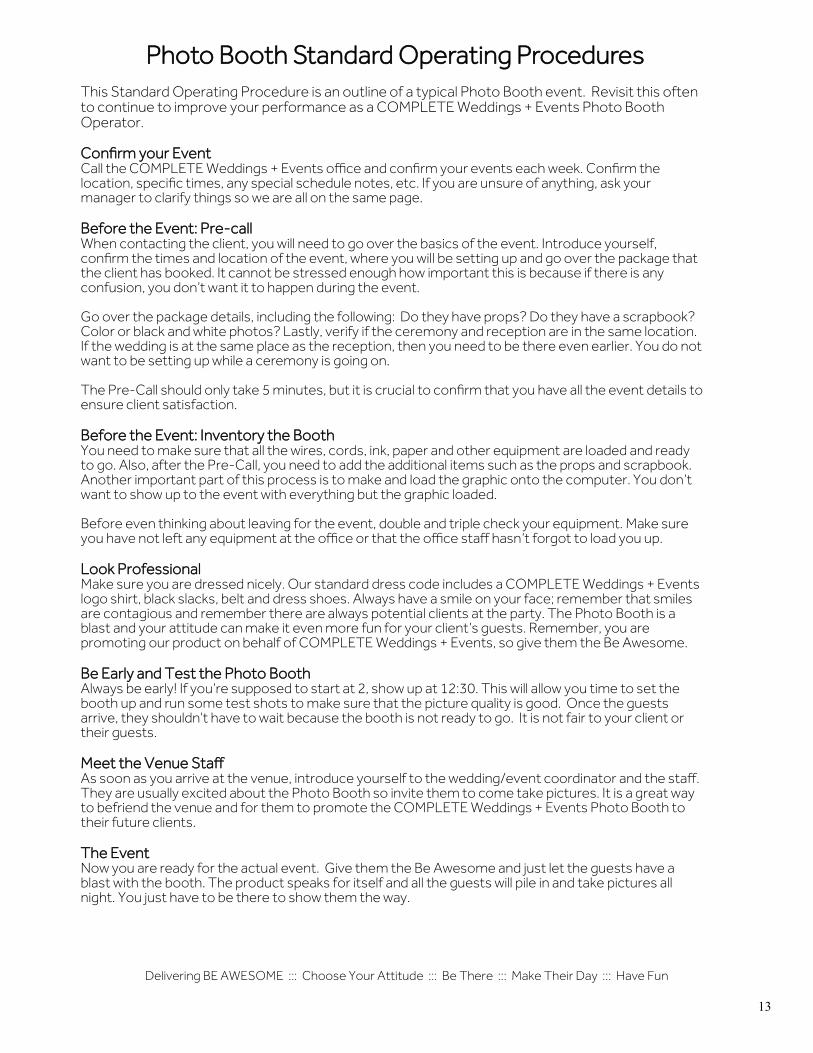
This Standard Operating Procedure is an outline of a typical Photo Booth event. Revisit this often to continue to improve your performance as a COMPLETE Weddings + Events Photo Booth Operator. Confirm your Event Call the COMPLETE Weddings + Events office and confirm your events each week. Confirm the location, specific times, any special schedule notes, etc. If you are unsure of anything, ask your manager to clarify things so we are all on the same page. Before the Event: Pre-call When contacting the client, you will need to go over the basics of the event. Introduce yourself, confirm the times and location of the event, where you will be setting up and go over the package that the client has booked. It cannot be stressed enough how important this is because if there is any confusion, you don’t want it to happen during the event. Go over the package details, including the following: Do they have props? Do they have a scrapbook? Color or black and white photos? Lastly, verify if the ceremony and reception are in the same location. If the wedding is at the same place as the reception, then you need to be there even earlier. You do not want to be setting up while a ceremony is going on. The Pre-Call should only take 5 minutes, but it is crucial to confirm that you have all the event details to ensure client satisfaction. Before the Event: Inventory the Booth You need to make sure that all the wires, cords, ink, paper and other equipment are loaded and ready to go. Also, after the Pre-Call, you need to add the additional items such as the props and scrapbook. Another important part of this process is to make and load the graphic onto the computer. You don’t want to show up to the event with everything but the graphic loaded. Before even thinking about leaving for the event, double and triple check your equipment. Make sure you have not left any equipment at the office or that the office staff hasn’t forgot to load you up. Look Professional Make sure you are dressed nicely. Our standard dress code includes a COMPLETE Weddings + Events logo shirt, black slacks, belt and dress shoes. Always have a smile on your face; remember that smiles are contagious and remember there are always potential clients at the party. The Photo Booth is a blast and your attitude can make it even more fun for your client’s guests. Remember, you are promoting our product on behalf of COMPLETE Weddings + Events, so give them the Be Awesome. Be Early and Test the Photo Booth Always be early! If you’re supposed to start at 2, show up at 12:30. This will allow you time to set the booth up and run some test shots to make sure that the picture quality is good. Once the guests arrive, they shouldn’t have to wait because the booth is not ready to go. It is not fair to your client or their guests. Meet the Venue Staff As soon as you arrive at the venue, introduce yourself to the wedding/event coordinator and the staff. They are usually excited about the Photo Booth so invite them to come take pictures. It is a great way to befriend the venue and for them to promote the COMPLETE Weddings + Events Photo Booth to their future clients. The Event Now you are ready for the actual event. Give them the Be Awesome and just let the guests have a blast with the booth. The product speaks for itself and all the guests will pile in and take pictures all night. You just have to be there to show them the way.
Photo Booth Standard Operating Procedures
Delivering BE AWESOME ::: Choose Your Attitude ::: Be There ::: Make Their Day ::: Have Fun

14
This list of questions has been designed to serve as a guideline to help you in making the Pre-Call to your client. Always use the Planning Sheet to walk the client through the Pre-Call. The most important aspect of the Pre-Call is to develop a relationship with the client and understand their vision for their event. 90% of your work is done through a successful and thorough Pre-Call. The other 10% is simply showing up and executing the event. Remember, first impressions are very important; above all, be friendly and confident. Try to offer suggestions based upon your experience, but then always do things the client’s way. The Pre-Call is designed to set the client at ease, not to add to any nervousness. If you have questions about specific events and need clarification, call your manager before your Pre-Call. Directions to Event Ask for specific directions to the location and where to set up (i.e. by the stage). General Pre-Call Based upon the event times, inform the client when you expect to arrive to set up for the event. Confirm the event times for start and end. Be sure to verify if the ceremony and reception are in the same location. If the wedding is at the same place as the reception, then you need to be there even earlier. You do not want to be setting up while a ceremony is going on. Pre-Call Questions "What time do you expect to arrive at the venue?" “Is it okay to go to the guest tables to invite guests into the Photo Booth?” “Do you want color or black and white photos?”
Discuss Aspects of Event Confirm name spelling and date that will be printed on Photo Booth strips. Verify all information on the Planning Sheet is accurate. Their plans may have changed since
they filled out the form, so be sure to update any incorrect information.. Discuss the overall involvement level they expect from you. Verify the balance due, if any, and ask who to collect it from. Verify the correct spelling of names or event.
Review Timeline and Offer Your Assurance Review the order of events and give an overview of the night. Assure them that you are there to make sure everything runs smoothly and according to their plans and that everyone is going to have a great time. Let them know if they need anything, just ask!
Pre-Call
Delivering BE AWESOME ::: Choose Your Attitude ::: Be There ::: Make Their Day ::: Have Fun

15
Booking Sheet
Below is an example of a Photo Booth Booking Sheet that you will use for all COMPLETE Weddings + Events’ events. As noted below, you’ll see that these include pertinent information for your event, such as Client Names, Contact Information, Venue Location, Contracted Times, etc. The Booking Sheet is the paperwork that you will fill out and turn in at the end of your event.
Event Info: Including date, event type, hours of event, etc.
Your client, their contact info and times of your event.
Event loca-tion and any details about the venue.
Services booked, with other COMPLETE staff involved and their contact info

16
Booking Sheet Photo Booth Booking Sheet (continued)
Things to reflect on. Be sure to write down any issues with equipment used so management has the opportunity to fix them.
If clients prefer to pay their balance due with a CC you can write the info here. Be sure to check with management to verify which CC companies are accepted (e.g. Amex, VISA, etc…)

17
Planning Sheet Below is an example of the Photo Booth Planning Sheet that you will use for COMPLETE Weddings + Events’ events. As noted below, you’ll see that these include pertinent information for your event, such as Client Names, Venue Location, Contracted Vendors, etc. The Planning Sheets are generated through the COMPLETE Weddings + Events CMS program where the client fills out the information. All information on the Planning Sheet should be verified with the client during the Pre-Call, in case there are any changes.

18
Planning Sheet Photo Booth Planning Sheet (continued)

Photo Booth Manual
Quick Reference Guide

20
SET UP SOFT FRAME
Set up in a highly visible area
Allow ample room for guest flow
Make sure the frame is well connected and secure
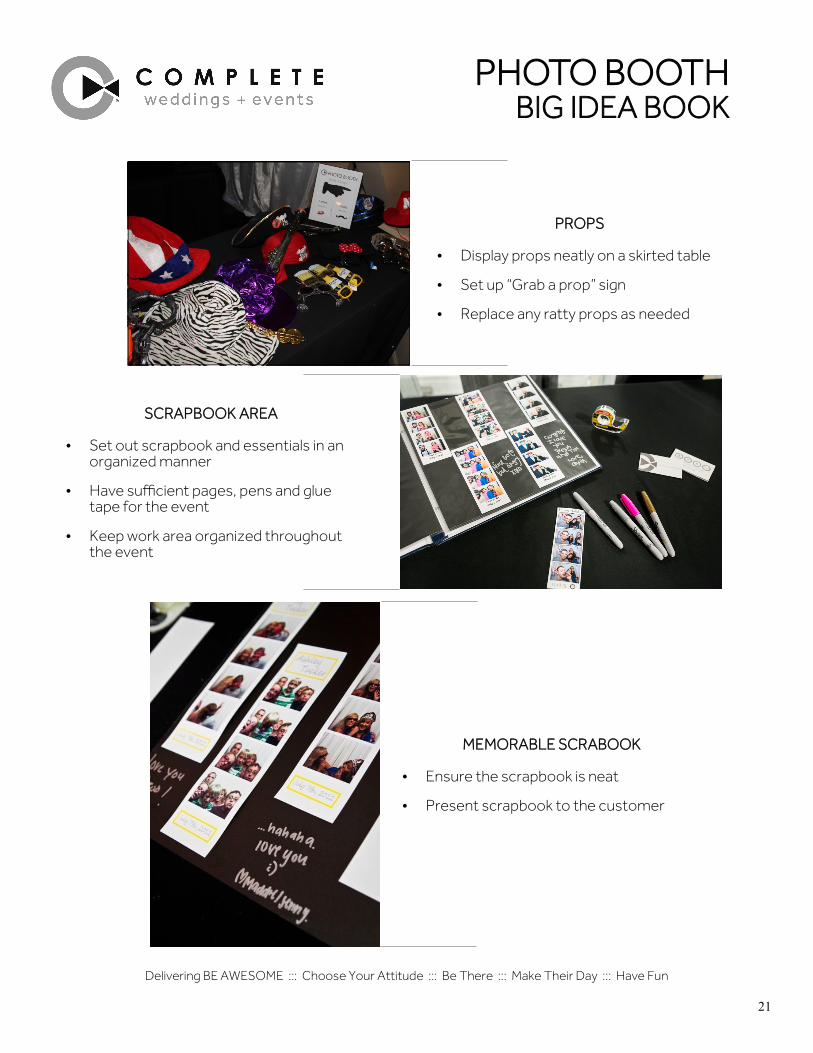
PHOTO BOOTH BIG IDEA BOOK
SET UP HARD FRAME
The hard frame is less moveable once set up, so make sure placement is correct
Set up in a highly visible area
Allow ample room for guest flow
COMPUTER and PRINTER
Set out laptop and printer neatly
Keep all cabling organized and as hidden as possible
Keep work area organized throughout the event
Delivering BE AWESOME ::: Choose Your Attitude ::: Be There ::: Make Their Day ::: Have Fun
21
PHOTO BOOTH BIG IDEA BOOK
PROPS
Display props neatly on a skirted table
Set up “Grab a prop” sign
Replace any ratty props as needed
SCRAPBOOK AREA
Set out scrapbook and essentials in an organized manner
Have sufficient pages, pens and glue tape for the event
Keep work area organized throughout the event
MEMORABLE SCRABOOK
Ensure the scrapbook is neat
Present scrapbook to the customer
Delivering BE AWESOME ::: Choose Your Attitude ::: Be There ::: Make Their Day ::: Have Fun

22
Darkroom Booth: Troubleshooting Guide: Please check here before calling the on-call manager.
During the week, you can call the Darkroom 1-800-517-4522 Monday-Friday - 8:00 am to 5:00 pm (Central)
Their customer support can troubleshoot your issue by logging into your computer. Main Settings: Make sure the correct event is highlighted on the left side under Booth Events.
Delivering BE AWESOME ::: Choose Your Attitude ::: Be There ::: Make Their Day ::: Have Fun
PHOTO BOOTH TROUBLESHOOTING

23
LiveView Settings:
To Save the Large Photos: 1. Go to the Photos tab 2. Under Photo, select copy or burn files 3. Browse for the correct folder and use the following settings:
Delivering BE AWESOME ::: Choose Your Attitude ::: Be There ::: Make Their Day ::: Have Fun
PHOTO BOOTH TROUBLESHOOTING

24
If something is incorrect on your photostrip:
1. In the main settings, click choose by the photostrip 2. Make sure the photostrip you wish to change is highlighted and click edit at the top 3. One the right side of the screen, double click on the text layer and change the text (see photo below) 4. Click Save 5. Make sure the proper strip is still high-lighted and click choose at the bottom
Delivering BE AWESOME ::: Choose Your Attitude ::: Be There ::: Make Their Day ::: Have Fun
PHOTO BOOTH TROUBLESHOOTING

25
If the buttons on the screen don’t start the session: 1. Go to Screens in the main settings and click Edit 2. Double click on the button layer on the right side of the screen (it’s called something like this)
3. Go to Booth Command in the pop-up screen
Delivering BE AWESOME ::: Choose Your Attitude ::: Be There ::: Make Their Day ::: Have Fun
PHOTO BOOTH TROUBLESHOOTING

26
4. Make sure the command is set correctly and check the Start photo session after applying command box
5. Do this for the B/W button as well 6. If something is spelled incorrectly, double click on the text layer on the right and change it 7. Click save at the top left Camera Settings: Make sure camera is set to the correct camera (example: Logitech C-920, HP Webcam, etc.) and adjust the video compression (example: None, YUY2, etc.) and then select your Video Frame Size. This selection will be based on the amount of memory on the laptop, however a standard size is 352 x 288.
Delivering BE AWESOME ::: Choose Your Attitude ::: Be There ::: Make Their Day ::: Have Fun
PHOTO BOOTH TROUBLESHOOTING

27
Ciaat Brava 21 Printers: Important first steps: 1. Go to printers from the start menu. 2. Highlight your connected printer and right click. 3. Go to properties at the bottom 4. Go to the advanced tab and make sure the checkbox at the bottom for enabling advanced printing settings is UNchecked
Delivering BE AWESOME ::: Choose Your Attitude ::: Be There ::: Make Their Day ::: Have Fun
PHOTO BOOTH TROUBLESHOOTING

28
If you don't do this then the photos will print way too large.
*These steps have to be in this order.
1. Click Global Settings in the upper right corner 2. Click Add Printer on the right and then select windows printer or if you’re using Brava
21 Printers it’s already listed as the first printer option 3. Select the printer and copy number that matches the connected printer in devices
and printers 4. Highlight the printer you just added and click Configure Printer on the right 5. In the box that appears, click on Properties 6. Make sure the paper size is set to 4x6 and the split print is set to 2x6. Zoom must be
set at 100%
Delivering BE AWESOME ::: Choose Your Attitude ::: Be There ::: Make Their Day ::: Have Fun
PHOTO BOOTH TROUBLESHOOTING

29
7. On the Windows Printer pop-up set the page size to 4x6 and click ok
8. Back in the main setting screen, make sure the size is set for 2x6
Delivering BE AWESOME ::: Choose Your Attitude ::: Be There ::: Make Their Day ::: Have Fun
PHOTO BOOTH TROUBLESHOOTING
30
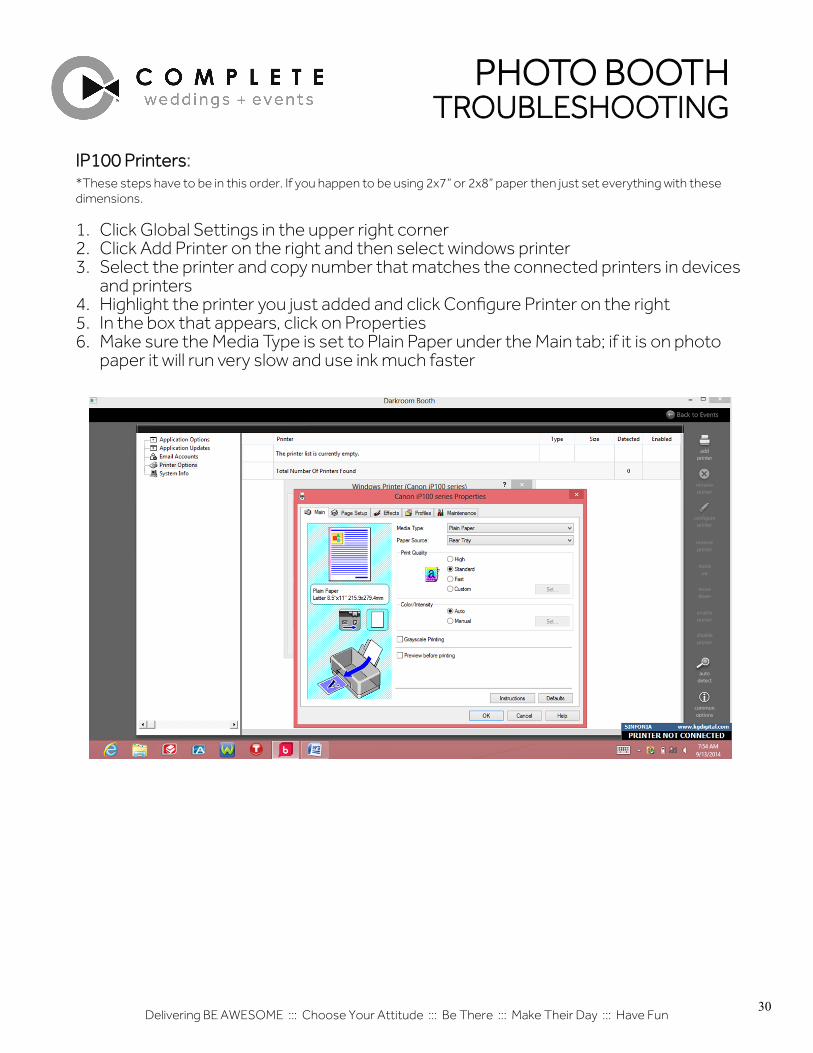
IP100 Printers:
*These steps have to be in this order. If you happen to be using 2x7” or 2x8” paper then just set everything with these dimensions.
1. Click Global Settings in the upper right corner 2. Click Add Printer on the right and then select windows printer 3. Select the printer and copy number that matches the connected printers in devices
and printers 4. Highlight the printer you just added and click Configure Printer on the right 5. In the box that appears, click on Properties 6. Make sure the Media Type is set to Plain Paper under the Main tab; if it is on photo
paper it will run very slow and use ink much faster
Delivering BE AWESOME ::: Choose Your Attitude ::: Be There ::: Make Their Day ::: Have Fun
PHOTO BOOTH TROUBLESHOOTING

31
7. Under the Page Setup tab, scroll down to Custom under page size
8. Set the width to 2.13 and the height to 6.00 and click OK and then OK again
Delivering BE AWESOME ::: Choose Your Attitude ::: Be There ::: Make Their Day ::: Have Fun
PHOTO BOOTH TROUBLESHOOTING
32
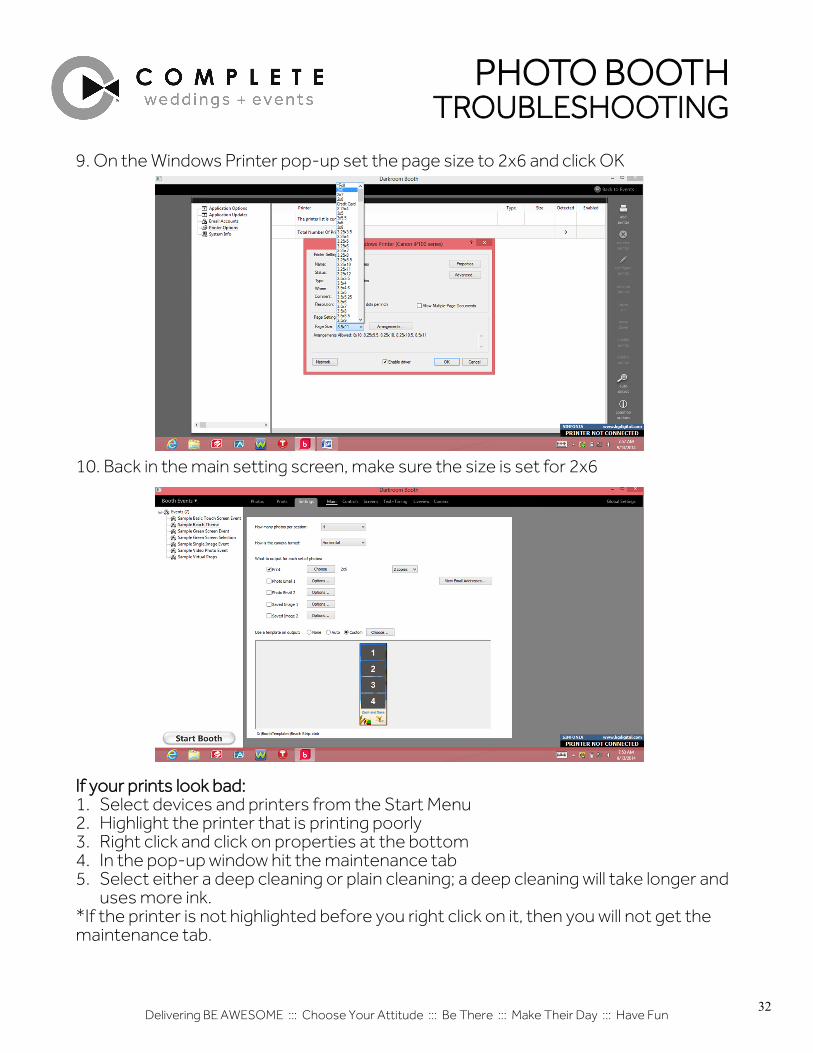
9. On the Windows Printer pop-up set the page size to 2x6 and click OK
10. Back in the main setting screen, make sure the size is set for 2x6
If your prints look bad: 1. Select devices and printers from the Start Menu 2. Highlight the printer that is printing poorly 3. Right click and click on properties at the bottom 4. In the pop-up window hit the maintenance tab 5. Select either a deep cleaning or plain cleaning; a deep cleaning will take longer and
uses more ink. *If the printer is not highlighted before you right click on it, then you will not get the maintenance tab.
Delivering BE AWESOME ::: Choose Your Attitude ::: Be There ::: Make Their Day ::: Have Fun
PHOTO BOOTH TROUBLESHOOTING

33
Booth freezes after sitting unused: To keep this from happening go to the LiveView tab and change "When to show LiveView window" to "After a session has started". This way the LiveView will cycle on and off with each session.
Darkroom crashes when I click Start Booth or tries to print If you just created a new screen template and added any new images or graphics, make sure they did not use interlaced or progressive compression. Darkroom is com-patible with most graphic formats, such as .JPG, .PNG, and .TIF, but any of those for-mats with interlaced or progressive compression will cause issues in the current ver-sion of Darkroom. Darkroom is also not compatible with 16 or 24 bit files, only 8 bit. Some graphics available on the internet use these options. To test and see if this is the cause, remove any graphics you added from the screen template and then click Start Booth and see if the issue goes away. If it does, then you can open the graphics in Photoshop and do a save as and un-check progressive or interlaced then add them back to the template.
Error converting file message: In the Main settings tab see if you have one or both of the "Saved Image 1 or 2" set to save to a valid location. This can also occur if the Save Originals option set to an inva-lid location. For example, if you have that set to a thumb drive that is not plugged in you will get that message. You can also get that error if you are using a third party software to monitor a saved image folder and that software tries to open the file to soon before we are through saving it. If you disable any third party software and the issue goes away contact that software maker. A less common but possible cause is from a timing setting set to short to allow the save to complete. After solving the original cause you may need to clear the queue of jobs waiting by pressing F11 and deleting all jobs there.
I can't exit the booth, it asks for a PIN code: To prevent a customer from inadvertently exiting booth mode you can set a PIN code that will be required to exit. This setting is the last option at the bottom of the Con-trols tab (see example below). The default is off but if you checked that without realiz-ing it. The default code is 0000.
Delivering BE AWESOME ::: Choose Your Attitude ::: Be There ::: Make Their Day ::: Have Fun
PHOTO BOOTH TROUBLESHOOTING
34
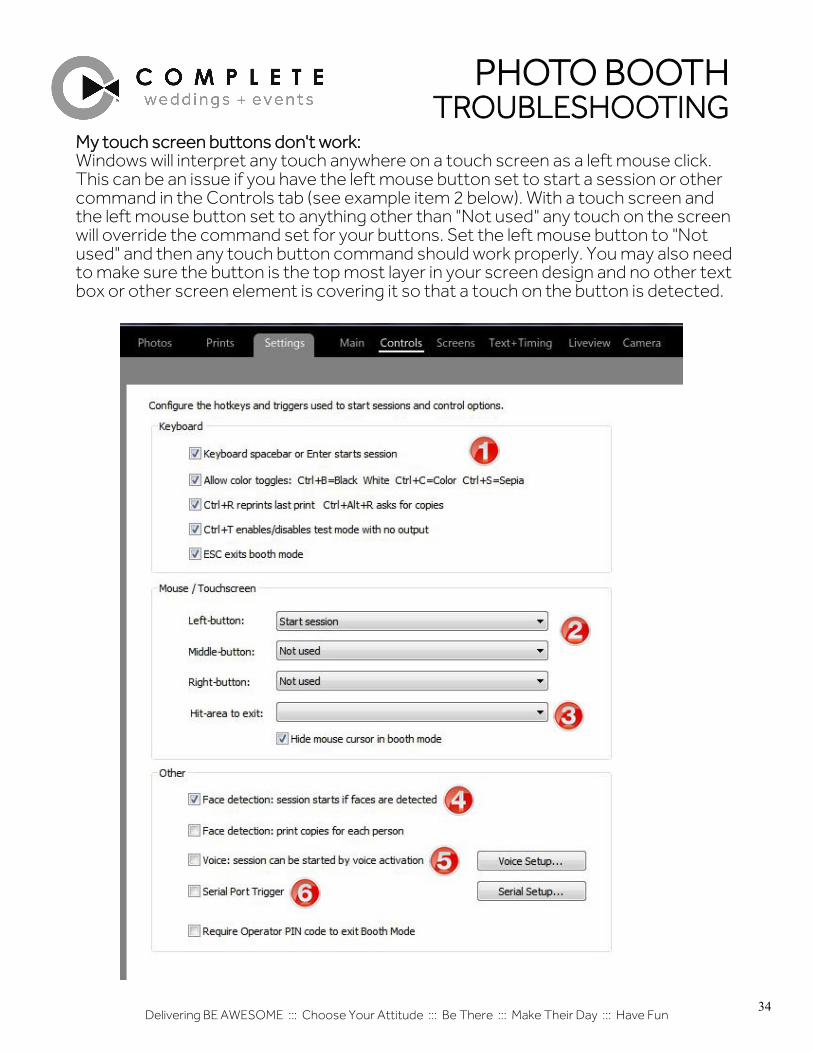
My touch screen buttons don't work: Windows will interpret any touch anywhere on a touch screen as a left mouse click. This can be an issue if you have the left mouse button set to start a session or other command in the Controls tab (see example item 2 below). With a touch screen and the left mouse button set to anything other than "Not used" any touch on the screen will override the command set for your buttons. Set the left mouse button to "Not used" and then any touch button command should work properly. You may also need to make sure the button is the top most layer in your screen design and no other text box or other screen element is covering it so that a touch on the button is detected.
Delivering BE AWESOME ::: Choose Your Attitude ::: Be There ::: Make Their Day ::: Have Fun
PHOTO BOOTH TROUBLESHOOTING

35
The fonts change when I edit a sample template: The Darkroom Booth screen and print template format embeds fonts into those files so they can be transferred to other computers. In this way you can design on one computer while using another for the actual booth. For copyright reasons we cannot install the full font on the PC but can embed only the letters needed for that template. If you edit the template and do not have that font on your computer then Darkroom has to make a font substitution and that is what you are seeing. You may be able to locate that font online and install it on your computer then Darkroom would have access to it. Otherwise you can choose another font.
Booth crashes when it tries to print: If you just created a new print template and added any new images or graphics make sure they did not use interlaced or progressive compression. Booth is compatible with most graphic formats such as .JPG, .PNG, and .TIF but any of those formats with interlaced or progressive compression will cause issues in the current version of Booth. Some free graphics available on the internet use these options. To test and see if this is the cause, re-move any graphics you added from the print template and do a new session and see if the issue goes away. If it does then you can open the graphics in Photoshop and do a save as and uncheck progressive or interlaced then add them back to the template.
Booth runs slow and hangs up during a session: Be sure to disable any anti-virus software that may be on your computer. Windows 7 and 8 computers have Windows Defender on by default and many new computers have trial ver-sions of McAfee or Norton installed. Check to make sure any graphics added to your screen are not excessively large. If you are displaying a graphic on screen at 200 pixels wide but the original graphic is 4000 pixels that can make the screen file excessively large and cause slow response and hang, especially if you have more than 1 graphic like that in your screen Make sure your camera is set to small or medium size jpg files. Using large jpg or RAW files can cause slow performance due to the larger files transfer time and processing time. The LiveView does not work: First, make sure your camera supports LiveView, Many older SLR cameras will work with Booth but do not have the live view feature. Next, make sure the "Use LiveView if supported by camera" option is checked in the live view tab. Click on the test button in the LiveView tab and see if LiveView opens in the preview on that tab. If it does but is black see if the "exposure compensation" box is checked to the left of the Test but-ton. Finally, make sure the camera is set to P, M, Tv, or Av mode, many of the other specialty settings disable LiveView.
Delivering BE AWESOME ::: Choose Your Attitude ::: Be There ::: Make Their Day ::: Have Fun
PHOTO BOOTH TROUBLESHOOTING

36
I added my printer to Booth but nothing is printing: First, if you are using a Windows driver for your printer make sure you have the cor-rect driver selected in the printers list. If you plug a Windows printer into a different USB port than it was originally installed on Windows will add a new copy of the driver and call it Copy 1, etc.. You can see this in the Devices and Printers section in the Win-dows Control panel. If you have Booth set to the original driver then from Booth's perspective the printer is not present. It is best to always plug a printer into the same USB port every time to prevent this. To find out which driver is the correct one try printing a Windows test page and see if it prints. Next, in the Global settings section in the Printers list double click on the printer and make sure the Page Size (lower left corner of the properties window if you are using a Windows printer) is set to 4x6 if you are printing 2x6 or 4x6 prints. For any other size set it to that size (for example, 5x7 print set that to 5x7 page size). For 2x6 size make sure the "Allow Multiple-Page Documents" is check as well.
Delivering BE AWESOME ::: Choose Your Attitude ::: Be There ::: Make Their Day ::: Have Fun
PHOTO BOOTH TROUBLESHOOTING

37
I get a thin white line on the edge of my prints: In the Global Settings section under Printers double click on your printer in the list. In the properties windows click on Advanced in the top right. In the Advanced window look for the Bleed option at the bottom left. The Windows default bleed for printers is 30 pixels. This means that Windows will enlarge and prints sent to a printer by 30 pix-els to make a border-less print. Booth lets you adjust the bleed and defaults to 0. You can adjust this up until the white line goes away. Normally about 15 to 20 works well but if you have to go over 30 you may need to check to see if the paper is loaded cor-rectly.
Delivering BE AWESOME ::: Choose Your Attitude ::: Be There ::: Make Their Day ::: Have Fun
PHOTO BOOTH TROUBLESHOOTING
38
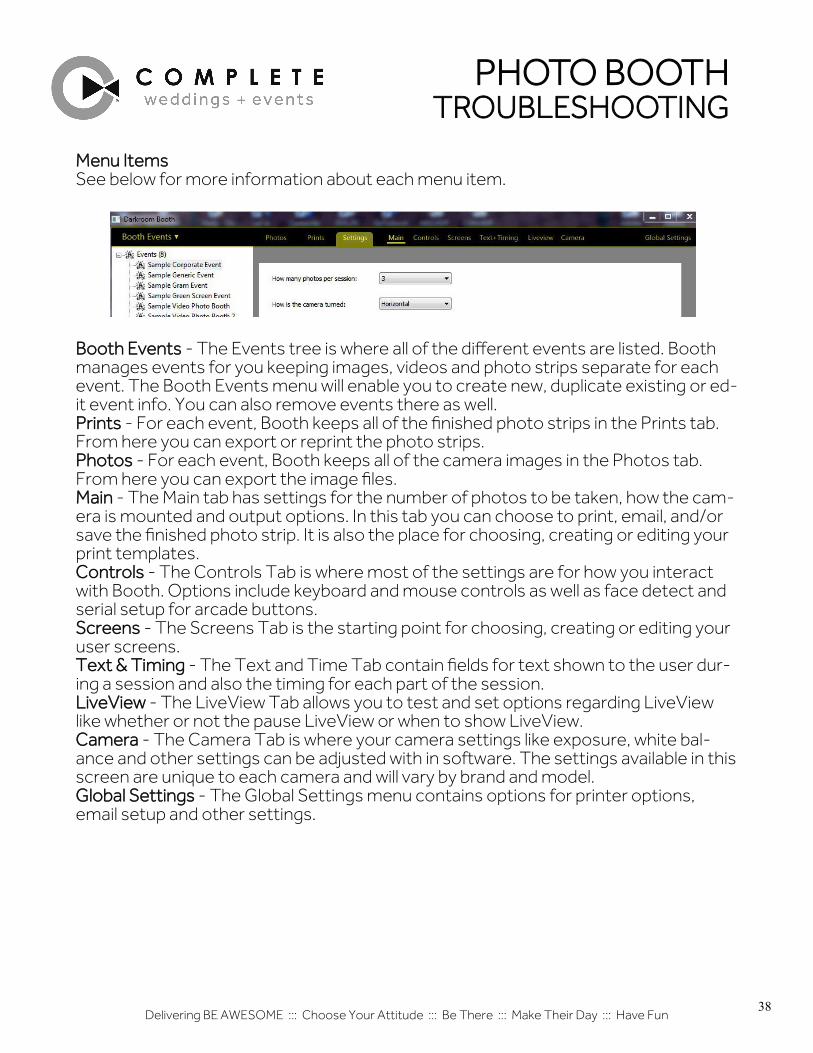
Menu Items See below for more information about each menu item.
Booth Events - The Events tree is where all of the different events are listed. Booth manages events for you keeping images, videos and photo strips separate for each event. The Booth Events menu will enable you to create new, duplicate existing or ed-it event info. You can also remove events there as well. Prints - For each event, Booth keeps all of the finished photo strips in the Prints tab. From here you can export or reprint the photo strips. Photos - For each event, Booth keeps all of the camera images in the Photos tab. From here you can export the image files. Main - The Main tab has settings for the number of photos to be taken, how the cam-era is mounted and output options. In this tab you can choose to print, email, and/or save the finished photo strip. It is also the place for choosing, creating or editing your print templates. Controls - The Controls Tab is where most of the settings are for how you interact with Booth. Options include keyboard and mouse controls as well as face detect and serial setup for arcade buttons. Screens - The Screens Tab is the starting point for choosing, creating or editing your user screens. Text & Timing - The Text and Time Tab contain fields for text shown to the user dur-ing a session and also the timing for each part of the session. LiveView - The LiveView Tab allows you to test and set options regarding LiveView like whether or not the pause LiveView or when to show LiveView. Camera - The Camera Tab is where your camera settings like exposure, white bal-ance and other settings can be adjusted with in software. The settings available in this screen are unique to each camera and will vary by brand and model. Global Settings - The Global Settings menu contains options for printer options, email setup and other settings.
Delivering BE AWESOME ::: Choose Your Attitude ::: Be There ::: Make Their Day ::: Have Fun
PHOTO BOOTH TROUBLESHOOTING

39
Global Settings The Global Settings section contains Printer settings and email account information as well as information about your system and activation. Printer Options In the Printer Options section click the Add Printer icon in the top right. This will open the Add Printer list. If you are using one of the printers that we have a built in driver for just select it and click the Add Printer button at the bottom. If your printer is not in the list then make sure the Windows driver provided by the printer manufacture is in-stalled on the computer and choose Windows Printer from the list. A new list will ap-pear with all of the Windows printers and select it there. See Windows Printer set-up for more information about setting up a Windows printer.
Shortcut Keys If you would like to use Booth with a keyboard, here are some shortcut keys that can be used: Start Session Space Bar or Enter Switch to Color Ctrl C Switch to B+W Ctrl B Switch to Sepia Ctrl S Switch to Color plus Start Alt C Switch to B+W plus Start Alt B Switch to Sepia plus Start Alt S Reprint Ctrl R Reprint - prompt for copies Alt R Test mode - no prints Ctrl T Exit Booth mode Esc Show print queue F11
Delivering BE AWESOME ::: Choose Your Attitude ::: Be There ::: Make Their Day ::: Have Fun
PHOTO BOOTH TROUBLESHOOTING

40
How do I export the photo strips? To export the photo strips after and event go to the Prints Tab of your event and se-lect all of the strips you want to export. Then click on the print drop down menu in the center of the black menu bar (see figure 1). Next, select "Copy or burn files...". The next screen (see below) will allow you to set the location, format (jpg is the most com-mon file type) and file size to export. This same option is available for the camera files in the Photos tab. You can also do this in real time after each session by using the "Save Image 1 or 2" option in the Main Tab.
Delivering BE AWESOME ::: Choose Your Attitude ::: Be There ::: Make Their Day ::: Have Fun
PHOTO BOOTH TROUBLESHOOTING

41
How do I email the photo strips? Begin by setting up your send account in the global settings section. For more infor-mation on that go to Email Accounts. Next, in the main settings tab Check the box for email. The Options button allows options for file size and information that is added to the email like your company name, website, contact info, etc. This information can be in text form or HTML. If an internet connection is not available at your event the emails will wait in a queue until one is available and then they will be sent.
Delivering BE AWESOME ::: Choose Your Attitude ::: Be There ::: Make Their Day ::: Have Fun
PHOTO BOOTH TROUBLESHOOTING

42
How do I save strips and images to a folder You can have Booth save the photo strip and the single images to a folder of your choice after each session. This is a great feature to use to save all images to a thumb drive to give the customer at the end of the event or to use for a slide show throughout the event. To save the single images choose "Copy Original Images" (figure 1) and then set the folder to save to (figure 2). You can choose the image size as well. By adding a tem-plate file (figure 3) you can save the single image with an overlay or a green screen background. This template can be designed with the same designer used for print templates and use any of the features available there. If you add one with a graphic list the same as the print template it will change to the background selected by the user. These same options are available in the "Save Image 1 and 2" options for saving the photo strips. You can save both to the same folder or to different folders.
Delivering BE AWESOME ::: Choose Your Attitude ::: Be There ::: Make Their Day ::: Have Fun
PHOTO BOOTH TROUBLESHOOTING

43
How do I upload to Facebook
*Please note that Facebook no longer allows posting by email to a Facebook page. We released a new version called Booth2 in late June 2015 that will allow direct log in to Facebook for posting. The following instructions apply to Booth 2
To upload photo strips to a specific Facebook page first setup the access to the ac-count then in the Settings Tab check the box next to Post to Facebook. You can set options like posting to an album or event page as well as the file size by clicking on the button. You can also add a different template to upload to Facebook than you are printing. This option will post in the background to that account, to allow an individual user to post to their own page go to the Settings Tab check the User Post to Face-book option.
How do I add my printer? Darkroom Booth includes a number of printer drivers for some of the most popular printers. These drivers offer faster printing and easier set up that using the manufac-tures Windows driver. In the Global settings section click on Add Printer in the top right and if you have one of the listed printers for example (Ciaat Brava 21 prnter) you can select it from that list. Select your printer and Darkroom Booth will detect it and configure it with the most common settings. If your printer is not in the list then from the same Add Printer menu select Windows Printer at the bottom of the list and then a list will open with all of the Windows printer installed on your computer. Follow any guidelines for printer settings provided by the manufacture of the printer. If your printer is not in the Windows list then you need to install the driver provided by the manufacture and then repeat the add printer pro-cess. Be aware that when using the Windows driver if you plug the printer into a differ-ent USB port than last time Windows will install a new copy of that driver and add copy 1, etc. to the name. Be sure you add the correct copy to the printers list in Booth. The best practice is to always plug printers into the same USB port when possible.
Delivering BE AWESOME ::: Choose Your Attitude ::: Be There ::: Make Their Day ::: Have Fun
PHOTO BOOTH TROUBLESHOOTING

44
Photo Booth tips to avoid refunds:
Back up computer. You need to have a back up PC with a licensed copy of darkroom booth ready to go, just in case. Remember we are dealing with computers, and we know, as sure as death and taxes… all computers crash eventually. So you don’t want to shell out an extra $600 for a laptop for the on-call Photo Booth Operator? (that’s probably only 1 refund). OK then pick up a PC stick. There are several available for about $100. It’s a computer you plug directly into your touchscreen monitor HDMI slot and you have a backup in emergencies. Again be sure it has a licensed version of the software loaded, and all the drivers required to run your camera, monitor, and printer. Here are some reviews:
http://www.digitaltrends.com/computing/best-stick-pcs/#:o5G6rGGNh2R6zA
Turn off auto updates If it ain’t broke don’t fix it! This is specifically pertaining to windows system updates, but also consider darkroom booth updates. If it’s working well don’t change the software. With this in mind however, if something is not working properly start with downloading the latest darkroom software update as often they fix unintended bugs. Always test your photo booth with everything plugged in after any updates!
Don’t use your laptop for anything except photo booths The best way avoid a virus on your laptop is by not going onto the internet. Additionally if you keep your laptop lean and mean with ONLY necessary software for the photo booth you will avoid conflicting software problems.
Set up email and text accounts. If your printers are not working you can turn on the email strip settings and strips will be emailed or even sent directly to the guest’s phone! This should avoid having to give a refund as the booth is still working. Go here to learn how to set up your email accounts: http://www.helpconsole.com/Darkroom%20Booth%20User%20Guide/#pageid=how_do_i_email_the_photo_strips_
Delivering BE AWESOME ::: Choose Your Attitude ::: Be There ::: Make Their Day ::: Have Fun
PHOTO BOOTH TROUBLESHOOTING