Perle Device Server (DS) Installation Instructionsbernationalcontrols.com/support_docs/Parking/3M/3M...
49
Perle Device Server (DS) Installation Instructions Revision History Version 1 ............ April 2007, August 2013 Table of Contents Introduction ................................................................................................................................... 2 Prerequisites ................................................................................................................................ 3 Step 1: Download Firmware and Device Drivers ......................................................................... 4 Step 2: Install TruePort................................................................................................................. 6 Step 3: Install DeviceManager ................................................................................................... 10 Step 4: Install the Perle DS ........................................................................................................ 13 Step 5: Configure the Perle DS Serial Communication Settings ............................................... 17 Step 6: Ping the Device .............................................................................................................. 25 Step 7: Add the Device Manually ............................................................................................... 28 Step 8: Update the Perle DS Firmware ...................................................................................... 31 Step 9: Download Settings to Perle DS ..................................................................................... 33 Step 10: TruePort Configuration ................................................................................................ 37 Perle Device Server (DS) Installation Instructions 1 75-0302-1463-1, Version 1
Transcript of Perle Device Server (DS) Installation Instructionsbernationalcontrols.com/support_docs/Parking/3M/3M...

Perle Device Server (DS) Installation Instructions Revision History
Version 1 ............ April 2007, August 2013
Table of Contents
Introduction ................................................................................................................................... 2 Prerequisites ................................................................................................................................ 3 Step 1: Download Firmware and Device Drivers ......................................................................... 4 Step 2: Install TruePort................................................................................................................. 6 Step 3: Install DeviceManager ................................................................................................... 10 Step 4: Install the Perle DS ........................................................................................................ 13 Step 5: Configure the Perle DS Serial Communication Settings ............................................... 17 Step 6: Ping the Device .............................................................................................................. 25 Step 7: Add the Device Manually ............................................................................................... 28 Step 8: Update the Perle DS Firmware ...................................................................................... 31 Step 9: Download Settings to Perle DS ..................................................................................... 33 Step 10: TruePort Configuration ................................................................................................ 37
Perle Device Server (DS) Installation Instructions 1 75-0302-1463-1, Version 1

Warranty Information Product Use: Many factors beyond 3M’s control and uniquely within user’s knowledge and control can affect the use and performance of a 3M product in a particular application Given the variety of factors that can affect the use and performance of a 3M product, user is solely responsible for evaluating the 3M product and determining whether it is fit for a particular purpose and suitable for user’s method of application.
Warranty, Limited Remedy, and Disclaimer: Unless a different warranty is specifically stated on the applicable 3M product packaging or product literature, terms of sale or software license agreement, 3M warrants that the 3M product will be free from substantial defects in material and workmanship under normal use and service, wear and tear excepted, for two (2) years from the original date of purchase, and (ii) for software products, for ninety (90) days from the original date of purchase, the software will materially perform the functions described in the accompanying documentation. 3M MAKES NO OTHER WARRANTIES OR CONDITIONS, EXPRESS OR IMPLIED, INCLUDING, BUT NOT LIMITED TO, ANY IMPLIED WARRANTY OR CONDITION OF MERCHANTABILITY OR FITNESS FOR A PARTICULAR PURPOSE OR ANY IMPLIED WARRANTY OR CONDITION ARISING OUT OF A COURSE OF DEALING, CUSTOM OR USAGE OF TRADE. If the 3M product does not conform to this warranty, then the sole and exclusive remedy is, at 3M’s option, to replace or repair any defective part or parts.
Limitation of Liability: Except where prohibited by law, 3M will not be liable for any loss or damage arising from the 3M product, whether direct, indirect, special, incidental or consequential, regardless of the legal theory asserted, including warranty, contract, negligence or strict liability.
2 Perle Device Server (DS) Installation Instructions 75-0302-1463-1, Version 1

Introduction This document provides instructions for installing and configuring the Perle Device Server (DS). The Perle DS is an Ethernet communications/terminal server that allows serial devices to be connected directly to local area networks (LANs). The Perle DS is used to connect from the ScanNet server to NetPorts and lane devices via an Ethernet connection from ScanNet to the Perle DS and an RS-232 serial connection from the Perle DS to the NetPort or lane device. This allows for long cable runs from ScanNet to the Perle DS.
Perle Device Server (DS)
Prerequisites The following hardware, software, and network information are required, in order to install Perle Device Servers.
• Perle SDS1 Device Server (3M part number 11-26303). • Tera Term Pro (http://www.snapfiles.com/get/teraterm.html) terminal emulation program (or
other suitable terminal emulation program), if the ScanNet server has COM1–COM4 ports. Note: If the ScanNet server does not have COM1–COM4 ports, use Windows® HyperTerminal. This procedure describes using Tera Term Pro only.
• Null modem serial cable, for setting up the Perle DS serial communication. • RS-232, DB-9, serial cable, for connection from the Perle DS to the Port Controller or
lane device. • Ethernet cable, for connection from the network to the Perle DS. • The ScanNet server must be running Windows XP or Windows Server 2003. • The ScanNet server must have an internet connection, in order to access the Perle web site
(http://www.perle.com) and download firmware and device drivers. IMPORTANT!: The network administrator must be available to assist throughout this procedure.1
1 This manual may reference legacy part numbers and product names. Please refer to the 3M Parking Price Book for current product names or contact your customer service representative with questions. Perle Device Server (DS) Installation Instructions 3 75-0302-1463-1, Version 1

Note the following network addresses (consult the network administrator):
• All Perle DS IP addresses and subnet masks:
Perle IP Address Subnet Mask
• ScanNet server IP address: _______________________________________________________
Step 1: Download Firmware and Device Drivers 1. Create a "Perle" folder on the ScanNet Server in the root directory (i.e., C:\Perle).
2. Go to the Perle web site (http://www.perle.com).
3. Click SUPPORT/SERVICES;
the "Software Downloads" hyperlink is displayed:
4. Click Software Downloads; the "Please Select your Product" drop-down menu is displayed:
4 Perle Device Server (DS) Installation Instructions 75-0302-1463-1, Version 1

5. From the "Please Select your Product" drop-down menu, click Device Server>IOLAN SDS1; the firmware hyperlinks are displayed:
6. Click the DS firmware version hyperlink (e.g., Version 3.0.3); the following "File Download"
dialog box is displayed:
7. Click the Save button and save the file (e.g., iolan_sds_v30g3.bin) to the folder created in
step 1 (C:\Perle).
8. Click the DeviceManager firmware version hyperlink (e.g., DeviceManager V3.0.0.2, see step 5 above); the following "File Download - Security Warning" dialog box is displayed:
9. Click the Save button and save the file (e.g., Dev_man_V3002.exe) to the folder created in
step 1 (C:\Perle).
Perle Device Server (DS) Installation Instructions 5 75-0302-1463-1, Version 1

10. Click the Trueport hyperlink (see step 5 above); the following screen is displayed:
11. For Windows 2000, XP, Server 2003 32 bit x86 operating systems, in the "Package" column, click
the TruePort hyperlink (e.g., 6.0.0); the following "File Download - Security Warning" dialog box is displayed:
12. Click the Save button and save the file (e.g., trueport-setup-x86.exe) to the folder created in
step 1 (C:\Perle).
13. Go to Step 2: Install TruePort.
Step 2: Install TruePort 1. In the C:\Perle folder, double-click "trueport-setup-x86.exe"; the "Perle TruePort Setup" dialog
box is displayed:
6 Perle Device Server (DS) Installation Instructions 75-0302-1463-1, Version 1

2. Click the Next > button from the "Welcome to the Perle TruePort Setup Wizard" dialog box; the "Choose Components" dialog box is displayed:
3. Click the Next > button from the "Choose Components" dialog box (accept the defaults); the
"Choose Install Location" dialog box is displayed:
Perle Device Server (DS) Installation Instructions 7 75-0302-1463-1, Version 1

4. Click the Next > button from the "Choose Install Location" dialog box (accept the default Destination Folder); the following software installation caution dialog box is displayed: Note: Ignore the following caution. Go to step 5 below.
5. Click the Continue Anyway button from the software installation caution dialog box; the following
software installation caution dialog box is displayed: Note: Ignore the following caution. Go to step 6 below.
8 Perle Device Server (DS) Installation Instructions 75-0302-1463-1, Version 1

6. Click the Continue Anyway button from the software installation caution dialog box; the "Completing the Perle TruePort Setup Wizard" dialog box is displayed:
7. Uncheck both check boxes.
8. Click the Finish button from the Completing the Perle TruePort Setup Wizard" dialog box. The TruePort installation is complete.
9. Go to Step 3: Install DeviceManager.
Perle Device Server (DS) Installation Instructions 9 75-0302-1463-1, Version 1
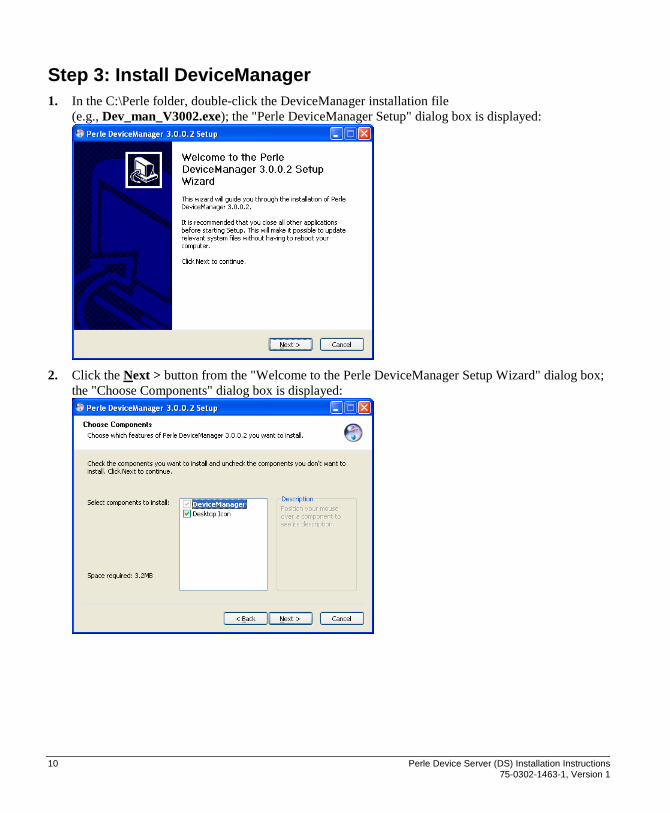
Step 3: Install DeviceManager 1. In the C:\Perle folder, double-click the DeviceManager installation file
(e.g., Dev_man_V3002.exe); the "Perle DeviceManager Setup" dialog box is displayed:
2. Click the Next > button from the "Welcome to the Perle DeviceManager Setup Wizard" dialog box;
the "Choose Components" dialog box is displayed:
10 Perle Device Server (DS) Installation Instructions 75-0302-1463-1, Version 1

3. Click the Next > button from the "Choose Components" dialog box (accept the defaults); the "Choose Install Location" dialog box is displayed:
4. Click the Next > button from the "Choose Install Location" dialog box (accept the default
Destination Folder); the "Choose Start Menu Folder" dialog box is displayed:
Perle Device Server (DS) Installation Instructions 11 75-0302-1463-1, Version 1

5. Click the Install button from the "Choose Start Menu Folder" dialog box (accept the default folder); the "Completing the Perle DeviceManager Setup Wizard" dialog box is displayed:
6. Uncheck both check boxes.
7. Click the Finish button from the "Completing the Perle DeviceManager Setup Wizard" dialog box. The DeviceManager installation is complete.
8. Go to Step 4: Install the Perle DS.
12 Perle Device Server (DS) Installation Instructions 75-0302-1463-1, Version 1

Step 4: Install the Perle DS 1. Install the Perle DS using the mounting flanges with screw holes.
2. Connect the Perle DS to the network.
a. Connect the Ethernet cable from the network to the Perle DS 10/100 ETHERNET connector.
b. Connect the RS-232, DB-9, serial cable from the Perle DS SERIAL connector to the Port Controller or lane device.
SERIAL Connector
10/100 ETHERNET Connector
Mounting Flange
Screw Holes
Perle Device Server (DS) Installation Instructions 13 75-0302-1463-1, Version 1

3. Plug the 12 VDC power supply into an AC receptacle.
CAUTION!: Ensure that the power supply meets the following specifications: Input—120 VAC, 60 Hz; Output—12 VDC, 400 mA, as shown on the power supply label in the following figure. If the power supply does not meet these specifications, damage to the Perle DS can occur.
4. Connect the power supply cable to the Perle DS, as shown in the figure below.
Power Supply Cable
Switch ON=Console OFF=Serial
14 Perle Device Server (DS) Installation Instructions 75-0302-1463-1, Version 1

5. Set the console/serial selection switch (see figure above) to the OFF (Serial) position.
Note: Wait for the device to boot up (minimum of 30 seconds). When the device is done booting up, both the Power/Ready and Link/10/100 indicators (see figure below) are solidly lit (i.e., not flickering).
6. From the Windows Taskbar, click Start>All Programs>Perle>Device Manager>Device Manager
(or click the Perle DeviceManager icon on the Windows Desktop) to start the DeviceManager; the "DeviceManager" dialog box is displayed:
7. Check Manage Device Server.
8. Click the OK button from the "DeviceManager" dialog box; the "Manage Device Server" dialog box is displayed:
Power/Ready Link/10/100
Indicators
Perle Device Server (DS) Installation Instructions 15 75-0302-1463-1, Version 1

9. Click the Search Local Network button from the "Manage Device Server" dialog box; the devices are displayed in the "Device Server List":
10. Verify that the MAC (Media Access Control) Address (e.g., 00-80-D4-06-2F-CE), for the Perle DS
installed in step 1, is listed on the "Device Server List".
Note: The MAC address (e.g., 00-80-D4-06-2F-CE) is printed on the Perle DS rear label, as shown in the figure below.
Note: If the device is not listed, go to Step 5: Configure the Perle DS Serial Communication
Settings. If the device is listed, go to Step 6: Ping the Device.
Ethernet/MAC Address
16 Perle Device Server (DS) Installation Instructions 75-0302-1463-1, Version 1

Step 5: Configure the Perle DS Serial Communication Settings This procedure describes how to manually configure the Perle DS RS-232 serial communication settings, using a null modem serial cable and the Tera Term Pro terminal emulation program.
1. Connect a null modem serial cable between the Perle DS SERIAL connector and a ScanNet server serial port (e.g., COM 1).
2. Start Tera Term Pro.
3. Click Setup from the drop-down menu and then Keyboard...;
the "Tera Term: Keyboard setup" dialog box is displayed:
SERIAL Connector
Perle Device Server (DS) Installation Instructions 17 75-0302-1463-1, Version 1

4. Check both "Transmit DEL by:" check boxes:
a. Backspace key
b. Delete key
5. Click the OK button from the "Tera Term: Keyboard setup" dialog box.
6. Click Setup from the drop-down menu and then click the Serial port... menu item;
the "Tera Term: Serial port setup" dialog box is displayed:
7. Select the following settings from the drop-down menus:
a. Port: COM1
b. Baud rate: 9600
c. Data:, 8 bit
d. Parity: none
e. Stop : 1 bit
f. Flow control: none
8. Click the OK button from the "Tera Term: Serial port setup" dialog box.
18 Perle Device Server (DS) Installation Instructions 75-0302-1463-1, Version 1

9. Set the Perle DS console/serial switch to the ON (Console) position.
10. At the "Tera Term - COM1 VT" window, observer that the Perle DS is booting. When the Perle DS
has completed the boot process, the "Login:" prompt is displayed:
Switch ON=Console OFF=Serial
Login Prompt
Perle Device Server (DS) Installation Instructions 19 75-0302-1463-1, Version 1

11. Press/hold the RESET switch until "Factory Reset switch detected" is displayed:
12. Release the RESET switch.
RESET Switch
Reset Detected
Power Supply Cable
20 Perle Device Server (DS) Installation Instructions 75-0302-1463-1, Version 1

13. When the Perle DS has completed the reset, the "Login:" prompt is displayed:
14. At the "Login:" prompt, type "admin" and then press the Enter key.
15. At the "Password:" prompt, type "superuser" and then press the Enter key.
16. At the "SDS1#" prompt, type "set server internet XXX.XXX.XXX.XXX" (where XXX.XXX.XXX.XXX is the Perle DS IP address, see Error! Reference source not found., page Error! Bookmark not defined.) (e.g., 10.31.251.142) and then press the Enter key.
17. At the "SDS1#" prompt, type "set server netmask XXX.XXX.XXX.X" (where XXX.XXX.XXX.X is the Perle DS netmask, see Error! Reference source not found., page Error! Bookmark not defined.)(e.g., 255.255.255.0) and then press the Enter key.
18. At the "SDS1#" prompt, type "set service dhcp/boot off" and then press the Enter key.
19. At the "SDS1#" prompt, type "show server" and then press the Enter key; server (i.e., Perle DS) information, including the Internet Address (IP) and Netmask (subnet mask), is displayed.
Login Prompt
Internet Address
and Netmask
Perle Device Server (DS) Installation Instructions 21 75-0302-1463-1, Version 1

20. Verify that the Internet (IP) Address and Netmask (subnet mask) are correct
(refer to step 16 and 17 above).
21. Verify that the Disabled Services line indicates "DHCP/BOOTP".
22. At the "SDS1#" prompt, type "reboot" and then press the Enter key to reboot the Perle DS.
23. Type "y" (yes) when prompted to "Save config to flash ROM y/n" and then press the Enter key.
24. Type "y" (yes) when prompted to "Confirm reboot unit y/n" and then press the Enter key; observe that the Perle DS is booting (indicators flickering).
25. When the Perle DS bootup is complete (i.e., indicators are solidly lit), set the console/serial switch to OFF (Serial).
26. Cycle the Perle DS power (unplug/plug in the power supply cable).
Disabled Services
Reboot
22 Perle Device Server (DS) Installation Instructions 75-0302-1463-1, Version 1

27. Start the DeviceManager, the "DeviceManager" dialog box is displayed:
28. Check Manage Device Server and then click the OK button from the "DeviceManager" dialog box;
the "Manage Device Server" dialog box is displayed:
29. Click the Search Local Network button from the "Manage Device Server" dialog box; the devices
are displayed on the "Device Server List":
Perle Device Server (DS) Installation Instructions 23 75-0302-1463-1, Version 1
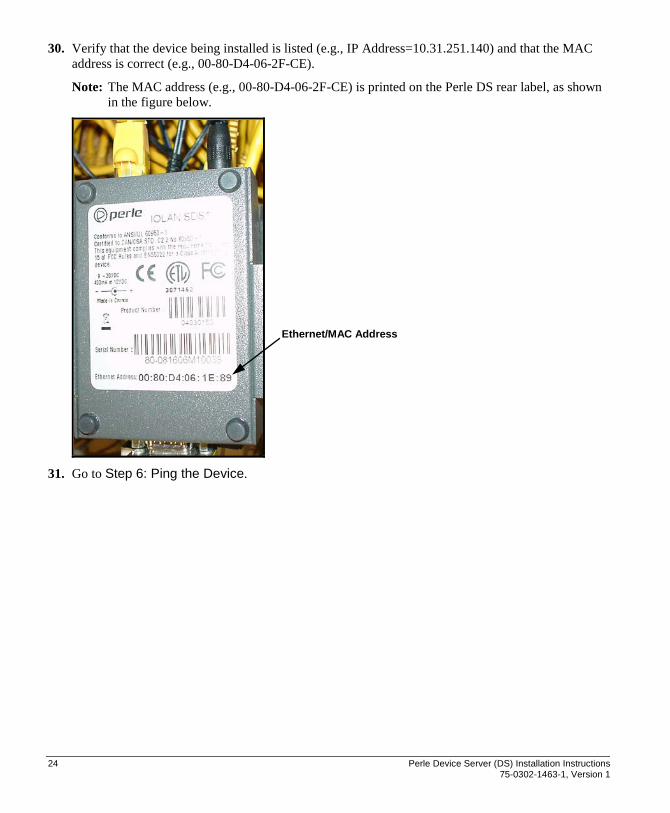
30. Verify that the device being installed is listed (e.g., IP Address=10.31.251.140) and that the MAC address is correct (e.g., 00-80-D4-06-2F-CE).
Note: The MAC address (e.g., 00-80-D4-06-2F-CE) is printed on the Perle DS rear label, as shown in the figure below.
31. Go to Step 6: Ping the Device.
Ethernet Address Ethernet/MAC Address
24 Perle Device Server (DS) Installation Instructions 75-0302-1463-1, Version 1

Step 6: Ping the Device 1. Start the Device Manager; the "DeviceManager" dialog box is displayed:
2. Check Manage Device Server and then click the OK button from the "DeviceManager" dialog box;
the "Manage Device Server" dialog box is displayed:
Note: If the device is listed on the "Device Server List", the device can be pinged from the "Manage
Device Server" dialog box, continue with step 3. If the device is not listed, it must be pinged from the Windows command prompt, go to step 5 below.
3. From the "Manage Device Server" dialog box "Device Server List", click to select the device.
Perle Device Server (DS) Installation Instructions 25 75-0302-1463-1, Version 1

4. Click the Ping button; observe that the ping results are indicated in the "Ping" dialog box:
See the note on page 27.
5. From the Windows Taskbar click Start>Run; the "Run" dialog box is displayed:
6. In the "Open:" field, type "cmd" (or select "cmd" from the drop-down menu).
7. Click the OK button from the "Run" dialog box; the "C:\WINDOWS\system32\cmd.exe" window is
displayed:
26 Perle Device Server (DS) Installation Instructions 75-0302-1463-1, Version 1

8. At the command prompt (>), type "ping XX.XX.XXX.XXX" (where XX.XX.XXX.XXX is the Perle DS IP address; e.g., 10.31.251.146); the ping reply information is displayed:
Note: If the device is pinged successfully (i.e., a reply from the device is received), but the device is
not listed on "Device Server List", the device must be added manually; go to Step 7: Add the Device Manually. If the device is listed, go to Step 8: Update the Perle DS Firmware.
Perle Device Server (DS) Installation Instructions 27 75-0302-1463-1, Version 1

Step 7: Add the Device Manually Note: Perform this step only if the device is pinged successfully in Step 6: Ping the Device, but the
device is not listed on the "Device Server List". If the device is listed on the "Device Server List", go to Step 8: Update the Perle DS Firmware.
1. Start the Device Manager; the "DeviceManager" dialog box is displayed:
2. Check Manage Device Server and then click the OK Button from the "DeviceManager" dialog
box; the "Manage Device Server" dialog box is displayed:
3. Click the Static Server List button from the "Manage Device Server" dialog box; the
"Static Servers" dialog box is displayed:
28 Perle Device Server (DS) Installation Instructions 75-0302-1463-1, Version 1

4. In the "IP Address" field, type the Perle DS device IP address (e.g., 10.31.251.142).
5. Click the Add Server button from the "Static Servers" dialog box; the device is listed on the
"Device Server List":
6. From the "Device Server List", click to select the Perle DS device
(e.g., IOLAN SDS1, IP Address=10.31.251.142).
7. Click the OK button from the "Manage Device Server" dialog box; the "Login" dialog box is displayed:
Perle Device Server (DS) Installation Instructions 29 75-0302-1463-1, Version 1

8. In the "Password:" field, type "superuser".
Note: Each new Perle DS has firmware already installed; however, it may not be the most current version.
9. Click the OK button from the "Login" dialog box; the "DeviceManager" window is displayed:
10. Ensure that the Perle DS firmware "Version" {e.g., 3.0 (Build 3)}is the same version that was
downloaded in Step 1: Download Firmware and Device Drivers.
a. If the firmware version is the same, go to Step 9: Download Settings to Perle DS.
b. If the firmware version is not the same, go to Step 8: Update the Perle DS Firmware.
30 Perle Device Server (DS) Installation Instructions 75-0302-1463-1, Version 1

Step 8: Update the Perle DS Firmware In this procedure, the Perle DS firmware is updated to the latest version.
1. From the DeviceManager Tools drop-down menu, click Download Firmware to Unit;
the Open window is displayed:
2. Click to select the Perle DS firmware file (e.g., iolan_sds_v31g12.bin) and then
click the Open button; the following "DeviceManager" dialog box is displayed:
3. Click the OK button; the following "DeviceManager" dialog box is displayed:
Perle Device Server (DS) Installation Instructions 31 75-0302-1463-1, Version 1

4. Click the Yes button; the following "DeviceManager" dialog box is displayed:
5. Click the OK button, the following "DeviceManager" dialog box is displayed:
6. Click the OK button.
The Perle DS firmware update is complete.
7. Continue with Step 9: Download Settings to Perle DS.
32 Perle Device Server (DS) Installation Instructions 75-0302-1463-1, Version 1

Step 9: Download Settings to Perle DS 1. From the "DeviceManger - Session" window, in the left pane, expand
Configuration>Server Configuration.
2. Click to select Server; the server information is displayed in a dialog box in the right pane:
Note: The default Server Name is "localhost". It is recommended that the Server Name entered in
step 3 below describe a particular facility/location (e.g., Main Street Garage).
3. Type the Perle DS name in the "Server Name" field.
4. Verify the following:
a. Internet Address (Eth1): Perle DS IP address (e.g., 10.31.251.142)
b. Mask: Perle DS subnet mask (e.g., 255.255.255.0)
c. DHCP/BOOTP: not checked
Perle Device Server (DS) Installation Instructions 33 75-0302-1463-1, Version 1

5. Click the Advanced... button in the right pane; the "Advanced Server Settings" dialog box is displayed:
6. Clear the following fields in the "Advanced Server Settings" dialog box:
a. Line Menu String
b. Session Escape String
c. Power Management Menu String
7. Click the OK button from the "Advanced Server Settings" dialog box.
8. Click the Apply button in the "Session 1 (Server)" window.
9. Expand Line Configuration in the left pane.
Note: "Line" indicates the Perle DS port number. For an SDS1, the "1" indicates that there is one port.
34 Perle Device Server (DS) Installation Instructions 75-0302-1463-1, Version 1

10. Click to select Line in the left pane; the Line 1 information is displayed in the right pane dialog box.
11. In the "Line" section in the right pane dialog box, do the following:
Note: For the "Line Name", spaces are not allowed.
a. Line Name: type the line name (e.g., "Line1" or "Line_1").
b. Service: from the drop-down menu, select Rev Raw.
c. Terminal Type: from the drop-down menu, select Dumb.
d. DS Port: verify that "10001" is displayed (default).
12. In the "Hardware Settings" area, from each of the drop-down menus, select the following:
a. Serial Interface: EIA-232
b. Speed: 9600
c. Bits: 8
d. Parity: Odd
e. Stop Bits: 1
f. Flow Control: None Note: For all other settings, accept the defaults.
13. Click the Apply button from the "Session 1 (Server)" dialog box.
Perle Device Server (DS) Installation Instructions 35 75-0302-1463-1, Version 1

14. From the Tools drop-down menu, click Download Configuration to Unit;
the following "Device Manager" dialog box is displayed:
15. Click the Yes button; the following "Device Manager" dialog box is displayed:
16. Click the OK button.
17. From the Tools drop-down menu, click Reboot Server; the prompt "Are you sure?" is displayed.
18. Click YES at the prompt; the Perle DS indicators flicker while the device is rebooting. When the indicators are solidly lit, the reboot is complete.
19. Close the DeviceManager.
36 Perle Device Server (DS) Installation Instructions 75-0302-1463-1, Version 1

Step 10: TruePort Configuration This procedure describes adding a TruePort COM port.
1. Start the TruePort Device Management Tool.
2. Click the Add... button from the "TruePort Device Management Tool" dialog box; the "Add Device
Wizard Choose Device" dialog box is displayed:
Perle Device Server (DS) Installation Instructions 37 75-0302-1463-1, Version 1

3. Click to select IOLAN DS family from the "Choose Device" dialog box, "Available Devices" box.
4. Click the Next > button from the "Choose Device" dialog box; the "Configure Device" dialog box is
displayed:
5. Check IP Address in the "Network Settings" section.
6. Type the Perle DS IP address (e.g., 10.31.251.142) in the "IP Address" field.
7. Type the device name in the "Device Name" field (i.e., the Perle DS name; e.g., "Perle_Test").
38 Perle Device Server (DS) Installation Instructions 75-0302-1463-1, Version 1

8. Click the Next > button from the "Configure Device" dialog box; the "Add Serial Ports" dialog box is displayed:
9. Select the number of ports from the "Number of Ports:" field (e.g., for an SDS1, select 1) using the
∧∨ buttons.
Note: In step 10, select an unused COM port.
10. Select the starting COM port (e.g., COM2) from the "Starting COM Port:" field using the ∨ button; the COM port is displayed in the box on the right.
11. Click the Next > button from the "Add Serial Ports" dialog box; the "Device Installation" dialog box is displayed:
Perle Device Server (DS) Installation Instructions 39 75-0302-1463-1, Version 1
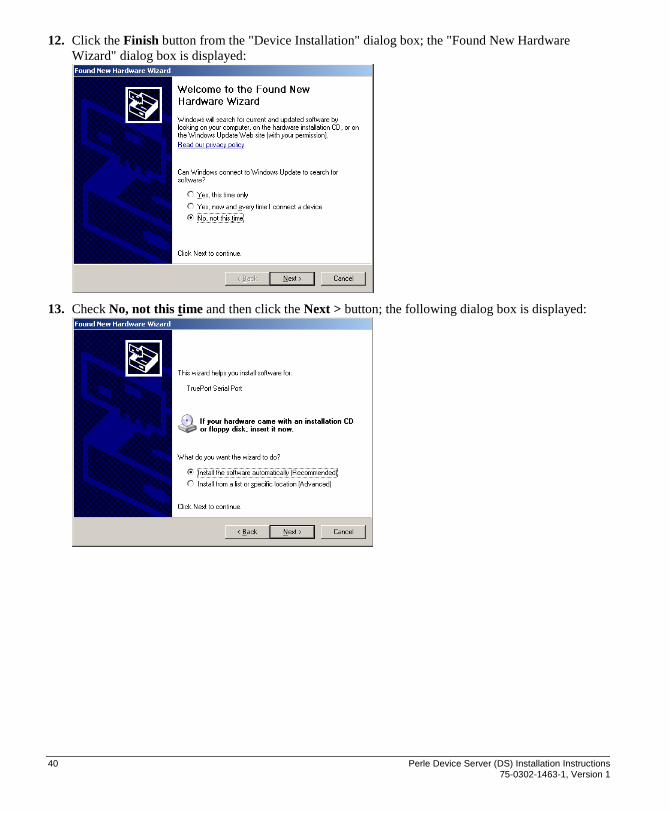
12. Click the Finish button from the "Device Installation" dialog box; the "Found New Hardware Wizard" dialog box is displayed:
13. Check No, not this time and then click the Next > button; the following dialog box is displayed:
40 Perle Device Server (DS) Installation Instructions 75-0302-1463-1, Version 1

14. Check Install the software automatically (Recommended) and then click the Next > button; the following software installation caution dialog box is displayed: Note: Ignore the following caution. Go to step 15 below.
15. Click the Continue Anyway button from the software installation caution dialog box: the
"Completing the Found New Hardware Wizard" dialog box is displayed:
Perle Device Server (DS) Installation Instructions 41 75-0302-1463-1, Version 1

16. Click the Finish button from the "Completing the Found New Hardware Wizard" dialog box; the "TruePort Device Management Tool" dialog box is displayed:
17. Click the Properties button from the "TruePort Device Management Tool" dialog box: the
"IOLAN DS family Properties" dialog box is displayed:
18. Click the Configuration tab; the "IOLAN DS family Settings" dialog box is displayed
42 Perle Device Server (DS) Installation Instructions 75-0302-1463-1, Version 1

19. Click to select the COM port {e.g., COM2 (Connect; 10001)}; the connection settings are displayed:
20. Verify the following settings:
a. Connection Mode: Lite Mode
b. Initiate Connection to Device (Client-Initiated Connection): checked
c. Connection to TCP Port: 10001
21. Click the OK button.
Perle Device Server (DS) Installation Instructions 43 75-0302-1463-1, Version 1

22. Click the Advanced tab; the advanced tab settings are displayed:
23. Check Keep TCP connection open when COM port is closed.
24. Uncheck Enable Nagle Algorithm.
25. Click the Close button.
44 Perle Device Server (DS) Installation Instructions 75-0302-1463-1, Version 1

26. Set the console/serial switch to the OFF (Serial) position.
Switch ON=Console OFF=Serial
Power Supply Cable
Perle Device Server (DS) Installation Instructions 45 75-0302-1463-1, Version 1

27. Reboot the Perle DS, do one of the following:
a. If the device is readily accessible—cycle the power (unplug/plug in the power supply cable).
b. If the device is remote—use the web-based configuration utility to reboot the device.
1) From the Windows Taskbar click Start>Control Panel>System and then click the Hardware tab:
2) Click the Device Manager button; the Windows "Device Manager" window is displayed:
46 Perle Device Server (DS) Installation Instructions 75-0302-1463-1, Version 1

3) Expand Multi-port serial adapters and double-click the Perle DS to reboot {e.g., IOLAN DS family (Perle_Test)}; the "IOLAN DS family Properties" dialog box is displayed:
4) Click the Configuration tab, the "Configuration" tab is displayed:
Perle Device Server (DS) Installation Instructions 47 75-0302-1463-1, Version 1

5) Click the Web Config button from the "Configuration" tab; the web-based configuration utility window is displayed:
6) In the Password field type "superuser"; the "Server Configuration" window is displayed:
7) Click the Reboot button; the device is rebooted.
The Perle DS installation is complete.
48 Perle Device Server (DS) Installation Instructions 75-0302-1463-1, Version 1