PerfectDisk Hyper-V Configuration Guide - Raxcoftp.raxco.com/pub/download/pd14.0/userguides/... ·...
23
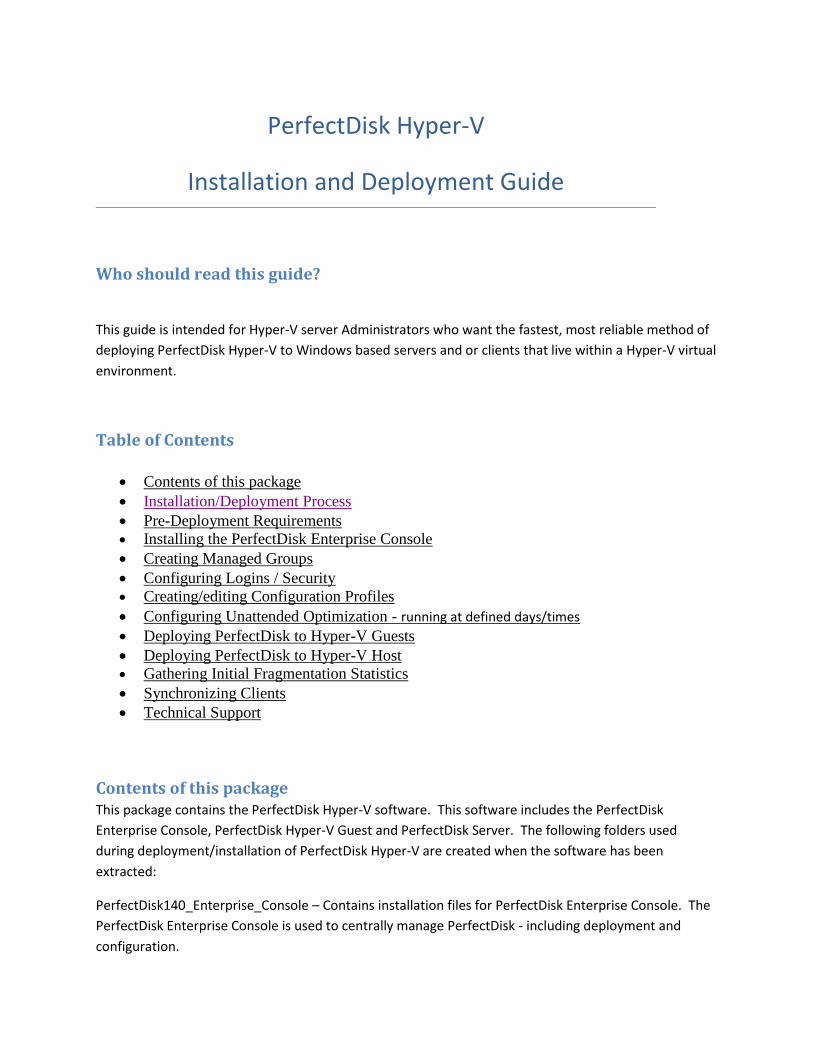
PerfectDisk Hyper-V Installation and Deployment Guide Who should read this guide? This guide is intended for Hyper-V server Administrators who want the fastest, most reliable method of deploying PerfectDisk Hyper-V to Windows based servers and or clients that live within a Hyper-V virtual environment. Table of Contents Contents of this package Installation/Deployment Process Pre-Deployment Requirements Installing the PerfectDisk Enterprise Console Creating Managed Groups Configuring Logins / Security Creating/editing Configuration Profiles Configuring Unattended Optimization - running at defined days/times Deploying PerfectDisk to Hyper-V Guests Deploying PerfectDisk to Hyper-V Host Gathering Initial Fragmentation Statistics Synchronizing Clients Technical Support Contents of this package This package contains the PerfectDisk Hyper-V software. This software includes the PerfectDisk Enterprise Console, PerfectDisk Hyper-V Guest and PerfectDisk Server. The following folders used during deployment/installation of PerfectDisk Hyper-V are created when the software has been extracted: PerfectDisk140_Enterprise_Console – Contains installation files for PerfectDisk Enterprise Console. The PerfectDisk Enterprise Console is used to centrally manage PerfectDisk - including deployment and configuration.
-
Upload
nguyendien -
Category
Documents
-
view
236 -
download
0
Transcript of PerfectDisk Hyper-V Configuration Guide - Raxcoftp.raxco.com/pub/download/pd14.0/userguides/... ·...
PerfectDisk Hyper-V
Installation and Deployment Guide
Who should read this guide?
This guide is intended for Hyper-V server Administrators who want the fastest, most reliable method of
deploying PerfectDisk Hyper-V to Windows based servers and or clients that live within a Hyper-V virtual
environment.
Table of Contents
Contents of this package
Installation/Deployment Process
Pre-Deployment Requirements
Installing the PerfectDisk Enterprise Console
Creating Managed Groups
Configuring Logins / Security
Creating/editing Configuration Profiles
Configuring Unattended Optimization - running at defined days/times
Deploying PerfectDisk to Hyper-V Guests
Deploying PerfectDisk to Hyper-V Host
Gathering Initial Fragmentation Statistics
Synchronizing Clients
Technical Support
Contents of this package This package contains the PerfectDisk Hyper-V software. This software includes the PerfectDisk
Enterprise Console, PerfectDisk Hyper-V Guest and PerfectDisk Server. The following folders used
during deployment/installation of PerfectDisk Hyper-V are created when the software has been
extracted:
PerfectDisk140_Enterprise_Console – Contains installation files for PerfectDisk Enterprise Console. The
PerfectDisk Enterprise Console is used to centrally manage PerfectDisk - including deployment and
configuration.
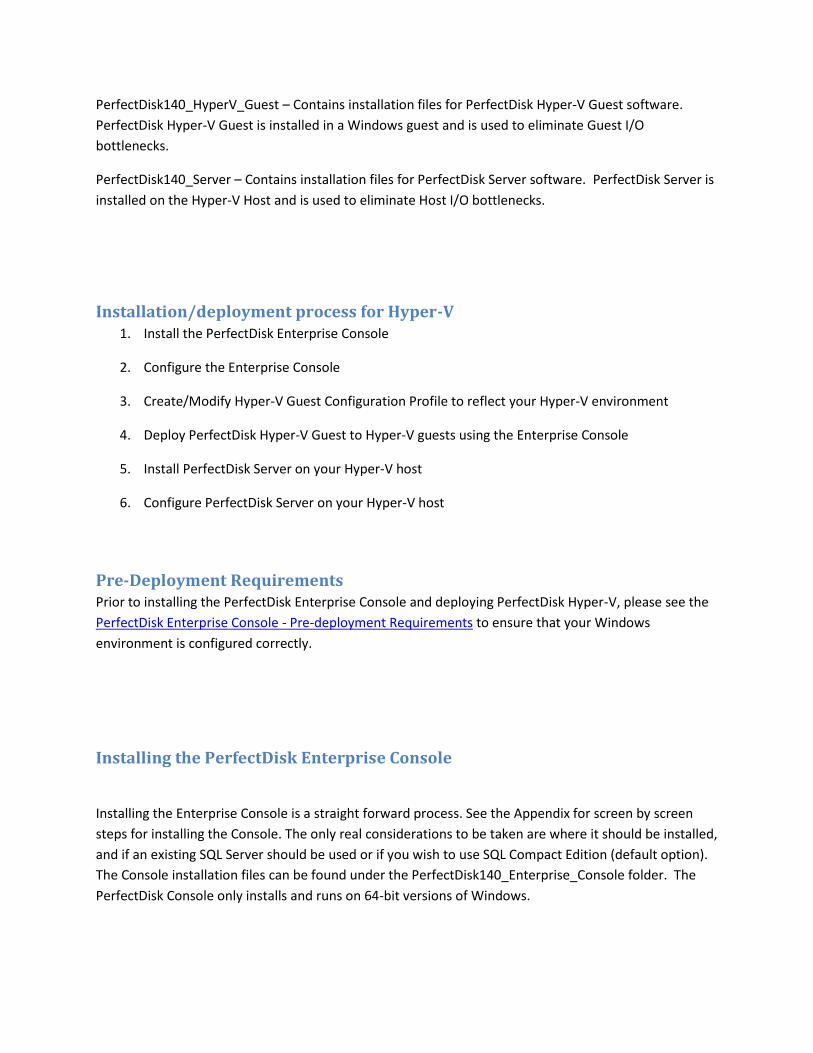
PerfectDisk140_HyperV_Guest – Contains installation files for PerfectDisk Hyper-V Guest software.
PerfectDisk Hyper-V Guest is installed in a Windows guest and is used to eliminate Guest I/O
bottlenecks.
PerfectDisk140_Server – Contains installation files for PerfectDisk Server software. PerfectDisk Server is
installed on the Hyper-V Host and is used to eliminate Host I/O bottlenecks.
Installation/deployment process for Hyper-V 1. Install the PerfectDisk Enterprise Console
2. Configure the Enterprise Console
3. Create/Modify Hyper-V Guest Configuration Profile to reflect your Hyper-V environment
4. Deploy PerfectDisk Hyper-V Guest to Hyper-V guests using the Enterprise Console
5. Install PerfectDisk Server on your Hyper-V host
6. Configure PerfectDisk Server on your Hyper-V host
Pre-Deployment Requirements Prior to installing the PerfectDisk Enterprise Console and deploying PerfectDisk Hyper-V, please see the
PerfectDisk Enterprise Console - Pre-deployment Requirements to ensure that your Windows
environment is configured correctly.
Installing the PerfectDisk Enterprise Console
Installing the Enterprise Console is a straight forward process. See the Appendix for screen by screen
steps for installing the Console. The only real considerations to be taken are where it should be installed,
and if an existing SQL Server should be used or if you wish to use SQL Compact Edition (default option).
The Console installation files can be found under the PerfectDisk140_Enterprise_Console folder. The
PerfectDisk Console only installs and runs on 64-bit versions of Windows.
Installation: Raxco recommends that the Console be installed within the Virtual environment for maximum
performance. This also avoids issues with Domain trusts when / if crossing domains and allows for
unhindered communication – your firewall policies notwithstanding. To install the Console on a guest in
your Hyper-V virtualized environment, copy the PerfectDisk140_Enterprise_Console folder to the guest
and double click on InstallPDEC.exe to begin the installation process.
Database selection: The Console has the ability to install using an existing Microsoft SQL server or by default will use SQL
Compact Edition on the local system. For performance reasons Raxco recommends that you do not use
SQL Compact Edition if you will be administering over 100 clients. Use SQL Server 2005 and up to scale
to greater numbers.
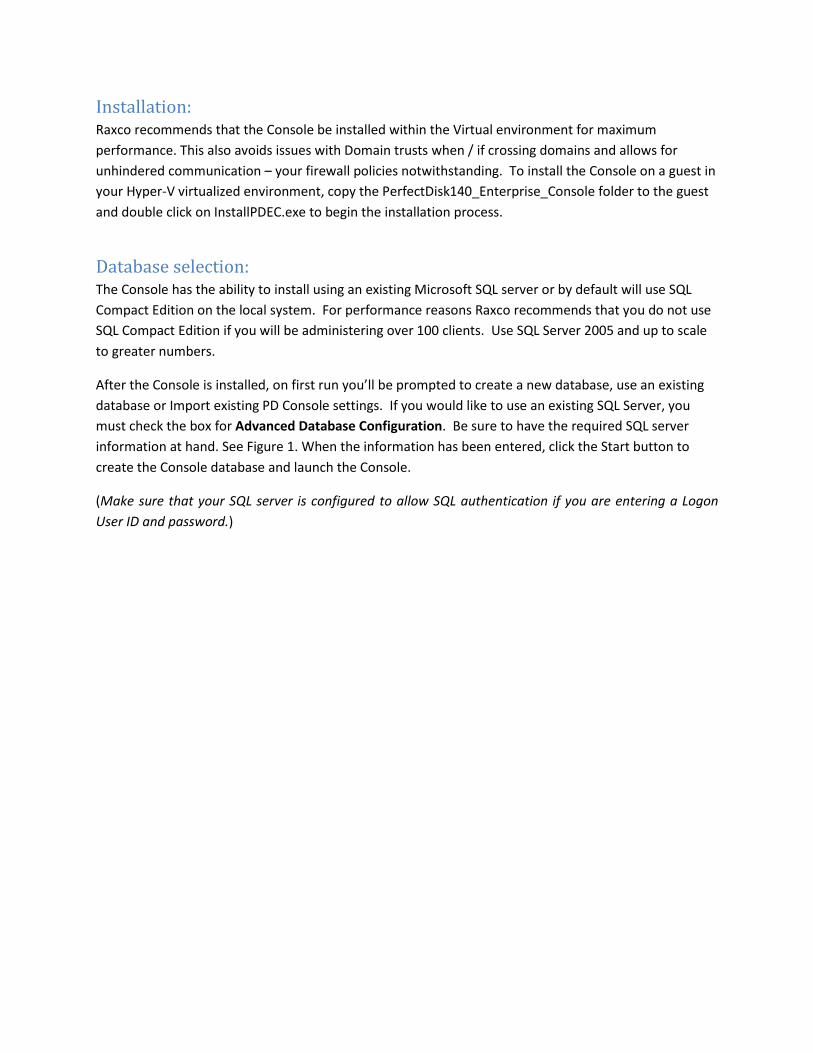
After the Console is installed, on first run you’ll be prompted to create a new database, use an existing
database or Import existing PD Console settings. If you would like to use an existing SQL Server, you
must check the box for Advanced Database Configuration. Be sure to have the required SQL server
information at hand. See Figure 1. When the information has been entered, click the Start button to
create the Console database and launch the Console.
(Make sure that your SQL server is configured to allow SQL authentication if you are entering a Logon
User ID and password.)
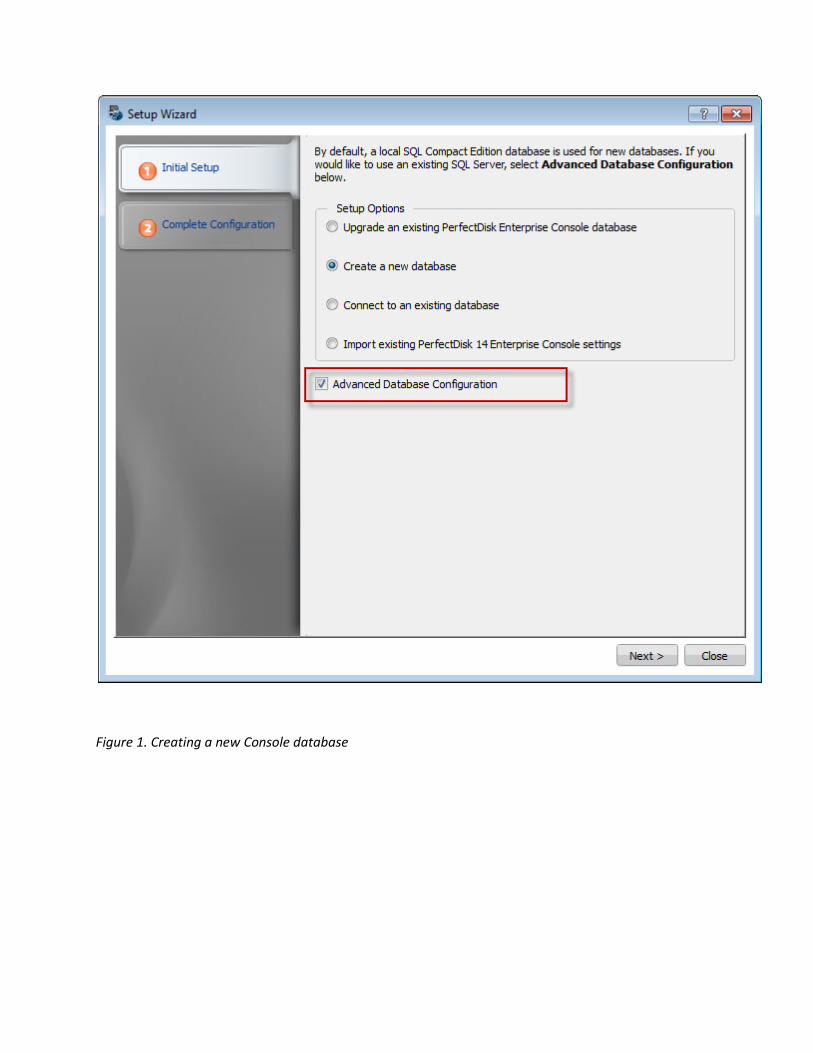
Figure 1. Creating a new Console database
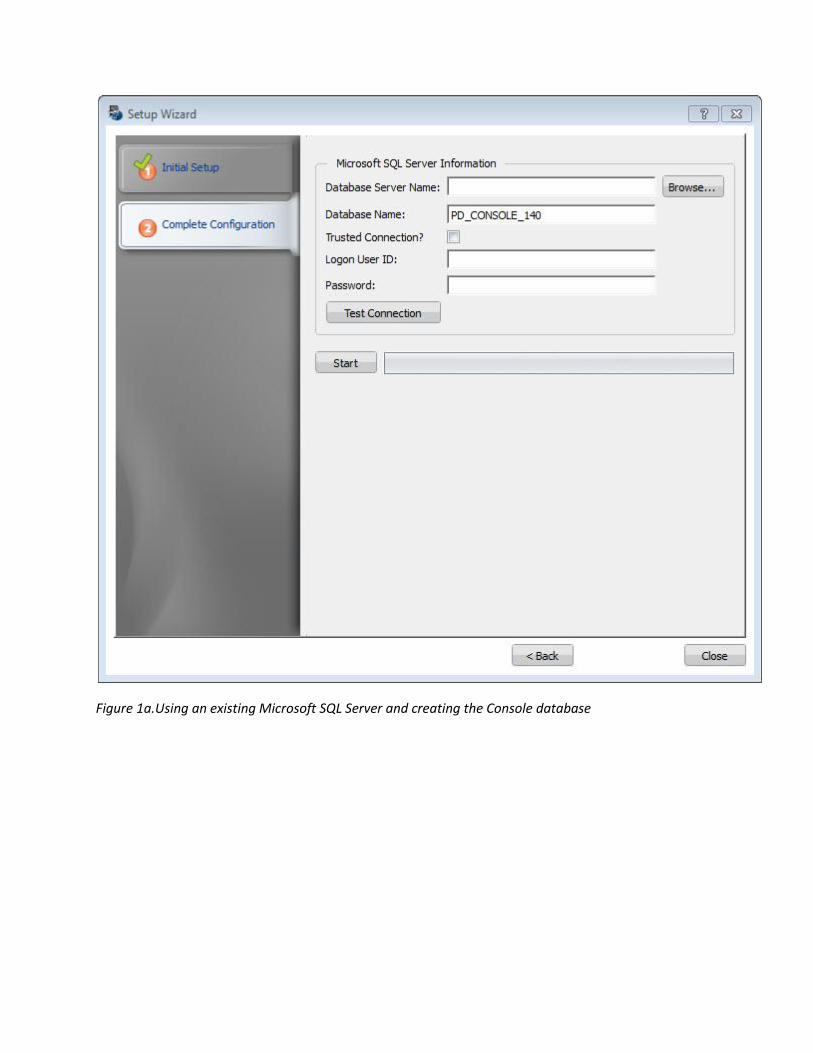
Figure 1a.Using an existing Microsoft SQL Server and creating the Console database
Figure 2. The Console
Creating Managed Groups Next we begin creating our Managed Groups. Typical configuration involves two major groups, Servers
and Clients. Typical production environments for Hyper-V are generally server focused, so for this the
purposes of this guide we will only create one Subgroup servers. (With one server serving as the Console
host)
From the main Console screen, begin by clicking the button on the right
hand side. See figures 3 and 4 for an example.

Figure 3. Creating Managed Groups

Figure 4. Organizing machines into groups
Once you’ve setup and organized all your groups, we move on to providing the Console access to these
machines.
Configuring Logins / Security
Begin by select Security and creating a profile. In this example we’ll use one set of valid
credentials for all machines.
Follow Figures 5 and 6 for an example of how to create and assign login profiles.

Figure 5. Create a new login profile
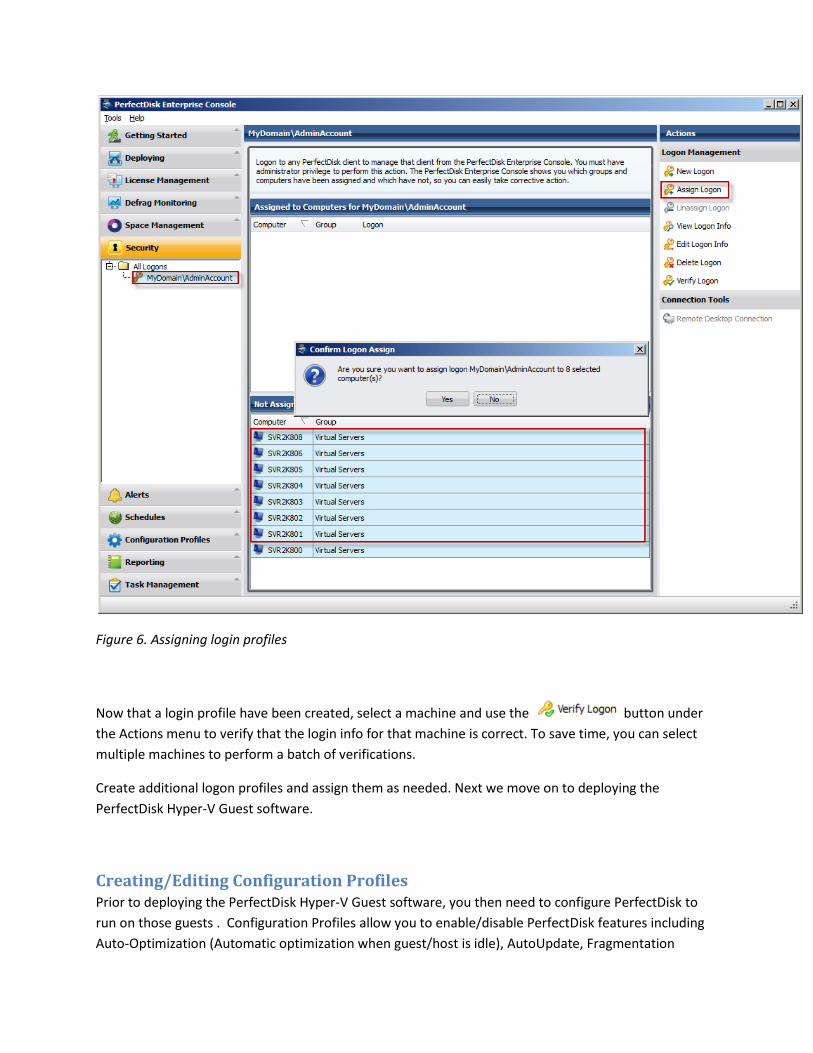
Figure 6. Assigning login profiles
Now that a login profile have been created, select a machine and use the button under
the Actions menu to verify that the login info for that machine is correct. To save time, you can select
multiple machines to perform a batch of verifications.
Create additional logon profiles and assign them as needed. Next we move on to deploying the
PerfectDisk Hyper-V Guest software.
Creating/Editing Configuration Profiles Prior to deploying the PerfectDisk Hyper-V Guest software, you then need to configure PerfectDisk to
run on those guests . Configuration Profiles allow you to enable/disable PerfectDisk features including
Auto-Optimization (Automatic optimization when guest/host is idle), AutoUpdate, Fragmentation
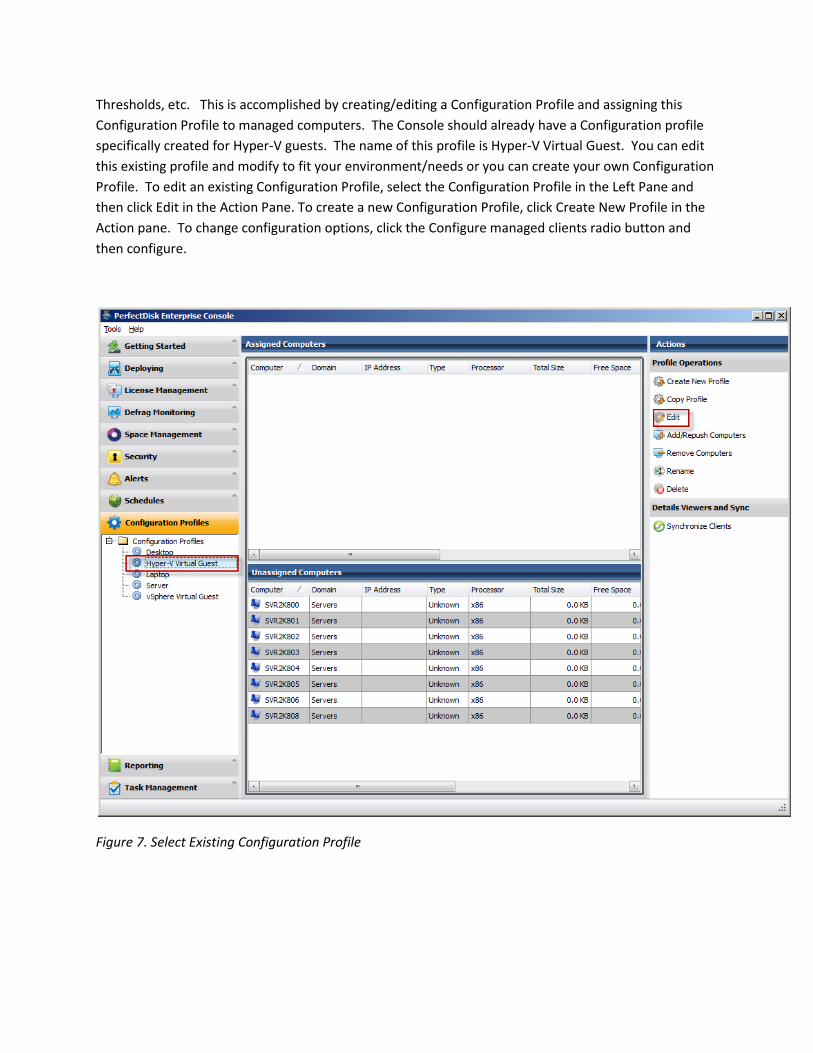
Thresholds, etc. This is accomplished by creating/editing a Configuration Profile and assigning this
Configuration Profile to managed computers. The Console should already have a Configuration profile
specifically created for Hyper-V guests. The name of this profile is Hyper-V Virtual Guest. You can edit
this existing profile and modify to fit your environment/needs or you can create your own Configuration
Profile. To edit an existing Configuration Profile, select the Configuration Profile in the Left Pane and
then click Edit in the Action Pane. To create a new Configuration Profile, click Create New Profile in the
Action pane. To change configuration options, click the Configure managed clients radio button and
then configure.
Figure 7. Select Existing Configuration Profile
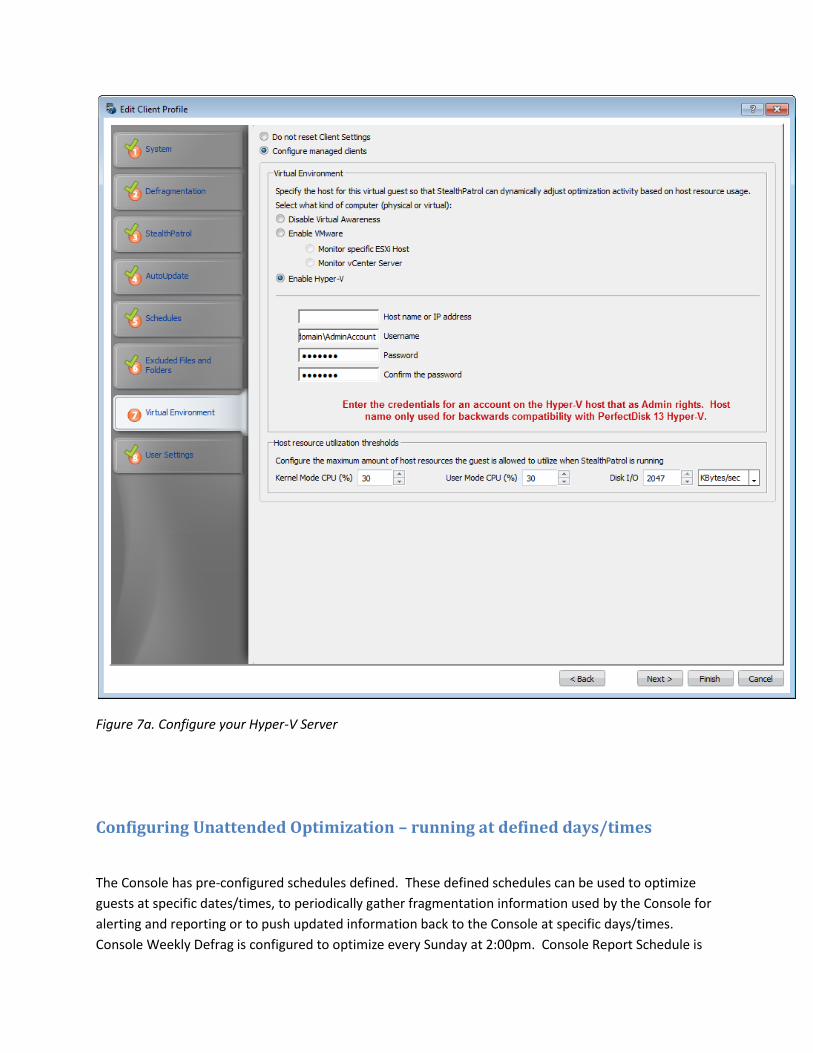
Figure 7a. Configure your Hyper-V Server
Configuring Unattended Optimization – running at defined days/times
The Console has pre-configured schedules defined. These defined schedules can be used to optimize
guests at specific dates/times, to periodically gather fragmentation information used by the Console for
alerting and reporting or to push updated information back to the Console at specific days/times.
Console Weekly Defrag is configured to optimize every Sunday at 2:00pm. Console Report Schedule is
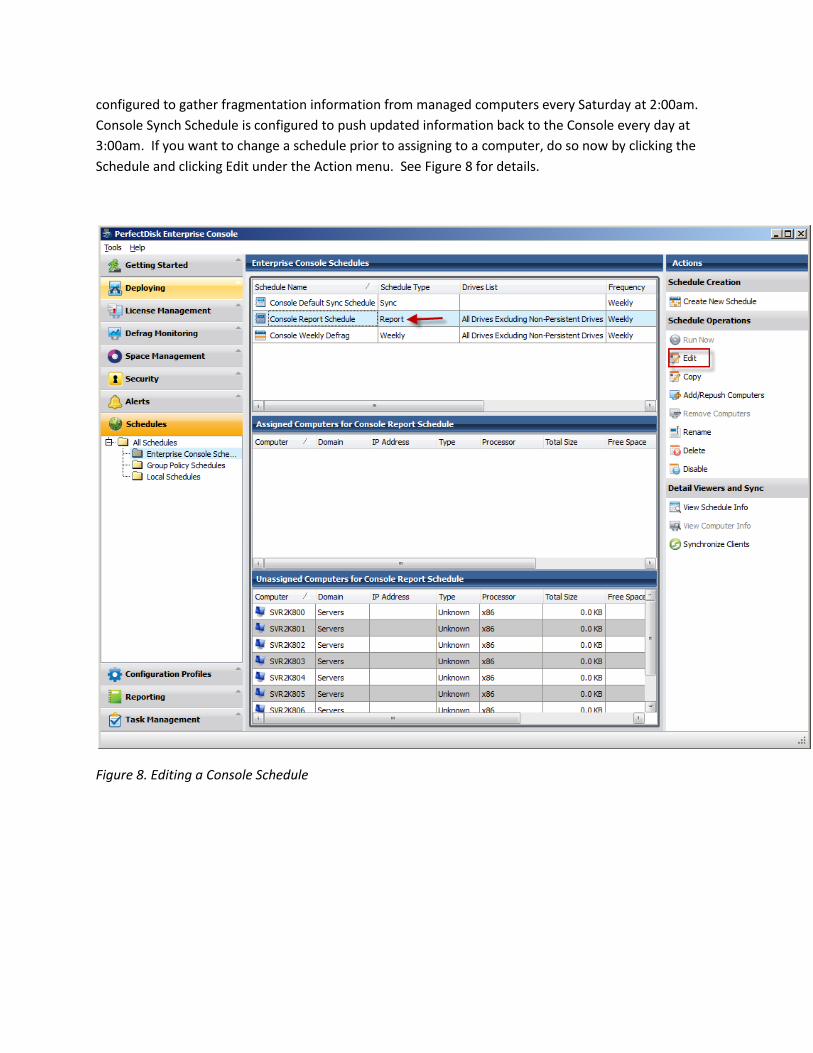
configured to gather fragmentation information from managed computers every Saturday at 2:00am.
Console Synch Schedule is configured to push updated information back to the Console every day at
3:00am. If you want to change a schedule prior to assigning to a computer, do so now by clicking the
Schedule and clicking Edit under the Action menu. See Figure 8 for details.
Figure 8. Editing a Console Schedule
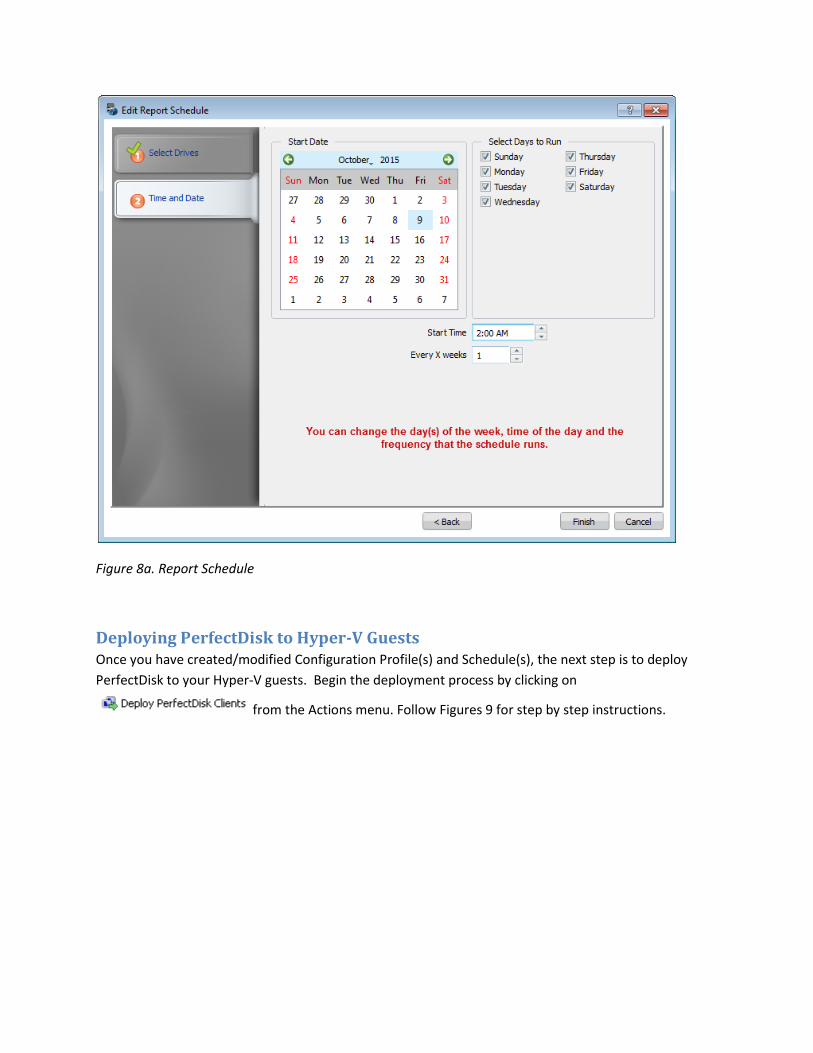
Figure 8a. Report Schedule
Deploying PerfectDisk to Hyper-V Guests Once you have created/modified Configuration Profile(s) and Schedule(s), the next step is to deploy
PerfectDisk to your Hyper-V guests. Begin the deployment process by clicking on
from the Actions menu. Follow Figures 9 for step by step instructions.
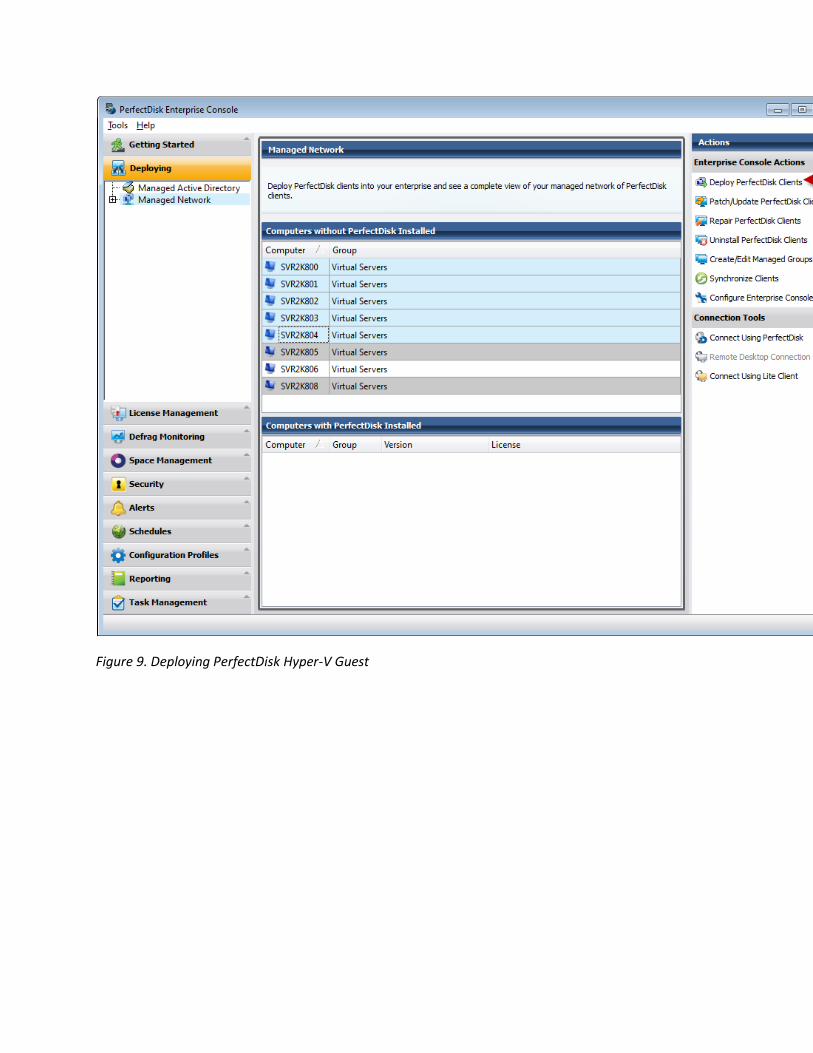
Figure 9. Deploying PerfectDisk Hyper-V Guest

Figure 9b. Pre-Deployment

Figure 9c. Client Selection

Figure 9d. Assignment of Configuration Profile and/or Schedules
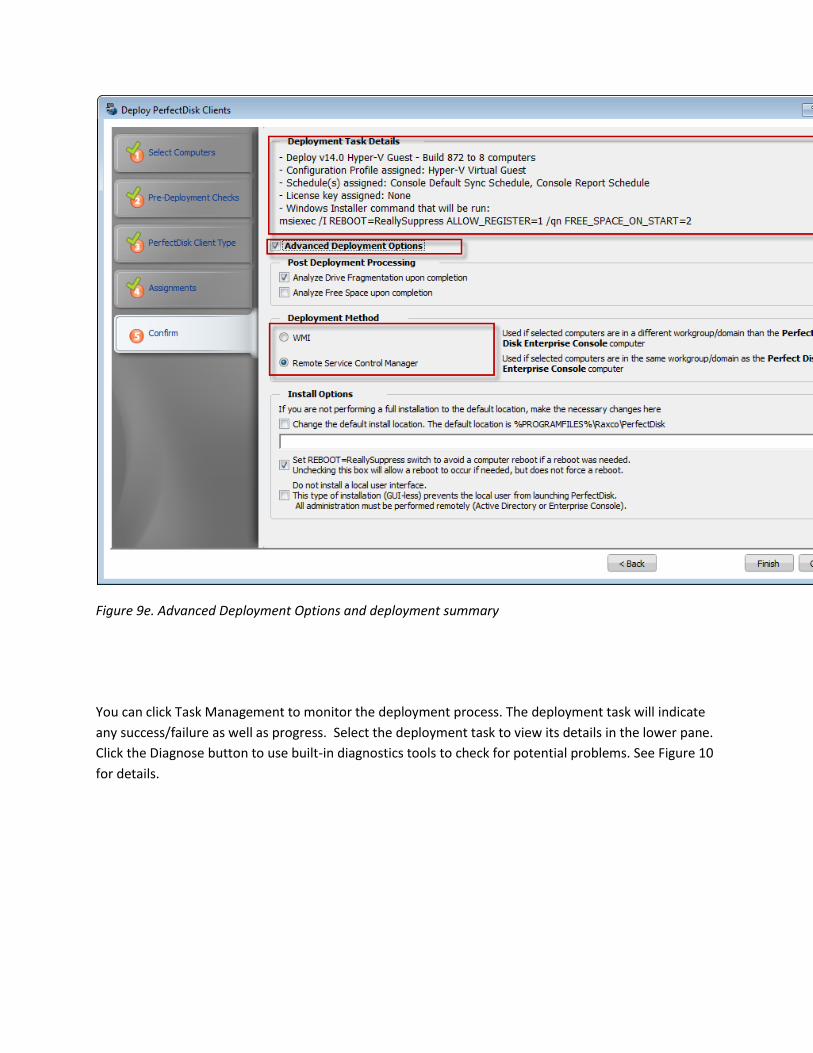
Figure 9e. Advanced Deployment Options and deployment summary
You can click Task Management to monitor the deployment process. The deployment task will indicate
any success/failure as well as progress. Select the deployment task to view its details in the lower pane.
Click the Diagnose button to use built-in diagnostics tools to check for potential problems. See Figure 10
for details.

Figure 10. Diagnostics
Deploying PerfectDisk Server to your Hyper-V Host PerfectDisk Server allows you to optimize Hyper-V hosts. You can use the PerfectDisk Enterprise
Console to deploy the PerfectDisk Server software to your Hyper-V physical server(s). The process is
similar to installing PerfectDisk Hyper-V Guest except that you will select PerfectDisk Server from the
client list. See figure 11 for details.
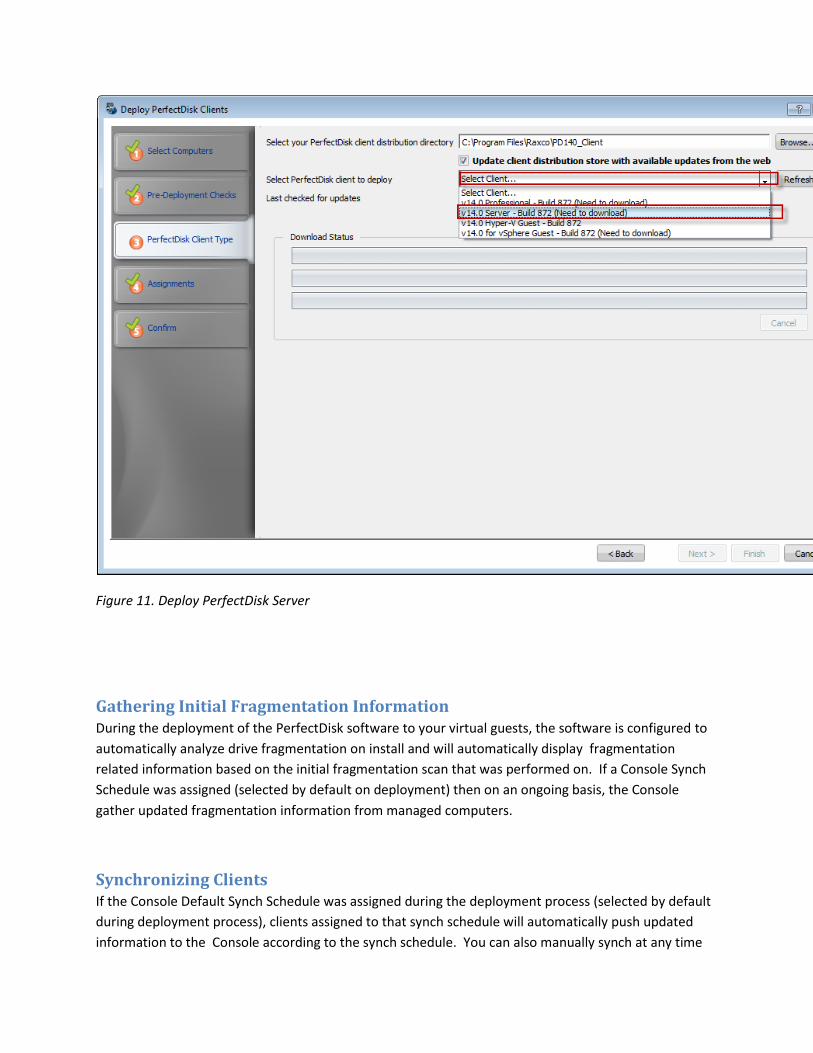
Figure 11. Deploy PerfectDisk Server
Gathering Initial Fragmentation Information During the deployment of the PerfectDisk software to your virtual guests, the software is configured to
automatically analyze drive fragmentation on install and will automatically display fragmentation
related information based on the initial fragmentation scan that was performed on. If a Console Synch
Schedule was assigned (selected by default on deployment) then on an ongoing basis, the Console
gather updated fragmentation information from managed computers.
Synchronizing Clients If the Console Default Synch Schedule was assigned during the deployment process (selected by default
during deployment process), clients assigned to that synch schedule will automatically push updated
information to the Console according to the synch schedule. You can also manually synch at any time
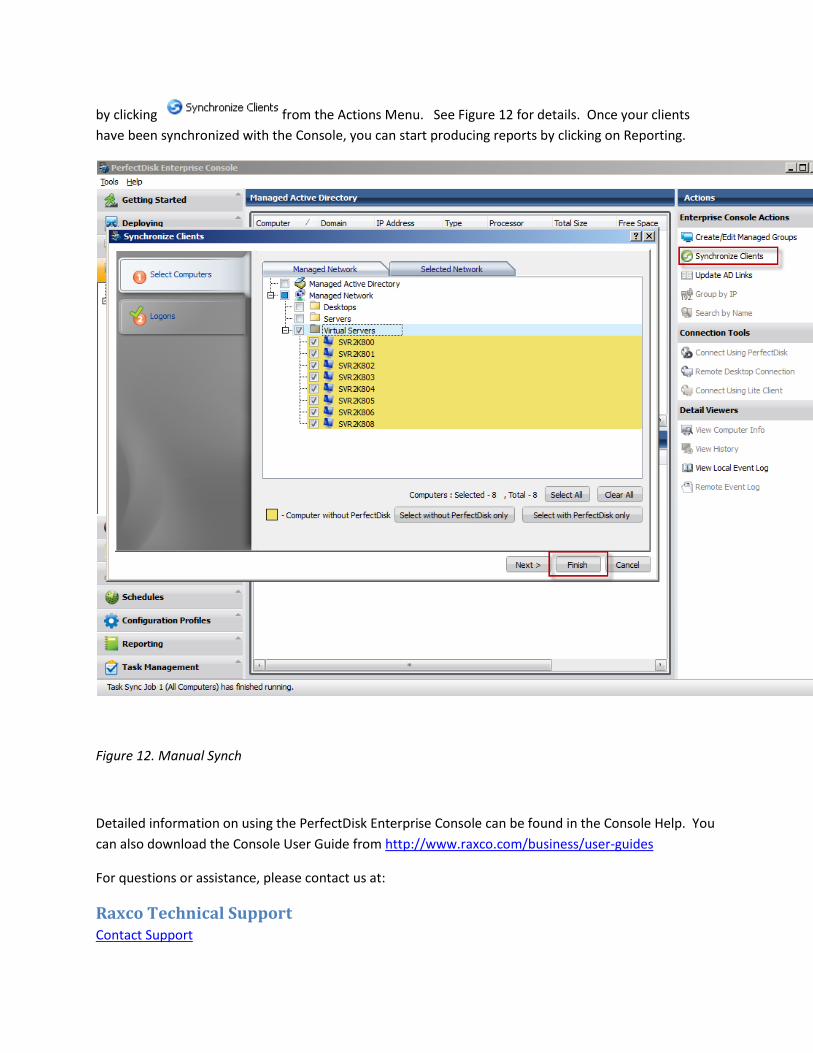
by clicking from the Actions Menu. See Figure 12 for details. Once your clients
have been synchronized with the Console, you can start producing reports by clicking on Reporting.
Figure 12. Manual Synch
Detailed information on using the PerfectDisk Enterprise Console can be found in the Console Help. You
can also download the Console User Guide from http://www.raxco.com/business/user-guides
For questions or assistance, please contact us at:
Raxco Technical Support Contact Support

http://www.raxco.com/support
Toll Free: 1.800.836.3844
Direct: 301.527.0803