Perceval implant Key points REF. FSCA-HV-2016-001 - Perceval implant key... · A Perceval valve...
30
Perceval implant Key points REF. FSCA-HV-2016-001 IM-00760
Transcript of Perceval implant Key points REF. FSCA-HV-2016-001 - Perceval implant key... · A Perceval valve...
Perceval implant Key points REF. FSCA-HV-2016-001
IM-00760

Patient pre-operative assessment
Perceval out of the jar
Surgical Technique
• Aortotomy
• Perceval implant related precautions
• Decalcification
• Sizing
• Guiding sutures
• Traction sutures
• Valve deployment
• Ballooning
• Inspection before closing the aorta
• Removal of the Guiding Sutures
• Prosthesis Removal Procedure
Patient pre-operative assessment

Preoperative patient assessment
IM-00760 3
WARNING: Check that at the preoperative echo the ratio between the sinotubular
junction and the annulus diameter is ≤ 1.3. A ratio greater than 1.3 indicates a
condition of aortic root dilation for which Perceval S implant is contraindicated.
Transesophageal echocardiography (TEE) provides information on the aortic root geometry
allowing the measurement of the sinotubular junction (STJ) and the subsequent
calculation of the STJ to annulus ratio, which should be <1.3 for optimal seating of the
valve. Measurement of the sinotubular junction may be challenging without TEE.

Perceval out of the jar
IM-00760 5
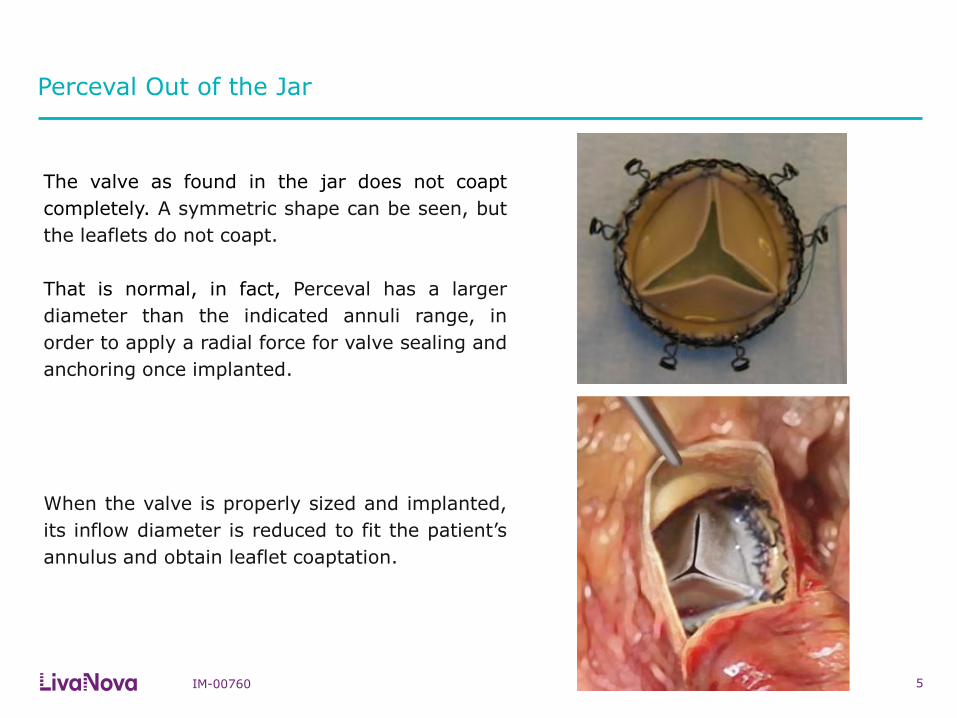
Perceval Out of the Jar
The valve as found in the jar does not coapt
completely. A symmetric shape can be seen, but
the leaflets do not coapt.
That is normal, in fact, Perceval has a larger
diameter than the indicated annuli range, in
order to apply a radial force for valve sealing and
anchoring once implanted.
When the valve is properly sized and implanted,
its inflow diameter is reduced to fit the patient’s
annulus and obtain leaflet coaptation.

Surgical Technique
Aortotomy
IM-00760 7
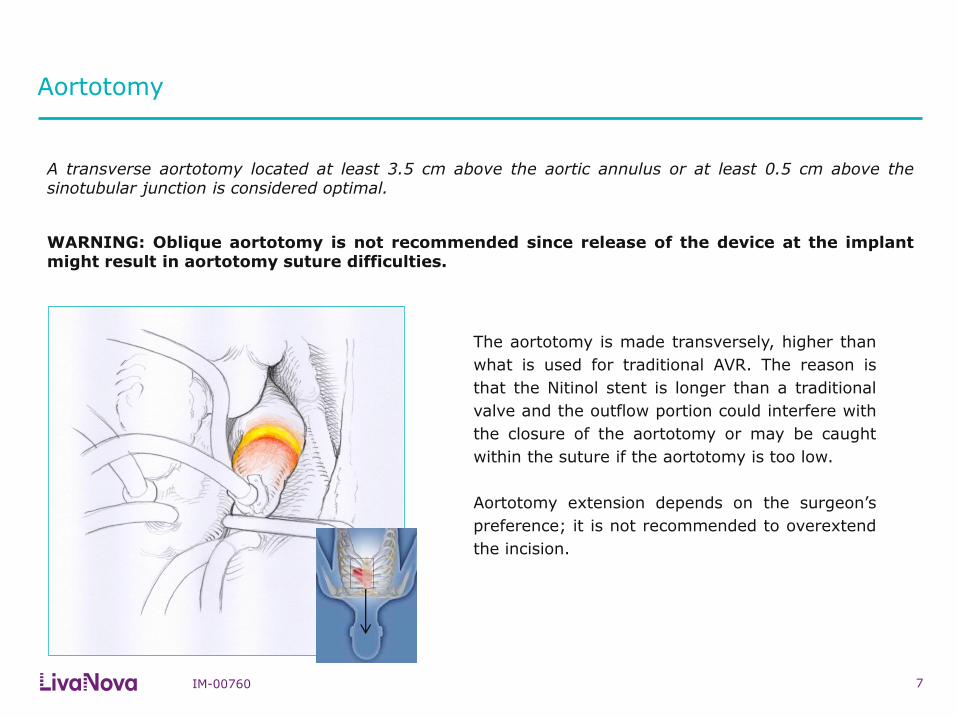
The aortotomy is made transversely, higher than
what is used for traditional AVR. The reason is
that the Nitinol stent is longer than a traditional
valve and the outflow portion could interfere with
the closure of the aortotomy or may be caught
within the suture if the aortotomy is too low.
Aortotomy extension depends on the surgeon’s
preference; it is not recommended to overextend
the incision.
A transverse aortotomy located at least 3.5 cm above the aortic annulus or at least 0.5 cm above the sinotubular junction is considered optimal.
WARNING: Oblique aortotomy is not recommended since release of the device at the implant might result in aortotomy suture difficulties.

Perceval implant related precautions
IM-00760 8
In case of concomitant procedures these must be performed as much as possible prior to Perceval S implantation.
After Perceval implantation, manipulation of the heart and/or of the ascending aorta, if required, should be done gently; should an atrial retractor be placed, take care not to compress the ascending aorta. These manoeuvres may lead to unknown effects on the implanted valve, including displacement and folding.
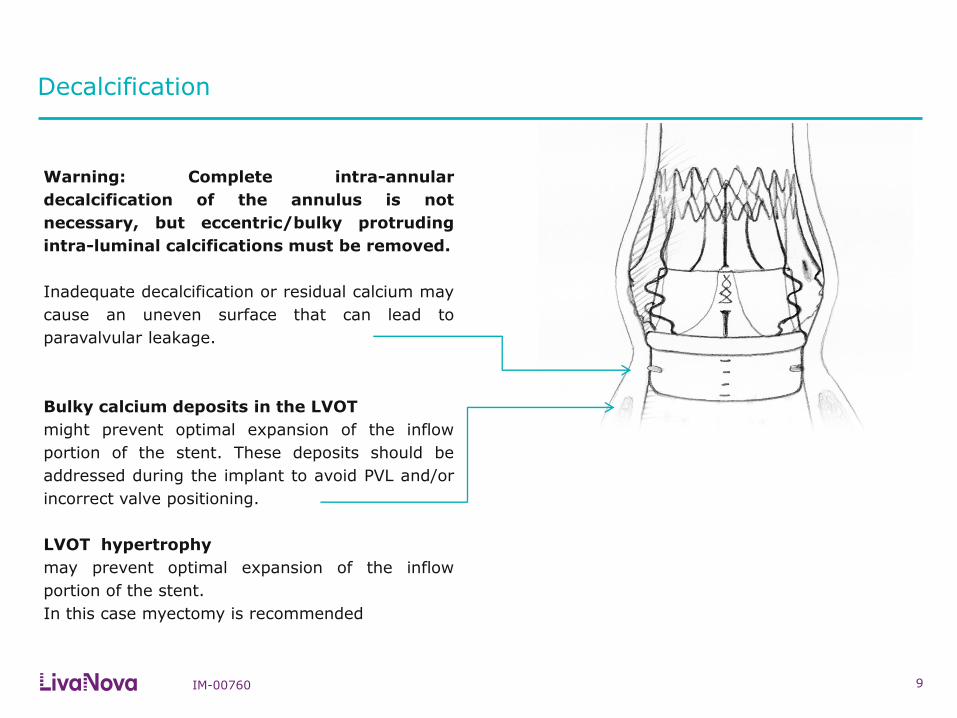
Decalcification
IM-00760 9
Warning: Complete intra-annular
decalcification of the annulus is not
necessary, but eccentric/bulky protruding
intra-luminal calcifications must be removed.
Inadequate decalcification or residual calcium may
cause an uneven surface that can lead to
paravalvular leakage.
Bulky calcium deposits in the LVOT
might prevent optimal expansion of the inflow
portion of the stent. These deposits should be
addressed during the implant to avoid PVL and/or
incorrect valve positioning.
LVOT hypertrophy
may prevent optimal expansion of the inflow
portion of the stent.
In this case myectomy is recommended

Decalcification
IM-00760 10
Decalcification is very important in the areas
close to the commissures.
Here the calcium deposits could impair the
commissural strut expansion.
Collar Seating
Commissural Strut

Sizing
IM-00760 11
Each sizer represents the lower and upper limits of the
Perceval valve’s respective size.
It is recommended to start the sizing with the “S” sizer.
White obturators should not deform the annulus during
the sizing procedure. Avoid forcing the white obturator
through the annulus.
The importance of correct sizing
The appropriate size of the prosthesis is established
when the transparent obturator passes easily through
the aortic annulus into the left ventricle, and the white
obturator remains stable above the aortic annulus
Undersizing may lead to central or paravalvular
leakage, while oversizing may lead to elevated
pressure gradients or valve malfunction.
Ø in mm
S
M
L
XL
19 21
23
25
27
21
23
25
Ø in mm
Correct size
Proceed with next sizer
Sizing: what to do in case of doubt?
IM-00760 12
Example: if you push with additional force, the white obturator will pass through the annulus
Suggestion: verify that the valve sizer has entered into the annulus perpendicular to the annular plane.
Then, if white obturator remains above the annulus or blocked within the annulus requiring firm traction
for retrieval, choose the same size valve (not the larger size).
REMEMBER:
There is no advantage in Perceval oversizing.
An oversized Perceval valve will not guarantee better hemodynamic performance. If oversized, Perceval
will likely show suboptimal expansion which could result in higher gradients.
TIP:
In a border line case, with the annulus right in between two sizes, consider the overall dimension of the
aortic root (sinuses and STJ width) for your size choice.

Guiding Sutures
IM-00760 13
Correct placement of the guiding sutures is key to
the correct positioning of the valve.
Guiding sutures must be placed to hold the
traction applied during the implantation of the
device.
Position a guiding suture in each valve sinus, 2- 3
mm under the leaflet hinge point, perpendicular to
the annulus.
The 120 degree distribution of the sutures can be
ensured by using the sizers, as they have
reference spokes which are distributed at 120
degrees.
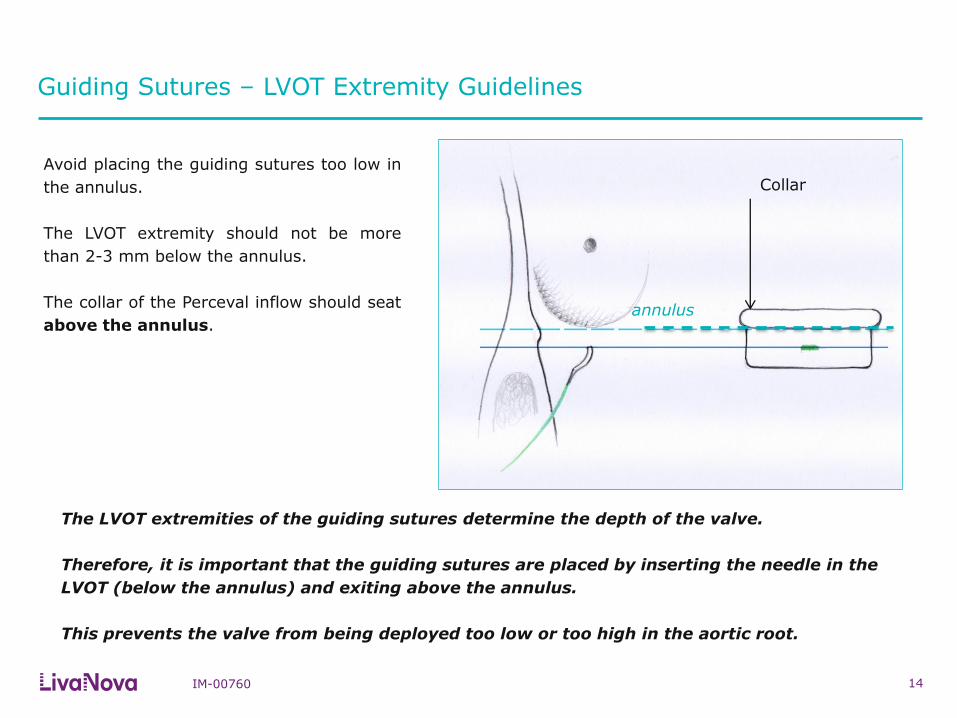
Guiding Sutures – LVOT Extremity Guidelines
IM-00760 14
Avoid placing the guiding sutures too low in
the annulus.
The LVOT extremity should not be more
than 2-3 mm below the annulus.
The collar of the Perceval inflow should seat
above the annulus.
The LVOT extremities of the guiding sutures determine the depth of the valve.
Therefore, it is important that the guiding sutures are placed by inserting the needle in the
LVOT (below the annulus) and exiting above the annulus.
This prevents the valve from being deployed too low or too high in the aortic root.
annulus
Collar
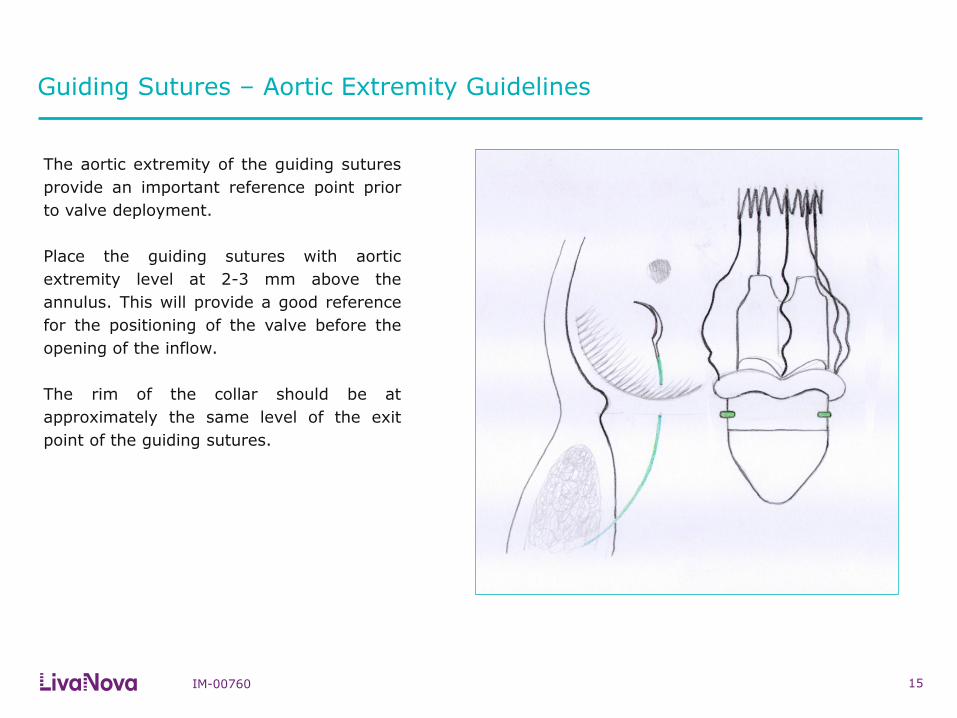
Guiding Sutures – Aortic Extremity Guidelines
IM-00760 15
The aortic extremity of the guiding sutures
provide an important reference point prior
to valve deployment.
Place the guiding sutures with aortic
extremity level at 2-3 mm above the
annulus. This will provide a good reference
for the positioning of the valve before the
opening of the inflow.
The rim of the collar should be at
approximately the same level of the exit
point of the guiding sutures.

Traction Sutures
IM-00760 16
If using traction sutures, remember to
release the traction sutures prior to
valve deployment.
As traction sutures lift the annulus plane
upwards, they should be released prior to
Perceval implantation to avoid
misplacement of the valve after their
release.
Release
Release
Release
The use of traction sutures, placed at level of the
commissures, is not mandatory in Perceval
implantation.
However, their use may help visualization and
facilitate the positioning of the guiding sutures.
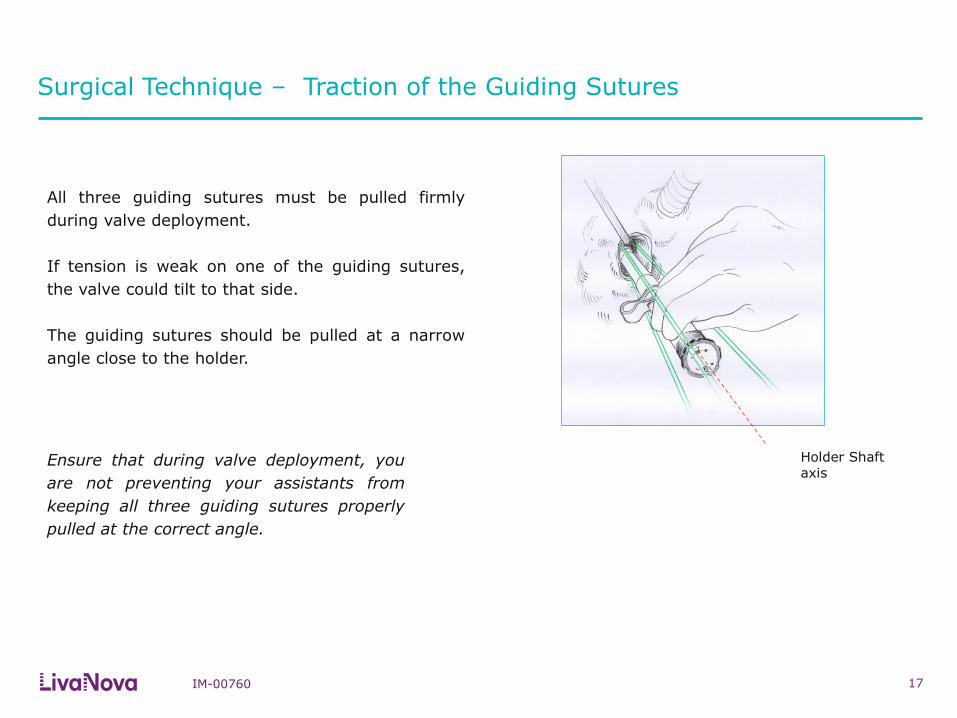
Surgical Technique – Traction of the Guiding Sutures
IM-00760 17
All three guiding sutures must be pulled firmly
during valve deployment.
If tension is weak on one of the guiding sutures,
the valve could tilt to that side.
The guiding sutures should be pulled at a narrow
angle close to the holder.
Ensure that during valve deployment, you
are not preventing your assistants from
keeping all three guiding sutures properly
pulled at the correct angle.
Holder Shaft axis
Valve Deployment
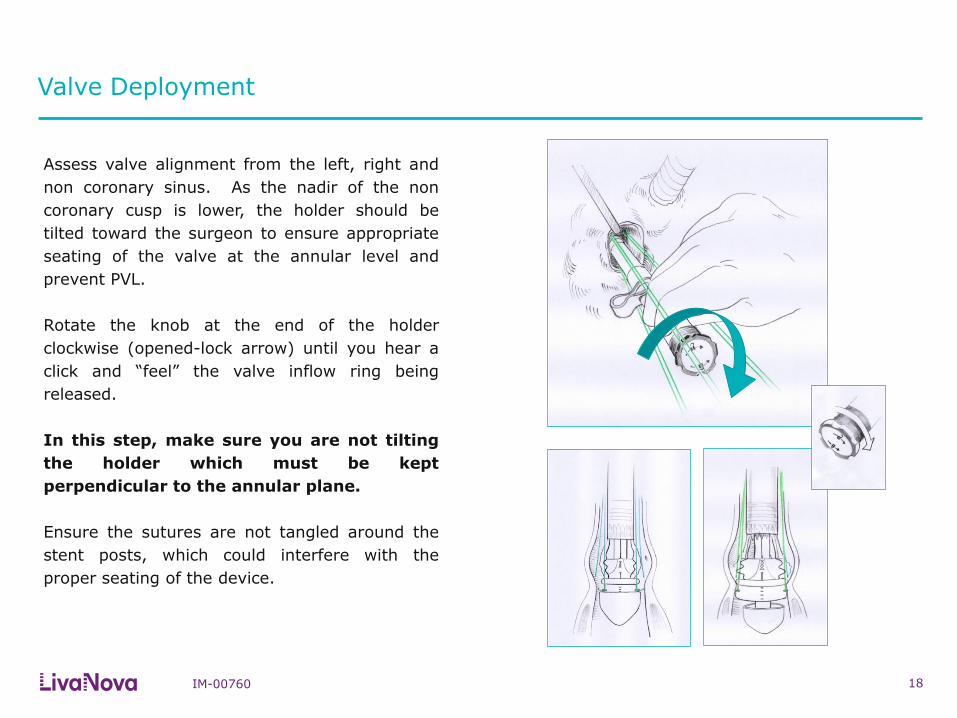
IM-00760 18
Assess valve alignment from the left, right and
non coronary sinus. As the nadir of the non
coronary cusp is lower, the holder should be
tilted toward the surgeon to ensure appropriate
seating of the valve at the annular level and
prevent PVL.
Rotate the knob at the end of the holder
clockwise (opened-lock arrow) until you hear a
click and “feel” the valve inflow ring being
released.
In this step, make sure you are not tilting
the holder which must be kept
perpendicular to the annular plane.
Ensure the sutures are not tangled around the
stent posts, which could interfere with the
proper seating of the device.
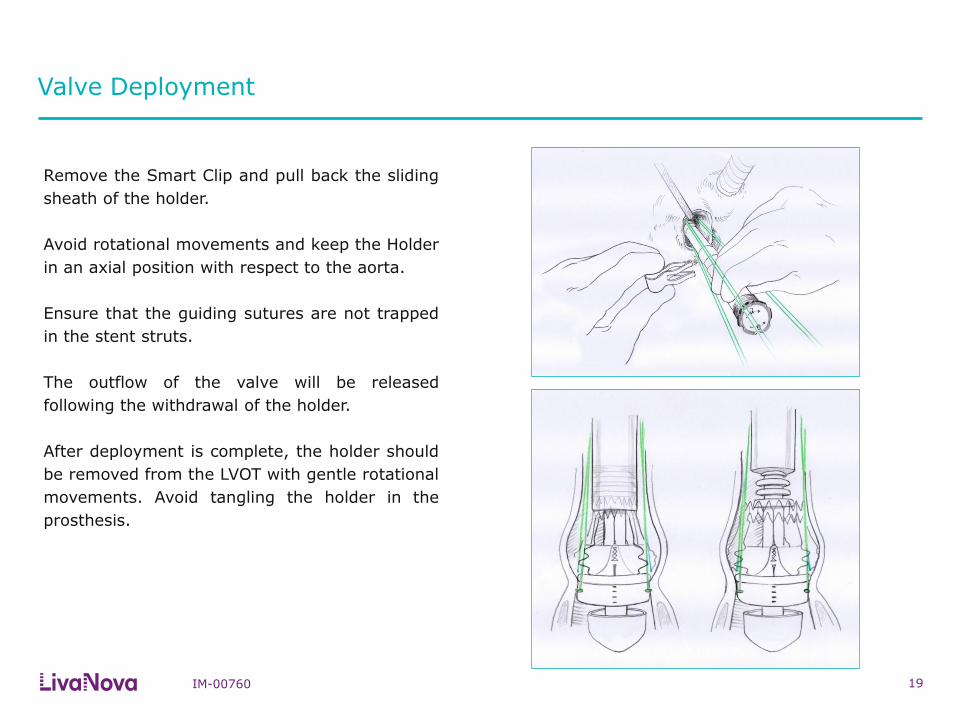
Valve Deployment
IM-00760 19
Remove the Smart Clip and pull back the sliding
sheath of the holder.
Avoid rotational movements and keep the Holder
in an axial position with respect to the aorta.
Ensure that the guiding sutures are not trapped
in the stent struts.
The outflow of the valve will be released
following the withdrawal of the holder.
After deployment is complete, the holder should
be removed from the LVOT with gentle rotational
movements. Avoid tangling the holder in the
prosthesis.
Ballooning
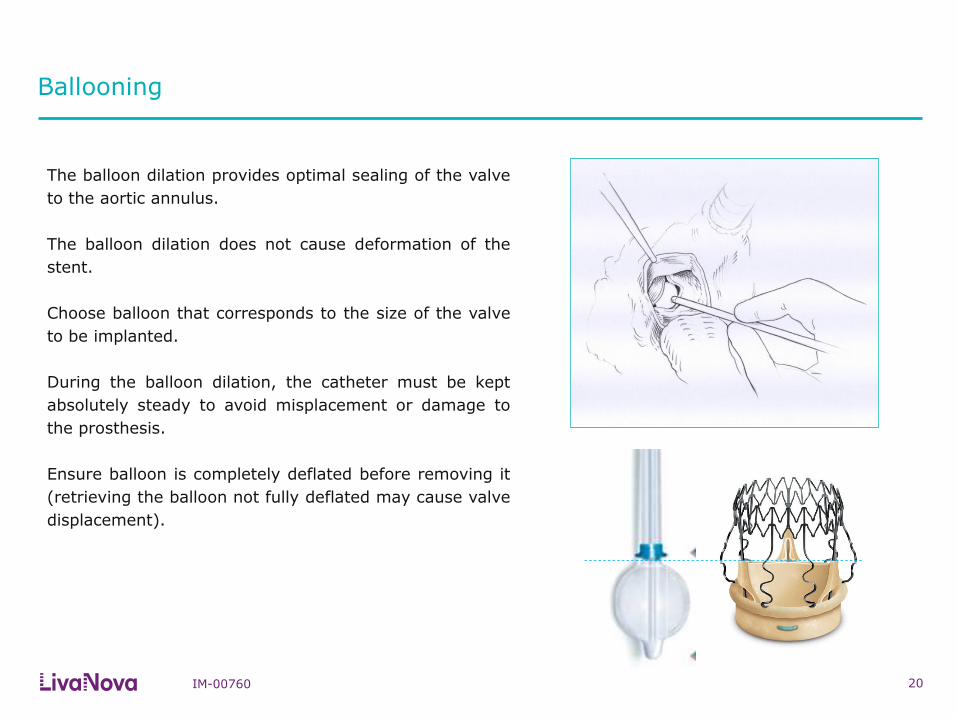
IM-00760 20
The balloon dilation provides optimal sealing of the valve
to the aortic annulus.
The balloon dilation does not cause deformation of the
stent.
Choose balloon that corresponds to the size of the valve
to be implanted.
During the balloon dilation, the catheter must be kept
absolutely steady to avoid misplacement or damage to
the prosthesis.
Ensure balloon is completely deflated before removing it
(retrieving the balloon not fully deflated may cause valve
displacement).
21
C
A
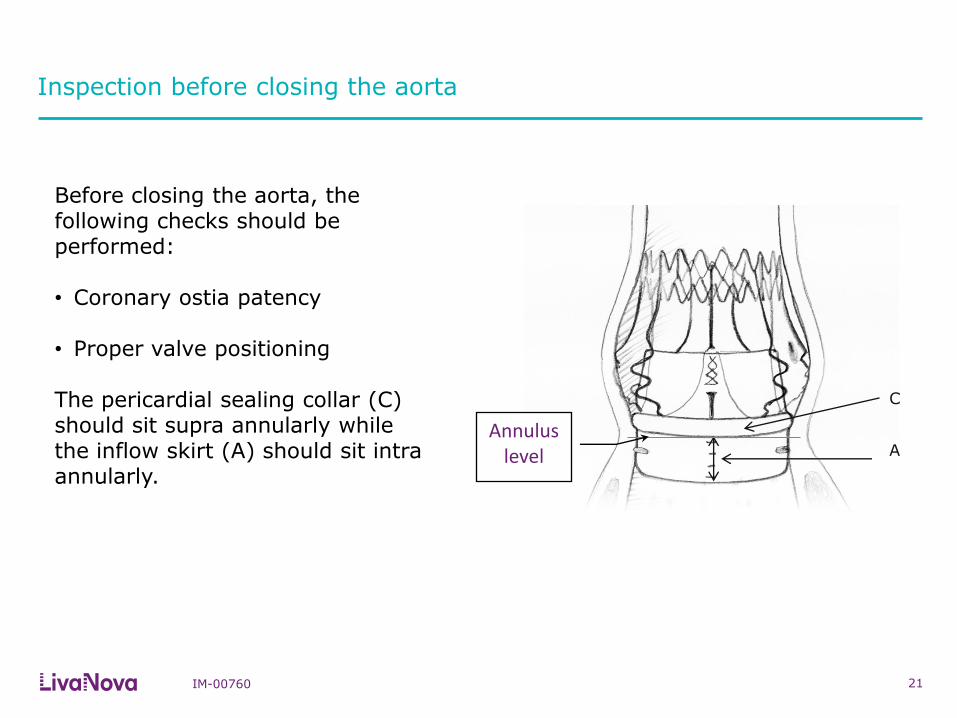
Before closing the aorta, the following checks should be performed: • Coronary ostia patency
• Proper valve positioning The pericardial sealing collar (C) should sit supra annularly while the inflow skirt (A) should sit intra annularly.
Annulus level
Inspection before closing the aorta
IM-00760

Inspection before closing the aorta
IM-00760 22
Valve positioning:
The collar of the Perceval seats supra-annularly
while the skirt of the inflow seats intra-annularly.
Therefore, if the annulus is visible from the top,
the valve is placed too low.
If the annulus is visible from the ventricular side,
the valve is positioned too high.
Check visually that sinusoidal struts are
juxtaposed at the Valsalva sinuses. Full apposition
of the outflow ring to the aortic wall at the level of
the STJ is not required. Post-dilation of the outflow
ring is not recommended.
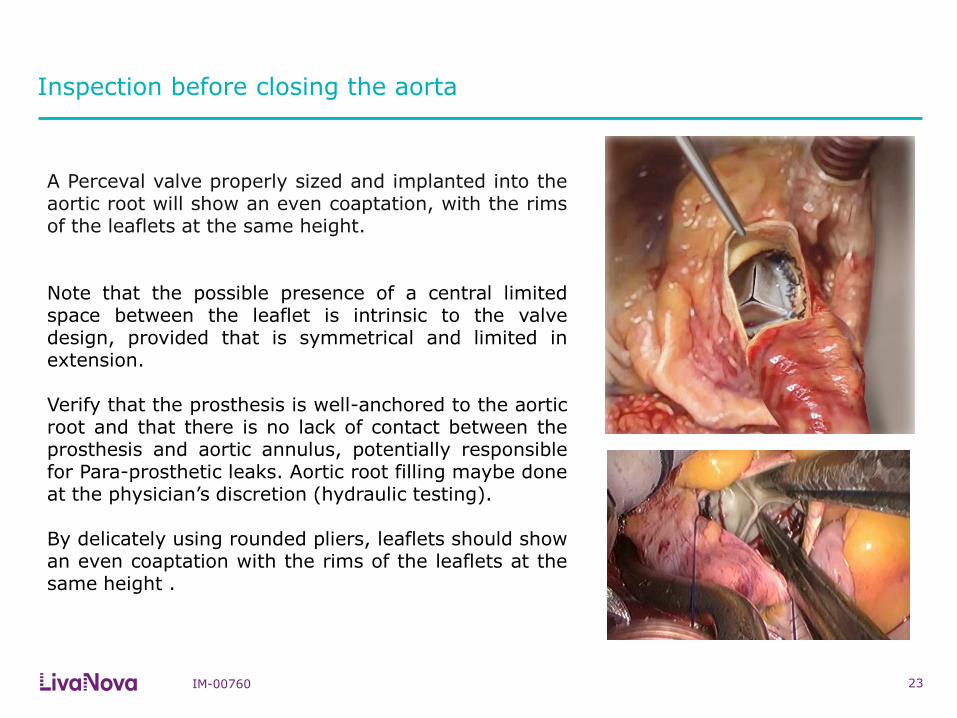
A Perceval valve properly sized and implanted into the aortic root will show an even coaptation, with the rims of the leaflets at the same height. Note that the possible presence of a central limited space between the leaflet is intrinsic to the valve design, provided that is symmetrical and limited in extension. Verify that the prosthesis is well-anchored to the aortic root and that there is no lack of contact between the prosthesis and aortic annulus, potentially responsible for Para-prosthetic leaks. Aortic root filling maybe done at the physician’s discretion (hydraulic testing). By delicately using rounded pliers, leaflets should show an even coaptation with the rims of the leaflets at the same height .
Inspection before closing the aorta
23 IM-00760

Removal of the Guiding Sutures
IM-00760 24
Remove guiding sutures before closing the aortotomy.
To remove the guiding sutures, they must be cut right above the level of the
aortotomy.
The guiding sutures must not be tied. This may prevent optimal valve
seating and cause central or paravalvular leaks.

Potential risks due to tying of guiding sutures
25
Tilted valve due to:
• improper guiding sutures positioning in unfavorable anatomy
• misplacement during knotting
IM-00760
Distorted valve due to improper guiding sutures placement (not aligned to the valve eyelets, distributed at 120 degrees)

Prosthesis Removal Procedure
IM-00760 26
Should it be necessary to remove the prosthesis from the implant site, proceed as follows:
Place crushed ice from a sterile physiological solution in the surgical area, ensuring that the ice comes
into contact with the prosthesis;
Wet the prosthesis with the iced physiological solution and simultaneously clamp the outflow section of
the prosthesis with three surgical forceps positioned at 120°;
Use the forceps to create radial compression on the prosthesis to reduce its diameter; the procedure is
performed holding the superior portion of the stent (outflow) at two opposite points and dragging them to
the center at the same time, forming an ‘χ’ . Using the ‘χ-movement’, the prosthesis can be easily
removed (*).
After detachment of the prosthesis from the aortic wall, extract the forceps and prosthesis as if they were
a single device, do not damage the surrounding tissue.
A removed Perceval prosthesis MUST NOT BE REIMPLANTED, as its integrity is no longer
guaranteed.
(*) Santarpino G. et al. “A supra-annular malposition of the Perceval S sutureless aortic valve: the ‘χ-movement’ removal technique and subsequent reimplantation” Interactive CardioVascular and Thoracic Surgery 15 (2012) 280–281
IM-00760 27
Closing the aorta
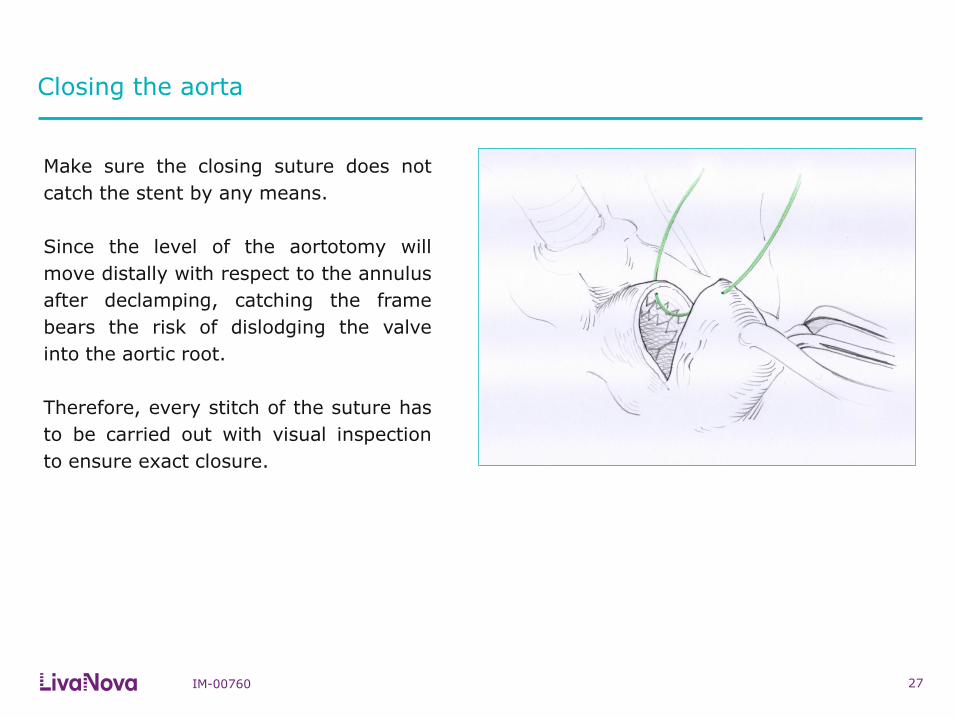
Make sure the closing suture does not
catch the stent by any means.
Since the level of the aortotomy will
move distally with respect to the annulus
after declamping, catching the frame
bears the risk of dislodging the valve
into the aortic root.
Therefore, every stitch of the suture has
to be carried out with visual inspection
to ensure exact closure.

IM-00760 28
Intraoperative post-implant Echo
Intraoperative post-implant echo is an
important step for quality control in
every valve procedure.
In the setting of sutureless implantation,
it prevents late detection of device
malfunction or regurgitation following
the procedure.
Note: after declamping, especially in
cases of low pressure, a trivial central
leakage may be detected. This most
likely disappears in a few hours once
diastolic pressure is restored.
If greater leakage is detected, check
valve sizing and positioning to assess the
need for valve explant.

www.livanova.com