PeopleSoft Financials Requisition Management and Receiving User Guide
77
PeopleSoft Financials Requisition Management and Receiving User Guide
Transcript of PeopleSoft Financials Requisition Management and Receiving User Guide

PeopleSoft Financials
Requisition Management
and Receiving
User Guide

Nassau BOCES PeopleSoft Financials v9.1
NASSAU BOCES
PEOPLESOFT FINANCIALS
HELP DESK EXT. 2574
2

Nassau BOCES PeopleSoft Financials v9.1
NASSAU BOCES
PEOPLESOFT FINANCIALS
HELP DESK EXT. 2574
3
How to Access Oracle PeopleSoft Financials ............................................................. 5
Creating Sign In Favorites ............................................................................................ 6
Signing in to PeopleSoft ............................................................................................... 8
Navigating in PeopleSoft .............................................................................................. 9
Creating PeopleSoft Favorites ................................................................................... 10
Editing PeopleSoft Favorites ...................................................................................... 11
Purchasing Process Explained .................................................................................. 12
Requisition Defaults Explained .................................................................................. 12
Advanced Vendor Search ........................................................................................... 13
Entering Requisition – Description Based Item ........................................................ 15
Entering Requisition to purchase an Asset ............................................................... 21
Entering Requisition – Multiple Items and Internal Comment .................................. 29
Entering Requisition for Open Purchase Order ........................................................ 36
Entering Requisition with Multiple Budget Codes .................................................... 42
Entering Requisition – Using Bid Catalog ................................................................. 50
Requisition Budget Checking..................................................................................... 57
Placing a Requisition on Hold .................................................................................... 57
Modifying Requisitions ............................................................................................... 58
Canceling a Requisition .............................................................................................. 58
Managing the PeopleSoft Worklist ............................................................................. 59
Managing Recycled Requisitions ............................................................................... 60
Document Status - Requisition .................................................................................. 61
Document Status – Purchase Order .......................................................................... 63
PO Activity Summary .................................................................................................. 65
Printing Requisitions .................................................................................................. 68
Printing Purchase Orders ........................................................................................... 70
Reviewing Approval History ....................................................................................... 72
Entering a Receipt ....................................................................................................... 73
Entering a Receipt for an Asset ................................................................................. 75
Canceling a Receipt .................................................................................................... 77
Nassau BOCES PeopleSoft Financials v9.1
NASSAU BOCES
PEOPLESOFT FINANCIALS
HELP DESK EXT. 2574
4

Nassau BOCES PeopleSoft Financials v9.1
NASSAU BOCES
PEOPLESOFT FINANCIALS
HELP DESK EXT. 2574
5
How to Access Oracle PeopleSoft Financials
Accessing Internet Explorer
Internet Explorer (IE) is a tool used for searching, viewing and accessing information available on the Internet. In addition to using Internet Explorer to access information online, at Nassau BOCES, we use Internet Explorer to connect to the PeopleSoft Financials Management System (FMS) and Human Resource Management Step 1: You can launch IE by clicking the IE icon located on the Quick Launch Bar next to the Start Button.
Or, You can also click the start button select programs and choose Once in the Internet Explorer Window enter the URL below into the address bar to get to the sign on page for PeopleSoft Financial Version 9.1. Step 2: Enter URL http://finps.nasboces.org/fsys91/signon.html
Note: Do not use the Internet Explorer BACK buttons to navigate to prior screens in PeopleSoft it will work but the pages will sometimes display error messages. Use the navigation menus in PeopleSoft to avoid these error messages.
Nassau BOCES PeopleSoft Financials v9.1
NASSAU BOCES
PEOPLESOFT FINANCIALS
HELP DESK EXT. 2574
6
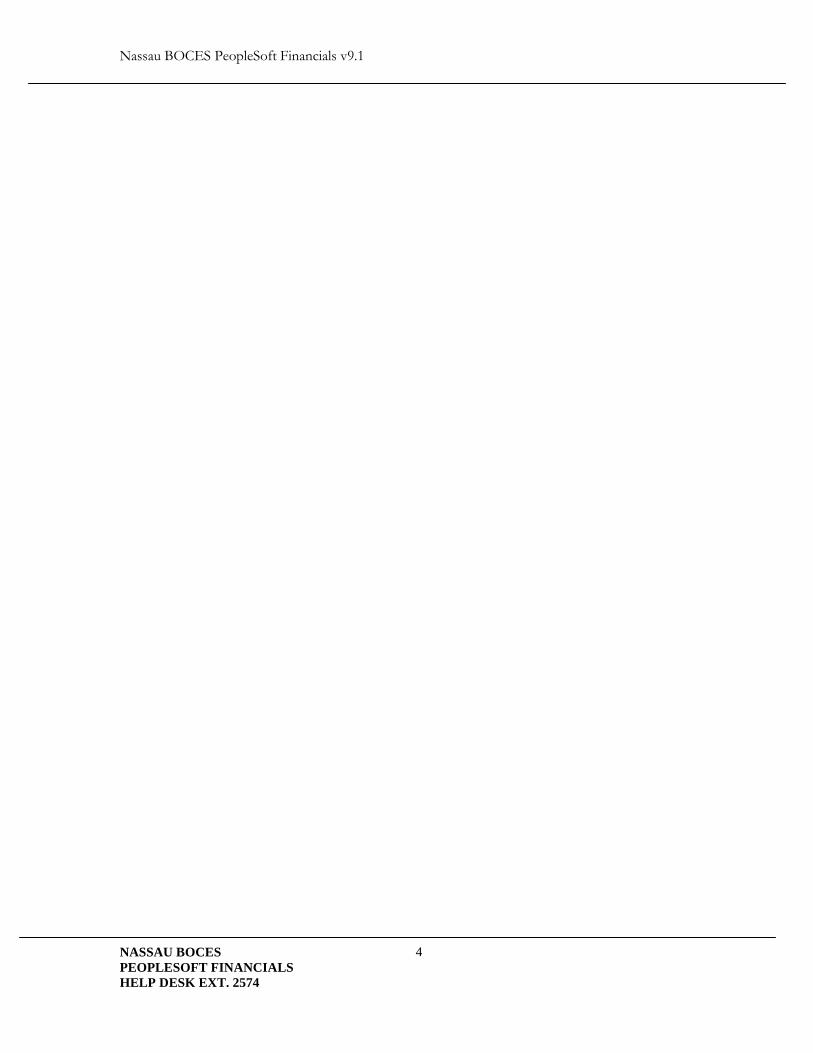
Creating Sign In Favorites 1.0 Saving Favorites using Internet Explorer Internet Explorer contains a system that allows you to keep track of frequently visited websites also known as Favorites. Once you are at the Oracle PeopleSoft Financials 9.1 sign on page you can add it as a Favorite. Let’s begin. Step 1: Click on Favorites from the Menu Bar, and then click Add to Favorites…
Step 2: The Add Favorite dialog box is displayed. Place your cursor in the name box and
type PS FIN then click the button to add PS FIN to your Favorites list.
Note: You have successfully added PeopleSoft as an Internet Explorer Favorite.
Nassau BOCES also uses PeopleSoft Human Resources so
be sure to change the name. This will help you distinguish between HR and Financials.
Nassau BOCES PeopleSoft Financials v9.1
NASSAU BOCES
PEOPLESOFT FINANCIALS
HELP DESK EXT. 2574
7
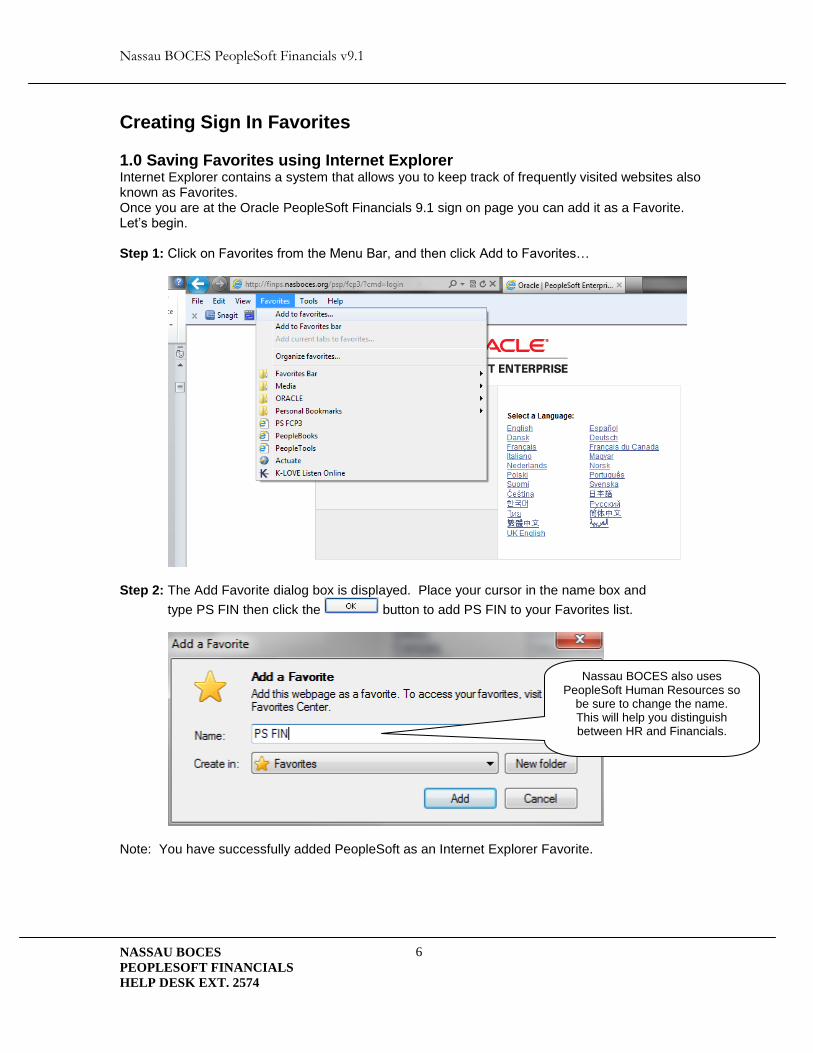
Step 3: To access Oracle PeopleSoft Sign-in screen using Favorites, click Favorites from the Menu Bar. Scroll down the list and select PS FIN
2.0 Creating Desktop Icon using Internet Explorer Internet Explorer contains a system that allows you to send shortcuts to your desktop. Here’s how: Once you are at the Oracle PeopleSoft Financial 9.1 sign on page (Step 1.0) you can add it to your desktop. Let’s begin. Click on File -> Choose Send -> Choose Shortcut to Desktop.
Nassau BOCES PeopleSoft Financials v9.1
NASSAU BOCES
PEOPLESOFT FINANCIALS
HELP DESK EXT. 2574
8
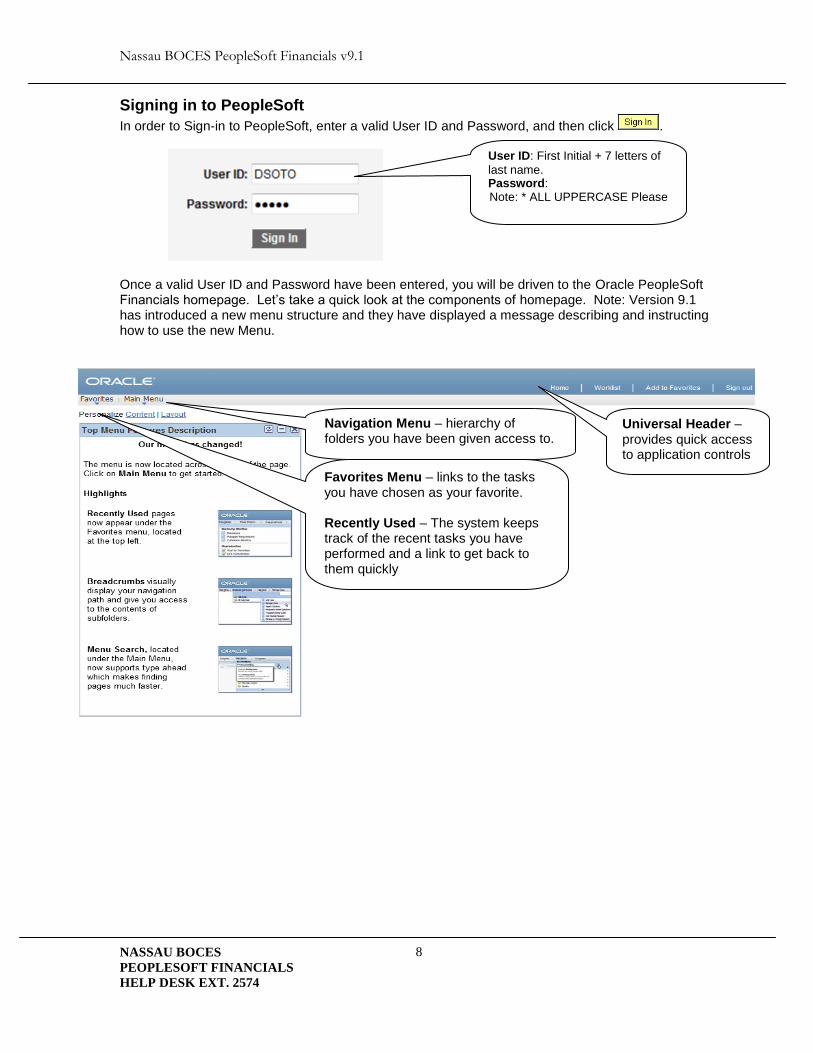
Signing in to PeopleSoft
In order to Sign-in to PeopleSoft, enter a valid User ID and Password, and then click .
Once a valid User ID and Password have been entered, you will be driven to the Oracle PeopleSoft Financials homepage. Let’s take a quick look at the components of homepage. Note: Version 9.1 has introduced a new menu structure and they have displayed a message describing and instructing how to use the new Menu.
Navigation Menu – hierarchy of folders you have been given access to.
Universal Header – provides quick access to application controls
User ID: First Initial + 7 letters of
last name. Password: Note: * ALL UPPERCASE Please
Favorites Menu – links to the tasks you have chosen as your favorite. Recently Used – The system keeps track of the recent tasks you have performed and a link to get back to them quickly

Nassau BOCES PeopleSoft Financials v9.1
NASSAU BOCES
PEOPLESOFT FINANCIALS
HELP DESK EXT. 2574
9
Navigating in PeopleSoft You have two options: the Main Menu and Favorites 1.) The Main Menu option contains the hierarchy of folders you have access to and their subfolders.
1.) The Favorites option displays: The My Favorites section has the links to the tasks you have chosen as your favorites. The Recently Used section displays the recent pages you have navigated to.

Nassau BOCES PeopleSoft Financials v9.1
NASSAU BOCES
PEOPLESOFT FINANCIALS
HELP DESK EXT. 2574
10
Creating PeopleSoft Favorites
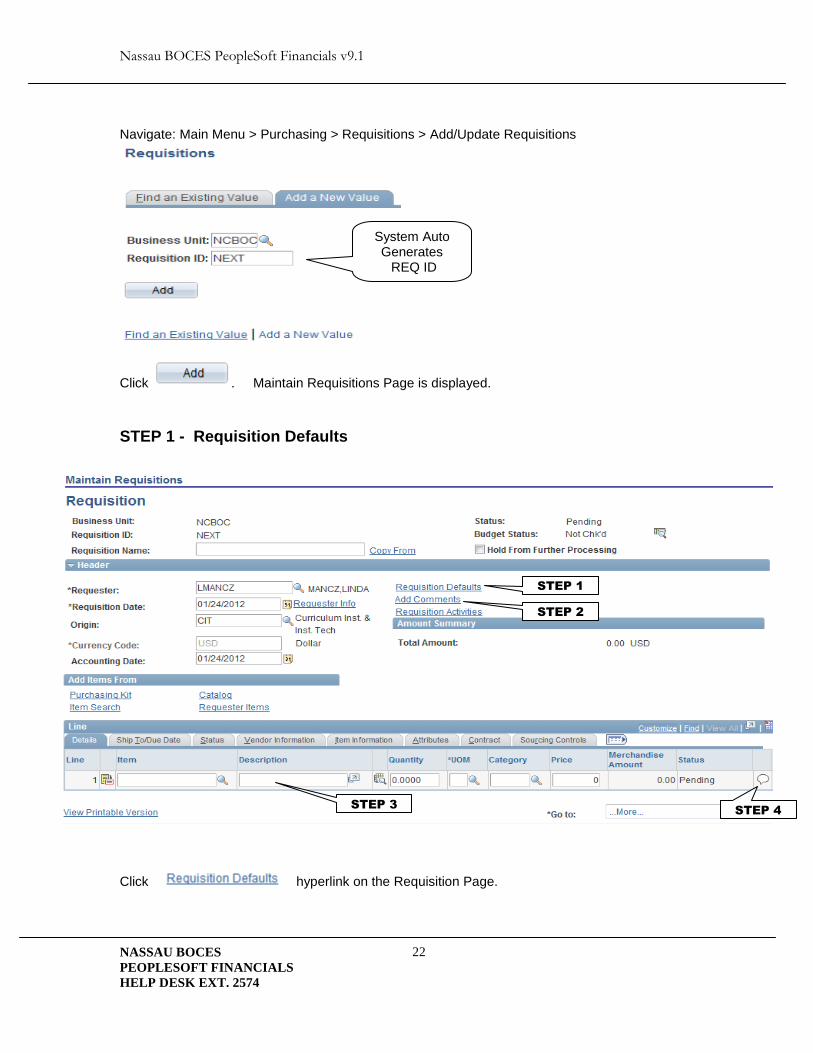
Example: If entering and maintaining Requisitions is a common task during the course of the day, consider adding the Maintain Requisitions page to your list of PeopleSoft Favorites. Step 1: Navigate: Main Menu > Purchasing > Requisitions> Add/Update Requisitions
Step 2: On the top left of the Header click the hyperlink.
Note: You can accept the default description or enter your own. Step 3: Click OK button. This confirmation message below will appear then click OK. Your screen will return to the Requisition Page. Step 3: Click Favorites from the Navigation Menu to review your updated Favorites list.
Next time you need to Add a requisition, click the new
favorite you created!
Nassau BOCES PeopleSoft Financials v9.1
NASSAU BOCES
PEOPLESOFT FINANCIALS
HELP DESK EXT. 2574
11
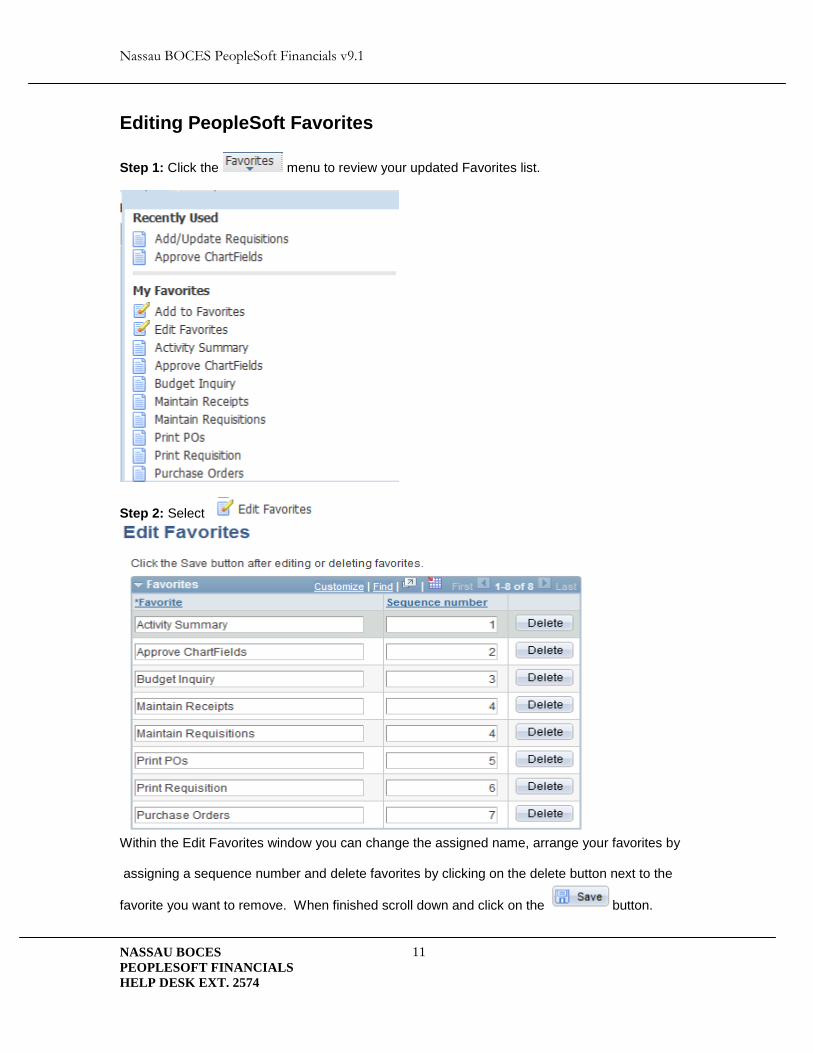
Editing PeopleSoft Favorites
Step 1: Click the menu to review your updated Favorites list.
Step 2: Select
Within the Edit Favorites window you can change the assigned name, arrange your favorites by assigning a sequence number and delete favorites by clicking on the delete button next to the
favorite you want to remove. When finished scroll down and click on the button.

Nassau BOCES PeopleSoft Financials v9.1
NASSAU BOCES
PEOPLESOFT FINANCIALS
HELP DESK EXT. 2574
12
Purchasing Process Explained The purchasing life cycle begins with the electronic data entry of a requisition. The requisition is then submitted electronically for approval. The approval process consists of a four step approval route. Step 1-Clerk, Step 2-Requester, Step 3-Approver, Step 4-Purchasing Agent Once the final approval is made by the Purchasing Agent, evening processes are run that take the approved requisitions and create them into official purchase orders.
Requisition Defaults Explained Requisition Defaults are values that you enter in the requisition default screen that are common to the entire requisition. They are (Vendor, Unit of Measure, Category, Budget Code, Ship to Code, etc…) Entering this information in the default screen will copy this data to all lines on the requisition so that you only have to enter it once. You can go directly to any line and change these values if a line will have different values. The one default code that needs explanation is the Category Code.
The Category Code classifies the items you are purchasing and also holds business rules that are used through the entire life cycle of a requisition. For example: If you are purchasing from a bid, a bid document states that the price on the bid must be the price we are invoiced. When you select the category with this rule, if Accounts Payable enters a different price for that item, the system will error and not allow the payment to go through. Please make sure you select accordingly. For bids, if you do not see the bid listed use the ABI category. Note: If the item or service you are requisitioning is not listed use the AAZ category.

Nassau BOCES PeopleSoft Financials v9.1
NASSAU BOCES
PEOPLESOFT FINANCIALS
HELP DESK EXT. 2574
13
Advanced Vendor Search
1.0 Vendor Lookup
From Requisitions Page, click hyperlink.
Click hyperlink to display Vendor Lookup Page. Enter the vendor name you are
looking for. Example: Office (looking for Office Team). Click to view a list of matching results. Note: System retrieves ALL vendors with the word Office as the first word.
Viewing Search Results Max Rows is set to 10. If the system retrieves more than 10 results, use the arrow icons to advance through the results.
For this example there are 13 results Use these icons to advance through the search results.
click this button to go to the next 10 results
click this button to go the last 10 results Note: If do not find the vendor you are looking for, complete a Vendor Add/Change Form and fax it to the Purchasing Office. Note: You can find the form on the Nassau BOCES Website.
Select specific vendor name from search results by clicking the Sel next to Vendor ID. You can
click or to view additional vendor info.

Nassau BOCES PeopleSoft Financials v9.1
NASSAU BOCES
PEOPLESOFT FINANCIALS
HELP DESK EXT. 2574
14
If this is the vendor you are choosing. Click to return to the Requisition Defaults Screen.

Nassau BOCES PeopleSoft Financials v9.1
NASSAU BOCES
PEOPLESOFT FINANCIALS
HELP DESK EXT. 2574
15
Entering Requisition – Description Based Item Navigate: Main Menu > Purchasing > Requisitions > Add/Update Requisitions
Click . Maintain Requisitions Page is displayed.
System Auto Generates REQ ID
STEP 1
STEP 2
STEP 3 STEP 4

Nassau BOCES PeopleSoft Financials v9.1
NASSAU BOCES
PEOPLESOFT FINANCIALS
HELP DESK EXT. 2574
16
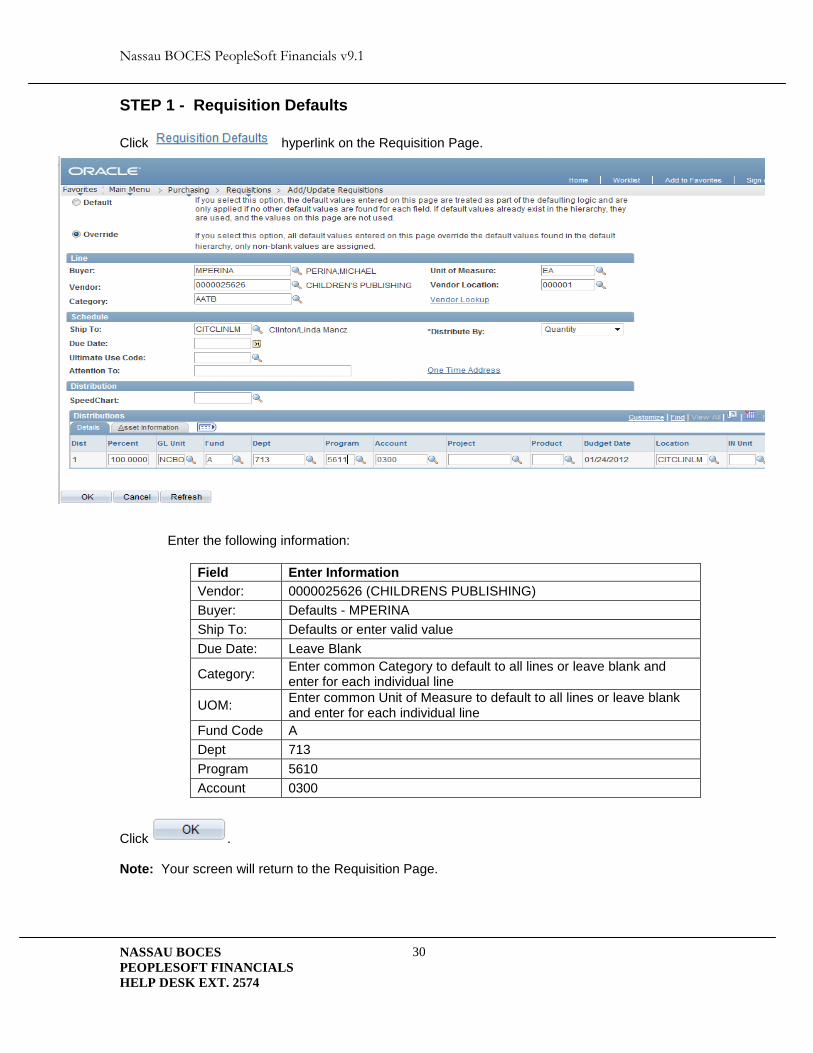
STEP 1 - Requisition Defaults
Click hyperlink on the Requisition Page.
Enter the following information:
Field Enter Information
Vendor: 0000025626 (CHILDRENS PUBLISHING)
Buyer: Defaults - MPERINA
Ship To: Defaults or enter valid value
Due Date: Leave Blank
Category: Enter common Category to default to all lines or leave blank and enter for each individual line
UOM: Enter common Unit of Measure to default to all lines or leave blank and enter for each individual line
Fund Code A
Dept 713
Program 5610
Account 0300
Click . Note: Your screen will return to the Requisition Page.

Nassau BOCES PeopleSoft Financials v9.1
NASSAU BOCES
PEOPLESOFT FINANCIALS
HELP DESK EXT. 2574
17
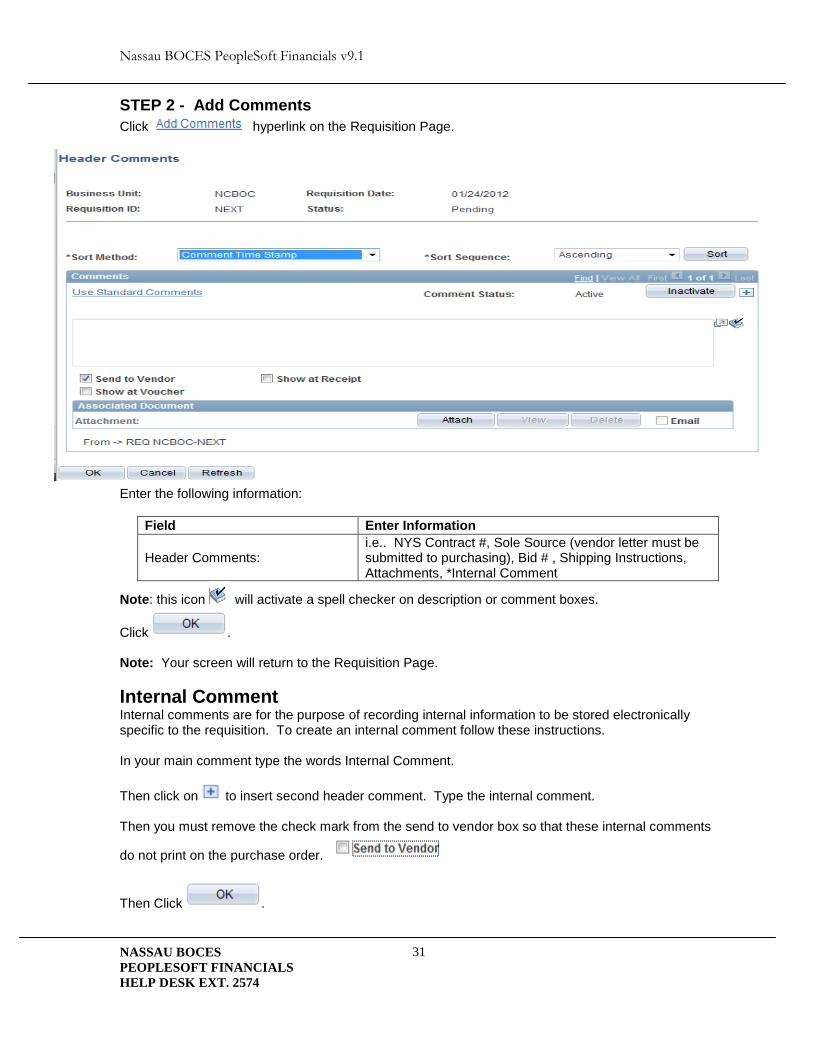
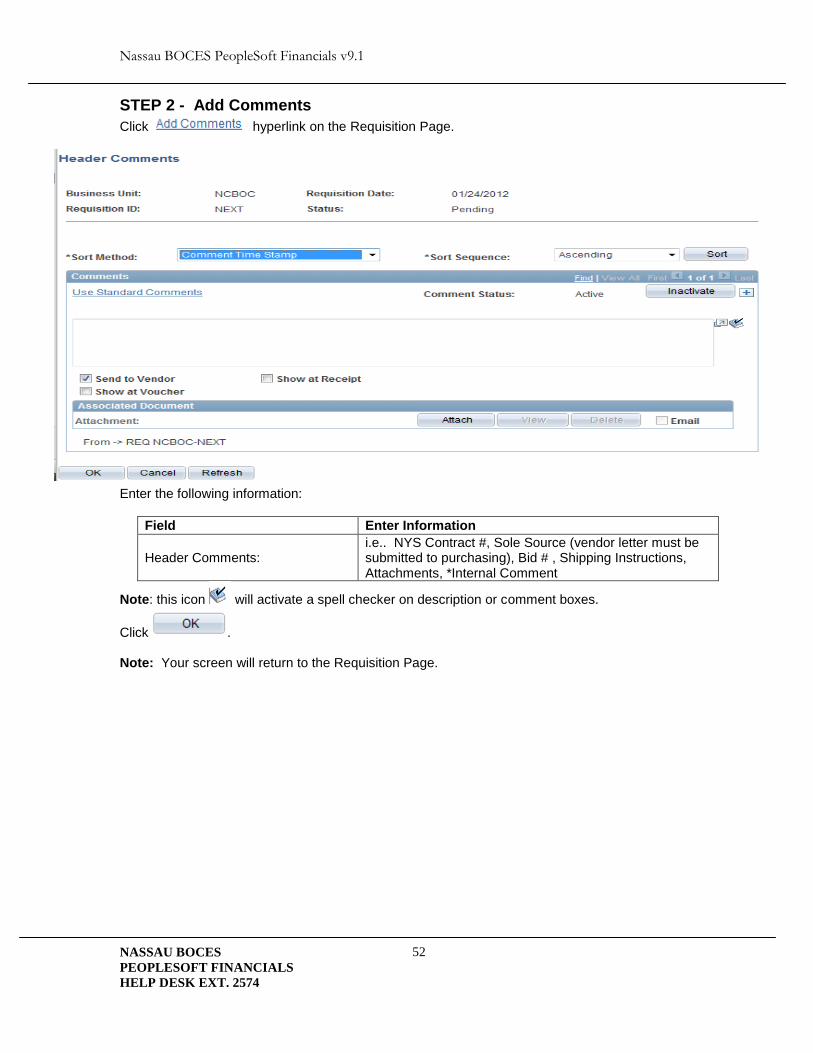
STEP 2 - Add Comments
Click hyperlink on the Requisition Page.
Enter the following information:
Field Enter Information
Header Comments: i.e.. NYS Contract #, Sole Source (vendor letter must be submitted to purchasing), Bid # , Shipping Instructions, Attachments, *Internal Comment
Note: this icon will activate a spell checker on description or comment boxes.
Click . Note: Your screen will return to the Requisition Page.
Nassau BOCES PeopleSoft Financials v9.1
NASSAU BOCES
PEOPLESOFT FINANCIALS
HELP DESK EXT. 2574
18
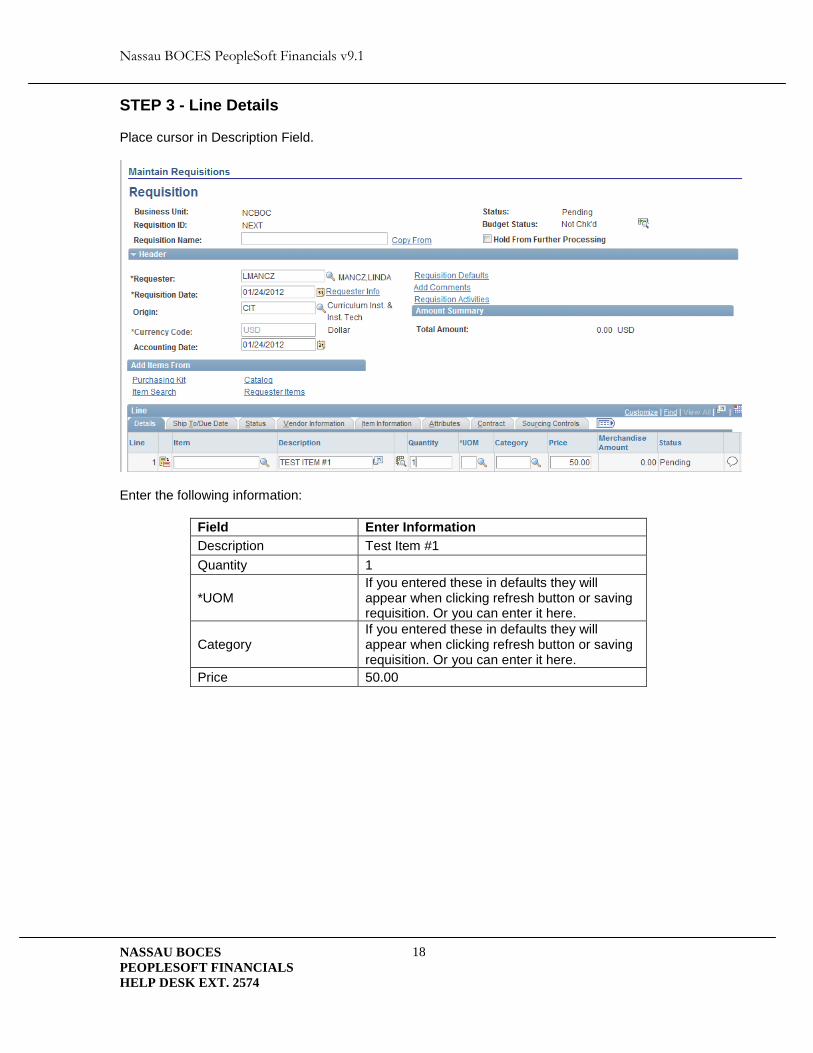
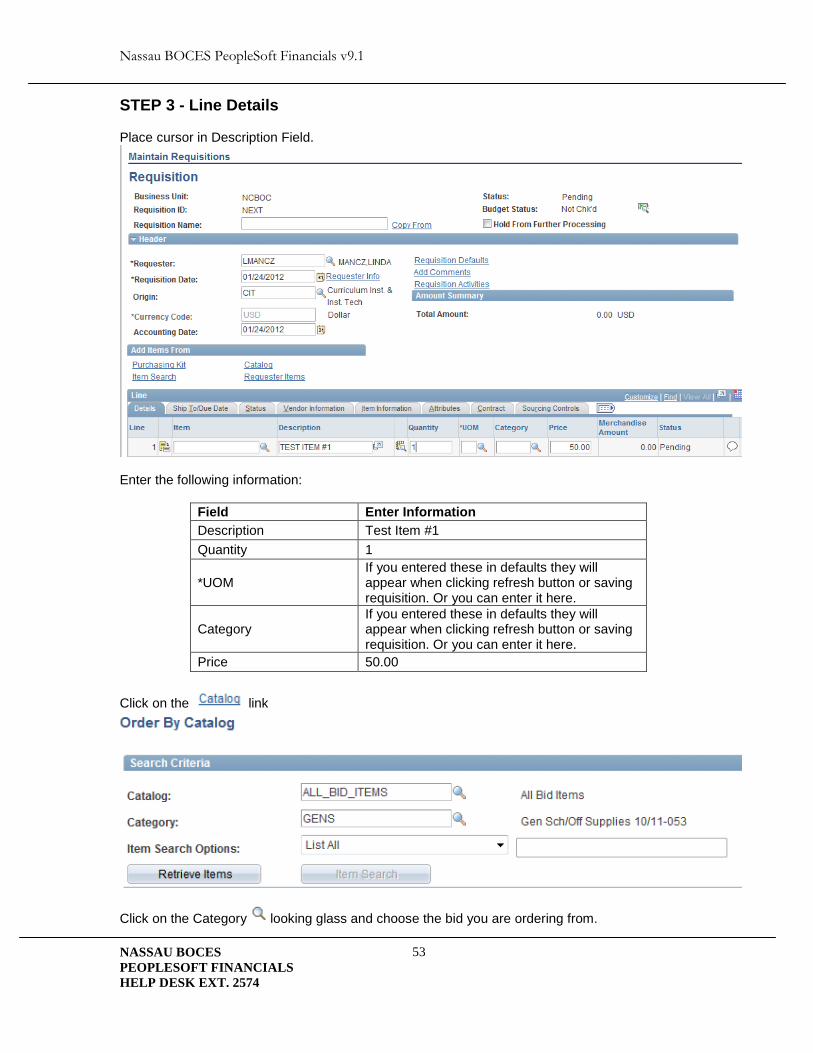
STEP 3 - Line Details Place cursor in Description Field.
Enter the following information:
Field Enter Information
Description Test Item #1
Quantity 1
*UOM If you entered these in defaults they will appear when clicking refresh button or saving requisition. Or you can enter it here.
Category If you entered these in defaults they will appear when clicking refresh button or saving requisition. Or you can enter it here.
Price 50.00

Nassau BOCES PeopleSoft Financials v9.1
NASSAU BOCES
PEOPLESOFT FINANCIALS
HELP DESK EXT. 2574
19
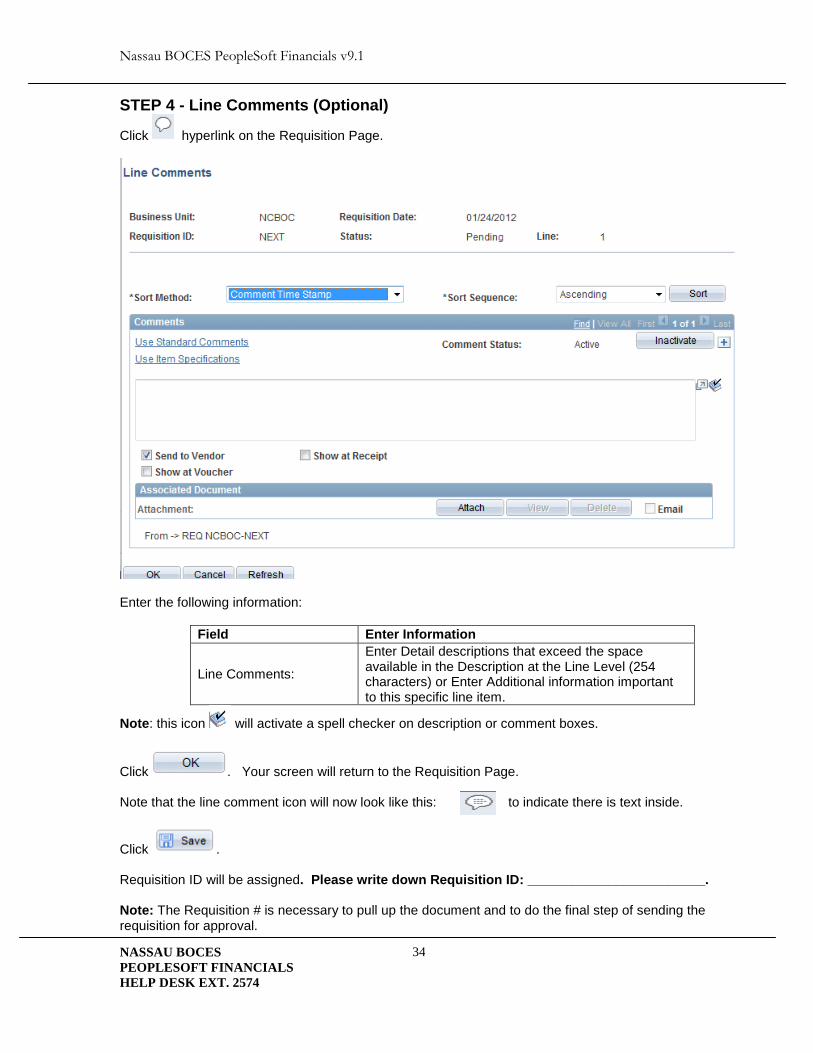
STEP 4 - Line Comments (Optional)
Click hyperlink on the Requisition Page.
Enter the following information:
Field Enter Information
Line Comments:
Enter Detail descriptions that exceed the space available in the Description at the Line Level (254 characters) or Enter Additional information important to this specific line item.
Note: this icon will activate a spell checker on description or comment boxes.
Click . Your screen will return to the Requisition Page. Note that the line comment icon will now look like this: to indicate there is text inside.
Click . Requisition ID will be assigned. Please write down Requisition ID: ________________________. Note: The Requisition # is necessary to pull up the document and to do the final step of sending the requisition for approval.

Nassau BOCES PeopleSoft Financials v9.1
NASSAU BOCES
PEOPLESOFT FINANCIALS
HELP DESK EXT. 2574
20
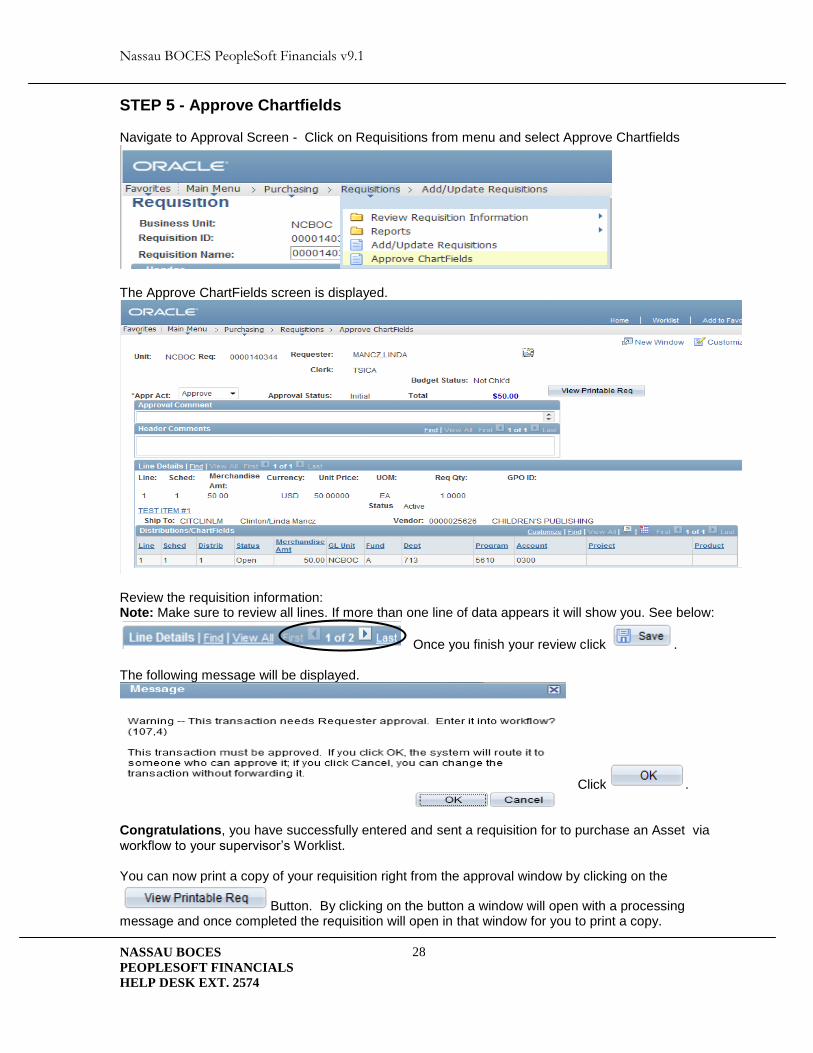
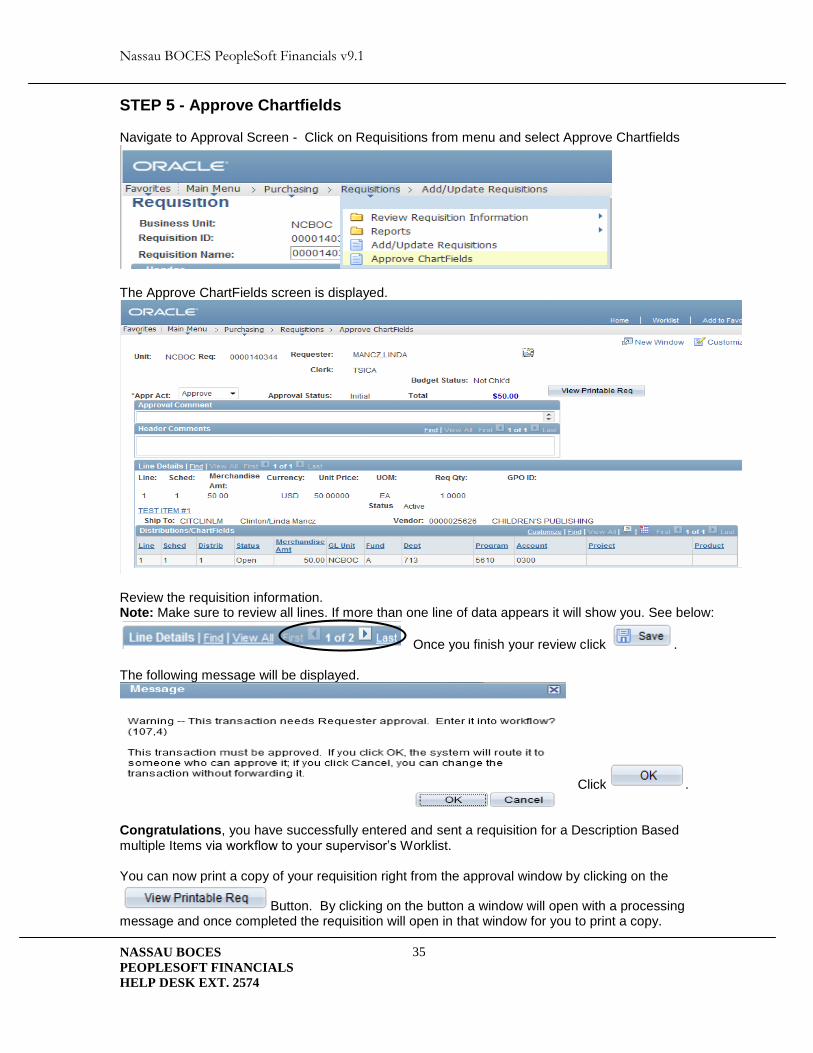
STEP 5 - Approve Chartfields Navigate to Approval Screen - Click on Requisitions from menu and select Approve Chartfields
The Approve ChartFields screen is displayed.
Review the requisition information. Note: Make sure to review all lines. If more than one line of data appears it will show you. See below:
Once you finish your review click . The following message will be displayed.
Click .
Congratulations, you have successfully entered and sent a requisition for a Description Based Item via workflow to your supervisor’s Worklist. You can now print a copy of your requisition right from the approval window by clicking on the
Button. By clicking on the button a window will open with a processing message and once completed the requisition will open in that window for you to print a copy.

Nassau BOCES PeopleSoft Financials v9.1
NASSAU BOCES
PEOPLESOFT FINANCIALS
HELP DESK EXT. 2574
21
Entering Requisition to Purchase an Asset When entering a requisition you must determine if any of the items you are ordering are an asset.
How to Determine What is an Asset Non-Capitalized Asset – Any item whose unit cost is between the dollar amount of $500.00 - $999.99 is coded to account code 0300, 0302, 0303 which is a physical part of the contents of an area in any BOCES location. Here are some examples: Computer (desktop or laptop), Printers, Typewriters, Furniture (desks, bookcases, file cabinets etc), televisions, washers, dryers, Tools (sanders, drill press, etc). These items are tracked but are not computed in the Asset Calculations. When saving requisitions with this criteria, if you have not assigned the NONCAPASST profile id, you will get a warning message but it will save the requisition. You can leave it blank if it does not need to be tracked. Use Profile id NONCAPASST for all Non capitalized assets. Capitalized Asset – Any item whose unit cost is $1,000.00 or more and is coded to account code 0200 and is located or used for any BOCES location. These items are tracked and computed as the Assets of Nassau BOCES. Requisition will not save without designating the profile id.
Use proper Profile ID below for all Capitalized Assets
If you are ordering an asset, here are the steps you must take when you enter your requisition.
Note: if you have a mix of non-asset items and asset items you are ordering. You must only enter this information to the appropriate line on the requisition, not all the lines on the requisition. If every item on the requisition is an Asset, you can enter the Asset information on the Requisition Default Page as explained on page 22.
Nassau BOCES PeopleSoft Financials v9.1
NASSAU BOCES
PEOPLESOFT FINANCIALS
HELP DESK EXT. 2574
22
Navigate: Main Menu > Purchasing > Requisitions > Add/Update Requisitions
Click . Maintain Requisitions Page is displayed.
STEP 1 - Requisition Defaults
Click hyperlink on the Requisition Page.
System Auto Generates REQ ID
STEP 1
STEP 2
STEP 3 STEP 4
Nassau BOCES PeopleSoft Financials v9.1
NASSAU BOCES
PEOPLESOFT FINANCIALS
HELP DESK EXT. 2574
23
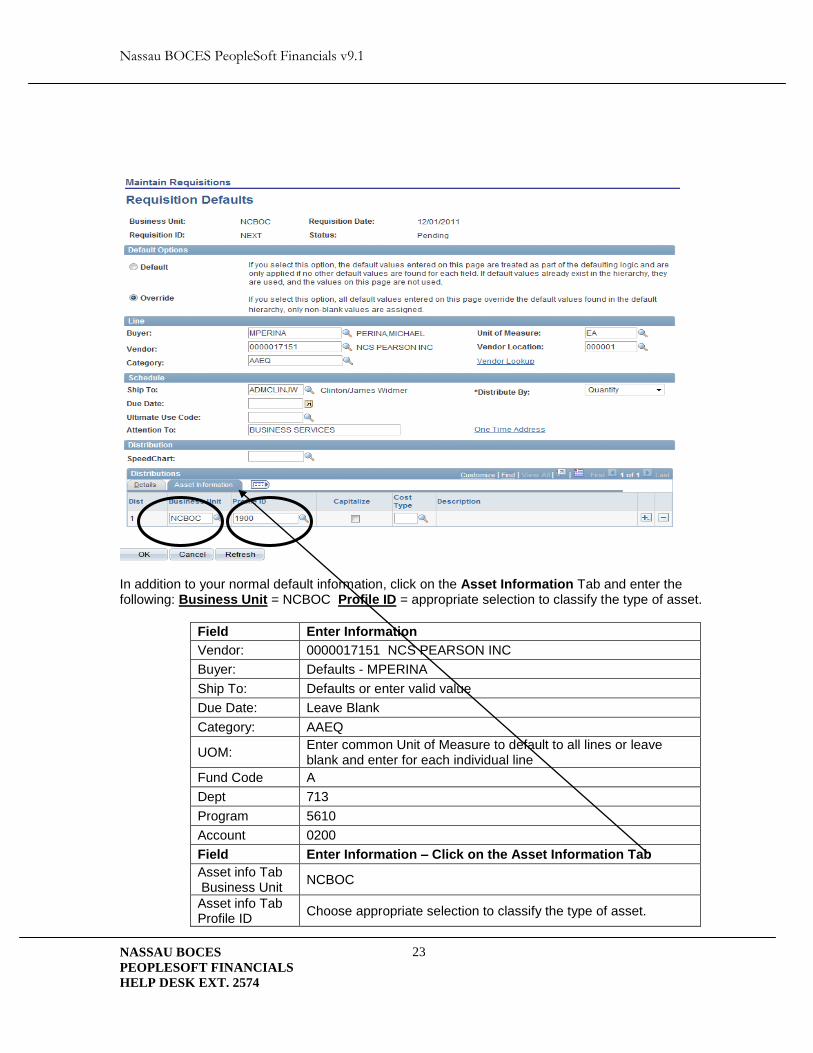
In addition to your normal default information, click on the Asset Information Tab and enter the following: Business Unit = NCBOC Profile ID = appropriate selection to classify the type of asset.
Field Enter Information
Vendor: 0000017151 NCS PEARSON INC
Buyer: Defaults - MPERINA
Ship To: Defaults or enter valid value
Due Date: Leave Blank
Category: AAEQ
UOM: Enter common Unit of Measure to default to all lines or leave blank and enter for each individual line
Fund Code A
Dept 713
Program 5610
Account 0200
Field Enter Information – Click on the Asset Information Tab
Asset info Tab Business Unit
NCBOC
Asset info Tab Profile ID
Choose appropriate selection to classify the type of asset.
Nassau BOCES PeopleSoft Financials v9.1
NASSAU BOCES
PEOPLESOFT FINANCIALS
HELP DESK EXT. 2574
24
Click . Note: Your screen will return to the Requisition Page.

Nassau BOCES PeopleSoft Financials v9.1
NASSAU BOCES
PEOPLESOFT FINANCIALS
HELP DESK EXT. 2574
25
STEP 2 - Add Comments
Click hyperlink on the Requisition Page.
Enter the following information:
Field Enter Information
Header Comments: i.e.. NYS Contract #, Sole Source (vendor letter must be submitted to purchasing), Bid # , Shipping Instructions, Attachments, *Internal Comment
Note: this icon will activate a spell checker on description or comment boxes.
Click . Note: Your screen will return to the Requisition Page.

Nassau BOCES PeopleSoft Financials v9.1
NASSAU BOCES
PEOPLESOFT FINANCIALS
HELP DESK EXT. 2574
26
STEP 3 - Line Details Place cursor in Description Field. Enter the following information:
Field Enter Information
Description 5000e IMAGE SCANNER
Quantity 1
*UOM EA
Category EQ
Price 27072.00
If only some lines on the requisition are an Asset see the following steps for entering the Asset Information:
Go to the line on the requisition that is the Asset and Click on the schedule icon
This will bring you to the Schedule Page
Click on the distribution icon
This will bring you to the Distribution Page
Click on the Asset Information Tab
Enter the following information:
AM Unit = NCBOC
Profile ID = appropriate selection to classify the type of asset. See the How to determine What is an Asset
section of this manual (page 4) to make the correct choice.

Nassau BOCES PeopleSoft Financials v9.1
NASSAU BOCES
PEOPLESOFT FINANCIALS
HELP DESK EXT. 2574
27
STEP 4 - Line Comments (Optional)
Click hyperlink on the Requisition Page.
Enter the following information:
Field Enter Information
Line Comments:
Enter Detail descriptions that exceed the space available in the Description at the Line Level (254 characters) or Enter Additional information important to this specific line item.
Note: this icon will activate a spell checker on description or comment boxes.
Click . Your screen will return to the Requisition Page. Note that the line comment icon will now look like this: to indicate there is text inside.
Click . Requisition ID will be assigned. Please write down Requisition ID: ________________________. Note: The Requisition # is necessary to pull up the document and to do the final step of sending the requisition for approval.
Nassau BOCES PeopleSoft Financials v9.1
NASSAU BOCES
PEOPLESOFT FINANCIALS
HELP DESK EXT. 2574
28
STEP 5 - Approve Chartfields Navigate to Approval Screen - Click on Requisitions from menu and select Approve Chartfields
The Approve ChartFields screen is displayed.
Review the requisition information: Note: Make sure to review all lines. If more than one line of data appears it will show you. See below:
Once you finish your review click . The following message will be displayed.
Click .
Congratulations, you have successfully entered and sent a requisition for to purchase an Asset via workflow to your supervisor’s Worklist. You can now print a copy of your requisition right from the approval window by clicking on the
Button. By clicking on the button a window will open with a processing message and once completed the requisition will open in that window for you to print a copy.

Nassau BOCES PeopleSoft Financials v9.1
NASSAU BOCES
PEOPLESOFT FINANCIALS
HELP DESK EXT. 2574
29
Entering Requisition – Multiple Items and Internal Comment Navigate: Main Menu > Purchasing > Requisitions > Add/Update Requisitions
Click . Maintain Requisitions Page is displayed.
System Auto Generates REQ ID
STEP 1
STEP 2
STEP 3 STEP 4
Nassau BOCES PeopleSoft Financials v9.1
NASSAU BOCES
PEOPLESOFT FINANCIALS
HELP DESK EXT. 2574
30
STEP 1 - Requisition Defaults
Click hyperlink on the Requisition Page.
Enter the following information:
Field Enter Information
Vendor: 0000025626 (CHILDRENS PUBLISHING)
Buyer: Defaults - MPERINA
Ship To: Defaults or enter valid value
Due Date: Leave Blank
Category: Enter common Category to default to all lines or leave blank and enter for each individual line
UOM: Enter common Unit of Measure to default to all lines or leave blank and enter for each individual line
Fund Code A
Dept 713
Program 5610
Account 0300
Click . Note: Your screen will return to the Requisition Page.
Nassau BOCES PeopleSoft Financials v9.1
NASSAU BOCES
PEOPLESOFT FINANCIALS
HELP DESK EXT. 2574
31
STEP 2 - Add Comments
Click hyperlink on the Requisition Page.
Enter the following information:
Field Enter Information
Header Comments: i.e.. NYS Contract #, Sole Source (vendor letter must be submitted to purchasing), Bid # , Shipping Instructions, Attachments, *Internal Comment
Note: this icon will activate a spell checker on description or comment boxes.
Click . Note: Your screen will return to the Requisition Page.
Internal Comment Internal comments are for the purpose of recording internal information to be stored electronically specific to the requisition. To create an internal comment follow these instructions. In your main comment type the words Internal Comment.
Then click on to insert second header comment. Type the internal comment. Then you must remove the check mark from the send to vendor box so that these internal comments
do not print on the purchase order.
Then Click .

Nassau BOCES PeopleSoft Financials v9.1
NASSAU BOCES
PEOPLESOFT FINANCIALS
HELP DESK EXT. 2574
32
STEP 3 - Line Details Place cursor in Description Field.
Enter the following information:
Field Enter Information
Description Test Item #1
Quantity 1
*UOM If you entered these in defaults they will appear when clicking refresh button or saving requisition. Or you can enter it here.
Category If you entered these in defaults they will appear when clicking refresh button or saving requisition. Or you can enter it here.
Price 50.00

Nassau BOCES PeopleSoft Financials v9.1
NASSAU BOCES
PEOPLESOFT FINANCIALS
HELP DESK EXT. 2574
33
3.1 Inserting Additional Line Items.
Click on Plus sign at end of line details:
Script Prompt box will appear asking for the number of lines you would like to add. Enter the number of lines and click the OK button. Additional Line(s) will be inserted to requisition.
Enter the following information for the additional lines.
Field Enter Information
Description Test Item #2
Quantity 1
*UOM If you entered these in defaults they will appear when clicking refresh button or saving requisition. Or you can enter it here.
Category If you entered these in defaults they will appear when clicking refresh button or saving requisition. Or you can enter it here.
Price 10.00
Field Enter Information
Description Test Item #3
Quantity 1
*UOM If you entered these in defaults they will appear when clicking refresh button or saving requisition. Or you can enter it here.
Category If you entered these in defaults they will appear when clicking refresh button or saving requisition. Or you can enter it here.
Price 12.00
Nassau BOCES PeopleSoft Financials v9.1
NASSAU BOCES
PEOPLESOFT FINANCIALS
HELP DESK EXT. 2574
34
STEP 4 - Line Comments (Optional)
Click hyperlink on the Requisition Page.
Enter the following information:
Field Enter Information
Line Comments:
Enter Detail descriptions that exceed the space available in the Description at the Line Level (254 characters) or Enter Additional information important to this specific line item.
Note: this icon will activate a spell checker on description or comment boxes.
Click . Your screen will return to the Requisition Page. Note that the line comment icon will now look like this: to indicate there is text inside.
Click . Requisition ID will be assigned. Please write down Requisition ID: ________________________. Note: The Requisition # is necessary to pull up the document and to do the final step of sending the requisition for approval.
Nassau BOCES PeopleSoft Financials v9.1
NASSAU BOCES
PEOPLESOFT FINANCIALS
HELP DESK EXT. 2574
35
STEP 5 - Approve Chartfields Navigate to Approval Screen - Click on Requisitions from menu and select Approve Chartfields
The Approve ChartFields screen is displayed.
Review the requisition information. Note: Make sure to review all lines. If more than one line of data appears it will show you. See below:
Once you finish your review click . The following message will be displayed.
Click .
Congratulations, you have successfully entered and sent a requisition for a Description Based multiple Items via workflow to your supervisor’s Worklist. You can now print a copy of your requisition right from the approval window by clicking on the
Button. By clicking on the button a window will open with a processing message and once completed the requisition will open in that window for you to print a copy.
Nassau BOCES PeopleSoft Financials v9.1
NASSAU BOCES
PEOPLESOFT FINANCIALS
HELP DESK EXT. 2574
36
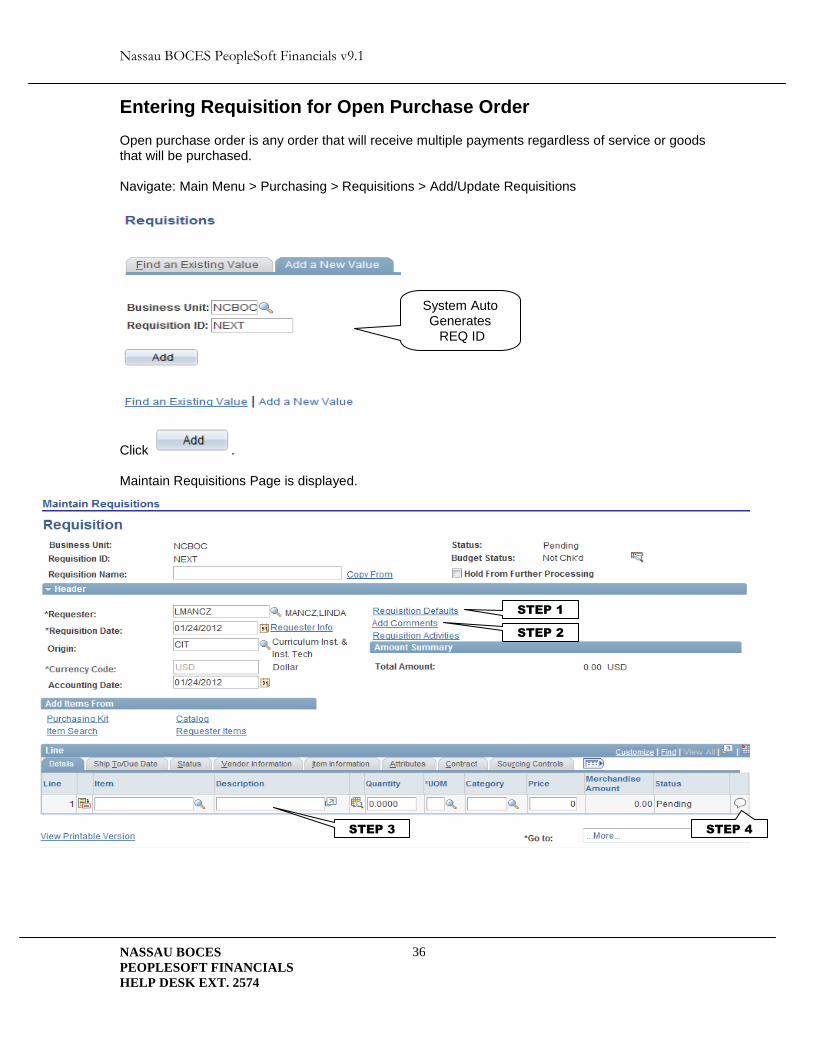
Entering Requisition for Open Purchase Order Open purchase order is any order that will receive multiple payments regardless of service or goods that will be purchased. Navigate: Main Menu > Purchasing > Requisitions > Add/Update Requisitions
Click . Maintain Requisitions Page is displayed.
System Auto Generates REQ ID
STEP 1
STEP 2
STEP 3 STEP 4

Nassau BOCES PeopleSoft Financials v9.1
NASSAU BOCES
PEOPLESOFT FINANCIALS
HELP DESK EXT. 2574
37
STEP 1 - Requisition Defaults
Click hyperlink on the Requisition Page.
Enter the following information:
Field Enter Information
Vendor: 0000006051 PATHMARK
Buyer: Defaults - MPERINA
Ship To: Defaults or enter valid value
Due Date: Leave Blank
Category: Enter common Category to default to all lines or leave blank and enter for each individual line
UOM: Enter common Unit of Measure to default to all lines or leave blank and enter for each individual line
Fund Code A
Dept 713
Program 5610
Account 0300
Click . Note: Your screen will return to the Requisition Page.

Nassau BOCES PeopleSoft Financials v9.1
NASSAU BOCES
PEOPLESOFT FINANCIALS
HELP DESK EXT. 2574
38
STEP 2 - Add Comments
Click hyperlink on the Requisition Page.
Enter the following information:
Field Enter Information
Header Comments: i.e.. NYS Contract #, Sole Source (vendor letter must be submitted to purchasing), Bid # , Shipping Instructions, Attachments, *Internal Comment
Note: this icon will activate a spell checker on description or comment boxes.
Click . Note: Your screen will return to the Requisition Page.

Nassau BOCES PeopleSoft Financials v9.1
NASSAU BOCES
PEOPLESOFT FINANCIALS
HELP DESK EXT. 2574
39
STEP 3 - Line Details Place cursor in Description Field.
Enter the following information:
Field Enter Information
Description Test Item #1
Quantity 500.00 full amount to be partially paid against
*UOM If you entered these in defaults they will appear when clicking refresh button or saving requisition. Or you can enter it here.
Category If you entered these in defaults they will appear when clicking refresh button or saving requisition. Or you can enter it here.
Price 1.00
Note: The quantity must be the full dollar amount that you will be making partial payments against in order for Accounts Payable to make multiple payments and for you to add partial receipts. The price must be $1.00.

Nassau BOCES PeopleSoft Financials v9.1
NASSAU BOCES
PEOPLESOFT FINANCIALS
HELP DESK EXT. 2574
40
STEP 4 - Line Comments (Optional)
Click hyperlink on the Requisition Page.
Enter the following information:
Field Enter Information
Line Comments:
Enter Detail descriptions that exceed the space available in the Description at the Line Level (254 characters) or Enter Additional information important to this specific line item.
Note: this icon will activate a spell checker on description or comment boxes.
Click . Your screen will return to the Requisition Page. Note that the line comment icon will now look like this: to indicate there is text inside.
Click . Requisition ID will be assigned. Please write down Requisition ID: ________________________. Note: The Requisition # is necessary to pull up the document and to do the final step of sending the requisition for approval.

Nassau BOCES PeopleSoft Financials v9.1
NASSAU BOCES
PEOPLESOFT FINANCIALS
HELP DESK EXT. 2574
41
STEP 5 - Approve Chartfields Navigate to Approval Screen - Click on Requisitions from menu and select Approve Chartfields
The Approve ChartFields screen is displayed.
Review the requisition information. Note: Make sure to review all lines. If more than one line of data appears it will show you. See below:
Once you finish your review click . The following message will be displayed.
Click .
Congratulations, you have successfully entered and sent a requisition for an Open purchase agreement via workflow to your supervisor’s Worklist. You can now print a copy of your requisition right from the approval window by clicking on the
Button. By clicking on the button a window will open with a processing message and once completed the requisition will open in that window for you to print a copy.

Nassau BOCES PeopleSoft Financials v9.1
NASSAU BOCES
PEOPLESOFT FINANCIALS
HELP DESK EXT. 2574
42
Entering Requisition with Multiple Budget Codes
Navigate: Main Menu > Purchasing > Requisitions > Add/Update Requisitions
Click . Maintain Requisitions Page is displayed.
System Auto Generates REQ ID
STEP 1
STEP 2
STEP 3 STEP 4
Nassau BOCES PeopleSoft Financials v9.1
NASSAU BOCES
PEOPLESOFT FINANCIALS
HELP DESK EXT. 2574
43
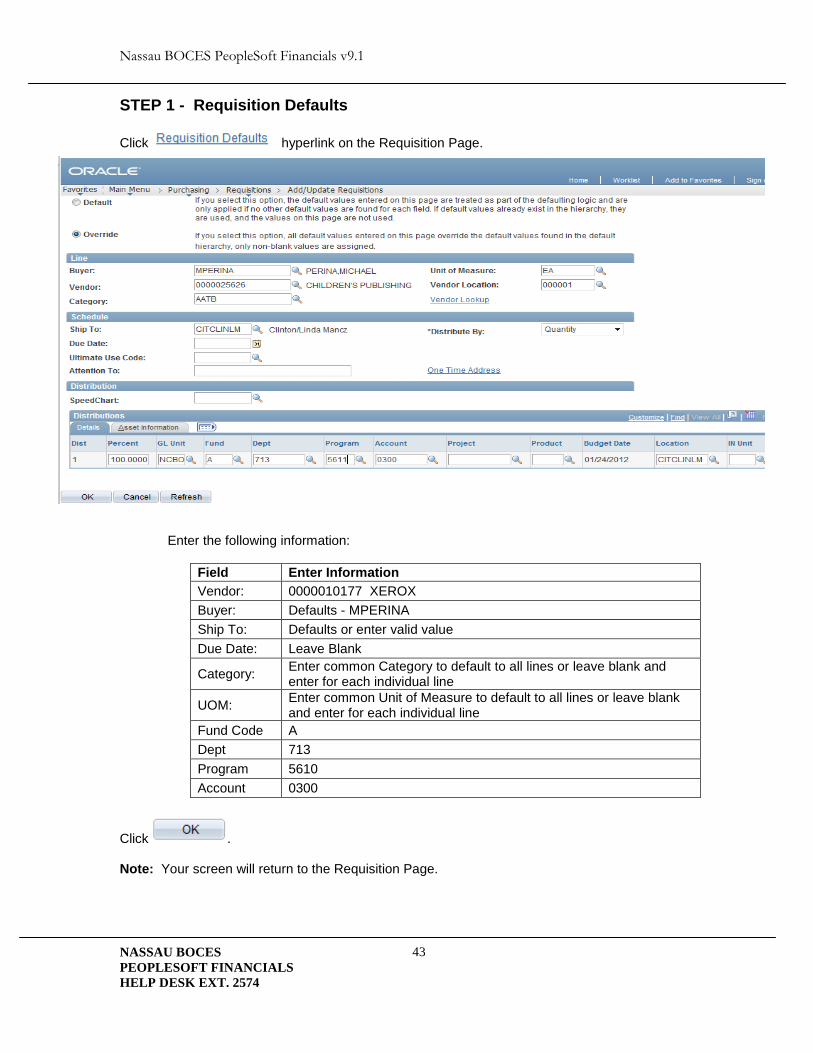
STEP 1 - Requisition Defaults
Click hyperlink on the Requisition Page.
Enter the following information:
Field Enter Information
Vendor: 0000010177 XEROX
Buyer: Defaults - MPERINA
Ship To: Defaults or enter valid value
Due Date: Leave Blank
Category: Enter common Category to default to all lines or leave blank and enter for each individual line
UOM: Enter common Unit of Measure to default to all lines or leave blank and enter for each individual line
Fund Code A
Dept 713
Program 5610
Account 0300
Click . Note: Your screen will return to the Requisition Page.

Nassau BOCES PeopleSoft Financials v9.1
NASSAU BOCES
PEOPLESOFT FINANCIALS
HELP DESK EXT. 2574
44
STEP 2 - Add Comments
Click hyperlink on the Requisition Page.
Enter the following information:
Field Enter Information
Header Comments: i.e.. NYS Contract #, Sole Source (vendor letter must be submitted to purchasing), Bid # , Shipping Instructions, Attachments, *Internal Comment
Note: this icon will activate a spell checker on description or comment boxes.
Click . Note: Your screen will return to the Requisition Page.
Nassau BOCES PeopleSoft Financials v9.1
NASSAU BOCES
PEOPLESOFT FINANCIALS
HELP DESK EXT. 2574
45
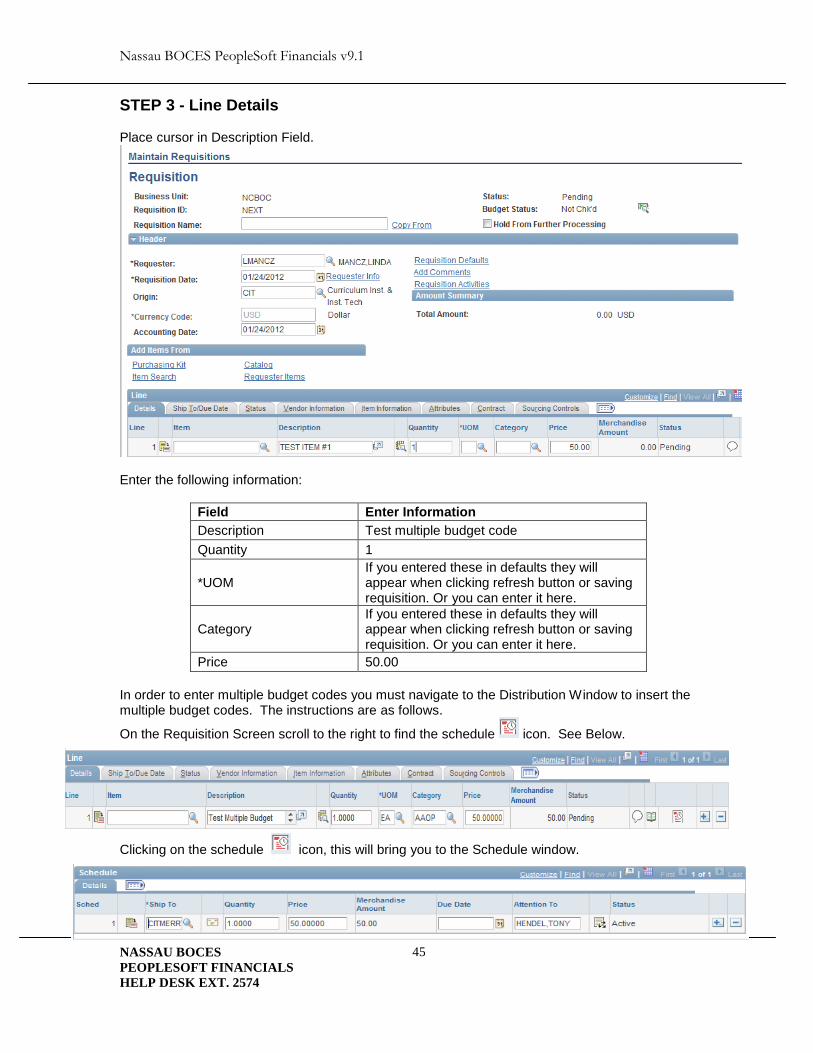
STEP 3 - Line Details Place cursor in Description Field.
Enter the following information:
Field Enter Information
Description Test multiple budget code
Quantity 1
*UOM If you entered these in defaults they will appear when clicking refresh button or saving requisition. Or you can enter it here.
Category If you entered these in defaults they will appear when clicking refresh button or saving requisition. Or you can enter it here.
Price 50.00
In order to enter multiple budget codes you must navigate to the Distribution Window to insert the multiple budget codes. The instructions are as follows.
On the Requisition Screen scroll to the right to find the schedule icon. See Below.
Clicking on the schedule icon, this will bring you to the Schedule window.

Nassau BOCES PeopleSoft Financials v9.1
NASSAU BOCES
PEOPLESOFT FINANCIALS
HELP DESK EXT. 2574
46
Click on the distribution icon, this will bring you to the Distribution window.
In the Distribution window click on the plus icon to add additional budget lines. When you click on the plus sign you will receive the following Script Prompt box which will ask you how many additional lines you would like to add. Enter your response and click the OK button.
This will insert the new budget line for you to enter the additional budget code. The system will carry down the budget information from the first line simply change the information to your desired budget code.
Note: you must make sure that the percent and quantity breakdown will total the original quantity and price that you entered on the requisition.

Nassau BOCES PeopleSoft Financials v9.1
NASSAU BOCES
PEOPLESOFT FINANCIALS
HELP DESK EXT. 2574
47
This is how the lines will appear when completed.
Click . Then save the requisition. Click on return to main page to do next step. Note: When entering multiple budget codes on 1 line item you cannot specify partial payment transaction to unique budget codes. If you need to make multiple payments to these codes we suggest you add a separate line for each budget code represented.

Nassau BOCES PeopleSoft Financials v9.1
NASSAU BOCES
PEOPLESOFT FINANCIALS
HELP DESK EXT. 2574
48
STEP 4 - Line Comments (Optional)
Click hyperlink on the Requisition Page.
Enter the following information:
Field Enter Information
Line Comments:
Enter Detail descriptions that exceed the space available in the Description at the Line Level (254 characters) or Enter Additional information important to this specific line item.
Note: this icon will activate a spell checker on description or comment boxes.
Click . Your screen will return to the Requisition Page. Note that the line comment icon will now look like this: to indicate there is text inside.
Click . Requisition ID will be assigned. Please write down Requisition ID: ________________________. Note: The Requisition # is necessary to pull up the document and to do the final step of sending the requisition for approval.
Nassau BOCES PeopleSoft Financials v9.1
NASSAU BOCES
PEOPLESOFT FINANCIALS
HELP DESK EXT. 2574
49
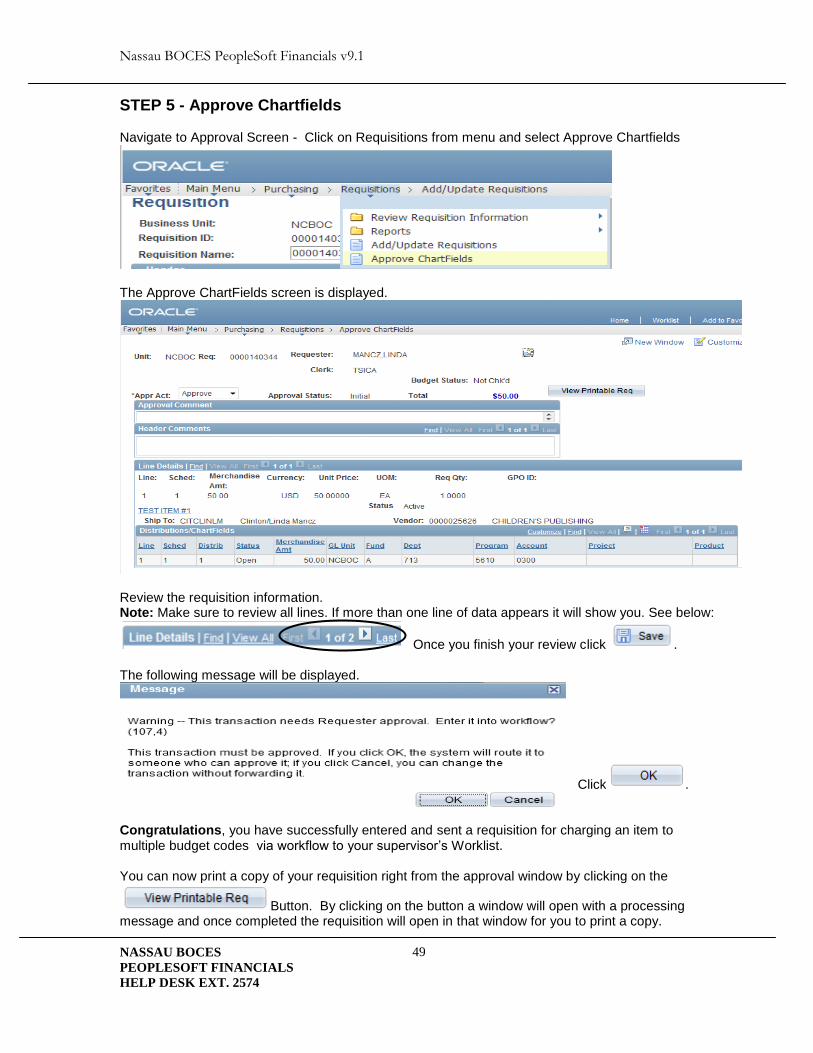
STEP 5 - Approve Chartfields Navigate to Approval Screen - Click on Requisitions from menu and select Approve Chartfields
The Approve ChartFields screen is displayed.
Review the requisition information. Note: Make sure to review all lines. If more than one line of data appears it will show you. See below:
Once you finish your review click . The following message will be displayed.
Click .
Congratulations, you have successfully entered and sent a requisition for charging an item to multiple budget codes via workflow to your supervisor’s Worklist. You can now print a copy of your requisition right from the approval window by clicking on the
Button. By clicking on the button a window will open with a processing message and once completed the requisition will open in that window for you to print a copy.

Nassau BOCES PeopleSoft Financials v9.1
NASSAU BOCES
PEOPLESOFT FINANCIALS
HELP DESK EXT. 2574
50
Entering Requisition – Using Bid Catalog Navigate: Main Menu > Purchasing > Requisitions > Add/Update Requisitions
Click . Maintain Requisitions Page is displayed.
System Auto Generates REQ ID
STEP 1
STEP 2
STEP 3 STEP 4
Nassau BOCES PeopleSoft Financials v9.1
NASSAU BOCES
PEOPLESOFT FINANCIALS
HELP DESK EXT. 2574
51
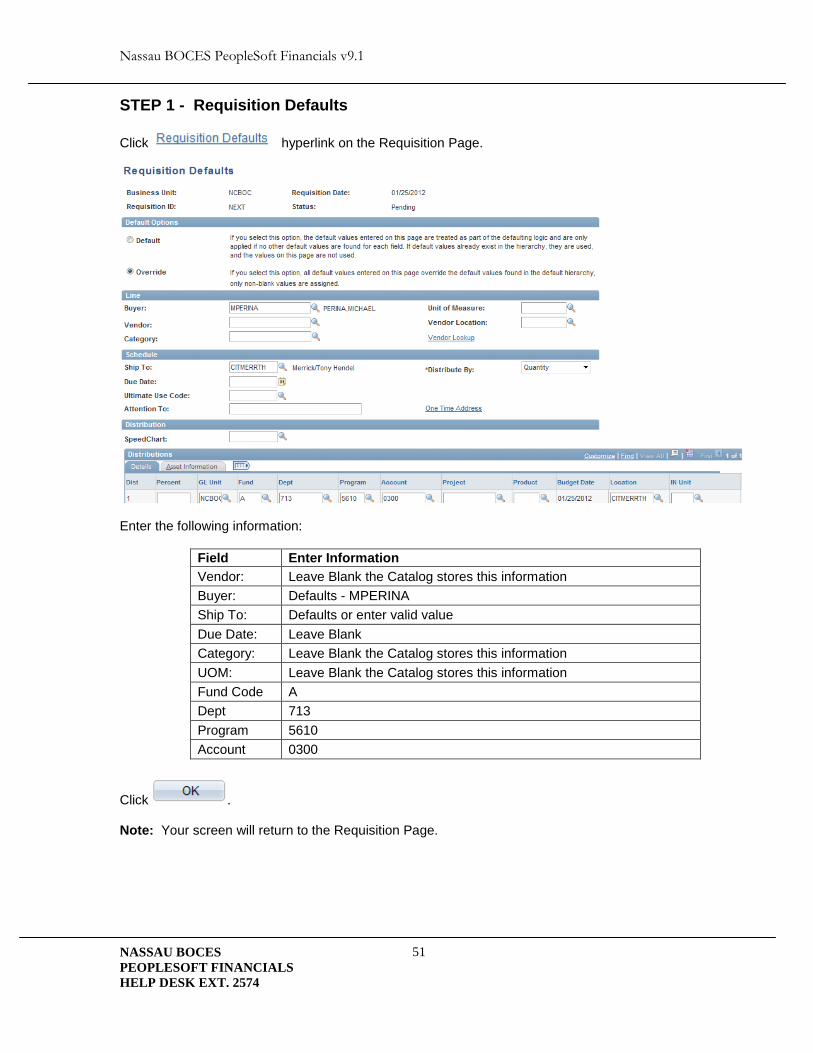
STEP 1 - Requisition Defaults
Click hyperlink on the Requisition Page.
Enter the following information:
Field Enter Information
Vendor: Leave Blank the Catalog stores this information
Buyer: Defaults - MPERINA
Ship To: Defaults or enter valid value
Due Date: Leave Blank
Category: Leave Blank the Catalog stores this information
UOM: Leave Blank the Catalog stores this information
Fund Code A
Dept 713
Program 5610
Account 0300
Click . Note: Your screen will return to the Requisition Page.
Nassau BOCES PeopleSoft Financials v9.1
NASSAU BOCES
PEOPLESOFT FINANCIALS
HELP DESK EXT. 2574
52
STEP 2 - Add Comments
Click hyperlink on the Requisition Page.
Enter the following information:
Field Enter Information
Header Comments: i.e.. NYS Contract #, Sole Source (vendor letter must be submitted to purchasing), Bid # , Shipping Instructions, Attachments, *Internal Comment
Note: this icon will activate a spell checker on description or comment boxes.
Click . Note: Your screen will return to the Requisition Page.
Nassau BOCES PeopleSoft Financials v9.1
NASSAU BOCES
PEOPLESOFT FINANCIALS
HELP DESK EXT. 2574
53
STEP 3 - Line Details Place cursor in Description Field.
Enter the following information:
Field Enter Information
Description Test Item #1
Quantity 1
*UOM If you entered these in defaults they will appear when clicking refresh button or saving requisition. Or you can enter it here.
Category If you entered these in defaults they will appear when clicking refresh button or saving requisition. Or you can enter it here.
Price 50.00
Click on the link
Click on the Category looking glass and choose the bid you are ordering from.

Nassau BOCES PeopleSoft Financials v9.1
NASSAU BOCES
PEOPLESOFT FINANCIALS
HELP DESK EXT. 2574
54
Then Click the button to bring up the items in the bid catalog.
To order the items place a in the box next to the item and enter the quantity you want to order.
Continue to do this for all items then click on the button to add the items to your requisition. This action will return you to the Requisition screen.
Click on the button to save the requisition.

Nassau BOCES PeopleSoft Financials v9.1
NASSAU BOCES
PEOPLESOFT FINANCIALS
HELP DESK EXT. 2574
55
STEP 4 - Line Comments (Optional)
Click hyperlink on the Requisition Page.
Enter the following information:
Field Enter Information
Line Comments:
Enter Detail descriptions that exceed the space available in the Description at the Line Level (254 characters) or Enter Additional information important to this specific line item.
Note: this icon will activate a spell checker on description or comment boxes.
Click . Your screen will return to the Requisition Page. Note that the line comment icon will now look like this: to indicate there is text inside.
Click . Requisition ID will be assigned. Please write down Requisition ID: ________________________. Note: The Requisition # is necessary to pull up the document and to do the final step of sending the requisition for approval.

Nassau BOCES PeopleSoft Financials v9.1
NASSAU BOCES
PEOPLESOFT FINANCIALS
HELP DESK EXT. 2574
56
STEP 5 - Approve Chartfields Navigate to Approval Screen - Click on Requisitions from menu and select Approve Chartfields
The Approve ChartFields screen is displayed.
Review the requisition information. Note: Make sure to review all lines. If more than one line of data appears it will show you. See below:
Once you finish your review click . The following message will be displayed.
Click .
Congratulations, you have successfully entered and sent a requisition for a Catalog Order via workflow to your supervisor’s Worklist. You can now print a copy of your requisition right from the approval window by clicking on the
Button. By clicking on the button a window will open with a processing message and once completed the requisition will open in that window for you to print a copy.
Nassau BOCES PeopleSoft Financials v9.1
NASSAU BOCES
PEOPLESOFT FINANCIALS
HELP DESK EXT. 2574
57
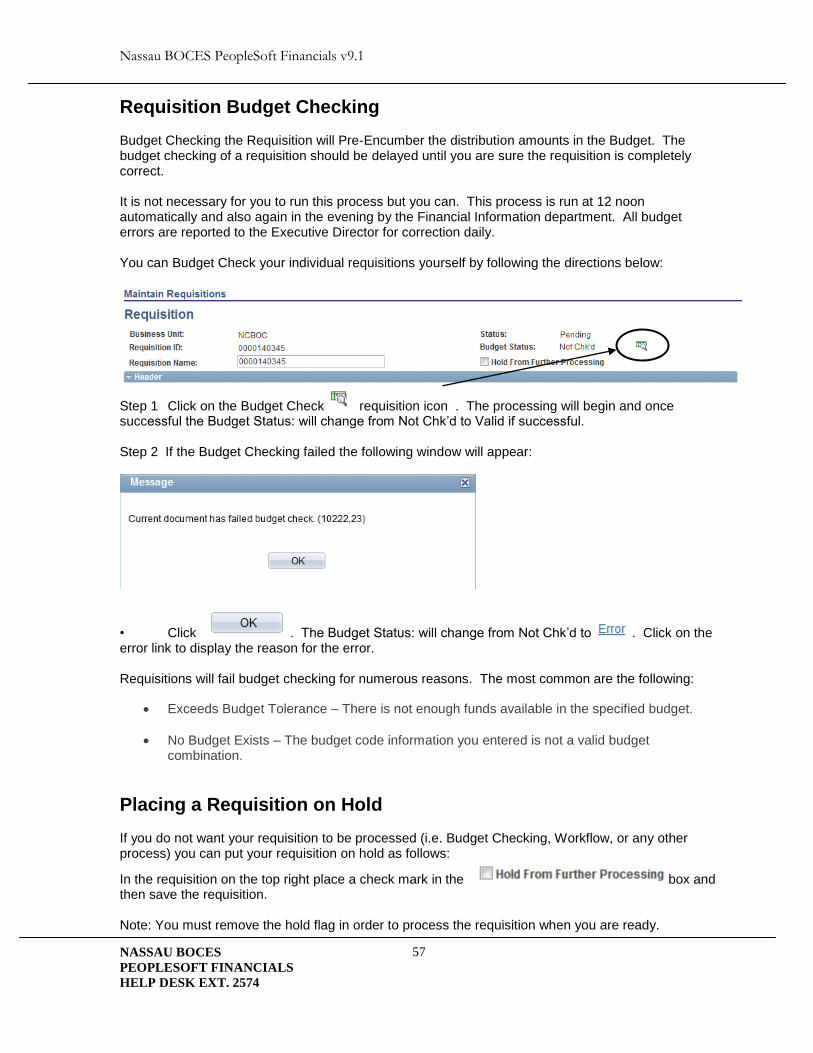
Requisition Budget Checking Budget Checking the Requisition will Pre-Encumber the distribution amounts in the Budget. The budget checking of a requisition should be delayed until you are sure the requisition is completely correct. It is not necessary for you to run this process but you can. This process is run at 12 noon automatically and also again in the evening by the Financial Information department. All budget errors are reported to the Executive Director for correction daily. You can Budget Check your individual requisitions yourself by following the directions below:
Step 1 Click on the Budget Check requisition icon . The processing will begin and once successful the Budget Status: will change from Not Chk’d to Valid if successful. Step 2 If the Budget Checking failed the following window will appear:
• Click . The Budget Status: will change from Not Chk’d to . Click on the error link to display the reason for the error. Requisitions will fail budget checking for numerous reasons. The most common are the following:
Exceeds Budget Tolerance – There is not enough funds available in the specified budget.
No Budget Exists – The budget code information you entered is not a valid budget combination.
Placing a Requisition on Hold If you do not want your requisition to be processed (i.e. Budget Checking, Workflow, or any other process) you can put your requisition on hold as follows:
In the requisition on the top right place a check mark in the box and then save the requisition. Note: You must remove the hold flag in order to process the requisition when you are ready.

Nassau BOCES PeopleSoft Financials v9.1
NASSAU BOCES
PEOPLESOFT FINANCIALS
HELP DESK EXT. 2574
58
Modifying Requisitions Navigate: Main Menu > Purchasing > Requisitions > Add/Update Requisitions Click on the Find An Existing Value link.
Enter the requisition number that you want to update then click search. The Maintain Requisitions Page will be displayed. Make the changes you need to make then.
Click . Most type of changes will remove the worklist entry from the approvers worklists. For all changes make sure to do the Approve ChartFields step. If the entry was not removed you will get a message saying it has already been submitted for approval. Note: Once a Requisition is Approved by the Purchasing agent changes to the requisitions are not allowed.
Canceling a Requisition Contact the Financial Information System to cancel a requisition at ext. 2574.
Nassau BOCES PeopleSoft Financials v9.1
NASSAU BOCES
PEOPLESOFT FINANCIALS
HELP DESK EXT. 2574
59
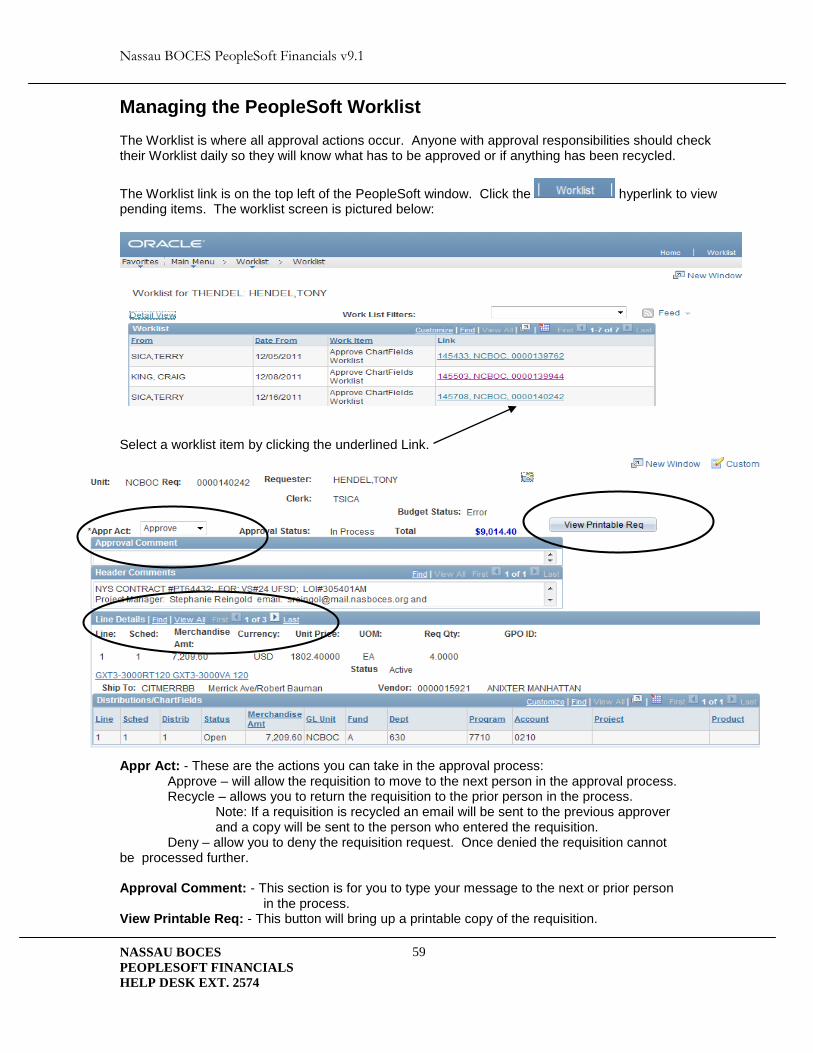
Managing the PeopleSoft Worklist The Worklist is where all approval actions occur. Anyone with approval responsibilities should check their Worklist daily so they will know what has to be approved or if anything has been recycled.
The Worklist link is on the top left of the PeopleSoft window. Click the hyperlink to view pending items. The worklist screen is pictured below:
Select a worklist item by clicking the underlined Link.
Appr Act: - These are the actions you can take in the approval process: Approve – will allow the requisition to move to the next person in the approval process. Recycle – allows you to return the requisition to the prior person in the process. Note: If a requisition is recycled an email will be sent to the previous approver and a copy will be sent to the person who entered the requisition. Deny – allow you to deny the requisition request. Once denied the requisition cannot be processed further. Approval Comment: - This section is for you to type your message to the next or prior person in the process. View Printable Req: - This button will bring up a printable copy of the requisition.

Nassau BOCES PeopleSoft Financials v9.1
NASSAU BOCES
PEOPLESOFT FINANCIALS
HELP DESK EXT. 2574
60
Review the requisition information. Note: Make sure to review all lines. If more than one line of data appears it will show you. See below:
View All will show the details for all lines on the requisition. The arrows allow you to view one line at a time.
Once you finish your review scroll to the bottom of the screen and click . The following message will be displayed:
Click . Once you click ok, the Worklist link for that requisition will be removed from your worklist and will send a worklist entry to the next person in the process.
Click the hyperlink to return to your worklist to continue the process.
Managing Recycled Requisitions If you are an approver of the requisition, recycle the requisition back to the clerk. The clerk can make the change to the requisition. If you are the entry clerk, make note of the change to be made and update the requisition with the changes. Return to the Approve ChartFields screen making sure to change the Appr Action: Recycle to Approve, then click save to resubmit change for approval.
Nassau BOCES PeopleSoft Financials v9.1
NASSAU BOCES
PEOPLESOFT FINANCIALS
HELP DESK EXT. 2574
61
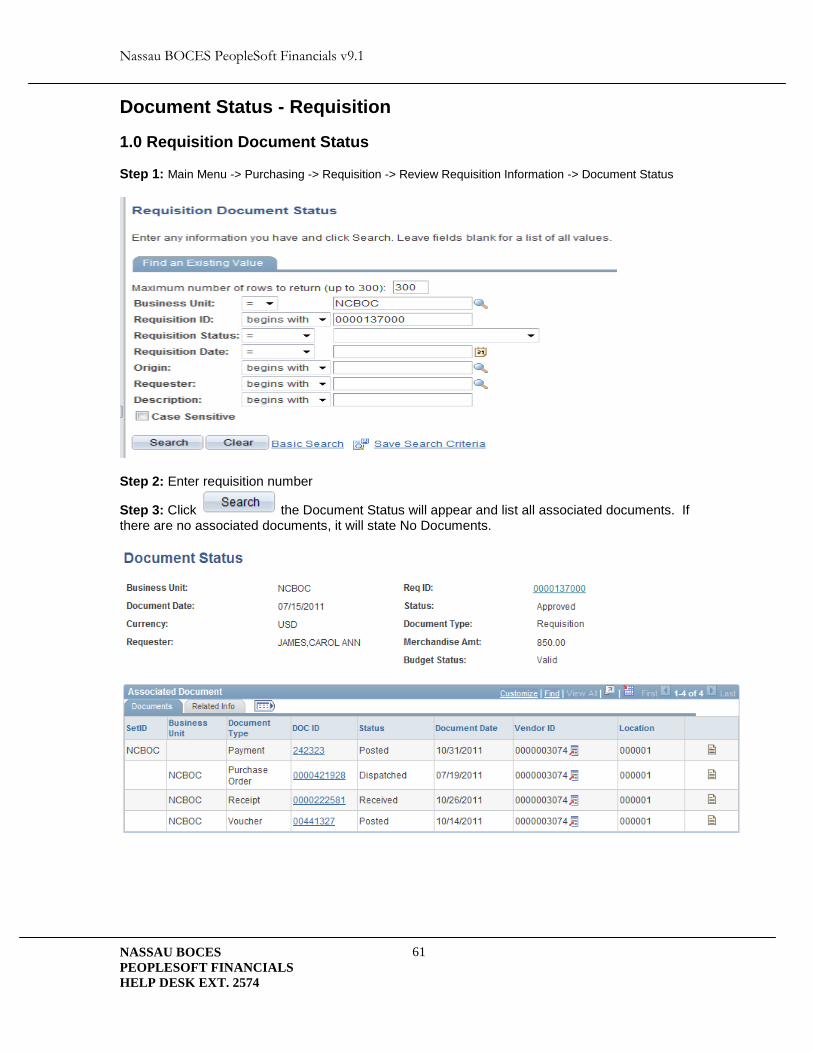
Document Status - Requisition
1.0 Requisition Document Status Step 1: Main Menu -> Purchasing -> Requisition -> Review Requisition Information -> Document Status
Step 2: Enter requisition number
Step 3: Click the Document Status will appear and list all associated documents. If there are no associated documents, it will state No Documents.

Nassau BOCES PeopleSoft Financials v9.1
NASSAU BOCES
PEOPLESOFT FINANCIALS
HELP DESK EXT. 2574
62
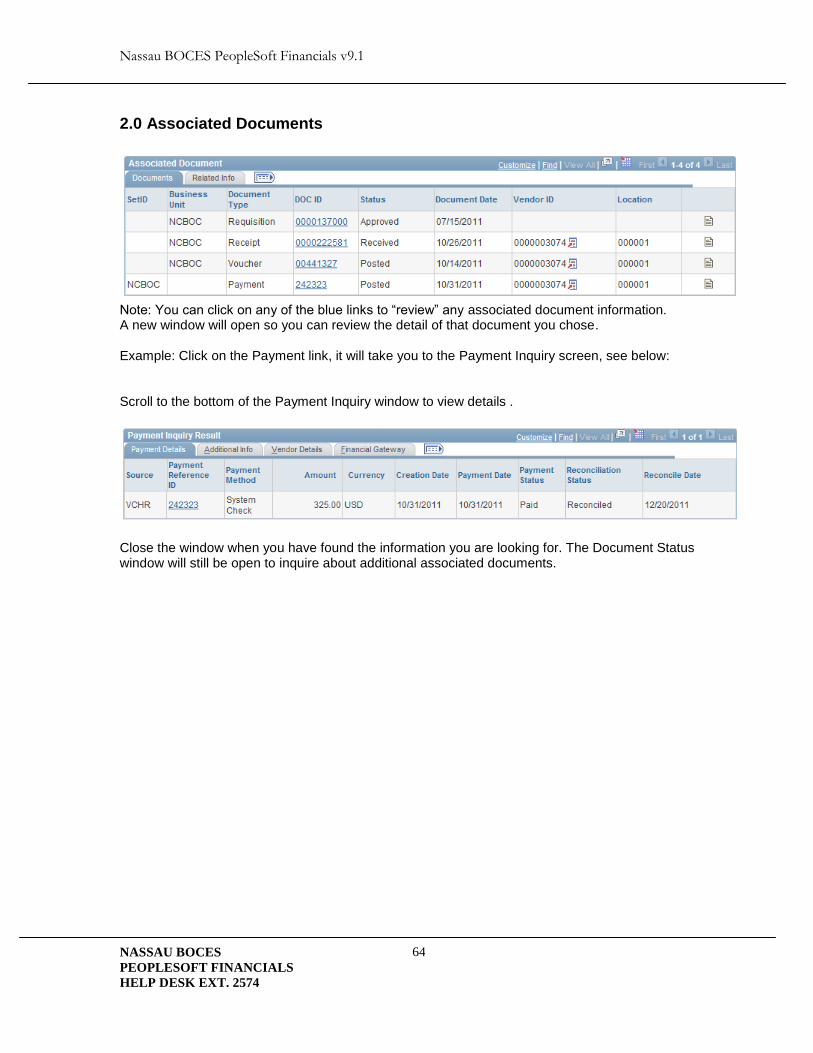
2.0 Associated Documents
Note: You can click on any of the blue links to “review” any associated document information. A new window will open so you can review the detail of the document you chose. Example: Click on the PO link, it will take you to the Purchase Order screen, see below:
Close the window when you have found the information you are looking for. The Document Status window will still be open to inquire about additional associated documents.
Nassau BOCES PeopleSoft Financials v9.1
NASSAU BOCES
PEOPLESOFT FINANCIALS
HELP DESK EXT. 2574
63
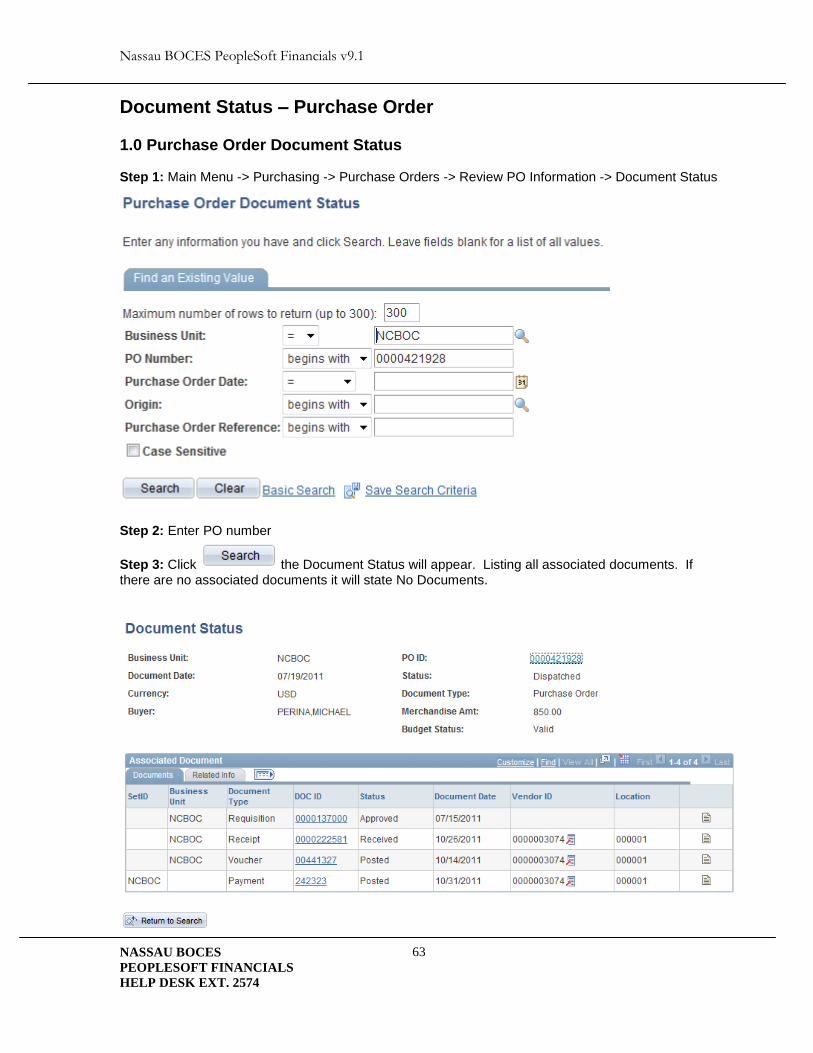
Document Status – Purchase Order 1.0 Purchase Order Document Status Step 1: Main Menu -> Purchasing -> Purchase Orders -> Review PO Information -> Document Status
Step 2: Enter PO number
Step 3: Click the Document Status will appear. Listing all associated documents. If there are no associated documents it will state No Documents.
Nassau BOCES PeopleSoft Financials v9.1
NASSAU BOCES
PEOPLESOFT FINANCIALS
HELP DESK EXT. 2574
64
2.0 Associated Documents
Note: You can click on any of the blue links to “review” any associated document information. A new window will open so you can review the detail of that document you chose. Example: Click on the Payment link, it will take you to the Payment Inquiry screen, see below: Scroll to the bottom of the Payment Inquiry window to view details .
Close the window when you have found the information you are looking for. The Document Status window will still be open to inquire about additional associated documents.

Nassau BOCES PeopleSoft Financials v9.1
NASSAU BOCES
PEOPLESOFT FINANCIALS
HELP DESK EXT. 2574
65
PO Activity Summary 1.0 Accessing PO Activity Summary Step 1: Main Menu > Purchasing > Purchase Orders > Review PO Information > Activity Summary The PO Activity Summary Page is displayed.
Step 2: Enter the PO number:
Step 3: Click to display Activity Summary.
Step 4: Click to view all related information or click individual tabs for that specific info. Details Tab – Shows Purchase Order Description, UOM, Ordered Qty, Amount Ordered,
Click icon to see line details.
Receipt Tab – Shows Qty Received, Qty Accepted, Open Quantity, Open Amount, Click icon to see receipt details.
Invoice Tab – Shows Quantity Invoiced, Amt Invoiced, Click icon to see invoice details.
Matched Tab – Shows Quantity Matched, Amt Matched, Click icon to see match details.

Nassau BOCES PeopleSoft Financials v9.1
NASSAU BOCES
PEOPLESOFT FINANCIALS
HELP DESK EXT. 2574
66
2.0 Understanding Information Available PO Status: Approved-PO has not been dispatched. Dispatched-PO is open, Compl-PO is closed. Details Tab: Shows Purchase Order Description, UOM, Ordered Qty, Amount Ordered.
When you Click icon to see line details the screen below allows you to view all related activity information for that line. Click Expand All to see the details.
Lets Look at the main Activity Summary Screen:
Receipt Tab: Shows Qty Received, Qty Accepted, Open Quantity, Open Amount, Click icon to see receipt details
Click on the Receipt No link to open a new window with the receipt inquiry screen.
Close the window when you have found the information you are looking for. The Activity Summary window will still be open to inquire about additional PO activity.

Nassau BOCES PeopleSoft Financials v9.1
NASSAU BOCES
PEOPLESOFT FINANCIALS
HELP DESK EXT. 2574
67
Invoice Tab: Shows Quantity Invoiced, Amt Invoiced, Click icon to see invoice details
Click on the Voucher link to open a new window with the Voucher inquiry screen.
Scroll down to bottom for the results.
To view payment information click on this icon and it will show you the check information.
You can further drill down by clicking on the Payment Reference ID for detailed check information.
Remember to close the additional windows when you have found the information you are looking for. The Activity Summary window will still be open to inquire about additional PO activity.
Nassau BOCES PeopleSoft Financials v9.1
NASSAU BOCES
PEOPLESOFT FINANCIALS
HELP DESK EXT. 2574
68
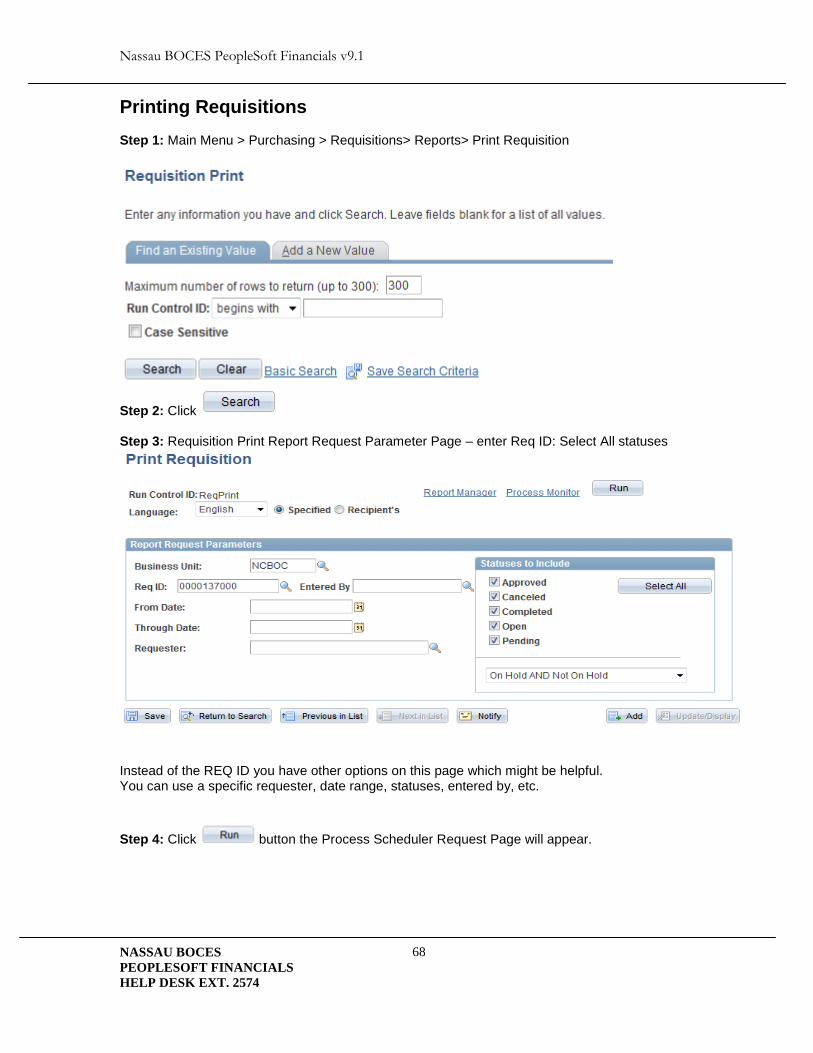
Printing Requisitions Step 1: Main Menu > Purchasing > Requisitions> Reports> Print Requisition
Step 2: Click Step 3: Requisition Print Report Request Parameter Page – enter Req ID: Select All statuses
Instead of the REQ ID you have other options on this page which might be helpful. You can use a specific requester, date range, statuses, entered by, etc.
Step 4: Click button the Process Scheduler Request Page will appear.

Nassau BOCES PeopleSoft Financials v9.1
NASSAU BOCES
PEOPLESOFT FINANCIALS
HELP DESK EXT. 2574
69
Step 5: Change type to Window and format to PDF
Step 6: Click Processing Window will appear
Once the Process changes from Queued to Success the requisition will be displayed.
Review the Requisition and click icon. Note: Once you have printed your REQ, close the window.

Nassau BOCES PeopleSoft Financials v9.1
NASSAU BOCES
PEOPLESOFT FINANCIALS
HELP DESK EXT. 2574
70
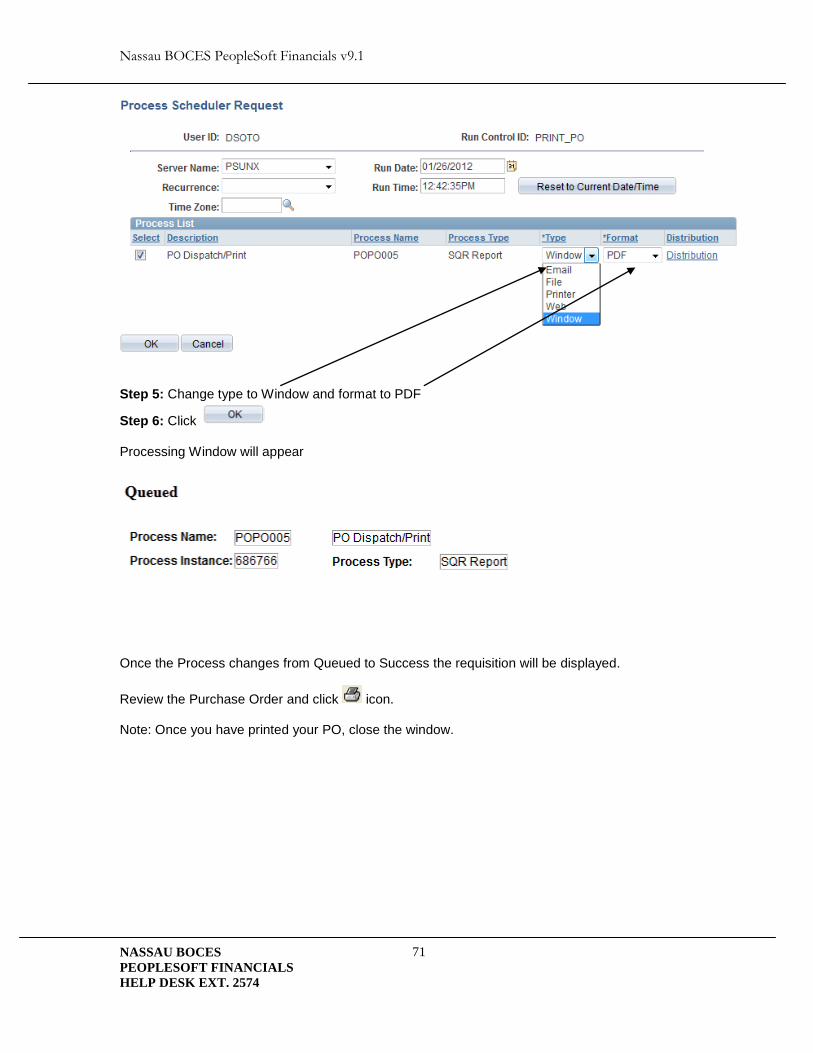
Printing Purchase Orders
1.0 Printing Purchase Orders Navigate: Main Menu > Purchasing > Purchase Orders > Review PO Information > Print PO’s
Step 2: Click Step 3: Purchase Order Print Report Request Parameter Page – enter PO ID:
Instead of the PO ID you have other options on this page which might be helpful. You can use a specific Ship to Location, date range, statuses, Vendor Id, etc.
Step 4: Click button the Process Scheduler Request Page will appear.
Nassau BOCES PeopleSoft Financials v9.1
NASSAU BOCES
PEOPLESOFT FINANCIALS
HELP DESK EXT. 2574
71
Step 5: Change type to Window and format to PDF
Step 6: Click Processing Window will appear
Once the Process changes from Queued to Success the requisition will be displayed.
Review the Purchase Order and click icon. Note: Once you have printed your PO, close the window.

Nassau BOCES PeopleSoft Financials v9.1
NASSAU BOCES
PEOPLESOFT FINANCIALS
HELP DESK EXT. 2574
72
Reviewing Approval History Navigate: Main Menu > Purchasing > Requisitions > Review Requisition Information > Requisitions Enter Requisition # into the Requisition Inquiry screen:
Click This will bring you to the Requisition Information screen see below. Click on Status tab.
Click on the Approval Status Icon to review the Approval history of the document:
Note: If any of the levels are blank this indicates that person needs to approve the document for it to continue through the approval process.

Nassau BOCES PeopleSoft Financials v9.1
NASSAU BOCES
PEOPLESOFT FINANCIALS
HELP DESK EXT. 2574
73
Entering a Receipt Navigate: Main Menu > Purchasing > Receipts > Add/Update Receipts
Click . The Select Purchase Order Screen is displayed. Enter the PO Id in the ID: box.
Click . The results will appear below the screen above
Click or the specific lines you have received the goods or services for then click the receipt screen will appear.

Nassau BOCES PeopleSoft Financials v9.1
NASSAU BOCES
PEOPLESOFT FINANCIALS
HELP DESK EXT. 2574
74
The Maintain Receipts Screen is displayed with the selected lines.
Enter correct Receipt Qty and click . Note: The Status will be Received and the Receipt ID Number appears.
Note: This X will cancel the entire
receipt.
This X will cancel a line
on the receipt.
Nassau BOCES PeopleSoft Financials v9.1
NASSAU BOCES
PEOPLESOFT FINANCIALS
HELP DESK EXT. 2574
75
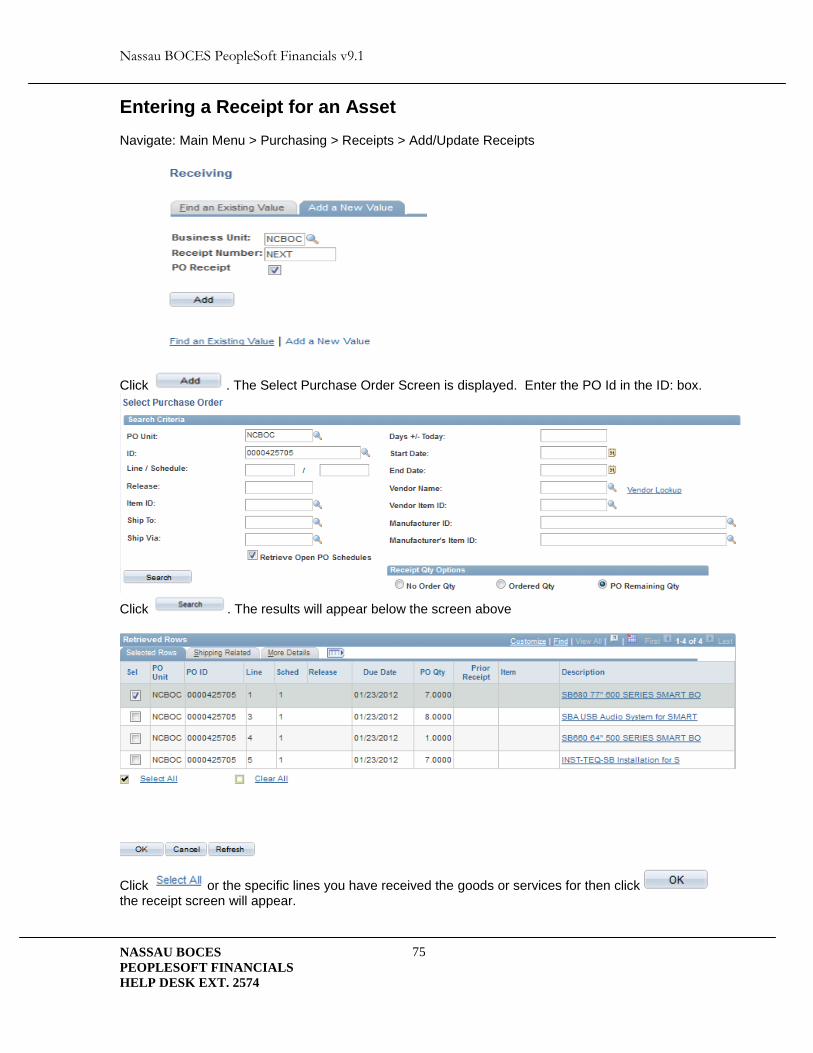
Entering a Receipt for an Asset Navigate: Main Menu > Purchasing > Receipts > Add/Update Receipts
Click . The Select Purchase Order Screen is displayed. Enter the PO Id in the ID: box.
Click . The results will appear below the screen above
Click or the specific lines you have received the goods or services for then click the receipt screen will appear.

Nassau BOCES PeopleSoft Financials v9.1
NASSAU BOCES
PEOPLESOFT FINANCIALS
HELP DESK EXT. 2574
76
The Maintain Receipts Screen is displayed with the selected lines.
Enter correct Receipt Qty then click on the Pending link to enter the required asset information.
Click on the More Details tab and continue entering the required information.
Scroll to the bottom and click the OK button then click . A processing message will come up with the receipt #. Click ok to the message and the Assets will be loaded into the Asset Module.
Click on the AM Status Pending link to enter the
asset details.
The required information that must be entered for a receipt is the Tag Number, Serial Id, Custodian, Location, Manufacturer and Model. Note: Custodian can be left blank but will trigger warning message. Custodian is the person in charge of the asset. Location will have the shipping information you must change it to the buildings room location.
Nassau BOCES PeopleSoft Financials v9.1
NASSAU BOCES
PEOPLESOFT FINANCIALS
HELP DESK EXT. 2574
77
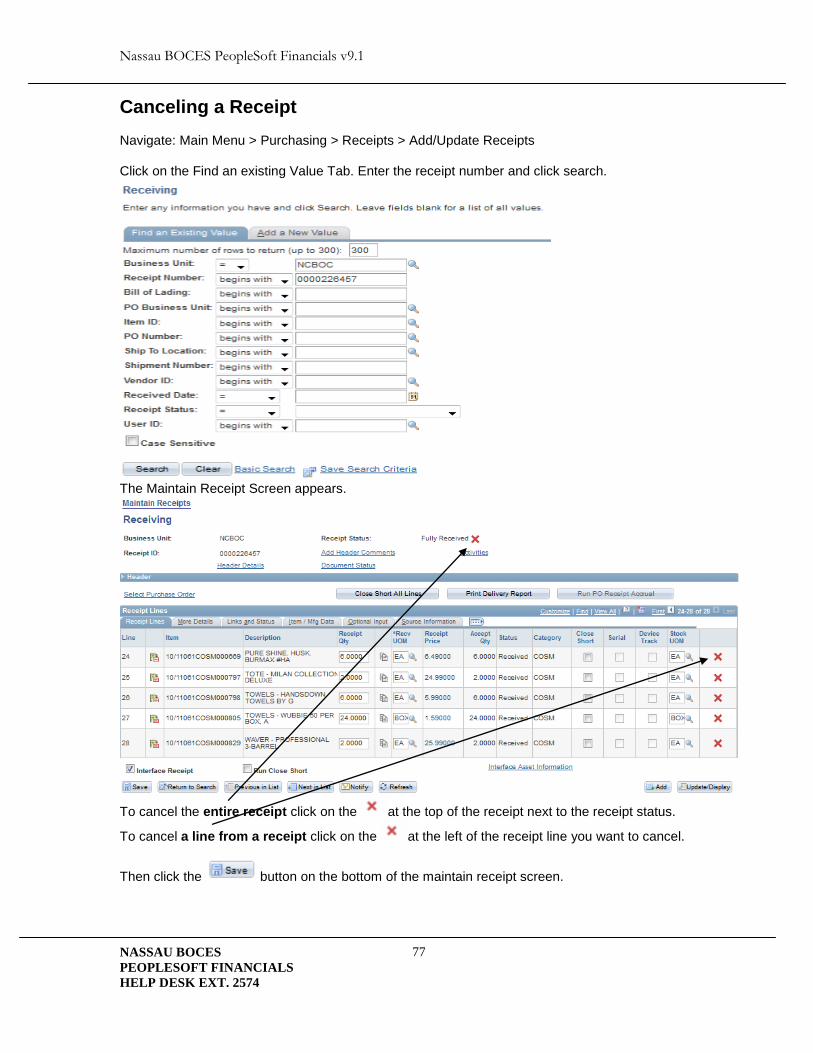
Canceling a Receipt Navigate: Main Menu > Purchasing > Receipts > Add/Update Receipts Click on the Find an existing Value Tab. Enter the receipt number and click search.
The Maintain Receipt Screen appears.
To cancel the entire receipt click on the at the top of the receipt next to the receipt status.
To cancel a line from a receipt click on the at the left of the receipt line you want to cancel.
Then click the button on the bottom of the maintain receipt screen.