People Soft Users Guide
80
Novell www.novell.com exteNd Composer™ 5.2.1 CONNECT FOR PEOPLESOFT* USER’S GUIDE
-
Upload
tanhanvankiep -
Category
Documents
-
view
238 -
download
0
Transcript of People Soft Users Guide

8172019 People Soft Users Guide
httpslidepdfcomreaderfullpeople-soft-users-guide 180
Novell
w w w n o v e l l c o m
exteNd Composertrade
5 2 1CONNE CT FOR PE OPL E S OFT US E R rsquo S
GU I D E
8172019 People Soft Users Guide
httpslidepdfcomreaderfullpeople-soft-users-guide 280
Legal Notices
Copyright copy 2004-2005 Novell Inc All rights reserved No part of this publication may be reproduced photocopied stored on a retrieval system or
transmitted without the express written consent of the publisher This manual and any portion thereof may not be copied without the express written
permission of Novell Inc
Novell Inc makes no representations or warranties with respect to the contents or use of this documentation and specifically disclaims any express
or implied warranties of merchantability or fitness for any particular purpose Further Novell Inc reserves the right to revise this publication and to
make changes to its content at any time without obligation to notify any person or entity of such revisions or changes
Further Novell Inc makes no representations or warranties with respect to any software and specifically disclaims any express or implied warrantiesof merchantability or fitness for any particular purpose Further Novell Inc reserves the right to makes changes to any and all parts of Novell
software at any time without any obligation to notify any person or entity of such changes
This product may require export authorization from the US Department of Commerce prior to exporting from the US or Canada
Copyright copy1997 1998 1999 2000 2001 2002 2003 SilverStream Software LLC All rights reserved
SilverStream software products are copyrighted and all rights are reserved by SilverStream Software LLC
Title to the Software and its documentation and patents copyrights and all other property rights applicable thereto shall at all times remain solely and
exclusively with SilverStream and its licensors and you shall not take any action inconsistent with such title The Software is protected by copyright
laws and international treaty provisions You shall not remove any copyright notices or other proprietary notices from the Software or its
documentation and you must reproduce such notices on all copies or extracts of the Software or its documentation You do not acquire any rights of
ownership in the Software
Patents pending
Novell Inc
404 Wyman Street Suite 500
Waltham MA 02451
USA
wwwnovellcom
Novell exteNd Composer 521 Connect for PeopleSoft Userrsquos Guide
March 2005
Online Documentation To access the online documemntation for this and other Novell products and to get updates see
wwwnovellcomdocumentation
8172019 People Soft Users Guide
httpslidepdfcomreaderfullpeople-soft-users-guide 380
Novell Trademarks
ConsoleOne GroupWise iChain NetWare and Novell are registered trademarks of Novell Inc
eDirectory exteNd exteNd Composer exteNd Director jBroker Novell eGuide and Nsure are trademarks of Novell Inc
SilverStream Trademarks
SilverStream is a registered trademark of SilverStream Software LLC
Third-Party Trademarks
All third-party trademarks are the property of their respective owners
Third-Party Software Legal Notices
The Apache Software License Version 11
Copyright (c) 2000 The Apache Software Foundation All rights reserved
Redistribution and use in source and binary forms with or without modification are permitted provided that the following conditions are met
1 Redistributions of source code must retain the above copyright notice this list of conditions and the following disclaimer
2 Redistributions in binary form must reproduce the above copyright notice this list of conditions and the following disclaimer in the documentation
andor other materials provided with the distribution
3 The end-user documentation included with the redistribution if any must include the following acknowledgment This product includes software
developed by the Apache Software Foundation (httpwwwapacheorg)
Alternately this acknowledgment may appear in the software itself if and wherever such third-party acknowledgments normally appear
4 The names Apache and Apache Software Foundation must not be used to endorse or promote products derived from this software without priorwritten permission For written permission please contact apacheapacheorg
5 Products derived from this software may not be called Apache nor may Apache appear in their name without prior written permission of the
Apache Software Foundation
THIS SOFTWARE IS PROVIDED ``AS IS AND ANY EXPRESSED OR IMPLIED WARRANTIES INCLUDING BUT NOT LIMITED TO
THE IMPLIED WARRANTIES OF MERCHANTABILITY AND FITNESS FOR A PARTICULAR PURPOSE ARE DISCLAIMED IN NO
EVENT SHALL THE APACHE SOFTWARE FOUNDATION OR ITS CONTRIBUTORS BE LIABLE FOR ANY DIRECT INDIRECT
INCIDENTAL SPECIAL EXEMPLARY OR CONSEQUENTIAL DAMAGES (INCLUDING BUT NOT LIMITED TO PROCUREMENT OF
SUBSTITUTE GOODS OR SERVICES LOSS OF USE DATA OR PROFITS OR BUSINESS INTERRUPTION) HOWEVER CAUSED AND
ON ANY THEORY OF LIABILITY WHETHER IN CONTRACT STRICT LIABILITY OR TORT (INCLUDING NEGLIGENCE OR
OTHERWISE) ARISING IN ANY WAY OUT OF THE USE OF THIS SOFTWARE EVEN IF ADVISED OF THE POSSIBILITY OF SUCH
DAMAGE
Autonomy
Copyright copy1996-2000 Autonomy Inc
Bouncy CastleLicense Copyright (c) 2000 - 2004 The Legion Of The Bouncy Castle (httpwwwbouncycastleorg)
Permission is hereby granted free of charge to any person obtaining a copy of this software and associated documentation files (the Software) to
deal in the Software without restriction including without limitation the rights to use copy modify merge publish distribute sublicense andor sell
copies of the Software and to permit persons to whom the Software is furnished to do so subject to the following conditions
The above copyright notice and this permission notice shall be included in all copies or substantial portions of the Software
THE SOFTWARE IS PROVIDED AS IS WITHOUT WARRANTY OF ANY KIND EXPRESS OR IMPLIED INCLUDING BUT NOT
LIMITED TO THE WARRANTIES OF MERCHANTABILITY FITNESS FOR A PARTICULAR PURPOSE AND NONINFRINGEMENT IN
NO EVENT SHALL THE AUTHORS OR COPYRIGHT HOLDERS BE LIABLE FOR ANY CLAIM DAMAGES OR OTHER LIABILITY
WHETHER IN AN ACTION OF CONTRACT TORT OR OTHERWISE ARISING FROM OUT OF OR IN CONNECTION WITH THE
SOFTWARE OR THE USE OR OTHER DEALINGS IN THE SOFTWARE
Castor Library
The original license is found at httpwwwcastororglicensehtml
The code of this project is released under a BSD-like license [licensetxt]
Copyright 1999-2004 (C) Intalio Inc and others All Rights Reserved
Redistribution and use of this software and associated documentation (Software) with or without modification are permitted provided that the
following conditions are met
1 Redistributions of source code must retain copyright statements and notices Redistributions must also contain a copy of this document
2 Redistributions in binary form must reproduce the above copyright notice this list of conditions and the following disclaimer in the documentation
andor other materials provided with the distribution
3 The name ExoLab must not be used to endorse or promote products derived from this Software without prior written permission of Intalio Inc
For written permission please contact infoexolaborg
4 Products derived from this Software may not be called Castor nor may Castor appear in their names without prior written permission of Intalio
Inc Exolab Castor and Intalio are trademarks of Intalio Inc
8172019 People Soft Users Guide
httpslidepdfcomreaderfullpeople-soft-users-guide 480
5 Due credit should be given to the ExoLab Project (httpwwwexolaborg)
THIS SOFTWARE IS PROVIDED BY INTALIO AND CONTRIBUTORS ``AS IS AND ANY EXPRESSED OR IMPLIED WARRANTIES
INCLUDING BUT NOT LIMITED TO THE IMPLIED WARRANTIES OF MERCHANTABILITY AND FITNESS FOR A PARTICULAR
PURPOSE ARE DISCLAIMED IN NO EVENT SHALL INTALIO OR ITS CONTRIBUTORS BE LIABLE FOR ANY DIRECT INDIRECT
INCIDENTAL SPECIAL EXEMPLARY OR CONSEQUENTIAL DAMAGES (INCLUDING BUT NOT LIMITED TO PROCUREMENT OF
SUBSTITUTE GOODS OR SERVICES LOSS OF USE DATA OR PROFITS OR BUSINESS INTERRUPTION) HOWEVER CAUSED AND
ON ANY THEORY OF LIABILITY WHETHER IN CONTRACT STRICT LIABILITY OR TORT (INCLUDING NEGLIGENCE OR
OTHERWISE) ARISING IN ANY WAY OUT OF THE USE OF THIS SOFTWARE EVEN IF ADVISED OF THE POSSIBILITY OF SUCH
DAMAGE
Indiana University Extreme Lab Software LicenseVersion 111
Copyright (c) 2002 Extreme Lab Indiana University All rights reserved
Redistribution and use in source and binary forms with or without modification are permitted provided that the following conditions are met
1 Redistributions of source code must retain the above copyright notice this list of conditions and the following disclaimer
2 Redistributions in binary form must reproduce the above copyright notice this list of conditions and the following disclaimer in the documentation
andor other materials provided with the distribution
3 The end-user documentation included with the redistribution if any must include the following acknowledgment This product includes software
developed by the Indiana University Extreme Lab (httpwwwextremeindianaedu)
Alternately this acknowledgment may appear in the software itself if and wherever such third-party acknowledgments normally appear
4 The names Indiana University and Indiana University Extreme Lab must not be used to endorse or promote products derived from this software
without prior written permission For written permission please contact httpwwwextremeindianaedu
5 Products derived from this software may not use Indiana University name nor may Indiana University appear in their name without prior
written permission of the Indiana University
THIS SOFTWARE IS PROVIDED AS IS AND ANY EXPRESSED OR IMPLIED WARRANTIES INCLUDING BUT NOT LIMITED TO
THE IMPLIED WARRANTIES OF MERCHANTABILITY AND FITNESS FOR A PARTICULAR PURPOSE ARE DISCLAIMED IN NO
EVENT SHALL THE AUTHORS COPYRIGHT HOLDERS OR ITS CONTRIBUTORS BE LIABLE FOR ANY DIRECT INDIRECT
INCIDENTAL SPECIAL EXEMPLARY OR CONSEQUENTIAL DAMAGES (INCLUDING BUT NOT LIMITED TO PROCUREMENT OF
SUBSTITUTE GOODS OR SERVICES LOSS OF USE DATA OR PROFITS OR BUSINESS INTERRUPTION) HOWEVER CAUSED AND
ON ANY THEORY OF LIABILITY WHETHER IN CONTRACT STRICT LIABILITY OR TORT (INCLUDING NEGLIGENCE OR
OTHERWISE) ARISING IN ANY WAY OUT OF THE USE OF THIS SOFTWARE EVEN IF ADVISED OF THE POSSIBILITY OF SUCH
DAMAGE
JDOMJAR
Copyright (C) 2000-2002 Brett McLaughlin amp Jason Hunter All rights reserved
Redistribution and use in source and binary forms with or without modification are permitted provided that the following conditions are met
1 Redistributions of source code must retain the above copyright notice this list of conditions and the following disclaimer
2 Redistributions in binary form must reproduce the above copyright notice this list of conditions and the disclaimer that follows these conditions in
the documentation andor other materials provided with the distribution
3 The name JDOM must not be used to endorse or promote products derived from this software without prior written permission For written
permission please contact licensejdomorg
4 Products derived from this software may not be called JDOM nor may JDOM appear in their name without prior written permission from the
JDOM Project Management (pmjdomorg)
In addition we request (but do not require) that you include in the end-user documentation provided with the redistribution andor in the software itself
an acknowledgement equivalent to the following This product includes software developed by the JDOM Project (httpwwwjdomorg)
Alternatively the acknowledgment may be graphical using the logos available at httpwwwjdomorgimageslogos
THIS SOFTWARE IS PROVIDED ``AS IS AND ANY EXPRESSED OR IMPLIED WARRANTIES INCLUDING BUT NOT LIMITED TO
THE IMPLIED WARRANTIES OF MERCHANTABILITY AND FITNESS FOR A PARTICULAR PURPOSE ARE DISCLAIMED IN NO
EVENT SHALL THE JDOM AUTHORS OR THE PROJECT CONTRIBUTORS BE LIABLE FOR ANY DIRECT INDIRECT INCIDENTAL
SPECIAL EXEMPLARY OR CONSEQUENTIAL DAMAGES (INCLUDING BUT NOT LIMITED TO PROCUREMENT OF SUBSTITUTE
GOODS OR SERVICES LOSS OF USE DATA OR PROFITS OR BUSINESS INTERRUPTION) HOWEVER CAUSED AND ON ANY
THEORY OF LIABILITY WHETHER IN CONTRACT STRICT LIABILITY OR TORT (INCLUDING NEGLIGENCE OR OTHERWISE)
ARISING IN ANY WAY OUT OF THE USE OF THIS SOFTWARE EVEN IF ADVISED OF THE POSSIBILITY OF SUCH DAMAGE
Phaos
This Software is derived in part from the SSLavaTM Toolkit which is Copyright copy1996-1998 by Phaos Technology Corporation All Rights
Reserved Customer is prohibited from accessing the functionality of the Phaos software
W3C
W3Creg SOFTWARE NOTICE AND LICENSE
This work (and included software documentation such as READMEs or other related items) is being provided by the copyright holders under the
following license By obtaining using andor copying this work you (the licensee) agree that you have read understood and will comply with the
following terms and conditions
Permission to copy modify and distribute this software and its documentation with or without modification for any purpose and without fee or
8172019 People Soft Users Guide
httpslidepdfcomreaderfullpeople-soft-users-guide 580
5
royalty is hereby granted provided that you include the following on ALL copies of the software and documentation or portions thereof including
modifications
1 The full text of this NOTICE in a location viewable to users of the redistributed or derivative work
2 Any pre-existing intellectual property disclaimers notices or terms and conditions If none exist the W3C Software Short Notice should be
included (hypertext is preferred text is permitted) within the body of any redistributed or derivative code
3 Notice of any changes or modifications to the files including the date changes were made (We recommend you provide URIs to the location from
which the code is derived)
THIS SOFTWARE AND DOCUMENTATION IS PROVIDED AS IS AND COPYRIGHT HOLDERS MAKE NO REPRESENTATIONS OR
WARRANTIES EXPRESS OR IMPLIED INCLUDING BUT NOT LIMITED TO WARRANTIES OF MERCHANTABILITY OR FITNESS
FOR ANY PARTICULAR PURPOSE OR THAT THE USE OF THE SOFTWARE OR DOCUMENTATION WILL NOT INFRINGE ANYTHIRD PARTY PATENTS COPYRIGHTS TRADEMARKS OR OTHER RIGHTS
COPYRIGHT HOLDERS WILL NOT BE LIABLE FOR ANY DIRECT INDIRECT SPECIAL OR CONSEQUENTIAL DAMAGES ARISING
OUT OF ANY USE OF THE SOFTWARE OR DOCUMENTATION
The name and trademarks of copyright holders may NOT be used in advertising or publicity pertaining to the software without specific written prior
permission Title to copyright in this software and any associated documentation will at all times remain with copyright holders
8172019 People Soft Users Guide
httpslidepdfcomreaderfullpeople-soft-users-guide 680
8172019 People Soft Users Guide
httpslidepdfcomreaderfullpeople-soft-users-guide 780
7
Contents
About This Book 9
Welcome to Novell exteNd Composer Connect for PeopleSoftreg 11
About Novell exteNd Composertrade 11
About the Composer Connect for PeopleSoftreg 12
About J2EE Connector Architecture 13
About iWay Technology 14
What Kinds of Applications Can You Build Using the Composer Connect for PeopleSoftreg 14
2 Getting Started with the Composer Connect for PeopleSoftreg 15
Setup and Configuration 15
PeopleSoft Java Object Adapter 15
Deploying the PeopleSoft Component Interface Files 17
Importing and Building the Component Interfaces 17
Configuring Component Interface Security 20
Testing the Component Interfaces 23
Generating Component Interface APIs 26
Building PeopleSoft Component Interface API Classes 26
Compiling the Component Interface Files 28
Updating andor Activating Your License(s) 29
3 Creating a PeopleSoft Component 33
Creating Connection Resources 33
Types of Connection Resources 33
About Constant-Driven and Expression-Driven Connection Parameters 33
Creating a PeopleSoft Connection Resource 34
Creating a File Service Connection Resource 36
Creating an HTTP Service Connection Resource 37Creating a TCP Service Connection Resource 38
XML Templates for PeopleSoft Components 39
Creating PeopleSoft Components 39
About the PeopleSoft Component Editor Window 41
Creating Actions in the Component Editor 42
Returning to Schema-Edit Mode 47
Request and Response Documents 47
ldquoBefore Executerdquo and ldquoAfter Executerdquo Actions 49
Creating PeopleSoft Services 49
Creating PeopleSoft Service Actions 52
Managing Deployed PeopleSoft Services 55
ECMAScript Extensions 57
A
ECMAScript Methods 59 Adapter Interface Methods 59
getAdapterType() 59
Connection Interface Methods 60
getAdapterMetaData() 60
getConnectionMetaData() 60
Additional Methods 61
getWarnings() 61
clearWarnings() 61
getLastError() 61
8172019 People Soft Users Guide
httpslidepdfcomreaderfullpeople-soft-users-guide 880
8 Novell exteNd Composer 521 Connect for PeopleSoft Userrsquos Guide
B Using Component Interfaces 63
How to Create a New Component Interface 63
Methods 65
Properties 66
Securing a Component Interface 66
Configuring Component Interface Security for PeopleSoft Version 81x 66
Configuring Component Interface Security for PeopleSoft Version 84+ 68
Testing a Component Interface 71
8172019 People Soft Users Guide
httpslidepdfcomreaderfullpeople-soft-users-guide 980
9
About This Book
Purpose
This guide describes how to use the Novell exteNd Composer Connect for PeopleSoftreg This product has
design-time as well as runtime executables and uses Java Connector Architecture technology to provide
integration capability
Audience
This book is for developers and systems integrators who are planning to use Novell exteNd Composer to
develop PeopleSoftreg-aware services and components
Prerequisites
This book assumes prior familiarity with exteNd Composerrsquos work environment and deployment
options Some familiarity with PeopleSoftreg is also assumed Familiarity with Java Connector
Architecture is helpful but not required
Software Versions
This guide assumes that you are using Novell exteNd Composer (Enterprise or Professional) version 52
(or higher) and that you are deploying your applications to a J2EE 13 application server or equivalent
The Connect for PeopleSoftreg is designed to work with PeopleSoftreg 81 or 84
NOTE You will need to obtain psjoajar from PeopleSoft in order to complete the installation of your
software This file is proprietary to PeopleSoft and is not shipped nor installed as part of the Novell exteNd
Suite If this file is not already on your file system as part of your PeopleSoft installation contact yourPeopleSoft representative to obtain it
Additional documentation
For the complete set of Novell exteNd documentation see the Novell Documentation Web Site
(httpwwwnovellcomdocumentation-indexindexjsp)
8172019 People Soft Users Guide
httpslidepdfcomreaderfullpeople-soft-users-guide 1080
10 Novell exteNd Composer 521 Connect for PeopleSoft Userrsquos Guide
8172019 People Soft Users Guide
httpslidepdfcomreaderfullpeople-soft-users-guide 1180
Welcome to Novell exteNd Composer Connect for PeopleSoftreg 11
1 Welcome to Novell exteNd Composer Connect
for PeopleSoftreg
Welcome to the Novell exteNd Composer Connect for PeopleSoft reg Userrsquos Guide This Guide is a
companion to the Novell exteNd Composer Userrsquos Guide which details how to use all the features of
Composer except for the Connect Component Editors So if you havenrsquot looked at the Composer Userrsquos
Guide yet please familiarize yourself with it before using this Guide
Novell exteNd Composer provides separate Component Editors for each Connect including the Connect
for PeopleSoftreg The special features of each component editor are described in separate Guides like this
one
If you have been using exteNd Composer and are familiar with the core component editor (the XML Map
Component Editor) then this Guide should be enough to get you started with the PeopleSoft Component
Editor
NOTE To be successful with this Component Editor you should already be familiar with PeopleSoft and
basic XML integration concepts
About Novell exteNd Composer trade Novell exteNd Composer is the XML integration-broker piece of the Novell exteNd suite It
encompasses a set of design tools for building XML integration applications and web services plus a
runtime engine that enables execution and administration of the services you build The applications and
services you build with Composer can be deployed to any popular J2EE application server or servletcontainer (Supported servers include JBoss IBM WebSphere and BEA WebLogic in addition to the
Novell exteNd application server Tomcat is also supported Be sure to consult the Novell web site for
latest platform-support information)
At the core of Composer is a robust XML transformation engine capable of performing a wide range of
data transformations including joining of multiple documents decomposition of documents andor
creation of entirely new documents on the fly The underlying enabling technologies include not only
XSLT but XPath ECMAScript and Java Composerrsquos design environment offers a rich intuitive
graphical user interface making it possible for you to specify XML transformations and mappings
visually using wizards dialogs and drag-and-drop gestures You never have to write raw XSL or Java
code
Composer supports numerous kinds of data-source connectivity through individual adapters called
Connects Using the functionality exposed in the various Connects you can design EAI applicationsandor web services that pull data in from or push data out to a variety of different kinds of back-end
systems using a variety of transport protocols and technologies ranging from 3270 and 5250 terminal
data streams to Telnet HP3000 Unisys T27 (and UTS) Tandem Data General etc in addition to
HTML screen-scraping JMS messaging and CICS RPC transactions You can also take advantage of
JDBC LDAP and other mechanisms to reach back-end data repositories and systems that might or might
not natively understand XML Composer Connects allow you to connect to these systems inobtrusively
so as to marshall non-XML data into XML form or vice versa without any need to modify host-system
setups or code
8172019 People Soft Users Guide
httpslidepdfcomreaderfullpeople-soft-users-guide 1280
12 Novell exteNd Composer 521 Connect for PeopleSoft Userrsquos Guide
In addition to legacy data-stream and protocol-specific Connects Composer has Connects for ERP and
CRM systems including Baan PeopleSoft SAP Siebel Lawson JD Edwards and Oracle Financials Aswith other Connect solutions the ERP and CRM Connects are fully integrated into Composerrsquos design-
time environment so that you can use intuitive visual tools to create powerful custom integration
solutions eliminating the need to write Java code or edit raw XML or schemas by hand You can also test
the components you build against live PeopleSoft connections using the design environmentrsquos animation
facility (step-through debugger) As part of the design and debug process your PeopleSoft-aware
components can call other Composer Components (such as XML Map Components JDBC Components
etc) and make use of any of the core actions that Composer defines (such as Map Function Log and
other actions)
About the Composer Connect for PeopleSoftregThe Novell exteNd Composer Connect for PeopleSoftreg allows you to leverage PeopleSoftrsquos Component
Interface technology to build powerful XML-based integration solutions
The Composer Connect for PeopleSoftreg enables you to access a PeopleSoft component using the
Component Interface mechanism provided by PeopleSoft (Here ldquoPeopleSoft componentrdquo means a
component defined by the PeopleSoft API not a Composer xObject)
You do not need to manually generate or install PeopleSoft XML schemas in order to use the Composer
Connect for PeopleSoftreg The Connect will generate schemas for you as needed automatically
You also donrsquot have to take any steps to preinstall RARs (resource adapter archives defined by the Java
Connector Architecture) on the target application server ahead of time Composer handles RAR
deployment for you automatically when you deploy any Composer-built service that utilizes the
Composer Connect for PeopleSoftreg
NOTE Some one-time setup and configuration steps are required in order to use the Composer Connect
for PeopleSoftreg The steps in question are described in detail under ldquoSetup and Configurationrdquo in the next
chapter
8172019 People Soft Users Guide
httpslidepdfcomreaderfullpeople-soft-users-guide 1380
Welcome to Novell exteNd Composer Connect for PeopleSoftreg 13
About J2EE Connector ArchitectureThe J2EEtrade Connector Architecture defines a standard architecture for connecting elements of the J2EE
platform to a heterogeneous Enterprise Information System (EIS) Examples of EIS components include
(typically) Enterprise Resource Planning (ERP) systems Customer Relationship Management (CRM)
Supply Chain Management (SCM) mainframe transaction processing database systems and legacy
applications that are not written in the Java programming language By defining a common set of
scalable secure transactional mechanisms reachable via a standard set of APIs J2EEtrade Connector
Architecture enables the integration of an EIS with an application server and enterprise applications
The J2EE Connector Architecture permits an EIS vendor to provide a standard resource adapter for its
EIS The resource adapter plugs into an application server providing connectivity to an EIS and
integrating it with the rest of the enterprise If an application server vendor has extended its system to
support J2EEtrade Connector Architecture it is assured of seamless connectivity to multiple Enterprise
Information Systems
Before J2EEtrade Connector Architecture most EIS vendors offered vendor-specific architectures to
provide connectivity between applications and their software each program interacting with an EIS
needed to be hand-tooled by someone with a detailed knowledge of the peculiarities of the target EIS
Custom software to do this across multiple systems was time consuming to develop debug and maintain
By providing a standard set of APIs and contracts for managing connectivity exposing EIS APIs and
using application-server services (like transaction control and connection pooling) J2EEtrade ConnectorArchitecture greatly reduces the need for custom programming Developers can focus on business logic
rather than connectivity and transaction-related logic and a variety of ldquoplumbing issuesrdquo
How J2EEtrade Connector Architecture Works
The ldquomajor participantsrdquo in J2EEtrade Connector Architecture include these components
Application server
Resource adapter (RAR)
Application
The application server is not strictly required Certain services like connection pooling and transaction
control will not be available in a ldquoserverrdquo that is just a servlet container But J2EEtrade Connector
Architecture resource adapters can still operate
The RAR represents the interests of the underlying EIS
The application interacts with the resource adapter using what J2EEtrade Connector Architecture calls
standard contracts Standard contracts define what interactions are to take place and how they are
exposed The contract between the application and the resource adapter is called the Common Client
Interface (CCI) The resource adapter in turn interacts with the application server under the Service
Provider Interface (SPI) which defines how the management of resource adapter interactions occurs
The aspects of this include
Connectivity management
Transaction demarcation
Event listening (listeners can receive notification of significant events for example a connection
failure)
Pooling of connections and other resources
In the normal course of events the application uses a naming service to locate the appropriate resource
adapter The application server supplies the naming service and so it recognizes that a request is being
made to locate a resource adapter In such a case the application server interposes a resource-adapter-
supplied intermediate object that interacts between the resource adapter and the application server
Through this intermediating object the application server manages the items within the SPI contract
below the awareness of the application
8172019 People Soft Users Guide
httpslidepdfcomreaderfullpeople-soft-users-guide 1480
14 Novell exteNd Composer 521 Connect for PeopleSoft Userrsquos Guide
For more information about J2EEtrade Connector Architecture visit httpjavasuncomj2eeconnector
About iWay Technology Novell exteNd Composer uses licensed J2EEtrade Connector Architecture adapter technology from iWay
Software (a division of Information Builders Inc) to mediate EIS interactions in the Composer Connect
for PeopleSoftreg A leader in the J2EEtrade Connector Architecture technology space iWay Software provide resource adapters and connectivity solutions across a wide array of EIS and other systems
For more information about iWay see httpwwwiwaysoftwarecom
What Kinds of Applications Can You Build Using the ComposerConnect for PeopleSoftreg
With Composer Connect for PeopleSoftreg you can build any kind of web service or integration
application that needs to push data into or pull data from a PeopleSoft-based data store using XML as the
interchange format Your integration application can be deployed to a J2EE application server and run as
a public web service or it can be used in ldquobehind the firewallrdquo scenarios It can be triggered by a servletJSP EJB e-mail timer file arrival JMS message arrival or programmatically via your own custom
code It can also run standalone or as part of a workflow built using Composer Enterprise Editionrsquos
Process Manager (For more information on deployment options see the deployment chapter of the
Composer Userrsquos Guide)
8172019 People Soft Users Guide
httpslidepdfcomreaderfullpeople-soft-users-guide 1580
Getting Started with the Composer Connect for PeopleSoftreg 15
2 Getting Started with the Composer Connect for
PeopleSoftreg
This chapter discusses software setup and configuration issues relevant to using the Composer Connect
for PeopleSoftreg as well as the steps needed to create a Composer Connection Resource for a
PeopleSoftreg Component
Setup and ConfigurationA number of steps must be taken before you can use the Composer Connect for PeopleSoftreg You must
at a minimum
1 Put copies of the PeopleSoft Java Object Adapter (psjoajar) on design-time and runtime
(application server) machines See ldquoPutting psjoajar in the Classpathrdquo on page 16
2 Deploy the supplied remote interfaces (Component Interfaces) See ldquoDeploying the PeopleSoft
Component Interface Filesrdquo on page 17
3 Generate PeopleSoft Component Interface API classes package them in a JAR and put the JAR on
design-time and runtime machines See ldquoBuilding PeopleSoft Component Interface API Classesrdquo
on page 26
4 Update classpath entries in xconfigxml (design environment) as well as on the server to reflect
addition of new JARs See (again) ldquoPeopleSoft Java Object Adapterrdquo on page 15
5 Update the license for your Composer Connect for PeopleSoftreg installation as needed See
ldquoUpdating andor Activating Your License(s)rdquo below6 Create new component interfaces for PeopleSoft services that you wish to expose See ldquoHow to
Create a New Component Interfacerdquo on page 63 in Appendix B of this guide
The steps necessary to accomplish these requirements are discussed in detail in the following sections
PeopleSoft Java Object Adapter
Before attempting to use the Composer Connect for PeopleSoftreg (which is installed automatically as part
of the default exteNd suite installation process) you must complete the installation by obtaining and
installing the psjoajar file which comes from PeopleSoftreg This file is proprietary to PeopleSoft reg and
is not shipped by Novell nor installed as part of the Novell exteNd Suite
The psjoajar file may already exist on your PeopleSoft Application Server under thePS_HOMEWebpsjoa directory If not contact your PeopleSoft representative to obtain a copy of this
file
When you have located the psjoajar file you must add it to your design-time classpath as well as your
runtime-environment classpath (typically the application server classpath) The procedures for doing this
are given below
8172019 People Soft Users Guide
httpslidepdfcomreaderfullpeople-soft-users-guide 1680
16 Novell exteNd Composer 521 Connect for PeopleSoft Userrsquos Guide
Putting psjoajar in the Classpath
The PeopleSoft Java Object Adapter (psjoajar) must be added to your design-time and runtime
environments before you can use the Composer Connect for PeopleSoftreg
To add psjoajar to your design-time configuration
1 Determine the version number of your existing PeopleSoft system It should conform to version 81
or 84 These are the only versions currently supported by Novell exteNd Composer
2 If Composer is running shut it down before proceeding
3 Obtain psjoajar from PeopleSoftreg if it is not already included in your preexisting PeopleSoft
installationreg
4 Copy psjoajar to the Commonlib folder of the exteNd installation directory on your design-time
machine
In this folder you should also see files called pstoolsproperties and iwpeoplesoftjar If these
files are not present contact Novell customer support to obtain them
5 Ensure that the JAR files are on your design-time CLASSPATH To do this Locate your
xconfigxml file under ComposerDesignerbin and open it in a text editor Scroll to the bottom
Within the ltRUNTIMEgt element you should see many ltJARgt entries Add an additional ltJARgt
element as follows
ltJARgtCommonlibpsjoajarCommonlibiwpeoplesoftjarCommonlibpsGenCompjarCommonlibpstoolspropertiesltJARgt
This entry essentially tells the classloader where it can find four files
psjoajarmdashThis is PeopleSoftrsquos own Java Object Adapter jar (which ships with PeopleSoft)
iwpeoplesoftjarmdashComes with Novell exteNd installation
pstoolspropertiesmdashThis file is not an absolute requirement but will prevent certain exceptions
from being thrown in the background
psGenCompjar mdash You will need to generate this JAR yourself according to the procedure
described at ldquoCompiling the Component Interface Filesrdquo on page 28 further below
6 In xconfigxml verify that a ltJARgt entry exists referring to iwpsci81jar if you are using
PeopleSoft 81 or iwpsci84jar if you are using PeopleSoft 84 (These files are installed as part of
the Novell exteNd suite installation)
CAUTION Only one of these JARs should be on the classpath Do not allow both JARs to be
referenced in xconfigxml as this will cause unpredictable behavior
7 Save xconfigxml and close it
To add psjoajar to your Novell application server environment
1 Obtain psjoajar from PeopleSoftreg if not already included in your preexisting PeopleSoft
installationreg
2 Copy psjoajar to a suitable location on your application server The exact location doesnrsquot matter
as long as you create a CLASSPATH entry pointing to it as described in the next step
3 Update the application server CLASSPATH For the Novell exteNd application server locate the
AgJarsconf file under the AppServerbin directory Under ldquoMODULE COMMONrdquo create a new pair of entries
$SS_LIB Commonlibpsjoajar
$SS_LIB CommonlibpsGenCompjar
(This example assumes that you have placed the JAR files under Commonlib Edit as necessary
to reflect the actual target directory)
NOTE For application servers other than Novell exteNd follow the application server vendorrsquos
instructions for updating the classpath
8172019 People Soft Users Guide
httpslidepdfcomreaderfullpeople-soft-users-guide 1780
Getting Started with the Composer Connect for PeopleSoftreg 17
Also verify that an entry exists for iwpsci81jar or iwpsci84jar (as appropriate to the version of
PeopleSoft you are using) Do not allow both JARs to have entries as this will cause unpredictable
behavior These files are installed as part of the Novell exteNd suite installation You do not need to
obtain them from a third party
Deploying the PeopleSoft Component Interface FilesBefore you can use the Component Interface APIs discussed in ldquoBuilding PeopleSoft Component
Interface API Classesrdquo on page 26 you must expose the supplied component interface files to your
PeopleSoft system This is not done by the exteNd installer program (because the location of your
PeopleSoft system and the file-write permissions in that system are not known at install time and in any
case this step requires manipulation of the files using PeopleSoftrsquos Application Designer) The files that
you need to deploy are contained in a zip archive called iwpsci84zip (if you are using PeopleSoft 84) or
iwpsci81zip (if you are using PeopleSoft 81) which are included in the Composer install in the ltinstall
directorygtNovellexteNd5ComposerDesignerlib directory The discussion that follows applies to
PeopleSoft 84
You will need to deploy the files in this archive to PeopleSoft (not to the application server) in order to
enable introspection of the PeopleSoft Component Interfaces by the middle-layer adapters that Composer
relies on to support interaction with PeopleSoft The following procedure describes how to do this
Importing and Building the Component Interfaces
To import and build the Component Interface files
1 Copy the iwpsci84zip or iwpsci81zip from ltinstall
directorygtNovellexteNd5ComposerDesignerlib to an empty directory of your choice (eg
CtempPSProjects) then expand the zip file This creates a sub-folder called IWY_CI_84 (which
contains 2 files) or IWY_CI_81 (which contains 21 files)
2 Launch the PeopleSoft Application Designer in two-tier mode
3 From the PeopleSoft Login Screen select the Connection Type dropdown and select the
appropriate database for your system (eg Oracle)4 Log on using your IDpassword
8172019 People Soft Users Guide
httpslidepdfcomreaderfullpeople-soft-users-guide 1880
18 Novell exteNd Composer 521 Connect for PeopleSoft Userrsquos Guide
5 From the Tools menu choose Copy Project gt From File
6 In the file-browsing dialog that appears (see the following illustration) navigate to your unzipped
project directory and select IWY_CI_84 or IWY_CI_81
7 Click the Open button The project appears in the Project Workspace and there is output in the
Output Window Make sure that all the objects listed under Object Types are highlighted and then
click Copy
8172019 People Soft Users Guide
httpslidepdfcomreaderfullpeople-soft-users-guide 1980
Getting Started with the Composer Connect for PeopleSoftreg 19
The Application Designer displays an ldquoUpgrade Copy endedrdquo message in the Output Window to
indicate successful completion
8 Next we will build the views in the project by choosing Build gt Project from the main menu
9 Check the Create Views checkbox from Build Options (See the following illustration) Under
Rule Execute Options select the Build Script File radio button
You may want to click on the Settings button to verify that ldquoRecreate view if it already existsrdquo is
checked then return to the Build dialogue box
10 Click Build
8172019 People Soft Users Guide
httpslidepdfcomreaderfullpeople-soft-users-guide 2080
20 Novell exteNd Composer 521 Connect for PeopleSoft Userrsquos Guide
11 Verify in the Upgrade tab (at the bottom of the main window) that the view built correctly
NOTE If the view has not been generated correctly close the dialog and double-click the SQL
Build log
Configuring Component Interface Security
You must ensure that all Application Explorer users have access to the Component Interfaces that you
deployed and built in the previous sections As with all PeopleSoft objects security is assigned at the
Permission List level Review your site security requirements to determine which users are going to work
with Composer and then set Component Interface security for each distinct Permission List belonging to
those users
NOTE These Component Interfaces have only Get and Find access and cannot be used to update your
PeopleSoft database This minimizes any possible security exposure
In PeopleSoft release 81 you may set security in 2 3 or 4-tier mode in release 84 and higher you may
set security 4-tier mode only
The following procedure describes how to configure security for all supported releases of PeopleSoft in
all supported modes The figures shown in the steps are from PeopleSoft release 84 in 4-tier mode
To configure security for each Component Interface
1 Choose PeopleTools Security User Profiles Permissions amp Roles and then Permission Lists
2 Select Search and select the relevant Permission List The Permission List pane opens on the right
8172019 People Soft Users Guide
httpslidepdfcomreaderfullpeople-soft-users-guide 2180
Getting Started with the Composer Connect for PeopleSoftreg 21
3 Click the right arrow next to the Sign-on Times tab to display the Component Interfaces tab
4 Click the Component Interfaces tab
8172019 People Soft Users Guide
httpslidepdfcomreaderfullpeople-soft-users-guide 2280
22 Novell exteNd Composer 521 Connect for PeopleSoft Userrsquos Guide
5 To add a new row to the Component Interfaces list select the plus sign (+)
6 Enter or select the IWY_CI_ATTRIBUTES Component Interface and select Edit
8172019 People Soft Users Guide
httpslidepdfcomreaderfullpeople-soft-users-guide 2380
Getting Started with the Composer Connect for PeopleSoftreg 23
7 To set the Get and Find methods to Full Access select Full Access (All)
8 Select OK
9 Repeat steps 5 through 8 for the IWY_CI_MESSAGES Component Interface
10 Scroll down to the bottom of the Component Interfaces window and click Save
You have finished configuring security for the Component Interfaces delivered with Composer To
test these Component Interfaces see ldquoTesting the Component Interfacesrdquo on page 23
Testing the Component Interfaces
You must test each of the Component Interfaces that were created and secured in the previous sections
before using them
To test the Component Interfaces
1 In PeopleSoft Application Designer open the IWY_CI_ATTRIBUTES Component Interface
2 Select Tools and then Test Component Interface The Component Interface Tester dialog box is
displayed
8172019 People Soft Users Guide
httpslidepdfcomreaderfullpeople-soft-users-guide 2480
24 Novell exteNd Composer 521 Connect for PeopleSoft Userrsquos Guide
NOTE The Create New option is disabled because the Add method is not applicable to this
Component Interface
3 Click Find Entries for the underlying component are displayedNOTE A message may appear stating that display is limited to a certain number of entries this is
not a problem
4 Highlight one of the lines with its corresponding key in the Find Results window and click Get
Selected The relevant data for the selected key is displayed
8172019 People Soft Users Guide
httpslidepdfcomreaderfullpeople-soft-users-guide 2580
Getting Started with the Composer Connect for PeopleSoftreg 25
If this window is displayed the Component Interface has been successfully tested for the Find
method
5 Click the Get button For the Get method an existing key must be entered
The exposed properties for the key that is entered are returned
8172019 People Soft Users Guide
httpslidepdfcomreaderfullpeople-soft-users-guide 2680
26 Novell exteNd Composer 521 Connect for PeopleSoft Userrsquos Guide
If this window is displayed the Component Interface has been successfully tested for the Get
method
6 Repeat this process for the IWY_CI_MESSAGES Component Interface
You have finished testing the Component Interfaces
Generating Component Interface APIsYou must create a PeopleSoft API to enable communications with the PeopleSoft application The API
is a collection of Java class files that reside on the client machine and mediate between the client
application layer and PeopleSoft You also must apply security to the component interface and test the
component interface (see ldquoSecuring a Component Interfacerdquo on page 66 and ldquoTesting a Component
Interfacerdquo on page 71)
Building PeopleSoft Component Interface API Classes
Before you can build working integration applications with the Composer Connect for PeopleSoftreg you
must create Java classes for the particular PeopleSoft services you wish to utilize and make these classes
available to Composer (at design time as well as runtime) These classes serve as the API bindings that
allow your Composer components to perform Add Update and other operations on the target PeopleSoft
system
To create the necessary Java classes you will
Determine which PeopleSoft services (methods) you wish to call from Composer
Create a Component Interface for each service using the PeopleSoft Application Designer Use the Application Designer to generate Java source files representing the API bindings for the
particular Component Interface(s) you want to use (which could be just a few or potentially many)
Use javacexe (in your JDK) to compile the generated Java sources into class files
Use jarexe (from the JDK) to assemble the class files into a Java archive (JAR)
Put the JAR on your design-time and runtime machines and make appropriate classpath updates
The detailed procedure is as follows
8172019 People Soft Users Guide
httpslidepdfcomreaderfullpeople-soft-users-guide 2780
Getting Started with the Composer Connect for PeopleSoftreg 27
To create Component Interface Classes (and JAR)
1 Launch your copy of PeopleSoft Application Designer
2 From the PeopleSoft Application Designer open a component interface
3 Click the right-hand pane to give it focus Then select PeopleSoft APIs from the Build menu (See
the previous illustration)
The Build PeopleSoft API Bindings dialog box opens and prompts you for the types of bindings to
create
4 Ensure that Java Classes Build is selected (deselect ldquoCOM Type Library Buildrdquo if necessary) then
select a directory on your local machine where the generated Java files are to be placed
5 Select the APIs for which you wish to generate Java source files (Click the None button first to
clear any selections)
NOTE In addition to the APIs for the selected component interface you also must generate the
API files for the following generic component interface properties
8172019 People Soft Users Guide
httpslidepdfcomreaderfullpeople-soft-users-guide 2880
28 Novell exteNd Composer 521 Connect for PeopleSoft Userrsquos Guide
CompIntfcPropertyInfo
CompIntfcPropertyInfoCollection
6 Click OK PeopleSoft generates the files This may take from a few seconds to several minutes
depending on how many selections you made After the process is complete a message appears in
the PeopleSoft Application Designer output window
Compiling the Component Interface FilesThe files you generated in the previous steps must be compiled into classes and the classes packaged into
a JAR before you can use them
Note that PeopleSoft places the Java sources to be compiled in the directory called
[targetFolder]PeopleSoftGeneratedCompIntfc
where targetFolder is the directory you specified during the build process
There are two Java files for every API file that you selected when you generated the source files
Before you compile the Java sources you should confirm that you have a copy of the PeopleSoft Java
Object Adapter (the psjoajar file that resides on your PeopleSoft Application Server under the
PS_HOMEWebpsjoa directory) Note its location
How to Compile the generated PeopleSoft API Java sources
NOTE Before beginning ensure that you have a copy of Sunrsquos JDK (14x or later) on your machine
1 If you are compiling on a machine that does not have a local copy of the psjoajar file bring a
copy onto the local machine You will need to have this JAR in the classpath in order for
compilation to occur without errors
2 Compile the files To do this first open an operating-system console and navigate to the target
folder you specified in the Java Target Build step (step 4) of the previous procedure From there
run a batch file or shell script that invokes the javacexe program in your JDK to compile the
sources A typical Windows batch file that does this might look like
echo off
set JAVA_HOME=ltmy-java-homegt
set PATH=JAVA_HOMEbinPATH
set CLASSPATH=JAVA_HOMElibtoolsjarpsjoajarCLASSPATH
javac -classpath CLASSPATH PeopleSoftGeneratedCompIntfcjava
where
ltmy-java-homegt
is the fully qualified path name of your Java home directory
3 Compress the class files into a JAR file Again start from the target directory you specified in the
Java Target Build step of the previous sectionrsquos procedure A Windows batch file similar to the
following will create a JAR file named psGenCompjar
echo off
set JAVA_HOME= my-java-home
set PATH=JAVA_HOMEbinPATH
set CLASSPATH=JAVA_HOMElibtoolsjarCLASSPATHjar cvf psGenCompjar PeopleSoftGeneratedCompIntfcclass
Substitute the appropriate path for my-java-home (eg cjdk142)
NOTE Java is case-sensitive Be sure to use the correct case when creating the JAR file since the
Java classloader mechanism depends on this
4 Place the resulting JAR file (in this example psGenCompjar) into your exteNd installationrsquos
Commonlib directory This applies to both design-time and runtime machines if they are
different
8172019 People Soft Users Guide
httpslidepdfcomreaderfullpeople-soft-users-guide 2980
Getting Started with the Composer Connect for PeopleSoftreg 29
Updating andor Activating Your License(s)You will need to activate your design-time and runtime copies of the Novell exteNd Composer Connect
for PeopleSoftreg before using them Follow the procedure outlined below
To update the license on your design-time software
1 Obtain a valid license string from your Novell representative
NOTE The same license string will be used to activate both the design-time and runtime versions
of the software
2 Launch Composer
3 Use the About Composer command on the Help menu on Composerrsquos main menu An ldquoAboutrdquo
screen appears
4 At the bottom of the ldquoAboutrdquo dialog click the System button A System Information dialog
appears
5 Near the top of the System Information dialog click the Licenses tab to bring it forward
6 Scroll down until you see the table row for PeopleSoft
NOTE The Connect ships with an Evaluation license string which may be used for 90 days
7 To use the evaluation license string select the check box in the Enabled column and skip to Step
10 To enter a different license string select the check box in the Enabled column The Edit button
in the Siebel row is enabled
8 Select Edit in the PeopleSoft row The Edit License dialog box is displayed
8172019 People Soft Users Guide
httpslidepdfcomreaderfullpeople-soft-users-guide 3080
30 Novell exteNd Composer 521 Connect for PeopleSoft Userrsquos Guide
9 Type the license string for the Composer Connect for PeopleSoft in the New License field
10 Scroll down until you see the row for PeopleSoft Service
11 Repeat Step 7 through Step 9 for the PeopleSoft Service row
12 Click OK
13 Exit out of all dialogs using the OK button
To update the runtime license1 Start the application server if it is not already running (Novell exteNd Composer Enterprise Server
should already be installed It will start when the application server starts)
2 Open a browser window and navigate to the Novell exteNd Composer main administrative console
Typically this is at
httplocalhostexteNdComposer
3 In the upper left corner of the console window click the exteNd Composer logo immediately
above the words ldquoServer Consolerdquo See the following illustration
4 In the content area of the main frame near the bottom click the Licenses button A new window
will open showing the license status of every Composer Connect See the following illustration
5 Scroll down to the entry labeled ldquopsftrdquo
8172019 People Soft Users Guide
httpslidepdfcomreaderfullpeople-soft-users-guide 3180
Getting Started with the Composer Connect for PeopleSoftreg 31
NOTE The Connect ships with Evaluation license strings which may be used for 90 days
6 Type a license string in the text field in the ldquopsftrdquo row then select Enabled in the ldquopsftrdquo row To use
the evaluation license string just select Enabled
7 Select Update in the ldquopsftrdquo row
8 Scroll down to the entry labeled ldquopsftservicerdquo
9 Type a license string in the text field in the ldquopsftservicerdquo row then select Enabled in the
ldquopsftservicerdquo row To use the evaluation license string just select Enabled
10 Select Update in the ldquopsftservicerdquo row
8172019 People Soft Users Guide
httpslidepdfcomreaderfullpeople-soft-users-guide 3280
32 Novell exteNd Composer 521 Connect for PeopleSoft Userrsquos Guide
8172019 People Soft Users Guide
httpslidepdfcomreaderfullpeople-soft-users-guide 3380
Creating a PeopleSoft Component 33
3 Creating a PeopleSoft Component
To create a Component that utilizes the Composer Connect for PeopleSoft you will generally need to do
three things
Create a Connection Resource (to allow your component to connect to a PeopleSoft system)
Create any necessary XML Templates
Create the Component itself (containing your business logic)
Each of these processes is discussed in detail in this chapter
Creating Connection ResourcesBefore creating a component that interacts with a PeopleSoft system you need to create a Connection
Resource which is a lightweight Composer object (xObject) that encapsulates basic connection
information (parameter values) associated with a connection to a back-end system
In addition to a connection resource a PeopleSoft Component requires that you have already created
XML templates so that you have sample input and output documents for use in designing your
component For more information see ldquoCreating an XML Templaterdquo in the Novell exteNd Composer
Userrsquos Guide
If your component design calls for any other resources such as custom scripts XSL XSD etc it is best
to create these before creating the PeopleSoft Component For more information see ldquoCreating Custom
Scriptsrdquo in the Novell exteNd Composer Userrsquos Guide
Types of Connection Resources
You create different types of connection resource depending on the type of interaction with the
PeopleSoft system that is desired If your application needs to initiate PeopleSoft business events you
need to create a PeopleSoft Connection resource If your application needs to process data when a
business event occurs within PeopleSoft you need to create an inbound connection resource Inbound
connection resources include file HTTP and TCP connection types
About Constant-Driven and Expression-Driven Connection Parameters
You can specify Connection parameter values in one of two ways as Constants or as Expressions Aconstant-driven parameter uses the value you type in the Connection dialog every time the Connection is
used An expression-driven parameter allows you to set the value using a programmatic expression
which can result in a different value each time the connection is used at runtime This allows the
Connectionrsquos behavior to be flexible and vary based on runtime conditions each time it is used
8172019 People Soft Users Guide
httpslidepdfcomreaderfullpeople-soft-users-guide 3480
34 Novell exteNd Composer 521 Connect for PeopleSoft Userrsquos Guide
For instance one very simple use of an expression-driven parameter in a Connection would be to define
the User ID and Password as PROJECT Variables (eg
PROJECTXPATH(ldquoUSERCONFIGMyDeployUserrdquo) This way when you deploy the project you can
update the PROJECT Variables in the Deployment Wizard to values appropriate for the final deployment
environment At the other extreme you could have a custom script that queries a Java business object in
the Application Server to determine what User ID and Password to use
To switch a parameter from Constant-driven to Expression driven
1 Click the right mouse button in the parameter field you are interested in changing
2 Select Expression from the context menu and the editor button will appear or become enabled
3 Click on the button and then create an expression that evaluates to a valid parameter value at
runtime (Strings should be wrapped in double-quotes)
Creating a PeopleSoft Connection Resource
To create a PeopleSoft connection resource
1 Select File gt New gt xObject and select the Resource tab Click on Connection The ldquoCreate a
New Connection Resourcerdquo Wizard appears
2 Type a Name for the connection object
3 Optionally type Description text
4 Click Next The parameters panel appears
8172019 People Soft Users Guide
httpslidepdfcomreaderfullpeople-soft-users-guide 3580
Creating a PeopleSoft Component 35
5 Select PeopleSoft Connection from the Connection Type pull down menu
6 In the Application Server field enter the host name or IP address for the PeopleSoft server that
yoursquoll be using
NOTE This parameter and all subsequent parameters in this dialog can be dynamically set using
Expressions See the discussion ldquoAbout Constant-Driven and Expression-Driven ConnectionParametersrdquo later in this chapter
7 In the PeopleSoft Port field enter the appropriate port number
8 Enter a valid User ID to sign on to the selected PeopleSoft server
9 Enter a valid Password
10 In the Initial Pool Size field enter the desired J2EEtrade Connector Architecture pool size (Not
applicable for non-managed environments)
11 Enter a Maximum Pool Size as desired Again this is a J2EEtrade Connector Architecture setting
(Not applicable for non-managed environments)
12 If desired select Test to see if your connection parameters and current network environment will
allow you to create a live connection (The connection is discarded immediately after the test) A
ldquosuccessrdquo or ldquofailurerdquo message dialog will appear You can continue working with the resourceeven if your connection fails
NOTE This does not test the connection pool (if defined)
13 Click Finish The newly-created resource connection object appears in the Composer Connection
Resource detail pane
8172019 People Soft Users Guide
httpslidepdfcomreaderfullpeople-soft-users-guide 3680
36 Novell exteNd Composer 521 Connect for PeopleSoft Userrsquos Guide
Creating a File Service Connection Resource
To Create a PeopleSoft File Service Connection Resource
1 Select File gt New gt xObject The New xObject dialog box is displayed
2 Select the Resource tab
3 Double-click on Connection The ldquoCreate a New Connection Resourcerdquo wizard is displayed
4 Type a name for the connection object in the Name field
5 Optionally type a description of the connection object in the Description field
6 Select Next A connection parameters panel is displayed
7 Select PeopleSoft File Service Connection from the Connection Type list
8 Use the Browse button next to the Polling Location field to select the target file system location
for the PeopleSoft XML file
8172019 People Soft Users Guide
httpslidepdfcomreaderfullpeople-soft-users-guide 3780
Creating a PeopleSoft Component 37
9 In the File Mask field type the file name to be used for the output file generated as a result of this
operation The default is ldquordquo
10 Select REQUEST REQUEST_RESPONSE or REQUEST_ACK from the Synchronization Type
list Select the option that is correct for the Workflow with which you are integrating (eg if your
Workflow is set up to process a response select REQUEST_RESPONSE) The Synchronization
Type selected also determines the tabs that are displayed in the Service Request Native
Environment pane (eg if REQUEST_RESPONSE is selected both Request and Response tabs
are displayed)
11 Use the Browse button next to the ResponseAck Directory field to select the directory to which
responses or acknowledgements from your application will be written
12 Use the Browse button next to the Error Directory field to select the directory to which error
information will be written
13 In the Poll Interval field type the interval (in milliseconds) in which the Polling Location is
checked for input The default is 3000 (3 seconds)
14 Select Threaded or Sequential from the Processing Mode list Threaded indicates processing of
multiple requests simultaneously Sequential indicates serial processing of requests
15 If Threaded processing mode is selected in the Processing Mode list use the Thread Limit field to
specify the maximum number of requests that can be processed simultaneously
16 From the Metadata Connection list select a PeopleSoft connection resource from the list of
defined connection resources This connection is used for acquiring metadata from the PeopleSoftsystem
17 Type the desired maximum pool size in the Maximum Pool Size field This is a JCA setting that
specifies the maximum number of connections to be allowed in the connection pool (not applicable
for non-managed environments)
Creating an HTTP Service Connection Resource
To Create a PeopleSoft HTTP Service Connection Resource
1 Select File gt New gt xObject The New xObject dialog box is displayed
2 Select the Resource tab
3 Double-click on Connection The ldquoCreate a New Connection Resourcerdquo wizard is displayed
4 Type a name for the connection object in the Name field
5 Optionally type a description of the connection object in the Description field
6 Select Next A connection parameters panel is displayed
8172019 People Soft Users Guide
httpslidepdfcomreaderfullpeople-soft-users-guide 3880
38 Novell exteNd Composer 521 Connect for PeopleSoft Userrsquos Guide
7 Select PeopleSoft HTTP Service Connection from the Connection Type list
8 In the Listener Port field type the number of the port on which the application will listen for
PeopleSoft event data The default port is 8080
9 To use HTTPS for this connection select HTTPS
10 Select REQUEST REQUEST_RESPONSE or REQUEST_ACK from the Synchronization Type
list Select the option that is correct for the Workflow with which you are integrating (eg if your
Workflow is set up to process a response select REQUEST_RESPONSE) The Synchronization
Type selected also determines the tabs that are displayed in the Service Request NativeEnvironment pane (eg if REQUEST_RESPONSE is selected both Request and Response tabs
are displayed)
11 From the Metadata Connection list select an outbound PeopleSoft connection resource from the
list of defined connection resources This connection is used for acquiring metadata from the
PeopleSoft system
12 Type the desired maximum pool size in the Maximum Pool Size field This is a JCA setting that
specifies the maximum number of connections to be allowed in the connection pool (not applicable
for non-managed environments)
Creating a TCP Service Connection Resource
To Create a PeopleSoft TCP Service Connection Resource
1 Select File gt New gt xObject The New xObject dialog box is displayed
2 Select the Resource tab
3 Double-click on Connection The ldquoCreate a New Connection Resourcerdquo wizard is displayed
4 Type a name for the connection object in the Name field
5 Optionally type a description of the connection object in the Description field
6 Select Next A connection parameters panel is displayed
7 Select PeopleSoft Service TCP Connection from the Connection Type list
8 In the Host field specify the host name or URL of the system on which the PeopleSoft system is
installed
9 In the Port field type the name of the port on which the host is listening
10 Select RECEIVE_REPLY RECEIVE_ACK or RECEIVE from the Synchronization Type list
Select RECEIVE_REPLY if the PeopleSoft application expects a reply sent back to it
Select RECEIVE_ACK when a TCPIP acknowledgement (ACK) is sent back to the PeopleSoft
application
8172019 People Soft Users Guide
httpslidepdfcomreaderfullpeople-soft-users-guide 3980
Creating a PeopleSoft Component 39
Select RECEIVE if the PeopleSoft application does not expect a return
11 Select Is Length Prefix if the PeopleSoft application sends data that is not in XML format The
TCPIP event application must prefix the data with a 4-byte binary length field when writing the
data to the TCPIP port When this option is selected deselect the Is XML option
12 Select Is XML if the PeopleSoft application sends data in XML format When this option is
selected deselect the Is Length Prefix checkbox
13 Select Is Keep Alive to maintain continuous communication between the PeopleSoft application
and your application14 From the Metadata Connection list select an PeopleSoft Connection resource from the list of
defined connection resources This connection is used for acquiring metadata from the PeopleSoft
system
15 Type the desired maximum pool size in the Maximum Pool Size field This is a JCA setting that
specifies the maximum number of connections to be allowed in the connection pool (not applicable
for non-managed environments)
XML Templates for PeopleSoft ComponentsBefore creating a PeopleSoft Component you should create any XML templates that might be needed
This basically means telling Composer what XML samples to use (For more information see Creating
a New XML Template in the separate Composer Userrsquos Guide) Once yoursquove specified the XML
templates you can create a component using the templatersquos sample documents to represent the inputs
and outputs processed by your component
Creating PeopleSoft ComponentsAlso as part of the process of creating a PeopleSoft Component you can select a preexisting PeopleSoft
connection resource or you can create a new one If you create the connection beforehand (as outlined in
the previous chapter) then it is available to for use by any PeopleSoft Components in the current project
If you have not already created at least one PeopleSoft connection resource in the current project youwill be prompted to do so when you try to create a PeopleSoft Component
NOTE You can still create a Component without first creating a Connection Resource but you wonrsquot be
able to use any debug features that depend on a live connection
To create a new PeopleSoft Component
1 Select FilegtNewgtxObject In the dialog that appears select the Component tab and then the
PeopleSoft component type
NOTE Alternatively under Component in the Composer Navigator pane (explorer view) you can
highlight PeopleSoft click the right mouse button then select New
2 The ldquoCreate a New PeopleSoft Componentrdquo Wizard appears
8172019 People Soft Users Guide
httpslidepdfcomreaderfullpeople-soft-users-guide 4080
40 Novell exteNd Composer 521 Connect for PeopleSoft Userrsquos Guide
3 Enter a Name for the new PeopleSoft Component
4 Optionally type Description text
5 Click Next The XML InputOutput Property Info panel of the New PeopleSoft Component Wizard
appears
6 Specify the Input and Output templates as follows
Type in a name for the template under Part if you wish the name to appear in the DOM as
something other than ldquoInputrdquo
Select a Template Category if it is different than the default category
Select a Template Name from the list of XML templates in the selected Template Category
To add additional input XML templates click Add and choose a Template Category and
Template Name for each
To remove an input XML template select an entry and click Delete
7 Select an XML template for use as an Output DOM using the same steps outlined above
NOTE You can specify an input or output XML template that contains no structure by selecting
SystemANY as the Input or Output template For more information see Creating an Output
Document without Using a Template in the Composer Userrsquos Guide
8 Click Next The Temp and Fault XML Template panel appears
8172019 People Soft Users Guide
httpslidepdfcomreaderfullpeople-soft-users-guide 4180
Creating a PeopleSoft Component 41
9 If desired specify a template to be used as a scratchpad under the ldquoTemp Messagerdquo pane of the
dialog window This can be useful if you need a place to hold scratchpad values that will be used
temporarily during the execution of your component Select a Template Category if it is different
than the default category Then select a Template Name from the list of XML templates in the
selected Template Category
10 Under the ldquoFault Messagerdquo pane select an XML template to be used to pass back to clients when
an error condition occurs
11 As above to add additional input XML templates click Add and choose a Template Category and
Template Name for each Repeat as many times as desired To remove an input XML template
select an entry and click Delete
12 Click Next The Connection Info panel of the ldquoCreate a New PeopleSoft Componentrdquo Wizard
appears
13 Select a PeopleSoft Connection from the Connection list
14 Click Finish The component is created and the PeopleSoft Component Editor appears
About the PeopleSoft Component Editor Window
The PeopleSoft Component Editor includes all the functionality of the XML Map Component Editor It
contains mapping panes for Input and Output XML documents as well as an Action Model
8172019 People Soft Users Guide
httpslidepdfcomreaderfullpeople-soft-users-guide 4280
42 Novell exteNd Composer 521 Connect for PeopleSoft Userrsquos Guide
The PeopleSoft Component Editor also includes a Native Environment Pane which appears as a grey
pane until you create a PeopleSoft Request action at which time it will show a tabbed RequestResponse
pane with corresponding XML trees
(The Native Environment Pane shown here is blank because no PeopleSoft Request action has yet been
created)
Creating Actions in the Component Editor
You can create all the normal Composer actions in the Action Model of your PeopleSoft component (eg
XML Map Function Log Send Mail and so on) In addition you can create a PeopleSoft Request
action
The PeopleSoft Request action communicates requests (XML request documents) to your PeopleSoft
system and fetches responses back from the same system
The Composer GUI for creating a PeopleSoft Request action allows you to
specify the type of PeopleSoft function (or ldquoservicerdquo) you want to invoke
automatically generate XML schemas (request and response) for the particular ComponentInterface API you wish to use
use the generated schemas to fine-tune the exact structure of the actual request document you wantto use (a request document that conforms to the schema but reflects your own ldquosetuprdquo choices andinitialization parameters etc)
automatically generate the corresponding XML request and response documents that conform tothe schemas and choices yoursquove made
You will see how this works in the procedure given below
Input
mapping pane
Output
mapping pane
Action Model pane
Native Environment
pane
8172019 People Soft Users Guide
httpslidepdfcomreaderfullpeople-soft-users-guide 4380
Creating a PeopleSoft Component 43
To create a PeopleSoft Request action
1 Right-click in the Action Model at the location where you wish to create a new PeopleSoft Request
action then (in the context menu that appears) choose New Action gt Request
2 In the dialog that appears (see below) give focus to the Functions tab and expand the topmost node
(Component Interfaces) in the tree-view shown
You will see a list of functions corresponding to those for which Component Interface classes were
built (see ldquoDeploying the PeopleSoft Component Interface Filesrdquo on page 17 and ldquoHow to Create a
New Component Interfacerdquo on page 63)
All nodes have tooltips specifying the node type
8172019 People Soft Users Guide
httpslidepdfcomreaderfullpeople-soft-users-guide 4480
44 Novell exteNd Composer 521 Connect for PeopleSoft Userrsquos Guide
Folder and Searchable Folder nodes ldquotype ndash Folderrdquo
Function nodes ldquotype ndash EventOprdquo ldquotype ndash Operationrdquo ldquotype - Messagerdquo
3 Right-click on the function of interest Select Get Schemas from the context menu that appears (If
the command is not available it means no Component Interface API classes are available for this
Function type)
4 After a few seconds the Request and Response tabs of the dialog should become enabled When
this has occurred select the Request tab to bring it forward
5 Enter a request-message (document) mapping name or accept the default as shown
6 Select the elements that you want to occur in the Request document by checking or unchecking
checkboxes in the node tree Some nodes are greyed out (disabled) while others are not This is
because the documentrsquos schema determines which nodes you can edit
Composer will not let you specify an invalid request document because the things you should not
edit are greyed out (disabled) and the editable items for which customization is allowed have RMB
context-menus that non-customizable nodes do not have etc For example
Mandatory elements and attributes are marked selected and disabled
All child nodes are left unselected and disabled if the parent node is not selected
8172019 People Soft Users Guide
httpslidepdfcomreaderfullpeople-soft-users-guide 4580
Creating a PeopleSoft Component 45
A parent element once selected will autoselect mandatory elements and attributes underneath
it
When a parent node is selected you will need to select optional element manually
Tool tips are an important aid in using the Request and Response panes because they display
document-structure rules that come straight from the corresponding Component Interface
requestresponse document schema You should take time to familiarize yourself with the tooltip
feature by letting the mouse hover over various nodes An example is shown below
NOTE The tooltips that appear in this tree are also made available in the Native Environment
pane
7 If a node has ldquomaximum occurrencerdquo of more than one then a RMB menu command called ldquoCreate
newrdquo is available Choosing that command brings up the following dialog
Enter the number of additional instances of this node-type that you want to insert in the document
Then click OK New nodes are added to the document structure
CAUTION There is currently no Undo for this
If an Enumeration Button appears to the right of a given node you can click it to choose from the
list of appropriate (schema-allowed) values for that enumeration
8 A common situation is that an enumeration offers choices of Update Insert or Delete An example
of this is shown in the following illustration which shows the dialog that appears when you click
an Enumeration Button
8172019 People Soft Users Guide
httpslidepdfcomreaderfullpeople-soft-users-guide 4680
46 Novell exteNd Composer 521 Connect for PeopleSoft Userrsquos Guide
9 Visit all of the nodes in the request tree that are of interest to you and use the various Composer UIfeatures to customize the request documentrsquos structure
10 When you are satisfied with the structure click the Response tab at the top of the dialog to bring the
Response document pane forward This pane shows a tree view of the response document similar
to the one shown for the Request document
11 Check or uncheck Filter Response as desired It is checked by default If this box is unchecked the
tree will be disabled and greyed (no longer editable) meaning that a default schema configuration
will be used When the box is checked you can customize the structure of the request document by
specifying various types of node filtering
8172019 People Soft Users Guide
httpslidepdfcomreaderfullpeople-soft-users-guide 4780
Creating a PeopleSoft Component 47
12 Visit all of the nodes in the Response document tree and customize the settings as desired (See
previous steps applicable to the Request document for an explanation of the UI semantics)
13 Click OK (Otherwise use Cancel) The dialog goes away and a new action appears in the Action
Model of your component At the same time the Native Environment Pane changes to show the
Request and Response tabs along with corresponding tree views of the fully customized
document(s)
14 In the normal component editor view drag and drop data from the Input document pane to the
Request document of the Native Environment Pane as desired This will create mappings fromyour Input document to the Request doc that will be submitted to the PeopleSoft server The
mappings will appear (automatically) as new XML Map Actions in the Action Model
15 Repeat the drag-and-drop mapping process for the Response document dragging nodes from the
Native Environment Pane to the componentrsquos Output document tree view Again this will
automatically cause new Map Actions to appear in your Action Model (You can cutcopydelete
the actions once they appear in the Action Model pane)
16 Add or remove actions from the Action Model as needed to create the business logic you need
Returning to Schema-Edit Mode
Once you have created a PeopleSoft Request Action in your action model (using the above procedure)
you can go back and revisit the Request and Response schema trees (and change your customizations)simply by doubleclicking the Request Action in your action model Doubleclicking will cause the
PeopleSoft Request Action dialog to reappear You can use the Request and Response tabs to navigate the
request- and response-doc schemas and change your customizations as desired When you exit out of the
dialog your changes will be reflected in the Native Environment Pane
NOTE If you make hand-edits to the Request or Response documents in your Native Environment
Pane you will not be able to reopen the PeopleSoft Request Action dialog (See discussion further below)
Therefore try to avoid manually editing requestresponse documents Instead make modifications
through careful use of the XML Map Action or by using RequestcreateXPath( ) andor DOM methods in a
Function Action
Request and Response DocumentsAfter you have created the PeopleSoft Request Action using the foregoing procedure the Native
Environment Pane portion of the Composer editor view will show Request and Response documents in
tree-view form
As mentioned earlier you can drag and drop data from your componentrsquos Input document to the Request
document to create XML Map actions (First put focus on the target Request-document node by clicking
in it Then go to the Input document and click-drag any data you want to map over to the target node in
the Request document) You can use drag-and-drop mapping to map from Response to Output as well
In the illustration shown above some nodes are shown in red The red entries represent nodes to which
data have been mapped
8172019 People Soft Users Guide
httpslidepdfcomreaderfullpeople-soft-users-guide 4880
48 Novell exteNd Composer 521 Connect for PeopleSoft Userrsquos Guide
Manually Editing the Request and Response Docs
If you right-click anywhere inside the Request or Response tree views in the Native Environment Pane
you will get a context menu
The Edit Document command in this menu will open the document in a text-editor view as shown
below
In this window you can hand-edit the Request or Response document as desired
CAUTION If you make hand-edits to the document it may no longer conform to the original schema As
a result you will no longer be able to reopen it in the PeopleSoft Request Action dialog
Note that if yoursquove made hand-edits to a Request or Response document doubleclicking on the
corresponding PeopleSoft Request Action in the action model will cause the following dialog to appear
If this dialog appears you will need to recreate the action in order to see the original Request or Response
document (Any hand edits will be lost however)
8172019 People Soft Users Guide
httpslidepdfcomreaderfullpeople-soft-users-guide 4980
Creating a PeopleSoft Component 49
To prevent this situation from occurring avoid making manual edits to Request or Response documents
Instead use XML Map Actions (andor Function actions) to modify documents or node contents Be
aware that doing so may violate schema constraints This will not necessarily cause runtime problems for
your component when executing in the Composer Enterprise Server environment because Composer
does not validate the request document against the schema at runtime on the server However your
PeopleSoft system may validate incoming requests in which case a hand-edited Request document could
be the source of hard-to-troubleshoot errors
ldquoBefore Executerdquo and ldquoAfter Executerdquo Actions
You will notice that whenever a PeopleSoft Request action is created in your Action Model two
additional lines are added to the action list Before Execute Actions and After Execute Actions These are
header labels (grouping labels) for blocks of actions that you want to occur before the request is sent to
the PeopleSoft system or after a response document has come back respectively Typically you will want
to map data fields from Input to Request and have those actions be grouped under the ldquoBefore Execute
Actionsrdquo header Likewise any map actions or other action logic you need to perform on the Response
document after the PeopleSoft system executes you request should be grouped under the ldquoAfter Execute
Actionsrdquo heading
Creating PeopleSoft ServicesThis section describes how to use the exteNd Composer trade Connect for PeopleSoft to create a PeopleSoft
Service component to connect to PeopleSoft and listen for events As part of the process of creating a
PeopleSoft Service you can select an existing PeopleSoft connection resource or you can create a new
one If you create the connection beforehand it is available for use by any PeopleSoft Services in the
current project If you have not already created at least one PeopleSoft connection resource in the current
project you will be prompted to do so when you try to create a PeopleSoft Service
NOTE You can still create a PeopleSoft Service without first creating a connection resource but you
wonrsquot be able to use any debug features that depend on a live connection
To Create a New PeopleSoft Service
1 Select File gt New gt xObject The New xObject dialog box is displayedNOTE Alternatively under Service in the Composer Navigator pane (Explorer view) you can
highlight PeopleSoft Service click the right mouse button then select New
2 Select the ProcessService tab
3 Double-click on ldquoPeopleSoft Servicerdquo
If you have not previously defined a connection resource you are prompted to do so now (see
ldquoCreating Connection Resourcesrdquo on page 33)
8172019 People Soft Users Guide
httpslidepdfcomreaderfullpeople-soft-users-guide 5080
50 Novell exteNd Composer 521 Connect for PeopleSoft Userrsquos Guide
If you have already defined a connection resource the ldquoCreate a New PeopleSoft Servicerdquo Wizard
is displayed
4 Type a Name for the new PeopleSoft Service
5 Optionally type Description text
6 Select Next The XML InputOutput Message Property Info panel of the New PeopleSoft ServiceWizard is displayed
7 Specify the Input and Output templates as follows
Type a name for the template under Part if you wish the name to appear in the DOM as
something other than ldquoInputrdquo
Select a Template Category if it is different than the default category
Select a Template Name from the list of XML templates in the selected Template Category
To add additional input XML templates click Add then choose a Template Category and
Template Name for each To remove an input XML template select an entry and click Delete
8 Select an XML template for use as an Output DOM using the procedure described in the previous
step
NOTE You can specify an input or output XML template that contains no structure by selecting
SystemANY as the Input or Output template For more information see ldquoCreating an Output
Document without Using a Templaterdquo in the Novell exteNd Composer Userrsquos Guide
9 Select Next The Temp and Fault XML Template panel is displayed
8172019 People Soft Users Guide
httpslidepdfcomreaderfullpeople-soft-users-guide 5180
Creating a PeopleSoft Component 51
10 If desired specify a template to be used as a scratch pad under the ldquoTemp Messagerdquo pane of the
dialog box This can be useful if you need a place to hold values that will be used temporarily
during the execution of your component Select a Template Category if it is different than the
default category Then select a Template Name from the list of XML templates in the selected
Template Category
11 Under the ldquoFault Messagerdquo pane select an XML template to be used to pass back to clients when
an error condition occurs
12 To add additional input XML templates click Add and choose a Template Category and
Template Name for each Repeat as many times as desired To remove an input XML template
select an entry and click Delete
13 Select Next The Connection Info panel of the Create a New PeopleSoft Service wizard is
displayed
14 Select a PeopleSoft File HTTP or TCP Service connection from the Connection list The
Connection list displays the names of the PeopleSoft connection resources that have been definedin this project
15 Select Finish The component is created and the PeopleSoft Service Editor is displayed The
features of this window are identical to the features described in ldquoAbout the PeopleSoft Component
Editor Windowrdquo on page 41 The following sections describe the steps required to create a
PeopleSoft Service Action
8172019 People Soft Users Guide
httpslidepdfcomreaderfullpeople-soft-users-guide 5280
52 Novell exteNd Composer 521 Connect for PeopleSoft Userrsquos Guide
Creating PeopleSoft Service Actions
You can create all the normal Composer actions in the Action Model of your PeopleSoft Service (eg
XML Map Function Log Send Mail) In addition you can create a PeopleSoft Service Request action
The PeopleSoft Service Request action is similar to a Switch action (see ldquoThe Switch Actionrdquo in the in
the Novell exteNd Composer Userrsquos Guide) A Switch action allows program control to branch to a block
of actions based on a match between an input value and a Case value In a PeopleSoft Service Request
Composer receives a DOM and compares a series of cases against the DOM If an exact match occurs
between the DOM and a case execution branches to the actions listed underneath the case in the Actionmodel Cases are tested in the order listed and once a match is found execution of the match logic
precludes execution of any other logic in the PeopleSoft Service Request
To Create a PeopleSoft Service Request Action
1 In the Action Model right-click on PeopleSoft Service Request
2 Select Edit Action The Service Request dialog box is displayed
3 In the Function tree click on the plus (+) sign to the left of the Messages node to expand the tree
view for that node
8172019 People Soft Users Guide
httpslidepdfcomreaderfullpeople-soft-users-guide 5380
Creating a PeopleSoft Component 53
4 Right-click on the message name that you want to use for input and select Add Case or double-
click on the message name
The Adapter Service Request dialog box is displayed This dialog box is similar to the PeopleSoftRequest dialog box (see ldquoCreating Actions in the Component Editorrdquo on page 42)
5 Select or deselect Filter Request as desired Filter Request is selected by default If deselected the
tree will be disabled and greyed (no longer editable) indicating that a default schema configuration
will be used If selected you can customize the structure of the request document by selecting the
nodes to be included in the request document
6 Expand the nodes of the Service Request Tree by clicking on the plus signs to the left of the nodes
7 Select the elements that you want to include in the Service Request document by selecting or
deselecting the check boxes in the node tree Some nodes are greyed out (disabled) This is because
the document schema determines the nodes that you can edit
8172019 People Soft Users Guide
httpslidepdfcomreaderfullpeople-soft-users-guide 5480
54 Novell exteNd Composer 521 Connect for PeopleSoft Userrsquos Guide
8 If the Service Response tab is enabled (this depends on the Synchronization Type setting in the
Connection resource) click the Service Response tab at the top of the dialog box to bring the
Service Response document pane forward This pane shows a tree view of the Response document
similar to the one shown for the Request document The same user interface features that applied to
the Request document pane apply to the Response document pane
9 Visit all of the nodes in the Response document tree and customize the settings as desired
10 Click the Case Expression tab at the top of the dialog box to bring the Case Expression pane
forward This pane provides an Expression Builder that you use to build a case expression
11 Type the static string values or the ECMAScript expressions that will be checked against the input
DOM
12 Select the OK button The Service Request dialog box is displayed
13 To add another case repeat Step 3 through Step 12 The cases are listed from top to bottom in the
order in which they are evaluated Each Case value will be checked in turn in the order you list
them
For optimal performance list the most likely matches first
You can change the order in which the cases are listed by clicking on the name of a case then
clicking the up or down triangle icons
8172019 People Soft Users Guide
httpslidepdfcomreaderfullpeople-soft-users-guide 5580
Creating a PeopleSoft Component 55
To edit a case select the name of the case then press the Mapping button You can also select
the name of the case then select the Expression Builder button
14 When you have finished adding cases select OK The Service Request dialog box closes and a new
action appears in the Action Model of your component The Native Environment Pane changes to
show the Request and Response (if the Synchronization Type is set to REQUEST_RESPONSE in
the Connection resource) tabs along with tree views of the request and response documents
15 In the Action Model add actions to be performed to each case to create the desired business logic
To map a node of the Input document to a node in the Request document drag a node from the
Input pane and drop it on a node in the Request tab of the Native Environment pane This
automatically creates a new XML Map Action in the Action Model
To map a node of the Response document to a node in the Output document drag a node from
the Response tab of the Native Environment pane and drop it on a node in the Output pane This
automatically creates a new XML Map Action in the Action Model You can cut copy or deletethe actions once they appear in the Action Model pane
When all of the Actions for a case have been evaluated Composer sets the Service Response
DOM
The final case in the Action model is always labeled Default This case is generated
automatically and cannot be removed Actions placed under Default are executed if and only if
the none of the other cases are matched While you are not required to place actions under
Default it is good programming practice to have at least some kind of fallback logic for the
Default case even if itrsquos only a Log action or a Raise Error action
The Request and Response document displays for Service Requests work similarly to the
displays for Requests (see ldquoRequest and Response Documentsrdquo on page 47)
Managing Deployed PeopleSoft Services
Once a project containing PeopleSoft Services has been deployed (see ldquoDeploying Your Projectrdquo in the
Novell exteNd Composer Userrsquos Guide) the Listener objects actively listen for messages each time you
start your server To manually start and stop these services you need to use the exteNd PeopleSoft
Services Console This browser-based console allows you to see the list of PeopleSoft Services the status
of each service (running or not running) the running tally (Count) of messages received other
administrative information and a StartStop button
8172019 People Soft Users Guide
httpslidepdfcomreaderfullpeople-soft-users-guide 5680
56 Novell exteNd Composer 521 Connect for PeopleSoft Userrsquos Guide
To display the exteNd PeopleSoft Services Console
1 Make sure that your application server is running
2 From the Windows Start menu select Programs gt Novell Extend 52 gt Composer gt Composer
Server Console A dialog box for entering the application server administrator ID and password is
displayed
3 Type your administrator ID and password then select OK The Composer Server Console page is
displayed
4 Scroll down the About Products list on the left side of the page until you see the link titledldquopsftservicerdquo
5 Select the ldquopsftservicerdquo link A page is displayed that provides information (eg version license
number copyright) about the Connect It also displays a Console button
6 Select the Console button The PeopleSoft Service console page is displayed This page lists anyPeopleSoft Services that have been deployed
7 To stop a PeopleSoft Service select the appropriate Stop button (the button will then change to
Start)
8172019 People Soft Users Guide
httpslidepdfcomreaderfullpeople-soft-users-guide 5780
Creating a PeopleSoft Component 57
NOTE If messages are being handled by a service at the time of the Stop command there may
be some delay before the service actually exits Select the Refresh button periodically until the
ldquoRunningrdquo column of the console says No for the service
To undeploy a PeopleSoft Service
1 Make sure that your application server is running
2 From the Windows Start menu select Programs gt Novell Extend 52 gt AppServer gt Server
Management Console
3 Login as an administrator (File gt Login)
4 Select the Deployment icon ( )from the toolbar
5 Select Deployed Objects
6 Expand the database containing the deployed objects that you want to manage
7 Select the object that you want to undeploy
8 Select the Undeploy button
ECMAScript ExtensionsSee Appendix A to this guide for a list of ECMAScript extension methods that can be used with the
PeopleSoft Connect
8172019 People Soft Users Guide
httpslidepdfcomreaderfullpeople-soft-users-guide 5880
58 Novell exteNd Composer 521 Connect for PeopleSoft Userrsquos Guide
8172019 People Soft Users Guide
httpslidepdfcomreaderfullpeople-soft-users-guide 5980
ECMAScript Methods 59
A ECMAScript Methods
The J2EE Connector framework of the exteNd Composer Connect for PeopleSoft implements a number
of ECMAScript extension methods that are available for use through the Expression Builder (which is
available in Function Actions and elsewhere) You will find the methods listed in the FunctionsMethods
pane of the Expression Builder
Hover-help is available for each method
For more information on working with the Expression Builder see the Scripting chapter of the Composer
Userrsquos Guide
Adapter Interface Methods
getAdapterType()
This method calls returns the adapter type name (eg ldquopsftrdquo) as a String
Syntax
getAdapterType()
8172019 People Soft Users Guide
httpslidepdfcomreaderfullpeople-soft-users-guide 6080
60 Novell exteNd Composer 521 Connect for PeopleSoft Userrsquos Guide
Connection Interface MethodsThe following CCI API metadata-wrapped methods are published through the Expression Builder
getAdapterMetaData()
This method wraps calls on the javaxresourcecciResourceAdapterMetaData class
SyntaxgetAdapterMetaData(String parameter )
getConnectionMetaData()
This method wraps calls on the javaxresourcecciConnectionMetaData class
Syntax
getConnectionMetaData(String parameter )
Parameter Description
NAME Returns the name of the adapter (eg ldquoiWay JCA adapterrdquo)
EXECUTEWITHI Returns true if the implementation class for the Interaction interface
implements public Record execute method otherwise the method returns
false
EXECUTEWITHIO Returns true if the implementation class for the Interaction interface
implements public boolean execute method otherwise the method returns
false
VENDOR Returns the name of the vendor that has provided the resource adapter(eg ldquoiWay Software Incrdquo
VERSION Returns the version of the resource adapter (eg ldquo55rdquo)
INTERACTIONSPECS Returns the fully-qualified name of the InteractionSpec type supported by
this resource adapter (eg ldquocomibiafjcaIWAFInteractionSpecrdquo)
SPECVERSION Returns a string representation of the version of the connector architecture
specification that is supported by the resource adapter (eg ldquo10rdquo)
LOCALTX Returns true if the resource adapter implements the LocalTransaction
interface and supports local transaction demarcation on the underlying EIS
(Enterprise Information System) instance through the LocalTransaction
interface
Parameter Description
EISPRODUCTNAME Returns the product name of the underlying EIS instance (eg
ldquoPeopleSoftrdquo)
EISPRODUCTVERSION Returns product version of the underlying EIS instance (eg ldquoSupportsPeopleSoft 8rdquo)
USER Returns the user name for an active connection as known to the
underlying EIS instance
8172019 People Soft Users Guide
httpslidepdfcomreaderfullpeople-soft-users-guide 6180
ECMAScript Methods 61
Additional MethodsThe following ECMA-wrapped methods are not displayed by the Expression Builder user interface but
you can use them in the Expression Builder by typing them directly into expressions
getWarnings()
Returns line separated list of javaxresourcecciResourceWarning for the javaxresourcecciInteraction
clearWarnings()
Calls javaxresourcecciInteractionclearWarnings()
getLastError()
Returns last error such as a javaxresourceResourceException
8172019 People Soft Users Guide
httpslidepdfcomreaderfullpeople-soft-users-guide 6280
62 Novell exteNd Composer 521 Connect for PeopleSoft Userrsquos Guide
8172019 People Soft Users Guide
httpslidepdfcomreaderfullpeople-soft-users-guide 6380
Using Component Interfaces 63
B Using Component Interfaces
This appendix describes how to create new component interfacesmdashand how to modify existing
component interfacesmdashfor use with PeopleSoft 8 and Novell exteNd Composer
After generating and securing a component interface as described in this Appendix you must generate its
API as described in ldquoBuilding PeopleSoft Component Interface API Classesrdquo on page 26 in this guide
NOTE This appendix is not a substitute for PeopleSoft documentation For complete and up-to-date
information about PeopleSoft integration APIs see the PeopleSoft Online Library for your PeopleSoft
system
How to Create a New Component Interface
To create a component interface
1 Launch the PeopleSoft Application Designer
2 Choose New from the File menu
The New dialog box opens
3 Select Component Interface and click OK The Select Source Component for Component Interface
dialog opens
8172019 People Soft Users Guide
httpslidepdfcomreaderfullpeople-soft-users-guide 6480
64 Novell exteNd Composer 521 Connect for PeopleSoft Userrsquos Guide
4 Select the component to use as a basis for a Component Interface
5 Click the Select buttonThe Application Designer dialog opens
6 To create the component interface without displaying individual properties for one-by-one
selection click No Otherwise to expose component properties manually click No and drag the
relevant fields from the left pane to the right pane
NOTE If the component interface is large it is recommended that you expose the component
properties manually as just described
See your PeopleBooks documentation for additional options and their meanings
8172019 People Soft Users Guide
httpslidepdfcomreaderfullpeople-soft-users-guide 6580
Using Component Interfaces 65
7 Designate the methods you wish to use in this Component Interface as described in the next
procedure
Methods
The standard methods created for a component interface are
Create
Find
Get
Save
Only those methods actually implemented in the underlying component are available For example if the
underlying component does not contain Add capabilities Create is not available
To designate Methods to use in the Component Interface
1 Open the Component Interface Properties dialog box (continuing from the procedure described
previously)
8172019 People Soft Users Guide
httpslidepdfcomreaderfullpeople-soft-users-guide 6680
66 Novell exteNd Composer 521 Connect for PeopleSoft Userrsquos Guide
2 Select the desired methods
Properties
You may add properties from the records in the component view You can also delete a property in the
component interface that you do not want to expose You can rename properties by clicking the property
and then clicking again until you can type a new name If you rename a property it can be referenced in
the component interface only by the new name not by the underlying component nameProperties may have various icons adjacent to them For example EMPLID has an icon indicating that it
is a key field from the underlying record NAME has an icon indicating that it is an alternate key field
from the underlying record For a complete list of property icons see the PeopleBooks documentation
You can right-click both panes to select various functions to perform depending on which pane is active
For a complete list of functions see the PeopleBooks documentation
Securing a Component InterfaceYou must set up security for the component interface before you can begin testing
Configuring Component Interface Security for PeopleSoft Version 81x
The following procedure describes how to configure component interface security for PeopleSoft
Version 81 in 2- and 3-tier mode
To configure component interface security
1 From the Use menu select Permission Lists Component Interface and then click UpdateDisplayBefore Security can be set the Permission List(s) must be identified
8172019 People Soft Users Guide
httpslidepdfcomreaderfullpeople-soft-users-guide 6780
Using Component Interfaces 67
2 Select the relevant Permission list
NOTE For more information on Permission Lists see the PeopleBooks documentation
The following pane opens
3 Insert the new component interface that you created
4 Click Edit
NOTE When you select the component interface all available methods appear including user-
defined methods This enables you to specify whether this particular Permission List must have Full
or Partial Access
5 Select the desired level of access
6 Click OK
In the following example the ALLPORTL Permission List has Full Access to all methods
8172019 People Soft Users Guide
httpslidepdfcomreaderfullpeople-soft-users-guide 6880
68 Novell exteNd Composer 521 Connect for PeopleSoft Userrsquos Guide
Configuring Component Interface Security for PeopleSoft Version 84+
The following sample procedure describes how to configure component interface security for PeopleSoft
Version 84 or higher
To configure interface security
1 Expand PeopleTools Security User Profiles and Permissions amp Roles and then click Permission
Lists
2 Click Search
The Permissions List search window opens
8172019 People Soft Users Guide
httpslidepdfcomreaderfullpeople-soft-users-guide 6980
Using Component Interfaces 69
3 Select the relevant Permission ListThe Permissions List window opens
4 Click the right arrow next to the Sign-on Times tab
The Component Interfaces tab becomes available
8172019 People Soft Users Guide
httpslidepdfcomreaderfullpeople-soft-users-guide 7080
70 Novell exteNd Composer 521 Connect for PeopleSoft Userrsquos Guide
5 Click the Component Interfaces tab
6 Click the + button to add a new row to the Component Interfaces list
7 Type the component interface name and click Edit
This example uses component interface AR_ITEM_AGENT
8172019 People Soft Users Guide
httpslidepdfcomreaderfullpeople-soft-users-guide 7180
Using Component Interfaces 71
8 Select the desired access from the drop-down lists
9 Click OK
10 Scroll down to the bottom of the Component Interface Permissions window and click Save
Testing a Component InterfaceThe iWay Adapter for PeopleSoft 8 uses PeopleSoft metadata and component interfaces therefore it can
accommodate new or modified component interfaces The adapter makes no assumptions about
component interfaces except that they are logical and valid Therefore each component interface must be
tested before being used as a source for the adapter
8172019 People Soft Users Guide
httpslidepdfcomreaderfullpeople-soft-users-guide 7280
72 Novell exteNd Composer 521 Connect for PeopleSoft Userrsquos Guide
If changes are made to the underlying application by the user or by means of a PeopleSoft upgrade and
these changes invalidate a component interface the user must repair the invalid component interface
before the adapter uses it
To test a component interface
1 In Application Designer select Test Component Interface from the Tools menu
The Component Interface Tester dialog box opens
2 Click the Component Interface Tester dialog box to bring it to the foreground if required
3 To test the component interface using the Find method click Find
The Component Interface Tester - Find Results window opens displaying all of the possible entries
for the underlying component If there are more than 300 entries a message appears
4 Select a field in the left pane of the Find Results window
5 To display the relevant data for that particular key click Get Selected
8172019 People Soft Users Guide
httpslidepdfcomreaderfullpeople-soft-users-guide 7380
Using Component Interfaces 73
If the security settings permit you can change the values in the individual fields
6 To test the component interface using the Get method enter the existing key(s)
7 Click Get Existing
This returns the exposed properties for the key that you entered
You can change values if Update access has been specified
8172019 People Soft Users Guide
httpslidepdfcomreaderfullpeople-soft-users-guide 7480
74 Novell exteNd Composer 521 Connect for PeopleSoft Userrsquos Guide
8 To test the component interface using the Create method enter all required key values
9 Click Create New
When you enter valid values in lsquoCreatersquo keys the JOBCODE Data Display window opens after the
Table name is expanded with default data in place
You can change fields at this point Changes are validated against the componentrsquos underlying business logic
10 After you finish making changes right-click the top item in the pane
11 Click Save to save your changes
The keys used to create the record can be used with the Get method for viewing data
The data that were added can be viewed in the PeopleSoft Component as shown in the following
example
8172019 People Soft Users Guide
httpslidepdfcomreaderfullpeople-soft-users-guide 7580
Using Component Interfaces 75
Notice the Effective Date as one of the default values
You have finished testing the component interface Before using the component interface you must
generate its API as described at ldquoBuilding PeopleSoft Component Interface API Classesrdquo on page 26
8172019 People Soft Users Guide
httpslidepdfcomreaderfullpeople-soft-users-guide 7680
76 Novell exteNd Composer 521 Connect for PeopleSoft Userrsquos Guide
8172019 People Soft Users Guide
httpslidepdfcomreaderfullpeople-soft-users-guide 7780
77
Index
Aactions
After Execute 49Before Execute 49creating 42PeopleSoft Request creating 43PeopleSoft Service Request creating 52XML Map 55
Adapter Service Request 53Add Case 53After Execute actions 49AgJarsconf 16API bindings 26application servers
Novell 16supported 11
BBEA WebLogic 11Before Execute actions 49
CCase Expression 54CCI 13classpath
application server 16design-time 16
clearWarnings 61Common Client Interface 13Component Interface Properties 65component interface PeopleSoft
creating 63methods 65
properties 66securing 66
testing 71component PeopleSoft
creating 39Editor window 41generating interface classes 26
Composer about 11connection parameter
Connection Type 36 38constant 33Error Directory 37
expression-driven 33File Mask 37Host 38Is Keep Alive 39Is Length Prefix 39Is XML 39Listener Port 38Maximum Pool Size 37 38 39Metadata Connection 37 38 39Poll Interval 37Polling Location 36
Port 38Processing Mode 37ResponseAck Directory 37switching from constant to expression-driven 34Synchronization Type 37 38Thread Limit 37
connection resource
File service 36HTTP Service 37PeopleSoft connection 34TCP Ser vice 38types of 33
connection resour ce PeopleSoft creating 34Connection Type 36 38
Connectsdescription 11
Native Environment pane 42PeopleSoft about 12
DDefault case 55Deployed Objects 57DOM output selecting XML template for 50
EECMAScript
Composer 11methods 57 59
Edit Document 48Edit License 29EISPRODUCTNAME 60EISPRODUCTVERSION 60Error Directory 37EXECUTEWITHI 60EXECUTEWITHIO 60
8172019 People Soft Users Guide
httpslidepdfcomreaderfullpeople-soft-users-guide 7880
78
expression-driven 34
FFault Message 51File Mask 37Filter Request 53Filter Response 46
GGet Existing 73Get Schemas 44getAdapterMetaData 60getAdapterType 59getConnectionMetaData 60getLastError 61getWarnings 61
HHost 38HTTPS 38
IIBM WebSphere 11Initial Pool Size 35INTERACTIO NSPECS 60Is Keep Alive 39Is Length Prefix 39Is XML 39iWay 14iwpeoplesoftjar 16
iwpsci81jar 16 17iwpsci84jar 16 17
JJ2EE Connector Architecture 13
jar files
iwpeoplesoftjar 16iwpsci81jar 16iwpsci84jar 16
psGenCompjar 16 28 psjoajar 16
jarexe 26
javacexe 26JBoss 11
KKeep Alive 39
Llicense update
design-time 29Edit License 29obtaining 29runtime 30
Licenses tab 29Listener 55
Listener Por t 38LOCALTX 60
MMapping 55maximum occurrence 45Maximum Pool Size 35 37 38 39Metadata Connection 37 38 39methods
adapter interface 59connector interface 60
N Native Environment pane 42
OOutput DOM
selecting XML template for 40
PPeopleSoft component
creating 39Editor window 41PeopleSoft component interface
classes generating 26creating 63methods 65
properties 66securing 66testing 71
PeopleSoft File Service Connection 36PeopleSoft HTTP Service Connection 38PeopleSoft Java Object Adapter 15PeopleSoft Service
Console displaying 56
creating 49deploying 55managing 55starting and stopping 55undeploying 57
PeopleSoft Service Request action 52PeopleSoft Service TCP Connection 38
permission lists
access level specifying 67identifying 66
8172019 People Soft Users Guide
httpslidepdfcomreaderfullpeople-soft-users-guide 7980
79
selecting 69Poll Interval 37Polling Location 36Port 38Processing Mode 37
psGenCompjar 16 28 psjoajar
design time configuration adding to 16 Novell application server adding to 16requirement 9
pstoolsproperties 16
RRAR
deployment 12description 13
RECEIVE 39RECEIVE_ACK 38RECEIVE_REPLY 38Request action
creating 43
description 42modifying manually 48
Request Tree 53RequestcreateXPath( ) 47resource adaptor archives deployment 12ResponseAck Directory 37
Sschemas get 44security component interface
PeopleSoft 81x 66PeopleSoft 84+ 68
Sequential 37Service Request dialog box 52Service Request Tree 53Service Response 54service PeopleSoft
creating 49managing 55
Sign-on Times ta b 69SPECVERSION 60Synchronization Type 37 38 54 55
T
TCPIs Length Pr efix 39Keep Alive 39length field 4-bit binary 39Service Connection resource creating 38
Temp Message 51Template Category 50 51Template Name 50 51testing component interface PeopleSoft 71Thread Limit 37Threaded 37
UUndeploy 57
Vvariables project 34
Xxconfigxml 16XML templates 39xObject
descr iption 33
New 36 37 38 49XPath 11XSLT 11
8172019 People Soft Users Guide
httpslidepdfcomreaderfullpeople-soft-users-guide 8080

8172019 People Soft Users Guide
httpslidepdfcomreaderfullpeople-soft-users-guide 3580
Creating a PeopleSoft Component 35
5 Select PeopleSoft Connection from the Connection Type pull down menu
6 In the Application Server field enter the host name or IP address for the PeopleSoft server that
yoursquoll be using
NOTE This parameter and all subsequent parameters in this dialog can be dynamically set using
Expressions See the discussion ldquoAbout Constant-Driven and Expression-Driven ConnectionParametersrdquo later in this chapter
7 In the PeopleSoft Port field enter the appropriate port number
8 Enter a valid User ID to sign on to the selected PeopleSoft server
9 Enter a valid Password
10 In the Initial Pool Size field enter the desired J2EEtrade Connector Architecture pool size (Not
applicable for non-managed environments)
11 Enter a Maximum Pool Size as desired Again this is a J2EEtrade Connector Architecture setting
(Not applicable for non-managed environments)
12 If desired select Test to see if your connection parameters and current network environment will
allow you to create a live connection (The connection is discarded immediately after the test) A
ldquosuccessrdquo or ldquofailurerdquo message dialog will appear You can continue working with the resourceeven if your connection fails
NOTE This does not test the connection pool (if defined)
13 Click Finish The newly-created resource connection object appears in the Composer Connection
Resource detail pane
8172019 People Soft Users Guide
httpslidepdfcomreaderfullpeople-soft-users-guide 3680
36 Novell exteNd Composer 521 Connect for PeopleSoft Userrsquos Guide
Creating a File Service Connection Resource
To Create a PeopleSoft File Service Connection Resource
1 Select File gt New gt xObject The New xObject dialog box is displayed
2 Select the Resource tab
3 Double-click on Connection The ldquoCreate a New Connection Resourcerdquo wizard is displayed
4 Type a name for the connection object in the Name field
5 Optionally type a description of the connection object in the Description field
6 Select Next A connection parameters panel is displayed
7 Select PeopleSoft File Service Connection from the Connection Type list
8 Use the Browse button next to the Polling Location field to select the target file system location
for the PeopleSoft XML file
8172019 People Soft Users Guide
httpslidepdfcomreaderfullpeople-soft-users-guide 3780
Creating a PeopleSoft Component 37
9 In the File Mask field type the file name to be used for the output file generated as a result of this
operation The default is ldquordquo
10 Select REQUEST REQUEST_RESPONSE or REQUEST_ACK from the Synchronization Type
list Select the option that is correct for the Workflow with which you are integrating (eg if your
Workflow is set up to process a response select REQUEST_RESPONSE) The Synchronization
Type selected also determines the tabs that are displayed in the Service Request Native
Environment pane (eg if REQUEST_RESPONSE is selected both Request and Response tabs
are displayed)
11 Use the Browse button next to the ResponseAck Directory field to select the directory to which
responses or acknowledgements from your application will be written
12 Use the Browse button next to the Error Directory field to select the directory to which error
information will be written
13 In the Poll Interval field type the interval (in milliseconds) in which the Polling Location is
checked for input The default is 3000 (3 seconds)
14 Select Threaded or Sequential from the Processing Mode list Threaded indicates processing of
multiple requests simultaneously Sequential indicates serial processing of requests
15 If Threaded processing mode is selected in the Processing Mode list use the Thread Limit field to
specify the maximum number of requests that can be processed simultaneously
16 From the Metadata Connection list select a PeopleSoft connection resource from the list of
defined connection resources This connection is used for acquiring metadata from the PeopleSoftsystem
17 Type the desired maximum pool size in the Maximum Pool Size field This is a JCA setting that
specifies the maximum number of connections to be allowed in the connection pool (not applicable
for non-managed environments)
Creating an HTTP Service Connection Resource
To Create a PeopleSoft HTTP Service Connection Resource
1 Select File gt New gt xObject The New xObject dialog box is displayed
2 Select the Resource tab
3 Double-click on Connection The ldquoCreate a New Connection Resourcerdquo wizard is displayed
4 Type a name for the connection object in the Name field
5 Optionally type a description of the connection object in the Description field
6 Select Next A connection parameters panel is displayed
8172019 People Soft Users Guide
httpslidepdfcomreaderfullpeople-soft-users-guide 3880
38 Novell exteNd Composer 521 Connect for PeopleSoft Userrsquos Guide
7 Select PeopleSoft HTTP Service Connection from the Connection Type list
8 In the Listener Port field type the number of the port on which the application will listen for
PeopleSoft event data The default port is 8080
9 To use HTTPS for this connection select HTTPS
10 Select REQUEST REQUEST_RESPONSE or REQUEST_ACK from the Synchronization Type
list Select the option that is correct for the Workflow with which you are integrating (eg if your
Workflow is set up to process a response select REQUEST_RESPONSE) The Synchronization
Type selected also determines the tabs that are displayed in the Service Request NativeEnvironment pane (eg if REQUEST_RESPONSE is selected both Request and Response tabs
are displayed)
11 From the Metadata Connection list select an outbound PeopleSoft connection resource from the
list of defined connection resources This connection is used for acquiring metadata from the
PeopleSoft system
12 Type the desired maximum pool size in the Maximum Pool Size field This is a JCA setting that
specifies the maximum number of connections to be allowed in the connection pool (not applicable
for non-managed environments)
Creating a TCP Service Connection Resource
To Create a PeopleSoft TCP Service Connection Resource
1 Select File gt New gt xObject The New xObject dialog box is displayed
2 Select the Resource tab
3 Double-click on Connection The ldquoCreate a New Connection Resourcerdquo wizard is displayed
4 Type a name for the connection object in the Name field
5 Optionally type a description of the connection object in the Description field
6 Select Next A connection parameters panel is displayed
7 Select PeopleSoft Service TCP Connection from the Connection Type list
8 In the Host field specify the host name or URL of the system on which the PeopleSoft system is
installed
9 In the Port field type the name of the port on which the host is listening
10 Select RECEIVE_REPLY RECEIVE_ACK or RECEIVE from the Synchronization Type list
Select RECEIVE_REPLY if the PeopleSoft application expects a reply sent back to it
Select RECEIVE_ACK when a TCPIP acknowledgement (ACK) is sent back to the PeopleSoft
application
8172019 People Soft Users Guide
httpslidepdfcomreaderfullpeople-soft-users-guide 3980
Creating a PeopleSoft Component 39
Select RECEIVE if the PeopleSoft application does not expect a return
11 Select Is Length Prefix if the PeopleSoft application sends data that is not in XML format The
TCPIP event application must prefix the data with a 4-byte binary length field when writing the
data to the TCPIP port When this option is selected deselect the Is XML option
12 Select Is XML if the PeopleSoft application sends data in XML format When this option is
selected deselect the Is Length Prefix checkbox
13 Select Is Keep Alive to maintain continuous communication between the PeopleSoft application
and your application14 From the Metadata Connection list select an PeopleSoft Connection resource from the list of
defined connection resources This connection is used for acquiring metadata from the PeopleSoft
system
15 Type the desired maximum pool size in the Maximum Pool Size field This is a JCA setting that
specifies the maximum number of connections to be allowed in the connection pool (not applicable
for non-managed environments)
XML Templates for PeopleSoft ComponentsBefore creating a PeopleSoft Component you should create any XML templates that might be needed
This basically means telling Composer what XML samples to use (For more information see Creating
a New XML Template in the separate Composer Userrsquos Guide) Once yoursquove specified the XML
templates you can create a component using the templatersquos sample documents to represent the inputs
and outputs processed by your component
Creating PeopleSoft ComponentsAlso as part of the process of creating a PeopleSoft Component you can select a preexisting PeopleSoft
connection resource or you can create a new one If you create the connection beforehand (as outlined in
the previous chapter) then it is available to for use by any PeopleSoft Components in the current project
If you have not already created at least one PeopleSoft connection resource in the current project youwill be prompted to do so when you try to create a PeopleSoft Component
NOTE You can still create a Component without first creating a Connection Resource but you wonrsquot be
able to use any debug features that depend on a live connection
To create a new PeopleSoft Component
1 Select FilegtNewgtxObject In the dialog that appears select the Component tab and then the
PeopleSoft component type
NOTE Alternatively under Component in the Composer Navigator pane (explorer view) you can
highlight PeopleSoft click the right mouse button then select New
2 The ldquoCreate a New PeopleSoft Componentrdquo Wizard appears
8172019 People Soft Users Guide
httpslidepdfcomreaderfullpeople-soft-users-guide 4080
40 Novell exteNd Composer 521 Connect for PeopleSoft Userrsquos Guide
3 Enter a Name for the new PeopleSoft Component
4 Optionally type Description text
5 Click Next The XML InputOutput Property Info panel of the New PeopleSoft Component Wizard
appears
6 Specify the Input and Output templates as follows
Type in a name for the template under Part if you wish the name to appear in the DOM as
something other than ldquoInputrdquo
Select a Template Category if it is different than the default category
Select a Template Name from the list of XML templates in the selected Template Category
To add additional input XML templates click Add and choose a Template Category and
Template Name for each
To remove an input XML template select an entry and click Delete
7 Select an XML template for use as an Output DOM using the same steps outlined above
NOTE You can specify an input or output XML template that contains no structure by selecting
SystemANY as the Input or Output template For more information see Creating an Output
Document without Using a Template in the Composer Userrsquos Guide
8 Click Next The Temp and Fault XML Template panel appears
8172019 People Soft Users Guide
httpslidepdfcomreaderfullpeople-soft-users-guide 4180
Creating a PeopleSoft Component 41
9 If desired specify a template to be used as a scratchpad under the ldquoTemp Messagerdquo pane of the
dialog window This can be useful if you need a place to hold scratchpad values that will be used
temporarily during the execution of your component Select a Template Category if it is different
than the default category Then select a Template Name from the list of XML templates in the
selected Template Category
10 Under the ldquoFault Messagerdquo pane select an XML template to be used to pass back to clients when
an error condition occurs
11 As above to add additional input XML templates click Add and choose a Template Category and
Template Name for each Repeat as many times as desired To remove an input XML template
select an entry and click Delete
12 Click Next The Connection Info panel of the ldquoCreate a New PeopleSoft Componentrdquo Wizard
appears
13 Select a PeopleSoft Connection from the Connection list
14 Click Finish The component is created and the PeopleSoft Component Editor appears
About the PeopleSoft Component Editor Window
The PeopleSoft Component Editor includes all the functionality of the XML Map Component Editor It
contains mapping panes for Input and Output XML documents as well as an Action Model
8172019 People Soft Users Guide
httpslidepdfcomreaderfullpeople-soft-users-guide 4280
42 Novell exteNd Composer 521 Connect for PeopleSoft Userrsquos Guide
The PeopleSoft Component Editor also includes a Native Environment Pane which appears as a grey
pane until you create a PeopleSoft Request action at which time it will show a tabbed RequestResponse
pane with corresponding XML trees
(The Native Environment Pane shown here is blank because no PeopleSoft Request action has yet been
created)
Creating Actions in the Component Editor
You can create all the normal Composer actions in the Action Model of your PeopleSoft component (eg
XML Map Function Log Send Mail and so on) In addition you can create a PeopleSoft Request
action
The PeopleSoft Request action communicates requests (XML request documents) to your PeopleSoft
system and fetches responses back from the same system
The Composer GUI for creating a PeopleSoft Request action allows you to
specify the type of PeopleSoft function (or ldquoservicerdquo) you want to invoke
automatically generate XML schemas (request and response) for the particular ComponentInterface API you wish to use
use the generated schemas to fine-tune the exact structure of the actual request document you wantto use (a request document that conforms to the schema but reflects your own ldquosetuprdquo choices andinitialization parameters etc)
automatically generate the corresponding XML request and response documents that conform tothe schemas and choices yoursquove made
You will see how this works in the procedure given below
Input
mapping pane
Output
mapping pane
Action Model pane
Native Environment
pane
8172019 People Soft Users Guide
httpslidepdfcomreaderfullpeople-soft-users-guide 4380
Creating a PeopleSoft Component 43
To create a PeopleSoft Request action
1 Right-click in the Action Model at the location where you wish to create a new PeopleSoft Request
action then (in the context menu that appears) choose New Action gt Request
2 In the dialog that appears (see below) give focus to the Functions tab and expand the topmost node
(Component Interfaces) in the tree-view shown
You will see a list of functions corresponding to those for which Component Interface classes were
built (see ldquoDeploying the PeopleSoft Component Interface Filesrdquo on page 17 and ldquoHow to Create a
New Component Interfacerdquo on page 63)
All nodes have tooltips specifying the node type
8172019 People Soft Users Guide
httpslidepdfcomreaderfullpeople-soft-users-guide 4480
44 Novell exteNd Composer 521 Connect for PeopleSoft Userrsquos Guide
Folder and Searchable Folder nodes ldquotype ndash Folderrdquo
Function nodes ldquotype ndash EventOprdquo ldquotype ndash Operationrdquo ldquotype - Messagerdquo
3 Right-click on the function of interest Select Get Schemas from the context menu that appears (If
the command is not available it means no Component Interface API classes are available for this
Function type)
4 After a few seconds the Request and Response tabs of the dialog should become enabled When
this has occurred select the Request tab to bring it forward
5 Enter a request-message (document) mapping name or accept the default as shown
6 Select the elements that you want to occur in the Request document by checking or unchecking
checkboxes in the node tree Some nodes are greyed out (disabled) while others are not This is
because the documentrsquos schema determines which nodes you can edit
Composer will not let you specify an invalid request document because the things you should not
edit are greyed out (disabled) and the editable items for which customization is allowed have RMB
context-menus that non-customizable nodes do not have etc For example
Mandatory elements and attributes are marked selected and disabled
All child nodes are left unselected and disabled if the parent node is not selected
8172019 People Soft Users Guide
httpslidepdfcomreaderfullpeople-soft-users-guide 4580
Creating a PeopleSoft Component 45
A parent element once selected will autoselect mandatory elements and attributes underneath
it
When a parent node is selected you will need to select optional element manually
Tool tips are an important aid in using the Request and Response panes because they display
document-structure rules that come straight from the corresponding Component Interface
requestresponse document schema You should take time to familiarize yourself with the tooltip
feature by letting the mouse hover over various nodes An example is shown below
NOTE The tooltips that appear in this tree are also made available in the Native Environment
pane
7 If a node has ldquomaximum occurrencerdquo of more than one then a RMB menu command called ldquoCreate
newrdquo is available Choosing that command brings up the following dialog
Enter the number of additional instances of this node-type that you want to insert in the document
Then click OK New nodes are added to the document structure
CAUTION There is currently no Undo for this
If an Enumeration Button appears to the right of a given node you can click it to choose from the
list of appropriate (schema-allowed) values for that enumeration
8 A common situation is that an enumeration offers choices of Update Insert or Delete An example
of this is shown in the following illustration which shows the dialog that appears when you click
an Enumeration Button
8172019 People Soft Users Guide
httpslidepdfcomreaderfullpeople-soft-users-guide 4680
46 Novell exteNd Composer 521 Connect for PeopleSoft Userrsquos Guide
9 Visit all of the nodes in the request tree that are of interest to you and use the various Composer UIfeatures to customize the request documentrsquos structure
10 When you are satisfied with the structure click the Response tab at the top of the dialog to bring the
Response document pane forward This pane shows a tree view of the response document similar
to the one shown for the Request document
11 Check or uncheck Filter Response as desired It is checked by default If this box is unchecked the
tree will be disabled and greyed (no longer editable) meaning that a default schema configuration
will be used When the box is checked you can customize the structure of the request document by
specifying various types of node filtering
8172019 People Soft Users Guide
httpslidepdfcomreaderfullpeople-soft-users-guide 4780
Creating a PeopleSoft Component 47
12 Visit all of the nodes in the Response document tree and customize the settings as desired (See
previous steps applicable to the Request document for an explanation of the UI semantics)
13 Click OK (Otherwise use Cancel) The dialog goes away and a new action appears in the Action
Model of your component At the same time the Native Environment Pane changes to show the
Request and Response tabs along with corresponding tree views of the fully customized
document(s)
14 In the normal component editor view drag and drop data from the Input document pane to the
Request document of the Native Environment Pane as desired This will create mappings fromyour Input document to the Request doc that will be submitted to the PeopleSoft server The
mappings will appear (automatically) as new XML Map Actions in the Action Model
15 Repeat the drag-and-drop mapping process for the Response document dragging nodes from the
Native Environment Pane to the componentrsquos Output document tree view Again this will
automatically cause new Map Actions to appear in your Action Model (You can cutcopydelete
the actions once they appear in the Action Model pane)
16 Add or remove actions from the Action Model as needed to create the business logic you need
Returning to Schema-Edit Mode
Once you have created a PeopleSoft Request Action in your action model (using the above procedure)
you can go back and revisit the Request and Response schema trees (and change your customizations)simply by doubleclicking the Request Action in your action model Doubleclicking will cause the
PeopleSoft Request Action dialog to reappear You can use the Request and Response tabs to navigate the
request- and response-doc schemas and change your customizations as desired When you exit out of the
dialog your changes will be reflected in the Native Environment Pane
NOTE If you make hand-edits to the Request or Response documents in your Native Environment
Pane you will not be able to reopen the PeopleSoft Request Action dialog (See discussion further below)
Therefore try to avoid manually editing requestresponse documents Instead make modifications
through careful use of the XML Map Action or by using RequestcreateXPath( ) andor DOM methods in a
Function Action
Request and Response DocumentsAfter you have created the PeopleSoft Request Action using the foregoing procedure the Native
Environment Pane portion of the Composer editor view will show Request and Response documents in
tree-view form
As mentioned earlier you can drag and drop data from your componentrsquos Input document to the Request
document to create XML Map actions (First put focus on the target Request-document node by clicking
in it Then go to the Input document and click-drag any data you want to map over to the target node in
the Request document) You can use drag-and-drop mapping to map from Response to Output as well
In the illustration shown above some nodes are shown in red The red entries represent nodes to which
data have been mapped
8172019 People Soft Users Guide
httpslidepdfcomreaderfullpeople-soft-users-guide 4880
48 Novell exteNd Composer 521 Connect for PeopleSoft Userrsquos Guide
Manually Editing the Request and Response Docs
If you right-click anywhere inside the Request or Response tree views in the Native Environment Pane
you will get a context menu
The Edit Document command in this menu will open the document in a text-editor view as shown
below
In this window you can hand-edit the Request or Response document as desired
CAUTION If you make hand-edits to the document it may no longer conform to the original schema As
a result you will no longer be able to reopen it in the PeopleSoft Request Action dialog
Note that if yoursquove made hand-edits to a Request or Response document doubleclicking on the
corresponding PeopleSoft Request Action in the action model will cause the following dialog to appear
If this dialog appears you will need to recreate the action in order to see the original Request or Response
document (Any hand edits will be lost however)
8172019 People Soft Users Guide
httpslidepdfcomreaderfullpeople-soft-users-guide 4980
Creating a PeopleSoft Component 49
To prevent this situation from occurring avoid making manual edits to Request or Response documents
Instead use XML Map Actions (andor Function actions) to modify documents or node contents Be
aware that doing so may violate schema constraints This will not necessarily cause runtime problems for
your component when executing in the Composer Enterprise Server environment because Composer
does not validate the request document against the schema at runtime on the server However your
PeopleSoft system may validate incoming requests in which case a hand-edited Request document could
be the source of hard-to-troubleshoot errors
ldquoBefore Executerdquo and ldquoAfter Executerdquo Actions
You will notice that whenever a PeopleSoft Request action is created in your Action Model two
additional lines are added to the action list Before Execute Actions and After Execute Actions These are
header labels (grouping labels) for blocks of actions that you want to occur before the request is sent to
the PeopleSoft system or after a response document has come back respectively Typically you will want
to map data fields from Input to Request and have those actions be grouped under the ldquoBefore Execute
Actionsrdquo header Likewise any map actions or other action logic you need to perform on the Response
document after the PeopleSoft system executes you request should be grouped under the ldquoAfter Execute
Actionsrdquo heading
Creating PeopleSoft ServicesThis section describes how to use the exteNd Composer trade Connect for PeopleSoft to create a PeopleSoft
Service component to connect to PeopleSoft and listen for events As part of the process of creating a
PeopleSoft Service you can select an existing PeopleSoft connection resource or you can create a new
one If you create the connection beforehand it is available for use by any PeopleSoft Services in the
current project If you have not already created at least one PeopleSoft connection resource in the current
project you will be prompted to do so when you try to create a PeopleSoft Service
NOTE You can still create a PeopleSoft Service without first creating a connection resource but you
wonrsquot be able to use any debug features that depend on a live connection
To Create a New PeopleSoft Service
1 Select File gt New gt xObject The New xObject dialog box is displayedNOTE Alternatively under Service in the Composer Navigator pane (Explorer view) you can
highlight PeopleSoft Service click the right mouse button then select New
2 Select the ProcessService tab
3 Double-click on ldquoPeopleSoft Servicerdquo
If you have not previously defined a connection resource you are prompted to do so now (see
ldquoCreating Connection Resourcesrdquo on page 33)
8172019 People Soft Users Guide
httpslidepdfcomreaderfullpeople-soft-users-guide 5080
50 Novell exteNd Composer 521 Connect for PeopleSoft Userrsquos Guide
If you have already defined a connection resource the ldquoCreate a New PeopleSoft Servicerdquo Wizard
is displayed
4 Type a Name for the new PeopleSoft Service
5 Optionally type Description text
6 Select Next The XML InputOutput Message Property Info panel of the New PeopleSoft ServiceWizard is displayed
7 Specify the Input and Output templates as follows
Type a name for the template under Part if you wish the name to appear in the DOM as
something other than ldquoInputrdquo
Select a Template Category if it is different than the default category
Select a Template Name from the list of XML templates in the selected Template Category
To add additional input XML templates click Add then choose a Template Category and
Template Name for each To remove an input XML template select an entry and click Delete
8 Select an XML template for use as an Output DOM using the procedure described in the previous
step
NOTE You can specify an input or output XML template that contains no structure by selecting
SystemANY as the Input or Output template For more information see ldquoCreating an Output
Document without Using a Templaterdquo in the Novell exteNd Composer Userrsquos Guide
9 Select Next The Temp and Fault XML Template panel is displayed
8172019 People Soft Users Guide
httpslidepdfcomreaderfullpeople-soft-users-guide 5180
Creating a PeopleSoft Component 51
10 If desired specify a template to be used as a scratch pad under the ldquoTemp Messagerdquo pane of the
dialog box This can be useful if you need a place to hold values that will be used temporarily
during the execution of your component Select a Template Category if it is different than the
default category Then select a Template Name from the list of XML templates in the selected
Template Category
11 Under the ldquoFault Messagerdquo pane select an XML template to be used to pass back to clients when
an error condition occurs
12 To add additional input XML templates click Add and choose a Template Category and
Template Name for each Repeat as many times as desired To remove an input XML template
select an entry and click Delete
13 Select Next The Connection Info panel of the Create a New PeopleSoft Service wizard is
displayed
14 Select a PeopleSoft File HTTP or TCP Service connection from the Connection list The
Connection list displays the names of the PeopleSoft connection resources that have been definedin this project
15 Select Finish The component is created and the PeopleSoft Service Editor is displayed The
features of this window are identical to the features described in ldquoAbout the PeopleSoft Component
Editor Windowrdquo on page 41 The following sections describe the steps required to create a
PeopleSoft Service Action
8172019 People Soft Users Guide
httpslidepdfcomreaderfullpeople-soft-users-guide 5280
52 Novell exteNd Composer 521 Connect for PeopleSoft Userrsquos Guide
Creating PeopleSoft Service Actions
You can create all the normal Composer actions in the Action Model of your PeopleSoft Service (eg
XML Map Function Log Send Mail) In addition you can create a PeopleSoft Service Request action
The PeopleSoft Service Request action is similar to a Switch action (see ldquoThe Switch Actionrdquo in the in
the Novell exteNd Composer Userrsquos Guide) A Switch action allows program control to branch to a block
of actions based on a match between an input value and a Case value In a PeopleSoft Service Request
Composer receives a DOM and compares a series of cases against the DOM If an exact match occurs
between the DOM and a case execution branches to the actions listed underneath the case in the Actionmodel Cases are tested in the order listed and once a match is found execution of the match logic
precludes execution of any other logic in the PeopleSoft Service Request
To Create a PeopleSoft Service Request Action
1 In the Action Model right-click on PeopleSoft Service Request
2 Select Edit Action The Service Request dialog box is displayed
3 In the Function tree click on the plus (+) sign to the left of the Messages node to expand the tree
view for that node
8172019 People Soft Users Guide
httpslidepdfcomreaderfullpeople-soft-users-guide 5380
Creating a PeopleSoft Component 53
4 Right-click on the message name that you want to use for input and select Add Case or double-
click on the message name
The Adapter Service Request dialog box is displayed This dialog box is similar to the PeopleSoftRequest dialog box (see ldquoCreating Actions in the Component Editorrdquo on page 42)
5 Select or deselect Filter Request as desired Filter Request is selected by default If deselected the
tree will be disabled and greyed (no longer editable) indicating that a default schema configuration
will be used If selected you can customize the structure of the request document by selecting the
nodes to be included in the request document
6 Expand the nodes of the Service Request Tree by clicking on the plus signs to the left of the nodes
7 Select the elements that you want to include in the Service Request document by selecting or
deselecting the check boxes in the node tree Some nodes are greyed out (disabled) This is because
the document schema determines the nodes that you can edit
8172019 People Soft Users Guide
httpslidepdfcomreaderfullpeople-soft-users-guide 5480
54 Novell exteNd Composer 521 Connect for PeopleSoft Userrsquos Guide
8 If the Service Response tab is enabled (this depends on the Synchronization Type setting in the
Connection resource) click the Service Response tab at the top of the dialog box to bring the
Service Response document pane forward This pane shows a tree view of the Response document
similar to the one shown for the Request document The same user interface features that applied to
the Request document pane apply to the Response document pane
9 Visit all of the nodes in the Response document tree and customize the settings as desired
10 Click the Case Expression tab at the top of the dialog box to bring the Case Expression pane
forward This pane provides an Expression Builder that you use to build a case expression
11 Type the static string values or the ECMAScript expressions that will be checked against the input
DOM
12 Select the OK button The Service Request dialog box is displayed
13 To add another case repeat Step 3 through Step 12 The cases are listed from top to bottom in the
order in which they are evaluated Each Case value will be checked in turn in the order you list
them
For optimal performance list the most likely matches first
You can change the order in which the cases are listed by clicking on the name of a case then
clicking the up or down triangle icons
8172019 People Soft Users Guide
httpslidepdfcomreaderfullpeople-soft-users-guide 5580
Creating a PeopleSoft Component 55
To edit a case select the name of the case then press the Mapping button You can also select
the name of the case then select the Expression Builder button
14 When you have finished adding cases select OK The Service Request dialog box closes and a new
action appears in the Action Model of your component The Native Environment Pane changes to
show the Request and Response (if the Synchronization Type is set to REQUEST_RESPONSE in
the Connection resource) tabs along with tree views of the request and response documents
15 In the Action Model add actions to be performed to each case to create the desired business logic
To map a node of the Input document to a node in the Request document drag a node from the
Input pane and drop it on a node in the Request tab of the Native Environment pane This
automatically creates a new XML Map Action in the Action Model
To map a node of the Response document to a node in the Output document drag a node from
the Response tab of the Native Environment pane and drop it on a node in the Output pane This
automatically creates a new XML Map Action in the Action Model You can cut copy or deletethe actions once they appear in the Action Model pane
When all of the Actions for a case have been evaluated Composer sets the Service Response
DOM
The final case in the Action model is always labeled Default This case is generated
automatically and cannot be removed Actions placed under Default are executed if and only if
the none of the other cases are matched While you are not required to place actions under
Default it is good programming practice to have at least some kind of fallback logic for the
Default case even if itrsquos only a Log action or a Raise Error action
The Request and Response document displays for Service Requests work similarly to the
displays for Requests (see ldquoRequest and Response Documentsrdquo on page 47)
Managing Deployed PeopleSoft Services
Once a project containing PeopleSoft Services has been deployed (see ldquoDeploying Your Projectrdquo in the
Novell exteNd Composer Userrsquos Guide) the Listener objects actively listen for messages each time you
start your server To manually start and stop these services you need to use the exteNd PeopleSoft
Services Console This browser-based console allows you to see the list of PeopleSoft Services the status
of each service (running or not running) the running tally (Count) of messages received other
administrative information and a StartStop button
8172019 People Soft Users Guide
httpslidepdfcomreaderfullpeople-soft-users-guide 5680
56 Novell exteNd Composer 521 Connect for PeopleSoft Userrsquos Guide
To display the exteNd PeopleSoft Services Console
1 Make sure that your application server is running
2 From the Windows Start menu select Programs gt Novell Extend 52 gt Composer gt Composer
Server Console A dialog box for entering the application server administrator ID and password is
displayed
3 Type your administrator ID and password then select OK The Composer Server Console page is
displayed
4 Scroll down the About Products list on the left side of the page until you see the link titledldquopsftservicerdquo
5 Select the ldquopsftservicerdquo link A page is displayed that provides information (eg version license
number copyright) about the Connect It also displays a Console button
6 Select the Console button The PeopleSoft Service console page is displayed This page lists anyPeopleSoft Services that have been deployed
7 To stop a PeopleSoft Service select the appropriate Stop button (the button will then change to
Start)
8172019 People Soft Users Guide
httpslidepdfcomreaderfullpeople-soft-users-guide 5780
Creating a PeopleSoft Component 57
NOTE If messages are being handled by a service at the time of the Stop command there may
be some delay before the service actually exits Select the Refresh button periodically until the
ldquoRunningrdquo column of the console says No for the service
To undeploy a PeopleSoft Service
1 Make sure that your application server is running
2 From the Windows Start menu select Programs gt Novell Extend 52 gt AppServer gt Server
Management Console
3 Login as an administrator (File gt Login)
4 Select the Deployment icon ( )from the toolbar
5 Select Deployed Objects
6 Expand the database containing the deployed objects that you want to manage
7 Select the object that you want to undeploy
8 Select the Undeploy button
ECMAScript ExtensionsSee Appendix A to this guide for a list of ECMAScript extension methods that can be used with the
PeopleSoft Connect
8172019 People Soft Users Guide
httpslidepdfcomreaderfullpeople-soft-users-guide 5880
58 Novell exteNd Composer 521 Connect for PeopleSoft Userrsquos Guide
8172019 People Soft Users Guide
httpslidepdfcomreaderfullpeople-soft-users-guide 5980
ECMAScript Methods 59
A ECMAScript Methods
The J2EE Connector framework of the exteNd Composer Connect for PeopleSoft implements a number
of ECMAScript extension methods that are available for use through the Expression Builder (which is
available in Function Actions and elsewhere) You will find the methods listed in the FunctionsMethods
pane of the Expression Builder
Hover-help is available for each method
For more information on working with the Expression Builder see the Scripting chapter of the Composer
Userrsquos Guide
Adapter Interface Methods
getAdapterType()
This method calls returns the adapter type name (eg ldquopsftrdquo) as a String
Syntax
getAdapterType()
8172019 People Soft Users Guide
httpslidepdfcomreaderfullpeople-soft-users-guide 6080
60 Novell exteNd Composer 521 Connect for PeopleSoft Userrsquos Guide
Connection Interface MethodsThe following CCI API metadata-wrapped methods are published through the Expression Builder
getAdapterMetaData()
This method wraps calls on the javaxresourcecciResourceAdapterMetaData class
SyntaxgetAdapterMetaData(String parameter )
getConnectionMetaData()
This method wraps calls on the javaxresourcecciConnectionMetaData class
Syntax
getConnectionMetaData(String parameter )
Parameter Description
NAME Returns the name of the adapter (eg ldquoiWay JCA adapterrdquo)
EXECUTEWITHI Returns true if the implementation class for the Interaction interface
implements public Record execute method otherwise the method returns
false
EXECUTEWITHIO Returns true if the implementation class for the Interaction interface
implements public boolean execute method otherwise the method returns
false
VENDOR Returns the name of the vendor that has provided the resource adapter(eg ldquoiWay Software Incrdquo
VERSION Returns the version of the resource adapter (eg ldquo55rdquo)
INTERACTIONSPECS Returns the fully-qualified name of the InteractionSpec type supported by
this resource adapter (eg ldquocomibiafjcaIWAFInteractionSpecrdquo)
SPECVERSION Returns a string representation of the version of the connector architecture
specification that is supported by the resource adapter (eg ldquo10rdquo)
LOCALTX Returns true if the resource adapter implements the LocalTransaction
interface and supports local transaction demarcation on the underlying EIS
(Enterprise Information System) instance through the LocalTransaction
interface
Parameter Description
EISPRODUCTNAME Returns the product name of the underlying EIS instance (eg
ldquoPeopleSoftrdquo)
EISPRODUCTVERSION Returns product version of the underlying EIS instance (eg ldquoSupportsPeopleSoft 8rdquo)
USER Returns the user name for an active connection as known to the
underlying EIS instance
8172019 People Soft Users Guide
httpslidepdfcomreaderfullpeople-soft-users-guide 6180
ECMAScript Methods 61
Additional MethodsThe following ECMA-wrapped methods are not displayed by the Expression Builder user interface but
you can use them in the Expression Builder by typing them directly into expressions
getWarnings()
Returns line separated list of javaxresourcecciResourceWarning for the javaxresourcecciInteraction
clearWarnings()
Calls javaxresourcecciInteractionclearWarnings()
getLastError()
Returns last error such as a javaxresourceResourceException
8172019 People Soft Users Guide
httpslidepdfcomreaderfullpeople-soft-users-guide 6280
62 Novell exteNd Composer 521 Connect for PeopleSoft Userrsquos Guide
8172019 People Soft Users Guide
httpslidepdfcomreaderfullpeople-soft-users-guide 6380
Using Component Interfaces 63
B Using Component Interfaces
This appendix describes how to create new component interfacesmdashand how to modify existing
component interfacesmdashfor use with PeopleSoft 8 and Novell exteNd Composer
After generating and securing a component interface as described in this Appendix you must generate its
API as described in ldquoBuilding PeopleSoft Component Interface API Classesrdquo on page 26 in this guide
NOTE This appendix is not a substitute for PeopleSoft documentation For complete and up-to-date
information about PeopleSoft integration APIs see the PeopleSoft Online Library for your PeopleSoft
system
How to Create a New Component Interface
To create a component interface
1 Launch the PeopleSoft Application Designer
2 Choose New from the File menu
The New dialog box opens
3 Select Component Interface and click OK The Select Source Component for Component Interface
dialog opens
8172019 People Soft Users Guide
httpslidepdfcomreaderfullpeople-soft-users-guide 6480
64 Novell exteNd Composer 521 Connect for PeopleSoft Userrsquos Guide
4 Select the component to use as a basis for a Component Interface
5 Click the Select buttonThe Application Designer dialog opens
6 To create the component interface without displaying individual properties for one-by-one
selection click No Otherwise to expose component properties manually click No and drag the
relevant fields from the left pane to the right pane
NOTE If the component interface is large it is recommended that you expose the component
properties manually as just described
See your PeopleBooks documentation for additional options and their meanings
8172019 People Soft Users Guide
httpslidepdfcomreaderfullpeople-soft-users-guide 6580
Using Component Interfaces 65
7 Designate the methods you wish to use in this Component Interface as described in the next
procedure
Methods
The standard methods created for a component interface are
Create
Find
Get
Save
Only those methods actually implemented in the underlying component are available For example if the
underlying component does not contain Add capabilities Create is not available
To designate Methods to use in the Component Interface
1 Open the Component Interface Properties dialog box (continuing from the procedure described
previously)
8172019 People Soft Users Guide
httpslidepdfcomreaderfullpeople-soft-users-guide 6680
66 Novell exteNd Composer 521 Connect for PeopleSoft Userrsquos Guide
2 Select the desired methods
Properties
You may add properties from the records in the component view You can also delete a property in the
component interface that you do not want to expose You can rename properties by clicking the property
and then clicking again until you can type a new name If you rename a property it can be referenced in
the component interface only by the new name not by the underlying component nameProperties may have various icons adjacent to them For example EMPLID has an icon indicating that it
is a key field from the underlying record NAME has an icon indicating that it is an alternate key field
from the underlying record For a complete list of property icons see the PeopleBooks documentation
You can right-click both panes to select various functions to perform depending on which pane is active
For a complete list of functions see the PeopleBooks documentation
Securing a Component InterfaceYou must set up security for the component interface before you can begin testing
Configuring Component Interface Security for PeopleSoft Version 81x
The following procedure describes how to configure component interface security for PeopleSoft
Version 81 in 2- and 3-tier mode
To configure component interface security
1 From the Use menu select Permission Lists Component Interface and then click UpdateDisplayBefore Security can be set the Permission List(s) must be identified
8172019 People Soft Users Guide
httpslidepdfcomreaderfullpeople-soft-users-guide 6780
Using Component Interfaces 67
2 Select the relevant Permission list
NOTE For more information on Permission Lists see the PeopleBooks documentation
The following pane opens
3 Insert the new component interface that you created
4 Click Edit
NOTE When you select the component interface all available methods appear including user-
defined methods This enables you to specify whether this particular Permission List must have Full
or Partial Access
5 Select the desired level of access
6 Click OK
In the following example the ALLPORTL Permission List has Full Access to all methods
8172019 People Soft Users Guide
httpslidepdfcomreaderfullpeople-soft-users-guide 6880
68 Novell exteNd Composer 521 Connect for PeopleSoft Userrsquos Guide
Configuring Component Interface Security for PeopleSoft Version 84+
The following sample procedure describes how to configure component interface security for PeopleSoft
Version 84 or higher
To configure interface security
1 Expand PeopleTools Security User Profiles and Permissions amp Roles and then click Permission
Lists
2 Click Search
The Permissions List search window opens
8172019 People Soft Users Guide
httpslidepdfcomreaderfullpeople-soft-users-guide 6980
Using Component Interfaces 69
3 Select the relevant Permission ListThe Permissions List window opens
4 Click the right arrow next to the Sign-on Times tab
The Component Interfaces tab becomes available
8172019 People Soft Users Guide
httpslidepdfcomreaderfullpeople-soft-users-guide 7080
70 Novell exteNd Composer 521 Connect for PeopleSoft Userrsquos Guide
5 Click the Component Interfaces tab
6 Click the + button to add a new row to the Component Interfaces list
7 Type the component interface name and click Edit
This example uses component interface AR_ITEM_AGENT
8172019 People Soft Users Guide
httpslidepdfcomreaderfullpeople-soft-users-guide 7180
Using Component Interfaces 71
8 Select the desired access from the drop-down lists
9 Click OK
10 Scroll down to the bottom of the Component Interface Permissions window and click Save
Testing a Component InterfaceThe iWay Adapter for PeopleSoft 8 uses PeopleSoft metadata and component interfaces therefore it can
accommodate new or modified component interfaces The adapter makes no assumptions about
component interfaces except that they are logical and valid Therefore each component interface must be
tested before being used as a source for the adapter
8172019 People Soft Users Guide
httpslidepdfcomreaderfullpeople-soft-users-guide 7280
72 Novell exteNd Composer 521 Connect for PeopleSoft Userrsquos Guide
If changes are made to the underlying application by the user or by means of a PeopleSoft upgrade and
these changes invalidate a component interface the user must repair the invalid component interface
before the adapter uses it
To test a component interface
1 In Application Designer select Test Component Interface from the Tools menu
The Component Interface Tester dialog box opens
2 Click the Component Interface Tester dialog box to bring it to the foreground if required
3 To test the component interface using the Find method click Find
The Component Interface Tester - Find Results window opens displaying all of the possible entries
for the underlying component If there are more than 300 entries a message appears
4 Select a field in the left pane of the Find Results window
5 To display the relevant data for that particular key click Get Selected
8172019 People Soft Users Guide
httpslidepdfcomreaderfullpeople-soft-users-guide 7380
Using Component Interfaces 73
If the security settings permit you can change the values in the individual fields
6 To test the component interface using the Get method enter the existing key(s)
7 Click Get Existing
This returns the exposed properties for the key that you entered
You can change values if Update access has been specified
8172019 People Soft Users Guide
httpslidepdfcomreaderfullpeople-soft-users-guide 7480
74 Novell exteNd Composer 521 Connect for PeopleSoft Userrsquos Guide
8 To test the component interface using the Create method enter all required key values
9 Click Create New
When you enter valid values in lsquoCreatersquo keys the JOBCODE Data Display window opens after the
Table name is expanded with default data in place
You can change fields at this point Changes are validated against the componentrsquos underlying business logic
10 After you finish making changes right-click the top item in the pane
11 Click Save to save your changes
The keys used to create the record can be used with the Get method for viewing data
The data that were added can be viewed in the PeopleSoft Component as shown in the following
example
8172019 People Soft Users Guide
httpslidepdfcomreaderfullpeople-soft-users-guide 7580
Using Component Interfaces 75
Notice the Effective Date as one of the default values
You have finished testing the component interface Before using the component interface you must
generate its API as described at ldquoBuilding PeopleSoft Component Interface API Classesrdquo on page 26
8172019 People Soft Users Guide
httpslidepdfcomreaderfullpeople-soft-users-guide 7680
76 Novell exteNd Composer 521 Connect for PeopleSoft Userrsquos Guide
8172019 People Soft Users Guide
httpslidepdfcomreaderfullpeople-soft-users-guide 7780
77
Index
Aactions
After Execute 49Before Execute 49creating 42PeopleSoft Request creating 43PeopleSoft Service Request creating 52XML Map 55
Adapter Service Request 53Add Case 53After Execute actions 49AgJarsconf 16API bindings 26application servers
Novell 16supported 11
BBEA WebLogic 11Before Execute actions 49
CCase Expression 54CCI 13classpath
application server 16design-time 16
clearWarnings 61Common Client Interface 13Component Interface Properties 65component interface PeopleSoft
creating 63methods 65
properties 66securing 66
testing 71component PeopleSoft
creating 39Editor window 41generating interface classes 26
Composer about 11connection parameter
Connection Type 36 38constant 33Error Directory 37
expression-driven 33File Mask 37Host 38Is Keep Alive 39Is Length Prefix 39Is XML 39Listener Port 38Maximum Pool Size 37 38 39Metadata Connection 37 38 39Poll Interval 37Polling Location 36
Port 38Processing Mode 37ResponseAck Directory 37switching from constant to expression-driven 34Synchronization Type 37 38Thread Limit 37
connection resource
File service 36HTTP Service 37PeopleSoft connection 34TCP Ser vice 38types of 33
connection resour ce PeopleSoft creating 34Connection Type 36 38
Connectsdescription 11
Native Environment pane 42PeopleSoft about 12
DDefault case 55Deployed Objects 57DOM output selecting XML template for 50
EECMAScript
Composer 11methods 57 59
Edit Document 48Edit License 29EISPRODUCTNAME 60EISPRODUCTVERSION 60Error Directory 37EXECUTEWITHI 60EXECUTEWITHIO 60
8172019 People Soft Users Guide
httpslidepdfcomreaderfullpeople-soft-users-guide 7880
78
expression-driven 34
FFault Message 51File Mask 37Filter Request 53Filter Response 46
GGet Existing 73Get Schemas 44getAdapterMetaData 60getAdapterType 59getConnectionMetaData 60getLastError 61getWarnings 61
HHost 38HTTPS 38
IIBM WebSphere 11Initial Pool Size 35INTERACTIO NSPECS 60Is Keep Alive 39Is Length Prefix 39Is XML 39iWay 14iwpeoplesoftjar 16
iwpsci81jar 16 17iwpsci84jar 16 17
JJ2EE Connector Architecture 13
jar files
iwpeoplesoftjar 16iwpsci81jar 16iwpsci84jar 16
psGenCompjar 16 28 psjoajar 16
jarexe 26
javacexe 26JBoss 11
KKeep Alive 39
Llicense update
design-time 29Edit License 29obtaining 29runtime 30
Licenses tab 29Listener 55
Listener Por t 38LOCALTX 60
MMapping 55maximum occurrence 45Maximum Pool Size 35 37 38 39Metadata Connection 37 38 39methods
adapter interface 59connector interface 60
N Native Environment pane 42
OOutput DOM
selecting XML template for 40
PPeopleSoft component
creating 39Editor window 41PeopleSoft component interface
classes generating 26creating 63methods 65
properties 66securing 66testing 71
PeopleSoft File Service Connection 36PeopleSoft HTTP Service Connection 38PeopleSoft Java Object Adapter 15PeopleSoft Service
Console displaying 56
creating 49deploying 55managing 55starting and stopping 55undeploying 57
PeopleSoft Service Request action 52PeopleSoft Service TCP Connection 38
permission lists
access level specifying 67identifying 66
8172019 People Soft Users Guide
httpslidepdfcomreaderfullpeople-soft-users-guide 7980
79
selecting 69Poll Interval 37Polling Location 36Port 38Processing Mode 37
psGenCompjar 16 28 psjoajar
design time configuration adding to 16 Novell application server adding to 16requirement 9
pstoolsproperties 16
RRAR
deployment 12description 13
RECEIVE 39RECEIVE_ACK 38RECEIVE_REPLY 38Request action
creating 43
description 42modifying manually 48
Request Tree 53RequestcreateXPath( ) 47resource adaptor archives deployment 12ResponseAck Directory 37
Sschemas get 44security component interface
PeopleSoft 81x 66PeopleSoft 84+ 68
Sequential 37Service Request dialog box 52Service Request Tree 53Service Response 54service PeopleSoft
creating 49managing 55
Sign-on Times ta b 69SPECVERSION 60Synchronization Type 37 38 54 55
T
TCPIs Length Pr efix 39Keep Alive 39length field 4-bit binary 39Service Connection resource creating 38
Temp Message 51Template Category 50 51Template Name 50 51testing component interface PeopleSoft 71Thread Limit 37Threaded 37
UUndeploy 57
Vvariables project 34
Xxconfigxml 16XML templates 39xObject
descr iption 33
New 36 37 38 49XPath 11XSLT 11
8172019 People Soft Users Guide
httpslidepdfcomreaderfullpeople-soft-users-guide 8080
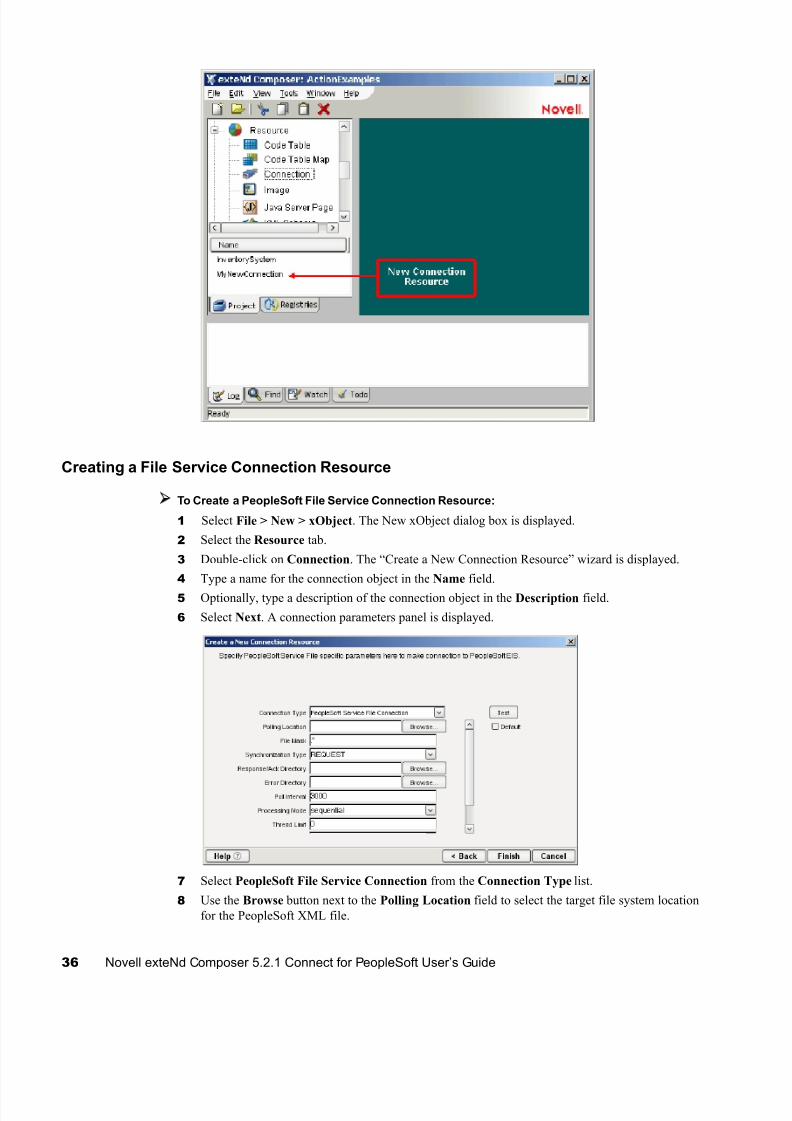
8172019 People Soft Users Guide
httpslidepdfcomreaderfullpeople-soft-users-guide 4480
44 Novell exteNd Composer 521 Connect for PeopleSoft Userrsquos Guide
Folder and Searchable Folder nodes ldquotype ndash Folderrdquo
Function nodes ldquotype ndash EventOprdquo ldquotype ndash Operationrdquo ldquotype - Messagerdquo
3 Right-click on the function of interest Select Get Schemas from the context menu that appears (If
the command is not available it means no Component Interface API classes are available for this
Function type)
4 After a few seconds the Request and Response tabs of the dialog should become enabled When
this has occurred select the Request tab to bring it forward
5 Enter a request-message (document) mapping name or accept the default as shown
6 Select the elements that you want to occur in the Request document by checking or unchecking
checkboxes in the node tree Some nodes are greyed out (disabled) while others are not This is
because the documentrsquos schema determines which nodes you can edit
Composer will not let you specify an invalid request document because the things you should not
edit are greyed out (disabled) and the editable items for which customization is allowed have RMB
context-menus that non-customizable nodes do not have etc For example
Mandatory elements and attributes are marked selected and disabled
All child nodes are left unselected and disabled if the parent node is not selected
8172019 People Soft Users Guide
httpslidepdfcomreaderfullpeople-soft-users-guide 4580
Creating a PeopleSoft Component 45
A parent element once selected will autoselect mandatory elements and attributes underneath
it
When a parent node is selected you will need to select optional element manually
Tool tips are an important aid in using the Request and Response panes because they display
document-structure rules that come straight from the corresponding Component Interface
requestresponse document schema You should take time to familiarize yourself with the tooltip
feature by letting the mouse hover over various nodes An example is shown below
NOTE The tooltips that appear in this tree are also made available in the Native Environment
pane
7 If a node has ldquomaximum occurrencerdquo of more than one then a RMB menu command called ldquoCreate
newrdquo is available Choosing that command brings up the following dialog
Enter the number of additional instances of this node-type that you want to insert in the document
Then click OK New nodes are added to the document structure
CAUTION There is currently no Undo for this
If an Enumeration Button appears to the right of a given node you can click it to choose from the
list of appropriate (schema-allowed) values for that enumeration
8 A common situation is that an enumeration offers choices of Update Insert or Delete An example
of this is shown in the following illustration which shows the dialog that appears when you click
an Enumeration Button
8172019 People Soft Users Guide
httpslidepdfcomreaderfullpeople-soft-users-guide 4680
46 Novell exteNd Composer 521 Connect for PeopleSoft Userrsquos Guide
9 Visit all of the nodes in the request tree that are of interest to you and use the various Composer UIfeatures to customize the request documentrsquos structure
10 When you are satisfied with the structure click the Response tab at the top of the dialog to bring the
Response document pane forward This pane shows a tree view of the response document similar
to the one shown for the Request document
11 Check or uncheck Filter Response as desired It is checked by default If this box is unchecked the
tree will be disabled and greyed (no longer editable) meaning that a default schema configuration
will be used When the box is checked you can customize the structure of the request document by
specifying various types of node filtering
8172019 People Soft Users Guide
httpslidepdfcomreaderfullpeople-soft-users-guide 4780
Creating a PeopleSoft Component 47
12 Visit all of the nodes in the Response document tree and customize the settings as desired (See
previous steps applicable to the Request document for an explanation of the UI semantics)
13 Click OK (Otherwise use Cancel) The dialog goes away and a new action appears in the Action
Model of your component At the same time the Native Environment Pane changes to show the
Request and Response tabs along with corresponding tree views of the fully customized
document(s)
14 In the normal component editor view drag and drop data from the Input document pane to the
Request document of the Native Environment Pane as desired This will create mappings fromyour Input document to the Request doc that will be submitted to the PeopleSoft server The
mappings will appear (automatically) as new XML Map Actions in the Action Model
15 Repeat the drag-and-drop mapping process for the Response document dragging nodes from the
Native Environment Pane to the componentrsquos Output document tree view Again this will
automatically cause new Map Actions to appear in your Action Model (You can cutcopydelete
the actions once they appear in the Action Model pane)
16 Add or remove actions from the Action Model as needed to create the business logic you need
Returning to Schema-Edit Mode
Once you have created a PeopleSoft Request Action in your action model (using the above procedure)
you can go back and revisit the Request and Response schema trees (and change your customizations)simply by doubleclicking the Request Action in your action model Doubleclicking will cause the
PeopleSoft Request Action dialog to reappear You can use the Request and Response tabs to navigate the
request- and response-doc schemas and change your customizations as desired When you exit out of the
dialog your changes will be reflected in the Native Environment Pane
NOTE If you make hand-edits to the Request or Response documents in your Native Environment
Pane you will not be able to reopen the PeopleSoft Request Action dialog (See discussion further below)
Therefore try to avoid manually editing requestresponse documents Instead make modifications
through careful use of the XML Map Action or by using RequestcreateXPath( ) andor DOM methods in a
Function Action
Request and Response DocumentsAfter you have created the PeopleSoft Request Action using the foregoing procedure the Native
Environment Pane portion of the Composer editor view will show Request and Response documents in
tree-view form
As mentioned earlier you can drag and drop data from your componentrsquos Input document to the Request
document to create XML Map actions (First put focus on the target Request-document node by clicking
in it Then go to the Input document and click-drag any data you want to map over to the target node in
the Request document) You can use drag-and-drop mapping to map from Response to Output as well
In the illustration shown above some nodes are shown in red The red entries represent nodes to which
data have been mapped
8172019 People Soft Users Guide
httpslidepdfcomreaderfullpeople-soft-users-guide 4880
48 Novell exteNd Composer 521 Connect for PeopleSoft Userrsquos Guide
Manually Editing the Request and Response Docs
If you right-click anywhere inside the Request or Response tree views in the Native Environment Pane
you will get a context menu
The Edit Document command in this menu will open the document in a text-editor view as shown
below
In this window you can hand-edit the Request or Response document as desired
CAUTION If you make hand-edits to the document it may no longer conform to the original schema As
a result you will no longer be able to reopen it in the PeopleSoft Request Action dialog
Note that if yoursquove made hand-edits to a Request or Response document doubleclicking on the
corresponding PeopleSoft Request Action in the action model will cause the following dialog to appear
If this dialog appears you will need to recreate the action in order to see the original Request or Response
document (Any hand edits will be lost however)
8172019 People Soft Users Guide
httpslidepdfcomreaderfullpeople-soft-users-guide 4980
Creating a PeopleSoft Component 49
To prevent this situation from occurring avoid making manual edits to Request or Response documents
Instead use XML Map Actions (andor Function actions) to modify documents or node contents Be
aware that doing so may violate schema constraints This will not necessarily cause runtime problems for
your component when executing in the Composer Enterprise Server environment because Composer
does not validate the request document against the schema at runtime on the server However your
PeopleSoft system may validate incoming requests in which case a hand-edited Request document could
be the source of hard-to-troubleshoot errors
ldquoBefore Executerdquo and ldquoAfter Executerdquo Actions
You will notice that whenever a PeopleSoft Request action is created in your Action Model two
additional lines are added to the action list Before Execute Actions and After Execute Actions These are
header labels (grouping labels) for blocks of actions that you want to occur before the request is sent to
the PeopleSoft system or after a response document has come back respectively Typically you will want
to map data fields from Input to Request and have those actions be grouped under the ldquoBefore Execute
Actionsrdquo header Likewise any map actions or other action logic you need to perform on the Response
document after the PeopleSoft system executes you request should be grouped under the ldquoAfter Execute
Actionsrdquo heading
Creating PeopleSoft ServicesThis section describes how to use the exteNd Composer trade Connect for PeopleSoft to create a PeopleSoft
Service component to connect to PeopleSoft and listen for events As part of the process of creating a
PeopleSoft Service you can select an existing PeopleSoft connection resource or you can create a new
one If you create the connection beforehand it is available for use by any PeopleSoft Services in the
current project If you have not already created at least one PeopleSoft connection resource in the current
project you will be prompted to do so when you try to create a PeopleSoft Service
NOTE You can still create a PeopleSoft Service without first creating a connection resource but you
wonrsquot be able to use any debug features that depend on a live connection
To Create a New PeopleSoft Service
1 Select File gt New gt xObject The New xObject dialog box is displayedNOTE Alternatively under Service in the Composer Navigator pane (Explorer view) you can
highlight PeopleSoft Service click the right mouse button then select New
2 Select the ProcessService tab
3 Double-click on ldquoPeopleSoft Servicerdquo
If you have not previously defined a connection resource you are prompted to do so now (see
ldquoCreating Connection Resourcesrdquo on page 33)
8172019 People Soft Users Guide
httpslidepdfcomreaderfullpeople-soft-users-guide 5080
50 Novell exteNd Composer 521 Connect for PeopleSoft Userrsquos Guide
If you have already defined a connection resource the ldquoCreate a New PeopleSoft Servicerdquo Wizard
is displayed
4 Type a Name for the new PeopleSoft Service
5 Optionally type Description text
6 Select Next The XML InputOutput Message Property Info panel of the New PeopleSoft ServiceWizard is displayed
7 Specify the Input and Output templates as follows
Type a name for the template under Part if you wish the name to appear in the DOM as
something other than ldquoInputrdquo
Select a Template Category if it is different than the default category
Select a Template Name from the list of XML templates in the selected Template Category
To add additional input XML templates click Add then choose a Template Category and
Template Name for each To remove an input XML template select an entry and click Delete
8 Select an XML template for use as an Output DOM using the procedure described in the previous
step
NOTE You can specify an input or output XML template that contains no structure by selecting
SystemANY as the Input or Output template For more information see ldquoCreating an Output
Document without Using a Templaterdquo in the Novell exteNd Composer Userrsquos Guide
9 Select Next The Temp and Fault XML Template panel is displayed
8172019 People Soft Users Guide
httpslidepdfcomreaderfullpeople-soft-users-guide 5180
Creating a PeopleSoft Component 51
10 If desired specify a template to be used as a scratch pad under the ldquoTemp Messagerdquo pane of the
dialog box This can be useful if you need a place to hold values that will be used temporarily
during the execution of your component Select a Template Category if it is different than the
default category Then select a Template Name from the list of XML templates in the selected
Template Category
11 Under the ldquoFault Messagerdquo pane select an XML template to be used to pass back to clients when
an error condition occurs
12 To add additional input XML templates click Add and choose a Template Category and
Template Name for each Repeat as many times as desired To remove an input XML template
select an entry and click Delete
13 Select Next The Connection Info panel of the Create a New PeopleSoft Service wizard is
displayed
14 Select a PeopleSoft File HTTP or TCP Service connection from the Connection list The
Connection list displays the names of the PeopleSoft connection resources that have been definedin this project
15 Select Finish The component is created and the PeopleSoft Service Editor is displayed The
features of this window are identical to the features described in ldquoAbout the PeopleSoft Component
Editor Windowrdquo on page 41 The following sections describe the steps required to create a
PeopleSoft Service Action
8172019 People Soft Users Guide
httpslidepdfcomreaderfullpeople-soft-users-guide 5280
52 Novell exteNd Composer 521 Connect for PeopleSoft Userrsquos Guide
Creating PeopleSoft Service Actions
You can create all the normal Composer actions in the Action Model of your PeopleSoft Service (eg
XML Map Function Log Send Mail) In addition you can create a PeopleSoft Service Request action
The PeopleSoft Service Request action is similar to a Switch action (see ldquoThe Switch Actionrdquo in the in
the Novell exteNd Composer Userrsquos Guide) A Switch action allows program control to branch to a block
of actions based on a match between an input value and a Case value In a PeopleSoft Service Request
Composer receives a DOM and compares a series of cases against the DOM If an exact match occurs
between the DOM and a case execution branches to the actions listed underneath the case in the Actionmodel Cases are tested in the order listed and once a match is found execution of the match logic
precludes execution of any other logic in the PeopleSoft Service Request
To Create a PeopleSoft Service Request Action
1 In the Action Model right-click on PeopleSoft Service Request
2 Select Edit Action The Service Request dialog box is displayed
3 In the Function tree click on the plus (+) sign to the left of the Messages node to expand the tree
view for that node
8172019 People Soft Users Guide
httpslidepdfcomreaderfullpeople-soft-users-guide 5380
Creating a PeopleSoft Component 53
4 Right-click on the message name that you want to use for input and select Add Case or double-
click on the message name
The Adapter Service Request dialog box is displayed This dialog box is similar to the PeopleSoftRequest dialog box (see ldquoCreating Actions in the Component Editorrdquo on page 42)
5 Select or deselect Filter Request as desired Filter Request is selected by default If deselected the
tree will be disabled and greyed (no longer editable) indicating that a default schema configuration
will be used If selected you can customize the structure of the request document by selecting the
nodes to be included in the request document
6 Expand the nodes of the Service Request Tree by clicking on the plus signs to the left of the nodes
7 Select the elements that you want to include in the Service Request document by selecting or
deselecting the check boxes in the node tree Some nodes are greyed out (disabled) This is because
the document schema determines the nodes that you can edit
8172019 People Soft Users Guide
httpslidepdfcomreaderfullpeople-soft-users-guide 5480
54 Novell exteNd Composer 521 Connect for PeopleSoft Userrsquos Guide
8 If the Service Response tab is enabled (this depends on the Synchronization Type setting in the
Connection resource) click the Service Response tab at the top of the dialog box to bring the
Service Response document pane forward This pane shows a tree view of the Response document
similar to the one shown for the Request document The same user interface features that applied to
the Request document pane apply to the Response document pane
9 Visit all of the nodes in the Response document tree and customize the settings as desired
10 Click the Case Expression tab at the top of the dialog box to bring the Case Expression pane
forward This pane provides an Expression Builder that you use to build a case expression
11 Type the static string values or the ECMAScript expressions that will be checked against the input
DOM
12 Select the OK button The Service Request dialog box is displayed
13 To add another case repeat Step 3 through Step 12 The cases are listed from top to bottom in the
order in which they are evaluated Each Case value will be checked in turn in the order you list
them
For optimal performance list the most likely matches first
You can change the order in which the cases are listed by clicking on the name of a case then
clicking the up or down triangle icons
8172019 People Soft Users Guide
httpslidepdfcomreaderfullpeople-soft-users-guide 5580
Creating a PeopleSoft Component 55
To edit a case select the name of the case then press the Mapping button You can also select
the name of the case then select the Expression Builder button
14 When you have finished adding cases select OK The Service Request dialog box closes and a new
action appears in the Action Model of your component The Native Environment Pane changes to
show the Request and Response (if the Synchronization Type is set to REQUEST_RESPONSE in
the Connection resource) tabs along with tree views of the request and response documents
15 In the Action Model add actions to be performed to each case to create the desired business logic
To map a node of the Input document to a node in the Request document drag a node from the
Input pane and drop it on a node in the Request tab of the Native Environment pane This
automatically creates a new XML Map Action in the Action Model
To map a node of the Response document to a node in the Output document drag a node from
the Response tab of the Native Environment pane and drop it on a node in the Output pane This
automatically creates a new XML Map Action in the Action Model You can cut copy or deletethe actions once they appear in the Action Model pane
When all of the Actions for a case have been evaluated Composer sets the Service Response
DOM
The final case in the Action model is always labeled Default This case is generated
automatically and cannot be removed Actions placed under Default are executed if and only if
the none of the other cases are matched While you are not required to place actions under
Default it is good programming practice to have at least some kind of fallback logic for the
Default case even if itrsquos only a Log action or a Raise Error action
The Request and Response document displays for Service Requests work similarly to the
displays for Requests (see ldquoRequest and Response Documentsrdquo on page 47)
Managing Deployed PeopleSoft Services
Once a project containing PeopleSoft Services has been deployed (see ldquoDeploying Your Projectrdquo in the
Novell exteNd Composer Userrsquos Guide) the Listener objects actively listen for messages each time you
start your server To manually start and stop these services you need to use the exteNd PeopleSoft
Services Console This browser-based console allows you to see the list of PeopleSoft Services the status
of each service (running or not running) the running tally (Count) of messages received other
administrative information and a StartStop button
8172019 People Soft Users Guide
httpslidepdfcomreaderfullpeople-soft-users-guide 5680
56 Novell exteNd Composer 521 Connect for PeopleSoft Userrsquos Guide
To display the exteNd PeopleSoft Services Console
1 Make sure that your application server is running
2 From the Windows Start menu select Programs gt Novell Extend 52 gt Composer gt Composer
Server Console A dialog box for entering the application server administrator ID and password is
displayed
3 Type your administrator ID and password then select OK The Composer Server Console page is
displayed
4 Scroll down the About Products list on the left side of the page until you see the link titledldquopsftservicerdquo
5 Select the ldquopsftservicerdquo link A page is displayed that provides information (eg version license
number copyright) about the Connect It also displays a Console button
6 Select the Console button The PeopleSoft Service console page is displayed This page lists anyPeopleSoft Services that have been deployed
7 To stop a PeopleSoft Service select the appropriate Stop button (the button will then change to
Start)
8172019 People Soft Users Guide
httpslidepdfcomreaderfullpeople-soft-users-guide 5780
Creating a PeopleSoft Component 57
NOTE If messages are being handled by a service at the time of the Stop command there may
be some delay before the service actually exits Select the Refresh button periodically until the
ldquoRunningrdquo column of the console says No for the service
To undeploy a PeopleSoft Service
1 Make sure that your application server is running
2 From the Windows Start menu select Programs gt Novell Extend 52 gt AppServer gt Server
Management Console
3 Login as an administrator (File gt Login)
4 Select the Deployment icon ( )from the toolbar
5 Select Deployed Objects
6 Expand the database containing the deployed objects that you want to manage
7 Select the object that you want to undeploy
8 Select the Undeploy button
ECMAScript ExtensionsSee Appendix A to this guide for a list of ECMAScript extension methods that can be used with the
PeopleSoft Connect
8172019 People Soft Users Guide
httpslidepdfcomreaderfullpeople-soft-users-guide 5880
58 Novell exteNd Composer 521 Connect for PeopleSoft Userrsquos Guide
8172019 People Soft Users Guide
httpslidepdfcomreaderfullpeople-soft-users-guide 5980
ECMAScript Methods 59
A ECMAScript Methods
The J2EE Connector framework of the exteNd Composer Connect for PeopleSoft implements a number
of ECMAScript extension methods that are available for use through the Expression Builder (which is
available in Function Actions and elsewhere) You will find the methods listed in the FunctionsMethods
pane of the Expression Builder
Hover-help is available for each method
For more information on working with the Expression Builder see the Scripting chapter of the Composer
Userrsquos Guide
Adapter Interface Methods
getAdapterType()
This method calls returns the adapter type name (eg ldquopsftrdquo) as a String
Syntax
getAdapterType()
8172019 People Soft Users Guide
httpslidepdfcomreaderfullpeople-soft-users-guide 6080
60 Novell exteNd Composer 521 Connect for PeopleSoft Userrsquos Guide
Connection Interface MethodsThe following CCI API metadata-wrapped methods are published through the Expression Builder
getAdapterMetaData()
This method wraps calls on the javaxresourcecciResourceAdapterMetaData class
SyntaxgetAdapterMetaData(String parameter )
getConnectionMetaData()
This method wraps calls on the javaxresourcecciConnectionMetaData class
Syntax
getConnectionMetaData(String parameter )
Parameter Description
NAME Returns the name of the adapter (eg ldquoiWay JCA adapterrdquo)
EXECUTEWITHI Returns true if the implementation class for the Interaction interface
implements public Record execute method otherwise the method returns
false
EXECUTEWITHIO Returns true if the implementation class for the Interaction interface
implements public boolean execute method otherwise the method returns
false
VENDOR Returns the name of the vendor that has provided the resource adapter(eg ldquoiWay Software Incrdquo
VERSION Returns the version of the resource adapter (eg ldquo55rdquo)
INTERACTIONSPECS Returns the fully-qualified name of the InteractionSpec type supported by
this resource adapter (eg ldquocomibiafjcaIWAFInteractionSpecrdquo)
SPECVERSION Returns a string representation of the version of the connector architecture
specification that is supported by the resource adapter (eg ldquo10rdquo)
LOCALTX Returns true if the resource adapter implements the LocalTransaction
interface and supports local transaction demarcation on the underlying EIS
(Enterprise Information System) instance through the LocalTransaction
interface
Parameter Description
EISPRODUCTNAME Returns the product name of the underlying EIS instance (eg
ldquoPeopleSoftrdquo)
EISPRODUCTVERSION Returns product version of the underlying EIS instance (eg ldquoSupportsPeopleSoft 8rdquo)
USER Returns the user name for an active connection as known to the
underlying EIS instance
8172019 People Soft Users Guide
httpslidepdfcomreaderfullpeople-soft-users-guide 6180
ECMAScript Methods 61
Additional MethodsThe following ECMA-wrapped methods are not displayed by the Expression Builder user interface but
you can use them in the Expression Builder by typing them directly into expressions
getWarnings()
Returns line separated list of javaxresourcecciResourceWarning for the javaxresourcecciInteraction
clearWarnings()
Calls javaxresourcecciInteractionclearWarnings()
getLastError()
Returns last error such as a javaxresourceResourceException
8172019 People Soft Users Guide
httpslidepdfcomreaderfullpeople-soft-users-guide 6280
62 Novell exteNd Composer 521 Connect for PeopleSoft Userrsquos Guide
8172019 People Soft Users Guide
httpslidepdfcomreaderfullpeople-soft-users-guide 6380
Using Component Interfaces 63
B Using Component Interfaces
This appendix describes how to create new component interfacesmdashand how to modify existing
component interfacesmdashfor use with PeopleSoft 8 and Novell exteNd Composer
After generating and securing a component interface as described in this Appendix you must generate its
API as described in ldquoBuilding PeopleSoft Component Interface API Classesrdquo on page 26 in this guide
NOTE This appendix is not a substitute for PeopleSoft documentation For complete and up-to-date
information about PeopleSoft integration APIs see the PeopleSoft Online Library for your PeopleSoft
system
How to Create a New Component Interface
To create a component interface
1 Launch the PeopleSoft Application Designer
2 Choose New from the File menu
The New dialog box opens
3 Select Component Interface and click OK The Select Source Component for Component Interface
dialog opens
8172019 People Soft Users Guide
httpslidepdfcomreaderfullpeople-soft-users-guide 6480
64 Novell exteNd Composer 521 Connect for PeopleSoft Userrsquos Guide
4 Select the component to use as a basis for a Component Interface
5 Click the Select buttonThe Application Designer dialog opens
6 To create the component interface without displaying individual properties for one-by-one
selection click No Otherwise to expose component properties manually click No and drag the
relevant fields from the left pane to the right pane
NOTE If the component interface is large it is recommended that you expose the component
properties manually as just described
See your PeopleBooks documentation for additional options and their meanings
8172019 People Soft Users Guide
httpslidepdfcomreaderfullpeople-soft-users-guide 6580
Using Component Interfaces 65
7 Designate the methods you wish to use in this Component Interface as described in the next
procedure
Methods
The standard methods created for a component interface are
Create
Find
Get
Save
Only those methods actually implemented in the underlying component are available For example if the
underlying component does not contain Add capabilities Create is not available
To designate Methods to use in the Component Interface
1 Open the Component Interface Properties dialog box (continuing from the procedure described
previously)
8172019 People Soft Users Guide
httpslidepdfcomreaderfullpeople-soft-users-guide 6680
66 Novell exteNd Composer 521 Connect for PeopleSoft Userrsquos Guide
2 Select the desired methods
Properties
You may add properties from the records in the component view You can also delete a property in the
component interface that you do not want to expose You can rename properties by clicking the property
and then clicking again until you can type a new name If you rename a property it can be referenced in
the component interface only by the new name not by the underlying component nameProperties may have various icons adjacent to them For example EMPLID has an icon indicating that it
is a key field from the underlying record NAME has an icon indicating that it is an alternate key field
from the underlying record For a complete list of property icons see the PeopleBooks documentation
You can right-click both panes to select various functions to perform depending on which pane is active
For a complete list of functions see the PeopleBooks documentation
Securing a Component InterfaceYou must set up security for the component interface before you can begin testing
Configuring Component Interface Security for PeopleSoft Version 81x
The following procedure describes how to configure component interface security for PeopleSoft
Version 81 in 2- and 3-tier mode
To configure component interface security
1 From the Use menu select Permission Lists Component Interface and then click UpdateDisplayBefore Security can be set the Permission List(s) must be identified
8172019 People Soft Users Guide
httpslidepdfcomreaderfullpeople-soft-users-guide 6780
Using Component Interfaces 67
2 Select the relevant Permission list
NOTE For more information on Permission Lists see the PeopleBooks documentation
The following pane opens
3 Insert the new component interface that you created
4 Click Edit
NOTE When you select the component interface all available methods appear including user-
defined methods This enables you to specify whether this particular Permission List must have Full
or Partial Access
5 Select the desired level of access
6 Click OK
In the following example the ALLPORTL Permission List has Full Access to all methods
8172019 People Soft Users Guide
httpslidepdfcomreaderfullpeople-soft-users-guide 6880
68 Novell exteNd Composer 521 Connect for PeopleSoft Userrsquos Guide
Configuring Component Interface Security for PeopleSoft Version 84+
The following sample procedure describes how to configure component interface security for PeopleSoft
Version 84 or higher
To configure interface security
1 Expand PeopleTools Security User Profiles and Permissions amp Roles and then click Permission
Lists
2 Click Search
The Permissions List search window opens
8172019 People Soft Users Guide
httpslidepdfcomreaderfullpeople-soft-users-guide 6980
Using Component Interfaces 69
3 Select the relevant Permission ListThe Permissions List window opens
4 Click the right arrow next to the Sign-on Times tab
The Component Interfaces tab becomes available
8172019 People Soft Users Guide
httpslidepdfcomreaderfullpeople-soft-users-guide 7080
70 Novell exteNd Composer 521 Connect for PeopleSoft Userrsquos Guide
5 Click the Component Interfaces tab
6 Click the + button to add a new row to the Component Interfaces list
7 Type the component interface name and click Edit
This example uses component interface AR_ITEM_AGENT
8172019 People Soft Users Guide
httpslidepdfcomreaderfullpeople-soft-users-guide 7180
Using Component Interfaces 71
8 Select the desired access from the drop-down lists
9 Click OK
10 Scroll down to the bottom of the Component Interface Permissions window and click Save
Testing a Component InterfaceThe iWay Adapter for PeopleSoft 8 uses PeopleSoft metadata and component interfaces therefore it can
accommodate new or modified component interfaces The adapter makes no assumptions about
component interfaces except that they are logical and valid Therefore each component interface must be
tested before being used as a source for the adapter
8172019 People Soft Users Guide
httpslidepdfcomreaderfullpeople-soft-users-guide 7280
72 Novell exteNd Composer 521 Connect for PeopleSoft Userrsquos Guide
If changes are made to the underlying application by the user or by means of a PeopleSoft upgrade and
these changes invalidate a component interface the user must repair the invalid component interface
before the adapter uses it
To test a component interface
1 In Application Designer select Test Component Interface from the Tools menu
The Component Interface Tester dialog box opens
2 Click the Component Interface Tester dialog box to bring it to the foreground if required
3 To test the component interface using the Find method click Find
The Component Interface Tester - Find Results window opens displaying all of the possible entries
for the underlying component If there are more than 300 entries a message appears
4 Select a field in the left pane of the Find Results window
5 To display the relevant data for that particular key click Get Selected
8172019 People Soft Users Guide
httpslidepdfcomreaderfullpeople-soft-users-guide 7380
Using Component Interfaces 73
If the security settings permit you can change the values in the individual fields
6 To test the component interface using the Get method enter the existing key(s)
7 Click Get Existing
This returns the exposed properties for the key that you entered
You can change values if Update access has been specified
8172019 People Soft Users Guide
httpslidepdfcomreaderfullpeople-soft-users-guide 7480
74 Novell exteNd Composer 521 Connect for PeopleSoft Userrsquos Guide
8 To test the component interface using the Create method enter all required key values
9 Click Create New
When you enter valid values in lsquoCreatersquo keys the JOBCODE Data Display window opens after the
Table name is expanded with default data in place
You can change fields at this point Changes are validated against the componentrsquos underlying business logic
10 After you finish making changes right-click the top item in the pane
11 Click Save to save your changes
The keys used to create the record can be used with the Get method for viewing data
The data that were added can be viewed in the PeopleSoft Component as shown in the following
example
8172019 People Soft Users Guide
httpslidepdfcomreaderfullpeople-soft-users-guide 7580
Using Component Interfaces 75
Notice the Effective Date as one of the default values
You have finished testing the component interface Before using the component interface you must
generate its API as described at ldquoBuilding PeopleSoft Component Interface API Classesrdquo on page 26
8172019 People Soft Users Guide
httpslidepdfcomreaderfullpeople-soft-users-guide 7680
76 Novell exteNd Composer 521 Connect for PeopleSoft Userrsquos Guide
8172019 People Soft Users Guide
httpslidepdfcomreaderfullpeople-soft-users-guide 7780
77
Index
Aactions
After Execute 49Before Execute 49creating 42PeopleSoft Request creating 43PeopleSoft Service Request creating 52XML Map 55
Adapter Service Request 53Add Case 53After Execute actions 49AgJarsconf 16API bindings 26application servers
Novell 16supported 11
BBEA WebLogic 11Before Execute actions 49
CCase Expression 54CCI 13classpath
application server 16design-time 16
clearWarnings 61Common Client Interface 13Component Interface Properties 65component interface PeopleSoft
creating 63methods 65
properties 66securing 66
testing 71component PeopleSoft
creating 39Editor window 41generating interface classes 26
Composer about 11connection parameter
Connection Type 36 38constant 33Error Directory 37
expression-driven 33File Mask 37Host 38Is Keep Alive 39Is Length Prefix 39Is XML 39Listener Port 38Maximum Pool Size 37 38 39Metadata Connection 37 38 39Poll Interval 37Polling Location 36
Port 38Processing Mode 37ResponseAck Directory 37switching from constant to expression-driven 34Synchronization Type 37 38Thread Limit 37
connection resource
File service 36HTTP Service 37PeopleSoft connection 34TCP Ser vice 38types of 33
connection resour ce PeopleSoft creating 34Connection Type 36 38
Connectsdescription 11
Native Environment pane 42PeopleSoft about 12
DDefault case 55Deployed Objects 57DOM output selecting XML template for 50
EECMAScript
Composer 11methods 57 59
Edit Document 48Edit License 29EISPRODUCTNAME 60EISPRODUCTVERSION 60Error Directory 37EXECUTEWITHI 60EXECUTEWITHIO 60
8172019 People Soft Users Guide
httpslidepdfcomreaderfullpeople-soft-users-guide 7880
78
expression-driven 34
FFault Message 51File Mask 37Filter Request 53Filter Response 46
GGet Existing 73Get Schemas 44getAdapterMetaData 60getAdapterType 59getConnectionMetaData 60getLastError 61getWarnings 61
HHost 38HTTPS 38
IIBM WebSphere 11Initial Pool Size 35INTERACTIO NSPECS 60Is Keep Alive 39Is Length Prefix 39Is XML 39iWay 14iwpeoplesoftjar 16
iwpsci81jar 16 17iwpsci84jar 16 17
JJ2EE Connector Architecture 13
jar files
iwpeoplesoftjar 16iwpsci81jar 16iwpsci84jar 16
psGenCompjar 16 28 psjoajar 16
jarexe 26
javacexe 26JBoss 11
KKeep Alive 39
Llicense update
design-time 29Edit License 29obtaining 29runtime 30
Licenses tab 29Listener 55
Listener Por t 38LOCALTX 60
MMapping 55maximum occurrence 45Maximum Pool Size 35 37 38 39Metadata Connection 37 38 39methods
adapter interface 59connector interface 60
N Native Environment pane 42
OOutput DOM
selecting XML template for 40
PPeopleSoft component
creating 39Editor window 41PeopleSoft component interface
classes generating 26creating 63methods 65
properties 66securing 66testing 71
PeopleSoft File Service Connection 36PeopleSoft HTTP Service Connection 38PeopleSoft Java Object Adapter 15PeopleSoft Service
Console displaying 56
creating 49deploying 55managing 55starting and stopping 55undeploying 57
PeopleSoft Service Request action 52PeopleSoft Service TCP Connection 38
permission lists
access level specifying 67identifying 66
8172019 People Soft Users Guide
httpslidepdfcomreaderfullpeople-soft-users-guide 7980
79
selecting 69Poll Interval 37Polling Location 36Port 38Processing Mode 37
psGenCompjar 16 28 psjoajar
design time configuration adding to 16 Novell application server adding to 16requirement 9
pstoolsproperties 16
RRAR
deployment 12description 13
RECEIVE 39RECEIVE_ACK 38RECEIVE_REPLY 38Request action
creating 43
description 42modifying manually 48
Request Tree 53RequestcreateXPath( ) 47resource adaptor archives deployment 12ResponseAck Directory 37
Sschemas get 44security component interface
PeopleSoft 81x 66PeopleSoft 84+ 68
Sequential 37Service Request dialog box 52Service Request Tree 53Service Response 54service PeopleSoft
creating 49managing 55
Sign-on Times ta b 69SPECVERSION 60Synchronization Type 37 38 54 55
T
TCPIs Length Pr efix 39Keep Alive 39length field 4-bit binary 39Service Connection resource creating 38
Temp Message 51Template Category 50 51Template Name 50 51testing component interface PeopleSoft 71Thread Limit 37Threaded 37
UUndeploy 57
Vvariables project 34
Xxconfigxml 16XML templates 39xObject
descr iption 33
New 36 37 38 49XPath 11XSLT 11
8172019 People Soft Users Guide
httpslidepdfcomreaderfullpeople-soft-users-guide 8080
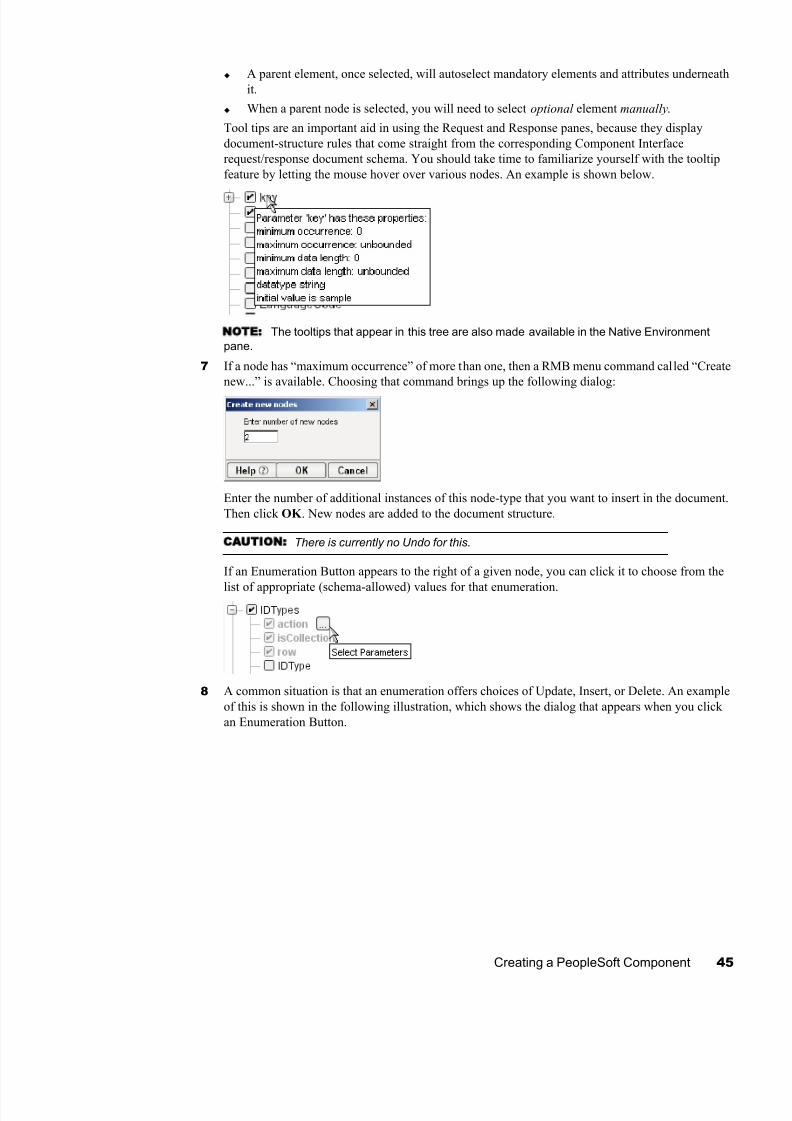
8172019 People Soft Users Guide
httpslidepdfcomreaderfullpeople-soft-users-guide 4580
Creating a PeopleSoft Component 45
A parent element once selected will autoselect mandatory elements and attributes underneath
it
When a parent node is selected you will need to select optional element manually
Tool tips are an important aid in using the Request and Response panes because they display
document-structure rules that come straight from the corresponding Component Interface
requestresponse document schema You should take time to familiarize yourself with the tooltip
feature by letting the mouse hover over various nodes An example is shown below
NOTE The tooltips that appear in this tree are also made available in the Native Environment
pane
7 If a node has ldquomaximum occurrencerdquo of more than one then a RMB menu command called ldquoCreate
newrdquo is available Choosing that command brings up the following dialog
Enter the number of additional instances of this node-type that you want to insert in the document
Then click OK New nodes are added to the document structure
CAUTION There is currently no Undo for this
If an Enumeration Button appears to the right of a given node you can click it to choose from the
list of appropriate (schema-allowed) values for that enumeration
8 A common situation is that an enumeration offers choices of Update Insert or Delete An example
of this is shown in the following illustration which shows the dialog that appears when you click
an Enumeration Button
8172019 People Soft Users Guide
httpslidepdfcomreaderfullpeople-soft-users-guide 4680
46 Novell exteNd Composer 521 Connect for PeopleSoft Userrsquos Guide
9 Visit all of the nodes in the request tree that are of interest to you and use the various Composer UIfeatures to customize the request documentrsquos structure
10 When you are satisfied with the structure click the Response tab at the top of the dialog to bring the
Response document pane forward This pane shows a tree view of the response document similar
to the one shown for the Request document
11 Check or uncheck Filter Response as desired It is checked by default If this box is unchecked the
tree will be disabled and greyed (no longer editable) meaning that a default schema configuration
will be used When the box is checked you can customize the structure of the request document by
specifying various types of node filtering
8172019 People Soft Users Guide
httpslidepdfcomreaderfullpeople-soft-users-guide 4780
Creating a PeopleSoft Component 47
12 Visit all of the nodes in the Response document tree and customize the settings as desired (See
previous steps applicable to the Request document for an explanation of the UI semantics)
13 Click OK (Otherwise use Cancel) The dialog goes away and a new action appears in the Action
Model of your component At the same time the Native Environment Pane changes to show the
Request and Response tabs along with corresponding tree views of the fully customized
document(s)
14 In the normal component editor view drag and drop data from the Input document pane to the
Request document of the Native Environment Pane as desired This will create mappings fromyour Input document to the Request doc that will be submitted to the PeopleSoft server The
mappings will appear (automatically) as new XML Map Actions in the Action Model
15 Repeat the drag-and-drop mapping process for the Response document dragging nodes from the
Native Environment Pane to the componentrsquos Output document tree view Again this will
automatically cause new Map Actions to appear in your Action Model (You can cutcopydelete
the actions once they appear in the Action Model pane)
16 Add or remove actions from the Action Model as needed to create the business logic you need
Returning to Schema-Edit Mode
Once you have created a PeopleSoft Request Action in your action model (using the above procedure)
you can go back and revisit the Request and Response schema trees (and change your customizations)simply by doubleclicking the Request Action in your action model Doubleclicking will cause the
PeopleSoft Request Action dialog to reappear You can use the Request and Response tabs to navigate the
request- and response-doc schemas and change your customizations as desired When you exit out of the
dialog your changes will be reflected in the Native Environment Pane
NOTE If you make hand-edits to the Request or Response documents in your Native Environment
Pane you will not be able to reopen the PeopleSoft Request Action dialog (See discussion further below)
Therefore try to avoid manually editing requestresponse documents Instead make modifications
through careful use of the XML Map Action or by using RequestcreateXPath( ) andor DOM methods in a
Function Action
Request and Response DocumentsAfter you have created the PeopleSoft Request Action using the foregoing procedure the Native
Environment Pane portion of the Composer editor view will show Request and Response documents in
tree-view form
As mentioned earlier you can drag and drop data from your componentrsquos Input document to the Request
document to create XML Map actions (First put focus on the target Request-document node by clicking
in it Then go to the Input document and click-drag any data you want to map over to the target node in
the Request document) You can use drag-and-drop mapping to map from Response to Output as well
In the illustration shown above some nodes are shown in red The red entries represent nodes to which
data have been mapped
8172019 People Soft Users Guide
httpslidepdfcomreaderfullpeople-soft-users-guide 4880
48 Novell exteNd Composer 521 Connect for PeopleSoft Userrsquos Guide
Manually Editing the Request and Response Docs
If you right-click anywhere inside the Request or Response tree views in the Native Environment Pane
you will get a context menu
The Edit Document command in this menu will open the document in a text-editor view as shown
below
In this window you can hand-edit the Request or Response document as desired
CAUTION If you make hand-edits to the document it may no longer conform to the original schema As
a result you will no longer be able to reopen it in the PeopleSoft Request Action dialog
Note that if yoursquove made hand-edits to a Request or Response document doubleclicking on the
corresponding PeopleSoft Request Action in the action model will cause the following dialog to appear
If this dialog appears you will need to recreate the action in order to see the original Request or Response
document (Any hand edits will be lost however)
8172019 People Soft Users Guide
httpslidepdfcomreaderfullpeople-soft-users-guide 4980
Creating a PeopleSoft Component 49
To prevent this situation from occurring avoid making manual edits to Request or Response documents
Instead use XML Map Actions (andor Function actions) to modify documents or node contents Be
aware that doing so may violate schema constraints This will not necessarily cause runtime problems for
your component when executing in the Composer Enterprise Server environment because Composer
does not validate the request document against the schema at runtime on the server However your
PeopleSoft system may validate incoming requests in which case a hand-edited Request document could
be the source of hard-to-troubleshoot errors
ldquoBefore Executerdquo and ldquoAfter Executerdquo Actions
You will notice that whenever a PeopleSoft Request action is created in your Action Model two
additional lines are added to the action list Before Execute Actions and After Execute Actions These are
header labels (grouping labels) for blocks of actions that you want to occur before the request is sent to
the PeopleSoft system or after a response document has come back respectively Typically you will want
to map data fields from Input to Request and have those actions be grouped under the ldquoBefore Execute
Actionsrdquo header Likewise any map actions or other action logic you need to perform on the Response
document after the PeopleSoft system executes you request should be grouped under the ldquoAfter Execute
Actionsrdquo heading
Creating PeopleSoft ServicesThis section describes how to use the exteNd Composer trade Connect for PeopleSoft to create a PeopleSoft
Service component to connect to PeopleSoft and listen for events As part of the process of creating a
PeopleSoft Service you can select an existing PeopleSoft connection resource or you can create a new
one If you create the connection beforehand it is available for use by any PeopleSoft Services in the
current project If you have not already created at least one PeopleSoft connection resource in the current
project you will be prompted to do so when you try to create a PeopleSoft Service
NOTE You can still create a PeopleSoft Service without first creating a connection resource but you
wonrsquot be able to use any debug features that depend on a live connection
To Create a New PeopleSoft Service
1 Select File gt New gt xObject The New xObject dialog box is displayedNOTE Alternatively under Service in the Composer Navigator pane (Explorer view) you can
highlight PeopleSoft Service click the right mouse button then select New
2 Select the ProcessService tab
3 Double-click on ldquoPeopleSoft Servicerdquo
If you have not previously defined a connection resource you are prompted to do so now (see
ldquoCreating Connection Resourcesrdquo on page 33)
8172019 People Soft Users Guide
httpslidepdfcomreaderfullpeople-soft-users-guide 5080
50 Novell exteNd Composer 521 Connect for PeopleSoft Userrsquos Guide
If you have already defined a connection resource the ldquoCreate a New PeopleSoft Servicerdquo Wizard
is displayed
4 Type a Name for the new PeopleSoft Service
5 Optionally type Description text
6 Select Next The XML InputOutput Message Property Info panel of the New PeopleSoft ServiceWizard is displayed
7 Specify the Input and Output templates as follows
Type a name for the template under Part if you wish the name to appear in the DOM as
something other than ldquoInputrdquo
Select a Template Category if it is different than the default category
Select a Template Name from the list of XML templates in the selected Template Category
To add additional input XML templates click Add then choose a Template Category and
Template Name for each To remove an input XML template select an entry and click Delete
8 Select an XML template for use as an Output DOM using the procedure described in the previous
step
NOTE You can specify an input or output XML template that contains no structure by selecting
SystemANY as the Input or Output template For more information see ldquoCreating an Output
Document without Using a Templaterdquo in the Novell exteNd Composer Userrsquos Guide
9 Select Next The Temp and Fault XML Template panel is displayed
8172019 People Soft Users Guide
httpslidepdfcomreaderfullpeople-soft-users-guide 5180
Creating a PeopleSoft Component 51
10 If desired specify a template to be used as a scratch pad under the ldquoTemp Messagerdquo pane of the
dialog box This can be useful if you need a place to hold values that will be used temporarily
during the execution of your component Select a Template Category if it is different than the
default category Then select a Template Name from the list of XML templates in the selected
Template Category
11 Under the ldquoFault Messagerdquo pane select an XML template to be used to pass back to clients when
an error condition occurs
12 To add additional input XML templates click Add and choose a Template Category and
Template Name for each Repeat as many times as desired To remove an input XML template
select an entry and click Delete
13 Select Next The Connection Info panel of the Create a New PeopleSoft Service wizard is
displayed
14 Select a PeopleSoft File HTTP or TCP Service connection from the Connection list The
Connection list displays the names of the PeopleSoft connection resources that have been definedin this project
15 Select Finish The component is created and the PeopleSoft Service Editor is displayed The
features of this window are identical to the features described in ldquoAbout the PeopleSoft Component
Editor Windowrdquo on page 41 The following sections describe the steps required to create a
PeopleSoft Service Action
8172019 People Soft Users Guide
httpslidepdfcomreaderfullpeople-soft-users-guide 5280
52 Novell exteNd Composer 521 Connect for PeopleSoft Userrsquos Guide
Creating PeopleSoft Service Actions
You can create all the normal Composer actions in the Action Model of your PeopleSoft Service (eg
XML Map Function Log Send Mail) In addition you can create a PeopleSoft Service Request action
The PeopleSoft Service Request action is similar to a Switch action (see ldquoThe Switch Actionrdquo in the in
the Novell exteNd Composer Userrsquos Guide) A Switch action allows program control to branch to a block
of actions based on a match between an input value and a Case value In a PeopleSoft Service Request
Composer receives a DOM and compares a series of cases against the DOM If an exact match occurs
between the DOM and a case execution branches to the actions listed underneath the case in the Actionmodel Cases are tested in the order listed and once a match is found execution of the match logic
precludes execution of any other logic in the PeopleSoft Service Request
To Create a PeopleSoft Service Request Action
1 In the Action Model right-click on PeopleSoft Service Request
2 Select Edit Action The Service Request dialog box is displayed
3 In the Function tree click on the plus (+) sign to the left of the Messages node to expand the tree
view for that node
8172019 People Soft Users Guide
httpslidepdfcomreaderfullpeople-soft-users-guide 5380
Creating a PeopleSoft Component 53
4 Right-click on the message name that you want to use for input and select Add Case or double-
click on the message name
The Adapter Service Request dialog box is displayed This dialog box is similar to the PeopleSoftRequest dialog box (see ldquoCreating Actions in the Component Editorrdquo on page 42)
5 Select or deselect Filter Request as desired Filter Request is selected by default If deselected the
tree will be disabled and greyed (no longer editable) indicating that a default schema configuration
will be used If selected you can customize the structure of the request document by selecting the
nodes to be included in the request document
6 Expand the nodes of the Service Request Tree by clicking on the plus signs to the left of the nodes
7 Select the elements that you want to include in the Service Request document by selecting or
deselecting the check boxes in the node tree Some nodes are greyed out (disabled) This is because
the document schema determines the nodes that you can edit
8172019 People Soft Users Guide
httpslidepdfcomreaderfullpeople-soft-users-guide 5480
54 Novell exteNd Composer 521 Connect for PeopleSoft Userrsquos Guide
8 If the Service Response tab is enabled (this depends on the Synchronization Type setting in the
Connection resource) click the Service Response tab at the top of the dialog box to bring the
Service Response document pane forward This pane shows a tree view of the Response document
similar to the one shown for the Request document The same user interface features that applied to
the Request document pane apply to the Response document pane
9 Visit all of the nodes in the Response document tree and customize the settings as desired
10 Click the Case Expression tab at the top of the dialog box to bring the Case Expression pane
forward This pane provides an Expression Builder that you use to build a case expression
11 Type the static string values or the ECMAScript expressions that will be checked against the input
DOM
12 Select the OK button The Service Request dialog box is displayed
13 To add another case repeat Step 3 through Step 12 The cases are listed from top to bottom in the
order in which they are evaluated Each Case value will be checked in turn in the order you list
them
For optimal performance list the most likely matches first
You can change the order in which the cases are listed by clicking on the name of a case then
clicking the up or down triangle icons
8172019 People Soft Users Guide
httpslidepdfcomreaderfullpeople-soft-users-guide 5580
Creating a PeopleSoft Component 55
To edit a case select the name of the case then press the Mapping button You can also select
the name of the case then select the Expression Builder button
14 When you have finished adding cases select OK The Service Request dialog box closes and a new
action appears in the Action Model of your component The Native Environment Pane changes to
show the Request and Response (if the Synchronization Type is set to REQUEST_RESPONSE in
the Connection resource) tabs along with tree views of the request and response documents
15 In the Action Model add actions to be performed to each case to create the desired business logic
To map a node of the Input document to a node in the Request document drag a node from the
Input pane and drop it on a node in the Request tab of the Native Environment pane This
automatically creates a new XML Map Action in the Action Model
To map a node of the Response document to a node in the Output document drag a node from
the Response tab of the Native Environment pane and drop it on a node in the Output pane This
automatically creates a new XML Map Action in the Action Model You can cut copy or deletethe actions once they appear in the Action Model pane
When all of the Actions for a case have been evaluated Composer sets the Service Response
DOM
The final case in the Action model is always labeled Default This case is generated
automatically and cannot be removed Actions placed under Default are executed if and only if
the none of the other cases are matched While you are not required to place actions under
Default it is good programming practice to have at least some kind of fallback logic for the
Default case even if itrsquos only a Log action or a Raise Error action
The Request and Response document displays for Service Requests work similarly to the
displays for Requests (see ldquoRequest and Response Documentsrdquo on page 47)
Managing Deployed PeopleSoft Services
Once a project containing PeopleSoft Services has been deployed (see ldquoDeploying Your Projectrdquo in the
Novell exteNd Composer Userrsquos Guide) the Listener objects actively listen for messages each time you
start your server To manually start and stop these services you need to use the exteNd PeopleSoft
Services Console This browser-based console allows you to see the list of PeopleSoft Services the status
of each service (running or not running) the running tally (Count) of messages received other
administrative information and a StartStop button
8172019 People Soft Users Guide
httpslidepdfcomreaderfullpeople-soft-users-guide 5680
56 Novell exteNd Composer 521 Connect for PeopleSoft Userrsquos Guide
To display the exteNd PeopleSoft Services Console
1 Make sure that your application server is running
2 From the Windows Start menu select Programs gt Novell Extend 52 gt Composer gt Composer
Server Console A dialog box for entering the application server administrator ID and password is
displayed
3 Type your administrator ID and password then select OK The Composer Server Console page is
displayed
4 Scroll down the About Products list on the left side of the page until you see the link titledldquopsftservicerdquo
5 Select the ldquopsftservicerdquo link A page is displayed that provides information (eg version license
number copyright) about the Connect It also displays a Console button
6 Select the Console button The PeopleSoft Service console page is displayed This page lists anyPeopleSoft Services that have been deployed
7 To stop a PeopleSoft Service select the appropriate Stop button (the button will then change to
Start)
8172019 People Soft Users Guide
httpslidepdfcomreaderfullpeople-soft-users-guide 5780
Creating a PeopleSoft Component 57
NOTE If messages are being handled by a service at the time of the Stop command there may
be some delay before the service actually exits Select the Refresh button periodically until the
ldquoRunningrdquo column of the console says No for the service
To undeploy a PeopleSoft Service
1 Make sure that your application server is running
2 From the Windows Start menu select Programs gt Novell Extend 52 gt AppServer gt Server
Management Console
3 Login as an administrator (File gt Login)
4 Select the Deployment icon ( )from the toolbar
5 Select Deployed Objects
6 Expand the database containing the deployed objects that you want to manage
7 Select the object that you want to undeploy
8 Select the Undeploy button
ECMAScript ExtensionsSee Appendix A to this guide for a list of ECMAScript extension methods that can be used with the
PeopleSoft Connect
8172019 People Soft Users Guide
httpslidepdfcomreaderfullpeople-soft-users-guide 5880
58 Novell exteNd Composer 521 Connect for PeopleSoft Userrsquos Guide
8172019 People Soft Users Guide
httpslidepdfcomreaderfullpeople-soft-users-guide 5980
ECMAScript Methods 59
A ECMAScript Methods
The J2EE Connector framework of the exteNd Composer Connect for PeopleSoft implements a number
of ECMAScript extension methods that are available for use through the Expression Builder (which is
available in Function Actions and elsewhere) You will find the methods listed in the FunctionsMethods
pane of the Expression Builder
Hover-help is available for each method
For more information on working with the Expression Builder see the Scripting chapter of the Composer
Userrsquos Guide
Adapter Interface Methods
getAdapterType()
This method calls returns the adapter type name (eg ldquopsftrdquo) as a String
Syntax
getAdapterType()
8172019 People Soft Users Guide
httpslidepdfcomreaderfullpeople-soft-users-guide 6080
60 Novell exteNd Composer 521 Connect for PeopleSoft Userrsquos Guide
Connection Interface MethodsThe following CCI API metadata-wrapped methods are published through the Expression Builder
getAdapterMetaData()
This method wraps calls on the javaxresourcecciResourceAdapterMetaData class
SyntaxgetAdapterMetaData(String parameter )
getConnectionMetaData()
This method wraps calls on the javaxresourcecciConnectionMetaData class
Syntax
getConnectionMetaData(String parameter )
Parameter Description
NAME Returns the name of the adapter (eg ldquoiWay JCA adapterrdquo)
EXECUTEWITHI Returns true if the implementation class for the Interaction interface
implements public Record execute method otherwise the method returns
false
EXECUTEWITHIO Returns true if the implementation class for the Interaction interface
implements public boolean execute method otherwise the method returns
false
VENDOR Returns the name of the vendor that has provided the resource adapter(eg ldquoiWay Software Incrdquo
VERSION Returns the version of the resource adapter (eg ldquo55rdquo)
INTERACTIONSPECS Returns the fully-qualified name of the InteractionSpec type supported by
this resource adapter (eg ldquocomibiafjcaIWAFInteractionSpecrdquo)
SPECVERSION Returns a string representation of the version of the connector architecture
specification that is supported by the resource adapter (eg ldquo10rdquo)
LOCALTX Returns true if the resource adapter implements the LocalTransaction
interface and supports local transaction demarcation on the underlying EIS
(Enterprise Information System) instance through the LocalTransaction
interface
Parameter Description
EISPRODUCTNAME Returns the product name of the underlying EIS instance (eg
ldquoPeopleSoftrdquo)
EISPRODUCTVERSION Returns product version of the underlying EIS instance (eg ldquoSupportsPeopleSoft 8rdquo)
USER Returns the user name for an active connection as known to the
underlying EIS instance
8172019 People Soft Users Guide
httpslidepdfcomreaderfullpeople-soft-users-guide 6180
ECMAScript Methods 61
Additional MethodsThe following ECMA-wrapped methods are not displayed by the Expression Builder user interface but
you can use them in the Expression Builder by typing them directly into expressions
getWarnings()
Returns line separated list of javaxresourcecciResourceWarning for the javaxresourcecciInteraction
clearWarnings()
Calls javaxresourcecciInteractionclearWarnings()
getLastError()
Returns last error such as a javaxresourceResourceException
8172019 People Soft Users Guide
httpslidepdfcomreaderfullpeople-soft-users-guide 6280
62 Novell exteNd Composer 521 Connect for PeopleSoft Userrsquos Guide
8172019 People Soft Users Guide
httpslidepdfcomreaderfullpeople-soft-users-guide 6380
Using Component Interfaces 63
B Using Component Interfaces
This appendix describes how to create new component interfacesmdashand how to modify existing
component interfacesmdashfor use with PeopleSoft 8 and Novell exteNd Composer
After generating and securing a component interface as described in this Appendix you must generate its
API as described in ldquoBuilding PeopleSoft Component Interface API Classesrdquo on page 26 in this guide
NOTE This appendix is not a substitute for PeopleSoft documentation For complete and up-to-date
information about PeopleSoft integration APIs see the PeopleSoft Online Library for your PeopleSoft
system
How to Create a New Component Interface
To create a component interface
1 Launch the PeopleSoft Application Designer
2 Choose New from the File menu
The New dialog box opens
3 Select Component Interface and click OK The Select Source Component for Component Interface
dialog opens
8172019 People Soft Users Guide
httpslidepdfcomreaderfullpeople-soft-users-guide 6480
64 Novell exteNd Composer 521 Connect for PeopleSoft Userrsquos Guide
4 Select the component to use as a basis for a Component Interface
5 Click the Select buttonThe Application Designer dialog opens
6 To create the component interface without displaying individual properties for one-by-one
selection click No Otherwise to expose component properties manually click No and drag the
relevant fields from the left pane to the right pane
NOTE If the component interface is large it is recommended that you expose the component
properties manually as just described
See your PeopleBooks documentation for additional options and their meanings
8172019 People Soft Users Guide
httpslidepdfcomreaderfullpeople-soft-users-guide 6580
Using Component Interfaces 65
7 Designate the methods you wish to use in this Component Interface as described in the next
procedure
Methods
The standard methods created for a component interface are
Create
Find
Get
Save
Only those methods actually implemented in the underlying component are available For example if the
underlying component does not contain Add capabilities Create is not available
To designate Methods to use in the Component Interface
1 Open the Component Interface Properties dialog box (continuing from the procedure described
previously)
8172019 People Soft Users Guide
httpslidepdfcomreaderfullpeople-soft-users-guide 6680
66 Novell exteNd Composer 521 Connect for PeopleSoft Userrsquos Guide
2 Select the desired methods
Properties
You may add properties from the records in the component view You can also delete a property in the
component interface that you do not want to expose You can rename properties by clicking the property
and then clicking again until you can type a new name If you rename a property it can be referenced in
the component interface only by the new name not by the underlying component nameProperties may have various icons adjacent to them For example EMPLID has an icon indicating that it
is a key field from the underlying record NAME has an icon indicating that it is an alternate key field
from the underlying record For a complete list of property icons see the PeopleBooks documentation
You can right-click both panes to select various functions to perform depending on which pane is active
For a complete list of functions see the PeopleBooks documentation
Securing a Component InterfaceYou must set up security for the component interface before you can begin testing
Configuring Component Interface Security for PeopleSoft Version 81x
The following procedure describes how to configure component interface security for PeopleSoft
Version 81 in 2- and 3-tier mode
To configure component interface security
1 From the Use menu select Permission Lists Component Interface and then click UpdateDisplayBefore Security can be set the Permission List(s) must be identified
8172019 People Soft Users Guide
httpslidepdfcomreaderfullpeople-soft-users-guide 6780
Using Component Interfaces 67
2 Select the relevant Permission list
NOTE For more information on Permission Lists see the PeopleBooks documentation
The following pane opens
3 Insert the new component interface that you created
4 Click Edit
NOTE When you select the component interface all available methods appear including user-
defined methods This enables you to specify whether this particular Permission List must have Full
or Partial Access
5 Select the desired level of access
6 Click OK
In the following example the ALLPORTL Permission List has Full Access to all methods
8172019 People Soft Users Guide
httpslidepdfcomreaderfullpeople-soft-users-guide 6880
68 Novell exteNd Composer 521 Connect for PeopleSoft Userrsquos Guide
Configuring Component Interface Security for PeopleSoft Version 84+
The following sample procedure describes how to configure component interface security for PeopleSoft
Version 84 or higher
To configure interface security
1 Expand PeopleTools Security User Profiles and Permissions amp Roles and then click Permission
Lists
2 Click Search
The Permissions List search window opens
8172019 People Soft Users Guide
httpslidepdfcomreaderfullpeople-soft-users-guide 6980
Using Component Interfaces 69
3 Select the relevant Permission ListThe Permissions List window opens
4 Click the right arrow next to the Sign-on Times tab
The Component Interfaces tab becomes available
8172019 People Soft Users Guide
httpslidepdfcomreaderfullpeople-soft-users-guide 7080
70 Novell exteNd Composer 521 Connect for PeopleSoft Userrsquos Guide
5 Click the Component Interfaces tab
6 Click the + button to add a new row to the Component Interfaces list
7 Type the component interface name and click Edit
This example uses component interface AR_ITEM_AGENT
8172019 People Soft Users Guide
httpslidepdfcomreaderfullpeople-soft-users-guide 7180
Using Component Interfaces 71
8 Select the desired access from the drop-down lists
9 Click OK
10 Scroll down to the bottom of the Component Interface Permissions window and click Save
Testing a Component InterfaceThe iWay Adapter for PeopleSoft 8 uses PeopleSoft metadata and component interfaces therefore it can
accommodate new or modified component interfaces The adapter makes no assumptions about
component interfaces except that they are logical and valid Therefore each component interface must be
tested before being used as a source for the adapter
8172019 People Soft Users Guide
httpslidepdfcomreaderfullpeople-soft-users-guide 7280
72 Novell exteNd Composer 521 Connect for PeopleSoft Userrsquos Guide
If changes are made to the underlying application by the user or by means of a PeopleSoft upgrade and
these changes invalidate a component interface the user must repair the invalid component interface
before the adapter uses it
To test a component interface
1 In Application Designer select Test Component Interface from the Tools menu
The Component Interface Tester dialog box opens
2 Click the Component Interface Tester dialog box to bring it to the foreground if required
3 To test the component interface using the Find method click Find
The Component Interface Tester - Find Results window opens displaying all of the possible entries
for the underlying component If there are more than 300 entries a message appears
4 Select a field in the left pane of the Find Results window
5 To display the relevant data for that particular key click Get Selected
8172019 People Soft Users Guide
httpslidepdfcomreaderfullpeople-soft-users-guide 7380
Using Component Interfaces 73
If the security settings permit you can change the values in the individual fields
6 To test the component interface using the Get method enter the existing key(s)
7 Click Get Existing
This returns the exposed properties for the key that you entered
You can change values if Update access has been specified
8172019 People Soft Users Guide
httpslidepdfcomreaderfullpeople-soft-users-guide 7480
74 Novell exteNd Composer 521 Connect for PeopleSoft Userrsquos Guide
8 To test the component interface using the Create method enter all required key values
9 Click Create New
When you enter valid values in lsquoCreatersquo keys the JOBCODE Data Display window opens after the
Table name is expanded with default data in place
You can change fields at this point Changes are validated against the componentrsquos underlying business logic
10 After you finish making changes right-click the top item in the pane
11 Click Save to save your changes
The keys used to create the record can be used with the Get method for viewing data
The data that were added can be viewed in the PeopleSoft Component as shown in the following
example
8172019 People Soft Users Guide
httpslidepdfcomreaderfullpeople-soft-users-guide 7580
Using Component Interfaces 75
Notice the Effective Date as one of the default values
You have finished testing the component interface Before using the component interface you must
generate its API as described at ldquoBuilding PeopleSoft Component Interface API Classesrdquo on page 26
8172019 People Soft Users Guide
httpslidepdfcomreaderfullpeople-soft-users-guide 7680
76 Novell exteNd Composer 521 Connect for PeopleSoft Userrsquos Guide
8172019 People Soft Users Guide
httpslidepdfcomreaderfullpeople-soft-users-guide 7780
77
Index
Aactions
After Execute 49Before Execute 49creating 42PeopleSoft Request creating 43PeopleSoft Service Request creating 52XML Map 55
Adapter Service Request 53Add Case 53After Execute actions 49AgJarsconf 16API bindings 26application servers
Novell 16supported 11
BBEA WebLogic 11Before Execute actions 49
CCase Expression 54CCI 13classpath
application server 16design-time 16
clearWarnings 61Common Client Interface 13Component Interface Properties 65component interface PeopleSoft
creating 63methods 65
properties 66securing 66
testing 71component PeopleSoft
creating 39Editor window 41generating interface classes 26
Composer about 11connection parameter
Connection Type 36 38constant 33Error Directory 37
expression-driven 33File Mask 37Host 38Is Keep Alive 39Is Length Prefix 39Is XML 39Listener Port 38Maximum Pool Size 37 38 39Metadata Connection 37 38 39Poll Interval 37Polling Location 36
Port 38Processing Mode 37ResponseAck Directory 37switching from constant to expression-driven 34Synchronization Type 37 38Thread Limit 37
connection resource
File service 36HTTP Service 37PeopleSoft connection 34TCP Ser vice 38types of 33
connection resour ce PeopleSoft creating 34Connection Type 36 38
Connectsdescription 11
Native Environment pane 42PeopleSoft about 12
DDefault case 55Deployed Objects 57DOM output selecting XML template for 50
EECMAScript
Composer 11methods 57 59
Edit Document 48Edit License 29EISPRODUCTNAME 60EISPRODUCTVERSION 60Error Directory 37EXECUTEWITHI 60EXECUTEWITHIO 60
8172019 People Soft Users Guide
httpslidepdfcomreaderfullpeople-soft-users-guide 7880
78
expression-driven 34
FFault Message 51File Mask 37Filter Request 53Filter Response 46
GGet Existing 73Get Schemas 44getAdapterMetaData 60getAdapterType 59getConnectionMetaData 60getLastError 61getWarnings 61
HHost 38HTTPS 38
IIBM WebSphere 11Initial Pool Size 35INTERACTIO NSPECS 60Is Keep Alive 39Is Length Prefix 39Is XML 39iWay 14iwpeoplesoftjar 16
iwpsci81jar 16 17iwpsci84jar 16 17
JJ2EE Connector Architecture 13
jar files
iwpeoplesoftjar 16iwpsci81jar 16iwpsci84jar 16
psGenCompjar 16 28 psjoajar 16
jarexe 26
javacexe 26JBoss 11
KKeep Alive 39
Llicense update
design-time 29Edit License 29obtaining 29runtime 30
Licenses tab 29Listener 55
Listener Por t 38LOCALTX 60
MMapping 55maximum occurrence 45Maximum Pool Size 35 37 38 39Metadata Connection 37 38 39methods
adapter interface 59connector interface 60
N Native Environment pane 42
OOutput DOM
selecting XML template for 40
PPeopleSoft component
creating 39Editor window 41PeopleSoft component interface
classes generating 26creating 63methods 65
properties 66securing 66testing 71
PeopleSoft File Service Connection 36PeopleSoft HTTP Service Connection 38PeopleSoft Java Object Adapter 15PeopleSoft Service
Console displaying 56
creating 49deploying 55managing 55starting and stopping 55undeploying 57
PeopleSoft Service Request action 52PeopleSoft Service TCP Connection 38
permission lists
access level specifying 67identifying 66
8172019 People Soft Users Guide
httpslidepdfcomreaderfullpeople-soft-users-guide 7980
79
selecting 69Poll Interval 37Polling Location 36Port 38Processing Mode 37
psGenCompjar 16 28 psjoajar
design time configuration adding to 16 Novell application server adding to 16requirement 9
pstoolsproperties 16
RRAR
deployment 12description 13
RECEIVE 39RECEIVE_ACK 38RECEIVE_REPLY 38Request action
creating 43
description 42modifying manually 48
Request Tree 53RequestcreateXPath( ) 47resource adaptor archives deployment 12ResponseAck Directory 37
Sschemas get 44security component interface
PeopleSoft 81x 66PeopleSoft 84+ 68
Sequential 37Service Request dialog box 52Service Request Tree 53Service Response 54service PeopleSoft
creating 49managing 55
Sign-on Times ta b 69SPECVERSION 60Synchronization Type 37 38 54 55
T
TCPIs Length Pr efix 39Keep Alive 39length field 4-bit binary 39Service Connection resource creating 38
Temp Message 51Template Category 50 51Template Name 50 51testing component interface PeopleSoft 71Thread Limit 37Threaded 37
UUndeploy 57
Vvariables project 34
Xxconfigxml 16XML templates 39xObject
descr iption 33
New 36 37 38 49XPath 11XSLT 11
8172019 People Soft Users Guide
httpslidepdfcomreaderfullpeople-soft-users-guide 8080
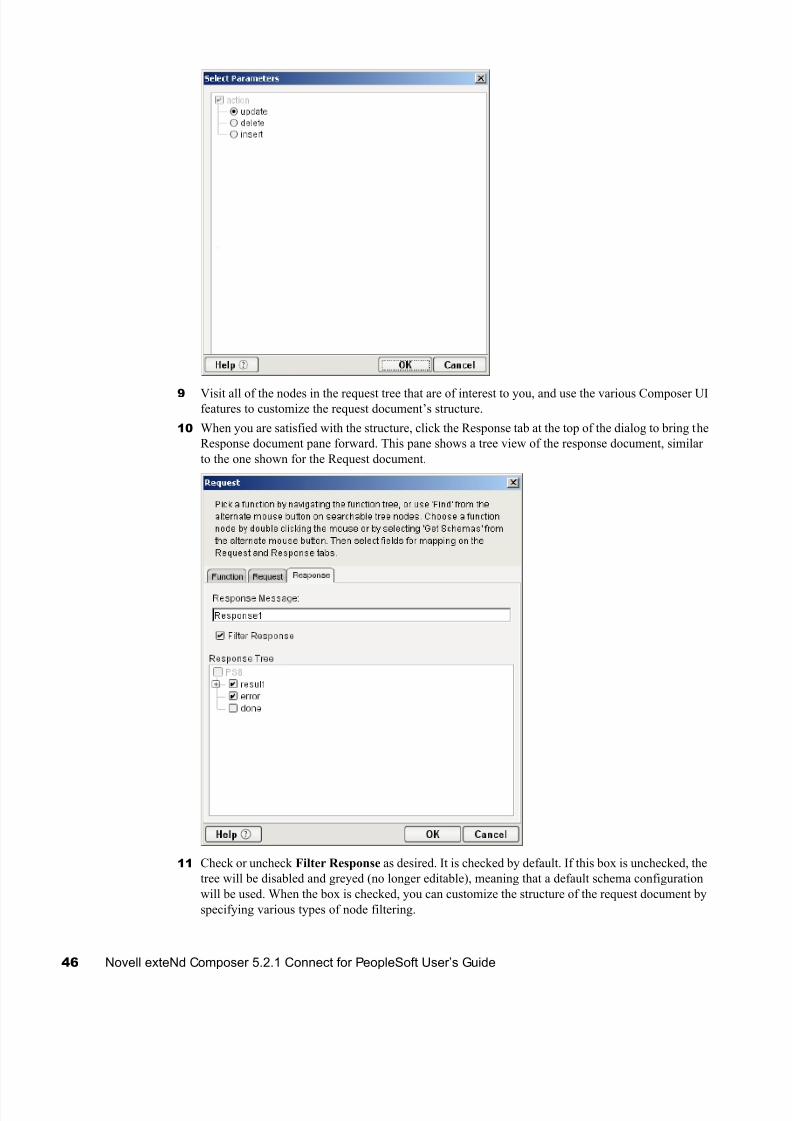
8172019 People Soft Users Guide
httpslidepdfcomreaderfullpeople-soft-users-guide 8080