Pegasus Web Xchange - payslip.heart-it.co.ukpayslip.heart-it.co.uk/WebXchange/Help/Payroll Self...
15
Pegasus Web Xchange Payroll Self Service - Setup Guide
-
Upload
vuongthuan -
Category
Documents
-
view
213 -
download
0
Transcript of Pegasus Web Xchange - payslip.heart-it.co.ukpayslip.heart-it.co.uk/WebXchange/Help/Payroll Self...

Pegasus Web Xchange
Payroll Self Service - Setup Guide

Pegasus Web Xchange Payroll Self Service - Setup Guide
Copyright © Pegasus Softw are Limited, 2013
Manual published by:
Pegasus Softw are Limited Orion House Orion Way Kettering Northamptonshire NN15 6PE
www.pegasus.co.uk
All rights reserved. No part of this manual or any accompanying programs may be copied, sold, loaned or in any w ay disposed of by way of trade or for any kind of profit or incentive w ithout the express permission of Pegasus Softw are Limited in w riting, or as specif ied in the licence agreement w hich accompanies this manual and associated programs. Whilst Pegasus Softw are Limited takes reasonable steps to ensure that the contents of this manual are up to date, and correctly describe the functioning of the programs, neither Pegasus Softw are Limited nor any of its Partners give any w arranty that the manual is error free, nor that the programs w ill perform all functions stated in the manual. Pegasus Softw are Limited has a policy of continual improvement of its softw are and accordingly this manual may describe features w hich are no longer available in the current release of the softw are available to customers, or w hich are proposed for a future release of the softw are. Under no circumstances w ill Pegasus Softw are Limited or any of its Partners have any liability to any customer arising out of any error, omission or inaccuracy in this manual. All trademarks are acknow ledged. Pegasus Opera 3 is a trademark.

Pegasus Web Xchange Page 3 of 15 Payroll Self Service - Setup Guide
Payroll Self Service - Setup Guide Contents
Introduction ..................................................................................................................................................................4 Welcome ....................................................................................................................................................................4 About this Guide .......................................................................................................................................................4 Audience & Expected Skills ....................................................................................................................................4 Companion Guides...................................................................................................................................................4
Setup Flowchart...........................................................................................................................................................5 Setup Checklists – Opera 3 ......................................................................................................................................6
STEP 1: Activate for Payroll Self Service and Run Update Data Structures ..................................................6 STEP 2: Run the Payroll Self Service Validator Utility (Pegasus Partners Only) ..........................................7 STEP 3: Subscribe Companies to Payroll Self Service......................................................................................8 STEP 4: Create Payroll Self Service Departments and Link to Employees (Optional) .................................9 STEP 5: Update Employees’ Email Addresses (Optional) ............................................................................. 10
Setup Checklists – Payroll Self Service Website ............................................................................................ 11 STEP 6: Define Default Access for User Roles ................................................................................................ 11 STEP 7: Create User Accounts & Send Invitations to Join............................................................................. 12 STEP 8: Give Managers Access to their Team’s Details (Optional) ............................................................. 13
Feedback .................................................................................................................................................................... 14 Glossary...................................................................................................................................................................... 15

Pegasus Web Xchange Page 4 of 15 Payroll Self Service - Setup Guide
Payroll Self Service - Setup Guide Introduction
Welcome Thank you for purchasing Payroll Self Service - the first feature available with Pegasus Web Xchange, the application that provides access to Opera 3 data using a web browser. With Payroll Self Service your employees can access their payroll information online either when logged on to a company intranet or when using the internet.
About this Guide This Setup Guide provides information needed to set up Payroll Self Service after Opera 3 (2.00 or later) and Pegasus Web Xchange have been installed, the Communications Service has been configured and the website has been set up before employees join Payroll Self Service. Once the steps in this guide have been completed the website can be updated with the employees’ payslips as part of the normal payroll run.
Audience & Expected Skills This guide is for administrators who will be responsible for setting up Payroll Self Service.
It is assumed that you have working knowledge of the following:
• Pegasus Opera 3
• Pegasus Web Xchange
Companion Guides These other guides are available for Pegasus Web Xchange:
Guide Description Audience
Installation & Implementation Guide
This provides information concerning the installation and initial configuration of the necessary components for Pegasus Web Xchange on one or more machines.
Implementation engineers
Payroll Self Service User Guide
This guide provides instructions for using the Payroll Self Service website.
Everyday users of the Payroll Self Service website

Pegasus Web Xchange Page 5 of 15 Payroll Self Service - Setup Guide
Payroll Self Service - Setup Guide Setup Flowchart
Pegasus Web Xchange Page 6 of 15 Payroll Self Service - Setup Guide
Payroll Self Service - Setup Guide Setup Checklists – Opera 3
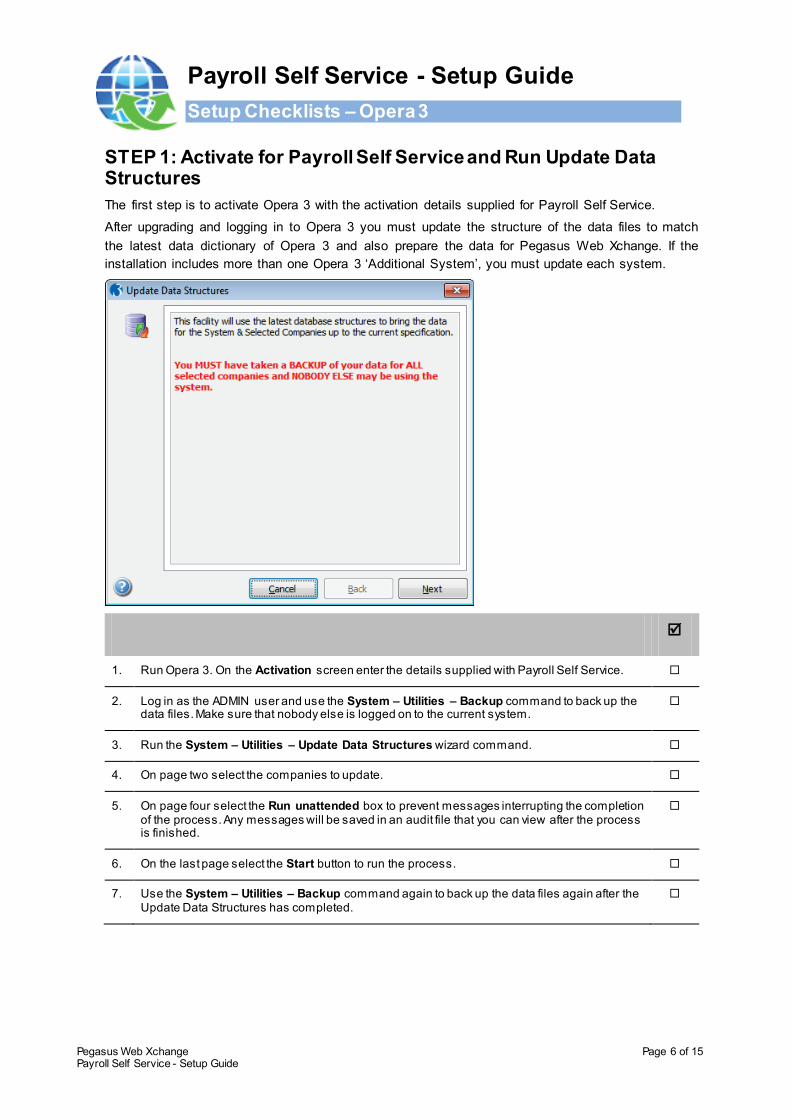
STEP 1: Activate for Payroll Self Service and Run Update Data Structures The first step is to activate Opera 3 with the activation details supplied for Payroll Self Service.
After upgrading and logging in to Opera 3 you must update the structure of the data files to match the latest data dictionary of Opera 3 and also prepare the data for Pegasus Web Xchange. If the installation includes more than one Opera 3 ‘Additional System’, you must update each system.
1. Run Opera 3. On the Activation screen enter the details supplied with Payroll Self Service.
2. Log in as the ADMIN user and use the System – Utilities – Backup command to back up the data files. Make sure that nobody else is logged on to the current system.
3. Run the System – Utilities – Update Data Structures wizard command.
4. On page two select the companies to update.
5. On page four select the Run unattended box to prevent messages interrupting the completion of the process. Any messages will be saved in an audit file that you can view after the process is finished.
6. On the last page select the Start button to run the process.
7. Use the System – Utilities – Backup command again to back up the data files again after the Update Data Structures has completed.

Pegasus Web Xchange Page 7 of 15 Payroll Self Service - Setup Guide
STEP 2: Run the Payroll Self Service Validator Utility (Pegasus Partners Only) Run the Payroll Self Service Validator Utility on the Opera 3 payroll data to validate it prior to subscribing the company to the Payroll Self Service feature. This utility checks for issues with the payroll and personnel data on the selected companies. It is important that any information available to an employee is both accurate and comprehensive.
Important: This is designed for use only by Pegasus partners.
1. Copy all the Payroll Self Service Validator files into the Opera 3 Client Installation folder. The default installation folder is either C:\Program Files (x86)\Pegasus\O3 Client XXX or C:\Program Files\Pegasus\O3 Client XXX (where XXX is either VFP or SQL).
2. Open the pssReadme.html file and read the contents.
3. Run the pssv.exe or pssvsql.exe file (depending on whether the Visual Foxpro or SQL Server edition of Opera 3 is used).
4. Follow the on-screen prompts and information and run the PSS Validator report.
5. Log out and then log in to Opera 3 as normal.
6. If applicable fix the data issues using either the Opera 3 form described under the Action heading in the Payroll Self Service Validator or by using either Visual Foxpro or SQL Server (depending on the edition of Opera 3 used).

Pegasus Web Xchange Page 8 of 15 Payroll Self Service - Setup Guide
STEP 3: Subscribe Companies to Payroll Self Service The ‘subscription’ to Payroll Self Service is when company and employee information is uploaded to the Pegasus Web Xchange SQL Server databases. After a company is subscribed all future updates to employee records in Opera 3 will automatically be synchronised and displayed on the Payroll Self Service pages of the website. Changes made by employees to their details on the website will need to be approved before they are updated in Opera 3.
This must be done for all companies that will be included in Payroll Self Service.
1. Run the Personnel - Utilities - Re-Organise command. This must be done before subscribing the first company.
2. Run the Opera 3 System - PWX Centre command.
3. From the Action menu select the Subscription command to load the subscription wizard or press F7.
4. On page two of the wizard select the Payroll Self Service option for each selected company.
5. On the last page select Start to run the process.
Note: This process may take some time, depending on both the number of companies selected and the number of employees in each company.
Note: There may be a small delay after a company is subscribed before it can be used in Pegasus Web Xchange. This depends on the amount of data that needs to be synchronised between Opera 3 and Pegasus Web Xchange.

Pegasus Web Xchange Page 9 of 15 Payroll Self Service - Setup Guide
STEP 4: Create Payroll Self Service Departments and Link to Employees (Optional)
Note: This step is necessary only if team leaders or managers need to be able to see their employees’ details in Payroll Self Service. If this is not necessary go to the next step.
Employees working in teams can be included in Payroll Self Service Departments so that their team leaders can see some of the details for people in those teams. For example you could have a department called ‘Production’ that includes everyone in manufacturing but is made up of ‘Assembly’, ‘Finishing’ and ‘Quality Control’ teams - each supervised by different team leaders. These teams can be created as ‘PSS Departments’ and then linked to the team members. Each team leader is then assigned manager permissions for their team in Payroll Self Service.
1. Run the Payroll – Maintenance – PSS Department Details command and add a code for each of the required teams. To copy the existing Payroll Departments, use CTRL+ M or select the copy data icon from the Opera 3 toolbar.
2. Run the Payroll – Processing command.
For each employee that will be invited to join Payroll Self Service:
i. Locate their record and open the Details & Bank form
ii. Enter their PSS Department code on the Additional Information tab.
Close the form and then repeat for each employee.

Pegasus Web Xchange Page 10 of 15 Payroll Self Service - Setup Guide
STEP 5: Update Employees’ Email Addresses (Optional) This step is necessary only if the Personnel application is used and the employees’ email addresses have not been saved on their record. The email addresses are included in the data upload to the Payroll Self Service website when employees are created on the website. If the email addresses have not been entered you must add them when you create the users on the Payroll Self Service website.
1. Run the Personnel – Processing command. For the first employee, open the Personal form from the Action menu.
2. Update the email address on the form and select Save.
3. Repeat for each employee.

Pegasus Web Xchange Page 11 of 15 Payroll Self Service - Setup Guide
Payroll Self Service - Setup Guide Setup Checklists – Payroll Self Service Website
After Opera 3 has been set up for Payroll Self Service the web site needs to be set up. This involves setting up default access permissions for users of the website - including users, managers and administrators, then creating the users of the website to join Payroll Self Service.
STEP 6: Define Default Access for User Roles Payroll Self Service includes user roles for both managers and employees. User roles define default access permissions when new to the employee summary and details pages in Payroll Self Service. Managers will be able to see their own details as well as that of the people in their teams (PSS departments).
Installed Default User Roles
Page Permission
Man
ager
Employee Summary Read Only
Employee Details No Access
Employee Photo, Contacts, Education, Bank Account, Company Car, Diary No Access
Empl
oyee
Employee Details, Photo, Bank Account, Contacts, Education, Company Car Full Access
Employee Diary Read Only
1
2
Note: If the default access permissions do not need to be changed, go to STEP 6.
1. Sign in as PSSAdmin and open the Payroll Self Service Administration section. This user should have been created by the engineer who installed and implemented Pegasus Web Xchange.
2. Select the Roles button.
3. Set the access permissions for the manager role and save the page
4. Repeat for the employee role and save the page.
Pegasus Web Xchange Page 12 of 15 Payroll Self Service - Setup Guide
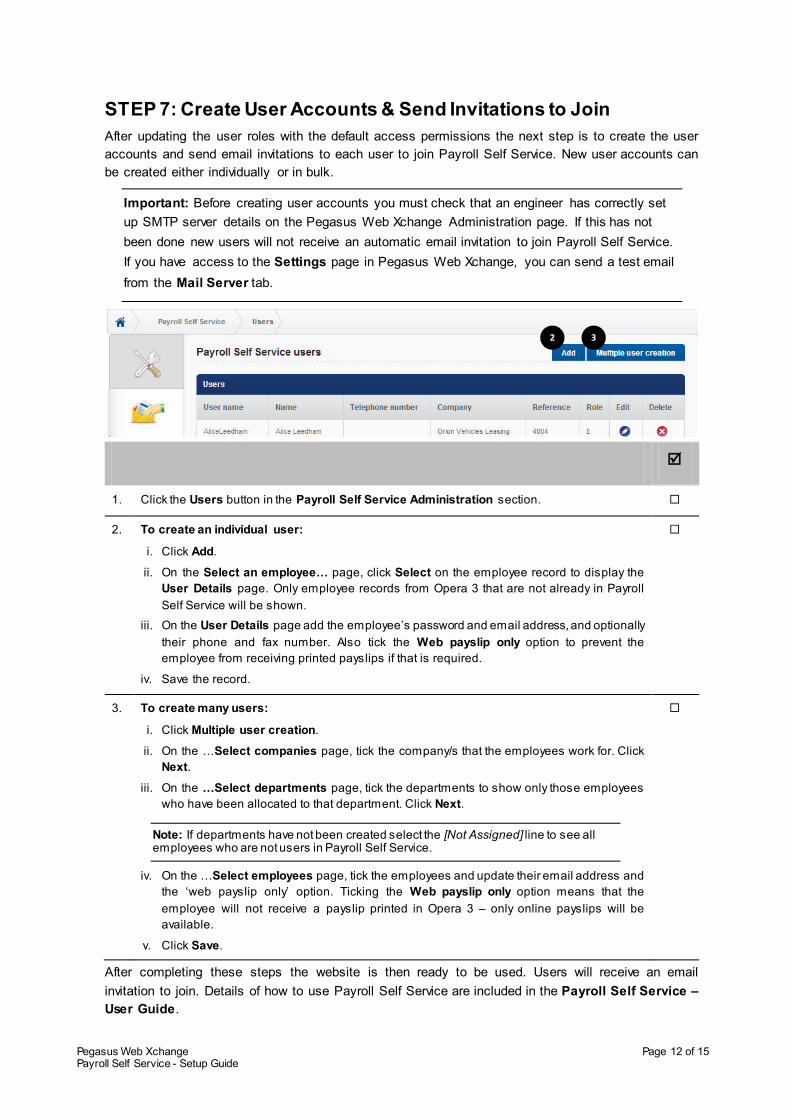
STEP 7: Create User Accounts & Send Invitations to Join After updating the user roles with the default access permissions the next step is to create the user accounts and send email invitations to each user to join Payroll Self Service. New user accounts can be created either individually or in bulk.
Important: Before creating user accounts you must check that an engineer has correctly set up SMTP server details on the Pegasus Web Xchange Administration page. If this has not been done new users will not receive an automatic email invitation to join Payroll Self Service. If you have access to the Settings page in Pegasus Web Xchange, you can send a test email from the Mail Server tab.
2 3
1. Click the Users button in the Payroll Self Service Administration section.
2. To create an individual user:
i. Click Add.
ii. On the Select an employee… page, click Select on the employee record to display the User Details page. Only employee records from Opera 3 that are not already in Payroll Self Service will be shown.
iii. On the User Details page add the employee’s password and email address, and optionally their phone and fax number. Also tick the Web payslip only option to prevent the employee from receiving printed payslips if that is required.
iv. Save the record.
3. To create many users:
i. Click Multiple user creation.
ii. On the …Select companies page, tick the company/s that the employees work for. Click Next.
iii. On the …Select departments page, tick the departments to show only those employees who have been allocated to that department. Click Next.
Note: If departments have not been created select the [Not Assigned] line to see all employees who are not users in Payroll Self Service.
iv. On the …Select employees page, tick the employees and update their email address and the ‘web payslip only’ option. Ticking the Web payslip only option means that the employee will not receive a payslip printed in Opera 3 – only online payslips will be available.
v. Click Save.
After completing these steps the website is then ready to be used. Users will receive an email invitation to join. Details of how to use Payroll Self Service are included in the Payroll Self Service – User Guide.

Pegasus Web Xchange Page 13 of 15 Payroll Self Service - Setup Guide
STEP 8: Give Managers Access to their Team’s Details (Optional) If you completed step 4 to create the required PSS Departments and then link those departments to the employees in the Payroll application, you must now link the departments to the managers on the Payroll Self Service website. This will give the managers access to some details for people in their teams. The access they are given is controlled by the access permissions on the manager role – defined on step 6.
Note: Remain signed in as the PSSAdmin user to complete these steps.
1. Select the Users button.
2. Select the edit button for the relevant manager user record.
3. On the User Details page select the Assign departments button and then select the Add link for each relevant PSS department.
Select Done when all the necessary departments have been selected.
4. Select Assign manager access and choose the appropriate access permissions for the manager’s access to their team’s details. This defines what the manager will be able to see, and whether they will be able to change any details.
Select Save.
5. Select Assign employee access and choose the appropriate access permissions for the manager’s access to their own details.
Select Save.

Pegasus Web Xchange Page 14 of 15 Payroll Self Service - Setup Guide
Payroll Self Service - Setup Guide Feedback
After completing these steps the website is then ready to be used. Users will receive an email invitation to join. Details of how to use Payroll Self Service are included in the Payroll Self Service – User Guide.
All the necessary steps are now completed. You have subscribed your companies to Payroll Self Service, created PSS Departments if required, defined the access permissions for people using Payroll Self Service, created the necessary user accounts, allocated managers to their PSS departments – and thereby linked them to their teams- and sent invitations to your employees to join.
Feedback We are interested to hear your views on the documents we provide. Your point of view is important to us. To give your feedback, send an email to [email protected].
Please type “Payroll Self Service - Setup Guide” in the subject box. Please note that product support is not offered through the above email address.
Pegasus Web Xchange Page 15 of 15 Payroll Self Service - Setup Guide
Payroll Self Service - Setup Guide Glossary
Administrator Users There are two types of administrators:
• Pegasus Web Xchange administrators: These users have access to the Website Administration pages of Pegasus Web Xchange – where all user accounts can be changed or deleted.
• Payroll Self Service administrators: These users can set access permissions for manager and employee roles and create user accounts for employees.
Employee Users Employee users are the everyday users of the website to check their payslips and when necessary change their details.
Managers Users Managers can see the summary information and/or details of employees in their teams.
Opera 3 ‘Additional System’ A system in Opera 3 includes a maximum of thirty six companies using 0-9 and A-Z as the company identifier. All Opera 3 installations include at least the ‘main’ system. ‘Additional Systems’ provide a mechanism to include up to thirty six more companies per system.
Payroll Self Service A feature of Pegasus Web Xchange that provides employees with access to their payslips and allows them to change their personal details using a web browser on a PC or iPad.
Payroll Self Service Administration
An area on the Payroll Self Service website where administrators define the access permissions for manager and employee roles and create user accounts for employees.
Payroll Self Service subscription
Opera 3 companies need to be subscribed to use Payroll Self Service from the PWX Centre in Opera 3. This prepares Pegasus Web Xchange for Payroll Self Service and links the company databases in Opera 3 to the Pegasus Web Xchange SQL Server databases.
Pegasus Web Xchange A set of web based services and Windows communication services that allow Opera 3 data to be viewed and modified using Windows File Servers, PCs and iPads.
Update Data Structures This command in the Opera 3 System Manager is normally used when the Opera 3 software is upgraded to the latest version. It updates the structure of the data files to match the latest data dictionary of Opera 3 and also prepares the data ready for use with Pegasus Web Xchange.
User accounts Each employee has a unique user account allocated to them. They are invited to join by email when their user account is created.
Web Payslips Web payslips are viewed on the Payroll Self Service website. Payslips can also be printed in the Opera 3 Payroll application. User accounts can be set up as ‘Web Payslip Only’ to prevent payslips from being printed for the employee.
End of Guide


![[Nutanix Partner Xchange] · pARTNER XCHANGE .NEXTCONFERENCE Announcing NUTANI PARTNER XCHANGE Connect I Learn I Celebrate 1 NEW ORLEANS, LA ERNEST N MORIAI CONVENTION CENTER](https://static.fdocuments.in/doc/165x107/5be7b78a09d3f246788cedee/nutanix-partner-xchange-partner-xchange-nextconference-announcing-nutani.jpg)