Developing a Samsung Integrated Gear...
38
Developing a Samsung Integrated Gear Application Development of an application requesting public transport data from Wiener Linien Seminar Thesis Course of study: Information Systems Vienna University of Economics and Business by Klemens Engelbrechtsmüller Submission date: June 18, 2015 Matriculation number, course: h0925814, 4251 Project Seminar of Information Systems Supervisor: ao.Univ.Prof. Dr. Rony G. Flatscher
-
Upload
nguyenxuyen -
Category
Documents
-
view
221 -
download
0
Transcript of Developing a Samsung Integrated Gear...

Developing a Samsung
Integrated Gear Application
Development of an application requesting public transportdata from Wiener Linien
Seminar ThesisCourse of study: Information Systems
Vienna University of Economics and Business
by
Klemens Engelbrechtsmüller
Submission date: June 18, 2015
Matriculation number, course: h0925814, 4251 Project Seminar of Information Systems
Supervisor: ao.Univ.Prof. Dr. Rony G. Flatscher
DeclarationI do solemnly declare that I have written the presented research thesis
Developing a Samsung Integrated Gear Application - Development of an
application requesting public transport data from Wiener Linien
By myself without undue help from a second person others and without using
such tools other than that specified. Where I have used thoughts from external
sources, directly or indirectly, published or unpublished, this is always clearly
attributed. Furthermore, I certify that this research thesis or any part of it has not
been previously submitted for a degree or any other qualification at the Vienna
University of Economics and Business or any other institution in Austria or
abroad.
Vienna, the May 31, 2015
Klemens Engelbrechtsmüller
I

AbstractThis paper describes the creation of a Samsung Integrated Gear application
requesting public transport data from Wiener Linien. In more detail, this paper
illustrates how to develop an Android Host application with a corresponding
Samsung Gear Wearable application step by step, including how to set up a
suitable development equipment for the development process and a description
how to deploy such an application on a Samsung Galaxy Note 3 smartphone
and a Samsung Gear wristwatch. Additionally, it shows how to connect and call
two Web services from Wiener Linien to get real-time data of their transports.
II
Contents1 Introduction...............................................................................................................................1
1.1 Samsung Accessory SDK.....................................................................................................2
1.2 Tizen...................................................................................................................................3
1.3 Open Government Data.....................................................................................................3
1.3.1 Wiener Linien Routingservice.................................................................................4
1.3.2 Wiener Linien Realtime Data..................................................................................5
2 Setting Up the Development Environment................................................................................6
2.1 Android SDK, Samsung Accessories and Eclipse.................................................................6
2.2 Tizen Wearable SDK with IDE.............................................................................................8
3 Creating a Samsung Gear Application......................................................................................10
3.1 Integrated Gear Application – PT Search..........................................................................10
3.2 Developing an Android Host.............................................................................................12
3.3 PT Search..........................................................................................................................18
3.4 Developing a Tizen Client.................................................................................................21
3.4.1 index.html.............................................................................................................22
3.4.2 main.js..................................................................................................................23
3.4.3 config.xml.............................................................................................................25
3.4.4 sapservices.xml.....................................................................................................25
3.5 Deploy the Application.....................................................................................................25
3.5.1 Create a WGT File.................................................................................................26
3.5.2 Install the Application...........................................................................................27
4 Conclusion...............................................................................................................................30
5 References...............................................................................................................................31
III
List of AbbreviationsADT Android Developer Tools
API Application Programming Interface
APK Android Package
BLE Bluetooth Low Energy
CSS Cascading Style Sheets
EFA Elektronische Fahrplanauskunft
GPS Global Positioning System
HTML Hypertext Markup Language
HTTP Hypertext Transfer Protocol
IDE Integrated Development Environment
JDK Java Development Kit
JRE Java Runtime Environment
JSON JavaScript Object Notation
LiMo Linux Mobile Foundation
SAP Samsung Accessory Protocol
SDK Software Development Kit
URL Uniform Ressource Locator
USB Universal Serial Bus
WU Vienna University of Economics and Business
WWW World Wide Web
XML Extensible Markup Language
IV
List of FiguresFigure 1 – Samsung Smart Device and Accessories [Samsung, A.]................................................2
Figure 2 – Objectives of data.gv.at...............................................................................................4
Figure 3 - Install Eclispe ADT Plugin..............................................................................................7
Figure 4 - Install Tizen IDE............................................................................................................9
Figure 5 - Application Types [Developer, S2.].............................................................................10
Figure 6 - Samsung Gear SM-V700.............................................................................................11
Figure 7 - Samsung Galaxy Note 3.............................................................................................11
Figure 8 – PT Search Process......................................................................................................12
Figure 9 - Eclipse IDE, New Android Application.........................................................................13
Figure 10 - User Interface PT Search..........................................................................................21
Figure 11 - Create a Web Application Project.............................................................................22
Figure 12 - Tizen IDE, Register Certificate...................................................................................26
Figure 13 – Eclipse IDE - Running the application.......................................................................29
V
Introduction Page 1
1 IntroductionAndroid is an operating system for many different mobile devices like
smartphones, tablets, wearables, televisions or cars. It was first developed by a
company called Android Inc. in 2003. After two years of development Google
bought Android Inc. in 2005. From now on Andy Rubin and his team worked on
what would later be known as the Android mobile operating system. In 2008,
Google partnered with T-Mobile to launch its first mobile phone with Android,
the G1 [BusinessInsider 2013]. Now, seven years and many versions later,
Android runs on more than one billion devices. [Android]
Android is written in C, C++ and Java and is based on a Linux Kernel. Its source
model is Open Source and in many devices with proprietary components.
Google publishes most of the code under the non-copyleft Apache License 2.0
which allows developers the modification and redistribution of the Android
source code [Wikipedia, Android].
Because of the big number of devices and users running Android, many
developers are creating and developing applications, so called apps, for the
Android operating system. Android applications are programmed in Java
language. There are a lot of Java libraries, distributed from Google and other
developers, which makes it easy to integrate functionality to the applications.
The Samsung Gear is a product line of smartwatches, which was launched in
2013. Although the Samsung Gear 2, which is used in this article, runs Tizen as
operating system, a connection to an Android device can be developed. To
build an app with an Android Host-side and a Tizen wearable side, Samsung
provides the Samsung Accessory SDK and the Tizen Wearable SDK
[Developer, S.]. It is also possible to program a standalone app for the
Samsung Gear, only using the Tizen Wearable SDK, but in this work a Gear
Companion App was developed.
Klemens Engelbrechtsmüller
Introduction Page 2
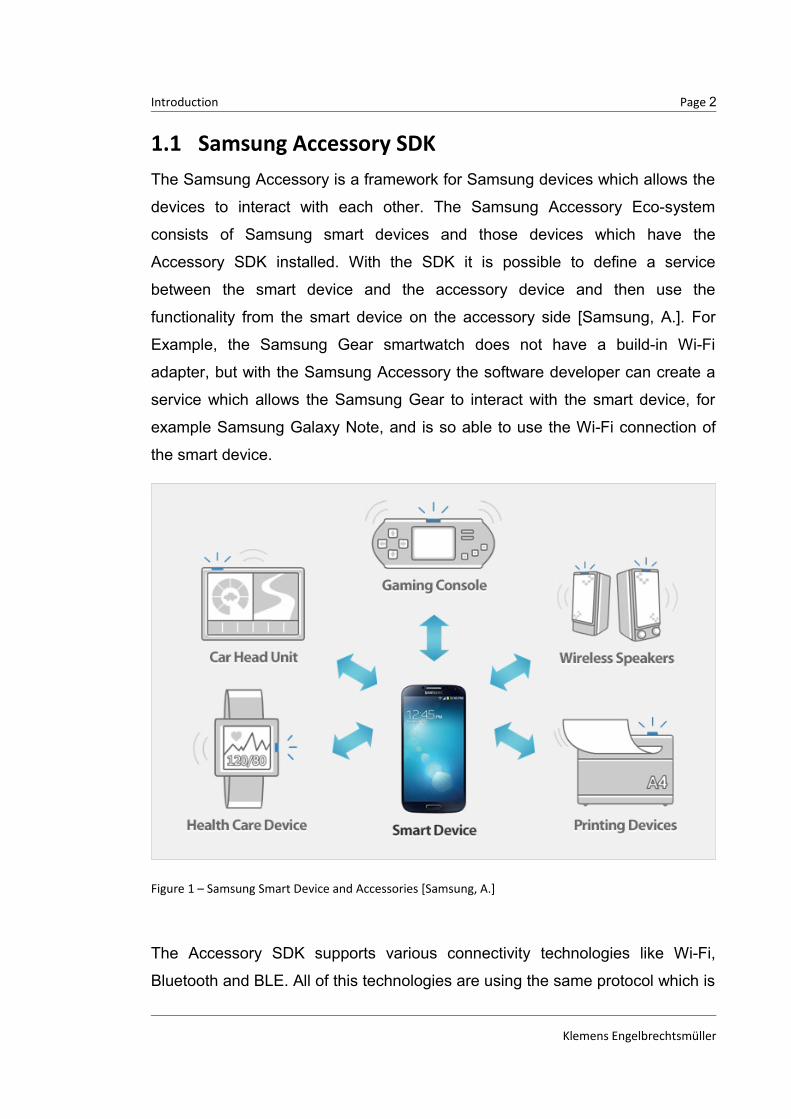
1.1 Samsung Accessory SDKThe Samsung Accessory is a framework for Samsung devices which allows the
devices to interact with each other. The Samsung Accessory Eco-system
consists of Samsung smart devices and those devices which have the
Accessory SDK installed. With the SDK it is possible to define a service
between the smart device and the accessory device and then use the
functionality from the smart device on the accessory side [Samsung, A.]. For
Example, the Samsung Gear smartwatch does not have a build-in Wi-Fi
adapter, but with the Samsung Accessory the software developer can create a
service which allows the Samsung Gear to interact with the smart device, for
example Samsung Galaxy Note, and is so able to use the Wi-Fi connection of
the smart device.
Figure 1 – Samsung Smart Device and Accessories [Samsung, A.]
The Accessory SDK supports various connectivity technologies like Wi-Fi,
Bluetooth and BLE. All of this technologies are using the same protocol which is
Klemens Engelbrechtsmüller
Introduction Page 3
provided from the SDK. Furthermore, it makes no difference in the development
process which of the connectivity technology is used, because all of them are
using the same protocol, independent from the technology [Samsung, A.].
1.2 TizenTizen is the operating system of the Samsung Gear smartwatch. It is an open-
source operating system which is based on Linux and was founded and first
developed from the Linux Foundation and the LiMo Foundation. In 2011, Intel
and the Linux Foundation decided to focus on Tizen instead of MeeGo.
Therefore, in 2012, the LiMo Foundation was renamed to Tizen Association and
is run by companies including Samsung, Intel, Huawei and many others. The
Tizen Association was formed to define the industry role of Tizen and works
closely with the Linux Foundation, which supports the Tizen open-source
project [Wikipedia, Tizen].
The advantages are the cross-platform architecture and the portability of the
operating system, so it can be installed on many different devices including
smartphones, tablets, wearable devices and others. Tizen provides two types of
applications running on the operation system. First, the developer is able to
create web applications, using HTML, JavaScript, CSS and HTML5. Second, it
is also possible to create native applications for Tizen. The native framework,
based on Bada, consists of system services and native modules which can be
used to develop native applications. Tizen also allows to develop hybrid
applications combining web and native application [Developer, T.].
1.3 Open Government DataOpen Government Data Österreich is a cooperation which was initiated from the
Federal Chancellery and the cities Vienna, Linz, Salzburg and Graz in 2011. Its
aim is to provide various data from different, decentralized data dictionaries and
to offer them in a centralized way to people who are interested in them [OGD].
Klemens Engelbrechtsmüller

Introduction Page 4
Figure 2 – Objectives of data.gv.at
1.3.1 Wiener Linien Routingservice
Wiener Linien Routingservice is an EFA XML Interface provided from Wiener
Linien. It includes the schedule from the public transport system in Vienna. It
was made public in 2013 within the Open Government Data Initiate from the city
Vienna under the ‘Creative Commons Namensnennung 3.0 Österreich’ [CC3.0].
It includes an API, a csv file describing stations, a csv file for transport lines and
a third csv file for platforms [WL, Routing].
The API can be reached with a simple HTTP request using this URL:
http://www.wienerlinien.at/ogd_routing/XML_TRIP_REQUEST2?
language=de. There are many possible request parameters to manipulate the
request. More details can be found in the API documentation [WL, Routing API
2013]. In this work the service is used to request stations from Wiener Linien
close to the sending device. Additionally, the csv files were used to get more
precise data. To get such stations from Wiener Linien the basic URL has to be
extended with two parameters including the coordinates in WGS84 format.
Klemens Engelbrechtsmüller
Introduction Page 5
http://www.wienerlinien.at/ogd_routing/XML_TRIP_REQUEST2?type_origin=coord&name_origin=16.338705:48.197833:WGS84
1.3.2 Wiener Linien Realtime Data
Wiener Linien Realtime Data is a Web service interface which provides real
time data, departure times, disturbances and news from Wiener Linien and their
public transport vehicles. The API, created in 2013, is also licensed under the
‘Creative Commons Namensnennung 3.0 Österreich’ [CC3.0]. It can be reached
via HTTP GET request using this URL:
http://www.wienerlinien.at/ogd_realtime/. The request allows different
URL parameters and the response data is in JSON format. Details can be found
in the API documentation [WL, Realtime API 2013].
Klemens Engelbrechtsmüller
Setting Up the Development Environment Page 6
2 Setting Up the Development EnvironmentIn this chapter it is explained what requirements must be fullfilled to develop a
Samsung Gear application on the wearable side with a host-side being an
Android mobile phone. The instructions are for Microsoft Windows 8.1
Professional, 64 Bit Intel i7 Processor. At first you need to install a Java
Runtime Environment (JRE) or a Java Development Kit (JDK) including a JRE.
In this article JDK1.7 x64 is used, which can be obtained under
http://www.oracle.com/technetwork/java/javase/overview/index.htm
l.
2.1 Android SDK, Samsung Accessories and EclipseThere are various ways to install a running development environment for
Android development. One way is to only install the Android SDK and program
with an IDE of your choice. A second possibility is to install Eclipse IDE with the
Android Developer Tools Plugin (ADT) and the Android SDK. Since May 2015
Android recommends to use their new official IDE ‘Android Studio” which also
includes the Android SKD. This bundle can be obtained from
https://developer.android.com/sdk/index.html.
In this article the second possibility is used. The first step is to install the
Android SDK which can be obtained from
https://developer.android.com/sdk/index.html - ‘SDK Tools Only”. After
downloading the EXE, follow the installation instructions.
The Eclipse IDE Version 3.7.2 Indigo or newer versions can be downloaded
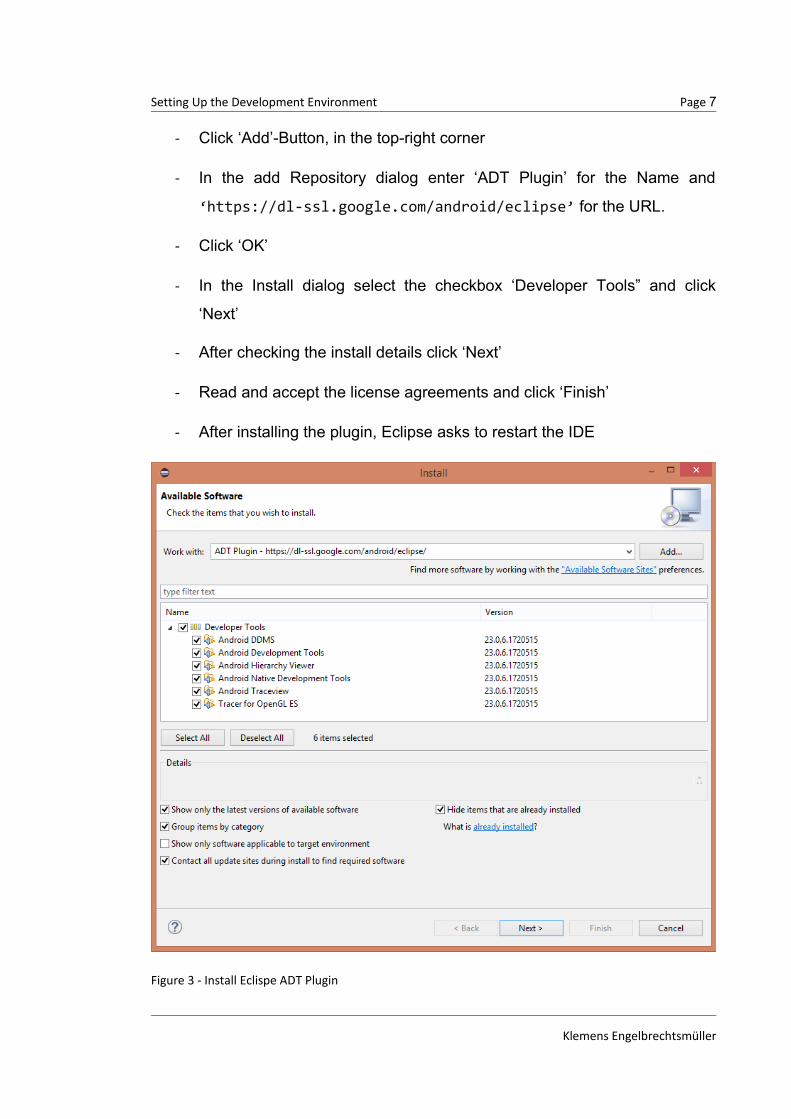
from http://eclipse.org/downloads. After installing Eclipse the Eclipse
ADT Plugin must be installed. To add the ADT plugin to Eclipse following steps
must be executed [Developer, A.]
- Start Eclipse and select ‘Help’ - ‘Install New Software’
Klemens Engelbrechtsmüller
Setting Up the Development Environment Page 7
- Click ‘Add’-Button, in the top-right corner
- In the add Repository dialog enter ‘ADT Plugin’ for the Name and
‘https://dl-ssl.google.com/android/eclipse’ for the URL.
- Click ‘OK’
- In the Install dialog select the checkbox ‘Developer Tools” and click
‘Next’
- After checking the install details click ‘Next’
- Read and accept the license agreements and click ‘Finish’
- After installing the plugin, Eclipse asks to restart the IDE
Figure 3 - Install Eclispe ADT Plugin
Klemens Engelbrechtsmüller
Setting Up the Development Environment Page 8
After these steps a standard Android application can be created. To program a
Samsung Android Host including a wearable side the Eclipse plugin ‘Samsung
Accessories plugin’ must be installed. For the installation of the ADT Plugin
open Eclipse and install new software. In the add repository dialog type
‘Samsung Accessories’ for the name and
http://developer.samsung.com/smsdk/repository/samsung-sdk for the
URL and install the plugin as described above. Finally, the Accessory SDK has
to be downloaded from
http://developer.samsung.com/galaxy#accessory. This ZIP file contains
two JAR files which will be needed if you want to create an Android project in
Eclipse [Developer, S1.].
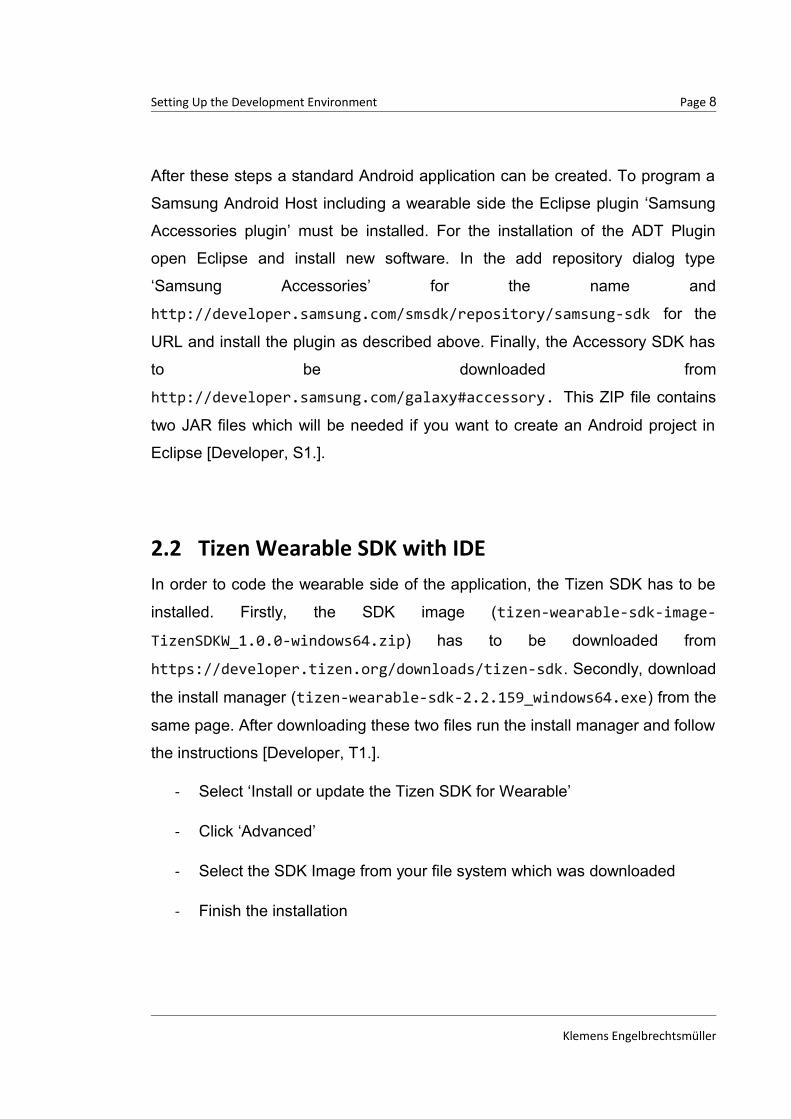
2.2 Tizen Wearable SDK with IDEIn order to code the wearable side of the application, the Tizen SDK has to be
installed. Firstly, the SDK image (tizen-wearable-sdk-image-
TizenSDKW_1.0.0-windows64.zip) has to be downloaded from
https://developer.tizen.org/downloads/tizen-sdk. Secondly, download
the install manager (tizen-wearable-sdk-2.2.159_windows64.exe) from the
same page. After downloading these two files run the install manager and follow
the instructions [Developer, T1.].
- Select ‘Install or update the Tizen SDK for Wearable’
- Click ‘Advanced’
- Select the SDK Image from your file system which was downloaded
- Finish the installation
Klemens Engelbrechtsmüller
Setting Up the Development Environment Page 9
Figure 4 - Install Tizen IDE
Klemens Engelbrechtsmüller
Creating a Samsung Gear Application Page 10
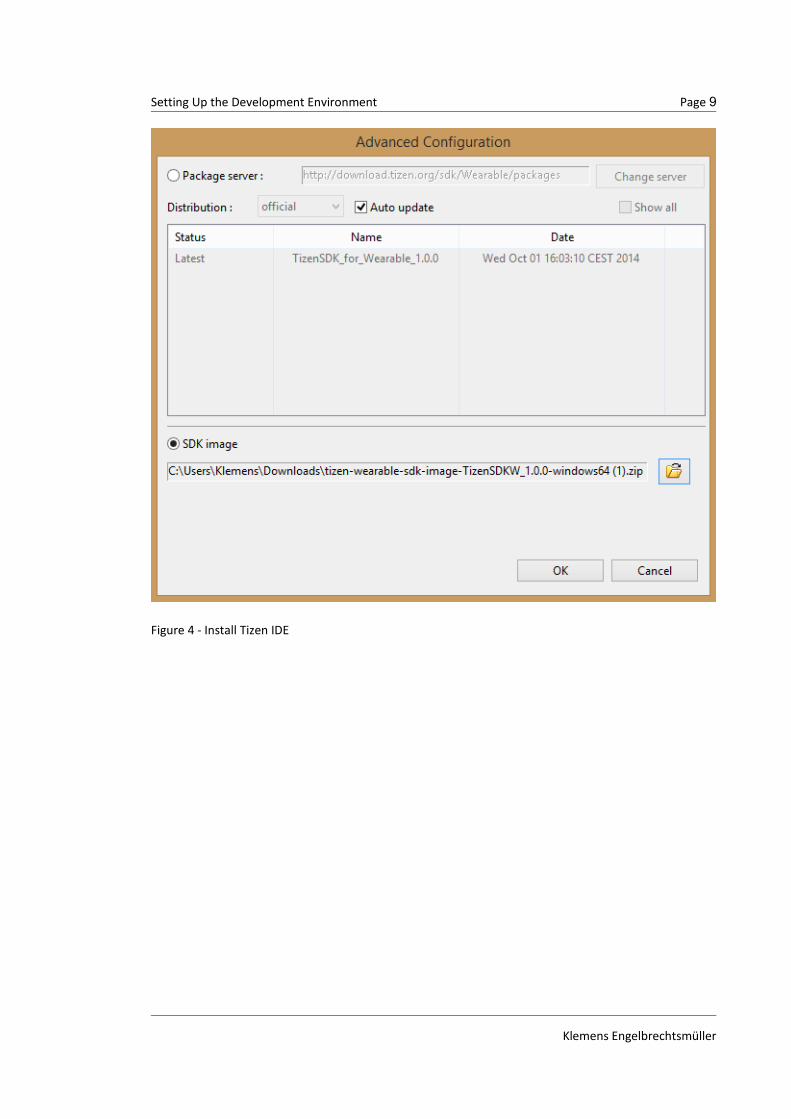
3 Creating a Samsung Gear ApplicationThis chapter explains the creation of an Integrated Samsung Gear application.
As mentioned before, there are three types of Samsung Gear applications,
which are called Linked (Master – Follower), Integrated and Standalone
application.
Figure 5 - Application Types [Developer, S2.]
The Master – Follower application is used if the installation of the host is not
necessary for a running wearable side. The Integrated solution is used if the
wearable side depends on the host side. Integrated applications are installed on
the host device, and install themselves automatically on the wearable side. A
Standalone application does not need a host-side, it only consists of a widget
for the wearable side, for example a clock widget.
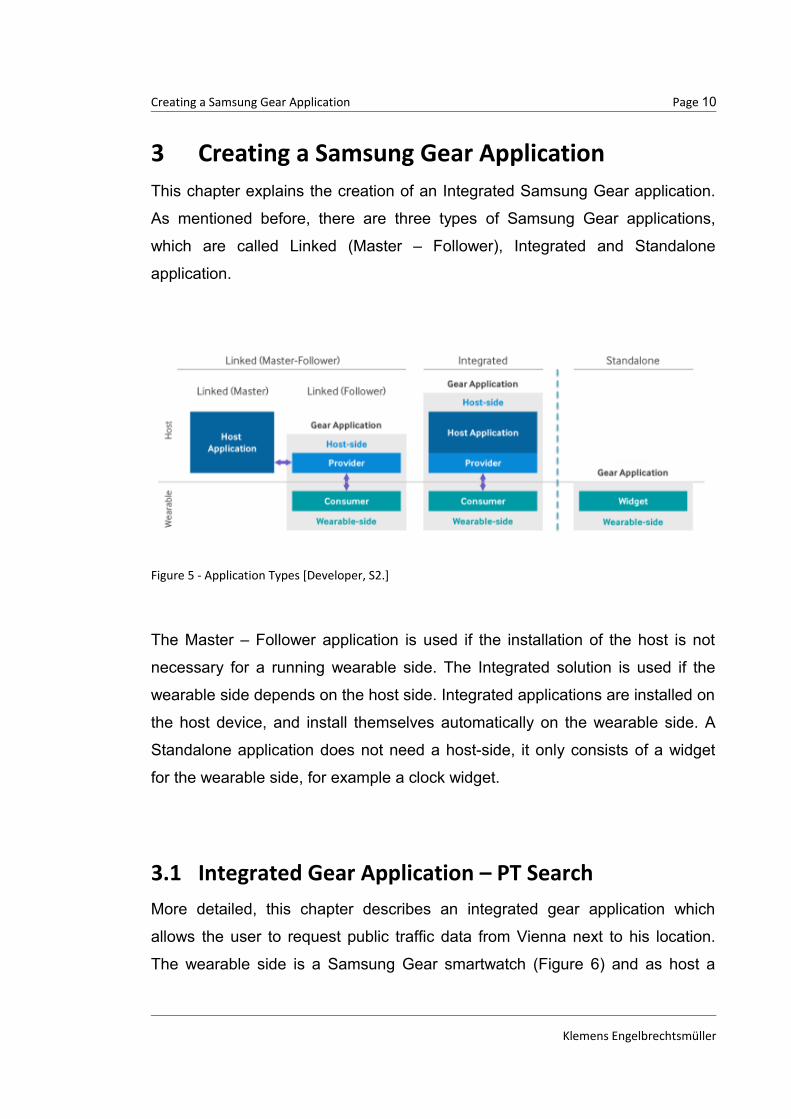
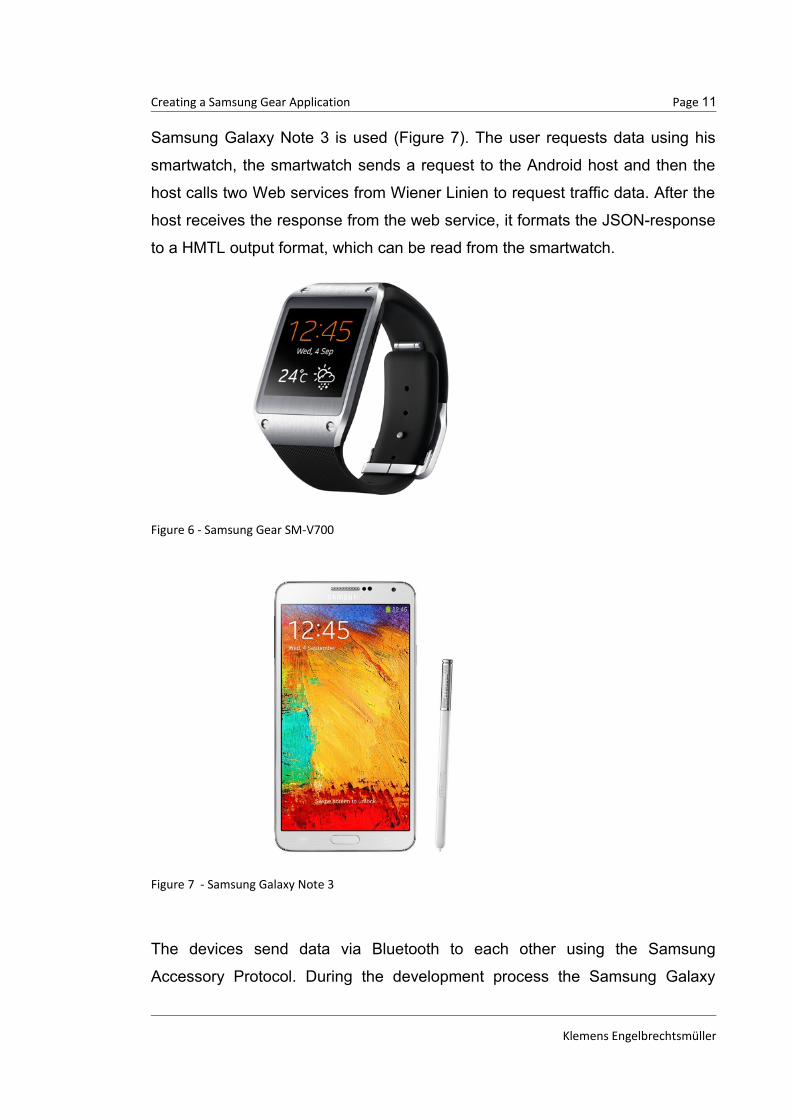
3.1 Integrated Gear Application – PT SearchMore detailed, this chapter describes an integrated gear application which
allows the user to request public traffic data from Vienna next to his location.
The wearable side is a Samsung Gear smartwatch (Figure 6) and as host a
Klemens Engelbrechtsmüller
Creating a Samsung Gear Application Page 11
Samsung Galaxy Note 3 is used (Figure 7). The user requests data using his
smartwatch, the smartwatch sends a request to the Android host and then the
host calls two Web services from Wiener Linien to request traffic data. After the
host receives the response from the web service, it formats the JSON-response
to a HMTL output format, which can be read from the smartwatch.
Figure 6 - Samsung Gear SM-V700
Figure 7 - Samsung Galaxy Note 3
The devices send data via Bluetooth to each other using the Samsung
Accessory Protocol. During the development process the Samsung Galaxy
Klemens Engelbrechtsmüller

Map to HTML format andsend data to Gear
Map Web service response to a Java object
Creating a Samsung Gear Application Page 12
Note 3 runs Android 4.x as operating system. The Samsung Gear runs Tizen,
which contains a web engine with an integrated rendering engine to display
HTML and CSS. Additionally JavaScript can be executed in Tizen.
Figure 8 – PT Search Process
3.2 Developing an Android HostThis chapter explains how to develop an Android host for an Integrated
Samsung Gear Application. The steps shown below are referring to the app ‘PT
Search’, the needed full source code is available on GitHub under
https://github.com/KlemensEngel/PTSearch.
Klemens Engelbrechtsmüller
HTTP request to Web service
Connection to AndroidHost via SAP
Creating a Samsung Gear Application Page 13
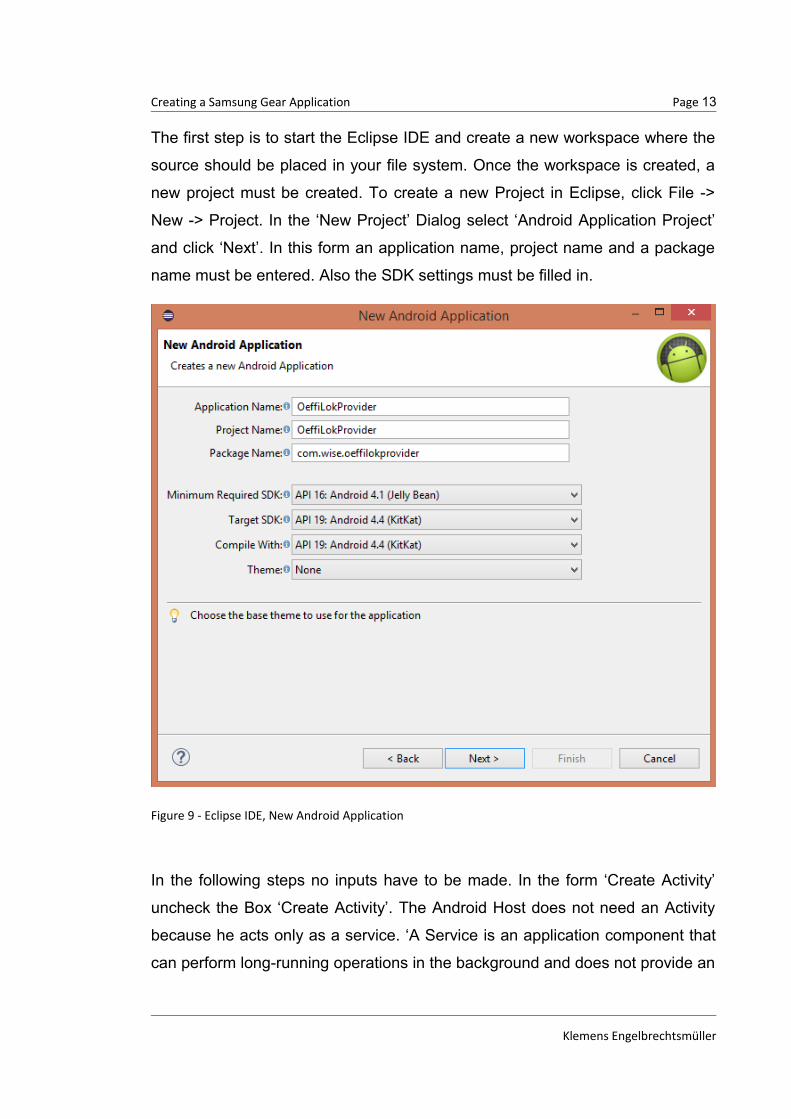
The first step is to start the Eclipse IDE and create a new workspace where the
source should be placed in your file system. Once the workspace is created, a
new project must be created. To create a new Project in Eclipse, click File ->
New -> Project. In the ‘New Project’ Dialog select ‘Android Application Project’
and click ‘Next’. In this form an application name, project name and a package
name must be entered. Also the SDK settings must be filled in.
Figure 9 - Eclipse IDE, New Android Application
In the following steps no inputs have to be made. In the form ‘Create Activity’
uncheck the Box ‘Create Activity’. The Android Host does not need an Activity
because he acts only as a service. ‘A Service is an application component that
can perform long-running operations in the background and does not provide an
Klemens Engelbrechtsmüller
Creating a Samsung Gear Application Page 14
user interface.’ [Developer, A1.]. In this application no user interface is needed,
because all of the interactions are made on the smartwatch and the Android
Host is only necessary for doing background operations. To end the creation of
the new project click ‘Finish’.
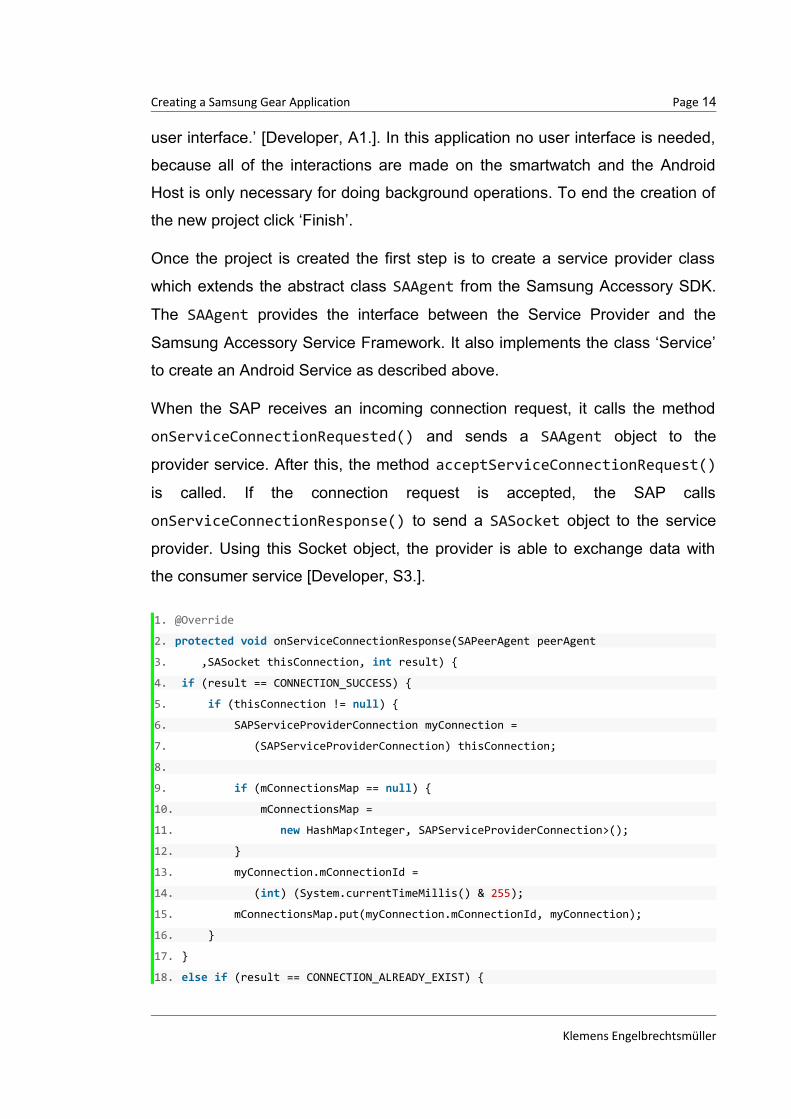
Once the project is created the first step is to create a service provider class
which extends the abstract class SAAgent from the Samsung Accessory SDK.
The SAAgent provides the interface between the Service Provider and the
Samsung Accessory Service Framework. It also implements the class ‘Service’
to create an Android Service as described above.
When the SAP receives an incoming connection request, it calls the method
onServiceConnectionRequested() and sends a SAAgent object to the
provider service. After this, the method acceptServiceConnectionRequest()
is called. If the connection request is accepted, the SAP calls
onServiceConnectionResponse() to send a SASocket object to the service
provider. Using this Socket object, the provider is able to exchange data with
the consumer service [Developer, S3.].
1. @Override
2. protected void onServiceConnectionResponse(SAPeerAgent peerAgent
3. ,SASocket thisConnection, int result) {
4. if (result == CONNECTION_SUCCESS) {
5. if (thisConnection != null) {
6. SAPServiceProviderConnection myConnection =
7. (SAPServiceProviderConnection) thisConnection;
8.
9. if (mConnectionsMap == null) {
10. mConnectionsMap =
11. new HashMap<Integer, SAPServiceProviderConnection>();
12. }
13. myConnection.mConnectionId =
14. (int) (System.currentTimeMillis() & 255);
15. mConnectionsMap.put(myConnection.mConnectionId, myConnection);
16. }
17. }
18. else if (result == CONNECTION_ALREADY_EXIST) {
Klemens Engelbrechtsmüller
Creating a Samsung Gear Application Page 15
19. Log.e(TAG, ’onServiceConnectionResponse
20. ,CONNECTION_ALREADY_EXIST’);
21. }
22.}
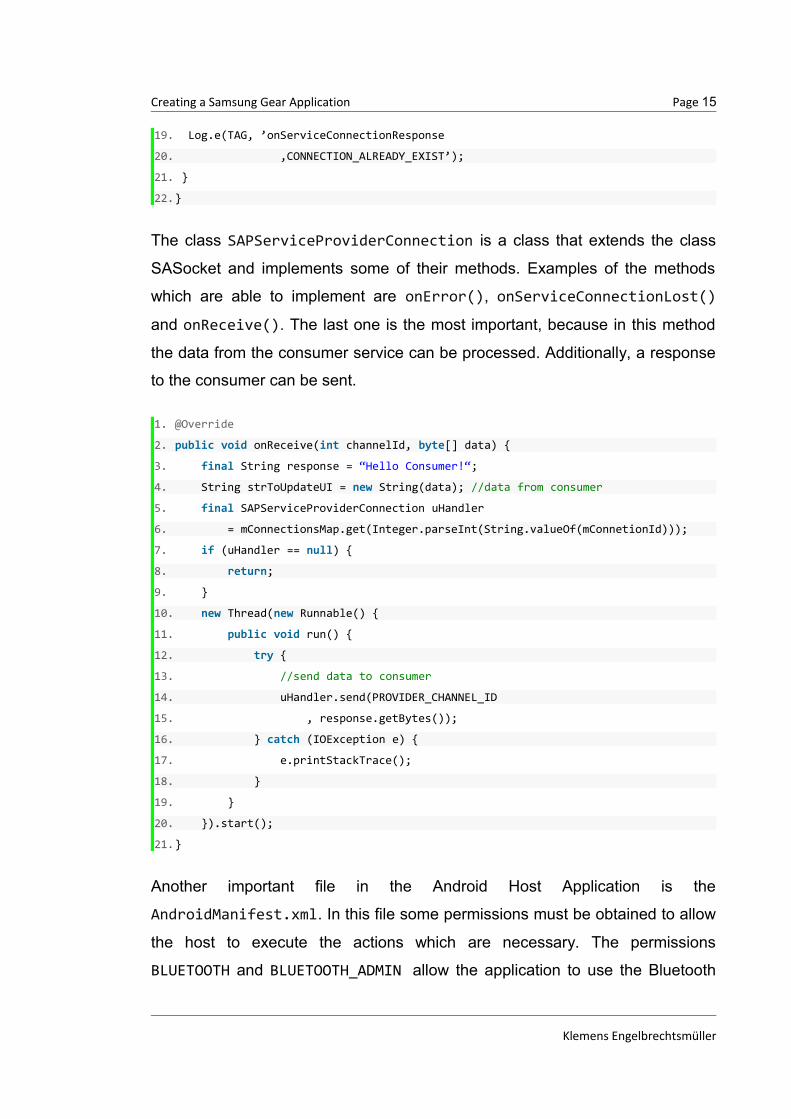
The class SAPServiceProviderConnection is a class that extends the class
SASocket and implements some of their methods. Examples of the methods
which are able to implement are onError(), onServiceConnectionLost()
and onReceive(). The last one is the most important, because in this method
the data from the consumer service can be processed. Additionally, a response
to the consumer can be sent.
1. @Override
2. public void onReceive(int channelId, byte[] data) {
3. final String response = “Hello Consumer!“;
4. String strToUpdateUI = new String(data); //data from consumer
5. final SAPServiceProviderConnection uHandler
6. = mConnectionsMap.get(Integer.parseInt(String.valueOf(mConnetionId)));
7. if (uHandler == null) {
8. return;
9. }
10. new Thread(new Runnable() {
11. public void run() {
12. try {
13. //send data to consumer
14. uHandler.send(PROVIDER_CHANNEL_ID
15. , response.getBytes());
16. } catch (IOException e) {
17. e.printStackTrace();
18. }
19. }
20. }).start();
21.}
Another important file in the Android Host Application is the
AndroidManifest.xml. In this file some permissions must be obtained to allow
the host to execute the actions which are necessary. The permissions
BLUETOOTH and BLUETOOTH_ADMIN allow the application to use the Bluetooth
Klemens Engelbrechtsmüller
Creating a Samsung Gear Application Page 16
connection and to send data. ACCESSORY_FRAMEWORK is needed for the
permission of the Samsung Accessory Protocol. wmanager.APP is used for the
permission of the Wearable application, ENABLE_NOTIFICATION allows the host
to send notifications to the consumer side and WATCH_APP_TYPE.Integrated is
necessary to tell the application that it is an integrated Gear App [Developer,
S3.].
1. <uses-permission android:name=“android.permission.BLUETOOTH“ />
2. <uses-permission android:name=“android.permission.BLUETOOTH_ADMIN“ />
3. <uses-permission
4. android:name=“com.samsung.accessory.permission.ACCESSORY_FRAMEWORK“ />
5. <uses-permission android:name=“com.samsung.WATCH_APP_TYPE.Integrated“ />
6. <uses-permission android:name=“com.samsung.wmanager.APP“ />
7. <uses-permission android:name=“com.samsung.wmanager.ENABLE_NOTIFICATION“ />
Additionally in the AndroidManifest.xml the service and two receiver classes
must be declared. As service the service provider class, which was created
before, has to be declared to implement your provider. The receivers are useful
to be sure the provider works properly [Developer, S3.].
1. <service android:name=“com.wise.oeffilokprovider.service.SAPServiceProvider“>
2. </service>
3. <receiver
4. android:name=“com.samsung.android.sdk.accessory.ServiceConnectionIndicationBro
adcastReceiver“ >
5. <intent-filter>
6. <action
7. android:name=“android.accessory.service.action.ACCESSORY_SERVICE_CONNECTIO
N_IND“ />
8. </intent-filter>
9. </receiver>
10.<receiver
11. android:name=“com.samsung.android.sdk.accessory.RegisterUponInstallReceiver“ >
12. <intent-filter>
13. <action
14. android:name=“android.accessory.device.action.REGISTER_AFTER_INSTALL“ />
Klemens Engelbrechtsmüller
Creating a Samsung Gear Application Page 17
15. </intent-filter>
16.</receiver>
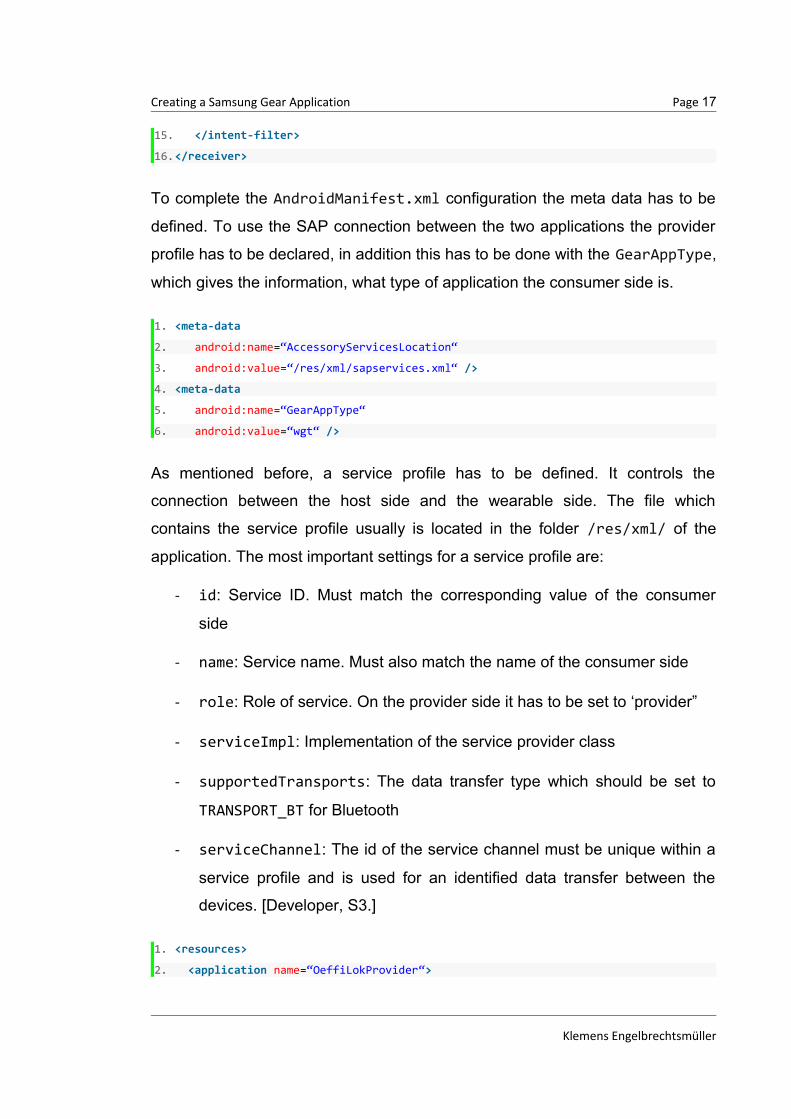
To complete the AndroidManifest.xml configuration the meta data has to be
defined. To use the SAP connection between the two applications the provider
profile has to be declared, in addition this has to be done with the GearAppType,
which gives the information, what type of application the consumer side is.
1. <meta-data
2. android:name=“AccessoryServicesLocation“
3. android:value=“/res/xml/sapservices.xml“ />
4. <meta-data
5. android:name=“GearAppType“
6. android:value=“wgt“ />
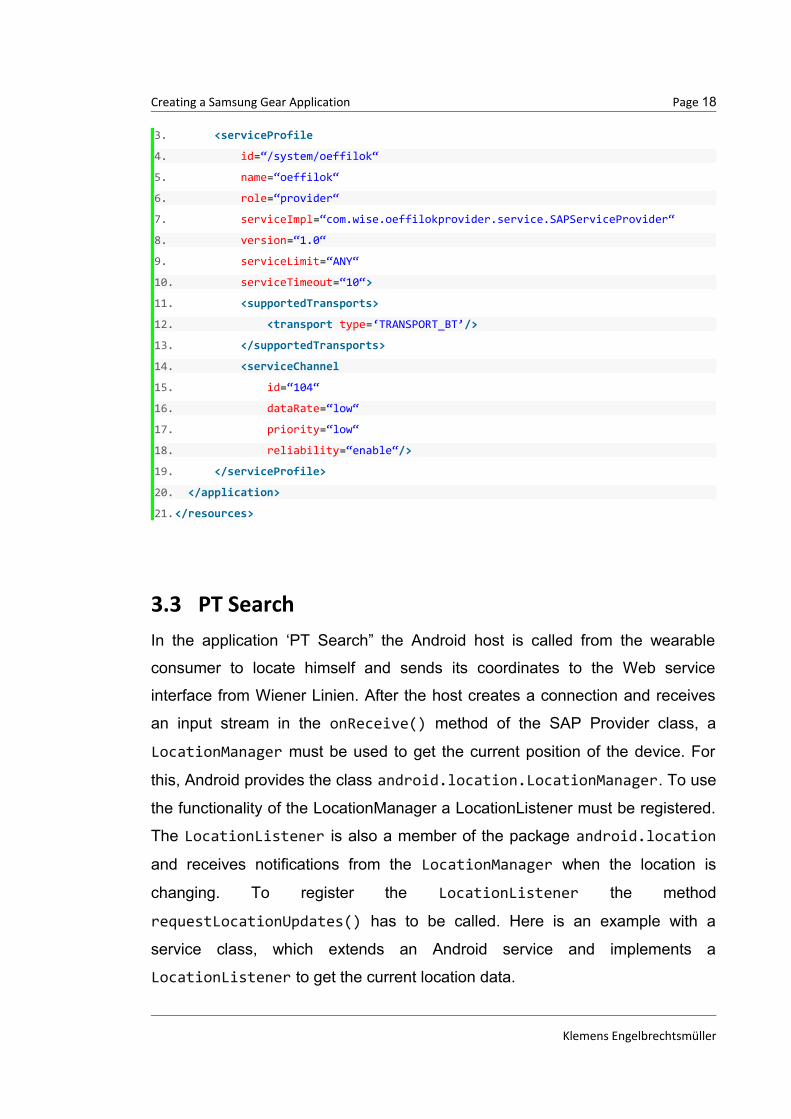
As mentioned before, a service profile has to be defined. It controls the
connection between the host side and the wearable side. The file which
contains the service profile usually is located in the folder /res/xml/ of the
application. The most important settings for a service profile are:
- id: Service ID. Must match the corresponding value of the consumer
side
- name: Service name. Must also match the name of the consumer side
- role: Role of service. On the provider side it has to be set to ‘provider”
- serviceImpl: Implementation of the service provider class
- supportedTransports: The data transfer type which should be set to
TRANSPORT_BT for Bluetooth
- serviceChannel: The id of the service channel must be unique within a
service profile and is used for an identified data transfer between the
devices. [Developer, S3.]
1. <resources>
2. <application name=“OeffiLokProvider“>
Klemens Engelbrechtsmüller
Creating a Samsung Gear Application Page 18
3. <serviceProfile
4. id=“/system/oeffilok“
5. name=“oeffilok“
6. role=“provider“
7. serviceImpl=“com.wise.oeffilokprovider.service.SAPServiceProvider“
8. version=“1.0“
9. serviceLimit=“ANY“
10. serviceTimeout=“10“>
11. <supportedTransports>
12. <transport type=‘TRANSPORT_BT’/>
13. </supportedTransports>
14. <serviceChannel
15. id=“104“
16. dataRate=“low“
17. priority=“low“
18. reliability=“enable“/>
19. </serviceProfile>
20. </application>
21.</resources>
3.3 PT SearchIn the application ‘PT Search” the Android host is called from the wearable
consumer to locate himself and sends its coordinates to the Web service
interface from Wiener Linien. After the host creates a connection and receives
an input stream in the onReceive() method of the SAP Provider class, a
LocationManager must be used to get the current position of the device. For
this, Android provides the class android.location.LocationManager. To use
the functionality of the LocationManager a LocationListener must be registered.
The LocationListener is also a member of the package android.location
and receives notifications from the LocationManager when the location is
changing. To register the LocationListener the method
requestLocationUpdates() has to be called. Here is an example with a
service class, which extends an Android service and implements a
LocationListener to get the current location data.
Klemens Engelbrechtsmüller
Creating a Samsung Gear Application Page 19
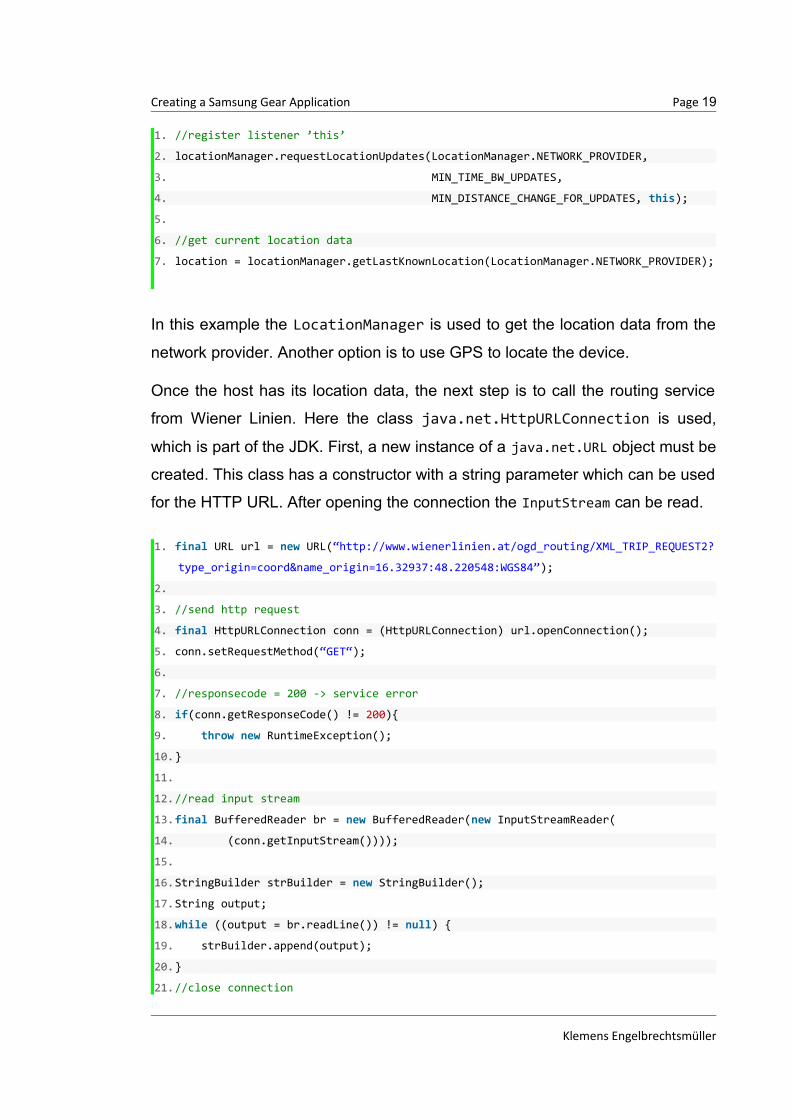
1. //register listener ’this’
2. locationManager.requestLocationUpdates(LocationManager.NETWORK_PROVIDER,
3. MIN_TIME_BW_UPDATES,
4. MIN_DISTANCE_CHANGE_FOR_UPDATES, this);
5.
6. //get current location data
7. location = locationManager.getLastKnownLocation(LocationManager.NETWORK_PROVIDER);
In this example the LocationManager is used to get the location data from the
network provider. Another option is to use GPS to locate the device.
Once the host has its location data, the next step is to call the routing service
from Wiener Linien. Here the class java.net.HttpURLConnection is used,
which is part of the JDK. First, a new instance of a java.net.URL object must be
created. This class has a constructor with a string parameter which can be used
for the HTTP URL. After opening the connection the InputStream can be read.
1. final URL url = new URL(“http://www.wienerlinien.at/ogd_routing/XML_TRIP_REQUEST2?
type_origin=coord&name_origin=16.32937:48.220548:WGS84”);
2.
3. //send http request
4. final HttpURLConnection conn = (HttpURLConnection) url.openConnection();
5. conn.setRequestMethod(“GET“);
6.
7. //responsecode = 200 -> service error
8. if(conn.getResponseCode() != 200){
9. throw new RuntimeException();
10.}
11.
12.//read input stream
13.final BufferedReader br = new BufferedReader(new InputStreamReader(
14. (conn.getInputStream())));
15.
16.StringBuilder strBuilder = new StringBuilder();
17.String output;
18.while ((output = br.readLine()) != null) {
19. strBuilder.append(output);
20.}
21.//close connection
Klemens Engelbrechtsmüller
Creating a Samsung Gear Application Page 20
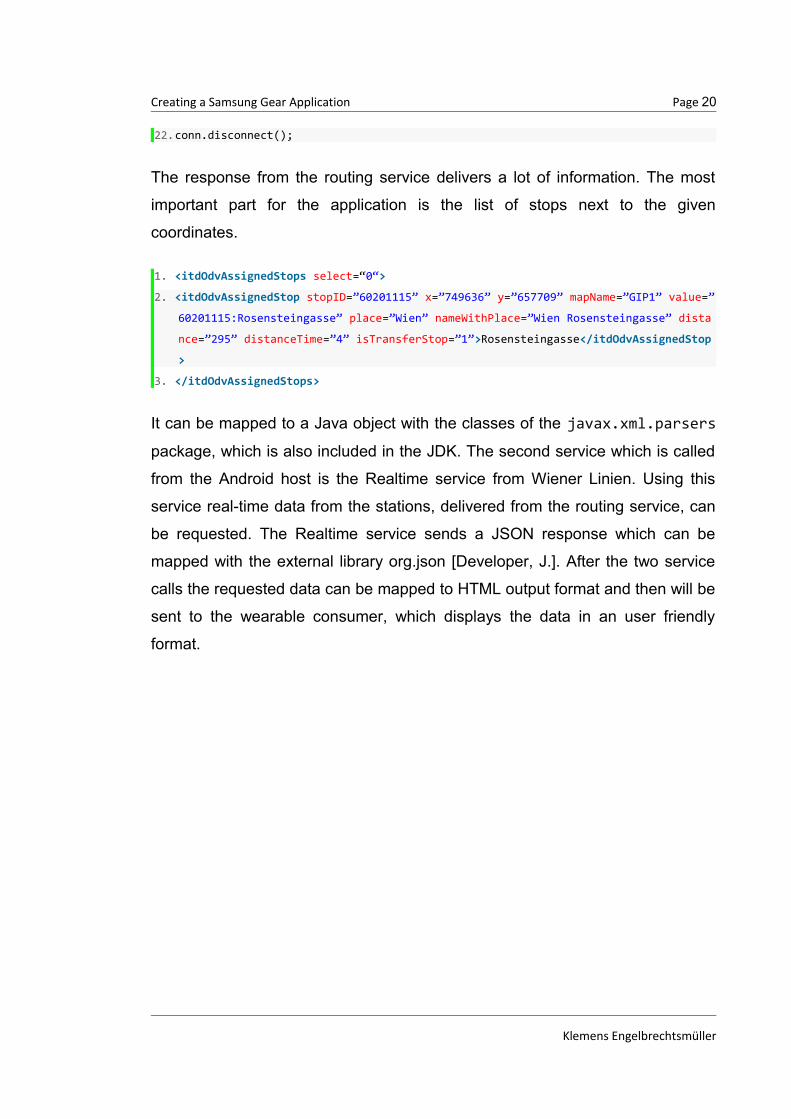
22.conn.disconnect();
The response from the routing service delivers a lot of information. The most
important part for the application is the list of stops next to the given
coordinates.
1. <itdOdvAssignedStops select=“0“>
2. <itdOdvAssignedStop stopID=”60201115” x=”749636” y=”657709” mapName=”GIP1” value=”
60201115:Rosensteingasse” place=”Wien” nameWithPlace=”Wien Rosensteingasse” dista
nce=”295” distanceTime=”4” isTransferStop=”1”>Rosensteingasse</itdOdvAssignedStop
>
3. </itdOdvAssignedStops>
It can be mapped to a Java object with the classes of the javax.xml.parsers
package, which is also included in the JDK. The second service which is called
from the Android host is the Realtime service from Wiener Linien. Using this
service real-time data from the stations, delivered from the routing service, can
be requested. The Realtime service sends a JSON response which can be
mapped with the external library org.json [Developer, J.]. After the two service
calls the requested data can be mapped to HTML output format and then will be
sent to the wearable consumer, which displays the data in an user friendly
format.
Klemens Engelbrechtsmüller
Creating a Samsung Gear Application Page 21
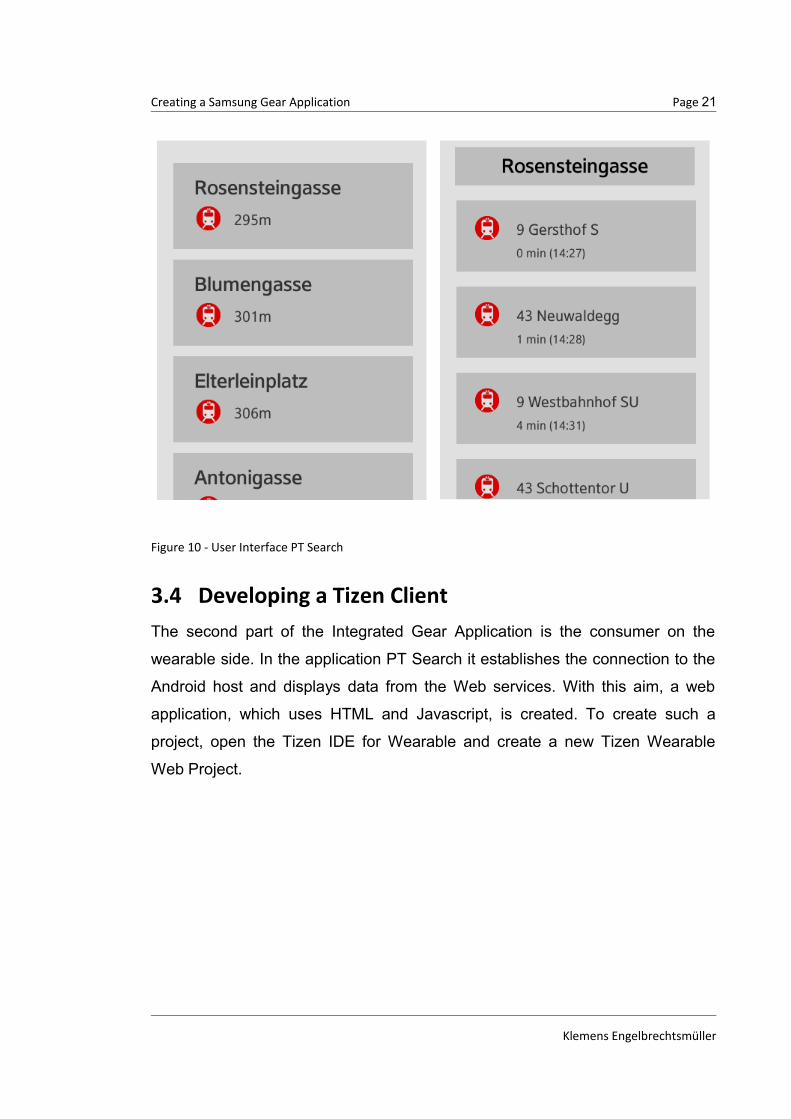
Figure 10 - User Interface PT Search
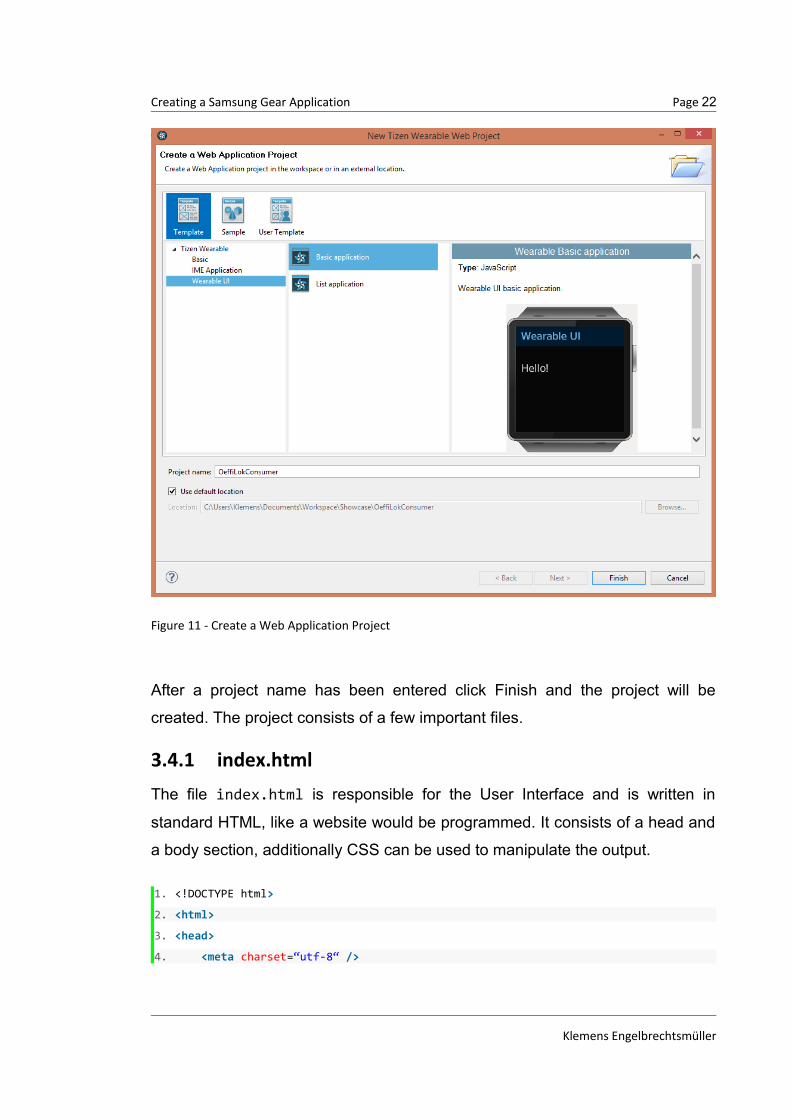
3.4 Developing a Tizen ClientThe second part of the Integrated Gear Application is the consumer on the
wearable side. In the application PT Search it establishes the connection to the
Android host and displays data from the Web services. With this aim, a web
application, which uses HTML and Javascript, is created. To create such a
project, open the Tizen IDE for Wearable and create a new Tizen Wearable
Web Project.
Klemens Engelbrechtsmüller
Creating a Samsung Gear Application Page 22
Figure 11 - Create a Web Application Project
After a project name has been entered click Finish and the project will be
created. The project consists of a few important files.
3.4.1 index.html
The file index.html is responsible for the User Interface and is written in
standard HTML, like a website would be programmed. It consists of a head and
a body section, additionally CSS can be used to manipulate the output.
1. <!DOCTYPE html>
2. <html>
3. <head>
4. <meta charset=“utf-8“ />
Klemens Engelbrechtsmüller
Creating a Samsung Gear Application Page 23
5. <meta name=“viewport“ content=“width=device-width, initial-scale=1.0, maximum-
scale=1.0“>
6. <meta name=“description“ content=“Tizen Wearable basic template generated by T
izen Wearable Web IDE“/>
7.
8. <title>Title</title>
9.
10. <link rel=“stylesheet“ type=“text/css“ href=“css/style.css“/>
11.</head>
12.<body>
13. <div>Hello World!</div>
14.</body>
15.<script src=“js/main.js“></script>
16.</html>
3.4.2 main.js
On the other hand in the main.js all the functionality from the wearable side is
programmed. Here the consumer can establish the connection to the Android
Host, send and also receive data. The wearables also use the Samsung
Accessory Protocol and its implementations to connect to the host. First of all,
the SAAgent, which is specified in a service profile, must be requested with the
method requestSAAgent().
1. function onsuccess(agents) {
2. try {
3. if (agents.length > 0) {
4. SAAgent = agents[0];
5.
6. SAAgent.setPeerAgentFindListener(peerAgentFindCallback);
7. SAAgent.findPeerAgents();
8. } else {
9. console.log(‘SAAgent not found!’);
10. }
11. } catch(err) {
12. console.log(‘err [‘ + err.name + ’] msg[‘ + err.message + ’]’);
13. }
14.}
Klemens Engelbrechtsmüller

Creating a Samsung Gear Application Page 24
15.
16.webapis.sa.requestSAAgent(onsuccess, function (err) {
17. console.log(‘err [‘ + err.name + ’] msg[‘ + err.message + ’]’);
18.});
If the SAAgent is found, the method onsuccess() will be called. To search for
peer agents the method findPeerAgent() has to be called. To handle the
found agents, a handler, which uses the ServiceConnectionCallback
listener, has to be defined.
1. var peerAgentFindCallback = {
2. onpeeragentfound : function(peerAgent) {
3. try {
4. if (peerAgent.appName == ProviderAppName) {
5. SAAgent.setServiceConnectionListener(agentCallback);
6. SAAgent.requestServiceConnection(peerAgent);
7. } else {
8. console.log(‘Not expected app!! : ’ + peerAgent.appName);
9. }
10. } catch(err) {
11. console.log(‘err [‘ + err.name + ’] msg[‘ + err.message + ’]’);
12. }
13. },
14. onerror : onerror
15.}
Once a peer agent with the expected appName is found, the method
requestServiceConnection() has to be used to establish the connection.
1. var agentCallback = {
2. onconnect : function(socket) {
3. SASocket = socket;
4. alert(‘Connection established!’);
5. SASocket.setSocketStatusListener(function(reason){
6. console.log(‘Service connection lost, Reason : [‘ + reason + ’]’);
7. disconnect();
8. });
9. },
10. onerror : onerror
11.};
Klemens Engelbrechtsmüller
Creating a Samsung Gear Application Page 25
If the connection is successfully established, the consumer side and the
provider side can exchange data this way:
1. function onreceive(channelId, data) {
2. //handle received data
3. }
4.
5. function sendData(){
6. SASocket.setDataReceiveListener(onreceive);
7. SASocket.sendData(CHANNELID, ’Hello Android host!’);
8. }
3.4.3 config.xml
The config.xml file includes the widget of the wearable application and
describes among other things the application name and the startup site.
Additionally, it contains the path to the file which includes the service profile.
1. <tizen:metadata key=“AccessoryServicesLocation“ value=“res/accessoryservices.xml“/
>
3.4.4 sapservices.xml
The service profile, defined in the sapservice.xml file, is basically equal to the
service profile of the Android host. Except of the attribute ‘role’ which has to be
changed to ‘consumer’.
3.5 Deploy the ApplicationThere are several ways to deploy the programmed app on a Samsung Gear.
This chapter describes how to install the Android Package (APK) from the
Eclipse IDE on a smartphone and later the Samsung Widget file (WGT) on the
smartwatch. As mentioned before, a Samsung Galaxy Note 3 Android phone
and a Samsung Gear smartwatch is used to install the application. A
corresponding USB cable between the PC, where the application was
developed, and the Samsung Galaxy Note is also needed.
Klemens Engelbrechtsmüller
Creating a Samsung Gear Application Page 26
3.5.1 Create a WGT File
First of all, an executable WGT file from the Tizen Wearable Application has to
be created. To create a running Gear Application it is necessary to register a
Certificate for the application. This certificate signs the code and protects the
application from modification and ensures the ownership during a version
upgrade process. The code signing also names a specific device to ensure the
application is only running on devices which it is specified for [Developer, S4.]
The certificate is not only necessary for testing the application, but also needed
for uploading the application to the Samsung GALAXY Apps Seller site.
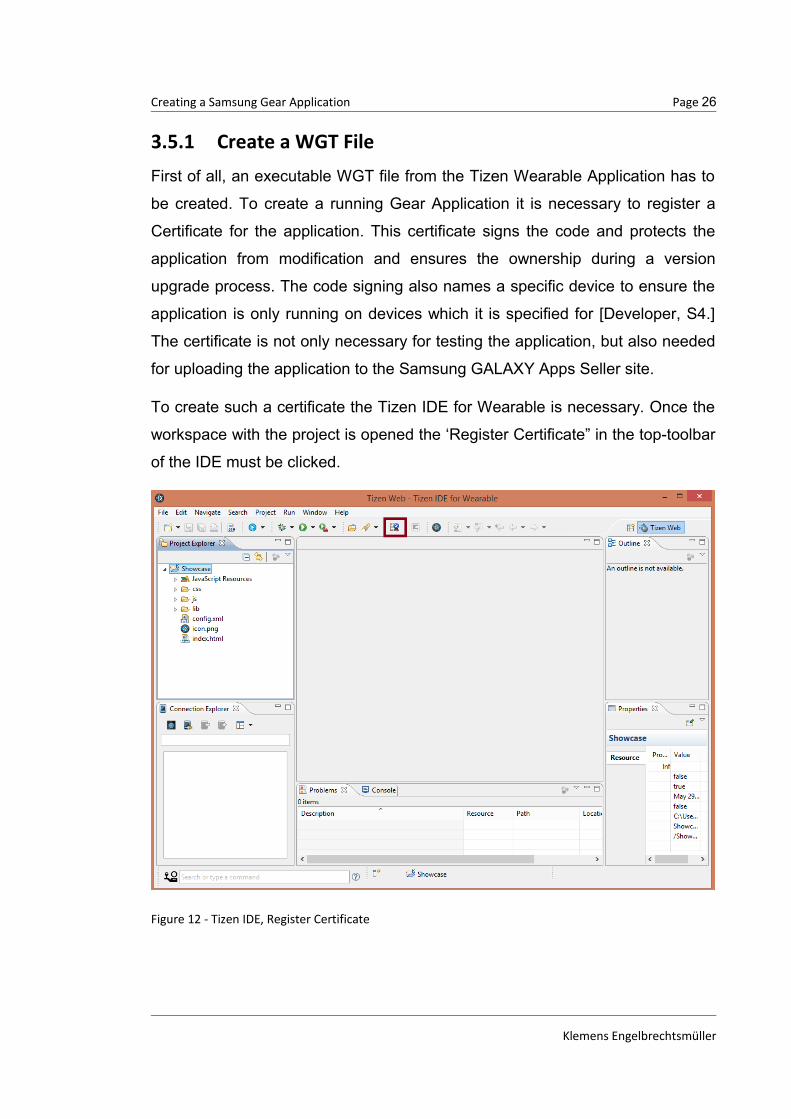
To create such a certificate the Tizen IDE for Wearable is necessary. Once the
workspace with the project is opened the ‘Register Certificate” in the top-toolbar
of the IDE must be clicked.
Figure 12 - Tizen IDE, Register Certificate
Klemens Engelbrechtsmüller
Creating a Samsung Gear Application Page 27
After then the Request and Register Certificate dialog appears. This dialog
includes these steps:
1. Generate a certificate singing request (CSR file)
Generate a new certificate signing request must be select and
after clicking Next, personal data must be filled in.
If the request is successful, a file named author.csr can be
found under keystore folder in the data folder of the Tizen
SDK.
2. Request the certificate
With the author.csr file a certificate can be requested. Click
the button Request the certificate and follow the instructions.
3. Request the device profile
Click the button and follow the instructions
4. Register the certificates
After receiving the two files called author.crt and device-
profile.xml, these two files must be entered and also the
corresponding passwords. Now the certificates should be
automatically added to the security profile.
To finish the creation of a WGT file select the project in the IDE and build it.
After building is done, the WGT file can be found in the package explorer of the
IDE.
3.5.2 Install the Application
To install the Android host application on the Samsung Galaxy Note 3
smartphone, an APK file is needed. But there is no need to manually install the
APK file on the device, the Eclipse IDE with the Android SDK is able to create
Klemens Engelbrechtsmüller
Creating a Samsung Gear Application Page 28
an APK file from the application and pushes the file directly to the smartphone
where the application will be automatically installed. The generated APK file
also includes the created WGT file which will be automatically installed on the
Samsung Gear.
To start make sure USB Debugging is activated on both devices. The primary
function of USB Debugging is to facilitate a connection between an Android
device and a computer with Android SDK. This mode turns the device into
debug mode and grants a level of access to the device which is important in
programming a new application [Droid, 2015]. To activate USB Debugging on
the Samsung Galaxy Note 3 open the Settings menu and select ‘General’ in the
upper right corner of the phone. Now the menu option ‘About Device” appears
on the screen. After selecting this option the select option ‘Build number” is
shown. This option must be tapped seven times and then the message
‘Developer mode has been enabled” appears. After returning to ‘Phone
Settings’ the menu option ‘Developer Options” can be seen. In this menu you
can check the box ‘USB Debugging’. To active USB Debugging on an Samsung
Gear device open settings menu, select ‘Gear Info’, then select ‘About Gear’
and tap the option ‘Software Version’ about 10 times. After this steps the option
‘USB Debug’ will appear in the ‘Gear Info’ menu. This box must be checked to
activate the debugging mode.
When these modes are activated on both devices the Samsung Galaxy Note 3
device has to be plugged into the computer. Both devices have to be turned on
and Bluetooth must be activated. When Bluetooth is activated, the Samsung
Gear automatically builds a connection to the smartphone.
In the Eclipse IDE with the Android host project, the WGT file, which was
created before, has to be copied to the ‘assets” folder of the Android host
application. To finally run the application on the device it must be ensured that
Eclipse IDE has accepted the device.
Klemens Engelbrechtsmüller
Creating a Samsung Gear Application Page 29
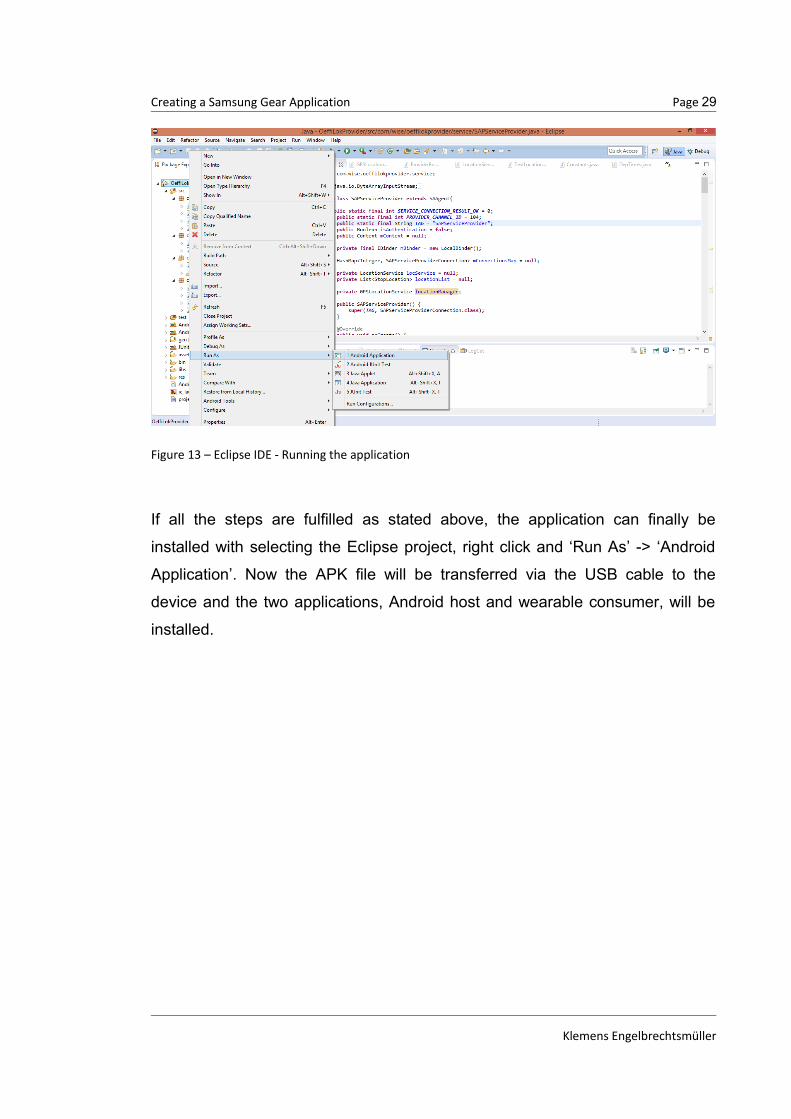
Figure 13 – Eclipse IDE - Running the application
If all the steps are fulfilled as stated above, the application can finally be
installed with selecting the Eclipse project, right click and ‘Run As’ -> ‘Android
Application’. Now the APK file will be transferred via the USB cable to the
device and the two applications, Android host and wearable consumer, will be
installed.
Klemens Engelbrechtsmüller
Conclusion Page 30
4 ConclusionIn conclusion, the effort needed to create a Samsung Integrated Gear
Application is smaller than the author thought. The Tizen SDK, Samsung
Accessories SDK and the Android SDK, which were used during the
development process, have a good and a sufficient documentation in the WWW
and the connection between the used devices works very well. It is also
possible to create such an application with moderate resource equipment.
Nevertheless, the author recommends basic Android development knowhow
before starting to program a Samsung Gear application. The most challenging
task was the deployment of the application, because of the code signing with
the certificate for the Samsung Gear application. In contrast, the integration of
the Web service from Wiener Linien was very easy to accomplish, because of
the documentation of the interface, which is very understandable. The target of
the work was to develop a Samsung Integrated Gear Application that can show
public transport data from stations next to the device. Although the final results
of the development are very good, there are a lot of possibilities to extend the
functionality of the application, for example a navigation to a selected station.
Klemens Engelbrechtsmüller
References Page 31
5 References[Android] – ‘The Android Story’. http://www.android.com/history, as of April 2015
[BusinessInsider 2013] – ‘How Android Grew To Be More Popular Than The iPhone’. http://www.businessinsider.com/history-of-android-2013-8?op=1&IR=T, as of April, 2015
[CC3.0] – ‘creative commons Namensnennung 3.0 Unported’. https://creativecommons.org/licenses/by/3.0/deed.de, as of April, 2015
[Developer, A.] – ‘Installing the Eclipse Plugin’. https://developer.android.com/sdk/installing/installing-adt.html, as of April, 2015
[Developer, A1.] – ‘Android DEV – Android Development / Services’. http://developer.android.com/guide/components/services.html, as of May, 2015
[Developer, J.] – ‘JSON in Java’. http://www.json.org/java/, as May, 2015
[Developer, S.] – ‘Samsung Gear‘. http://developer.samsung.com/gear, asof April, 2015
[Developer, S1.] – ‘Accessory Programming Guide Version 2.2.2’. Part of the SDK, which can be downloaded from http://developer.samsung.com/galaxy#accessory
[Developer, S2.] – ‘Samsung Gear Application Programming Guide Version 1.0’http://developer.samsung.com/technical-doc/view.do?v=T000000163, as of April, 2015
[Developer, S3.] – ‘Samsung Gear Application, Hello Accessory Developer’sGuide V1.1’. http://developer.samsung.com/technical-doc as of April,2015
[Developer, S4.] – ‘Getting the Gear Certificate’. http://img-developer.samsung.com/gear/certificationguide.html, as of May, 2015
[Developer, T.] – ‘Tizen Developers’. https://developer.tizen.org, as of May, 2015
[Developer, T1.] – ‘Tizen SDK Installation’. https://developer.tizen.org/downloads/sdk/installing-tizen-sdk, as of May, 2015
Klemens Engelbrechtsmüller
References Page 32
[Droid, 2015] – ‘USB-Debugging’. http://www.droidwiki.de/USB-Debugging, as of May, 2015
[OGD] – ‘offene Daten Österreichs – lesbar für Mensch und Maschine’. https://www.data.gv.at, as of April, 2015
[Samsung, A.] – ‘What Is Accessory SDK’. http://developer.samsung.com/galaxy#accessory, as of April, 2015
[Wikipedia, Android] – ‘Android (operating system)’. http://en.wikipedia.org/wiki/Android_(operating_system), as of April, 2015
[Wikipedia, Tizen] – ‘Tizen’. http://en.wikipedia.org/wiki/Tizen, as ofMay, 2015
[WL, Realtime API 2013] – ‘Wiener Linien Realtime |Schnittstellendokumentation’. http://data.wien.gv.at/pdf/wienerlinien-echtzeitdaten-dokumentation.pdf, as of April, 2015
[WL, Routing] - ‘Katalog Wiener Linien – Routingservice’. https://www.data.gv.at/katalog/dataset/wiener-linien-routingservice, as of April, 2015
[WL, Routing API 2013] – ‘Beschreibung der EFA XML-Schnittstelle für die Open Government Data Initiative der WIENER LINIEN’. http://data.wien.gv.at/pdf/wiener-linien-routing.pdf, as of April, 2015
Klemens Engelbrechtsmüller