AVOIDING THE PROBLEM OF SPOILED...
20
16-1 Many of the tools that health workers need are costly to buy. But some can be handmade with local materials by the health workers themselves, blacksmiths, or other local craftsmen. Homemade equipment can be simple or complex. It can be made from local materials only, or from a combination of local and outside resources. The dental drill shown here combines a high-technology drill with appropriate local power sources— people and bicycle. Most of the homemade equipment we describe in this chapter can be made quickly and easily with materials on hand. During training, encourage health workers to invent and make some of their own equipment. This develops the imagination and creativity needed to help people solve their problems in their own way- HOMEMADE SCALES FOR WEIGHING BABIES During training, health workers can make their own simple scales for weighing babies. Although less accurate and less easy to use than store-bought scales, they have several advantages: • They are cheap and easy to make • They can be made of local materials. • By building the scales themselves, the health workers gain new understanding and skills. • By getting the local people to help them, they extend that knowledge and skill to others. • This gets people, including fathers, to take a more active part. • Midwives or parents can make their own scales using the health worker’s as a model. • Homemade scales make the baby-weighing process less mysterious. Ideas for several types of homemade scales are given on the next page. Be sure to T h i s high-speed dental drill runs on air compressed by bicycle power. It is used by village dental workers in Verano, Mexico. Helping Health Workers Learn 2012
Transcript of AVOIDING THE PROBLEM OF SPOILED...

16-1
Many of the tools that health workers need are costly to buy. But some can be handmade with local materials by the health workers themselves, blacksmiths, or other local craftsmen.
Homemade equipment can be simple or complex. It can be made from local materials only, or from a combination of local and outside resources. The dental drill shown here combines a high-technology drill with appropriate local power sources—people and bicycle.
Most of the homemade equipment we describe in this chapter can be made quickly and easily with materials on hand.
During training, encourage health workers to invent and make some of their own equipment. This develops the imagination and creativity needed to help people solve their problems in their own way-
HOMEMADE SCALES FOR WEIGHING BABIES
During training, health workers can make their own simple scales for weighing babies. Although less accurate and less easy to use than store-bought scales, they have several advantages:
• They are cheap and easy to make• They can be made of local
materials.• By building the scales themselves,
the health workers gain new understanding and skills.
• By getting the local people to help them, they extend that knowledge and skill to others.
• This gets people, including fathers, to take a more active part.• Midwives or parents can make their own scales using the health worker’s as a
model.• Homemade scales make the baby-weighing process less mysterious.
Ideas for several types of homemade scales are given on the next page. Be sure to
T h i s high-speed dental drill runs on air compressed by bicycle power. It is used by village dental workers in Verano, Mexico.
Helping Health Workers Learn 2012 Helping Health Workers Learn 2012

16-2
EXAMPLES OF HOMEMADE SCALES
BEAM SCALES: This is the easiest kind to make, and probably the most accurate. The beam can be made of dry wood or bamboo. The movable weight can be a bag, bottle, or tin filled with sand.
two hooks about 5 cm. apart
scale hangs from this hook
beam (1 meter long)
Weight is correct when beam stays horizontal.
child holder movable weight
(about 1 kilogramt)
FOLDING SCALE: Easy to carry from place to place. Works best if made of metal or plywood strips.
joined with nuts and bolts
plywood or sheet metal
SPRING SCALE: This is made with a coil spring inside a bamboo tube. The spring should be about 30 cm. long and squeeze to half its length with a weight of 15 kilograms.
30 cm.
metal hook weight
QUARTER-CIRCLE SCALE: If made with plywood, use sheet metal to reinforce upper corner. The weight should be between 1 and 2 kilograms. It can be made from scrap metal or a piece of heavy pipe.
Bind ends of bamboo to prevent splitting.
holes about 2 cm. apart
washer to mark weight
bamboo
coil spring
bent nail
slot
bent nail
4. Now add one more kilo and repeat the process. Keep going until the whole scale is marked. To weigh children up to age 5, mark your scale up to 20 kilos.
30 cm.
weight
plywood or sheet metal wire or cord
metal hook SIDE VIEW FRONT VIEW
3. Mark the spot with a small line and write a ‘2’.
2. Balance the movable weight
1. Hang 2 kilos on it.
To mark your scale:
How to mark or calibrate the scales:To do this, you will need some accurate standard weights. Perhaps you can . . .
borrow some weights from a merchant at the market
or use his scale to prepare several and weights
or borrow some 1-kilo packages or cans of food.
Helping Health Workers Learn 2012 Helping Health Workers Learn 2012

16-3
AVOIDING THE PROBLEM OF SPOILED VACCINES”
Keeping vaccines cold is important. If they get warm before being used, they spoil and will not protect children against disease.
Vaccines need to be kept cold all the way from the factory where they are made to the village where a health worker vaccinates the local children. The vaccine changes hands many times along the way. If at any time the vaccine gets warm (or in the case of polio vaccine, thaws and is refrozen), it spoils and becomes useless.
Not keeping vaccines cold enough is a very common problem. A great many vaccines get warm and spoil at some point on the way from factory to child. In fact, in many countries more than one third of the vaccines given do no good-because they were not kept cold enough.
In many countries, 1 of every 3 vaccines given to children
does not work to prevent the disease because
the vaccine had spoiled BEFORE it was given.
*These ideas and drawings are from the Expanded Immunization Project in Liberia, Africa. Their Handbook for Health Workers is an excellent booklet about vaccination and the ‘cold chain’—keeping vaccines cold. It is available from the following:
Christian Health Association of Liberia P.O. Box 10-9056-1000 Monrovia 10, Liberia [email protected]
Helping Health Workers Learn 2012 Helping Health Workers Learn 2012

16-4
HOMEMADE ‘COLD BOX’ FOR KEEPING VACCINES COLD:
Sometimes vaccines spoil simply because there are not enough thermoses or ‘cold boxes’ to allow each health worker to take them quickly to his or her village.
But there is nothing magic or secret about a cold box. It is a box that has been insulated or padded so that cold will stay in and heat will stay out. Any box with insulation can be a cold box.
Here is a way that you can make your own cold box:
1. Find a carton that can be covered —one that has a lid or flaps.
2. Line the bottom and the sides with insulation. Be sure that every part is lined, even the corners.
For insulation you can use . . .
• foam rubber (like for a mattress) 2 inches or 5 cm. thick,
• Styrofoam (what radios are packed in),
• dry grass, rolled up so it is about 2 inches thick, or
• many layers of old newspaper.
Insulation is something that keeps cold air in and hot air out.
Helping Health Workers Learn 2012 Helping Health Workers Learn 2012
16-5
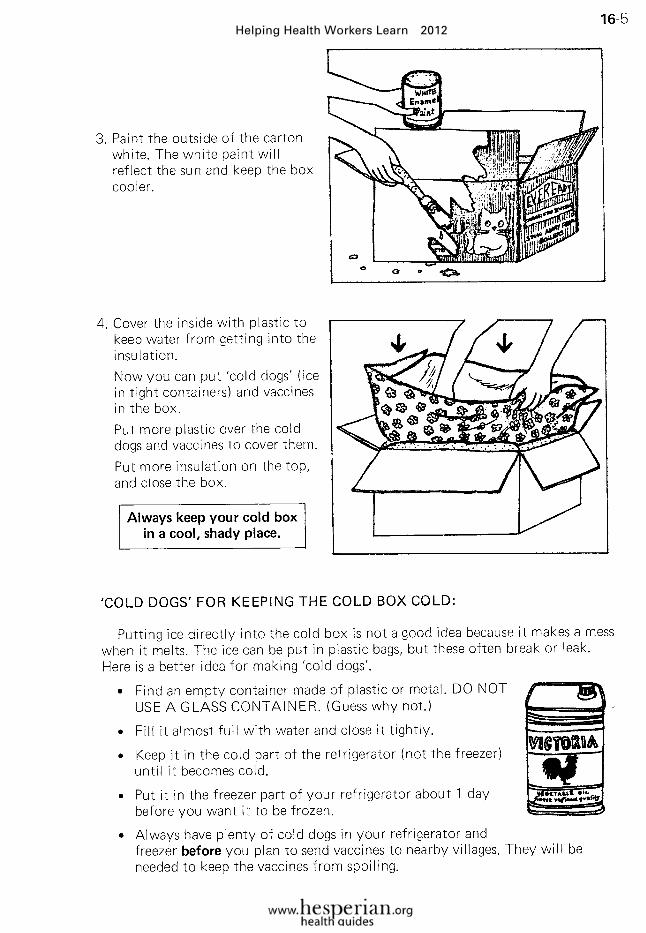
3. Paint the outside of the carton white. The white paint will reflect the sun and keep the box cooler.
4. Cover the inside with plastic to keep water from getting into the insulation.
Now you can put ‘cold dogs’ (ice in tight containers) and vaccines in the box.
Pui more plastic over the cold dogs and vaccines to cover them.Put more insulation on the top, and close the box.
‘COLD DOGS’ FOR KEEPING THE COLD BOX COLD:
Putting ice directly into the cold box is not a good idea because it makes a mess when it melts. The ice can be put in plastic bags, but these often break or leak. Here is a better idea for making ‘cold dogs’.
• Find an empty container made ol plastic or metal. DO NOT USE A GLASS CONTAINER. (Guess why not.)
• Fill it almost full with water and close it tightly.
• Keep it in the cold part of the refrigerator {not the freezer) until it becomes cold.
• Put it in the freezer part of your refrigerator about 1 day before you want it to be frozen.
• Always have plenty of cold dogs in your refrigerator and freezer before you plan to send vaccines to nearby villages. They will be needed to keep the vaccines from spoiling.
Always keep your cold box in a cool, shady place.
Helping Health Workers Learn 2012 Helping Health Workers Learn 2012

16-6
HOMEMADE STETHOSCOPES
A stethoscope is a hollow tube that makes it easier to listen for sounds inside a person’s chest or belly: breathing in the lungs, heartbeats, and gurgling in the belly.
The besl stethoscopes are made of metal and plastic, andean be expensive.
Breathing sounds you may hear with the stethoscope: Long, high-pitched squeaks are wheezes, often a sign of asthma. Lower-pitched sounds, like silk or thin paper being rubbed against itself, are rales, often a sign of pneumonia. The lack of normal breathing sounds in one area, but not everywhere, usually means pneumonia in one part of a lung—or advanced tuberculosis.
Heart sounds: Also listen to the person’s heart on the front of the chest where it beats hardest. There should be two sounds for each pulse. In an older person, a third sound may mean heart disease, especially if he has swollen feet or is short of breath (see WTND, p. 325). In a child, an extra sound may mean he has had rheumatic fever (WTND, p. 310). If he is sickly he should see a doctor.
Belly sounds: In a severely III person, the absence of normal gurgles in the belly is probably a sign of acute abdomen (see WTND, p. 93).
OTHER KINDS OF HOMEMADE STETHOSCOPES:
But a simple stethoscope can be made of a hollow tube of bamboo, wood, or clay.
To use it, press your ear firmly to one end while holding the other end flat again>t the person’s back.Check the lungs by listening on the person’s back in 6 places.
Then listen to the front between the shoulders and neck.
Compare what you hear in one place with what you hear in the same place on the other side.
Use the top of a narrow-necked plastic bottle and a piece of rubber tube.
Or cut off the top of a rubber suction bulb.
This piece can also be used for looking in people’s ears.
are especially useful for listening to the heartbeats of unborn babies (see WTND, p. 252).
‘Fetoscopes’ made of wood or fired clay
mouth open-breathing deeply
about 15 cm.
3-4 cm.
Helping Health Workers Learn 2012 Helping Health Workers Learn 2012

16-7
HOMEMADE TIMERS
Health workers, midwives, and parents at times need to measure the number of heartbeats (pulse) or breaths (respirations) per minute. But they may not be able to afford a clock or watch with a second hand.
However, simple instruments for measuring time can be made by the health workers themselves. Encourage them to invent and make their own timers. When you first make the timers, be sure you have a watch to ‘set’ the time. Here are some ideas that have been tried and work fairly well.
WATER TIMERS-easy to make, but less accurate2.
Instead of a syringe, you can use a glass or plastic tube.
The longer and thinner the tube, the more accurate a timer it will make.
To form a narrow hole in a glass tube, hold it over a hot flame, then stretch, cool, and break it. (See the next page.)
Cfheck this a few times, and then mark the spot with ink, nail polish, or a piece of tape.
If the water drips out too slowly, break off the needle to make it drip faster.
Hold the syringe upright and fill it with water exactly to the top line.
Using a watchf with a second hand, measure how far the water level drops in exactly one minute.
1.
Use and old or disposable syringe with an 18 or 20 gauge needle
3.
A fairly accurate timer can be made from an old I.V. (intravenous solution) administration kit.Open the wider tube at the top to serve as a funnel.Fill the tube with water. (Be sure there is no air in the tube.)
Using a watch with a second hand, mark the distance the water drops in 1 minute. Check it several times to be sure.
To help keep the tube straight, tie a weigth at the lower end.
The I.V. tube timer has the advantage of being fairly accurate and easy to make, and it can be made at no cost from old I.V. sets.
Counting the pulse using an I.V. tube timer.
23 to 25 gauge needle
rock or other weight
one minute
start here
Helping Health Workers Learn 2012 Helping Health Workers Learn 2012

16-8
SAND TIMER-harder to make, but more accurate
A sand timer consists of a tube of glass closed at both ends, with a narrow neck in the middle. It is partly filled with fine sand. The sand runs from the upper to the lower half in an exact period of time.
‘Egg timers’, or 3-minute sand timers, can be purchased at low cost in some areas. To use one, count the number of pulses or breaths for 3 minutes and then divide by 3 to know the number of pulses or breaths per minute.
A 1-minute sand timer can be made as follows:
Sometimes a timer will get partly clogged and give a false reading. So it is a good idea to check your timer occasionally (especially the water timer) with someone’s watch. If this is not possible, you can make 2 timers and check one against the other.
Sand and water timers, if well made, are fairly accurate. They are better than watches in that health workers, midwives, or almost anyone can learn to make and use them. A person using them does not need to know how to read a clock.
Store-bought 3-minule sand timer.
One-minute sand timer available through UNICEF (UNIPAC #0568500).
Note: Do not be surprised if you have to make the timer several times before you get it just right. Try to make sure you have the right amount of sand before you seal the tube. If the sand sticks, try to find a smoother, finer sand, and be sure it is absolutely dry. Protect the timer by keeping it in a box with cotton, as it can break very easily at the neck.
An easier method is to use a ‘soft glass’ test tube, or a blood collection tube. Instead of melting the end, simply seal it with a cork or rubber stopper. This timer may be less accurate in a moist climate.
4. Wash some fine sand to remove (he dirt Dry it in the sun, and sift it through a very fine strainer. Then heat the sand to remove moisture.
5. Put just enough sand in the tube so that it takes exactly 1 minute for all of it to run from one pari to the other. (Use someone’s watch with a second hand to check this.)
I. Heat the middle of a glass tube over a Bunscn burner or other small, very hot flame.
2. Stretch the tube to make a thin neck in the middle.
3. Seal one end of the tube by melting it slowly.
6. Seal the other end of the tube.
Helping Health Workers Learn 2012 Helping Health Workers Learn 2012

16-9
MEASURING WITHOUT INSTRUMENTS-A TEST FOR SHOCK
In some cases, rather than using instruments for specific tests, you can make measurements without any instruments at all. Here are some examples from this book:
• In a CHI LD-to-child activity, a group of children becomes the ‘measuring instrument’ for testing hearing. See page 24-12.
• A simple test for dehydration is described on p. 11-9.
• A way to check for malnutrition using your fingers is explained on p. 25-15.
• Ways of checking for anemia are described on p. 25-18 and 25-19.
Here is a simple way of testing for shock without using instruments:
If you suspect a person is in a state of shock (very weak or unconscious, with rapid weak pulse and cool sweaty skin), quickly
Squeeze one finger hard for a moment, and then let go.
The moment you let go, the palm side of the finger will look white. If it takes more than 3 seconds for the normal pink or reddish color (blood) to return, the person is probably in shock. (You can measure the 3 seconds by quickly saying “Is he in shock?” 3 times.)
This is a good test to do when a child is dehydrated and seems very weak. If the child is in shock, provide emergency care (WTND, p. 77) and get medical help fast.
IN SHOCK NOT IN SHOCK
Helping Health Workers Learn 2012 Helping Health Workers Learn 2012

16-10
MINOR SURGERY IN THE FIELD
Health workers in remote areas sometimes need to do emergency minor surgery, such as closing of wounds, without the basic supplies for sterilizing and suturing. The Medical Mission Sisters in the Philippines have developed these alternative methods, using local resources.
FOR STERILIZING INSTRUMENTS AND BANDAGE MATERIALS:
Instruments and supplies are put into a tray. Bandage materials, thread, and other objects that must be kept dry are wrapped in several layers of dead, dry banana leaves, and then a layer of green banana leaf. A piece of raw cassava wrapped in banana leaf is also placed in the tray, to serve as a ‘timer’.
The pan is then filled with water until it reaches halfway up the tray.
Then the pan is placed on a low fire.
After boiling for about 2 hours, carefully remove the banana leaves and check to see if the cassava is cooked (soft). If it is, your equipment should be sufficiently sterilized.
FOR SURGICAL DRAPES:
The pan is covered with 8 layers of green banana leaves that have been well washed. These are bound tightly in place with strips of banana leaf or bark from the banana plant.
When removing the banana leaves, throw away only the top layer. The inner layers are sterile and can be used as surgical drapes.
The tray is placed in a cooking pan.
bandage and suture material wrapped in banana leaves
cassava ‘timer’
water level
strip of banana bark
banana leaves
Helping Health Workers Learn 2012 Helping Health Workers Learn 2012

16-11
FOR SUTURING WOUNDS:
You can use silk or cotto n sewing thread, and a sewing needle, also sterilized. (See WTND, p. 86.)
FOR SURGICAL PADS AND BANDAGES:
Instead of sterile gauze pads, the sisters have used the leaves of a Philippine tree called hogonoy. These are said to be antiseptic and to help control bleeding. The leaves are first washed and then soaked in soapy water.
For outer bandages, the sisters use papaya leaves, which they scrub and soak in soapy water, and then bind in place with thin strips of banana bark.
ACUPUNCTURE AND ACUPRESSURE ANESTHESIA:
A number of health programs in the Philippines, including the Medical Mission Sisters, are experimenting with acupuncture and acupressure for anesthetizing parts of the body and for treating a variety of common health problems.
Acupuncture is an ancient Chinese science now being used increasingly in many parts of the world. Thin sterile needles are put into specific parts or points of the body—often distant from those areas being treated or anesthetized. Special ‘body maps’ showing the many acupuncture points are available.
Acupressure, or ‘finger pressure’, is similar to acupuncture, except that the points are pressed rather than being pierced with a needle. Acupressure is now being taught to health workers in several countries. In the Philippines, some health workers are said to pull teeth painlessly using acupressure as the only anesthesia.
The Medical Mission Sisters recognize that acupuncture and finger pressure usually are most effective for removing pain or other
symptoms, not for curing the underlying illness. They do not work for all illnesses or for all persons. Yet for problems like arthritis, headache, backache, sinus trouble, and asthma, they sometimes give great relief— at little cost and with no side effects.
Basic techniques for acupuncture or finger pressure may be appropriate to include in health worker training, especially in places where these methods are already widely accepted. But just as with modern medicine, care must be taken that the learners do not misuse them as magic ‘cure-alls’. Books are available on both acupuncture and acupressure. However, the best way to learn is from someone who knows how.
In some parts of the world, the heads of ants with big jaws are used to clamp wounds shut. After the ant bites, the head is cut off the the jaws stay locked.
Helping Health Workers Learn 2012 Helping Health Workers Learn 2012

16-12
SILKSCREENING PRINTING FOR MAKING POSTERS
In community health work, a low-cost method of printing posters and shirts can be a big help.
If health workers learn to make and use a simple silkscreen during their training, those who want to can construct similar ones for use in their villages. The silkscreen described here has been made by village health workers and works well.
SILKSCREEN:Making the screen
• wood about 5 cm. (2 in.) wide• screws or nails• silk or very fine nylon cloth (see
p. 16-14)• small nails or tacks• glue or paint that resists water• a smooth board for the base• hinges
1. Make a wooden frame. Then stretch the silk tightly over it and tack it down.
2. Spread glue or paint on the edges of the screen that will not be covered by the stencil. That way ink will not come through.
3. When the screen is dry, turn the frame over and attach it to the base with hinges.
Printing copies
• stencils (see p. 16-14)• adhesive tape or sticking plaster• ink or paint (see next page) • squeegee for spreading the ink
(see next page)
1. Write or draw on the stencil, and tape it to the bottom of the screen.
Place paper or cloth to be printed here.
2. Pour a little ink at one end of the screen.
3. In one firm, even motion, spread the ink acros the screen with the squeeqee.
Lift frame and take out copy to dry.
Helping Health Workers Learn 2012 Helping Health Workers Learn 2012

16-13
Mix starch with enough cold water to make a smooth paste. Add boiling water, and cool until glossy. Stir in soap flakes while mixture is warm. When the mixture is cool, add coloring.
Mix cornstarch with a small amount of cold water. Stir it into the boiling water. Bring to a boil again, and stir until thickened. Add soap flakes while mixture is warm. Then add coloring.
Dissolve cornstarch in 170 ml. (3/4 cup) cold water. Dissolve gelatin in 60 ml. (1/4 cup) cold water. Heat 460 ml. (2 cups) of water, pour in cornstarch, and add dissolved gelatin. Boil and stir until thickened. Cool and add soap flakes and coloring.
A HOMEMADE SQUEEGEE:
Wrap a piece of inner tube or thin rubber around a stiff strip of metal or thin plywood. Then mount it in a wooden frame.
SILKSCREEN PAINTS AND INKS:*
You can buy special silkscreen inks, or make your own low-cost inks and paints with materials commonly found in a village store. For coloring you can use ink, food color, tempera (paint) powder, or any kind of dye that will dissolve in water. Tempera powder makes the most brilliant colors.
The following silkscreen paint recipes have been used successfully in a cool climate. If you try them in hot climates, please let us know how well they work.
Recipe 1• Non-instant starch
120 ml. (1/2 cup)• Boiling water 350 ml. (11/2 cups)• Soap flakes 120 ml. (1/2 cup)• Coloring
Recipe 2 (quite lumpy, but this does not affect the printing quality)
• Cornstarch 60 ml. (1/4 cup)• Boiling water 460 ml. (2 cups) • Soap flakes 30 ml. (2 Tbs) • Coloring
Recipe 3• Cornstarch 120 ml. (1/2 cup)• Gelatin (unflavored)
1 envelope or 15 ml. (1 Tbs)• Soap flakes 120 ml. (1/2 cup)• Water 700 ml. (3 cups)• Coloring
Note: If you add 1 or 2 teaspoons of glycerine to these inks, they will be smoother and easier to use.
These paints should last for several months if stored in jars with tight-fitting lids.
Never let dried particles of paint get mixed into the paint or fall onto the screen, as they may puncture the silk during printing. A small hole in the silk can be repaired with a drop of shellac. (Fine nylon cloth is tougher than silk, and does not puncture as easily.)
Be sure to wash the screen after you have finished making copies. For the homemade inks described above, wash the screen with soap and water. But if you use an oil-based ink or paint, wash it with turpentine, kerosene, or gasoline.
*From Village Technology Handbook, p 405 Available from Enterprise Works/VITA, 1100 H Street, Suite 1200 NW, Washington, DC 20005, U.S.A. www.enterpriseworks.org
Helping Health Workers Learn 2012 Helping Health Workers Learn 2012
16-14
CLOTH FOR THE SILKSCREEN
When finding cloth to use for making the screen, look for silk or nylon cloth with very fine threads. Cloth with finer threads is easier to use and makes clearer prints. Some stores sell special cloth for silkscreens, called screen fabric or screen mesh.
MAKING STENCILS
It usually helps to first draw the images and words you want on the poster onto your stencil. Use a piece of thin plastic or stiff paper, such as a manila folder. With scissors or an exacto knife, cut out the drawing (the holes in the paper or plastic are what will later appear on the poster). This takes practice! It is easiest to use simple images and large letters.
A different method called photo emulsion makes it possible to print more detailed images and smaller letters by drawing or typing them onto clear thin plastic. However, to use photo emulsion, you need to buy and use light sensitive chemicals that harden on the screen. For more information on photo emulsion, talk to someone who knows how, or see this helpful website: http://en.wikibooks.org/wiki/Screen_Printing/Making_the_Stencil/Photo_Emulsion
POSSIBLE USES FOR SILKSCREEN PRINTING
You can make silkscreen copies of:
• notices with health information for the public• health education posters drawn by school
children• posters with useful information for school
children, mothers, midwives, or other groups• notices for upcoming events or meetings• t-shirts
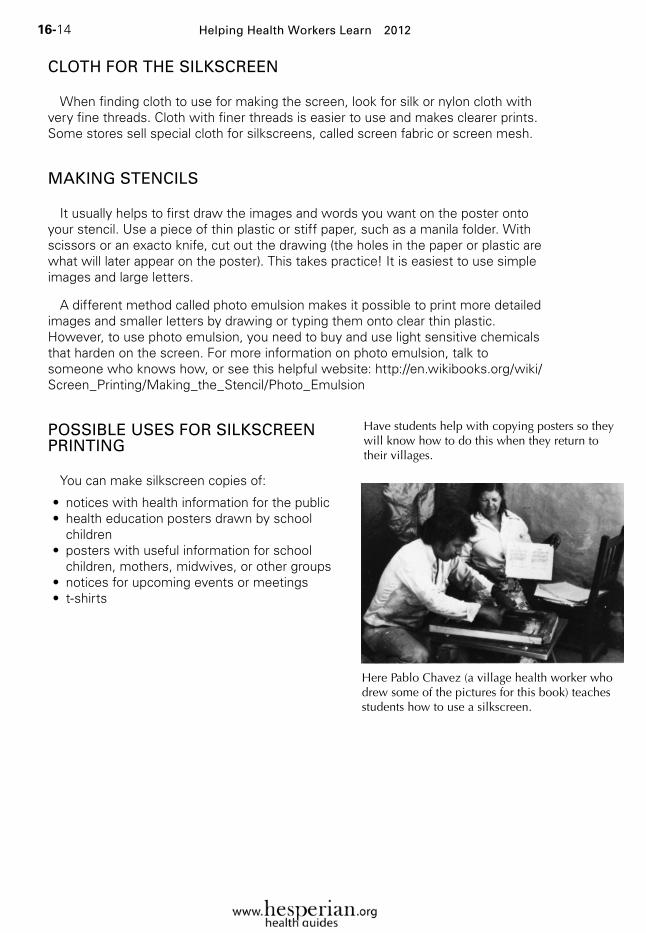
Have students help with copying posters so they will know how to do this when they return to their villages.
Here Pablo Chavez (a village health worker who drew some of the pictures for this book) teaches students how to use a silkscreen.
Helping Health Workers Learn 2012 Helping Health Workers Learn 2012

16-15
A COMMUNITY NEWS SHEET OR ‘HEALTH BULLETIN’
Good communications between a health worker or health team and the community are important. Meetings may be useful, but not everyone attends them.
In places where many people can read (even a little), a good way to improve communications is to print news sheets with information and announcements. These news sheets need not be longer than a page or two, and could be produced every month or so.
Invite people in your village to contribute articles and announcements. You might also ask the school teacher to help. He could have the children write about different things they think are important to health in their village. Then the children could choose one or two of their better articles, work together to improve them, and contribute them to the news sheet.
Perhaps some school children, mothers, young men, or other persons in town can help you produce the news sheet. This would not only save time, but give you a chance to work closely with members of the community.
THE SKILL OF CLEAR, SIMPLE WRITING
The skill of being able to write simply and clearly, to organize ideas, and to say strongly what you feel is one of the most powerful tools a person can have. But it is a skill the poor often lack. Many village schools teach children to read, and to copy letters and words, but do not teach them to express clearly what they want to say.
Clear, simple writing is a skill that can best be learned through practice. Working on a community news sheet is a good way to get such practice. It helps if someone with more writing experience-perhaps the school teacher—can review the articles and make suggestions about clearness, organization, and perhaps spelling. But it is important that whoever gives these suggestions let the writers themselves decide upon and make the corrections.
News sheets with simple, clear information can help persons with little formal education learn to read and write better (especially if they help produce them).
Helping Health Workers Learn 2012 Helping Health Workers Learn 2012
16-16
Suggestions for good writing
A group of school boys from poor farm families in Italy has written a powerful book called Letter To A Teacher. * In this book, ihey point out that “the peasants of Italy were left out when a school for them was being planned.” The boys state their reasons for feeling that “school is a war against the poor.” They say the school system often makes the children of the poor feel worthless, lazy, or stupid. These Italian school boys join hands with the children of the world, saying:
“In Africa, in Asia, in Latin America, in southern Italy, in the hills, in the fields, even in the cities, millions of children are waiting to be made equal. Shy like me; stupid like Sandro; lazy like Gianni. The best of humanity.”
These farm boys have taught themselves to write well, and in doing so have found a strong means of self-defense. Their immediate goal is “to understand others and to make oneself understood.” Their rules of good writing should be a help to any group working on a news sheet or trying to develop writing skills.
RULES OF GOOD WRITING (by the school boys of Barbiana):
• Have something important to say, something useful to everyone, or at least to many.
• Know tor whom you are writing.
• Gather all useful materials.
• Find a logical pattern with which to develop the theme.
• Eliminate every useless word.
• Eliminate every word not used in the spoken language.
• Never set time limits.
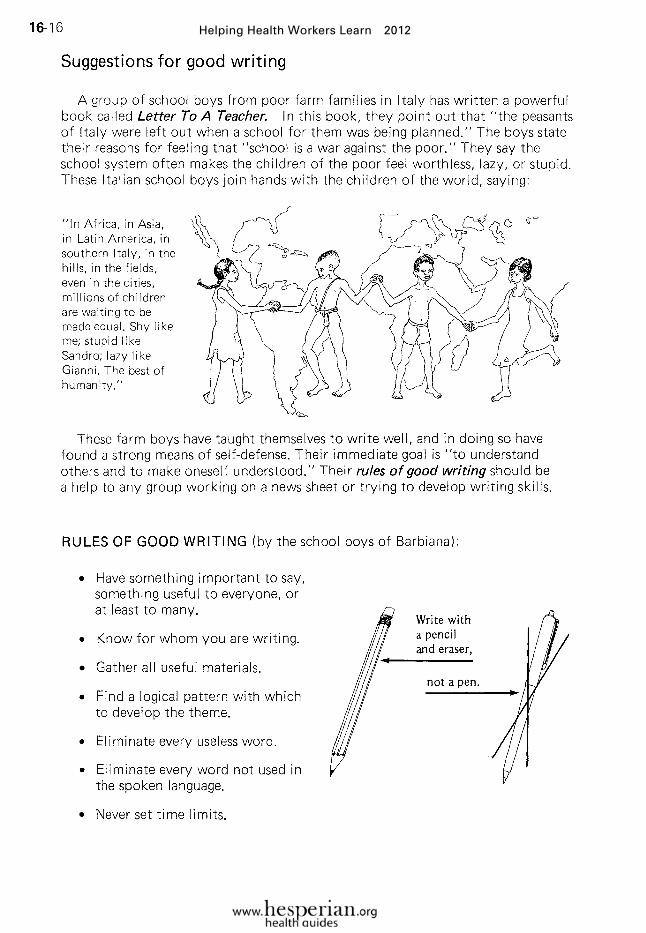
Wrile with a pencil and eraser,
not a pen.
Helping Health Workers Learn 2012 Helping Health Workers Learn 2012

16-17
If you are trying to produce a news sheet, statement, or any other piece of writing as a group, the Barbiana school boys’ explanation of how they worked together to write Letter To A Teacher may give you some ideas:
THIS IS THE WAY WE DO IT:
To start with, each of us keeps a notebook in his pocket. Every time an idea comes up, we make a note of it. Each idea on a separate sheet, on one side of the page.
Then one day we gather together all the sheets of paper and spread them on a big table. We look through them, one by one, to get rid of duplications. Next, we make separate piles of the sheets that are related, and these will make up the chapters. Every chapter is subdivided into small piles, and they will become paragraphs.
At this point we try to give a title to each paragraph. If we can’t, it means either that the paragraph has no content or that too many things are squeezed into it. Some paragraphs disappear. Some are broken up.
While we name the paragraphs, we discuss their logical order, until an outline is born. With the outline set, we reorganize all the piles to follow its pattern.
We take the first pile, spread the sheets on the table, and we find the sequence for them. And so we begin to put down a first draft of the text.
We mimeograph that part so that we each can have a copy in front of us. Then, scissors, paste, and colored pencils. We shuffle it all again. New sheets are added. We mimeograph again.
A race begins now for all of us to find any word that can be crossed out, any excess adjectives, repetitions, lies, difficult words, overly long sentences, and any two concepts that are forced into one sentence.
We call in one outsider after another. We prefer that they not have had too much school. We ask them to read aloud. And we watch to see if they have understood what we meant to say.
We accept their suggestions if they clarify the text. We reject any suggestions made in the name of caution.
Helping Health Workers Learn 2012 Helping Health Workers Learn 2012

16-18
PREPARING TRAINING AND WORK MANUALS FOR HEALTH WORKERS
One of the most valuable tools health workers can have is a clearly written, well-illustrated, easy-to-use manual. Ideally, it should be written for, or adapted to, the local area and its needs. If the health workers’ training focuses on learning to use a practical manual effectively, they can accomplish far more than if they are expected to rely on their memories or class notes.
Unfortunately, many manuals written for community health workers are not adequate. Often they are too simple or too complex, or a combination of both. Drawings and photos tend to be carelessly done or hard to understand. The text often provides too little information, or is not arranged for easy problem-solving use.
Here we give a lew suggestions that may help in the preparation of interesting, useful manuals:
1. Content. Base the content on the most important local needs. Be sure to include concerns of the people—not just of the health authorities. (For example, in Where There Is No Doctor, we include a discussion of ‘Mask of Pregnancy’. Although it is not really a medical problem, it is of concern to village women in Mexico.)
2. Length. Include information on all areas that are important for the health workers’ work. But do not include so much that they will not read or use the manual. Its length should depend both on the health workers’ reading ability and on the way it is written. If written in a practical, interesting way, with lots of informative pictures, the book can be longer and health workers will still use it eagerly.
3. Organization of material. Try 10 arrange subject matter in a way that makes problem solving and day-to-day use easier. For example, group together the information on diagnosis, treatment, and prevention of each health problem. And present the information in the order that health workers will use it (signs and symptoms first, then treatment, then prevention).
4. Language. Use the spoken language of the people and avoid big words. For example, say “Press with your finger,” instead of “Apply digital pressure.”
5. Writing style. Keep paragraphs and sentences short. Try to avoid sentences of more than 20 words. Use many headings and subheadings to divide up the material and to make specific references easy to find.
An idea for helping you find things quickly in your manua
Cut the edges of the pages like this, to mark important sections.
Helping Health Workers Learn 2012 Helping Health Workers Learn 2012

16-19
6. Emphasis. Emphasize what is most important by underlining or using bold or dark print. Also use pictures and ‘boxes’ to set off important points. For example:
7. Pictures. Include plenty of clear, informative line drawings. Integrate the drawings with the text in a way that saves extra words. For example:
8. Type and layout. Use large, clear type. Keep lines of words relatively short (not more than about 60 letters). Compare these actual-size examples from two different health manuals.
LESS APPROPRI ATE-Print is unclear and too small; lines too long, sentences much too long, and the message confusing.
MORE APPROPRIATE-Letters are large and clear, lines short, sentences and words short, and the message is clear.
THIS BABY’S CORD WAS CUT SHORT, KEPT DRY, AND LEFT OPEN TO THE AIR.
HE STAYED HEALTHY.
THIS BABY’S CORD WAS LEFT LONG, KEPT TIGHTLY COVERED, AND NOT KEPT DRY.
HE DIED OF TETANUS.
SINUS TROUBLE (SINUSITIS)Signs:
• Pain in the face above and below the eyes, here (It hurts more when you tap lightly just over the bones, or when the person bends over.)
• Thick mucus or pus in the nose, perhaps with a bad smell. The nose is often stuffy.
• Fever {sometimes).
22. 2 POISONING
a) Kerosene poisoning
this is a common poison drunk by young children. It is kept in houses as fuel for lamps or primus stoves and is often kept in an old squash or beer bottle. A child usually does not drink more than a mouthful because of the unpleasant taste.
fro
m p
. 320
, Th
e Pr
imar
y H
ealt
h W
ork
er,
WH
O
fro
m p
. 22.
2, C
hild
H
ealt
h, A
fric
an
Med
ical
an
d R
esea
rch
Fo
un
dat
ion
For one who knows about a task and can answer questions and teach others well
but is not able to do correctly important tasks like a dressing or giving an injection, we must held him to correct what is wrong and to spend more time doing practical work. So we see why it is important to write what you want the student to be able to do at the end of his training (lear ning objectives) so that you can see if he has learned these tasks (evaluation) and when and why to go back to correct what is wrong and continue to develop what is good.
Helping Health Workers Learn 2012 Helping Health Workers Learn 2012

16-20
9. Do not break words at the ends of lines.
10. Make information easy to find and use.
• Include a clear and complete INDEX—perhaps on paper of a different color, as in Where There Is No Doctor.
• Include pictures that show the subjects covered on each page. That way readers can find what they want by flipping through the book.
• Arrange material under headings and subheadings {such as Signs, Treatment, and Prevention),
• Put related points of information in the form of a list. Mark each item with a number (1,2,3) or a bullet (•), as we have done with this list. (Inexperienced readers may at first have trouble with lists, but with a little practice they soon get used to them. Once they do, the lists make it easier and quicker to review information.)
11. Field testing. Before final production of a manual, or any teaching materia try it out with the people who will be using it. Get their responses to these questions:
• Can you understand everything easily?
• Can you find the subjects you are looking for?
• Does it answer your questions and provide the information you need?
• Do you find it so interesting and informative that you want to read more of it?
• How could it be improved?
12. Show you care. The care you put into the preparation of teaching materials or manuals will inspire health workers to take equal care in their work. The care you take also reflects your appreciation and respect for the health workers and the people they serve.
LESS APPROPRIATE
To make writing clearer for marginal readers, try to avoid dividing words at ends of lines.
MORE APPROPRIATE
To make writing clearer for marginal readers, try to avoid dividing words at ends of lines.
Helping Health Workers Learn 2012 Helping Health Workers Learn 2012