AutoSet & Elite - Default Home Page & Elite POSITIVE AIRWAY PRESSURE DEVICES H5i HEATED HUMIDIFIER...
39
AutoSet ™ & Elite ™ POSITIVE AIRWAY PRESSURE DEVICES H5i ™ HEATED HUMIDIFIER Clinical Guide English
-
Upload
truongdiep -
Category
Documents
-
view
231 -
download
3
Transcript of AutoSet & Elite - Default Home Page & Elite POSITIVE AIRWAY PRESSURE DEVICES H5i HEATED HUMIDIFIER...

AutoSet™ & Elite™
POSITIVE AIRWAY PRESSURE DEVICES
H5i™
HEATED HUMIDIFIER
Clinical GuideEnglish
Global leaders in sleep and respiratory medicine www.resmed.com
Manufacturer: ResMed Ltd 1 Elizabeth Macarthur Drive Bella Vista NSW 2153 Australia. Distributed by: ResMed Corp 9001 Spectrum Center Boulevard San Diego CA 92123 USA. ResMed (UK) Ltd 96 Milton Park Abingdon Oxfordshire OX14 4RY UK. See www.resmed.com for other ResMed locations worldwide.For patent information, see www.resmed.com/ip.S9, AutoSet, S9 Elite, H5i, SlimLine, ClimateLine, SmartStart are trademarks of ResMed Ltd. S9, H5i, AutoSet, SlimLine, ClimateLine and SmartStart are registered in U.S. Patent and Trademark Office.© 2012 ResMed Ltd.
368134/7 2012-10S9 Series
AutoSet & EliteH5i
CLINICALROW ENG


iEnglish
ContentsWelcome ..................................................................................................... 1
S9 AutoSet indications for use ............................................................. 1S9 Elite indications for use ................................................................... 1S9 contraindications ............................................................................. 1S9 adverse effects ................................................................................ 1H5i indications for use .......................................................................... 1H5i contraindications ............................................................................ 1
S9 at a glance............................................................................................... 2Travelling with the S9 ........................................................................... 2
H5i at a glance ............................................................................................. 3Travelling with the H5i .......................................................................... 3
Operating information .................................................................................. 4EPR technology ............................................................................................ 4
EPR checklist ........................................................................................ 4AutoSet technology ...................................................................................... 5
Normal airway ...................................................................................... 5Flow limitation ...................................................................................... 5Snore .................................................................................................... 5Apnoea ................................................................................................. 6
New to the S9 platform ............................................................................... 7Climate Control .................................................................................... 7Central sleep apnoea ............................................................................ 8S9 Essentials ........................................................................................ 8Sleep quality ......................................................................................... 8Ramp .................................................................................................... 9Data management ................................................................................ 9
Setup .......................................................................................................... 10Mask and tubing setup ....................................................................... 11
Filling the water tub ................................................................................... 12S9 basics .................................................................................................... 13Navigating the menus ................................................................................ 14About the menus ....................................................................................... 14
Home menu ...................................................................................... 14Changing settings via the Home menu .............................................. 15Treatment screens ............................................................................. 16Info menu ........................................................................................... 16Setup menu ........................................................................................ 17Reminder menu.................................................................................. 18
Managing Climate Control ......................................................................... 18Treatment screen and clinical setup menus ....................................... 19
Delivering therapy ...................................................................................... 22Adding supplemental oxygen ............................................................. 22
Data management ..................................................................................... 23SD card ...................................................................................................... 23
Removing the card ............................................................................. 23

ii
Inserting the card ............................................................................... 23Analysing the SD card data ................................................................ 24Data storage ....................................................................................... 24Data transmission adapters ................................................................ 24
Cleaning and maintenance ......................................................................... 25Disassembling the H5i ....................................................................... 25Daily ................................................................................................... 25Monthly .............................................................................................. 25Reassembling the H5i ........................................................................ 26Maintenance checklist ........................................................................ 26Reprocessing the H5i between patients ............................................ 26Replacing the air filter......................................................................... 27Antibacterial filters ............................................................................. 27
Technical specifications .............................................................................. 28WARNINGS ........................................................................................ 32CAUTIONS .......................................................................................... 32

1English
Welcome Thank you for choosing the S9 AutoSet, S9 Elite or H5i. Before operating these devices, please read the entire Clinical and Information Guides.
S9 AutoSet indications for useThe S9 AutoSet self-adjusting system is indicated for the treatment of obstructive sleep apnoea (OSA) in patients weighing more than 30 kg. The S9 AutoSet self-adjusting system is intended for home and hospital use.
S9 Elite indications for useThe S9 Elite CPAP system is indicated for the treatment of obstructive sleep apnoea (OSA) in patients weighing more than 30 kg. The S9 Elite CPAP system is intended for home and hospital use.
S9 contraindicationsPositive airway pressure therapy may be contraindicated in some patients with the following pre-existing conditions: • severe bullous lung disease • pneumothorax • pathologically low blood pressure • dehydration • cerebrospinal fluid leak, recent cranial surgery, or trauma.
S9 adverse effectsPatients should report unusual chest pain, severe headache, or increased breathlessness to their prescribing physician. An acute upper respiratory tract infection may require temporary discontinuation of treatment.The following side effects may arise during the course of therapy with these devices: • drying of the nose, mouth, or throat • nosebleed • bloating • ear or sinus discomfort • eye irritation • skin rashes.
H5i indications for useThe H5i is indicated for the humidification of the air delivered from a CPAP or bilevel device. The H5i is for use only as recommended by a physician. The H5i is intended for single patient re-use in the home environment and re-use in a hospital/institutional environment.
H5i contraindicationsThe H5i is contraindicated for use with patients whose upper (supraglottic) airway has been bypassed.

2
Air filterDC power inlet
SD card slot
Module/Adapter port
Air outlet
S9 at a glanceThe S9 system comprises the following elements: • S9 device • SlimLine air tubing • 90W power supply unit • S9 travel bag • SD card • S9 SD card protective folder.
Optional components include: • H5i heated humidifier • Standard air tubing • S9 Wireless Module • S9 Oximeter Adapter • 30W power supply unit (does not support H5i) • Power Station II battery pack • DC/DC Converter 24V/90W.
Travelling with the S9When the patient travels with the S9 only: • Advise the patient to pack the SlimLine or Standard air tubing as the ClimateLine or ClimateLineMAX
heated air tubing is not designed to connect directly to the S9 device. • Advise the patient to purchase and travel with the approved power cord for the region where they will
be using the S9 device. • ResMed confirms that the S9 AutoSet and S9 Elite meets the Federal Aviation Administration (FAA)
requirements (RTCA/DO-160, section 21, category M) for all phases of air travel.

3English
Latch
Release button
ClimateLine / ClimateLineMAX
connection port
Air outletFlip lid
Flip lid seal
H5i water tub
H5i at a glanceThe H5i system comprises the following elements: • H5i heated humidifier • H5i cleanable water tub • ClimateLine heated air tubing (if sold as a Climate Control Kit).
Optional components include: • ClimateLine heated air tubing • ClimateLineMAX heated air tubing • H5i standard water tub.
Travelling with the H5iWhen moving or travelling with your H5i: • Ensure that the water tub is empty. • Disconnect the H5i from the S9 by pressing the release button.

4
Operating informationThe following table describes the operating modes available on the S9 AutoSet and S9 Elite.
Mode S9 Elite S9 AutoSet
CPAP modeA fixed pressure is delivered with optional Expiratory Pressure Relief (EPR). EPR can help ease any discomfort that your patient experiences when breathing out during treatment.
ü ü
AutoSet modeThe AutoSet algorithm automatically adjusts pressure in response to inspiratory flow limitation, snore and apnoea. AutoSet mode offers optional EPR. You can set the minimum and maximum allowable treatment pressures.
– ü
EPR technologyDesigned to make therapy more comfortable, EPR maintains optimal treatment for the patient during inhalation and reduces the delivered mask pressure during exhalation. You can select EPR in either CPAP or AutoSet mode.
EPR checklist ü You can set EPR to Off, Ramp Only, Full Time. ü You can select an EPR Level of Off, 1, 2, or 3 cm H2O, or Patient (configurable by the patient). ü In CPAP mode you can set the EPR Inhale to Med or Fast. ü When EPR is enabled, the delivered pressure will not drop below a minimum pressure of 4 cm H2O,
regardless of the settings.

5English
AutoSet technologyThe treatment pressure required by your patient may vary due to changes in sleep state, body position and airway resistance. In AutoSet mode, the device provides only that amount of pressure required to maintain upper airway patency.The device analyses the state of your patient’s upper airway on a breath-by-breath basis and delivers pressure within the allowed range according to the degree of obstruction. The AutoSet algorithm adjusts treatment pressure as a function of three parameters: inspiratory flow limitation, snore, and apnoea.
Normal airwayWhen your patient is breathing normally, the inspiratory flow measured by the device as a function of time shows a typically rounded curve for each breath.
Open unrestricted airway
Time
Flow
Inspiration
Unrestricted inspiratory flow-time curve (rounded)
Flow limitationAs the upper airway begins to collapse, the shape of the inspiratory flow-time curve changes. The S9 recognises and treats traditional as well as less common flow-limited breath wave forms.
10
Silent partial airway obstructionTime
Flow
Flattened inspiratory flow-time curve (denoting partial obstruction)
SnoreSnoring is sound generated by vibrations of the walls of the upper airway. It is often preceded by flow limitation or a partial obstruction of the airway.
22 © ResMed 08 2007
Noisy partial airway obstruction
Time
Flow
Snore superimposed on inspiratory flow-time curve

6
ApnoeaThe enhanced AutoSet algorithm detects both obstructive and central apnoeas. If an apnoea occurs, the device responds appropriately.
Obstructive apnoea
An obstructive apnoea is when the upper airway becomes severely limited or completely obstructed. AutoSet generally prevents obstructive apnoeas from occurring by responding to flow limitation and snoring. If an obstructive apnoea occurs, the device will respond by increasing pressure.
Complete airway obstruction
Time
Flow
Inspiratory flow-time curve
Absence of flow (for at least 10 sec)
Central apnoea
During a central apnoea, the airway will remain open, but there is no flow. When a central apnoea is detected, the device responds appropriately by not increasing pressure.
Open unrestricted airway
Time
Flow
Inspiratory flow-time curve
Absence of flow (for at least 10 sec)

7English
New to the S9 platform
Climate ControlS9 devices, when used in conjunction with the H5i and ClimateLine or ClimateLineMAX heated air tubing, offer a feature called Climate Control. Climate Control enables the automatic delivery of a constant value of absolute humidity to the patient’s upper airway while protecting against rainout and allowing patients to select the air temperature that offers the most comfort for them.
Rainout protection
Rainout refers to the water or condensation that collects in the patient’s tubing or mask. Rainout is a common side effect of using a humidifier due to the humidified air cooling as it travels down the tubing and into the mask. Rainout occurs when relative humidity, which is a measure of the air’s capacity to hold water vapour, exceeds 100%. Climate Control protects the patient from rainout by maintaining a target relative humidity of 80% as well as maintaining the temperature of the air delivered to the patient without compromising the amount of absolute humidity delivered.
Automatic constant humidity delivery
For each temperature setting, the Climate Control system delivers a constant amount of water vapour, or absolute humidity, to the patient’s upper airway. The following table shows the target absolute humidity value that will be delivered to the mask for a selection of temperature settings.
Temperature delivered to the mask Target absolute humidity at the mask, Body Temperature Pressure Saturated (BTPS)
16ºC 10 mg/L
20ºC 12 mg/L
24ºC 16 mg/L
27ºC 19 mg/L
30ºC 22 mg/L
Automatic constant temperature delivery
The temperature sensor located at the mask end of the ClimateLine or ClimateLineMAX heated air tube enables the system to automatically control the temperature of the air delivered to the patient. This ensures the temperature of the air delivered to the patient does not fall below the set minimum temperature, therefore maximizing breathing comfort for the patient.
Automatic adjustment
The H5i and ClimateLine or ClimateLineMAX heated tubing are controlled by the Climate Control algorithm to deliver constant humidity and temperature outputs. The system adjusts automatically to changes in: • ambient room temperature and humidity values • flow due to pressure changes from the AutoSet algorithm or mask or mouth leak.

8
Central sleep apnoeaThe S9 Series detects both obstructive and central sleep apnoeas (CSA). CSA detection uses the Forced Oscillation Technique (FOT) to determine the state of the patient’s airway during an apnoea. When an apnoea has been detected, small oscillations in pressure (1 cm H2O peak-to-peak at 4 Hz) are added to the current device pressure. The CSA algorithm uses the resulting flow and pressure (determined at the mask) to measure the airway patency.
Respiratory flow
delay(respiratory pause)
CSA detectorbegins
Apnea typedetected - Central or Obstructive
4 sec 6 sec
10 sec
S9 EssentialsS9 Essentials is designed to make device interaction and menu navigation easier for patients. If enabled, S9 Essentials disables the Info and Setup functionality so that patients can simply start and stop therapy and adjust ramp, humidification and Climate Control. S9 Essentials can be enabled via Clinical Setup > Options > Access.
Sleep qualityDesigned to promote compliance, the Sleep Quality indicator allows the patient to actively engage in their own therapy by identifying leak, usage and AHI information. This information can be set to: • Usage—where only usage hours are displayed • On—where usage, leak and AHI information are displayed.

9English
RampDesigned to make the beginning of treatment more comfortable, ramp is available in both CPAP and AutoSet modes. Ramp time defines the period during which the pressure gradually increases from a lower more comfortable start pressure to the minimum AutoSet pressure before the auto-adjusting algorithm commences. In previous products in the AutoSet range, settling was the period where the device was at a minimum AutoSet pressure until the auto-adjusting algorithm commenced.
Pres
sure
20
16
8
4
0Time
AutoSet Max
AutoSet Min
Settling
RampStart
Data managementDesigned to make data more easily available, the S9 SD card gives clinicians greater insight to patient therapy by making high resolution flow and detailed data available on every device. The amount of data stored on the SD card varies compared to the data stored on the device.
Type of data S9 device SD Card
Compliance and therapy summary and statistic data (usage, AHI, pressure, and leak)
365 nights 365 nights
Detailed data – 30 nights
High resolution flow data – 7 nights

10
Setup1. Align your H5i with your S9 and push them together until they click into place.2. Connect the DC plug of the power supply unit to the rear of the S9.3. Connect the power cord to the power supply unit.4. Plug the other end of the power cord into the power outlet.5. Connect one end of the air tubing firmly onto the air outlet.6. Connect the assembled mask system to the free end of air tubing.
Notes: • Always ensure that the S9 and H5i are placed on a stable, level surface for proper operation. • Place the power supply unit away from the H5i to allow for adequate ventilation.

11English
Mask and tubing setup • For more information on assembling the mask see the mask user guide. • If your patient is using a full face mask ensure that the “Full Face” setting is selected. If your patient
is using a nasal pillows mask ensure that the “Pillows” setting is selected. If your patient is using a nasal mask ensure that the “Nasal” setting is selected with the exception of the Ultra Mirage mask which should use the “Nasal Ultra” setting.
• For a complete list of recommended masks and their settings go to www.resmed.com on the Products page under Service & Support. If you do not have internet access, please contact your ResMed representative.
• The S9 device is compatible with the following tubing:
Tube Specifications Settings
SlimLineLength:
Inner diameter:1.8 m15 mm
Default setting
StandardLength:
Inner diameter:2 m19 mm
If using the standard tubing, adjust the tube setting in the Patient Setup or Clinical Setup menus.
ClimateLineLength:
Inner diameter:
Heated2 m15 mm
Automatically detected
ClimateLineMAX
Length:Inner diameter:
Heated1.9 m19 mm
Automatically detected

12
Filling the water tub1. Slide the latch and lift open the flip lid.2. Remove the water tub.3. Fill the water tub (through the centre hole) with water
up to the maximum water level mark (380 mL).4. Return the water tub to the H5i.5. Close the flip lid ensuring that it clicks into place.

13English
LCD screen
Start/Stop button Starts or stops treatment.
S9 basics
Home menu
Key
Home
Ramp
Start/Stop Power Save mode (hold for 3 sec)
Push Dial
Setup menu
Info menu
Advanced Info menu (hold for 3 sec)
Clinical Setup menu (hold for 3 sec)
Info menu*Allows you to
view your sleep statistics.
Setup menu* Allows you to
make changes to settings.
Push DialTurning the dial
allows you to scroll through the menu and change
settings. Pushing the dial allows you to
enter into a menu and confirm your choice.
BacklightWhen treatment is being
delivered, the backlight (including Start/Stop button) automatically
turns off after 30 seconds, otherwise it
turns off after 3 minutes.
* The Info and Setup menus are disabled if S9 Essentials is enabled.

14
Navigating the menusIn general, to navigate the menus:
1. Turn until the parameter you require is displayed in blue.
2. Press . The selection is highlighted in orange.
3. Turn until you see the setting that you require.
4. Press to confirm your choice. The screen returns to blue.
About the menusThere are three menus that are designed to help you to navigate to where you want to go. They are:1. Home menu—for day to day adjustments.2. Info menu—provides sleep quality information.3. Setup menu—where settings can be adjusted.
Home menu The Home menu shows you and your patient what features are currently activated, and the accessories that are connected to the device.
Ramp—displayed when the Max Ramp function is activated in the Clinical Setup menu.
Humidity Level—displayed when the H5i is connected.
Climate Control—displayed when both the H5i and the ClimateLine or ClimateLineMAX heated air tube are connected and when Climate Control is activated in the Clinical Setup menu.
Humidity Level and Heated Tube—displayed when both the H5i and the ClimateLine or ClimateLineMAX heated air tube are connected and when Climate Control is set to Manual in the Clinical Setup menu.

15English
Changing settings via the Home menuFrom the home menu, you can adjust or check the following features:
Ramp
Designed to make the beginning of treatment more comfortable for the patient, ramp time is the period during which the pressure increases from an initial pressure to the prescribed CPAP pressure or minimum AutoSet pressure.Ramp is available in both AutoSet and CPAP modes.
Humidity level
The patient can adjust their humidity level at any time to find the setting that is most comfortable for them.
Climate Control
When the ClimateLine or ClimateLineMAX heated air tubing is connected and Climate Control is enabled, the patient can adjust the air temperature to find the setting that is most comfortable for them.When set to Auto, Climate Control prevents rainout by maintaining 80% relative humidity in the delivered air. If Climate Control is set to Manual, Humidity Level and Heated Tube temperature can be set independently.
Mask-fit
Mask-fit is designed to help patients fit the mask properly. In the S9 AutoSet, the mask-fit pressure is based on the 95th percentile of the previous session or 10 cm H2O whichever is greater.In the S9 Elite, the mask-fit feature delivers 10 cm H2O or set CPAP pressure (whichever is greater) for a three-minute period, prior to starting treatment. During this time, the mask can be adjusted to minimize leaks.To use mask-fit:1. Fit the mask as described in the mask user guide.2. Press for at least three seconds.
One of the MASK FIT screens shown is displayed (as shown on the left).3. If necessary, adjust the mask, mask cushion and headgear until there is
a secure and comfortable fit. After three minutes, the pressure reverts to the set pressure and treatment will begin. You can end mask-fit at any time by pressing .
S9 Essentials
When S9 Essentials is enabled, the patient can simply start and stop therapy, access mask-fit and adjust ramp, humidification and Climate Control.
16
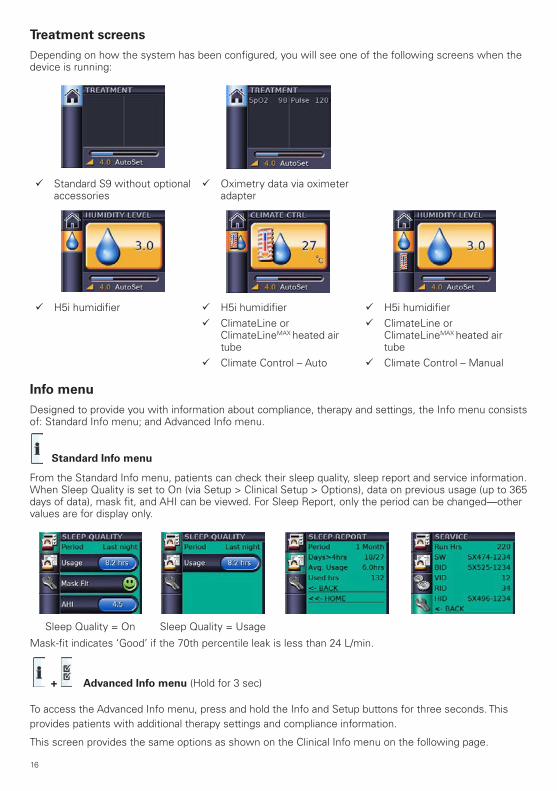
Treatment screensDepending on how the system has been configured, you will see one of the following screens when the device is running:
ü Standard S9 without optional accessories
ü Oximetry data via oximeter adapter
ü H5i humidifier ü H5i humidifier ü ClimateLine or
ClimateLineMAX heated air tube
ü Climate Control – Auto
ü H5i humidifier ü ClimateLine or
ClimateLineMAX heated air tube
ü Climate Control – Manual
Info menuDesigned to provide you with information about compliance, therapy and settings, the Info menu consists of: Standard Info menu; and Advanced Info menu.
Standard Info menu
From the Standard Info menu, patients can check their sleep quality, sleep report and service information. When Sleep Quality is set to On (via Setup > Clinical Setup > Options), data on previous usage (up to 365 days of data), mask fit, and AHI can be viewed. For Sleep Report, only the period can be changed—other values are for display only.
Sleep Quality = On Sleep Quality = Usage
Mask-fit indicates ‘Good’ if the 70th percentile leak is less than 24 L/min.
+ Advanced Info menu (Hold for 3 sec)
To access the Advanced Info menu, press and hold the Info and Setup buttons for three seconds. This provides patients with additional therapy settings and compliance information.
This screen provides the same options as shown on the Clinical Info menu on the following page.

17English
Setup menuThe Setup menu consists of: • Patient Setup menu—allows the patient to optimise comfort settings as well as make changes to
the mask or tube type. • Clinical Setup menu—allows the clinician to set all parameters and options pertaining to the
patient’s therapy.
Patient Setup menu
Only settings relevant to the patient are displayed in the Patient Setup menu. Depending on how the device has been customised via the Clinical Setup menu, the following screens can be viewed:
EPR Level—displayed if set to PATIENT in the Clinical Setup menu.Tube—only displayed if ClimateLine or ClimateLineMAX is not connected. If ClimateLine is attached, no setting is required.Climate Ctrl—only displayed if ClimateLine or ClimateLineMAX is connected and also set to PATIENT in the Clinical Setup menu.Mask—always available.Mask Fit—always available.SmartStart—only displayed if set to PATIENT in the Clinical Setup menu.
+ Clinical Setup menu (Hold for 3 sec)
There are four screens available from the Clinical Setup menu:
• Settings—displays parameters directly affecting the patient’s therapy. • Options—displays parameters affecting the patient’s comfort, therapy feedback and compliance
reporting. • Reminders—displays parameters for accessories requiring replacement. • Configuration—displays general device setting and resetting options.
Clinical menus are identified by the yellow open lock shown in the top right corner.
Where further options exist on a screen, the blue scroll bar down the right of the screen (present on the first two screens above) indicates your position within these options.
Clinical Info menu (accessed from the Clinical Setup menu)

18
Reminder menuYou can use the Reminder menu to alert a patient to specific events, such as when to replace their mask (shown below) or when to insert an SD card. When a reminder is due, a message is displayed on the LCD and remains while the device is not delivering therapy. The backlight on the LCD flashes when a message is displayed.
If more than one reminder for a patient is scheduled for the same date, all scheduled reminders will be displayed. Patients can clear each message by pressing any key (except the Start/stop button).You can access the Reminder menu from the Clinical Menu > Options.Select the required reminder and change the settings as necessary.
For a list of each of the reminders available and their default settings, see the table on the next page.
Managing Climate ControlDesigned to be ideal for most patients, Climate Control Auto enables the automatic delivery of a constant value of absolute humidity while protecting against rainout.To allow for increased flexibility, Climate Control can be turned to Manual in either the Patient Setup (when enabled) or the Clinical Setup menus. Setting Climate Control to Manual disables the automatic control of humidity and allows the patient to set humidity and temperature levels independently. However, rainout protection is not provided when Climate Control is set to Manual.
ModeHumidity Temperature
Setting range Default settings Setting range Default settings
Climate Control – Auto Climate Control
Constant absolute humidity
(depending on temperature
setting)
– Off,1 16ºC–30ºC 27ºC
Climate Control – Manual
Humidity level Heated tube
Off–6.0 (0.5 increments)
3 Off, 16ºC–30ºC 27ºC
1 When the temperature setting is set to Off the tube will not heat the air, nor will the humidifier heat the water to add
humidity to the air.

19English
Treatment screen and clinical setup menus
Parameter Modes Default Range DescriptionCPAP AutoSet
Treatment screen
CPAP ü ü Shows the set pressure.
AutoSetMinMax
ü4 cm H2O20 cm H2O
Shows the treatment pressure.
Ramp ü ü – – Orange icon shows that device is ramping up.
Settings
Mode ü – – Sets the therapy mode depending on what modes are available on the device.
Set pressure (CPAP)
ü 10 cm H2O 4–20 cm H2O, 0.2 cm H2O increments
Sets the fixed treatment pressure.
Max pressure ü 20 cm H2O Min–20 cm H2O, 0.2 cm H2O increments
Sets the upper limit of treatment pressure.
Min pressure ü 4 cm H2O 4–Max cm H2O, 0.2 cm H2O increments
Sets the lower limit of treatment pressure.
Max ramp ü ü 30 minutes Off–45 minutes, 5-minute increments
Limits the ramp times the patient may select.
Start pressure ü ü 4 cm H2O 4–Min pressure (AutoSet mode), 4–Set pressure (CPAP mode), 0.2 cm H2O increments
Sets the pressure at the start of ramp, up to fixed treatment pressure (CPAP) or minimum treatment pressure (AutoSet mode).
EPR ü ü Ramp Off / Ramp Only / Full Time
Sets when EPR is to occur.
EPR level ü ü 1 Off / 1 / 2 / 3 / Patient
Sets the EPR value.
Mask ü ü Nasal Pillows / Full Face / Nasal / Nasal Ultra
Selects the type of mask used by the patient.
Tube type ü ü SlimLine SlimLine / Standard
Selects the type of air tubing used by the patient.

20
Parameter Modes Default Range DescriptionCPAP AutoSet
Options
Climate Control
ü ü Auto Auto / Manual / Patient
Sets the type of Climate Control.
Sleep quality ü ü On On / Usage Sets Sleep Quality to Usage or On.
SmartStart ü ü On On / Off / Patient
Enables or disables the SmartStart feature.
EPR inhale ü Med Med / Fast Sets the inhalation type.
Access ü ü Full Full / Limited Enables or disables S9 Essentials—If set to Limited, the Info and Setup menu buttons are disabled. This means that the patient can simply start or stop therapy and adjust ramp, humidification or Climate Control. Combined button presses remain enabled.
Date ü ü – – Sets the current date or time. If you set a new date or time that occurs in the past then an ‘Invalid date/time, data exists for this period’ message is displayed. Before this change can be made, erase the compliance data – available under the Configuration menu.
Time ü ü – –
Configuration
Restore factory defaults
ü ü – – Resets machine default settings (except for language, date and time).
Erase data ü ü – – Allows the clinician to erase all data stored in the unit and SD card (except for machine hours). Settings, date and time are not affected.
Temperature units
ü ü oC oF / oC Sets temperature units.
Advanced Info menu
Sleep quality ü ü – – Displays information on last night’s usage, mask fit and AHI data or usage only.
View settings ü ü – – Displays Mode, Pressure, Ramp, EPR, Mask, Tube type, Climate Control, Sleep quality, and SmartStart settings.
Service
SW ü ü – – Displays the current software version.
21English
Parameter Modes Default Range DescriptionCPAP AutoSet
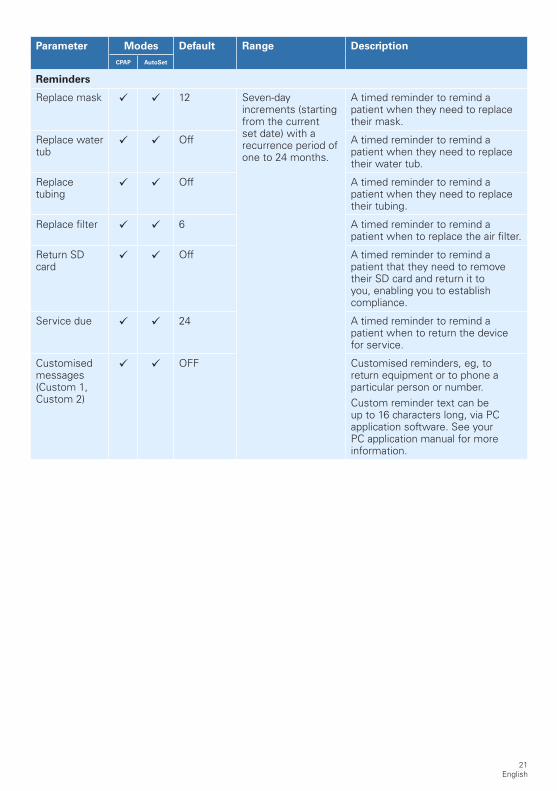
Reminders
Replace mask ü ü 12 Seven-day increments (starting from the current set date) with a recurrence period of one to 24 months.
A timed reminder to remind a patient when they need to replace their mask.
Replace water tub
ü ü Off A timed reminder to remind a patient when they need to replace their water tub.
Replace tubing
ü ü Off A timed reminder to remind a patient when they need to replace their tubing.
Replace filter ü ü 6 A timed reminder to remind a patient when to replace the air filter.
Return SD card
ü ü Off A timed reminder to remind a patient that they need to remove their SD card and return it to you, enabling you to establish compliance.
Service due ü ü 24 A timed reminder to remind a patient when to return the device for service.
Customised messages (Custom 1, Custom 2)
ü ü OFF Customised reminders, eg, to return equipment or to phone a particular person or number. Custom reminder text can be up to 16 characters long, via PC application software. See your PC application manual for more information.

22
In order to assist the heater plate in cooling, your S9 device will continue to blow air for up to an hour after treatment has stopped. However, you can unplug the device from the power outlet at any time and allow the heater plate to cool without air flow or press to enable Power Save mode.If you enable SmartStart, the patient’s device will start automatically when the patient breathes into the mask and stop automatically when they remove their mask.Once therapy has started the treatment screen is displayed.
Note: If power is interrupted during treatment, the device automatically restarts therapy when power is restored.
Adding supplemental oxygenYour S9 device is designed to be compatible with up to 4 L/min of supplemental oxygen.At a fixed rate of supplemental oxygen flow, the inhaled oxygen concentration will vary, depending on the pressure settings, patient breathing pattern, mask selection, and the leak rate.Notes: • Adding oxygen may affect the delivered pressure, and the accuracy of the displayed leak and minute
ventilation. • Before adding oxygen, familiarise yourself and your patient with the specific warnings relating to the
use of supplemental oxygen. These can be found at the end of this guide.
1. Make sure the power is connected.2. Adjust the ramp time or humidification level if required.3. Instruct the patient to fit their mask as described in the mask
user guide.4. To start therapy, instruct the patient to breathe into the mask and/
or press .5. Instruct the patient to lie down and arrange the air tubing so that
it is free to move if they turn in their sleep.6. To stop treatment at any time, instruct the patient to remove the
mask and/or press .
Delivering therapy

23English
Data managementThe SD card may be used to monitor patient usage as well as treatment pressure, mask leak, and incidence of apnoeas and hypopnoeas. To assess the patient’s progress, data for the last session may be compared to values for the last week, the last month, the last three months, the last six months, and the last year. The device stores usage and summary data for up to 365 sessions.
Removing the cardBefore removing the card, instruct the patient to disconnect the S9 device from the power outlet. Instruct the patient to:
1. Push in the SD card to release it.
2. Remove the card.
3. Insert the card into the protective folder.
4. Send the protective folder back to you as instructed.
Inserting the card1. Remove the card from the protective folder.2. Push the card into the S9 device until it clicks.3. The following message is briefly displayed: Reading SD cardNotes: • For more information on removing and inserting the card refer to the S9 SD Card Protective Folder
provided with the device. • Ask the patient to retain the S9 SD Card Protective Folder for future use.
SD cardThe SD card allows S9 devices to capture data. The S9 Series comes with the SD card already inserted and ready to be used. Compliance data is also stored on the device, so if the card is lost, the data is not. You can also create new treatment settings and transfer them to the patient’s device via the SD card.

24
Analysing the SD card dataTo analyse the data, use a ResMed PC application to transfer data and settings between an S9 or an SD card and your personal computer. Refer to your PC application guide for more information about analysing the information on returned SD cards.
Data storageThe amount of data stored on the SD card varies compared to the data stored on the device.
Type of data S9 device SD Card Sampling rate
Compliance and therapy summary and statistic data (usage, AHI, pressure, and leak)
365 nights 365 nights
Detailed data – 30 nights
Apnoea or hypopnoea events (sec) Aperiodic
Flow limitation (flat to round) 1/2 Hz
Leak (L/sec) 1/2 Hz
Minute ventilation (L/min) 1/2 Hz
Pressure (cm H2O) 1/2 Hz
Pulse rate (beats/min)1 1 Hz
Snore (quiet to loud) 1/2 Hz
Oxygen saturation (SpO2) (%)1 1 Hz
High resolution respiratory flow data – 7 nights 25 Hz1 Information only available via oximeter adapter.
Data transmission adaptersThe following data transmission adapters are designed for use with S9 devices.
Device Method Description Type of data transfered
Oximeter adapter
Enables collection of oximetry data from an oximeter for storing data on the SD card inserted into the device.
Oximetry data (oxygen saturation and pulse rate)
Wireless module
• Transmits compliance information wirelessly on the GSM network.
• Communicates settings changes to the S9 device.
Therapy data from the S9 device
Note: For more information on setting up your S9 adapter refer to the relevant S9 adapter user guide.

25English
Cleaning and maintenanceYou should regularly carry out cleaning and maintenance as described in this section.
Disassembling the H5i1. Slide the latch.2. Lift open the flip lid.3. Remove the water tub.4. Discard any excess water from the water tub.5. Unclip all four side latches.6. Pull apart the tub lid, plate and base.
Daily1. Disconnect the air tubing and hang it in a clean, dry place until next use.2. Wash the disassembled tub lid, plate and base in warm water using a mild detergent.3. Rinse thoroughly in clean water and allow them to dry away from direct sunlight.
Notes: • The disassembled tub lid, plate and base may also be washed in a dishwasher on the delicate or
glassware cycle (top shelf only). • Do not hang the air tubing in direct sunlight as it may harden over time and eventually crack. • Do not wash the air tubing in a washing machine or dishwasher.
Monthly1. Wipe the exterior of the S9 and H58 with a damp cloth and mild detergent.2. Peel the flip lid seal from the flip lid and wash it in warm water using a mild detergent.
3. Check the air filter for holes and blockage by dirt of dust. Replace the air filter if necessary.

26
Reassembling the H5i1. Place the plate back onto the base ensuring that the maximum water level mark faces up.2. Place the tub lid back onto the plate/base ensuring that the centre holes are aligned.3. Clip all four side latches.4. Fill the water tub and return the water tub to the H5i.5. Close the flip lid ensuring that it clicks into place.
Maintenance checklist ü Inspect the H5i water tub and flip lid seal for wear and deterioration. ü Replace the water tub if any component is leaking or has become cracked, cloudy or pitted. ü Replace the flip lid seal if cracked or torn. ü Clean white powder deposits in the water tub by using a solution of one part household vinegar to 10
parts water. ü Inspect the maximum water level mark. If cleaning is required, remove by pinching and pushing out
the locks from the plate. Wash in warm water using a mild detergent.
Reprocessing the H5i between patientsThe H5i should be reprocessed when used between patients. Cleaning and disinfection instructions are available from the ResMed website, www.resmed.com under Products and Service & Support. If you do not have internet access, please contact your ResMed representative.

27English
Replacing the air filterReplace the air filter every six months (or more often if necessary).1. Remove the air filter cover from the back of the S9 device.2. Remove and discard the old filter.3. Insert a new ResMed air filter ensuring that it is sitting flat in the air filter cover.4. Replace the air filter cover.
Notes: • Ensure the air filter and air filter cover are fitted at all times. • Do not wash the air filter. The air filter is not washable or reusable.
The following filters are available for use with S9 devices:
Filter Efficiency
Standard (ASMB 160) 88% at 7 micron
Hypo-allergenic (Air Safety Electret100 – electrostatic filter) 89.8% at 0.5 micron, bacterial efficiency of 99.54%.
Antibacterial filtersAntibacterial filters increase resistance in the air circuit and may affect accuracy of displayed and delivered pressure, particularly at high flows. ResMed recommends using a filter with a low impedance (eg, less than 2 cm H2O at 60 L/min).Antibacterial filters are not compatibile with ClimateLine, ClimateLineMAX heated air tubing as the electrical connection will not be available.
Air filter
Air filter cover

28
Technical specifications
General technical specifications
90W power supply unit Input range: 100–240V; 50–60Hz; 115V, 400Hz nominal for aircraft use; 70W (80VA) (typical power consumption); 110W (120VA) (maximum power consumption)
30W power supply unit Input range: 100–240V; 50–60Hz; 115V, 400Hz nominal for aircraft use; 20W (40VA) (typical power consumption); 36W (75VA) (maximum power consumption)
90W DC/DC converter Nominal inputs: 12V, 24V Typical power consumption: 70W Maximum power consumption: 110W
Operating temperature +5ºC to +35ºCNote: The air flow for breathing produced by this therapy device can be higher than the temperature of the room. Under extreme ambient temperature conditions (40ºC) the device remains safe.
Operating humidity 10–95% non-condensingOperating altitude Sea level to 2,591 mStorage and transport temperature
-20ºC to +60ºC
Storage and transport humidity
10–95% non-condensing
Electromagnetic compatibility Product complies with all applicable electromagnetic compatibility requirements (EMC) according to IEC60601-1-2:2007, for residential, commercial, and light industry environments. It is recommended that mobile communication devices are kept at least 1 m away from the device.Information regarding the electromagnetic emissions and immunity of these ResMed devices can be found on www.resmed.com, on the Products page under Service & Support. Click on the PDF file for your language.
Aircraft use ResMed confirms that the S9 AutoSet and S9 Elite meets the Federal Aviation Administration (FAA) requirements (RTCA/DO-160, section 21, category M) for all phases of air travel.
IEC 60601-1 classification Class II (double insulation), Type BFMeasuring and display devices
Pressure sensor:
Flow sensor:
Internally located at device outlet, analog gauge pressure type, -5 to 45 cm H2OInternally located at device inlet, digital mass flow type, -70 to 200 L/min

29English
S9 technical specifications
Operating pressure range 4 to 20 cm H2OMaximum single fault steady state pressure
30 cm H2O if pressure exceeded for >6 sec40 cm H2O if pressure exceeded for >1 sec
Pressure measurement tolerance
±0.5 cm H2O ± 4% of the measured reading
Flow measurement tolerance ±6 L/min or 10% of reading, whichever is greater, at 0 to 150 L/min positive flow
DECLARED DUAL-NUMBER NOISE EMISSION VALUES in accordance with ISO 4871:1996Sound pressure level
with SlimLine tube:
with Standard tube:
with either SlimLine tube or Standard tube and H5i:
24 dBA as measured according to ISO 17510-1:200226 dBA with uncertainty of 2 dBA as measured according to EN ISO 17510-1:200924 dBA as measured according to ISO 17510-1:200227 dBA with uncertainty of 2 dBA as measured according to EN ISO 17510-1:200927 dBA as measured according to ISO 17510-1:200228 dBA with uncertainty of 2 dBA as measured according to EN ISO 17510-1:2009
Sound power levelwith SlimLine tube:
with Standard tube:
with either SlimLine tube or Standard tube and H5i:
34 dBA with uncertainty of 2 dBA as measured according to EN ISO 17510-1:200935 dBA with uncertainty of 2 dBA as measured according to EN ISO 17510-1:200936 dBA with uncertainty of 2 dBA as measured according to EN ISO 17510-1:2009
Nominal dimensions (L x W x H)
153 mm x 140 mm x 86 mm
Weight 835 gHousing construction Flame retardant engineering thermoplasticSupplemental oxygen Recommended maximum supplemental oxygen flow: 4 L/minAir filter
Standard:Hypoallergenic:
Polyester non-woven fibreAcrylic and polypropylene fibres in a polypropylene carrier
Air outlet The 22 mm conical air outlet complies with ISO 5356-1:2004
H5i technical specifications
Maximum heater plate temperature
65°C
Temperature cut-out 74°CMaximum gas temperature at mask
≤ 41°C
Nominal dimensions (L x W x H)
Docking station and water tub: 153 mm x 145 mm x 86 mm
Weight (standard water tub) Docking station and unfilled water tub 0.69 kgWeight (cleanable water tub) Docking station and unfilled water tub 0.79 kgWater capacity To maximum fill line 380 mLDocking station Flame retardant engineering thermoplastic, aluminiumCleanable water tub Injection molded plastic, stainless steel and silicone sealStandard water tub Injection molded plastic, aluminium and elastomer seal

30
Air tubing technical specifications
ClimateLine heated air tubing Flexible plastic and electrical components, 2 m, 15 mm inner diameter
ClimateLineMAX heated air tubing Flexible plastic and electrical components, 1.9 m, 19 mm inner diameter
SlimLine air tubing Flexible plastic, 1.8 m, 15 mm inner diameterStandard air tubing Flexible plastic, 2 m, 19 mm inner diameterClimateLine temperature cut-out ≤ 41°C
Notes: • The manufacturer reserves the right to change these specifications without notice. • The temperature and relative humidity settings displayed for Climate Control are not measured
values.
Humidifier performance
The following settings have been tested at 22°C ambient temperature:
CPAP mask pressure cm H2O
RH output %Setting 3 Setting 6
Nominal system output AH1, BTPS2
Setting 3 Setting 6
4 90 100 10 18
10 95 100 11.5 21
20 95 100 11 181 AH- Absolute Humidity in mg/L.2 BTPS- Body Temperature Pressure Saturated.
Pneumatic flow path
Inlet filter Blower Tube
MaskS9 AutoSet/S9 Elite H5i

31English
Flow (maximum) at set pressures
The following are measured at the end of the specified tubing:
Pressure cm H2O
S9 and Standard air tube
L/min
S9 and SlimLine air tube
L/min
S9, H5i and ClimateLine heated air tube
L/min
4 198 178 1678 189 171 15912 180 164 14216 170 156 13720 155 140 115
Displayed values
Value Range Accuracy Display resolution
Pressure sensor at air outlet
Pressure 4 to 20 cm H2O ±0.5 cm H2O (± 4% of measured value)
0.1 cm H2O
Flow derived value
Leak 0–200 L/min * 1 L/min* The displayed values are estimates. They are provided for trending purposes only.
Pressure accuracy
Maximum static pressure variation at 10 cm H2O according to EN ISO 17510-1:2009:
Without humidifier (SlimLine tube)
9.76 cm H2O to 9.87 cm H2O
With H5i humidifier (SlimLine tube)
9.78 cm H2O to 9.88 cm H2O
Maximum dynamic pressure variation according to EN ISO 17510-1:2009:
Pressure (cm H2O) 10 BPM 15 BPM 20 BPMS9 and SlimLine tube without H5i / S9 and SlimLine tube with H5i
4 0.22 / 0.20 0.28 / 0.29 0.47 / 0.53
8 0.23 / 0.19 0.32 / 0.29 0.41 / 0.42
12 0.22 / 0.21 0.35 / 0.29 0.41 / 0.45
16 0.22 / 0.23 0.41 / 0.33 0.44 / 0.50
20 0.24 / 0.27 0.37 / 0.34 0.48 / 0.50

32
WARNINGS • Read the entire manual before using the device. • Use the device only as directed by your physician or healthcare provider. • Use the device only for the intended use as described in this manual. Advice contained in this manual
should not supersede instructions given by the prescribing physician. • If you notice any unexplained changes in the performance of the device, if it is making unusual or
harsh sounds, if the device or the power supply are dropped or mishandled, if water is spilled into the enclosure, or if the enclosure is broken, discontinue use and contact your ResMed Service Center.
• Beware of electrocution. Do not immerse the device, humidifier, power supply or power cord in water. In the event of a spill, disconnect the device from the power supply and let the parts dry. Always unplug the device before cleaning and make sure that all parts are dry before plugging in the device.
• Explosion hazard—do not use in the vicinity of flammable anesthetics. • Make sure the power cord and plug are in good condition and the equipment is not damaged. • Keep the power cord away from hot surfaces. • The device should only be used with masks (and connectors1) recommended by ResMed, or by a
physician or respiratory therapist. A mask should not be used unless the device is turned on. Once the mask is fitted, ensure that the device is blowing air. The vent hole or holes associated with the mask should never be blocked.Explanation: The device is intended to be used with special masks (or connectors) which have vent holes to allow continuous flow of air out of the mask. When the device is turned on and functioning properly, new air from the device flushes the exhaled air out through the mask vent holes. However, when the device is not operating, insufficient fresh air will be provided through the mask, and the exhaled air may be rebreathed. Rebreathing of exhaled air for longer than several minutes can, in some circumstances, lead to suffocation. This applies to most models of CPAP or bilevel devices.
• Oxygen supports combustion. Oxygen must not be used while smoking or in the presence of an open flame.
• Always ensure that the device is turned on and airflow generated before the oxygen supply is turned on. Always turn the oxygen supply off before the device is turned off, so that unused oxygen does not accumulate within the device enclosure and create a risk of fire.
• Do not operate the H5i if it is not working properly or if any part of the device or H5i has been dropped or damaged.
• Do not leave long lengths of air tubing around the top of the patient’s bed. It could twist around the patient’s head or neck while they are sleeping.
• Do not use electrically conductive or antistatic air tubings. • Do not use the air tubing if there are any visible signs of damage. • Only ResMed air tubing and accessories should be used with the device. A different type of air tubing
or accessory may alter the pressure you actually receive, reducing the effectiveness of the treatment. • Only use the ResMed 90W or 30W power supply unit. Use the 90W power supply unit to power the
system comprising the device, H5i, air tubing, DC/DC converter and battery pack. The 30W power supply unit is designed to power the device only and recommended for traveling.
• Only ResMed products are designed to be connected to the module connector port. Connecting other devices could damage the device.
• Blocking the air tubing and/or air inlet of the device while in operation could lead to overheating of the device.
CAUTIONS • Do not open the device enclosure. There are no user serviceable parts inside. Repairs and servicing
should only be performed by an authorised ResMed service agent. • Do not use bleach, chlorine, alcohol, or aromatic-based solutions, moisturising or antibacterial soaps
or scented oils to clean the device, humidifier or air tubing. These solutions may cause damage and reduce the life of these products.
• Incorrect system setup may result in incorrect mask pressure reading. Ensure the system is correctly set up.
• Be careful not to place the device where it can be bumped or where someone is likely to trip over the power cord.
1 Ports may be incorporated into the mask or in connectors that are near the mask.

33English
• Make sure the area around the device is dry and clean and clear of bedding, clothes or other objects that could block the air inlet or cover the power supply unit.
• Ensure that the device is protected against water if used outdoors. Enclose the device in the S9 travel bag for transport.
• The H5i should only be used with tubing or accessories recommended by ResMed. Connection of other delivery tubes or accessories could result in injury, or damage to the device.
• Do not open the H5i enclosure. There are no user serviceable parts inside. Repairs and servicing should only be performed by an authorised ResMed service agent.
• Do not overfill the water tub as water may enter the device and air tubing. • Do not use any additives (eg, scented oils and perfumes). These may reduce the humidification
output of the H5i and/or cause deterioration of the water tub materials. • Take care when handling the H5i as the water/water tub may be hot. Allow 10 minutes for the heater
plate and any excess water to cool. • The H5i should only be connected or disconnected when the water tub is empty. • Make sure that the water tub is empty before transporting the H5i. • Do not operate the H5i on an aircraft as water may enter the device and air tubing during turbulence. • Always place the H5i on a level surface below the level of the user to prevent the mask and tubing
from filling with water. • If liquids are inadvertently spilled into or on the H5i, unplug the device from the power outlet.
Disconnect the H5i from the device and allow it to drain and dry before re-using..


AutoSet™ & Elite™
POSITIVE AIRWAY PRESSURE DEVICES
H5i™
HEATED HUMIDIFIER
Clinical GuideEnglish
Global leaders in sleep and respiratory medicine www.resmed.com
Manufacturer: ResMed Ltd 1 Elizabeth Macarthur Drive Bella Vista NSW 2153 Australia. Distributed by: ResMed Corp 9001 Spectrum Center Boulevard San Diego CA 92123 USA. ResMed (UK) Ltd 96 Milton Park Abingdon Oxfordshire OX14 4RY UK. See www.resmed.com for other ResMed locations worldwide.For patent information, see www.resmed.com/ip.S9, AutoSet, S9 Elite, H5i, SlimLine, ClimateLine, SmartStart are trademarks of ResMed Ltd. S9, H5i, AutoSet, SlimLine, ClimateLine and SmartStart are registered in U.S. Patent and Trademark Office.© 2012 ResMed Ltd.
368134/7 2012-10S9 Series
AutoSet & EliteH5i
CLINICALROW ENG