Arches National Park - Photograph America Newsletter Utah is the location of the greatest...
12
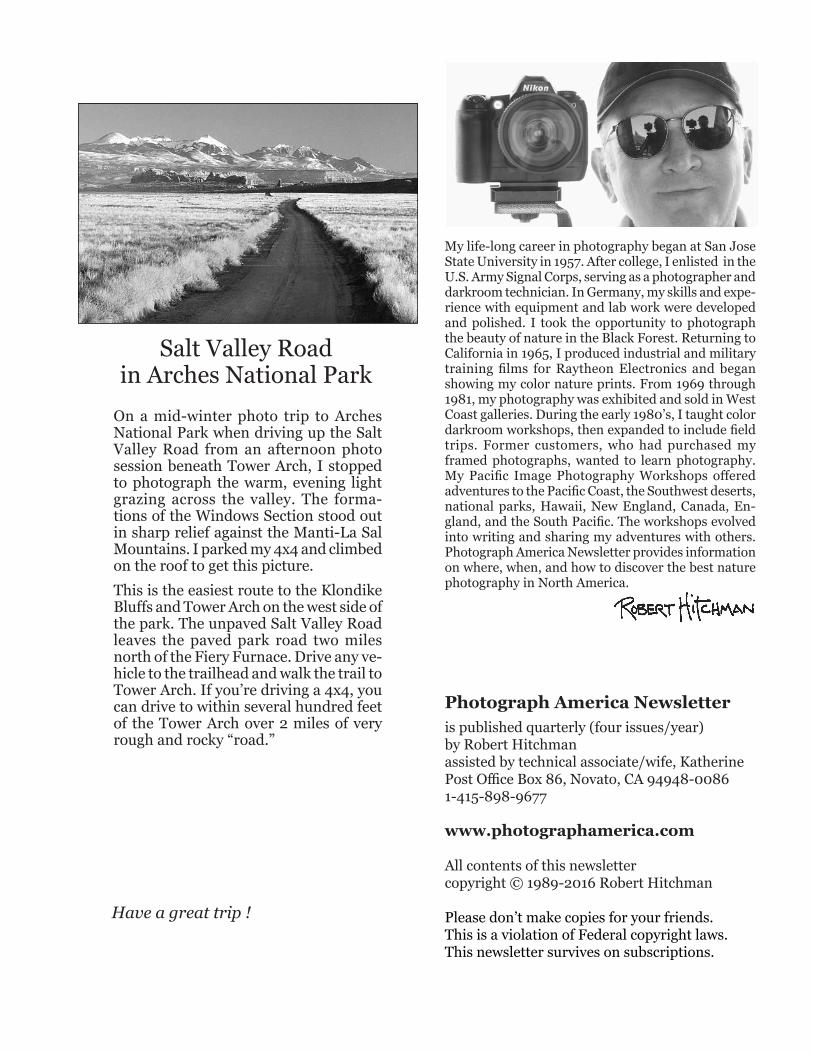
Southeastern Utah is the location of the greatest concentration of natural arches in the world. Over a thousand stone arches can be found on this high desert. Delicate Arch stands out as the symbol of Arches National Park. The image of Delicate Arch is recognized as the symbol of the Park and the scene that every visiting photographer must capture. The arch is forty-six feet high, thirty-two feet wide, and stands on the rim of a circular sandstone basin at 4,800 feet, close to the eastern edge of the Park. Sunset is the best time to be there with your camera, as the last golden light of the day turns the red sandstone to fire. Some photographers make plans to arrive when a full moon rises over the La Sal Mountains and into the opening of Deli- cate Arch. A layer of snow on the distant peaks, framed by the arch, will improve the scene. A fresh dusting of snow across the foreground of your composition and over the top of the arch is the icing on the cake. With good planning and a little luck, you can capture all these elements in one photograph. Updated - August 2016 ™ 18 Where, when, and how to discover the best photography in America Published since 1989 Arches National Park
Transcript of Arches National Park - Photograph America Newsletter Utah is the location of the greatest...

Southeastern Utah is the location of the greatest concentration of natural arches in the world. Over a thousand stone arches can be found on this high desert. Delicate Arch stands out as the symbol of Arches National Park. The image of Delicate Arch is recognized as the symbol of the Park and the scene that every visiting photographer must capture. The arch is forty-six feet high, thirty-two feet wide, and stands on the rim of a circular sandstone basin at 4,800 feet, close to the eastern edge of the Park. Sunset is the best time to be there with your camera, as the last golden light of the day turns the red sandstone to fire. Some photographers make plans to arrive when a full moon rises over the La Sal Mountains and into the opening of Deli-cate Arch. A layer of snow on the distant peaks, framed by the arch, will improve the scene. A fresh dusting of snow across the foreground of your composition and over the top of the arch is the icing on the cake. With good planning and a little luck, you can capture all these elements in one photograph.
Updated - August 2016™
18 Where, when, and howto discover the best
photography in America
Published since 1989
Arches National Park
ost visitors to this area split their time between Arches and Canyonlands
National Parks. Canyonlands, just across the highway to the west, covers over four times more area than Arches. Spectacular viewpoints, like the Island in the Sky and Grand View Point Overlook, high above the Green and Colorado Rivers, offer only glimps-es of the ex-panse of iso-lated back country that m a k e s u p most of Can-yonlands Na-tional Park. To adquately explore Can-y o n l a n d s , which is 85 percent back c o u n t r y , leave your car and proceed on foot, mountain bike, horseback, or four-wheel-drive vehicle. This newsletter covers the more accessible parts of Arches National Park. Canyonlands National Park will be the subject of a future newsletter.Except for a couple miles of graded dirt roads, you can reach most of the best places to photograph in Arches National Park by paved roads. Trails to the arches are generally short and easy to hike. Two weeks of photography in Arches National Park will not give you enough time to see it all. If you have a short time to spend in the area, concentrate on a few locations and avoid trying to see too much. This newsletter has suggestions that will help you plan your photo trip.
When to visitThe best times to visit Arches National Park are in the Spring and the Fall during the months of March, April, and May, and the months of September, October, and November. May, June, and July are the hottest and driest months. October has the most rain. Spring can bring strong winds and dust storms to the area. Late October and early November brings the color of autumn to the Fremont cotton-woods along Courthouse Wash.
M An early spring visit or a late fall visit will sometimes coincide with a snow fall. The Colorado River, along the southeastern border of the Park, can freeze over on a mid-winter day. Be prepared for cold weather and discover some unusual landscapes when the Park is under a layer of snow. Freshly fallen snow on red
sandstone is a good reason to visit Arches in mid-winter. Some of the trails may be hidden under a blanket of snow. The climb up to Delicate Arch can be difficult when the trail is covered with snow. The
trails in the Windows area are fairly level, and snow should cause you no problems there. Avoid the Devil’s Garden Trail beyond Landscape Arch if there is snow or ice on the trail. Sections of the Devil’s Garden Trail beyond Landscape Arch cross steep and narrow ridges of slickrock that can be very slippery when covered with snow.
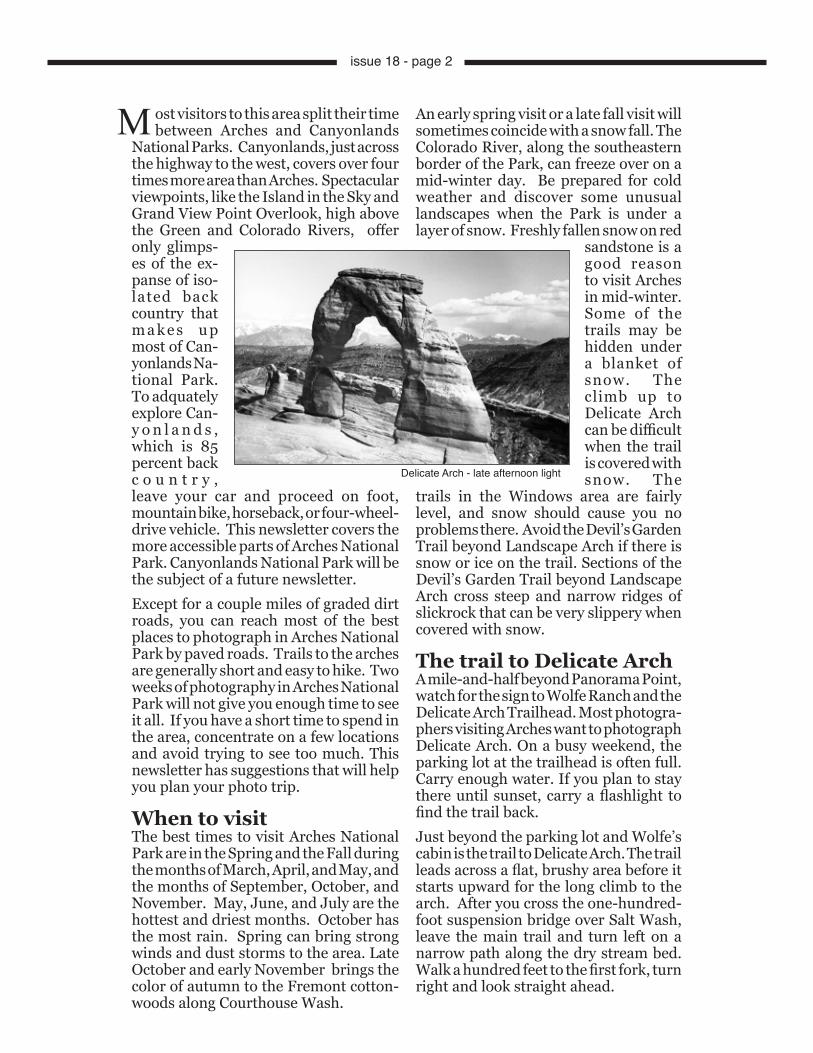
The trail to Delicate ArchA mile-and-half beyond Panorama Point, watch for the sign to Wolfe Ranch and the Delicate Arch Trailhead. Most photogra-phers visiting Arches want to photograph Delicate Arch. On a busy weekend, the parking lot at the trailhead is often full. Carry enough water. If you plan to stay there until sunset, carry a flashlight to find the trail back.Just beyond the parking lot and Wolfe’s cabin is the trail to Delicate Arch. The trail leads across a flat, brushy area before it starts upward for the long climb to the arch. After you cross the one-hundred-foot suspension bridge over Salt Wash, leave the main trail and turn left on a narrow path along the dry stream bed. Walk a hundred feet to the first fork, turn right and look straight ahead.
Delicate Arch - late afternoon light
issue 18 - page 2
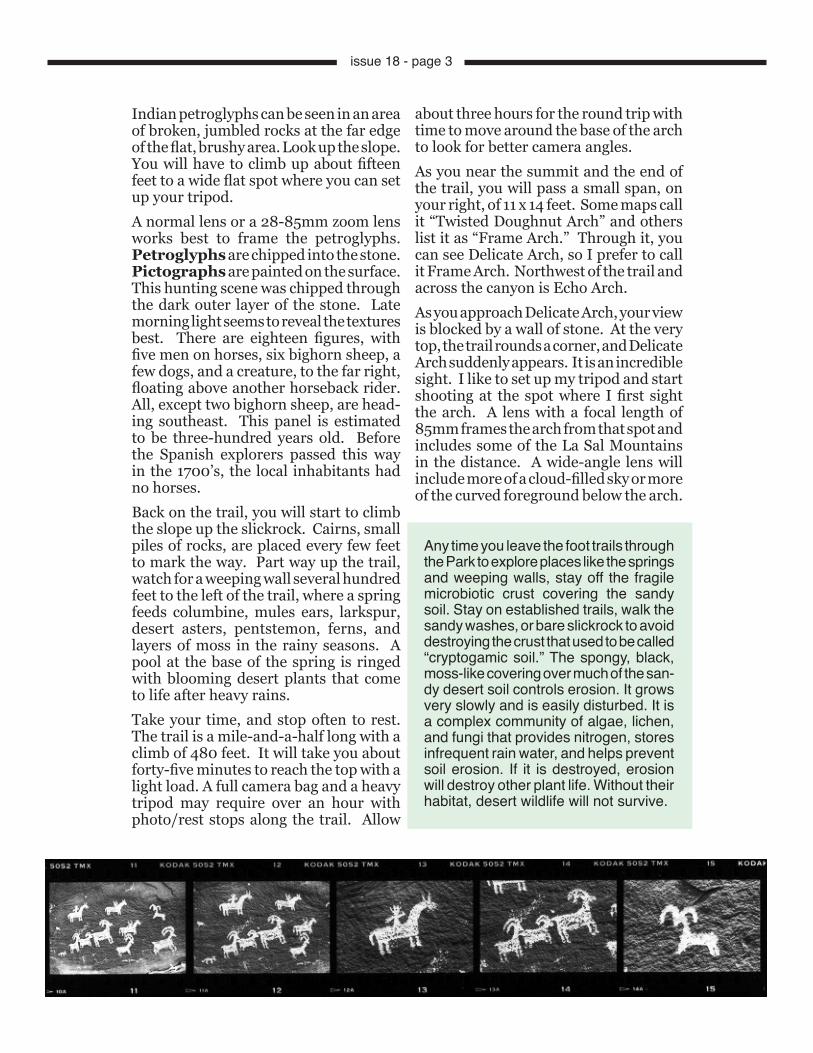
Indian petroglyphs can be seen in an area of broken, jumbled rocks at the far edge of the flat, brushy area. Look up the slope. You will have to climb up about fifteen feet to a wide flat spot where you can set up your tripod.A normal lens or a 28-85mm zoom lens works best to frame the petroglyphs. Petroglyphs are chipped into the stone. Pictographs are painted on the surface. This hunting scene was chipped through the dark outer layer of the stone. Late morning light seems to reveal the textures best. There are eighteen figures, with five men on horses, six bighorn sheep, a few dogs, and a creature, to the far right, floating above another horseback rider. All, except two bighorn sheep, are head-ing southeast. This panel is estimated to be three-hundred years old. Before the Spanish explorers passed this way in the 1700’s, the local inhabitants had no horses.Back on the trail, you will start to climb the slope up the slickrock. Cairns, small piles of rocks, are placed every few feet to mark the way. Part way up the trail, watch for a weeping wall several hundred feet to the left of the trail, where a spring feeds columbine, mules ears, larkspur, desert asters, pentstemon, ferns, and layers of moss in the rainy seasons. A pool at the base of the spring is ringed with blooming desert plants that come to life after heavy rains.Take your time, and stop often to rest. The trail is a mile-and-a-half long with a climb of 480 feet. It will take you about forty-five minutes to reach the top with a light load. A full camera bag and a heavy tripod may require over an hour with photo/rest stops along the trail. Allow
about three hours for the round trip with time to move around the base of the arch to look for better camera angles.As you near the summit and the end of the trail, you will pass a small span, on your right, of 11 x 14 feet. Some maps call it “Twisted Doughnut Arch” and others list it as “Frame Arch.” Through it, you can see Delicate Arch, so I prefer to call it Frame Arch. Northwest of the trail and across the canyon is Echo Arch. As you approach Delicate Arch, your view is blocked by a wall of stone. At the very top, the trail rounds a corner, and Delicate Arch suddenly appears. It is an incredible sight. I like to set up my tripod and start shooting at the spot where I first sight the arch. A lens with a focal length of 85mm frames the arch from that spot and includes some of the La Sal Mountains in the distance. A wide-angle lens will include more of a cloud-filled sky or more of the curved foreground below the arch.
Any time you leave the foot trails through the Park to explore places like the springs and weeping walls, stay off the fragile microbiotic crust covering the sandy soil. Stay on established trails, walk the sandy washes, or bare slickrock to avoid destroying the crust that used to be called “cryptogamic soil.” The spongy, black, moss-like covering over much of the san-dy desert soil controls erosion. It grows very slowly and is easily disturbed. It is a complex community of algae, lichen, and fungi that provides nitrogen, stores infrequent rain water, and helps prevent soil erosion. If it is destroyed, erosion will destroy other plant life. Without their habitat, desert wildlife will not survive.
issue 18 - page 3
Late afternoon light is best on this arch. The more southern-setting winter sun creates better rim lighting than the more northern angle of summer sunsets. If you arrive in mid-winter to photograph Delicate Arch dusted with snow, beware of the last hundred feet of slickrock trail. At any time of year, be careful if you try to move in closer and find a better angle from below or beyond the arch. Just beyond the arch is a vertical cliff, dropping several hundred feet. See the photo on page 8.
If you arrive on a busy holiday weekend, you may never get a chance for a photo-graph of Delicate Arch without someone posing for a snapshot beneath the span. Be patient and wait for a moment when the scene is clear. Plan your descent with time to return to your car before it gets too dark to see the trail. You should carry a flashlight, just in case.
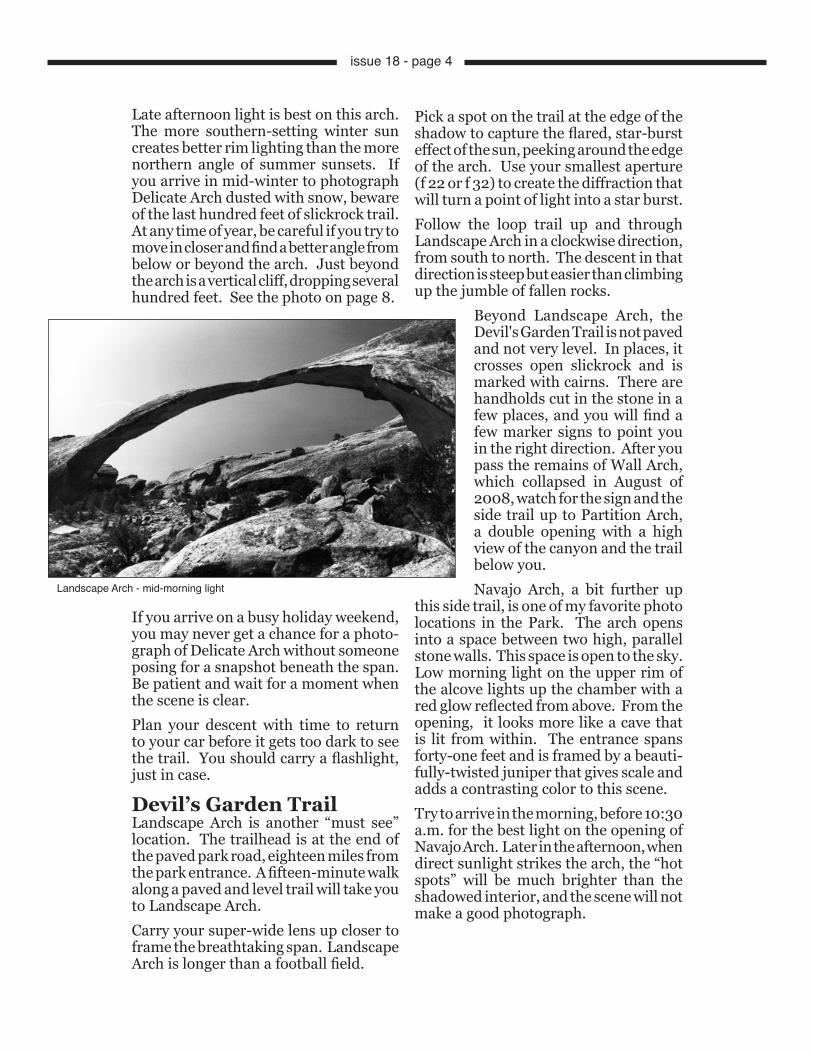
Devil’s Garden TrailLandscape Arch is another “must see” location. The trailhead is at the end of the paved park road, eighteen miles from the park entrance. A fifteen-minute walk along a paved and level trail will take you to Landscape Arch. Carry your super-wide lens up closer to frame the breathtaking span. Landscape Arch is longer than a football field.
Pick a spot on the trail at the edge of the shadow to capture the flared, star-burst effect of the sun, peeking around the edge of the arch. Use your smallest aperture (f 22 or f 32) to create the diffraction that will turn a point of light into a star burst.Follow the loop trail up and through Landscape Arch in a clockwise direction, from south to north. The descent in that direction is steep but easier than climbing up the jumble of fallen rocks.
Beyond Landscape Arch, the Devil's Garden Trail is not paved and not very level. In places, it crosses open slickrock and is marked with cairns. There are handholds cut in the stone in a few places, and you will find a few marker signs to point you in the right direction. After you pass the remains of Wall Arch, which collapsed in August of 2008, watch for the sign and the side trail up to Partition Arch, a double opening with a high view of the canyon and the trail below you. Navajo Arch, a bit further up
this side trail, is one of my favorite photo locations in the Park. The arch opens into a space between two high, parallel stone walls. This space is open to the sky. Low morning light on the upper rim of the alcove lights up the chamber with a red glow reflected from above. From the opening, it looks more like a cave that is lit from within. The entrance spans forty-one feet and is framed by a beauti-fully-twisted juniper that gives scale and adds a contrasting color to this scene. Try to arrive in the morning, before 10:30 a.m. for the best light on the opening of Navajo Arch. Later in the afternoon, when direct sunlight strikes the arch, the “hot spots” will be much brighter than the shadowed interior, and the scene will not make a good photograph.
Landscape Arch - mid-morning light
issue 18 - page 4

Windows AreaMany of the arches in the Windows area of the Park can be seen from the paved road. Trails, leading to the best locations for your tripod, are short and easy to fol-low, even under a layer of snow. Double Arch, in the Windows section of the Park, is a magnificent subject and should not be missed. An easy trail from the parking lot leads up and into the huge alcove formed by the arches. Some of my favorite imag-es have included snow-covered junipers in the foreground, patterns of red sand, and rain-filled pot holes in the slickrock. Including something in the foreground of your photograph will give your compo-sition a recognizable scale and will give viewers an idea of the size of the arches. The larger of the two flying buttresses has a span of 160 feet and is the second largest in the Park. Move around and try to frame different compositions using dif-ferent lenses. Move in very close and use your widest wide-angle lens in a vertical format to emphasize the foreground and the height of the openings. Move back, away from the arches, to change your perspective and use a normal focal length. Or use a longer lens to fill more of your frame with the arches and still include some foreground in your composition. Tight, frame-filling compositions of the arches and other geological formations in this Park will not convey the feeling of the massive size and the great expanse of this landscape. Back off a bit, include something in your foreground. Don’t zoom in too tight for every shot.The Double Arch Trail leads right up and into the opening, but drops off too steeply to climb through, to the other side. Off to the left side of the trail is another opening and a better way to move around behind the arches into an area called the Cove of Caves. Red sand, blown into ridged pat-terns, covers an area of this cove that is hidden behind large stones. The patterns make great “leading lines” and strong foreground elements in compositions of the cave-pocked vertical walls of this area.
Double-O Arch is a two- mile hike from the trailhead. At Navajo Arch, you are more than halfway there. The last part of the trail is marked by cairns along the ridge of a long, narrow rock wall. Several hundred feet of this trail follows the narrow ridge of an up-ended slickrock fin. Some parts of the trail are steep and short. Others are long narrow tracks only a few feet wide. Watch for the cairns, and you won’t get lost. The Devil’s Garden Trail is not difficult unless you are afraid of heights.One of the better views of Double-O Arch can be seen from the narrowest part of the trail along a rock fin. This is a good angle, looking toward the west, in the morning. In afternoon light, you will probably want to climb through the lower opening of Double-O Arch and set up your tripod on the high spot just west of the span. From your viewpoint of Double-O, you will see the tall, dark stone spire of Dark Angel off toward the northwest. It is worth the effort to carry your camera gear all the way to the end of the trail, another half-mile, for a closer view of Dark Angel. You will find more interesting and taller stone spires and needles in other areas of the park.The trail to Dark Angel is lined with low-growing prickly-pear cactus that will probably be covered with red and yellow blossoms during the last two weeks of May. This cactus can be found along the loop trail around the North Window and many other areas of the Park.From Double-O Arch, a primitive loop trail returns back to the parking lot through Fin Canyon. This trail is not well marked and not easy to hike. There are ten more arches along the primitive loop trail. If you have the time and a trail guide (from the Visitor Center), you may want to enjoy the rest of the day there. If you return along the same trail, you can photograph all the same arches in dif-ferent light. If you start this walk in the morning and return via the same route later in the afternoon, the light on each arch will be completely different. Carry plenty of water.
issue 18 - page 5
Some of the caves have seeping springs with the back walls covered with lush, green growth and wildflowers. It is easier to climb up these sandstone formations than to climb down.
Klondike BluffsOne of my favorite arches is in the re-mote, northwestern corner of the Park called Klondike Bluffs. Tower Arch is reached via an eight-mile dirt road that leaves the paved park road near Skyline Arch. The road is well-marked on the free map handed out at the gate and the Visitor Center. Wet weather will close the road where it dips down into a wash and follows a stream bed in Salt Valley. If the weather forecast looks clear, any two-wheel vehicle can make the trip across the dusty, washboard road to the trailhead to Tower Arch. Park your car in the shade of the only tree at the end of the road. The trail sign says “Tower Arch 1.2 Miles” and points you in the right direction, up the hill.Pack your wide-angle–a 28mm is just barely wide enough for this location. My 20mm lens was perfect. I even used my 17mm to photograph Tower Arch. If the cactus are in bloom, carry your macro lens. The prickly-pear cactus are very low to the ground. I like to use my right-angle finder to avoid lying in the sand.
Watch for the cairns, the piles of rocks marking the trail. At the top of the first climb, you will cross a flat, sandy area where the best cacti will be found. The trail dips and crosses slickrock, then drops
into a sandy wash and climbs a steep, sandy slope. At the top is a marker arrow, the only one pointing the way. After another ten minutes of scram-bling over a jumble of large and small sandstone blocks, the trail ends at an old broken sign, propped up at a steep angle, pointing toward Tower Arch. Named for the tall stone tower above and behind the arch, Tower Arch has a span of over one-hundred feet. On the right or southern support is the name “Alexander Ringhoffer - 1922” carved into the stone. He was the “father of Arches National Park.” This is am arch, not a natural bridge. Like most of the spans in the Park, it
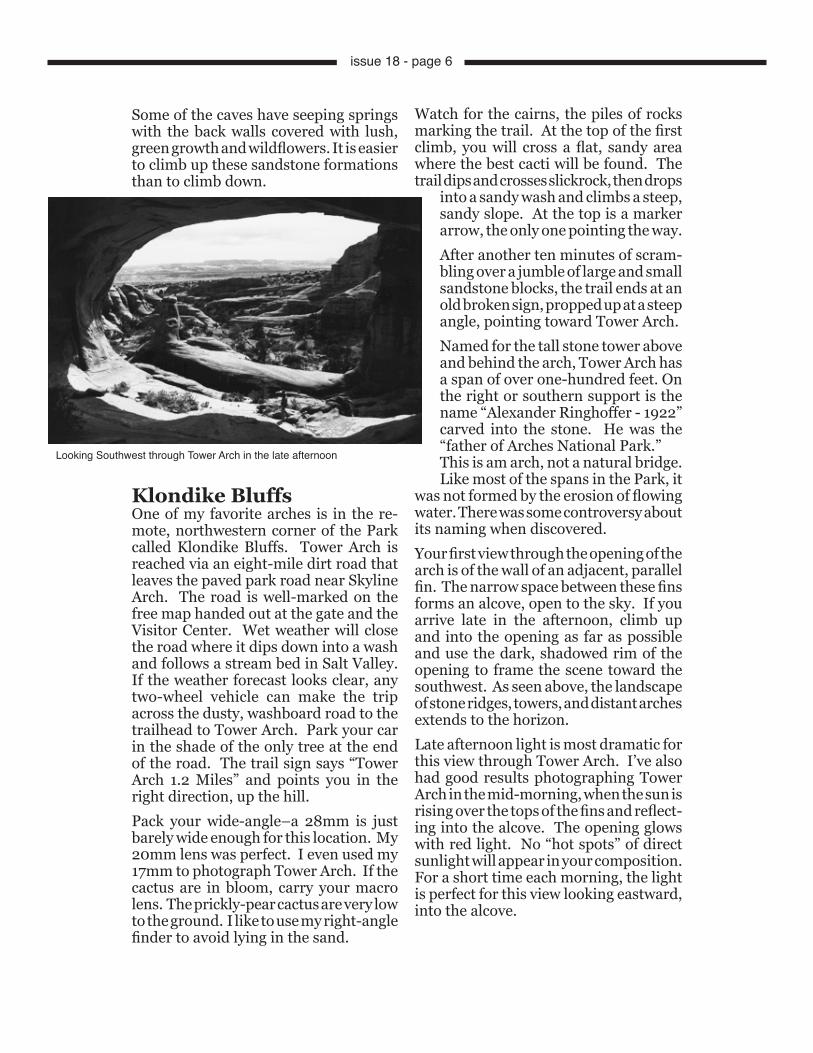
was not formed by the erosion of flowing water. There was some controversy about its naming when discovered. Your first view through the opening of the arch is of the wall of an adjacent, parallel fin. The narrow space between these fins forms an alcove, open to the sky. If you arrive late in the afternoon, climb up and into the opening as far as possible and use the dark, shadowed rim of the opening to frame the scene toward the southwest. As seen above, the landscape of stone ridges, towers, and distant arches extends to the horizon. Late afternoon light is most dramatic for this view through Tower Arch. I’ve also had good results photographing Tower Arch in the mid-morning, when the sun is rising over the tops of the fins and reflect-ing into the alcove. The opening glows with red light. No “hot spots” of direct sunlight will appear in your composition. For a short time each morning, the light is perfect for this view looking eastward, into the alcove.
Looking Southwest through Tower Arch in the late afternoon
issue 18 - page 6
With a 4x4, you can drive to within a half-mile of Tower Arch. Buy a good Jeep trail map if you attempt any back-country explorations. Many of the primitive roads are not marked with signs. Side roads lead in all directions. Many of these roads end at abandoned mining sites.Carry a flashlight in case you plan to shoot Tower Arch or any of the other arches in the Klondike Bluffs area at sunset. It is 1.2 miles back to your car. Trail guides rank this trail as moderately strenuous. The Tower Arch Trail is well-marked with cairns.
The Fiery FurnaceThis area of weathered and broken sandstone formations have tall, parallel fins that form a maze of narrow redrock canyons. You will quickly become lost if you try to follow any of the trails winding through the narrow passageways. Some of the trails lead into narrow cracks you can barely squeeze through. Others lead into dead-ends, box canyons, and sudden drop-offs. In some places, there are hand-holds and steps cut into the soft stone. There are places along the trails that require a sit-down descent. This maze is one of the coolest places in the Park on a hot day. It was probably named the Fiery Furnace because the tops of the formations glow in the setting sun. These deep canyons are cool and dark. You won’t need your sunglasses here, but you will need your tripod. There are about ninety arches in the Fiery Furnace area and one of the few natural bridges in the Park. The openings of Twin Arch look like eye sockets of a skull. Six-ty-three-foot long Surprise Arch spans an easily-overlooked, dead-end slot canyon. If you want to photograph one of the most interesting sections of Arches National Park, sign up at the Visitor Center for one of the twice-daily, free, ranger-led walks through the area. On these walks, you won’t have time to set up a tripod.
If you retrace your steps back from the parking lot at the end of the tour, you will be able to photograph Surprise Arch without a group. Carry a 20mm or 24mm lens for this arch. In the close quarters of these narrow passageways, a 28mm lens is not wide enough. You can try a few hand-held shots along the trail or just take trail notes in case you want to return alone.
Visitor CenterAs soon as you pay your fee or show your pass at the gate, stop at the Visitor Center. Check the bulletin board for the weather forecast and the road and trail conditions.Pick up a copy of the free park map and the trail guides to any area you want to explore. Check out the displays describing how the arches were formed and where to find them. Because of their locations and orienta-tion, some arches receive the best light at sunrise, some look better in mid-morning or afternoon, and others face the setting sun and are best photographed later in the day. Use these maps and guides to help plan your photo exploration of the Park. Avoid driving aimlessly along park roads looking for something to photograph.
SunriseEast of the Windows area are some mag-nificently-twisted and gnarled Utah juni-pers that make wonderful foregrounds for your sunrise photos. Drive out to the parking area near the North and South Windows. Walk to the end of the trail at the South Window. A sign marks the primitive trail that continues around the South Window to the right. Follow the cairns, or small piles of stones, that mark the route all the way around the Windows and back to the parking area. This area, east of the twin arches, slopes down toward the Colorado River. Twisted junipers cover these rocky slopes. Use fill-flash to light the foregrounds of your early-morning landscapes as the sun is rising over the deep canyon of the Colo-rado River in the east.
issue 18 - page 7

Mid-morningNavajo Arch comes alive before direct sunlight fills the space, open to the sky, between the arch and the adjacent parallel wall. Around mid-morning light bounces off the upper wall and fills the chamber. Pick a spot a few feet southwest of the opening, and frame the span in the twisted branch of a juniper.Continue driving east on the dirt road to Delicate Arch trailhead parking area. Drive another mile and a half to the end of the road and the view-point due south of the arch. Don’t bother shooting from the parking area. The angle is poor. Follow the marked trail up to the edge of the vertical cliffs that rim the deep canyon just south of Delicate Arch. The rising sun will first strike the top of the distant arch and work its way down the vertical red wall. Watch out for the edge, it’s a four-hundred foot drop. Look for several twisted junipers growing along the can-yon rim that make great fore-grounds for this photograph. Use fill flash or wait for the sun to rise high enough to light this side of the canyon too. A 20mm wide-angle lens will take in the whole scene. A much longer lens will be necessary to tightly frame Delicate Arch across the canyon. In the spring, Indian paint brush grows from the cracks in this slickrock canyon rim. There is an unmarked trail that leads down to the bottom of this deep canyon. The view from the bottom is not worth the steep climb back to the top.
SunsetDelicate Arch is the best place to set up your tripod at sunset. If you can’t make it to the top for that event, drive a short way farther up the Park road to the Salt Valley Overlook or the Fiery Furnace parking area. From both of those viewpoints, watch the tops of the formation called the Fiery Furnace turning bright red in the last few minutes before the sun drops below the horizon.
In the Fiery Furnace area, find a high spot along the road. With a telephoto lens, frame the towers of the Windows area in the distance toward the south. The rising sun will light the tips of the red sandstone towers. The whole plateau of petrified sand dunes will be glowing in the low morning light.
Full MoonIf you do not want to make the climb all the way up to Delicate Arch after dark to photograph the full moon, consider setting up your tripod along the trail through the canyon called “Park Avenue.” This is an easy trail and is near the park entrance. Along both sides of the trail are tall, thin stone spires and balancing rocks. If your moon is not in the correct position for the composition you want, make a double exposure and place it lower in the sky, right over the canyon wall. Use a longer lens to enlarge the moon, and use a wide-angle lens for the second exposure of the foreground scene. This technique works best when the moon is directly overhead and out of the way of your wide-angle view. The full moon is quite bright. A second exposure (on the same frame) will lighten the night sky enough to reveal the silhouette of the dark stone walls. Check your instruction manual if you are not sure how to make double exposures with your camera. You can make the exposure of the moon first or the exposure of the landscape first; it doesn’t matter. Proper placement of the moon in the sky is easier if you have a grid in your viewfinder.
Del
icat
e Ar
ch fr
om th
e vi
ewpo
int a
t the
end
of t
he ro
ad.
issue 18 - page 8
Navajo Arch at Mid-Morning
© Robert Hitchman 2006
Mid-morning light on Navajo Arch isa good reason to get an early-morningstart on the Devil's Garden Trail.
Morning light on Landscape Arch isnot to be missed. Pack a wide-angle lens with you. From a distance, the arch blends into the background.
Sunset on Delicate Arch is one of themost spectacular sights in the park. Allow at least three hours for the round trip hike and any extra side trips.
Sunset lights up the tops of the redrock formation called the Fiery Furnace. Move in close with a wide-angle lens.
DELICATEARCH
Sunrise on the east side of the "Spectacles," the North and South Windows, is one of my favorite locations. It's near Double Arch.
Sunrise is a good time to be on the rim of the overlook for the view of the other side of Delicate Arch. Use a longer telephoto lens.
Sunrise lighting the tops of the formations in the Windows area are best photographed from the Salt Valley Overlook. Use a long telephoto lens for this shot.
Mid-morning and late after-noon light works well on the Tower Arch in the Klondike Bluffs area of the park
Sunrise reflected off the redrock of the Great Wall lights up any water flowing in Courthouse Wash. Frame the scene with cottonwoods.
The full moon framed in the opening of Park Avenue is spectacular and the trail is easy to find after dark.
Try some night photo-graphy with star trails, or the full moon reflecting on the Colorado River.
MOAB
COLORADOUTAH
ARIZONA NEWMEXICO
ArchesNational
Park
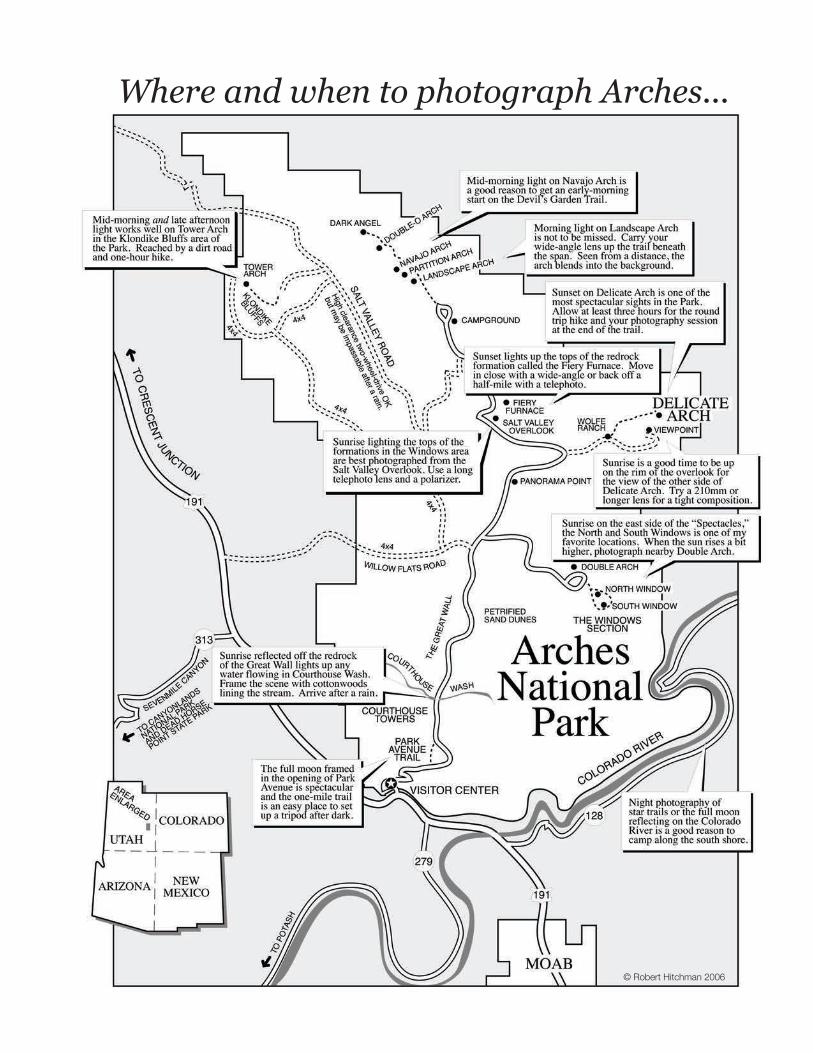
Where and when to photograph Arches...
© Robert Hitchman 2006
Bad weatherOn several occasions during photo trips into the desert, I’ve encountered strong winds, blowing dust and sand storms. Keep your camera gear safely packed away to avoid damaging it. Fine dust and grit will accumulate inside your camera and work its way into the focusing mechanism and everyplace else. I carry a roll of large zip up plastic bags in my car and sometimes double-bag my camera before starting out on a hike into blowing sand. Zipped-up plastic bags protect against moisture, too, and may save your camera if you get caught out in a sudden rain storm on the trail. Late one afternoon in May, when dark storm clouds were forming over the La Sal Mountains to the east, I set up my tripod on Panorama Point. With a small aperture and a five-stop neutral density filter, I was able to make three-minute exposures of the landscape beneath the approaching storm. Each frame recorded several lighting strikes. My best image captured six bolts reaching the ground. I waited out each exposure from the safety of my car. After the rain passed and the storm cleared, I could see for miles in all directions from Panorama Point. Rays of sunlight were breaking through the clouds and lighting up the redrock formations. I went to the base of the high walls in the Court House area to photograph the narrow cascades of water dropping over the rim of the canyon and falling hundreds of feet. Rain water was flowing from pothole to pothole down the steeply inclined slickrock. Stay off the Park’s dirt roads in bad weather. Salt Wash may fill and rise over the dirt road out to Delicate Arch’s eastern viewpoint. The primitive road out to the Klondike Bluffs on the northwestern edge of the Park will probably be under water and impassible in the lowest places.
The best photography is often found on the edge of a storm, just before a storm, when the sky is filling with clouds, or just after a storm passes, when spectacular lighting effects can be seen across the landscape. Redrock is redder and plants are a cleaner shade of green. After a storm, the desert air is fresh, cool, and a good time for a long hike.
MoabFive miles south of the entrance to Arches National Park is the largest city in Southeastern Utah. Moab is the center of activity and the headquarters for tourists visiting Arches, Canyonlands, and the La Sal Mountains. There are hotels, motels, hostels, RV parks, and campgrounds listed on the guide to lodgings available from the Moab Chamber of Commerce. The biggest boom occurred in Moab in the 1950's, when uranium was discovered nearby. Fortunes were quickly made and quickly lost, and Moab grew four times larger. The national parks have greatly increased the tourism through this part of Utah. Canyonlands was established in 1964. Arches was established in 1971. There are eighteen campgrounds in and around Moab, including private camp-grounds and National Park, National Forest and BLM campgrounds. Most of Moab’s private campgrounds are locat-ed along busy and noisy Highway 191, Moab’s main street.
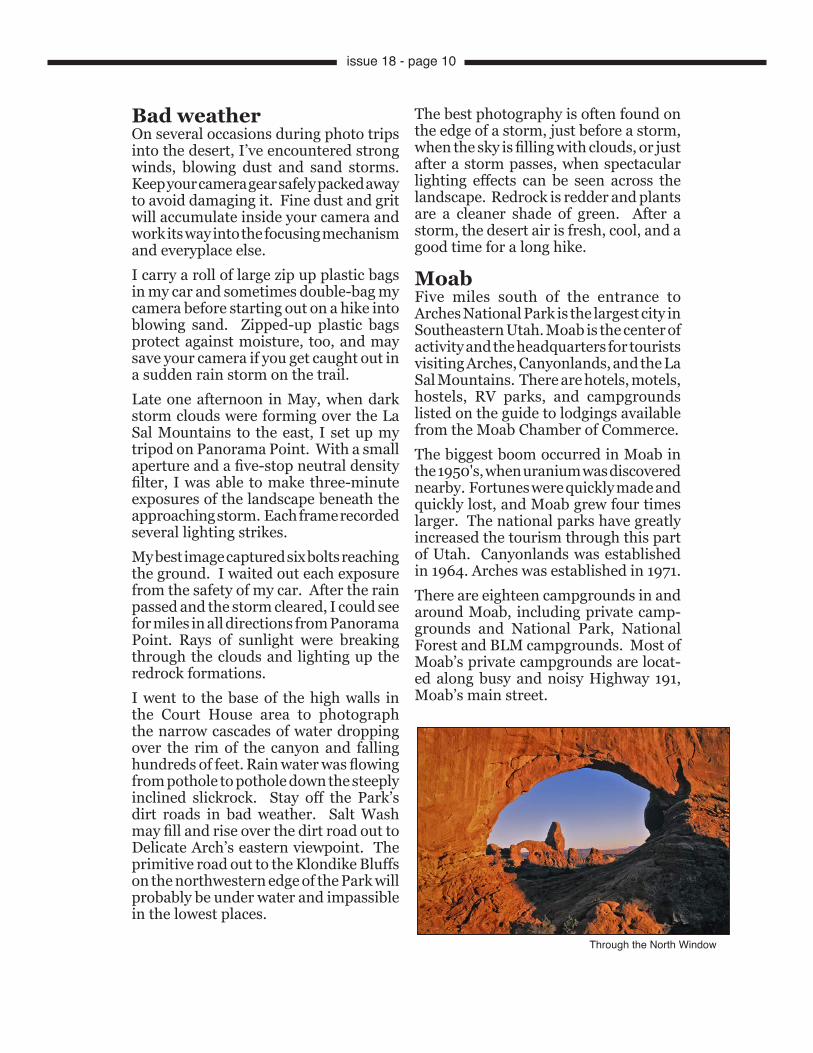
Through the North Window
issue 18 - page 10
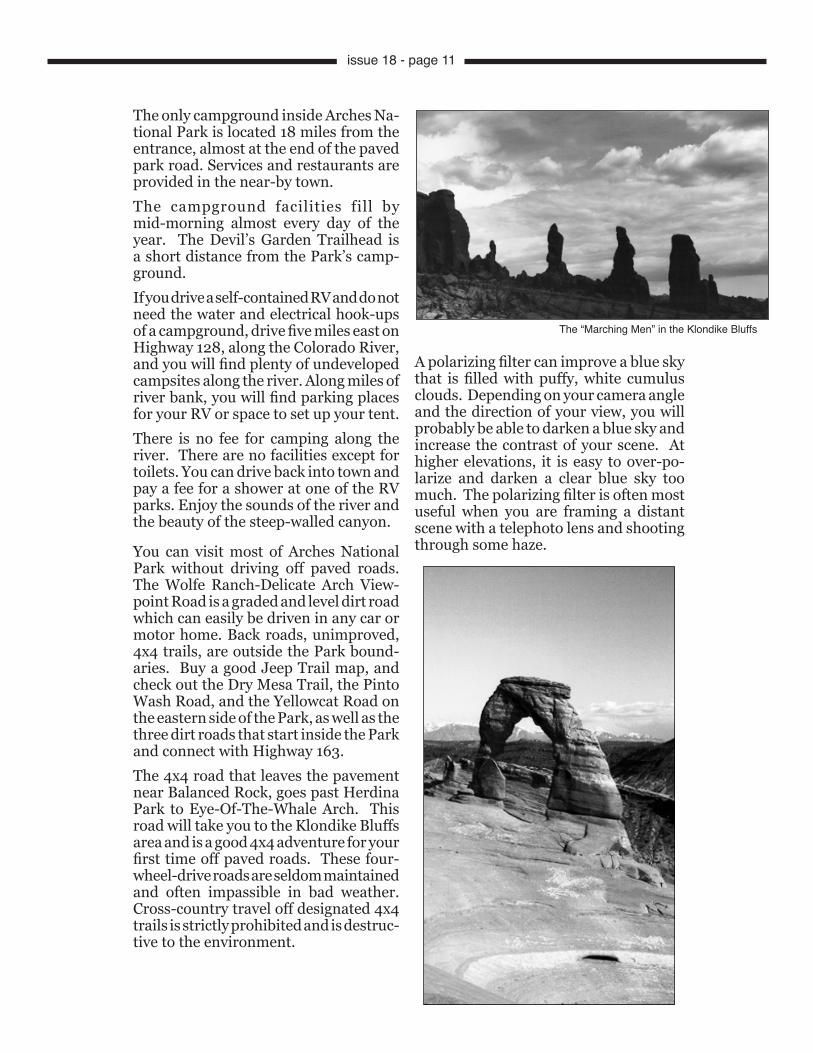
The “Marching Men” in the Klondike Bluffs
A polarizing filter can improve a blue sky that is filled with puffy, white cumulus clouds. Depending on your camera angle and the direction of your view, you will probably be able to darken a blue sky and increase the contrast of your scene. At higher elevations, it is easy to over-po-larize and darken a clear blue sky too much. The polarizing filter is often most useful when you are framing a distant scene with a telephoto lens and shooting through some haze.
issue 18 - page 11
The only campground inside Arches Na-tional Park is located 18 miles from the entrance, almost at the end of the paved park road. Services and restaurants are provided in the near-by town.The campground facilities fill by mid-morning almost every day of the year. The Devil’s Garden Trailhead is a short distance from the Park’s camp-ground.If you drive a self-contained RV and do not need the water and electrical hook-ups of a campground, drive five miles east on Highway 128, along the Colorado River, and you will find plenty of undeveloped campsites along the river. Along miles of river bank, you will find parking places for your RV or space to set up your tent. There is no fee for camping along the river. There are no facilities except for toilets. You can drive back into town and pay a fee for a shower at one of the RV parks. Enjoy the sounds of the river and the beauty of the steep-walled canyon.
You can visit most of Arches National Park without driving off paved roads. The Wolfe Ranch-Delicate Arch View-point Road is a graded and level dirt road which can easily be driven in any car or motor home. Back roads, unimproved, 4x4 trails, are outside the Park bound-aries. Buy a good Jeep Trail map, and check out the Dry Mesa Trail, the Pinto Wash Road, and the Yellowcat Road on the eastern side of the Park, as well as the three dirt roads that start inside the Park and connect with Highway 163. The 4x4 road that leaves the pavement near Balanced Rock, goes past Herdina Park to Eye-Of-The-Whale Arch. This road will take you to the Klondike Bluffs area and is a good 4x4 adventure for your first time off paved roads. These four-wheel-drive roads are seldom maintained and often impassible in bad weather. Cross-country travel off designated 4x4 trails is strictly prohibited and is destruc-tive to the environment.
My life-long career in photography began at San Jose State University in 1957. After college, I enlisted in the U.S. Army Signal Corps, serving as a photographer and darkroom technician. In Germany, my skills and expe-rience with equipment and lab work were developed and polished. I took the opportunity to photograph the beauty of nature in the Black Forest. Returning to California in 1965, I produced industrial and military training films for Raytheon Electronics and began showing my color nature prints. From 1969 through 1981, my photography was exhibited and sold in West Coast galleries. During the early 1980’s, I taught color darkroom workshops, then expanded to include field trips. Former customers, who had purchased my framed photographs, wanted to learn photography. My Pacific Image Photography Workshops offered adventures to the Pacific Coast, the Southwest deserts, national parks, Hawaii, New England, Canada, En-gland, and the South Pacific. The workshops evolved into writing and sharing my adventures with others. Photograph America Newsletter provides information on where, when, and how to discover the best nature photography in North America.
Photograph America Newsletteris published quarterly (four issues/year)by Robert Hitchmanassisted by technical associate/wife, KatherinePost Office Box 86, Novato, CA 94948-00861-415-898-9677
www.photographamerica.com
All contents of this newslettercopyright © 1989-2016 Robert Hitchman
Please don’t make copies for your friends.This is a violation of Federal copyright laws.This newsletter survives on subscriptions.
Salt Valley Roadin Arches National Park
On a mid-winter photo trip to Arches National Park when driving up the Salt Valley Road from an afternoon photo session beneath Tower Arch, I stopped to photograph the warm, evening light grazing across the valley. The forma-tions of the Windows Section stood out in sharp relief against the Manti-La Sal Mountains. I parked my 4x4 and climbed on the roof to get this picture.This is the easiest route to the Klondike Bluffs and Tower Arch on the west side of the park. The unpaved Salt Valley Road leaves the paved park road two miles north of the Fiery Furnace. Drive any ve-hicle to the trailhead and walk the trail to Tower Arch. If you’re driving a 4x4, you can drive to within several hundred feet of the Tower Arch over 2 miles of very rough and rocky “road.”
Have a great trip !