PCGENESIS FINANCIAL ACCOUNTING AND REPORTING ( · PDF filePCGenesis Financial Accounting and...
76
PCGENESIS FINANCIAL ACCOUNTING AND REPORTING (FAR) SYSTEM OPERATIONS GUIDE 4/4/2017 Section G: Accounts Receivable Processing, V2.4
Transcript of PCGENESIS FINANCIAL ACCOUNTING AND REPORTING ( · PDF filePCGenesis Financial Accounting and...

PCGENESIS FINANCIAL
ACCOUNTING AND REPORTING
(FAR) SYSTEM OPERATIONS GUIDE
4/4/2017 Section G: Accounts Receivable Processing,
V2.4


Georgia Department of Education
April 4, 2017 8:25 AM Page i of ii
All Rights Reserved.
Revision History
Date Version Description Author 4/4/2017 2.4 17.01.00 – Add export file option to Print Open Receivables Report. S. Scrivens
03/04/2016 2.3 16.01.00 – Update Logo and Footers. S. Scrivens
04/06/2012 2.2 11.03.01 – Added button bar processing instructions and instructions for the
screen print function.
D. Ochala
12/15/2008 2.1 08.04.00 – Added B6 - F10 (Browse for file) default to the CSV (Comma
delimited) (*.csv) file type information and instructions
C. W. Jones
09/28/2008 2.0 08.03.00 – Updated receivable entry and revenue source print and maintenance,
and added receivable import .csv file information and instructions.
C. W. Jones

Georgia Department of Education
April 4, 2017 8:25 AM Page ii of ii
All Rights Reserved.
Table of Contents
OVERVIEW ......................................................................................................................................................................... 1
TOPIC 1: PROCESSING ACCOUNTS RECEIVABLES ............................................................................................................... 3
PROCEDURE A: INQUIRING ON AN ACCOUNTS RECEIVABLE/UPDATING THE ACCOUNTS RECEIVABLE REASON .............................................. 3 PROCEDURE B: ENTERING AN ACCOUNTS RECEIVABLE MANUALLY INTO PCGENESIS ............................................................................ 11 PROCEDURE C: LARGE RECEIVABLE IMPORT .................................................................................................................................. 18
C1. Creating an Accounts Receivable Using the ReceiptOrReceivableTemplate.xls ....................................................... 18 C1.1. Downloading the PCGenesis ReceiptOrReceivable.xls Template ......................................................................................... 18 C1.1.1. ReceiptOrReceivable.xls Template – Example .................................................................................................................. 19 C1.2. Saving the PCGenesis ReceiptOrReceivable.xls Template as a Microsoft® Excel Spreadsheet/Workbook .......................... 20 C1.3. Using the PCGenesis Receivable.xls Template to Create an Accounts Receivable............................................................... 22 C1.4. Saving the PCGenesis Accounts Receivable Spreadsheet/Workbook as a .csv File ............................................................. 24
C2. Importing the Accounts Receivable.csv File into PCGenesis ..................................................................................... 27 PROCEDURE D: CLOSING AN ACCOUNTS RECEIVABLE...................................................................................................................... 34
D1. Closing a Current Year’s Receivable ......................................................................................................................... 34 D2. Closing a Prior Year’s Receivable ............................................................................................................................. 42
TOPIC 2: PRINTING THE OPEN RECEIVABLES REPORT ...................................................................................................... 43
2A. Open Accounts Receivable (by Fund) Report ......................................................................................................................... 47
TOPIC 3: MAINTAINING THE REVENUE SOURCE FILE ....................................................................................................... 48
PROCEDURE A: ADDING A REVENUE SOURCE ................................................................................................................................ 48 PROCEDURE B: UPDATING/DISPLAYING A REVENUE SOURCE .......................................................................................................... 54 PROCEDURE C: DELETING A REVENUE SOURCE ............................................................................................................................. 59 PROCEDURE D: PRINTING THE REVENUE SOURCE FILE ................................................................................................................... 65
D.1. Revenue Source File (Source Name Sequence - All) Report – Example ................................................................... 67
APPENDIX A: RECEIVABLE.XLS TEMPLATE AND IMPORT FILE ERROR PROCESSING .......................................................... 68
APPENDIX B: RECEIVABLE.CSV FILE FORMATTING AND PROCESSING .............................................................................. 71

PCGenesis Financial Accounting and Reporting (FAR) System Operations Guide
Georgia Department of Education
April 4, 2017 8:25 AM Page 1 of 72
All Rights Reserved.
Overview
The following processing guidelines apply to accounts receivables:
Inquiries: PCGenesis users may inquire on accounts receivable records by account number and by
source number. PCGenesis displays up to forty (40) account detail lines per accounts receivable record,
and allows up to twenty (20) account detail lines per page. Where appropriate, PCGenesis provides
Page Up (F4 – PgUp), Page Down (F5 - PgDn), Line Up (F6 - LnUp), and Line
Down (F7 - LnDn) to scroll through the receivable account lines. PCGenesis provides (F1
- Next) and (F2 - Prev) to browse additional receivable records. Selecting (F10 - Receipt)
displays any associated receipt information for the accounts receivable.
Entering Receivables: Accounts receivable entries may be made in PCGenesis either manually, or via
the file import procedure.
PCGenesis allows up to forty (40) account detail lines for the ‘Regular (1-40)’ receivable entry, and
allows up to but not to exceed 998 account detail lines for the ‘Large (1-998)’ and the ‘Import (1-998)’
accounts receivable record entries. Note that the ‘Large (1-998)’ accounts receivable import procedure
accommodates Quality Based Education (QBE) allotment processing.
The ReceiptOrReceivable.xls Template located on the PCGenesis documentation website is provided for
use during the Import file procedure. While the template is designed for use with both the accounts
receivable and the receipt import, the instructions differ between the modules. Refer to the Financial
Accounting and Reporting (FAR) System Operations Guide, Section H: Receipt Processing for
instructions on using the ReceiptOrReceivable.xls template in the creation of receipts.
***IMPORTANT***
Do not enter commas (,) in any of the Microsoft® Excel spreadsheet’s data fields as doing so creates
incompatibilities with the .csv file’s format.
Closing Receivables: Close accounts receivables when the anticipated funds are no longer expected.
Only close receivables however when there are no additional receipts to post against the receivable, or if
the receivable was entered in error.
Closing Prior Year Receivables: To more easily distinguish between prior year receivables and current
year receipts, PCGenesis users should cancel prior year receivables without posted receipts. When
posting receipts against prior year receivables, PCGenesis closes the receivable, and posts all
transactions to the current year. In doing so however, PCGenesis does not make entries to the fund
balance. PCGenesis users are not required to make journal entries to correct fund balances. Prior year
receivables entered for reporting purposes may also be closed.

PCGenesis Financial Accounting and Reporting (FAR) System Operations Guide
Georgia Department of Education
April 4, 2017 8:25 AM Page 2 of 72
All Rights Reserved.
Open Receivables Report: The Open Receivables Report lists the school district’s or system’s open
receivables by fund or by name. The Open Receivables Report allows the option of producing a comma
separated export file (.csv file) in addition to the printed report. The export file contains the same
information that prints on the report, but puts the data into a data file. This allows users to perform data
analysis on the open receivables data by using spreadsheet capabilities. Producing the export file is
optional, but the report will always be produced.
Revenue Source File: Revenue source records must exist in the Source file before they can be included on
accounts receivables. PCGenesis allows revenue source records to be added, modified, and deleted. The
Revenue Source File Listing provides a listing of the Source file’s contents.
Screen Print: The screen print feature allows the user to obtain a screen print of the Enter Receivable
screen or the Receivable Inquiry screen. The screen print feature is available on display/inquiry screens
which have the button. The screen print file will be available in the print queue with the name
‘PSCNnnnn’.

PCGenesis Financial Accounting and Reporting (FAR) System Operations Guide
Georgia Department of Education
April 4, 2017 8:25 AM Page 3 of 72
All Rights Reserved.
Topic 1: Processing Accounts Receivables
Procedure A: Inquiring on an Accounts Receivable/Updating
the Accounts Receivable Reason
Step Action
1 Select (F6 - Accounts Receivable Processing Menu).

PCGenesis Financial Accounting and Reporting (FAR) System Operations Guide
Georgia Department of Education
April 4, 2017 8:25 AM Page 4 of 72
All Rights Reserved.
The following screen displays:
Step Action
2 Select (F1 - Inquiry Receivable).

PCGenesis Financial Accounting and Reporting (FAR) System Operations Guide
Georgia Department of Education
April 4, 2017 8:25 AM Page 5 of 72
All Rights Reserved.
The following screen displays:
Step Action
3 Enter the revenue source code, or select the drop-down selection icon to choose the
information for the first field, enter the sequence number where appropriate in the (Opt. Seq.
#) field, and select (Enter).
If the receivable does not exist: “*** NO MATCH ON SOURCE REQUESTED***”
displays. In this instance, reenter the search criteria and select Enter, or select (F16
– Exit) to exit this procedure and to return to the Financial Accounting & Reporting -
Accounts Receivable Menu.
If the receivable’s number is unknown: Select (F12 - Search by account number).
When the fields become available, enter the complete or partial account information in the
Yr Fnd F Prgm Fnct Objct Fcty B Addt'l field, and select (Enter).

PCGenesis Financial Accounting and Reporting (FAR) System Operations Guide
Georgia Department of Education
April 4, 2017 8:25 AM Page 6 of 72
All Rights Reserved.
The following screen displays:
Step Action
4 For account receivable displays: Review the information displayed on the Receivable
Inquiry/Update screen, and select Page Up (F4 – PgUp), Page Down (F5 -
PgDn), Line Up (F6 - LnUp), and Line Down (F7 - LnDn) to scroll through
the receivable account lines.
Select (F1 - Next) and (F2 - Prev) to view additional receivable records where
appropriate.
Select and (F10 - Receipt) to view the accounts receivable’s receipt. Proceed to Step
5.
Select (F17 – Print Screen) to obtain a screen print of the receivable screen. The
screen print file will be available in the print queue with the name ‘PSCNnnnn’.
For account receivable “Reason” field modifications: Select (F9 - Change
Reason) to modify the Reason field’s entry. Make the appropriate modifications to the field,
and select (Enter) twice. Proceed to Step 6.

PCGenesis Financial Accounting and Reporting (FAR) System Operations Guide
Georgia Department of Education
April 4, 2017 8:25 AM Page 7 of 72
All Rights Reserved.
For Step 4-F10 selections, the following screen displays:
Step Action
5 Review the information Associated Receipt Detail screen, and select (F16 to Return)
to return to the Receivable Inquiry/Update screen.

PCGenesis Financial Accounting and Reporting (FAR) System Operations Guide
Georgia Department of Education
April 4, 2017 8:25 AM Page 8 of 72
All Rights Reserved.
The following screen displays:
Step Action
6 Select (F16 - Exit) to return to the Receivable Inquiry/Update Source Selection
Menu.

PCGenesis Financial Accounting and Reporting (FAR) System Operations Guide
Georgia Department of Education
April 4, 2017 8:25 AM Page 9 of 72
All Rights Reserved.
The following screen displays:
Step Action
7 Select (F16 - Exit) to return to the Financial Accounting & Reporting – Accounts
Receivable Menu.
PCGenesis Financial Accounting and Reporting (FAR) System Operations Guide
Georgia Department of Education
April 4, 2017 8:25 AM Page 10 of 72
All Rights Reserved.
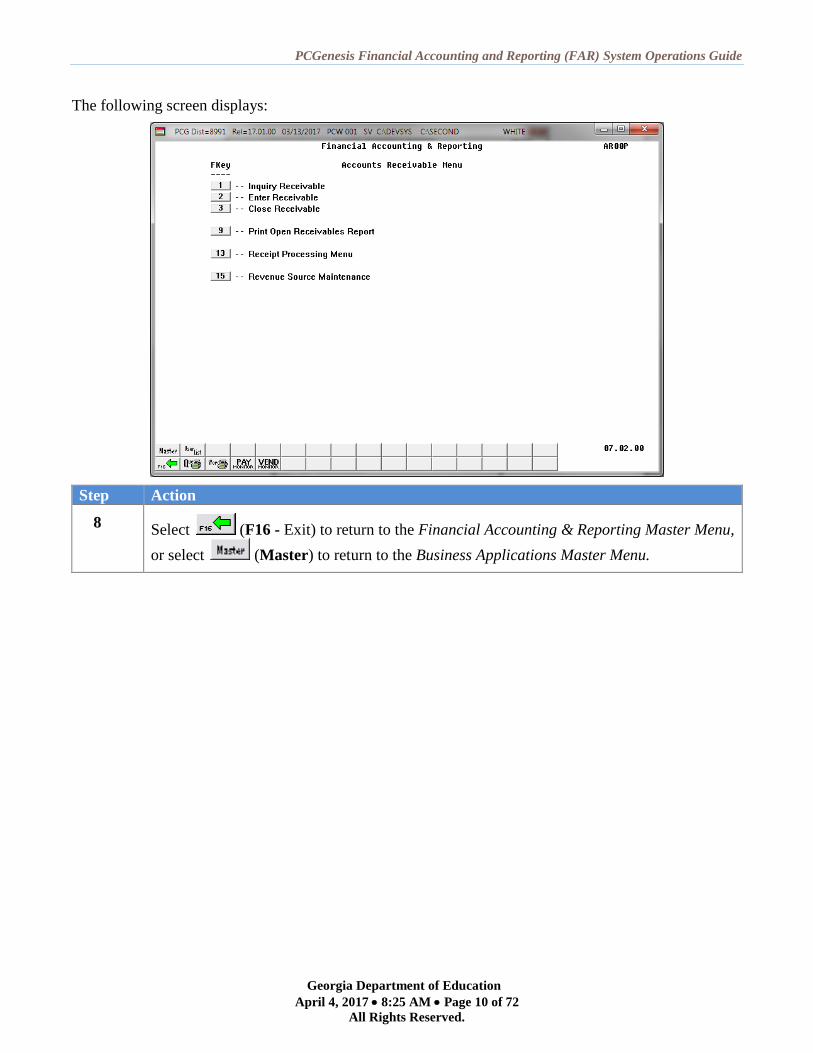
The following screen displays:
Step Action
8 Select (F16 - Exit) to return to the Financial Accounting & Reporting Master Menu,
or select (Master) to return to the Business Applications Master Menu.

PCGenesis Financial Accounting and Reporting (FAR) System Operations Guide
Georgia Department of Education
April 4, 2017 8:25 AM Page 11 of 72
All Rights Reserved.
Procedure B: Entering an Accounts Receivable Manually into
PCGenesis
Step Action
1 Select (F6 - Accounts Receivable Processing Menu).

PCGenesis Financial Accounting and Reporting (FAR) System Operations Guide
Georgia Department of Education
April 4, 2017 8:25 AM Page 12 of 72
All Rights Reserved.
The following screen displays:
Step Action
2 Select (F2 – Enter Receivable).
The following screen displays:

PCGenesis Financial Accounting and Reporting (FAR) System Operations Guide
Georgia Department of Education
April 4, 2017 8:25 AM Page 13 of 72
All Rights Reserved.
Step Action
3 Select the (Radio button) to the left of Regular (1-40) (Regular receivable containing 1-
40 account line entries), or Large (1-998) (Large receivable containing 1-998 account line
entries).
PCGenesis allows up to, but not to exceed forty (40) account detail lines for the ‘Regular (1-
40)’ receivable entry, and allows up to, but not to exceed 998 account detail lines for both,
the ‘Large (1-998)’ and the Import (1-998) receivable entries.
4 Select (Enter - Continue).
The following screen displays:
Step Action
5 Enter the revenue source code, or select the drop-down selection icon to choose the
information in the Revenue source # (Revenue source Number) field, and select
(Enter).
6 Enter the date (MM/DD/CCYY) in the Open Date field.
PCGenesis defaults to the current date.
7 Enter the accounts receivable reason, up to twenty (20) characters, in the Reason field.
8 Enter the receivable’s total dollar amount in the Amount field.

PCGenesis Financial Accounting and Reporting (FAR) System Operations Guide
Georgia Department of Education
April 4, 2017 8:25 AM Page 14 of 72
All Rights Reserved.
Step Action
9 Enter the Balance Sheet account code in the A/R Blnc (Accounts Receivable Balance Sheet
account) field.
10 PCGenesis populates the Unallocated Amount and Allocated Amount field entries, based on
the Yr Fnd F Prgm Fnct Objct Fcty B Addt'l, and the (account detail) Amount fields’ entries.
Repeat Steps 11-12 for each account detail line entry.
PCGenesis allows up to forty (40) account detail lines via this procedure.
11 Enter the account information, or select the drop-down selection icon in the Yr Fnd F Prgm
Fnct Objct Fcty B Addt'l field.
12 Enter the corresponding dollar amounts in the Amount field(s).
Where appropriate, select Page Up (F4 – PgUp), Page Down (F5 - PgDn), Line
Up (F6 - LnUp), and Line Down (F7 - LnDn) to scroll through the receivable
account lines.
13 Select (Enter - Validate).
Select (F17 – Print Screen) to obtain a screen print of the receivable screen. The
screen print file will be available in the print queue with the name ‘PSCNnnnn’.
The following screen displays:

PCGenesis Financial Accounting and Reporting (FAR) System Operations Guide
Georgia Department of Education
April 4, 2017 8:25 AM Page 15 of 72
All Rights Reserved.
Step Action
14 Verify the information displayed is correct and select (F12 - Post) to post the
receivable.
If the information is incorrect, select (F16 - Reenter), make the appropriate
modifications, and then select (Enter – validate) to validate the entries, and
(F12 – Post ) to post the receivable.
The following screen displays:
Step Action
15 Record or screen-print the sequence number information and select (Enter - continue)
to continue.

PCGenesis Financial Accounting and Reporting (FAR) System Operations Guide
Georgia Department of Education
April 4, 2017 8:25 AM Page 16 of 72
All Rights Reserved.
The following screen displays:
Step Action
16 Select (F16 - Exit) to return to the Financial Accounting & Reporting – Accounts
Receivable Menu.
To enter additional accounts receivables, repeat this procedure beginning at Step 3.

PCGenesis Financial Accounting and Reporting (FAR) System Operations Guide
Georgia Department of Education
April 4, 2017 8:25 AM Page 17 of 72
All Rights Reserved.
The following screen displays:
Step Action
17 Select (F16 - Exit) to return to the Financial Accounting & Reporting Master Menu,
or select (Master) to return to the Business Applications Master Menu.

PCGenesis Financial Accounting and Reporting (FAR) System Operations Guide
Georgia Department of Education
April 4, 2017 8:25 AM Page 18 of 72
All Rights Reserved.
Procedure C: Large Receivable Import
C1. Creating an Accounts Receivable Using the
ReceiptOrReceivableTemplate.xls
C1.1. Downloading the PCGenesis ReceiptOrReceivable.xls Template
Based on the version of software used, file extensions such as Excel Workbook (*.xlsx), Excel 97-2003
Workbook (*.xls), Comma delimited (*.csv), and Excel 97-2003 Template (*.xlt), for example, may
contain descriptions that differ from this document’s instructions. Ensuring that the filename
description selected, such as “Workbook”, “Spreadsheet”, and “.csv File” for example, corresponds to
the file type indicated within the instructions prevents additional processing errors.
Step Action
1 On the C:\ drive, create a folder entitled Receive.
The following window displays:
Step Action
2 Access the “PCGenesis Receipt or Receivable Template”
(ReceiptOrReceivableTemplate.xlsx) file located at:
http://www.gadoe.org/pea_infosys.aspx?PageReq=PEAISDPCGenesisInfoDoc.
3 Save the ReceiptOrReceivableTemplate file to the Receive folder created in Step 1.
Do not change the filename in this step.

PCGenesis Financial Accounting and Reporting (FAR) System Operations Guide
Georgia Department of Education
April 4, 2017 8:25 AM Page 19 of 72
All Rights Reserved.
C1.1.1. ReceiptOrReceivable.xls Template – Example

PCGenesis Financial Accounting and Reporting (FAR) System Operations Guide
Georgia Department of Education
April 4, 2017 8:25 AM Page 20 of 72
All Rights Reserved.
C1.2. Saving the PCGenesis ReceiptOrReceivable.xls Template as a
Microsoft® Excel Spreadsheet/Workbook
Step Action
1 Verify the ReceiptOrReceivable.xls template exists within the C:\Receive folder.
If the file or folder does not exist, refer to C1.1. Downloading the PCGenesis
ReceiptOrReceivable.xls Template for the instructions.
2 Within Microsoft® Excel, access and open the ReceiptOrReceivable.xls template.
The following window displays:
Step Action
3 Select (Save), or from the Menu Bar, select File Save As.
4 Within the Save in: field, navigate to the C:\Receive folder or to the appropriate file
location.
Within the screenshot examples, a folder entitled “Receivables_CWJ” was created to easily
identify the user’s receivable files.

PCGenesis Financial Accounting and Reporting (FAR) System Operations Guide
Georgia Department of Education
April 4, 2017 8:25 AM Page 21 of 72
All Rights Reserved.
The following window displays:
Step Action
5 Optional: Enter ReceivableTemplate in the File name field.
This step is optional. As this template is also used during receipt processing, saving
separate “ReceivableTemplate.xlsx” and “ReceiptTemplate.xlsx” files provides a
safeguard against the selection of the wrong template file during the import process while
maintaining the integrity of the original “ReceiptorReceivable.xlsx Template”. Refer the
Financial Accounting and Reporting (FAR) System Operations Guide, Section H: Receipt
Processing for additional receipt processing instructions.
6 Select the drop-down selection icon within the Save as type field and verify the
selection of, or choose Microsoft Excel Workbook (.xls).
Saving the file initially as a Microsoft® Excel spreadsheet/workbook simplifies making
modifications for PCGenesis users.
7 Select (Save).

PCGenesis Financial Accounting and Reporting (FAR) System Operations Guide
Georgia Department of Education
April 4, 2017 8:25 AM Page 22 of 72
All Rights Reserved.
C1.3. Using the PCGenesis Receivable.xls Template to Create an Accounts
Receivable
***IMPORTANT***
Do not enter commas (,) in any of the Microsoft® Excel spreadsheet’s data fields as doing so creates
incompatibilities with the .csv file’s format.
Step Action
1 Access the Microsoft® Excel spreadsheet/workbook saved in C1.2. Saving the PCGenesis
ReceiptOrReceivable.xls Template as a Microsoft® Excel Spreadsheet/Workbook.
The following window displays:
Step Action
2 Enter RCV (Accounts Receivable) in the Enter ‘RCV’ for receivable import or Enter
‘REC’ from receipt import field.
3 Enter the accounts receivable’s reason in the FOR field.
4 Enter the Balance Sheet account code in the A/R Blnc (Accounts Receivable Balance Sheet
account) field.
5 Enter the revenue source code in the Source field.

PCGenesis Financial Accounting and Reporting (FAR) System Operations Guide
Georgia Department of Education
April 4, 2017 8:25 AM Page 23 of 72
All Rights Reserved.
Step Action
6 Enter the date (MM/DD/CCYY) in the Date field.
7 Determined by the “Yr Fnd F Prgm Fnct Objct Fcty B Addt'l account detail and Amount field
entries, the Amount field is automatically calculated as the user exits each “Yr Fnd F Prgm Fnct
Objct Fcty B Addt'l/Amount detail line entries.
8 Enter the accounts receivable reason, up to twenty (20) characters, in the Reason field.
9 Enter the account information in the Yr Fnd F Prgm Fnct Objct Fcty B Addt'l fields, and
the corresponding dollar amounts in the Amount field(s).
Repeat this process for all of the account detail line entries.
10 Select (Save), or from the Menu Bar, select File Save, and select (Save).
11 Proceed to C1.4. Saving the PCGenesis Accounts Receivable Spreadsheet/Workbook as a
.csv File.

PCGenesis Financial Accounting and Reporting (FAR) System Operations Guide
Georgia Department of Education
April 4, 2017 8:25 AM Page 24 of 72
All Rights Reserved.
C1.4. Saving the PCGenesis Accounts Receivable Spreadsheet/Workbook as
a .csv File
Saving the Microsoft® Excel spreadsheet/workbook as a .csv file allows PCGenesis to read the
Receivable.xls template’s data.
Step Action
1 Access the Microsoft® Excel spreadsheet/workbook identified in C1.3. Using the
PCGenesis Accounts Receivable.xls Template to Create an Accounts Receivable.
2 After From the Menu Bar, select File Save As.
3 Within the Save in: field, navigate to the C:\Receive or to the appropriate file location.
The following window displays:
Step Action
4 Select the drop-down selection icon within the Save as type field and select CSV
(Comma delimited)(*.csv).
5 Verify or enter Receive. Filename.csv in the File name field, where “ReceiveFilename”
is the file saved using the naming convention covered previously.
It is not necessary for the user to change the defaulting filename in this step.

PCGenesis Financial Accounting and Reporting (FAR) System Operations Guide
Georgia Department of Education
April 4, 2017 8:25 AM Page 25 of 72
All Rights Reserved.
The following window displays:
Step Action
6 Select (Save).
If the “Microsoft Office Excel – The selected file type does not support workbooks that
contain multiple sheets.” dialog box displays, select (OK).
The following dialog box displays:
Do not become alarmed, this dialog box always displays.
Step Action
7 Select (Yes).
8 From the Menu Bar, select File → Close to close the current file or select File → Exit to
completely exit Microsoft® Excel.
The .csv file must be closed before it can be imported into PCGenesis.

PCGenesis Financial Accounting and Reporting (FAR) System Operations Guide
Georgia Department of Education
April 4, 2017 8:25 AM Page 26 of 72
All Rights Reserved.
The following dialog box displays:
Step Action
9 If no additional modifications were made since Step 5: Select (No).
For additional modifications since Step 5: Select (Yes), and repeat Steps 1 – 5
to save the file.

PCGenesis Financial Accounting and Reporting (FAR) System Operations Guide
Georgia Department of Education
April 4, 2017 8:25 AM Page 27 of 72
All Rights Reserved.
C2. Importing the Accounts Receivable.csv File into PCGenesis
Step Action
1 Select (F6 - Accounts Receivable Processing Menu).
The following screen displays:

PCGenesis Financial Accounting and Reporting (FAR) System Operations Guide
Georgia Department of Education
April 4, 2017 8:25 AM Page 28 of 72
All Rights Reserved.
Step Action
2 Select (F2 – Enter Receivable).
The following screen displays:
Step Action
3 Select the (Radio button) to the left of Import (1-998) (Large receivable import file
containing 1-998 account line entries).
4 Select (Enter - Continue).

PCGenesis Financial Accounting and Reporting (FAR) System Operations Guide
Georgia Department of Education
April 4, 2017 8:25 AM Page 29 of 72
All Rights Reserved.
The following screen displays:
Step Action
5 Select (F10 - Browse for file), and navigate to the .csv file saved in C1.4. Saving the
PCGenesis Accounts Receivable Spreadsheet/Workbook as a .csv File.
For (F10 - Browse for file) selections, PCGenesis defaults the Browse (Select the .csv
File) window to the .csv file type where appropriate. PCGenesis users may select either the
CSV (Comma delimited) (*.csv) or the All Files (*.*) options from the drop down file listing
for file type selection. PCGenesis displays a warning message dialog box when an import
filename does not contain the .csv file extension.
6 Select (Enter) twice.

PCGenesis Financial Accounting and Reporting (FAR) System Operations Guide
Georgia Department of Education
April 4, 2017 8:25 AM Page 30 of 72
All Rights Reserved.
For successful file imports, the following screen displays:
For import file errors, the following is an example of an import file error screen:

PCGenesis Financial Accounting and Reporting (FAR) System Operations Guide
Georgia Department of Education
April 4, 2017 8:25 AM Page 31 of 72
All Rights Reserved.
Step Action
7 For successful file imports: Verify the screens’ entries are as intended, select (Enter
- Validate), and select (F12 - Post). Proceed to Step 8.
PCGenesis may display additional field edit error messages after the receivable file
successfully imports. In this instance, following the on-line messages to correct the errors,
and to continue processing as normal. If the file entries require modification, make the
appropriate entries, validate and post the accounts receivable as normal.
Refer to Appendix A: Receivable.xls Template and Import File Error Processing and to
Appendix B: Receivable.csv File Formatting and Processing for additional error message
examples, and for additional information to aid in the correction of errors. After correcting
the error(s), repeat this procedure beginning at Step 1.
For import file errors: Screen-print or record the *** Scanning Import File *** screen,
and select (F16 - Cancel) to exit.
For successful file imports, the following screen displays:
Step Action
8 Screen-print or record the screen’s results, and select (Enter - Continue).

PCGenesis Financial Accounting and Reporting (FAR) System Operations Guide
Georgia Department of Education
April 4, 2017 8:25 AM Page 32 of 72
All Rights Reserved.
The following screen displays:
Step Action
9 Select (F16 - Exit).
To import additional accounts receivables files, repeat this procedure beginning at Step 3.

PCGenesis Financial Accounting and Reporting (FAR) System Operations Guide
Georgia Department of Education
April 4, 2017 8:25 AM Page 33 of 72
All Rights Reserved.
The following screen displays:
Step Action
10 Select (F16 - Exit) to return to the Financial Accounting & Reporting Master Menu,
or select (Master) to return to the Business Applications Master Menu.

PCGenesis Financial Accounting and Reporting (FAR) System Operations Guide
Georgia Department of Education
April 4, 2017 8:25 AM Page 34 of 72
All Rights Reserved.
Procedure D: Closing an Accounts Receivable
* * * ATTENTION * * * Before closing a receivable, ensure users are not viewing the record. If another user is viewing the record,
the “Record lock” message displays. In this instance, have the user to discontinue viewing the record, and
continue processing as normal.
D1. Closing a Current Year’s Receivable
Step Action
1 Select (F6 - Accounts Receivable Processing Menu).

PCGenesis Financial Accounting and Reporting (FAR) System Operations Guide
Georgia Department of Education
April 4, 2017 8:25 AM Page 35 of 72
All Rights Reserved.
The following screen displays:
Step Action
2 Select (F3 - Close Receivable).
The following screen displays:

PCGenesis Financial Accounting and Reporting (FAR) System Operations Guide
Georgia Department of Education
April 4, 2017 8:25 AM Page 36 of 72
All Rights Reserved.
Step Action
3 Enter the revenue source code, or select the drop-down selection icon to choose the entry
in the Revenue Source # (Revenue Source number) field, and select (Enter).
The following screen displays:
Step Action
4 Verify the information displayed is correct, and enter the date (MMDDCCYY) in the Close
Date field.
If receipts exist against the receivable, the “Close Date Cannot Be Less than MMDDCCYY”
message will display if the date entered is prior to the date of an already posted receipt for
the receivable. If no receipts exist against the receivable, the “Close date can not be less
than open date” message will display if the date entered is prior to open date of the
receivable.
5 Select (F13 - Close).
Select (F17 – Print Screen) to obtain a screen print of the receivable screen. The
screen print file will be available in the print queue with the name ‘PSCNnnnn’.

PCGenesis Financial Accounting and Reporting (FAR) System Operations Guide
Georgia Department of Education
April 4, 2017 8:25 AM Page 37 of 72
All Rights Reserved.
The following screen displays:
Step Action
6 Select (F29 - Close).

PCGenesis Financial Accounting and Reporting (FAR) System Operations Guide
Georgia Department of Education
April 4, 2017 8:25 AM Page 38 of 72
All Rights Reserved.
The following screen displays:
Step Action
7 To verify the receivables’ status: Re-enter the entry(ies) in Step 3 and select
(Enter).

PCGenesis Financial Accounting and Reporting (FAR) System Operations Guide
Georgia Department of Education
April 4, 2017 8:25 AM Page 39 of 72
All Rights Reserved.
The following screen displays:
Step Action
8 Select (F16 - Exit) to return to the Close Receivable Entry screen.

PCGenesis Financial Accounting and Reporting (FAR) System Operations Guide
Georgia Department of Education
April 4, 2017 8:25 AM Page 40 of 72
All Rights Reserved.
The following screen displays:
Step Action
9 Select (F16 - Exit) to return to the Financial Accounting & Reporting – Accounts
Receivable Menu.

PCGenesis Financial Accounting and Reporting (FAR) System Operations Guide
Georgia Department of Education
April 4, 2017 8:25 AM Page 41 of 72
All Rights Reserved.
The following screen displays:
Step Action
10 Select (F16 - Exit) to return to the Financial Accounting & Reporting Master Menu,
or select (Master) to return to the Business Applications Master Menu.

PCGenesis Financial Accounting and Reporting (FAR) System Operations Guide
Georgia Department of Education
April 4, 2017 8:25 AM Page 42 of 72
All Rights Reserved.
D2. Closing a Prior Year’s Receivable
Refer to the Financial Accounting and Reporting (FAR) System Operations Guide, Section H: Receipt
Processing for instructions.

PCGenesis Financial Accounting and Reporting (FAR) System Operations Guide
Georgia Department of Education
April 4, 2017 8:25 AM Page 43 of 72
All Rights Reserved.
Topic 2: Printing the Open Receivables Report
Step Action
1 Select (F6 - Accounts Receivable Processing Menu).
The following screen displays:

PCGenesis Financial Accounting and Reporting (FAR) System Operations Guide
Georgia Department of Education
April 4, 2017 8:25 AM Page 44 of 72
All Rights Reserved.
Step Action
2 Select (F9 - Print Open Receivables Report).
The following screen displays:
Step Action
3 Enter the date (MM/DD/CCYY) in the Enter Period Ending field.
PCGenesis defaults this entry to the current date and will convert dates entered as
MMDDCCYY to MM/DD/CCYY when using the Tab key to access the next field.
4 Enter F (Fund Sequence) or N (Name Sequence) in the Please enter the Sort Sequence field to
determine the sort order.
5 Select the (Radio Button) to left of the appropriate response in the Create Open
Receivables Report to Load in Excel? field. In order to produce a comma separated data
file with the data from the report, select ‘Yes’. Otherwise, select ‘No’.
6 If creating an export file: Verify the C:\EXPORT folder exists, or create the folder where
appropriate.

PCGenesis Financial Accounting and Reporting (FAR) System Operations Guide
Georgia Department of Education
April 4, 2017 8:25 AM Page 45 of 72
All Rights Reserved.
Step Action
7 If creating an export file: Enter C:\EXPORT\OpnRcvccyymmdd.csv in the Enter File
Name and Path for Export File field, or select (F10 to Browse for file) to locate the
file manually.
8 Select (Enter) to continue.
If the export filename is invalid, the “UNABLE TO OPEN OpnRcv CSV FILE 35 = File Not
Found” error message displays. In this instance, return to Step 5 to enter the correct
information.
“** Processing Request **” briefly displays. If no open receivables exist, a warning
message displays. PCGenesis will not generate a report in this instance.
The following screen displays:

PCGenesis Financial Accounting and Reporting (FAR) System Operations Guide
Georgia Department of Education
April 4, 2017 8:25 AM Page 46 of 72
All Rights Reserved.
Step Action
9 To print the report via the Uqueue Print Manager: Select (Uqueue).
To print the report via Microsoft® Word: Select (MS WORD).
Follow the User Interface instructions provided in Topic 1: Creating the Microsoft®-
PCGenesis QWORD Macro for Report Printing to create the macro necessary to use the
feature where appropriate.
10 Select (F16 - Exit) to return to the Financial Accounting & Reporting Master Menu,
or select (Master) to return to the Business Applications Master Menu.

PCGenesis Financial Accounting and Reporting (FAR) System Operations Guide
Georgia Department of Education
April 4, 2017 8:25 AM Page 47 of 72
All Rights Reserved.
2A. Open Accounts Receivable (by Fund) Report
The final page of the report completes the listing of individual account totals, and provides the overall total
for all funds.

PCGenesis Financial Accounting and Reporting (FAR) System Operations Guide
Georgia Department of Education
April 4, 2017 8:25 AM Page 48 of 72
All Rights Reserved.
Topic 3: Maintaining the Revenue Source File
Procedure A: Adding a Revenue Source
Step Action
1 Select (F6 - Accounts Receivable Processing Menu).

PCGenesis Financial Accounting and Reporting (FAR) System Operations Guide
Georgia Department of Education
April 4, 2017 8:25 AM Page 49 of 72
All Rights Reserved.
The following screen displays:
Step Action
2 Select (F15 - Revenue Source Maintenance).

PCGenesis Financial Accounting and Reporting (FAR) System Operations Guide
Georgia Department of Education
April 4, 2017 8:25 AM Page 50 of 72
All Rights Reserved.
The following screen displays:
Step Action
3 Select F13 (Add a Source) or select (Create New Source Record).

PCGenesis Financial Accounting and Reporting (FAR) System Operations Guide
Georgia Department of Education
April 4, 2017 8:25 AM Page 51 of 72
All Rights Reserved.
The following screen displays:
Step Action
4 Enter the revenue source name up to thirty (30) characters in the Name field.
5 Enter the additional identifier by which users will be able to search for the revenue source in the
Seq key (Sequence key) field.
For example, entering Georgia Department of Education in the field and Department of
Education, DOE in the Seq key (Sequence key) field, allows users to locate the record by
searching through the alphabetic character D (Department) also. If the Seq key field is left
blank, the Name field’s entry will default to the field.
6 Enter the mailing address in the Address field.
7 Enter the city and state separated by a comma in the City/State field.
8 Enter the postal code in the Zip field.
9 Enter the name of the individual responsible for managing the revenue source up to thirty
(30) characters in the Contact field.

PCGenesis Financial Accounting and Reporting (FAR) System Operations Guide
Georgia Department of Education
April 4, 2017 8:25 AM Page 52 of 72
All Rights Reserved.
Step Action
10 Select (Enter) twice.
When processing is complete, PCGenesis will assign and populate the revenue source code
in the Revenue Source# (Revenue Source number) field when the Source Maintenance
screen redisplays.
The following screen displays:
Step Action
11 Select (F16 – Exit) to return to the Financial Accounting & Reporting – Accounts
Receivable Menu.

PCGenesis Financial Accounting and Reporting (FAR) System Operations Guide
Georgia Department of Education
April 4, 2017 8:25 AM Page 53 of 72
All Rights Reserved.
The following screen displays:
Step Action
12 Select (F16 - Exit) to return to the Financial Accounting & Reporting Master Menu,
or select (Master) to return to the Business Applications Master Menu.

PCGenesis Financial Accounting and Reporting (FAR) System Operations Guide
Georgia Department of Education
April 4, 2017 8:25 AM Page 54 of 72
All Rights Reserved.
Procedure B: Updating/Displaying a Revenue Source
Step Action
1 Select (F6 - Accounts Receivable Processing Menu).
The following screen displays:

PCGenesis Financial Accounting and Reporting (FAR) System Operations Guide
Georgia Department of Education
April 4, 2017 8:25 AM Page 55 of 72
All Rights Reserved.
Step Action
2 Select (F15 - Revenue Source Maintenance).
The following screen displays:
Step Action
3 Enter the revenue source code, or select the drop-down selection icon within the field to
choose the revenue source.

PCGenesis Financial Accounting and Reporting (FAR) System Operations Guide
Georgia Department of Education
April 4, 2017 8:25 AM Page 56 of 72
All Rights Reserved.
The following screen displays:
Step Action
4 To update the revenue source: Make the appropriate modifications, and select (Enter)
twice. To display the revenue source: Review the screen’s entries, select (F16 - Exit)
to return to the Revenue Source Maintenance Menu.

PCGenesis Financial Accounting and Reporting (FAR) System Operations Guide
Georgia Department of Education
April 4, 2017 8:25 AM Page 57 of 72
All Rights Reserved.
The following screen displays:
Step Action
5 Select (F16 - Exit) to return to the Financial Accounting & Reporting – Accounts
Receivable Menu.

PCGenesis Financial Accounting and Reporting (FAR) System Operations Guide
Georgia Department of Education
April 4, 2017 8:25 AM Page 58 of 72
All Rights Reserved.
The following screen displays:
Step Action
6 Select (F16 - Exit) to return to the Financial Accounting & Reporting Master Menu,
or select (Master) to return to the Business Applications Master Menu

PCGenesis Financial Accounting and Reporting (FAR) System Operations Guide
Georgia Department of Education
April 4, 2017 8:25 AM Page 59 of 72
All Rights Reserved.
Procedure C: Deleting a Revenue Source
Step Action
1 Select (F6 - Accounts Receivable Processing Menu).
The following screen displays:

PCGenesis Financial Accounting and Reporting (FAR) System Operations Guide
Georgia Department of Education
April 4, 2017 8:25 AM Page 60 of 72
All Rights Reserved.
Step Action
2 Select (F15 - Revenue Source Maintenance).
The following screen displays:
Step Action
3 Enter the revenue source code, or select the drop-down selection icon within the field to
choose the revenue source.

PCGenesis Financial Accounting and Reporting (FAR) System Operations Guide
Georgia Department of Education
April 4, 2017 8:25 AM Page 61 of 72
All Rights Reserved.
The following screen displays:
Step Action
4 Select (F18 - to Delete).

PCGenesis Financial Accounting and Reporting (FAR) System Operations Guide
Georgia Department of Education
April 4, 2017 8:25 AM Page 62 of 72
All Rights Reserved.
The following screen displays:
Step Action
5 Select (F18 - to Confirm).

PCGenesis Financial Accounting and Reporting (FAR) System Operations Guide
Georgia Department of Education
April 4, 2017 8:25 AM Page 63 of 72
All Rights Reserved.
The following screen displays:
Step Action
6 Select (F16 - Exit) to return to the Financial Accounting & Reporting – Accounts
Receivable Menu.

PCGenesis Financial Accounting and Reporting (FAR) System Operations Guide
Georgia Department of Education
April 4, 2017 8:25 AM Page 64 of 72
All Rights Reserved.
The following screen displays:
Step Action
7 Select (F16 - Exit) to return to the Financial Accounting & Reporting Master Menu,
or select (Master) to return to the Business Applications Master Menu

PCGenesis Financial Accounting and Reporting (FAR) System Operations Guide
Georgia Department of Education
April 4, 2017 8:25 AM Page 65 of 72
All Rights Reserved.
Procedure D: Printing the Revenue Source File
Step Action
1 Select (F15 - Source Master Menu).
The following screen displays:

PCGenesis Financial Accounting and Reporting (FAR) System Operations Guide
Georgia Department of Education
April 4, 2017 8:25 AM Page 66 of 72
All Rights Reserved.
Step Action
2 Select the appropriate option:
(F10 - Source Name Sequence – Active Only)
(F11 - Source Name Sequence – Inactive Only
(F12 - Source Name Sequence – All)
(F20 (Sequence Key Sequence – Active Only)
(F26 - Sequence Key Sequence – Inactive Only)
(F27 - Sequence Key Sequence – All)
The Financial Accounting & Reporting System – Source Master Menu redisplays.
3 To print the report via the Uqueue Print Manager: Select (Uqueue).
To print the report via Microsoft® Word: Select (MS WORD).
Follow the User Interface instructions provided in Topic 1: Creating the Microsoft®-
PCGenesis QWORD Macro for Report Printing to create the macro necessary to use the
feature where appropriate.
4 Select (F16 - Exit) to return to the Financial Accounting & Reporting Master Menu,
or select (Master) to return to the Business Applications Master Menu.

PCGenesis Financial Accounting and Reporting (FAR) System Operations Guide
Georgia Department of Education
April 4, 2017 8:25 AM Page 67 of 72
All Rights Reserved.
D.1. Revenue Source File (Source Name Sequence - All) Report –
Example

PCGenesis Financial Accounting and Reporting (FAR) System Operations Guide
Georgia Department of Education
April 4, 2017 8:25 AM Page 68 of 72
All Rights Reserved.
Appendix A: Receivable.xls Template and Import File
Error Processing
If the .csv file contains invalid data, the PCGenesis file upload will list up to twelve (12) errors.
These errors will include the input file’s line number, the error type, and the field in which the
error occurred. Compare the error(s) identified to the .csv file’s spreadsheet to determine the
appropriate corrective measures.

PCGenesis Financial Accounting and Reporting (FAR) System Operations Guide
Georgia Department of Education
April 4, 2017 8:25 AM Page 69 of 72
All Rights Reserved.
The following screenshot examples identify additional errors that can occur after the receivable
successfully imports.

PCGenesis Financial Accounting and Reporting (FAR) System Operations Guide
Georgia Department of Education
April 4, 2017 8:25 AM Page 70 of 72
All Rights Reserved.
PCGenesis displays the first error line number and corresponding error message. To view
subsequent error messages, select PgUp (Page Up), and PgDn (Page Down) to scroll the
accounts receivable screens.
PCGenesis Financial Accounting and Reporting (FAR) System Operations Guide
Georgia Department of Education
April 4, 2017 8:25 AM Page 71 of 72
All Rights Reserved.
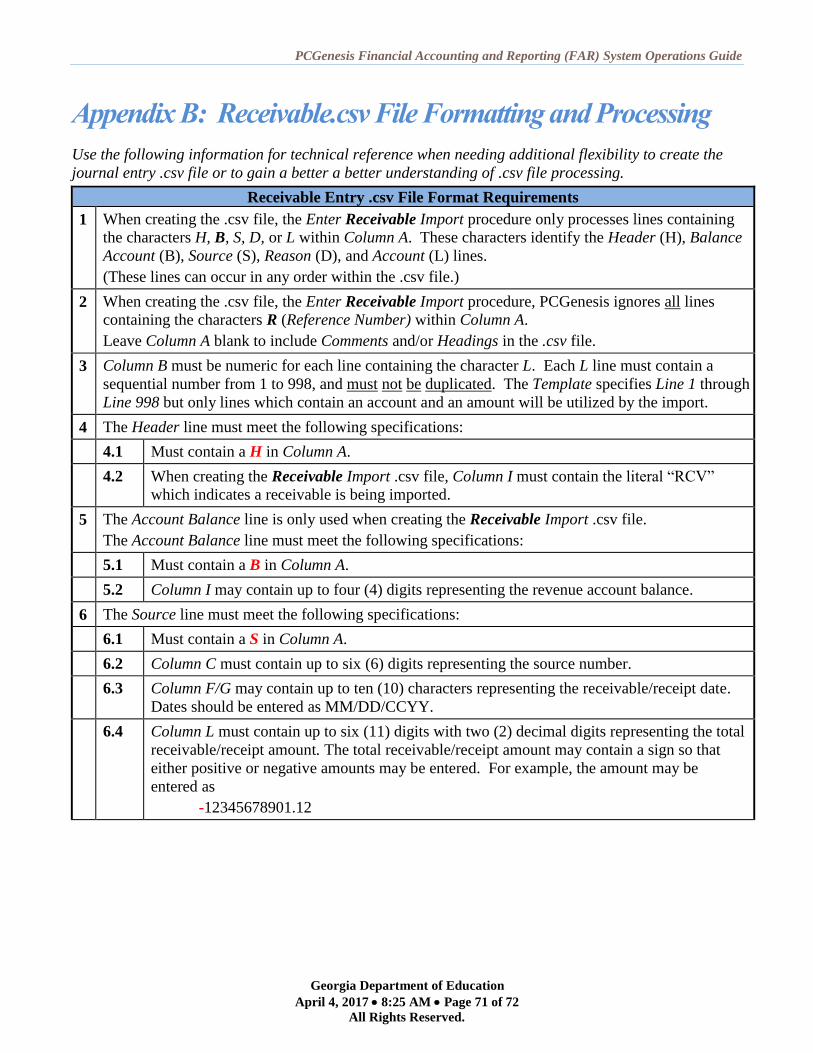
Appendix B: Receivable.csv File Formatting and Processing
Use the following information for technical reference when needing additional flexibility to create the
journal entry .csv file or to gain a better a better understanding of .csv file processing.
Receivable Entry .csv File Format Requirements
1 When creating the .csv file, the Enter Receivable Import procedure only processes lines containing
the characters H, B, S, D, or L within Column A. These characters identify the Header (H), Balance
Account (B), Source (S), Reason (D), and Account (L) lines.
(These lines can occur in any order within the .csv file.)
2 When creating the .csv file, the Enter Receivable Import procedure, PCGenesis ignores all lines
containing the characters R (Reference Number) within Column A.
Leave Column A blank to include Comments and/or Headings in the .csv file.
3 Column B must be numeric for each line containing the character L. Each L line must contain a
sequential number from 1 to 998, and must not be duplicated. The Template specifies Line 1 through
Line 998 but only lines which contain an account and an amount will be utilized by the import.
4 The Header line must meet the following specifications:
4.1 Must contain a H in Column A.
4.2 When creating the Receivable Import .csv file, Column I must contain the literal “RCV”
which indicates a receivable is being imported.
5 The Account Balance line is only used when creating the Receivable Import .csv file.
The Account Balance line must meet the following specifications:
5.1 Must contain a B in Column A.
5.2 Column I may contain up to four (4) digits representing the revenue account balance.
6 The Source line must meet the following specifications:
6.1 Must contain a S in Column A.
6.2 Column C must contain up to six (6) digits representing the source number.
6.3 Column F/G may contain up to ten (10) characters representing the receivable/receipt date.
Dates should be entered as MM/DD/CCYY.
6.4 Column L must contain up to six (11) digits with two (2) decimal digits representing the total
receivable/receipt amount. The total receivable/receipt amount may contain a sign so that
either positive or negative amounts may be entered. For example, the amount may be
entered as
-12345678901.12

PCGenesis Financial Accounting and Reporting (FAR) System Operations Guide
Georgia Department of Education
April 4, 2017 8:25 AM Page 72 of 72
All Rights Reserved.
Receivable Entry .csv File Format Requirements
7 The Reason line must meet the following specifications:
7.1 Must contain a D in Column A.
7.2 Column C/D/E/F/G may contain up to thirty (30) alphanumeric characters representing the
receivable/receipt reason description.
8 Each Account (L) line must meet the following specifications:
8.1 Must contain an L within Column A.
8.2 Is sequentially numbered from 1 thru 998 within Column B.
8.3 Column C must contain up to two (2) digits representing the revenue account fiscal year.
8.4 Column D may contain up to three (3) digits representing the revenue account fund.
8.5 Column E may contain one (1) digit representing the revenue account fiscal indicator.
8.6 Column F may contain up to four (4) digits representing the revenue account program.
8.7 Column G may contain up to four (4) digits representing the revenue account function.
8.8 Column H may contain up to five (5) digits representing the revenue account object.
8.9 Column I may contain up to four (4) digits representing the revenue account facility.
8.10 Column J may contain one (1) digit representing the revenue account building.
8.11 Column K may contain up to six (6) digits representing the revenue account additional.
8.12 Column L must contain up to eleven (11) digits with two (2) decimal digits representing a
receivable/receipt amount to be posted to this revenue account. The receivable/receipt
amount may contain a sign so that either positive or negative amounts may be entered. For
example, the amount may be entered as
-12345678901.12