Payment Processing - Columbia University
212
Payment Processing
Transcript of Payment Processing - Columbia University

Payment Processing

COPYRIGHT & TRADEMARKS
Copyright © 1998, 2009, Oracle and/or its affiliates. All rights reserved.
Oracle is a registered trademark of Oracle Corporation and/or its affiliates. Other names
may be trademarks of their respective owners.
This software and related documentation are provided under a license agreement
containing restrictions on use and disclosure and are protected by intellectual property
laws. Except as expressly permitted in your license agreement or allowed by law, you
may not use, copy, reproduce, translate, broadcast, modify, license, transmit, distribute,
exhibit, perform, publish or display any part, in any form, or by any means. Reverse
engineering, disassembly, or decompilation of this software, unless required by law for
interoperability, is prohibited.
The information contained herein is subject to change without notice and is not warranted
to be error-free. If you find any errors, please report them to us in writing.
If this software or related documentation is delivered to the U.S. Government or anyone
licensing it on behalf of the U.S. Government, the following notice is applicable:
U.S. GOVERNMENT RIGHTS
Programs, software, databases, and related documentation and technical data delivered to
U.S. Government customers are “commercial computer software” or “commercial
technical data” pursuant to the applicable Federal Acquisition Regulation and agency-
specific supplemental regulations. As such, the use, duplication, disclosure, modification,
and adaptation shall be subject to the restrictions and license terms set forth in the
applicable Government contract, and, to the extent applicable by the terms of the
Government contract, the additional rights set forth in FAR 52.227-19, Commercial
Computer Software License (December 2007). Oracle USA, Inc., 500 Oracle Parkway,
Redwood City, CA 94065.
This software is developed for general use in a variety of information management
applications. It is not developed or intended for use in any inherently dangerous
applications, including applications which may create a risk of personal injury. If you use
this software in dangerous applications, then you shall be responsible to take all
appropriate fail-safe, backup, redundancy and other measures to ensure the safe use of
this software. Oracle Corporation and its affiliates disclaim any liability for any damages
caused by use of this software in dangerous applications.
This software and documentation may provide access to or information on content,
products and services from third parties. Oracle Corporation and its affiliates are not
responsible for and expressly disclaim all warranties of any kind with respect to third
party content, products and services. Oracle Corporation and its affiliates will not be
responsible for any loss, costs, or damages incurred due to your access to or use of third
party content, products or services.

Training Guide Payment Processing
Page iii
Table of Contents Payment Processing .......................................................................................................... 2
Payment Processing ................................................................................................................... 3 Payment Processing Overview ............................................................................................................... 4
Roles and Responsibilities .................................................................................................................................. 5 Creating Payments Overview ............................................................................................................................. 6 Maintaining Payments Overview ........................................................................................................................ 7 Bank Reconciliation Overview ........................................................................................................................... 8 What's Changing? ............................................................................................................................................... 9
Pay Cycle Processing ............................................................................................................................ 10 Pay Cycle Manager ........................................................................................................................................... 11 Run a Pay Cycle................................................................................................................................................ 12 Pay Cycle Options ............................................................................................................................................ 98 Pay Cycle Reports ........................................................................................................................................... 114
Maintaining Payments ........................................................................................................................ 152 Canceling a Payment ...................................................................................................................................... 153 Issuing a Stop Payment ................................................................................................................................... 164 Escheating a Payment ..................................................................................................................................... 165
Bank Reconciliation ............................................................................................................................ 181 Running Bank Reconciliation ......................................................................................................................... 182 Incorrect Bank Transactions ........................................................................................................................... 206
Course References .............................................................................................................................. 207 Knowledge Assessment ...................................................................................................................... 208


Training Guide Payment Processing
Page 1

Training Guide
Payment Processing
Page 2
Payment Processing

Training Guide Payment Processing
Page 3
Payment Processing This is the Payment Processing course within the Accounts Payable curriculum.
If you need a reminder on how to navigate through this course using ARC's web-based training
tool (WBT), click here (http://gateway-
7.webservices.lamptest.columbia.edu/files/gateway/content/training/job_aids/Job_Aid_Getting_S
tarted_With_the_Web_Based_Tool.pdf) for a quick reference guide.

Training Guide
Payment Processing
Page 4
Payment Processing Overview This is the Payment Processing Overview lesson of the Payment Processing course. Upon
completion of this lesson, you will be able to:
Describe the end to end process for processing payments in the Accounts Payable (AP)
module, including key changes and benefits for making the changes
Understand the roles and responsibilities of users involved in payment processing
Estimated time needed to complete lesson: 30 minutes

Training Guide Payment Processing
Page 5
Roles and Responsibilities
Payment processing roles are managed by security rights. Payment processing is generally
managed by people within the Central Accounts Payable group. Throughout this course, the
following characters with different security rights and roles will help demonstrate payment
processing business flow:

Training Guide
Payment Processing
Page 6
Creating Payments Overview
In the ARC Accounts Payable module, there are multiple ways to create payments. In addition to
creating manual payments, Central AP will have the ability to use ARC’s Pay Cycle functionality
for standard payment processing. This tool is known as the Pay Cycle Manager. The process is as
follows:
At the end of the process, the Pay Cycle Processor will use the ACH InfoDex System to enable
Chase bank to verify the authenticity of ACH files received by the Bank. The InfoDex System
will only communicate with someone within CU who enters the proper user ID and password
assigned to them. Using a touchtone telephone the authorized CU personnel determine whether
the ACH file has been received by Chase bank and determines if the file conforms to the pertinent
ARC reports produced as part of pay cycle processing.
Training Guide Payment Processing
Page 7
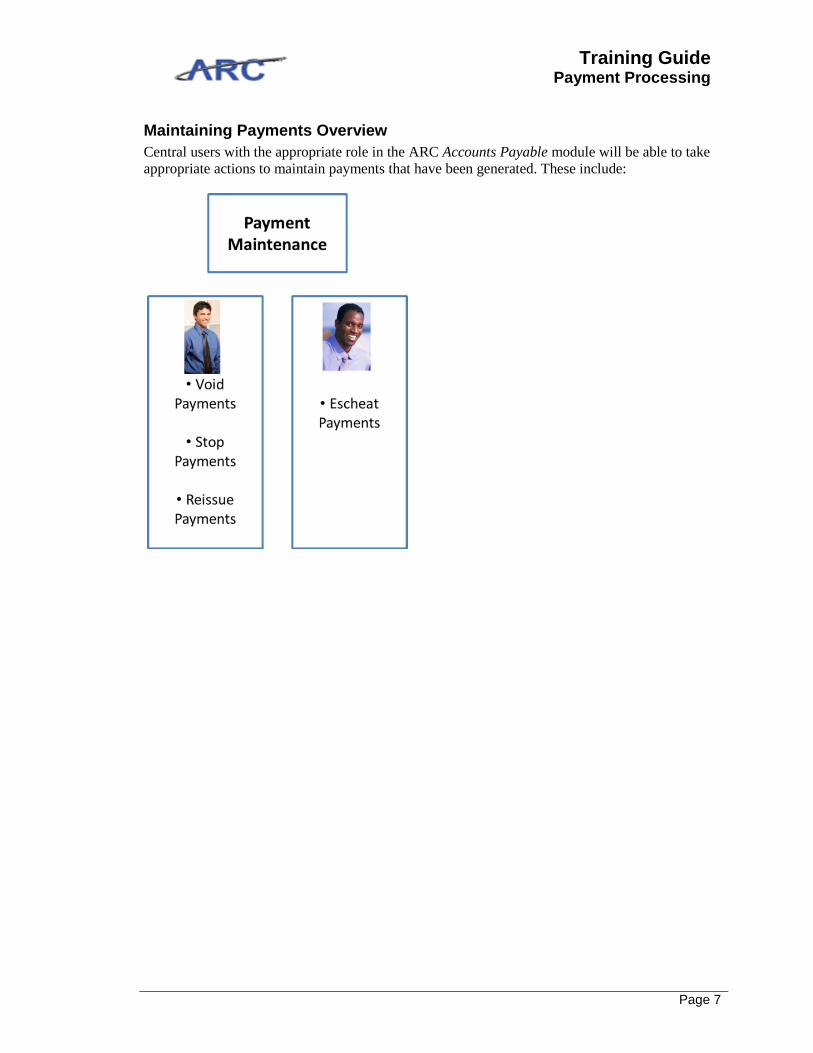
Maintaining Payments Overview
Central users with the appropriate role in the ARC Accounts Payable module will be able to take
appropriate actions to maintain payments that have been generated. These include:

Training Guide
Payment Processing
Page 8
Bank Reconciliation Overview
ARC's bank reconciliation functionality enables Cash Accounting to reconcile bank statements
against system transactions. First, a redeemed check file from Chase Bank is loaded into the
system. ARC will then automatically reconcile transactions in the system against the transactions
in the redeemed check file. Exception handling will be managed centrally by users with the
appropriate security role in the ARC Accounts Payable module via the Semi-Manual
Reconciliation page:

Training Guide Payment Processing
Page 9
What's Changing?
The new Pay Cycle Manager will help streamline payment processing. In addition, the following
changes will occur:

Training Guide
Payment Processing
Page 10
Pay Cycle Processing This is the Pay Cycle Processing lesson of the Payment Processing course. Upon completion of
this lesson, you will be able to:
Process a Pay Cycle using the Pay Cycle Manager
Run Pay Cycle Reports
Run the Trial Register Report
Approve or reject a Pay Cycle
Generate Payment Files
Estimated time needed to complete lesson: 30 minutes

Training Guide Payment Processing
Page 11
Pay Cycle Manager
The Pay Cycle Manager tool in ARC encomposses all the individual processes required to
generate payments. These individual processes—such as payment selection, payment creation,
and approval — that generate payments are referred to collectively as the pay cycle. In order to
run the pay cycle and generate payment files, the Pay Cycle Processor in Accounts Payable will
perform each individual process within ARC's Pay Cycle Manager tool. The Pay Cycle Manager
follows this process:
From the ‘Pay Cycle Processing’ page, users identify the criteria for the transactions to be
processed, such as scheduled payment date range, business unit, vendor and bank
account. The Pay Cycle process creates the actual payments based on the bank account,
vendor, voucher, and business unit information defined
Use Pay Cycle Manager to initiate the pay cycle process, view and send payments to a
printer or a file, and create automated clearing house (ACH) files, check files, wire
advice reports, and positive payment files
Individual payments can be reviewed and updated for exclusion from the Pay Cycle,
placed on hold, or flagged for separate payment before the Payment Creation process
runs

Training Guide
Payment Processing
Page 12
Run a Pay Cycle
Running a Pay Cycle consists of the following steps:
Throughout the following topic, imagine a time you have faced a similar scenario: The voucher
process is complete, and Jill needs to run the pay cycle process so that payments can be created
and distributed to vendors.
Estimated time needed to complete topic: 20 minutes
Procedure
Welcome to the Run a Pay Cycle topic where you will learn how to run a pay cycle.
Step Action
1. Click the Accounts Payable link.
Training Guide Payment Processing
Page 13
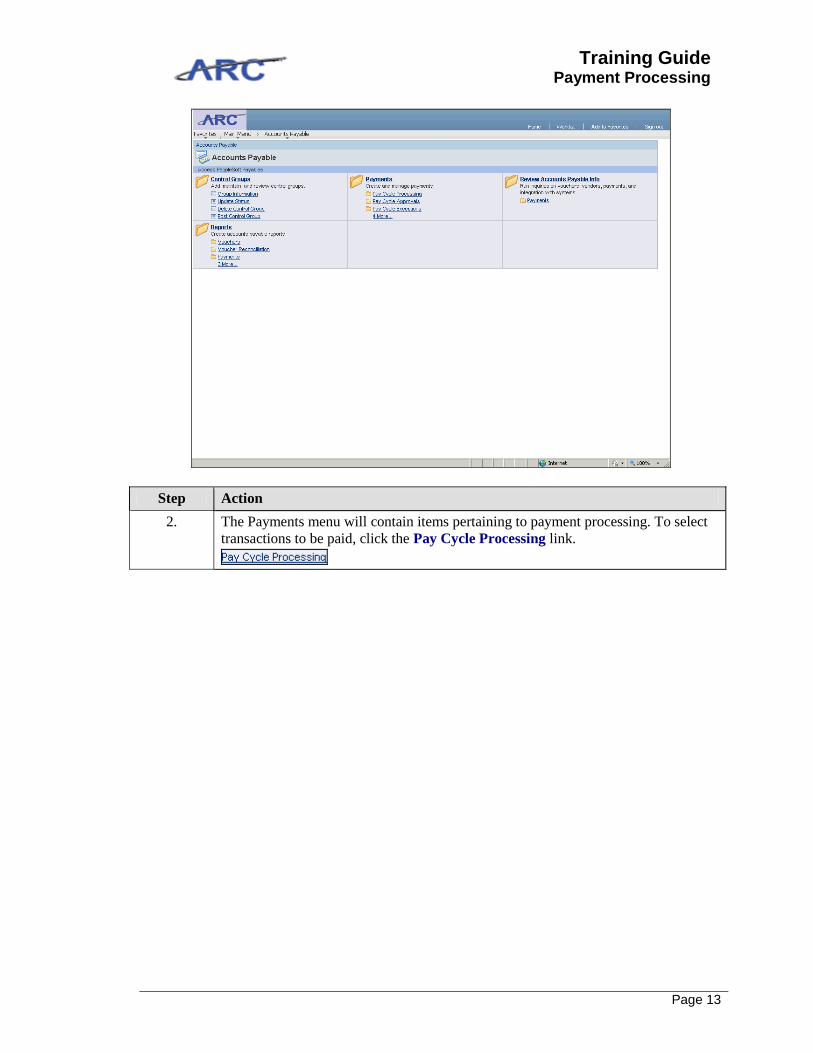
Step Action
2. The Payments menu will contain items pertaining to payment processing. To select
transactions to be paid, click the Pay Cycle Processing link.

Training Guide
Payment Processing
Page 14
Step Action
3. Click the Payment Selection Criteria link.

Training Guide Payment Processing
Page 15
Step Action
4. First you will need to enter a Pay Cycle identifier. In the live ARC system, you will
actually choose from a list of existing pay cycles (discussed in the next topic). For
training purposes and to highlight the payment selection criteria tabs, we will use a
new pay cycle (although you should not normally need to do this). Start by ensuring
the "Add a New Value" tab is selected and enter an identifier for this particular Pay
Cycle. In this case, we will use the date. Enter the desired information into the Pay
Cycle field. Enter "051612". (Note: At go-live,the various pay cycles will be
established to be run on a daily basis, in which the payment selection dates will be
incremented daily to pick up vouchers for payment. You will not need to create a
new Pay Cycle ID every time you run the Pay Cycle.)
Step Action
5. Click the Add button.

Training Guide
Payment Processing
Page 16
Step Action
6. Click in the Pay Cycle field.

Training Guide Payment Processing
Page 17
Step Action
7. Enter the desired information into the Pay Cycle Description field.
Enter "Columbia Pay Cycle".
Step Action
8. Now, you will define the dates by which to filter transactions you want to pay. Enter
the desired information into the Pay From Date field. Enter "05/16/2012".

Training Guide
Payment Processing
Page 18
Step Action
9. Enter the desired information into the Next Pay Through Date field. Enter
"05/18/2012".

Training Guide Payment Processing
Page 19
Step Action
10. Enter the desired information into the Next Payment Date field. Enter
"05/18/2012".
Step Action
11. Click the Preferences tab.

Training Guide
Payment Processing
Page 20
Step Action
12. Click the Suppress Zero Amount Check option.

Training Guide Payment Processing
Page 21
Step Action
13. Click the Approval list to select which approvals are necessary for transactions
being processed in this Pay Cycle.
Step Action
14. Click the User Approval list item.
Training Guide
Payment Processing
Page 22
Step Action
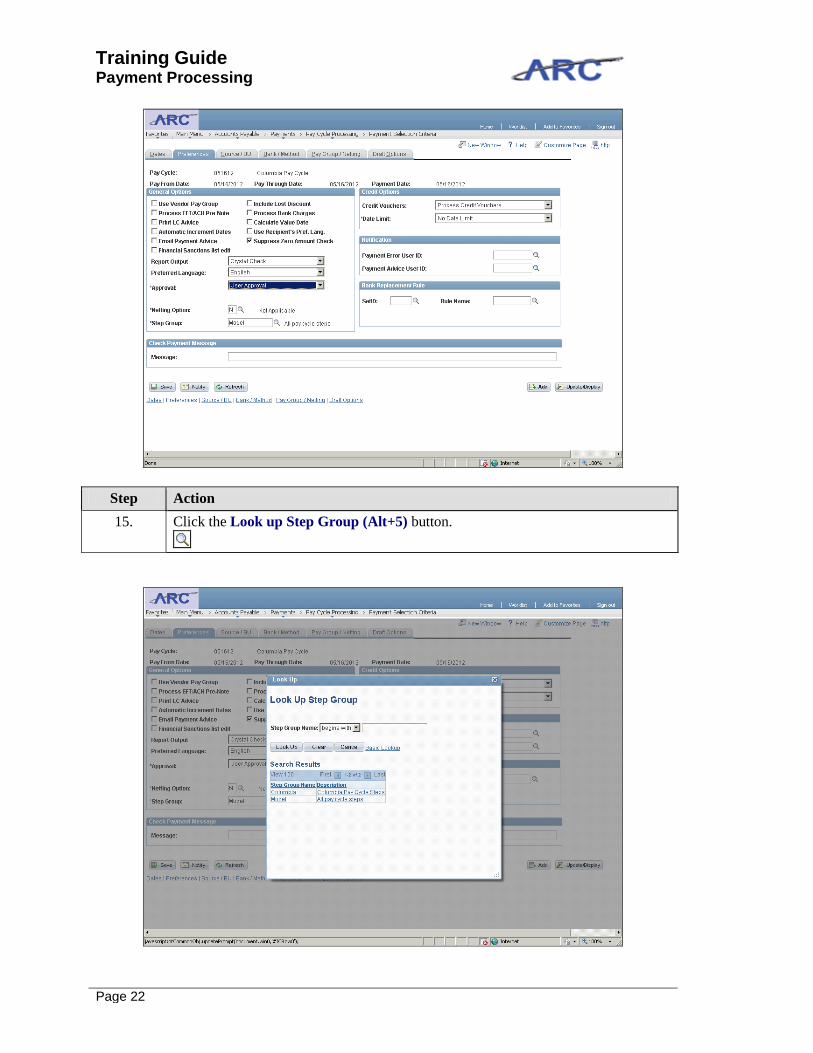
15. Click the Look up Step Group (Alt+5) button.

Training Guide Payment Processing
Page 23
Step Action
16. This will specify what steps are taken in the Pay Cycle. Click the Columbia link.
Step Action
17. Click the Credit Vouchers list to determine what options you went to select for
credit versus debit vouchers.

Training Guide
Payment Processing
Page 24
Step Action
18. Click the Process When DRs >= CRs list item.

Training Guide Payment Processing
Page 25
Step Action
19. Click the Source / BU tab.
Step Action
20. Validate that the options are appropriate on the Source/BU tab. You can select the
types of transactions from which to process payments. Note: when processing
payments for vouchers from HRPAC (i.e. garnishments, insurance payments), the
CUBUS business unit should be included.

Training Guide
Payment Processing
Page 26
Step Action
21. Click the Bank / Method tab.

Training Guide Payment Processing
Page 27
Step Action
22. Click the Look up Bank (Alt+5) button to select the bank from which you're
processing payments.
Step Action
23. Click the CHASE link.

Training Guide
Payment Processing
Page 28
Step Action
24. Select the appropriate account by clicking the Look up Account (Alt+5) button.

Training Guide Payment Processing
Page 29
Step Action
25. Click the DISB link.
Step Action
26. Click the Add a new row at row 1 (Alt+7) button to select multiple payment
methods.

Training Guide
Payment Processing
Page 30
Step Action
27. Click the Payment Method list.

Training Guide Payment Processing
Page 31
Step Action
28. Click the Automated Clearing House list item.
Step Action
29. Click the Payment Method option.

Training Guide
Payment Processing
Page 32
Step Action
30. Click the Add a new row at row 1 (Alt+7) button to create a wire transfer payment
method.

Training Guide Payment Processing
Page 33
Step Action
31. Click in the Bank field.

Training Guide
Payment Processing
Page 34
Step Action
32. Enter the desired information into the Bank field. Enter "CHASE".
Step Action
33. Click in the Account field.
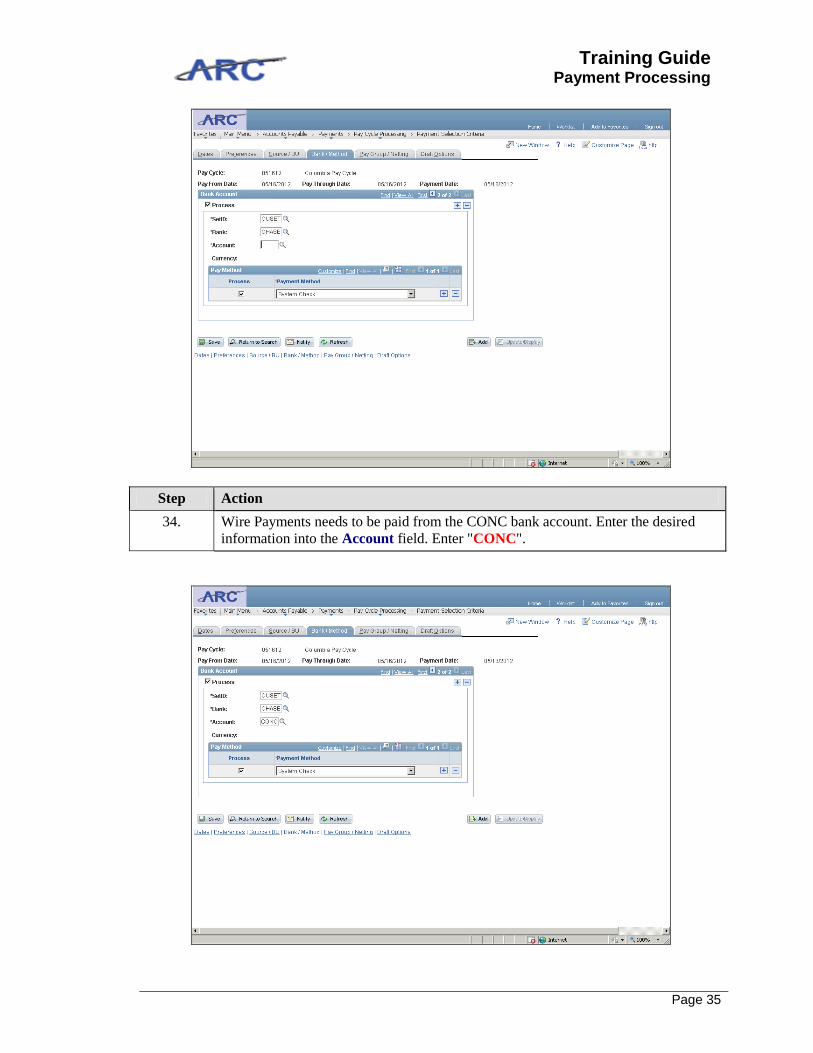
Training Guide Payment Processing
Page 35
Step Action
34. Wire Payments needs to be paid from the CONC bank account. Enter the desired
information into the Account field. Enter "CONC".

Training Guide
Payment Processing
Page 36
Step Action
35. Click the Payment Method list.
Step Action
36. Click the Wire Transfer list item.

Training Guide Payment Processing
Page 37
Step Action
37. Click the Save button.

Training Guide
Payment Processing
Page 38
Step Action
38. Click the Pay Cycle Processing button.
Step Action
39. Click the Pay Cycle Manager button to process the Pay Cycle.

Training Guide Payment Processing
Page 39
Step Action
40. Click in the Pay Cycle field.
Training Guide
Payment Processing
Page 40
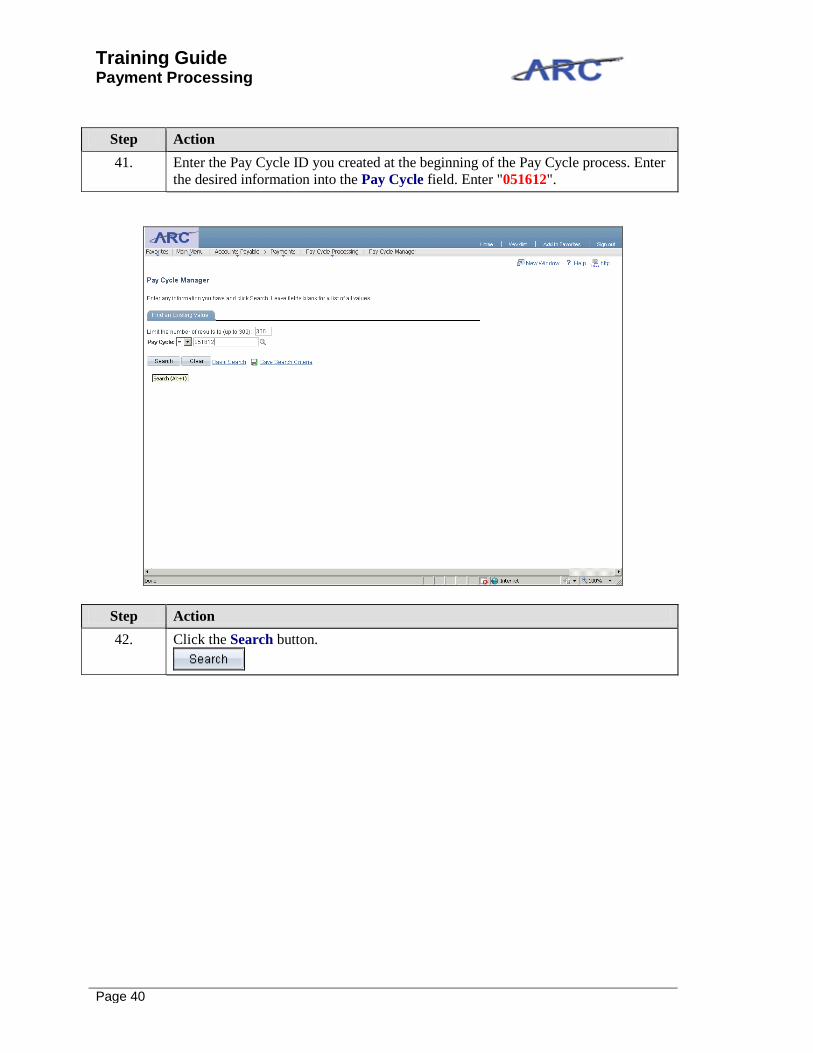
Step Action
41. Enter the Pay Cycle ID you created at the beginning of the Pay Cycle process. Enter
the desired information into the Pay Cycle field. Enter "051612".
Step Action
42. Click the Search button.

Training Guide Payment Processing
Page 41
Step Action
43. Click the Process button to run the Payment Selection process and select
transactions for payment based off on the preferences information defined in the
Pay Cycle Processing Criteria page you created for the Pay Cycle.

Training Guide
Payment Processing
Page 42
Step Action
44. Click the Process Monitor link to see when the process has completed.

Training Guide Payment Processing
Page 43
Step Action
45. Click the Refresh button until the Run Status of the Process is "Success" and the
Distribution Status is "Posted".
Step Action
46. Click the Go back to Pay Cycle Manager link.

Training Guide
Payment Processing
Page 44
Step Action
47. Search for the appropriate Pay Cycle again by entering the Pay Cycle ID into
the Pay Cycle field. Enter "051612".

Training Guide Payment Processing
Page 45
Step Action
48. Click the Search button.
Step Action
49. Click the Details link to view the transactions selected for payment.

Training Guide
Payment Processing
Page 46
Step Action
50. Once on this page, you can select different actions on a particular voucher by
clicking the Action menu.

Training Guide Payment Processing
Page 47
Step Action
51. These are the available options for each voucher. By selecting Exclude, this voucher
will be excluded from this particular Pay Cycle and will disappear after you have
saved your selection.
Putting a transaction on Hold will delay the Payment from being processed and a
Hold Reason is necessary. Hold & Separate will both hold the transaction (a Hold
Reason is necessary) and create separate payment for this voucher (separate is only
really used when two payments are being processed to the same vendor).
None means that no special action will be taken on this voucher, and it will be
processed in this Pay Cycle.
Separate is used when processing two payments to the same vendor and is used to
indicate that you would like to create two separate payments.

Training Guide
Payment Processing
Page 48
Step Action
52. Click the Save button.

Training Guide Payment Processing
Page 49
Step Action
53. Click the Pay Cycle Manager link.
Step Action
54. Click the Process button to run the Payment Creation process.

Training Guide
Payment Processing
Page 50
Step Action
55. Click the Process Monitor link.

Training Guide Payment Processing
Page 51
Step Action
56. Click the Refresh button until the Run Status is "Success" and the Distribution
Status is "Posted".
Step Action
57. Click the button of the scrollbar.

Training Guide
Payment Processing
Page 52
Step Action
58. Click the Go back to Pay Cycle Manager link.

Training Guide Payment Processing
Page 53
Step Action
59. Click in the Pay Cycle field.
Step Action
60. Search for the appropriate Pay Cycle by entering the Pay Cycle ID into the Pay
Cycle field. Enter "051612".

Training Guide
Payment Processing
Page 54
Step Action
61. Click the Search button.

Training Guide Payment Processing
Page 55
Step Action
62. Click the Trial Register link to run the Trial Register report and see what vouchers
are being paid. The Trial Register can only be reviewed after payment selection and
payment creation. Once the pay cycle is completed, no data will be produced in the
report.
Step Action
63. Click the Add a New Value tab.

Training Guide
Payment Processing
Page 56
Step Action
64. A Run Control ID is a way to identify the particular report you are running. Run
Control IDs are used in PeopleSoft each time you submit a report or any other batch
process. All the criteria used to specify a process are saved so that they can be
remembered for future submissions. Enter the desired information into the Run
Control ID field. Enter "Pay_Report".

Training Guide Payment Processing
Page 57
Step Action
65. Click the Add button.

Training Guide
Payment Processing
Page 58
Step Action
66. Click in the Pay Cycle field.
Step Action
67. Enter the Pay Cycle for which you want to run the report. Enter the desired
information into the Pay Cycle field. Enter "051612".

Training Guide Payment Processing
Page 59
Step Action
68. Click the Run button.

Training Guide
Payment Processing
Page 60
Step Action
69. Select the appropriate Server Name by clicking on the Server Name Menu.
Step Action
70. Click the Select option next to the "Crystal" process type option.

Training Guide Payment Processing
Page 61
Step Action
71. Click the OK button.

Training Guide
Payment Processing
Page 62
Step Action
72. Click the Process Monitor link.
Step Action
73. Click the Refresh button until the Run Status is "Success" and the Distribution
Status is "Posted".

Training Guide Payment Processing
Page 63
Step Action
74. Click the Details link.

Training Guide
Payment Processing
Page 64
Step Action
75. Click the View Log/Trace link.
Step Action
76. Click the file that ends in the .PDF to see the PDF version of the report. Press the
left mouse button on the APY2030-_19230.PDF link.

Training Guide Payment Processing
Page 65
Step Action
77. The report will open in a separate window for your to analyze/print. Then close out
of the report to navigate back to ARC.

Training Guide
Payment Processing
Page 66
Step Action
78. You will now approve the Pay Cycle by navigating back to the Pay Cycle Manager.
Click the Pay Cycle Processing button.
Step Action
79. Click the Pay Cycle Manager menu.

Training Guide Payment Processing
Page 67
Step Action
80. Click in the Pay Cycle field.

Training Guide
Payment Processing
Page 68
Step Action
81. Enter the desired information into the Pay Cycle field. Enter "051612".
Step Action
82. Click the Search button.

Training Guide Payment Processing
Page 69
Step Action
83. Click the Approve link.

Training Guide
Payment Processing
Page 70
Step Action
84. Click the Approve button to approve the Pay Cycle.
Step Action
85. See that the Status has been changed to "Approved".

Training Guide Payment Processing
Page 71
Step Action
86. Click the Pay Cycle Manager link.
Training Guide
Payment Processing
Page 72
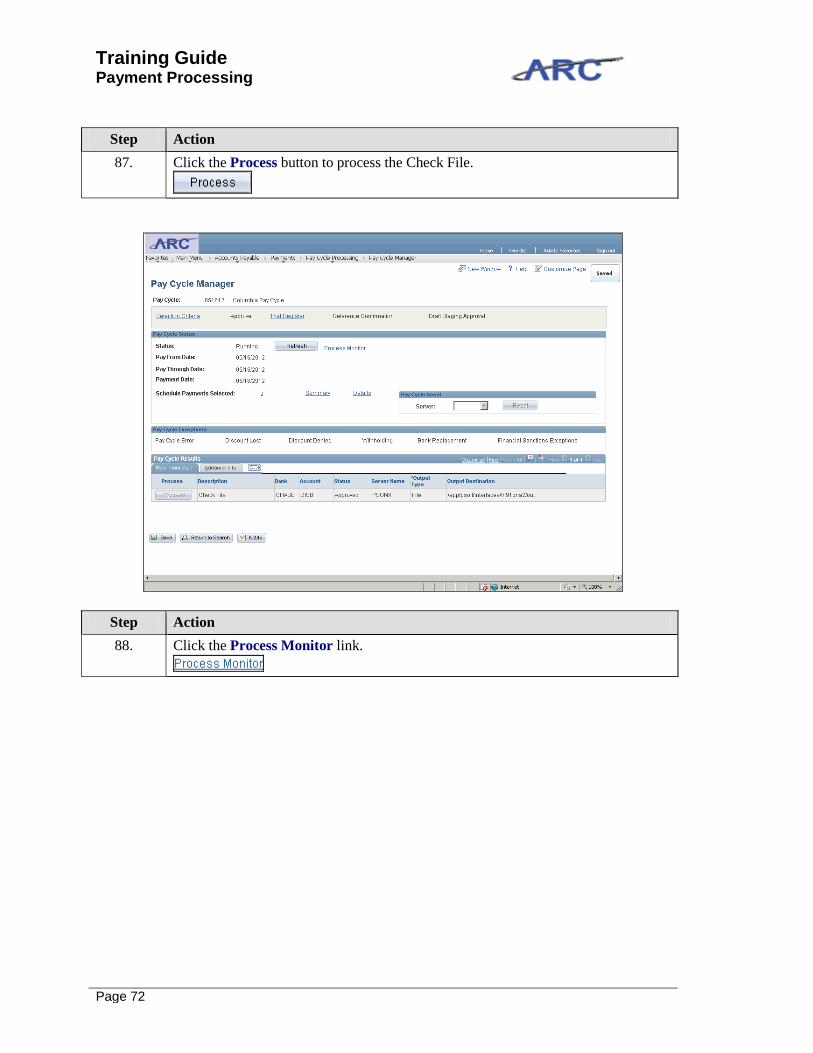
Step Action
87. Click the Process button to process the Check File.
Step Action
88. Click the Process Monitor link.

Training Guide Payment Processing
Page 73
Step Action
89. Click the Refresh button until the Run Status is "Success" and the Distribution
Status is "Posted".

Training Guide
Payment Processing
Page 74
Step Action
90. Click the button of the scrollbar.

Training Guide Payment Processing
Page 75
Step Action
91. Click the Go back to Pay Cycle Manager link.
Step Action
92. Click in the Pay Cycle field.

Training Guide
Payment Processing
Page 76
Step Action
93. Search for the appropriate Pay Cycle using the Pay Cycle ID in the Pay Cycle field.
Enter "051612".
Training Guide Payment Processing
Page 77
Step Action
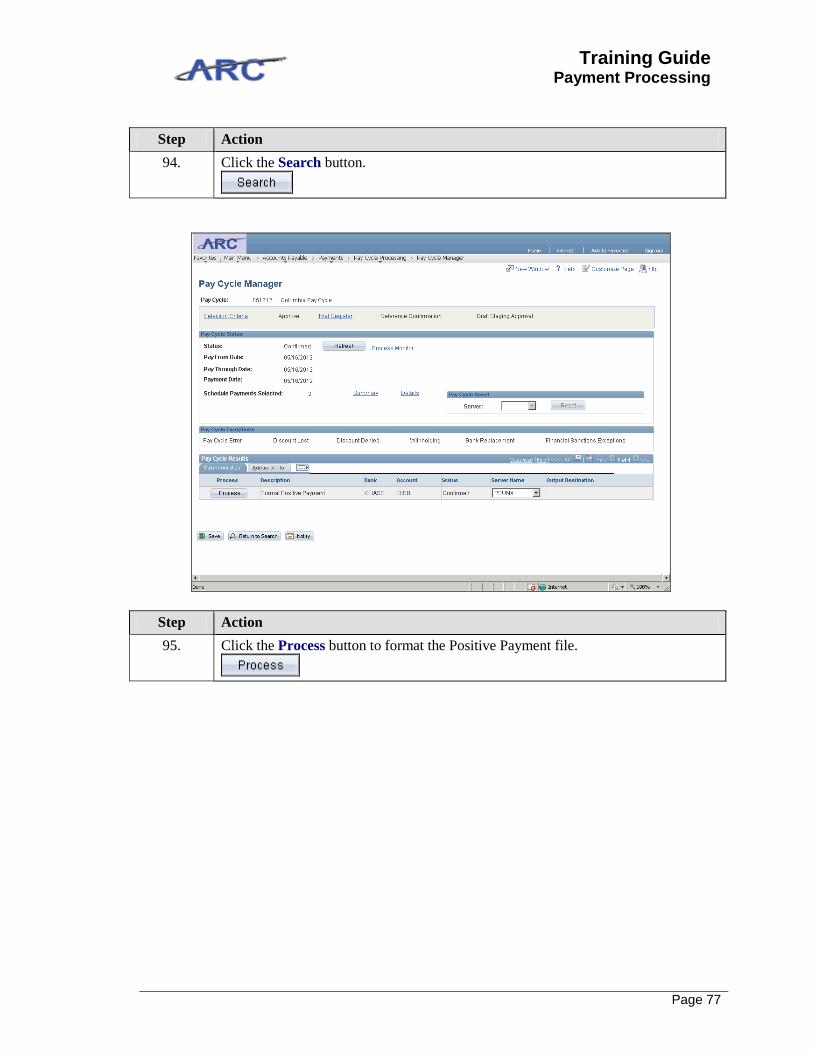
94. Click the Search button.
Step Action
95. Click the Process button to format the Positive Payment file.

Training Guide
Payment Processing
Page 78
Step Action
96. Click the Process Monitor link.

Training Guide Payment Processing
Page 79
Step Action
97. Click the Refresh button until the Run Status is "Success" and the Distribution
Status is "Posted".
Step Action
98. Click the button of the scrollbar.
Training Guide
Payment Processing
Page 80
Step Action
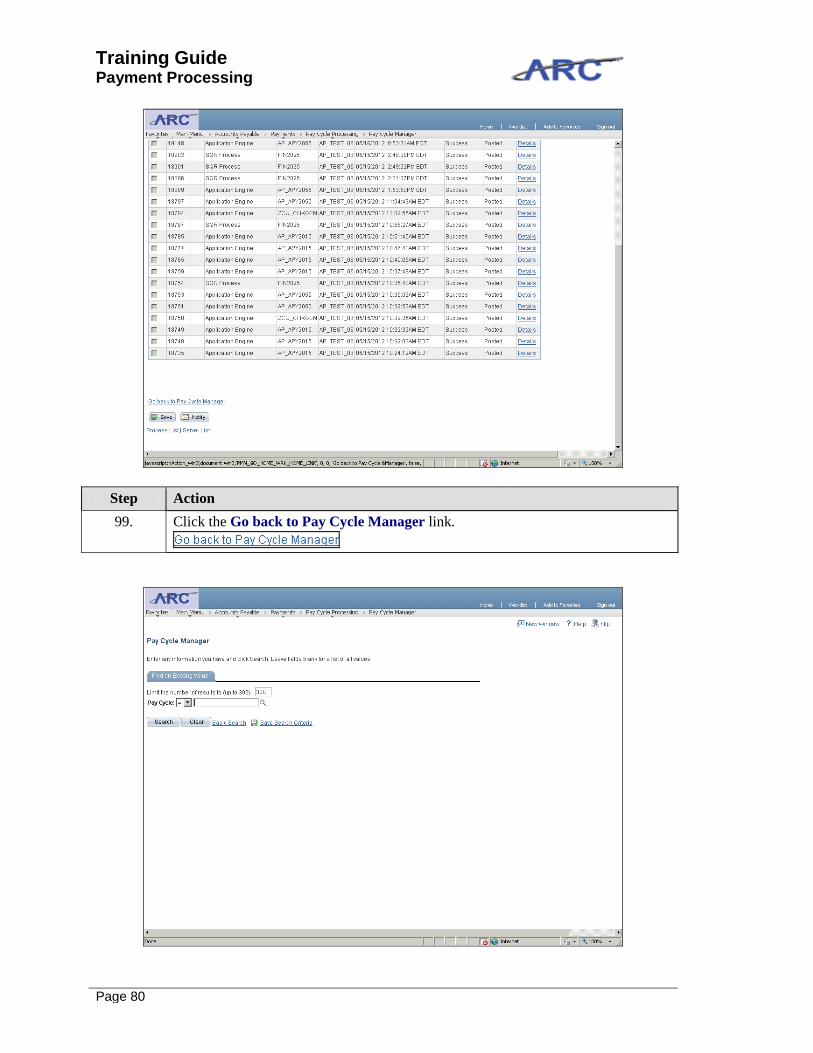
99. Click the Go back to Pay Cycle Manager link.

Training Guide Payment Processing
Page 81
Step Action
100. Enter the desired information into the Pay Cycle field. Enter "051612".
Step Action
101. Click the Search button.

Training Guide
Payment Processing
Page 82
Step Action
102. Click the Process button to produce the Positive Payment File.

Training Guide Payment Processing
Page 83
Step Action
103. Click the Process Monitor link.
Step Action
104. Click the Refresh button until the Run Status is "Success" and the Distribution
Status is "Posted".

Training Guide
Payment Processing
Page 84
Step Action
105. Click the Go back to Pay Cycle Manager link.

Training Guide Payment Processing
Page 85
Step Action
106. Enter the desired information into the Pay Cycle field. Enter "051612".
Step Action
107. Click the Search button.

Training Guide
Payment Processing
Page 86
Step Action
108. Note that the Pay Cycle Status is completed.

Training Guide Payment Processing
Page 87
Step Action
109. Click the Payments button.
Step Action
110. Click the Review Accounts Payable Info menu.

Training Guide
Payment Processing
Page 88
Step Action
111. Click the Payments menu.

Training Guide Payment Processing
Page 89
Step Action
112. Click the Payments menu.
Step Action
113. You can filter by a variety of fields. In this example, we'll filter by Bank Account,
Bank Code, Pay Cycle, and Payment Date. Enter the desired information into
the Bank Code field. Enter "CHASE".

Training Guide
Payment Processing
Page 90
Step Action
114. Enter the desired information into the Bank Account field. Enter "DISB".

Training Guide Payment Processing
Page 91
Step Action
115. Click in the Pay Cycle field.
Step Action
116. Enter the desired information into the Pay Cycle field. Enter "051612".

Training Guide
Payment Processing
Page 92
Step Action
117. Click in the Payment Date field.

Training Guide Payment Processing
Page 93
Step Action
118. Enter the desired information into the Payment Date field. Enter "05/16/2012".
Step Action
119. Click the button of the scrollbar.

Training Guide
Payment Processing
Page 94
Step Action
120. Click the Search button.

Training Guide Payment Processing
Page 95
Step Action
121. Click the button of the scrollbar.
Step Action
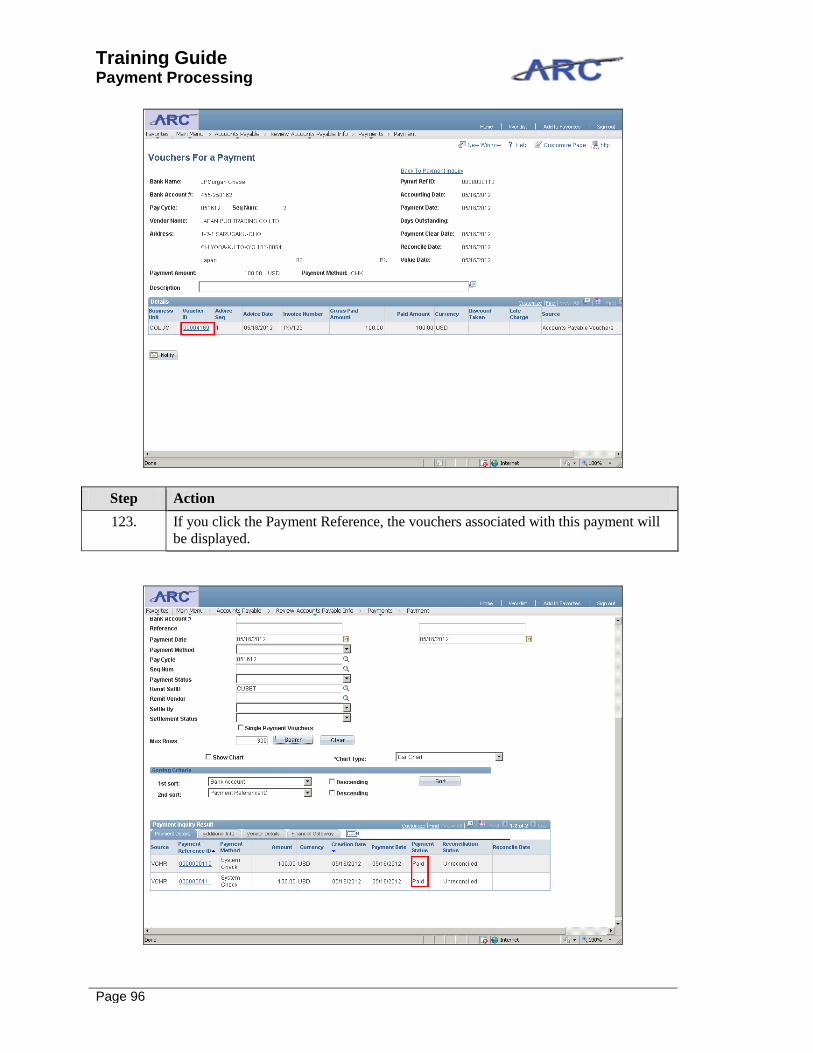
122. Verify that the vouchers have been paid. You can click on the Payment Reference
ID for additional detail on the transaction.
Training Guide
Payment Processing
Page 96
Step Action
123. If you click the Payment Reference, the vouchers associated with this payment will
be displayed.

Training Guide Payment Processing
Page 97
Step Action
124. You have successfully run a Pay Cycle. You can now select the next topic, Pay
Cycle Reports.
End of Procedure.

Training Guide
Payment Processing
Page 98
Pay Cycle Options
There will be eight established pay cycles in ARC: six for checks, one for wire, and one for ACH.
The pay cycle codes are as follows:
ACH - ACH Pay Cycle
Wire - Wire Pay Cycle
Check1 - US Mail and Foreign Checks
Check2 - Local Checks
Check3 - Bursar Checks
Check4 - Library Checks
Check5 - Call for Pick Up - Black Bldg
Check6 - CM Call for Pick Up and Enclosure Docs
After selecting each pay cycle, you will just need to validate that the Pay Group matches the type
of pay cycle and that the bank method is appropriate given the pay cycle.
This topic will teach you how to choose from the available pay cycles and where to validate the
pay group and bank method information prior to running the pay cycle.
Estimated time needed to complete topic: 3 minutes
Procedure
Welcome to the Pay Cycle options topic where you will learn about the various pay cycles you
can run in ARC.

Training Guide Payment Processing
Page 99
Step Action
1. First, we will navigate to the Payment Selection Criteria page. Click the Accounts
Payable link.
Step Action
2. Click the Pay Cycle Processing link.
Training Guide
Payment Processing
Page 100
Step Action
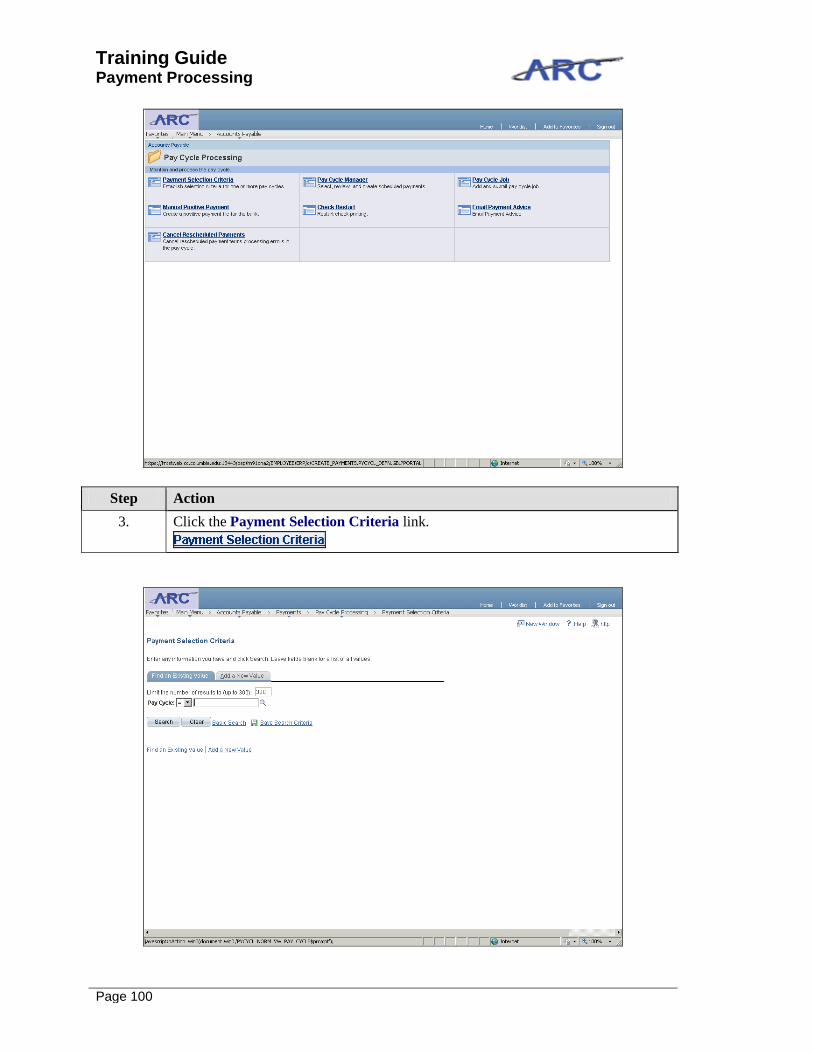
3. Click the Payment Selection Criteria link.

Training Guide Payment Processing
Page 101
Step Action
4. Click the Look up Pay Cycle (Alt+5) button to see the list of available Pay Cycles.
Step Action
5. See the list of Pay Cycles (there are a few extra here that will not be in the actual
system). Click the CHECK1 link to select hte US Mail and Foreign Checks Pay
Cycle.

Training Guide
Payment Processing
Page 102
Step Action
6. Click the Search button.

Training Guide Payment Processing
Page 103
Step Action
7. See that the dates are pre-established.
Step Action
8. Click the Pay Group / Netting tab.

Training Guide
Payment Processing
Page 104
Step Action
9. See that the US and Foreign (FN) pay group codes are selected and that they match
that particular pay cycle. For all Check Pay Cycles, you will need to verify that the
Pay Group matches the Pay Cycle type.

Training Guide Payment Processing
Page 105
Step Action
10. Click the Bank / Method tab.

Training Guide
Payment Processing
Page 106
Step Action
11. Verify that the Bank/Method Information is correct.
Step Action
12. Now, we will look at another Pay Cycle as an example. Click the Pay Cycle
Processing button.

Training Guide Payment Processing
Page 107
Step Action
13. Click the Payment Selection Criteria menu.

Training Guide
Payment Processing
Page 108
Step Action
14. Click the Look up Pay Cycle (Alt+5) button.
Step Action
15. Click the button of the scrollbar.

Training Guide Payment Processing
Page 109
Step Action
16. Select the Wire Pay Cycle by clicking the WIRE link.

Training Guide
Payment Processing
Page 110
Step Action
17. Click the Search button.
Step Action
18. Click the Pay Group / Netting tab.

Training Guide Payment Processing
Page 111
Step Action
19. Because this is a Wire Pay Cycle, you will see that there is not a necessary Pay
Group Code (unlike the Check Pay Cycles).

Training Guide
Payment Processing
Page 112
Step Action
20. Click the Bank / Method tab.
Step Action
21. For Wire Pay Cycles, you will need to verify that the Chase Bank is selected and
that the Account is the concentration account.
Training Guide Payment Processing
Page 113
Step Action
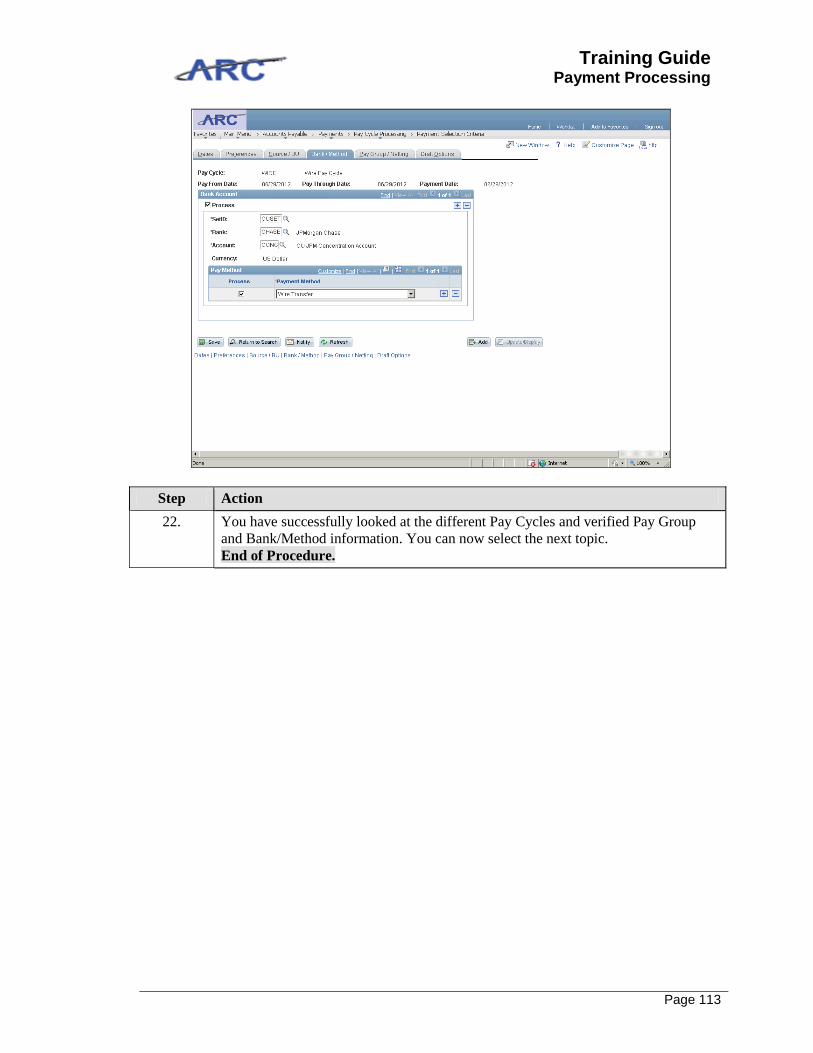
22. You have successfully looked at the different Pay Cycles and verified Pay Group
and Bank/Method information. You can now select the next topic.
End of Procedure.

Training Guide
Payment Processing
Page 114
Pay Cycle Reports
Throughout the Pay Cycle, reports are available in order to gauge the status of different
payments. Once the Payment Selection process is run, the ‘Pay Cycle Summary’ and ‘Details’
page can be viewed to see a summary payment count and total or detailed list of all vouchers
selected for payment.
Throughout the following topic, imagine a time you have faced a similar scenario: When
processing a pay cycle, you want to review payment information form past pay cycles.
Estimated time needed to complete topic: 10 minutes
Procedure
Welcome to the Pay Cycle Reports topic where you will learn how to run the reports associated
with payments.
Step Action
1. Click the Accounts Payable link.

Training Guide Payment Processing
Page 115
Step Action
2. Click the Payments link.

Training Guide
Payment Processing
Page 116
Step Action
3. Click the Payment History by Bank link.
Step Action
4. To run this report, you will enter a new Run Control ID. Ensure the "Add a New
Value" tab is selected and enter the Run Control ID to help identify the report. Click
in the Run Control ID field.

Training Guide Payment Processing
Page 117
Step Action
5. In this example, we'll use the date. Enter the desired information into the Run
Control ID field. Enter "051612".

Training Guide
Payment Processing
Page 118
Step Action
6. Click the 051612 link.
Step Action
7. Click in the Bank Code field to filter the payments by bank.

Training Guide Payment Processing
Page 119
Step Action
8. Enter the desired information into the Bank Code field. Enter "CHASE".

Training Guide
Payment Processing
Page 120
Step Action
9. Enter the appropriate date range by which you want to filter the information. Enter
the desired information into the From Date field. Enter "01/01/2012".
Step Action
10. Click the Detail option.

Training Guide Payment Processing
Page 121
Step Action
11. Click the Run button.

Training Guide
Payment Processing
Page 122
Step Action
12. Ensure the appropriate server is selected by clicking on the Server Name menu.
Step Action
13. Click the OK button.

Training Guide Payment Processing
Page 123
Step Action
14. Click the Process Monitor link.

Training Guide
Payment Processing
Page 124
Step Action
15. Click the Refresh button until the Run Status is "Success" and Distribution Status is
"Posted".
Step Action
16. Click the Details link.

Training Guide Payment Processing
Page 125
Step Action
17. Click the View Log/Trace link.

Training Guide
Payment Processing
Page 126
Step Action
18. Click the file that ends in .PDF. Press the left mouse button on the APY2004-
_19238.PDF link.
Step Action
19. The report will launch in a new window for you to review/print.

Training Guide Payment Processing
Page 127
Step Action
20. Click the Close button.

Training Guide
Payment Processing
Page 128
Step Action
21. Click the Payments button to select a new report.
Step Action
22. Click the Payment History by Payment menu.

Training Guide Payment Processing
Page 129
Step Action
23. Search for the Run Control ID you already created. Enter the desired information
into the Run Control ID field. Enter "051612".

Training Guide
Payment Processing
Page 130
Step Action
24. Click the Search button.
Step Action
25. Filter the results of the report by Pay Cycle. Click in the Pay Cycle field.

Training Guide Payment Processing
Page 131
Step Action
26. Enter the desired information into the Pay Cycle field. Enter "051612".

Training Guide
Payment Processing
Page 132
Step Action
27. Click the Run button.
Step Action
28. Click the OK button.
Training Guide Payment Processing
Page 133
Step Action
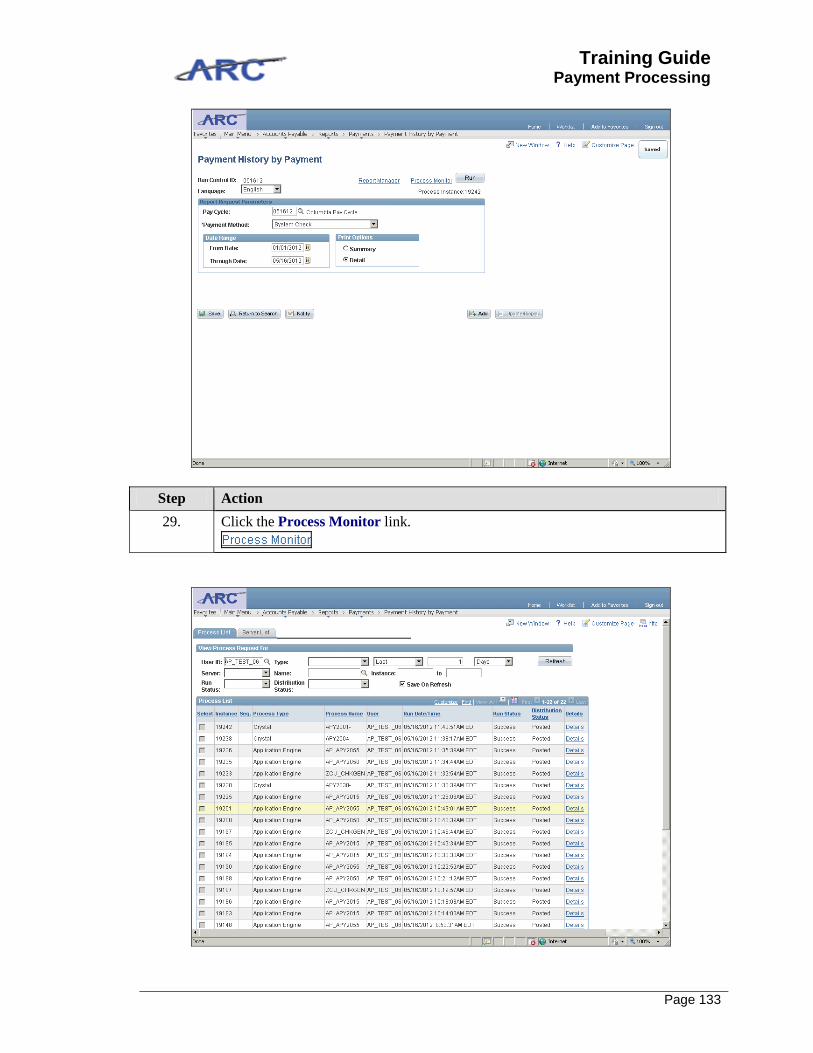
29. Click the Process Monitor link.
Training Guide
Payment Processing
Page 134
Step Action
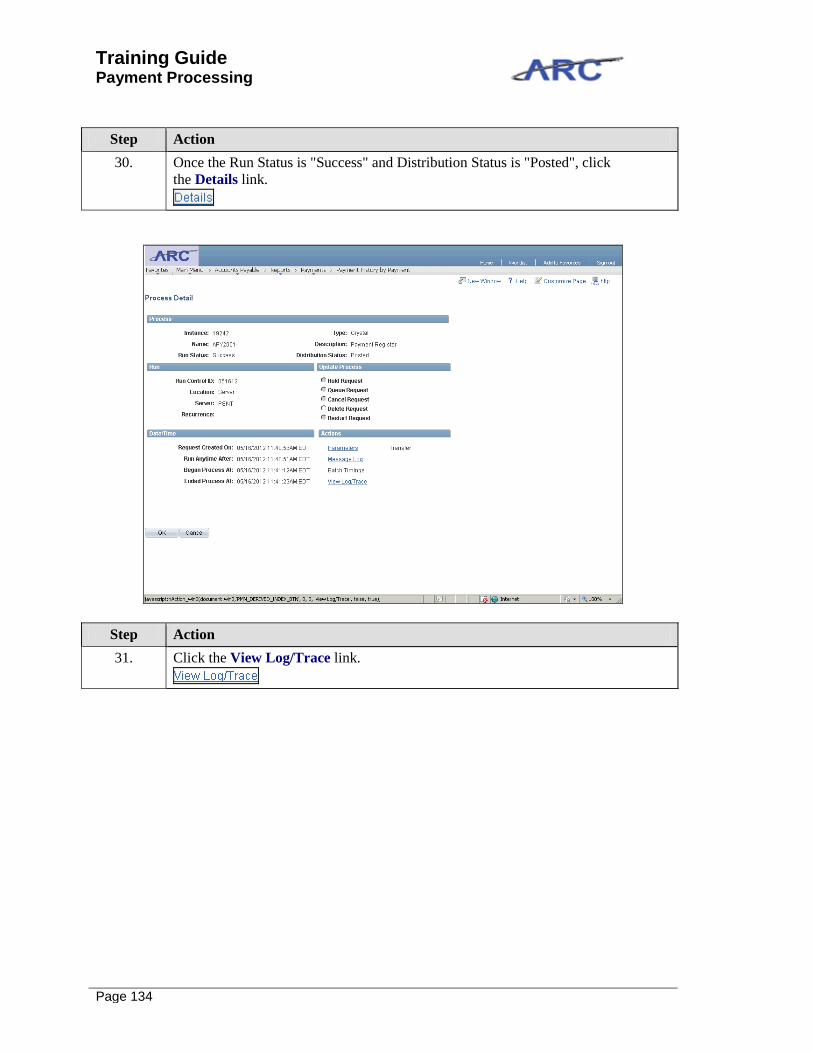
30. Once the Run Status is "Success" and Distribution Status is "Posted", click
the Details link.
Step Action
31. Click the View Log/Trace link.

Training Guide Payment Processing
Page 135
Step Action
32. Click the file name that ends in .PDF. Click the APY2001-_19242.PDF link.
Training Guide
Payment Processing
Page 136
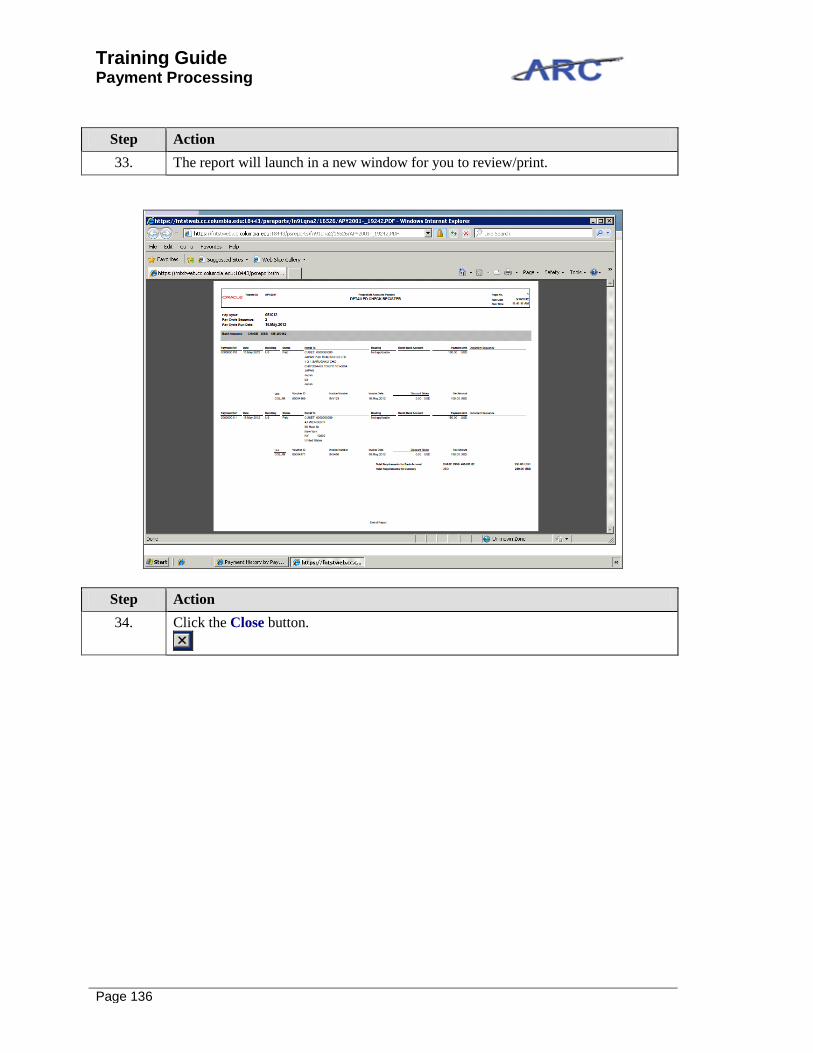
Step Action
33. The report will launch in a new window for you to review/print.
Step Action
34. Click the Close button.

Training Guide Payment Processing
Page 137
Step Action
35. Click the Payments button to select a different report.

Training Guide
Payment Processing
Page 138
Step Action
36. Click the Payment History by Pay Method menu.
Step Action
37. Search for the Run Control ID you created previously. Click in the Run Control
ID field.

Training Guide Payment Processing
Page 139
Step Action
38. Enter the desired information into the Run Control ID field. Enter "051612".

Training Guide
Payment Processing
Page 140
Step Action
39. Click the Search button.
Step Action
40. Click the Run Option list.

Training Guide Payment Processing
Page 141
Step Action
41. Filter the information with the appropriate options. Click the Bank Accounts list
item.

Training Guide
Payment Processing
Page 142
Step Action
42. Enter the appropriate Bank Code first by clicking the Look up Bank Code
(Alt+5) button.

Training Guide Payment Processing
Page 143
Step Action
43. Click the CHASE link.

Training Guide
Payment Processing
Page 144
Step Action
44. Click the Look up Bank Account (Alt+5) button.
Step Action
45. Click the DISB link.
Training Guide Payment Processing
Page 145
Step Action
46. Click the Run button.

Training Guide
Payment Processing
Page 146
Step Action
47. Click the OK button.
Step Action
48. Click the Process Monitor link.

Training Guide Payment Processing
Page 147
Step Action
49. Click the Refresh button until the Run Status is "Success" and the Distribution
Status is "Posted".

Training Guide
Payment Processing
Page 148
Step Action
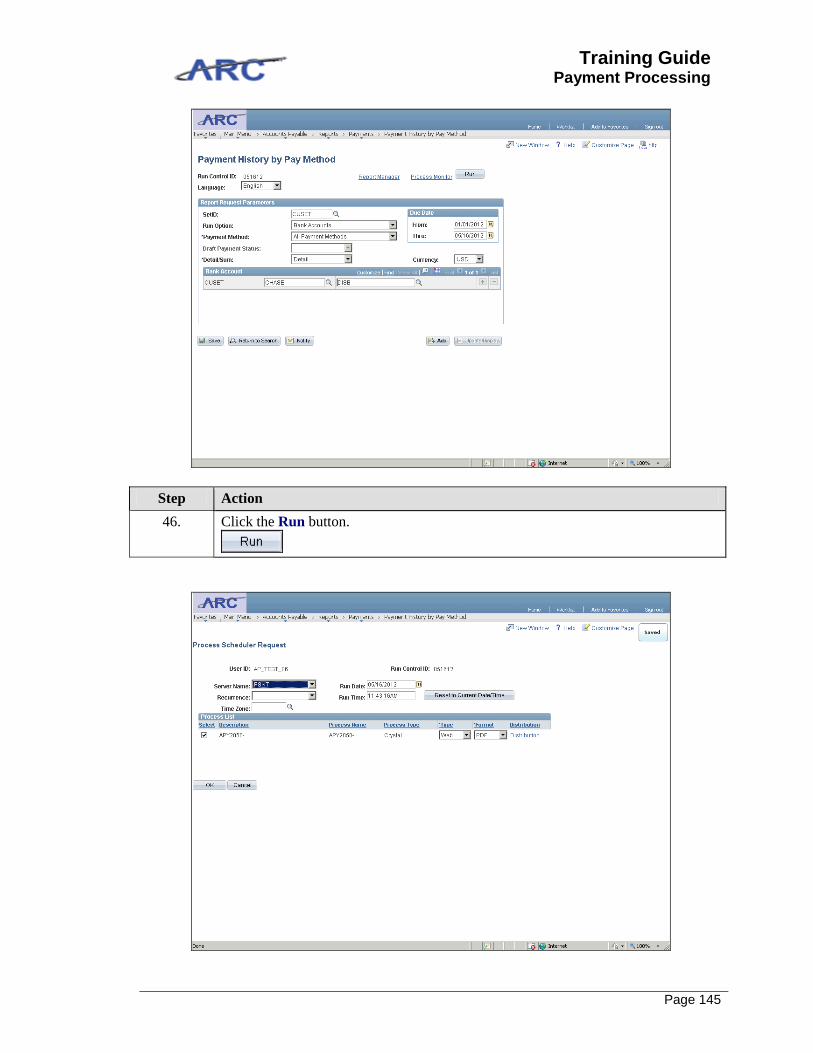
50. Click the Details link.

Training Guide Payment Processing
Page 149
Step Action
51. Click the View Log/Trace link.
Step Action
52. Click the file that ends in .PDF. Press the left mouse button on the APY2050-
_19244.PDF link.

Training Guide
Payment Processing
Page 150
Step Action
53. The report will open in a new window for your review.

Training Guide Payment Processing
Page 151
Step Action
54. You have successfully run Pay Cycle Reports. You can now select the next lesson in
the course.
End of Procedure.
Training Guide
Payment Processing
Page 152
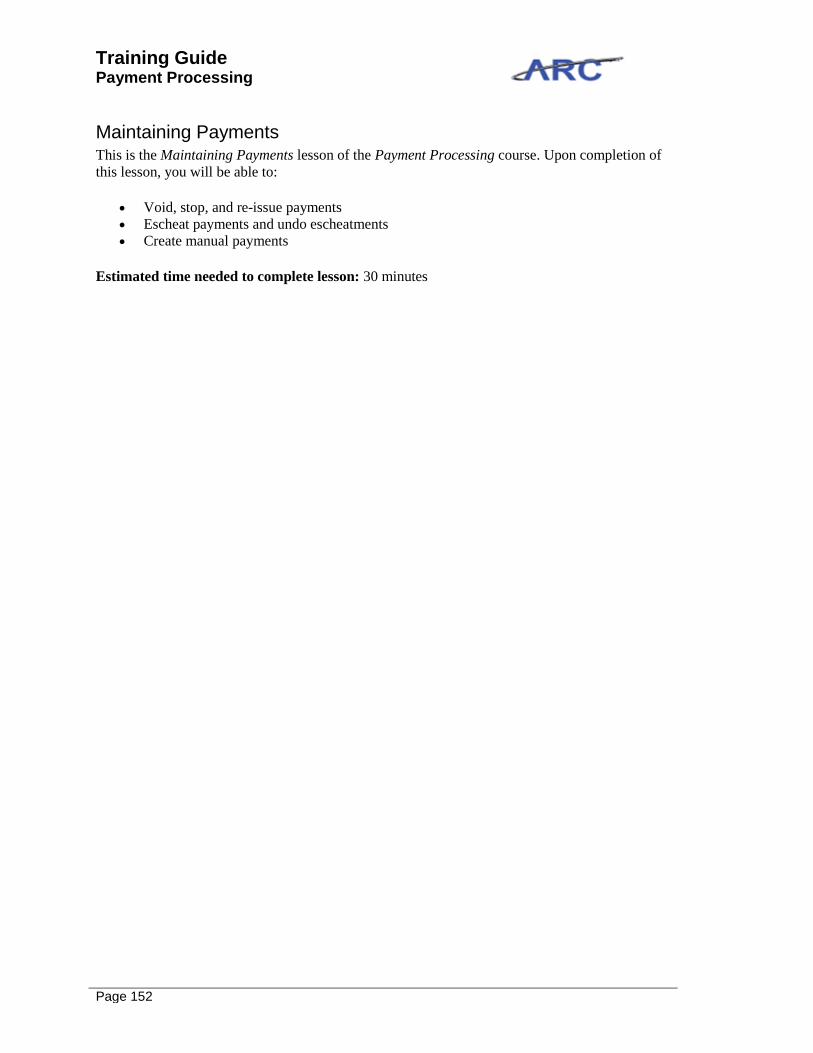
Maintaining Payments This is the Maintaining Payments lesson of the Payment Processing course. Upon completion of
this lesson, you will be able to:
Void, stop, and re-issue payments
Escheat payments and undo escheatments
Create manual payments
Estimated time needed to complete lesson: 30 minutes

Training Guide Payment Processing
Page 153
Canceling a Payment
Different functions are available to cancel a payment in ARC. It is also possible to undo the
cancellation of a payment or perform mass cancellations if multiple payments need to be
canceled. This table summarizes the different cancel functions in ARC:
Throughout the following topic, imagine a time you have faced a similar scenario: Will needs to
cancel a payment because he realizes the amount for which the payment has been generated is
incorrect.
Estimated time needed to complete topic: 10 minutes
Procedure
Welcome to the Canceling a Payment topic where you will learn how to void and stop payments.

Training Guide
Payment Processing
Page 154
Step Action
1. Click the Accounts Payable link.

Training Guide Payment Processing
Page 155
Step Action
2. Click the Cancel/Void Payments link.
Step Action
3. Click the Payment Cancellation link.

Training Guide
Payment Processing
Page 156
Step Action
4. Enter information to find the payment you would like to cancel. Enter the desired
information into the Bank Code field. Enter "CHASE".

Training Guide Payment Processing
Page 157
Step Action
5. Click in the Bank Account field.
Step Action
6. Enter the desired information into the Bank Account field. Enter "DISB".

Training Guide
Payment Processing
Page 158
Step Action
7. Click the Payment Method list.

Training Guide Payment Processing
Page 159
Step Action
8. Click the System Check list item.
Step Action
9. Click the Search button.

Training Guide
Payment Processing
Page 160
Step Action
10. Click the Payment Date column header to sort the results by payment date.

Training Guide Payment Processing
Page 161
Step Action
11. Click the 0000000113 link to select the payment you'd like to cancel.
Step Action
12. You will then select the appropriate option based on the action you would like to
take on the payment. If you want to re-issue a payment but place it on hold to
prevent it from being processed in the Pay Cycle, you will also need to enter a hold
reason. You can also enter a description for the payment cancellation action.

Training Guide
Payment Processing
Page 162
Step Action
13. When the appropriate options are selected, click the Save button.
Note: If a payment is voided and re-issued, the Payment Post process must run in
order to create a new payment row on the voucher to be processed in pay cycle.

Training Guide Payment Processing
Page 163
Step Action
14. You have successfully voided a payment. You can now select the next topic,
Escheating a Payment.
End of Procedure.

Training Guide
Payment Processing
Page 164
Issuing a Stop Payment
ARC's stop payment function can be used in the event a check has been issued but should not be
cashed. The action of stopping a payment must be performed by the bank, however, it is possible
to indicate that a payment has been stopped in ARC for informational purposes only. Once
Central Accounts Payable receives confirmation that the payment has been successfully stopped,
Central Accounts Payable can void the transaction in ARC. The process is as follows:

Training Guide Payment Processing
Page 165
Escheating a Payment
Escheatment includes all forms of property, both tangible and intangible, that becomes abandoned
(and if it's a check, stale-dated) by its rightful owner. In the case of Columbia, common types of
property are un-cashed checks to vendors, customer credit balances or refunds, security deposits,
dividend check, corporate securities, insurance refunds or claims, and sometimes wages.
Depending on the area and the type of proper, a payment that has not been redeemed within 3-6
years from the issue date will be escheated in order to be turned over to the State.
A custom batch program has been created to automatically escheat payments on a bi-annual basis
(May and November). Chase will send an Outstanding Checks file on a monthly basis that
identifies which checks have yet to be redeemed by the payee. Twice a year, Cash Accounting
will request the program to run that will automatically match unreconciled check payments in
ARC with the unredeemed checks in the Outstanding Check file. Once the program completes,
the Payment Post process will run to generate the appropriate escheatment liability accounting
entries. An exception report will be generated for payments that fail to be escheated.
After the escheatment process runs, a file will be sent to Unclaimed Property that will be loaded
to the Tracker database. The information will be used to send payment to the State for
redemption.
ARC's Payment Escheatment component will be utilized to manually escheat payments for any
exceptions that were not escheated in the custom escheatment batch program. When users escheat
payments, they enter an escheatment date. The system uses the escheatment date to post the
accounting entries to the appropriate period for the escheatment entry. The escheatment process
flow is as follows:
Throughout the following topic, imagine a time you have faced a similar scenario: A payment has
been distributed to a vendor, but the vendor has not deposited the check. The check was
referenced in the Outstanding Checks file from Chase with the incorrect payment date and thus
was written to the exceptions report. Will needs to manually escheat the payment since it has
become stale-dated.
Estimated time needed to complete topic: 10 minutes
Procedure
Welcome to the Escheating a Payment topic where you will learn how to escheat a payment.

Training Guide
Payment Processing
Page 166
Step Action
1. Click the Accounts Payable link.

Training Guide Payment Processing
Page 167
Step Action
2. Click the Escheat Payment link.
Step Action
3. Enter information to identify the payment you'd like to escheat. Click in the Bank
Code field.

Training Guide
Payment Processing
Page 168
Step Action
4. Enter the desired information into the Bank Code field. Enter "CHASE".

Training Guide Payment Processing
Page 169
Step Action
5. Click in the Bank Account field.
Step Action
6. Enter the desired information into the Bank Account field. Enter "DISB".
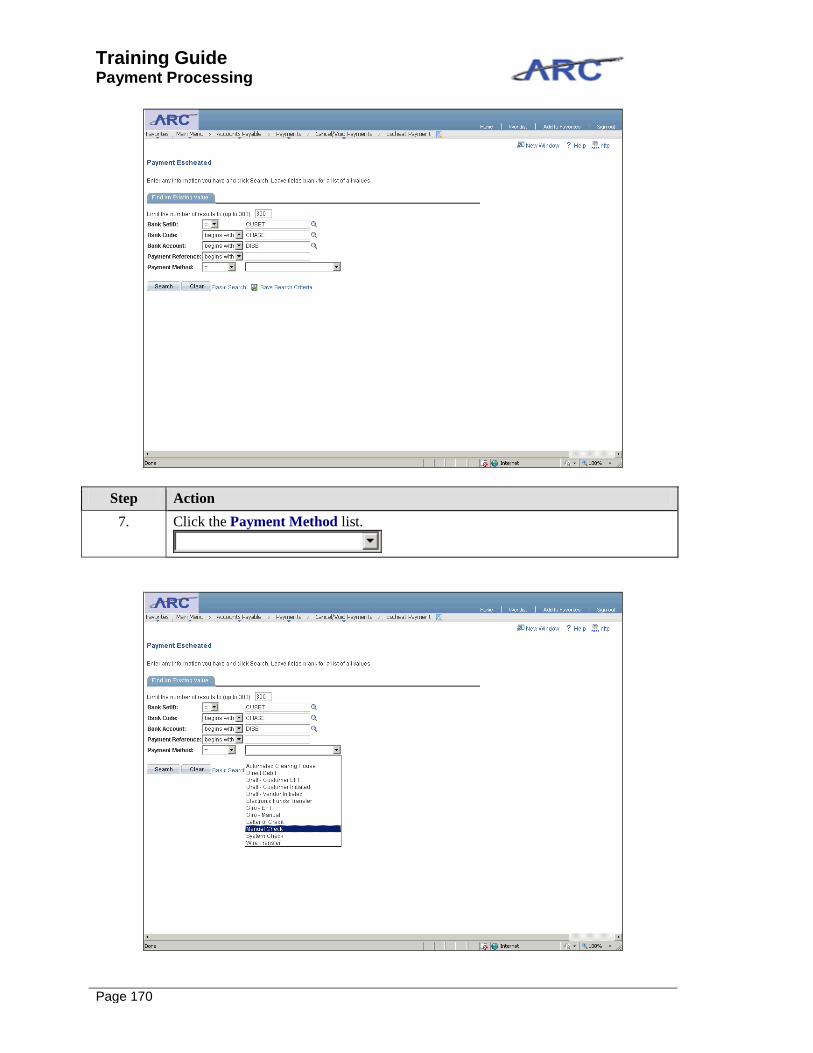
Training Guide
Payment Processing
Page 170
Step Action
7. Click the Payment Method list.

Training Guide Payment Processing
Page 171
Step Action
8. Click the System Check list item.
Step Action
9. Click the Search button.

Training Guide
Payment Processing
Page 172
Step Action
10. Select the payment you'd like to escheat. Click the 0000000026 link.

Training Guide Payment Processing
Page 173
Step Action
11. Select the appropriate options. In this case, we will click the Escheated
Check option.
Step Action
12. Click the Save button.
Note: The Payment status is then updated to Escheated and the escheated date is
record.

Training Guide
Payment Processing
Page 174
Step Action
13. You can verify in the Payments Inquiry that payments have been escheated. Click
the Accounts Payable button.

Training Guide Payment Processing
Page 175
Step Action
14. Click the Review Accounts Payable Info menu.

Training Guide
Payment Processing
Page 176
Step Action
15. Click the Payments menu.
Step Action
16. Click the Payment menu.

Training Guide Payment Processing
Page 177
Step Action
17. Click in the Reference field.

Training Guide
Payment Processing
Page 178
Step Action
18. Enter the desired information into the Reference field. Enter "0000000026".
Step Action
19. Click the Search button.

Training Guide Payment Processing
Page 179
Step Action
20. Click the button of the scrollbar.

Training Guide
Payment Processing
Page 180
Step Action
21. You can see that the check has been escheated (it is the check we escheated
manually). For the escheatment batch process, you will see that the payment has
been escheated via the payment inquiry.
Step Action
22. You have successfully escheated a payment. You can now select the next lesson in
the course.
End of Procedure.

Training Guide Payment Processing
Page 181
Bank Reconciliation This is the Bank Reconciliation lesson of the Payment Processing course. Upon completion of
this lesson, you will be able to:
Run the automatic bank reconciliation process and the semi-manual reconciliation
process through reconciling a redeemed check file sent from the bank with system
transactions
View and resolve exceptions from the automatic bank reconciliation process
Estimated time needed to complete lesson: 30 minutes
Training Guide
Payment Processing
Page 182
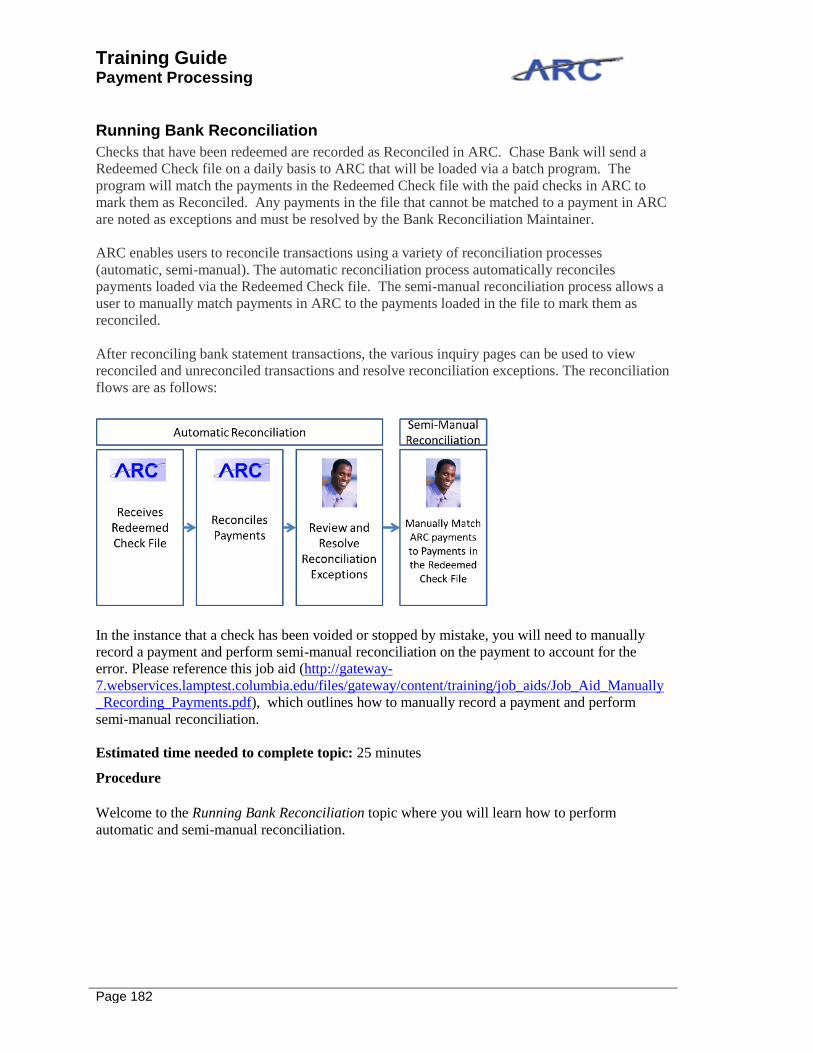
Running Bank Reconciliation
Checks that have been redeemed are recorded as Reconciled in ARC. Chase Bank will send a
Redeemed Check file on a daily basis to ARC that will be loaded via a batch program. The
program will match the payments in the Redeemed Check file with the paid checks in ARC to
mark them as Reconciled. Any payments in the file that cannot be matched to a payment in ARC
are noted as exceptions and must be resolved by the Bank Reconciliation Maintainer.
ARC enables users to reconcile transactions using a variety of reconciliation processes
(automatic, semi-manual). The automatic reconciliation process automatically reconciles
payments loaded via the Redeemed Check file. The semi-manual reconciliation process allows a
user to manually match payments in ARC to the payments loaded in the file to mark them as
reconciled.
After reconciling bank statement transactions, the various inquiry pages can be used to view
reconciled and unreconciled transactions and resolve reconciliation exceptions. The reconciliation
flows are as follows:
In the instance that a check has been voided or stopped by mistake, you will need to manually
record a payment and perform semi-manual reconciliation on the payment to account for the
error. Please reference this job aid (http://gateway-
7.webservices.lamptest.columbia.edu/files/gateway/content/training/job_aids/Job_Aid_Manually
_Recording_Payments.pdf), which outlines how to manually record a payment and perform
semi-manual reconciliation.
Estimated time needed to complete topic: 25 minutes
Procedure
Welcome to the Running Bank Reconciliation topic where you will learn how to perform
automatic and semi-manual reconciliation.

Training Guide Payment Processing
Page 183
Step Action
1. Click the Banking link to navigate to the reconciliation options.

Training Guide
Payment Processing
Page 184
Step Action
2. Click the Automatic Reconciliation link.
Step Action
3. You will first select the search criteria by which you want to filter the loaded bank
files. As there is only one Bank ID and Account #, these will default and simply
show a "%" symbol. First, click the Date list to select search options.

Training Guide Payment Processing
Page 185
Step Action
4. Click the Date Statement Loaded list item.

Training Guide
Payment Processing
Page 186
Step Action
5. Click in the Date Thru field to continue to filter the date.
Step Action
6. Enter the desired information into the From field. Enter "05/29/2012".

Training Guide Payment Processing
Page 187
Step Action
7. Click the Date button.

Training Guide
Payment Processing
Page 188
Step Action
8. You will see there are two files that meet these search criteria. One is in "Ready"
status meaning that it is ready to be reconciled and that not all transactions in the file
have already been reconciled. The other file is in "Complete" status meaning that all
payments within that file have been reconciled.
In addition, you can see how many transactions are in the file and of these
transactions, how many have been reconciled. If not all transactions have been
reconciled, there are exceptions that require semi-manual reconciliation.
Step Action
9. To see the details of the exceptions within a file, click the Exceptions link.

Training Guide Payment Processing
Page 189
Step Action
10. See the details of each exception in the file.

Training Guide
Payment Processing
Page 190
Step Action
11. Click the Return to Automatic Reconciliation link.
Step Action
12. To see the exceptions in a report format, click the Check Box next to the Bank File
you would like to run the exceptions report for.

Training Guide Payment Processing
Page 191
Step Action
13. Click the Reports list.

Training Guide
Payment Processing
Page 192
Step Action
14. Select the information you'd like to see in the report. Click the Exceptions list item.
Step Action
15. Click the Run Report button.

Training Guide Payment Processing
Page 193
Step Action
16. Click the OK button.
Training Guide
Payment Processing
Page 194
Step Action
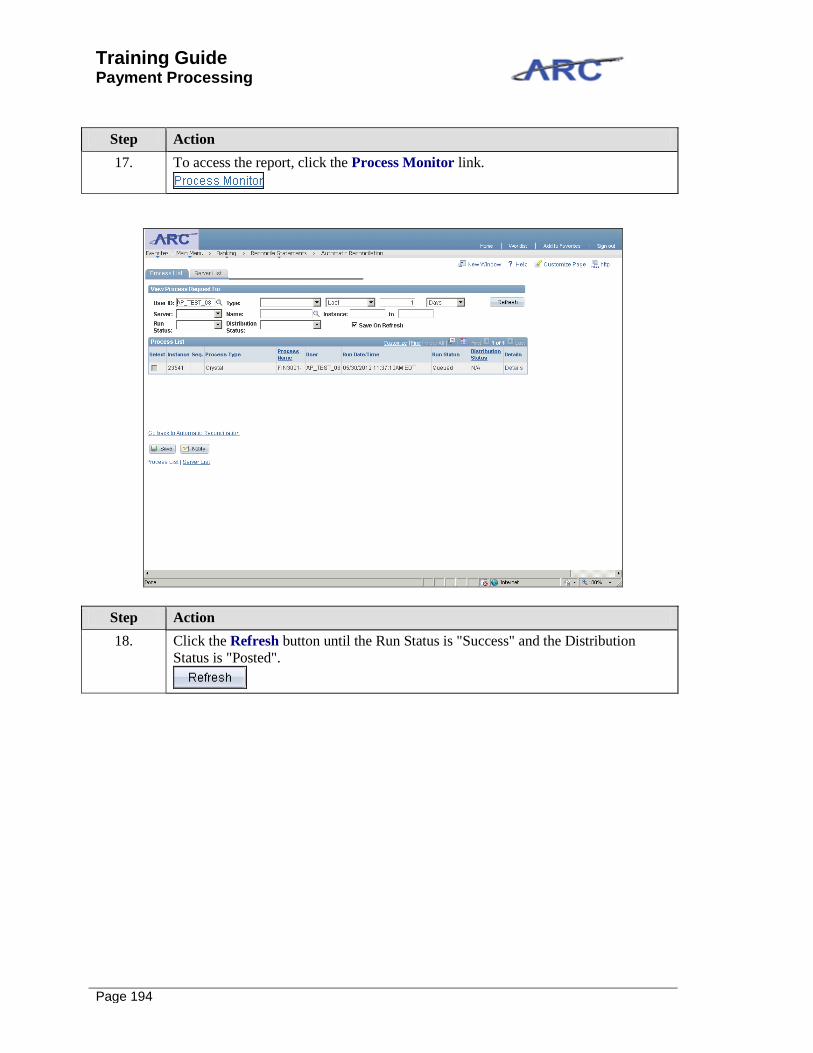
17. To access the report, click the Process Monitor link.
Step Action
18. Click the Refresh button until the Run Status is "Success" and the Distribution
Status is "Posted".

Training Guide Payment Processing
Page 195
Step Action
19. Click the Details link to access the report.
Training Guide
Payment Processing
Page 196
Step Action
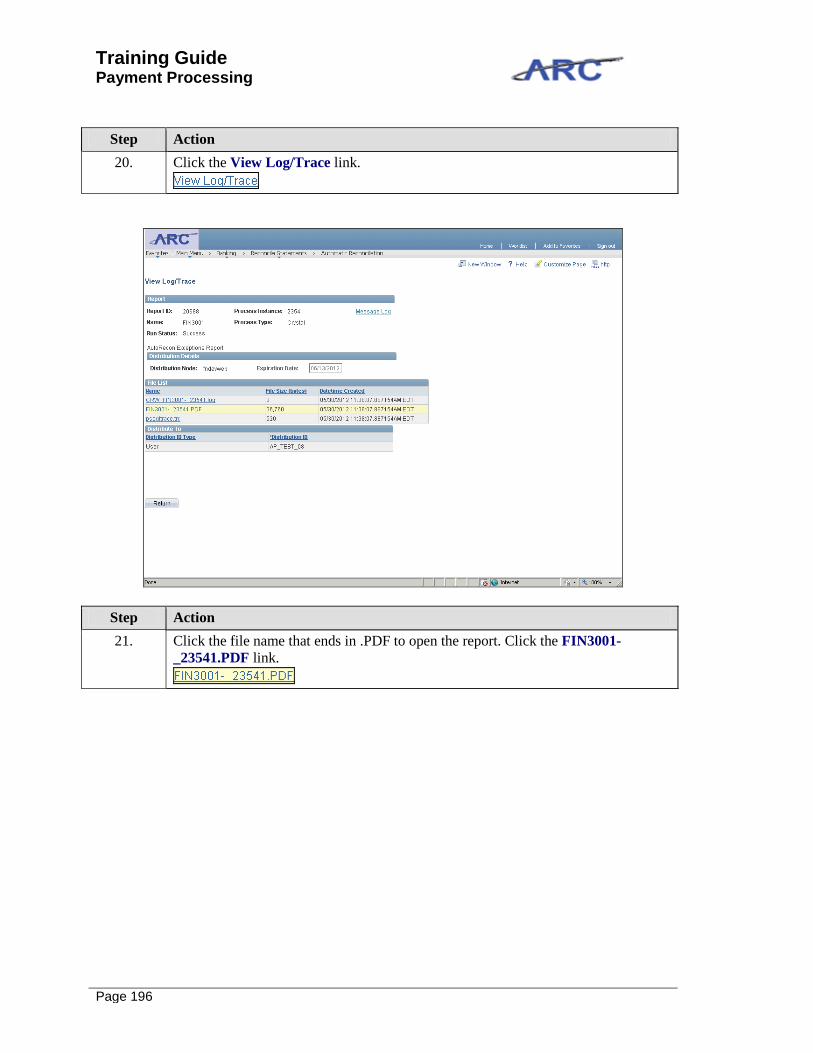
20. Click the View Log/Trace link.
Step Action
21. Click the file name that ends in .PDF to open the report. Click the FIN3001-
_23541.PDF link.

Training Guide Payment Processing
Page 197
Step Action
22. The Report Appears for you the analyze and print.

Training Guide
Payment Processing
Page 198
Step Action
23. Click the Close button to navigate back to ARC.
Step Action
24. Now we will go to the Semi-Manual Reconciliation page to reconcile one of the
exceptions from the Bank File. Click the Reconcile Statements button.

Training Guide Payment Processing
Page 199
Step Action
25. Click the Semi-Manual Reconciliation menu.

Training Guide
Payment Processing
Page 200
Step Action
26. Just like in Automatic Reconciliation, you will narrow the transactions you are
searching for by using the date ranges. Click the From Date button.
Step Action
27. Click the 1 link.

Training Guide Payment Processing
Page 201
Step Action
28. Click the Search button.

Training Guide
Payment Processing
Page 202
Step Action
29. You will then look for transactions that align with in their amounts and reference
IDs. We saw through the exception detail that Reference ID 0000000039 was an
exception, and it is in both the Bank Transactions and System Transactions lists, so
we can match them and reconcile this transaction manually. Click
the 0000000039 option.
Step Action
30. You will click the corresponding reference ID in the System Transactions list. Click
the 0000000039 option.

Training Guide Payment Processing
Page 203
Step Action
31.
Click the button of the scrollbar.
Training Guide
Payment Processing
Page 204
Step Action
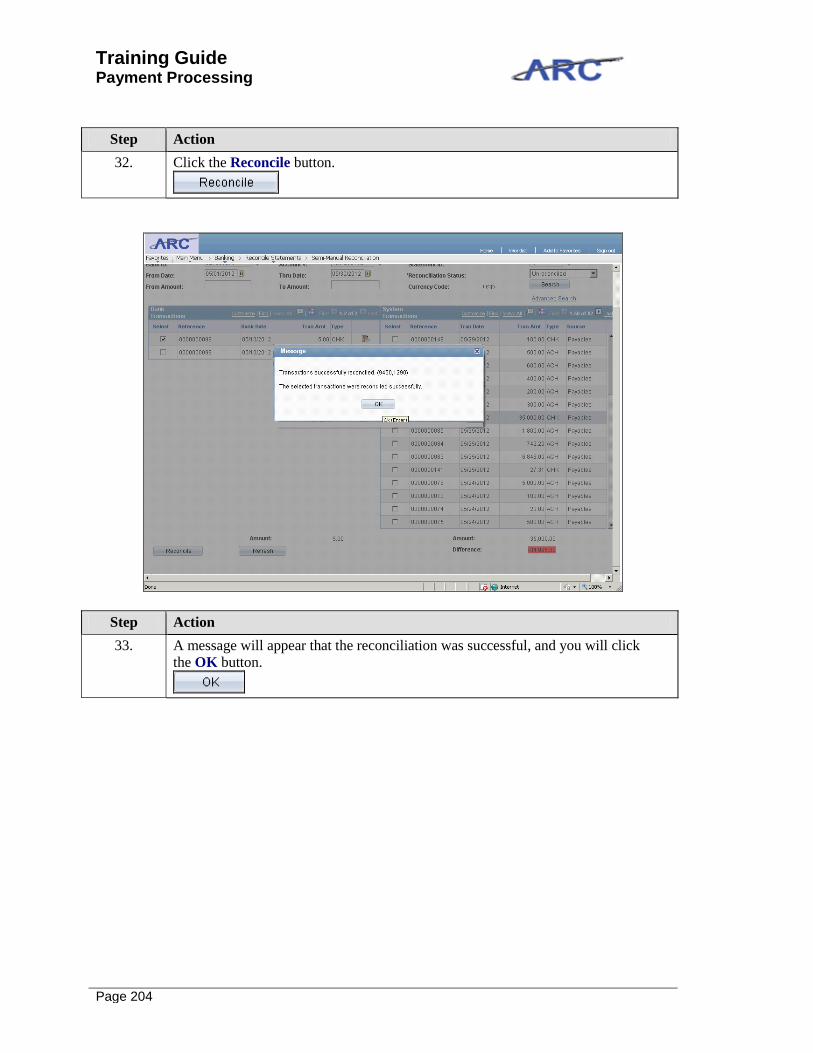
32. Click the Reconcile button.
Step Action
33. A message will appear that the reconciliation was successful, and you will click
the OK button.

Training Guide Payment Processing
Page 205
Step Action
34. You have successfully reconciled transactions using automatic and semi-manual
reconciliation. You can now select the next topic.
End of Procedure.

Training Guide
Payment Processing
Page 206
Incorrect Bank Transactions
On occasion, you may receive a file from the bank that contains incorrect
transactions/information (duplicate file, etc.) These transactions cannot be reconciled in ARC. In
this case, you will need to submit a Incident to the help desk, so that they can remove the
incorrect transactions using an "SQL Delete". If you observe incorrect transactions in a bank file,
you will log an Incident with the following information:
Bank Statement ID
Payment Ref ID
Redeem Date
Amount
Reconciliation Status
Any Additional Comments
Please reference this job aid (http://gateway-
7.webservices.lamptest.columbia.edu/files/gateway/content/training/job_aids/Job_Aid_SQL_Dele
te_Incident.pdf) for additional detail on how to log an Incident using the Service-Now tool
(https://columbia.service-now.com/ (https://columbia.service-now.com/)).

Training Guide Payment Processing
Page 207
Course References Below is a list of all the job aids referenced throughout this course:
1. Getting Started with the Web- Based Training Tool (http://gateway-
7.webservices.lamptest.columbia.edu/files/gateway/content/training/job_aids/Job_Aid_G
etting_Started_With_the_Web_Based_Tool.pdf)
2. Recording Manual Payments (http://gateway-
7.webservices.lamptest.columbia.edu/files/gateway/content/training/job_aids/Job_Aid_M
anually_Recording_Payments.pdf)
3. Logging an Incident for an SQL Delete (http://gateway-
7.webservices.lamptest.columbia.edu/files/gateway/content/training/job_aids/Job_Aid_S
QL_Delete_Incident.pdf)
4. Payment Processing Training Guide (http://gateway-
7.webservices.lamptest.columbia.edu/files/gateway/content/training/Training_Guides/Pay
ment_Processing_TRAIN.pdf)

Training Guide
Payment Processing
Page 208
Knowledge Assessment If you are taking this course to obtain security access to one of Columbia University’s Financial
Systems, please ensure you have completed the following:
1. Security Application Request: All security roles must be requested by the user through
the Columbia University Financial Systems Security Application which can be found in
the Service Catalog of ServiceNow (https://columbia.service-now.com/
(https://columbia.service-now.com/)). Note: All security roles must be approved by both
the user’s manager and Department Security Administrator (DSA) for the School/Admin
Unit to which access is being requested.
2. Training Requirements: Security access will only be granted once all training
requirements have been fulfilled. After a user has reviewed all of the applicable training
material for a particular role, users must complete the Knowledge Assessment associated
with that training course with a score of 90% or higher. The Knowledge Assessments
can be found in New CourseWorks by clicking here
(https://newcourseworks.columbia.edu/samigo-app/servlet/Login?id=f1d3fc4d-5c0c-
4b5d-93d1-4f4bf0030b4a1341421815250). If you have any questions about the training
required for any security role, click here (http://gateway-
7.webservices.lamptest.columbia.edu/files/gateway/content/training/job_aids/Job_Aid_R
ole_to_Course_Directory.pdf) for the Role to Course Job Aid.
If you are taking this course for information purposes only, i.e., you are not requesting a security
role, no Knowledge Assessment is required.