Patton's First Victory - Decision Games | AFTER ACTION REPORT | Patton's First Victory outflanked it...
15
Turn 1 February 20, 1943 Axis Player The Axis side goes first. The game opens with the Axis assault on US II Corps. Rommel is deployed in La Fauconnerie with the 15 th Panzer and some 88’s. The Americans are overex- tended into Sbeitla and Kasserine Pass. German and Italian forces have a fairly solid line on the Algerian border to the north. To the south the Mareth Line is defended by the La Spezia, some marines and Gen. Messe’s assets. Rommel’s force with the 10 th Panzer advances to Bir Mrabatt as 15 th Panzer outflanks that position to the south. The 334 th Division has Rommel’s right at Hadjeb el Aioun. Rommel and the 10 th Panzer attack the American 1 st Armored just west of Bir Mrabatt. The Luftwaffe is called in to provide close support. American P-38s support the defense. Since both sides have air units involved, air-to-air combat is resolved first. The Americans lose; so the P-38 is flipped to its reduced side and is then returned to the Base Box. The Luftwaffe remains for close ground support. Next the ground combat is resolved. The Axis force has –9 in modifiers; so the US 1 st Armored is nearly an auto- matic hit. It flips to its reduced side. During defensive fire the American tanks don’t damage the Axis. The Axis player wins this battle, and the American unit must retreat two hexes (about 40 miles). Unfortunately, it can’t retreat because 15 th Panzer has by E.R. Bickford Production: Lise ’ Patterson © 2011 Decision Games Bakersfield, CA. Patton's First Victory
-
Upload
truongnguyet -
Category
Documents
-
view
216 -
download
1
Transcript of Patton's First Victory - Decision Games | AFTER ACTION REPORT | Patton's First Victory outflanked it...

Turn 1
February 20, 1943
Axis Player
The Axis side goes first. The game opens with the Axis assault on US II Corps. Rommel is deployed in La Fauconnerie with the 15th Panzer and some 88’s. The Americans are overex-tended into Sbeitla and Kasserine Pass. German and Italian forces have a fairly solid line on the Algerian border to the north. To the south the Mareth Line is defended by the La Spezia, some marines and Gen. Messe’s assets.
Rommel’s force with the 10th Panzer advances to Bir Mrabatt as 15th Panzer outflanks that position to the south. The 334th Division has Rommel’s right at Hadjeb el Aioun.
Rommel and the 10th Panzer attack the American 1st Armored just west of Bir Mrabatt. The Luftwaffe is called in to provide close support. American P-38s support the defense. Since both sides have air units involved, air-to-air combat is resolved first. The Americans lose; so the P-38 is flipped to its reduced side and is then returned to the Base Box. The Luftwaffe remains for close ground support.
Next the ground combat is resolved. The Axis force has –9 in modifiers; so the US 1st Armored is nearly an auto-matic hit. It flips to its reduced side. During defensive fire the American tanks don’t damage the Axis. The Axis player wins this battle, and the American unit must retreat two hexes (about 40 miles). Unfortunately, it can’t retreat because 15th Panzer has
by E.R. Bickford
Production: Lise’ Patterson
© 2011 Decision Games
Bakersfield, CA.
Patton's First Victory

A2 | AFTER ACTION REPORT |
Patton's First Victory
outflanked it and has a ZOC; so the American unit is eliminated instead.
Next, 15th Panzer attacks US 1st Infantry at Kasserine Pass. Again, the Luftwaffe is used to support the combat, and USAF P-38s support the defenders. The Luftwaffe again wins the air-to-air combat, and the reduced P-38s return to base. Then 15th Panzer rolls over US 1st Infantry, which retreats back toward Tebessa.
The 334th Infantry attacks the US 3rd Division at Sbeitla. A Luftwaffe support asset is employed, and the Allies counter with a Spitfire unit. The RAF wins the air combat, and the Axis air returns to base reduced. Nonetheless, the 334th wins the ground combat, but the US 3rd can’t retreat and is eliminated instead. Rommel’s break-through allows another attack. Both sides employ air assets again, and they
battle to a draw. Both are reduced and return to base without providing close support. The 10th Panzer battles the US 9th Division. Both sides inflict hits. The 9th is flipped to its reduced side, and the German 88s are reduced as well.
Allied Player Turn
Gen. Fredendall’s II Corps has been whacked by the Axis. The US II Corps falls back from Kasserine. The Axis has inflicted serious damage, as two divisions are now out of commis-sion. In the southern sector, Gen. Montgomery’s army advances into position against the Mareth Line. That’s a tough fortified location, as the hex side yields a +6 combat modifier.
In the north, Gen. Anderson launches an attack against the 164th Division. Anderson’s 6th Armored is supported by
artillery and air assets. The Germans counter with the Luftwaffe flying close support. The RAF wins the air battle and the air assets provide –2 DRM. Both sides score a hit in the land battle. The 164th is flipped to its reduced side, and the British sacrifice the artillery assets. Due to the draw the Axis unit doesn’t retreat.
Next the French attack the Italian Bersaglieri at the village Rhordimoou. The Allies send US air support in hope of drawing off the last Axis air unit and thus freeing Monty up for his attack in the south, but the Axis player keeps the Italian air assets in reserve. Despite the advantages, Gen. Juin is repulsed. The French artillery assets are sacrificed.
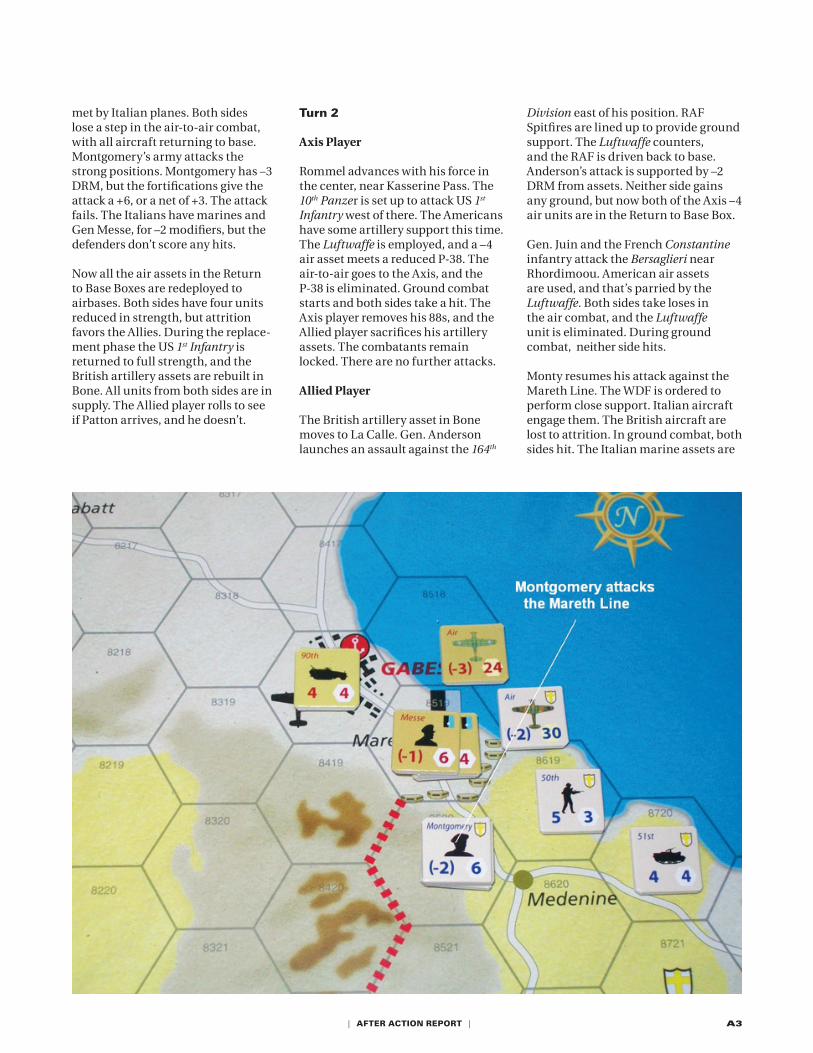
Monty launches an attack against the Mareth Line. The WDF flies in for ground support, but they’re
| AFTER ACTION REPORT | A3
met by Italian planes. Both sides lose a step in the air-to-air combat, with all aircraft returning to base. Montgomery’s army attacks the strong positions. Montgomery has –3 DRM, but the fortifications give the attack a +6, or a net of +3. The attack fails. The Italians have marines and Gen Messe, for –2 modifiers, but the defenders don’t score any hits.
Now all the air assets in the Return to Base Boxes are redeployed to airbases. Both sides have four units reduced in strength, but attrition favors the Allies. During the replace-ment phase the US 1st Infantry is returned to full strength, and the British artillery assets are rebuilt in Bone. All units from both sides are in supply. The Allied player rolls to see if Patton arrives, and he doesn’t.
Turn 2
Axis Player
Rommel advances with his force in the center, near Kasserine Pass. The 10th Panzer is set up to attack US 1st Infantry west of there. The Americans have some artillery support this time. The Luftwaffe is employed, and a –4 air asset meets a reduced P-38. The air-to-air goes to the Axis, and the P-38 is eliminated. Ground combat starts and both sides take a hit. The Axis player removes his 88s, and the Allied player sacrifices his artillery assets. The combatants remain locked. There are no further attacks.
Allied Player
The British artillery asset in Bone moves to La Calle. Gen. Anderson launches an assault against the 164th
Division east of his position. RAF Spitfires are lined up to provide ground support. The Luftwaffe counters, and the RAF is driven back to base. Anderson’s attack is supported by –2 DRM from assets. Neither side gains any ground, but now both of the Axis –4 air units are in the Return to Base Box.
Gen. Juin and the French Constantine infantry attack the Bersaglieri near Rhordimoou. American air assets are used, and that’s parried by the Luftwaffe. Both sides take loses in the air combat, and the Luftwaffe unit is eliminated. During ground combat, neither side hits.
Monty resumes his attack against the Mareth Line. The WDF is ordered to perform close support. Italian aircraft engage them. The British aircraft are lost to attrition. In ground combat, both sides hit. The Italian marine assets are

A4 | AFTER ACTION REPORT |
Patton's First Victory
eliminated, and the British artillery is destroyed. The Mareth Line holds.
The air units of both sides return to on-map airbases. The Axis replacement is used to rebuild an air asset. The Allies rebuild a P-38 air asset and a British artillery asset. The airplanes are deployed at Bone and the artillery at Medenine. Both sides pass their supply checks. Gen. Fredendall remains in charge of the American II Corps. Note: though the Fredendall asset has no DRM, it still has value as it can be used to take a step loss.
Turn 3
Axis Player
The 164th falls back to the village of Djebel Abiod. Broich advances from Bizerte, moving westward to manage
the Axis position on the northern flank. The Axis player decides not to make any attacks this turn. Since the Allies need to capture all five of the major ports in Tunisia, the Axis strategy is mostly one of delay. Rommel used his early advantage to give II Corps a bloody nose, but now it’s time to focus on defense and delay.
Allied Player
Gen. Anderson and British 6th Armored renew the attack against the Axis defenses near La Calle. American P-38s attempt to support the attack while the Luftwaffe supports the defense. The Allied planes are out-gunned and return to base reduced. Nonetheless, Anderson’s attack continues. Broich’s forces defend in the hills, which negate the attackers’ DRM. Neither side manages a hit.
The Allied player wants to attrit the Axis air support, and tempts them with attacks in the center. Fredendall and the 34th Infantry attack KG Pfeiffer to the south of La Kef. American air support is employed, and is countered by the Luftwaffe. The US planes are defeated and return to base. The ground combat has no effect.
Montgomery’s army makes another attempt to breakthrough the Mareth Line. The RAF provides air support, which is defeated by a powerful Luftwaffe presence. Both sides take hits during the ground combat phase. Gen. Messe’s headquarters is eliminated and the British forfeit their artillery assets. All the expended air units are returned to on-map bases. The Axis takes replacements for 164th Infantry Division. The Allied player expends two replacements to return an RAF unit to Bone and a British artillery
Italian troops put upeffective resistance

| AFTER ACTION REPORT | A5
unit to Medenine. Both sides supply lines are safe. Patton arrives to take command of II Corps. That increases US firepower and leadership.
Turn 4
Axis Player
The Axis remains in a strong defensive position to the west, though the Italians seem to be ready to crumble in the Mareth Line. We’ll see how the Allies do in penetrating the Axis defense. The Mareth Line is a tough position, as there is no way to outflank it. That being said, once Eighth Army breaks through, there’s a wide open route into the Axis flank.
Allied Player
Gen. Anderson attacks Broich’s unit outside El Calle. Soon British Spitfires
are roaming the skies. The Luftwaffe based at Bizerte also goes aloft and suppresses the RAF. Anderson’s assets are sacrificed, and the Broich unit is flipped to its reduced side. The Axis aircraft goes to the Return to Base Box. Pressing the attack, British 1st Infantry with artillery support attacks Broich’s reduced troops. The RAF supports the attack and tangles with enemy planes. The Spitfires are defeated again, and the ground attack is stopped in its tracks. British 1st Infantry Division takes a step loss.
The French attack at Rhordimoou. The US provides air support. The Luftwaffe loses the air battle this time, and the Axis air unit is eliminated. The ground attack starts. The Constantine Division is led by Gen. Juin with American planes flying close support. The attack doesn’t go well, and the French infantry takes a step loss.
Patton launches an attack against KG Pfeiffer near Kaloo Djerda. P-38s tangle with the Luftwaffe and the USAF prevails. The German KG takes a hit and is forced to retreat. Patton wins a breakthrough. A second attack is launched against KG Gruen. American air support wins again, and another Luftwaffe unit is eliminated. KG Gruen is reduced and forced to retreat. Patton captures Kaloo Djerda.
On the Mareth Line, Montgomery’s army resumes its attack. Both sides contest air superiority, but that’s get-ting to be costly for the Axis. US P-38s carry the day again, and the powerful Luftwaffe unit is reduced and returns to base. In the ground battle the Italian La Spezia Division is reduced a step and forced to retreat. The British achieve a breakthrough (due to Monty) and make an attack against the port city of Gabes. There’s a German unit there.

A6 | AFTER ACTION REPORT |
Patton's First Victory
Photo 7 T4
The Allies have local air superiority and the Axis air assets have all been used. Both sides take a step loss. The German 90th Division is flipped at Gabes, and the British give up the artillery asset.
The air units return to the map. The Luftwaffe has only three air units at this time. One goes to the base at Bizerte, a second to Tunis, and the third to Sousse. The Allies air units also return to bases on the map. The Allies have eight air units in play, though seven of them are at reduced strength. The air battles have weakened the Axis. Both sides expend replacements. The Axis player brings his 88s (artillery assets) back into play at Sbeitla. US 1st Armored Division is brought back to full strength, and Anderson’s HQ is reorganized in Bone. Both sides remain in supply.

| AFTER ACTION REPORT | A7
Turn 5
Axis Player
KG Broich falls back to Bedja. Since the unit is reduced, this will allow it to potentially receive a replace-ment. Meanwhile, the 164th Infantry advances to the hills north of Souk el Arba. Next, 10th Panzer is pulled out of Kasserine, and it swings around to the hills east of Kaloo Djerda. Rommel joins 10th Panzer’s move. Then the 88s move to the hills north of Sbeitla to protect KG Gruen.
In the south the 90th Division leaves Gabes and drives along the highway to the plains south of Sousse. Then the Italian Centauro moves to Gabes, while the La Spezia redeploys to Sfax.
Allied Player
In the south Montgomery prepares for another round of combat with the hope of a breakthrough. Patton’s II Corps will attack in the center, while Anderson will attempt to make gains in the north.
The first battle resolved is British Eighth Army against the Italian tanks at Gabes. Both sides use air power and all those planes abort. The RAF unit is eliminated and the Luftwaffe unit is reduced. The ground combat is incon-clusive, as neither side inflicts a hit.
In the north near Le Calle, Anderson and 6th Armored attack the 164th Division. The American P-38s are eliminated and the Luftwaffe sup-ports the defenders. Lacking close support, the British attack fail and
their artillery assets are destroyed. The British 78th Infantry with artillery support attacks the Bersaglieri in Rhordimoou. The RAF flies in some air support. The Axis player has only one more air unit available, but he saves it for a more important defensive task. The Italians take a hit and are forced to retreat east of Souk el Arba. The 78th Infantry remains in place.
Gen. Juin and the Tunisian Infantry launch an attack against the Italian Superga Division. The Italians have artillery support. The US sends in P-38s that go uncontested. The attack has no effect, and both sides remained locked. Patton orders 1st Armored to attack Superga from the south. P-51s support the attack, but they’re intercepted by Bf-109s. The Luftwaffe wins and the P-51s abort. The ground

A8 | AFTER ACTION REPORT |
Patton's First Victory
battle devolves into an exchange. The II Corps artillery is reduced and the Italian artillery is eliminated.
The air units all return to on-map bases. The disparity has lessened as the Axis still has three air units while the Allies have five. The Axis player uses his replacement point to replace an air asset at Sousse. The Allies replenish Gen. Anderson’s headquarters and a squadron of P-38s. All forces are supplied. The Allies weren’t aggressive in their advance after combat. The Axis player can’t trade loss for loss, as the Allies have 2:1 replacements. As air bases are captured, the Axis player has further limitations on how many air units he can rebuild.
Turn 6
Axis Player
The 164th falls back to Tabarka. Then the Superga moves back a hex to the east of La Kef. Rommel repositions the panzers in the area of Kasserine and Kaloo Djerda. The Axis player has a strong posi-tion from Tabarka south through Kasserine. No attacks, no attrition.
Allied Player
The Allies advance to contact. Anderson and British 6th Armored attack the 164th at Tabarka. The RAF loses the air battle, leaving the Luftwaffe in sup-port of the 164th. Both sides exchange losses in the ground combat. The 164th is flipped to its reduced side and Anderson’s support asset is eliminated.
Next, the British 78th Infantry Division with artillery attacks the Superga Division. The RAF drives away the Luftwaffe, which is eliminated after the air-to-air fight. The ground combat is a stalemate; neither side hits. Gen. Juin and the Tunisian Division in Le Kef attack Superga. The Luftwaffe wins the air battle, and the American planes are eliminated. The French lose contact on the ground and Juin’s HQ is eliminated.
Patton and 1st Armored attack 10th Panzer. The US flies P-38s uncontested. Both sides ground forces are hit. The American artillery asset is eliminated and the Rommel unit flees. The 1st Armored Division remains in contact with 10th Panzer.
At Gabes, Montgomery attacks the Italian Centauro Division. A US air unit (-3) engages a Luftwaffe unit (-4)

| AFTER ACTION REPORT | A9
and wins. The Luftwaffe loses a step and aborts. Montgomery attacks the Italians at Gabes. Both sides get a hit in the land combat. The Italian armor is reduced and the Montgomery asset is removed.
The air units redeploy to on-map bases. The Axis returns the Rommel unit to the map in Hadjeb Aioun. The Allies bring Montgomery back at Medenine along with an RAF asset at Bone. Both sides maintain their supply lines.
Turn 7
Axis Player
The Axis player decides he needs to give a little ground due to his increasingly brittle line. Superga falls back a few miles. That prevents them from being surrounded with no retreat path. Rommel moves to rejoin 10th Panzer. There are no attacks. The Axis is strictly on the defensive now. Nonetheless, the Allies haven’t captured any of the ports yet; so that’s a good thing for the Axis player.
Allied Player
British 46th Infantry Division advances to Le Calle, which positions it on 6th Armored Division’s left. Then 78th Infantry moves to Souk el Arba with British artillery assets. The French cross the river east of La Kef. US 1st Armored and 1st Infantry both remain in position on the road net at Kaloo Djerda. The 2nd Armored Division shifts to the area west of Kasserine, with 34th Infantry to its right.
Montgomery’s army resumes its attempt to capture Gabes. That attack is supported by the RAF, but the move is countered by the Luftwaffe. The RAF wins; so the Axis air asset is flipped and returns to the Base Box. Despite all those advantages, Monty and his armor are repulsed. The asset unit is sacrificed to satisfy the step loss, and Centauro remains in Gabes.
British 6th Armored Division attacks the 164th Infantry at Tabarka. Both sides contest the air space, and the US is driven off. Neither player scores a hit in the land battle. The 46th Infantry
also attacks the 164th with US air support. That’s also a stalemate.
Patton and 1st Armored Division attack 10th Panzer near Kaloo Djerda. The US flies in air support, which is countered by the Luftwaffe. The P-38s prevail, and the Luftwaffe unit is eliminated. The US 1st Armored continues with the land portion of the battle, and both sides take losses. The Patton assets and the Rommel assets are eliminated, while 1st Armored and 10th Panzer stare each other down.
The Allies have one air asset avail-able, which can’t be countered by the Axis player. British 50th Infantry attacks Gabes with US air support. Both sides take a hit. The 50th Infantry loses a step, and Centauro is reduced to a battlegroup. Gabes, however, remains in Italian control.
The air assets return to bases. The Allies have four units and the Axis are down to two. The Rommel unit is returned to play at Sbeitla. The Allies replace the Patton asset and the US II Corps artillery at Tebessa.
The Allies aren’t doing well. British Eighth Army has bogged down get-ting through the Mareth Line and in capturing Gabes. Besides that,
Patton is facing the strongest German units in the center, and hasn’t been able to break through either.
Turn 8
Axis Player
Rommel moves back to 10th Panzer east of Kaloo Djerda. The 88s are moved there as well. The Axis player sees a couple potential attacks, but decides it’s better to remain on the defensive. There’s an air support disparity; so an attack is problematic for the Axis.
Allied Player
The Allies resume the attack and realize time is running out. British 6th Armored Division attacks 164th Division at Tabarka. The RAF joins the battle and the Luftwaffe counters. The RAF is reduced and aborts. The British are repulsed and the 6th Armored is flipped to its reduced side.
British 7th Armored presses forward against the Italian battlegroup at Gabes. Allied air support wins the battle against the Luftwaffe, which is subsequently eliminated. The British armor fails to make any gains. The 51st Infantry also attempts an attack at Gabes. There’s no resistance from
A10 | AFTER ACTION REPORT |
Patton's First Victory
enemy aircraft. This time the Italians fold. The 51st captures Gabes.
Then US 2nd Armored Division attacks the 334th Infantry at Kasserine. The US has Patton and artillery in support. Both sides take a step loss. The 334th is reduced and the US artillery is flipped as well.
In a final attack, British 46th Infantry fails in its effort against the weakened 164th at Tabarka. The British force is reduced in place. The air units return to base. The Allies have four air units to the Axis player’s one. The Axis player adds an air asset (-4) while the Allies bring back Montgomery at Gabes and a US air asset. All forces remain supplied.
Turn 9
Axis Player
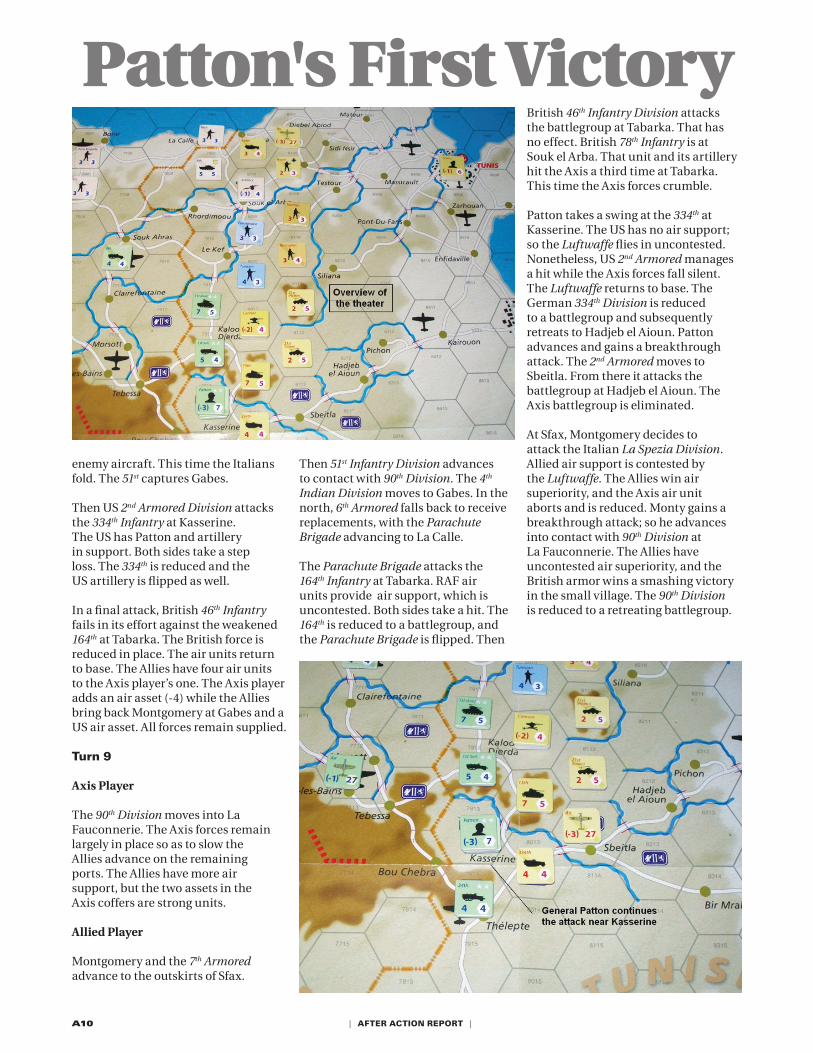
The 90th Division moves into La Fauconnerie. The Axis forces remain largely in place so as to slow the Allies advance on the remaining ports. The Allies have more air support, but the two assets in the Axis coffers are strong units.
Allied Player
Montgomery and the 7th Armored advance to the outskirts of Sfax.
Then 51st Infantry Division advances to contact with 90th Division. The 4th Indian Division moves to Gabes. In the north, 6th Armored falls back to receive replacements, with the Parachute Brigade advancing to La Calle.
The Parachute Brigade attacks the 164th Infantry at Tabarka. RAF air units provide air support, which is uncontested. Both sides take a hit. The 164th is reduced to a battlegroup, and the Parachute Brigade is flipped. Then
British 46th Infantry Division attacks the battlegroup at Tabarka. That has no effect. British 78th Infantry is at Souk el Arba. That unit and its artillery hit the Axis a third time at Tabarka. This time the Axis forces crumble.
Patton takes a swing at the 334th at Kasserine. The US has no air support; so the Luftwaffe flies in uncontested. Nonetheless, US 2nd Armored manages a hit while the Axis forces fall silent. The Luftwaffe returns to base. The German 334th Division is reduced to a battlegroup and subsequently retreats to Hadjeb el Aioun. Patton advances and gains a breakthrough attack. The 2nd Armored moves to Sbeitla. From there it attacks the battlegroup at Hadjeb el Aioun. The Axis battlegroup is eliminated.
At Sfax, Montgomery decides to attack the Italian La Spezia Division. Allied air support is contested by the Luftwaffe. The Allies win air superiority, and the Axis air unit aborts and is reduced. Monty gains a breakthrough attack; so he advances into contact with 90th Division at La Fauconnerie. The Allies have uncontested air superiority, and the British armor wins a smashing victory in the small village. The 90th Division is reduced to a retreating battlegroup.

| AFTER ACTION REPORT | A11
All of the air units return to base. The Axis places one air asset in Bizerte and the other in Tunis. The Allies have four air assets returning to base and one that wasn’t used. The Axis replacement is used to bring an air unit back into play. The Allies add replacements to 6th Armored Division, which returns it to full strength. Also, Anderson’s HQ is brought back into play. Rommel is nearly cut off, but his force is covered by friendly ZOC. The Allies have two of the five ports.
Turn 10
Axis Player
Rommel’s forces are in a bit of a mess, as he was probably defending forward too long; or perhaps Patton’s breakthrough created the situation. It’s difficult to fall back due to the
locking ZOC. In fact, 15th Panzer is really stuck unless it can inflict a loss, because it has no retreat path. Rommel and the 88s attach to 15th Panzer to make a counterattack to weaken US 2nd Armored, which has them pinned.
Since the attack is important, the Luftwaffe is called in to provide support. If the air unit survives, it will almost give the panzers an automatic hit. The US wins the air superiority battle and the Luftwaffe aborts. Despite the modifiers, 15th Panzer fails to make a hit. The Americans gain a hit against Rommel, and the 88s are flipped to their reduced side. The odds were with the Axis to at least split the results with the defenders. Now the Rommel asset and the artillery are in danger.
Allied Player
Montgomery and 7th Armored Division advance to Sousse, with 2nd New Zealand Division on his right. The 50th and 51st Infantry Divisions advance on the left to La Fauconnerie, and the 4th Indian moves toward Bir Mrabatt.
The Parachute Brigade marches along the coast toward Bizerte. Anderson and 6th Armored Division move to Djebel Abiod. The 78th Infantry with British artillery deploy at the village of Bedia. The 46th Division advances to Tabarka, and the 1st goes to Souk el Arba. Both the French infantry divisions advance to maintain pressure on the Axis center. US II Corps moves to surround Rommel’s panzers near Hadjeb el Aioun.

A12 | AFTER ACTION REPORT |
Patton's First Victory
The Parachute Brigade attacks Bizerte, which is weakly defended. It’s important to use air whenever possible to force the Luftwaffe to fly. The US supports with an air asset against the Luftwaffe. The Allies win, and the Luftwaffe is eliminated. Bizerte is sub-sequently captured by British ground forces. Next, Anderson launches an attack with 6th Armored against Broich’s force at Sidi Nsir. The RAF provides close support, but the defenders put up a stalwart defense. There’s no effect.
British 78th Infantry attacks Superga at Testour. The British have artillery assets in support, and manage a hit against the Italians. They retreat to the abandoned airbase east of Massicault. Monty’s attack fails against the Italian battlegroup in Sousse. The 2nd New Zealand also stalls out in the flank attack.
Patton and the US 2nd Armored Division launch an all-out attack against Rommel and 15th Panzer near Hadjeb el Aioun. Both sides have air units in the battle, and the Luftwaffe prevails. Both sides score a hit during the ground combat, and the II Corps artillery is wrecked. The German 88s are also destroyed. The rest of II Corps holds back.
In a final attack, British 51st Division targets the German battlegroup at Pichon. Neither side has any air assets available; so there’s only ground combat. The British infantry scores a hit that wipes out the battlegroup. The attackers advance into the village.
All the air units return to base. The Superga adds a replacement step near Tunis. The Allies rebuild the II Corps
artillery and an air asset. Both sides are able to get to their supply lines.
Turn 11
Axis Player
The Axis forces fall back as much as they can to protect their LOC. Their right is weakly held by Broich, KG Pfeiffer and Superga. The British are close to a breakthrough on the left, if it weren’t for the battlegroup holding at Sousse.
Allied Player
The 201st Mobile Group moves to the western side of Sousse to sup-port Montgomery’s main attack. Anderson’s troops in the north move to contact with Broich’s unit.

| AFTER ACTION REPORT | A13
Patton resumes his attack against 15th Panzer. Both sides’ air forces tangle and the Luftwaffe wins this time. The II Corps attack is turned back with heavy casualties. The 1st Armored Division strikes from the flank. That also fails, and the American armor loses a step. At least the Luftwaffe is out of the battle.
At Sousse, Montgomery and 7th Armored renew the investment of the port. Despite being fully supported by the RAF, the Axis position holds. Anderson attacks Broich’s unit with 6th Armored Division supported by Allied air power, and the Axis unit is defeated with no retreat. Anderson earns a breakthrough. Anderson and 6th Armored attack KG Pfeiffer, which is defending behind the river at Massicault. The Axis is defeated again, and Pfeiffer is reduced to a battlegroup that retreats to Zarhouan.
The French skirmish with the Bersaglieri in the center. Eventually the Tunisian Division damages the Italian unit. It’s reduced to a battlegroup and then retreats to Pont du Fans.
The two Luftwaffe units return to Tunis and the nearby air base. The Allied planes also redeploy to the map. The Axis uses a replacement to bring back an artillery unit. The Allies add an air asset and a British
artillery unit. Both sides have supply. Rommel passes his departure die roll and remains with the panzers.
Turn 12
Axis Player
The Axis player continues to withdraw along his LOC. KG Gruen falls back to the Enfidaville. A battlegroup is moved
to block the road to Tunis. Then 10th Panzer redeploys to Pont Du Fans. That leaves 15th Panzer exposed; so Rommel will attempt an attack in the hope of achieving a breakthrough that will allow him to fall back out of EZOC. Rommel calls for air support, with the idea of gaining local air superiority. The US responds with its P-38s, but they fail in their mission. Rommel attacks 4th Indian Division (a weak 3-strength unit). The Axis forces carry the day, and 4th Indian retreats from Kairouon. That allows Rommel to launch a breakthrough, which he will use to fall back on his LOC to Hammamet.
Allied Player
The Allies have only two turns to secure the last two ports, Sousse and Tunis. That’s a tall order. Patton advances with II Corps and attacks what’s left of KG Gruen. The Luftwaffe chases away the US close support, and the Axis forces repulse the attack. But now the Axis has no more airpower available.
Montgomery’s army resumes its attack against Sousse. With air support, this time the defenders are uprooted and Monty gains a breakthrough. The British move and attack KG Gruen. Again the British control the skies and have close

A14 | AFTER ACTION REPORT |
Patton's First Victory
ground support. This time KG Gruen is defeated. With no retreat path, it’s destroyed. The Allies now have three of the five ports. Montgomery’s forces have been painfully slow in making gains from the south.
Anderson zeroes in on the battlegroup deployed at Massicault. Again the Allies have close support aircraft, and the battlegroup is overrun. The British attackers earn a breakthrough and launch an attack to weaken Tunis. The US flies close support. Tunis is defended by the Herman Goering Panzer Division. The British assault is turned back.
Allied air support redeploys to the map. The Luftwaffe can’t return to any on-map airbases, as there are no bases that don’t have EZOC on them. The Axis expends a replacement point
to construct an Italian artillery asset at Hammamet. The Allies bring back the US II Corps artillery and a British artillery asset. Both sides have open supply lines. Rommel remains in play.
Turn 13
Axis Player
The Axis player strengthens Tunis as much as possible for the last turn. Arnim moves to the perimeter while Rommel and the 88s deploy in Tunis to protect the port. There are no attacks, and the Axis has no air units left in range. Figuring the Allies will attack with everything, the Axis player needs to do all he can avoid having to retreat. Up to two assets can stack with a unit. The Hermann Goering is a strong unit; with Rommel (-3) and the 88s (-2) the defense is formidable.
Allied Player
Montgomery starts to move around the Axis flank, leaving Enfidaville. Patton moves into the village behind Monty. Zarhouan is defended by a strong unit, 15th Panzer, which is supported by the remaining Italian artillery. Patton strikes first. He has close air support. Both sides take a hit, and the Italian artillery is destroyed. The US II Corps artillery is weakened a step. There’s no breakthrough.
North of Tunis, Anderson and 6th Armored attack Tunis. That’ s a long shot. The RAF flies in Spitfires for ground support. Anderson also has British artillery assets. He needs a die roll of nine or less to hit. He rolls a nine. The Axis returns fire. That can’t miss unless they roll a 12, due to the modifiers: hit.

| AFTER ACTION REPORT | A15
Montgomery is on 15th Panzer’s left, and he chooses to attack the artillery that was moved out of Tunis to make room for the 88s. This was a tactical mistake by the Axis player, as Monty has a fair chance at a breakthrough that will allow another attack on Tunis. The artillery is easily dispatched, and 7th Armored does in fact achieve a breakthrough, advancing to the outskirts of Tunis. The RAF is called in for close support. Both sides achieve a hit; so the attack stalls.
In the end the Allies have four of the five ports, while the Axis holds onto Tunis. That gives the Axis the victory, as the Allies need to capture all the ports for a win. Montgomery’s failure to breakthrough the Mareth Line and then capture Gabes in a timely way hurt the Allies immensely. Also, Patton was neutralized by continuing to focus on attacking Rommel and 10th Panzer and 15th Panzer Divisions, which proved to be a match for US II Corps.