PATS 1.0 Installation Guide for IRM Staff · Web viewTitle PATS 1.0 Installation Guide for IRM...
33
PATIENT ADVOCATE TRACKING SYSTEM (PATS) INSTALLATION GUIDE FOR IRM STAFF Patch QAC*2.0*19 March 2007 Revised October 2011;
Transcript of PATS 1.0 Installation Guide for IRM Staff · Web viewTitle PATS 1.0 Installation Guide for IRM...

PATIENT ADVOCATE TRACKING SYSTEM (PATS)
INSTALLATION GUIDE FORIRM STAFF
Patch QAC*2.0*19
March 2007
Revised October 2011;

Patient Advocate Tracking System (PATS)
Department of Veterans AffairsOffice of Enterprise Development (OED)
Veterans Health Information Technology (VHIT)
ii PATS Installation Guide for IRM Staff 1.2 Rev. 07-10-10

Patient Advocate Tracking System (PATS)
Revision History
The following table displays the revision history for this document.
Date Revision Description Author
03/15/07 Initial Susan Bunker
Tami Winn, developer
Don Morgan, PM
7/12/07 1.1 Updated Sections 2.5 and 2.10. The Patient Advocate who downloads the station number list also migrates the data to PATS.
Susan Bunker
Tami Winn, developer
Don Morgan, PM
8/09/09 1.2 Updated Section 2.4. Summarized role definitions in a table.
Changed sequence of setup sections to setup download list of station numbers and migrate data to PATS; setup pre-migration cleanup; setup SIT, SRCU, and VU users.
Updated Sections 2.5, 2.6, 2.7. Summarized security key, options, divisions, and URLs by role.
Updated Sections 2.7. Warning that individuals are assigned only one role (SIT, SRCU, VU).
Added Quick Reference Chart with security key, options, divisions, and URLs by role, Section 2.9.
Susan Bunker
Michaele Mahoney, PM
10/10/2011 1.3 Revised the document in relation to a name change of an EIE group
Arsen Mikhailutsa,
developer
Rev. 10-10-11 PATS Installation Guide for IRM Staff 1.2 iii

Patient Advocate Tracking System (PATS)
iv PATS Installation Guide for IRM Staff 1.2 Rev. 10-10-11

Patient Advocate Tracking System (PATS)
Table of Contents
About This Document.......................................................................................................vii
Chapter 1 – Before You Begin to Install and Set up PATS...........................................1
1.1 VistALink Connector Proxy Users...........................................................................1
1.2 List of Divisions........................................................................................................2
Chapter 2 – Installation Instructions...............................................................................3
2.1 Unload the PATS KIDS Distribution in VistA.........................................................4
2.2 Install the PATS KIDS Distribution in VistA...........................................................5
2.3 Components Installed by the KIDS Build.................................................................7
2.4 Roles Defined............................................................................................................9
2.5 Setup for User Downloading the Station Number List and Performing Data Migration into PATS...............................................................................................10
2.6 Setup for Users Performing Pre-Migration Data Cleanup......................................11
2.7 Setup for Site Information Taker Users, Site Record Control Users, and VISN-Level Patient Advocate Users.................................................................................11
2.8 Setup for National Program Office and Central Office Users................................13
2.9 Setup Quick Reference Chart..................................................................................14
2.10 Download Station Number List to Temporary Global..........................................15
2.11 Assign URL Links to Users..................................................................................15
Rev. 10-10-11 PATS Installation Guide for IRM Staff 1.2 v

Patient Advocate Tracking System (PATS)
vi PATS Installation Guide for IRM Staff 1.2 Rev. 10-10-11

Patient Advocate Tracking System (PATS)
About This DocumentIntroductionThe Patient Advocate Tracking System (PATS) provides a way of documenting and tracking patient-related issues.
This Patient Advocate Tracking System Installation Guide is intended for individuals on the IRM staff who are responsible for installing the PATS application and its related components at field sites. The concepts and step-by-step instructions will help field sites install and configure the PATS application.
PATS will be released by the Project Implementation Office (PIO) in a controlled manner. It is recommended that you wait until you have been notified by the PIO before you install PATS.
Other ResourcesAdditional PATS documentation resources can be found on the PATS Technical Services Project Repository (TSPR) at: http://tspr.vista.med.va.gov/warboard/anotebk.asp?proj=604&Type=Active.
The PATS Installation ProcessInstalling PATS is seven-stage process. Steps 1 – 6 are performed at the EIE. This is intended for your information only.
The IRM staff performs Step 7.
Stage Process Role Performing Task
1 Download the PATS compressed file (bundle) and extract it to a temporary directory at the hosting center.
EIE
2 Install the PATS database at the hosting center. EIE
3 Install the Data Migration application at the hosting center.
EIE
4 Install the Download to VistA application at the hosting center.
EIE
5 Install the PATS application at the hosting center. EIE
6 Install and set up Business Objects Enterprise XI at the hosting center.
EIE
7 Install the PATS KIDS build at the field sites and assign keys, options and divisions to
IRM
Rev. 10-10-11 PATS Installation Guide for IRM Staff 1.2 vii

Patient Advocate Tracking System (PATS)
users.
viii PATS Installation Guide for IRM Staff 1.2 Rev. 10-10-11

Patient Advocate Tracking System (PATS)
Chapter 1 – Before You Begin to Install and Set up PATS
Before you install the KIDS build, verify that the following patches have been installed:
VistALink XOBU 1.5
KAAJEE patch XU*8.0*329
Kernel patch XU*8.0*430
Person Service Lookup patch DG*5.3*538
Person Service Construct patch DG*5.3*557
Verify that you have received the KIDS installation via VistA mail with the subject line Released QAC*2*19.
1.1 VistALink Connector Proxy Users
The VistALink Connector Proxy User is an entry on your VistA NEW PERSON file that the PATS application and other web-based applications use to connect to your VistA site. For the PATS application, there will be one data center located in Falling Waters, VA and a second fail-over data center in Hines, IL. A VistALink connector proxy user needs to be set up on your VistA server for the Falling Waters data center and also for the Hines data center.
You may have already set up the VistALink connector proxy users to support the Blind Rehab or VPFS applications. In that case, you won't need to set them up. Please verify your existing VistALink connector proxy users.
To validate and/or set up VistALink connector proxy users:
1. From the System Manager menu, select Operations Management>User Management Menu>Proxy User List.
Result: A report displays existing connector proxy users.
2. If you do not see any VistALink connector proxy users in the report, go to step 4.
If there are any connector proxy users in the report, check with other ISO or IRM Specialists at your site to verify that the connection information has been given to the EIE J2EE Administrator. If you can not validate that the information has been sent, send an email to the EIE J2EE Administrator (using mail group VHA HSITES EMC HEV SUPPORT) to determine if the connectors to both the Hines and Falling Waters data centers have been established.
Note: Do not add new connector proxy users without consulting your EIE J2EE Administrator.
Rev. 10-10-11 PATS Installation Guide for IRM Staff 1.2 1

Patient Advocate Tracking System (PATS)
3. Make sure that your connector proxy users are not DISUSERed or terminated.
4. If you do not have VistALink connector proxy users already set up for both Hines and Falling Waters/Silver Spring, follow instructions in the VistALink Installation Guide 1.5 (section 2.6 Post-Install: Configuring Connector Proxy User(s) for J2EE Access) to add these users to your NEW PERSON file.
Set up connector proxy users using the following recommended names:
VISTALINK,EIE HINES
VISTALINK,EIE SSPFW (SSPFW stands for Silver Spring Falling Waters, since the data center is moving from Silver Spring to Falling Waters)
Give the following connector information to the EIE J2EE Administrator using email group VHA HSITES EMC HEV SUPPORT:
Your site name
Your computing station number
Your fully qualified domain name (FQDN)
Port number for your VistALink connection
Access/verify code of the connector proxy user for the Hines data center and the Falling Waters data center (securely communicate this information using PKI, FED EX properly addressed, by phone, or using local requirements for secure communications).
1.2 List of Divisions
In addition to the information for connecting to your VistA account, you must also provide a list of divisions to the Project Implementation Office (PIO). The list will be used to populate the Division drop-down list for log on. This list will come from your MEDICAL CENTER DIVISION file, which is the list you currently use when entering a new Report of Contact.
You can get that list by running the following FileMan report:
Select OPTION: 2 PRINT FILE ENTRIES
OUTPUT FROM WHAT FILE: MEDICAL CENTER DIVISION// MEDICAL CENTER DIVISION (nn entries)SORT BY: NAME// <Enter>START WITH NAME: FIRST// <Enter>FIRST PRINT FIELD: .01 NAME THEN PRINT FIELD: INSTITUTION FILE POINTER THEN PRINT FIELD: INSTITUTION FILE POINTER:STATION NUMBERTHEN PRINT FIELD: <Enter>Heading (S/C): MEDICAL CENTER DIVISION LIST Replace <Enter>
Once you get the list of divisions, email it to Chuck Krochmal at the Exchange email address: [email protected].
2 PATS Installation Guide for IRM Staff 1.2 Rev. 10-10-11

Patient Advocate Tracking System (PATS)
Chapter 2 – Installation InstructionsThis chapter describes the install of the KIDS build and the setup instructions. There is a separate Patient Advocate Tracking System (PATS) Data Migration Guide that will lead you through the process of migrating the legacy data.
You will install a KIDS build to support PATS. The KIDS build contains both components needed for migrating the Patient Representative legacy data into PATS and components needed while running PATS.
To install and set up PATS at field sites, complete the following tasks:
1. Unload the PATS KIDS distribution in VistA.
2. Install the PATS KIDS distribution in VistA.
3. Setup for user downloading the station number list and performing data migration into PATS.
4. Setup for users performing pre-migration data cleanup.
5. Setup for Site Information Taker (SIT) users.
6. Setup for Site Record Control Users (SRCU).
7. Setup for VISN-level users (VU) if a VISN-level user has access to your VistA account.
8. Setup for National Program Office (NPO) or Central Office (CO) users (only if you maintain a VistA system used to allow logon by NPO or CO).
9. Assign URL links for the Pre-migration Data Cleanup, Data Migration and PATS applications to users.
Note: When your site is scheduled to begin pre-migration data cleanup, the Program Implementation Office (PIO) will instruct you to install this patch and will send you a URL link used by the data cleanup option.
When your site is scheduled to begin using the PATS application, the PIO will send you two URL links—one to the data migration application and one to the PATS application.
Rev. 10-10-11 PATS Installation Guide for IRM Staff 1.2 3

Patient Advocate Tracking System (PATS)
2.1 Unload the PATS KIDS Distribution in VistAUse VistA Mail to read the message containing the KIDS build. Then use the Packman Extract KIDS option to unload the KIDS build onto your system.
Follow the instructions below to extract the KIDS build. Information in bold type indicates how you will answer questions and keys you press.
Subj: Released QAC*2*19 SEQ #18 [#411] 3 Mar 2006 12:02:06 -0500 (EST) 5327 linesFrom: <"NPM [#39264106]"@FORUM.VA.GOV> In 'IN' basket. Page 1 *New*---------------------------------------------------$TXT Created by WINN,TAMI KATHLEEN at CHEY45.FO-BAYPINES.MED.VA.GOV (KIDS) Friday, 03/03/06 at 11:56===================================================Run Date: MAR 03, 2006 Designation: QAC*2*19Package : QAC - PATIENT REPRESENTATIVE Priority: MandatoryVersion : 2 Status: Released===================================================
Associated patches: (v)QAC*2*18 <<= must be installed BEFORE ‘QAC*2*19’
Subject: PATS Transition
Category: - Enhancement (Mandatory) - Routine - Other
Description:============
Enter RETURN to continue or '^' to exit: ^ [Enter]
Enter message action (in IN basket): Delete// x [Enter] Xtract KIDS Select PackMan function: 6 [Enter] INSTALL/CHECK MESSAGE
Line 160 Message #29 Unloading KIDS Distribution QAC*2.0*19 QAC*2.0*19
Want to Continue with Load? YES// YES [Enter]Loading Distribution...
QAC*2.0*19Will first run the Environment Check Routine, QACIENV
4 PATS Installation Guide for IRM Staff 1.2 Rev. 10-10-11

Patient Advocate Tracking System (PATS)
Note: The environment check routine will make sure that the broker type options DGRR GUI PATIENT LOOKUP and DGRR PATIENT SERVICE QUERY exist in your VistA account.
2.2 Install the PATS KIDS Distribution in VistA
After you have completed unloading the KIDS build from the mail message, you are ready to install it. Use Install Name QAC*2.0*19 to install this distribution.
Some tips on installing the KIDS build:
This patch can be loaded with users on the system; however, it should be installed during a non-peak period of usage.
From the Installation menu, you may want to Verify Checksums in Transport Global to insure the integrity of the routines in the transport global, and Print Transport Global to view the components in the KIDS build.
There is no need to Backup a Transport Global or Compare Transport Global to Current System, because this patch brings in new routines and does not change any of the existing Patient Representative routines.
This installation will bring new routines, options, remote procedures and keys. It does not bring in any new files or data, and does not alter any existing files or data. The patch does no data conversions.
There is no need to inhibit logons or to disable any options or protocols while installing this patch.
The patch should run in a few seconds.
The Patient Advocate Tracking System (PATS) Systems Management Guide contains detailed information about all of the components installed by this patch.
From Installation option on the Kernel Installation and Distribution (KIDS) menu
1 Load a Distribution 2 Verify Checksums in Transport Global 3 Print Transport Global 4 Compare Transport Global to Current System 5 Backup a Transport Global 6 Install Package(s) Restart Install of Package(s) Unload a Distribution
Rev. 10-10-11 PATS Installation Guide for IRM Staff 1.2 5

Patient Advocate Tracking System (PATS)
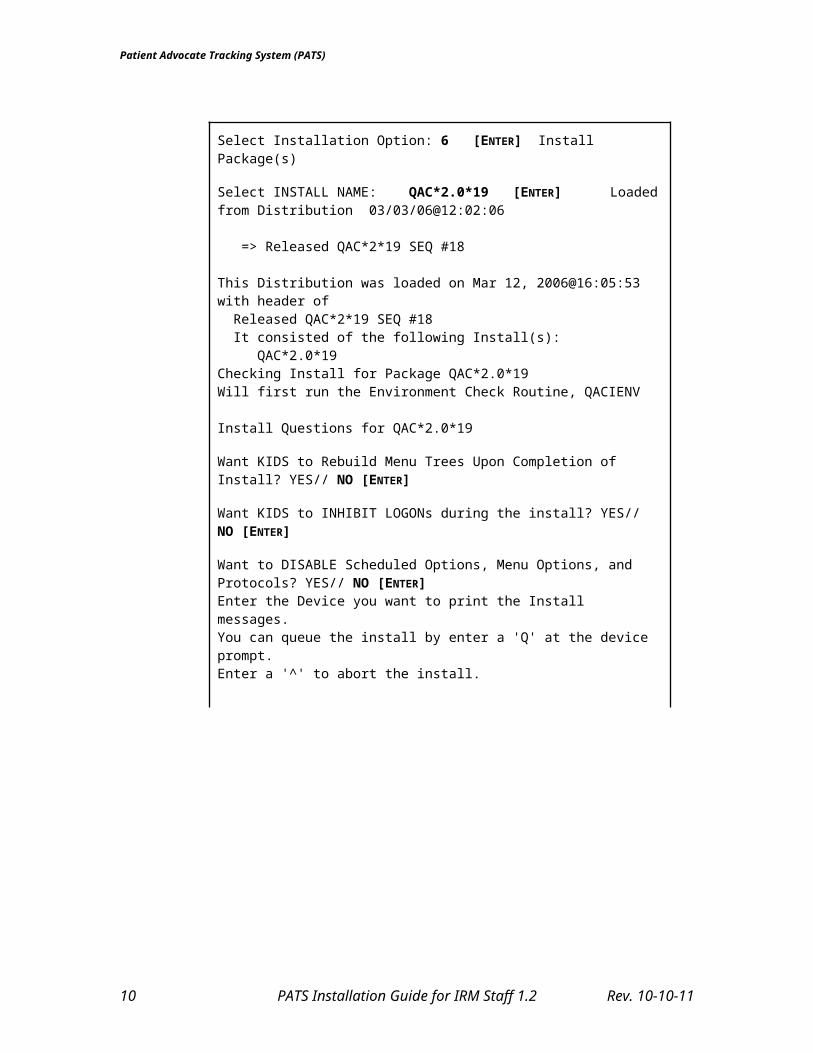
Select Installation Option: 6 [ENTER] Install Package(s)
Select INSTALL NAME: QAC*2.0*19 [ENTER] Loaded from Distribution 03/03/06@12:02:06
=> Released QAC*2*19 SEQ #18
This Distribution was loaded on Mar 12, 2006@16:05:53 with header of Released QAC*2*19 SEQ #18 It consisted of the following Install(s): QAC*2.0*19Checking Install for Package QAC*2.0*19Will first run the Environment Check Routine, QACIENV
Install Questions for QAC*2.0*19
Want KIDS to Rebuild Menu Trees Upon Completion of Install? YES// NO [ENTER]
Want KIDS to INHIBIT LOGONs during the install? YES// NO [ENTER]
Want to DISABLE Scheduled Options, Menu Options, and Protocols? YES// NO [ENTER] Enter the Device you want to print the Install messages.You can queue the install by enter a 'Q' at the device prompt.Enter a '^' to abort the install.
DEVICE: HOME// [ENTER]
Install Started for QAC*2.0*19 : Mar 12 2006@16:05:54 Build Distribution Date: Jun 22 2004 QAC*2.0*19 ───────────────────────────────────────────────────────Installing Routines: Mar 12 2006@16:05:54 Installing PACKAGE COMPONENTS:
Installing SECURITY KEY Installing REMOTE PROCEDURE Installing OPTION Mar 12 2006@16:05:55
6 PATS Installation Guide for IRM Staff 1.2 Rev. 10-10-11
Patient Advocate Tracking System (PATS)
Updating Routine file... Updating KIDS files... QAC*2.0*19 Installed. Mar 12 2006@16:05:56 NO Install Message sent ─────────────────────────────────────────────────────── ┌─────────────────────────────────────────────────────┐│ 25 50 75 100% │ └─────────────────────────────────────────────────────┘Install Completed
2.3 Components Installed by the KIDS Build
Routines installed by the KIDS buildQACI0 QACI2EQACI1 QACI3QACI1A QACI4QACI2 QACI5QACI20 QACIENVQACI2A QACVDEMQACI2B QACVEMPXQACI2C QACVKHLDQACI2D
Options installed by the KIDS buildQACI AUTO CLOSE ROCSQACI INACTIVATE PAT REPQACI KILL ROLLUP TASKQACI MAIN DATA CLEANUP MENU QACI MAIN PATS MIGRATION MENU QACI MIGRATION DATA BUILDQACI PATS RPC ACCESS QACI PREMIGRATION ERROR REPORTQACI REPORT AUTO-CLOSED ROCSQACI REPORT MENUQACI REPORT MIGR COUNTS QACI REPORT NOTIFICATIONSQACI REPORT ROC CHANGES
Rev. 10-10-11 PATS Installation Guide for IRM Staff 1.2 7

Patient Advocate Tracking System (PATS)
Options installed by the KIDS buildQACI REPRINT ERRORS REPORT QACI RESCHEDULE ROLLUP TASKQACI ROC MIGRATION STATUSQACI UTILITY MENUQACV PATS RPC ACCESS
Keys installed by the KIDS buildQACV_ADUSHQACV_DMGRQACV_NPOQACV_SITQACV_SRCUQACV_VU
Remote Procedures installed by the KIDS buildQACI DELETE ALL LISTSQACI LOAD REFERENCE TABLESQACI LOAD ROCQACV KEY HOLDERS VLHQACV PERSON LOOKUP VLHQACI NATL INSTITUTION LIST
Pre-Init Routine QACIENVThis routine makes sure that the Patient Service Lookup broker type option DGRR GUI PATIENT LOOKUP, and the Patient Service Construct broker type option DGRR PATIENT SERVICE QUERY exist at the site where the installation will take place.
8 PATS Installation Guide for IRM Staff 1.2 Rev. 10-10-11

Patient Advocate Tracking System (PATS)
2.4 Roles DefinedBefore users have access to the PATS application, you must assign them roles with associated security keys, options and divisions. Each role has specific functions the user can perform in PATS.
Role Tasks role performs
Data Migration Manager Download national station list
Oversee data cleanup
Perform the data migration
Users performing data cleanup Clean up Patient Rep data prior to migrating the data into PATS
SIT – Site Information Taker Add an ROC (Report of Contact)
Edit an ROC entered by the person
SRCU – Site Record Control User (Patient Advocate)
Add or edit their ROCs
Edit ROCs entered by others
Send notifications
Run reports (Standard and Ad hoc)
Update local reference tables: Congressional Contact, Hospital Locations, Comps, Resolution Text
VU – VISN User (VISN-Level Advocate) Same as SRCU with additional task of updating Facility Service or Section reference table
NPO – National Program Office user Update national tables: Method of Contact, Treatment Status, Issue Category/Issue Code, Contacting Entity, Days until an ROC expires
Run national reports
CO – Central Office user Run some national reports
Rev. 10-10-11 PATS Installation Guide for IRM Staff 1.2 9

Patient Advocate Tracking System (PATS)
2.5 Setup for User Downloading the Station Number List and Performing Data Migration into PATS
The following setup steps will allow any VistA user to perform the first step in data cleanup (downloading the national station number list) and to perform data migration from Patient Rep to PATS. This job (Data Migration Manager) will usually be done by an SRCU.
1. Check with the current Patient Representative users to determine who will download the station number list and perform the migration of Patient Representative data into PATS. This person must have access to a PC and a browser.
2. Select the Edit an Existing User option. Assign the new Broker Type option QACI PATS RPC ACCESS as a secondary menu to the user. This option will not need a synonym. The option will allow the PATS system to access the Patient Representative legacy data on the VistA system during the migration.
3. From Edit an Existing User, assign the new option QACI MAIN PATS MIGRATION MENU as a secondary menu to the users. Give the secondary menu the synonym PRDM.
4. In a site that has multiple divisions, the user performing data migration MUST have the default institution in their DIVISIONS list (i.e., the facility with the 3-digit station number). Data for the default institution and all divisions within the default institution will be migrated, regardless of any other divisions assigned to the user.
a. Select the Edit an Existing User option.b. At the Select DIVISION prompt, select the default institution.
5. In a site that has one division, the user is given access to the Institution set as the DEFAULT INSTITUTION in your KERNEL SYSTEM PARAMETERS file.
Note: For more details on how the list of accessible Divisions is used during sign-on, see the KAAJEE Installation Guide.
6. Select the Key Management option to assign the new security key QACV_DMGR to the user. This will be used to make a VistALink connection between the data migration application and the VistA system during the migration.
The table summarizes the setup for the user downloading the list of station numbers and performing data migration into PATS:
Role Security Key Options Divisions URLs
Data Migration Manager
QACV_DMGR QACI MAIN PATS MIGRATION MENU (synonym PRDM)
QACI PATS RPC
3-digit default institution
PATSDV application (Download national station numbers)
PATSDM application
10 PATS Installation Guide for IRM Staff 1.2 Rev. 10-10-11
Patient Advocate Tracking System (PATS)
ACCESS (Data Migration)
2.6 Setup for Users Performing Pre-Migration Data CleanupThe following setup steps will give any VistA user access to reports used to clean up the data prior to migration from Patient Rep to PATS. This job will usually be done by SIT or SRCU users.
1. Check with your current Patient Representative users to see which users will be performing the pre-migration data cleanup role (see the Patient Advocate Tracking System (PATS) Data Migration Guide if your users need help in deciding who will perform that function).
2. Select the Edit an Existing User option. Assign the new option QACI MAIN DATA CLEANUP MENU as a secondary menu to the user. Give the secondary menu the synonym PRDC.
The table summarizes the setup for users performing pre-migration data cleanup:
Role Security Key Options Divisions URLs
User(s) performing data cleanup
None QACI MAIN DATA CLEANUP MENU (synonym PRDC)
None None
Note: At least one user must be set up to download the list of national stations and perform data migration as described in Section 2.5.
2.7 Setup for Site Information Taker Users, Site Record Control Users, and VISN-Level Patient Advocate UsersThis section covers the steps to set up users for the following roles: Site Information taker (SIT), Site Record Control User (SRCU), VISN-level User (VU).
Note: SIT, SRCU or VU roles should not be combined with either the CO or NPO role.
1. Check with the current Patient Representative users to determine who will be assigned the following roles:
SIT-level access SRCU-level access VISN-level access (VU)
Only assign an individual ONE of the following roles: SIT, SRCU, VU.
Rev. 10-10-11 PATS Installation Guide for IRM Staff 1.2 11

Patient Advocate Tracking System (PATS)
2. Select the Edit an Existing User option to assign the new Broker Type option QACV PATS RPC ACCESS as a secondary menu to the users. This option will not need a synonym. It allows the PATS system to access Patient and New Person data from the VistA system.
3. Use the Edit an Existing User option to assign options DGRR GUI PATIENT LOOKUP and DGRR PATIENT SERVICE QUERY as secondary menus to the user. These options do not require synonyms. They are used to support the Patient Lookup service used in the PATS application.
4. In a site that has multiple divisions, give each user access to all divisions to which they need access. PATS users need access only to divisions in your MEDICAL CENTER DIVISION file. Note you MUST enter any division they need to access in this list:
a. Select the Edit an Existing User option.
b. At the Select DIVISION prompt, add each Division the user is permitted to access.
5. In a site that has one division, the user is given access to the Institution set as the DEFAULT INSTITUTION in your KERNEL SYSTEM PARAMETERS file.
Note: For more details on how the list of accessible Divisions is used during sign-on, see the KAAJEE Installation Guide.
6. Select the Key Management option to assign the applicable security key:
Role Security Key
SIT QACV_SIT
SRCU QACV_SRCU
VU (VISN-level Advocate) QACV_SRCU and QACV_VU
12 PATS Installation Guide for IRM Staff 1.2 Rev. 10-10-11

Patient Advocate Tracking System (PATS)
The table summarizes the setup for the SIT, SRCU, and VU roles:
Role Security Key Options Divisions URLs
SIT QACV_SIT QACV PATS RPC ACCESS
DGRR GUI PATIENT LOOKUP
DGRR PATIENT SERVICE QUERY
All divisions whose data the user should access.
If no divisions are assigned, the person can only access the 3-digit default institution.
PATS application
SRCU QACV_SRCU Same as SIT Same as SIT PATS application
VU (VISN-level Advocate)
QACV_SRCU and QACV_VU
Same as SIT Same as SIT PATS application
2.8 Setup for National Program Office and Central Office UsersThe PATS system provides national reports to National Program Office (NPO) users and Central Office (CO). In addition, NPO users will maintain some national tables using PATS.
Note: These users will probably not be users on an existing medical center’s VistA system. However, PATS logon requires that the users have a VistA access and verify code; NPO and CO users will need to be users on some VistA system.
Note: NPO and CO roles should not be combined with the SIT, SRCU or VU role.
Setup on the VistA side is minimal, because these users access reports showing data for all divisions and don’t retrieve any data directly from VistA (only from the PATS Oracle tables).
1. NPO and CO users should be assigned a menu only if they need to access a VistA option directly.
2. NPO and CO users do not need to be assigned any divisions in their DIVISION multiple. They will log on to PATS using the Institution set as the DEFAULT INSTITUTION in the KERNEL SYSTEM PARAMETERS file on the VistA account to which they have access.
Rev. 10-10-11 PATS Installation Guide for IRM Staff 1.2 13

Patient Advocate Tracking System (PATS)
3. Select the Key Management option to assign the applicable security key:
Role Security Key
CO QACV_ADUSH
NPO QACV_NPO
2.9 Setup Quick Reference ChartThe chart below summarizes the security key, options, divisions, and URLs that you assign to individuals by their role. Roles are defined in Section 2.4. For instructions on setting up specific roles, see Sections 2.5 – 2.8.
Role Security Key Options Divisions URLs
Data Migration Manager
QACV_DMGR QACI MAIN PATS MIGRATION MENU (synonym PRDM)
QACI PATS RPC ACCESS
3-digit default institution
PATSDV application (Download national station numbers)
PATSDM application (Data Migration)
User(s) performing data cleanup
None QACI MAIN DATA CLEANUP MENU (synonym PRDC)
None None
SIT QACV_SIT QACV PATS RPC ACCESS
DGRR GUI PATIENT LOOKUP
DGRR PATIENT SERVICE QUERY
All divisions whose data the user should access.
If no divisions are assigned, the person can only access the 3-digit default institution.
PATS application
SRCU QACV_SRCU Same as SIT Same as SIT PATS application
VU (VISN-level Advocate)
QACV_SRCU and QACV_VU
Same as SIT Same as SIT PATS application
Only assign an individual ONE of the following roles: SIT, SRCU, VU.
14 PATS Installation Guide for IRM Staff 1.2 Rev. 10-10-11

Patient Advocate Tracking System (PATS)
2.10 Download Station Number List to Temporary GlobalWhen it is time for your site to begin pre-migration data cleanup, the Project Implementation Office (PIO) will notify you and send a URL link. After you install the KIDS build, share that URL link with your Point of Contact in the Patient Advocates Office—the person who will perform the data migration. That user will click on the link to log on to the application and press the Download button. A list of station numbers from the EIE master institution file will be downloaded into the temporary global ^XTMP(“QACMIGR”,”STDINSTITUTION”) on your VistA system. The list is needed to do pre-migration data error checking. This list only needs to be downloaded one time; but if it is run multiple times, it will not hurt anything.
Detailed instructions for running the application are documented in the Patient Advocate Tracking System (PATS) Data Migration Guide.
Note: If you accidentally download the stations prior to installing the KIDS build it will not cause a problem.
2.11 Assign URL Links to UsersAfter your site has installed the local PATS KIDS build, your patient advocates will be given about a month to perform data cleanup in preparation for migrating the data into PATS. The Project Implementation Office (PIO) will schedule a time for your site to begin using the new PATS application. At that time, PIO will send you two URL links—one to the data migration application and the other to the PATS application.
1. Share the link to the data migration application with the user who will migrate the legacy Patient Rep data into the new PATS database.
2. Share the link to the PATS application with all users who need access to the application (i.e., all of the users you have set up in the preceding steps).
3. Instruct individuals that use either the data migration application or the PATS application to save the links in their Favorites folder in the browser.
4. You will probably also want to instruct the users to save a shortcut to the PATS application on their desktops.
Rev. 10-10-11 PATS Installation Guide for IRM Staff 1.2 15