Patient Information Management System (BDG/BSD) · PDF file · 2012-02-15Patient...
44
RESOURCE AND PATIENT MANAGEMENT SYSTEM Patient Information Management System (PIMS) (BDG/BSD) Installation Guide and Release Notes Version 5.3 June 2004 Office of Information Technology (OIT) Division of Information Resource Management Albuquerque, New Mexico
Transcript of Patient Information Management System (BDG/BSD) · PDF file · 2012-02-15Patient...

RESOURCE AND PATIENT MANAGEMENT SYSTEM
Patient Information Management System (PIMS)
(BDG/BSD)
Installation Guide and Release Notes
Version 5.3 June 2004
Office of Information Technology (OIT) Division of Information Resource Management
Albuquerque, New Mexico
Patient Information Management System v5.3
Installation Guide and Release Notes i Preface June 2004
Preface
This manual provides the site manager and the Area ISC the tools needed to install the various components of PIMS (Patient Information Management System) V. 5.3 PIMS is the name given by the VA for a suite of software that IHS uses. PIMS contains the Admission/Discharge/Transfer (ADT) application, the Clinic Scheduling application, and the Sensitive Patient Tracking (SPT) module. This release includes all of the VA routines and options even if not currently used by IHS.
The ADT package includes the basic bed control functions (admissions, ward transfers, service transfers, discharges, etc.) in addition to census tracking, incomplete chart tracking, and scheduled visits (admissions, day surgeries, outpatient visits from outside the area).
The Clinic Scheduling package provides three major functions: outpatient appointments management, pulling of paper charts for appointments, walk-ins and chart requests and thirdly primary care team management. This last item entails assigning a primary care provider to patients and grouping these providers into teams that then assists in making appointments with a patient’s primary care provider or with a provider on the same team.
The Sensitive Patient Tracking (SPT) module is part of the VA Patient Registration application. Since it is a fairly stand-alone application you can use it along with your own Patient Registration software. SPT allows a facility to track who accesses patient records designated as sensitive. It warns users that they are accessing a restricted record. This manual gives full documentation of the Sensitive Patient Tracking module including its tie into file 2 (patient lookup routine AUPNLK calls SPT routine DGSEC).
Revision History
Date Where Change 07/08/04 Section 2.1 Added “Prior to the installation, verify that there are at least 2 GB of
free journal space in your AIX file system. Contact ITSC if you need assistance.”

Patient Information Management System v5.3
Installation Guide and Release Notes ii Table of Contents June 2004
TABLE OF CONTENTS
1.0 RELEASE NOTES ............................................................................................ 1
1.1 General Comments .................................................................................... 1 1.2 ADT Changes ............................................................................................ 1 1.3 Scheduling Changes ................................................................................. 3 1.4 Sensitive Patient Tracking Module ............................................................ 5
2.0 INSTALLATION NOTES ................................................................................... 7
2.1 General Information ................................................................................... 7 2.2 Contents of Distribution ............................................................................. 7 2.3 Required RPMS Resources (Minimum Software) ...................................... 8 2.4 Optional RPMS Resources (Minimum Software) ....................................... 8
3.0 PREINSTALL .................................................................................................... 9
3.1 Scheduling Preparations ........................................................................... 9 3.1.1 Review Scheduling Keys .............................................................. 10 3.1.2 Clinic Setup ................................................................................... 10
3.2 ADT Preparations .................................................................................... 11
4.0 INSTALLATION .............................................................................................. 12
5.0 POST-INSTALLATION ................................................................................... 13
6.0 IMPLEMENTATION AND MAINTENANCE .................................................... 15
6.1 Implementing VA Patient file .................................................................... 15 6.2 Implementing the Clinic Scheduling Module ............................................ 15
6.2.1 Edit System-Wide Parameters ...................................................... 15 6.2.2 Edit Facility-Wide Parameters ...................................................... 15 6.2.3 Update Appointment Slip Letter .................................................... 19 6.2.4 View Scheduling Event Driver ....................................................... 19 6.2.5 Set Up a Clinic (Optional) ............................................................. 20
6.3 Printing PCC+ forms from the Scheduling Package ................................ 20 6.4 Implementing Admissions Module ........................................................... 22
6.4.1 Edit System-Wide Parameters ...................................................... 22 6.4.2 Edit Facility-wide Parameters ....................................................... 23 6.4.3 Setup ADT Files: ........................................................................... 26 6.4.4 Check ADT-PCC Link ................................................................... 28 6.4.5 Initialize Census Files ................................................................... 29
6.5 Implementing Sensitive Patient Tracking................................................. 29 6.5.1 Implementation Steps ................................................................... 29 6.5.2 Update Security Parameters ......................................................... 30
7.0 SECURITY KEYS............................................................................................ 32
7.1 Sensitive Patient Tracking ....................................................................... 32 7.2 ADT.......................................................................................................... 32

Patient Information Management System v5.3
Installation Guide and Release Notes iii Release Notes June 2004
7.3 Scheduling ............................................................................................... 33
8.0 APPENDIX A: IMPLEMENTATION CHECKLISTS ......................................... 35
8.1 PIMS Site Preparation List....................................................................... 35 8.2 ADT Checklist .......................................................................................... 37 8.3 Scheduling Checklist ............................................................................... 38
9.0 CONTACT INFORMATION............................................................................. 40

Patient Information Management System v5.3
Installation Guide and Release Notes 1 Release Notes June 2004
1.0 Release Notes
1.1 General Comments Many of the reports in PIMS have been converted to ListMan. This change was made to encourage paper printing only when necessary. ListMan uses the computer screen to display and navigate through a report. Some reports will have the added functionality of allowing you to pull up more details on each entry.
The IHS options, routines, protocols, and files have been left intact as much as possible during this implementation phase.
1.2 ADT Changes The IHS namespace has been changed from ADG to BDG. Most IHS ADT fields now have new data dictionaries using this new namespace. This change allows for a redesign of some data dictionaries.
Observation patients
PIMS ADT allows for the tracking of observation patients through the ADT Bed Control functions. An observation patient is defined as a patient admitted to an observation type service. This allows the patient to show up on inpatient lists, be accessible by other clinical packages such as Inpatient Pharmacy, Laboratory and Dietetics, yet be counted separately when desired. If an observation patient is subsequently admitted to inpatient status, simply add a service transfer for the date and time that decision was made. This leaves the audit trail showing that the patient was originally an observation patient. The ADT link with PCC creates a visit with the proper service category (H – Hospitalization or O – Observation) and updates the information if necessary. The A&D Sheet code has also been rewritten to separate the counts for these patients.
Provider Change
A new option on the Bed Control menu allows a facility to change the attending provider without entering a service transfer. This appears in the file to look very similar to a service transfer. This option was designed to assist in tracking who was responsible for a patient’s care on which dates.

Patient Information Management System V 5.3
Installation Guide and Release Notes 2 Release Notes June 2004
ADT Event Driver
This version continues to use an event driver based on a protocol menu to fire off various tasks upon an ADT event. See the protocol BDGPM Movement Events or use the ADT Event Driver View option under the Setup ADT Files option under the ADT System Definition Menu for more details.
Patient Inquiry
Several patient inquiry options are now combined into one. This option is displayed in ListMan browse mode. There is an expand entry action to see more details on the different sections presented. These are demographics, admissions, day surgeries, scheduled visits, future appointments and incomplete chart status. For sites running TIU (Text Integration Utility), the CWAD Display option is also available within Patient Inquiry. The CWAD display presents any notes for the patient under four distinct categories: C (Crisis Notes), W (Clinical Warnings), A (Allergies/Adverse Reactions), and D (Advance Directives).
Provider Inquiry
A new option displays all inpatients tied to a particular provider. For the provider selected, it will display in the following order: patients where provider is current attending provider, where provider was admitting provider, and then where provider is patient’s primary care provider. This option will also list that provider’s day surgeries for today and other appointments. Like Patient Inquiry, this display is presented in browse mode, with expand entry and CWAD action choices.
Census Logic
In addition to handling observation patients, the census updates include the breakdown by service within wards.
Day Surgery
The logic in ADT looks at two different places for day surgery information: the IHS day surgery files and the VA Surgery package. The appropriate data will show up in various ADT reports regardless of which file the information is stored.
ADT Reports Menu
ADT reports have been grouped by type and placed on a condensed menu to make reports easier to find. All reports listing current inpatients can found under the Current Inpatient listings, and reports listed by date are grouped under the Inpatient Listings by Date option. On-line help is available under each category.

Patient Information Management System V 5.3
Installation Guide and Release Notes 3 Release Notes June 2004
Incomplete Chart Tracking
Tracking of incomplete charts for inpatients and for day surgery patients has been combined into one file. You can print reports separately or combined. The data entry option is in ScreenMan format. Several new date fields have been added to track the time it takes to complete a chart at your facility. The inpatient coding option has also been rewritten, putting the display of the visit data into ListMan with the data entry actions as choices. New to this version is the ability to fix the service category on ambulatory visits that should be in-hospital visits. All Incomplete Chart reports have also been grouped by category into three options.
Scheduled Visits module
The data entry option is now in ScreenMan format. Additional travel and escort fields have been added.
Reverse Key
A new reverse key arrives with this version. Giving this key to a user along with the main ADT key allows access to limited non-clinical data. Please be careful not to give this to yourself (site managers and programmers) as it may restrict your ability to see certain options.
1.3 Scheduling Changes Appointment Management
This new option combines the major appointment functions into one ListMan based screen. After choosing either a patient or a clinic, the appointments for that patient or clinic are displayed in browse mode. The following actions are available: Check-In, Walk In, Patient Registration, Make Appointment, No-Show, Cancel Appointment, Add/Edit Other Info, Ancillary Tests, Check-out, Delete Check-out, Update PCP (Primary Care Provider), Expand Entry (detailed display of appointment on list), Health Summary, Rx Profiles, Change Patient, Change Clinic, Change Date Range, and Appt Profiles (change type of appointments displayed). This is a major change in focus for the Scheduling module.
Event Driver
New to this version is an event driver similar to the one in ADT. For any defined Scheduling event (make appointment, check in, cancel appointment, etc.) a number of other tasks are triggered. These can include task from other software packages. See the Protocols Chapter for more details.

Patient Information Management System V 5.3
Installation Guide and Release Notes 4 Release Notes June 2004
Chart Requests
Chart requests are no longer stored as appointments or under the same multiple in file 44. There is another multiple called Chart Check with the subscript C where chart requests are stored. This provides an easier way to differentiate chart requests from appointments.
Month-at-a-glance
The display of available appointments now uses ListMan and can display up to 16 hours per day. You can now have one clinic schedule for those clinics that are open more than 8 hours. The display can include multiple months if appointments are allowed to be scheduled that far in advance for the specified clinic. There is still a display for clinics grouped under a principal clinic. It will now display three days per clinic instead of just the first one with open appointments.
Primary Care Provider Menu
This new menu expands the simple assigning of primary care providers to patients. Primary Care Teams can also be set up as well as assigning a women’s health provider when appropriate. Primary care providers can be assigned by individual patient, by provider or by community. For more details see the Menu Options chapter.
Set Up a Clinic
The option to set up clinic parameters uses ScreenMan. It consists of four screens where the questions are grouped logically. There are new fields such as Owner to lock out others from changing your clinic setup and Default Provider to link a clinic name with a specific provider. This link between clinic and provider is used when creating a visit at check-in, for finding all available appointments for one provider, to view a provider’s daily or weekly schedule, and in ADT to list a provider’s appointments for today after listing current inpatients.
Application Coordinator Menu
A new menu was designed to separate out those options that many people can use such as Set Up A Clinic and those that only one or two people per facility need to use such as Edit Scheduling Parameters. Due to many problems with people selecting the Inactivate/Reactivate Clinic option when they really meant to use Cancel /Restore Clinic Availability, that first option has been placed on this menu. New functions such as setting up clinic schedules in reusable templates and adding new cancellation reasons are also found here. For details see the Menu Options chapter and the Security Issues chapter.

Patient Information Management System V 5.3
Installation Guide and Release Notes 5 Release Notes June 2004
Routing Slips
There are now three kinds of routing slips that can be printed: original whole page format, two per page and those that fit on small cards. When making an appointment, the appointment slip you can hand to the patient is no longer a routing slip. Rather it is a pre-appointment letter. The data found on a routing slip is for the use of the file room and is not appropriate for handing or sending to patients. Letters can be customized by clinic. There are two new reports that track the routing slip workload for chart requests and for appointments. A new tool for the file room is the Chart Locator option which lists all potential actions that could have resulted in a chart being pulled. It is designed to help find a chart.
Scheduling Reports
Reports have been grouped by category. Appointment management Reports deal with the completeness of the appointment data for past dates. Were all the appointments either checked in, marked as no-shows or cancelled? The Clinic Availability Reports present how busy your clinics are, how long patients must wait for appointments and general capacity reporting, The Workload/Statistical Report rely on the Appointment management Reports being clean so the numbers reported are accurate. Again for more details see the Menu Options chapter.
1.4 Sensitive Patient Tracking Module This module was pulled from the VA Registration package. We are releasing a separate menu to be assigned to the designated security officer at your facility. The module uses a few new files and includes a hook put into the IHS patient lookup routine: AUPNLK. Depending on the parameter settings, user accessing a patient will be logged and in some cases a bulletin is sent.
Sensitive Patient Logic
If user is accessing his/her own patient record, and if site has parameter (Restrict Patient Record Access) turned on, and if user does not hold DG Record Access key, then message displays “Security regulations prohibit computer access to your own medical record” and user can go no further.
If site parameter Track All Patient Access is turned on, then all patients not already classified as Sensitive, will be tracked per the Non-Sensitive logic below.
If patient is listed as Sensitive and is an outpatient, and if accessed by Security Officer (holds DG Security Officer key) or by user holding DG Sensitivity key, then message displays saying “Warning - Restricted Record” and access is tracked for future reference.

Patient Information Management System V 5.3
Installation Guide and Release Notes 6 Release Notes June 2004
If accessed by other users, then the warning screen displays a message (Figure 1-1), and asks if user wants to continue. If user does, bulletin is sent to security team and access is tracked for future reference.
* * * * * * * * * * * * * * * * * * * * * * * * * * * * * * * * * * * * * * This record is protected by the Privacy Act of 1974. If you elect to proceed, you will be required to prove you have a need to know. Accessing this patient is tracked. The assigned Sensitive Patient Tracking monitor will contact you for your justification. * * * * * * * * * * * * * * * * * * * * * * * * * * * * * * * * * * * * * *
Figure 1-1: Warning screen #1
If patient is listed as Sensitive and is an inpatient:
No matter who accesses record, just short “Warning – Restricted Record” message is displayed and access is tracked for future reference. VA has determined that too many people need to access inpatients and often that the long warning and extra question are an imposition.
If patient is listed as Non-Sensitive:
All accesses are tracked but no warning message of any kind is displayed. Users will not know they are being tracked.
Code Logic:
For FileMan lookup to file 2 and 900001, ^AUPNLK is called which now calls ^DGSEC. ^DGSEC calls OWNREC^DGSEC4 to determine if user is accessing his/her own record. Then it calls SENS^DGSEC4 to determine if record is sensitive. Depending of the result it can call SETLOG1 and BULTN1 within DGSEC to add entry of the access and to send a bulletin.
There are 2 RPC/API calls in ^DGSEC4 if access to a patient record is NOT through a FileMan call. Details can be found in the External Relations chapter.
If you need to look up a sensitive patient AND not have it tracked, the variable DGSENFLG must be defined. Be very careful using this. You must have very good reasons for bypassing this security measure. Make sure you delete the variable after the call.

Patient Information Management System v5.3
Installation Guide and Release Notes 7 Installation Notes June 2004
2.0 Installation Notes Prefix: PIMS Scheduling (BSD), ADT (BDG), Sensitive Patient Tracking (BDG)
Current Version: Version 5.3
Warning: Read entire notes file prior to attempting any installation.
***Attention*** Attention *** Attention *** Attention *** Attention ***
As part of your plan for installing this package, all sites are strongly encouraged to contact the ITSC Helpdesk to ensure sufficient technical support and/or assistance will be available during the install process. This recommendation is largely due to the complexity and integration of this package with other RPMS and COTS applications.
***Attention*** Attention *** Attention *** Attention *** Attention ***
2.1 General Information • Prior to the installation, verify that there are at least 2 GB of free journal space
in your AIX file system. Contact ITSC if you need assistance.
• Make a copy of this distribution for offline storage.
• Print all notes/readme files.
• It is recommended that the terminal output during the installation be captured using an auxport printer attached to the terminal at which you are performing the software installation. This will insure a printed audit trail if any problems should arise.
2.2 Contents of Distribution pims0530.k: KIDS file for package pims053i.pdf: Installation Guide pims053t.pdf: Technical Manual bdg_053u.pdf: ADT User Manual bsd_053u.pdf: Appointment Scheduling User Manual bdg_053s.pdf:Sensitive Patient Tracking User Manual

Patient Information Management System v5.3
Installation Guide and Release Notes 8 Installation Notes June 2004
2.3 Required RPMS Resources (Minimum Software) Package Minimum Version Utility Tables (AUT) 98.1 through patch 13 IHS VA Support Files (AVA) 93.2 through patch 18 Kernel (XU) 8.0 through patch 1007 IHS/VA Utilities (XB) 3.0 through patch 9 FileMan (DI) 22 through patch 1001 seq. 88 Patient Registration (AG) 7.0 through patch 1 IHS MAS 5.0 though patch 7 IHS Patient Dictionaries (AUPN) 99.1 through patch 13
2.4 Optional RPMS Resources (Minimum Software) Package Minimum Version
QI Links (AQAL) v1.0, Patch 1 VA Dietary (FH) v5, mod to FMWMAS Women’s Health (BW) v2.0, Patch 8 PCC+ (VEN) v2.2 patch 1 or higher

Patient Information Management System v5.3
Installation Guide and Release Notes 9 Preinstall June 2004
3.0 Preinstall These are the steps to ready your system for this large install.
1. If you have any local modifications to ADT, Scheduling or the VA Patient file please make sure you have documentation on them, you have copied them to a safe place. This install will keep ADG and ASD routines but it will delete DG, SD, VADPT and DPT init routines. It will also delete old DG and SD options and obsolete security keys. Remember to look for DG and SD options on users’ secondary menus lists.
2. If you have any local modifications to the following files, please document your changes. The data dictionaries for these files will be completely deleted and then reinstalled as they had many fields deleted between versions.
2 VA Patient 40.8 Medical Center Division 42 Ward Location 43 MAS Parameters 44 Hospital Location 405 Patient Movement
3. Make sure all ADT and Scheduling users know how to use list manager and ScreenMan screens.
4. Review all terminals and terminal emulators on PCs that bold and underlined items in List Manager and ScreenMan are readable. Verify that user’s terminal type name is set to C-VT100.
5. Review the implementation documentation and review the answers with the subject matter experts.
3.1 Scheduling Preparations Make sure all clinics no longer in use have inactivation dates. DO NOT inactivate any clinics that are being used by the lab for ordering lab tests. Check with the lab supervisor before inactivating any clinic as this will affect the lab package. This will speed up the postinit that copies IHS fields in active clinics to a new file structure. Unless you want this data moved over for old clinics, please fill in the inactivation date using the Inactivate/Reactivate option on the Supervisor’s Menu.

Patient Information Management System v5.3
Installation Guide and Release Notes 10 Preinstall June 2004
3.1.1 Review Scheduling Keys SDOB & SDMOB (overbook access): Print out a list of users who are assigned these keys. Review users currently assigned either of these keys and add/remove keys as appropriate. The preferred method for most users who need overbook access is to assign overbook access by clinic or principal clinic under the Set Up A Clinic option
SDMOB allows user to exceed the maximum overbook parameter in all clinics. Be very careful assigning this key. For most users who need master over book access, assign by clinic or by principal clinic. This can be done under Set Up A Clinic.
SDOB allows user to overbook a time slot up to the maximum per day for all clinics.
SDZSUP (Supervisor Menu): Print out a list of users currently assigned this key. Review user currently assigned this key and add/remove keys as appropriate This key should be assigned only to persons setting up ‘their’ clinic parameters and appointment availability
SDZPURG Print out a list of users currently assigned this key. Review users currently assigned this key and add/remove keys as appropriate. This key should be assigned to the application coordinator and the site manager
SDZPCC: Print out a list of users currently assigned this key. Review users currently assigned this key and add/remove keys as appropriate. This key unlocks questions pertaining to PCC visit creation at check-in.
Important Tip: For sites using PCC+, assign the VENZPRINT and VENZSCH keys to all users who check in patients. These keys are needed so that the PCC+ form prints when the patient is checked-in.
3.1.2 Clinic Setup From the Reports Menu, print out a copy of the Clinic Profiles for all clinics prior to the installation. This list will be useful for setting up the new package. Review all existing clinics and determine which ones will be active and which ones will be inactive. Inactivate the old clinics which are no longer in use so that they do not carry over data. After determining which clinics will be active, identify the person or persons that will be designated as the supervisor for each of the active clinics (and assign them the SDZSUP key).

Patient Information Management System v5.3
Installation Guide and Release Notes 11 Preinstall June 2004
Tip: Mark Principle clinic names with a trailing asterisk (or similar type character). This will aid the users in quickly identifying them on lists or reports.
Tip: Clinics designated as Principal clinics do not need an entry in the PRINCIPAL CLINIC field in the clinic setup.
3.2 ADT Preparations Review all entries in your Ward Location file (#42). Only active and inactive ones will have their IHS data moved to the new IHS Ward Definition file. The “deleted” ones will not. Optionally, to speed up implementation after install, you can edit the Service/Section file (#49) via FileMan to make sure all services are in the file, the Type of Service field is filled in, and a Date Closed is placed on any no longer active. See Set Up ADT Files under the Implementation section of this chapter for details. For ADT sites, work with your admitting office to compile a list of active inpatient services; pick an effective date for those already used; and obtain a list of observation services to be used at your facility.
Print out a hard copy of your ADT site parameters file.

Patient Information Management System v5.3
Installation Guide and Release Notes 12 Installation June 2004
4.0 Installation Allow 1-2 hours for this install due to its sheer size and the number of data conversions included.
Warning: All users must be off the RPMS system for this installation.
1. Make sure you have a current backup. This install includes a new version of the VA Patient file which affects many other packages. If something goes wrong, you want to be sure you can restore your environment to its previous state. This install also converts data in both ADT and PCC (transfer facility).
2. Remove the DGMENU and SDMENU options any menu on which they reside. If you have any other DG or SD options on other menus, please document what they are and remove them. If you have any locally namespaced options calling ADT or Scheduling routines, please make them unavailable until after the implementation phase is completed.
Warning: Do not delete any ADG or ASD routines.
3. Using the appropriate utility on your system, delete the following routines: DG*, SD*, VADPT* and DPTI*
4. Set your partition size to 16M using ^%PARTSIZ or the appropriate utility for your system—MSM sites only. Cache sites will automatically expand the partition.
5. Set the minimum user variables using ^XUP. Then go into KIDS using the normal menu options.
6. This is a KIDS install. Load distribution pims0530.k. After it is loaded, install it.
a. Answer Yes to overwrite the Med Specialty/Bedsection file. It has a new name.
b. Answer No to Rebuild Menu and No to Inhibit logons. You will rebuild menus at a later step and the logons should already be inhibited.
c. You will be asked to enter a mail group coordinator for many new mail groups. You only need to answer the DG Missing New Person SSN question with your site manager’s name. Please press the Return key past the others.
d. If you need assistance with a KIDS install please call your Area Support personnel.

Patient Information Management System v5.3
Installation Guide and Release Notes 13 Post-Installation June 2004
5.0 Post-Installation Before continuing with this section, all steps identified in section 4.0 should have been successfully performed.
1. The IHS postinit will run for a significant amount of time, especially for larger sites. If the postinit errors out, it can be restarted after the cause of the error has been found and corrected.
2. To restart, go into KIDS and select "Installation…', then select 'Restart Install of Package(s)'. If you need help finding the cause of an error or the install fails before the postinit, call ITSC for assistance.
Note: If the install does complete, print out the install file if you did not capture the install to a printer.
3. You may now allow users back on the system. ADT and Scheduling will not be available until after the implementation phase has been completed.
4. If your site runs Scheduling, on a separate terminal, run the AIHSDAM cross-reference by typing D AIHSDAM^BSDPOST. This was originally part of the postinit process but it took too long to run. If it is still running when you’ve completed everything else, it is okay to let users back into Scheduling.
5. From programmer mode, with an expert in each package in attendance or with the agreed upon answers documented, run through the implementation phases.
6. If your site runs Scheduling, type D EN^BSDIMPL. Follow the detailed instructions in the Implementing the Clinic Scheduling module in the next section of this chapter.
7. If your site runs ADT, type D EN^BDGIMPL. Follow the detailed instructions in the Implementing Admissions module in the next section of this chapter.
8. Once the basic implementation has been completed, place the BDGMENU and BSDMENU menu options on your main user menus. These are the new ADT and Scheduling menus. The same security keys are used for these main menus as in the last version. Allocate the new SDZAC key to your Scheduling Application Coordinator. Allocate the SDZPCP key to those users who are responsible for updating patient’s primary care providers. Allocate the new DGZNOCL reverse key to any ADT users who should not have access to clinical data. Allocate the DGZNUR key to any user who needs to access the Seriously Ill data. Remove the Out Of Order Message from any local option you placed out of order after checking to see if the code needs to be changed.

Patient Information Management System v5.3
Installation Guide and Release Notes 14 Post-Installation June 2004
9. Allocate the DG Security Officer and DG Sensitivity keys to your designated security officer. Place the BDG Security menu on that person’s menu tree.
10. Rebuild menus.
Patient Information Management System v5.3
Installation Guide and Release Notes 15 Implementation and Maintenance June 2004
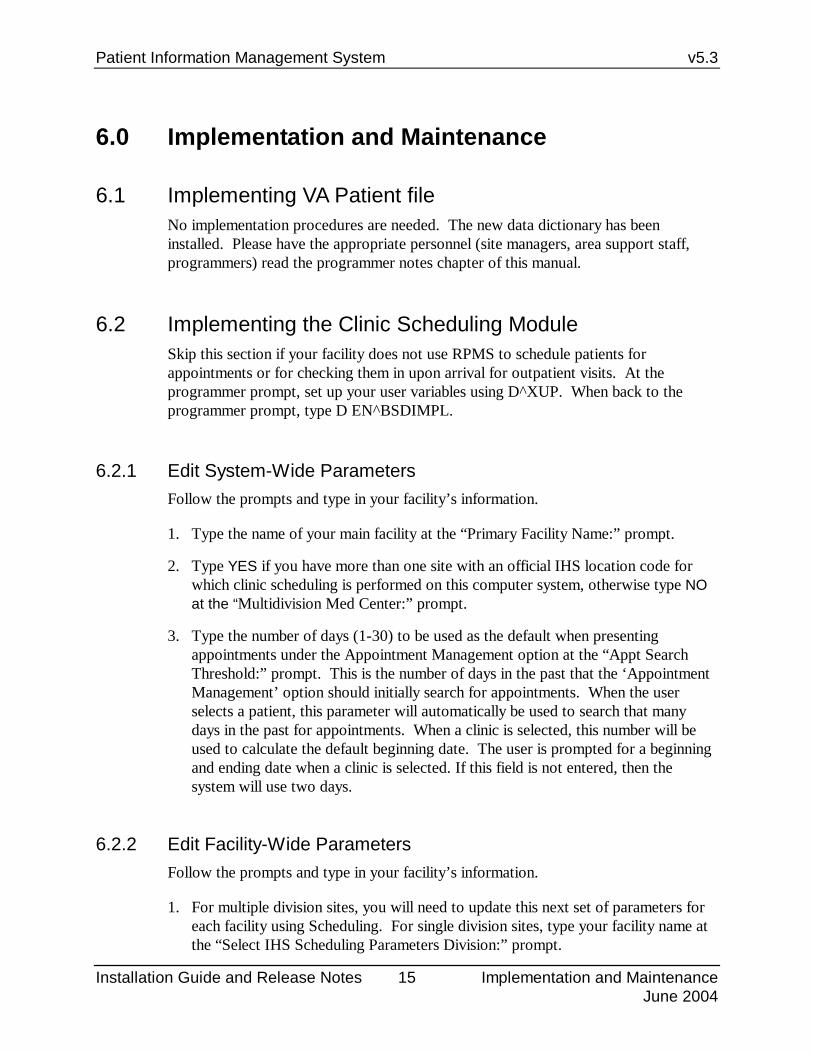
6.0 Implementation and Maintenance
6.1 Implementing VA Patient file No implementation procedures are needed. The new data dictionary has been installed. Please have the appropriate personnel (site managers, area support staff, programmers) read the programmer notes chapter of this manual.
6.2 Implementing the Clinic Scheduling Module Skip this section if your facility does not use RPMS to schedule patients for appointments or for checking them in upon arrival for outpatient visits. At the programmer prompt, set up your user variables using D^XUP. When back to the programmer prompt, type D EN^BSDIMPL.
6.2.1 Edit System-Wide Parameters Follow the prompts and type in your facility’s information.
1. Type the name of your main facility at the “Primary Facility Name:” prompt.
2. Type YES if you have more than one site with an official IHS location code for which clinic scheduling is performed on this computer system, otherwise type NO at the “Multidivision Med Center:” prompt.
3. Type the number of days (1-30) to be used as the default when presenting appointments under the Appointment Management option at the “Appt Search Threshold:” prompt. This is the number of days in the past that the ‘Appointment Management’ option should initially search for appointments. When the user selects a patient, this parameter will automatically be used to search that many days in the past for appointments. When a clinic is selected, this number will be used to calculate the default beginning date. The user is prompted for a beginning and ending date when a clinic is selected. If this field is not entered, then the system will use two days.
6.2.2 Edit Facility-Wide Parameters Follow the prompts and type in your facility’s information.
1. For multiple division sites, you will need to update this next set of parameters for each facility using Scheduling. For single division sites, type your facility name at the “Select IHS Scheduling Parameters Division:” prompt.

Patient Information Management System v5.3
Installation Guide and Release Notes 16 Implementation and Maintenance June 2004
2. The “Institution File Pointer:” prompt should already be filled in. This is the name of the facility as it appears in the official IHS list and therefore in the Location and Institution files.
3. If not already filled in, type the internal entry number for this facility from the Location file at the “Facility Number:” prompt.
4. A data entry screen (1 of 2) for this facility will be displayed (Figure 6-1). The underlined data fields are required.
5. Type YES at the “Outpatient Only:” if this is an outpatient site with no inpatient or observation beds, otherwise leave this prompt blank.
6. Type the time in the morning at which lab tests begin at the “Appt Lab Test Start Time:” prompt. This is used by the auto-rebook functionality to prevent lab test being scheduled too early. For example, if a patient has an appointment at 2pm with lab at 11pm and the appointment is cancelled and auto-rebooked for 8am, the lab would have been scheduled for 5am. This will prevent that.
7. Type the time in the morning at which EKG test begin at the “Appt EKG Start Time:” prompt.
8. Type the time in the morning at which X-ray test begin at the “Appt X-Ray Start Time:” prompt.
9. Type the location (top or bottom) where the address should appear for letters generated for appointments or other activities at this division at the “Address Location on Letters:” prompt.
10. Type 1 for bottom or 0 for top at the “Choose from:” prompt.
11. Type YES to remove the salutations Mr. and Ms. from your scheduling letters at the “Remove Salutation from Letters:” prompt. Some sites have had complaints from patients not wanting Ms. used as a salutation and the use of Mrs. vs. Miss cannot be determined as IHS does not collect marital status.
12. Do you want users asked if they want to print out a pre-appointment letter when making an appointment to hand to the patient? Type YES at the “Ask Letter During Make Appt?:” prompt if there are printers available and you want to give an appointment slip when patients are present. If you do not have printers available or patients are never not present, then type NO at the “Ask Letter During Make Appt?:” prompt. If clinics do not have a pre-appointment letter set up, then the “Appointment Slip” general letter will be used. Routing slips are no longer used as appointment slips; they are solely tools for the chart room.
13. Type YES if only those holding supervisor keys should be able to see who made an individual appointment at the “Restrict View of Who Made Appt:” prompt.

Patient Information Management System v5.3
Installation Guide and Release Notes 17 Implementation and Maintenance June 2004
14. Type the number of days (up to 365) to go back to count up no-shows for patients for this division at the “Waiting Period for No-Shows:” prompt. Each clinic can also have its own parameter that overrides this one. This count displays when making an appointment, under the Display Patient Appointments and the No-Show Reports option.
15. Type the amount of registration data that can be updated during the Make Appointment and Check-in options at the “Patient Registration Edit?:” prompt.
a. Type 0 (NONE) to turn off access to updating any Patient Registration data.
b. Type 1 (YES, ADDRESS ONLY) to restrict all users to only updating the patient’s address.
c. Type 2 (YES, FULL EDIT OR ADDRESS) to restrict the amount of updating to a security key. Holders of the SDZREGEDIT key will be able to access full Patient Registration. All other users can only update patient addresses.
d. Type 3 (YES, FULL EDIT ONLY) to allow holders of the SDZREGEDIT key to access full Patient Registration. All other users will have no Registration access.
SCHEDULING PARAMETERS for ANMC Page 1 of 2 OUTPATIENT ONLY (answer only if YES): APPT LAB TEST START TIME: APPT EKG START TIME: APPT X-RAY START TIME: ADDRESS LOCATION ON LETTERS: REMOVE SALUTATION FROM LETTERS: ASK LETTER DURING MAKE APPT?: RESTRICT VIEW OF WHO MADE APPT: WAITING PERIOD FOR NO-SHOWS: PATIENT REGISTRATION EDIT?: COMMAND: Press <PF1>H for help Insert
Figure 6-1: Editing facility-wide parameters (screen 1)
16. Once done with screen 1, proceed to screen 2. Again, underlined fields are required.
17. Type YES at the “File Room Uses Terminal Digit?:” prompt if your charts stored in terminal digit order.
18. When printing the file room list, which sort order do you want as the default? Type C for sorting by clinic code, P for sorting by principal clinic, or T for sorting by terminal digit at the “Default File Room List Sort:” prompt. If your site does not store charts by terminal digit then choice T will print in chart order.

Patient Information Management System v5.3
Installation Guide and Release Notes 18 Implementation and Maintenance June 2004
19. Type which format you want printed at your facility at the “Routing slip format:” prompt. You can pick only one format for your whole facility.
a. Short: No address, no future appointments; fits on 3x5 card but can be printed on 8x11 paper which is then folded. Lists patient name, chart #, appointment date and information on each appointment for that date.
b. Long: Includes patient’s address, future appointments and fits on 8x11 paper.
c. Duplicate: Fits 2 copies of same routing slip on one 8x11 sheet of paper separated by a dashed line. Does not include patient’s address or future appointments.
20. Type YES or NO at the “Print Extra Routing Slip for Chart?:” prompt.
a. If you type NO, only one routing slip for each patient will print. It is assumed that copy will be used as a charge out slip in medical records.
b. If you type YES, the software will print one routing slip for the chart room plus one for each appointment the patient has that day. It is assumed the first extra routing slip is placed in the chart. Any others are routed to those clinics seeing the patient later in the day so they know from whom they will be receiving the paper chart.
21. Type YES or NO at the “Print Health Summaries with Routing Slips?:” prompt.
a. If you type YES, then Health Summaries and other forms (Medication Profiles, Address Update forms, Encounter forms) will print along with the routing slips for those clinics that say YES to the forms.
b. If you type NO, you must use the option Health Summaries By Clinic to print out the Health Summaries and other forms for the patients been seen in clinic. This is most often used, if the routing slip printer is loaded with paper smaller than the 8x11 needed by the other items.
22. If you use a different printer for Health Summaries than for Routing Slips type that printer’s name at the “Default Health Summary Printer:” prompt. Otherwise, type the same device you entered under default routing slip printer. If you leave this blank, then the terminal’s closest printer will be the default.
23. If your facility uses a different printer for walk-ins and same day appointments than for printing Routing Slips for scheduled appointments, type that printer’s name at the “Default Walk-in Printer:” prompt. If you use the same printer, just type the same device you entered for Default Routing Slip Printer. If you leave this blank, the person making the appointment will be asked for the printer’s name.
24. Some facilities use a different printer for Chart Requests than for printing out Routing Slips for scheduled appointments. If you use the same printer, just enter the same device you entered for Default Routing Slip Printer at the “Default Chart Request Printer:” prompt. Otherwise, type the name of that other printer at the “Default Chart Request Printer:” prompt.

Patient Information Management System v5.3
Installation Guide and Release Notes 19 Implementation and Maintenance June 2004
25. Type the terminal type with code to change font for Action Profiles if they are used by your facility when printing routings slips for clinic appointments at the “Action Profile Terminal Type:” prompt.
26. Type the amount of time you want to wait to print a AIU at the “Waiting Period For AIU:” prompt. The AIU is an Address & Insurance Update form. A facility can use it to update registration data on their patients on a periodic basis. You can decide how often to print this form for a patient. The time period is based on their last registration update date. You can enter any whole number from 0 to 365. By typing a 0, the AIU will print every time a patient comes for an outpatient appointment. One year is the limit. When setting up your clinics, you can turn the AIU on or off for each clinic. The waiting period stays the same for the whole facility.
SCHEDULING PARAMETERS for ANMC Page 2 of 2 FILE ROOM USES TERMINAL DIGIT?: DEFAULT FILE ROOM LIST SORT: ROUTING SLIP FORMAT: PRINT EXTRA ROUTING SLIP FOR CHART?: PRINT HEALTH SUMMARIES WITH ROUTING SLIPS?: DEFAULT HEALTH SUMMARY PRINTER: DEFAULT WALKIN PRINTER: DEFAULT CHART REQUEST PRINTER: ACTION PROFILE TERMINAL TYPE: WAITING PERIOD FOR AIU: COMMAND: Press <PF1>H for help Insert
Figure 6-2: Editing facility-wide parameters (screen 2)
6.2.3 Update Appointment Slip Letter A generic letter named appointment slip was added to the Letter file during installation. If your facility turned on the “Ask Letter During Make Appt.” parameter, this letter is the default letter to print at that time. Each clinic may have a specific letter defined for it but this generic letter is used if nothing is defined. Use this option to modify the letter text to suit your facility.
6.2.4 View Scheduling Event Driver This version of Scheduling now contains an event driver much like the one in ADT. It allows a site to easily add functions from other software packages at make appointment, check-in, cancel appointment, and other related events. This view option shows you what is currently attached to your event driver. If you know of other protocols that need to be added for your site, you must add them through FileMan.

Patient Information Management System v5.3
Installation Guide and Release Notes 20 Implementation and Maintenance June 2004
6.2.5 Set Up a Clinic (Optional) The Set Up a Clinic option does not have to be done at install. At your earliest convenience please review your busiest clinics to make sure their parameters are set correctly. Do this by running the Set Up a Clinic option on the Supervisor’s Menu. There are many new parameters so review of all clinics will be required.
6.3 Printing PCC+ forms from the Scheduling Package If your site uses PCC+ in all or some of your clinics and you want to print the PCC+ forms during the check-in process using the Scheduling Package, you will need to check the following:
Security Keys
All users printing PCC+ forms during check-in must have 2 security keys, VENZPRT and VENZSCH
Clinic Setup
All clinics that you will be printing PCC+ forms for during check-in must be setup in the Scheduling Package to require a provider at check-in. Check your clinic profile for the clinics that use PCC+ and make sure the field “Require Provider” is set to yes. During the check-in process, a provider must be entered.

Patient Information Management System v5.3
Installation Guide and Release Notes 21 Implementation and Maintenance June 2004
Figure 6-3: Setting up a clinic
PCC+ setup
In the setup of the clinic in PCC+ the field “DEPARTMENT (CLINIC STOP)” must match the field “CLINIC CODE” in the setup of the clinic in the Scheduling Package.
Printing the PCC+ form during check-in
When checking in a patient, the user will be prompted for the provider, if they want a PCC+ form or not, and the name of the PCC+ clinic. In most cases, the PCC+ clinic name will appear as the default

Patient Information Management System v5.3
Installation Guide and Release Notes 22 Implementation and Maintenance June 2004
Figure 6-4: Printing the PCC+ form during check-in
6.4 Implementing Admissions Module Skip this step if your facility does not have inpatient or observation beds. Make sure to answer Yes to the Outpatient Only question under the Scheduling implementation. Before placing the BDGMENU option on your users main menus, run through the implementation steps using the routine ^BDGIMPL. Each step can be accessed later on the ADT System Definition menu. At programmer prompt, set up your user variables using D ^XUP. When back to the programmer prompt, type D EN^BDGIMPL. The following menu will be displayed. Perform each step in order.
6.4.1 Edit System-Wide Parameters Answer the series of questions presented.
1. Type the name of your main facility “Primary Facility Name:” prompt.
2. Type YES if you have more than one site with an official IHS location code for which clinic scheduling is performed on this computer system otherwise type NO at the “Multidivision Med Center:” prompt.

Patient Information Management System v5.3
Installation Guide and Release Notes 23 Implementation and Maintenance June 2004
6.4.2 Edit Facility-wide Parameters Answer the series of questions presented.
1. For multiple division sites, you will need to update this next set of parameters for each facility using Scheduling. For single division sites, type your facility name at the “Select IHS Scheduling Parameters Division:” prompt.
2. The “Institution File Pointer:” prompt should already be completed. This is the name of the facility as it appears in the official IHS list and therefore in the Location and Institution files.
3. If not already filled in, type the internal entry number for this facility from the Location file at the “Facility Number:” prompt.
4. A data entry screen (1 of 2) for your facility will be displayed (Figure 6-6). The underlined data fields are required.
5. Type YES to have a chart requested when a patient is admitted at the “Request Chart at Admission?:” prompt.
6. Type the clinic name to be used when requesting admission charts “Admission Request Clinic:” prompt.
7. Type YES if your facility uses locator cards at the “Use Locator Cards?:” prompt.
8. Type a printer to receive locator cards at the “LOCATOR CARD PRINTER:” prompt.
9. Enter the A sheet format used by your facility at the “Clinical Record Brief Format:” Prompt. The two choices sent with the package are IHS and ANMC. You may set up your own if you wish.
10. Type the default when printing a final A sheet at the “Final a Sheet Default:” prompt. The user will still be able to print any of the three formats. This just sets the default answer. Choose from:
a. A sheet only
b. A sheet & CPT list
c. MCR/MCD listing
11. Type YES to have the software automatically create an Incomplete Chart entry upon discharge at the “Create Incomplete Chart Entry at Discharge:” prompt.
12. Enter the number of days needed before a chart becomes delinquent at the “Days to Delinquency:” prompt. If not answered, it defaults to 30 days.
13. Type YES if you track bill prep completion dates in the Incomplete Chart Tracking module at the “Bill Prep Tracked?:” prompt.

Patient Information Management System v5.3
Installation Guide and Release Notes 24 Implementation and Maintenance June 2004
14. Enter how far back access to the census files are allowed (# of days) at the “Census Lockout Days:” prompt. This prevents entering or changing admissions, transfers or discharges past this number of days also.
15. Type the age at which your facility no longer considers someone a pediatric patient at the “Minimum Age for Adult Patients:” prompt. Used to determine adult vs. pediatric service statistics.
16. Type a clinic to be used when a Day Surgery visit is created at the “Day Surgery Hospital Location:” prompt. If you do not populate this field, when users select the Day Surgery (DSE) option they will see the following error (Figure 6-5):
Each Division must have a valid Clinic entered in the DAY SURGERY HOSP LOCATION field, found in the ADT parameters set up Press ENTER to continue:
Figure 6-5:Error message
Figure 6-6: Editing Facility-wide parameters (steps 1-16)
17. Type YES to have all transfers in from other facilities send a bulletin to the designated mail group at the “Transfer in Bulletin?:” prompt.
18. Type YES to have all admissions within a specified number of days after a day surgery trigger a bulletin “Admit after DS Bulletin?:” prompt.

Patient Information Management System v5.3
Installation Guide and Release Notes 25 Implementation and Maintenance June 2004
19. Enter the number of days after day surgery to still trigger the bulletin. Required only if Admit after DS bulletin turned on at the “Time Length for Admit DS:” prompt.
20. Type YES to have all readmissions within a specified number of days from discharge trigger a bulletin at the “Readmission Bulletin?:” prompt.
21. Enter the number of days between discharge and the next admission to be considered a readmission that triggers a bulletin. Required only if Readmission bulletin turned on at the “Time Length of Readmission:” prompt.
22. Type YES to have all readmissions within 24 hours of discharge trigger a bulletin at the “Readmit Within 24hrs Bulletin?:” prompt. These can be errors that need to be corrected.
23. Type YES to have all admissions with a length of stay under 24 hours trigger a bulletin at the “Admission <24 hrs Bulletin?:” prompt. These could be observations entered incorrectly.
24. Type YES to trigger a bulletin every time an admission is deleted at the “Admission Deleted Bulletin?:” prompt. This alerts those in charge of the census files, that an error has been fixed and census files may need updating.
25. Type YES to have all transfer to ICU designated wards trigger a bulletin at the “ICU Transfer Bulletin?:” prompt.
26. Type YES to have only those returns to ICU wards within a designated time frame trigger a bulletin “Return to ICU Bulletin?:” prompt.
27. Enter the number of days within which a return to ICU warrants a bulletin “Time Length for Return to ICU:” prompt.
28. Type YES to have all discharges to other inpatient facilities trigger a bulletin at the “Transfer Out Bulletin?:” prompt.
29. Answer YES to have all AMA (Against Medical Advise) discharges trigger a bulletin at the “AMA Discharge Bulletin?:” prompt.
30. Type YES to have all inpatient deaths trigger a bulletin at the “Inpatient Death Bulletin?:” prompt.

Patient Information Management System v5.3
Installation Guide and Release Notes 26 Implementation and Maintenance June 2004
Figure 6-7: Editing Facility-wide parameters (steps 17-30)
6.4.3 Setup ADT Files: Use this option to set up and maintain the basic tables used by ADT.
Hospital Service Setup
This setup option presents a list of the major services and departments in your facility. These include all patient care and administrative services. The list displays service name, abbreviation, mail code, and type (clinical vs. administrative). If the service has been closed, then that date will display in the Type column. Although this file may be used by other RPMS software applications, in ADT it is mainly used by the Treating Specialty setup to link inpatient services to major hospital ones.
You have the option to add new services. Deleting services is not allowed. Under the Edit option, you can enter a Date Closed to make the service unavailable for selection.
Treating Specialty Setup
This setup option presents all official IHS inpatient services and their IHS code in alphabetical order. The display also includes abbreviations, specialty, hospital service, and whether or not this treating specialty is set up as an active admitting service at your facility. Only those set up correctly may be chosen when admitting a patient. If the treating specialty is set up as an active admitting service, it must have an effective date. The effective date must be prior to the date that the census will be initialized.

Patient Information Management System v5.3
Installation Guide and Release Notes 27 Implementation and Maintenance June 2004
Important Tip: The recommendation is to set the effective date 60 days prior to the census initialization date.
Note: Due to new date fields, editing of all your admitting services is required.
New in this version are observation services. They were added during the installation of PIMS. For IHS codes, they utilize the code for the corresponding inpatient service followed by the letter O. Please activate those observation services used by your facility.
Wards Setup
This setup option presents all active and inactive wards contained in your files. The data is stored in two different files: Ward Location (#42) with VA data fields and IHS Ward Definition (#9009016.5) with IHS data fields. During the installation of PIMS version 5.3, data for all active and inactive wards was copied to the IHS file.
This list is presented first in order by facility and within that active wards first, followed by inactive ones in alphabetical order. The display includes name, abbreviation, division (facility), and designation. This last column can include information such as inactive, ICU ward, or Seriously Ill ward.
Note: Before using ADT, please make sure that all active wards have the proper division entered, have the correct abbreviation and designations.
New to this version of PIMS is the A Sheet Printer question. If you want the ADT software to automatically print A Sheets at admission to the ward, enter the ward’s printer here. Otherwise, the user will be asked to select a printer.
Another new field is Print Order that designates that the order wards will be presented in the current inpatient listings. If you wish wards to print alphabetically, simply set the Print Order on all wards to one.
Room-Bed Setup
This setup option presents all defined room-beds in your facility. Those that have been inactivated are listed last. For each, the room-bed designation is displayed along with description, bed phone number, and inactive. You can add new room-bed designations, edit current ones including assigning them to the proper wards or print the list.

Patient Information Management System v5.3
Installation Guide and Release Notes 28 Implementation and Maintenance June 2004
Transfer Facilities Setup
This setup option presents a list of all transfer facilities used by your site. During the installation of ADT version 5.3, the transfer facility fields in ADT and PCC were converted from variable pointers looking at two files (Institution and Vendor) to pointers looking at one locally maintained table. This option displays the entries in this new table.
This option is used to add new facilities to the list, edit existing ones, and print the list. Please review this list to eliminate duplicates (inactivate one of them) and change names if spelled incorrectly. You cannot delete any entries but can only inactivate them.
The Link to the IHS Facility field (last column) points to the Location file for information such as IHS facility code. This field is not completed for non-IHS/tribal facilities.
ADT Event Driver View
This is solely a view option. It displays the current items attached to the ADT Event Driver. Upon any ADT event (admission, transfer, or discharge), the event driver is triggered and each item on the list is executed. Please review this periodically to make sure all necessary items are on the list. This display also includes technical documentation on variables set at event time and how to add a new event to the list.
Add Mail Groups to PIMS Bulletins
This setup option is used if you turned on any of the ADT bulletins. The bulletins will not fire if there are no recipients. For those bulletins you have turned on, please enter at least one mail group to receive that bulletin. The creation of mail groups must be done under MailMan.
6.4.4 Check ADT-PCC Link This option gives you a quick look at the status of the link between ADT and PCC. It will give you the status of each component making up the link. At the end, it will determine if the link is properly turned on or not. If not turned on, then no visits will be created from ADT. Fixing any component must be done via FileMan.
ADT-PCC Link Components
Does the RPMS Site file have an entry for this site? And is the PCC Present question answered to YES?
Is your site defined in the PCC Master Control file?
Is the default visit type defined in the PCC Master Control file for your site? And what is it?

Patient Information Management System v5.3
Installation Guide and Release Notes 29 Implementation and Maintenance June 2004
What is the primary ADT division for your system?
Is PIMS defined in your Package file?
Is the PIMS package defined in the PCC Master Control file for your site?
And under that PIMS entry, is the question “Pass Data to PCC” set to YES?
6.4.5 Initialize Census Files With this new version, the census files have been moved to new data dictionaries. The data has been left alone in the old files. A new feature is that you can initialize the census (start over) any time you want WITHOUT having to figure out who was an inpatient on your starting date. The software will determine that for you. You will be asked for a starting date. The earlier the date, the longer this initialization will take. We recommend 2 years in the past as a maximum. It will be queued to run in the background. All owners of the DGZMGR key will receive a mail message when it completes.
Note: All Sites using the ADT package prior to this installation must initialize their census files after the installation.
6.5 Implementing Sensitive Patient Tracking As part of the effort to ensure patient privacy, additional security measures have been added to the patient access function. Any patient added to the DG Security Log file will have access to his/her record tracked. In addition, for patients flagged as Sensitive, warning messages will be displayed when staff access these records. For staff not holding a special key, choosing to continue accessing the record means a bulletin is sent to a designated mail group. The long warning message is removed when accessing inpatients since those records must be accessed many times a day. A site can also restrict staff members from accessing their own patient record.
6.5.1 Implementation Steps Upon installation, none of the new functionality of this module goes into effect until turned on. Listed below are the recommended steps to implement these new security measures:
1. Give the DG Security Officer and DG Sensitivity keys to those individuals designated to maintain the system.
2. Place the BDG Security menu on the appropriate main menu for those given the aforementioned keys.
Patient Information Management System v5.3
Installation Guide and Release Notes 30 Implementation and Maintenance June 2004
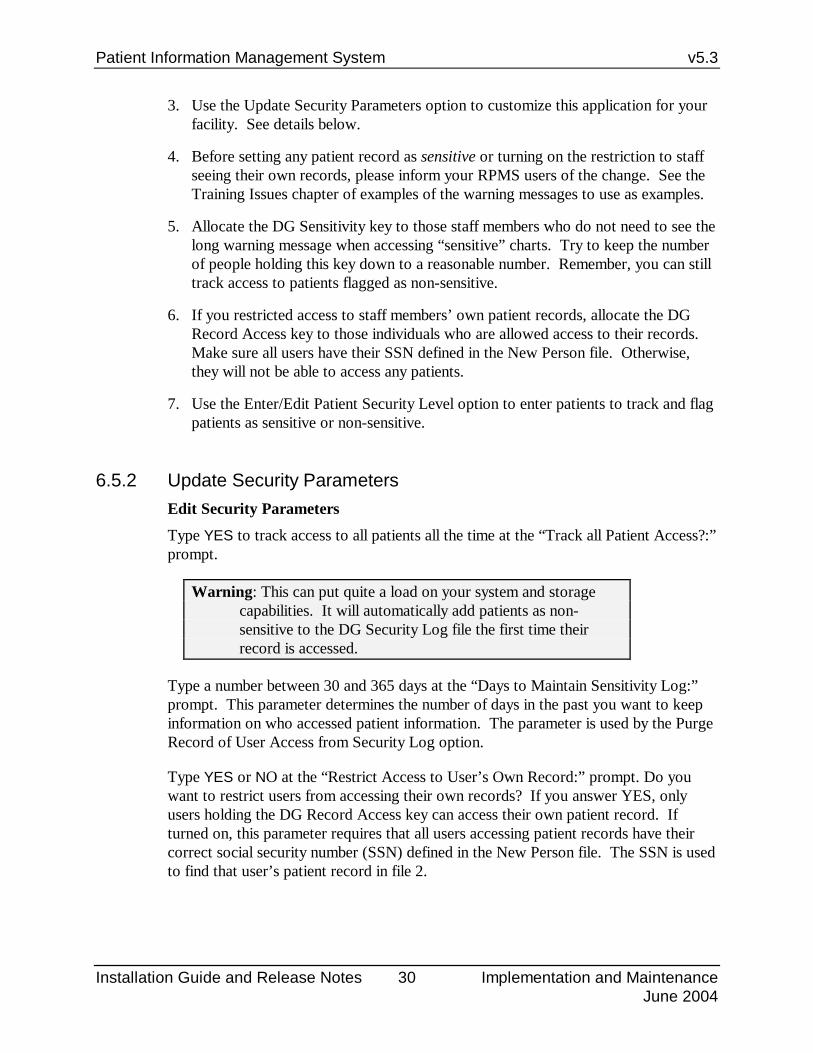
3. Use the Update Security Parameters option to customize this application for your facility. See details below.
4. Before setting any patient record as sensitive or turning on the restriction to staff seeing their own records, please inform your RPMS users of the change. See the Training Issues chapter of examples of the warning messages to use as examples.
5. Allocate the DG Sensitivity key to those staff members who do not need to see the long warning message when accessing “sensitive” charts. Try to keep the number of people holding this key down to a reasonable number. Remember, you can still track access to patients flagged as non-sensitive.
6. If you restricted access to staff members’ own patient records, allocate the DG Record Access key to those individuals who are allowed access to their records. Make sure all users have their SSN defined in the New Person file. Otherwise, they will not be able to access any patients.
7. Use the Enter/Edit Patient Security Level option to enter patients to track and flag patients as sensitive or non-sensitive.
6.5.2 Update Security Parameters Edit Security Parameters
Type YES to track access to all patients all the time at the “Track all Patient Access?:” prompt.
Warning: This can put quite a load on your system and storage capabilities. It will automatically add patients as non-sensitive to the DG Security Log file the first time their record is accessed.
Type a number between 30 and 365 days at the “Days to Maintain Sensitivity Log:” prompt. This parameter determines the number of days in the past you want to keep information on who accessed patient information. The parameter is used by the Purge Record of User Access from Security Log option.
Type YES or NO at the “Restrict Access to User’s Own Record:” prompt. Do you want to restrict users from accessing their own records? If you answer YES, only users holding the DG Record Access key can access their own patient record. If turned on, this parameter requires that all users accessing patient records have their correct social security number (SSN) defined in the New Person file. The SSN is used to find that user’s patient record in file 2.

Patient Information Management System v5.3
Installation Guide and Release Notes 31 Implementation and Maintenance June 2004
Type the mail group to be notified when sensitive records are accessed by users not holding the DG Sensitivity key “Sensitive Record Accessed Group:” prompt. This must be a mail group already defined. You can add new mail groups under action 2 – Edit Mail Group Members detailed below.
Type the mail group to be notified when a patient’s security level is changed from sensitive to non-sensitive “Sensitivity Removed Group:” prompt. This must be already defined in the Mail Group file.
Edit Mail Group Members
Add members to mail groups defined in Security Parameters. You can add a new mail group here. The add function automatically sets the mail group type to public, self-enrollment to No and restrictions to Unrestricted. If you want these changed, you must access the Mail Group Edit on the site manager menu.
You also need to add members to the DG Missing New Person SSN mail group. This mail group receives bulletins when users don’t have their SSN defined in the New Person file. The bulletin is only sent if the Restrict Access to User’s Own Record parameter is turned on, the user does not hold the DG Record Access key, and there is no SSN in file 200 for that user. These users cannot access any patient record because the software cannot determine if the user is accessing his/her record. Until at least one member is added to this mail group, you will be reminded to add members when you select this action.
List Security Key Holders:
This action simply lists everyone who holds security keys used by this module. This is provided to help you keep track of who has which level of access.

Patient Information Management System v5.3
Installation Guide and Release Notes 32 Security Keys June 2004
7.0 Security Keys
7.1 Sensitive Patient Tracking Security Key Description DG RECORD ACCESS If access to user’s own record is restricted, this key
overrides it and allows user to see his/her patient record.
DG SECURITY OFFICER Allocate for full access to this module.
DG SENSITIVITY Allocate for access to all patient records. Allows access to sensitive records
7.2 ADT Security Key Description DGZADT Assign this key to staff who will be entering the actual
admissions, discharges, and transfers.
DGZAUTH Assign to users who will be doing the data entry for the Scheduled Visit module.
DGZDAY Assign to users who need access to the Day Surgery menu. Do not assign this key if your facility uses the VA Surgery package.
DGZDAY1 Unlocks the Day Surgery Enter/Edit options.
DGZDAYAU This key unlocks the Day Surgery Audit report.
DGZICE Assign to users who need access to edit supervisor fields in the Incomplete Chart file. This key also unlocks the Fix Visit in ICE [BDG IC Edit Visit] option.
DGZMENU Assign to all personnel who need access to ADT. This key alone will result in a view-only access to ADT.
DGZNOCLN Reverse key; takes away access. Assign to users who need access to some ADT data but not to clinical data such as diagnosis or seriously Ill status. Use this key in combination with DGZMENU only. Assigning any other ADT keys will override part of this restriction.

Patient Information Management System v5.3
Installation Guide and Release Notes 33 Security Keys June 2004
Security Key Description DGZNUR Assign to nursing personnel who will designate patients as
Seriously Ill or DNR.
DGZPCC Assign this key to the medical record personnel that process incomplete charts and code the inpatient records.
DGZPCC1 Assign this key to the inpatient coders.
DGZPCC2 Assign to personnel who need access to print the Final A sheet. Assigning this key will add "Final A sheet" as a choice under Admissions forms.
DGZPCC3 This key unlocks the PCC Day Surgery Visit Listing menu option
DGZSUP Assign this key only to those users who need to access the Supervisor Menu options. These include running the census updates.
DGZSYS Assign this key to the application coordinator and admitting supervisor only. This key allows access to ADT parameters and setup options.
7.3 Scheduling Security Key Description DGZNOCLN REVERSE KEY; takes away access!! Assign to users who
need access to some ADT data but NOT to clinical data such as diagnosis or seriously Ill status. Use this key in combination with DGZMENU only! Assigning any other ADT keys will override at least part of this restriction.
SDMOB Allows user to exceed the maximum overbook parameter in all clinics. Be very careful assigning this key. For most users who need master overbook access, assign by clinic or by principal clinic. This can be done under Set Up A Clinic.
SDOB Allows user to overbook a time slot up to the maximum per day for all clinics. Be very careful assigning this key. For most users who need overbook access, assign by clinic or by principal clinic under Set Up A Clinic.
SDZAC Assign this key only to those users needing access to the restricted supervisor options that now live under the Application Coordinator menu. Restrict access to very few people.
SDZMENU Access to Main Scheduling menu; basic key.
SDZMHPCP This key allows users to update MH PCP.
Patient Information Management System v5.3
Installation Guide and Release Notes 34 Security Keys June 2004
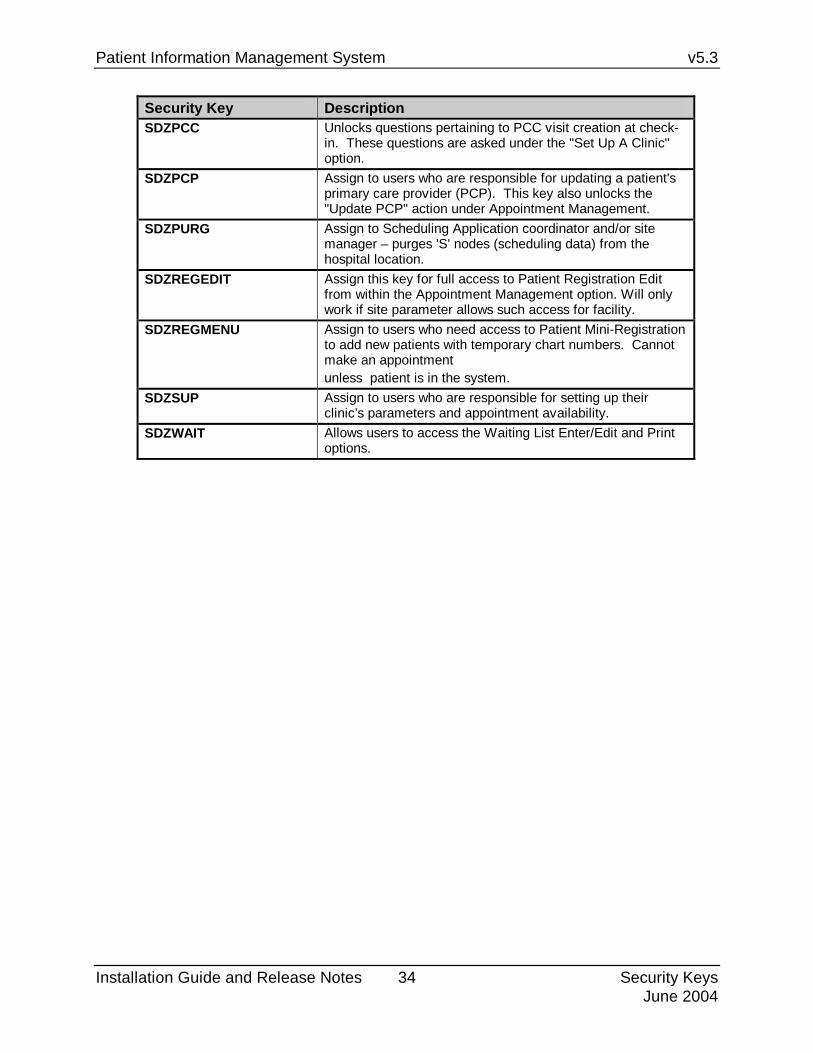
Security Key Description SDZPCC Unlocks questions pertaining to PCC visit creation at check-
in. These questions are asked under the "Set Up A Clinic" option.
SDZPCP Assign to users who are responsible for updating a patient's primary care provider (PCP). This key also unlocks the "Update PCP" action under Appointment Management.
SDZPURG Assign to Scheduling Application coordinator and/or site manager – purges 'S' nodes (scheduling data) from the hospital location.
SDZREGEDIT Assign this key for full access to Patient Registration Edit from within the Appointment Management option. Will only work if site parameter allows such access for facility.
SDZREGMENU Assign to users who need access to Patient Mini-Registration to add new patients with temporary chart numbers. Cannot make an appointment unless patient is in the system.
SDZSUP Assign to users who are responsible for setting up their clinic’s parameters and appointment availability.
SDZWAIT Allows users to access the Waiting List Enter/Edit and Print options.

Patient Information Management System v5.3
Installation Guide and Release Notes 35 Appendix A: Implementation Checklists June 2004
8.0 Appendix A: Implementation Checklists
8.1 PIMS Site Preparation List Action Item Responsible Identify Super Users for ADT, Scheduling,
Sensitive Pt Tracking Site Manager/Clinical Applications Coordinator
Identify all end users Clinical Applications Coordinator Review the implementation documentation,
Review Preparations for Install Steps 1-8 PIMS Implementation Team
Obtain access to training server on all workstations and verify that all users can log in
Site Manager/Clinical Applications Coordinator
Plan GO LIVE DATE Clinical Applications Coordinator Schedule On Site Training Session and
Implementation Date with ITSC PIMS Implementation Team
Clinical Applications Coordinator
Review and complete the Scheduling Checklist and the ADT Checklist
Clinical Applications Coordinator
Review all terminals and terminal emulators on PCs that bold and underline items in list manager and verify that these screens are readable. Verify that users terminal type name is set to C-VT100
Site Manager
Provide mandatory on site end user training and keep a record of all attendees. Verify that all users have been trained. The ITSC PIMS Team will provide the training on site.
Clinical Applications Coordinator
Verify that users know how to use list manager and screen man screens. Verify that all users have been trained.
Clinical Applications Coordinator
Assign menu options to each user to test on the test server (Alpha/Beta Sites)
Clinical Applications Coordinator
If your site uses custom menus or secondary menus you will need to print screen captures of this if you want to reestablish these after the installation.
Site manager
If your site has modified any software, save copies of these routines.
Site manager
Notify all users that the first time they login to PIMS –they may receive a prompt to continue where they were (because they were timed out under the old package). Have the users answer NO to this question. After the users first logon, FileMan will have the new options setup correctly for that user
Clinical Applications Coordinator
Patient Information Management System v5.3
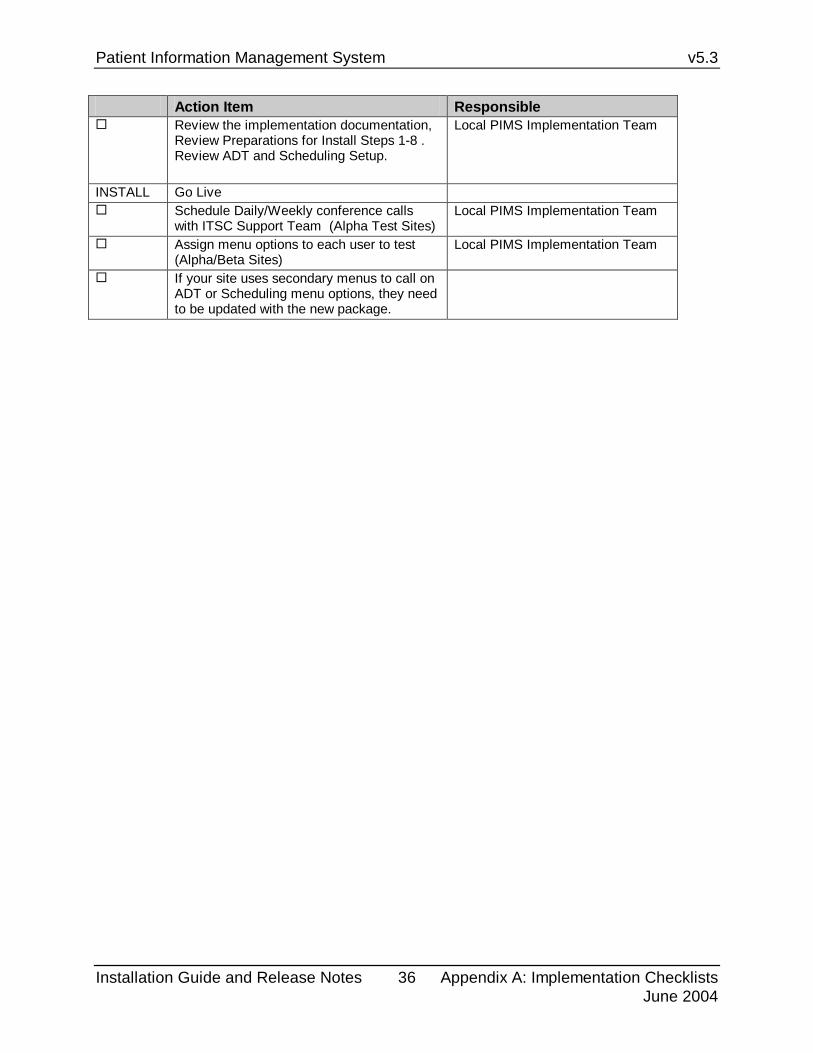
Installation Guide and Release Notes 36 Appendix A: Implementation Checklists June 2004
Action Item Responsible Review the implementation documentation,
Review Preparations for Install Steps 1-8 . Review ADT and Scheduling Setup.
Local PIMS Implementation Team
INSTALL Go Live Schedule Daily/Weekly conference calls
with ITSC Support Team (Alpha Test Sites) Local PIMS Implementation Team
Assign menu options to each user to test (Alpha/Beta Sites)
Local PIMS Implementation Team
If your site uses secondary menus to call on ADT or Scheduling menu options, they need to be updated with the new package.

Patient Information Management System v5.3
Installation Guide and Release Notes 37 Appendix A: Implementation Checklists June 2004
8.2 ADT Checklist Timeline Action Item Prior to Install
• Print out a hard copy of the ADT Site Parameters • Review all entries in your Ward Location file (#42). Active and inactive wards will
have their IHS data moved to the new IHS Ward Definition file. • Optionally, to speed up implementation after install, you can edit the
Service/Section file (#49) via FileMan to make sure all services are in the file, the Type of Service field is filled in, and a Date Closed is placed on any no longer active. See Set Up ADT Files under the Implementation section of this chapter for details.
• For ADT sites, work with your admitting office to compile a list of active inpatient services; pick an effective date for those already used; and obtain a list of observation services to be used at your facility.
• Print out a hard copy of your adt site parameters file After Install
REVIEW/SETUP ADT files/parameters: • Setup Site Parameters • Hospital Service should have name, abbreviation and type of service • Treating Specialty should have abbreviation, hospital service (Service/Section,
Type of Service or MIS Costing Code), whether or not it is an admitting service, effective date (post date this at least one year) and whether the treating specialty is active. You must enter an Effective date and Activate the TS in order that it may be selected as a Facility TS at the time of admitting a patient. Additionally, the effective date which is entered will also affect various ‘lists’ and reports (by date range). Tip: If you decide to change the default name for any observation treating specialty, you must keep the word ‘OBSERVATION’ in the new name. Additionally, do not post date ‘observation treating specialty effective date’, use the actual date.
• Room-Bed Setup Prior to implementation what is their observation beds, how many where?
• Transfer Facilities Setup • ADT Event Driver View • Add Mail Groups to PIMS Bulletins (optional)
After Install
KEYS • Determine who needs access to pt demographics, but not clinical data. Assign
DGZNOCLN • Assign the ‘new’ keys: DGZICE – Assign to users who need access to edit supervisor fields in the Incomplete Chart file. This key also unlocks the Fix Visit in ICE [BDG IC EDIT VIST] option.

Patient Information Management System v5.3
Installation Guide and Release Notes 38 Appendix A: Implementation Checklists June 2004
8.3 Scheduling Checklist Timeline Action Item Prior to Install
KEYS (Page 132) • SDOB & SDMOB (overbook access): Print out a list of users who are assigned
these keys. Review users currently assigned either of these keys and add/remove keys as appropriate. The preferred method for most users who need overbook access is to assign overbook access by clinic or principal clinic under the Set Up A Clinic option (pg 150 Scheduling user manual).
• SDZSUP (Supervisor Menu): Print out a list of users currently assigned this key. Review user currently assigned this key and add/remove keys as appropriate This key should be assigned only to persons setting up ‘their’ clinic parameters and appointment availability
• SDZPURG Print out a list of users currently assigned this key. Review users currently assigned this key and add/remove keys as appropriate. This key should be assigned to the application coordinator and the site manager
• SDZPCC: Print out a list of users currently assigned this key. Review users currently assigned this key and add/remove keys as appropriate. This key unlocks questions pertaining to PCC visit creation at check-in.
Prior to Install
CLINIC SETUP: • Print out from the Reports menu, select Print Clinic Profiles for ALL clinics • Review all existing clinics and determine which ones will be active and which
ones will be inactive. Inactivate the old clinics which are no longer in use so that they do not carry over. After determining which clinics will be active, identify the person or persons that will be designated as the supervisor for each of the active clinics (and assign them the SDZSUP key).
• Tip: Mark Principle clinic names with a trailing asterisk (or similar type character). This will aid the users in quickly identifying them on lists or reports.
• Tip: Clinics designated as Principal clinics do not need an entry in the PRINCIPAL CLINIC field in the clinic setup.
After Install
Assign New Keys • SDZAC (New key) Application Coordinator menu found under the Supervisor
Menu. This key should be assigned to the application coordinator (and possibly a backup person)
• SDZPCP (New key) : Assign to person responsible for updating a patients Primary Care Provider (PCP) under Scheduling. NOTE: PCC users with the APCDZMENU key can also update a PCP.
• SDZMHPCP (New key): Assign to person who will update MH PCP
• DGZNOCLN: This is a REVERSE KEY; takes away access!! Assign to users who need access to scheduling data but not clinical data such as printing health summaries or medication profiles.

Patient Information Management System v5.3
Installation Guide and Release Notes 39 Appendix A: Implementation Checklists June 2004
After Install
Review Existing Keys • SDMOB Allows user to exceed the maximum overbook parameter in all clinics.
Be very careful assigning this key. For most users who need master overbook access, assign by clinic or by principal clinic. This can be done under Set Up A Clinic.
• SDOB Allows user to overbook a time slot up to the maximum per day for all clinics. Be very careful assigning this key. For most users who need overbook access, assign by clinic or by principal clinic under Set Up A Clinic.
• SDZMENU Access to Main Scheduling menu; basic key.
• SDZPCC Unlocks questions pertaining to PCC visit creation at check-in. These questions are asked under the "Set Up A Clinic" option.
• SDZPURG Assign to Scheduling Application coordinator and/or site manager – purges 'S' nodes (scheduling data) from the hospital location.
• SDZREGEDIT Assign this key for full access to Patient Registration Edit from within the Appointment Management option. Will only work if site parameter allows such access for facility.
• SDZREGMENU Assign to users who need access to Patient Mini- Registration to add new patients with temporary chart numbers. Cannot make an appointment unless patient is in the system.
• SDZSUP Assign to users who are responsible for setting up their clinic’s parameters and appointment availability.
• SDZWAIT Allows users to access the Waiting List Enter/Edit and Print options. After Install
Clinics • To avoid people designated as supervisors from going in to another clinics set up,
enter the designated supervisor(s) name in the CLINIC OWNER field for that particular clinic – you can enter more than one name if needed (backup person). If PROHIBIT ACCESS TO A CLINIC (found on page 2 when setting up a clinic) is answered with ‘YES’, then only privileged users (entered by the person setting up the clinic) will be allowed to Make Appointments to that clinic.
• Review and complete clinic profiles for all active clinics. New fields include: Facility
• SDOB & SDMOB (overbook access): Reference the list of users who were assigned SDOB and SDMOB keys. The preferred method for most users who need overbook access is to assign overbook access by clinic or principal clinic under the Set Up A Clinic option (pg 150 Scheduling user manual).
After Install
PRIMARY CARE PROVIDER (PCP) SETUP (OPTIONAL) • Someone should start identifying team names; which providers will be on which
teams and enter this information into the system. • Providers – Confirm that PCC users (with the APCDZMENU) know how to
designate a PCP for a patient in PCC. Schedulers (with the new SDZPCP key) can enter them using the PCP menu option or the AM menu option from the Scheduling main menu.

Patient Information Management System v5.3
Installation Guide and Release Notes 40 Contact Information June 2004
9.0 Contact Information If you have any questions or comments regarding this distribution, please contact the OIT Help Desk (IHS).
Phone: (505) 248-4371 or (888) 830-7280 (toll free)
Fax: (505) 248-4363
Web: http://www.ihs.gov/GeneralWeb/HelpCenter/Helpdesk/index.cfm
Email: [email protected]


![BSD Security BSD 07 2011[1]](https://static.fdocuments.in/doc/165x107/547c144d5906b56d798b46af/bsd-security-bsd-07-20111.jpg)