Patient Guide Knee Replacement Surgery Guide Knee Replacement Surgery. ... The operation you are...
32
Joint Program Patient Guide Knee Replacement Surgery
Transcript of Patient Guide Knee Replacement Surgery Guide Knee Replacement Surgery. ... The operation you are...
Joint Program
Patient GuideKnee Replacement Surgery

Joint Program
© 2009 Baylor Health Care System. All rights reserved. 1
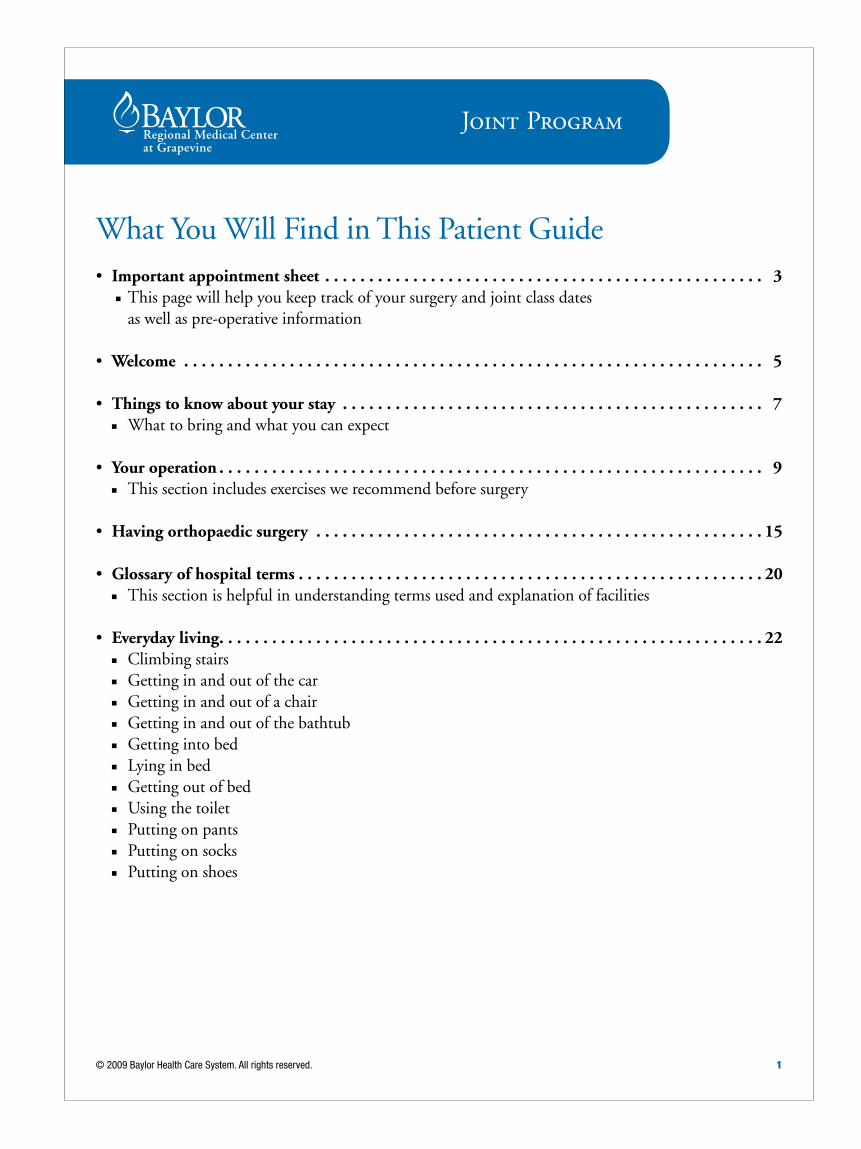
What You Will Find in This Patient Guide• Important appointment sheet . . . . . . . . . . . . . . . . . . . . . . . . . . . . . . . . . . . . . . . . . . . . . . . . . . 3
n This page will help you keep track of your surgery and joint class dates as well as pre-operative information
• Welcome . . . . . . . . . . . . . . . . . . . . . . . . . . . . . . . . . . . . . . . . . . . . . . . . . . . . . . . . . . . . . . . . . . 5 • Things to know about your stay . . . . . . . . . . . . . . . . . . . . . . . . . . . . . . . . . . . . . . . . . . . . . . . . 7 n What to bring and what you can expect
• Your operation . . . . . . . . . . . . . . . . . . . . . . . . . . . . . . . . . . . . . . . . . . . . . . . . . . . . . . . . . . . . . . 9 n This section includes exercises we recommend before surgery
• Having orthopaedic surgery . . . . . . . . . . . . . . . . . . . . . . . . . . . . . . . . . . . . . . . . . . . . . . . . . . . 15
• Glossary of hospital terms . . . . . . . . . . . . . . . . . . . . . . . . . . . . . . . . . . . . . . . . . . . . . . . . . . . . . 20 n This section is helpful in understanding terms used and explanation of facilities
• Everyday living . . . . . . . . . . . . . . . . . . . . . . . . . . . . . . . . . . . . . . . . . . . . . . . . . . . . . . . . . . . . . . 22 n Climbing stairs n Getting in and out of the car n Getting in and out of a chair n Getting in and out of the bathtub n Getting into bed n Lying in bed n Getting out of bed n Using the toilet n Putting on pants n Putting on socks n Putting on shoes

Joint Program
© 2009 Baylor Health Care System. All rights reserved. 3
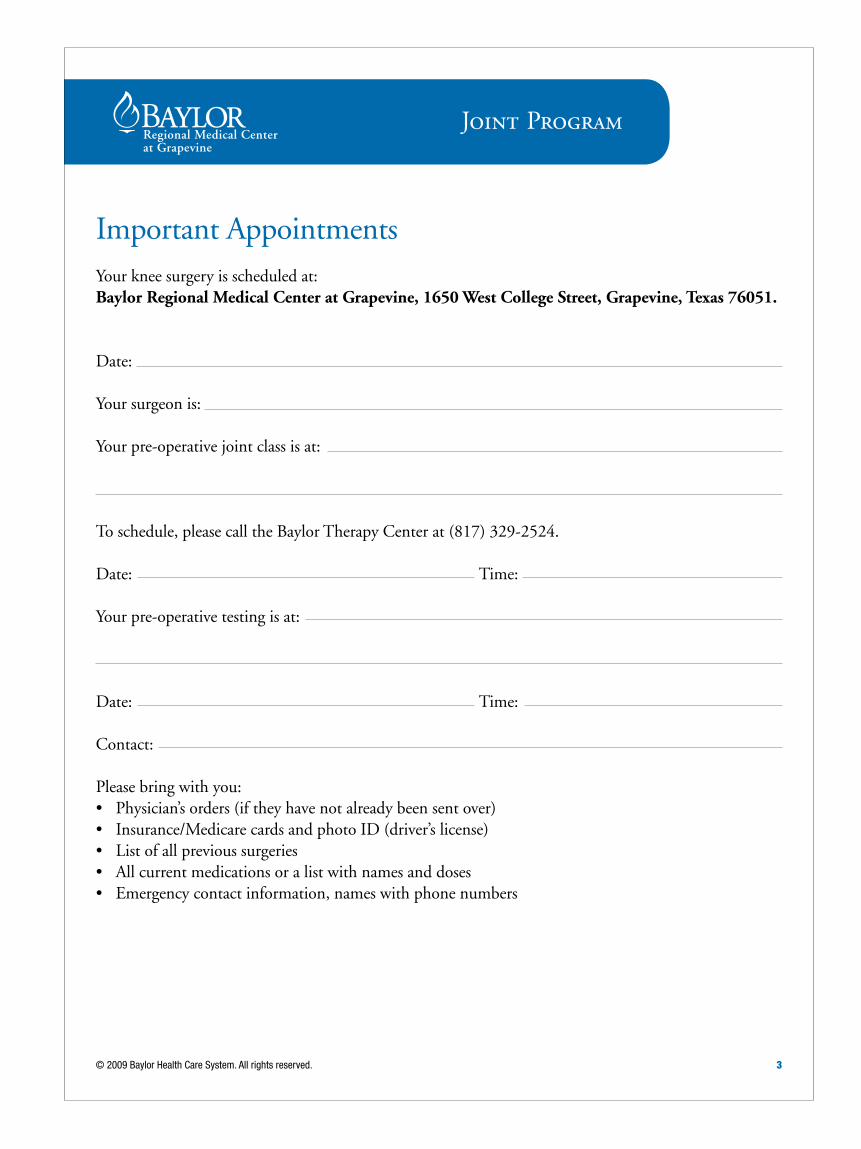
Important Appointments Your knee surgery is scheduled at: Baylor Regional Medical Center at Grapevine, 1650 West College Street, Grapevine, Texas 76051 .
Date: Your surgeon is:
Your pre-operative joint class is at:
To schedule, please call the Baylor Therapy Center at (817) 329-2524. Date: Time:
Your pre-operative testing is at:
Date: Time:
Contact:
Please bring with you:• Physician’sorders(iftheyhavenotalreadybeensentover)• Insurance/MedicarecardsandphotoID(driver’slicense)• Listofallprevioussurgeries• Allcurrentmedicationsoralistwithnamesanddoses• Emergencycontactinformation,nameswithphonenumbers


Joint Program
© 2009 Baylor Health Care System. All rights reserved. 5
WelcomeWewouldliketotaketheopportunitytowelcomeyoutotheJointProgramatBaylorRegionalMedicalCenter at Grapevine. Some of the features you may enjoy during your visit are listed below. We are committed to making your stay as comfortable as possible, helping you to restore an active lifestyle.
• Afamilymemberorfriendcanserveasyourcoachtohelpspeedrecoveryandassistwiththerapy• Dedicatedstafftrainedtoworkwithjointreplacementpatients• Backincasualclothessoonaftersurgery• Frequentupdatesofeventsandprocedures• Educationsessions• Post-dischargefollow-up• Writteninstructions
It’s a joint effort at Baylor Grapevine and we appreciate the opportunity to assist you on your road to recovery.

Joint Program
© 2009 Baylor Health Care System. All rights reserved. 7
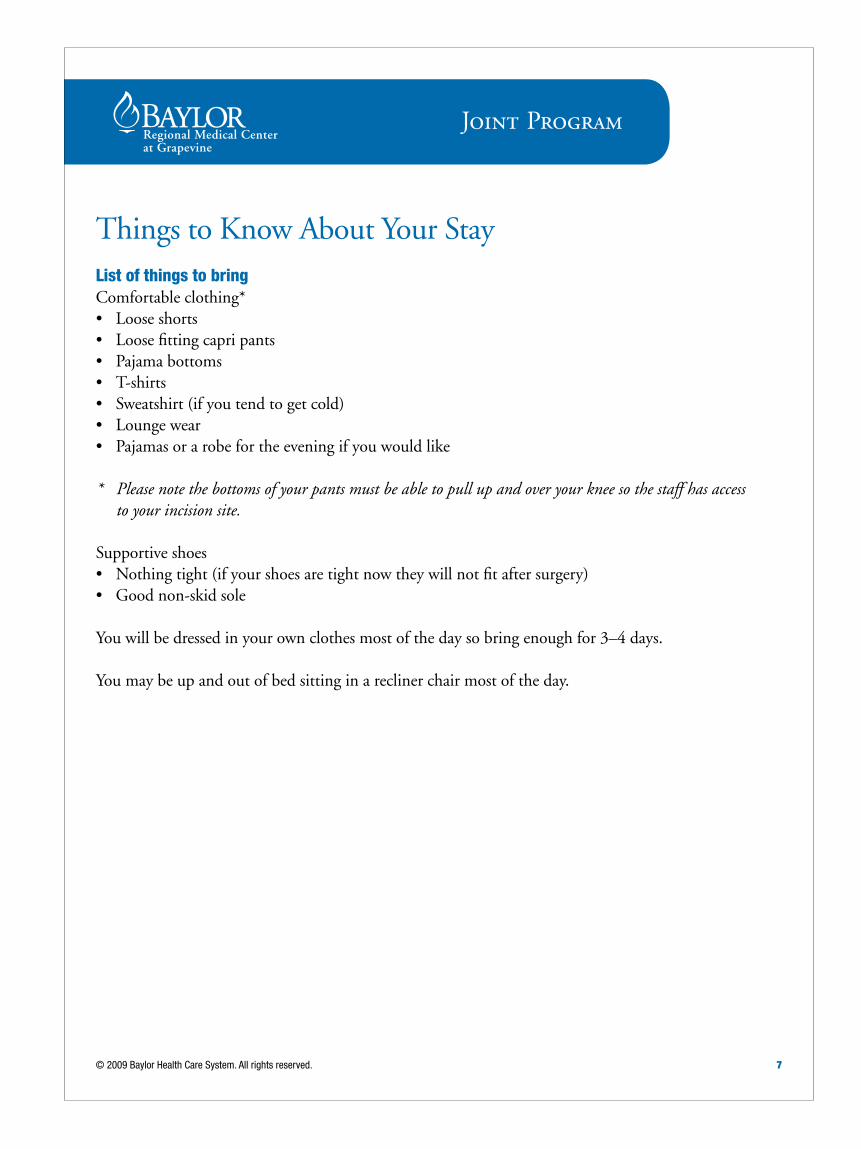
Things to Know About Your StayList of things to bringComfortable clothing*• Looseshorts• Loosefittingcapripants• Pajamabottoms• T-shirts• Sweatshirt(ifyoutendtogetcold)• Loungewear• Pajamasorarobefortheeveningifyouwouldlike
* Please note the bottoms of your pants must be able to pull up and over your knee so the staff has access to your incision site.
Supportive shoes• Nothingtight(ifyourshoesaretightnowtheywillnotfitaftersurgery)• Goodnon-skidsole
You will be dressed in your own clothes most of the day so bring enough for 3–4 days.
You may be up and out of bed sitting in a recliner chair most of the day.

Joint Program
© 2009 Baylor Health Care System. All rights reserved. 9
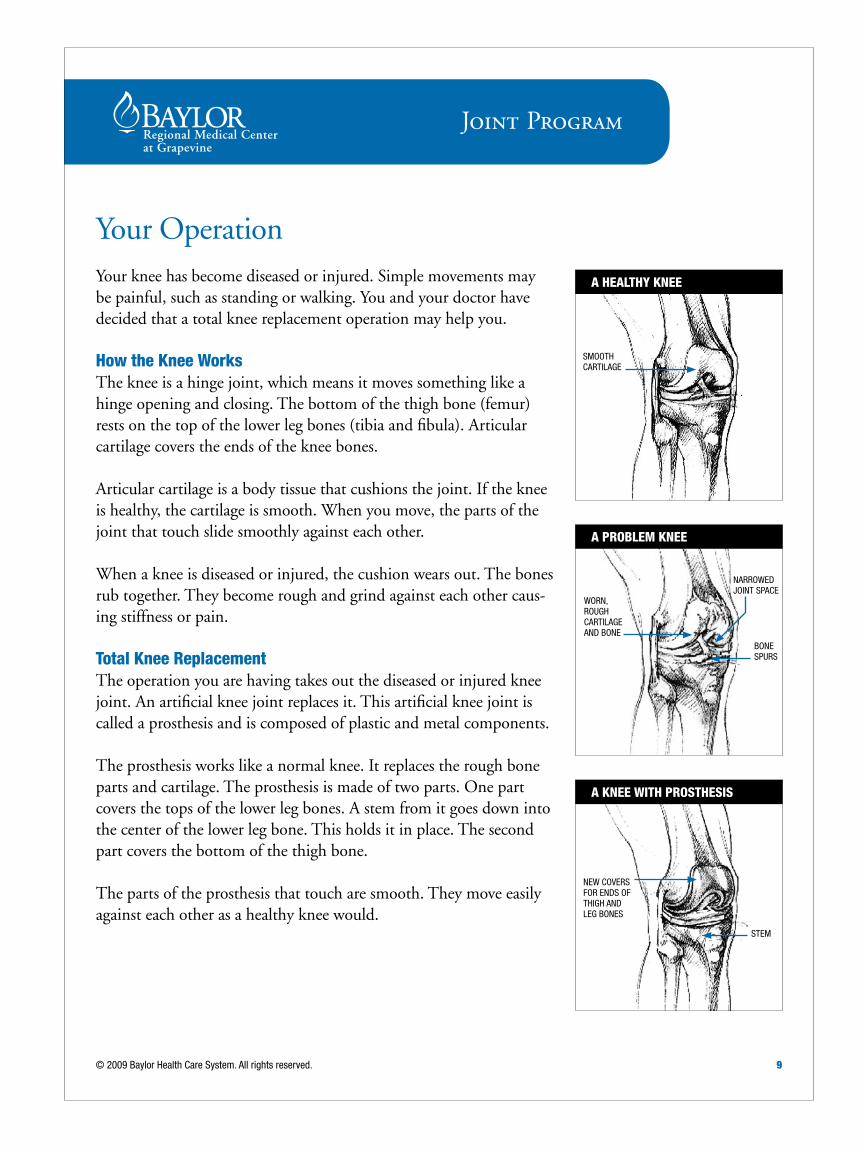
Your OperationYour knee has become diseased or injured. Simple movements may be painful, such as standing or walking. You and your doctor have decided that a total knee replacement operation may help you.
How the Knee Works The knee is a hinge joint, which means it moves something like a hinge opening and closing. The bottom of the thigh bone (femur) restsonthetopofthelowerlegbones(tibiaandfibula).Articularcartilage covers the ends of the knee bones.
Articular cartilage is a body tissue that cushions the joint. If the knee is healthy, the cartilage is smooth. When you move, the parts of the joint that touch slide smoothly against each other.
When a knee is diseased or injured, the cushion wears out. The bones rub together. They become rough and grind against each other caus-ing stiffness or pain.
Total Knee Replacement The operation you are having takes out the diseased or injured knee joint.Anartificialkneejointreplacesit.Thisartificialkneejointiscalled a prosthesis and is composed of plastic and metal components.
The prosthesis works like a normal knee. It replaces the rough bone parts and cartilage. The prosthesis is made of two parts. One part covers the tops of the lower leg bones. A stem from it goes down into the center of the lower leg bone. This holds it in place. The second part covers the bottom of the thigh bone.
The parts of the prosthesis that touch are smooth. They move easily against each other as a healthy knee would.
A HeALTHy KNee
SmootH CArtilAge
A pRoBLem KNee
worn, rougH CArtilAge And Bone
A KNee WITH pRosTHesIs
new CoverS for endS of tHigH And leg BoneS
nArrowed joint SpACe
Bone SpurS
Stem
Joint Program
10 © 2009 Baylor Health Care System. All rights reserved.
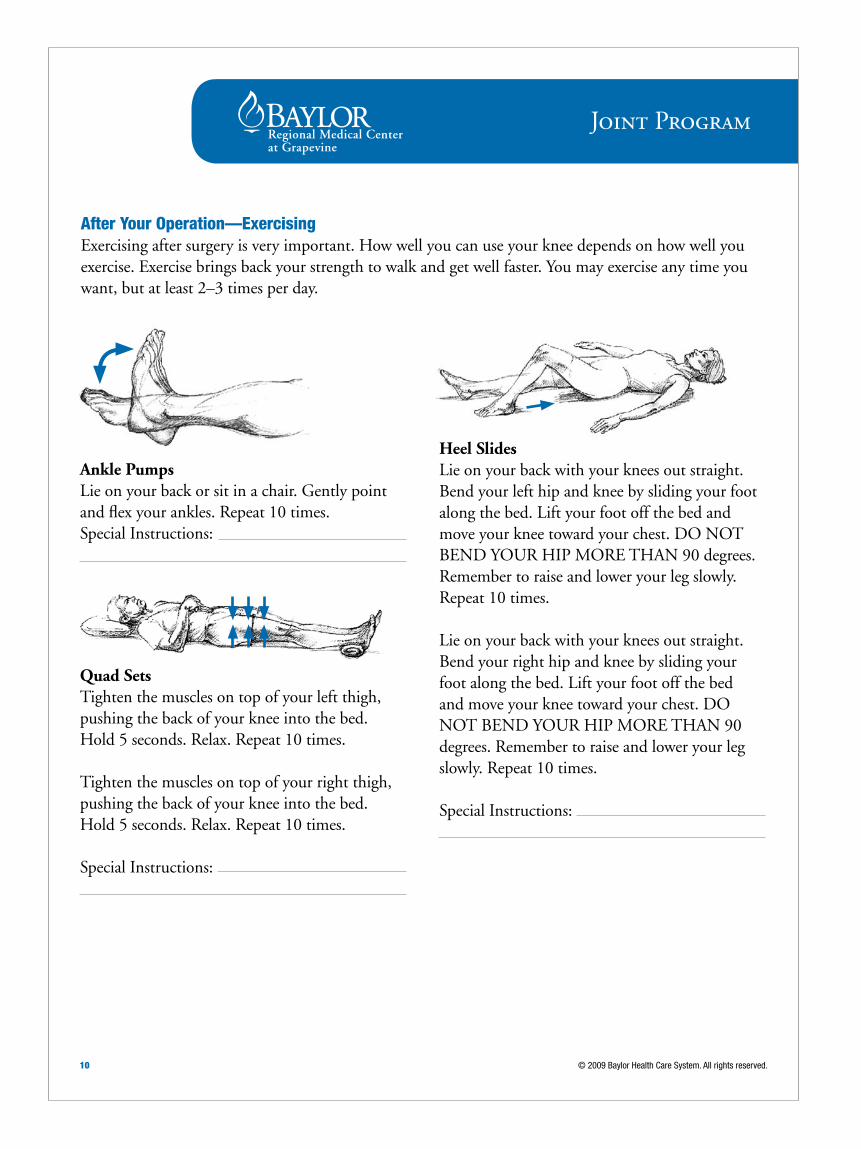
After your operation—exercising Exercisingaftersurgeryisveryimportant.Howwellyoucanuseyourkneedependsonhowwellyou exercise.Exercisebringsbackyourstrengthtowalkandgetwellfaster.Youmayexerciseanytimeyouwant, but at least 2–3 times per day.
Ankle PumpsLie on your back or sit in a chair. Gently point and flex your ankles. Repeat 10 times.Special Instructions:
Quad SetsTighten the muscles on top of your left thigh, pushing the back of your knee into the bed. Hold5seconds.Relax.Repeat10times.
Tighten the muscles on top of your right thigh, pushing the back of your knee into the bed. Hold5seconds.Relax.Repeat10times.
Special Instructions:
Heel SlidesLie on your back with your knees out straight. Bend your left hip and knee by sliding your foot along the bed. Lift your foot off the bed and moveyourkneetowardyourchest.DONOTBENDYOURHIPMORETHAN90degrees.Remember to raise and lower your leg slowly. Repeat 10 times.
Lie on your back with your knees out straight. Bend your right hip and knee by sliding your foot along the bed. Lift your foot off the bed and move your knee toward your chest. DO NOTBENDYOURHIPMORETHAN90degrees. Remember to raise and lower your leg slowly. Repeat 10 times.
Special Instructions:
Joint Program
© 2009 Baylor Health Care System. All rights reserved. 11
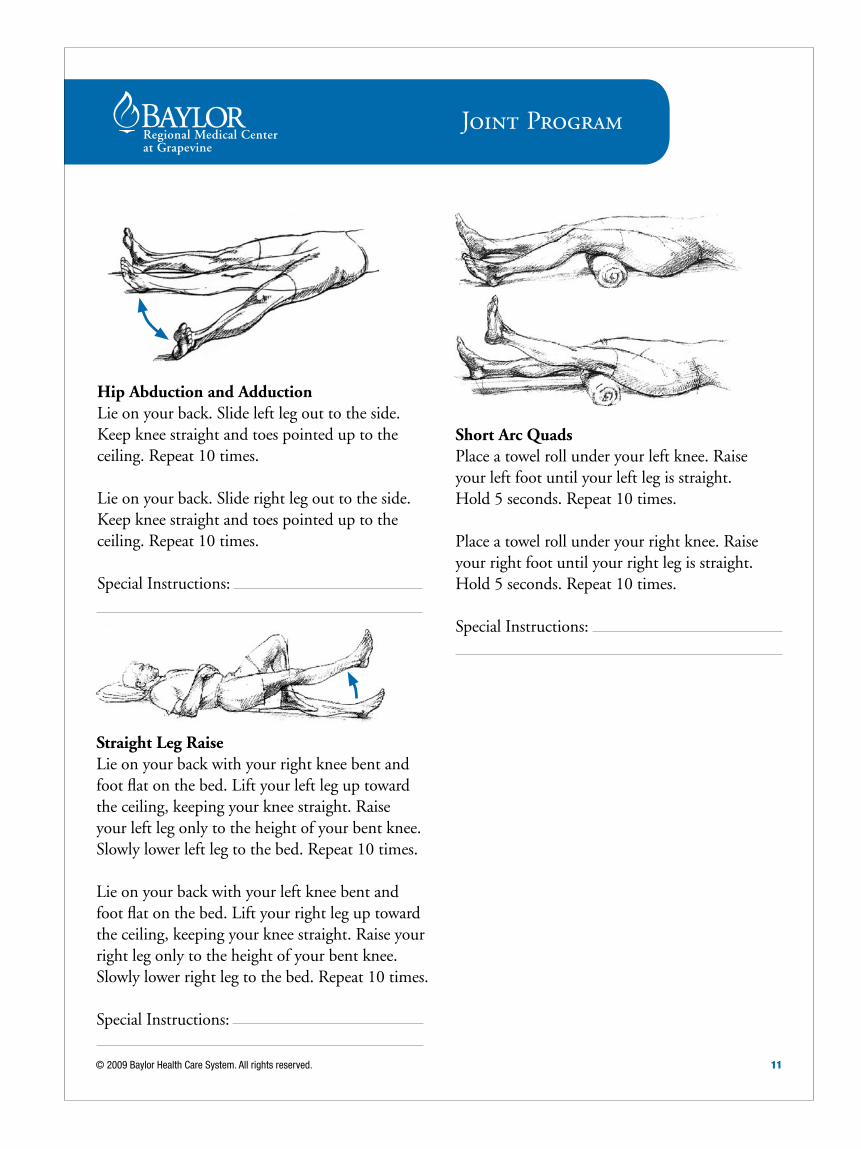
Straight Leg RaiseLie on your back with your right knee bent and foot flat on the bed. Lift your left leg up toward the ceiling, keeping your knee straight. Raise your left leg only to the height of your bent knee. Slowly lower left leg to the bed. Repeat 10 times.
Lie on your back with your left knee bent and foot flat on the bed. Lift your right leg up toward the ceiling, keeping your knee straight. Raise your right leg only to the height of your bent knee. Slowly lower right leg to the bed. Repeat 10 times.
Special Instructions:
Short Arc QuadsPlace a towel roll under your left knee. Raise your left foot until your left leg is straight. Hold5seconds.Repeat10times.
Place a towel roll under your right knee. Raise your right foot until your right leg is straight. Hold5seconds.Repeat10times.
Special Instructions:
Hip Abduction and AdductionLie on your back. Slide left leg out to the side. Keep knee straight and toes pointed up to the ceiling. Repeat 10 times.
Lie on your back. Slide right leg out to the side. Keep knee straight and toes pointed up to the ceiling. Repeat 10 times.
Special Instructions:

Joint Program
12 © 2009 Baylor Health Care System. All rights reserved.
Knee ExtensionSit with back against the chair. Straighten left knee.Hold5seconds.Repeat10times.
Sit with back against the chair. Straighten right knee.Hold5seconds.Repeat10times.
Special Instructions:
Knee Flexion-Active AssistiveSitting, cross legs with left leg on bottom. Slide feet underneath chair. Keep hips on the chair. Hold5seconds.Repeat10times.
Sitting, cross legs with right leg on bottom. Slide feet underneath chair. Keep hips on the chair. Hold5seconds.Repeat10times.
Special Instructions:
Joint Program
© 2009 Baylor Health Care System. All rights reserved. 13
Discharge goals*The patient should be able to:1. Perform the home exercise program
independently.2. Communicate an understanding of post-
operative precautions.3. Get in and out of bed without assistance.4. Transfer and walk with the aid of an assistive
device.5. Climbanddescendcurbs/stairswiththeaidof
an assistive device.
* Discharge goals may change based on individual patient needs.
Going homeWhen you are ready to go home, your doctor and nurse will provide you with instructions. Please follow them carefully.
Before you leave the hospital, be sure to know about: • Medications• Diet• Activityandexercise• Goingbacktowork• Driving• Rest• Incisioncareandremovalofstitches• Airportmetaldetectors• Follow-upvisitswiththedoctor
Before your surgeryA little planning before you leave home will help youwhileyou’reinthehospitalandwhenyougetback home.
Plan for your return home1. Plan easy meals in advance.2. Organize your kitchen so that supplies are at
shoulder or waist level to avoid excessive lifting, bending or reaching.
3. Prepare a room downstairs if you live in a two-story house to reduce the amount of stair climbing.
4. Clear your house of obstacles and remove any throw rugs for safe walking.
5.Haveafirmchairwitharmrestsandgoodheight available.
6. Arrange for help from a friend or family mem-ber to assist with housekeeping, shopping or driving.
7. Be cautious of small pets who could trip you.
What to bring with youTo help make your stay comfortable, bring:• Anyprosthesesorassistivedevices• Pajamas(shortgown)androbe• Comfortable,non-bindingclothingforday-
time hours—jogging suits, athletic shorts and tennis shoes are especially comfortable
• Toiletriessuchastoothbrushandtoothpaste,comb, brush, shampoo, makeup, deodorant, razor, etc.
Joint Program
14 © 2009 Baylor Health Care System. All rights reserved.
HavingOrthopaedicSurgeryAsapatientundergoingorthopaedicsurgeryatBaylorRegionalMedicalCenteratGrapevine,wewantyourexperiencetobeasstress-freeaspossible.Thisbookletwillexplaintheprocedures,equipment, operation, as well as the pre-and post-operative care. When you know what to expect and when to expect it, you are less likely to feel anxious.
We individually plan your care, and then adjust it according to your needs. By the time you leave the hospital, you will know how to better help yourself during your recovery process at home.
straight Talk with mDs and RNsYouarenotastatisticoranumberwhileyouareatBaylorGrapevine.Youwillbenefitfrominteraction with many different hospital employees—physicians, specialists (like anesthesiologists), nurses, physical therapists, and other members of the health care team whose job it is to care for you.
Again,pleasedonotbeshyaboutaskingquestionsandtellsomeoneifyouarefeelinganxiousatany time.Certainly,manypeoplewillbeaskingyouquestionsandtalkingtoyouaboutavarietyoftopics.Your feedback helps us plan your operation and follow-up care. Please be thorough when you answer a questionfromanyonecaringforyou.Allinformationisstrictlyconfidential.
Your doctor already knows a great deal about your medical history; however, to learn even more about you, pre-operative tests may be ordered. The following tests are common: blood, urine, electrocardiogram (ECG)andx-rays.
Verify with your phyician if any of your medications should be taken the morning of your surgery.
Priortoyouroperation,hospitalprotocolrequiresthateachpatientsignconsentformsforanesthesia andsurgery.Pleasetrytohavequestionsaboutyoursurgeryandanesthesiaansweredbeforeitistimetosign the consent forms.
surgery Day• Youwillbeinstructedtoshowerortubbathebeforesurgery.Youmayuseagermkillingsoap,butdo
not use any lotion, powder, or deodorant.• Whenbrushingyourteeth,donotswallowanywater.• Pleasedonotwearmake-upornailpolishtosurgery.Naturalskincolorisanimportantindicatorof
your condition, especially in the face and hands.• Youwillbegivenahospitalgowntobewornduringsurgery.Nootherclothingisallowed.Your
privacy and modesty will be respected and protected at all times.
Joint Program
© 2009 Baylor Health Care System. All rights reserved. 15
• Allpersonalitemsmustberemoved,includinghairaccessories,jewelry,glasses,contactlenses,hearingaidsandprostheses(suchasartificiallimbsoreyes).Werecommendyourfamilybepermittedtotakevaluables home.
• Youwillbeissuedredsockstowearforyoursafety.• Removeanyartificialdentalworkunlessotherwiseinstructedbyyourdoctor.Werecommendthat
you let family or friends hold your dental work.• Aboutanhourbeforesurgery,youmaybegivenmedicationtohelpyourelax.Justbeforereceiving
this medicine you will be asked to empty your bladder. The medication may cause drowsiness or light-headedness. Your mouth may become dry and your eyesight may seemed blurred. For your safety, the side rails on your bed will be raised. Please do not get out of bed without asking the nurse for help.
• AnIVwillbestartedshortlyafteryougettotheOperatingRoom(OR).ThroughthisIVyouwillreceive anesthesia, fluids and medication.
The operating RoomThe OR holding area is a busy, active place. When you arrive, an OR nurse will ask your full name, con-firmthatitmatchesyouridentificationbraceletandaskyouafewotherquestions.Thenursewillalwaysexplainwhatishappeningandyoumayalsoaskquestions.
In the OR you will be moved to the operating table. You may also notice that the operating room is brightly lit. Doctors, nurses, and other OR staff will be preparing for surgery and talking with you. At this time if your IV has not already been started it will be. Both the surgeon and anesthesiologist will talk to you before the procedure begins.
EachnurseandphysicianwillcheckyourIDbandforyournameanddateofbirth.Thesurgeonwillmark your surgical site with a special pen with the word “yes.”
Waking Up from surgeryFollowing surgery you will go the Recovery Room (PACU—Post Anesthesia Care Unit) where nurses will be closely monitoring you. Other recovering patients will be around you and you may hear sounds like monitors and other machines at work or the hum of conversations.
You will probably be sleepy and confused upon waking up because the anesthetic has not completely worn off. You may feel yourself drifting in and out of sleep as you slowly become more alert.
Openingyoureyeswillbehardatfirst.Youreyesightmaybeblurredbecauseoftheointmentappliedduring surgery to keep them moist. The nurse will wipe your eyes for you. Your mouth will be dry, so the nurse may give you ice chips. Your incision will probably feel uncomfortable and your throat may feel sore. The nurse may give you pain medication.

Joint Program
16 © 2009 Baylor Health Care System. All rights reserved.
You may have an oxygen mask on your face or a breathing tube in your mouth. If you have a breathing tube you will be unable to talk. The breathing tube will be taken out as soon as you are awake enough to take deep breaths. To do this the nurse will help you turn and cough.
once in your RoomWhenyouarrivetoyourroom,yournursewillbewaitingforyou.Heorshewillcheckonyouoftentomakesureyouarecomfortableandhavewhatyouneed.Forthefirst48hoursvitalsignsandbandageswillbecheckedfrequentlythroughoutthedayandnight.Allstaffandvisitorstoyourroomshouldwashtheir hands or use sanitizer.
TubesDepending on your surgery you may be connected to a number of tubes. You may have a bladder catheter during the operation that may still be in place. The bladder catheter will be removed based on yourphysician’sorders. Also, you will probably still have your IV in since it is the most effective way to transfer fluids and medi-cations into your system. The nurse will check your IV often, but if you notice the skin becoming red, swollen, or tender near it, tell your nurse right away.
Lastly, you may have drainage tubes positioned near your incision. These tubes drain fluids from the area around the incision to promote healing. Your doctor will decide when it is safe to remove the incision drainage tubes.
pain managementThe incision area may burn and you may feel stiff, but as soon as your body heals you will increasingly feel more comfortable. Pain medication may be given by injecting it into your IV, using a PCA (Patient Controlled Analgesia), or in pill form.
Donothesitatetoaskforpainmedicationatthefirstsignofdiscomfort.Thenursewillfrequentlyaskyou what your pain level is at, 0 being no pain and 10 being worst possible. Asking for the medication is better than letting the pain become more severe. If it is too soon for more medication, the nurse may change your position, turn your pillow or try other alternatives until it is safe for more medication, ice packs are often helpful.
Pain medication will not completely stop the pain, but it will take the edge off. When pain is manageable you will be more inclined to get started with the simple exercises you have been taught.
Joint Program
© 2009 Baylor Health Care System. All rights reserved. 17
Some pain medications have side effects of nausea or constipation so please alert your nurse if you experience these.
Adjusting, Knowing your LimitsThe post-operative healing process may be hard work for your body. During this period, you may feel strange sensations such as mood swings, night sweats, bad dreams, and some people run a low-grade temperature. If those feelings persist or worsen, tell your nurse or doctor.
CoughingFluid or mucus may collect in the lungs during surgery, and coughing is the best way to get rid of it. After taking three deep breaths, cough several times as hard as you can. Do not be discouraged if it is difficultatfirst.
post operative Requirement—simple physical ActivitiesYouwillbeaskedtoperformthesesimpleactivitiesafteryoursurgery.Exercisingwillhelpworkofftheeffects of anesthesia, stimulate blood circulation and keep your muscles strong. Granted, much of your care will be handled by doctors and nurses, however it is your job to do these exercises. If you do, you will recover faster—so be familiar with the following before your surgery:
WalkingWalking is very important to your recovery, as early as the day after surgery you will begin walking with our physical therapists.
You may think the last thing you will want to do after surgery is exercise; however these simple actives are critical to your recovery. We understand that you may feel some discomfort when doing them, but please rememberthebenefitsarewellworththeeffort.Studieshaveshownthatpeoplewhoexercisehealfasterand better than those who do not.
Deep BreathingSome anesthesia gases remain in the lungs after surgery. Deep breathing is crucial for expanding and clearing the lungs. To practice, lie on your back, set a tissue box on the middle of your chest and slowly inhale through your nose. Observe how the box rises and make sure to breathe deeply enough so that your whole chest expands. Let all the air out through your mouth and watch the box descend. You can begin deep breathing any time after surgery.
Joint Program
18 © 2009 Baylor Health Care System. All rights reserved.
Hand and Foot ExercisesEventhesmallestmovementswithyourhandsandfeethelpimproveyourcirculation.Dothefollowingsimple movements several times a day:1. Point your toes away from your body2. Roll your ankle3. Point your toes toward your head4. Swivel your ankle5. Clenchyourfists6. Straightenyourfingers7.Wiggleyourfingers
The Can and Can’t Do’s post-op Activities DietHospitaldietitiansareveryawareofyourdigestivesystem’sresponsetoanesthetic.Asyourmealsgradu-allygofromliquidtosolid,theymaygiveyoudietinstructionsorhelpyoumakefoodchoices.Your appetite may be irregular, but eat as healthy as you can. Without good nutrition, it takes longer to heal and begin feeling better.
Getting Up and AroundWhen you are allowed to resume activity, please allow Baylor staff to assist you. You will be instructed on how much you can do. Remember it is imperative that you do your exercises. You may be weak and uncomfortableatfirst,buttheearliestmovementsarenecessaryforhealingandrecovery.Yournurseortherapist will help you as you gain strength. Do not attempt to get out of bed, stand up, or walk without help until given permission by your nurse or therapist.
Standing UpTo begin, sit on the edge of the bed, then proceed to stand for a few moments. Take several slow deep breaths before you stand up, which will help return blood to your heart and head. Deep breathing helps prevent dizziness and fainting. Please take it easy and slow.
WalkingWalking“wakesup”allyourbody’ssystemsandhelpsthemreturntonormal.Standandwalkasstraightas you can (stooped shoulders may cause tight, sore muscles in your back and legs). Good posture contributes to breathing, circulation and speedy healing. Again start slowly and stop after short distances.Your body will tell you when it is time to rest; however push yourself to walk a bit further each day. Generally, the more you can do for yourself, the sooner you can go home.
Joint Program
© 2009 Baylor Health Care System. All rights reserved. 19
RestResting is also important for your recovery. While you do not have to go to sleep, try to get in the habit of lying down after meals and baths once at home.
VisitorsVisitsfromfriendsandfamilycancheeryouupandmakeyoufeelbetter.However,toomanyvisitors cantireanddisturbyourrest.Evenaringingtelephonecaninterruptimportantresttime.
GlossaryofHospitalTermsAnesthesiaPartial or complete loss of feeling during which patient may or may not be asleep.
AnestheticMedicationusuallygivenbyinjection,IV(intravenoustubeorsmallneedle)orinhalationtoblockanysensationofpainordiscomfort.Generalanestheticisfrequentlyadministeredduringsurgery.Localanestheticmaybeinjectedintoandaroundaspecificoperativearea.Localanestheticgreatlydiminishestrauma to nerves in and around the operative site during surgery, therefore dramatically lessening post-operative pain.
AnesthesiologistA specialized physician who calculates and administers a pre-determined amount of anesthetic depending onspecificdatarelativetothepatientandhis/heroperativeprocedure.Thisdoctorispresentthroughoutsurgery to make certain your body is constantly functioning properly.
Anti-Embolism Reduction DevicesElastic Support Stockings (TED Hose)Stockings which stimulate blood flow in the legs and help reduce blood clots following surgery; these are worn by both men and women.
Foot Pumps and Sequential Compression DevicesAutomated devices designed to pump the blood from the foot and lower leg to help circulation and reduce the possibility of blood clots.
Bladder CatheterA small tube inserted into the bladder to drain urine.
Joint Program
20 © 2009 Baylor Health Care System. All rights reserved.
Bowel PrepProcedure to cleanse or medicate the bowl before surgery.
Clip and PrepThe pre-op special cleansing (sterilization) or removing of hair around the operative area.
ECG or EKG (Electrocardiogram)Agraphicrecordingoftheheart’sactivities.
Holding AreaA room near the operating room where the patient waits before surgery.
ICU (Intensive Care Unit)Anareainthehospitalforseriouslyillpatientsrequiringimmediateandcontinuousattention.
IncisionA precision cut made in the body during an operation.
Incision Drainage TubeA tube placed in or near the incision to drain fluid from the area.
InjectionA “shot.”
IV (Intravenous)Athinneedleortubeplacedinabloodveintotransportliquids,medicineornutrientsintothebodyduring and following surgery.
NG (Nasogastric Tube)A small tube that goes from the nose, down the throat and into the stomach to remove excess fluid or gas.
NPOAn abbreviation for the Latin terms, nil per os, meaning “nothing by mouth”, including food, drink, chewing gum, tobacco or other substances.
Nurse AnesthetistA registered nurse trained to give anesthetics.
Joint Program
© 2009 Baylor Health Care System. All rights reserved. 21
OR (Operating Room)Thespecialtyequippedroomwheresurgeryisperformed.
PACU (Post Anesthesia Care Unit)Anareaoutfittedwithspecialequipmentandmonitoredbypostanesthesiatrainedstafftoassistpatientsas they wake up after surgery.
Pre-Op (Pre-Operative)Before surgery.
Post-OP (Post-Operative)After surgery.
PRNAnabbreviationfortheLatinterms,prorena’ta,meaning“accordingtothecircumstances.”Forexample,painmedicineisgivenPRN,orwhenitisneeded.
PCA (Patient Controlled Analgesia)Gives you control over any pain you may experience by pushing a button you will receive a very small dose of pain medication through your IV.
Recovery RoomSame as PACU.
SurgeonA doctor specially trained to perform surgery.
Vital SignsTemperature, pulse, blood pressure and breathing rate.
Joint Program
22 © 2009 Baylor Health Care System. All rights reserved.
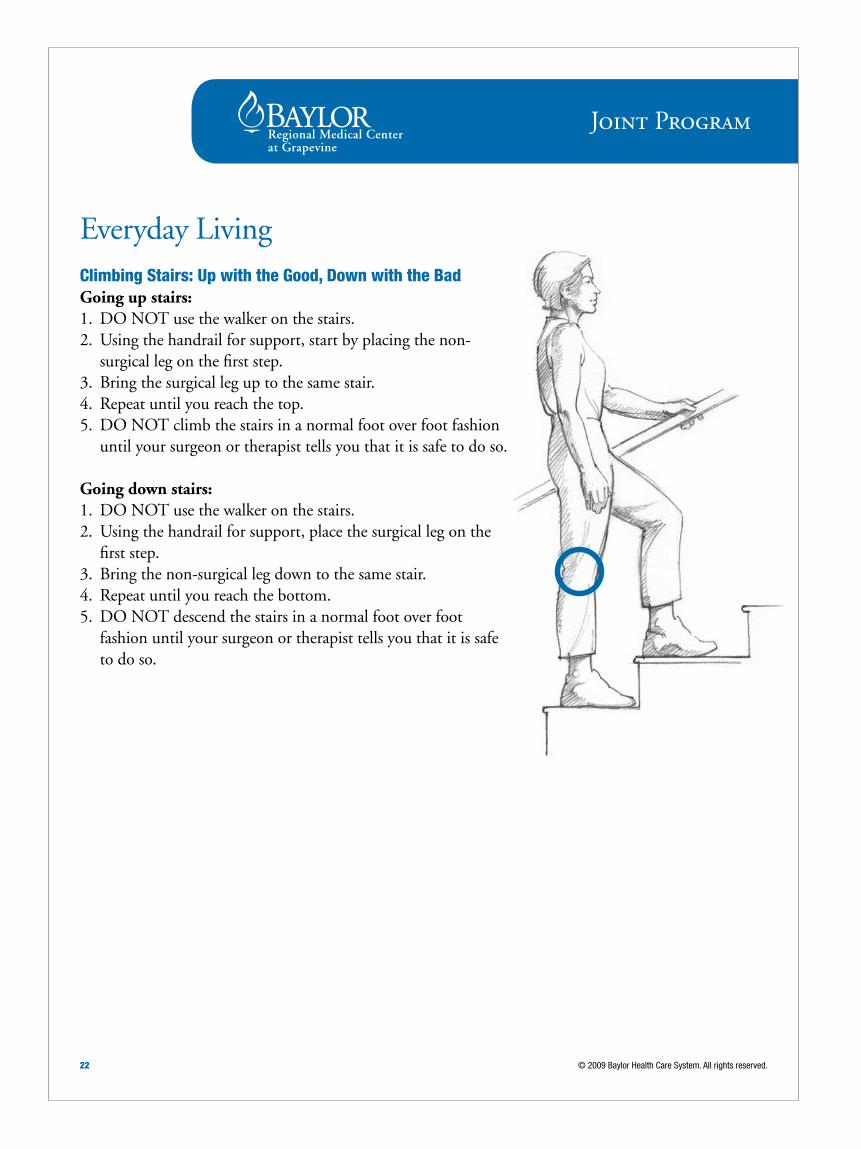
EverydayLivingClimbing stairs: Up with the Good, Down with the BadGoing up stairs:1. DONOTusethewalkeronthestairs.2. Using the handrail for support, start by placing the non- surgicallegonthefirststep.
3. Bring the surgical leg up to the same stair. 4. Repeat until you reach the top. 5. DONOTclimbthestairsinanormalfootoverfootfashion
until your surgeon or therapist tells you that it is safe to do so.
Going down stairs:1. DONOTusethewalkeronthestairs.2. Using the handrail for support, place the surgical leg on the firststep.
3. Bring the non-surgical leg down to the same stair. 4. Repeat until you reach the bottom.5. DONOTdescendthestairsinanormalfootoverfoot
fashion until your surgeon or therapist tells you that it is safe to do so.
Joint Program
© 2009 Baylor Health Care System. All rights reserved. 23
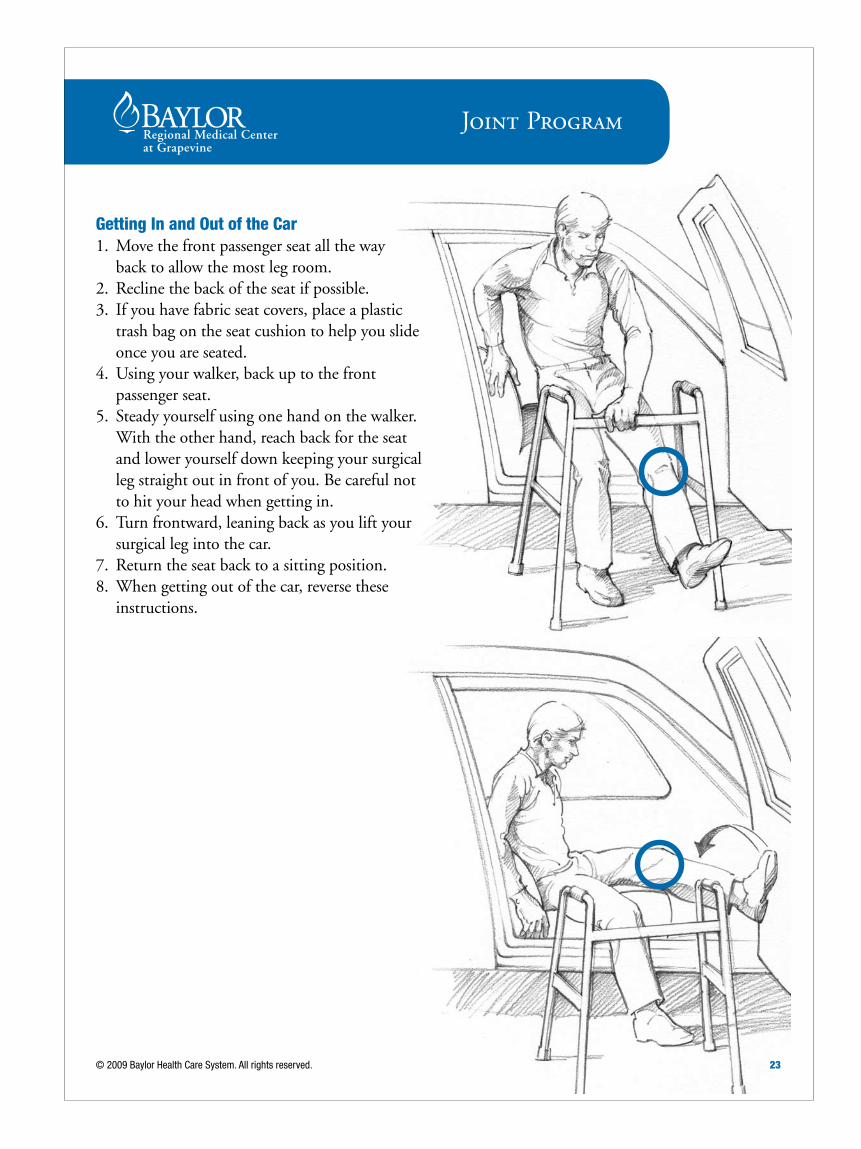
Getting In and out of the Car1.Movethefrontpassengerseatalltheway
back to allow the most leg room.2. Recline the back of the seat if possible.3. If you have fabric seat covers, place a plastic
trash bag on the seat cushion to help you slide once you are seated.
4. Using your walker, back up to the front passenger seat.
5. Steady yourself using one hand on the walker. With the other hand, reach back for the seat and lower yourself down keeping your surgical leg straight out in front of you. Be careful not to hit your head when getting in.
6. Turn frontward, leaning back as you lift your surgical leg into the car.
7. Return the seat back to a sitting position.8. When getting out of the car, reverse these
instructions.
23
Joint Program
24 © 2009 Baylor Health Care System. All rights reserved.
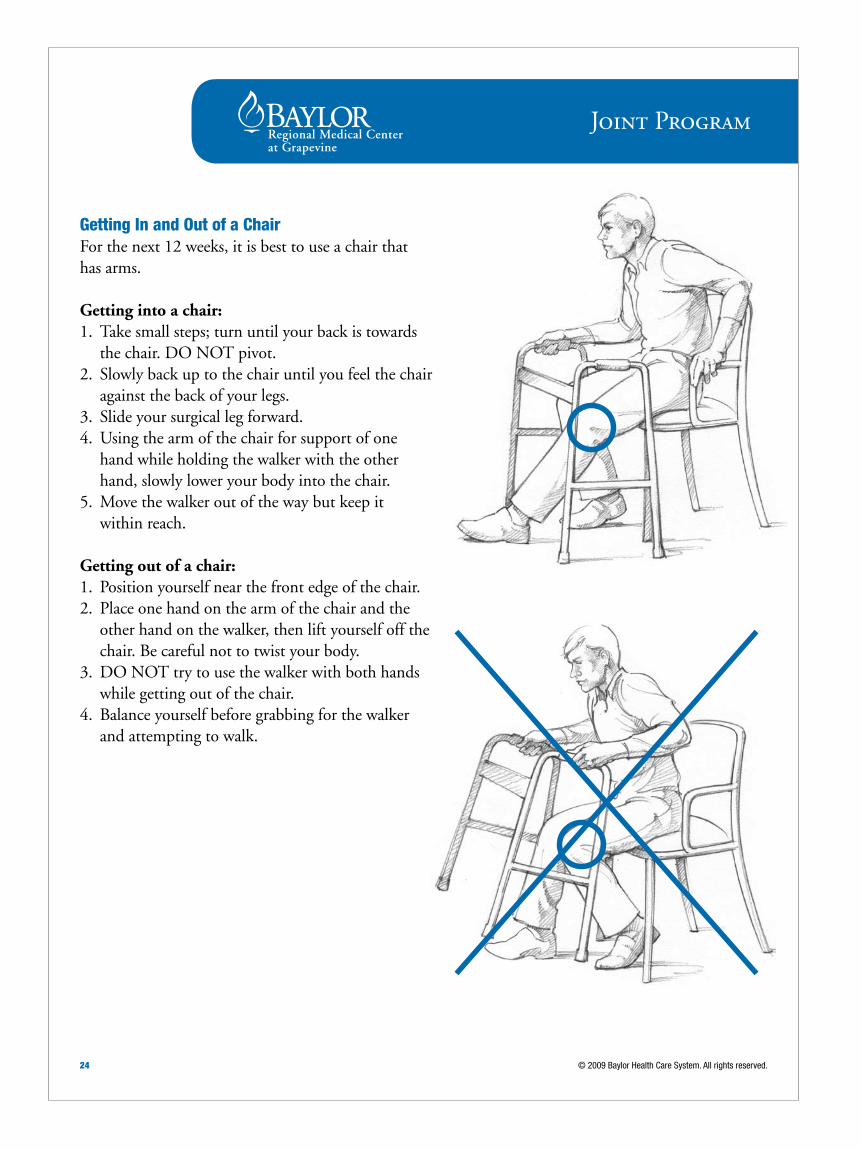
Getting In and out of a ChairFor the next 12 weeks, it is best to use a chair that has arms.
Getting into a chair: 1. Take small steps; turn until your back is towards thechair.DONOTpivot.
2. Slowly back up to the chair until you feel the chair against the back of your legs.
3. Slide your surgical leg forward. 4. Using the arm of the chair for support of one
hand while holding the walker with the other hand, slowly lower your body into the chair.
5.Movethewalkeroutofthewaybutkeepit within reach.
Getting out of a chair:1. Position yourself near the front edge of the chair.2. Place one hand on the arm of the chair and the
other hand on the walker, then lift yourself off the chair. Be careful not to twist your body.
3. DONOTtrytousethewalkerwithbothhandswhile getting out of the chair.
4. Balance yourself before grabbing for the walker and attempting to walk.
Joint Program
© 2009 Baylor Health Care System. All rights reserved. 25
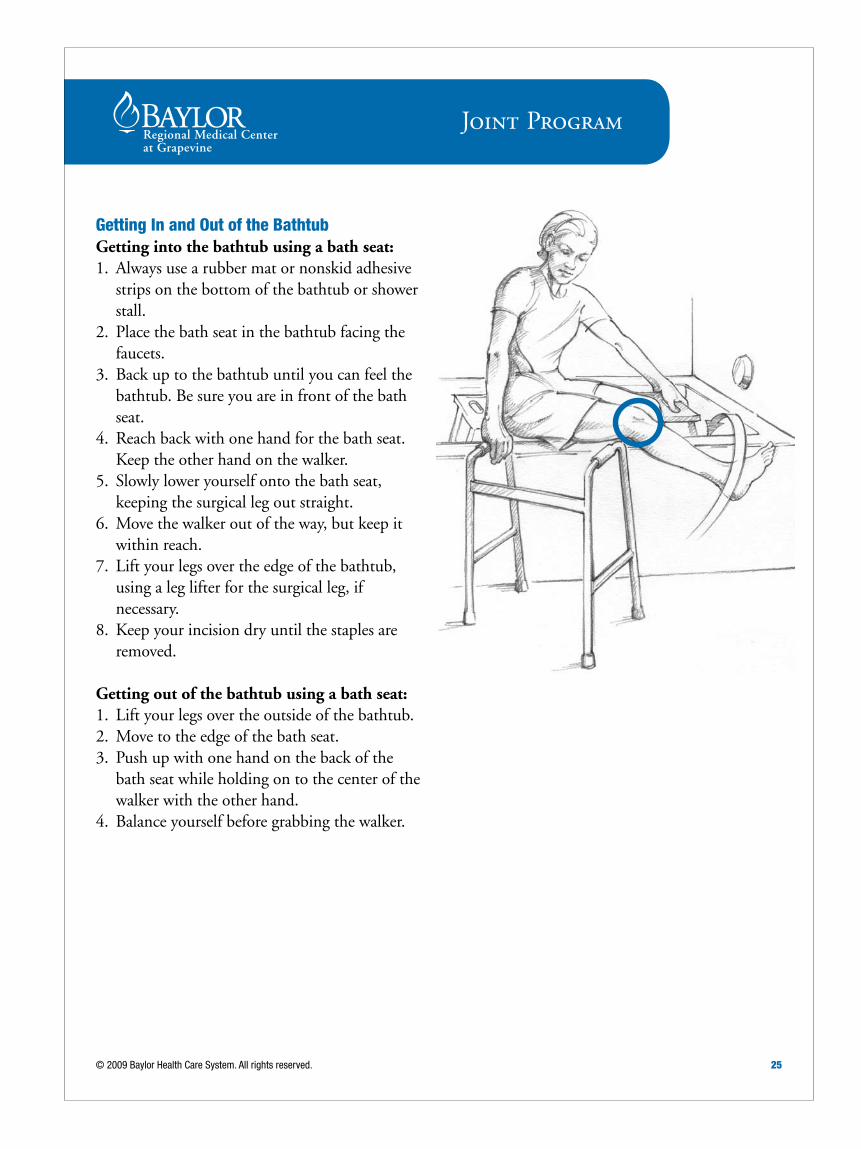
Getting In and out of the BathtubGetting into the bathtub using a bath seat:1. Always use a rubber mat or nonskid adhesive
strips on the bottom of the bathtub or shower stall.
2. Place the bath seat in the bathtub facing the faucets.
3. Back up to the bathtub until you can feel the bathtub. Be sure you are in front of the bath seat.
4. Reach back with one hand for the bath seat. Keep the other hand on the walker.
5. Slowly lower yourself onto the bath seat, keeping the surgical leg out straight.
6.Movethewalkeroutoftheway,butkeepitwithin reach.
7. Lift your legs over the edge of the bathtub, using a leg lifter for the surgical leg, if necessary.
8. Keep your incision dry until the staples are removed.
Getting out of the bathtub using a bath seat:1. Lift your legs over the outside of the bathtub.2.Movetotheedgeofthebathseat.3. Push up with one hand on the back of the
bath seat while holding on to the center of the walker with the other hand.
4. Balance yourself before grabbing the walker.
Joint Program
26 © 2009 Baylor Health Care System. All rights reserved.
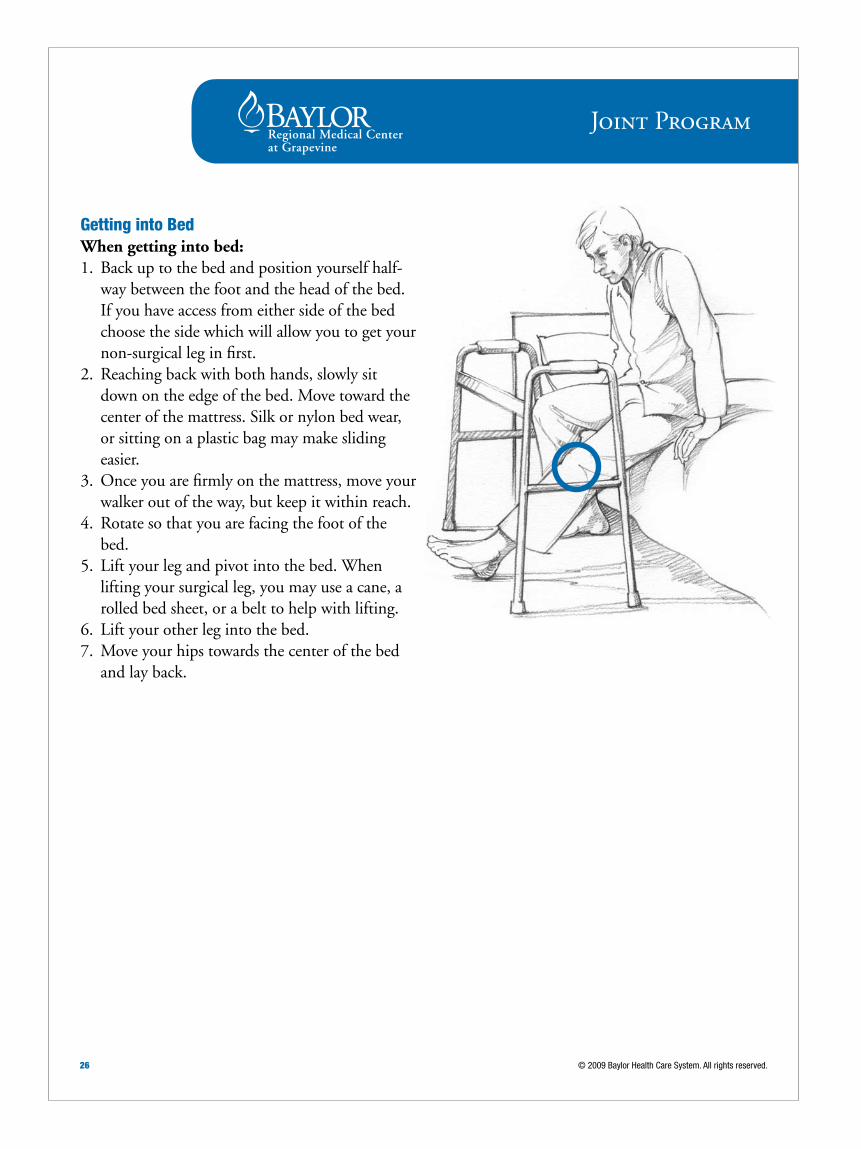
Getting into BedWhen getting into bed:1. Back up to the bed and position yourself half-
way between the foot and the head of the bed. If you have access from either side of the bed choose the side which will allow you to get your non-surgicalleginfirst.
2. Reaching back with both hands, slowly sit downontheedgeofthebed.Movetowardthecenter of the mattress. Silk or nylon bed wear, or sitting on a plastic bag may make sliding easier.
3.Onceyouarefirmlyonthemattress,moveyourwalker out of the way, but keep it within reach.
4. Rotate so that you are facing the foot of the bed.
5. Lift your leg and pivot into the bed. When lifting your surgical leg, you may use a cane, a rolled bed sheet, or a belt to help with lifting.
6. Lift your other leg into the bed.7.Moveyourhipstowardsthecenterofthebed
and lay back.
Joint Program
© 2009 Baylor Health Care System. All rights reserved. 27
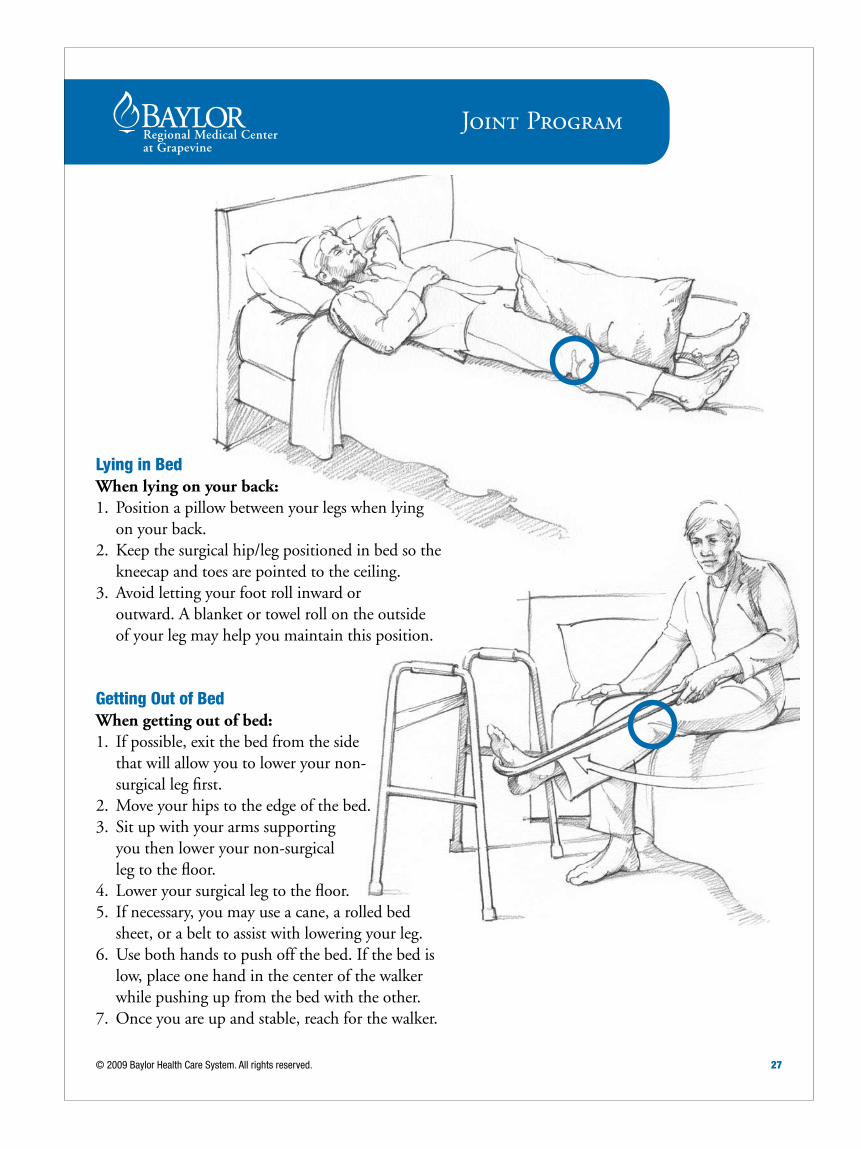
Lying in BedWhen lying on your back:1. Position a pillow between your legs when lying
on your back. 2. Keepthesurgicalhip/legpositionedinbedsothe
kneecap and toes are pointed to the ceiling. 3. Avoid letting your foot roll inward or
outward. A blanket or towel roll on the outside of your leg may help you maintain this position.
Getting out of BedWhen getting out of bed:1. If possible, exit the bed from the side
that will allow you to lower your non- surgicallegfirst.
2.Moveyourhipstotheedgeofthebed.3. Sit up with your arms supporting
you then lower your non-surgical leg to the floor.
4. Lower your surgical leg to the floor. 5. If necessary, you may use a cane, a rolled bed
sheet, or a belt to assist with lowering your leg.6. Use both hands to push off the bed. If the bed is
low, place one hand in the center of the walker while pushing up from the bed with the other.
7. Once you are up and stable, reach for the walker.

Joint Program
28 © 2009 Baylor Health Care System. All rights reserved.
Using the ToiletWhen sitting down on the toilet:1. Take small steps and turn until your back is to thetoilet.DONOTpivot.
2. Back up to the toilet until you feel it touch the back of your leg.
3. Slide your surgical leg out in front when sitting down.
4. If using a commode with arm rests, reach back for both arm rests and lower yourself onto the toilet. If using a raised toilet seat without arm rests, keep one hand in the center of the walker while reaching back for the toilet seat with the other.
When getting up from the toilet:1. If using a commode with arm rests, use the arm
rests to push up. 2. If using a raised toilet seat without arm rests,
place one hand on the walker and push off the toilet seat with the other.
3. Slidesurgicalknee/legoutinfrontofyouwhenstanding up.
4. Balance yourself before grabbing the walker and attempting to walk.
Joint Program
© 2009 Baylor Health Care System. All rights reserved. 29
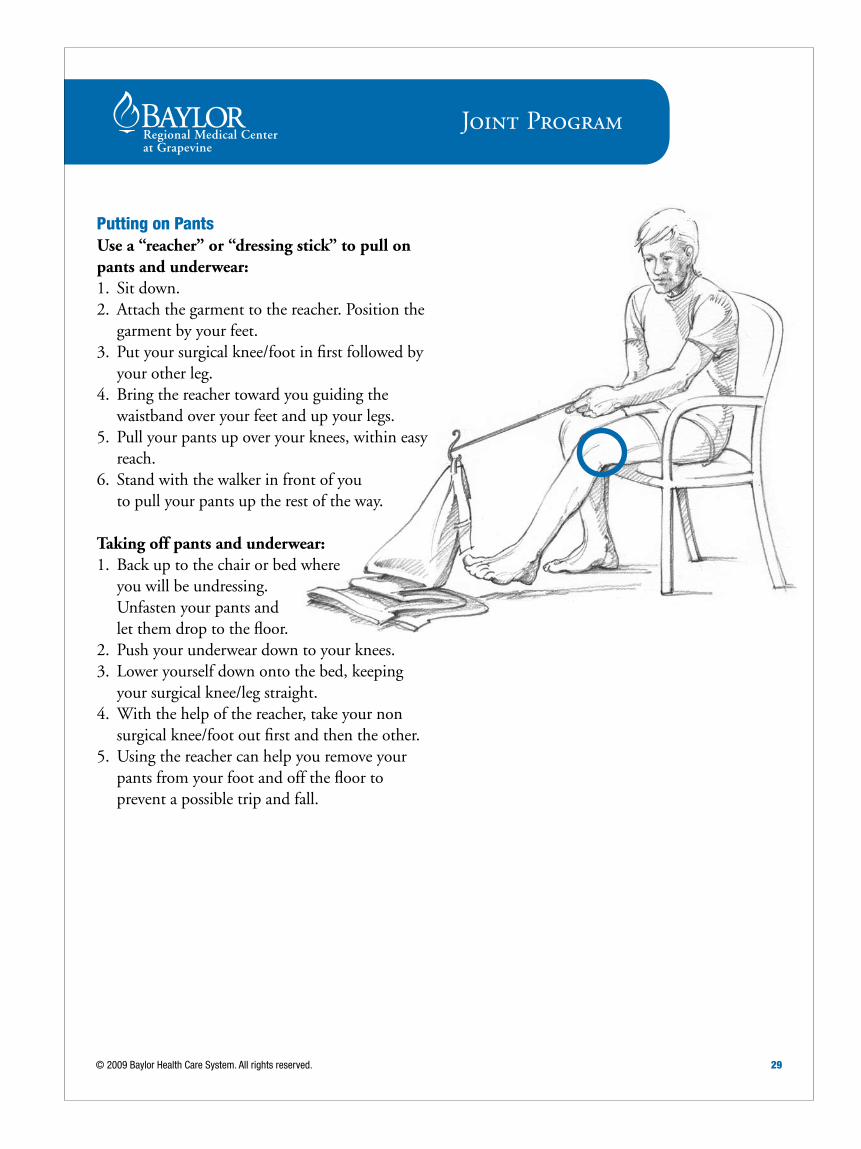
putting on pantsUse a “reacher” or “dressing stick” to pull on pants and underwear:1. Sit down. 2. Attach the garment to the reacher. Position the
garment by your feet. 3. Putyoursurgicalknee/footinfirstfollowedby
your other leg.4. Bring the reacher toward you guiding the
waistband over your feet and up your legs.5. Pull your pants up over your knees, within easy
reach. 6. Stand with the walker in front of you
to pull your pants up the rest of the way.
Taking off pants and underwear:1. Back up to the chair or bed where
you will be undressing. Unfasten your pants and let them drop to the floor.
2. Push your underwear down to your knees. 3. Lower yourself down onto the bed, keeping yoursurgicalknee/legstraight.
4. With the help of the reacher, take your non surgicalknee/footoutfirstandthentheother.
5. Using the reacher can help you remove your pants from your foot and off the floor to prevent a possible trip and fall.
Joint Program
30 © 2009 Baylor Health Care System. All rights reserved.
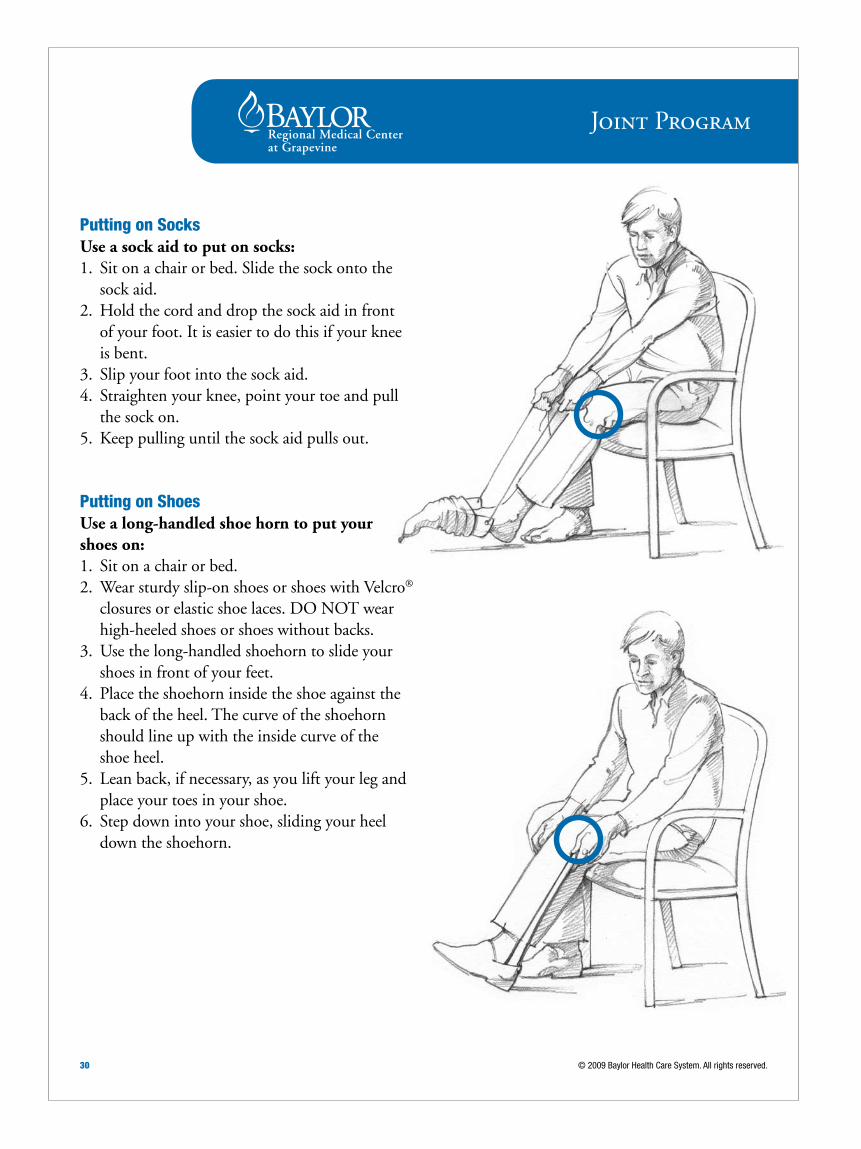
putting on socksUse a sock aid to put on socks:1. Sit on a chair or bed. Slide the sock onto the
sock aid. 2.Holdthecordanddropthesockaidinfront
of your foot. It is easier to do this if your knee is bent.
3. Slip your foot into the sock aid.4. Straighten your knee, point your toe and pull
the sock on.5. Keep pulling until the sock aid pulls out.
putting on shoesUse a long-handled shoe horn to put your shoes on:1. Sit on a chair or bed. 2. Wear sturdy slip-on shoes or shoes with Velcro® closuresorelasticshoelaces.DONOTwearhigh-heeled shoes or shoes without backs.
3. Use the long-handled shoehorn to slide your shoes in front of your feet.
4. Place the shoehorn inside the shoe against the back of the heel. The curve of the shoehorn should line up with the inside curve of the shoe heel.
5. Lean back, if necessary, as you lift your leg and place your toes in your shoe.
6. Step down into your shoe, sliding your heel down the shoehorn.