Patient Demographics Training Guide
20
Patient Demographics Training Guide Medicat Version 10.7 July 2013 Notice: All Medicat content and information provided in this document is confidential and intended for the use of Medicat clients only. All content and information in this document is covered by the nondisclosure and confidentiality provisions of the Medicat license agreement, under which clients are not permitted to disclose, copy or redistribute to any other parties.
Transcript of Patient Demographics Training Guide

Patient Demographics
Training Guide
Medicat Version 10.7
July 2013
Notice: All Medicat content and information provided in this document is confidential and intended for the use of Medicat clients only. All content and information in this document is covered by the nondisclosure and confidentiality provisions of the Medicat license agreement, under which clients are not permitted to disclose, copy or redistribute to any other parties.

Patient, Transaction Codes, Ticket & History Training Guide 2 | P a g e
CONTENTS Patient Screen ............................................................................................................................................... 3
Patient Information Tab .......................................................................................................................... 4
Responsible Party Information Tab ......................................................................................................... 7
Miscellaneous Tab ................................................................................................................................... 8
Student Information Tab ......................................................................................................................... 9
Other Contacts ....................................................................................................................................... 10
Patient Screen Navigation Bar ............................................................................................................... 10
Insurance .......................................................................................................................................... 11
Printing Patient Insurance Record .................................................................................................... 13
HCFA ................................................................................................................................................. 14
Immune ............................................................................................................................................ 15
Notes ................................................................................................................................................ 16
Images .............................................................................................................................................. 16
Ledger ............................................................................................................................................... 18
Tracking ............................................................................................................................................ 19

Patient, Transaction Codes, Ticket & History Training Guide 3 | P a g e
PATIENT SCREEN
The Patient Screen of Practice Management contains demographic information for patients in the database. Much of the information contained in this page was received from the client’s Student Information system through a demographic upload of patient data. However, patient records can also be manually created from this screen.
Select Patient from the Care menu on the Medicat Home screen.
The Patient Screen contains 4 tabs, or pages, of information on the patient. Depending on your demographic upload and the amount of information you have access to from the Student Information; some fields in this page may not contain values.
Patient, Transaction Codes, Ticket & History Training Guide 4 | P a g e
Patient Information Tab
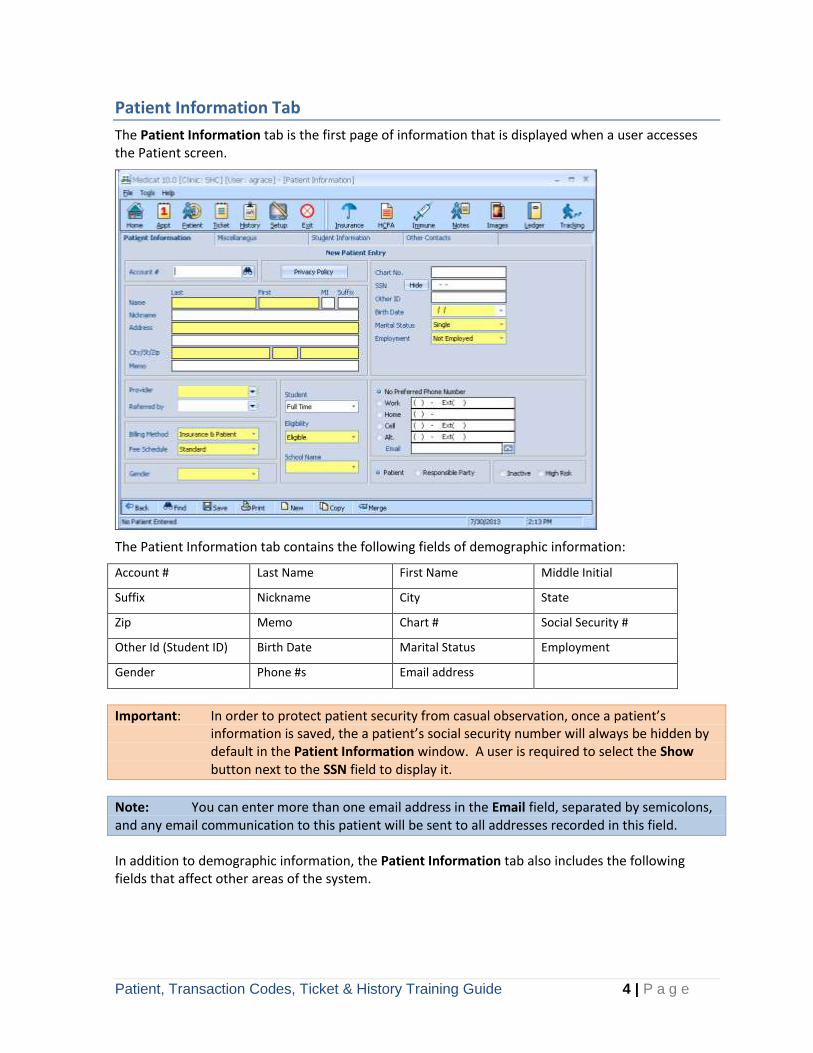
The Patient Information tab is the first page of information that is displayed when a user accesses the Patient screen.
The Patient Information tab contains the following fields of demographic information:
Account # Last Name First Name Middle Initial
Suffix Nickname City State
Zip Memo Chart # Social Security #
Other Id (Student ID) Birth Date Marital Status Employment
Gender Phone #s Email address
Important: In order to protect patient security from casual observation, once a patient’s information is saved, the a patient’s social security number will always be hidden by default in the Patient Information window. A user is required to select the Show button next to the SSN field to display it.
Note: You can enter more than one email address in the Email field, separated by semicolons, and any email communication to this patient will be sent to all addresses recorded in this field.
In addition to demographic information, the Patient Information tab also includes the following fields that affect other areas of the system.

Patient, Transaction Codes, Ticket & History Training Guide 5 | P a g e
Provider
The default provider for the patient. If a ticket is created that does not have a relationship to an appointment, the provider selected here will be the default provider for the ticket. However, this provider selection can be changed at the time the ticket is created.
Referred by
The patient’s referral source
Billing Method
the billing method is used to determine whether the ticket should be filed to insurance or if the patient is responsible for the charges. There are 4 options for Billing Method:
No Bill/No Insurance: the ticket will not appear in the Claims screen to be filed to insurance and the ticket will also not appear in the Statements screen so the patient will not receive a Statement for any balances.
Important: This option creates an “orphaned” ticket for any visits for this patient. Be aware that this setting is not recommended and can throw some Medicat financial reports out of balance.
Suggestion: If you are concerned that your accounts receivables may be affected by patients for whom this option is already chosen, go to Reporting>Standard Reports>Receivables>All. Choose either Detail No Statement or Summary No Statement from the Report Type drop list to see the patients who have this option selected. This is important because any money that is owed on a ticket for a patient with this setting is in limbo because the Medicat system has no way to process it.
Patient Only: the patient is responsible for the charges incurred; The balance due will appear in the Statement area of the system. If this option is selected, you will never be able to generate an insurance claim for this patient.
Insurance and Patient: the patient’s ticket will be filed to Insurance, and the remaining balance will appear in the Statement area of the system as the patient’s responsibility. This is the required setting for electronic claims submission.
Insurance only: the ticket will be filed to insurance, and the patient is not responsible for any amount not paid by insurance. If this option is selected, you will only be able to generate insurance claims for any patient visits for this patient and will never be able to generate a patient statement.
Key to eClaims: The Billing Method must be either Insurance Only or Insurance & Patient for a ticket to be filed electronically.
Fee Schedule
The fee schedule that applies to this patient is chosen from the drop list of fee schedules and determines the fees a patient pays for services. Standard is always the first fee schedule, should not
Patient, Transaction Codes, Ticket & History Training Guide 6 | P a g e
have the name changed, and should be your standard retail billing rate with no discounts. Any other rate that is added after the Standard rate is a discount rate for insurance, student health insurance plan, faculty/staff rates, etc. Think of the Standard rate as a benchmark of what your services are worth in the retail market and this will help you to understand how much you are discounting your fees for the various other fee schedules you apply.
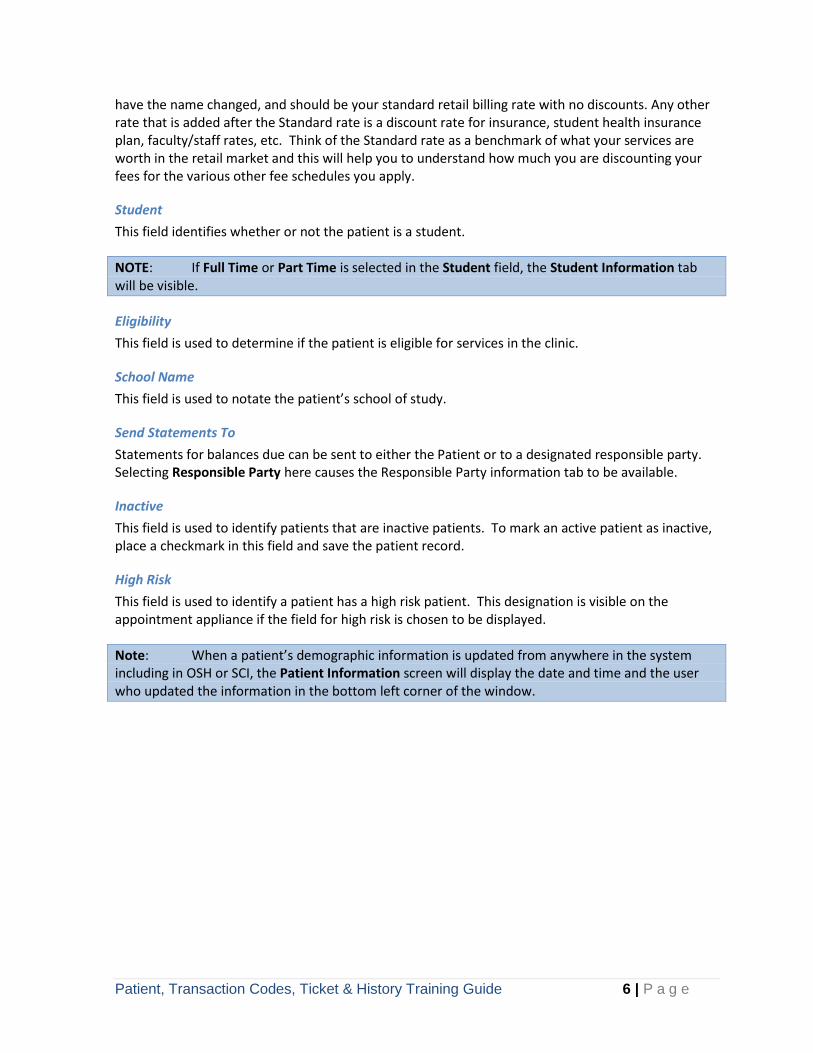
Student
This field identifies whether or not the patient is a student.
NOTE: If Full Time or Part Time is selected in the Student field, the Student Information tab will be visible.
Eligibility
This field is used to determine if the patient is eligible for services in the clinic.
School Name
This field is used to notate the patient’s school of study.
Send Statements To
Statements for balances due can be sent to either the Patient or to a designated responsible party. Selecting Responsible Party here causes the Responsible Party information tab to be available.
Inactive
This field is used to identify patients that are inactive patients. To mark an active patient as inactive, place a checkmark in this field and save the patient record.
High Risk
This field is used to identify a patient has a high risk patient. This designation is visible on the appointment appliance if the field for high risk is chosen to be displayed.
Note: When a patient’s demographic information is updated from anywhere in the system including in OSH or SCI, the Patient Information screen will display the date and time and the user who updated the information in the bottom left corner of the window.
Patient, Transaction Codes, Ticket & History Training Guide 7 | P a g e
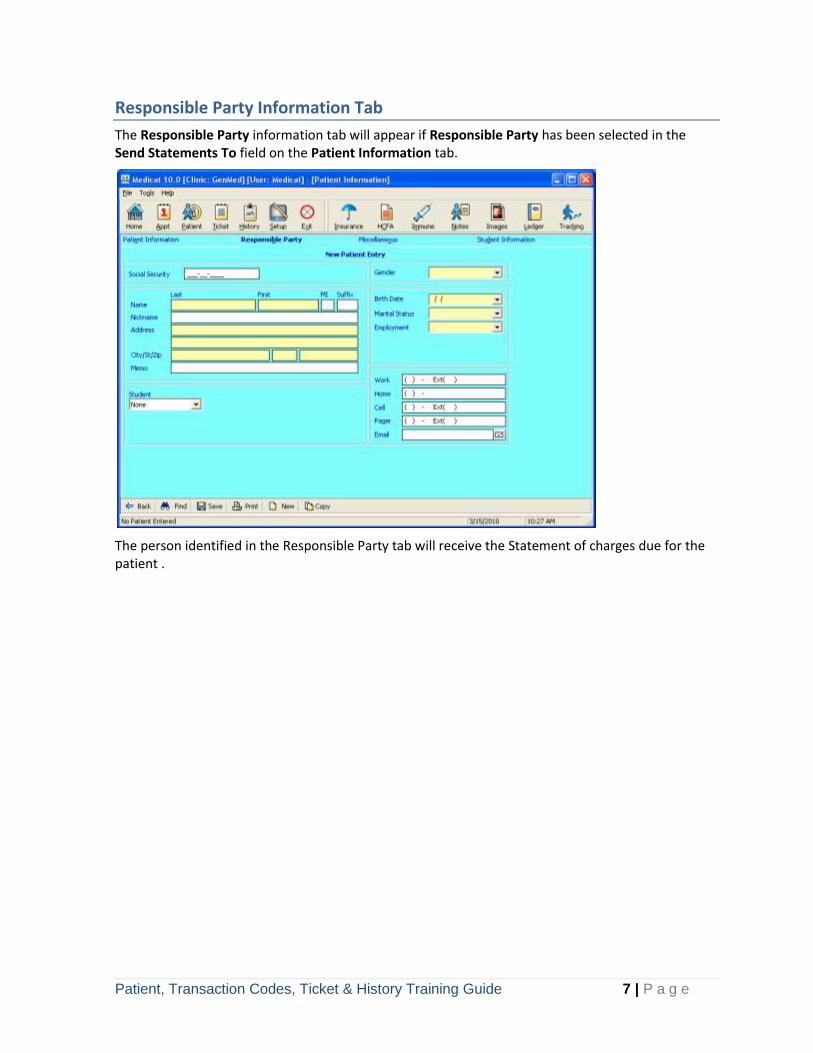
Responsible Party Information Tab
The Responsible Party information tab will appear if Responsible Party has been selected in the Send Statements To field on the Patient Information tab.
The person identified in the Responsible Party tab will receive the Statement of charges due for the patient .
Patient, Transaction Codes, Ticket & History Training Guide 8 | P a g e
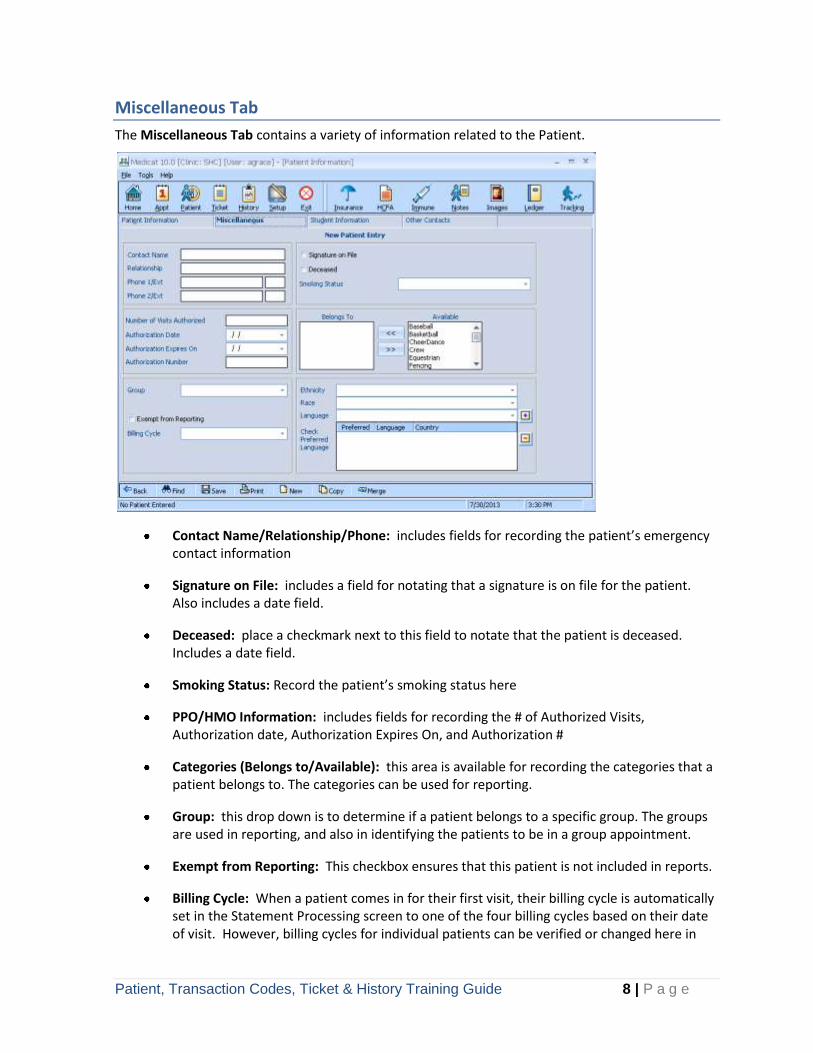
Miscellaneous Tab
The Miscellaneous Tab contains a variety of information related to the Patient.
Contact Name/Relationship/Phone: includes fields for recording the patient’s emergency contact information
Signature on File: includes a field for notating that a signature is on file for the patient. Also includes a date field.
Deceased: place a checkmark next to this field to notate that the patient is deceased. Includes a date field.
Smoking Status: Record the patient’s smoking status here
PPO/HMO Information: includes fields for recording the # of Authorized Visits, Authorization date, Authorization Expires On, and Authorization #
Categories (Belongs to/Available): this area is available for recording the categories that a patient belongs to. The categories can be used for reporting.
Group: this drop down is to determine if a patient belongs to a specific group. The groups are used in reporting, and also in identifying the patients to be in a group appointment.
Exempt from Reporting: This checkbox ensures that this patient is not included in reports.
Billing Cycle: When a patient comes in for their first visit, their billing cycle is automatically set in the Statement Processing screen to one of the four billing cycles based on their date of visit. However, billing cycles for individual patients can be verified or changed here in

Patient, Transaction Codes, Ticket & History Training Guide 9 | P a g e
the Miscellaneous tab in cases where you want to override a patient’s automatic assignment to ensure they are included in a certain cycle.
Ethnicity: this drop down box is used to record the patient’s ethnicity
Student Information Tab
The Student Information tab captures information related to the student.
Permanent Address: records the patient’s permanent address information
Campus Address: records the patient’s campus address information
Additional Information
o Major: field for the patient’s academic major of study
o Standing: drop down list to notate the patient’s standing: undergraduate, graduate, etc
o Class: drop down list to notate the patient’s classification: freshman, sophomore, etc
o Enrollment Date: field used to record the patient’s enrollment date
o Residency: field used to notate the patient’s residency status: ex: on campus, off campus, etc.

Patient, Transaction Codes, Ticket & History Training Guide 10 | P a g e
o International Student: used to notate if a patient is an International Student; also includes a field for Visa Type
Note: Standing, Class, Residency, and International Student are fields used in the Immunization Compliance Manager to manage the requirements for specific groups of students.
Other Contacts
A new Other Contacts tab allows the clinic to track more than one contact for a patient.
1. Click the plus sign to add a new contact.
2. Enter the information for this person including contact Type and Relationship to Patient. The highlighted fields are required.
3. Click the Update Contact button to save the contact to the grid and stay on this screen to add more contacts. Click the Save button in the bottom toolbar to save this contact to the grid and return to the Patient Information tab.
4. Enter multiple contacts in the grid by clicking the plus sign to blank out the fields and make them available to add a new contact. Click Update Contact to save to the grid.
Patient Screen Navigation Bar
The Patient Screen Navigation Bar contains seven buttons that are specific to the page.

Patient, Transaction Codes, Ticket & History Training Guide 11 | P a g e
Insurance
Select the Insurance button from the navigation bar to open the Patient Insurance screen and record the patient’s insurance information.
To enter a patient’s insurance information, follow these steps:
Insured Is:
1. Select if the Insured is the Patient, Responsible Party, or a Third Party.
Insured Information Policy Information
Insurance Company Information

Patient, Transaction Codes, Ticket & History Training Guide 12 | P a g e
If the insured is a Third Party, select the Third Party button to fill in additional information regarding the Third Party in this screen.
2. Enter the Relationship to the Insured in the drop down list.
3. To view or scan an image of the insurance card (optional), select the Images button to scan an image of the insurance card.
4. If an image is already in the system, select the Card Image link to view the image.
Insurance Company Code & Insurance Type
5. Select the patient’s insurance carrier from the Insurance Co. Code drop list.
6. Select the Insurance Type from the Insurance Type drop list.
Policy Information
7. Enter the specific information regarding the policy, including policy number, group number, Program Name, Plan Name, Effective Date, and Expiration Date.
Note: Only the Policy # is required. Other fields related to Policy information are optional fields.
8. If a copay is required for this insurance, place a checkmark next to Copay Required.
9. If you would like the system to calculate the patient’s % of responsibility, place a checkmark next to Calculate Patient Responsibility (%) and enter the patient’s responsibility %.
10. If the patient has a deductible, enter the deductible amount in the Deductible field.
11. Use the Comment Field to enter an administrative comment related to the patient’s insurance.

Patient, Transaction Codes, Ticket & History Training Guide 13 | P a g e
Printing Patient Insurance Record
There are times when clients reported it would be helpful to print a copy of the patient’s insurance record for the patient to take to a referral. This release includes the option to print insurance records in several formats.
1. With a patient record open, click on the Insurance button in the toolbar to open the Patient Insurance screen.
2. Click on the Print down arrow in the bottom toolbar to see the options for printing.
3. Select whether you wish to print the currently displayed insurance information in a label format, or, when there are multiple insurance options, whether you need to print the Current Record, the Primary and Secondary records or All Insurance records for this patient.
4. When you select one of the options, the document that will print displays in a print preview window so you can see how the record will print.
5. Use the built-in controls at the top of the window to print the record.

Patient, Transaction Codes, Ticket & History Training Guide 14 | P a g e
HCFA
Primarily the HCFA template is used to identify the patient’s primary insurance company and secondary insurance company (if applicable).
1. Select the HCFA button from the navigation bar to open the HCFA Setup screen and create a HCFA template for a patient’s insurance.
2. In the Insurance Companies frame, select the patient’s Primary and Secondary insurance companies from the drop lists.
3. The additional fields are not required, but can be entered depending on the complexity of your billing processes.
4. Save this information to the patient’s record by clicking the Save button.

Patient, Transaction Codes, Ticket & History Training Guide 15 | P a g e
Immune
Select the Immune button from the navigation bar to open the Immunization Record screen to display the patient’s immunization history and any immunization requirements that apply to this patient.
Patient, Transaction Codes, Ticket & History Training Guide 16 | P a g e
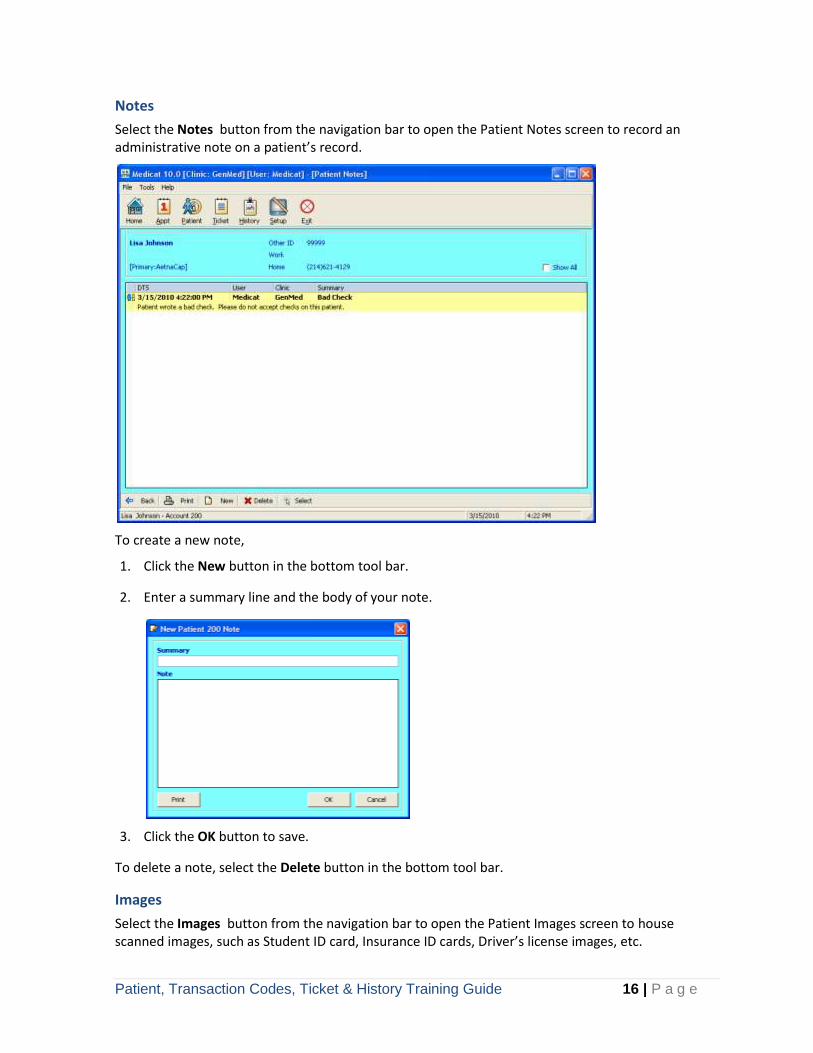
Notes
Select the Notes button from the navigation bar to open the Patient Notes screen to record an administrative note on a patient’s record.
To create a new note,
1. Click the New button in the bottom tool bar.
2. Enter a summary line and the body of your note.
3. Click the OK button to save.
To delete a note, select the Delete button in the bottom tool bar.
Images
Select the Images button from the navigation bar to open the Patient Images screen to house scanned images, such as Student ID card, Insurance ID cards, Driver’s license images, etc.

Patient, Transaction Codes, Ticket & History Training Guide 17 | P a g e
To scan a new image:
1. Select the New button in the bottom tool bar.
2. Select Scan.
3. Follow the steps prompted by your scanner (these will vary depending on your specific scanner.
4. Once the scan is complete the image will appear as an option in the drop menu and will appear in the window.
To attach an already scanned image to the Patient Images area:
1. Select the New button in the bottom tool bar.
Patient, Transaction Codes, Ticket & History Training Guide 18 | P a g e
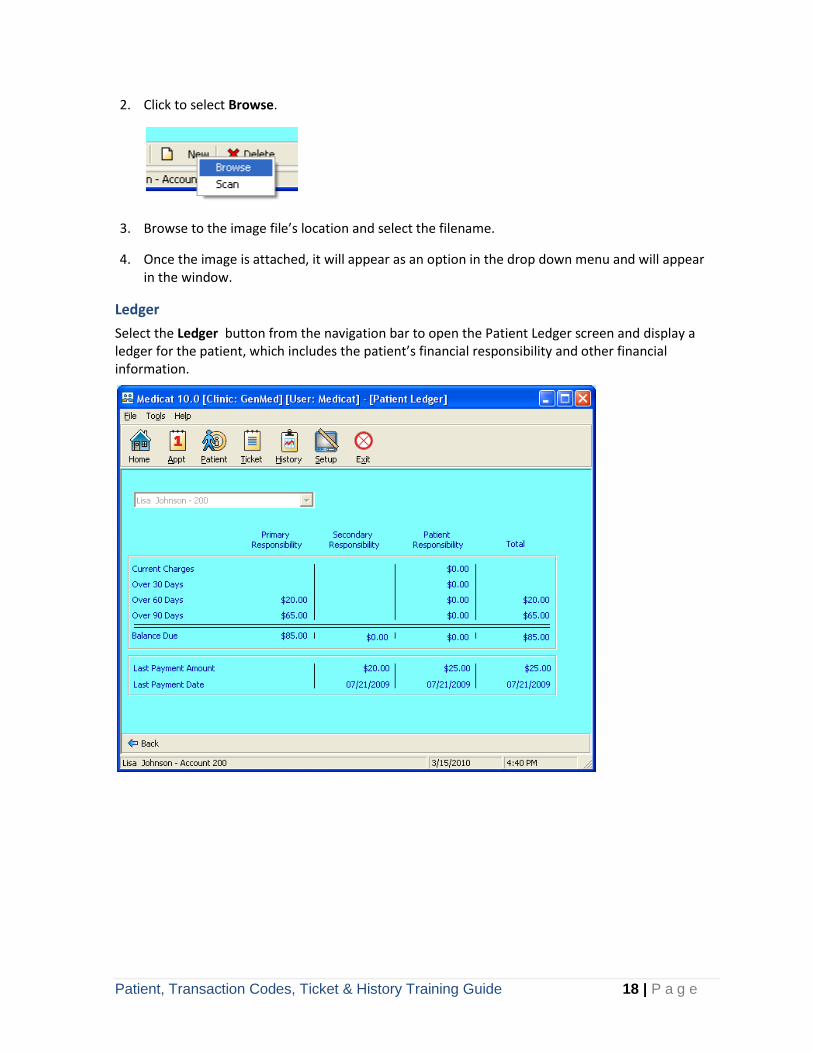
2. Click to select Browse.
3. Browse to the image file’s location and select the filename.
4. Once the image is attached, it will appear as an option in the drop down menu and will appear in the window.
Ledger
Select the Ledger button from the navigation bar to open the Patient Ledger screen and display a ledger for the patient, which includes the patient’s financial responsibility and other financial information.

Patient, Transaction Codes, Ticket & History Training Guide 19 | P a g e
Tracking
Select the Tracking button from the navigation bar to open the Patient Visit Tracking screen to track a patient’s authorized visits. The tracking area will count and track the # appointments for a patient within a specific appointment group, and can alert appointment schedulers once a patient is close to completing the specified # of visits.
1. Select the New button in the bottom tool bar.
2. Select the Appt. Reason Group that you would like to track.
3. Enter a Description for the visits being tracked.
4. Enter the# of visits authorized in the # Visits column.
5. Enter the Starting # Visits in that column.
6. Enter the effective date for this tracking in the Eff. Date column.
7. Enter the expiration date for this tracking in the Exp. Date column.
8. Enter the tracking number in the Tracking No column.
9. Place a checkmark in the Warn column if you would like to be warned when making an appointment if the patient is reaching the end of their authorized visits.
10. Enter the visit # in the Warn Level column where you would like to receive a warning when making an appointment.
11. Click the Save button.
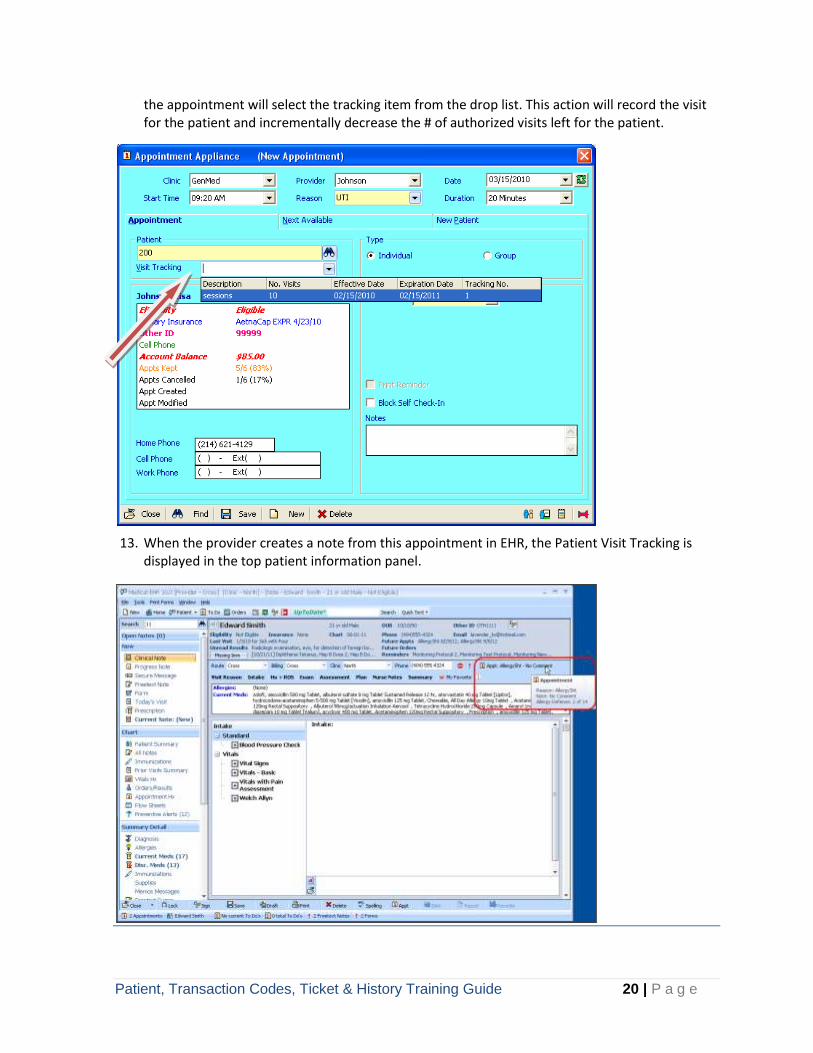
12. When an appointment is made that falls into appointment reason group that is being tracked for the patient, a Visit Tracking drop list will appear in the appointment appliance. The user making
Patient, Transaction Codes, Ticket & History Training Guide 20 | P a g e
the appointment will select the tracking item from the drop list. This action will record the visit for the patient and incrementally decrease the # of authorized visits left for the patient.
13. When the provider creates a note from this appointment in EHR, the Patient Visit Tracking is displayed in the top patient information panel.