Passport directions
7
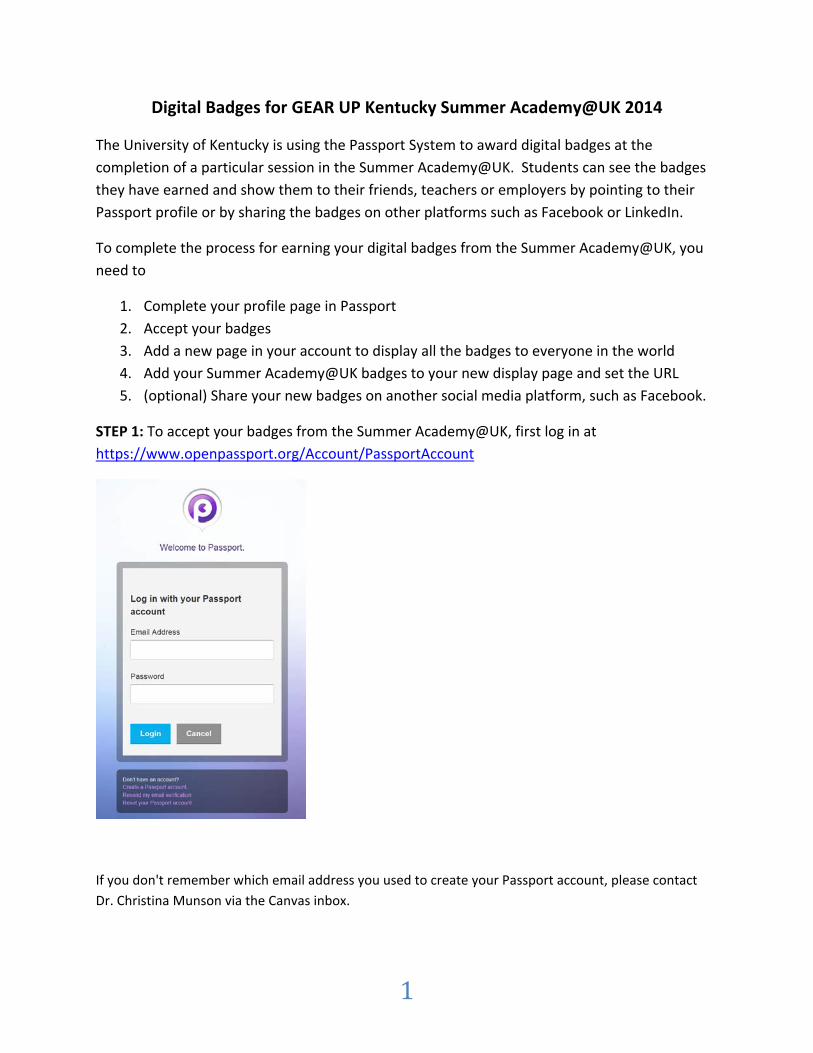
1 Digital Badges for GEAR UP Kentucky Summer Academy@UK 2014 The University of Kentucky is using the Passport System to award digital badges at the completion of a particular session in the Summer Academy@UK. Students can see the badges they have earned and show them to their friends, teachers or employers by pointing to their Passport profile or by sharing the badges on other platforms such as Facebook or LinkedIn. To complete the process for earning your digital badges from the Summer Academy@UK, you need to 1. Complete your profile page in Passport 2. Accept your badges 3. Add a new page in your account to display all the badges to everyone in the world 4. Add your Summer Academy@UK badges to your new display page and set the URL 5. (optional) Share your new badges on another social media platform, such as Facebook. STEP 1: To accept your badges from the Summer Academy@UK, first log in at https://www.openpassport.org/Account/PassportAccount If you don't remember which email address you used to create your Passport account, please contact Dr. Christina Munson via the Canvas inbox.
-
Upload
university-of-kentucky -
Category
Documents
-
view
70 -
download
0
Transcript of Passport directions
1
Digital Badges for GEAR UP Kentucky Summer Academy@UK 2014
The University of Kentucky is using the Passport System to award digital badges at the
completion of a particular session in the Summer Academy@UK. Students can see the badges
they have earned and show them to their friends, teachers or employers by pointing to their
Passport profile or by sharing the badges on other platforms such as Facebook or LinkedIn.
To complete the process for earning your digital badges from the Summer Academy@UK, you
need to
1. Complete your profile page in Passport
2. Accept your badges
3. Add a new page in your account to display all the badges to everyone in the world
4. Add your Summer Academy@UK badges to your new display page and set the URL
5. (optional) Share your new badges on another social media platform, such as Facebook.
STEP 1: To accept your badges from the Summer Academy@UK, first log in at
https://www.openpassport.org/Account/PassportAccount
If you don't remember which email address you used to create your Passport account, please contact
Dr. Christina Munson via the Canvas inbox.

2
STEP 2: In the top right hand corner, you can see the notification (a number) about your new
badges pending.
Underneath your profile name, you will see "Accept all badges" in blue text with the number of pending
badges ‐ click on the blue text “Accept All Badges.”
3
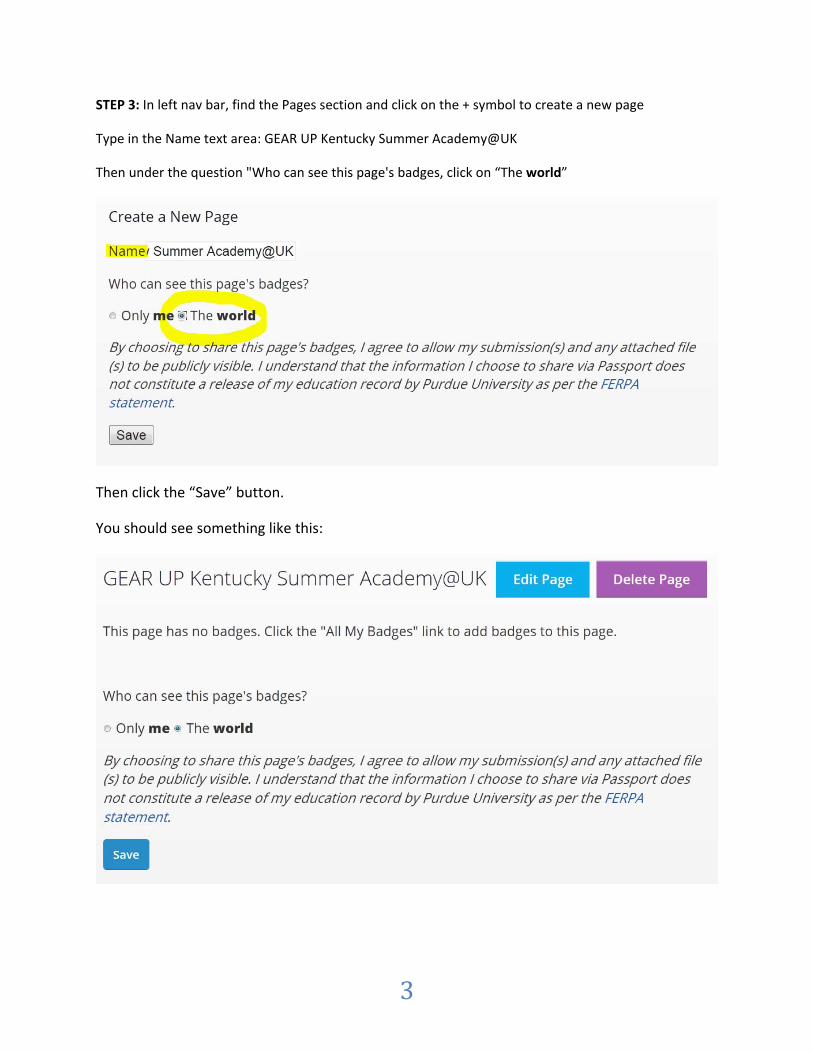
STEP 3: In left nav bar, find the Pages section and click on the + symbol to create a new page
Type in the Name text area: GEAR UP Kentucky Summer Academy@UK
Then under the question "Who can see this page's badges, click on “The world”
Then click the “Save” button.
You should see something like this:
4
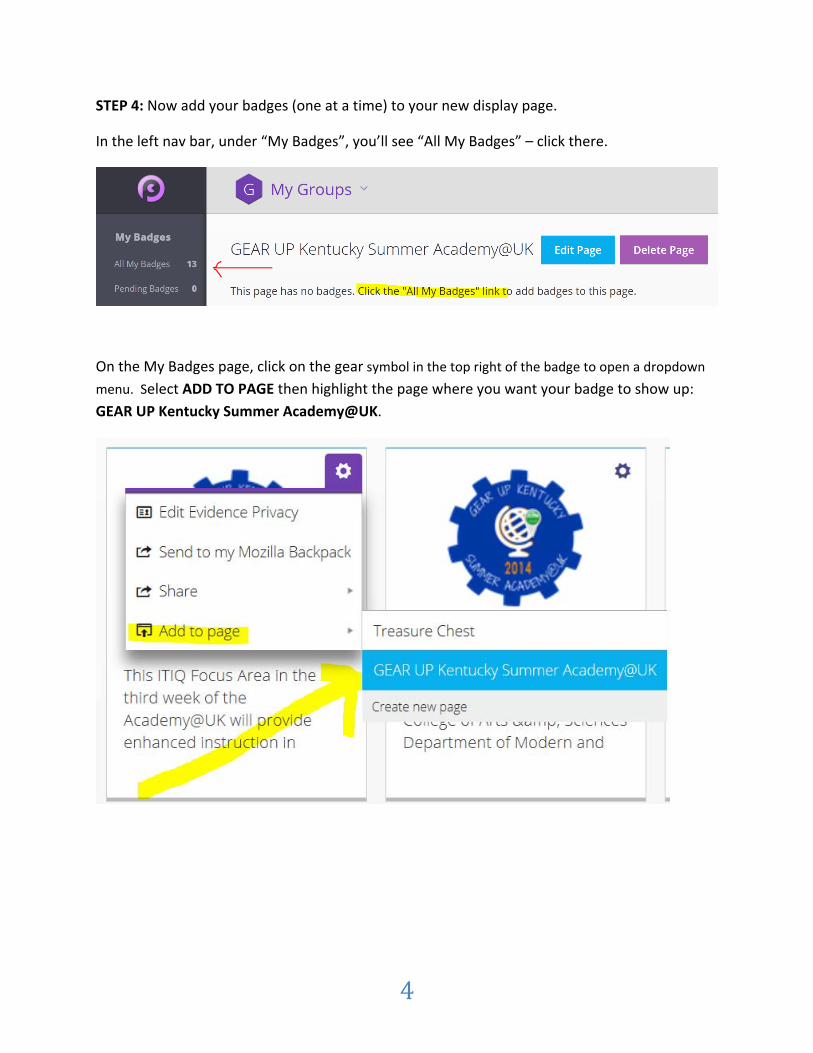
STEP 4: Now add your badges (one at a time) to your new display page.
In the left nav bar, under “My Badges”, you’ll see “All My Badges” – click there.
On the My Badges page, click on the gear symbol in the top right of the badge to open a dropdown
menu. Select ADD TO PAGE then highlight the page where you want your badge to show up:
GEAR UP Kentucky Summer Academy@UK.
5
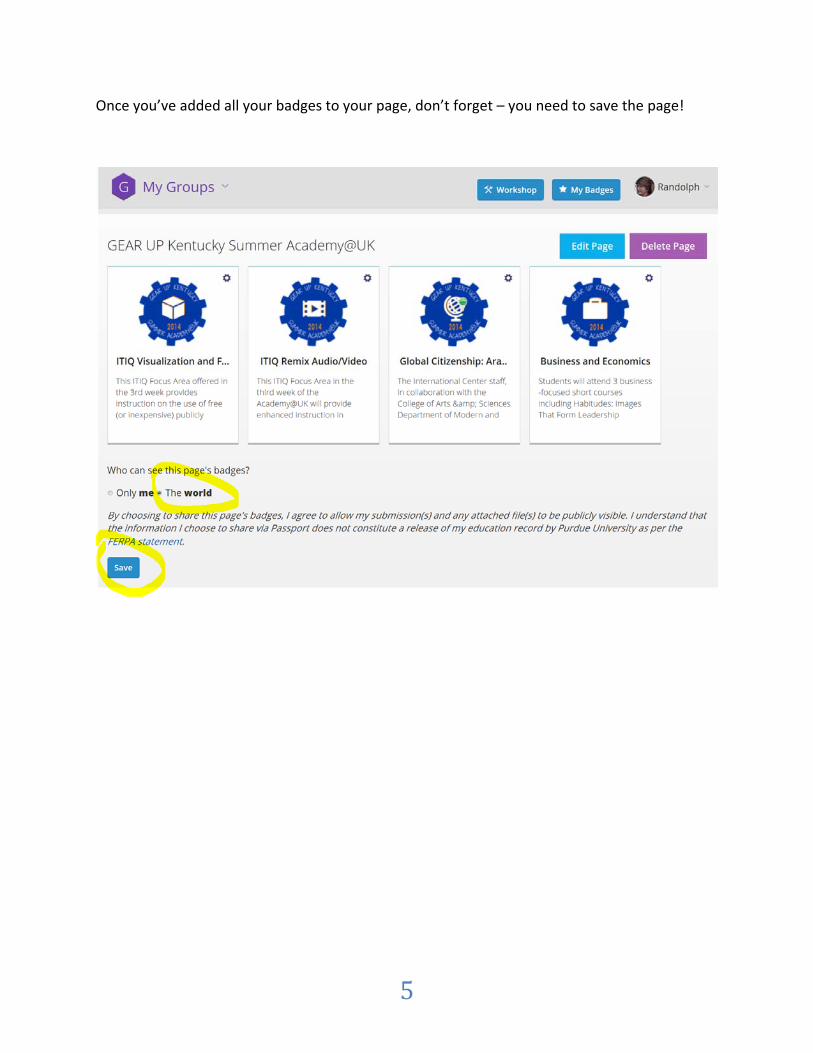
Once you’ve added all your badges to your page, don’t forget – you need to save the page!
6
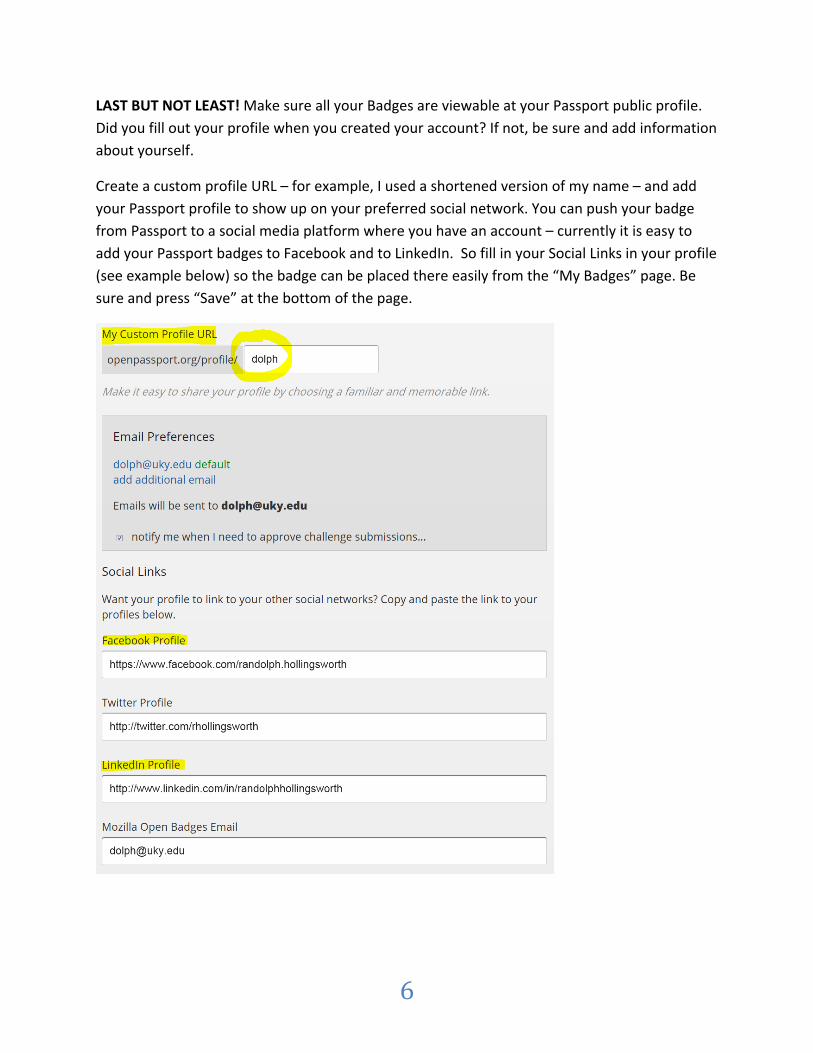
LAST BUT NOT LEAST! Make sure all your Badges are viewable at your Passport public profile.
Did you fill out your profile when you created your account? If not, be sure and add information
about yourself.
Create a custom profile URL – for example, I used a shortened version of my name – and add
your Passport profile to show up on your preferred social network. You can push your badge
from Passport to a social media platform where you have an account – currently it is easy to
add your Passport badges to Facebook and to LinkedIn. So fill in your Social Links in your profile
(see example below) so the badge can be placed there easily from the “My Badges” page. Be
sure and press “Save” at the bottom of the page.
7
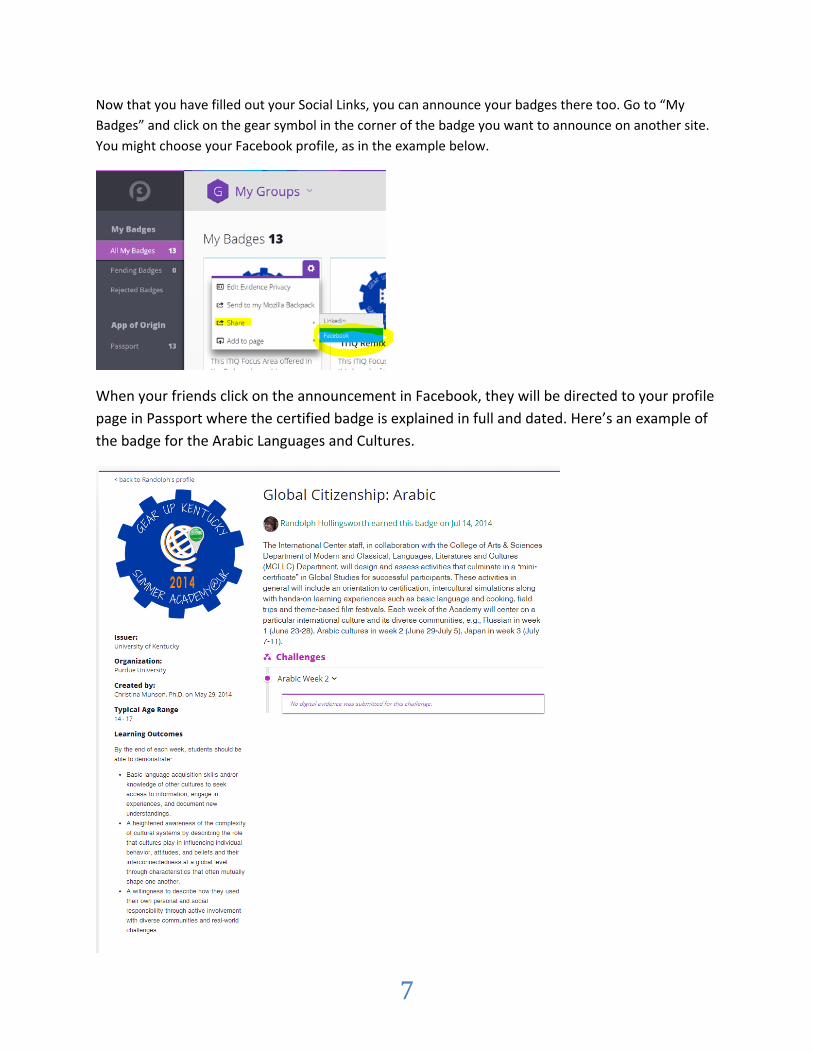
Now that you have filled out your Social Links, you can announce your badges there too. Go to “My
Badges” and click on the gear symbol in the corner of the badge you want to announce on another site.
You might choose your Facebook profile, as in the example below.
When your friends click on the announcement in Facebook, they will be directed to your profile
page in Passport where the certified badge is explained in full and dated. Here’s an example of
the badge for the Arabic Languages and Cultures.