Passaic, New Jersey 07055 Passaic PowerTeacher Gradebook...
12
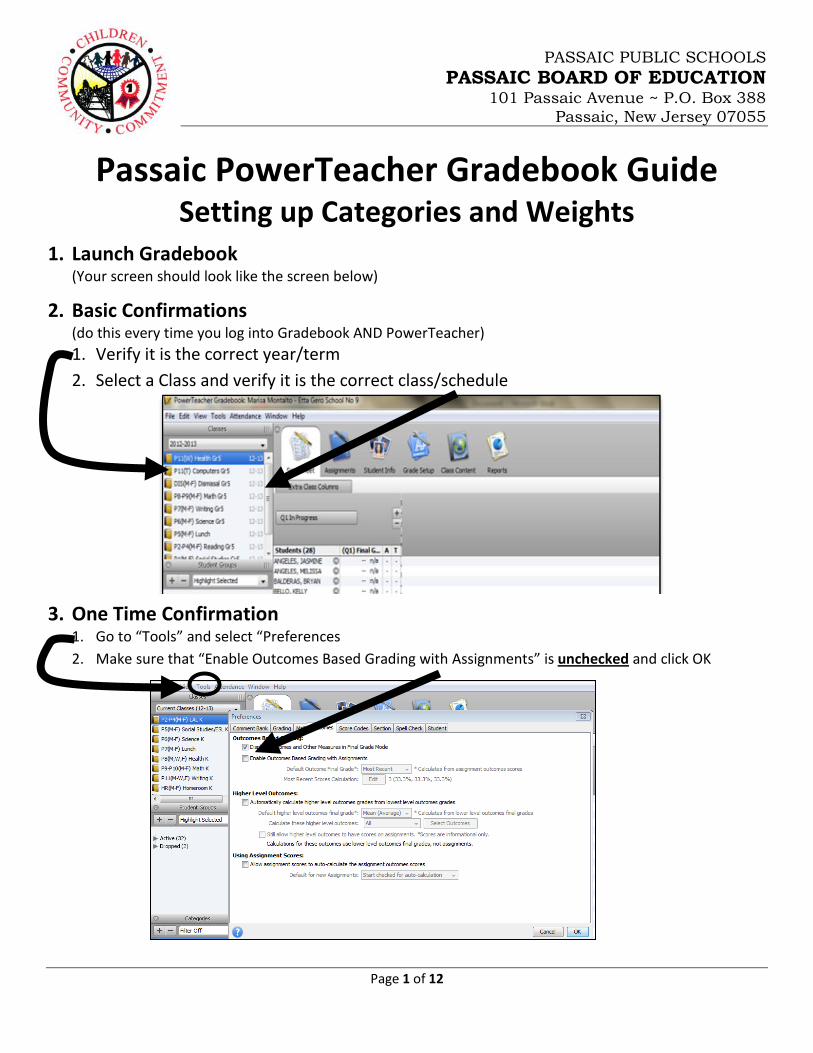
Page 1 of 12 PASSAIC PUBLIC SCHOOLS PASSAIC BOARD OF EDUCATION 101 Passaic Avenue ~ P.O. Box 388 Passaic, New Jersey 07055 Passaic PowerTeacher Gradebook Guide Setting up Categories and Weights 1. Launch Gradebook (Your screen should look like the screen below) 2. Basic Confirmations (do this every time you log into Gradebook AND PowerTeacher) 1. Verify it is the correct year/term 2. Select a Class and verify it is the correct class/schedule 3. One Time Confirmation 1. Go to “Tools” and select “Preferences 2. Make sure that “Enable Outcomes Based Grading with Assignments” is unchecked and click OK
Transcript of Passaic, New Jersey 07055 Passaic PowerTeacher Gradebook...
Page 1 of 12
PASSAIC PUBLIC SCHOOLS PASSAIC BOARD OF EDUCATION
101 Passaic Avenue ~ P.O. Box 388 Passaic, New Jersey 07055
Passaic PowerTeacher Gradebook Guide Setting up Categories and Weights
1. Launch Gradebook (Your screen should look like the screen below)
2. Basic Confirmations (do this every time you log into Gradebook AND PowerTeacher) 1. Verify it is the correct year/term 2. Select a Class and verify it is the correct class/schedule
3. One Time Confirmation 1. Go to “Tools” and select “Preferences 2. Make sure that “Enable Outcomes Based Grading with Assignments” is unchecked and click OK

Page 2 of 12
I. Grade Setup a. Select the Grade Set-up
tab b. Click “Grade Scale” button
to the right of “Mode” c. Select the appropriate Grade Scale
by clicking the button: • Grades 1-6: “Default • Grade K: “Kindergarten”
Term Weights (Marking Periods and Final)
a. Select Calculations b. Select F1 c. Select “Term Weights” d. Type in 25% for all quarters e. Click on the “percentages
to insure everything changes to “25%” (the total must equal 100% when you are done)
f. Click SAVE! g. Select Copy

Page 3 of 12
e. Ensure entire class is selected
f. Click “OK”
g. Ensure the year is correct from the drop-down (2012-2013)
h. Check all the boxes next to each of the classes
i. Click Next
j. Select “Finish”
Page 4 of 12
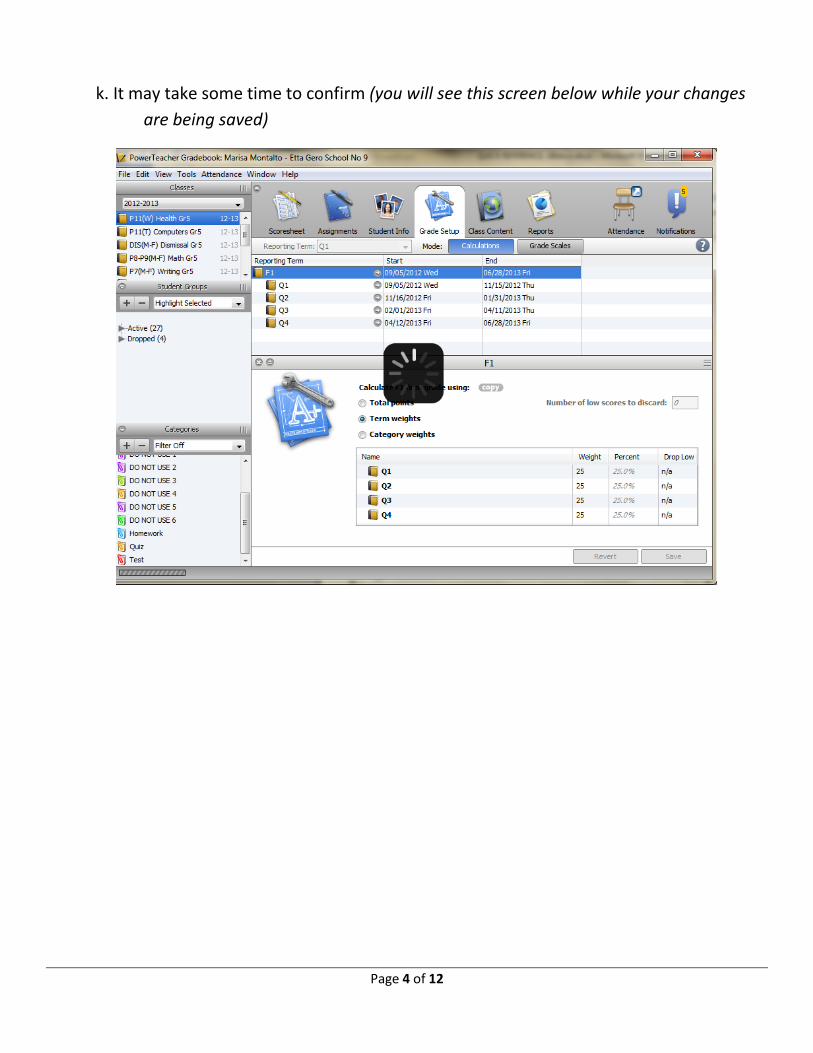
k. It may take some time to confirm (you will see this screen below while your changes are being saved)
Page 5 of 12
II. Category Set-up
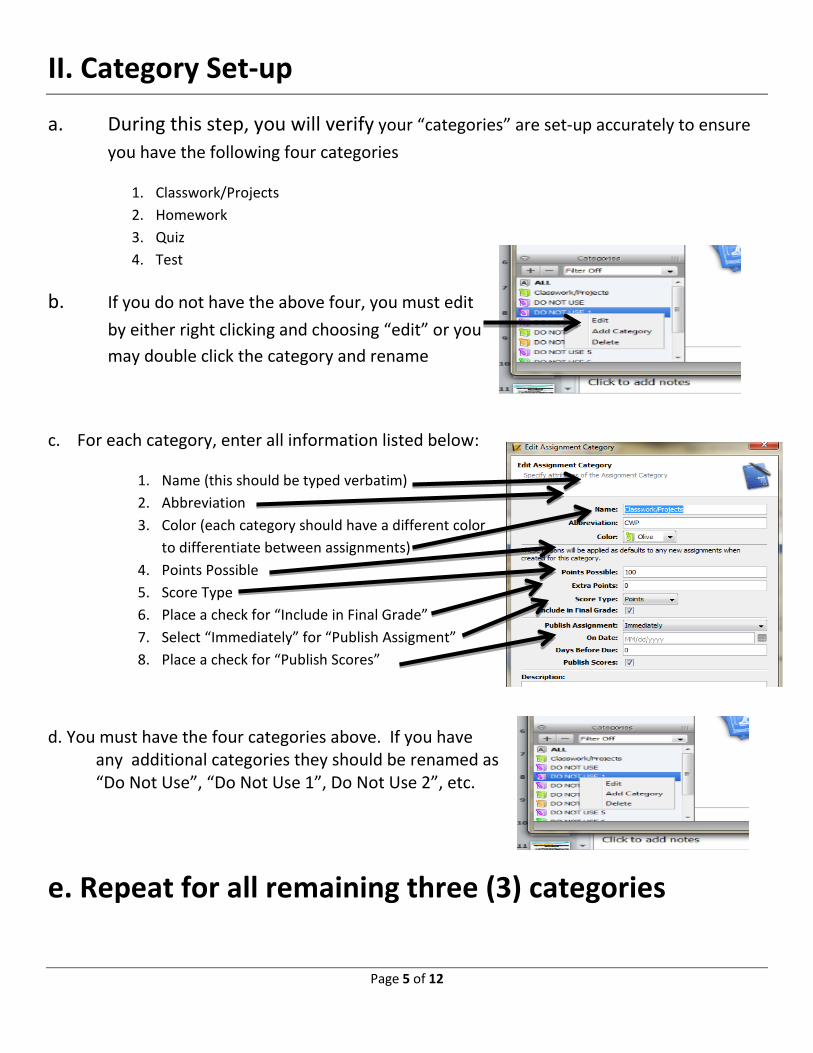
a. During this step, you will verify your “categories” are set-up accurately to ensure you have the following four categories
1. Classwork/Projects 2. Homework 3. Quiz 4. Test
b. If you do not have the above four, you must edit by either right clicking and choosing “edit” or you may double click the category and rename
c. For each category, enter all information listed below:
1. Name (this should be typed verbatim) 2. Abbreviation 3. Color (each category should have a different color
to differentiate between assignments) 4. Points Possible 5. Score Type 6. Place a check for “Include in Final Grade” 7. Select “Immediately” for “Publish Assigment” 8. Place a check for “Publish Scores”
d. You must have the four categories above. If you have any additional categories they should be renamed as “Do Not Use”, “Do Not Use 1”, Do Not Use 2”, etc.
e. Repeat for all remaining three (3) categories
Page 6 of 12
III. Setting up weight breakdown for each class / subject
NOTE: This is not applicable for Homeroom, dismissal, lunch, and other non-graded classes / subjects (whatever will not appear on the report card)
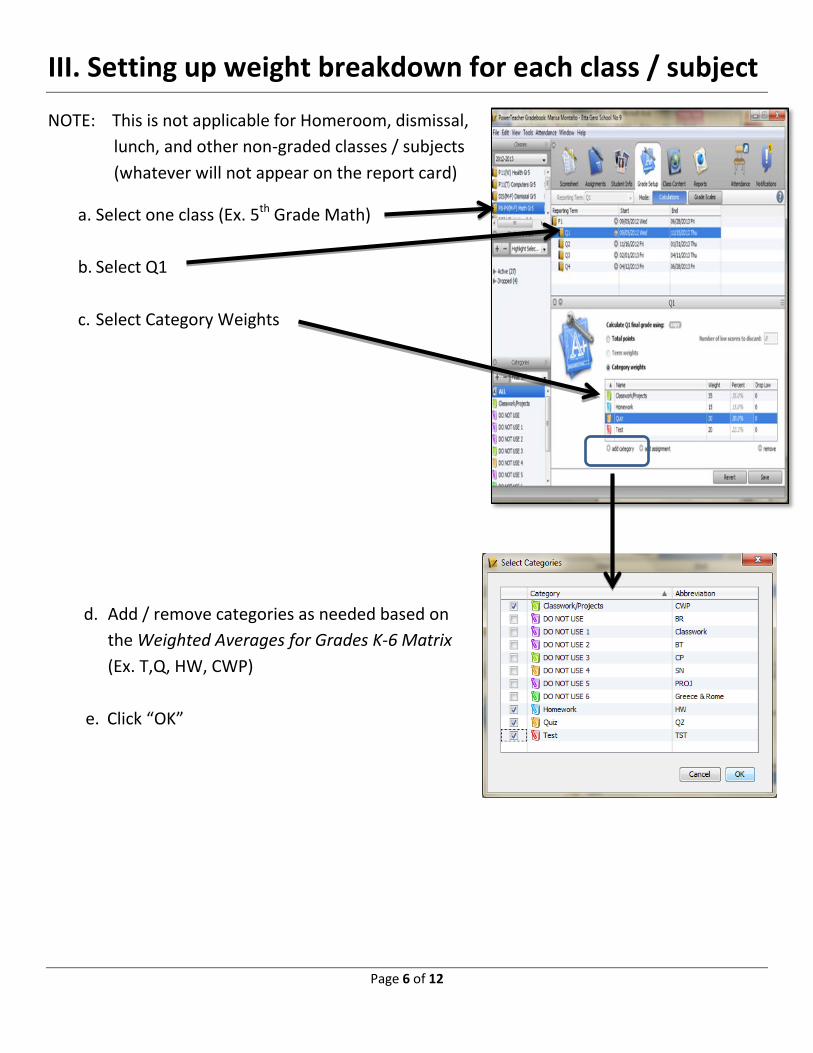
a. Select one class (Ex. 5th Grade Math)
b. Select Q1
c. Select Category Weights
d. Add / remove categories as needed based on the Weighted Averages for Grades K-6 Matrix (Ex. T,Q, HW, CWP)
e. Click “OK”
Page 7 of 12
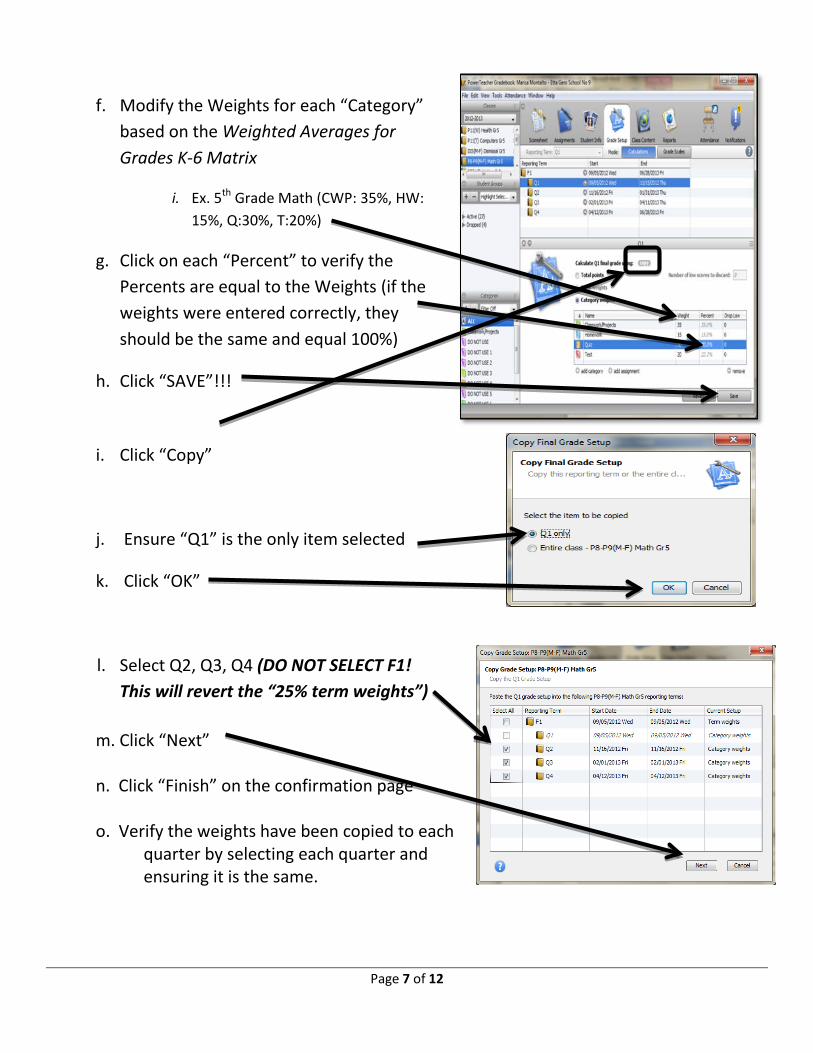
f. Modify the Weights for each “Category” based on the Weighted Averages for Grades K-6 Matrix
i. Ex. 5th Grade Math (CWP: 35%, HW: 15%, Q:30%, T:20%)
g. Click on each “Percent” to verify the Percents are equal to the Weights (if the weights were entered correctly, they should be the same and equal 100%)
h. Click “SAVE”!!!
i. Click “Copy”
j. Ensure “Q1” is the only item selected
k. Click “OK”
l. Select Q2, Q3, Q4 (DO NOT SELECT F1! This will revert the “25% term weights”)
m. Click “Next” n. Click “Finish” on the confirmation page o. Verify the weights have been copied to each
quarter by selecting each quarter and ensuring it is the same.

Page 8 of 12
Repeat for all other classes based on the Weighted Averages for Grades K-6 Matrix
IV. Assignments
Click “ScoreSheet”
Do you have existing assignments?
YES! a. Verify all previously entered assignments have
the correct categories by double clicking and viewing information previously entered in the “Scoresheet” tab
c. If assignment is not in the correct category, use drop down box to choose correct category
No? Do you need to add new assignments?
-- Instructions for creating new assignments!!!
a. Choose “Scoresheet” tab
b. Select the “+”

Page 9 of 12
c. Now you will see this screen
d. Enter assignment name- detail is critical to help you remember what you did and for parents and students once access is granted to the parent portal. Additionally, this will be useful for parent meetings.
e. Make sure you fill in all areas: name- detail abbreviation category score type- points
points possible- 100 weight- 1.00 (unless
counting twice then enter 2.00)
date- ensure it falls within quarter
description- 1-2 sentences include in final grade-
check box
f. Click “Save”
Repeat for all assignments NOTE: If no assignments are entered, there will be NO grade on the report card!

Page 10 of 12
V. Getting Ready for the Report Card!!!!! NOTE: This should only be done at the END of the Marking
Period once all grades are ENTERED and VERIFIED
Part 1: Entering Skills electronically (for the report card) This is what will appear in the electronic gradebook for the report card which used to be where you used to place a check () when the student “Needed Improvement” for a specific “Skill”
1. Click “ScoreSheet”
2. Select a skill
3. Select a student that “Needs Improvement” in a skill listed across the top of the gradebook and select the corresponding box
4. Either Type “NI” as in Needs Improvement OR Right-Click and select Grades “NI”
NOTE: Do NOT select “Fill Scores” This will copy the information for the entire class
5. Repeat for ALL students that Need Improvement for ALL Skills for All Classes
6. Click Save after each class
Page 11 of 12
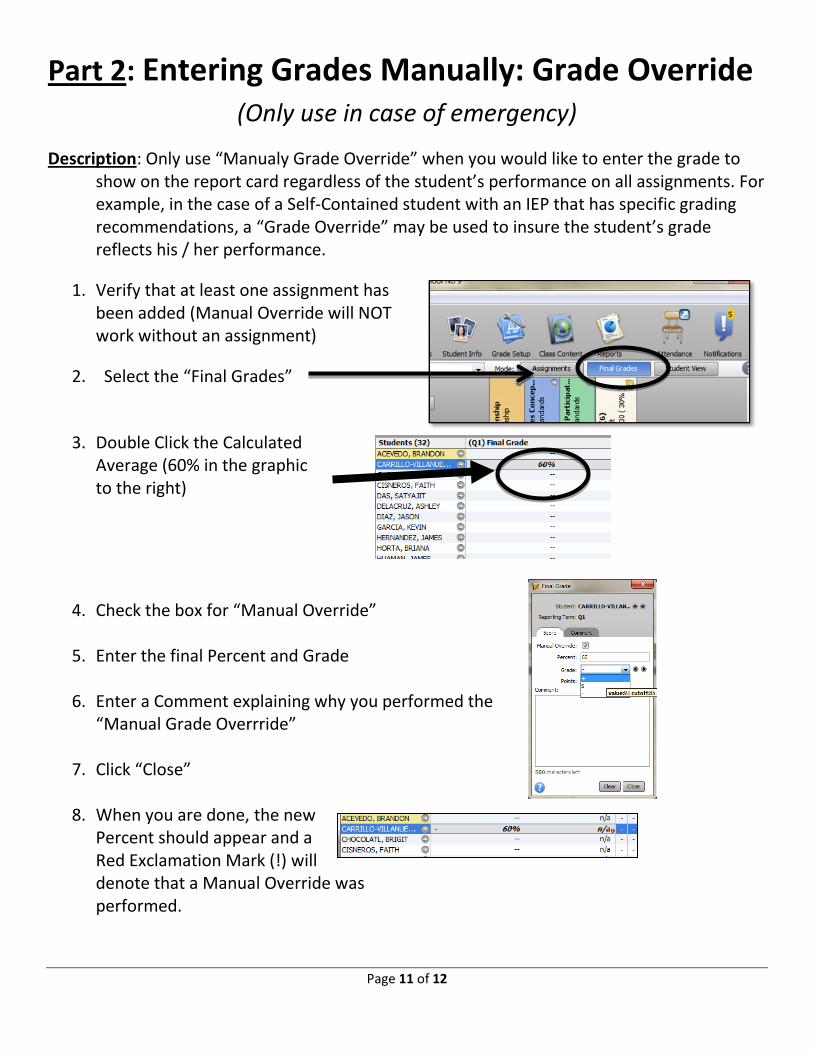
Part 2: Entering Grades Manually: Grade Override (Only use in case of emergency)
Description: Only use “Manualy Grade Override” when you would like to enter the grade to show on the report card regardless of the student’s performance on all assignments. For example, in the case of a Self-Contained student with an IEP that has specific grading recommendations, a “Grade Override” may be used to insure the student’s grade reflects his / her performance.
1. Verify that at least one assignment has
been added (Manual Override will NOT work without an assignment)
2. Select the “Final Grades”
3. Double Click the Calculated Average (60% in the graphic to the right)
4. Check the box for “Manual Override”
5. Enter the final Percent and Grade
6. Enter a Comment explaining why you performed the “Manual Grade Overrride”
7. Click “Close”
8. When you are done, the new
Percent should appear and a Red Exclamation Mark (!) will denote that a Manual Override was performed.

Page 12 of 12
Part 3: Finalizing your Grades for the Report Card
a. Select the “Final Grades”
b. Select the “Q1 in Progress”
c. Select the “Final Grades
Complete” check box d. Type a message saying “Grades
are confirmed and finalized” e. Click “OK”
Repeat for ALL CLASSES to confirm grades are verified and finalized