Part I: Grids, Editors, Navigation, and ControlsPart I: Grids, Editors, Navigation, and Controls 8...
34
Part I: Grids, Editors, Navigation, and Controls Chapter 1: Programming with the ASPxGridView Chapter 2: Advanced ASPxGridView Computing Chapter 3: Using the ASPxTreeList, ASPxDataView, and ASPxNewsControl Chapter 4: Adding SiteMaps, Navigation, and Popup Dialog Boxes Chapter 5 : Implementing a Menu and Tabbed Controls Chapter 6: Managing Scheduled Items and Using Gauges COPYRIGHTED MATERIAL
Transcript of Part I: Grids, Editors, Navigation, and ControlsPart I: Grids, Editors, Navigation, and Controls 8...
Part I: Grids, Editors, Navigation, and Controls
Chapter 1: Programming with the ASPxGridView
Chapter 2: Advanced ASPxGridView Computing
Chapter 3: Using the ASPxTreeList, ASPxDataView, and ASPxNewsControl
Chapter 4: Adding SiteMaps, Navigation, and Popup Dialog Boxes
Chapter 5 : Implementing a Menu and Tabbed Controls
Chapter 6: Managing Scheduled Items and Using Gauges
c01.indd 1c01.indd 1 10/8/09 3:54:18 PM10/8/09 3:54:18 PM
COPYRIG
HTED M
ATERIAL

c01.indd 2c01.indd 2 10/8/09 3:54:20 PM10/8/09 3:54:20 PM

Programming with the ASPxGridView
This year is the tenth anniversary of my VB Today column for Codeguru.com and Developer.com. (My first article was published in PC World in 1992.) In that time, during which I ’ ve written hundreds of articles, readers have written to me more about two subjects than any other: keyboard hooking and grid controls.
Low - level keyboard hooks are cool. I started using them with DOS interrupts and C++ in the early 1990s. Grids of data, however, have the more practical and compelling everyday usefulness.
For years now, customers have asked me to make grids do things that they originally did not seem designed to do, including doing complex relationship modeling with grid nesting and performing real - time calculations with solutions that are more like Rube Goldberg machines than algorithms. Although crafting these solutions — sometimes against my better judgment — with nested user controls and hand - written asynchronous callbacks from scratch has been fun, I ’ m pleased to pass the baton off to the ASPxGridView .
The ASPxGridView is designed to support nesting, the power of Ajax callbacks, tuned performance for small and huge data sets, sorting, grouping, creating summaries, working with themes and skins, and much more. This chapter and the next chapter explore the ASPxGridView . I created the TotalFlight database for the samples used in these chapters because I wanted large amounts of data, but you can easily use Northwind or any other database that has a great deal of data to run the samples. (I used Red Gate Software ’ s SQL Data Generator 1 to populate the TotalFlight database.)
c01.indd 3c01.indd 3 10/8/09 3:54:20 PM10/8/09 3:54:20 PM
Part I: Grids, Editors, Navigation, and Controls
4
Understanding How Ajax Delivers Real Per formance to the ASPxGridView
A lot of conventional wisdom floats around, including the idea that to get high performance from your Web applications, you need to limit the amount of data you return to the client. Generally, limiting returned data required that each programmer limit possible query results or invent some mechanism for micromanaging high - data - prone controls such as grids. Then, things changed — and they seemed to change pretty quickly even for Internet time. Ajax had arrived.
Now called Ajax (in mixed case), the term AJAX (all uppercase) was coined in 2005. Originally, AJAX was an acronym for Asynchronous JavaScript and XML. AJAX was a derivative of capabilities created in the 1990s, including Internet Explorer ’ s IFrame and Java Applets, and is based on the ActiveX object XMLHttpRequest, or remote scripting for browsers that don ’ t support XMLHttpRequest . The term AJAX brought asynchronous callbacks to the general programming community ’ s attention, and AJAX made controls such as the UpdatePanel accessible to all developers. (These later developments actually happened in 2005 and 2006.) Originally dubbed AJAX for JavaScript, XML, or asynchronous calls, it is now simply referred to as Ajax.
What Does Ajax Do for Web Developers? Web forms have a life cycle. (Refer to “ Appendix A: Understanding How Web Applications Differ from Windows Applications ” for more on page life cycles.) When a page is posted back from the client to the server, it goes through the entire life cycle. This life cycle includes rerendering the page, which in turn causes the very visible page flicker users experience. Many times, much of what the user experiences is the result of static content and minor changes based on their interactions with the page; what they pay for with a postback is the re - creation of everything.
Ajax uses callbacks. A callback sends data back to the server, but only the relevant response is returned through the browser. Ajax plumbing literally used to require — as late as 2005 — programmers to inject dynamic JavaScript, wire up event handlers, and manually parse and stuff text returned into the client Web page with more JavaScript. (There are dozens of JavaScript examples throughout the book.) The benefit of employing all this specialized knowledge is that users had a better experience because they paid for data refreshes only when something actually changed on a page. Also, pages seemed to update magically.
You can still use wired - up Ajax with injected script if you want, but it is more error prone and requires great JavaScript authoring and debugging skills. With DevExpress controls and the ASPxGridView, you get the benefit of Ajax without the hassle.
ASPxGridView and Ajax On top of all the features in the ASPxGridView , including sorting, grouping, filtering, and summaries, the ASPxGridView does three very important things that help you get the highest performance: It uses the database server instead of client - side script to manage data; it manages the client VIEWSTATE block
c01.indd 4c01.indd 4 10/8/09 3:54:22 PM10/8/09 3:54:22 PM

Chapter 1: Programming with the ASPxGridView
5
To demonstrate the ASPxGridView, you can follow the examples in this chapter and the next to build the TotalFlight sample shown in Figure 1 - 1, which includes a 1,000,000 - row result set.
Figure 1 - 1: You can complete the TotalFlight passenger manifest sample by working through the samples in this chapter and in Chapter 2.
Microsoft shipped the UpdatePanel in late 2005 (or 2006). Any control can get some Ajax support with the UpdatePanel.
itself by using a smart caching engine rather than sending tons of VIEWSTATE to the client; and it is built using Ajax internally. The UpdatePanel is supported — by setting EnableCallbacks to false — but the UpdatePanel is not required.
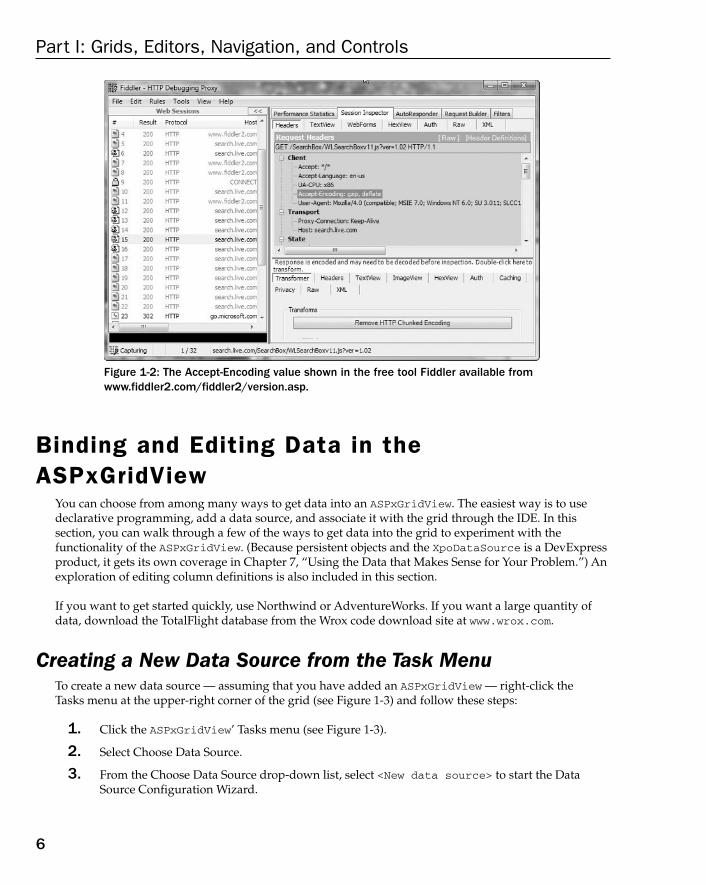
Another feature of the ASPxGridView is the EnableCallbackCompression property. IIS supports compression — a general approach — whereas the ASPxGridView will support compression for the grid if IIS compression is not enabled, a refinement from the general in IIS to the specific compression in the ASPxGridView . (Refer to the Appendix A section “ Upgrading to IIS 7 ” for information on enabling IIS compression.) If you set ASPxGridView.EnableCallbackCompression to true, the grid checks to see whether the Accept - Encoding request header contains gzip or deflate — if content encoding is supported by the browser — and ASPxCallback compresses the result if supported. You can check the Accept - Encoding value by using a free tool such as Fiddler (see Figure 1 - 2) or exploring the Page.Request.ServerVariables[ “ HTTP_ACCEPT_ENCODING ” ] value in Visual Studio debug mode.
c01.indd 5c01.indd 5 10/8/09 3:54:22 PM10/8/09 3:54:22 PM
Part I: Grids, Editors, Navigation, and Controls
6
Figure 1-2: The Accept-Encoding value shown in the free tool Fiddler available from www.fiddler2.com/fiddler2/version.asp.
Binding and Editing Data in the ASPxGridView
You can choose from among many ways to get data into an ASPxGridView . The easiest way is to use declarative programming, add a data source, and associate it with the grid through the IDE. In this section, you can walk through a few of the ways to get data into the grid to experiment with the functionality of the ASPxGridView . (Because persistent objects and the XpoDataSource is a DevExpress product, it gets its own coverage in Chapter 7, “ Using the Data that Makes Sense for Your Problem. ” ) An exploration of editing column definitions is also included in this section.
If you want to get started quickly, use Northwind or AdventureWorks. If you want a large quantity of data, download the TotalFlight database from the Wrox code download site at www.wrox.com.
Creating a New Data Source from the Task Menu To create a new data source — assuming that you have added an ASPxGridView — right - click the Tasks menu at the upper - right corner of the grid (see Figure 1 -3 ) and follow these steps:
1. Click the ASPxGridView ’ Tasks menu (see Figure 1 - 3).
2. Select Choose Data Source.
3. From the Choose Data Source drop - down list, select < New data source > to start the Data Source Configuration Wizard.
c01.indd 6c01.indd 6 10/8/09 3:54:25 PM10/8/09 3:54:25 PM

Chapter 1: Programming with the ASPxGridView
7
4. From the Where Will the Application Get Data From? list, select Database. This selection adds the default data source name SqlDataSource1 .
5. Click OK.
6. In the Choose Your Data Connection, click the New Connection button.
7. In the Add Connection option, change the Data Source to Microsoft SQL Server (refer to Figure 1 - 4).
8. For the sever name, enter .\SQLEXPRESS .
9. Leave authentication to Windows mode.
10. In the Connect to a database option, select the TotalFlight database.
11. In the Add Connection dialog box, click Test Connection. If the connection works, click OK.
12. Click Next.
13. Use the default name for the “ Save Your Connection String to the Application Configuration File ” step. Click Next.
14. In the Configure the Select Statement, specify the PassengerManifest view.
15. For the Columns, select the * check box for a SELECT * query of the view.
16. Click Next.
17. Click the Test Query button.
18. Click Finish.
Figure 1-3: Click the tasks menu (indicated here), click Choose Data Source, and then click <New data source> to start the Data Source Configuration Wizard.
c01.indd 7c01.indd 7 10/8/09 3:54:28 PM10/8/09 3:54:28 PM

Part I: Grids, Editors, Navigation, and Controls
8
After you finish using the wizard, a SqlDataSource is added to the Web page containing the ASPxGridView, the ASPxGridView ’ s DataSourceID property is set to the SqlDataSource1 component, and the grid is updated to reflect the columns in the PassengerManifest view. If you look at the Source view of the Web page, the ASPX should look like Listing 1 - 1.
Listing 1 - 1: The ASPX after running through the new data source configuration wizard.
< %@ Page Language=”C#” AutoEventWireup=”true” CodeFile=”Default.aspx.cs”Inherits=”_Default”% > < %@ Register assembly=”DevExpress.Web.ASPxGridView.v8.3, Version=8.3.2.0,Culture=neutral, PublicKeyToken=b88d1754d700e49a”namespace=”DevExpress.Web.ASPxGridView” tagprefix=”dxwgv” % > < %@ Register assembly=”DevExpress.Web.ASPxEditors.v8.3, Version=8.3.2.0,Culture=neutral, PublicKeyToken=b88d1754d700e49a”namespace=”DevExpress.Web.ASPxEditors” tagprefix=”dxe” % > < %@ Register assembly=”DevExpress.Xpo.v8.3, Version=8.3.2.0, Culture=neutral,PublicKeyToken=b88d1754d700e49a” namespace=”DevExpress.Xpo” tagprefix=”dxxpo”% > < %@ Register assembly=”DevExpress.Web.ASPxGridView.v8.3, Version=8.3.4.0,
Figure 1-4: Configure the Add Connection dialog box as shown to add a connection string for TotalFlight to your web.config file.
c01.indd 8c01.indd 8 10/8/09 3:54:29 PM10/8/09 3:54:29 PM

Chapter 1: Programming with the ASPxGridView
9
Culture=neutral, PublicKeyToken=b88d1754d700e49a”namespace=”DevExpress.Web.ASPxGridView” tagprefix=”dxwgv” % > < %@ Register assembly=”DevExpress.Web.ASPxEditors.v8.3, Version=8.3.4.0,Culture=neutral, PublicKeyToken=b88d1754d700e49a”namespace=”DevExpress.Web.ASPxEditors” tagprefix=”dxe” % > < !DOCTYPE html PUBLIC “-//W3C//DTD XHTML 1.0 Transitional//EN”“http://www.w3.org/TR/xhtml1/DTD/xhtml1-transitional.dtd” > < html xmlns=”http://www.w3.org/1999/xhtml” > < head runat=”server” > < title > < /title > < /head > < body > < form id=”form1” runat=”server” > < div > < dxwgv:ASPxGridView ID=”ASPxGridView1” runat=”server” AutoGenerateColumns=”False” DataSourceID=”SqlDataSource1” > < Columns > < dxwgv:GridViewDataTextColumn FieldName=”FlightNumber” VisibleIndex=”0” > < /dxwgv:GridViewDataTextColumn > < dxwgv:GridViewDataTextColumn FieldName=”LastName” VisibleIndex=”1” > < /dxwgv:GridViewDataTextColumn > < dxwgv:GridViewDataTextColumn FieldName=”FirstName” VisibleIndex=”2” > < /dxwgv:GridViewDataTextColumn > < dxwgv:GridViewDataTextColumn FieldName=”Title” VisibleIndex=”3” > < /dxwgv:GridViewDataTextColumn > < dxwgv:GridViewDataTextColumn FieldName=”Seat” VisibleIndex=”4” > < /dxwgv:GridViewDataTextColumn > < /Columns > < /dxwgv:ASPxGridView > < asp:SqlDataSource ID=”SqlDataSource1” runat=”server” ConnectionString=” < %$ ConnectionStrings:TotalFlightConnectionString% > ” SelectCommand=”SELECT * FROM [PassengerManifest]” > < /asp:SqlDataSource > < /div > < /form > < /body > < /html >
The top of Listing 1 - 1 are the Page and assembly registration statements. The ASPXGridView is defined in the < div > tag section with the DataSourceID and columns specified. Note the definition of the SqlDataSource and the reference to the connection string and the select command. With the wizard and the declarative style approach, you can get a page up and running without writing a single line of ADO.NET code.
c01.indd 9c01.indd 9 10/8/09 3:54:31 PM10/8/09 3:54:31 PM

Part I: Grids, Editors, Navigation, and Controls
10
To test the demo, click Debug Start Debugging. The page will take several seconds to show up because the database contains a million rows in the PassengerManifest view. The page loads in about 20 seconds on my multiprocessor, 3GB, Windows Vista box running the Cassini server and SQLExpress 2005. These are pretty good results for everything running on a workstation; your results may vary but should improve in a deployment environment. (See Figure 1 - 5.)
Figure 1-5: A million rows of data using the lightweight Cassini Web server, SQL Express, all running on a Windows Vista workstation.
I am not advocating that you routinely have million - row result sets, because 20 seconds is a long time in Internet time. (Anything more than a second is a long time in Internet time.) I am telling you that you can return many rows in the ASPxGridView if necessary, and the results will improve based on the deployment infrastructure.
If you need to modify the data source, you can select Configure Data Source from the Tasks menu. If the underlying schema changes, selecting Refresh Schema from the Tasks menu will update the columns in the grid relative to the current schema.
The <%$ %> tag is called an ASP.NET expression. ASP.NET expressions are used declaratively to set control properties at runtime based on connection strings, application settings, and configuration and resource file information.
c01.indd 10c01.indd 10 10/8/09 3:54:32 PM10/8/09 3:54:32 PM

Chapter 1: Programming with the ASPxGridView
11
Figure 1-6: The columns Editor Form for managing column properties in the ASPxGridView.
As a practical matter, begin building your applications with the amount and kind of information you need. Don ’ t worry about matters such as speed too early on. You can always add hardware, tune, and write data - limiting queries after some careful profiling. It is worth stipulating performance characteristics in your requirements and keeping an eye on performance relative to these characteristics.
Editing Column Information Among the several task menu items you can click, one is the Column item. From there, you can open the columns Editor Form. The Columns dialog box (see Figure 1 - 6) provides precise control over the ASPxGridView columns collection and each column ’ s properties and sub - properties. You can use the Columns dialog box to add and remove bound and unbound columns, change the order of columns, and change just about every imaginable property associated with each column. For example, to start the grid with the data sorted by Flight Number, select the Flight Number column, expand the Data property, and change the SortOrder subproperty from None to Ascending.
c01.indd 11c01.indd 11 10/8/09 3:54:32 PM10/8/09 3:54:32 PM
Part I: Grids, Editors, Navigation, and Controls
12
Chapter 2, “ Advanced ASPxGridView Computing, ” provides examples of defining unbound columns, and the section “ Managing the Grid ’ s Appearance, ” later in this chapter, tells more about using properties, including column properties. For more on sorting, refer to the “ Grouping and Sorting Data ” section, also later in this chapter.
Filtering Data Filtering data is a critical aspect of programming, especially for controls such as the ASPxGridView, which is capable of showing large amounts of data. Customers don ’ t want to scroll manually or page through large data sets. Customers want to put in some search criteria. Programmers, of course, are capable of handling filter queries entered through a control such as a TextBox and then filtering the data on a postback with an updated SQL query, LINQ, the Sort method of collections or by writing searching and sorting features manually. Of course, this isn ’ t an efficient use of a programmer ’ s time, either.
With the ASPxGridView, extensive support already exists for a variety of filtering. The ASPxGridView supports filtering through a filter row and filter menu, a header filter button (which is a drop - down list), or the filter control. The filter row, filter menu, and header filter button provide straightforward filtering. (I ’ ve included examples of using these features in this the sub - sections that follow). The ASPxGridView also supports advanced filtering through a control that supports a variety of Boolean - chained predicates, columns in the result set, every imaginable operator, and type - centric entry fields for the operand. In short, the filter control permits end users to build very complex filters in a visual and intuitive way, and these filters can be added programmatically as well. For the most part, however, the ASPxGridView offers an advanced filter that can be enabled and disabled without your writing a stitch of code.
You can start by working your way through the filter row and then through filtering options, including using the filter control and programmatic filtering at startup.
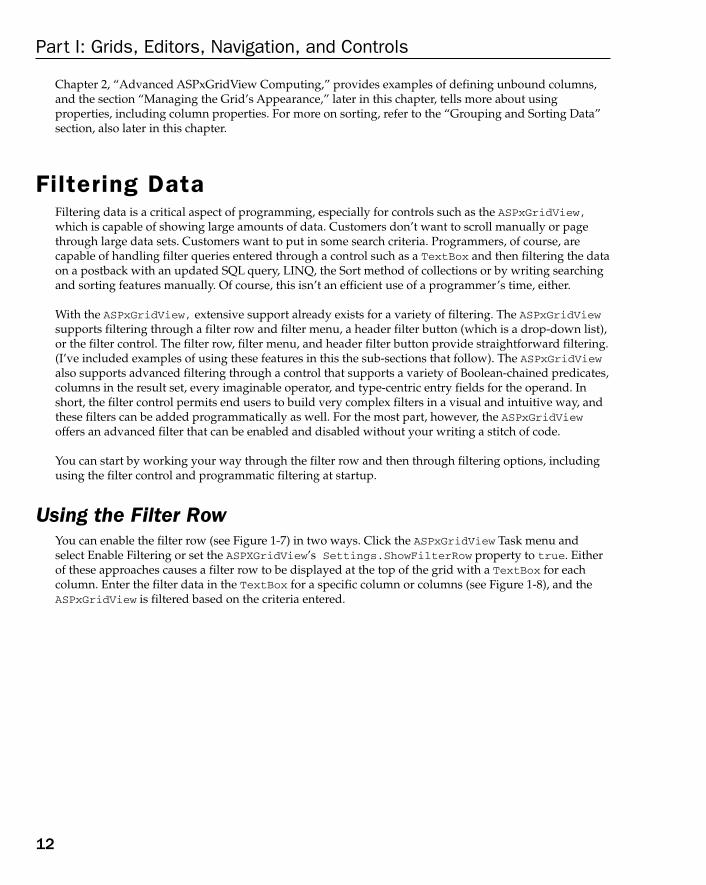
Using the Filter Row You can enable the filter row (see Figure 1 - 7) in two ways. Click the ASPxGridView Task menu and select Enable Filtering or set the ASPXGridView ’ s Settings.ShowFilterRow property to true. Either of these approaches causes a filter row to be displayed at the top of the grid with a TextBox for each column. Enter the filter data in the TextBox for a specific column or columns (see Figure 1 - 8), and the ASPxGridView is filtered based on the criteria entered.
c01.indd 12c01.indd 12 10/8/09 3:54:33 PM10/8/09 3:54:33 PM

Chapter 1: Programming with the ASPxGridView
13
Figure 1-7: Click the Task menu and select Enable Filtering or set Settings.ShowFilterRow to true to display the ASPxGridView’s filter row.
c01.indd 13c01.indd 13 10/8/09 3:54:33 PM10/8/09 3:54:33 PM
Part I: Grids, Editors, Navigation, and Controls
14
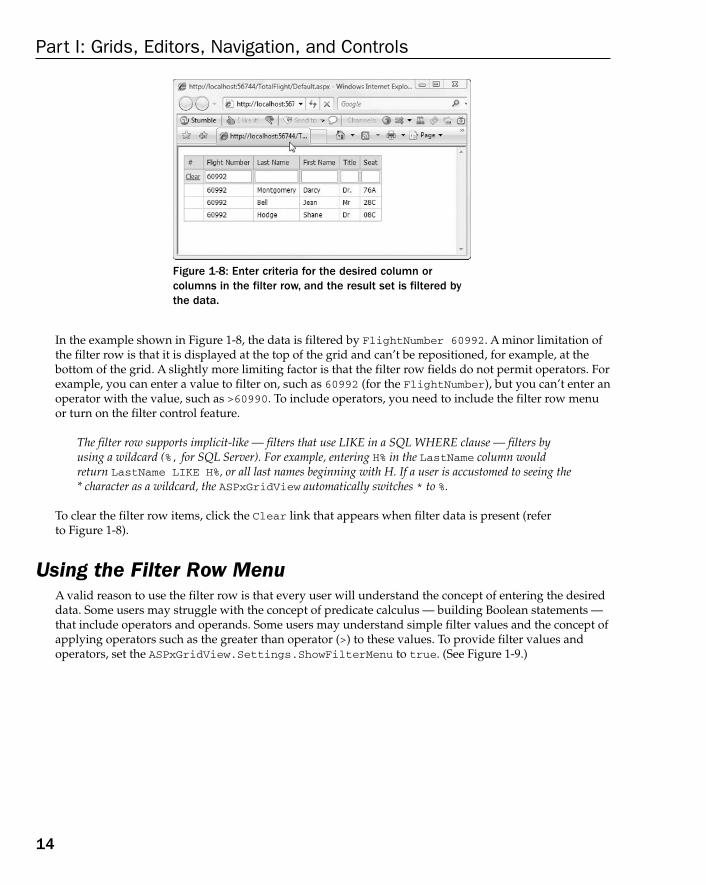
Figure 1-8: Enter criteria for the desired column or columns in the filter row, and the result set is filtered by the data.
In the example shown in Figure 1 - 8, the data is filtered by FlightNumber 60992 . A minor limitation of the filter row is that it is displayed at the top of the grid and can ’ t be repositioned, for example, at the bottom of the grid. A slightly more limiting factor is that the filter row fields do not permit operators. For example, you can enter a value to filter on, such as 60992 (for the FlightNumber ), but you can ’ t enter an operator with the value, such as > 60990 . To include operators, you need to include the filter row menu or turn on the filter control feature.
The filter row supports implicit-like — filters that use LIKE in a SQL WHERE clause — filters by using a wildcard ( %, for SQL Server). For example, entering H% in the LastName column would return LastName LIKE H% , or all last names beginning with H. If a user is accustomed to seeing the * character as a wildcard, the ASPxGridView automatically switches * to % .
To clear the filter row items, click the Clear link that appears when filter data is present (refer to Figure 1 - 8).
Using the Filter Row Menu A valid reason to use the filter row is that every user will understand the concept of entering the desired data. Some users may struggle with the concept of predicate calculus — building Boolean statements — that include operators and operands. Some users may understand simple filter values and the concept of applying operators such as the greater than operator ( > ) to these values. To provide filter values and operators, set the ASPxGridView.Settings.ShowFilterMenu to true . (See Figure 1 - 9.)
c01.indd 14c01.indd 14 10/8/09 3:54:33 PM10/8/09 3:54:33 PM
Chapter 1: Programming with the ASPxGridView
15
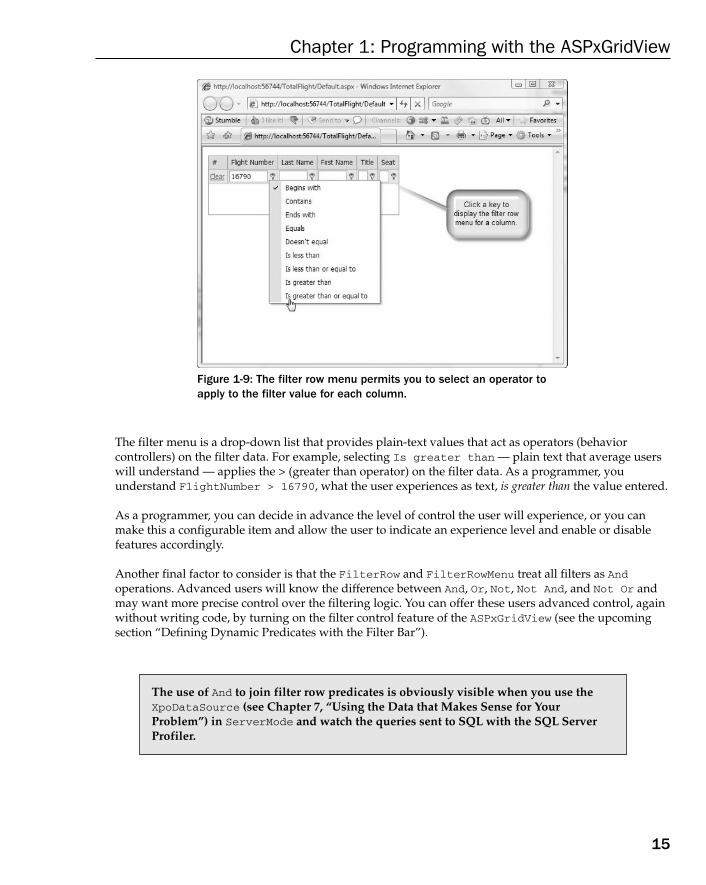
Figure 1-9: The filter row menu permits you to select an operator to apply to the filter value for each column.
The filter menu is a drop - down list that provides plain - text values that act as operators (behavior controllers) on the filter data. For example, selecting Is greater than — plain text that average users will understand — applies the > (greater than operator) on the filter data. As a programmer, you understand FlightNumber > 16790, what the user experiences as text, is greater than the value entered.
As a programmer, you can decide in advance the level of control the user will experience, or you can make this a configurable item and allow the user to indicate an experience level and enable or disable features accordingly.
Another final factor to consider is that the FilterRow and FilterRowMenu treat all filters as And operations. Advanced users will know the difference between And , Or , Not , Not And , and Not Or and may want more precise control over the filtering logic. You can offer these users advanced control, again without writing code, by turning on the filter control feature of the ASPxGridView (see the upcoming section “ Defining Dynamic Predicates with the Filter Bar ” ).
The use of And to join filter row predicates is obviously visible when you use the XpoDataSource (see Chapter 7, “Using the Data that Makes Sense for Your Problem”) in ServerMode and watch the queries sent to SQL with the SQL Server Profiler.
c01.indd 15c01.indd 15 10/8/09 3:54:34 PM10/8/09 3:54:34 PM
Part I: Grids, Editors, Navigation, and Controls
16
Defining Dynamic Predicates with the Filter Bar If you look in the Toolbox DX. n.n : Data tab, you see the ASPxFilterControl . An ASPxFilterControl is built into the ASPxGridView . To enable the advanced filter control, select ASPxGridView.Settings.ShowFilterBar and set it to Visible (see Figure 1 - 11). (The Filter Bar is set to Hidden by default.)
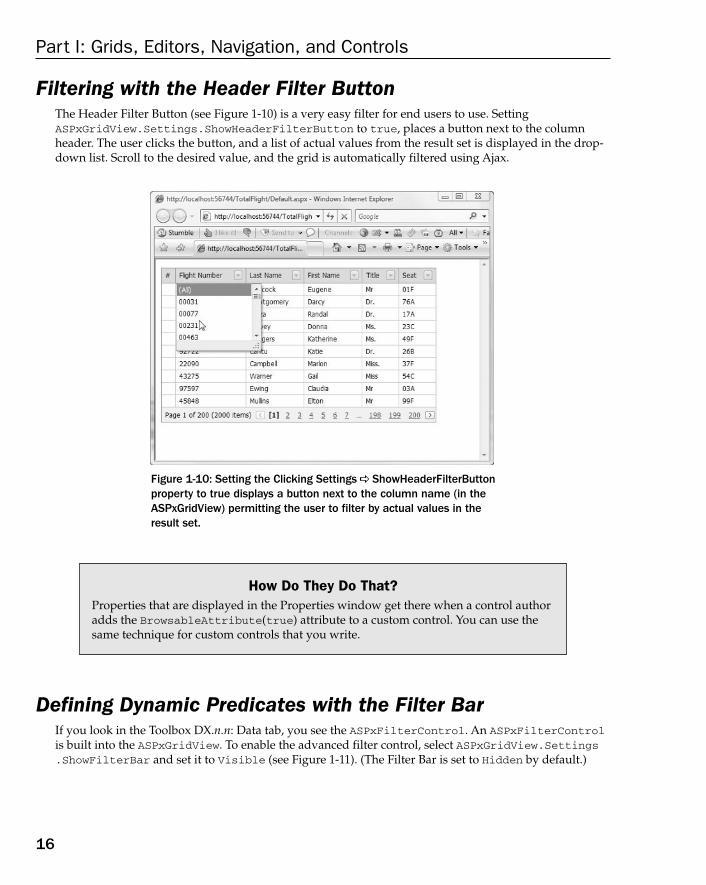
Filtering with the Header Filter Button The Header Filter Button (see Figure 1 - 10) is a very easy filter for end users to use. Setting ASPxGridView.Settings.ShowHeaderFilterButton to true, places a button next to the column header. The user clicks the button, and a list of actual values from the result set is displayed in the drop - down list. Scroll to the desired value, and the grid is automatically filtered using Ajax.
How Do They Do That?Properties that are displayed in the Properties window get there when a control author adds the BrowsableAttribute(true) attribute to a custom control. You can use the same technique for custom controls that you write.
Figure 1-10: Setting the Clicking Settings ShowHeaderFilterButton property to true displays a button next to the column name (in the ASPxGridView) permitting the user to filter by actual values in the result set.
c01.indd 16c01.indd 16 10/8/09 3:54:34 PM10/8/09 3:54:34 PM
Chapter 1: Programming with the ASPxGridView
17
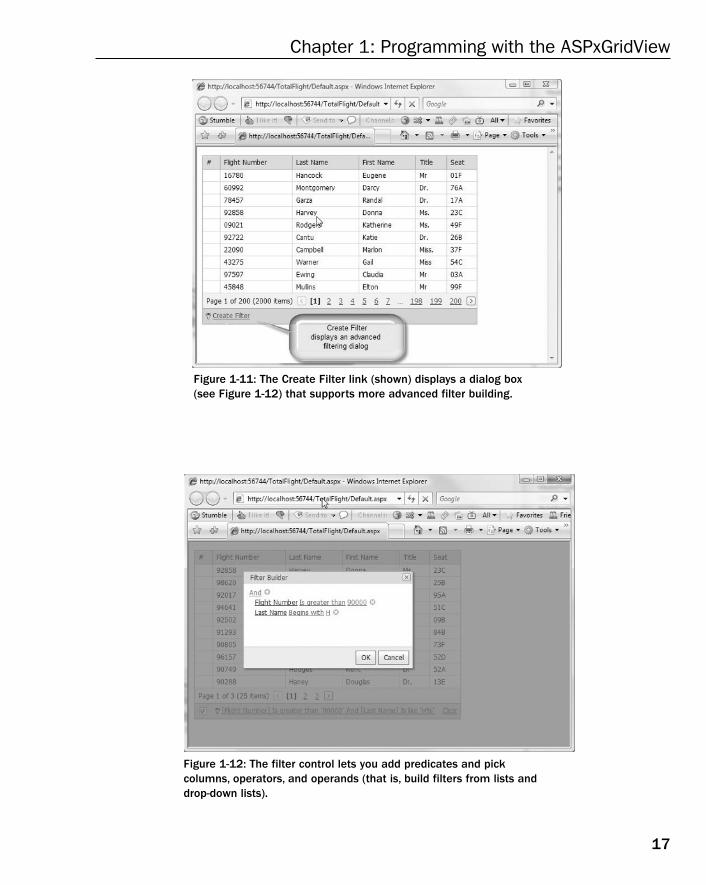
Figure 1-12: The filter control lets you add predicates and pick columns, operators, and operands (that is, build filters from lists and drop-down lists).
Figure 1-11: The Create Filter link (shown) displays a dialog box (see Figure 1-12) that supports more advanced filter building.
c01.indd 17c01.indd 17 10/8/09 3:54:35 PM10/8/09 3:54:35 PM

Part I: Grids, Editors, Navigation, and Controls
18
The power and flexibility of the Filter Bar is that it permits the user to build compound search predicates. For example, in Figure 1 - 12, an And group is shown filtering the result set by FlightNumber > 90000 And LastName beginning with H. Click the And link to change the logical operator. You can choose from And , Or , Not And , or Not Or . The And link also supports adding a group or condition, or removing all the conditions in a group. The (+) button next to the logical operator is shorthand for adding a condition.
The condition breaks down as a Boolean test with the column name, operator, and operand. Click the link for each of the elements to modify the element. For example, if you add a condition, the first column, Equals, and the < enter a value > prompt are added by default. Click the column name to change columns. Click the Equals link to change the operator, and click the operand to enter a test value. Clicking the (x) button removes the adjacent condition.
The filter control is designed to dynamically add a data - type appropriate control for the operand on the right side. For example, if the column is a datetime value, a Calendar date picker will be rendered for the value field. Using type - appropriate controls inhibits the user from entering invalid values.
When you are finished adding filter expressions, click OK. The ASPxGridView is updated to reflect the filter expression. To keep the expression but disable it, deselect the check box at the left of the filter expression. To redisplay the filter control, click the link (or key) in the Filter Bar. If you want to clear all filter expressions, click the Clear link on the right of the Filter Bar (bottom right; see Figure 1 - 13).
Figure 1-13: The active filter is shown in plain text in the Filter Bar and can be cleared (click the Clear link) or disabled by deselecting the check box.
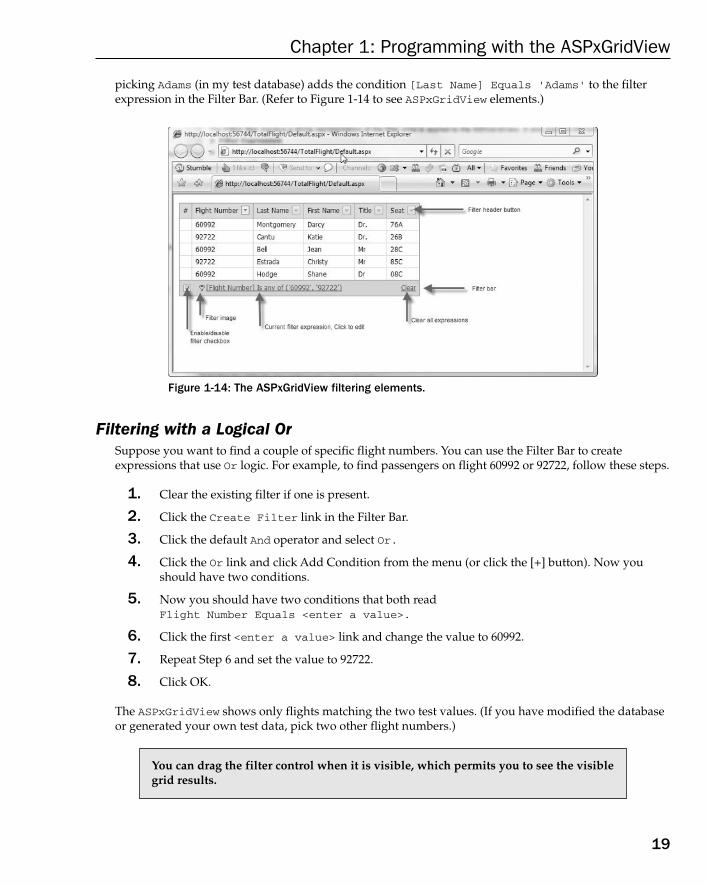
You can combine filter features, too. For example, if you show the Header Filter Button and the Filter Bar, you can create a filter in the Filter Bar and then further refine your search by selecting a value from the list of items displayed in the Header Filter drop - down list. The effect of combining a filter in the Filter Bar and picking from the Header Filter is to have additional conditions displayed in the Filter Bar. For example, adding the condition [Flight Number] Is greater than ‘ 40000 ’ in the Filter Bar and
c01.indd 18c01.indd 18 10/8/09 3:54:36 PM10/8/09 3:54:36 PM
Chapter 1: Programming with the ASPxGridView
19
picking Adams (in my test database) adds the condition [Last Name] Equals ‘ Adams ’ to the filter expression in the Filter Bar. (Refer to Figure 1 - 14 to see ASPxGridView elements.)
You can drag the filter control when it is visible, which permits you to see the visible grid results.
Figure 1-14: The ASPxGridView filtering elements.
Filtering with a Logical Or Suppose you want to find a couple of specific flight numbers. You can use the Filter Bar to create expressions that use Or logic. For example, to find passengers on flight 60992 or 92722, follow these steps.
1. Clear the existing filter if one is present.
2. Click the Create Filter link in the Filter Bar.
3. Click the default And operator and select Or.
4. Click the Or link and click Add Condition from the menu (or click the [+] button). Now you should have two conditions.
5. Now you should have two conditions that both read Flight Number Equals < enter a value > .
6. Click the first < enter a value > link and change the value to 60992.
7. Repeat Step 6 and set the value to 92722.
8. Click OK.
The ASPxGridView shows only flights matching the two test values. (If you have modified the database or generated your own test data, pick two other flight numbers.)
c01.indd 19c01.indd 19 10/8/09 3:54:36 PM10/8/09 3:54:36 PM
Part I: Grids, Editors, Navigation, and Controls
20
The result of the numbered steps is to create a straightforward WHERE clause with two predicates connected by an Or test.
Adding Condition Groups A filter condition group consists of all the conditions combined using the same logical operator. For example, if the logical operator is Or , all the conditions under the Or are combined using the Or operator.
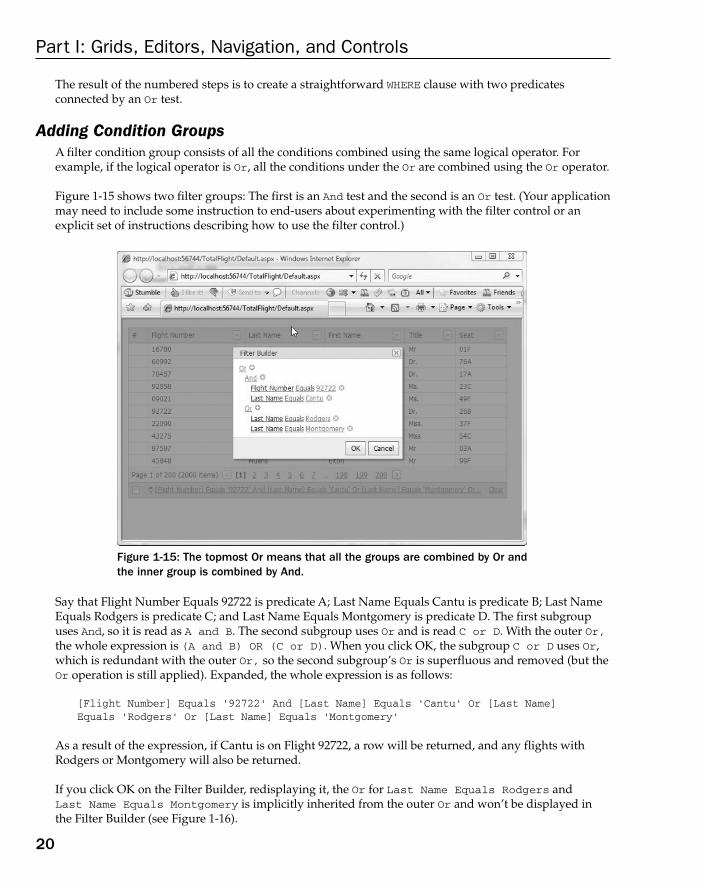
Figure 1 - 15 shows two filter groups: The first is an And test and the second is an Or test. (Your application may need to include some instruction to end-users about experimenting with the filter control or an explicit set of instructions describing how to use the filter control.)
Figure 1-15: The topmost Or means that all the groups are combined by Or and the inner group is combined by And.
Say that Flight Number Equals 92722 is predicate A; Last Name Equals Cantu is predicate B; Last Name Equals Rodgers is predicate C; and Last Name Equals Montgomery is predicate D. The first subgroup uses And , so it is read as A and B . The second subgroup uses Or and is read C or D . With the outer Or, the whole expression is (A and B) OR (C or D) . When you click OK, the subgroup C or D uses Or , which is redundant with the outer Or, so the second subgroup ’ s Or is superfluous and removed (but the Or operation is still applied). Expanded, the whole expression is as follows:
[Flight Number] Equals ‘92722’ And [Last Name] Equals ‘Cantu’ Or [Last Name]Equals ‘Rodgers’ Or [Last Name] Equals ‘Montgomery’
As a result of the expression, if Cantu is on Flight 92722, a row will be returned, and any flights with Rodgers or Montgomery will also be returned.
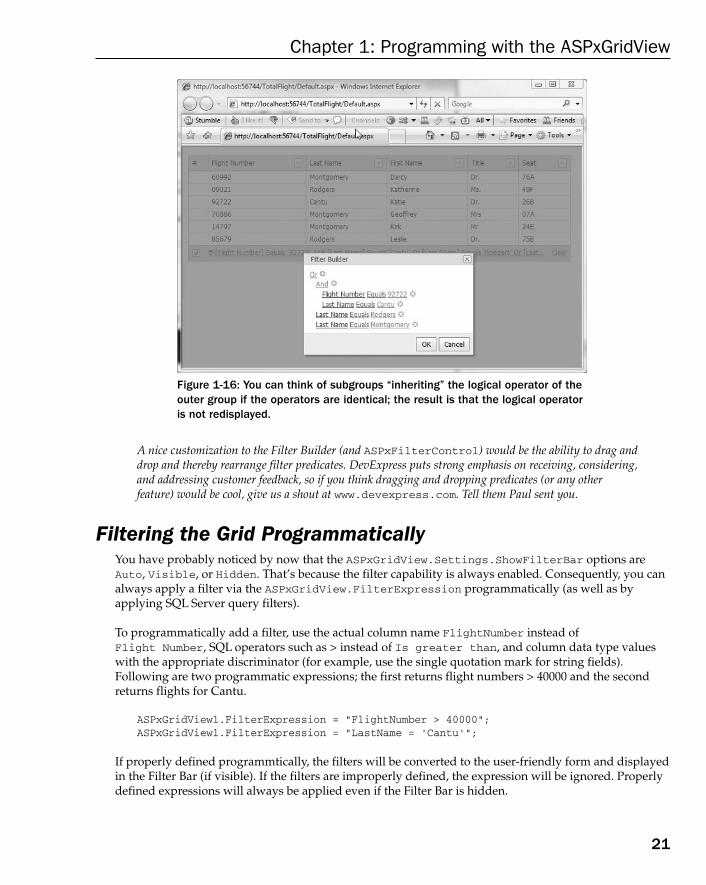
If you click OK on the Filter Builder, redisplaying it, the Or for Last Name Equals Rodgers and Last Name Equals Montgomery is implicitly inherited from the outer Or and won ’ t be displayed in the Filter Builder (see Figure 1 - 16).
c01.indd 20c01.indd 20 10/8/09 3:54:37 PM10/8/09 3:54:37 PM
Chapter 1: Programming with the ASPxGridView
21
A nice customization to the Filter Builder (and ASPxFilterControl ) would be the ability to drag and drop and thereby rearrange filter predicates. DevExpress puts strong emphasis on receiving, considering, and addressing customer feedback, so if you think dragging and dropping predicates (or any other feature) would be cool, give us a shout at www.devexpress.com . Tell them Paul sent you.
Filtering the Grid Programmatically You have probably noticed by now that the ASPxGridView.Settings.ShowFilterBar options are Auto , Visible , or Hidden . That ’ s because the filter capability is always enabled. Consequently, you can always apply a filter via the ASPxGridView.FilterExpression programmatically (as well as by applying SQL Server query filters).
To programmatically add a filter, use the actual column name FlightNumber instead of Flight Number , SQL operators such as > instead of Is greater than , and column data type values with the appropriate discriminator (for example, use the single quotation mark for string fields). Following are two programmatic expressions; the first returns flight numbers > 40000 and the second returns flights for Cantu.
ASPxGridView1.FilterExpression = “FlightNumber > 40000”;ASPxGridView1.FilterExpression = “LastName = ‘Cantu’”;
If properly defined programmtically, the filters will be converted to the user - friendly form and displayed in the Filter Bar (if visible). If the filters are improperly defined, the expression will be ignored. Properly defined expressions will always be applied even if the Filter Bar is hidden.
Figure 1-16: You can think of subgroups “inheriting” the logical operator of the outer group if the operators are identical; the result is that the logical operator is not redisplayed.
c01.indd 21c01.indd 21 10/8/09 3:54:37 PM10/8/09 3:54:37 PM

Part I: Grids, Editors, Navigation, and Controls
22
To disable the filter programmatically, set ASPxGridView.FilterEnabled to false . This programmtic option will be reflected in a visible Filter Bar.
Configuring Filtering Using web.config Settings Applying a broader set of skills, you can perform tasks such as make the Filter Bar settings an external web.config setting without requiring a change in code, recompilation, and redeployment. You can accomplish this goal by adding a key to the appSettings section of the web.config file and using an ASP.NET expression.
Listing 1 - 2 shows the application setting in the < configuration > section of the web.config file, and Listing 1 - 3 shows the ASP.NET expression in the .ASPX. (Listing 1 - 3 is elided to keep the listing short.)
Listing 1 - 2: An application setting for the Filter Bar in the web.config file.
< ?xml version=”1.0”? > < ! — Note: As an alternative to hand editing this file, you can use the web admin tool to configure settings for your application. Use the Website- > Asp.Net Configuration option in Visual Studio. A full list of settings and comments can be found in machine.config.comments, usually located in \Windows\Microsoft.Net\Framework\v2.x\Config. — > < configuration > < appSettings > < add key=”ShowFilterBar” value=”Hidden”/ > < /appSettings > < /configuration >
Listing 1 - 3: The elided .aspx page showing the placement of the ShowFilterBar option and the ASP.NET expression.
< body > < form id=”form1” runat=”server” > < div > < dxwgv:ASPxGridView ID=”ASPxGridView1” runat=”server” AutoGenerateColumns=”False” DataSourceID=”SqlDataSource1” > < Columns > < dxwgv:GridViewCommandColumn VisibleIndex=”0” > < ClearFilterButton Visible=”True” > < /ClearFilterButton > < /dxwgv:GridViewCommandColumn > < dxwgv:GridViewDataTextColumn FieldName=”FlightNumber” VisibleIndex=”1” > < /dxwgv:GridViewDataTextColumn > < dxwgv:GridViewDataTextColumn FieldName=”LastName” VisibleIndex=”2” > < /dxwgv:GridViewDataTextColumn > < dxwgv:GridViewDataTextColumn FieldName=”FirstName” VisibleIndex=”3” > < /dxwgv:GridViewDataTextColumn >
c01.indd 22c01.indd 22 10/8/09 3:54:38 PM10/8/09 3:54:38 PM

Chapter 1: Programming with the ASPxGridView
23
< dxwgv:GridViewDataTextColumn FieldName=”Title” VisibleIndex=”4” > < /dxwgv:GridViewDataTextColumn > < dxwgv:GridViewDataTextColumn FieldName=”Seat” VisibleIndex=”5” > < /dxwgv:GridViewDataTextColumn > < /Columns > < Settings ShowHeaderFilterButton=”True” ShowFilterBar=” < %$AppSettings:ShowFilterBar % > ” / > < /dxwgv:ASPxGridView > ...
Grouping and Sor ting Data The ASPxGridView has many “ wow ” factors. In addition to filtering and sorting, another wow factor is the grouping capability built into the ASPxGridView . In this section, you explore sorting and grouping. (Custom sorting, which is also supported, is covered in Chapter 2, “ Advanced ASPxGridView Computing. ” )
Sorting is enabled by default via the ASPxGridView.SettingsBehavior.AllowSort property. Click a column header and the grid is sorted in ascending order. Click the same column a second time and the grid is sorted in descending order. Hold the Shift key and click a second column header, and the grid is sorted on multiple columns. To implement custom sorting, refer to Chapter 2.
Grouping is supported through a property setting, too. By default, the group panel is hidden. Select ASPxGridView.Settings.ShowGroupPanel and set it to true , and a group panel is displayed at runtime (see Figure 1 - 17). All the end user has to do is click a column and drag the column header to the group panel, and the data will be grouped by that column (see Figure 1 - 18).
Figure 1-17: Show the group panel, and users can drag and drop columns to the group panel to group on that column.
c01.indd 23c01.indd 23 10/8/09 3:54:39 PM10/8/09 3:54:39 PM

Part I: Grids, Editors, Navigation, and Controls
24
Figure 1-18: The grid grouped at runtime by Flight Number.
Users will find this powerful feature very useful, and you get grouping without writing any code. (The drag and drop grouping is very intuitive, and you are encouraged to brag to your customers a bit.)
If you use the XpoDataSource in ServerMode, a grouping operation will be pushed back to the server and run on the SQL Server as a query. When combined with the incorporated Ajax callback, the grouping feature is quick and slick.
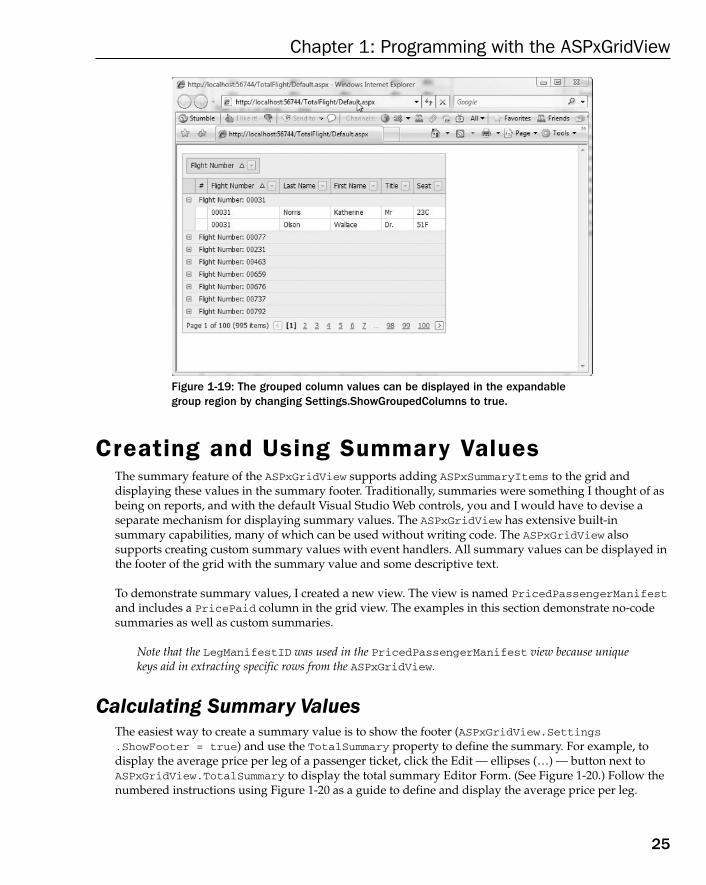
To view the contents of the group, click the expand button (+) next to its name. (Refer to Figure 1 - 18.) To group by additional columns, drag more columns into the group panel. To ungroup, drag the column from the group panel back to the grid column header. By default, the grouped column does not appear in the expanded group. If you want the group column(s) to be in the expandable region, change ASPxGridView.Settings.ShowGroupedColumns from false (the default) to true. (See Figure 1 - 19.)
c01.indd 24c01.indd 24 10/8/09 3:54:39 PM10/8/09 3:54:39 PM
Chapter 1: Programming with the ASPxGridView
25
Creating and Using Summary Values The summary feature of the ASPxGridView supports adding ASPxSummaryItems to the grid and displaying these values in the summary footer. Traditionally, summaries were something I thought of as being on reports, and with the default Visual Studio Web controls, you and I would have to devise a separate mechanism for displaying summary values. The ASPxGridView has extensive built - in summary capabilities, many of which can be used without writing code. The ASPxGridView also supports creating custom summary values with event handlers. All summary values can be displayed in the footer of the grid with the summary value and some descriptive text.
To demonstrate summary values, I created a new view. The view is named PricedPassengerManifest and includes a PricePaid column in the grid view. The examples in this section demonstrate no - code summaries as well as custom summaries.
Note that the LegManifestID was used in the PricedPassengerManifest view because unique keys aid in extracting specific rows from the ASPxGridView .
Calculating Summary Values The easiest way to create a summary value is to show the footer ( ASPxGridView.Settings.ShowFooter = true ) and use the TotalSummary property to define the summary. For example, to display the average price per leg of a passenger ticket, click the Edit — ellipses ( … ) — button next to ASPxGridView.TotalSummary to display the total summary Editor Form. (See Figure 1 - 20.) Follow the numbered instructions using Figure 1 - 20 as a guide to define and display the average price per leg.
Figure 1-19: The grouped column values can be displayed in the expandable group region by changing Settings.ShowGroupedColumns to true.
c01.indd 25c01.indd 25 10/8/09 3:54:39 PM10/8/09 3:54:39 PM

Part I: Grids, Editors, Navigation, and Controls
26
Figure 1-20: Fill out the total summary Editor Form as shown to create a summary for the average price paid per leg.
To test the summary, run the Web application (with Default2.aspx,or whatever the name of the Web page containing the ASPxGridView with summary is defined on, as the startup page). (See Figure 1 - 21.)
1. With the total summary Editor Form displayed, click the Add an Item button (top left of the TotalSummary toolbar). This step adds an ASPxSummaryItem to the ASPxGridView.TotalSummary collection property.
2. In the Properties window set the DisplayFormat to Average Price: {0:2c} to display the text and the average price as currency with two - decimal - place precision. (The DisplayFormat uses the same formatting characters as string.Format. )
3. For the FieldName property, select PricePaid.
4. For the ShowInGroupFooterCo property, select PricePaid to align the summary value with the PricePaid column.
5. For the SummaryType property, select Average .
6. Click OK.
c01.indd 26c01.indd 26 10/8/09 3:54:40 PM10/8/09 3:54:40 PM

Chapter 1: Programming with the ASPxGridView
27
Calculating Custom Summaries Programmers fall into a couple of camps when it comes to writing code. Some programmers prefer that the tools do as much as possible, and code is written when required. Some programmers prefer to write their own code. If I am trying to get a project done, I prefer to write only what is required, and only once.
The ASPxGridView supports creating a custom summary when one of the default options — Sum , Min , Max , Count , or Average — won ’ t suffice. To create a custom summary, select Custom in the SummaryType (or indicate the type as SummaryItemType.Custom if adding the ASPxSummaryItem programmatically). Then, all you need to do is define a CustomSummaryCalculate event handler for the grid.
The revised code - behind for Default.aspx (the original page) demonstrates how to add an ASPXSummaryItem programmatically and uses a LINQ query in the CustomSummaryCalculate event handler to figure out how many passengers are distinct (see Listing 1 - 4).
Listing 1 - 4: Using a custom summary and LINQ to calculate the number of distinct passengers.
using System;using System.Collections.Generic;using System.Linq;using System.Web;using System.Web.UI;
Figure 1-21: The average price paid is calculated and displayed without any code being written.
Continued
c01.indd 27c01.indd 27 10/8/09 3:54:40 PM10/8/09 3:54:40 PM

Part I: Grids, Editors, Navigation, and Controls
28
using System.Web.UI.WebControls;using DevExpress.Web.ASPxEditors;using DevExpress.Web.ASPxGridView;using DevExpress.Data;using System.Collections;using System.Data; public partial class _Default: System.Web.UI.Page{ protected void Page_Load(object sender, EventArgs e) { if (!IsPostBack) { ASPxSummaryItem lastName = new ASPxSummaryItem(); lastName.FieldName = “LastName”;lastName.ShowInColumn = “LastName”; lastName.SummaryType = SummaryItemType.Custom; ASPxGridView1.TotalSummary.Add(lastName); } } protected void ASPxGridView1_CustomSummaryCalculate( object sender, CustomSummaryEventArgs e) { if (e.SummaryProcess == CustomSummaryProcess.Finalize) { IEnumerable en = SqlDataSource1.Select(DataSourceSelectArguments.Empty); // figure out distinct number of passengers by first // and last name using LINQ with composite key var result = from DataRowView item in en group item by new { LastName = item.Row[1], FirstName = item.Row[2] } into groups select groups; e.TotalValue = string.Format(“Contains {0} distinct passengers”, result.Count()); } }}
The Page_Load method adds an ASPxSummaryItem to the ASPxGridView dynamically. The settings are the same as those set in the Editor Form (refer to Figure 1 - 20) and indicate that the summary is a Custom summary and will appear under the LastName column in the footer.
It is worth noting that CustomSummaryCalculate is called once for Start, once for Finalize, and once for each item in the result set, so this event can be labor intensive for large datasets.
Listing 1-4: Using a custom summary and LINQ to calculate the number of distinct passengers. (continued)
c01.indd 28c01.indd 28 10/8/09 3:54:41 PM10/8/09 3:54:41 PM

Chapter 1: Programming with the ASPxGridView
29
The CustomSummaryCalculate method can be generated from the ASPxGridView Properties window events view. The CustomSummaryEventArgs has a SummaryProcess value indicating the point in the summary calculation the event is in. There are three values: Start , Calculate , and Finalize . In the example, the only processing that occurs is when the summary process is ready to finish.
In the code listing, the data is returned as an instance of IEnumerable from the SqlDataSource.Select method. After you have Ienumerable, you can iterate over the data to perform calculations. You can, of course, process the enumerable collection any way you want, but LINQ is handy here. (For a complete guide to LINQ, refer to my book LINQ Unleashed for C#, published by Sams in 2008.)
The LINQ query is understood to mean read each item in the collection grouping by last name and first name, and the results are set in the CustomSummaryEventArgs.Total property.
With LINQ, the from clause is the first to aid with IntelliSense. In the simplest sense, LINQ is like reverse polish notation SQL. Roughly.
Although LINQ is beyond the scope of this book, here is an interpretation of the LINQ query:
var result is an anonymous type collection (usually) depending on the right - hand side query.
from DataRowView item in en defines the the range (named item and typed as a DataRowView ) from the source en.
group item by is a group by clause.
After the group by is new{ } when used this way, this is called a composite key for the group; use a composite key to group by multiple properties.
The select statement is last.
LINQ is pretty advanced technology, and whole books, including mine and Charlie Calvert ’ s Essential Linq (Addison - Wesley, 2009) are devoted to helping you master LINQ . The result variable contains a collection of the grouped composite key. Because it ’ s a collection, you can ask (with code) about items such as the count.
After the Finalize step runs, the value you put in CustomSummaryEventArgs.Total is displayed in the ASPxGridView footer.
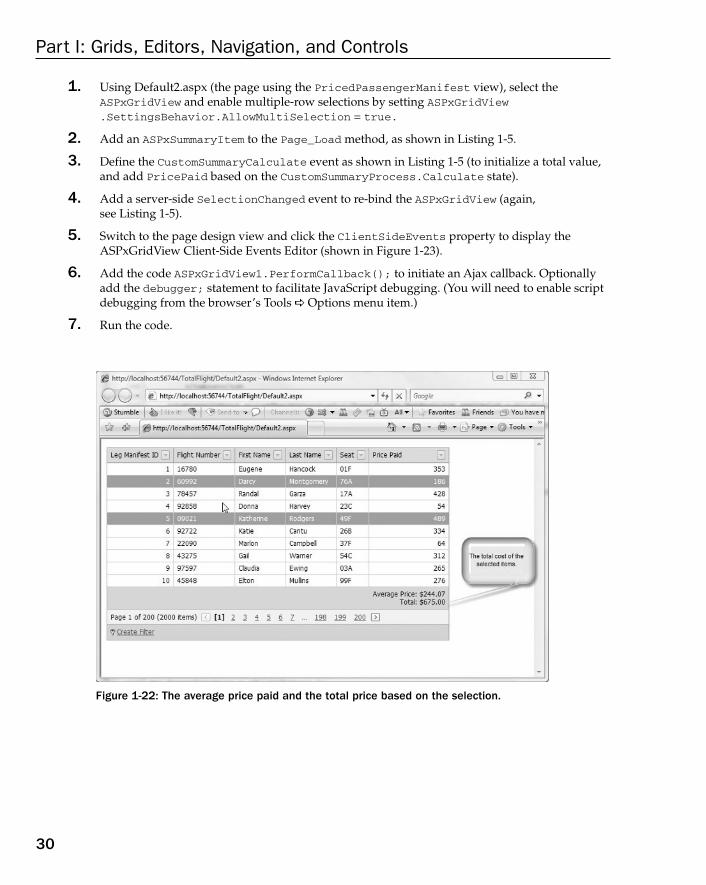
Calculating Total Custom Summaries Suppose you want to enable multiple - row selection to determine, for example, how much an individual customer spent. You can accomplish this by again using a custom summary, enabling multiple - row selection, and processing each row to display the sum of the price paid. Follow these steps to display the sum of the price paid based on the rows selected in the ASPxGridView. (See Figure 1 - 22.)
❑
❑
❑
❑
❑
c01.indd 29c01.indd 29 10/8/09 3:54:41 PM10/8/09 3:54:41 PM
Part I: Grids, Editors, Navigation, and Controls
30
1. Using Default2.aspx (the page using the PricedPassengerManifest view), select the ASPxGridView and enable multiple - row selections by setting ASPxGridView.SettingsBehavior.AllowMultiSelection = true.
2. Add an ASPxSummaryItem to the Page_Load method, as shown in Listing 1 - 5.
3. Define the CustomSummaryCalculate event as shown in Listing 1 - 5 (to initialize a total value, and add PricePaid based on the CustomSummaryProcess.Calculate state).
4. Add a server - side SelectionChanged event to re - bind the ASPxGridView (again, see Listing 1 - 5).
5. Switch to the page design view and click the ClientSideEvents property to display the ASPxGridView Client - Side Events Editor (shown in Figure 1 - 23).
6. Add the code ASPxGridView1.PerformCallback(); to initiate an Ajax callback. Optionally add the debugger; statement to facilitate JavaScript debugging. (You will need to enable script debugging from the browser ’ s Tools Options menu item.)
7. Run the code.
Figure 1-22: The average price paid and the total price based on the selection.
c01.indd 30c01.indd 30 10/8/09 3:54:42 PM10/8/09 3:54:42 PM

Chapter 1: Programming with the ASPxGridView
31
Listing 1 - 5: The additional ASPxSummaryItem that sums all the selected rows PricePaid fields.
using System;using System.Collections.Generic;using System.Linq;using System.Web;using System.Web.UI;using System.Web.UI.WebControls;using DevExpress.Web.ASPxGridView;using DevExpress.Data; public partial class Default2: System.Web.UI.Page{ protected void Page_Load(object sender, EventArgs e) { if (!IsPostBack) { ASPxSummaryItem totalSelected = new ASPxSummaryItem(); totalSelected.DisplayFormat = “Total: {0:c2}”; totalSelected.FieldName = “PricePaid”; totalSelected.ShowInColumn = “PricePaid”; totalSelected.SummaryType = SummaryItemType.Custom; ASPxGridView1.TotalSummary.Add(totalSelected); } } private decimal total = 0;
Figure 1-23: The JavaScript used to initiate a client callback on the selection changed with the debugger; call to aid in JavaScript debugging.
Continued
c01.indd 31c01.indd 31 10/8/09 3:54:42 PM10/8/09 3:54:42 PM

Part I: Grids, Editors, Navigation, and Controls
32
protected void ASPxGridView1_CustomSummaryCalculate(object sender, CustomSummaryEventArgs e) { // initialize on start switch (e.SummaryProcess) { case CustomSummaryProcess.Start: total = 0M; break; case CustomSummaryProcess.Calculate: // a unique key is needed here, so LegID was used in the view if (ASPxGridView1.Selection.IsRowSelectedByKey( e.GetValue(ASPxGridView1.KeyFieldName)))e.TotalValue = (decimal)e.TotalValue + Convert.ToDecimal(e.FieldValue); break; } } protected void ASPxGridView1_SelectionChanged(object sender, EventArgs e) { ASPxGridView1.DataBind(); }}
Page_Load dynamically adds an ASPxSummaryItem . (Note that you can add multiple summary items per column.) The CustomSummaryCalculate event handler initializes the e.totalValue Property on CustomSummartProcess.Start . On CustomSummary.Calculate, the key field — LegManifestID — is used to determine whether a row is selected. ( IsRowSelectedByKey requires a unique key.) If the row is selected, the e.FieldValue specified by ASPxSummaryItem.FieldName is added to e.totalValue. Finally, the server - side SelectionChanged event makes sure the grid is data bound.
You get the formatted output because of the ASPxSummaryItem.DisplayFormat value — Total: {0:c2} — set during initialization of the ASPxSummaryItem in the Page_Load method.
By combining techniques such as the ASPxGridView ’ s custom summary feature with Ajax, JavaScript, and LINQ, you can create a wide variety of useful summary information, all displayable in the ASPxGridView footer while benefitting from the performance characteristics of Ajax (and LINQ , if you use LINQ ).
Managing the Grid ’ s Appearance The power of the ASPxGridView is represented in a number of useful ways. The ASPxGridView incorporates Ajax for performance and ServerMode with the XpoDataSource . The grid also readily supports sorting, filtering, and summarizing with relatively little or no code. All these elements combine to give you the performance you need to provide the “ wow ” factor and utility that customers are coming to expect. (More features of the ASPxGridView , such as master - detail nesting, are covered in Chapter 2, “ Advanced ASPxGridView Computing. ” )
Listing 1 - 5: The additional ASPxSummaryItem that sums all the selected rows PricePaid fields. (continued)
c01.indd 32c01.indd 32 10/8/09 3:54:43 PM10/8/09 3:54:43 PM

Chapter 1: Programming with the ASPxGridView
33
The ASPxGridView also supports extensive support for CSS, themes, skins, and JavaScript. For example, click the ASPxGridView ’ s Task menu and select Auto Format. In the AutoFormat dialog box, pick the Plastic Blue theme and then click OK. The grid is automatically updated to reflect the colors for the selected theme (see Figure 1 - 24). (For more on using themes, CSS, and JavaScript, see Chapter 10, “ Using Themes, CSS, and JavaScript for Customizations and Enhancements. ” )
Figure 1-24: The Plastic Blue theme reflected in the ASPxGridView.
When you select an AutoFormat theme, an App_Themes folder is added to your project, and all the images and the Cascading Style Sheet (.css) that the theme is composed of are added to your project. Using pre - existing themes is a quick way to get a professional looking result quickly.
To complete the page, add a page title and some graphics; also, use some color to create the look you like. These elements require little or no programming but a lot of imagination.
Summary The ASPxGridView is demonstrably one of the most advanced controls in any category. The ASPxGridView , as demonstrated in this chapter, supports automatic sorting, multiple ways to filter data (including a filter control), summary rows, and ServerMode with the XpoDataSource (see Chapter 6). The grid has Ajax support built in, so you get the benefit of the most advanced Web programming capability available and your customers get support. All of this technology is managed by DevExpress ’ s programmers.
In Chapter 2, you can explore more features of the ASPxGridView, including master - detail nesting, custom sorting, binding to collections, client - side events, exporting, callback compression, using unbound columns, storing user settings with cookies, and much more.
c01.indd 33c01.indd 33 10/8/09 3:54:44 PM10/8/09 3:54:44 PM

c01.indd 34c01.indd 34 10/8/09 3:54:44 PM10/8/09 3:54:44 PM