
Part C Manufacturing -...
79
ADempiere User Manual Part C Manufacturing
Transcript of Part C Manufacturing -...

ADempiere User Manual
Part C
Manufacturing

Copyright
This document is Copyright © 2008 by its contributors as listed in the section titled Authors. You can distribute it and/or modify it under the terms of either the GNU General Public License, version 2 or later (http://www.gnu.org/licenses/gpl.html), or the Creative Commons Attribution License, version 3.0 (http://creativecommons.org/licenses/by/3.0/) or later.
All trademarks within this guide belong to their legitimate owners.
AuthorsHeinz-Günter Siebert (Oscar)e-evolution - Miguel Jimenez - http://www.adempiere.com/wiki/index.php/Libero_Manual (other contributors will be added)
FeedbackMaintainer of this document: Heinz-Günter Siebert Please direct any comments or suggestions about this document to:[email protected]
Publication date and software version
Published: 4th June, 2008. Based on Adempiere Version 3.5.1a Revision 5331 – Doc.Version 0.1
Update: 8th June, 2008. - Chapter Organisation added / Chapter renumbering – Doc.Version 0.2
Update: 10th June, 2008. - Some Enhancements – Doc. Version 0.3

Table of Content 1 Organisation......................................................................................................................................5
1.1 Client Organisation...................................................................................................................5 1.2 Product Configuration...............................................................................................................6
1.2.1 Product P1.........................................................................................................................6 1.2.2 Product P2.........................................................................................................................6 1.2.3 Product P3.........................................................................................................................6
1.3 Manufacturing Configuration...................................................................................................7 1.4 Access Matrix...........................................................................................................................8 1.5 The Manufacturing Model........................................................................................................9
2 Change Notice................................................................................................................................11 2.1 Change Notice.........................................................................................................................11 2.2 BOM Change Notice..............................................................................................................12
3 Engineering Management...............................................................................................................13 3.1 Resource Manufacturing.........................................................................................................13
3.1.1 Resource Type.................................................................................................................13 3.1.2 Manufacturing Resource.................................................................................................15
3.2 Manufacturing Workflow........................................................................................................16 3.2.1 Manufacturing Workflow setup......................................................................................17 3.2.2 Manufacturing Workflows..............................................................................................18 3.2.3 Workflow Editor..............................................................................................................22
3.3 Bill of Material & Formulas..................................................................................................22 3.3.1 BOM Types.....................................................................................................................22 3.3.2 BOM USE.......................................................................................................................23 3.3.3 Workflow Editor..............................................................................................................23 3.3.4 Bill of Material & Formula.............................................................................................24 3.3.5 BOM & Formula Info.....................................................................................................26 3.3.6 Multi Level BOM & Formula Detail..............................................................................27 3.3.7 Component Types............................................................................................................27 3.3.8 Multiple Components Change........................................................................................28 3.3.9 Product Configuration BOM...........................................................................................28
4 Planning Management....................................................................................................................29 4.1 Planning Management Setup..................................................................................................29 4.2 Product Data Planning............................................................................................................29
4.2.1 Product Planning.............................................................................................................30 4.2.2 Create Product Planning..................................................................................................32 4.2.3 Forecast...........................................................................................................................35
4.3 Material Resource Planning – MRP.......................................................................................36 4.3.1 Material Requirement Planning setup.............................................................................36 4.3.2 Calculate Low Level.......................................................................................................36 4.3.3 Create Record MRP........................................................................................................37 4.3.4 Calculate Material Plan...................................................................................................37 4.3.5 MRP Info.........................................................................................................................39Action Messages.......................................................................................................................40 4.3.6 MRP Notice.....................................................................................................................41 4.3.7 MRP Details....................................................................................................................42 4.3.8 Planned Order Approval..................................................................................................42
4.4 Capacity Requirements Planning - CRP.................................................................................43 4.4.1 Capacity Requirement Planning Setup...........................................................................43 4.4.2 Calculate Capacity Plan..................................................................................................43 4.4.3 Resource Load View.......................................................................................................44

4.4.4 CRP Info..........................................................................................................................45 4.5 Production Control..................................................................................................................45
4.5.1 Discrete Manufacturing...................................................................................................45Planned Order Approval.......................................................................................................45Manufacturing Order............................................................................................................45Manufacturing Orders Report..............................................................................................50Component Check................................................................................................................50Order Transactions...............................................................................................................51Printing and Release Order...................................................................................................51Order Receipt and Issue.......................................................................................................52
4.6 Distribution Resource Planning - DRP...................................................................................54 4.6.1 Distribution Resource Planning Setup............................................................................54 4.6.2 Calculate Distribution Plan.............................................................................................55 4.6.3 DRP Details.....................................................................................................................55
5 Production Management.................................................................................................................56 5.1 Discrete Manufacturing..........................................................................................................56
5.1.1 Discrete Manufacturing Setup .......................................................................................56 5.1.2 Manufacturing Order.......................................................................................................57 5.1.3 Manufacturing Orders Review........................................................................................58 5.1.4 Component Check...........................................................................................................58 5.1.5 Print & Release Order.....................................................................................................59 5.1.6 Order Receipt & Issue.....................................................................................................60 5.1.7 Inventory in Process........................................................................................................60 5.1.8 Order Transactions..........................................................................................................61 5.1.9 Management Maintenance..............................................................................................61
5.2 Shop Floor Control.................................................................................................................62 5.2.1 Activity Control Report...................................................................................................62 5.2.2 Shop Floor Transaction Details.......................................................................................62
6 Distribution Management...............................................................................................................63 6.1 Distribution Management Setup.............................................................................................63 6.2 Distribution Network..............................................................................................................64 6.3 Freight Category.....................................................................................................................65 6.4 Shipper....................................................................................................................................65 6.5 Distribution Order...................................................................................................................66 6.6 Generate Movement - Manual................................................................................................67 6.7 Generate Movement - Process................................................................................................68 6.8 Inventory Move.......................................................................................................................69
7 Quality Management.....................................................................................................................71 7.1 Quality Specifications.............................................................................................................71 7.2 Bill of Materials & Formula...................................................................................................72 7.3 Print Test Results....................................................................................................................72
8 Standard Costing Management.......................................................................................................73 8.1 Create Doc Type to Manufacturing.........................................................................................73 8.2 Create Element........................................................................................................................73 8.3 Product Costing.......................................................................................................................74 8.4 Copy Price to Standard Cost...................................................................................................75 8.5 Workflow Cost Roll-Up..........................................................................................................76 8.6 Cost Workflow & Process Details..........................................................................................76 8.7 Bill of Material & Formula Cost Roll-Up..............................................................................77 8.8 Cost Collector.........................................................................................................................77

1 OrganisationWith the introduction of the new Libero (Manufacturing), it seems quite reasonable to replace the Garden World Admin Sample with a more production like sample Client. The new sample client will be the ADinc (AD) with an appropriate organisation.
This issue raised when starting the ADempiere Documentation Project. There are three (initially – perhaps more to come) goals, which are targeted:
● Get a common understanding of the sample client
● Have a common document as a base for translation
○ The multis will show additional complexity
○ Common base of understanding
● Synchronize testing and documentation
1.1 Client OrganisationIn addition to get a common understandig about the functionality of Adempiere, the proposal to have an production oriented org-chart the following org-chart will be used to explain the functionality .
Durint creation of a new client for the fictionary Caompany ADinc (AD later on) the two default users adminAD and userAD are created. The other user are build using a two byte prefix and a continuous suffix.
To have a basis for general dicussions, testing, a common sense of understanding, the production configuration will be defined here. There has to be a manufacturing client organisation as a basis for common understanding. The name of the organisation will be ADinc (called AD). The default userids will be adminAD and clientAD. In addition there will be one sales person sd1, five workers in production {pp1, ..., pp5}, one CO co1, which is responsible for bookkeeping and procurement. Furthermore there are three vendors {vd1, vd2, vd3} and some customers {cu1, ...cun}.

1.2 Product Configuration
1.2.1 Product P1The semi-finished Product P1 will be manufactured in Plant MFG1. The required input material {???,???} will be delivered to Warehouse1 – Locator11. The output is stored into Warehouse2 – Locator 21 for further processing. Product P1 is build based on using „Bill of Material“ construction.
1.2.2 Product P2The semi-finished Product P2 will be manufactured in Plant MFG2. The required input material {???,???} will be delivered to Warehouse2 – Locator12. The output is stored into Warehouse2 – Locator 22 for further processing. Product P2 is build based on using „Formula“ construction.
1.2.3 Product P3The finished Product P3 will be manufactured in Plant MFG3. The required input material for product P3 {???, ???}are based on the semi-fished products P1 and P2 which are stored into Warehouse2 – Locator21/22. The product P3 is stored into one (based on algorithm ???, forecast, SO) of the three distribution centers DC1/2/3. From the distribution centers product is delivered to one of the stores for sales (POS – cash) or directly to customers (invoice).

1.3 Manufacturing Configuration
DC1
DC2
MFG2
DC3
MFG3
MFG1
S1
S2
Sn-1
Sn. . .
Warehouse1
L11
L12
Warehouse2
L21
L22
L = LocatorMFG = Manufacturing PlantDC = Distribution CenterS = Store

1.4 Access MatrixThe Access Matrix describes the access rules associated with roles.
Role Client Organisation AllSalesProductionBuyerMarketing Human ResourcesIT-adminexternal

1.5 The Manufacturing Model
The Manufacturing Model of ADempiere consists of three parts:
● Engineering Management
○ Creates, delivers Multi-Level BOM
● Planning
○ Sales-Order
○ Primary-Order demand
○ Secondary-Order demand (MRP)
■ Warehouse
■ Replenishment
○ Capacity Management
○ PP-Order Release
● Manufacturing
○ Shop Floor Control
○ production data Akquisition
○ Monitoring
■ amount
■ time
■ cost
○ Distribution
Abbildung 1: incomplete - brainstorming model - :-)

2 Change Notice
2.1 Change Notice
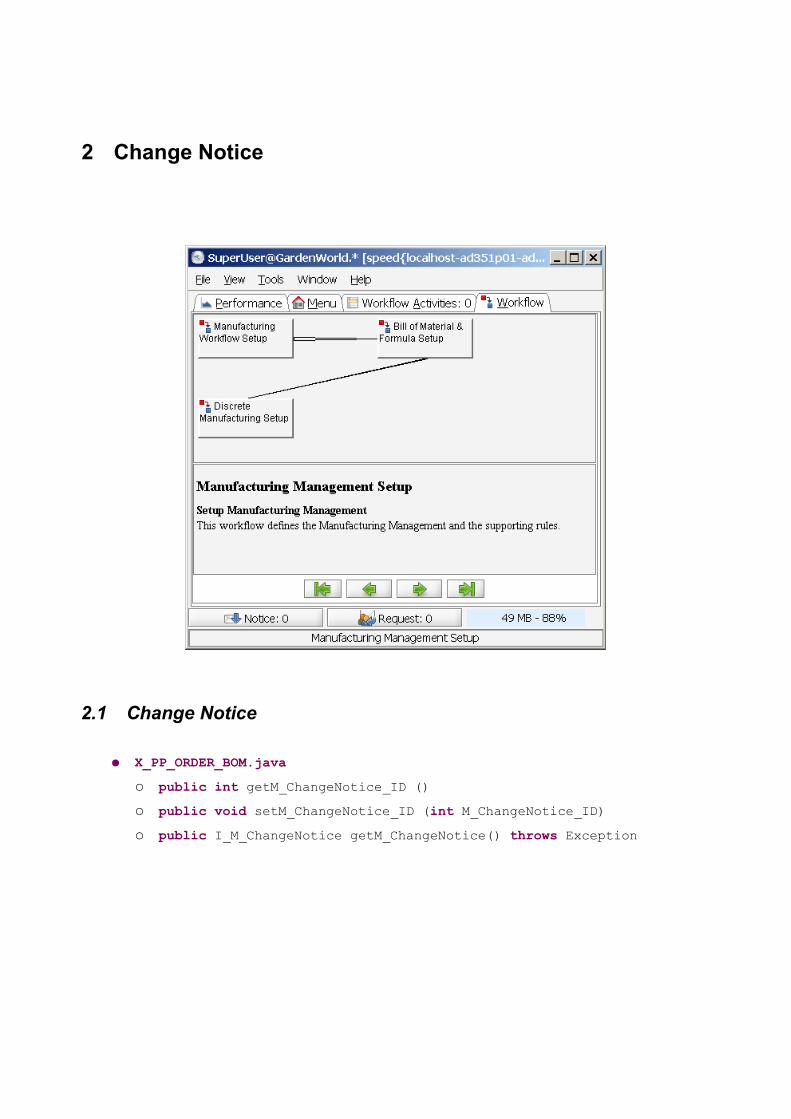
● X_PP_ORDER_BOM.java○ public int getM_ChangeNotice_ID ()○ public void setM_ChangeNotice_ID (int M_ChangeNotice_ID)○ public I_M_ChangeNotice getM_ChangeNotice() throws Exception

2.2 BOM Change Notice

3 Engineering Management
Engineering Management is the process, which delivers ...
3.1 Resource ManufacturingA Manufacturing Resource is defined as anything required for production and its unavailability can affect the Production Plan. Manufacturing Resources can be: Plants, Production lines, Work Centers and Work Stations.
It mainly answers the question: Where is the product made?
3.1.1 Resource TypeThe Resource Type Window is the ADempiere standard option which it is used to calculate the available time in a resource. It allows input of starting time and end time for the slot according to the working days. For more information please look in the Reference Manual.
The Resource Type field allows you to identify the capacity for this resource.
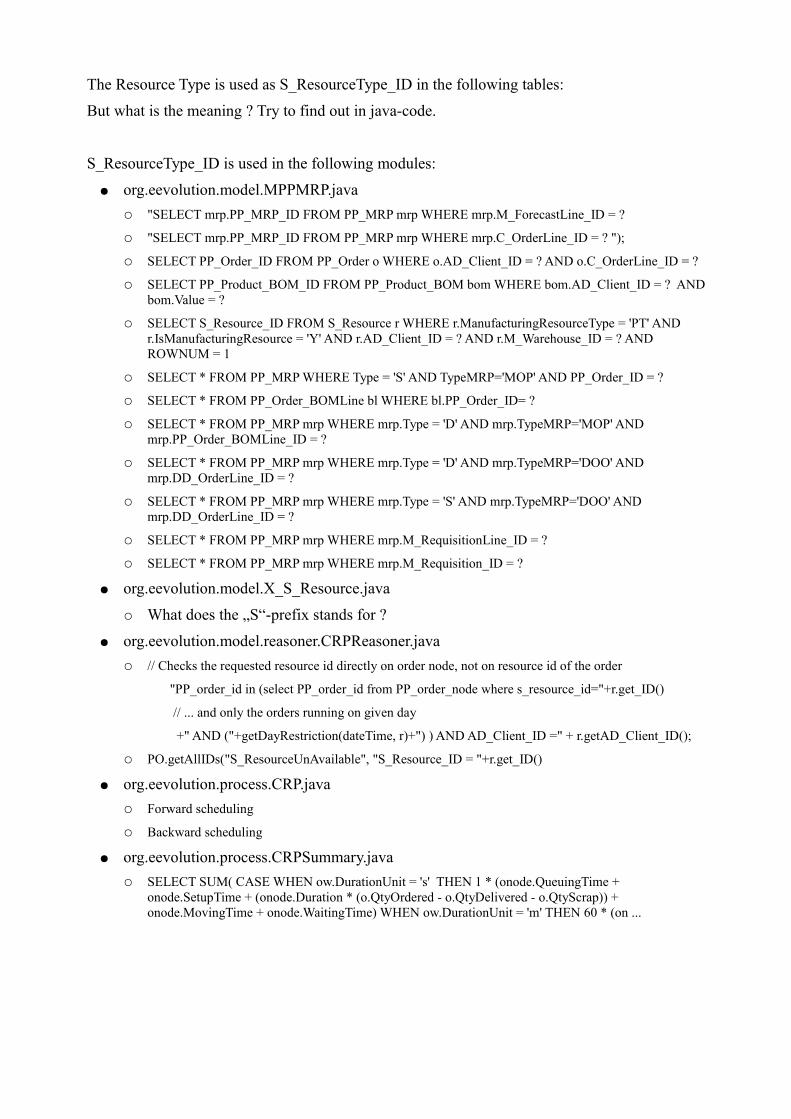
The Resource Type is used as S_ResourceType_ID in the following tables:
But what is the meaning ? Try to find out in java-code.
S_ResourceType_ID is used in the following modules:
● org.eevolution.model.MPPMRP.java ○ "SELECT mrp.PP_MRP_ID FROM PP_MRP mrp WHERE mrp.M_ForecastLine_ID = ?
○ "SELECT mrp.PP_MRP_ID FROM PP_MRP mrp WHERE mrp.C_OrderLine_ID = ? ");
○ SELECT PP_Order_ID FROM PP_Order o WHERE o.AD_Client_ID = ? AND o.C_OrderLine_ID = ?
○ SELECT PP_Product_BOM_ID FROM PP_Product_BOM bom WHERE bom.AD_Client_ID = ? AND bom.Value = ?
○ SELECT S_Resource_ID FROM S_Resource r WHERE r.ManufacturingResourceType = 'PT' AND r.IsManufacturingResource = 'Y' AND r.AD_Client_ID = ? AND r.M_Warehouse_ID = ? AND ROWNUM = 1
○ SELECT * FROM PP_MRP WHERE Type = 'S' AND TypeMRP='MOP' AND PP_Order_ID = ?
○ SELECT * FROM PP_Order_BOMLine bl WHERE bl.PP_Order_ID= ?
○ SELECT * FROM PP_MRP mrp WHERE mrp.Type = 'D' AND mrp.TypeMRP='MOP' AND mrp.PP_Order_BOMLine_ID = ?
○ SELECT * FROM PP_MRP mrp WHERE mrp.Type = 'D' AND mrp.TypeMRP='DOO' AND mrp.DD_OrderLine_ID = ?
○ SELECT * FROM PP_MRP mrp WHERE mrp.Type = 'S' AND mrp.TypeMRP='DOO' AND mrp.DD_OrderLine_ID = ?
○ SELECT * FROM PP_MRP mrp WHERE mrp.M_RequisitionLine_ID = ?
○ SELECT * FROM PP_MRP mrp WHERE mrp.M_Requisition_ID = ?
● org.eevolution.model.X_S_Resource.java
○ What does the „S“-prefix stands for ?
● org.eevolution.model.reasoner.CRPReasoner.java○ // Checks the requested resource id directly on order node, not on resource id of the order
"PP_order_id in (select PP_order_id from PP_order_node where s_resource_id="+r.get_ID()
// ... and only the orders running on given day
+" AND ("+getDayRestriction(dateTime, r)+") ) AND AD_Client_ID =" + r.getAD_Client_ID();
○ PO.getAllIDs("S_ResourceUnAvailable", "S_Resource_ID = "+r.get_ID()
● org.eevolution.process.CRP.java○ Forward scheduling
○ Backward scheduling
● org.eevolution.process.CRPSummary.java○ SELECT SUM( CASE WHEN ow.DurationUnit = 's' THEN 1 * (onode.QueuingTime +
onode.SetupTime + (onode.Duration * (o.QtyOrdered - o.QtyDelivered - o.QtyScrap)) + onode.MovingTime + onode.WaitingTime) WHEN ow.DurationUnit = 'm' THEN 60 * (on ...

3.1.2 Manufacturing ResourceWhen you tick the Is Manufacturing Resource check box the next fields are shown: Manufacturing Resource Type, Daily Capacity, Percent Utilization, Queuing Time and Waiting Time.
In the Manufacturing Resource Type field you can select a Resource among Work station, Production Line, Work Center or Plant. Normally a group of work stations will be integrated into a work center, a group of work centers in a Production line and a group of production lines in a Plant. This relation is build in a hierarchy which is used to accumulate the required and available capacity since the lower to the upper hierarchies for each resource.
The Utilization Percent for a resource is defined as the required time for that resource divided by the available time, the result is multiplied by 100.
The Queue Time is the time which normally a manufacturing order operation has to wait since it is moved to this operation until it starts to be worked. The Waiting Time is the time which normally a manufacturing order operation has to wait since it is finished until it is moved to the next operation or to the warehouse. Both, queue time and waiting time entered in the resource are used as default values for the nodes in the workflow.
The Resource Window is opened with the menu option
• Partner Relations • Service
• Resource
you can enter holidays, the planned cost etc. as you need. For more information on Resource please refer to (to be added)
The available daily time will be calculated for every weekly working day selected, when you tick the Day Slot. The calculation to get the available time for a day substracts the time when the slot starts, from the time when the slot ends.

3.2 Manufacturing WorkflowManufacturing workflow (Routing) is a tool which allows to define the required activities to fabricate a product taking into account the process sequence, how long does it take the node (operation) and where it should be done. 0
To use ADempiere Workflows gives you a great flexibility for describing the production process.
It answers the question: How should the product be made?
The Manufacturing Workflows Window allows you define the Workfow to fabricate a product in any Organization of the Client (organization *) or in a specific Organization.
You must use the Manufacturing Workflows tab to enter the general information, Type the Name

to identify this specific workflow. If the workflow name is the same as the product name this WF will be the default Wf for the product. Then enter a Description if you wish.
Tick the IsRouting check box and the Process Type and Resource fields are displayed. Not valid for Version 3.5.1a. The successor seemed to be WorkflowType Manufacturing.
3.2.1 Manufacturing Workflow setupThe Manufacturing Workflow consists of four nodes:
● Resource Type
● Warehouse & Locators
● Manufacturing Resource
● Manufacturing Workflows
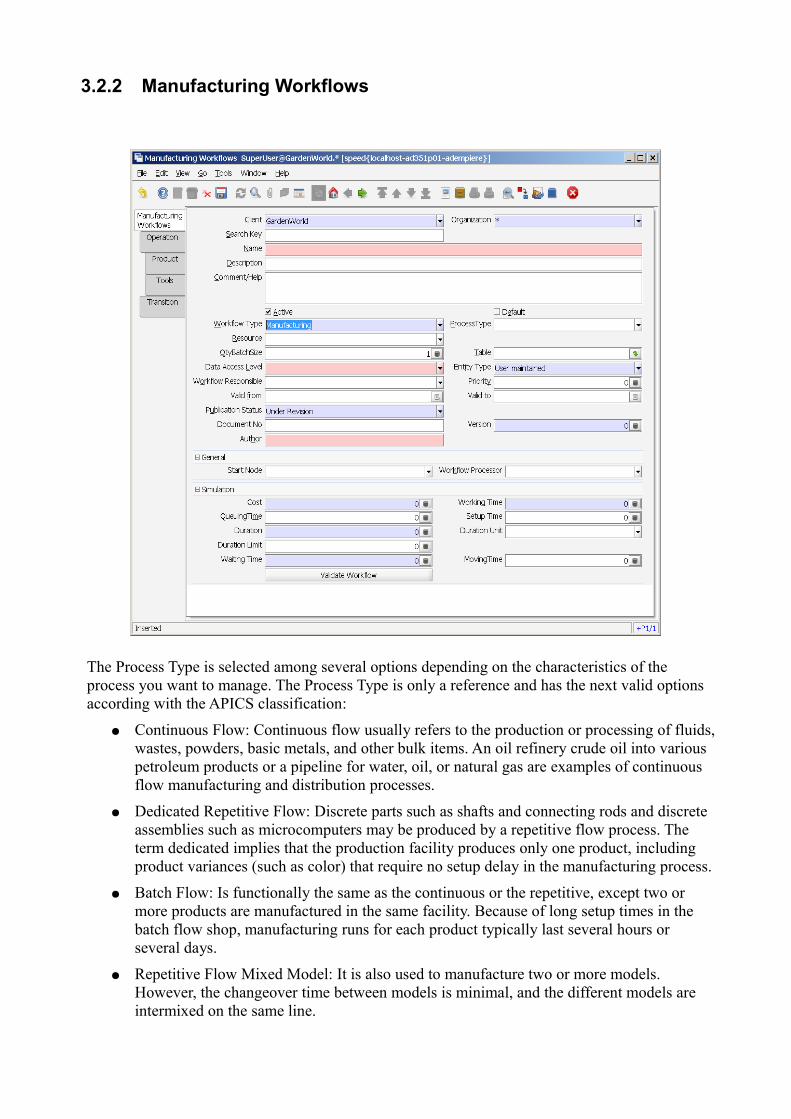
3.2.2 Manufacturing Workflows
The Process Type is selected among several options depending on the characteristics of the process you want to manage. The Process Type is only a reference and has the next valid options according with the APICS classification:
● Continuous Flow: Continuous flow usually refers to the production or processing of fluids, wastes, powders, basic metals, and other bulk items. An oil refinery crude oil into various petroleum products or a pipeline for water, oil, or natural gas are examples of continuous flow manufacturing and distribution processes.
● Dedicated Repetitive Flow: Discrete parts such as shafts and connecting rods and discrete assemblies such as microcomputers may be produced by a repetitive flow process. The term dedicated implies that the production facility produces only one product, including product variances (such as color) that require no setup delay in the manufacturing process.
● Batch Flow: Is functionally the same as the continuous or the repetitive, except two or more products are manufactured in the same facility. Because of long setup times in the batch flow shop, manufacturing runs for each product typically last several hours or several days.
● Repetitive Flow Mixed Model: It is also used to manufacture two or more models. However, the changeover time between models is minimal, and the different models are intermixed on the same line.

Job Shop: is characterized by the organization of similar equipment by function (such as milled, drilled, turned, forging, and assembly). As jobs flow from manufacturing resource to manufacturing resource a different type of operation is performed in each manufacturing resource.
Fixed Site (Project): It has the main characteristic that the materials, tools and personnel are brought to the manufacturing resource where the product is going to be fabricated.
The Resource field is a reference of the manufacturing resource where the work will be made (Plant).
In Batch Size you give the product quantity witch can be done by each batch. If we are going to produce more than 1 batch the system will schedule several batches in the manufacturing resource (production line), the quantity of each one will be taken from the pack size quantity to get the MO quantity required.
Data Access Level field shows the access level to this record.
In the Work Flow Responsible field you enter the person, role or organization in charge of the Work Flow.
Priority indicates how important is this entity, the valid entries are Hight, Medium or Low.
In the field Valid From-To is registered the time period into which the Workflow is valid.
The Document Number is allocated by the system and it comes from the sequence defined in the Document Sequence menu option.
Author is the person that created the record.
The Starting Node shows the first activity (node) of the work flow.
Finally, in the Manufacturing Work Flow Tab you can see the fields group Time, the fields included in this group are:
● Accumulated Time: currently is a reference where you enter the total time required to to accomplish every node of this WF.
● Queue Time: Currently is a reference where you enter the accumulated queue time for this WF. The Queue time is the time usually taken since the previous operation is finished, or the components were issued from the warehouse, until the current operation in a manufacturing order starts its process.
● The Setup Time Currently is a reference where you enter the accumulated Setup time for this WF. The Setup time is the time required to execute the necessary activities in a manufacturing resource to be able to start the manufacturing process.
Duration WF: Currently it is a reference where you enter the accumulated Duration for this WF. The Duration WF is the normal duration of a job, in duration units.
● Duration Unit is the time unit of measure for this group of fields (e.g. hours, minutes etc). Every time recorded in this work flow will be referenced at this Duration Unit.
● Waiting Time: Currently is a reference where you enter the accumulated Waiting time for this WF. The Waiting Time is the time a job remains at a manufacturing resource until it is moved to the next operation or to the warehouse it the operation is the last one.
● Move Time: Currently is a reference where you enter the accumulated Move time for this WF. It is the estimated time to move the material thought the manufacturing resources.
Clicking on the bottom Validate Work Flow it verifies that the work flow does not have errors.
When the process validation is finished it shows the message correct (OK) if the work flow is

correct (with a limited verification).
In the Operation (Node) Tab is introduced the Name to identify the operations from the manufacturing routing. If desired give a Description for operation.
From the selection list Resource select the manufacturing resource (previously defined) where you want to execute the operation. For the product costing, the Resource rate is taken from the cost element introduced in the window Product Costing.
If the check box Is Control Operation is selected it will indicate that in this operation you will report the real time used in the operation and that for all the previous operations, until the last control operation, the standard time will be used as real time. (this feature will be used in the Shop Floor Control Module).
If the check box Is Subcontract is selected, it indicates that this operation will be executed by an external Resource.


3.2.3 Workflow Editor
This Menu item does provide an interface to serach for specifc workflow to be edited. The required information to establish the sequence of the nodes is in the Node Tab and in the field Start Node field introduced in the Workflow Tab.
To be able to do a Manufacturing Schedule both forward or backward, the system uses the characteristics set in the Node tab and the sequence from the Sequence tab.
By Work Flow Editor it is possible to visualize in a graphic mode the operations of the production process and its execution sequence. At the same time you can see the information registered in the fields: Name, Description and Help from the Work Flow window.
When you select the zoom icon you get the Workflow window.
3.3 Bill of Material & FormulasIt is a list of all the subassemblies, intermediates, parts and raw material that go into a parent assembly showing the quantity of each required to make an assembly. There are a variety of display formats of bill of material, including single level bill of material, indented bill of material, modular (planning), costed bill of material, etc. May also be called “formula,”, “recipe”, “ingredients list” in certain industries.
It answers the question, what are the components of the product?
3.3.1 BOM TypesX_PP_ORDER_BOM.java
/** BOMType AD_Reference_ID=347 */public static final int BOMTYPE_AD_Reference_ID=347;/** Current Active = A */public static final String BOMTYPE_CurrentActive = "A";/** Make-To-Order = O */public static final String BOMTYPE_Make_To_Order = "O";/** Previous = P */public static final String BOMTYPE_Previous = "P";/** Previous, Spare = S */public static final String BOMTYPE_PreviousSpare = "S";/** Future = F */public static final String BOMTYPE_Future = "F";/** Maintenance = M */public static final String BOMTYPE_Maintenance = "M";/** Repair = R */

public static final String BOMTYPE_Repair = "R";/** Product Configure = C */public static final String BOMTYPE_ProductConfigure = "C";/** Set BOM Type.
@param BOMType Type of BOM
*/
3.3.2 BOM USEX_PP_ORDER_BOM.java
/** BOMUse AD_Reference_ID=348 */public static final int BOMUSE_AD_Reference_ID=348;/** Master = A */public static final String BOMUSE_Master = "A";/** Engineering = E */public static final String BOMUSE_Engineering = "E";/** Manufacturing = M */public static final String BOMUSE_Manufacturing = "M";/** Planning = P */public static final String BOMUSE_Planning = "P";/** Quality = Q */public static final String BOMUSE_Quality = "Q";/** Set BOM Use.
@param BOMUse The use of the Bill of Material
*/
3.3.3 Workflow Editor

3.3.4 Bill of Material & Formula
Version 3.4.0: When you click the menu option Manufacturing < Manufacturing Rules < Bill of Materials & Formula < Bill of Material the Bill of Material Windows is displayed.
Version 3.5.1a: Manufacturing Management > Bill of Materials & Formula > ParentProduct
In the Bills of Material Tab the following fields are required to identify in a specific way the bills of Material: Client, Organization, Search Key and Name.
Additionally with the Engineering Change Document number you can track the modifications made to the BOM. The sequence of the ECD is allocated by the system using the Sequence entered for this Document Type.
In the Bill of Material tab the following fields are required: Client, Organization, Search key and Name to identify in a unique way the bill of material and the Engineering Change Document Number used to track the modification.
The Revision field shows the number of revision you have made for this BOM and the Valid from and Valid to indicates the valid period for this BOM (In that period you can use de BOM in a manufacturing order).
The product field along with the product instance identify the parent product. The manufacturing Unit of Measure is also introduced and it will be taken into account for the quantities entered for the components.
The BOM Type is the same one used in the Product Window, in the BOM tab for the parent product. The valid options are Optional Products, Alternative Groups and Standard Part. To get more information around BOM please refer to the Chapter 5 of the Compiere User Manual.
Then you introduce the detailed information around the BOM for every component using the

BOM tab.
The required information in the Bill of Materials is the Product child and the Attribute Set Instance.
The Valid From and Valid To dates indicate the valid time period to use the BOM in a Manufacturing Order.
The Component Type Selection List has the next options:
● Component: identify a raw material, ingredient, part, or subassembly that goes into a higher level assembly, compound or other item. Byproduct: This entity is a non scheduled product gotten as a consequence of another production process. It has a sales value but it is minimum.
● Phantom: indicates the product is a fictitious assembly, that is to say, a set of components that are grouped only to make easier the analysis in a separated way from the rest of the BOM. When the MRP generates a requirement of the phantom and the projected on hand is not available, the process goes to the lower level and start a new MRP cycle but does not create Planned Orders for the phantom product.
● Packing: This product will not be taken into account to calculate the total quantity of components when the IsQtyPercentage check box is ticked.
● Planning: The parent product will be used for the planning process of the different options of similar products. (e.g. 30 % bread with fiber and 70 % bread without fiber)
● Tools:The product is a tool which is going to be used in a production operation.
If you click the IsQtyPercentage it means you need to introduce the quantity of the componenet as a percentage of all the components. If you do not click the IsQtyPercentage checkbox then you need to introduce in the Qty field the quantity of the component to produce a unit of measure of the parent product.
If you click IsCritical checkbox, a Manufacturing Order will not be released to the shop floor if this component is not on hand.
In the Assay field you enter a percentage of components that will be used to make a test.
The Scrap field is introduced as a component percentage factor that is expected not to be useful as a part of the parent production.
The Issue Method field permit you to select between Issue or Backflush, if you choose issue you need two steps, first you issue the components from the warehouse and after production you need a second warehouse movement of receiving the finished product into the warehouse.
Abbildung 2: Version 3.4.0 - where to find in 3.5.1a ?
If you choose backflush in one single movement you receive the finished product in the warehouse and automatically you issue the components required from the warehouse.
The Backflush Group is used in order to group components that you want to issue together in a Backflush process.
Lead Time offset is the number of days after you start to produce the finished product when you need this component.
Forecast is the percentage we expect to use of this component to produce the finished product. It is used to make plans of getting components and it has a BOM type of Planning BOM and you can not use this BOM for a manufacturing order.
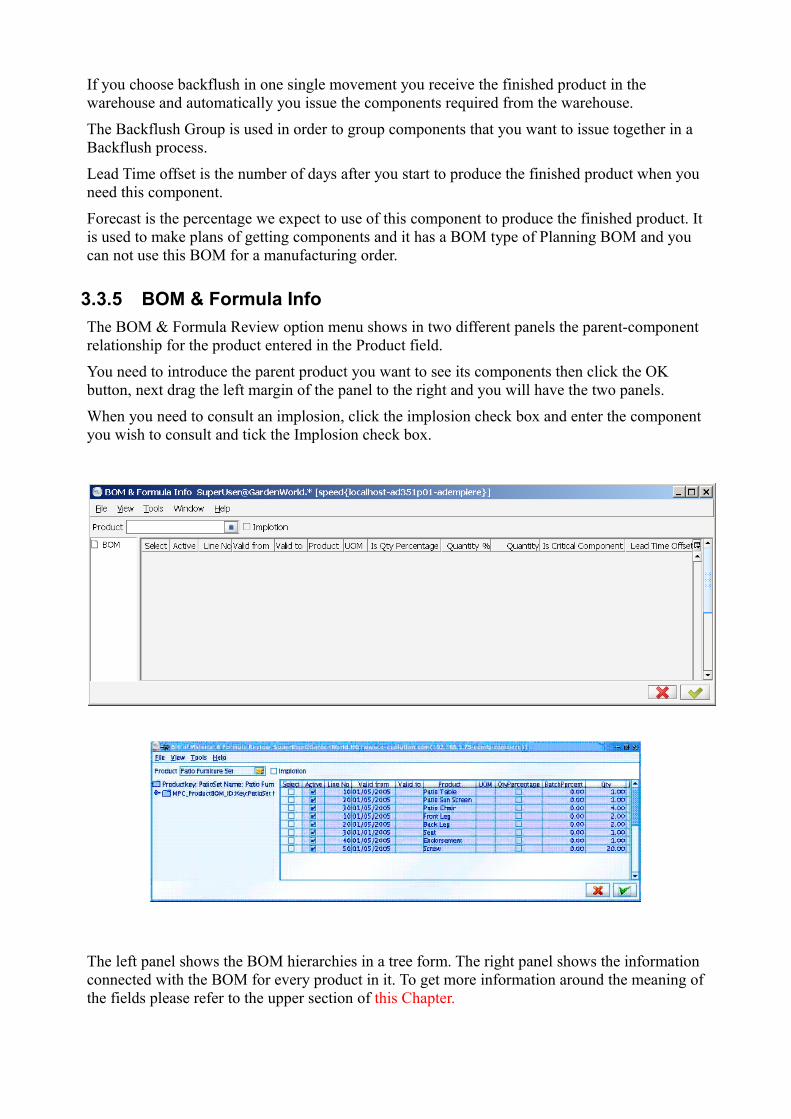
3.3.5 BOM & Formula InfoThe BOM & Formula Review option menu shows in two different panels the parent-component relationship for the product entered in the Product field.
You need to introduce the parent product you want to see its components then click the OK button, next drag the left margin of the panel to the right and you will have the two panels.
When you need to consult an implosion, click the implosion check box and enter the component you wish to consult and tick the Implosion check box.
The left panel shows the BOM hierarchies in a tree form. The right panel shows the information connected with the BOM for every product in it. To get more information around the meaning of the fields please refer to the upper section of this Chapter.
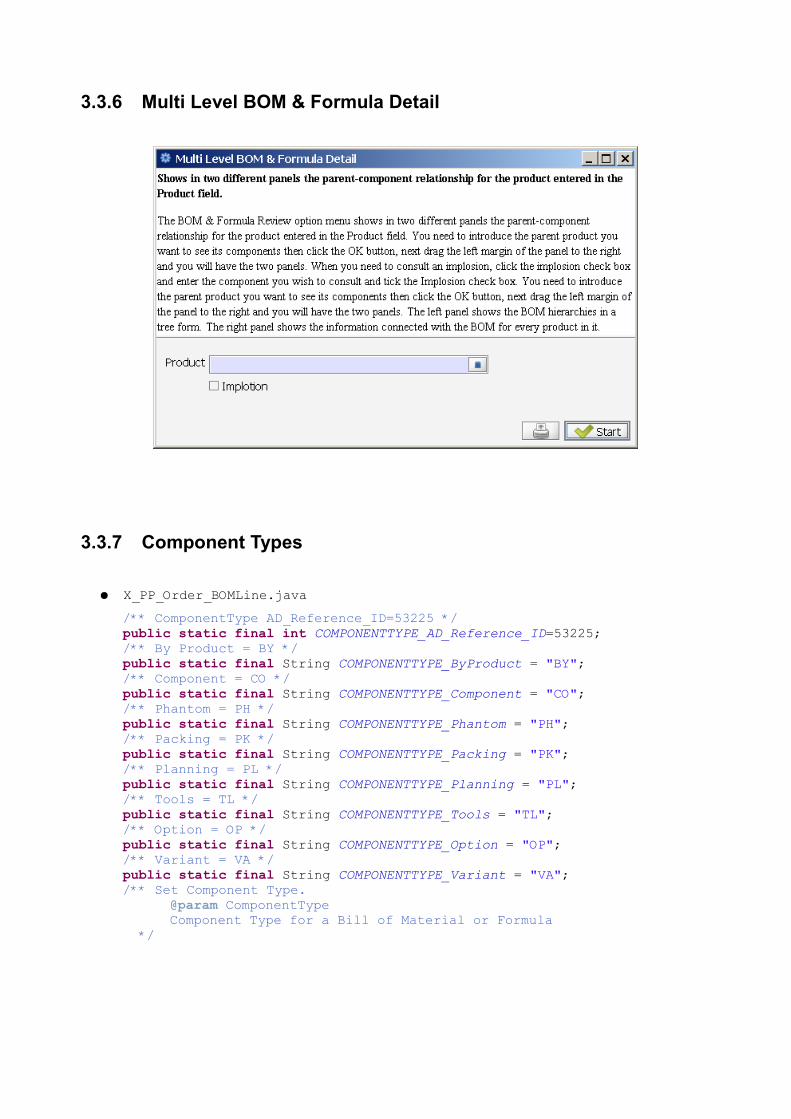
3.3.6 Multi Level BOM & Formula Detail
3.3.7 Component Types
● X_PP_Order_BOMLine.java/** ComponentType AD_Reference_ID=53225 */public static final int COMPONENTTYPE_AD_Reference_ID=53225;/** By Product = BY */public static final String COMPONENTTYPE_ByProduct = "BY";/** Component = CO */public static final String COMPONENTTYPE_Component = "CO";/** Phantom = PH */public static final String COMPONENTTYPE_Phantom = "PH";/** Packing = PK */public static final String COMPONENTTYPE_Packing = "PK";/** Planning = PL */public static final String COMPONENTTYPE_Planning = "PL";/** Tools = TL */public static final String COMPONENTTYPE_Tools = "TL";/** Option = OP */public static final String COMPONENTTYPE_Option = "OP";/** Variant = VA */public static final String COMPONENTTYPE_Variant = "VA";/** Set Component Type.
@param ComponentType Component Type for a Bill of Material or Formula
*/

3.3.8 Multiple Components Change
● Org.evolution.process ○ public class ComponentChange extends SvrProcess
■ p_Action = A (add)■ p_Action = D (deactivate)■ p_Action = E (expire)■ p_Action = R (replace)■ p_Action = RE(replace & expire)
3.3.9 Product Configuration BOM

4 Planning ManagementBefore the manufacturing process will be started, it is necessary to plan all activities which are required to deliver all required components and material in time. Planning Management does answer the question: What is the optimal input for manufacturing to fullfil sales orders in time and keep warehosue costs at a minimum. Another subject to take into account are the production cost and the capacity of shipping good quality products. Using Production Planning you answer the question: When and How Many products we must get?
4.1 Planning Management Setup
4.2 Product Data PlanningAdditionally to the data loaded in the Product window, where the characteristics of each product are defined, in the Window Product Planning you enter the product information which will serve as a base to execute the algorithms of Material Requirement Planning, along with PMP, open orders and inventories.
To enter planning data open the Product Planning with the menu option Manufacturing < Production Planning < Data Planning < Product Planning.
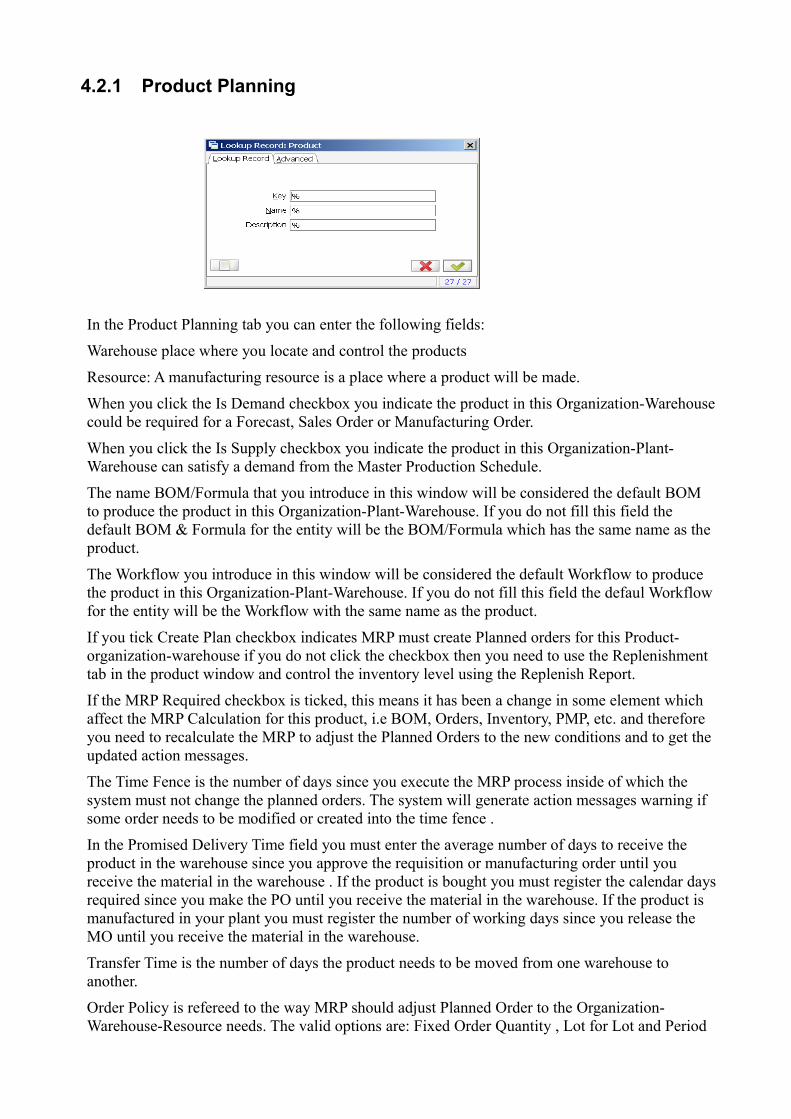
4.2.1 Product Planning
In the Product Planning tab you can enter the following fields:
Warehouse place where you locate and control the products
Resource: A manufacturing resource is a place where a product will be made.
When you click the Is Demand checkbox you indicate the product in this Organization-Warehouse could be required for a Forecast, Sales Order or Manufacturing Order.
When you click the Is Supply checkbox you indicate the product in this Organization-Plant-Warehouse can satisfy a demand from the Master Production Schedule.
The name BOM/Formula that you introduce in this window will be considered the default BOM to produce the product in this Organization-Plant-Warehouse. If you do not fill this field the default BOM & Formula for the entity will be the BOM/Formula which has the same name as the product.
The Workflow you introduce in this window will be considered the default Workflow to produce the product in this Organization-Plant-Warehouse. If you do not fill this field the defaul Workflow for the entity will be the Workflow with the same name as the product.
If you tick Create Plan checkbox indicates MRP must create Planned orders for this Product-organization-warehouse if you do not click the checkbox then you need to use the Replenishment tab in the product window and control the inventory level using the Replenish Report.
If the MRP Required checkbox is ticked, this means it has been a change in some element which affect the MRP Calculation for this product, i.e BOM, Orders, Inventory, PMP, etc. and therefore you need to recalculate the MRP to adjust the Planned Orders to the new conditions and to get the updated action messages.
The Time Fence is the number of days since you execute the MRP process inside of which the system must not change the planned orders. The system will generate action messages warning if some order needs to be modified or created into the time fence .
In the Promised Delivery Time field you must enter the average number of days to receive the product in the warehouse since you approve the requisition or manufacturing order until you receive the material in the warehouse . If the product is bought you must register the calendar days required since you make the PO until you receive the material in the warehouse. If the product is manufactured in your plant you must register the number of working days since you release the MO until you receive the material in the warehouse.
Transfer Time is the number of days the product needs to be moved from one warehouse to another.
Order Policy is refereed to the way MRP should adjust Planned Order to the Organization-Warehouse-Resource needs. The valid options are: Fixed Order Quantity , Lot for Lot and Period

Order Quantity
Use Fixed Order Quantity when you always need to ask the same Quantity of product, this Quantity is entered in the field Order Qty.
If the order policy is not FOQ and you enter a quantity in the Order Qty field, this quantity is the Economic Order Quantity.
The Lot for Lot Policy means MRP process must generate one planned order for each demand not satisfied.
The Period Order Quantity policy refers to the way MRP create one single planned order with every net requirements for a certain number of days. this days are entered in the field Order Period.
If you tick the Is Issue check box, when this product is a component of a MO, it will be issued from the warehouse if you do not tick the check box then this component will be taken from the shop floor inventory.
If you tick the Is Phantom check box, indicates the product is a virtual assembly, that is to say when the MRP require a phantom and it is oh hand MRP take it as a supply but if the on hand quantity required is not complete, instead of generate a planned order for this phantom product MRP look for the components and continue the process
If amount is registered in Order Qty is indicated that this is the economic batch size.
When you enter a quantity in the Order Pack Qty field, the Planned orders should be created in multiples of this quantity. , this is useful when the vendor only sells fixed quantities of products or when by effects of the MRP calculation you get fraction of products which must be gotten in integer quantities.
Minimum Order Quantity is used when the orders should be done at least for this quantity because of vendor policies or fabrication limitations. The MRP process will use this quantity when the calculated planned order is for a smaller quantity than the Minimum Order Quantity then MRP creates the planned order for the Minimum Order Quantity. The system generates a message warning this quantity change.
Order max is the maximum order quantity and it is used when the orders should be done at the maximum for this quantity because of vendor policies or warehouse limitations. The MRP process will use the quantity calculated to create the planned order but generates a message warning the quantity is greater than the maximum quantity.
In the field Working Time you enter the accumulated time (using the Promising Delivery Time) in the critical path of the BOM for this product. It is the required time to produce the product as if you would not have any component on hand.
In the Yield field enter the percentage of the product you expect will satisfy the QA specifications vs the total quantity to be produced.
The remaining tabs are part of the ADempiere Product window please refer to the Reference Manual.

4.2.2 Create Product PlanningIn order to facilitate to load planning data of similiar products, one can run teh process „Create Product Planning“ and this process will create the data planning register for every product, which fits the parameters: Product Category, Warehouse and Resource. One must indicate the planning parameters defined in the last section for every Product Category, Warehouse and Resource Set. Every Product which does fit with these three parameters will hava a data planning record with the same data planning values you enter in this form.

You must indicate the planning parameters defined in the last section for every Product category, Warehouse, and Resource set. Every product which fit these three parameters will have a data planning record with the same data planning values you enter in this form.
The meaning of the fields are explained in the previous section of this Chapter.


4.2.3 Forecast● public class MQMSpecification extends X_QM_Specification

4.3 Material Resource Planning – MRPMRP is a set of techniques which uses Bills of Meterial, Inventory Data and Master Production Schedule (MPS) to calculate requirements for materials. It does create planned manufacturing orders to balance demand and supply for products and it does issue recommendations to receipt material with the right quantities and just in time to satisfy the MPS in teh most efficient way.
4.3.1 Material Requirement Planning setup
4.3.2 Calculate Low LevelThis process calculate and register the lowest level of a product inside any BOM. It is used in the MRP calculations and should be executed when you enter a new BOM.
● Org.evolution.process○ public class CalculateLowLevel extends SvrProcess ○ SELECT p.M_Product_ID FROM M_Product p WHERE AD_Client_ID = " +
AD_Client_ID

4.3.3 Create Record MRPThis process recreate the demand, approved and open orders for a product.
4.3.4 Calculate Material Plan
● X_PP_MRP.java○ public void setDatePromised (Timestamp DatePromised)○ public Timestamp getDateSimulation ()

○ public Timestamp getDateStartSchedule () ○ public I_M_ForecastLine getM_ForecastLine() throws Exception ○ public I_M_Product getM_Product() throws Exception ○ public I_M_RequisitionLine getM_RequisitionLine() throws Exception ○ public I_M_Warehouse getM_Warehouse() throws Exception○ public org.eevolution.model.I_PP_Order_BOMLine getPP_Order_BOMLine()
throws Exception

4.3.5 MRP Info
Version 3.4.0 MRP Detail Review
● The detail of calculation can be verified in the option menu Manufacturing<Production Planning<MRP<MRP Detail Review
Version 3.5.1a MRP Info
● Manufacturing Management < Planning Management < MRP < MRP Info
Manufacturing RESOURCETYPE (might belong to another place)/** ManufacturingResourceType AD_Reference_ID=50008 */public static final int MANUFACTURINGRESOURCETYPE_AD_Reference_ID=50008;/** Production Line = PL */public static final String MANUFACTURINGRESOURCETYPE_ProductionLine = "PL";/** Plant = PT */public static final String MANUFACTURINGRESOURCETYPE_Plant = "PT";/** Work Center = WC */public static final String MANUFACTURINGRESOURCETYPE_WorkCenter = "WC";/** Work Station = WS */public static final String MANUFACTURINGRESOURCETYPE_WorkStation = "WS";
In the heading you enter the Product, Plant, Warehouse and the period of time when you want to inquiry the demands and supplies. As usually if you left blank a parameter all the possibilities will be considered.
Then you press the refresh button and two sets of data are displayed: In the upper panel the product planning data and the product on hand are displayed. In the lower one are shown the information around the Manufacturing Resource where the product will be made, the demand and supply Warehouse and the information for both documents of demand and supply.
The fields shown are:

The Gross Requirements are the Demand quantity. The demand source can be an Independent demand (Sales Order, Forecast) or the components required for a manufacturing order (dependent demand).
Date Promised is the due date for the demand or supply.
Scheduled Receipts shows the supply orders quantities which will be receipted with its due date. The source of the scheduled receipts can be an open purchase order, a requisition, an open manufacturing order or any planned order.
The Projected Quantity On Hand is calculated from the starting on hand showed in the heading adding the supplies and subtraction the Gross Requirements. Negative quantity on hand indicates is necessary to generate a planned order to satisfy the demand in such a way at the end of the MPS the projected quantity on hand must be at least zero.
The Details column has two possible entries, D and S. D indicates the order generates a demand (the product is a component of a MO, a product of a SO line or a forecast line). A S code indicates the order generates a supply (the product is a finished product of a MO, a product included in a PO line or a requisition).
The Type column indicates the type of demand or supply, the valid types are: SOO – Sales Order, Open POO – Purchase Order, Open POR – Purchase Requisition MOP – Manufacturing Order Planned
The Order Column shows us the Order Document Number
The possible States of the Order are: DR – Draft NA – Not Approved IP – In Process (Firm Planned) CO – Complete
Action MessagesIt is a group of messages generated for the MRP process. It indicates to the scheduler the actions he needs to do to reach the Master Production Schedule. The action messages are set as notices for the planner when he sign up the Compiere session.
The possible action messages are:
MRP Code Action Message MRP - 001 Beginning Quantity Less Than Zero.
MRP - 020 Create - A Supply Order should be created to satisfy a negative projected on hand balance. This message is only generate if Create Plan is No or if a new requirement appears the time fence.
MRP - 030 De Expedite - Indicates that a scheduled supply order is due before it is needed and should be delayed, or demand rescheduled to an earlier date.
MRP - 040 Expedite - Indicates that a scheduled supply order is due after is needed and should be rescheduled to an earlier date, or demand rescheduled to a later date.
MRP - 050 Cancel - Indicate that a scheduled supply order is no longer needed and should be deleted. MRP - 060 Release Due For - Indicate that a schedule order should be released.
MRP - 070 Release Past Due For - Indicate that a supply order was not released when it was due, and should be either released or expedited now, or the demand rescheduled for a later date.
MRP - 080 Quantity Less than Minimum - Indicates that a supply order was created for a quantity less than the minimum quantity set in the product planning
MRP - 090 Quantity Less than Maximum - Indicates that a supply order was created for a quantity for a quantity greater than than maximum quantity set in the product planning
MRP - 100 Past Due Time Fence - Indicates that there is an unsatisfied material requirement inside the planning time fence for this item. You should either manually schedule and expedite orders to fill this demand or delay fulfillment of the requirement that created the demand.
MRP - 110 No exists Demand Warehouse - indicates that the product planning is not set Demand MRP - 120 No exist supply warehouse - indicates that the product planning is not set supply
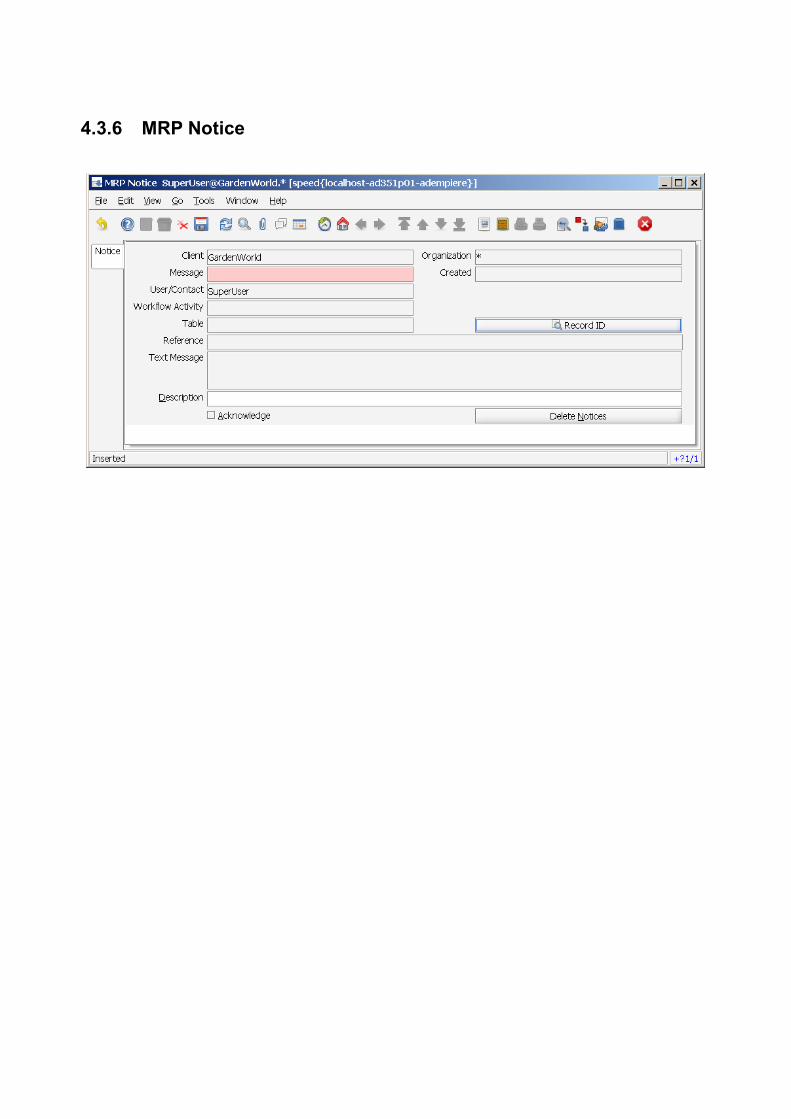
4.3.6 MRP Notice

4.3.7 MRP Details
4.3.8 Planned Order ApprovalA planned manufacturing order is a manufacturing order suggested by the MRP process and contains its quantity and its release and promise dates. when you approve a manufacturing planned order you convert it in a manufacturing order with the status of In Process.
When you approve a planned order you are telling the system that the manufacturing order is ready to start its process with the approval you change the order status from Draft to In Process.

4.4 Capacity Requirements Planning - CRPThe process of Capacity Plan Calculation allows us to know the available time in each manufacturing resource, as well as teh required time to satisfy the Master Production Schedule (MPS). It is a set of techniques which uses the planned manufacturing orders by MRP, open manufacturing resources and the workflows to calculate the required time for each resource along with the available time. With this information, we are able to balance teh time demand with the available time. Though the knowledge of the required and available capabilities it is possible to adjust the MPS until we arrive at a realistic time.It is a set of techniques which uses the planned orders by MRP, open manufacturing orders, manufacturing resources and the work-flows to calculate the required time for each resource along with the available time. With this information, we are able to balance the time demand with the available time. Through the knowledge of the required and available capacities it is possible to adjust the Master Production Schedule(MPS) until we arrive at a realistic one. CRP answers the question: Is the available capacity sufficient to satisfy the required time demand at each manufacturing resource?
4.4.1 Capacity Requirement Planning Setup
4.4.2 Calculate Capacity PlanThe process of Capacity Plan Calculation allows us to know the available time in each manufacturing resource, as well as the required time to satisfy the Master Production Schedule.

4.4.3 Resource Load ViewIt shows graphically of the required and available time for each manufacturing resource.
• The required parameters to get the Resource Load View are: • the resource you want to analyze and the date at the beginning of the month you wish
to analyze.
• Next click the OK button and you will see the daily available capacity at the selected resource. The bar of the graph shows the required capacity, the available capacity and the difference between them.
• The accumulated times from other periods are not considered for these calculations.

4.4.4 CRP Info
4.5 Production ControlThis is taken from http://www.adempiere.com/wiki/index.php/Production_Control . I have yet not found an equivalent place in version 3.5.1.a.
Once the production planning process is completed, the production control process let us to check the execution activities in order to be sure we can reach the material plan.
Each time you need to release an order you need to be sure the components are complete in the warehouse, this is obtained by tracking the release and due dates for every component, this is easy to get using the shortages reports and from this module.
This module mainly answer the question:
• What do I need to do to accomplish the MPS?
• If you cannot cover the MPS as you had planned, this module gives you information needed to decrease the effect on the costs and on the customer service.
4.5.1 Discrete Manufacturing
Planned Order ApprovalA planned manufacturing order is a manufacturing order suggested by the MRP process and contains its quantity and its release and promise dates. when you approve a manufacturing planned order you convert it in a manufacturing order with the status of In Process.
When you approve a planned order you are telling the system that the manufacturing order is ready to start its process with the approval you change the order status from Draft to In Process.
Manufacturing OrderThe Manufacturing Order is a document or schedule identity conveying authority for the manufacture of specified products in specified quantities.
To enter a manufacturing order or to give it maintenance
• click the menu option Manufacturing
• Production Control

• Discrete Manufacturing
• Manufacturing Order.
You must enter or select the parameters to filter the desired manufacturing order records. The options to filter the MO are: Document Number of the MO, Document Description, Product Name, date when the order was generated, the order promise date, the date when the order should be started according with the manufacturing schedule (also called release date) or the Document Status (DR, NA, IP, CO, CL).
Date Ordered – is the date when the order was generated. If the MO is created manually the default date ordered is the system date. If the MO was generated by MRP the default date ordered is the day of the MRP process.
Date Promised – Is the date we commit to give the order to the warehouse. If the MO is created manually the default date promised is the system date. If the MO was generated by MRP this date is filled automatically using its algorithm calculation.
Approval Date – Is the date on which the planned order should be approved to be released to the shop floor.

Delivered Date – Is the Date on which the finished material of this order was received by the warehouse.
Start Date Scheduled – Is the date, scheduled by MRP, when the MO should be released to the shop floor.
Finish Date Scheduled - Is the date, scheduled by MRP, when the MO should be received by the warehouse.
Start Date – It is the date when the first manufacturing order movement is reported, this movement can be an inventory or labor movement.
Finish Date - It is the date when the last manufacturing order movement is reported, It is the closing order date.
Before Float – It will be used in future releases in order to balance the resource loading.
After Float – It will be used in future releases in order to balance the resource loading.
In the Quantities group of fields you can see the next fields:
The product Quantity to be fabricated and the Unit of Measure of this quantity.
The Qty Batchs is the number of batches you are going to do to fabricate all the product in the order.
The Qty. Batch Size is the quantity of product to be made in each batch.
In the Yield field you can see the Product Yield defined as the the product quantity which fit the quality specifications divided by the total order quantity.
Delivered Quantity is a read only field which contains the quantity delivered to the warehouse up to date.
The Rejected Quantity is the quantity of product out of quality specifications reported to the manufacturing order. When Quality assurance take a decision around the rejected product, this product will have to be later reworked or sent to scrap. When you report Scrap Quantity, this will be added to the scrap quantity for the manufacturing order.
Qty Scrap is the quantity of material out of specifications and of such characteristics that rework is impractical.
Project and Campaign refer to the standard Compiere dimensions.
The data contained in the Status group of fields have the normal use of Compiere.
The BOM & Formula used in the Manufacturing Order are taken from the Product Planning data window.
BOM and Workflows used by the manufacturing orders are taken from the Product Data Planning.
The information relative to every component that will be used in the manufacture of the finished product is taken from the Bill of Materials. This information is contained in the Order BOM/Formula tab.
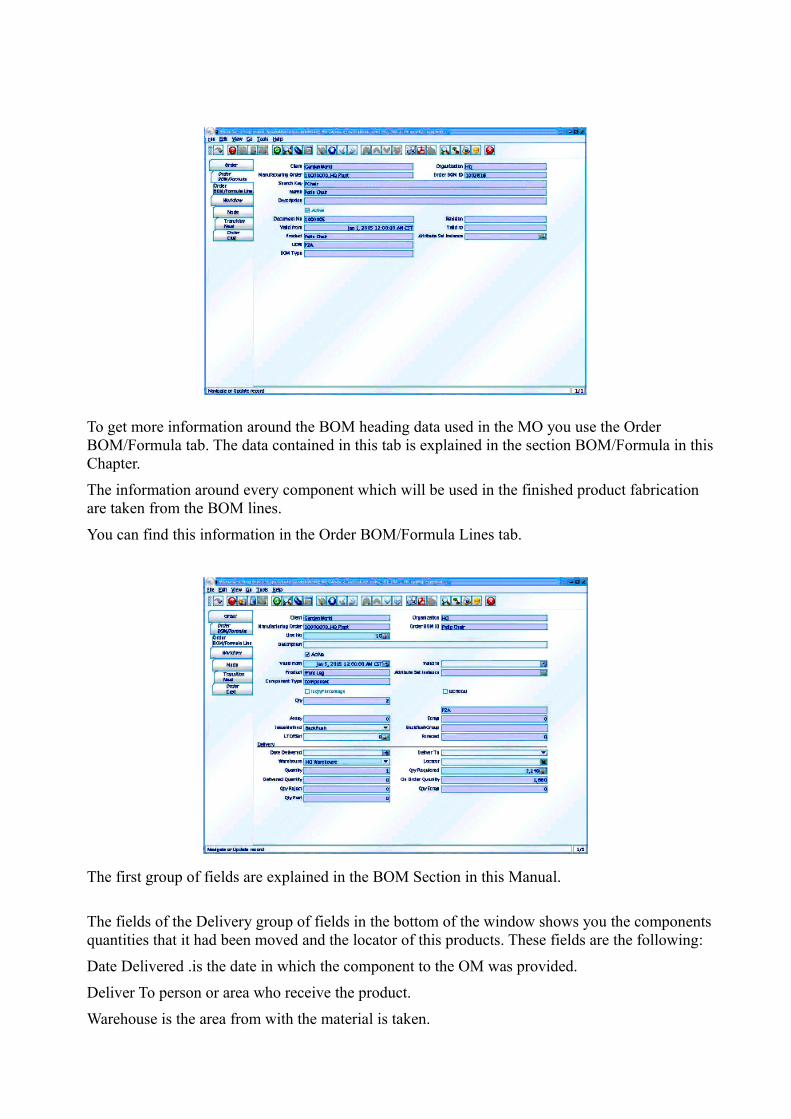
To get more information around the BOM heading data used in the MO you use the Order BOM/Formula tab. The data contained in this tab is explained in the section BOM/Formula in this Chapter.
The information around every component which will be used in the finished product fabrication are taken from the BOM lines.
You can find this information in the Order BOM/Formula Lines tab.
The first group of fields are explained in the BOM Section in this Manual.
The fields of the Delivery group of fields in the bottom of the window shows you the components quantities that it had been moved and the locator of this products. These fields are the following:
Date Delivered .is the date in which the component to the OM was provided.
Deliver To person or area who receive the product.
Warehouse is the area from with the material is taken.

Locator is the place into the warehouse where the material is taken.
Quantity is the amount of the movement.
QtyRequired: are the necessary component to MO.
Delivered Quantity amount of component that already had been provide the MO.
Reserved Quantity: amount of component that has been reserved from the warehouse to the MO through the approval of the MO.
Qty Reject: amount of the component that does not fulfill the quality specification reason why will have to be given back to the warehouse for process again or to be reported as Scrap.
Qty Scrap: amount of component that not will be part of production process because this product does not fullfill the quality specifications and no longer is possible to process again to turn it a usable product.
Qty Post: amount that has been applied to the General Accounting.
To get information about the Workflow heading which will be used in the Manufacturing Order, you must select the Workflow tab. Data contained in this tab are explained in the Manufacturing Workflow (Routes and Processes) section in this Manual.
Figure 1.3.1.2.5
The relative information to each node (Or operations) will be used in the production of a product and will be taken from the nodes registered in the Manufacturing Workflow Windows in the Nodes tab. This data can be modified and also the data from the transition tab. To get detailed information around the fields please see the section Manufacturing Workflow in this Chapter.
In the Cost Tab we have a record for each Cost Element defined in the Product to be produced, for these Organization, Warehouse, Cost Group and Resource.
You can see the standard amounts for each Cost Element at this level and for each Cost Element at

lower level for the product. The cost at this level refers to the Cost Elements of the product to be produced (just at the level of the finished product). Cost elements at lower levels refers to the cost of the the product to be produced (including the cost of the Cost Elements of every component).
Figure 1.3.1.2.6
The last four fields are related to the accumulated quantities and amounts for product movements and posted movements. These fields are for each cost element:
● Cum Qty Cost Element: This field shows the sum of the quantities of the product that have had movements.
● Cost Element Cum Qty Post: This field shows the sum of the quantities of the product that have had movements and have been posted to the GL for the cost elements.
● Cum Amt Cost Element: This field shows the sum of the amounts of the product that have had movements.
● Cum Amt Cost Element Post: This field shows the sum of the amounts of the product that have had movements and have been posted to the GL.
Manufacturing Orders ReportIt is a report of every Manufacturing Orders filtering according with the characteristics the user is interested to select.
Component CheckBefore you complete a MO it is necessary to validate the components are available in the warehouse, in order to track the components availability you get a report which shows among other data: the Required Quantity for the MO, the Reserved Quantity, the On Hand Quantity and the Available Quantity.

Figure 1.3.1.4
Order TransactionsTo get the Manufacturing Transactions Report click the menu option Manufacturing < Production Control < Discrete Manufacturing < Order Transactions.
Figure 1.3.1.5
With this report we can verify the detail of every Manufacturing Order transaction executed with a Manufacturing Order including information like document number, quantities, products and the date in which the transactions were made, etc.
Printing and Release OrderOnce the planned orders of manufacture generated by MRP, have been aprobed, has been reached the date of liberation and has been verified that the required components are in existence, the orders are emitted to the plant for its manufacture. If you wish to print the warehouse and shop floor documentation you must tick the adequate check box:

Figure 1.3.1.6
If you tick the Print Pick List check box you will get a report with the required components and quantities to help the warehouse clerk to issue the material to the shop floor. The next report is an example of this:
Figure 1.3.1.6.1
If you tick the Print Pack List check box you will get a report with the required components and containing the material with a Component Type of Packing recorded in the BOM Window.
Another report which is part of the Manufacturing Order Release Package is the Workflow(Routing). You can print this report with tick in the Print Workflow check box and it shows to the shop floor personnel the necessary steps for the manufacture of the product. This Report contains the place where the product should be made, the standard times, the tools and necessary devices. If you wish to print this report tick the check box Print Workflow.
Order Receipt and IssueThe last step in the fabrication process with a Manufacturing Order is to receipt the finished product in the warehouse. This last step is accomplished using with click in the menu option Manufacturing < Production Control < Discrete Manufacturing < Order Receipt and Issue.

Figure 1.3.1.7
The window shows at the upper side static information around the product and the manufacturing resource where it has to be made, it also shows a summary of the quantities to be controlled in the MO such as the Original and delivered quantities and the Quantity to deliver for the MO up to date.
If the production process requires production in batch, then the Qty Batchs shows the Number of batches the shop floor needs to do and the Qty Batch Size contains the size of every batch to be produced.
If you want to issue the MO components before you receive the finished product you should tick the checkbox Is Delivery, this case is recommended when you have a long to medium lead time and you want to have the inventory quantities as reliable as possible at every moment.
If you have small lead time and you wish to save clerk time then you must tick Is Backflush checkbox and you will receive the finished product at the same time you issue automatically the components
The Backflush Group field is used when you want to issue just components belonging to this group. (This characteristic could not be included in the current version).
At the lower part of the window you can find the list of every MO component, this can be modified according with the real products and quantities given to the shop floor.
The quantities to be issued are selected with the checkbox at the first column of the list of components. If the actual quantity is different from the standard quantity showed in the column Qty to deliver you should edit this field to enter the right quantity to be issued.
Finally a message box asks if you want to close the OM document, you should click the ok button if this MO does not have any more transactions and has to be closed.

4.6 Distribution Resource Planning - DRP
4.6.1 Distribution Resource Planning Setup

4.6.2 Calculate Distribution Plan
4.6.3 DRP Details

5 Production Management
● PP_ORDER type
5.1 Discrete Manufacturing
5.1.1 Discrete Manufacturing Setup Once the production planning process is completed1, the production control process allow the check the execution activities in order to garantuee to hold the material plan. Each time one needs to release a manufacturing order, the required components, material, man and machines are completely available in the warehouse. This is achieved by tracking the manufacturing release and due dates for every component, required to fullfil the initiating sales order. This is easy to get, using the shortage reports from this (?) module.
This module is responsible to answer the question: What do I need to accomplish the Master Production Schedule (MPS) ? If one cannot cover the MPS as planned, this module provides information required to decrease the negative effects on costs (reduce warehouse costs) and customer service (deliver in time).
1 Checklist ??

5.1.2 Manufacturing Order

5.1.3 Manufacturing Orders Review
5.1.4 Component Check

5.1.5 Print & Release Order

5.1.6 Order Receipt & Issue
5.1.7 Inventory in Process

5.1.8 Order Transactions
5.1.9 Management MaintenanceWhat are the Spare Parts for ?

5.2 Shop Floor Control
5.2.1 Activity Control Report
5.2.2 Shop Floor Transaction Details

6 Distribution Management● DD_ORDER are relevant to distribution
6.1 Distribution Management Setup

6.2 Distribution Network
● Network Distribution – X_DD_NetworkDistribution.java○ a new concept

6.3 Freight Category
6.4 Shipper

6.5 Distribution Order

6.6 Generate Movement - Manual
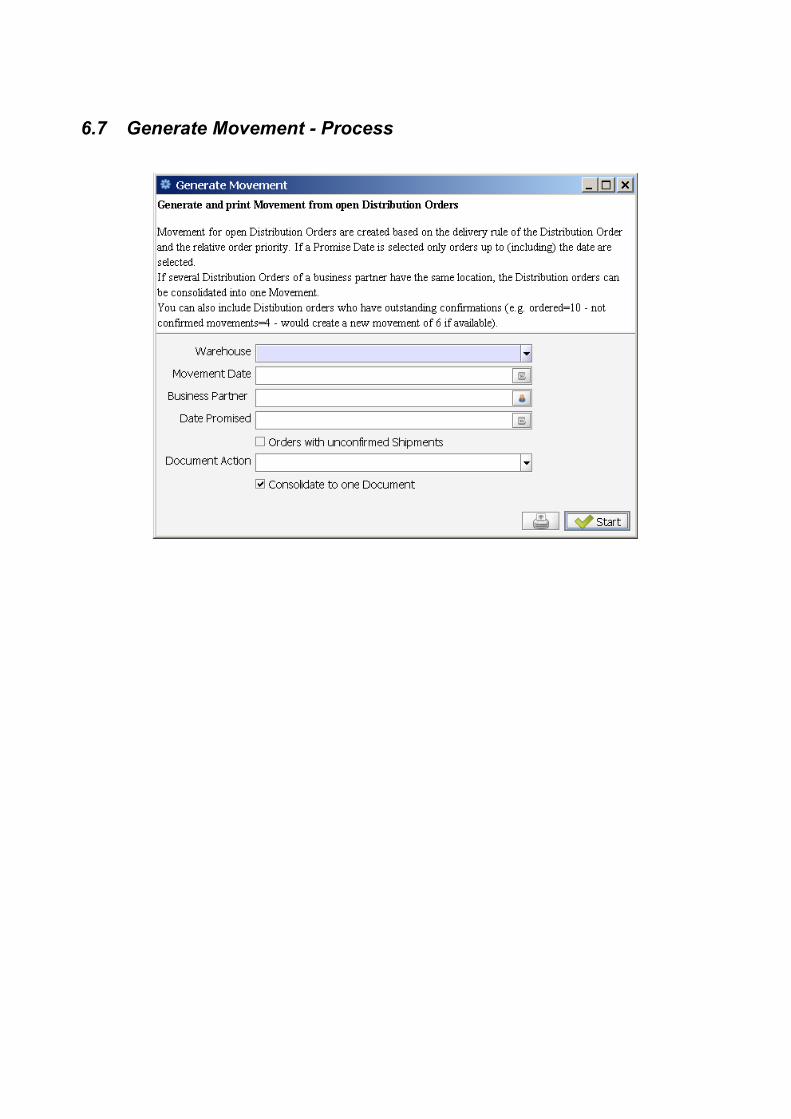
6.7 Generate Movement - Process

6.8 Inventory Move

7 Quality Management
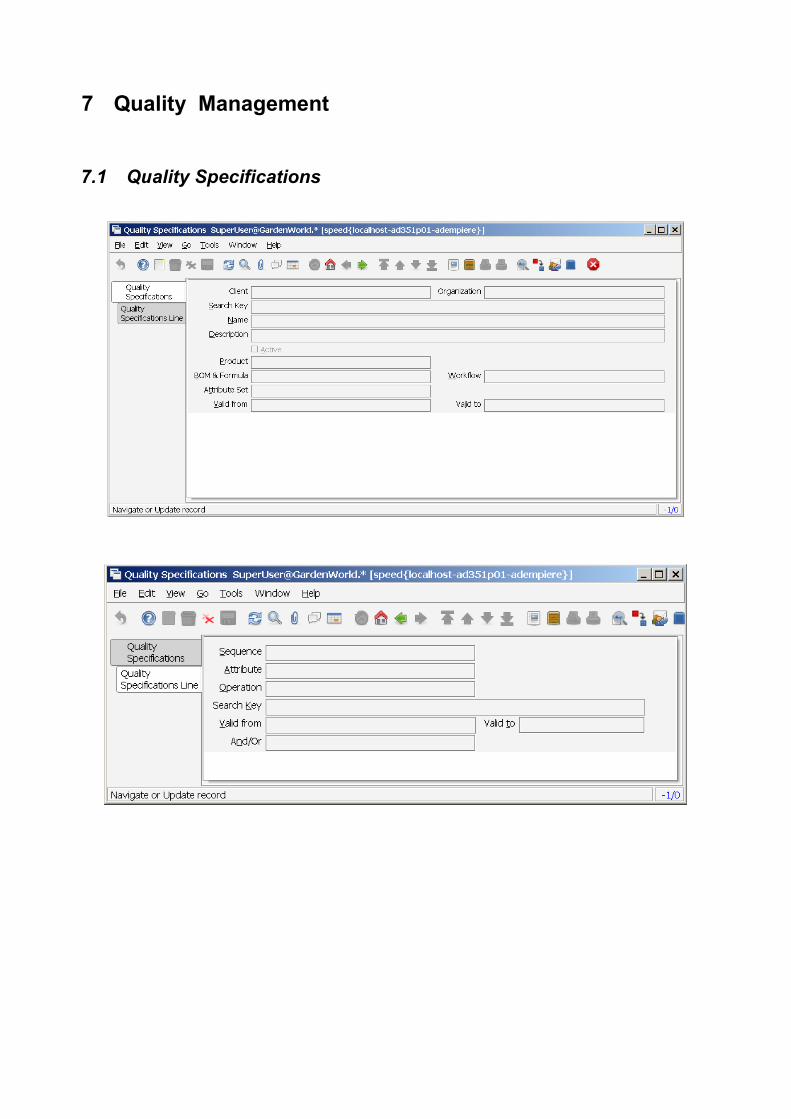
7.1 Quality Specifications
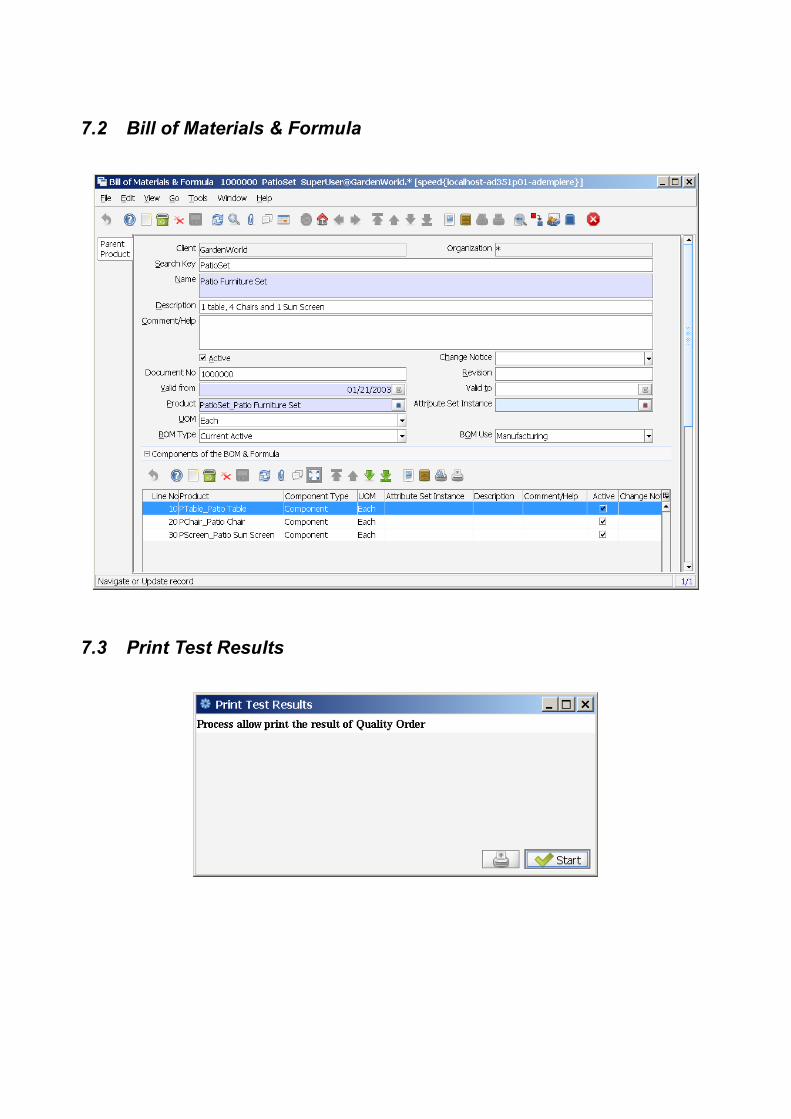
7.2 Bill of Materials & Formula
7.3 Print Test Results

8 Standard Costing Management● MCost.java
○ SELECT * FROM M_Cost WHERE AD_Client_ID =? AND M_Product_ID=? AND ( C_Acctschema_ID = ? AND M_Costtype_ID = ? AND M_CostElement_ID = ? )
The Cost Management system is used to segregate the most important problems from those which are less important using the production cost criteria. . With Cost Management we know the actual cost of the cost elements grouped into cost types: material, labor, burden, overhead, subcontracts and distribution for every product used in production. Knowing costs and its variances: current vs standard, you will be able to take the correcting actions at the right time
With this module you mainly answer the question: are every cost element used in the Manufacturing Orders inside the production plan?
8.1 Create Doc Type to Manufacturing
8.2 Create Element

The Cost group allows you to define as many as you wish, different costs for the same product at an organization. For Instance, you can set one or more Cost Groups to do an analysis of “What if” in case of possible cost changes because of the economic company environment. On the other hand you need to define one Cost Group to be used in the accounting transactions.
To introduce or modify a Cost Group you must select the option menu Costing Management < Cost Group CMPCS.
A Cost Element is a cost component that can be controlled in a separate way and it is part of the groups defined as Cost Type. The Cost Type can be: Material, Labor, Overhead, Burden, Distribution and Subcontract. For instance: the Cost type Material can be segregated in one Cost Element named Freight and another Cost Element named material.
The Cost Element can be controlled in different accounting elements in the Tab Account Cost Elements CMPCS.
You must enter the next Accounts:
COGS CMPCS : The account to register the costs associated with producing a product. This cost account is used when you make a customer shipment.
Absorption Cost CMPCS: The account to register the cost proportion of the productive cost,it is refereed to labor and burden cost.
Use variance: Is used to register the cost variance due to a difference between the real quantity used in the transaction and the standard quantity.
Rate variance: Is used to register the cost variance due to a difference between the real rate used in the transaction and the standard rate.
Method variance: Is used to register cost variances because of substitution of routing operation or substitution of components in the BOM. When the MO is closed any amount remaining in WIP will be taken to this variance.
8.3 Product CostingTo enter the cost elements for every set of Organization, Accounting Schema, Warehouse, Resource, Cost Group and product select the menu option: Cost Management<Cost Element:
The Product Tab shows the basic information about a product. It is the same information that is registered in the Product Tab from the Product option menu. The Product Cost Tab allows you to enter the cost in the field This Level amount for Cost Element CMPCS, which is the cost product at the level of the product and this cost element is given for an Organization, Accounting Schema, Warehouse, Resource and Cost Group.
In the same tab you can see the Lower Level Amounts for Cost Element CMPCS. Here you can see the result of adding the cost element amounts for the given product in every BOM lower levels.
The file Cum Qty Cost Element CMPCS shows the addition of the product quantities that have been issued to Manufacturing Orders with the same conditions of the windows elements.
The field Cumulative Amount of Cost Element shows the addition of all the product cost amounts which has been issued to MO with the same conditions of the cost elements of the window.
To watch the cost elements for every set of Product, Organization, Accounting Schema, Warehouse, Resource and Cost Group select the menu option: Cost Management < Product Cost Report.
The next form will be displayed:

Click the OK button and you will get a report showing for the products filtered the Cost Element, Cost Group, Cost Amounts at this and lower levels and Product Category.
8.4 Copy Price to Standard Cost

8.5 Workflow Cost Roll-Up
8.6 Cost Workflow & Process Details

8.7 Bill of Material & Formula Cost Roll-Up
8.8 Cost CollectorThe cost collector is a repository of all the MO transactions. This real transactions relation allows to compare it with the standard transactions in order to be able to calculate variations by cost element. To get access to the Cost Collector you must select the menu option Manufacturing< Costing Management < Cost Collector then the next window is displayed:


![Principles of Party Organisation Comintern 1921ciml.250x.com/archive/...principles...organisation.pdfPrinciples of Party Organisation [Comintern] PRINCIPLES OF PARTY ORGANISATION *](https://static.fdocuments.in/doc/165x107/5ea55ce501c1c41cf61ce7ef/principles-of-party-organisation-comintern-1921ciml250xcomarchiveprinciples.jpg)


