Parallel Virtual File Systems on Microsoft Azure · Parallel Virtual File Systems on Microsoft...
42
Parallel Virtual File Systems on Microsoft Azure Performance tests of Lustre, GlusterFS, and BeeGFS By Kanchan Mehrotra, Tony Wu, and Rakesh Patil Azure Customer Advisory Team (AzureCAT) April 2018
Transcript of Parallel Virtual File Systems on Microsoft Azure · Parallel Virtual File Systems on Microsoft...

Parallel Virtual File Systems on Microsoft Azure Performance tests of Lustre, GlusterFS, and BeeGFS
By Kanchan Mehrotra, Tony Wu, and Rakesh Patil
Azure Customer Advisory Team (AzureCAT)
April 2018

PVFS on Microsoft Azure: Performance tests of Lustre, GlusterFS, and BeeGFS
2
Contents Overview .............................................................................................................................................................. 4
Performance results .................................................................................................................................................... 4
Ease of deployment .................................................................................................................................................... 6
Lustre on Azure ................................................................................................................................................. 7
Installation ...................................................................................................................................................................... 7
1. Install Lustre 2.9.0 packages on server nodes ..................................................................................... 8
2. Configure the MGS/MDS node ................................................................................................................. 9
3. Configure the OSS node ........................................................................................................................... 10
4. Install Lustre 2.9.0 on the client node and validate the setup ................................................... 11
Lustre file system performance tests ................................................................................................................ 12
Maximum throughput test results ............................................................................................................. 12
IOPs test results ................................................................................................................................................. 14
Metadata test results ...................................................................................................................................... 15
Lustre evaluation ....................................................................................................................................................... 16
GlusterFS on Azure ........................................................................................................................................ 17
Installation ................................................................................................................................................................... 17
1. Install the GlusterFS server ....................................................................................................................... 17
2. Set up the GlusterFS volume ................................................................................................................... 19
3. Install and configure the client node ................................................................................................... 20
GlusterFS performance tests ................................................................................................................................ 21
Maximum throughput test results ............................................................................................................. 21
IOPs test results ................................................................................................................................................. 23
GlusterFS evaluation ................................................................................................................................................ 24
BeeGFS on Azure ........................................................................................................................................... 26
Installation ................................................................................................................................................................... 27
BeeGFS performance tests .................................................................................................................................... 28
Maximum throughput test results ............................................................................................................. 28
IOPs test results ................................................................................................................................................. 31
Metadata test results ...................................................................................................................................... 32
BeeGFS evaluation .................................................................................................................................................... 32
Monitoring ....................................................................................................................................................... 34
Install and run Ganglia ............................................................................................................................................ 34
Use BeeGFS monitoring tools .............................................................................................................................. 37
Conclusion ........................................................................................................................................................ 39
Learn more ....................................................................................................................................................... 39
Appendix ........................................................................................................................................................... 40
Testing tools ............................................................................................................................................................... 40
Lustre vs. GlusterFS .................................................................................................................................................. 41
BeeGFS performance tools and tuning ............................................................................................................ 41
PVFS on Microsoft Azure: Performance tests of Lustre, GlusterFS, and BeeGFS
3
List of figures
Figure 1. Simplified diagram of the test environment setup on Azure ......................................................... 4
Figure 2. Lustre file system architecture .................................................................................................................... 7
Figure 3. Graphical representation of write throughput results ..................................................................... 13
Figure 4. Graphical representation of read throughput results ...................................................................... 14
Figure 5. Write IOPs showing linear scale as nodes are added ...................................................................... 15
Figure 6. Read IOPs showing nonlinear scale ........................................................................................................ 15
Figure 7. Sample MDTest output for client host with four processes .......................................................... 16
Figure 8. Write throughput results for GlusterFS showing linear performance ....................................... 22
Figure 9. Read throughput results for GlusterFS showing linear performance ........................................ 23
Figure 10. Write IOPs results per number of GlusterFS servers ...................................................................... 24
Figure 11. Read IOPs results per number of GlusterFS servers....................................................................... 24
Figure 12. Transfer endpoint error during GlusterFS testing ........................................................................... 25
Figure 13. Write throughput results for BeeGFS compared to virtual machine limits........................... 30
Figure 14. IOPs test results for BeeGFS compared to virtual machine limits ............................................ 32
Figure 15. BeeGFS metadata operation test results ............................................................................................ 32
Figure 16. Monitoring I/O performance using the iostat command ............................................................ 34
Figure 17. Ganglia aggregated view .......................................................................................................................... 35
Figure 18. BeeGFS monitoring views ......................................................................................................................... 38
Figure 19. Monitoring work requests in BeeGFS .................................................................................................. 38
Figure 20. Lustre vs. GlusterFS. The write performance scales linearly as storage size increases. .... 41
Authored by Kanchan Mehrotra, Tony Wu, and Rakesh Patil. Reviewed by Solliance. Edited by Nanette Ray.
© 2018 Microsoft Corporation. This document is for informational purposes only. MICROSOFT MAKES NO WARRANTIES,
EXPRESS OR IMPLIED, IN THIS SUMMARY. The names of actual companies and products mentioned herein may be the
trademarks of their respective owners.

PVFS on Microsoft Azure: Performance tests of Lustre, GlusterFS, and BeeGFS
4
Overview When customers ask our team to help them deploy large-scale cluster computing on Microsoft
Azure, we tell them about Parallel Virtual File Systems (PVFSs). Several open-source systems are
available, such as the Lustre, GlusterFS, and BeeGFS file systems, and we have worked with them
all. But how well do they scale on Azure? To find out, we ran several informal performance tests
using default configurations to compare Lustre, GlusterFS, and BeeGFS.
A PVFS distributes file data across multiple servers and provides concurrent access by multiple
tasks of a parallel application. Used in high-performance computing (HPC) environments, a PVFS
delivers high-performance access to large data sets.
A PVFS cluster includes nodes designated as one or more clients, plus management servers,
storage servers, and metadata servers. Storage servers hold file data, while metadata servers store
statistics, attributes, data file-handles, directory entries, and other metadata. Clients run
applications that use the file system by sending requests to the servers over the network.
This document explains our testing process and the results we received. We looked at the
performance requirements for maximum throughput and input/output operations per sec (IOPs).
We also walked through the installation and configuration of each PVFS and compared the ease
of setup. Lustre, GlusterFS, and BeeGFS all performed well on Azure.
We hope this default configuration serves as a baseline you can refer to when designing and
sizing a PVFS architecture on Azure that meets your needs. We also show how to install the tools
we used for performance testing, so you can try your own comparison tests. The test scripts are
available from the az-cat/HPC-Filesystems repository on GitHub.
Performance results
All our tests were performed on Linux virtual machines on Azure. The DS14v2 size was used for its
balance of performance and cost backed by solid-state drives (SSD) with locally redundant
storage (LRS). The test environment setup is shown in Figure 1.
Figure 1. Simplified diagram of the test environment setup on Azure

PVFS on Microsoft Azure: Performance tests of Lustre, GlusterFS, and BeeGFS
5
Although our team would have liked to do more comprehensive testing, our informal efforts
clearly showed that performance tuning was the key to getting the best results. Overall,
performance scaled as expected as more nodes were added to the cluster.
Table 1 compares the best throughput performances from our tests. Later sections of this
document describe our processes and results in detail for each PVFS, but in general, the tests
showed a linear performance gain as storage size in terabytes (TB) increased for all three PVFSs.
We were not able to investigate every unusual result, but we suspect that the Lustre caching
effect (described later in this document) boosted its test results. The IOPs testing is based on a 4K
transfer size with a random pattern and a 32 MB transfer size with a sequential pattern for the
throughput (bandwidth) testing.
For more information, including NFS baselines, see Parallel File Systems for HPC Storage on
Azure.
Table 1. Maximum IOPs and throughput per number of servers
Maximum Lustre GlusterFS BeeGFS
Write IOPs
Number of server nodes*
756,669
(20)
225,298
(20)
434,432
(20)
Read IOPs
Number of server nodes
26,170,286**
(8)
138,766
(20)
410,200
(20)
Write throughput (MB/s)
Number of server nodes
11,574
(20)
5,835
(20)
13,424
(20)
Read throughput in (MB/s)
Number of server nodes
11,890
(20)
6,627
(20)
12,952
(20)
* 10 clients with multiple processes running, each client using all the CPU cores and networking bandwidth of the client
virtual machine.
** This high value likely reflects a caching effect for the Lustre testing. We used default testing parameters without
performance-tuning.

PVFS on Microsoft Azure: Performance tests of Lustre, GlusterFS, and BeeGFS
6
Ease of deployment
We also wanted to find out how easy each PVFS was to deploy on Azure. We compared the main
components of the architecture (Table 2), which can include multiple nodes—such a metadata
server (MDS), metadata target (MDT), management server (MGS), object storage server (OSS)—
and file system clients. Table 2 summarizes top-level deployments points.
Table 2. Deployment ease-of-use comparison
Lustre GlusterFS BeeGFS*
Nodes to deploy 4
(client, OSS, MDT,
and MGS)
2
(client, combined
OSS/MDS)
4
(client, OSS, MDT, and
management service)
Operating system Variety of Linux
kernels and
distributions
(for example, RHEL,
CentOS
Any Linux
distribution
Linux 2.6.18–4.13
from RHEL 5/6/7 (and
Fedora), SLES 11/12
(and OpenSuse),
Debian 7/8/9 (and
Ubuntu)
Min. number of
nodes for setup
3 3 3**
* BeeGFS data and metadata servers support mirroring only. There are no RAID considerations. BeeGFS replicates
between high availability nodes automatically for the managed data.
** Technically speaking, you can install all four BeeGFS components on one node, but practically speaking, at least
three nodes should be used.
Based on our team’s experiences during testing, we developed the following unofficial ease-of-
use rating system—the Cloudies—as shown in Table 3. For more results, see the specific file
system sections later in this document.
Table 3. Overall ease of deployment
PVFS Rating Notes
Lustre
Lustre gets a one-and-a-half clouds rating for its
comparatively complicated deployment—it required more
nodes to be set up separately and specific installation
packages. Our process was manual by design, because we
wanted to see what it was like. An Azure Resource Manager
template is also available to make deployment easier.
GlusterFS
We liked how straightforward GlusterFS was to deploy and
gave it a three-cloud rating. There were fewer nodes to set
up, and installation was simple.
BeeGFS
We found BeeGFS easy to deploy and gave it a three-cloud
rating. We highly recommend using the Azure Resource
Manager template.

PVFS on Microsoft Azure: Performance tests of Lustre, GlusterFS, and BeeGFS
7
Lustre on Azure Lustre is currently the most widely used PVFS in HPC solutions. Lustre
file systems can scale to tens of thousands of client nodes and tens of
petabytes of storage. Our Lustre file system performed well on Azure
for large file system. You can refer to the testing results for more details.
Lustre clusters contain four kinds of systems:
• File system clients, which can be used to access the file system.
• Object storage servers (OSSs), which provide file I/O services and manage the object storage
targets (OSTs).
• Metadata servers (MDSs), which manage the names and directories in the file system and
store them on a metadata target (MDT).
• Management servers (MGSs), which work as master nodes for the entire cluster setup and
contain information about all the nodes attached within the cluster.
A single node can be used to serve as both an MDS and MGS as we have done in our testing.
Figure 2 shows a standard Lustre file system architecture.
Figure 2. Lustre file system architecture
Installation
Lustre runs on a variety of Linux kernels from Linux distributions, including Red Hat Enterprise
Linux (RHEL) and CentOS. For our performance evaluation, we installed Lustre 2.9.0 on an
OpenLogic CentOS 7.3 image from the Azure Marketplace and configured the nodes as follows:
• First node serves as both the MGS and MDS with a virtual machine size of DS14v2, containing
16 cores and managed OS disks.
• Second node serves as the OSS. We attached 10 additional P30 data disks of 1 terabyte (TB)
each for a total of 10 TB storage for a single OSS node.
PVFS on Microsoft Azure: Performance tests of Lustre, GlusterFS, and BeeGFS
8
• Third node serves as a client. To measure performance, we installed multiple testing tools,
including IOR (Interleaved or Random) and MDTest.
To scale the cluster, we added more OSSs with 10 additional disks of 1 TB each. We ran
performance tests for varieties of OSS nodes—that is, 1, 2, 4, 8, 12…20. The test environment also
used openMPI (included in CentOS 7.2) as the Message Passing Interface (MPI).
TIP: This document walks you through a manual Lustre installation, so you can see how to
scale specific components later if desired. However, you can also install and configure Lustre
2.9.0 using an Azure Resource Manager template available on GitHub. To test your setup,
install the testing tools described later in this document. Azure Marketplace also includes Intel
Cloud Edition for Lustre software.
1. Install Lustre 2.9.0 packages on server nodes
1. If required for performance tuning, install Linux Integration Services (LIS ) packages with the
following commands:
sudo yum update
sudo reboot
sudo yum install microsoft-hyper-v
NOTE: LIS packages are intended to improve network performance, but we performed our
benchmark tests without them. We didn’t see any performance improvements when LIS
packages were installed and sometimes even saw lower performance. When we tested, the
NDIS single root I/O virtualization (SR-IOV) interface was not available, but it will help.
2. Log on to the server node using a Secure Shell (SSH) client, such as PuTTY.
3. Go to the /etc/yum.repos.d folder and create a file named LustrePackage.repo with the
following contents:
[lustreserver]
name=lustreserver
baseurl=https://downloads.hpdd.intel.com/public/lustre/latest-feature-
release/el7/server/
enabled=1
gpgcheck=0
[e2fs]
name=e2fs
baseurl=https://downloads.hpdd.intel.com/public/e2fsprogs/latest/el7/
enabled=1
gpgcheck=0
[lustreclient]
name=lustreclient
baseurl=https://downloads.hpdd.intel.com/public/lustre/latest-feature-
release/el7/client/
enabled=1
gpgcheck=0

PVFS on Microsoft Azure: Performance tests of Lustre, GlusterFS, and BeeGFS
9
4. To make sure the repos were created, run:
yum repolist
5. Install the following packages in the order shown:
a. Install the Linux kernel with Lustre software patches:
yum install kernel-3.10.0-514.el7_lustre.x86_64
b. Install the Lustre software command-line tools:
yum install lustre-2.9.0-1.el7.x86_64
6. To verify that all the dependent binaries were installed on the server, do the following:
a. Install the Lustre kernel module patches:
yum install kmod-lustre-2.9.0-1.el7.x86_64
b. Install the Lustre back-end file system tool for ldiskfs-based servers:
yum install kmod-lustre-osd-ldiskfs-2.9.0-1.el7.x86_64
c. Install the helper library for mount.lustre and mkfs.lustre for ldiskfs-based servers:
yum install lustre-osd-ldiskfs-mount-2.9.0-1.el7.x86_64
d. Install and update e2fsprogs:
yum install e2fsprogs
7. Repeat steps 1–5 to install all required RPM packages for Lustre 2.9.0 for each server in the
cluster (MGS/MDS or OSS).
8. To configure LNET, run the following commands:
#Configure LNET
echo "options lnet networks=tcp"> /etc/modprobe.d/lnet.conf
#Automatically start servers
chkconfig lnet --add
chkconfig lnet on
chkconfig lustre --add
chkconfig lustre on
reboot
2. Configure the MGS/MDS node
Whether you created a single MGS/MDS node as we did or separate nodes, the next step is to
configure the node in the cluster. The following parameters are used:
fsname: Names the file system, for example, LustreFS
mgs: Indicates the node is MGS
mdt: Indicates the node is MDS
backfstype: Identifies the backing file system
PVFS on Microsoft Azure: Performance tests of Lustre, GlusterFS, and BeeGFS
10
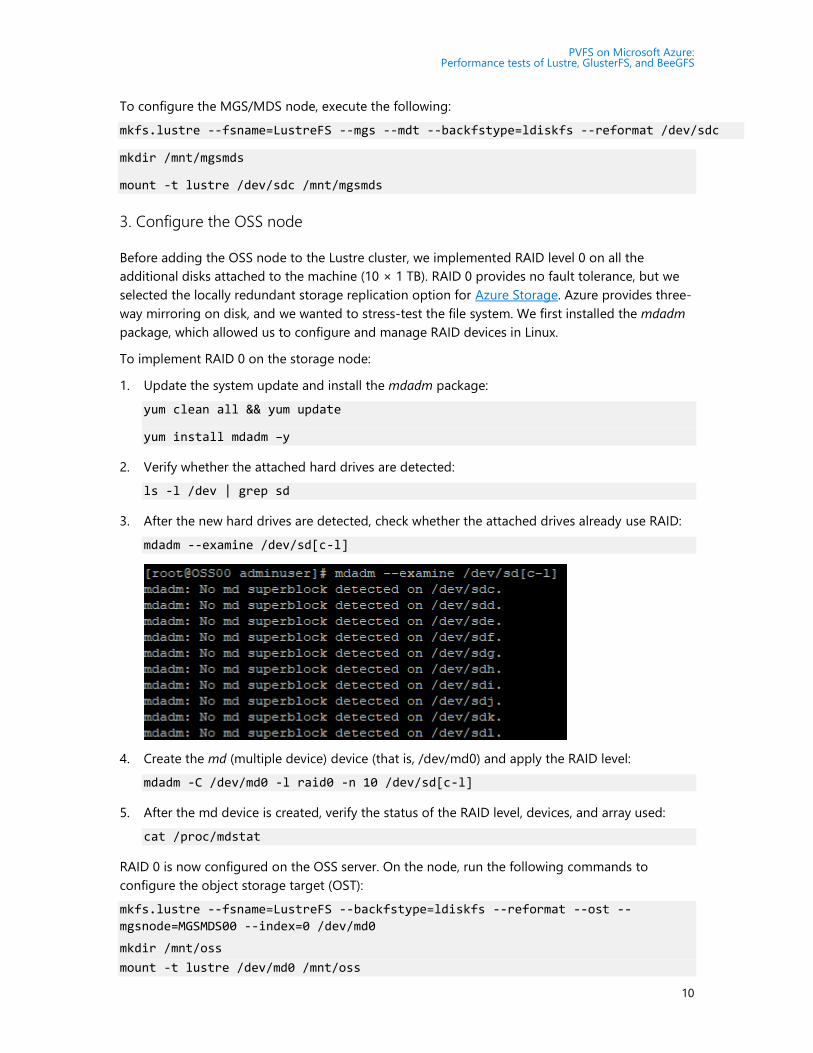
To configure the MGS/MDS node, execute the following:
mkfs.lustre --fsname=LustreFS --mgs --mdt --backfstype=ldiskfs --reformat /dev/sdc
mkdir /mnt/mgsmds
mount -t lustre /dev/sdc /mnt/mgsmds
3. Configure the OSS node
Before adding the OSS node to the Lustre cluster, we implemented RAID level 0 on all the
additional disks attached to the machine (10 × 1 TB). RAID 0 provides no fault tolerance, but we
selected the locally redundant storage replication option for Azure Storage. Azure provides three-
way mirroring on disk, and we wanted to stress-test the file system. We first installed the mdadm
package, which allowed us to configure and manage RAID devices in Linux.
To implement RAID 0 on the storage node:
1. Update the system update and install the mdadm package:
yum clean all && yum update
yum install mdadm –y
2. Verify whether the attached hard drives are detected:
ls -l /dev | grep sd
3. After the new hard drives are detected, check whether the attached drives already use RAID:
mdadm --examine /dev/sd[c-l]
4. Create the md (multiple device) device (that is, /dev/md0) and apply the RAID level:
mdadm -C /dev/md0 -l raid0 -n 10 /dev/sd[c-l]
5. After the md device is created, verify the status of the RAID level, devices, and array used:
cat /proc/mdstat
RAID 0 is now configured on the OSS server. On the node, run the following commands to
configure the object storage target (OST):
mkfs.lustre --fsname=LustreFS --backfstype=ldiskfs --reformat --ost --
mgsnode=MGSMDS00 --index=0 /dev/md0
mkdir /mnt/oss
mount -t lustre /dev/md0 /mnt/oss

PVFS on Microsoft Azure: Performance tests of Lustre, GlusterFS, and BeeGFS
11
NOTE: Whenever you add another OSS node to the cluster, increment the index—for
example, from 0 to 1.
4. Install Lustre 2.9.0 on the client node and validate the setup
For the client node to work with the Lustre cluster, you must install the required RPM packages
and configure the node. For other kernel versions than the one we used, see the Lustre Support
Matrix.
1. Log on to the node using a Secure Shell (SSH) client, such as PuTTY.
2. Go to the /etc/yum.repos.d folder and create a file named LustrePackage.repo with the same
contents shown earlier for the server node (see “Install Lustre 2.9.0 packages on server
nodes,” step 2).
3. Install the RPM packages as follows:
a. Install the kmod-lustre client package:
yum install kmod-lustre-client-2.9.0-1.el7.x86_64
b. Install the Lustre client 2.90 client package:
yum install lustre-client-2.9.0-1.el7.x86_64
c. Install the Lustre client DKMS packages:
yum install lustre-client-dkms-2.9.0-1.el7.noarch --skip-broken
4. To configure the client node to work with the Lustre cluster, run the following commands:
mkdir <directory>
mount -t lustre <hostname>@tcp:<filesystem> <directory>
Where:
<directory> is the directory to be mounted with the Lustre file system, such as /mnt/lustre.
<hostname> is the name of the host used for the management server. In our case, MDS and
MGS are served by a single node named MGSMDS00.
<filesystem> is the name of the Lustre file system. We specified the name LustreFS earlier
while creating the file system (see “Configure MGS/MDS node”).
For example:
mkdir /mnt/lustre
mount -t lustre MGSMDS00@tcp:/LustreFS /mnt/lustre
5. When the client configuration is complete, validate the Lustre setup as follows:
a. Display all the nodes attached in the cluster:
lfs check servers
b. Write a file in the mounted path to see the OST at which that file is located. For example:
lfs find –obd LustreFS-OST0000_UUID /mnt/lustre

PVFS on Microsoft Azure: Performance tests of Lustre, GlusterFS, and BeeGFS
12
Where LustreFS-OST0000_UUID is UUID of that OST as shown:
6. Install the IOR and MDTest tools. See the Appendix (Testing tools).
Lustre file system performance tests
To validate performance of the Lustre file system, we ran tests to measure maximum throughput
and IOPs. We changed various IOR test parameters, including the transfer rate, block size, number
of processes, and number of client nodes.
Our results were good, but inconclusive, because of the many factors that affected the
performance of our system:
• Caching effects: When we measured the I/O performance, we found that file caching defined
by default at the OS level caused very high I/O rates. Because we tested the performance of
storage nodes, the data was getting buffered in memory, not stored on the disk. As a result,
we evaluated the file system without caching except when testing IOPs.
• Transfer size: In our testing, we set the transfer size to 32 MB to achieve maximum
throughput, but results could vary in other environments. This parameter controls the amount
of data to be transferred each time for a process between memory and file.
• Programming interface: The IOR tool can be used to test the file system for both POSIX
(Portable Operating System Interface) and MPI-IO. We saw better results with MPI-IO. The
POSIX results are shown later in this section.
• Count of parallel processes: To achieve maximum throughput and IOPs, we varied the
number of total parallel processes for different storage nodes. We saw a maximum
throughput of 753.53 MB per second with one OSS node with 16 processes.
Maximum throughput test results
To measure read and write throughput, we used the following IOR syntax:
mpiexec --hosts=<client_hostname> -np <n_procs> /lustre/software/ior/bin/ior
-a MPIIO -v -B -F -w -t 32m -b 4G -o /mnt/lustre/test.`date
+"%Y-%m-%d_%H-%M-%S"`
Where:
-v indicates verbose mode
-B indicates by passing cache
-F indicates file per process
-w indicates write operation
-t indicates transfer rate (size of transfer in bytes)
-b indicates block size
-o indicates output test file
<client_hostname> is the name of the host used as the client
<n_procs> is the number of processes
PVFS on Microsoft Azure: Performance tests of Lustre, GlusterFS, and BeeGFS
13
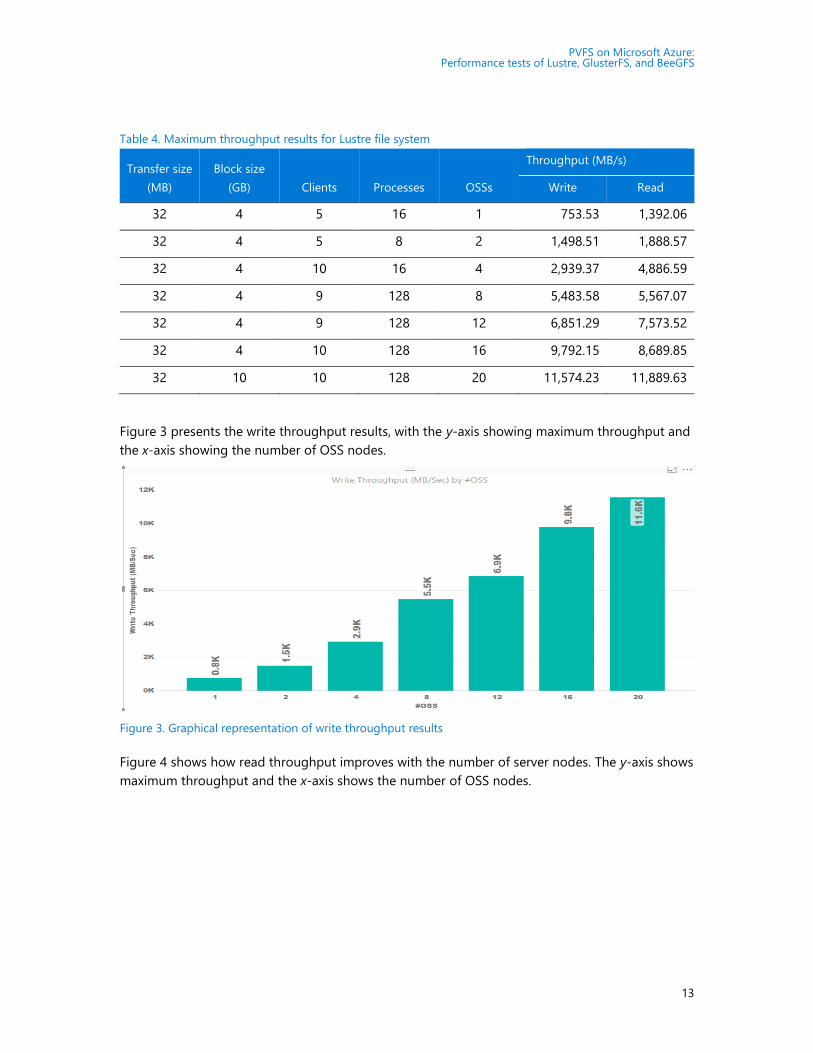
Table 4. Maximum throughput results for Lustre file system
Transfer size
(MB)
Block size
(GB) Clients Processes OSSs
Throughput (MB/s)
Write Read
32 4 5 16 1 753.53 1,392.06
32 4 5 8 2 1,498.51 1,888.57
32 4 10 16 4 2,939.37 4,886.59
32 4 9 128 8 5,483.58 5,567.07
32 4 9 128 12 6,851.29 7,573.52
32 4 10 128 16 9,792.15 8,689.85
32 10 10 128 20 11,574.23 11,889.63
Figure 3 presents the write throughput results, with the y-axis showing maximum throughput and
the x-axis showing the number of OSS nodes.
Figure 3. Graphical representation of write throughput results
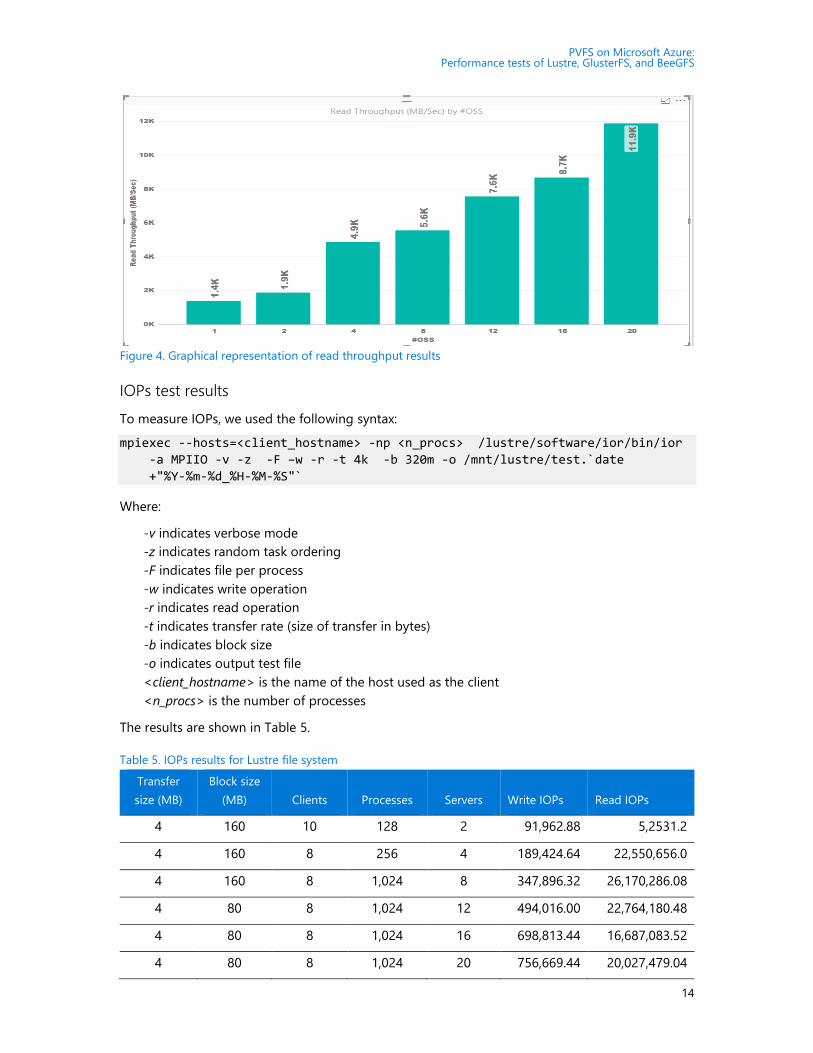
Figure 4 shows how read throughput improves with the number of server nodes. The y-axis shows
maximum throughput and the x-axis shows the number of OSS nodes.
PVFS on Microsoft Azure: Performance tests of Lustre, GlusterFS, and BeeGFS
14
Figure 4. Graphical representation of read throughput results
IOPs test results
To measure IOPs, we used the following syntax:
mpiexec --hosts=<client_hostname> -np <n_procs> /lustre/software/ior/bin/ior
-a MPIIO -v -z -F –w -r -t 4k -b 320m -o /mnt/lustre/test.`date
+"%Y-%m-%d_%H-%M-%S"`
Where:
-v indicates verbose mode
-z indicates random task ordering
-F indicates file per process
-w indicates write operation
-r indicates read operation
-t indicates transfer rate (size of transfer in bytes)
-b indicates block size
-o indicates output test file
<client_hostname> is the name of the host used as the client
<n_procs> is the number of processes
The results are shown in Table 5.
Table 5. IOPs results for Lustre file system
Transfer
size (MB)
Block size
(MB) Clients Processes Servers Write IOPs Read IOPs
4 160 10 128 2 91,962.88 5,2531.2
4 160 8 256 4 189,424.64 22,550,656.0
4 160 8 1,024 8 347,896.32 26,170,286.08
4 80 8 1,024 12 494,016.00 22,764,180.48
4 80 8 1,024 16 698,813.44 16,687,083.52
4 80 8 1,024 20 756,669.44 20,027,479.04

PVFS on Microsoft Azure: Performance tests of Lustre, GlusterFS, and BeeGFS
15
Figure 5. Write IOPs showing linear scale as nodes are added
Figure 5 provides the read IOPs results. The y-axis shows IOPs, and the x-axis shows the count of
OSS nodes. Our nonlinear results, shown in Figure 6, were unexpected and most likely related to
the caching effect. We ran out of time for further investigation, but suspect the Lustre caching
effects were the culprit.
Figure 6. Read IOPs showing nonlinear scale
Metadata test results
For the metadata operation testing, we used MDTest with the following syntax on the client node:
mpiexec --hosts=<client_hostname> -np <n_procs> /lustre/software/mdtest/mdtest
-I 10 -i 2 -z 5 -b 5 -d /mnt/lustre/
Where:
-I indicates the number of items per directory in the tree
-i indicates iterations
PVFS on Microsoft Azure: Performance tests of Lustre, GlusterFS, and BeeGFS
16
-b indicates block size
-z indicates random task ordering
-d is the directory where the tests are run (multiple paths require fully-qualified pathnames)
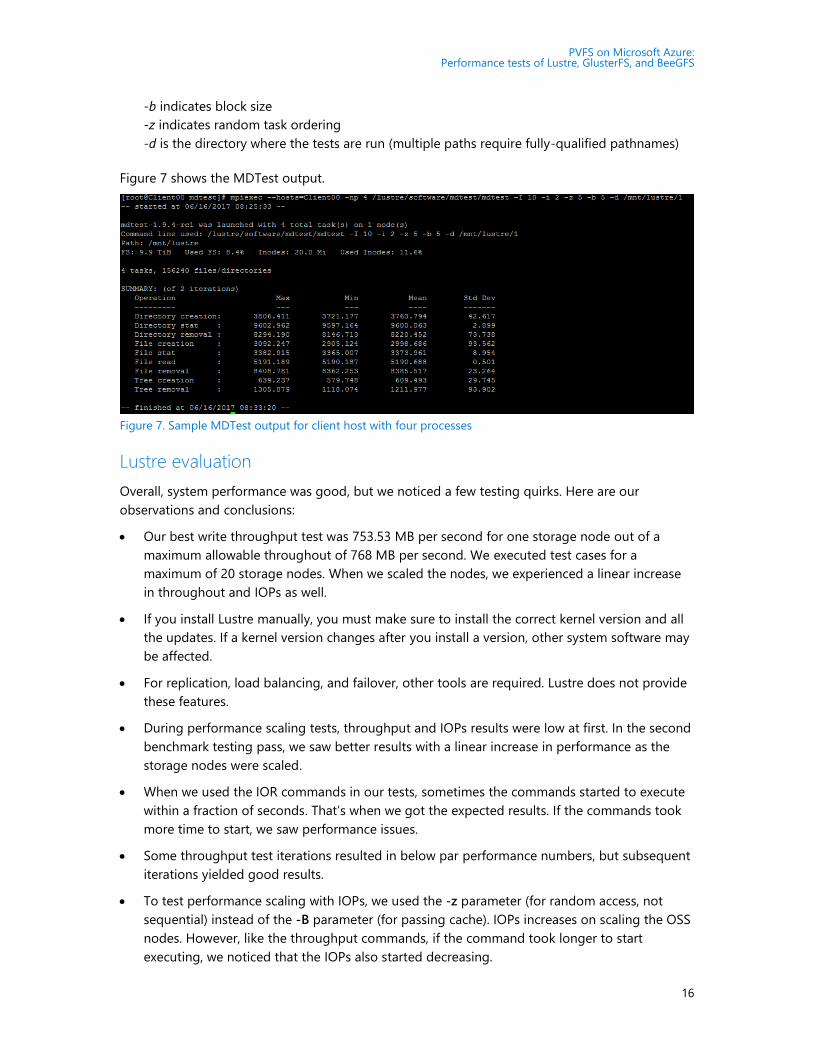
Figure 7 shows the MDTest output.
Figure 7. Sample MDTest output for client host with four processes
Lustre evaluation
Overall, system performance was good, but we noticed a few testing quirks. Here are our
observations and conclusions:
• Our best write throughput test was 753.53 MB per second for one storage node out of a
maximum allowable throughout of 768 MB per second. We executed test cases for a
maximum of 20 storage nodes. When we scaled the nodes, we experienced a linear increase
in throughout and IOPs as well.
• If you install Lustre manually, you must make sure to install the correct kernel version and all
the updates. If a kernel version changes after you install a version, other system software may
be affected.
• For replication, load balancing, and failover, other tools are required. Lustre does not provide
these features.
• During performance scaling tests, throughput and IOPs results were low at first. In the second
benchmark testing pass, we saw better results with a linear increase in performance as the
storage nodes were scaled.
• When we used the IOR commands in our tests, sometimes the commands started to execute
within a fraction of seconds. That’s when we got the expected results. If the commands took
more time to start, we saw performance issues.
• Some throughput test iterations resulted in below par performance numbers, but subsequent
iterations yielded good results.
• To test performance scaling with IOPs, we used the -z parameter (for random access, not
sequential) instead of the -B parameter (for passing cache). IOPs increases on scaling the OSS
nodes. However, like the throughput commands, if the command took longer to start
executing, we noticed that the IOPs also started decreasing.

PVFS on Microsoft Azure: Performance tests of Lustre, GlusterFS, and BeeGFS
17
GlusterFS on Azure The GlusterFS file system is a free, scalable, open-source distributed file
system specifically optimized for cloud storage, and it works great for
applications hosted on Azure. Unlike Lustre, it does not have separate
metadata servers. Instead, metadata is integrated into the file storage.
The GlusterFS architecture includes a server node and a client node in a
cluster. You can designate a single node for both storage and metadata—separate servers are not
required. GlusterFS stores and locates data using an elastic hash algorithm and doesn’t need any
metadata servers, so I/O bottlenecks are removed, which improves performance and parallel
access. Servers can be added or removed whenever required.
For our tests, we used the following node configuration:
• 20 server nodes deployed as a virtual machine scale set.
• 5 client nodes
With this cluster topology, we captured performance statistics for throughput and IOPs. The test
environment used openMPI (included in CentOS 7.2) as the MPI interface.
Installation
To get started, you need at least two nodes of any Linux distribution to serve as server nodes
(metadata server and storage server). GlusterFS can be installed on any Linux distribution. We
used an OpenLogic CentOS 7.3 image from Azure Marketplace for our tests. We chose a virtual
machine size of DS14v2 and attached 10 additional P30 data disks of 1 TB each.
1. Install the GlusterFS server
1. If required, install LIS packages using the following commands:
sudo yum update
sudo reboot
sudo yum install microsoft-hyper-v
NOTE: As with our Lustre deployment, we performed the GlusterFS tests without the LIS
packages. Since we tested, SR-IOV drivers have become available for accelerated networking.
2. If you want to use the RPMs from the CentOS Storage SIG, run the following commands,
which install the centos-release-gluster RPM and provide the required yum repository files:
yum install centos-release-gluster
yum install glusterfs-cli glusterfs-geo-replication glusterfs-fuse
glusterfs-server glusterfs
3. To start GlusterFS management services, run the following commands in order:
systemctl enable glusterd.service
systemctl enable glusterfsd.service
systemctl start glusterd.service
systemctl start glusterfsd.service

PVFS on Microsoft Azure: Performance tests of Lustre, GlusterFS, and BeeGFS
18
systemctl status glusterfsd.service
systemctl status glusterd.service
4. Set up RAID level 0 for the 10 additional data disks attached with the node. Implementing
RAID 0 on this storage node provides 10 TB of volume (1 TB × 10 = 10 TB]. To do this:
a. Update the system and install the mdadm package so you can configure and manage
RAID devices in Linux:
yum clean all && yum update
yum install mdadm –y
b. Verify whether the attached hard drives can be detected as follows:
ls -l /dev | grep sd
c. Verify whether the attached drives already use any existing RAID configuration:
mdadm --examine /dev/sd[c-l]
d. Create the md device (that is, /dev/md0) and apply RAID 0 as follows:
mdadm -C /dev/md0 -l raid0 -n 10 /dev/sd[c-l]
e. Verify the status of the RAID level, devices, and array:
cat /proc/mdstat
f. Run the following command:
mdadm --examine --scan | sudo tee /etc/mdadm.conf
5. Create a logical volume on top of the RAID 0 implementation as follows:
pvcreate --dataalignment 1024K /dev/md/md0
vgcreate --physicalextentsize 256K rhgs-data /dev/md/md0
lvcreate -L 9216g -T rhgs-data/brickpool -c 256K
lvchange --zero n rhgs-data/brickpool
lvcreate -V 9216g -T rhgs-data/brickpool -n brick1
6. Format and mount the bricks using the following commands:
a. Assume that the brick will reside on the volume created in the previous step (/dev/rhgs-
data/brick1):

PVFS on Microsoft Azure: Performance tests of Lustre, GlusterFS, and BeeGFS
19
mkfs.xfs -f -K -i size=512 -n size=8192 /dev/rhgs-data/brick1
mkdir -p /rhs/brick1
b. Echo the following line of text into fstab (File System TABle):
echo -e "/dev/rhgs-data/brick1\t/rhs/brick1\txfs\
tdefaults,inode64,nobarrier, noatime,nouuid 0 2" | sudo tee -a
/etc/fstab
c. Mount the device:
mount -a && mount
d. Verify that you can now see the volume mounted at /rhs/brick1 by running the following
command:
df –h
7. To establish a trusted pool, probe the first server from a second server to set its host name.
To do this, on the first server (“server1”), run:
gluster peer probe server2
Then, on the second server ("server2"), run:
gluster peer probe server1
2. Set up the GlusterFS volume
After a trusted pool has been established, we can create a GlusterFS volume. For our testing
purposes, we set up a distributed volume, but you can choose another type. Each volume type
has advantages and disadvantages as follows:
• Distributed volumes distribute files throughout the bricks in the volume. You can use
distributed volumes where the requirement is to scale storage and the redundancy is either
not important or is provided by other hardware/software layers.
• Replicated volumes replicate files across bricks in the volume. You can use replicated
volumes in environments where high-availability and high-reliability are critical.
• Striped volumes stripe data across bricks in the volume. For best results, you should use
striped volumes only in high-concurrency environments accessing very large files.
• Distributed striped volumes stripe data across two or more nodes in the cluster. You should
use distributed striped volumes where the requirement is to scale storage and in high-
concurrency environments where accessing very large files is critical.
• Distributed replicated volumes distribute files across replicated bricks in the volume. You can
use distributed replicated volumes in environments where the requirement is to scale storage
and high-reliability is critical. Distributed replicated volumes also offer improved read
performance in most environments.
• Distributed striped replicated volumes distribute striped data across replicated bricks in the
cluster. For best results, you should use distributed striped replicated volumes in highly
concurrent environments where parallel access of very large files and performance is critical.

PVFS on Microsoft Azure: Performance tests of Lustre, GlusterFS, and BeeGFS
20
In this release, configuration of this volume type is supported only for Map Reduce
workloads.
• Striped replicated volumes stripe data across replicated bricks in the cluster. For best results,
you should use striped replicated volumes in highly concurrent environments where there is
parallel access of very large files and performance is critical. In this release, configuration of
this volume type is supported only for Map Reduce workloads.
• Dispersed volumes are based on erasure codes, providing space-efficient protection against
disk or server failures. It stores an encoded fragment of the original file to each brick in a way
that only a subset of the fragments is needed to recover the original file. The number of
bricks that can be missing without losing access to data is configured by the administrator
when the volume is created.
• Distributed dispersed volumes distribute files across dispersed subvolumes. This has the
same advantages of distributed replicated volumes but uses disperse to store the data into
the bricks.
To set up a distributed GlusterFS volume, execute the following commands in order:
1. On server1, run:
mkdir /data/brick1/gv0
2. On server2, run:
mkdir /data/brick1/gv0
3. From any single server, run:
gluster vol create dist-vol glusterserver1:/rhs/brick1/dist-vol
glusterserver2:/rhs/brick1/dist-vol
gluster volume start dist-vol
4. Finish the volume setup using the gluster volume command as follows:
a. To confirm that the volume has started (Status: Started), use the info keyword:
gluster volume info
b. To see how many bricks are attached to the volume, use the status keyword:
gluster volume status
c. To scale your environment, add a new brick to an existing cluster by using the add-brick
keyword:
gluster volume add-brick dist-vol Server02:/rhs/brick1/dist-vol
d. Rebalance the nodes in the cluster using the rebalance keyword:
gluster volume rebalance dist-vol fix-layout start
3. Install and configure the client node
For automatic high-availability failover in our tests, we mounted the GlusterFS volume as a FUSE
client, although Network File System (NFS) is also supported.
PVFS on Microsoft Azure: Performance tests of Lustre, GlusterFS, and BeeGFS
21
1. To Install the FUSE package, run:
yum install glusterfs-fuse
2. Create the directory that serves as a mount point for the GlusterFS volumes:
mkdir /mnt/gluster
3. Mount the volume on the client at the specified mount point:
mount -t glusterfs server0:/dist-vol /mnt/gluster
4. Install the testing tools. If you installed the IOR and MDTest tools as part of the Lustre file
system evaluation, you do not need to reinstall them. If not, see the Appendix.
GlusterFS performance tests
To evaluate the performance of our GlusterFS file system, we ran tests to measure maximum
throughput and IOPs just as we did with the Lustre file system. We changed various IOR test
parameters, including the transfer rate, block size, number of processes, and number of client
nodes.
As with our Lustre tests, the performance of GlusterFS varied depending on the following:
• Caching effects: Because we tested storage nodes, file caching caused very high I/O rates, so
we evaluated GlusterFS without caching except when testing IOPs.
• Transfer size: As with Lustre, we found that a transfer size of 32 MB gave maximum
throughout, but this may vary in other environments.
• Programming interface: We tested for both POSIX and MPI-IO. As with Lustre, we saw better
results with MPI-IO. The POSIX results are shown in the next section.
• Count of parallel processes: We achieved a maximum throughput of 970.11 MB per second
with two storage nodes with 128 processes. Table 6, in the next section, provides more
specific details.
Maximum throughput test results
To measure read and write throughput, we used the following IOR syntax:
mpiexec --hosts=<client_hostname> -np <n_procs> /gluster/software/ior/bin/ior
-a MPIIO -v -B -F -w -t 32m -b 4G -o /mnt/gluster/test.`date
+"%Y-%m-%d_%H-%M-%S"`
Where:
-v indicates verbose mode
-B indicates by passing cache
-z indicates random task ordering
-F indicates file per process
-w indicates write operation
-r indicates read operation
-t indicates transfer rate (size of transfer in bytes)
-b indicates block size
-o indicates output test file
PVFS on Microsoft Azure: Performance tests of Lustre, GlusterFS, and BeeGFS
22
<client_hostname> is the name of the host used for the client
<n_procs> is the number of processes
Table 6 shows the results.
Table 6. Maximum throughput results for GlusterFS
Transfer
size (MB)
Block size
(GB) Processes Clients
Gluster
servers
Throughput (MB/s)
Write Read
32 10 128 10 2 970.11 1,003.94
64 8 256 8 4 1,612.56 1,907.7
32 1 512 8 8 2,164.51 3,520.25
32 1 512 8 12 3,192.73 3,870.6
128 4 512 9 16 4,472.52 5,180.96
128 4 512 9 20 5,835.14 6,627.38
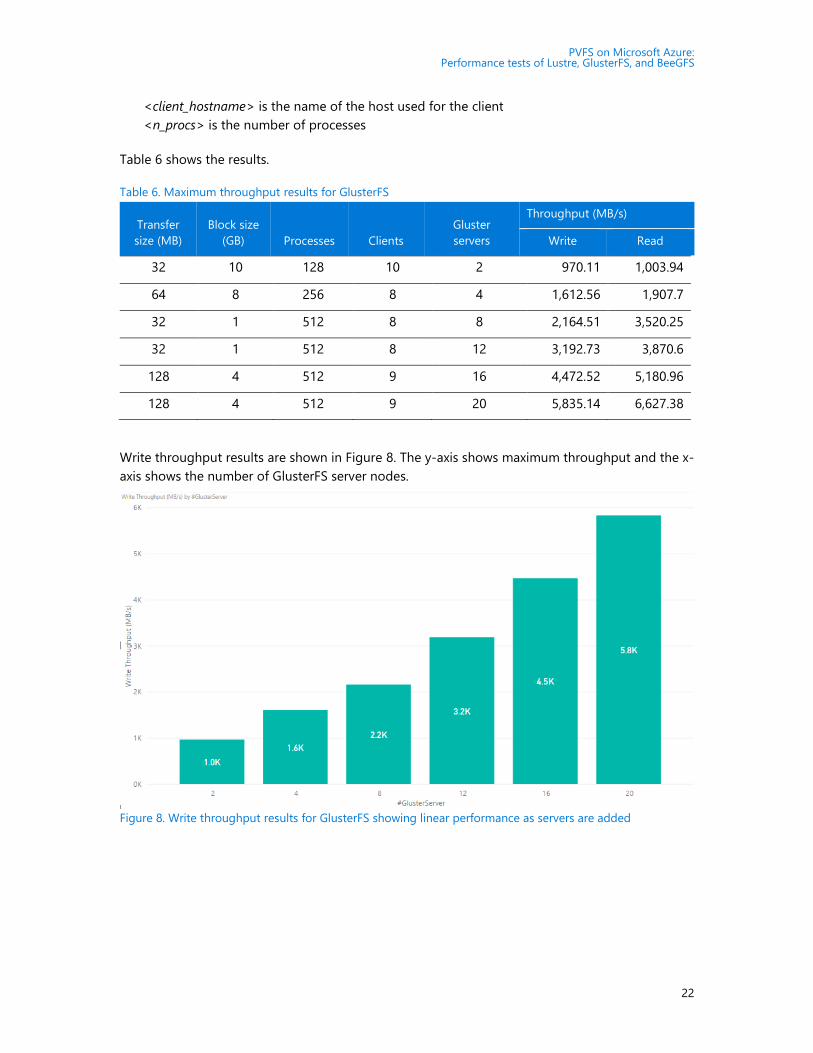
Write throughput results are shown in Figure 8. The y-axis shows maximum throughput and the x-
axis shows the number of GlusterFS server nodes.
Figure 8. Write throughput results for GlusterFS showing linear performance as servers are added

PVFS on Microsoft Azure: Performance tests of Lustre, GlusterFS, and BeeGFS
23
Read throughput results are displayed in Figure 9. The y-axis shows maximum throughput and
the x-axis shows the number of GlusterFS server nodes.
Figure 9. Read throughput results for GlusterFS showing linear performance as servers are added
IOPs test results
To measure IOPs on Azure, we used the following syntax:
mpiexec --hosts=<client_hostname> -np <n_procs> /lustre/software/ior/bin/ior
-a MPIIO -v -z -F –w -r -t 4k -b 320m -o /mnt/lustre/test.`date
+"%Y-%m-%d_%H-%M-%S"`
The results are shown in Table 7.
Table 7. IOPs results for GlusterFS
Transfer size
(KB)
Block size
(MB) Processes Clients
Gluster
servers Write IOPs Read IOPs
4 160 128 10 2 59,665.92 56,435.2
4 160 64 8 4 107,578.88 76,098.48
4 160 64 8 8 138,765.98 89,765.0
4 160 128 9 12 203,776.0 108,800.0
4 160 128 9 16 218,193.9 122,746.9
4 160 128 9 20 225,298.2 138,765.5
PVFS on Microsoft Azure: Performance tests of Lustre, GlusterFS, and BeeGFS
24
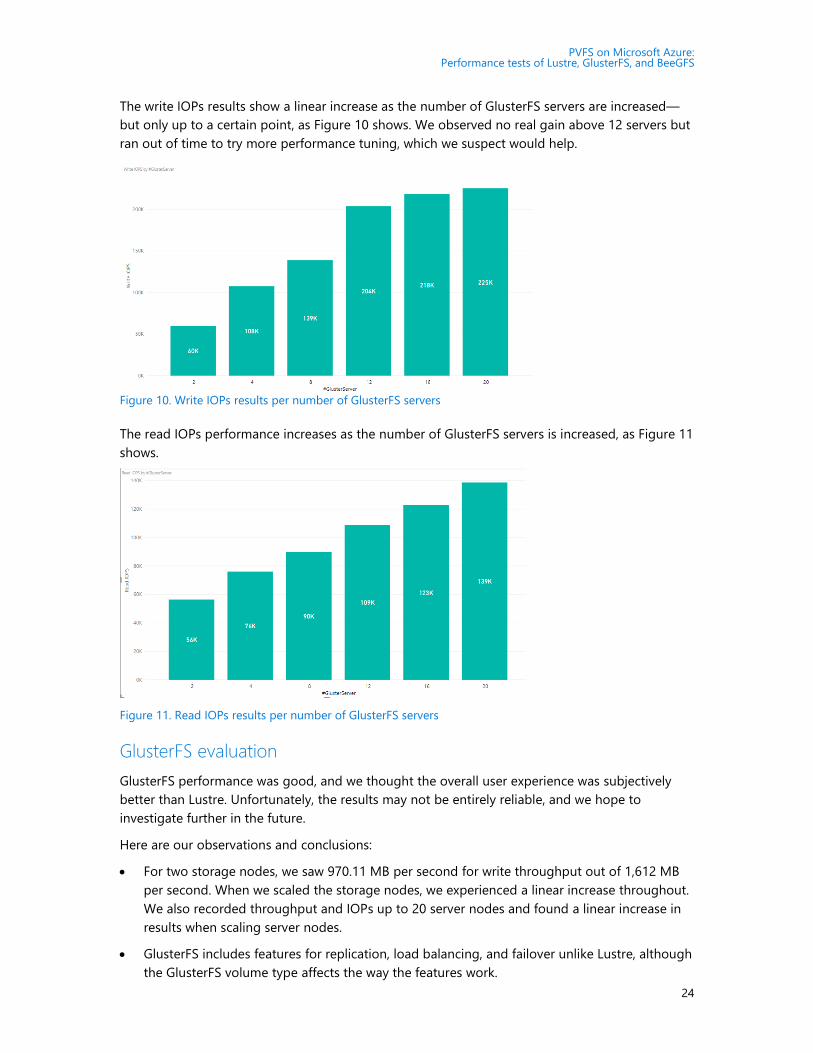
The write IOPs results show a linear increase as the number of GlusterFS servers are increased—
but only up to a certain point, as Figure 10 shows. We observed no real gain above 12 servers but
ran out of time to try more performance tuning, which we suspect would help.
Figure 10. Write IOPs results per number of GlusterFS servers
The read IOPs performance increases as the number of GlusterFS servers is increased, as Figure 11
shows.
Figure 11. Read IOPs results per number of GlusterFS servers
GlusterFS evaluation
GlusterFS performance was good, and we thought the overall user experience was subjectively
better than Lustre. Unfortunately, the results may not be entirely reliable, and we hope to
investigate further in the future.
Here are our observations and conclusions:
• For two storage nodes, we saw 970.11 MB per second for write throughput out of 1,612 MB
per second. When we scaled the storage nodes, we experienced a linear increase throughout.
We also recorded throughput and IOPs up to 20 server nodes and found a linear increase in
results when scaling server nodes.
• GlusterFS includes features for replication, load balancing, and failover unlike Lustre, although
the GlusterFS volume type affects the way the features work.

PVFS on Microsoft Azure: Performance tests of Lustre, GlusterFS, and BeeGFS
25
• We found GlusterFS easier to install than Lustre. Fewer packages are needed.
• GlusterFS issues an error if any of the server nodes are shut down, as the following figure
shows.
Figure 12. Transfer endpoint error during GlusterFS testing
• If the test commands we executed started instantaneously, we got the expected performance
results. But if the commands took time to start, the performance results were below par.
Unfortunately, we were not able to troubleshoot this issue.
• Some test iterations resulted in below par performance numbers, but subsequent iterations
yielded good results. The total time taken for execution of write/read throughput also
increased.

PVFS on Microsoft Azure: Performance tests of Lustre, GlusterFS, and BeeGFS
26
BeeGFS on Azure BeeGFS is a Linux-based, hardware-independent parallel file system and
designed for high-performance and high-throughput environments at
Fraunhofer ITWM. (Its original name was FhGFS.) BeeGFS is free to use
and offers commercial support.
One advantage of the BeeGFS client service is that it provides a normal
mount point that your applications can use to directly access the BeeGFS storage system.
Compared to Lustre, BeeGFS seemed more flexible and easier to use in our opinion. Lustre IOPs
performance outpaced BeeGFS—a result of the Lustre caching effect, we believe. BeeGFS plans to
add native Windows client software this year, which we expect will boost BeeGFS performance to
Lustre levels.
BeeGFS consists of four main components, each running as a multithreaded daemon process in
the Linux operating system:
• Management service and attached management target disk
• OSS and attached storage target disk
• MDS and attached metadata target disk
• File system client
The BeeGFS User Guide illustrates this system architecture. To set up BeeGFS on Azure, you need
a minimum of three nodes—one for the management service, and one each for storage and MDS.
It is technically possible to install all four components on one virtual machine, but practically
speaking, at least three virtual machines should be used.
All configuration files for a BeeGFS installation must point to the same management service,
which maintains a list of all file system components, including client, MDS, MDT, OSS, and storage
target. Because the management service is not involved in operations, it’s not performance-
critical. You can use an A-series virtual machine to host the management service as head node.
The test environment included:
• A total of 46 virtual machines of DS14v2 size used as clients.
• A total of 20 virtual machines of DS14v2 size used to run both storage servers and metadata
servers.
• One virtual machine running as BeeGFS management server.
• A total of six 128-GB Premium solid-state drives (SSD) with locally redundant storage (LRS)
used as metadata target servers and software RAID 0 on each metadata server.
• A total of 10 512-GB Premium SSDs with LRS used as storage target with software RAID 0 on
each storage server.
• One Premium storage account for each virtual machine hosting its associated Premium SSD
used for both metadata target and object storage target.
• OpenMPI (included in CentOS 7.2) as the MPI interface.
PVFS on Microsoft Azure: Performance tests of Lustre, GlusterFS, and BeeGFS
27
• IOR 3.01 and MDTEST 1.91 running on each client virtual machine as benchmarking tools over
openMPI.
Installation
The easiest way to deploy a test environment for BeeGFS on Azure is to use a Resource Manager
template available on GitHub. The template deploys a BeeGFS cluster of virtual machines running
the Openlogic CentOS 7.2 image from Azure Marketplace with the metadata service and storage
nodes.
1. To install BeeGFS, go to GitHub and follow the instructions at
https://github.com/smith1511/hpc/tree/master/beegfs-shared-on-centos7.2.
2. Install the testing tools. If you installed the IOR and MDTest tools as part of the Lustre file
system evaluation, you do not need to reinstall them. If not, see the Appendix.
3. Validate the configuration. On the BeeGFS management server, run the following command:
[root@storage0 azureuser]# beegfs-df
4. Make sure you have enough free disk space for the metadata target and storage data target.
Refer to the following examples.
METADATA SERVERS:
TargetID Pool Total Free % ITotal IFree %
======== ==== ===== ==== = ====== ===== =
1 normal 575.2GiB 575.0GiB 100% 383.8M 383.8M 100%
2 normal 575.2GiB 575.0GiB 100% 383.8M 383.8M 100%
3 normal 575.2GiB 575.0GiB 100% 383.8M 383.8M 100%
4 normal 575.2GiB 575.1GiB 100% 383.8M 383.8M 100%
5 normal 575.2GiB 575.0GiB 100% 383.8M 383.8M 100%
STORAGE TARGETS:
TargetID Pool Total Free % ITotal IFree %
======== ==== ===== ==== = ====== ===== =
1 normal 10226.7GiB 10226.7GiB 100% 2045.7M 2045.7M 100%
2 normal 10226.7GiB 10226.7GiB 100% 2045.7M 2045.7M 100%
3 normal 10226.7GiB 10226.7GiB 100% 2045.7M 2045.7M 100%
5. To check communication between the BeeGFS management server, object storage server, and
metadata server, list the server nodes by running the following command:
[root@storage0 azureuser]# beegfs-check-servers
For example:
Management
==========
storage0 [ID: 1]: reachable at 10.0.0.5:8008 (protocol: TCP)
Metadata
==========
storage26 [ID: 1]: reachable at 10.0.0.31:8005 (protocol: TCP)
storage15 [ID: 2]: reachable at 10.0.0.20:8005 (protocol: TCP)
PVFS on Microsoft Azure: Performance tests of Lustre, GlusterFS, and BeeGFS
28
storage16 [ID: 3]: reachable at 10.0.0.21:8005 (protocol: TCP)
storage0 [ID: 4]: reachable at 10.0.0.5:8005 (protocol: TCP)
Storage
==========
storage16 [ID: 1]: reachable at 10.0.0.21:8003 (protocol: TCP)
storage0 [ID: 2]: reachable at 10.0.0.5:8003 (protocol: TCP)
storage25 [ID: 3]: reachable at 10.0.0.30:8003 (protocol: TCP)
storage33 [ID: 4]: reachable at 10.0.0.38:8003 (protocol: TCP)
BeeGFS performance tests
To evaluate the performance of BeeGFS, we ran tests to measure maximum throughput and IOPs
just as we did with the Lustre and GlusterFS file systems. Several factors affected our BeeGFS test
results:
• Quota limits: To test scalability, we added nodes. But the quota for our Azure environment
limited our ability to fully test the massive scalability of BeeGFS.
• Virtual machine size: DS14v2 was used for both the BeeGFS client and storage nodes. We
compared our results to the published performance numbers for a virtual machine of this size
(see Table 8), and our results showed an 80-percent efficiency.
• Count of parallel processes: In our testing, it worked best to run around 32 processes in each
client. We recommend running multiple tests to determine the number of processes that
drive the best results.
• Tuning parameters: We tested various parameters to see which gave the better result and
made the most of the underlying concurrency features of the BeeGFS file system. We found it
helped to vary the number of processes to be generated from the clients along with the
number of files and size of block and transfer I/O.
Maximum throughput test results
To measure read and write throughput, we used the following IOR syntax:
mpirun -np <n_procs> -<hostfile> ~/<nodefile> /usr/bin/ior -w -r -B -C
-i4 -t32m -b4G -F -o /share/scratch/ior
Where:
<n_proc> is the number of processes, which depends on the number of clients and OSs
<nodefile> needs to be created to reflect the name of clients used to run benchmark
-w indicates write operation
-r indicates read operation
-B indicates to bypass the cache
-i is the number of iterations
-t indicates transfer size
-b indicates file size created by each process
-F indicates file per process
-o is output test file
Table 8 lists the results alongside the Azure virtual machine limits for comparison.

PVFS on Microsoft Azure: Performance tests of Lustre, GlusterFS, and BeeGFS
29
Table 8. Maximum throughput results for BeeGFS
Number
of servers
Maximum throughput (MB/s)
Virtual machine limit Write Read
1 768 760 674
2 1,536 1,521 1,257
4 3,072 2,972 2,057
6 4,608 4,471 3,460
8 6,144 5,760 4,659
10 7,680 7,151 6,860
12 9,216 8,496 7,985
14 10,752 9,641 9,011
16 12,288 11,075 10,649
18 13,824 12,542 12,050
20 15,360 13,424 12,952
Figure 13 presents the write throughput results, with the y-axis showing maximum throughput
and the x-axis showing the number of storage nodes. The blue bars show the Azure maximum
limit per virtual machine for driving throughput. (For details, see Azure Linux VM sizes in the
Azure documentation.) The orange and gray bars represent the BeeGFS performance for writes
and reads, respectively, running on the virtual machine. The scale-out performance output was
linear with an average efficiency above 80 percent compared to the raw performance of the
virtual machine.

PVFS on Microsoft Azure: Performance tests of Lustre, GlusterFS, and BeeGFS
30
Figure 13. Write throughput results for BeeGFS compared to virtual machine limits
Azure virtual machine limits are not caused by a bottleneck with the premium disk, but rather
reflect the limit of the virtual machine itself (see Table 9). Our setup had sufficient raw disk
performance:
Raid0 – 10 × P20=10 ×150 MB/s = 1,500 MB/s
For higher performance, you can choose G-series or DS15v2 virtual machines depending on your
SSD and virtual machine configuration. To find the best option, make sure the virtual machine-to-
disk throughput matches by considering both the virtual machine size and the disk performance.
Table 9. Size and performance specifications for DS14v2 virtual machines
Size
CPU
cores
Memory
(GB)
Local
SSD
(GiB)
Max
data
disks
Max disk throughput
(IOPs | MB/s) Max
NICs Cached Uncached
Standard_DS14_v2 16 112 224 32 64,000 | 512
(576)
51,200 | 768 8*
Disk type P10 P20 P30
Disk size 128 GiB 512 GiB 1,024 GiB (1 TB)
IOPS per disk 500 2,300 5,000
Throughput per disk 100 MB/second 150 MB/second 200 MB/second
* Extremely high

PVFS on Microsoft Azure: Performance tests of Lustre, GlusterFS, and BeeGFS
31
IOPs test results
To measure IOPs on Azure, we used the following syntax:
mpirun -np <n_procs> -<hostfile> ~/nodefile /usr/bin/ior -w -r -B -C -i4
-t4k -b320m -F -o /share/scratch/ior
The results are shown in Table 10.
Table 10. IOPs results for BeeGFS
Number
of servers
IOPs
Virtual machine limit Write Read
1 22,560 22,010 23,000
2 45,700 44,537 46,000
4 91,560 90,245 92,000
6 134,250 123,509 138,000
8 172,500 163,000 184,000
10 205,000 194,379 230,000
12 250,200 248,720 276,000
14 310,570 299,760 322,000
16 256,080 340,200 368,000
18 399,360 380,100 414,000
20 434,432 410,200 460,000
When the results are graphed, you can see the linear progression as servers are added (Figure 14).
The y-axis shows IOPS and the x-axis shows the number of servers. Compared to the raw virtual
machine performance values shown in gray, BeeGFS write and read IOPs performed with an
average efficiency above 80 percent on Azure.

PVFS on Microsoft Azure: Performance tests of Lustre, GlusterFS, and BeeGFS
32
Figure 14. IOPs test results for BeeGFS compared to virtual machine limits
Metadata test results
For the metadata operation testing, we used MDTest with the following syntax on the client node:
mpirun -np <n_procs> -hostfile ~/nodefile /usr/bin/mdtest -C -T -d
/share/scratch/mdtest5/ -i4 -I 2000 -z 2 -b 4 -L -u -F
Here, each client process creates a directory two levels deep and four levels wide, and each folder
contains 2,000 files with file creation and state operation tests. Figure 15 shows sample output.
Figure 15. BeeGFS metadata operation test results
BeeGFS evaluation
Our tests demonstrated the linear scale of BeeGFS performance for throughput and IOPs. To
increase performance and capacity, we simply added object storage server and metadata server
nodes or targets when needed.
The metadata servers showed balanced performance in handling work requests. In general,
serving metadata requires a powerful CPU with lots of memory for caching, so we recommend

PVFS on Microsoft Azure: Performance tests of Lustre, GlusterFS, and BeeGFS
33
Azure Premium SSD for IOPs and low latency on highly random access patterns with small read
and write operations. You can use either RAID 0 or a single Premium SSD. For instance, you can
combine P10s as RAID 0 or use a single P20. The lab testing shows that P20 may be better than
RAID 0 compared to four or fewer P10s. You don’t typically need two large-capacity SSDs for MDT
as the size is around 0.1 to 0.3 percent of total data capacity.
The IOPs results showed 80-percent efficiency on average against the performance baseline of
the system. Latency on average was less than a 10-ms response time—acceptable for many types
of applications. From a storage I/O perspective, even higher IOPs can be achieved through a large
disk queue, but then latency could increase. To decrease the latency, do not increase the disk
queue beyond its limit.
For a future testing pass, we’d like to showcase the scale of metadata beyond the 16-node scale
we tested. For example, BeeGFS multi-mode could be used to run multiple instances of the
BeeGFS service on the same machine with different targets.
We also looked at high availability, because the virtual machines are not redundant, and the
storage node or metadata node could possibly malfunction. BeeGFS 6.0 provides HA features for
the OSS and OST nodes and the MDS and MDT nodes at the file system level. The Azure
infrastructure supports HA through availability sets and virtual machine scale sets for virtual
machines, Managed Disks for storage, locally redundant storage, and geo-redundant storage.
Among the HA findings:
• Connectivity among different components can be supported at the same time over
InfiniBand, Ethernet, or any other TCP-enabled network and can automatically switch to a
redundant connection path in case any of them fails.
• If the management service fails, the system can continue to operate—you just can’t add new
clients or servers until it is restored.

PVFS on Microsoft Azure: Performance tests of Lustre, GlusterFS, and BeeGFS
34
Monitoring To validate the assumptions made when designing a PVFS, monitoring is essential. Our informal
performance testing included only a basic level of monitoring, but we recommend monitoring
both the cluster and the nodes to see if the system needs to be tuned or sized to suit the
demand. For example, to monitor I/O performance, you can use the tools included with the
operating system, such as iostat, shown in Figure 16.
Figure 16. Monitoring I/O performance using the iostat command
Install and run Ganglia
For cluster-level management, Ganglia offers scalable, distributed monitoring for HPC systems,
such as clusters and grids. Ganglia is based on a hierarchical design targeted at federations of
clusters. It makes use of widely used technologies, such as XML for data representation, XDR for
compact, portable data transport, and RRDtool for data storage and visualization. Figure 17 shows
an aggregated view from Ganglia, displaying compute clients and other components.

PVFS on Microsoft Azure: Performance tests of Lustre, GlusterFS, and BeeGFS
35
Figure 17. Ganglia aggregated view
Ganglia includes three main components:
• gmond is a daemon that must be deployed on each node you want to monitor. It gathers
monitoring statistics and sends and receives the statistics within the same multicast or unicast
channel.
When acting as sender (mute=no), gmond collects basic metrics, such as system load
(load_one) and CPU utilization. It can also send user-defined metrics through the addition of
C/Python modules.
When acting as receiver (deaf=no), gmond aggregates all metrics sent to it from other hosts,
and it keeps an in-memory cache of all metrics.
• gmetad is a daemon that polls gmonds periodically and stores the metrics in a storage
engine, such as RRD. It can poll multiple clusters and aggregate the metrics. The web
interface generates its display from gmetad statistics.
• ganglia-web is the front-end display. It must be deployed on the same node as gmetad as it
needs access to the RRD files.
To install Ganglia for monitoring the status of the grids or cluster:
1. Go to GitHub and install Ganglia (see HPC-Filesystems/Lustre/scripts/).
2. Download the script to the nodes where you want to set up Ganglia, and pass the following
parameter to the script:
<master/gmetad node> <clustername> <clusterport>
For example, Server00oss0 master 8649.
3. Add an inbound rule for port 80.

PVFS on Microsoft Azure: Performance tests of Lustre, GlusterFS, and BeeGFS
36
4. In a browser, open Ganglia at http://<IP of monitored node>/Ganglia.
5. To monitor the cluster, log on to Ganglia. The following screen appears.
6. In the Choose a Source box, notice that the cluster appears.

PVFS on Microsoft Azure: Performance tests of Lustre, GlusterFS, and BeeGFS
37
7. Select a cluster, then in the Choose a Node box, select the node you want to view.
8. After you select a node, its status is displayed as a function of time. Note that Ganglia can
generate XML and CSV files from the status information.
Use BeeGFS monitoring tools
BeeGFS includes lightweight monitoring that provides client statistics from the perspective of the
metadata operations as well as throughput and storage nodes statistics. As Figure 18 and Figure
19 show, you can monitor individual nodes, see an aggregated view, and get real-time feedback
in one-second intervals.

PVFS on Microsoft Azure: Performance tests of Lustre, GlusterFS, and BeeGFS
38
Figure 18. BeeGFS monitoring views
Figure 19. Monitoring work requests in BeeGFS

PVFS on Microsoft Azure: Performance tests of Lustre, GlusterFS, and BeeGFS
39
Conclusion The goal of our performance testing was to see how scalable Lustre, GlusterFS, and BeeGFS are
based on a default configuration. Use our results as a baseline and guide for sizing the servers
and storage configuration you need to meet your I/O performance requirements. Performance
tuning is critical.
Our test results were not always uniform—we spent more time performance-tuning BeeGFS than
Lustre or GlusterFS. When we tested our deployments, we got good throughput for both Lustre
and GlusterFS, and performance scaled as expected as we added storage nodes.
Our performance results were based on a raw configuration of the file systems obtained in a lab
with an emphasis on scalability. Many variables affect performance, from platform issues to
network drivers. Network performance, for instance, obviously affects a networked file system.
We hope to do more comprehensive testing in the future to investigate these results. In the
meantime, we can’t emphasize repeatability enough in any deployment. Use Azure Resource
Manager templates, run scripts, and do what you can to automate the execution of your test
environment on Azure. Repeatability is the cornerstone of solid benchmarking.
Learn more For more information, see the following resources:
• Implementing GlusterFS on Azure
• Azure Resource Manager template for deploying Lustre on GitHub

PVFS on Microsoft Azure: Performance tests of Lustre, GlusterFS, and BeeGFS
40
Appendix
Testing tools
To test the performance of our PVFS clusters, several popular testing tools can be installed on the
client nodes, such as IoZone and FIO. For our Lustre, GlusterFS, and BeeGFS setups, we installed
IOR and MDTest. IOR is used to test the performance of the file system as throughput and IOPs.
MDTest is useful for testing the metadata operations of the file system.
NOTE: These installation instructions show how to install the test tools on a Lustre client.
Once installed, the tools can be used for testing GlusterFS and BeeGFS.
To install the IOR and MDTest testing tools:
1. On the client node, compile MPICH using the following commands:
yum -y install gcc gcc-gfortran gcc-c++
mkdir /lustre/software
cd /lustre/software/
wget http://www.mpich.org/static/downloads/3.1.4/mpich-3.1.4.tar.gz
tar xzf mpich-3.1.4.tar.gz
cd mpich-3.1.4
./configure --prefix=/lustre/software/mpich3/
make
make install
2. To update the environment variables, run:
export PATH=/lustre/software/mpich3/bin:$PATH
export LD_LIBRARY_PATH=/lustre/software/mpich3/lib:${LD_LIBRARY_PATH}
3. To compile IOR, run:
cd /lustre/software/
yum -y install git automake
git clone https://github.com/chaos/ior.git
mv ior ior_src
cd ior_src/
./bootstrap
./configure --prefix=/lustre/software/ior/
make
make install
4. To install and compile MDTest on the client node, run the following commands:
cd /lustre/software/
git clone https://github.com/MDTEST-LANL/mdtest.git
cd mdtest
export MPI_CC=mpicc
make

PVFS on Microsoft Azure: Performance tests of Lustre, GlusterFS, and BeeGFS
41
Lustre vs. GlusterFS
Figure 20 compares Lustre and GlusterFS IOPs results side by side.
Figure 20. Lustre vs. GlusterFS. The write performance scales linearly as storage size (in TB) increases.
BeeGFS performance tools and tuning
To test raw storage and network performance, you can also use the StorageBench and NetBench
tools that come with BeeGFS.
In our benchmarks using IOR and MDTest, we used the following performance tuning parameters:
Table 11. OSS service tuning
IO scheduler options
(/sys/block//queue/) Value
Scheduler deadline
nr_requests 4096
read_ahead_kb 32768
OSS configuration tuning
(/etc/beegfs/beegfs-storage.conf) Value
connMaxInternodeNum 32
tuneFileReadAheadSize 32m
tuneFileReadAheadTriggerSize 2m
tuneFileReadSize 256K
tuneFileWriteSize 256K
91962.88
189424.64
347896.32
494016
698813.44
756669.44
59665.92
107578.88138765.98
203776 218193.9 225298.2
0
100000
200000
300000
400000
500000
600000
700000
800000
2 2 4 4 8 8 12 12 16 16 20 20
Lustre Write IOPS Gluster Write IOPS
PVFS on Microsoft Azure: Performance tests of Lustre, GlusterFS, and BeeGFS
42
tuneNumWorkers 64
tuneWorkerBufSize 16m
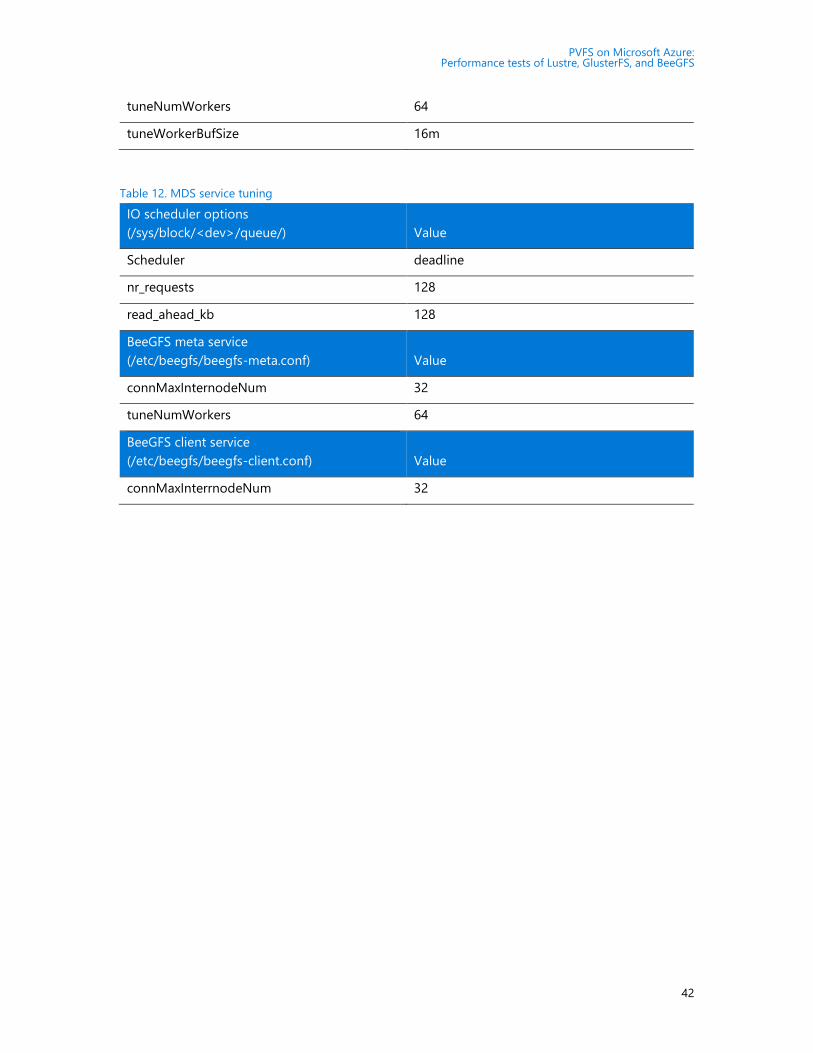
Table 12. MDS service tuning
IO scheduler options
(/sys/block/<dev>/queue/) Value
Scheduler deadline
nr_requests 128
read_ahead_kb 128
BeeGFS meta service
(/etc/beegfs/beegfs-meta.conf) Value
connMaxInternodeNum 32
tuneNumWorkers 64
BeeGFS client service
(/etc/beegfs/beegfs-client.conf) Value
connMaxInterrnodeNum 32