PAR-21MAA MA Remote Controller Instruction BookWT04474… · and Mitsubishi Mr. SLIM Air...
146
English Deutsch Français Nederlands Español Italiano WT04474X01 CITY MULTI Control System and Mitsubishi Mr. SLIM Air Conditioners MA Remote Controller PAR-21MAA Instruction Book ON/OFF TEMP. Please read these instructions carefully and take care to use this equipment correctly. Store these instructions safely for future reference. Be sure to pass these instructions and the corresponding installation instructions to anyone subsequently appointed to maintain this equipment. Installation and relocation of this equipment should be carried out by qualified persons only. Attempts by end users to install or move this equipment may lead to unsafe conditions or improper operation. Contents 1. Safety Precautions ........................................................................ 2 2. Parts Names .................................................................................. 4 3. Screen Configuration ..................................................................... 6 4. Setting the Day of the Week and Time .......................................... 6 5. Using the Remote Controller ......................................................... 7 (1) How to Start, Stop, Change the Mode, and Adjust the Temperature .. 7 (2) Fan Speed, Airflow Direction, and Ventilation ................................ 9 (3) Using the Timer ............................................................................ 11 1 Using the Weekly Timer .......................................................... 11 2 Using the Simple Timer .......................................................... 13 3 Using the Auto Off Timer ........................................................ 15 (4) Locking the Remote Controller Buttons (Operation function limit controller) .............................................. 17 (5) Other Indications .......................................................................... 18 6. Function Selection ....................................................................... 20 7. Specifications .............................................................................. 24
Transcript of PAR-21MAA MA Remote Controller Instruction BookWT04474… · and Mitsubishi Mr. SLIM Air...

English
Deutsch
Français
Nederlands
Español
Italiano
WT04474X01
CITY MULTI Control Systemand Mitsubishi Mr. SLIM Air Conditioners
MA Remote ControllerPAR-21MAAInstruction Book
ON/OFF TEMP.
Please read these instructions carefully and take care to use this equipmentcorrectly. Store these instructions safely for future reference.Be sure to pass these instructions and the corresponding installation instructionsto anyone subsequently appointed to maintain this equipment. Installation andrelocation of this equipment should be carried out by qualified persons only.Attempts by end users to install or move this equipment may lead to unsafeconditions or improper operation.
Contents1. Safety Precautions ........................................................................ 2
2. Parts Names .................................................................................. 4
3. Screen Configuration ..................................................................... 6
4. Setting the Day of the Week and Time .......................................... 6
5. Using the Remote Controller ......................................................... 7(1) How to Start, Stop, Change the Mode, and Adjust the Temperature .. 7(2) Fan Speed, Airflow Direction, and Ventilation ................................ 9(3) Using the Timer ............................................................................ 11
1 Using the Weekly Timer .......................................................... 112 Using the Simple Timer .......................................................... 133 Using the Auto Off Timer ........................................................ 15
(4) Locking the Remote Controller Buttons(Operation function limit controller) .............................................. 17
(5) Other Indications .......................................................................... 18
6. Function Selection ....................................................................... 20
7. Specifications .............................................................................. 24

– 2 –
1 Safety Precautions� Precautions are classified as follows, according to the level of potential danger.
Denotes a condition or operation which, if handled incorrectly, may lead to serious injury or death.
Denotes a condition or operation which, if handled incorrectly, may lead to bodily injury or property damage.
WARNING
CAUTION
WARNING
Do not attempt to install this equipment yourself.Please have your dealer or a qualified engineer install this equipment.Improper installation may result in fire, electric shock, or other severeaccident.
Be sure that the equipment has been fastened securely.Be sure that equipment is securely fastened to a sturdy support so thatthere is no risk that it will fall.
Be sure that you are supplying the rated voltage.Supply of an incorrect voltage may lead to fire or equipment failure.
Turn off this equipment immediately if operation becomes abnormal.Continued use may lead to equipment failure, electric shock, or fire.If you notice a burning smell or other abnormality, turn off the power switchimmediately and consult your dealer.
Do not attempt to relocate this equipment yourself.Improper reinstallation may result in fire, electric shock, or other severeaccident.Please have your dealer or a qualified engineer carry out relocation.
Do not dispose of this equipment yourself.Please consult the dealer when it comes time to discard this equipment.
Do not attempt to modify or repair this equipment yourself.Attempted modification or repair may lead to fire, electric shock, or othersevere accident. Please consult with your dealer if repair is required.
Stop using this equipment if it fails to operate correctly (if error messagesrecur and the unit does not run as expected).Continued use or attempted use of this equipment may lead to fire orequipment failure. Consult your dealer for advice.

– 3 –
Keep hazardous materials away from this equipment.Do not install this equipment in locations where there is risk of combustiblegas leakage. The presence of combustible gas may result in explosion orfire.
Do not wash this equipment with water.Washing with water may result in electric shock or equipment failure.
Do not touch buttons when hands are wet.Doing so may result in electric shock or equipment failure.
Do not use this equipment for purposes for which it was not intended.This equipment is for use with Mitsubishi Building Air Control systems.Please do not use it with any other systems, or for any other purpose, assuch usage may result in improper operation.
Do not spray insect repellant or combustible substances on theequipment.Keep combustible sprays and substances away from this equipment, andnever spray them directly onto this equipment. Contact with or proximity tosuch substances poses risk of explosion or fire.
Do not use this equipment in improper environments.Do not use in areas where there may be large quantities of oil (machine oil,etc.), exhaust gas, or sulfide gas. Such environments may degrade theperformance or cause equipment failure.
CAUTION
Do not use sharp-tipped objects to press the buttons.Use of sharp tips may lead to electric shock or equipment failure.
Do not use under extreme temperatures.Use only when ambient temperature is within the limits indicated in theinstructions. (If the instructions do not indicate limits, use only at tempera-tures between 0 °C and 40 °C.) Use of this equipment at temperaturesoutside of this range may result in major equipment failure.
Do not pull or twist the communication cables.Pulling or twisting a cable may result in fire or equipment failure.
Do not disassemble.Attempted disassembly may result in injury from contact with internal parts,or may lead to fire or equipment failure.
Do not wipe this equipment with benzene, paint thinner, or chemicalcleaning cloths.These substances may cause discoloration or equipment failure. If theequipment becomes noticeably dirty, clean it with a wrung-out cloth thathas been moistened with water-diluted neutral solvent, and then wipe itwith a dry cloth.

– 4 –
2 Parts Names
Display Section
For purposes of this explanation,all parts of the display are shownas lit. During actual operation, onlythe relevant items will be lit.
˚F˚C
˚F˚C
ERROR CODEAFTER
TIMERTIME SUN MON TUE WED THU FRI SAT
ON
OFF
Hr
AFTER
FILTERFUNCTION
ONLY1Hr.
WEEKLYSIMPLE
AUTO OFF
Identifies the current operationShows the operating mode, etc.* Multilanguage display is sup-
ported.
“Centrally Controlled” indicatorIndicates that operation of the re-mote controller has been prohib-ited by a master controller.
“Timer Is Off” indicatorIndicates that the timer is off.
Temperature SettingShows the target temperature.
Day-of-WeekShows the current day of the week.
Time/Timer DisplayShows the current time, unless the simple or Auto Offtimer is set.If the simple or Auto Off timer is set, shows the timeremaining.
“Sensor” indicationDisplayed when the remote controllersensor is used.
“Locked” indicatorIndicates that remote controller but-tons have been locked.
“Clean The Filter” indicatorComes on when it is time to clean thefilter.
Timer indicatorsThe indicator comes on if the corre-sponding timer is set.
Up/Down Air Direction indica-torThe indicator shows the direc-tion of the outcoming airflow.
“One Hour Only” indicatorDisplayed if the airflow is set toweak and downward during COOLor DRY mode. (Operation variesaccording to model.)The indicator goes off after onehour, at which time the airflow di-rection also changes.
Room Temperature displayShows the room temperature.
Louver displayIndicates the action of the swinglouver. Does not appear if thelouver is stationary.
(Power On indicator)Indicates that the power is on.
Fan Speed indicatorShows the selected fan speed.
Ventilation indicatorAppears when the unit is running inVentilation mode.

– 5 –
Operation Section
PAR-21MAA
ON/OFF
FILTER
CHECK
OPERATION CLEAR
TEST
TEMP.
MENU
BACK DAYMONITOR/SET
CLOCK
ON/OFF
Set Temperature buttons
Down
Up
Timer Menu button(Monitor/Set button)
Mode button (Return button)
Set Time buttons
Back
Ahead
Timer On/Off button(Set Day button)
Opening thedoor.
ON/OFF button
Fan Speed button
Filter button(<Enter> button)
Test Run button
Check button (Clear button)
Airflow Up/Down button
Louver button( Operation button)
To preceding operationnumber.
Ventilation button( Operation button)
To next operation number.
Note:� If you press a button for a feature that is not installed at the indoor unit, the remote controller will display the “Not Available”
message.If you are using the remote controller to drive multiple indoor units, this message will appear only if the feature is not presentat the parent unit.

– 6 –
3 Screen Configuration<Screen Types>
� Function Selection of remote controller:Set the functions and ranges available to the remotecontroller (timer functions, operating restrictions, etc.)
� Set Day/Time: Set the current day of the week or time.� Standard Control Screens: View and set the air conditioning system’s operating status� Timer Monitor: View the currently set timer (weekly timer, simple timer,
or Auto Off timer)� Timer Setup: Set the operation of any of the timers (weekly timer,
simple timer, or Auto Off timer).
˚F˚C
TIMERMON
OFF
WEEKLY
SUN MON TUE WED THU FRI SAT
WEEKLY
˚F˚C
˚C
TIME SUN
Function Selection of remote controller Set Day/Time
Standard Control Screens
OFF ON
Timer Monitor Timer Setup
A D C
B C
B
<How to change the screen>A : Hold down both the Mode button and the Timer On/Off button for 2 seconds.B : Press the Timer Menu button.C : Press the Mode (Return) button.D : Press either of the Set Time buttons ( or ).
4 Setting the Day of the Week and Time� Use this screen to change the current day of the week and time setting.
Note:The day and time will not appear if clock use has been disabled at Function Selectionof remote controller.
Day of the Week &Time display
˚C
˚C
TIME SUN
PAR-21MAA
ON/OFF
FILTER
CHECK
OPERATION CLEAR
TEST
TEMP.
MENU
BACK DAYMONITOR/SET
CLOCK
ON/OFF
2 4
9
1
A
<How to Set the Day of the Week and Time...>
Time SettingTIME SUN2
3
4
1. Press the or Set Time button A to show display 2.2. Press the Timer On/Off (Set Day) button 9 to set the day.
* Each press advances the day shown at 3 : Sun → Mon → ... → Fri → Sat.3. Press the appropriate Set Time button A as necessary to set the time.
* As you hold the button down, the time (at 4) will increment first in minute intervals,then in ten-minute intervals, and then in one-hour intervals.
4. After making the appropriate settings at Steps 2 and 3, press the Filter button 4to lock in the values.
Day of the Week Setting

– 7 –
Note:Your new entries at Steps 2 and 3 will be cancelled if you press the Mode (Return) button2 before pressing the Filter button 4.
5. Press the Mode (Return) button 2 to complete the setting procedure. This will returnthe display to the standard control screen, where 1 will now show the newly set dayand time.
5 Using the Remote Controller(1) How to Start, Stop, Change the Mode, and Adjust the Temperature
˚C
˚C
PAR-21MAA
ON/OFF
FILTER
CHECK
OPERATION CLEAR
TEST
TEMP.
MENU
BACK DAYMONITOR/SET
CLOCK
ON/OFF
2
7
2
33
8
6
4
58
7
1156
<To Start Operation>
� Press the ON/OFF button 1.• The ON lamp 1 and the display area
come on.
Note:� When the unit is restarted, initial settings
are as follows.
<To Stop Operation>
� Press the ON/OFF button 1 again.• The ON lamp 1 and the display
area go dark.
Mode
Temperaturesetting
Fan speed
Airflow up/down
Remote Controller settings
Last operation mode
Last set temperature
Last set fan speed
COOL or DRY
Mode HEAT
FAN
Horiz.outletLast
settingHoriz.outlet

– 8 –
<Selecting the Mode>
� With the unit running, press the Mode button 2 as many times as necessary.• Each press switches operation to the next mode, in the sequence shown below.
The currently selected mode is shown at 2.
→ COOL → DRY → FAN → AUTO → HEAT → Ventilate*1 *1,*3,*4 *1 *1,*2
Note:*1 Availability of this mode depends on the type of unit connected.*2 Appears only on Mr. Slim units with installed ventilation functionality.*3 Does not appear if Auto Mode has been disabled at the Function Selection of remote
controller. For information about how to set this function, refer to section 6, item [4]–2 (2).
*4 HEAT and COOL do not appear during AUTO mode if Auto mode display has beendisabled at the Function Selection of remote controller. For information about how toset this function, refer to section 6, item [4]–4 (3).
<To Change the Room Temperature Setting...>
� To lower the temperature: Press the Set Temperature button 3.� To raise the temperature: Press the Set Temperature button 3.
• Each press changes the setting by 1 °C. The current setting is displayed at 3.• The available ranges are as follows. *1, *2
COOL or DRYmode
FANAUTO modeHEAT mode
19 - 30 °C(67 - 87 °F) *3
19 - 28 °C(67 - 83 °F) *3
17 - 28 °C(63 - 83 °F) *3
Cannot be set.
Note:*1 Available ranges vary according to the type of unit connected (Mr. Slim, CITY MULTI,
etc.).*2 If temperature range limits have been set at Function Selection of remote controller,
the available ranges will be narrower than shown above. If you attempt to set a valueoutside of the restricted range, the display will show a message indicating that therange is currently restricted.For information about how to set and clear these range limits, refer to section 6, item[4]–2 (3).
*3 If Function Selection of remote controller are set to display the temperature inFahrenheit. For information about how to select °C or °F , refer to section 6, item [4]–4 (1).
<Room Temperature Display>
During operation, the intake temperature is shown at 4.
Note:� To display range is 8 °C to 39 °C. If the temperature is below 8 °C or above 39 °C,
the corresponding value (8 °C or 39 °C) will blink on the display.� If you are using the remote controller to drive multiple indoor units, the display will
show the temperature at the master unit.� You can select which temperature sensor to use to detect the temperature: either the
sensor at the indoor unit (“At Unit”), or else the sensor at the remote controller (“AtRemote”). The default setting is “At Unit”.To change the location of the sensor at the indoor unit:
• CITY MULTI models: Consult your dealer.• Mr. Slim models: Refer to the installation instructions.
� If room temperature display is disabled in Function Selection of remote controller, theroom temperature will not appear. For information about how to enable or disable thisfeature, refer to section 6, item [4]–4 (2).
� If Fahrenheit display is selected at Function Selection of remote controller, the displaywill show the °F mark. For information about how to select °C or °F, refer to section6, item [4]–4 (1).

– 9 –
(2) Fan Speed, Airflow Direction, and Ventilation<To Change the Fan Speed...>
� Press the Fan Speed button 5 as many times as necessary while the system isrunning.• Each press changes the force. The currently selected speed is shown at 5.• The change sequence, and the available settings, are as follows.
FANSPEED
Display
4-speedmodel
2-speedmodel
3-speedmodel
Auto Speed 1 Speed 2 Speed 3 Speed 4
Note:� The number of available fan speeds depends on the type of unit connected. Note also
that some units do not provide an “Auto” setting.� In the following cases, the actual fan speed generated by the unit will differ from the
speed shown the remote controller display.1. While the display is showing “STAND BY” or “DEFROST”.2. Immediately after starting HEAT mode (while the system is waiting for the mode
change to take effect).3. In HEAT mode, when room temperature is higher than the temperature setting.4. When the unit is in DRY mode.
<To Change the Airflow’s Up/Down Direction>� With the unit running, press the Airflow Up/Down button 6 as necessary.
• Each press changes the direction. The current direction is shown at 6.• The change sequence, and the available settings, are as follows.
Auto Horiz. 1 2 3 4 Swing
Display
* Note that during swing operation, the directional indication on the screen does notchange in sync with the directional vanes on the unit.
* Some models do not support directional settings.
Note:� Available directions depend on the type of unit connected. Note also that some units
do not provide an “Auto” setting.� In the following cases, the actual air direction will differ from the direction indicated
on the remote controller display.1. While the display is showing “STAND BY” or “DEFROST”.2. Immediately after starting heater mode (while the system is waiting for the mode
change to take effect).3. In heat mode, when room temperature is higher than the temperature setting.
<To Change the Right/Left Air Direction>
� Press the louver button 7 as necessary.• The louver image 7 appears.
Each press of the button switches the setting as follows.
(ON) (OFF)
During swing operation, the arrow displaymove to the left and right.
No display(Stop)

– 10 –
�
<Using Ventilation>
On Mr. Slim models
� To run the ventilator together with the indoor unit:� Press the ON/OFF button 1.
• The Vent indication appears on the screen (at 8). The ventilator will nowautomatically operate whenever the indoor unit is running.
� To run the ventilator independently:
� Press the Mode button 2 until appears on the display. This will cause the
ventilator to start.
� To change the ventilator force:� Press the Ventilation button 8 as necessary.
• Each press toggles the setting, as shown below.�
Low High
On CITY MULTI models
� To run the ventilator together with the indoor unit:� Press the ON/OFF button 1.
• The Vent indication appears on the screen (at 8). The ventilator will nowautomatically operate whenever the indoor unit is running.
� To run the ventilator only when the indoor unit is off:� Press the Ventilation button 8 while the indoor unit is off.
• The On lamp (at 1) and the Vent indication (at 8) come on.
� To change the ventilator force:� Press the Ventilation button 8 as necessary.
• Each press toggles the setting, as shown below.
(Low) (High)
� �� No display(Stop)
(OFF)
Note:� With some model configurations, the fan on the indoor unit may come on even when
you set the ventilator to run independently.

– 11 –
(3) Using the TimerThis section explains how to set and use the timer. You can use Function Selection of remote controller to select which of three types of timer to use: 1 Weekly timer, 2 Simpletimer, or 3 Auto Off timer.For information about how to set the Function Selection of remote controller, refer to section 6, item [4]–3 (3).
1 Using the Weekly Timer� The weekly timer can be used to set up to eight operations for each day of the week.
• Each operation may consist of any of the following: ON/OFF time together with a temperature setting, or ON/OFF time only, or temperature setting only.• When the current time reaches a time set at this timer, the air conditioner carries out the action set by the timer.
� Time setting resolution for this timer is 1 minute.
Note:*1. Weekly Timer/Simple Timer/Auto Off Timer cannot be used at the same time.*2. The weekly timer will not operate when any of the following conditions is in effect.
The timer feature is off; the system is in an malfunction state; a test run is in progress; the remote controller is undergoing self-check or remote controller check; the user isin the process of setting a function; the user is in the process of setting the timer; the user is in the process of setting the current day of the week or time; the system is undercentral control. (Specifically, the system will not carry out operations (unit on, unit off, or temperature setting) that are prohibited during these conditions.)
˚C
SUNON
WEEKLY
PAR-21MAA
ON/OFF
FILTER
CHECK
OPERATION CLEAR
TEST
TEMP.
MENU
BACK DAYMONITOR/SET
CLOCK
ON/OFF
2
4 2 3
A 9 78
0
4
13
B
1
Operation No.
Day Setting
<How to Set the Weekly Timer>1. Be sure that you are at a standard control screen, and that the weekly timer indicator 1 is
shown in the display.2. Press the Timer Menu button B, so that the “Set Up” appears on the screen (at 2). (Note that
each press of the button toggles the display between “Set Up” and “Monitor”.)3. Press the Timer On/Off (Set Day) button 9 to set the day. Each press advances the display
at 3 to the next setting, in the following sequence: “Sun Mon Tues Wed Thurs Fri Sat” → “Sun”→ ... → “Fri” → “Sat” → “Sun Mon Tues Wed Thurs Fri Sat”...
4. Press the or Operation button (7 or 8) as necessary to select the appropriateoperation number (1 to 8) 4.* Your inputs at Steps 3 and 4 will select one of the cells from the matrix illustrated below.
(The remote-controller display at left shows how the display would appear when settingOperation 1 for Sunday to the values indicated below.)
Op No. Sunday Monday … Saturday
Note:By setting the day to “Sun Mon Tues Wed Thurs Fri Sat”, you can set the same operation tobe carried out at the same time every day.(Example: Operation 2 above, which is the same for all days of the week.)
No. 1
No. 2
…
No. 8
• 8:30• ON• 23 °C
• 10:00• OFF
• 10:00• OFF
• 10:00• OFF
• 10:00• OFF
�
Setup Matrix
<Operation 1 settings for Sun-day>Start the air conditioner at 8:30,with the temperature set to23 °C.
<Operation 2 settings for everyday>Turn off the air conditioner at10:00.
�

– 12 –
<Setting the Weekly Timer>
5. Press the appropriate Set Time button A as necessary to set the desired time (at 5).* As you hold the button down, the time first increments in minute intervals, then in ten-
minute intervals, and then in one-hour intervals.6. Press the ON/OFF button 1 to select the desired operation (ON or OFF), at 6.
* Each press changes the next setting, in the following sequence: No display (no setting) →“ON” → “OFF”
7. Press the appropriate Set Temperature button 3 to set the desired temperature (at 7).* Each press changes the setting, in the following sequence: No display (no setting)
⇔ 24 ⇔ 25 ⇔ ... ⇔ 29 ⇔ 30 ⇔ 12 ⇔ ... ⇔ 23 ⇔ No display.(Available range: The range for the setting is 12 °C to 30 °C. The actual range over whichthe temperature can be controlled, however, will vary according to the type of theconnected unit.)
8. After making the appropriate settings at Steps 5, 6. and 7, press the Filter button 4 to lockin the values.To clear the currently set values for the selected operation, press and quickly release theCheck (Clear) button 1 once.* The displayed time setting will change to “—:—”, and the On/Off and temperature settings
will all disappear.(To clear all weekly timer settings at once, hold down the Check (Clear) button 0 for twoseconds or more. The display will begin flashing, indicating that all settings have beencleared.)
Note:Your new entries will be cancelled if you press the Mode (Return) button 2 before pressing theFilter button 4.If you have set two or more different operations for exactly the same time, only the operation withthe highest Operation No. will be carried out.9. Repeat Steps 3 to 8 as necessary to fill as many of the available cells as you wish.10. Press the mode (Return) button 2 to return to the standard control screen and complete the
setting procedure.11. To activate the timer, press the Timer On/Off button 9, so that the “Timer Off” indication
disappears from the screen. Be sure that the “Timer Off” indication is no longerdisplayed.* If there are no timer settings, the “Timer Off” indication will flash on the screen.
Shows the temperature setting* Does not appear if temperature is not set.
˚C
SUNON
WEEKLY
6
7
5Shows the time setting Shows the selected operation (ON or OFF)* Does not appear if operation is not set.
<How to View the Weekly Timer Settings>
Timer Settings
1. Be sure that the weekly timer indicator is visible on the screen (at 1).2. Press the Timer Menu button B so that “Monitor” is indicated on the screen
(at 8).3. Press the Timer On/Off (Set Day) button 9 as necessary to select the day
you wish to view.4. Press the or Operation button (7 or 8) as necessary to change the
timer operation shown on the display (at 9).* Each press will advance to the next timer operation, in order of time
setting.5. To close the monitor and return to the standard control screen, press the
Mode (Return) button 2.
˚C
TIMERSUN
ON
OFF
WEEKLY 1
98
<To Turn Off the Weekly Timer>
Press the Timer On/Off button 9 so that “Timer Off” appears at 0.
˚C
˚C
TIME SUN
WEEKLY
0
˚C
˚C
TIME SUN
WEEKLY
0
<To Turn On the Weekly Timer>Press the Timer On/Off button 9 so that the “Timer Off” indication (at 0) goesdark.

– 13 –
2 Using the Simple Timer� You can set the simple timer in any of three ways.
• Start time only: The air conditioner starts when the set time has elapsed.• Stop time only: The air conditioner stops when the set time has elapsed.• Start & stop times:The air conditioner starts and stops at the respective elapsed
times.� The simple timer (start and stop) can be set only once within a 72-hour period.
The time setting is made in hour increments.
Note:*1. Weekly Timer/Simple Timer/Auto Off Timer cannot be used at the same time.*2. The simple timer will not operate when any of the following conditions is in effect.
The timer is off; the system is in malfunction state; a test run is in progress; theremote controller is undergoing self-check or remote controller check; the user is inthe process of selecting a function; the user is in the process of setting the timer; thesystem is under central control. (Under these conditions, On/Off operation isprohibited.)
ONHr
AFTER
SIMPLE
PAR-21MAA
ON/OFF
FILTER
CHECK
OPERATION CLEAR
TEST
TEMP.
MENU
BACK DAYMONITOR/SET
CLOCK
ON/OFF
2 A 9
0
4
1
B
<How to Set the Simple Timer>
ONHr
AFTER
SIMPLE
4
1
3
2
1. Be sure that you are at a standard control screen, and that the simple timer indicatoris visible in the display (at 1).When something other than the Simple Timer is displayed, set it to SIMPLE TIMERusing the function selection of remote controller (see 6.[4]–3 (3)) timer function setting.
2. Press the Timer Menu button B, so that the “Set Up” appears on the screen (at 2).(Note that each press of the button toggles the display between “Set Up” and“Monitor”.)
3. Press the ON/OFF button 1 to display the current ON or OFF simple timer setting.Press the button once to display the time remaining to ON, and then again to displaythe time remaining to OFF. (The ON/OFF indication appears at 3).• “ON” timer: The air conditioner will start operation when the specified number of
hours has elapsed.• “OFF” timer:The air conditioner will stop operation when the specified number of
hours has elapsed.4. With “ON” or “OFF” showing at 3: Press the appropriate Set Time button A as
necessary to set the hours to ON (if “ON” is displayed) or the hours to OFF (if “OFF”is displayed) at 4.• Available Range: 1 to 72 hours
5. To set both the ON and OFF times, repeat Steps 3 and 4.* Note that ON and OFF times cannot be set to the same value.
6. To clear the current ON or OFF setting: Display the ON or OFF setting (see step 3)and then press the Check (Clear) button 0 so that the time setting clears to “—” at4. (If you want to use only an ON setting or only an OFF setting, be sure that thesetting you do not wish to use is shown as “—”.)
7. After completing steps 3 to 6 above, press the Filter button 4 to lock in the value.
Note:Your new settings will be cancelled if you press the Mode (Return) button 2 beforepressing the Filter button 4.
8. Press the Mode (Return) button 2 to return to the standard control screen.9. Press the Timer On/Off button 9 to start the timer countdown. When the timer is
running, the timer value is visible on the display. Be sure that the timer value isvisible and appropriate.
Timer Setting
Action (On or Off)* “— —” is displayed if there is no
setting.

– 14 –
<Viewing the Current Simple Timer Settings>
1. Be sure that the simple timer indicator is visible on the screen (at 1).2. Press the Timer Menu button B, so that the “Monitor” appears on the screen
(at 5).• If the ON or OFF simple timer is running, the current timer value will
appear at 6.• If ON and OFF values have both been set, the two values appear
alternately.3. Press the Mode (Return) button 2 to close the monitor display and return
to the standard control screen.
TIMER ON
OFF
Hr
AFTER
SIMPLE 1
65 Timer Setting
<To Turn Off the Simple Timer...>Press the Timer On/Off button 9 so that the timer setting no longer appearson the screen (at 7).
<To Turn On the Simple Timer...>
Press the Timer On/Off button 9 so that the timer setting becomes visible at7.
˚C
˚CSIMPLE
7
˚C
˚C
ONHr
AFTER
SIMPLE
7
ExamplesIf ON and OFF times have both been set at the simple timer, operation and display are asindicated below.
Example 1:Start the timer, with ON time set sooner than OFF timeON Setting: 3 hoursOFF Setting: 7 hours
ONHr
AFTER
SIMPLE
˚C
˚C
OFF
Hr
AFTER
SIMPLE
SIMPLE
˚C
˚C
OFF
Hr
AFTER
SIMPLE
ONHr
AFTER
SIMPLE
˚C
˚CSIMPLE
Example 2:Start the timer, with OFF time is sooner than ON timeON Setting: 5 hoursOFF Setting: 2 hours
�
�
�
�
At 3 hoursafter timer
start
At Timer Start
At 7 hours aftertimer start
Display shows the timer’s ON set-ting (hours remaining to ON).
Display changes to show the tim-er’s OFF setting (hours remainingto OFF).The time displayed is OFF setting(7 hours) – ON setting (3 hours) =4 hours.
The air conditioner goes off, andwill remain off until someone re-starts it.
At 2 hoursafter timer
start
At Timer Start
At 5 hours aftertimer start
Display shows the timer’s OFFsetting (hours remaining to OFF).
Display changes to show the tim-er’s ON setting (hours remainingto ON).The time displayed is ON setting(5 hours) – OFF setting (2 hours) =3 hours.
The air conditioner comes on, andwill continue to run until someoneturns it off.

– 15 –
3 Using the Auto Off Timer� This timer begins countdown when the air conditioner starts, and shuts the air
conditioner off when the set time has elapsed.� Available settings run from 30 minutes to 4 hours, in 30-minute intervals.
Note:*1. Weekly Timer/Simple Timer/Auto Off Timer cannot be used at the same time.*2. The Auto Off timer will not operate when any of the following conditions is in effect.
The timer is off; the system is in malfunction state; a test run is in progress; theremote controller is undergoing self-check or remote controller check; the user is inthe process of selecting a function; the user is in the process of setting the timer; thesystem is under central control. (Under these conditions, On/Off operation isprohibited.)
AFTER OFF
AUTO OFF
PAR-21MAA
ON/OFF
FILTER
CHECK
OPERATION CLEAR
TEST
TEMP.
MENU
BACK DAYMONITOR/SET
CLOCK
ON/OFF
2 A 9
4
B
<How to Set the Auto Off Timer>
1. Be sure that you are at a standard control screen, and that the Auto Off timer indicatoris visible in the display (at 1).When something other than the Auto Off Timer is displayed, set it to AUTO OFFTIMER using the function selection of remote controller (see 6.[4]–3 (3)) timerfunction setting.
2. Hold down the Timer Menu button B for 3 seconds, so that the “Set Up” appears onthe screen (at 2).(Note that each press of the button toggles the display between “Set Up” and“Monitor”.)
3. Press the appropriate Set Time button A as necessary to set the OFF time (at 3).4. Press the Filter button 4 to lock in the setting.
Note:Your entry will be cancelled if you press the Mode (Return) button 2 before pressing theFilter button 4.
5. Press the Mode (Return) button 2 to complete the setting procedure and return tothe standard control screen.
6. If the air conditioner is already running, the timer starts countdown immediately. Besure to check that the timer setting appears correctly on the display.
<Checking the Current Auto Off Timer Setting>
AFTER OFF
AUTO OFF
3
1
2 Timer Setting
AFTER
TIMER
OFF
AUTO OFF
5
1
4 Timer Setting
1. Be sure that the “Auto Off” is visible on the screen (at 1).2. Hold down the Timer Menu button B for 3 seconds, so that “Monitor” is indicated on
the screen (at 4).• The timer remaining to shutdown appears at 5.
3. To close the monitor and return to the standard control screen, press the Mode(Return) button 2.

– 16 –
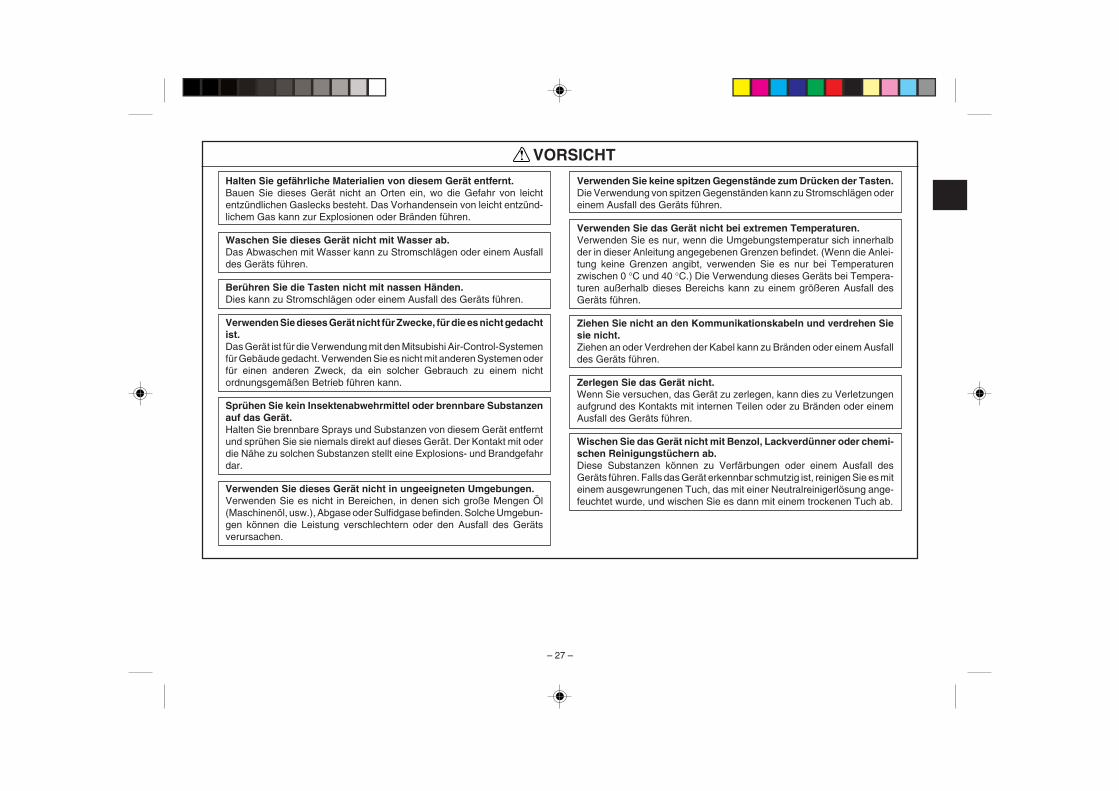
<To Turn Off the Auto Off Timer...>
� Hold down the Timer On/Off button 9 for 3 seconds, so that “Timer Off” appears (at6) and the timer value (at 7) disappears.
� Alternatively, turn off the air conditioner itself. The timer value (at 7) will disappearfrom the screen.
<To Turn On the Auto Off Timer...>
� Hold down the Timer On/Off button 9 for 3 seconds. The “Timer Off “ indicationdisappears (at 6), and the timer setting comes on the display (at 7).
� Alternatively, turn on the air conditioner. The timer value will appear at 7.
˚C
˚CAUTO OFF6
7
AUTO OFF
7
˚C
˚C
AFTER OFF
AUTO OFF6
7

– 17 –
(4) Locking the Remote Controller Buttons (Operation function limitcontroller)
� If you wish, you can lock the remote controller buttons. You can use the FunctionSelection of remote controller to select which type of lock to use. (For informationabout selecting the lock type, see section 6, item [4]–2 (1)).Specifically, you can use either of the following two lock types.
1 Lock All Buttons: Locks all of the buttons on the remote controller.2 Lock All Except ON/OFF: Locks all buttons other than the ON/OFF button.
Note:The “Locked” indicator appears on the screen to indicate that buttons are currentlylocked.
˚C
˚C
TIME SUN
FUNCTION
PAR-21MAA
ON/OFF
FILTER
CHECK
OPERATION CLEAR
TEST
TEMP.
MENU
BACK DAYMONITOR/SET
CLOCK
ON/OFF
4
1
1
Lock Indicator
<How to Lock the Buttons>
1. While holding down the Filter button 4, press and hold down the ON/OFF button 1for 2 seconds. The “Locked” indication appears on the screen (at 1), indicating thatthe lock is now engaged.* If locking has been disabled in Function Selection of remote controller, the screen
will display the “Not Available” message when you press the buttons as describedabove.
• If you press a locked button, the “Locked” indication (at 1) will blink on the display.
˚C
˚C
FUNCTION1
˚C
˚C
FUNCTION1
<How to Unlock the Buttons>
1. While holding down the Filter button 4, press and hold down the ON/OFF button 1for 2 seconds—so that the “Locked” indication disappears from the screen (at 1).
˚C
˚C
1

– 18 –
(5) Other Indications<Centrally Controlled>
ON/OFF TEMP.
˚C
˚C
� Displayed when operation is controlled by central controller, etc.Restricted operations are shown below.• ON/OFF (including timer operation)• Operation mode• Set temperature
Note:May also be individually restricted.
<Flashing Mode Indicator>
ON/OFF TEMP.
˚C
˚C
� When flashes continuouslyDisplayed when another indoor unit connected to the outdoor unit is already operatingin a different operation mode.Match with the operation mode of the other indoor unit.
� When mode switched after display flashesDisplayed when operation mode is restricted for each season by central controller,etc.Use another operation mode.
<Flashing “Filter”>
ON/OFF TEMP.
˚C
˚CFILTER
� Indicates that the filter needs cleaning.Clean the filter.
� When resetting “FILTER” displayWhen the [FILTER] button is pressed two times successively after cleaning the filter,the display goes off and is reset.
Note:� When two or more different types of indoor unit are controlled, the cleaning period
differs with the type of filter. When the master unit cleaning period arrives, “FILTER”is displayed. When the filter display goes off, the cumulative time is reset.
� “FILTER” indicates the cleaning period when the air conditioner was used undergeneral indoor air conditions by criteria time. Since the degree of dirtiness dependson the environmental conditions, clean the filter accordingly.
� The filter cleaning period cumulative time differs with the model.

– 19 –
<Flashing Error Codes>
On CITY MULTI Models On Mr. Slim Models
ON/OFF
ERROR CODE
ON/OFF
ERROR CODE
ON lamp(Flashing)
Error CodeIndoor Unit No.
� If the ON lamp and error code are both flashing: This means that the air conditioner is out of order and operation has been stopped (and cannot resume). Take note of the indicatedunit number and error code, then switch off the power to the air conditioner and call your dealer or servicer.
If you have entered contact number to be called in the event of a problem, the screen displays this number.(You can set this up under Function Selection of remote controller. For information, refer to section 6.)
Indoor Unit’s Refrig-erant Address
Error Code Indoor Unit No.
Alternating Display
ON lamp(Flashing)
On CITY MULTI Models On Mr. Slim Models When the Check button is pressed:
� If only the error code is flashing (while the ON lamp remains lit): Operation is continuing, but there may be a problem with the system. In this case, you should note down theerror code and then call your dealer or servicer for advice.
* If you have entered contact number to be called in the event of a problem, push the Check button to display it on the screen. (You can set this up under Function Selection ofremote controller. For information, refer to section 6.)
ON/OFF
˚C
˚C
ERROR CODE
ON/OFF
˚C
˚C
ERROR CODE
ON/OFF
CALL:XXXXXXX:XXX
Error Code Error Code

– 20 –
6 Function SelectionFunction selection of remote controllerThe setting of the following remote controller functions can be changed using the remote controller function selection mode. Change the setting when needed.
Item 1
1. Change Language(“CHANGELANGUAGE”)
2. Function limit(“FUNCTIONSELECTION”)
3. Mode selection(“MODE SELEC-TION”)
4. Display change(“DISP MODESETTING”)
Item 2
Language setting to display
(1) Operation function limit setting (operation lock) (“LOCKINGFUNCTION”)
(2) Use of automatic mode setting (“SELECT AUTO MODE”)
(3) Temperature range limit setting (“LIMIT TEMP FUNCTION”)
(1) Remote controller main/sub setting (“CONTROLLER MAIN/SUB”)
(2) Use of clock setting (“CLOCK”)
(3) Timer function setting (“WEEKLY TIMER”)
(4) Contact number setting for error situation (“CALL.”)
(1) Temperature display °C/°F setting (“TEMP MODE °C/°F”)
(2) Suction air temperature display setting (“ROOM TEMP DISPSELECT”)
(3) Automatic cooling/heating display setting (“AUTO MODEDISP C/H”)
Item 3 (Setting content)
• Display in multiple languages is possible
• Setting the range of operation limit (operation lock)
• Setting the use or non-use of “automatic” operation mode
• Setting the temperature adjustable range (maximum, minimum)
• Selecting main or sub remote controller* When two remote controllers are connected to one group, one controller
must be set to sub.
• Setting the use or non-use of clock function
• Setting the timer type
• Contact number display in case of error• Setting the telephone number
• Setting the temperature unit (°C or °F) to display
• Setting the use or non-use of the display of indoor (suction) air temperature
• Setting the use or non-use of the display of “Cooling” or “Heating” displayduring operation with automatic mode

– 21 –
→
[Function selection flowchart][1] Stop the air conditioner to start remote controller function selection mode. → [2] Select from item 1. → [3] Select from item 2. → [4] Make the setting. (Details are specified initem 3) → [5] Setting completed. → [6] Change the display to the normal one. (End)
(Hold down the E button and press the D button for twoseconds.)* The display cannot be changed during the unit function
selection, the test run and the self diagnosis.
(Hold down the E button and pressthe D button for two seconds.)* The remote controller records the
setting that is made in this way.
Press theG button.
See [4]–1Item 3
(Setting content)
See [4]–2. (1)
See [4]–2. (2)
See [4]–2. (3)
See [4]–3. (1)
See [4]–3. (2)
See [4]–3. (3)
See [4]–3. (4)
See [4]–4. (1)
See [4]–4. (2)
See [4]–4. (3)
Item 1 Remote Controller Function Se-lection Mode
Item 2
Mode selection(“MODE
SELECTION”)
Normal display (Display whenthe air condition is not running)
PAR-21MAA
ON/OFF
FILTER
CHECK
OPERATION CLEAR
TEST
TEMP.
MENU
BACK DAYMONITOR/SET
CLOCK
ON/OFF
F
G
C D
B
I
A
H
E
Change Language(“CHANGE LANGUAGE”)
Function limit(“FUNCTIONSELECTION”)
Display change(“DISP MODE
SETTING”)
NOTETimer operation stops when the display forremote controller function selection ischanged to the normal one.
Press the G button.
Press theE button.
Press theE button.
Press theE button.
Press theE button.
Press theG button.
Press theG button.
Press theD button.
Press theD button.
Press theD button.
→→
→→
→→
→ Operation function limit setting (“LOCKING FUNCTION”)Press the G button.
Temperature range limit setting (“LIMIT TEMP FUNCTION”)
Use of automatic mode setting (“SELECT AUTO MODE”)
→ Temperature display °C/°F setting (“TEMP MODE °C/°F”)Press the G button.
Automatic cooling/heating display setting (“AUTO MODE DISP C/H”)
Suction air temperature display setting (“ROOM TEMP DISP SELECT”)
→ Remote controller main/sub setting (“CONTROLLER MAIN/SUB”)Press the G button.
Timer function setting (“WEEKLY TIMER”)
Use of clock setting (“CLOCK”)
Contact number setting for error situation (“CALL.”)
Dot displayThe language that is selected inCHANGE LANGUAGE mode ap-pears on this display. English isset in this manual.

– 22 –
[Detailed setting]
[4]–1. CHANGE LANGUAGE setting
The language that appears on the dot display can be selected.• Press the [ MENU] button G to change the language.
1 Japanese (JP), 2 English (GB), 3 German (D), 4 Spanish (E),5 Russian (RU), 6 Italian (I), 7 Chinese (CH), 8 French (F)
[4]–2. Function limit
(1) Operation function limit setting (operation lock)• To switch the setting, press the [ ON/OFF] button D.
1 no1 : Operation lock setting is made on all buttons other than the [ ON/OFF] button.
2 no2 : Operation lock setting is made on all buttons.3 OFF (Initial setting value) : Operation lock setting is not made.
* To make the operation lock setting valid on the normal screen, it is necessary topress buttons (Press and hold down the [FILTER] and [ ON/OFF] buttons at thesame time for two seconds.) on the normal screen after the above setting is made.
(2) Use of automatic mode settingWhen the remote controller is connected to the unit that has automatic operationmode, the following settings can be made.• To switch the setting, press the [ ON/OFF] button D.
1 ON (Initial setting value) : The automatic mode is displayed when theoperation mode is selected.
2 OFF : The automatic mode is not displayed when theoperation mode is selected.
(3) Temperature range limit settingAfter this setting is made, the temperature can be changed within the set range.• To switch the setting, press the [ ON/OFF] button D.
1 LIMIT TEMP COOL MODE :The temperature range can be changed on cooling/dry mode.
2 LIMIT TEMP HEAT MODE :The temperature range can be changed on heating mode.
3 LIMIT TEMP AUTO MODE :The temperature range can be changed on automatic mode.
4 OFF (initial setting) : The temperature range limit is not active.* When the setting, other than OFF, is made, the temperature range limit setting
on cooling, heating and automatic mode is made at the same time. However,the range cannot be limited when the set temperature range has not changed.
• To increase or decrease the temperature, press the [ TEMP. ( ) or ( )]button F.
• To switch the upper limit setting and the lower limit setting, press the [ ]button H. The selected setting will flash and the temperature can be set.
• Settable rangeCooling/Dry mode : Lower limit: 19°C ~ 30°C Upper limit: 30°C ~ 19°CHeating mode : Lower limit: 17°C ~ 28°C Upper limit: 28°C ~ 17°CAutomatic mode : Lower limit: 19°C ~ 28°C Upper limit: 28°C ~ 19°C
* The settable range varies depending on the unit to connect (Mr. Slim units,CITY MULTI units, and intermediate temperature units).
[4]–3. Mode selection setting
(1) Remote controller main/sub setting• To switch the setting, press the [ ON/OFF] button D.
1 Main: The controller will be the main controller.2 Sub : The controller will be the sub controller.
(2) Use of clock setting• To switch the setting, press the [ ON/OFF] button D.
1 ON : The clock function can be used.2 OFF : The clock function cannot be used.
(3) Timer function setting• To switch the setting, press the [ ON/OFF] button D (Choose one of the
followings.).1 WEEKLY TIMER (initial setting value): The weekly timer can be used.2 AUTO OFF TIMER: The auto off timer can be used.3 SIMPLE TIMER: The simple timer can be used.4 TIMER MODE OFF: The timer mode cannot be used.
* When the use of clock setting is OFF, the “WEEKLY TIMER” cannot be used.

– 23 –
(4) Contact number setting for error situation• To switch the setting, press the [ ON/OFF] button D.
1 CALL OFF : The set contact numbers are not displayed in case of error.2 CALL **** *** **** : The set contact numbers are displayed in case of error.
CALL_ : The contact number can be set when the display is asshown on the left.
• Setting the contact numbersTo set the contact numbers, follow the following procedures.Move the flashing cursor to set numbers. Press the [ TEMP. ( ) and( )] button F to move the cursor to the right (left). Press the [ CLOCK( ) and ( )] button C to set the numbers.
[4]–4. Display change setting
(1) Temperature display °C/°F setting• To switch the setting, press the [ ON/OFF] button D.
1 °C: The temperature unit °C is used.2 °F: The temperature unit °F is used.
(2) Suction air temperature display setting• To switch the setting, press the [ ON/OFF] button D.
1 ON : The suction air temperature is displayed.2 OFF : The suction air temperature is not displayed.
(3) Automatic cooling/heating display setting• To switch the setting, press the [ ON/OFF] button D.
1 ON : One of “Automatic cooling” and “Automatic heating” is displayedunder the automatic mode is running.
2 OFF : Only “Automatic” is displayed under the automatic mode.

– 24 –
7 Specifications
Item Details
Dimensions 120 (H) × 130 (W) × 19 (D) mm
Weight 0.2 kg
Power Source 10 to 13V DC (Supplied from indoor unit)
Power Consumption 0.3 W
Ambient Usage Environment 0° to 40°C, 30% to 90% relative humidity
Composition PS

Deutsch
CITY MULTI Steuersystemund Mitsubishi Mr. SLIM Klimaanlagen
MA-FernbedienungPAR-21MAABedienungshandbuch
ON/OFF TEMP.
Bitte lesen Sie diese Anleitung sorgfältig durch und achten Sie darauf, diesesGerät richtig zu verwenden. Bewahren Sie diese Anleitung für den zukünftigenGebrauch sicher auf.Geben Sie diese Anleitung und die dazugehörige Einbauanleitung an Personenweiter, die später dieses Gerät warten. Der Einbau und ein Standortwechseldieses Geräts sollte nur von qualifizierten Personen durchgeführt werden. WennEndbenutzer versuchen, dieses Gerät einzubauen oder zu versetzen, kann dieszu unsicheren Bedingungen oder einem nicht ordnungsgemäßen Betrieb führen.
INHALT1. Sicherheitsvorkehrungen ............................................................. 26
2. Bezeichnungen der Teile ............................................................. 28
3. Bildschirmkonfiguration ............................................................... 30
4. Einstellen des Wochentags und der Zeit ..................................... 30
5. Verwenden der Fernbedienung ................................................... 31(1) So starten, stoppen, ändern Sie den Modus und stellen die
Temperatur ein ............................................................................. 31(2) Lüftergeschwindigkeit, Richtung des Luftstroms und Belüftung .. 33(3) Verwenden des Timers ................................................................. 35
1 Verwenden des wöchentlichen Timers ................................... 352 Verwenden des einfachen Timers .......................................... 373 Verwenden des Auto-Off-Timers ............................................. 39
(4) Sperren der Fernbedienungstasten(Beschränkung der Betriebsfunktionen) ....................................... 41
(5) Weitere Anzeigen ......................................................................... 42
6. Funktionsauswahl ........................................................................ 44
7. Technische Daten ........................................................................ 48

– 26 –
1 Sicherheitsvorkehrungen� Vorsichtsmaßnahmen werden wie folgt gemäß der potentiellen Gefahrenstufe klassifiziert:
Kennzeichnet eine Bedingung oder einen Betrieb, die/der bei falschem Umgang zu schweren Verletzungen oder zuTodesfällen führen kann.Kennzeichnet eine Bedingung oder einen Betrieb, die/der bei falschem Umgang zu Verletzungen oder zu Vermögensschädenführen kann.
WARNUNG
VORSICHT
WARNUNG
Versuchen Sie nicht, das Gerät selbst einzubauen.Lassen Sie dieses Gerät von Ihrem Händler oder einem qualifiziertenTechniker einbauen. Ein nicht ordnungsgemäßer Einbau kann zu Brän-den, Stromschlägen oder anderen schweren Unfällen führen.
Achten Sie darauf, daß das Gerät richtig befestigt ist.Achten Sie darauf, daß das Gerät richtig an einem stabilen Träger befestigtist, damit nicht die Gefahr besteht, daß es herunterfällt.
Achten Sie auf die korrekte Nennspannung.Eine falsche Spannung kann zu Bränden oder einem Ausfall des Gerätsführen.
Schalten Sie dieses Gerät sofort ab, wenn der Betrieb ungewöhnlichverläuft.Fortgesetzter Gebrauch kann zum Ausfall des Geräts, Stromschlägenoder Bränden führen.Wenn Sie einen Brandgeruch oder eine andere Unregelmäßigkeit bemer-ken, schalten Sie den Netzschalter sofort aus und wenden Sie sich anIhren Händler.
Versuchen Sie nicht, den Standort des Geräts selbst zu ändern.Ein nicht ordnungsgemäßer Neueinbau kann zu Bränden, Stromschlägenoder anderen schweren Unfällen führen.Lassen Sie den Standort dieses Geräts von Ihrem Händler oder einemqualifizierten Techniker ändern.
Entsorgen Sie dieses Gerät nicht selbst.Bitte wenden Sie sich an den Händler, wenn Sie dieses Gerät wegwerfenmöchten.
Versuchen Sie nicht, das Gerät selbst zu modifizieren oder zureparieren.Der Versuch einer Modifikation oder Reparatur kann zu Bränden, Strom-schlägen oder schweren Unfällen führen. Bitte wenden Sie sich an IhrenHändler, wenn eine Reparatur erforderlich ist.
Stoppen Sie die Verwendung dieses Geräts, wenn es nicht richtig funktio-niert (falls Fehlermeldungen erneut auftreten und das Gerät nicht wieerwartet läuft).Fortgesetzter Gebrauch oder versuchter Gebrauch dieses Geräts kann zuBränden oder einem Ausfall des Geräts führen. Fragen Sie Ihren Händlerum Rat.
– 27 –
Halten Sie gefährliche Materialien von diesem Gerät entfernt.Bauen Sie dieses Gerät nicht an Orten ein, wo die Gefahr von leichtentzündlichen Gaslecks besteht. Das Vorhandensein von leicht entzünd-lichem Gas kann zur Explosionen oder Bränden führen.
Waschen Sie dieses Gerät nicht mit Wasser ab.Das Abwaschen mit Wasser kann zu Stromschlägen oder einem Ausfalldes Geräts führen.
Berühren Sie die Tasten nicht mit nassen Händen.Dies kann zu Stromschlägen oder einem Ausfall des Geräts führen.
Verwenden Sie dieses Gerät nicht für Zwecke, für die es nicht gedachtist.Das Gerät ist für die Verwendung mit den Mitsubishi Air-Control-Systemenfür Gebäude gedacht. Verwenden Sie es nicht mit anderen Systemen oderfür einen anderen Zweck, da ein solcher Gebrauch zu einem nichtordnungsgemäßen Betrieb führen kann.
Sprühen Sie kein Insektenabwehrmittel oder brennbare Substanzenauf das Gerät.Halten Sie brennbare Sprays und Substanzen von diesem Gerät entferntund sprühen Sie sie niemals direkt auf dieses Gerät. Der Kontakt mit oderdie Nähe zu solchen Substanzen stellt eine Explosions- und Brandgefahrdar.
Verwenden Sie dieses Gerät nicht in ungeeigneten Umgebungen.Verwenden Sie es nicht in Bereichen, in denen sich große Mengen Öl(Maschinenöl, usw.), Abgase oder Sulfidgase befinden. Solche Umgebun-gen können die Leistung verschlechtern oder den Ausfall des Gerätsverursachen.
VORSICHT
Verwenden Sie keine spitzen Gegenstände zum Drücken der Tasten.Die Verwendung von spitzen Gegenständen kann zu Stromschlägen odereinem Ausfall des Geräts führen.
Verwenden Sie das Gerät nicht bei extremen Temperaturen.Verwenden Sie es nur, wenn die Umgebungstemperatur sich innerhalbder in dieser Anleitung angegebenen Grenzen befindet. (Wenn die Anlei-tung keine Grenzen angibt, verwenden Sie es nur bei Temperaturenzwischen 0 °C und 40 °C.) Die Verwendung dieses Geräts bei Tempera-turen außerhalb dieses Bereichs kann zu einem größeren Ausfall desGeräts führen.
Ziehen Sie nicht an den Kommunikationskabeln und verdrehen Siesie nicht.Ziehen an oder Verdrehen der Kabel kann zu Bränden oder einem Ausfalldes Geräts führen.
Zerlegen Sie das Gerät nicht.Wenn Sie versuchen, das Gerät zu zerlegen, kann dies zu Verletzungenaufgrund des Kontakts mit internen Teilen oder zu Bränden oder einemAusfall des Geräts führen.
Wischen Sie das Gerät nicht mit Benzol, Lackverdünner oder chemi-schen Reinigungstüchern ab.Diese Substanzen können zu Verfärbungen oder einem Ausfall desGeräts führen. Falls das Gerät erkennbar schmutzig ist, reinigen Sie es miteinem ausgewrungenen Tuch, das mit einer Neutralreinigerlösung ange-feuchtet wurde, und wischen Sie es dann mit einem trockenen Tuch ab.

– 28 –
2 Bezeichnungen der Teile
Display-Bereich
Für diese Erklärung werden alleTeile des Displays als beleuchtetdargestellt. Während dem tatsäch-lichen Betrieb sind nur die rele-vanten Elemente beleuchtet.
˚F˚C
˚F˚C
ERROR CODEAFTER
TIMERTIME SUN MON TUE WED THU FRI SAT
ON
OFF
Hr
AFTER
FILTERFUNCTION
ONLY1Hr.
WEEKLYSIMPLE
AUTO OFF
Zeigt den aktuellen BetriebZeigt den Betriebsmodus, usw.* Anzeige in mehreren Sprachen
wird unterstützt.
Anzeige “Centrally Controlled”Gibt an, daß der Betrieb der Fern-bedienung durch eine Master-Steuerung deaktiviert wurde.
Anzeige “Timer is Off”Gibt an, daß der Timer ausge-schaltet ist.
TemperatureinstellungZeigt die Zieltemperatur an.
WochentagZeigt den aktuellen Wochentag an.
Zeit-/Timer-AnzeigeZeigt die aktuelle Zeit an, außer der einfache oder derAuto-Off-Timer ist eingestellt.Falls der einfache oder der Auto-Off-Timer einge-stellt ist, wird die Restzeit angezeigt.
Anzeige “Sensor”Wird angezeigt, wenn die Fernbedie-nung verwendet wird.
Anzeige “Locked”Gibt an, daß die Tasten der Fernbedie-nung gesperrt wurden.
Anzeige “Clean The Filter”Erscheint, wenn der Filter gereinigtwerden muß.
Timer-AnzeigenDie Anzeige erscheint, wenn der ent-sprechende Timer eingestellt ist.
Anzeige der Luftrichtung nachoben/nach untenDie Anzeige gibt die Richtungder herausströmenden Luft an.
Anzeige “One Hour Only”Wird angezeigt, wenn der Luftstromim Modus COOL oder DRY aufschwach und abwärts eingestellt ist.(Der Betrieb unterscheidet sich jenach Modell.)Die Anzeige schaltet sich nach einerStunde aus, wenn sich die Richtungdes Luftstroms ebenfalls ändert.
Anzeige der Umgebungs-temperaturZeigt die Umgebungstemperatur an.
Anzeige der LuftklappenGibt die Aktion der Schwing-luftklappen an. Erscheint nicht,wenn die Luftklappe stationär ist.
(Netz-Ein-Anzeige)Gibt an, daß der Netzschalter ein-geschaltet ist.
Anzeige der LüftergeschwindigkeitZeigt die ausgewählte Lüfter-geschwindigkeit an.
BelüftungsanzeigeErscheint, wenn das Gerät imBelüftungsmodus läuft.

– 29 –
Kontrollbereich
PAR-21MAA
ON/OFF
FILTER
CHECK
OPERATION CLEAR
TEST
TEMP.
MENU
BACK DAYMONITOR/SET
CLOCK
ON/OFF
Tasten zum Einstellen der Temperatur
Nach unten
Nach oben
Taste Timer-Menü(Taste Monitor/Einstellen)
Taste Modus (Taste Zurück)
Taste Zeit einstellen
Zurück
Vorwärts
Taste Timer Aus/Ein(Taste Tag einstellen)
Öffnen derTür.
Taste Start/Stop
Taste Lüftergeschwindigkeit
Taste Filter (Taste )
Taste Testlauf
Taste Check (Taste Löschen)
Taste Luftstrom nach oben/nach unten
Taste Luftklappe(Taste Betrieb )
Zur vorherigen Betriebs-nummer.
Taste Belüftung(Taste Betrieb )
Zur nächsten Betriebs-nummer.
Hinweis:� Wenn Sie eine Taste für eine Funktion drücken, die nicht im Innengerät installiert ist, zeigt die Fernbedienung die Meldung “Not
Available”.Wenn Sie die Fernbedienung verwenden, um mehrere Innengeräte zu steuern, erscheint diese Meldung nur, wenn die Funktionauf dem übergeordneten Gerät nicht vorhanden ist.

– 30 –
3 BildschirmkonfigurationDie Anzeigen in dieser Anleitung beziehen sich auf den Zustand, nachdem dieSpracheinstellung mithilfe der Funktionsauswahl der Fernbedienung geändert wurde.In Abschnitt 6, Punkt [4]-1 sehen Sie, wie Sie die Spracheinstellung ändern. Dieanfängliche Einstellung ist Englisch.<Bildschirmtypen>� Funktionsauswahl: Stellt die verfügbaren Funktionen und Bereiche auf
der Fernbedienung ein (Timer-Funktionen, Betriebs-beschränkungen, usw.).
� Tag/Zeit einstellen: Stellt den aktuellen Wochentag oder die Zeit ein.� Standard-Kontrollbildschirme: Zeigt den Betriebsstatus des Klimaanlagensystems
und stellt ihn ein.� Timer-Monitor: Zeigt den aktuell eingestellten Timer an (wöchentli-
cher Timer, einfacher Timer oder Auto-Off-Timer).� Timer-Setup: Stellt den Betriebs eines der Timer ein (wöchentlicher
Timer, einfacher Timer oder Auto-Off-Timer).
˚F˚C
TIMERMON
OFF
WEEKLY
SUN MON TUE WED THU FRI SAT
WEEKLY
˚F˚C
˚C
TIME SUN
Funktionsauswahl Tag/Zeit einstellen
Standardkontrollbildschirme
OFF ON
Timer-Monitor Timer-Setup
A D C
B C
B
<So wechseln Sie den Bildschirm>Zu A : Halten Sie sowohl die Taste Modus als auch die Taste Timer Ein/Aus 2 Sekunden lang gedrückt.Zu B : Drücken Sie die Taste Timer-Menü.Zu C : Drücken Sie die Taste Modus (Zurück).Zu D : Drücken Sie eine der Tasten Zeit einstellen ( oder ).
4 Einstellen des Wochentags und der Zeit� Verwenden Sie diesen Bildschirm um den aktuellen Wochentag und die Zeitein-
stellung zu ändern.
Hinweis:Der Tag und die Zeit erscheinen nicht, wenn die Uhr in der Funktionsauswahl deaktiviertwurde.
Anzeige des Wochen-tags und der Zeit
<So stellen Sie den Wochentag und die Zeit ein…>
Zeit-EinstellungTIME SUN2
3
4
1. Drücken Sie die Taste Zeit einstellen oder A, um 2 anzuzeigen.2. Drücken Sie die Taste Timer Ein/Aus (Tag einstellen) 9, um den Tag einzustellen.
* Mit jedem Drücken rückt die Anzeige unter 3 einen Tag vor: Sun → Mon → ... →Fri → Sat.
3. Drücken Sie die entsprechenden Taste Zeit einstellen A nach Bedarf, um die Zeiteinzustellen.* Wenn Sie die Taste gedrückt halten, rückt die Zeit (unter 4) zuerst in Minuten-
intervallen vor, dann in Zehn-Minuten-Intervallen und dann in Ein-Stunden-Intervallen.4. Nachdem Sie die entsprechenden Einstellungen unter Schritt 2 und 3 durchgeführt
haben, drücken Sie die Taste Filter 4, um die Werte zu speichern.
Einstellung des Wochentags
˚C
˚C
TIME SUN
PAR-21MAA
ON/OFF
FILTER
CHECK
OPERATION CLEAR
TEST
TEMP.
MENU
BACK DAYMONITOR/SET
CLOCK
ON/OFF
2 4
9
1
A

– 31 –
Hinweis:Ihre neuen Einträge unter Schritt 2 und 3 werden storniert, wenn Sie die Taste Modus(Zurück) 2 drücken, bevor Sie die Taste Filter 4 drücken.
5. Drücken Sie die Taste Modus (Zurück) 2, um den Einstellvorgang abzuschließen.Die Anzeige kehrt zum Standardkontrollbildschirm zurück, auf dem 1 jetzt die neueEinstellung für den Tag und die Zeit erscheint.
5 Verwenden der Fernbedienung(1) So starten, stoppen, ändern Sie den Modus und stellen die Tempe-
ratur ein
˚C
˚C
PAR-21MAA
ON/OFF
FILTER
CHECK
OPERATION CLEAR
TEST
TEMP.
MENU
BACK DAYMONITOR/SET
CLOCK
ON/OFF
2
7
2
33
8
6
4
58
7
1156
<So starten Sie den Betrieb>
� Drücken Sie die Taste Start/Stop 1.• Die Lampe EIN 1 und der Anzeige-
bereich erscheinen.
Hinweis:� Wenn das Gerät neu gestartet wird, sind die
Anfangseinstellungen wie folgt.
<So stoppen Sie den Betrieb>
� Drücken Sie die Taste Start/Stop1 erneut.• Die Lampe EIN 1 und der Dis-
play-Bereich verschwinden.
Modus
Temperatur-einstellungLüfter-geschwindigkeit
Luftstromnach oben/nach unten
Fernbedienungseinstellungen
Letzte Einstellung
Letzte Einstellung
Letzte Einstellung
COOL oder DRY
Modus HEAT
FAN
Horiz.AuslaßLetzte
EinstellungHoriz.Auslaß

– 32 –
<Auswählen des Modus>
� Drücken Sie, während das Gerät läuft, die Taste Modus 2 so oft wie nötig.• Mit jedem Drücken wird in den nächsten Modus in der unten dargestellten
Reihenfolge umgeschaltet.Der aktuell ausgewählte Modus ist unter 2 dargestellt.
→ COOL → DRY → FAN → AUTO → HEAT → Ventilate*1 *1,*3,*4 *1 *1,*2
Hinweis:*1 Die Verfügbarkeit dieses Modus hängt von der Art des angeschlossenen Geräts ab.*2 Erscheint nur auf Mr. Slim-Geräten mit eingebauter Belüftungsfunktion.*3 Erscheint nicht, wenn der Auto-Modus in der Funktionsauswahl deaktiviert wurde.
Informationen darüber, wie Sie diese Funktion einstellen, finden Sie in Abschnitt 6,Punkt [4]–2 (2).
*4 HEAT und COOL erscheinen im AUTO-Modus nicht, wenn die Auto-Modus-Anzeigein der Funktionsauswahl deaktiviert wurde. Informationen darüber, wie Sie dieseFunktion einstellen, finden Sie in Abschnitt 6, Punkt [4]–4 (3).
<So ändern Sie die Raumtemperatureinstellung...>� So verringern Sie die Temperatur: Drücken Sie die Taste Temperatur einstellen
3.� So erhöhen Sie die Temperatur: Drücken Sie die Taste Temperatur einstellen
3.• Mit jedem Drücken ändert sich die Einstellung um 1 °C. Die aktuelle Einstellung
wird unter 3 angezeigt.• Die verfügbaren Bereiche sind wie folgt. *1,*2
COOL oder DRYmode
FANAUTO modeHEAT mode
19 - 30 °C(67 - 87 °F) *3
19 - 28 °C(67 - 83 °F) *3
17 - 28 °C(63 - 83 °F) *3
Kann nichteingestellt werden.
Hinweis:*1 Die verfügbaren Bereiche sind je nach Art des angeschlossenen Geräts verschieden
(Mr.Slim, CITY MULTI, usw.).*2 Wenn Grenzen für den Temperaturbereich in der Funktionseinstellung eingestellt
wurden, sind die verfügbaren Bereiche enger als oben dargestellt. Wenn Sieversuchen, einen Wert außerhalb des eingeschränkten Bereichs einzustellen, wirdeine Meldung angezeigt, daß der Bereich zur Zeit eingeschränkt ist.Informationen darüber, wie Sie diese Bereichsgrenzen einstellen und löschen,finden Sie in Abschnitt 6, Punkt [4]–2 (3).
*3 Falls die Funktionsauswahl so eingestellt ist, daß die Temperatur in Fahrenheitangezeigt wird. Informationen darüber, wie Sie °C oder °F auswählen, finden Sie inAbschnitt 6, Punkt [4]–4 (1).
<Anzeige der Umgebungstemperatur>
Während dem Betrieb wird die Einlaßtemperatur unter 4 angezeigt.
Hinweis:� Der Anzeigebereich ist 8 °C bis 39 °C. Wenn die Temperatur unter 8 °C oder über
39 °C liegt, blinkt der entsprechende Wert (8 °C oder 39 °C) auf dem Display.� Wenn Sie die Fernbedienung verwenden, um mehrere Innengeräte zu steuern, zeigt
das Display die Temperatur am übergeordneten Gerät.� Sie können auswählen, welcher Temperatursensor für das Erkennen der Tempera-
tur verwendet werden soll: entweder der Sensor am Innengerät (“At Unit”) oder derSensor an der Fernbedienung (“At Remote”). Die Voreinstellung ist “At Unit”.So ändern Sie den Ort des Sensor am Innengerät:
• CITY MULTI-Modelle: Wenden Sie sich an Ihren Händler.• Mr.Slim-Modelle: Sehen Sie in der Installationsanleitung nach.
� Falls die Anzeige der Umgebungstemperatur in der Funktionsauswahl deaktiviert ist,erscheint die Umgebungstemperatur nicht. Informationen darüber, wie Sie dieseFunktion aktivieren oder deaktivieren, finden Sie in Abschnitt 6, Punkt [4]–4 (2).
� Falls die Anzeige Fahrenheit in der Funktionsauswahl ausgewählt ist, zeigt dasDisplay das Zeichen °F. Informationen darüber, wie Sie °C oder °F auswählen, findenSie in Abschnitt 6, Punkt [4]–4 (1).

– 33 –
(2) Lüftergeschwindigkeit, Richtung des Luftstroms und Belüftung<So ändern Sie die Lüftergeschwindigkeit...>
� Drücken Sie die Taste Lüftergeschwindigkeit 5 so oft wie nötig, während das Systemläuft.• Jedes Drücken ändert die Stärke. Die aktuell ausgewählte Geschwindigkeit ist
unter 5 dargestellt.• Die Änderungsreihenfolge und die verfügbaren Einstellungen sind wie folgt.
FANSPEED
Anzeige
Modell mit 4Geschwin-digkeiten
Modell mit 2Geschwin-digkeiten
Modell mit 3Geschwin-digkeiten
Hinweis:� Die Anzahl der verfügbaren Lüftergeschwindigkeiten hängt von der Art des ange-
schlossenen Geräts ab. Beachten Sie außerdem, daß einige Geräte die Einstellung“Auto” nicht haben.
� In den folgenden Fällen unterscheidet sich die vom Gerät erzeugte tatsächlicheLüftergeschwindigkeit von der auf der Fernbedienungsanzeige angezeigten Ge-schwindigkeit:1. Während das Display “STAND BY” oder “DEFROST” anzeigt.2. Sofort nach Starten des HEAT-Modus (während das System darauf wartet, daß
sich der Modus ändert).3. Im HEAT-Modus, wenn die Raumtemperatur höher als die Temperatureinstellung
ist.4. Wenn sich das Gerät im DRY-Modus befindet.
<So ändern Sie die Richtung des Luftstroms (nach oben/nach unten)>� Drücken Sie, während das Gerät läuft, die Taste Luftstrom nach oben/nach unten 6
nach Bedarf.• Jedes Drücken ändert die Richtung. Die aktuelle Richtung wird unter 6 angezeigt.• Die Änderungsreihenfolge und die verfügbaren Einstellungen sind wie folgt:
Auto Horiz. 1 2 3 4 Swing
Anzeige
* Beachten Sie, daß sich während dem Schwingbetrieb die Richtungsanzeige aufdem Bildschirm nicht synchron mit den Richtungsklappen am Gerät ändert.
* Einige Modelle unterstützen Richtungseinstellungen nicht.
Hinweis:� Die verfügbaren Richtungen hängen von der Art des angeschlossenen Geräts ab.
Beachten Sie außerdem, daß einige Geräte die Einstellung “Auto” nicht haben.� In den folgenden Fällen unterscheidet sich die tatsächliche Luftrichtung von der
Richtung, die auf der Fernbedienungsanzeige angezeigt wird:1. Während das Display “STAND BY” oder “DEFROST” anzeigt.2. Sofort nach Starten des Heizmodus (während das System darauf wartet, daß sich
der Modus ändert).3. Im Heizmodus, wenn die Raumtemperatur höher als die Temperatureinstellung
ist.
<So ändern Sie die Luftrichtung (nach links/nach rechts)>
� Drücken Sie die Taste Luftklappe 7 nach Bedarf.• Das Bild Luftklappe 7 erscheint.
Mit jedem Drücken der Taste wird die Einstellung wie folgt umgeschaltet.
(ON) (OFF)
Während dem Schwingbetrieb bewegt sichdie Pfeilanzeige von links nach rechts.
Keine Anzeige(Stop)
AutoGeschwindig-keit 4
Geschwindig-keit 3
Geschwindig-keit 2
Geschwindig-keit 1

– 34 –
�
<Verwenden der Belüftung>
Bei Mr.Slim-Modellen
� So betreiben Sie den Ventilator zusammen mit dem Innengerät:� Drücken Sie die Start/Stop-Taste 1.
• Die Anzeige Vent erscheint auf dem Bildschirm (unter 8). Der Ventilatorarbeitet jetzt immer automatisch, wenn das Innengerät läuft.
� So lassen Sie den Ventilator unabhängig laufen:
� Drücken Sie die Taste Modus 2, bis auf dem Display erscheint. Dadurch
startet der Ventilator.
� So ändern Sie die Ventilatorstärke:� Drücken Sie die Taste Belüftung 8 nach Bedarf.
• Mit jedem Drücken wird die Einstellung wie unten dargestellt umgeschaltet.�
Niedrig Hoch
Bei CITY MULTI-Modellen
� So betreiben Sie den Ventilator zusammen mit dem Innengerät:� Drücken Sie die Taste Start/Stop 1.
• Die Anzeige Vent erscheint auf dem Bildschirm (unter 8). Der Ventilatorarbeitet jetzt immer automatisch, wenn das Innengerät läuft.
� So betreiben Sie den Ventilator nur, wenn das Innengerät ausgeschaltet ist:� Drücken Sie die Taste Belüftung 8, während das Innengerät ausgeschaltet ist.
• Die Lampe Ein (unter 1) und die Anzeige Belüftung (unter 8) erscheinen.
� So ändern Sie die Ventilatorstärke:� Drücken Sie die Taste Belüftung 8 nach Bedarf.
• Mit jedem Drücken wird die Einstellung wie unten dargestellt umgeschaltet.
(Niedrig) (Hoch)
� ��
Keine Anzeige (Stop)
(OFF)
Hinweis:� Bei einigen Modellkonfigurationen kann sich der Lüfter des Innengeräts einschal-
ten, auch wenn Sie den Ventilator so eingestellt haben, daß er unabhängig läuft.

– 35 –
(3) Verwenden des TimersDieser Abschnitt erklärt, wie Sie den Timer einstellen und verwenden. Sie können die Funktionsauswahl verwenden, um auszuwählen, welchen der drei Timer Sie verwendenmöchten: 1 Wöchentlicher Timer, 2 Einfacher Timer oder 3 Auto-Off-Timer.Informationen darüber, wie Sie die Funktionsauswahl einstellen, finden Sie in Abschnitt 6, Punkt [4]–3 (3).
1 Verwenden des wöchentlichen Timers� Der wöchentliche Timer kann verwendet werden, um bis zu acht Betriebsarten für jeden Tag der Woche einzustellen.
• Jede Betriebsart kann aus Folgendem bestehen: EIN/AUS-Zeit zusammen mit einer Temperatureinstellung oder nur EIN/AUS-Zeit oder nur Temperatureinstellung.• Wenn die aktuelle Zeit eine vom Timer eingestellte Zeit erreicht, führt die Klimaanlage die vom Timer eingestellte Aktion durch.
� Die Einteilung der Zeiteinstellung für diesen Timer ist 1 Minute.
Hinweis:*1. Der wöchentliche Timer/einfache Timer/Auto-Off-Timer können nicht gleichzeitig eingestellt werden.*2. Der wöchentliche Timer funktioniert nicht, wenn eine der folgenden Bedingungen wirksam ist.
Die Timerfunktion ist ausgeschaltet; das System befindet sich in einem unnormalen Zustand; ein Testlauf wird durchgeführt; die Fernbedienung führt einen Selbstcheck odereinen Fernbedienungscheck durch; der Benutzer stellt gerade eine Funktion ein; der Benutzer stellt gerade einen Timer ein; der Benutzer stellt gerade den aktuellen Wochentagoder die Zeit ein; das System wird zentral gesteuert. (Das System führt insbesondere dann keine Betriebsarten durch (Gerät ein, Gerät aus oder Temperatureinstellung), diewährend diesen Bedingungen deaktiviert sind.)
˚C
SUNON
WEEKLY
PAR-21MAA
ON/OFF
FILTER
CHECK
OPERATION CLEAR
TEST
TEMP.
MENU
BACK DAYMONITOR/SET
CLOCK
ON/OFF
2
4 2 3
A 9 78
0
4
13
B
1
Betriebsart Nr.
Tageseinstellung
<So stellen Sie den wöchentlichen Timer ein>1. Achten Sie darauf, daß Sie sich im Standardkontrollbildschirm befinden und daß die Anzeige für
den wöchentlichen Timer 1 auf dem Display angezeigt wird.2. Drücken Sie die Taste Timer-Menü B, so daß “Set Up” auf dem Bildschirm erscheint (unter 2). (Beachten
Sie, daß mit jedem Tastendruck die Anzeige zwischen“Set Up” und “Monitor” umgeschaltet wird.)3. Drücken Sie die Taste Timer Ein/Aus (Tag einstellen) 9, um den Tag einzustellen. Mit jedem Drücken
geht die Anzeige unter 3 zur nächsten Einstellung in der folgenden Reihenfolge: “Sun Mon Tues WedThurs Fri Sat” → “Sun” → ... → “Fri” → “Sat” → “Sun Mon Tues Wed Thurs Fri Sat”...
4. Drücken Sie die Taste Betrieb oder (7 oder 8) so oft wie nötig, um die entsprechendeBetriebsnummer auszuwählen (1 bis 8) 4.* Mit Ihren Eingaben unter Schritt 3 und 4 wählen Sie eine der Zellen aus der unten dargestellten Matrix.
(Die Fernbedienungsanzeige auf der linken Seite zeigt, wie das Display aussieht, wenn Betrieb 1 fürSonntag auf die unten angegebenen Werte eingestellt ist.)
Betr.-Nr. Sunday Monday … Saturday
Hinweis:Durch Einstellen des Tags auf “Sun Mon Tues Wed Thurs Fri Sat”, können Sie festlegen, daßderselbe Betrieb jeden Tag zur selben Zeit durchgeführt wird.(Beispiel: Betrieb 2 oben, der für jeden Tag der Woche gleich ist.)
No. 1
No. 2
…
No. 8
• 8:30• ON• 23 °C
• 10:00• OFF
• 10:00• OFF
• 10:00• OFF
• 10:00• OFF
�
Setup-Matrix
<Einstellungen von Betrieb 1für Sonntag>Klimaanlage um 8.30 Uhr mitauf 23 °C eingestellter Tem-peratur starten.
<Einstellung von Betrieb 2 fürjeden Tag>Klimaanlage um 10.00 Uhrausschalten.
�

– 36 –
˚C
TIMERSUN
ON
OFF
WEEKLY 1
98
<Einstellen des wöchentlichen Timers>
5. Drücken Sie die entsprechende Taste Zeit einstellen A so oft wie nötig, um die gewünschteZeit einzustellen (unter 5).* Wenn Sie die Taste gedrückt halten, rückt die Zeit zuerst in Minutenintervallen, dann in
Zehn-Minuten-Intervallen und dann in Ein-Stunden-Intervallen vor.6. Drücken Sie die Taste EIN/AUS 1, um die gewünschte Betriebsart auszuwählen (EIN oder
AUS) unter 6.* Jedes Drücken ändert die nächste Einstellung in der folgenden Reihenfolge: keine
Anzeige (keine Einstellung) → “ON” → “OFF”.7. Drücken Sie die entsprechende Taste Temperatur einstellen 3, um die gewünschte
Temperatur einzustellen (unter 7).* Jedes Drücken ändert die Einstellung in der folgenden Reihenfolge: keine Anzeige (keine
Einstellung) ⇔ 24 ⇔ 25 ⇔ ... ⇔ 29 ⇔ 30 ⇔ 12 ⇔ ... ⇔ 23 ⇔ keine Anzeige.(Verfügbarer Bereich: Der Bereich für die Einstellung ist 12 °C bis 30 °C. Der tatsächlicheBereich, über den die Temperatur gesteuert werden kann, variiert jedoch entsprechenddes Typs des angeschlossenen Geräts.)
8. Nachdem Sie die entsprechenden Einstellungen unter Schritt 5, 6 und 7 durchgeführt haben,drücken Sie die Taste Filter 4, um die Werte zu speichern.Um die aktuell eingestellten Werte für den ausgewählten Betrieb einzustellen, drücken Siedie Taste Check (Löschen) 1 einmal kurz.* Die angezeigte Zeiteinstellung ändert sich zu “—:—” und die Ein/Aus- und Temperaturein-
stellungen verschwinden.(Um alle wöchentlichen Timer-Einstellungen gleichzeitig zu löschen, halten Sie die TasteCheck (Löschen) 0 mindestens zwei Sekunden lang gedrückt. Das Display beginnt zublinken, wodurch angezeigt wird, daß alle Einstellungen gelöscht wurden.)
Hinweis:Ihre neuen Einträge werden storniert, wenn Sie die Taste Modus (Zurück) 2 drücken, bevor Siedie Taste Filter 4 drücken.Wenn Sie zwei oder mehr unterschiedliche Betriebsarten für genau dieselbe Zeit eingestellthaben, wird nur die Betriebsart mit der höchsten Betriebsart-Nr. ausgeführt.9. Wiederholen Sie die Schritte 3 bis 8 nach Bedarf, um so viele der verfügbaren Zellen
auszufüllen, wie Sie möchten.10. Drücken Sie die Taste Modus (Zurück) 2, um zum Standardkontrollbildschirm zurückzu-
kehren und den Einstellvorgang zu beenden.11. Um den Timer zu aktivieren, drücken Sie die Taste Timer Ein/Aus 9, so daß die Anzeige
“Timer Off” vom Bildschirm verschwindet. Achten Sie darauf, daß die Anzeige “Timer Off”verschwunden ist.* Wenn es keine Timer-Einstellungen gibt, blinkt die Anzeige “Timer Off” auf dem Bildschirm.
Zeigt die Temperatureinstellung an* Erscheint nicht, wenn die Temperatur nicht
eingestellt ist.
˚C
SUNON
WEEKLY
6
7
5Zeigt die Zeiteinstellung an Zeigt die ausgewählte Betriebsart an (EIN oder AUS)* Erscheint nicht, wenn die Betriebsart nicht eingestellt ist.
<So zeigen Sie den wöchentlichen Timer an>
1. Achten Sie darauf, daß die wöchentliche Timer-Anzeige auf dem Bildschirmsichtbar ist (unter 1).
2. Drücken Sie die Taste Timer-Menü B, so daß “Monitor” auf dem Bildschirmerscheint (unter 8).
3. Drücken Sie die Taste Timer Ein/Aus (Tag einstellen) 9 so oft wie nötig, umden Tag einzustellen, den Sie anzeigen möchten.
4. Drücken Sie die Taste Betrieb oder (7 oder 8) so oft wie nötig, umden auf dem Display angezeigten Timer-Betrieb zu ändern (unter 9).* Mit jedem Drücken gelangen Sie zur nächsten Timer-Betriebsart in der
Reihenfolge der Zeiteinstellung.5. Um den Monitor zu schließen und zum Standardkontrollbildschirm zurück-
zukehren, drücken Sie die Taste Modus (Zurück) 2.
<So schalten Sie den wöchentlichen Timer aus>
Drücken Sie die Taste Timer Ein/Aus 9, so daß “Timer Off” unter 0 erscheint.
˚C
˚C
TIME SUN
WEEKLY
0
˚C
˚C
TIME SUN
WEEKLY
0
<So schalten Sie den wöchentlichen Timer ein>Drücken Sie die Taste Timer Ein/Aus 9, so daß die Anzeige “Timer Off” (unter0) verschwindet.
Timer-Einstellungen

– 37 –
2 Verwenden des einfachen Timers� Sie haben drei Möglichkeiten, den einfachen Timer einzustellen.
• Nur Startzeit: Die Klimaanlage startet, wenn die eingestellte Zeit vergan-gen ist.
• Nur Stopzeit: Die Klimaanlage stoppt, wenn die eingestellte Zeit vergan-gen ist.
• Start- und Stopzeiten:Die Klimaanlage startet und stoppt, wenn die entsprechen-den Zeiten vergangen sind.
� Der einfache Timer (Start und Stop) kann nur einmal innerhalb eines Zeitraums von72 Stunden eingestellt werden. Die Zeiteinstellung erfolgt in Stunden-Schritten.
Hinweis:*1. Der wöchentliche Timer/einfache Timer/Auto-Off-Timer können nicht gleichzeitig
eingestellt werden.*2. Der einfache Timer funktioniert nicht, wenn eine der folgenden Bedingungen
wirksam ist:Die Timerfunktion ist ausgeschaltet; das System befindet sich in einem unnormalenZustand; ein Testlauf wird durchgeführt; die Fernbedienung führt einen Selbst-check oder eine Diagnose durch; der Benutzer wählt gerade eine Funktion aus; derBenutzer stellt gerade den Timer ein; das System wird zentral gesteuert. (Unterdiesen Bedingungen ist der Ein/Aus-Betrieb deaktiviert.)
ONHr
AFTER
SIMPLE
PAR-21MAA
ON/OFF
FILTER
CHECK
OPERATION CLEAR
TEST
TEMP.
MENU
BACK DAYMONITOR/SET
CLOCK
ON/OFF
2 A 9
0
4
1
B
<So stellen Sie den einfachen Timer ein>
ONHr
AFTER
SIMPLE
4
1
3
2
1. Achten Sie darauf, daß Sie sich im Standardkontrollbildschirm befinden und daß dieAnzeige des einfachen Timers auf dem Display angezeigt wird (unter 1).Wenn etwas anderes als der einfache Timer angezeigt wird, stellen Sie den SIMPLETIMER mit Hilfe der Timer-Funktionseinstellung der Funktionsauswahl ein (siehe6.[4]–3 (3)).
2. Drücken Sie die Taste Timer-Menü B, so daß “Set Up” auf dem Bildschirm erscheint(unter 2). (Beachten Sie, daß mit jedem Tastendruck die Anzeige zwischen “Set Up”und “Monitor” umgeschaltet wird.)
3. Drücken Sie die Taste EIN/AUS 1, um die aktuelle EIN- oder AUS-Einstellung deseinfachen Timers anzuzeigen. Drücken Sie die Taste einmal, um die restliche Zeitunter EIN anzuzeigen, und dann noch einmal, um die restliche Zeit unter AUSanzuzeigen. (Die Anzeige EIN/AUS erscheint unter 3.)• “EIN”-Timer: Die Klimaanlage startet den Betrieb, wenn die angegebene Anzahl
Stunden vergangen ist.• “AUS”-Timer: Die Klimaanlage stoppt den Betrieb, wenn die angegebene Anzahl
Stunden vergangen ist.4. Wenn “ON” oder “OFF” unter 3 angezeigt wird: Drücken Sie die entsprechende
Taste Zeit einstellen A so oft wie nötig, um die Stunden auf EIN (falls “ON” angezeigtwird) oder die Stunden auf AUS (falls “OFF” angezeigt wird) unter 4 einzustellen.• Verfügbarer Bereich: 1 bis 72 Stunden
5. Um sowohl die Zeiten für EIN als auch für AUS einzustellen, wiederholen Sie dieSchritte 3 und 4.* Beachten Sie, daß die AUS- und EIN-Zeiten nicht auf denselben Wert eingestellt
werden können.6. So löschen Sie die aktuelle EIN- oder AUS-Einstellung: Zeigen Sie die EIN- oder AUS-
Einstellung (siehe Schritt 3) an und drücken Sie dann die Taste Check (Löschen) 0,so daß die Zeiteinstellung zu “—” unter 4 zurückkehrt. (Wenn Sie nur eine EIN-Einstellung oder nur eine AUS-Einstellung verwenden wollen, achten Sie darauf, daßdie Einstellung, die Sie nicht verwenden möchten, als “—” angezeigt wird.)
7. Nach Durchführung der oben angegebenen Schritte 3 bis 6 drücken Sie die TasteFilter 4, um den Wert zu speichern.
Hinweis:Ihre neuen Einstellungen werden storniert, wenn Sie die Taste Modus (Zurück) 2drücken, bevor Sie die Taste Filter 4 drücken.
8. Drücken Sie die Taste Modus (Zurück) 2, um zum Standardkontrollbildschirmzurückzukehren.
9. Drücken Sie die Taste Timer Ein/Aus 9, um den Timer-Countdown zu starten. Wennder Timer läuft, wird der Timer-Wert auf dem Display angezeigt. Achten Sie darauf,ob der Timer-Wert sichtbar und richtig ist.
Timer-Einstellung
Aktion (Ein oder Aus)* “— —” wird angezeigt, wenn es
keine Einstellung gibt.

– 38 –
TIMER ON
OFF
Hr
AFTER
SIMPLE 1
65
<Anzeigen der aktuellen Einstellungen des einfachen Timers>
1. Achten Sie darauf, daß die Anzeige des einfachen Timers auf dem Bild-schirm sichtbar ist (unter 1).
2. Drücken Sie die Taste Timer-Menü B, so daß “Monitor” auf dem Bildschirmerscheint (unter 5).• Falls der einfache EIN- oder AUS-Timer läuft, erscheint der aktuelle
Timer-Wert unter 6.• Falls die EIN- und AUS-Werte beide eingestellt wurden, erscheinen
beide Werte abwechselnd.3. Drücken Sie die Taste Modus (Zurück) 2, um die Monitoranzeige zu
schließen und zum Standardkontrollbildschirm zurückzukehren.
Timer-Einstellung
<So schalten Sie den einfachen Timer aus...>Drücken Sie die Taste Timer Ein/Aus 9, so daß die Timer-Einstellung nichtmehr auf dem Bildschirm erscheint (unter 7).
<So starten Sie den einfachen Timer...>
Drücken Sie die Taste Timer Ein/Aus 9, so daß die Timer-Einstellungen unter7 sichtbar sind.
˚C
˚CSIMPLE
7
˚C
˚C
ONHr
AFTER
SIMPLE
7
BeispieleFalls die EIN- und AUS-Zeiten beide im einfachen Timer eingestellt wurden, werden der Betriebund die Anzeige wie unten dargestellt.
Beispiel 1:Starten Sie den Timer, wobei die EIN-Zeit früher als die AUS-Zeit eingestellt ist.EIN-Einstellung: 3 StundenAUS-Einstellung:7 Stunden
ONHr
AFTER
SIMPLE
˚C
˚C
OFF
Hr
AFTER
SIMPLE
SIMPLE
˚C
˚C
OFF
Hr
AFTER
SIMPLE
ONHr
AFTER
SIMPLE
˚C
˚CSIMPLE
Beispiel 2:Starten Sie den Timer, wobei die AUS-Zeit vor der EIN-Zeit liegt.EIN-Einstellung: 5 StundenAUS-Einstellung:2 Stunden
�
�
�
�
3 Stundennach dem
Timer-Start
Beim Timer-Start
7 Stunden nachdem Timer-Start
Das Display zeigt die EIN-Einstel-lung des Timers (Stunden bleibenEIN).
Die Anzeige wechselt zur Anzeigeder AUS-Einstellung des Timers(Stunden bleiben AUS).Die angezeigte Zeit entsprichtder Einstellung AUS (7 Stunden)– Einstellung EIN (3 Stunden) =4 Stunden.
Die Klimaanlage schaltet sich ausund bleibt aus, bis sie von jeman-dem erneut gestartet wird.
2 Stundennach dem
Timer-Start
Beim Timer-Start
5 Stunden nachdem Timer-Start
Das Display zeigt die AUS-Ein-stellung des Timers (Stunden blei-ben AUS).
Das Display wechselt zur Anzeigeder EIN-Einstellung des Timers(Stunden bleiben EIN).Die angezeigte Zeit entsprichtder Einstellung EIN (5 Stunden)– Einstellung AUS (2 Stunden) =3 Stunden.
Die Klimaanlage schaltet sich einund läuft weiter, bis sie jemandausschaltet.

– 39 –
AFTER
TIMER
OFF
AUTO OFF
5
1
4
3 Verwenden des Auto-Off-Timers� Dieser Timer beginnt den Countdown, wenn die Klimaanlage startet, und schaltet die
Klimaanlage aus, wenn die eingestellte Zeit abgelaufen ist.� Die verfügbaren Einstellungen gehen in 30-Minuten-Intervallen von 30 Minuten bis
zu 4 Stunden.
Hinweis:*1. Der wöchentliche Timer/einfache Timer/Auto-Off-Timer können nicht gleichzeitig
eingestellt werden.*2. Der Auto-Off-Timer funktioniert nicht, wenn eine der folgenden Bedingungen
wirksam ist:Die Timerfunktion ist ausgeschaltet; das System befindet sich in einem unnormalenZustand; ein Testlauf wird durchgeführt; die Fernbedienung führt einen Selbst-check oder eine Diagnose durch; der Benutzer wählt gerade eine Funktion aus; derBenutzer stellt gerade den Timer ein; das System wird zentral gesteuert. (Unterdiesen Bedingungen ist der Ein/Aus-Betrieb deaktiviert.)
AFTER OFF
AUTO OFF
PAR-21MAA
ON/OFF
FILTER
CHECK
OPERATION CLEAR
TEST
TEMP.
MENU
BACK DAYMONITOR/SET
CLOCK
ON/OFF
2 A 9
4
B
<So stellen Sie den Auto-Off-Timer ein>
1. Achten Sie darauf, daß Sie sich im Standardkontrollbildschirm befinden und daß dieAnzeige “Auto Off Timer” auf dem Display angezeigt wird (unter 1).Wenn etwas anderes als der Auto-Off-Timer angezeigt wird, stellen Sie den AUTO-OFF-TIMER mit Hilfe der Timer-Funktionseinstellung der Funktionsauswahl ein(siehe 6.[4]–3 (3)).
2. Halten Sie die Taste Timer-Menü B 3 Sekunden lang gedrückt, so daß “Set Up” aufdem Bildschirm erscheint (unter 2).(Beachten Sie, daß mit jedem Tastendruck die Anzeige zwischen “Set Up” und“Monitor” umgeschaltet wird.)
3. Drücken Sie die entsprechende Taste Zeit einstellen A so oft wie nötig, um die OFF-Zeit einzustellen (unter 3).
4. Drücken Sie die Taste Filter 4, um die Einstellung zu speichern.
Hinweis:Ihr Eintrag wird storniert, wenn Sie die Taste Modus (Zurück) 2 drücken, bevor Sie dieTaste Filter 4 drücken.
5. Drücken Sie die Taste Modus (Zurück) 2, um den Einstellvorgang zu beenden undzum Standardkontrollbildschirm zurückzukehren.
6. Falls die Klimaanlage bereits läuft, beginnt der Timer sofort mit dem Countdown.Achten Sie darauf, zu überprüfen, ob die Timer-Einstellung richtig auf demDisplay erscheint.
<Überprüfen der aktuellen Einstellung des Auto-Off-Timers>
AFTER OFF
AUTO OFF
3
1
2 Timer-Einstellung
Timer-Einstellung
1. Achten Sie darauf, daß “Auto Off” auf dem Bildschirm sichtbar ist (unter 1).2. Halten Sie die Taste Timer-Menü B 3 Sekunden lang gedrückt, so daß “Monitor” auf
dem Bildschirm angegeben wird (unter 4).• Der Timer, der noch beendet werden muß, erscheint unter 5.
3. Um den Monitor zu schließen und zum Standardkontrollbildschirm zurückzukehren,drücken Sie die Taste Modus (Zurück) 2.
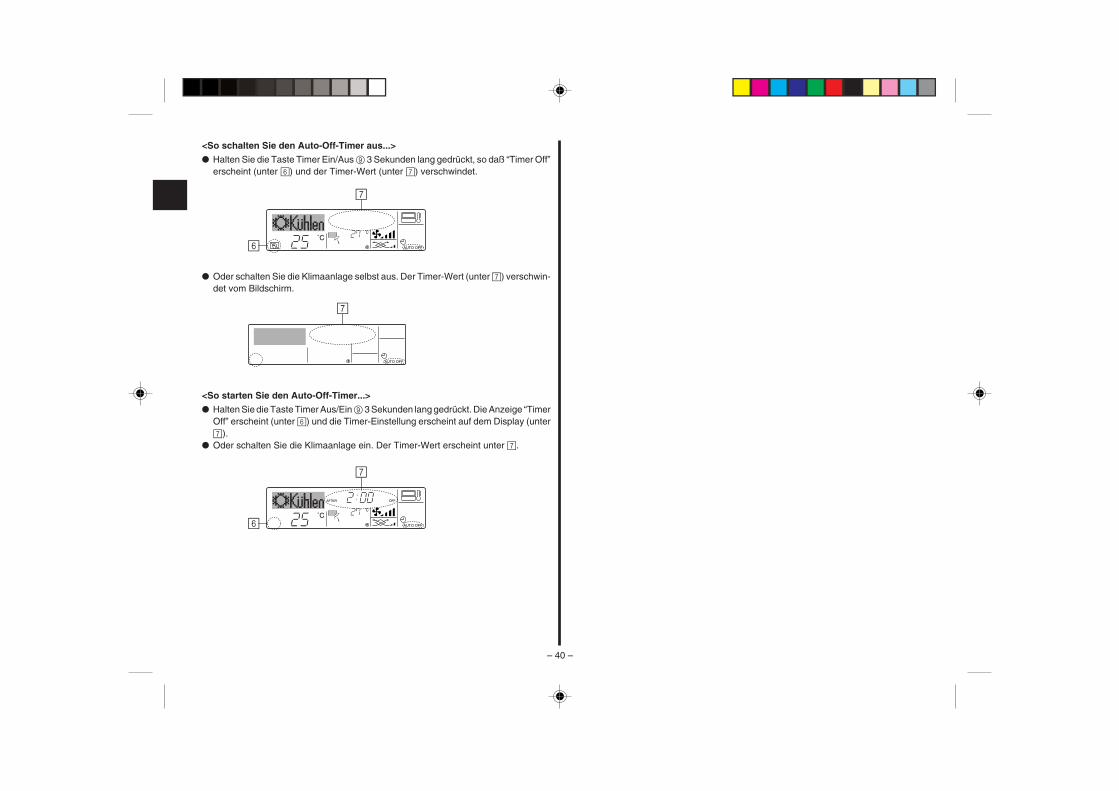
– 40 –
<So schalten Sie den Auto-Off-Timer aus...>
� Halten Sie die Taste Timer Ein/Aus 9 3 Sekunden lang gedrückt, so daß “Timer Off”erscheint (unter 6) und der Timer-Wert (unter 7) verschwindet.
� Oder schalten Sie die Klimaanlage selbst aus. Der Timer-Wert (unter 7) verschwin-det vom Bildschirm.
<So starten Sie den Auto-Off-Timer...>
� Halten Sie die Taste Timer Aus/Ein 9 3 Sekunden lang gedrückt. Die Anzeige “TimerOff” erscheint (unter 6) und die Timer-Einstellung erscheint auf dem Display (unter7).
� Oder schalten Sie die Klimaanlage ein. Der Timer-Wert erscheint unter 7.
˚C
˚CAUTO OFF6
7
AUTO OFF
7
˚C
˚C
AFTER OFF
AUTO OFF6
7

– 41 –
(4) Sperren der Fernbedienungstasten (Beschränkung der Betriebs-funktionen)
� Wenn Sie möchten, können Sie die Tasten der Fernbedienung sperren. Sie könnendie Funktionsauswahl der Fernbedienung verwenden, um auszuwählen, welche Artvon Sperre Sie verwenden möchten. (Informationen zur Auswahl des Sperrtypsfinden Sie in Abschnitt 6, Punkt [4]–2 (1).)Sie können eine der zwei folgenden Sperrarten verwenden:
1 Alle Tasten sperren: Sperrt alle Tasten auf der Fernbedienung.2 Alle außer EIN/AUS sperren: Sperrt alle Tasten außer der Taste EIN/AUS.
Hinweis:Die Anzeige “Locked” erscheint auf dem Bildschirm, um anzugeben, daß die Tasten zurZeit gesperrt sind.
˚C
˚C
TIME SUN
FUNCTION
PAR-21MAA
ON/OFF
FILTER
CHECK
OPERATION CLEAR
TEST
TEMP.
MENU
BACK DAYMONITOR/SET
CLOCK
ON/OFF
4
1
1
Sperr-Anzeige
<So sperren Sie die Tasten>
1. Halten Sie die Taste Filter 4 zusammen mit der Taste EIN/AUS 1 2 Sekunden langgedrückt. Die Anzeige “Locked” erscheint auf dem Bildschirm (unter 1) und zeigt an,daß die Sperre jetzt aktiv ist.* Wenn das Sperren in der Funktionsauswahl deaktiviert wurde, zeigt der Bild-
schirm die Meldung “Not Available” an, wenn Sie die Tasten wie oben beschriebendrücken.
• Wenn Sie eine gesperrte Taste drücken, blinkt die Anzeige “Locked” (unter 1) aufdem Display.
˚C
˚C
FUNCTION1
˚C
˚C
FUNCTION1
<So entsperren Sie die Tasten>1. Halten Sie die Taste Filter 4 zusammen mit der Taste EIN/AUS 1 2 Sekunden lang
gedrückt – die Anzeige “Locked” verschwindet vom Bildschirm (unter 1).
˚C
˚C
1

– 42 –
(5) Weitere Anzeigen<Zentral gesteuert>
ON/OFF TEMP.
˚C
˚C
� Angezeigt, wenn der Betrieb von der Zentralsteuerung usw. kontrolliert wird.Nachfolgend werden eingeschränkte Operationen gezeigt.• EIN/AUS (inkl. Timerbetrieb)• Betriebsart• Temperatureinstellung
Hinweis:Kann auch individuell eingeschränkt sein.
<Blinkende Modus-Anzeige>
ON/OFF TEMP.
˚C
˚C
� Bei DauerblinkenWird angezeigt, wenn eine andere Innenanlage an eine Außenanlage angeschlos-sen ist, die bereits in einer anderen Betriebsart arbeitet.Abstimmung mit der Betriebsart der anderen Innenanlage.
� Wenn Modus geschaltet wird, nachdem die Anzeige blinktAngezeigt, wenn die Betriebsart für jede Saison durch die Zentralsteuerung usw.eingeschränkt wird.Andere Betriebsart benutzen.
<“Filter” blinkt>
ON/OFF TEMP.
˚C
˚CFILTER
� Anzeige, daß der Filter gereinigt werden muß.Filter reinigen.
� “FILTER”-Anzeige zurücksetzenWird nach dem Reinigen des Filters die Taste [FILTER] zweimal hintereinandergedrückt, wird die Anzeige gelöscht und zurückgesetzt.
Hinweis:� Werden zwei oder mehr Innenanlagen gesteuert, kann die Reinigungsperiode
entsprechend der Filtertypen unterschiedlich sein. Wird die Reinigungsperiode derHauptanlage erreicht, wird “FILTER” angezeigt. Ist die Anzeige Filter ausgeschaltet,ist die kumulierte Zeit zurückgesetzt.
� “FILTER” zeigt die Reinigungsperiode an, in der die Klimaanlage unter allgemeineninneren Luftbedingungen in einer bestimmten Zeit betrieben wurde. Da der Grad derVerunreinigung von den Umgebungskonditionen abhängig ist, muß der Filter ent-sprechend gereinigt werden.
� Die kumulative Zeit der Reinigungsperiode der Filter unterscheidet sich nach denentsprechenden Modellen.
– 43 –
<Blinkende Fehlercodes>
Bei CITY MULTI-Modellen Bei Mr.Slim-Modellen
ON/OFF
ERROR CODE
ON/OFF
ERROR CODE
Lampe EIN(blinkt)
FehlercodeInnengerät-Nr.
� Falls sowohl die Lampe EIN als auch der Fehlercode blinken: Dies bedeutet, daß die Klimaanlage gestört ist und der Betrieb gestoppt wurde (und nicht wiederaufgenommenwerden kann). Notieren Sie sich die angegebene Gerätenummer und den Fehlercode und schalten Sie dann die Netztaste der Klimaanlage aus und rufen Sie Ihren Händleroder Servicetechniker.
Wenn Sie eine Telefonnummer eingegeben haben, die bei Auftreten eines Problems angerufen werdensollte, zeigt der Bildschirm diese Nummer an. (Sie können dies in der Funktionsauswahl einrichten.Informationen dazu finden Sie in Abschnitt 6.)
Kältemitteladressedes Innengeräts
Fehlercode Innengerät-Nr.
Wechselnde Anzeige
Lampe EIN(blinkt)
Bei CITY MULTI-Modellen Bei Mr.Slim-Modellen Wenn die Taste Check gedrückt ist:
� Wenn nur der Fehlercode blinkt (während die Lampe EIN leuchtet): Der Betrieb läuft weiter, es kann jedoch ein Problem mit dem System vorliegen. In diesem Fall sollten Sieden Fehlercode notieren und Ihren Händler oder Servicetechniker um Rat fragen.
* Falls Sie eine Telefonnummer eingegeben haben, die bei Auftreten eines Problems angerufen werden soll, drücken Sie die Taste Check und die Nummer wird auf dem Bildschirmangezeigt. (Sie können dies in der Funktionsauswahl einrichten. Informationen dazu finden Sie in Abschnitt 6.)
ON/OFF
˚C
˚C
ERROR CODE
ON/OFF
˚C
˚C
ERROR CODE
ON/OFF
CALL:XXXXXXX:XXX
Fehlercode Fehlercode
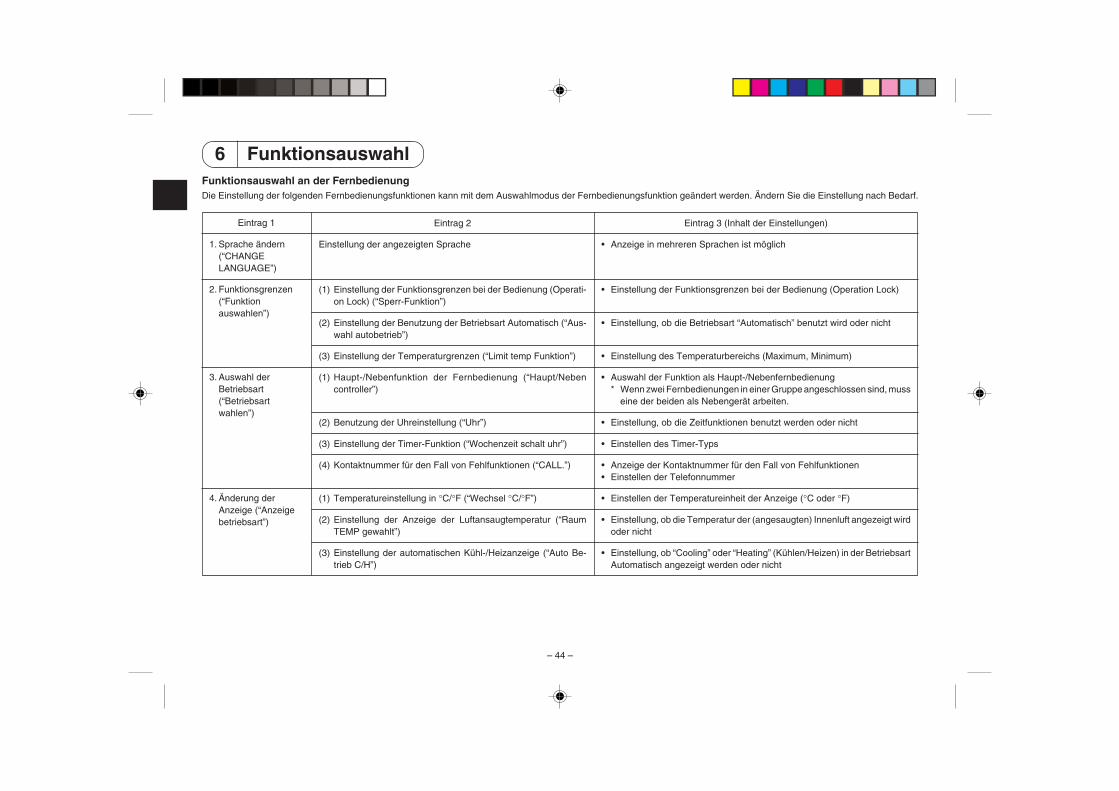
– 44 –
6 FunktionsauswahlFunktionsauswahl an der FernbedienungDie Einstellung der folgenden Fernbedienungsfunktionen kann mit dem Auswahlmodus der Fernbedienungsfunktion geändert werden. Ändern Sie die Einstellung nach Bedarf.
Eintrag 1
1. Sprache ändern(“CHANGELANGUAGE”)
2. Funktionsgrenzen(“Funktionauswahlen”)
3. Auswahl derBetriebsart(“Betriebsartwahlen”)
4. Änderung derAnzeige (“Anzeigebetriebsart”)
Eintrag 2
Einstellung der angezeigten Sprache
(1) Einstellung der Funktionsgrenzen bei der Bedienung (Operati-on Lock) (“Sperr-Funktion”)
(2) Einstellung der Benutzung der Betriebsart Automatisch (“Aus-wahl autobetrieb”)
(3) Einstellung der Temperaturgrenzen (“Limit temp Funktion”)
(1) Haupt-/Nebenfunktion der Fernbedienung (“Haupt/Nebencontroller”)
(2) Benutzung der Uhreinstellung (“Uhr”)
(3) Einstellung der Timer-Funktion (“Wochenzeit schalt uhr”)
(4) Kontaktnummer für den Fall von Fehlfunktionen (“CALL.”)
(1) Temperatureinstellung in °C/°F (“Wechsel °C/°F”)
(2) Einstellung der Anzeige der Luftansaugtemperatur (“RaumTEMP gewahlt”)
(3) Einstellung der automatischen Kühl-/Heizanzeige (“Auto Be-trieb C/H”)
Eintrag 3 (Inhalt der Einstellungen)
• Anzeige in mehreren Sprachen ist möglich
• Einstellung der Funktionsgrenzen bei der Bedienung (Operation Lock)
• Einstellung, ob die Betriebsart “Automatisch” benutzt wird oder nicht
• Einstellung des Temperaturbereichs (Maximum, Minimum)
• Auswahl der Funktion als Haupt-/Nebenfernbedienung* Wenn zwei Fernbedienungen in einer Gruppe angeschlossen sind, muss
eine der beiden als Nebengerät arbeiten.
• Einstellung, ob die Zeitfunktionen benutzt werden oder nicht
• Einstellen des Timer-Typs
• Anzeige der Kontaktnummer für den Fall von Fehlfunktionen• Einstellen der Telefonnummer
• Einstellen der Temperatureinheit der Anzeige (°C oder °F)
• Einstellung, ob die Temperatur der (angesaugten) Innenluft angezeigt wirdoder nicht
• Einstellung, ob “Cooling” oder “Heating” (Kühlen/Heizen) in der BetriebsartAutomatisch angezeigt werden oder nicht

– 45 –
→→
[Flussdiagramm der Funktionsauswahl][1] Stoppen Sie die Klimaanlage, um den Funktionsauswahlmodus der Fernbedienung zu starten → [2] Wählen Sie aus Eintrag 1 aus. → [3] Wählen Sie aus Eintrag 2 aus. →[4] Nehmen Sie die Einstellung vor. (Einzelheiten werden in Eintrag 3 angegeben) → [5] Einstellung abgeschlossen. → [6] Umschaltung der Anzeige auf Normalbetrieb. (Ende)
(Halten Sie die Taste E gedrückt und drücken Sie Taste Dzwei Sekunden lang.)* Die Anzeige lässt sich während der Funktionsauswahl,
des Testlaufs und der Selbstdiagnose nicht ändern.
(Halten Sie die Taste E gedrückt und drük-ken Sie Taste D zwei Sekunden lang.)* Die Fernbedienung speichert die vorge-
nommenen Änderungen.
Drücken SieTaste G.
Siehe [4]–1Eintrag 3
(Inhalt der Einstellungen)
Siehe [4]–2. (1)
Siehe [4]–2. (2)
Siehe [4]–2. (3)
Siehe [4]–3. (1)
Siehe [4]–3. (2)
Siehe [4]–3. (3)
Siehe [4]–3. (4)
Siehe [4]–4. (1)
Siehe [4]–4. (2)
Siehe [4]–4. (3)
Eintrag 1 Funktionsauswahlmodus derFernbedienung
Eintrag 2
Auswahl derBetriebsart
(“Betriebsart wahlen”)
Normalbetriebsanzeige (Anzeige beideaktivierter Klimaanlage)
PAR-21MAA
ON/OFF
FILTER
CHECK
OPERATION CLEAR
TEST
TEMP.
MENU
BACK DAYMONITOR/SET
CLOCK
ON/OFF
F
G
C D
B
I
A
H
E
Sprache ändern(“CHANGE LANGUAGE”)
Funktionsgrenzen(“Funktion
auswahlen”)
Änderung der Anzeige(“Anzeige betriebsart”)
HINWEISDer Timer-Betrieb stoppt, wenn die Anzei-ge des Funktionsauswahlmodus auf dieNormalbetriebsanzeige umschaltet.
Drücken Sie Taste G.
Drücken SieTaste E.
Drücken SieTaste E.
DrückenSie TasteE.
DrückenSie TasteE.
Drücken SieTaste G.
Drücken SieTaste G.
Drücken SieTaste D.
Drücken SieTaste D.
Drücken SieTaste D.
→→
→→
→
→ Einstellung der Funktionsgrenzen bei der Bedienung (“Sperr-Funktion”)Drücken Sie Taste G.
Einstellung der Temperaturgrenzen (“Limit temp Funktion”)
Einstellung der Benutzung der Betriebsart Automatisch (“Auswahl autobetrieb”)
→ Temperatureinstellung in °C/°F (“Wechsel °C/°F”)Drücken Sie Taste G.
Einstellung der automatischen Kühl-/Heizanzeige (“Auto Betrieb C/H”)
Einstellung der Anzeige der Luftansaugtemperatur (“Raum TEMP gewahlt”)
→ Haupt-/Nebenfunktion der Fernbedienung (“Haupt/Neben controller”)Drücken Sie Taste G.
Einstellung der Timer-Funktion (“Wochenzeit schalt uhr”)
Benutzung der Uhreinstellung (“Uhr”)
Kontaktnummer für den Fall von Fehlfunktionen (“CALL.”)
PunktmatrixanzeigeDie mit CHANGE LANGUAGE(Sprache einstellen) eingestellteSprache wird hier angezeigt. Inden Darstellungen dieser Anlei-tung ist Englisch ausgewählt.

– 46 –
[Genaue Einstellung]
[4]–1. Einstellung CHANGE LANGUAGE (Sprache ändern)
Die Sprache des Punktmatrix-Displays kann eingestellt werden.• Drücken Sie die Taste [ MENU], G um die Sprache einzustellen.
1 Japanisch (JP), 2 Englisch (GB), 3 Deutsch (D), 4 Spanisch (E),5 Russisch (RU), 6 Italienisch (I), 7 Chinesisch (CH), 8 Französisch (F)
[4]–2. Funktionsgrenzen
(1) Einstellung der Funktionsgrenzen bei der Bedienung (Operation Lock)• Zur Umschaltung der Einstellung drücken Sie die Taste [ ON/OFF] D.
1 no1 : Die Einstellung der Bedienungssperre (Operation Lock) gilt für alleTasten außer der [ ON/OFF]-Taste.
2 no2 : Die Einstellung der Bedienungssperre gilt für alle Tasten.3 OFF (Anfängliche Einstellungswert):Die Einstellung der Bedienungssperre
wird nicht vorgenommen.* Damit die Bedienungssperre (Operation Lock) in der normalen Anzeige gültig
ist, müssen Sie die [FILTER]-Taste gedrückt halten und währenddessen dieTaste [ ON/OFF] zwei Sekunden lang drücken, nachdem Sie die obigeEinstellung durchgeführt haben.
(2) Einstellung der Benutzung der Betriebsart AutomatischWenn die Fernbedienung an einem Gerät angeschlossen ist, bei dem ein automati-scher Betrieb möglich ist, können die folgenden Einstellungen vorgenommen werden.• Zur Umschaltung der Einstellung drücken Sie die Taste [ ON/OFF] D.
1 ON (Anfängliche Einstellungswert):Die Betriebsart Automatisch wird angezeigt, wenn diese Betriebs-art ausgewählt wird.
2 OFF: Die Betriebsart Automatisch wird nicht angezeigt, wenn dieseBetriebsart ausgewählt wird.
(3) Einstellung der TemperaturgrenzenNach dieser Einstellung kann die Temperatur im eingestellten Bereich verändertwerden.• Zur Umschaltung der Einstellung drücken Sie die Taste [ ON/OFF] D.
1 Limit Kuhl Temp : Der Temperaturbereich kann in der Betriebsart Kühlen/Trocknen geändert werden.
2 Limit Heiz Temp : Der Temperaturbereich kann in der Betriebsart Heizengeändert werden.
3 Limit Auto Temp : Der Temperaturbereich kann in der Betriebsart Automa-tisch geändert werden.
4 OFF (Anfangseinstellung):Die Temperaturbereichsgrenzen sind nicht aktiv.
* Wenn eine andere Einstellung als OFF gewählt wird, werden die Temperatur-bereichsgrenzen für Kühlen, Heizen und automatischen Betrieb gleichzeitigeingestellt. Der Bereich kann jedoch nicht begrenzt werden, wenn der einge-stellte Temperaturbereich sich nicht geändert hat.
• Um die Temperatur zu erhöhen oder zu verringern, drücken Sie die Taste[ TEMP. ( ) oder ( )] F.
• Um die Obergrenze und die Untergrenze einzustellen, drücken Sie die Taste[ ] H (Gebläsegeschwindigkeit). Die ausgewählte Einstellung blinkt, unddie Temperatur kann eingestellt werden.
• Einstellbarer BereichBetriebsart Kühlen/Trocknen:
Untergrenze: 19°C bis 30°C Obergrenze: 30°C bis 19°CBetriebsart Heizen:
Untergrenze: 17°C bis 28°C Obergrenze: 28°C bis 17°CBetriebsart Automatisch:
Untergrenze: 19°C bis 28°C Obergrenze: 28°C bis 19°C* Der einstellbare Bereich hängt vom angeschlossenen Gerät ab. (Mr.-Slim-
Geräte, CITY MULTI-Geräte und Zwischentemperaturgeräte)
[4]–3. Einstellen der Auswahl der Betriebsart
(1) Haupt-/Nebenfunktion der Fernbedienung• Zur Umschaltung der Einstellung drücken Sie die Taste [ ON/OFF] D.
1 Haupt : Die Fernbedienung fungiert als Hauptfernbedienung.2 Neben: Die Fernbedienung fungiert als Nebenfernbedienung.
(2) Benutzung der Uhreinstellung• Zur Umschaltung der Einstellung drücken Sie die Taste [ ON/OFF] D.
1 ON : Die Clock-Funktion kann benutzt werden.2 OFF : Die Clock-Funktion kann nicht benutzt werden.
(3) Einstellung der Timer-Funktion• Zur Umschaltung der Einstellung drücken Sie die Taste [ ON/OFF] D
(Wählen Sie einen der folgenden Einträge aus.).1 Wochenzeit schalt uhr (Anfängliche Einstellungswert):
Der Wochen-Timer kann benutzt werden.2 Auto Zeit funktion Aus : Der Auto-Off-Timer kann benutzt werden.3 Einfnche zeit funktion : Der einfache Timer kann benutzt werden.4 Zeitschaltuhr Aus : Der Timer-Modus kann nicht benutzt werden.
* Wenn die Verwendung der Clock-Einstellung auf OFF steht, kann “Wochen-zeit schalt uhr” nicht benutzt werden.

– 47 –
(4) Kontaktnummer für den Fall von Fehlfunktionen• Zur Umschaltung der Einstellung drücken Sie die Taste [ ON/OFF] D.
1 CALL OFF : Die eingestellten Kontaktnummern werden im Fallevon Fehlfunktionen nicht angezeigt.
2 CALL **** *** **** : Die eingestellten Kontaktnummern werden im Fallevon Fehlfunktionen angezeigt.
CALL_ : Die Kontaktnummer kann eingegeben werden, wenndas Display so aussieht wie links gezeigt.
• Eingabe der KontaktnummernZur Eingabe der Kontaktnummern gehen Sie wie folgt vor.Bewegen Sie den blinkenden Cursor auf die eingestellten Nummern.Drücken Sie die Taste [ TEMP. ( ) und ( )] F, um den Cursor nachrechts (links) zu bewegen. Drücken Sie die Taste [ CLOCK ( ) und( )] C, um die Nummern einzustellen.
[4]–4. Einstellung der Anzeige
(1) Temperatureinstellung in °C/°F• Zur Umschaltung der Einstellung drücken Sie die Taste [ ON/OFF] D.
1 °C : Für die Temperatur wird die Einheit Celsius (°C) verwendet.2 °F : Für die Temperatur wird die Einheit Fahrenheit (°F) verwendet.
(2) Einstellung der Anzeige der Luftansaugtemperatur• Zur Umschaltung der Einstellung drücken Sie die Taste [ ON/OFF] D.
1 ON : Die Temperatur der Ansaugluft wird angezeigt.2 OFF : Die Temperatur der Ansaugluft wird nicht angezeigt.
(3) Einstellung der automatischen Kühl-/Heizanzeige• Zur Umschaltung der Einstellung drücken Sie die Taste [ ON/OFF] D.
1 ON : Entweder “Automatic cooling” (Automatisches Kühlen) oder“Automatic heating” (Automatisches Heizen) wird in der BetriebsartAutomatisch angezeigt.
2 OFF : Nur “Automatic” wird in der Betriebsart Automatisch angezeigt.

– 48 –
7 Technische Daten
Eintrag Angaben
Abmessungen 120 (H) × 130 (W) × 19 (D) mm
Gewicht 0,2 kg
Stromquelle 10 bis 13 V DC (vom Innengerät geliefert)
Stromverbrauch 0,3 W
Betriebsumgebung 0° bis 40°C, 30% bis 90% relative Feuchtigkeit
Zusammensetzung PS

Français
Système de contrôle CITY MULTI et commande à distance MApour climatiseurs Mitsubishi ultra minces Mr. SLIM.
Commande à distance MAPAR-21MAALivret d’finstructions
ON/OFF TEMP.
Veuillez lire attentivement ces instructions et veiller à utiliser correctement cet équipe-ment. Conservez ces instructions afin de pouvoir vous y rapporter le cas échéant.Veillez à transmettre ces instructions ainsi que les instructions de d’installationcorrespondantes à toute personne qui serait chargée de l’entretien de cetéquipement par la suite. L’installation et le déplacement de cet équipement ne doitêtre effectué que par un personnel qualifié. Toute tentative par un utilisateur finalpour installer ou déplacer cet équipement peut être source de conditions dange-reuses ou de dysfonctionnement.
TABLE DES MATIERES1. Précautions d’usage .................................................................... 50
2. Nomenclature .............................................................................. 52
3. Configuration d’écran .................................................................. 54
4. Régler le jour de la semaine et l’heure ........................................ 54
5. Utiliser la télécommande ............................................................. 55(1) Comment Démarrer, Arrêter, Changer de mode et Ajuster la
température .................................................................................. 55(2) Vitesse de ventilateur, direction de l’air, et ventilation .................. 57(3) Utiliser le programmateur ............................................................. 59
1 Utiliser le programmateur hebdomadaire ............................... 592 Utiliser le programmateur simple ............................................ 613 Utiliser le programmateur Arrêt Auto ...................................... 63
(4) Verrouiller les boutons de la télécommande(limite de fonctionnement d’opération) ......................................... 65
(5) Autres indications ......................................................................... 66
6. Sélection des fonctions ................................................................ 68
7. Spécifications .............................................................................. 72

– 50 –
1 Précautions d’usage� Les précautions sont classées comme suit, selon le danger potentiel.
Indique une condition ou une opération qui, si elle est mal gérée, peut provoquer des blessures graves ou la mort.
Indique une condition ou une opération qui, si elle est mal gérée, peut provoquer des blessures corporels ou desdégâts matériels.
AVERTISSEMENT
PRECAUTION
AVERTISSEMENT
N’essayez pas d’installer cet équipement vous-même.Veuillez demander à votre revendeur ou à un ingénieur qualifié d’effectuercette opération. Une mauvaise installation peut déclencher un feu, deschocs électriques ou des accidents graves.
Veillez à ce que cet équipement ait été convenablement accroché.Veillez à ce que cet équipement ait été convenablement accroché à unsupport solide, afin qu’il ne risque pas de tomber.
Veillez à ce qu’il dispose de l’alimentation indiquée.Ne pas respecter la tension indiquée peut être cause d’incendie ou dedéfaillance de l’équipement.
Éteignez cet équipement immédiatement s’il fonctionne de manièreanormale.Continuer à l’utiliser peut entraîner une défaillance, des chocs électriques,ou un incendie.Si vous constatez une odeur de brûlé ou tout autre dysfonctionnement,coupez l’alimentation immédiatement et consultez votre revendeur.
N’essayez pas de réinstaller cet équipement vous-même ailleurs.Une mauvaise réinstallation peut déclencher un feu, des chocs électriquesou des accidents graves.Veuillez demander à votre revendeur ou à un ingénieur qualifié d’effectuercette réinstallation.
Ne jetez pas vous-même cet équipement.Veuillez consulter votre revendeur, quand il sera temps de vous débarras-ser de cet équipement.
N’essayez pas de modifier ou de réparer cet équipement vous-mêmeUne tentative de modification ou de réparation peut déclencher un feu, deschocs électriques ou des accidents graves. Veuillez consulter votrerevendeur en cas de réparations nécessaires.
cessez d’utiliser cet équipement s’il ne fonctionne pas correctement(messages d’erreur récurrents et l’unité ne fonctionne pas comme vousvous y attendiez).Continuer à l’utiliser, ou tenter de l’utiliser dans un tel cas peut être caused’incendie ou de défaillance de l’équipement. Demandez son avis à votrerevendeur.

– 51 –
Éloignez toute matière dangereuse de cet équipement.N’installez pas cet équipement dans un lieu où il y a un risque de fuite degaz combustible. La présence de gaz combustible peut provoquer uneexplosion ou un feu.
Ne lavez pas cet équipement à l’eau.Un lavage à l’eau peut être cause de choc électrique ou de défaillance del’équipement.
Ne touchez pas les boutons avec les mains mouillées.Cela pourrait vous causer un choc électrique ou une défaillance del’équipement.
N’utilisez pas cet équipement à quelque chose pour lequel il n’a pasété conçu.Cet équipement doit être utilisé avec les systèmes de contrôle d’aérationde bâtiment Mitsubishi. Veuillez ne l’utiliser avec aucun autre système, àaucun autre usage, cela pourrait provoquer des dysfonctionnements.
Ne vaporisez pas d’insecticide ou de substance combustible sur cetéquipement.Conservez vos vaporisateurs et substances combustibles loin de cetéquipement, et ne dirigez jamais le jet d’un vaporisateur directement surcet équipement. Le contact ou la proximité de telles substances représenteun risque d’explosion ou d’incendie.
N’utilisez pas cet équipement dans un environnement inadapté.Ne l’utilisez pas dans des zones où se trouvent de grandes quantitésd’huile (de machine, etc.), de gaz d’échappement ou de sulfure. De telsenvironnements peuvent altérer les performances ou être cause dedéfaillances de l’équipement.
PRECAUTION
N’utilisez pas dÅfobjets pointus pour appuyer sur les boutons.L’usage d’objets pointus peut entraîner des chocs électriques ou unedéfaillance de l’équipement.
Ne pas utiliser en cas de températures extrêmes.N’utiliser que quand la température ambiante est dans les limites indi-quées sur les instructions. (Si les instructions n’indiquent aucune limite,n’utiliser que lors de températures comprises entre 0 °C et 40 °C.) Utilisercet équipement à des températures différentes peut causer des dysfonc-tionnements majeurs.
Ne pas tirer ou tordre les câbles de communication.Tirer ou tordre un câble peut provoquer un incendie ou une défaillance del’équipement.
Ne pas démonter.Toute tentatives de démontage pourrait entraîner un contact avec deséléments internes et les endommager, causer un incendie ou une dé-faillance de l’équipement.
N’essuyez pas cet équipement avec du benzène, du diluant ou destissus nettoyants chimiques.Ces substances peuvent être cause de décoloration ou de défaillance. Sil’équipement devient particulièrement sale, nettoyez-le avec un chiffonsoigneusement essoré, humidifié d’un solvant neutre dilué dans de l’eau,puis essuyez avec un chiffon sec.

– 52 –
2 Nomenclature
Section de l’affichage
Pour cette explication, toutes lesparties de l’affichage sont mon-trées allumées. Lors du fonction-nement réel, seuls les élémentscorrespondants seront allumés.
˚F˚C
˚F˚C
ERROR CODEAFTER
TIMERTIME SUN MON TUE WED THU FRI SAT
ON
OFF
Hr
AFTER
FILTERFUNCTION
ONLY1Hr.
WEEKLYSIMPLE
AUTO OFF
Indique l’opération en coursMontre le mode de fonctionne-ment, etc.* les affichages peuvent être en
plusieurs langues.
Témoin “Commande centrale”Indique que le fonctionnement dela commande à distance a étédésactivée par une commandemaîtresse.
Témoin “Programmateur éteint”Indique que le programmateur estéteint.
Réglage de températureIndique la température souhaitée.
Jour de la semaineIndique le jour de la semaine.
Affichage heure/programmateurAffiche l’heure, à moins que le programmateur sim-ple ou arrêt auto soit activé.Si le programmateur simple ou arrêt auto est enactivé, l’affichage indique le temps restant.
Témoin “Capteur”S’affiche lors de l’utilisation du capteurde la télécommande.
Indicateur “Verrouillé”Indique que les boutons de la com-mande à distance ont été bloqués.
Témoin “Nettoyer le filtre”S’allume quand il est temps de net-toyer le filtre.
Témoins du programmateurCe témoin s’allume quand le program-mateur correspondant est en fonction.
Témoin de montée/descented’airCe témoin indique dans quelledirection souffle l’air sortant.
Témoin “une heure seulement”Il s’affiche si le courant d’air estréglé sur faible et descendant, lorsdes modes FROID ou SEC. (L’opé-ration varie en fonction du mo-dèle.)Le témoin s’éteint au bout d’uneheure, et à ce moment-là le fluxd’air change aussi.
Affichage de températureambianteDonne la température ambiante.
Affichage du louvreMontre l’action de la grille de trans-fert. N’apparaît pas si la grille restestationnaire.
(Témoin de marche)Indique que l’appareil est en mar-che.
Témoin de vitesse du ventilateurMontre la vitesse sélectionnée pour leventilateur.
Témoin de ventilationApparaît quand l’unité fonctionne enmode Ventilation.

– 53 –
Section de commandes
PAR-21MAA
ON/OFF
FILTER
CHECK
OPERATION CLEAR
TEST
TEMP.
MENU
BACK DAYMONITOR/SET
CLOCK
ON/OFF
Boutons de réglage de température
Baisser
Monter
Bouton de menu du programmateur(Bouton Monitor/Set)
Bouton de mode(bouton d’entrée)
Boutons de réglage horaire
Reculer
Avancer
Bouton marche/arrêt du pro-grammateur(Bouton de réglage de la date)
Ouvrir laporte.
Bouton Marche/Arrêt
Bouton de vitesse du ventilateur
Bouton du filtre (Bouton )
Bouton de test defonctionnement
Bouton Check(bouton d’effacement)
Bouton de ventilation mon-tante/descendante
Bouton de louvre(Bouton opération )
pour la précédenteopération
Bouton de ventilation(bouton opération )
pour l’opération suivante
Remarque :� Si vous appuyez sur un bouton pour une fonction qui n’est pas installée sur l’unité intérieure, la télécommande affichera le
message “Indisponible”.Si vous utilisez la télécommande pour contrôler plusieurs unités, ce message n’apparaîtra que si la fonctionnalité n’existe passur l’unité mère.

– 54 –
3 Configuration d’écranLes affichages sont donnés dans ce manuel après la modification de la langue enFrançais, grâce à la Sélection des Fonctions de la commande à distance.Voyez la section 6, paragraphe [4]-1 pour modifier la langue. La langue de base est l’Anglais.<Types d’écrans>� Sélection des fonctions : Règle les fonctions et les plages disponibles
pour la télécommande (fonctions du program-mateur, restrictions de fonctionnement, etc.)
� Régler date / heure : Règle le jour de la semaine et l’heure.� Écrans de contrôle standards : Visualise et règle le fonctionnement du système
de conditionnement.� Moniteur du programmateur : Affiche le programmateur en place (hebdoma-
daire, simple ou arrêt automatique)� Configuration du programmateur : Règle le fonctionnement des programmateurs
(hebdomadaire, simple ou arrêt automatique)
˚F˚C
TIMERMON
OFF
WEEKLY
SUN MON TUE WED THU FRI SAT
WEEKLY
˚F˚C
˚C
TIME SUN
Sélection des fonctions Règle date / heure
Filtres de contrôle standards
OFF ON
Moniteur du programmateur Configuration du programmateur
A D C
B C
B
4 Régler le jour de la semaine et l’heure� Utilisez cet écran pour changer le jour de la semaine et l’heure.
Remarque :Le jour et l’heure n’apparaîtront pas si l’horloge a été déconnectée dans la sélection desfonctions.
Affichage du jour de lasemaine et de l’heure
˚C
˚C
TIME SUN
PAR-21MAA
ON/OFF
FILTER
CHECK
OPERATION CLEAR
TEST
TEMP.
MENU
BACK DAYMONITOR/SET
CLOCK
ON/OFF
2 4
9
1
A
<Comment régler le jour de la semaine et l’heure…>
Réglage de l’heureTIME SUN2
3
4
1. Appuyez sur le bouton de réglage horaire A ou pour appeler l’affichage 2.2. Appuyez sur le bouton 9 Timer On/Off pour régler le jour.
* À chaque fois que vous appuyez, vous avancez le jour affiché en 3 : Dim → Lun→ … → Ven → Sam.
3. Appuyez sur le bouton de réglage correspondant A afin de régler l’heure.* À chaque fois que vous maintenez le bouton appuyé, l’heure (en 4) augmentera
d’abord toutes les minutes, puis toutes les 10 minutes, puis toutes les heures.4. Après avoir effectué les réglages nécessaires des étapes 2 et 3, appuyez sur le
bouton 4 Filter pour valider ces informations.
Réglage du jour de la semaine
<Comment changer d’écran>Pour aller à A : Appuyer sur les boutons Mode et On/Off du programmateur durant 2 secondes.Pour aller à B : Appuyez sur le bouton Menu du programmateur.Pour aller à C : Appuyez sur le bouton Mode (Entrée).Pour aller à D : Appuyez sur l’un ou l’autre des boutons de réglage horaire ( ou ).

– 55 –
Remarque :Vos nouvelles informations des étapes 2 et 3 seront effacées si vous tapez le bouton2 Mode (Entrée) avant d’appuyer sur le bouton 4 Filter .
5. Appuyez sur le bouton 2 Mode (Entrée) pour terminer la procédure de réglage. Celaramènera l’affichage sur l’écran de contrôle standard, où 1 vous indiquera lenouveau jour et la nouvelle heure.
5 Utiliser la télécommande(1) Comment Démarrer, Arrêter, Changer de mode et Ajuster la tempé-
rature
˚C
˚C
PAR-21MAA
ON/OFF
FILTER
CHECK
OPERATION CLEAR
TEST
TEMP.
MENU
BACK DAYMONITOR/SET
CLOCK
ON/OFF
2
7
2
33
8
6
4
58
7
1156
<Pour commencer l’opération>
� Appuyez sur le bouton Marche/Arrêt 1.• Le témoin de marche 1 et la zone d’af-
fichage s’allument.
Remarque :� Quand l’unité est relancée, les réglages de
base sont les suivants.
<Pour arrêter le fonctionnement>
� Appuyez de nouveau sur le boutonMarche/Arrêt 1.• Le témoin de marche 1 et la
zone d’affichage s’éteignent.
Mode
Réglage detempératureVitesse deventilateur
Air montant/descendant
Réglages de télécommande
Dernier réglage
Dernier réglage
Dernier réglage
COOL ou DRY
Mode HEAT
FAN
Sortiehoriz.
DernierréglageSortiehoriz.

– 56 –
<Sélectionner le mode>� Quand l’unité est en fonction, appuyez sur le bouton 2 autant de fois que nécessaire.
• À chaque fois que vous appuyez, vous passez au mode de fonctionnementsuivant, selon la séquence indiquée ci-dessous :Le mode actuel est indiqué en 2.
→ COOL → DRY → FAN → AUTO → HEAT → Ventilate*1 *1,*3,*4 *1 *1,*2
Remarque :*1 Ce mode n’est disponible que sur certaines unités connectées.*2 N’apparaît que sur les unités Mr. Slim disposant d’une fonction de ventilation.*3 N’apparaît pas si le mode Auto a été désactivé au niveau de la sélection des
fonctions. Pour de plus amples informations sur comment régler cette fonction, voyezla section 6, paragraphe [4]–2 (2).
*4 CHAUFFAGE et FROID n’apparaissent pas en mode AUTO si l’affichage du mode Autoa été désactivé au niveau de la sélection des fonctions. Pour de plus amplesinformations sur comment régler cette fonction, voyez la section 6, paragraphe [4]–4 (3).
<Pour changer le réglage de température...>
� Pour baisser la température : Appuyez sur le bouton 3 de réglage de tempéra-ture .
� Pour augmenter la température : Appuyez sur le bouton 3 de réglage de tempéra-ture .
• À chaque fois que vous appuyez sur le bouton, vous changez le réglage de 1 °C.Le réglage actuel est affiché en 3.
• Les plages disponibles sont les suivantes : *1,*2
COOL ou DRYmode
FANAUTO modeHEAT mode
19 - 30 °C(67 - 87 °F) *3
19 - 28 °C(67 - 83 °F) *3
17 - 28 °C(63 - 83 °F) *3
Ne peut être réglé.
Remarque :*1 Les portées possibles varient en fonction du type d’unité connecté (Mr.Slim, CITY
MULTI, etc.).*2 Si les limites de la plage de température ont été réglées à partir de la sélection des
fonctions, les plages disponibles seront plus faibles que celles indiquées ci-dessus.Si vous tentez de régler une valeur hors de la plage restreinte, l’affichage indiqueraun message expliquant que la portée est actuellement limitée.Pour de plus amples informations sur comment régler et réinitialiser cette fonction,voyez la section 6, paragraphe [4]–2 (3).
*3 Si les sélection de fonctions sont réglées sur l’affichage de la température enFahrenheit. Pour de plus amples informations sur comment sélectionner °C ou °F,6, paragraphe [4]–4 (1).
<Affichage de température ambiante>
Lors du fonctionnement, la température d’entrée est indiquée en 4.
Remarque :� La portée affichée va de 8 °C à 39 °C. Si la température est inférieure à 8 °C ou au-
dessus de 39 °C, la valeur correspondante (8 °C ou 39 °C) clignotera à l’affichage.� Si vous utilisez la télécommande pour contrôler plusieurs unités, l’affichage ne
montrera que la température au niveau de l’unité mère.� Vous pouvez choisir quel capteur de température servira à détecter la température :
soit le capteur l’unité intérieure (“À l’unité”), soit le capteur de la télécommande(“Télécommande”). Le réglage par défaut est “À l’unité”.Pour passer au capteur de l’unité intérieure :
• Modèles CITY MULTI : Consultez votre revendeur.• Modèles Mr. Slim : Reportez-vous aux instructions d’installation.
� Si l’affichage de la température ambiante est désactivé dans la sélection desfonctions, la température ambiante n’apparaîtra pas. Pour de plus amples informa-tions sur comment activer ou désactiver cette fonction, voyez la section 6, paragra-phe [4]–4 (2).
� Si c’est l’affichage en Fahrenheit qui est sélectionné pour la sélection des fonctions,l’affichage indiquera le symbole °F. Pour de plus amples informations sur commentsélectionner °C ou °F, voyez la section 6, paragraphe [4]–4 (1).

– 57 –
(2) Vitesse de ventilateur, direction de l’air, et ventilation<Pour changer la vitesse de ventilation...>
� Appuyez sur le bouton de vitesse du ventilateur 5 autant de fois que nécessaire alorsque le système est en fonction.• À chaque fois que vous appuyez sur le bouton, vous changez la force. La vitesse
actuelle est indiquée en 5.• La séquence de changement, et les réglages disponibles sont les suivants.
FANSPEED
Affichage
Modèle 4vitesses
Modèle 2vitesses
Modèle 3vitesses
Remarque :� Le nombre de ventilateurs disponible dépend du type d’unité connectée. Notez aussi
que certaines unités ne permettent que le réglage “Auto”.� Dans les cas suivants, la vitesse de ventilation actuelle générée par l’unité différera
de la vitesse indiquée au niveau de la commande à distance.1. Quand l’affichage indique “ATTENTE” ou “DEGIVRE”.2. Immédiatement après le démarrage du mode CHAUFFAGE (alors que le système
attend que le changement de mode se fasse).3. En mode CHAUFFAGE, quand la température ambiante dans la pièce est
supérieure à la température réglée.4. Quand l’unité est en mode SEC.
<Pour changer la direction de l’air (montant/descendant)>� Quand l’unité est en fonction, appuyez sur le bouton 6 de ventilation montante/
descendante autant de fois que nécessaire.• À chaque fois que vous appuyez sur le bouton, vous changez la direction. La
direction actuelle est affichée sur 6.• La séquence de changement, et les réglages disponibles sont les suivants :
Auto Horiz. 1 2 3 4 Bascule
Affichage
* Notez que lors de l’opération de basculement, l’indication directionnelle à l’écranne change pas en synchronisation avec les ailettes de l’unité.
* Certains modèles n’acceptent pas les réglages directionnels.
Remarque :� Les directions disponibles dépendent du type d’unités connectées. Notez aussi que
certaines unités ne permettent que le réglage “Auto”.� Dans les cas suivants, la direction actuelle de l’air différera de la direction indiquée
au niveau de la commande à distance.1. Quand l’affichage indique “ATTENTE” ou “DEGIVRE”.2. Immédiatement après le démarrage du mode CHAUFFAGE (alors que le système
attend que le changement de mode se fasse).3. En mode chauffage, quand la température ambiante dans la pièce est supérieure
à la température réglée.
<Pour changer la direction de l’air Droite/gauche>
� Appuyez sur le bouton du louvre 7 autant de fois que nécessaire.• L’image du louvre 7 apparaît.
À chaque fois que vous appuyez sur le bouton, vous changez le réglage commesuit.
(ON) (OFF)
Lors de l’opération de bascule, l’affichagede la flèche passe à gauche ou à droite.
Pas d’affichage(Stop)
Auto Vitesse 1 Vitesse 2 Vitesse 3 Vitesse 4

– 58 –
�
<Utiliser la ventilation>
Sur les modèles Mr. Slim :
� Pour lancer le ventilateur conjointement à l’unité intérieure :� Appuyez sur le bouton Marche/Arrêt 1.
• Quand l’indication de ventilation apparaît à l’écran (en 8). Le ventilateur seradésormais lancé automatiquement à chaque fois que l’unité intérieuredémarrera.
� Pour faire fonctionner le ventilateur indépendamment :
� Appuyez sur le bouton Mode 2 jusqu’à ce que apparaisse à l’affichage.
Cela lancera le ventilateur.
� Changer la force du ventilateur :� Appuyez sur le bouton de ventilation 8 autant que nécessaire.
• À chaque fois que vous appuyez sur le bouton, vous changez le réglagecomme indiqué ci-dessous.
�
Faible Forte
Sur les modèles CITY MULTI :
� Pour lancer le ventilateur conjointement à l’unité intérieure :� Appuyez sur le bouton Marche/Arrêt 1.
• Quand l’indication de ventilation apparaît à l’écran (sur 8). Le ventilateurfonctionnera désormais automatiquement à chaque fois que l’unité intérieuresera en fonction.
� Pour lancer le ventilateur uniquement quand l’unité intérieure est éteinte :� Appuyez sur le bouton de ventilation 8 quand l’unité intérieure est éteinte.
• Le témoin ON (en 1) et l’indication de ventilation (en 8) s’allument.
� Changer la force du ventilateur :� Appuyez sur le bouton de ventilation 8 autant que nécessaire.
• À chaque fois que vous appuyez sur le bouton, vous changez le réglagecomme indiqué ci-dessous.
(Faible) (Forte)
� ��
Pas d’affichage (Stop)
(OFF)
Remarque :� Dans certaines configurations, le ventilateur de l’unité intérieure peut s’allumer
même quand vous demandez au ventilateur de fonctionner indépendamment.

– 59 –
(3) Utiliser le programmateurCette section explique comment régler et utiliser le minuteur. Vous pouvez utiliser la sélection des fonctions pour sélectionner le type de programmateur, entre les trois disponibles.1 Hebdomadaire, 2 Simple, ou 3 Arrêt auto.Pour de plus amples informations sur comment régler la sélection des fonctions, voyez la section 6, paragraphe [4]–3 (3).
1 Utiliser le programmateur hebdomadaire� Le programmateur hebdomadaire peut servir à régler les huit opérations pour chaque jour de la semaine.
• Chaque opération permet l’une ou l’autre des fonctions suivantes : Programmateur Marche/Arrêt avec un réglage de température ou programmateur Marche/Arrêt seulement,ou réglage de température seulement.
• À l’heure dite, le conditionneur d’air effectue l’action programmée.� La précision horaire de ce programmateur est de 1 minute.
Remarque :*1. Les programmateurs hebdomadaire / simple / Arrêt auto ne peuvent être utilisés en même temps.*2. Le programmateur hebdomadaire ne fonctionne pas dans les conditions suivantes.
La fonction de temporisateur est désactivée ; le système est dans un état anormal ; une exécution de test est en cours ; la télécommande est soumise à un auto-diagnostic ou à un diagnosticexterne ; l’utilisateur est en train de définir une fonction ; l’utilisateur est en train de régler le temporisateur ; l’utilisateur est en train de régler l’heure ou le jour de la semaine ; le systèmeest sous commande centralisée. (Précisément, le système n’exécute pas les opérations (allumage, extinction ou réglage de la température) désactivées dans ces situations.)
˚C
SUNON
WEEKLY
PAR-21MAA
ON/OFF
FILTER
CHECK
OPERATION CLEAR
TEST
TEMP.
MENU
BACK DAYMONITOR/SET
CLOCK
ON/OFF
2
4 2 3
A 9 78
0
4
13
B
1
N° de fonctionnement
Réglage du jour
<Comment régler le programmateur hebdomadaire>1. Assurez-vous que vous êtes sur l’écran de contrôle standard, et que le témoin du program-
mateur hebdomadaire 1 s’affiche.2. Appuyez sur le bouton Menu du programmateur B, de manière à ce que le “Réglage”
apparaisse à l’écran (en 2). (Notez qu’à chaque fois que vous appuyez sur le bouton, vouspassez de “Réglage” à “Moniteur” (moniteur).)
3. Appuyez sur le bouton On/Off du programmateur 9 pour régler le jour. À chaque fois quevous appuyez, vous changez le réglage en 3, selon la séquence suivante : “Dim Lun MarMer Jeu Ven Sam” → “Dim” → … → “Ven” → “Sam” → “Dim Lun Mar Mer Jeu Ven Sam”…
4. Appuyez sur le bouton (7 ou 8) d’opération ou autant de fois que nécessaire poursélectionner le numéro d’opération approprié (1 à 8) 4.* Vos choix aux étapes 3 et 4 sélectionneront l’une des cellules de la matrice affichée ci-dessous
(l’affichage de la commande à distance à gauche montre comment l’affichage devraitapparaître lors du réglage de l’opération 1 pour dimanche aux valeurs indiquées ci-dessous).
Sunday Monday … Saturday
Remarque :En réglant le jour sur “Dim Lun Mar Mer Jeu Ven Sam”, vous pouvez régler la même opérationà effectuer au même moment tous les jours.(Exemple : L’opération 2 ci-dessus, qui est la même pour tous les jours de la semaine.)
No. 1
No. 2
…
No. 8
• 8:30• ON• 23 °C
• 10:00• OFF
• 10:00• OFF
• 10:00• OFF
• 10:00• OFF
�
Matrice de réglage
<Réglage de l’opération 1 pourdimanche>Démarrer le conditionneurd’air à 8:30, avec la tempéra-ture à 23 °C.
<Réglage de l’opération 2 pourtous les jours>Éteindre le conditionneur d’airà 10:00.
�
N ° d’op.

– 60 –
˚C
TIMERSUN
ON
OFF
WEEKLY 1
98
<Régler le programmateur hebdomadaire>
5. Appuyez sur le bouton de réglage de l’heure A approprié autant de fois que nécessaire pourrégler l’heure choisie (en 5).* Quand vous maintenez le bouton appuyé, l’heure augmentera d’abord toutes les minutes,
puis toutes les 10 minutes, puis toutes les heures.6. Appuyez sur le bouton ON/OFF 1 pour sélectionner l’opération choisie (Marche ou Arrêt :
marche ou arrêt), en 6.* À chaque fois que vous appuyez vous passez au réglage suivant, selon la séquence
suivante : aucun affichage (pas dé réglage) → “MARCHE” → “ARRET”7. Appuyez sur le bouton de réglage de température 3 approprié pour régler la température
choisie (en 7).* À chaque fois que vous appuyez vous changez le réglage, selon la séquence suivante :
aucun affichage (pas de réglage) ⇔ 24 ⇔ 25 ⇔ ... ⇔ 29 ⇔ 30 ⇔ 12 ⇔ ... ⇔ 23 ⇔ pasd’affichage.(Plage disponible : La plage disponible pour ce réglage va de 12 °C à 30 °C. La plage réelleau-delà de laquelle la température peut être contrôlée, toutefois, peut changer en fonctiondu type d’unité connectée.)
8. Après avoir effectué les réglages nécessaires des étapes 5, 6 et 7, appuyez sur le bouton 4Filter pour valider ces informations.pour effacer les valeurs actuelles de l’opération choisie, appuyez et relâchez rapidement lebouton 1 Check (Clear) une fois.* Le réglage du temps affiché devient “—:—”, et les réglages de température et On/Off
s’éteignent tous.(Pour effacer tous les réglages du programmateur hebdomadaire d’un coup, appuyez surle bouton 0 Check (Clear) pendant 2 secondes ou plus. L’affichage commencera àclignoter, ce qui indiquera que tous les réglages ont été effacés.)
Remarque :Vos nouvelles informations seront effacées si vous tapez le bouton 2 Mode (Entrée) avantd’appuyer sur le bouton 4 Filter .Si vous avez réglé deux opérations différentes ou plus pour le même temps exactement, seulel’opération ayant le n °le plus élevé sera effectuée.9. Répétez les étapes 3 à 8 autant de fois que nécessaire pour remplir les cellules disponibles
que vous souhaitez.10. Appuyez sur le bouton 2 Mode (Retour) pour revenir à l’écran de contrôle standard et
terminer la procédure de réglage.11. Pour activer le programmateur, appuyez sur le bouton Timer On/Off (programmateur
Marche/arrêt) 9, de manière à ce que l’indication “Timer Off” (arrêt programmateur)disparaisse de l’écran. Veillez à ce que l’indication “Timer Off” ne s’affiche plus.* Si le programmateur n’est pas réglé, l’indication “arrêt programmateur” clignote à l’écran.
Affiche le réglage de la température* N’apparaît pas si la température n’est pas
réglée.
˚C
SUNON
WEEKLY
6
7
5Affiche le réglage de l’heure Affiche l’opération choisie (Marche ou Arrêt)* N’apparaît pas si l’opération n’est pas réglée.
<Comment visualiser les réglages du programmateur hebdomadaire>
1. Assurez-vous que l’indication du programmateur hebdomadaire appa-raisse à l’écran (en 1).
2. Appuyez sur le bouton Menu du programmateur B, de manière à ce quel’écran affiche “Moniteur” (en 8).
3. Appuyez sur le bouton Marche/Arrêt du programmateur 9 tant qu’il fautpour choisir le jour.
4. Appuyez sur le bouton (7 ou 8) d’opération ou autant quenécessaire pour changer l’opération du programmateur à l’affichage (en 9).* À chaque fois que vous appuyez, vous passez à l’opération du program-
mateur suivante, dans l’ordre du réglage horaire.5. Pour fermer le moniteur et retourner à l’écran de contrôle standard, appuyez
sur le bouton Mode (Entrée) 2.
<Pour éteindre le programmateur hebdomadaire>
Appuyez sur le bouton Marche/Arrêt du programmateur 9, de manière à ceque l’indication “arrêt programmateur” apparaisse en 0.
˚C
˚C
TIME SUN
WEEKLY
0
˚C
˚C
TIME SUN
WEEKLY
0
<Pour allumer le programmateur hebdomadaire>Appuyez sur le bouton Marche/Arrêt du programmateur 9, de manière à ceque l’indication “arrêt programmateur” s’éteigne en 0.
Réglage du programmateur
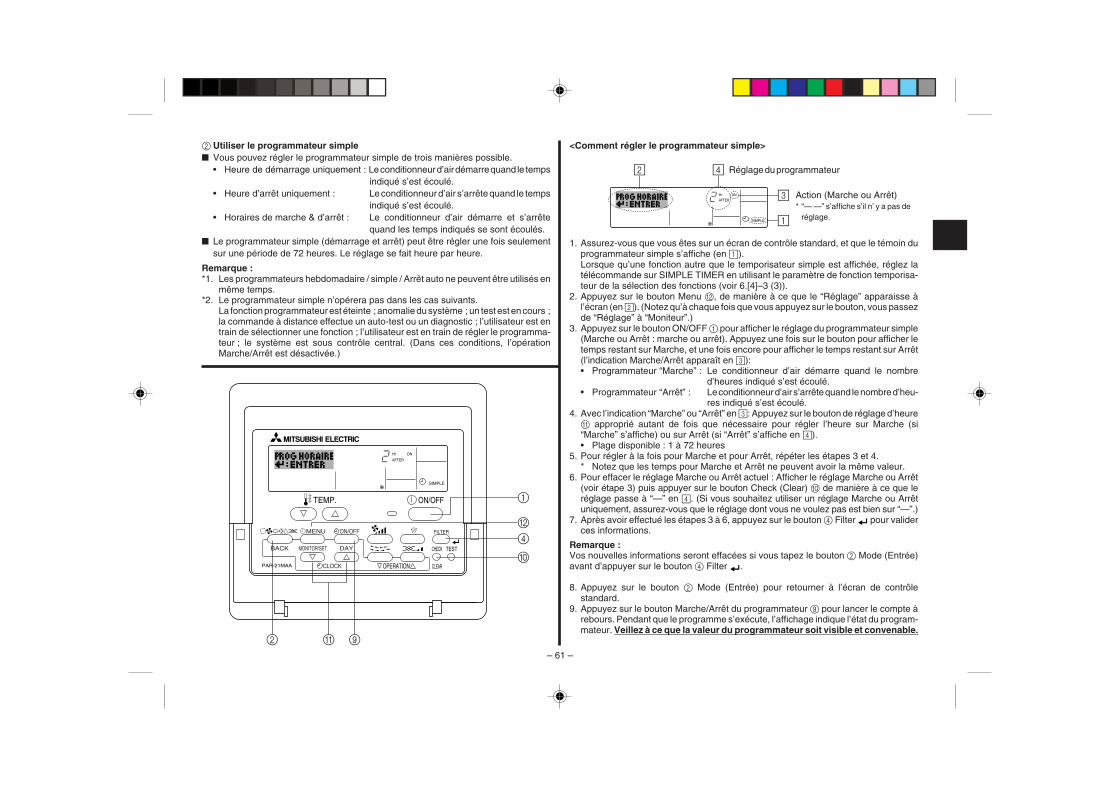
– 61 –
2 Utiliser le programmateur simple� Vous pouvez régler le programmateur simple de trois manières possible.
• Heure de démarrage uniquement : Le conditionneur d’air démarre quand le tempsindiqué s’est écoulé.
• Heure d’arrêt uniquement : Le conditionneur d’air s’arrête quand le tempsindiqué s’est écoulé.
• Horaires de marche & d’arrêt : Le conditionneur d’air démarre et s’arrêtequand les temps indiqués se sont écoulés.
� Le programmateur simple (démarrage et arrêt) peut être régler une fois seulementsur une période de 72 heures. Le réglage se fait heure par heure.
Remarque :*1. Les programmateurs hebdomadaire / simple / Arrêt auto ne peuvent être utilisés en
même temps.*2. Le programmateur simple n’opérera pas dans les cas suivants.
La fonction programmateur est éteinte ; anomalie du système ; un test est en cours ;la commande à distance effectue un auto-test ou un diagnostic ; l’utilisateur est entrain de sélectionner une fonction ; l’utilisateur est en train de régler le programma-teur ; le système est sous contrôle central. (Dans ces conditions, l’opérationMarche/Arrêt est désactivée.)
ONHr
AFTER
SIMPLE
PAR-21MAA
ON/OFF
FILTER
CHECK
OPERATION CLEAR
TEST
TEMP.
MENU
BACK DAYMONITOR/SET
CLOCK
ON/OFF
2 A 9
0
4
1
B
<Comment régler le programmateur simple>
ONHr
AFTER
SIMPLE
4
1
3
2
1. Assurez-vous que vous êtes sur un écran de contrôle standard, et que le témoin duprogrammateur simple s’affiche (en 1).Lorsque qu’une fonction autre que le temporisateur simple est affichée, réglez latélécommande sur SIMPLE TIMER en utilisant le paramètre de fonction temporisa-teur de la sélection des fonctions (voir 6.[4]–3 (3)).
2. Appuyez sur le bouton Menu B, de manière à ce que le “Réglage” apparaisse àl’écran (en 2). (Notez qu’à chaque fois que vous appuyez sur le bouton, vous passezde “Réglage” à “Moniteur”.)
3. Appuyez sur le bouton ON/OFF 1 pour afficher le réglage du programmateur simple(Marche ou Arrêt : marche ou arrêt). Appuyez une fois sur le bouton pour afficher letemps restant sur Marche, et une fois encore pour afficher le temps restant sur Arrêt(l’indication Marche/Arrêt apparaît en 3):• Programmateur “Marche” : Le conditionneur d’air démarre quand le nombre
d’heures indiqué s’est écoulé.• Programmateur “Arrêt” : Le conditionneur d’air s’arrête quand le nombre d’heu-
res indiqué s’est écoulé.4. Avec l’indication “Marche” ou “Arrêt” en 3: Appuyez sur le bouton de réglage d’heure
A approprié autant de fois que nécessaire pour régler l’heure sur Marche (si“Marche” s’affiche) ou sur Arrêt (si “Arrêt” s’affiche en 4).• Plage disponible : 1 à 72 heures
5. Pour régler à la fois pour Marche et pour Arrêt, répéter les étapes 3 et 4.* Notez que les temps pour Marche et Arrêt ne peuvent avoir la même valeur.
6. Pour effacer le réglage Marche ou Arrêt actuel : Afficher le réglage Marche ou Arrêt(voir étape 3) puis appuyer sur le bouton Check (Clear) 0 de manière à ce que leréglage passe à “—” en 4. (Si vous souhaitez utiliser un réglage Marche ou Arrêtuniquement, assurez-vous que le réglage dont vous ne voulez pas est bien sur “—”.)
7. Après avoir effectué les étapes 3 à 6, appuyez sur le bouton 4 Filter pour validerces informations.
Remarque :Vos nouvelles informations seront effacées si vous tapez le bouton 2 Mode (Entrée)avant d’appuyer sur le bouton 4 Filter .
8. Appuyez sur le bouton 2 Mode (Entrée) pour retourner à l’écran de contrôlestandard.
9. Appuyez sur le bouton Marche/Arrêt du programmateur 9 pour lancer le compte àrebours. Pendant que le programme s’exécute, l’affichage indique l’état du program-mateur. Veillez à ce que la valeur du programmateur soit visible et convenable.
Réglage du programmateur
Action (Marche ou Arrêt)* “— —” s’affiche s’il n’ y a pas de
réglage.

– 62 –
TIMER ON
OFF
Hr
AFTER
SIMPLE 1
65
<Afficher les réglages actuels du programmateur simple>
1. Assurez-vous que l’indication du programmateur simple apparaisse àl’écran (sur 1).
2. Appuyez sur le bouton Menu B, de manière à ce que le “Moniteur”apparaisse à l’écran (en 5).• Si le programmateur simple Marche ou Arrêt est en fonction, son état
actuel apparaîtra en 6.• Si les valeurs Marche et Arrêt ont été réglées toutes les deux, les deux
valeurs apparaîtront alternativement.3. Appuyez sur le bouton 2 Mode (Entrée) pour fermer le moniteur et retourner
à l’écran de contrôle standard.
Réglage du programmateur
<Pour éteindre le programmateur simple...>Appuyez sur le bouton Marche/Arrêt du programmateur 9, de manière à ceque le réglage du programmateur n’apparaisse plus à l’écran (en 7).
<Pour lancer le programmateur simple…>
Appuyez sur le bouton Marche/Arrêt du programmateur 9, de manière à ceque le réglage du programmateur apparaisse en 7.
˚C
˚CSIMPLE
7
˚C
˚C
ONHr
AFTER
SIMPLE
7
ExemplesSi les horaires de marche et d’arrêt ont été réglés pour le programmateur simple, l’opération etl’affichage sont comme indiqués comme ci-dessous.
Exemple 1 :Démarrer le programmateur, avec l’heure de démarrage avant l’heure d’arrêtRéglage Marche : 3 heuresRéglage Arrêt : 7 heures
ONHr
AFTER
SIMPLE
˚C
˚C
OFF
Hr
AFTER
SIMPLE
SIMPLE
˚C
˚C
OFF
Hr
AFTER
SIMPLE
ONHr
AFTER
SIMPLE
˚C
˚CSIMPLE
Exemple 2 :Démarrer le programmateur, avec l’heure d’arrêt avant l’heure de démarrageRéglage Marche : 5 heuresRéglage Arrêt : 2 heures
�
�
�
�
3 heures après ledémarrage du
programmateur
Au démarrage duprogrammateur
7 heures après ledémarrage duprogrammateur
Affiche le réglage de démarragedu programmateur (les heures res-tant avant le démarrage).
l’Affichage change pour montrer leréglage d’arrêt du programmateur(les heures restant avant l’arrêt).L’affichage indique l’horaire de lamanière suivante : ARRÊT (7heures) – MARCHE (3 heures) =4 heures.
Le conditionneur d’air s’éteint, etrestera éteint jusqu’à ce que quel-qu’un le relance.
2 heures après ledémarrage du
programmateur
Au démarrage duprogrammateur
5 heures après ledémarrage duprogrammateur
Affiche le réglage d’arrêt du pro-grammateur (les heures restantavant l’arrêt).
l’Affichage change pour montrer leréglage de démarrage du program-mateur (les heures restant avantle démarrage).L’affichage indique l’horaire de lamanière suivante : MARCHE (5heures) – ARRÊT (2 heures) = 3heures.Le conditionneur d’air s’allume, etrestera allumé jusqu’à ce que quel-qu’un l’éteigne.

– 63 –
3 Utiliser le programmateur Arrêt Auto� Ce programmateur commence le compte à rebours au démarrage du conditionneur
d’air, et éteint le conditionneur quand le temps indiqué s’est écoulé.� les réglages possibles vont de 30 minutes à 4 heures, par tranches de 30 minutes.
Remarque :*1. Les programmateurs hebdomadaire / simple / Arrêt auto ne peuvent être utilisés en
même temps.*2. Le programmateur Arrêt Auto n’opérera pas quand l’une des conditions suivantes
est en fonction.La fonction programmateur est éteinte ; anomalie du système ; un test est en cours ;la commande à distance effectue un auto-test ou un diagnostic ; l’utilisateur est entrain de sélectionner une fonction ; l’utilisateur est en train de régler le programma-teur ; le système est sous contrôle central. (Sous ces conditions, l’opérationMarche/Arrêt est désactivée.)
AFTER OFF
AUTO OFF
PAR-21MAA
ON/OFF
FILTER
CHECK
OPERATION CLEAR
TEST
TEMP.
MENU
BACK DAYMONITOR/SET
CLOCK
ON/OFF
2 A 9
4
B
<Comment régler le programmateur Arrêt Auto>
1. Assurez-vous que vous êtes sur un écran de contrôle standard, et que le témoin duprogrammateur Arrêt Auto s’affiche (en 1).Lorsque qu’une fonction autre que le temporisateur à extinction automatique estaffichée, réglez la télécommande sur AUTO OFF TIMER en utilisant le paramètre defonction temporisateur de la sélection des fonctions (voir 6.[4]–3 (3)).
2. Appuyez sur le bouton Menu du programmateur B pendant 3 secondes, de manièreà ce que le “Réglage” apparaisse à l’écran (en 2).(Notez qu’à chaque fois que vous appuyez sur le bouton, vous passez de “Réglage”à “Moniteur”.)
3. Appuyez sur le bouton de réglage d’heure A approprié autant de fois que nécessairepour régler l’heure d’arrêt (en 3).
4. Appuyez sur le bouton 4 Filter pour enregistrer le réglage.
Remarque :Vos informations seront effacées si vous tapez le bouton 2 Mode (Entrée) avantd’appuyer sur le bouton 4 Filter .
5. Appuyez sur le bouton 2 Mode (Entrée) pour terminer la procédure de réglage etretourner à l’écran de contrôle standard.
6. Si le conditionneur d’air est déjà en fonction, le programmateur démarre le compteà rebours immédiatement. Veillez à vérifier que le réglage du programmateurapparaisse correctement à l’écran.
<Vérifier le réglage actuel du programmateur Arrêt Auto>
AFTER OFF
AUTO OFF
3
1
2 Réglage du programmateur
AFTER
TIMER
OFF
AUTO OFF
5
1
4 Réglage du programmateur
1. Assurez-vous que l’indication “Arrêt Auto” apparaisse à l’écran (sur 1).2. Appuyez sur le bouton Menu du programmateur B pendant 3 secondes, de manière
à ce que “Moniteur” apparaisse à l’écran (en 4).• Le temps restant avant l’extinction apparaît en 5.
3. Pour fermer le moniteur et retourner à l’écran de contrôle standard, appuyez sur lebouton Mode (Entrée) 2.

– 64 –
<Pour éteindre le programmateur Arrêt Auto...>
� Appuyez sur le bouton Marche/Arrêt du programmateur 9 pendant 3 secondes, demanière à ce que l’indication “Arrêt programmateur” apparaisse en 6 et que la valeurdu programmateur (en 7) disparaisse.
� Sinon, il est possible d’éteindre le conditionneur d’air lui-même. La valeur duprogrammateur (en 7) disparaîtra de l’écran.
<Pour démarrer le programmateur Arrêt Auto...>
� Appuyez sur le bouton Marche/Arrêt du programmateur 9 pendant 3 secondes.L’indication “Arrêt programmateur” disparaît (en 6), et le réglage du programmateurapparaît (en 7).
� Sinon, il est possible d’allumer le conditionneur d’air lui-même. La valeur duprogrammateur apparaît en 7.
˚C
˚CAUTO OFF6
7
AUTO OFF
7
˚C
˚C
AFTER OFF
AUTO OFF6
7

– 65 –
(4) Verrouiller les boutons de la télécommande (limite de fonctionne-ment d’opération)
� Vous pouvez verrouillez les boutons de la télécommande si vous le souhaitez. Vouspouvez utiliser la sélection de fonction de la télécommande pour sélectionner le typede verrouillage. (Pour de plus amples informations sur comment sélectionner ceverrouillage, voyez la section 6, paragraphe [4]–2 (1).)Vous pouvez utiliser spécifiquement l’un ou l’autre des verrouillages ci-dessous.
1 Blocage de tous les boutons : Bloque tous les boutons de la télécommande.2 Blocage de tout sauf ON/OFF (Marche/Arrêt) :
Bloque tous les boutons autres que ON/OFF.
Remarque :L’indicateur “verrouillé” apparaît à l’écran pour indiquer que les boutons sont actuelle-ment bloqués.
˚C
˚C
TIME SUN
FUNCTION
PAR-21MAA
ON/OFF
FILTER
CHECK
OPERATION CLEAR
TEST
TEMP.
MENU
BACK DAYMONITOR/SET
CLOCK
ON/OFF
4
1
1
Indicateurs deblocage
<Comment bloquer les boutons>
1. Tout en pressant le bouton Filter 4, maintenez appuyé le bouton ON/OFF 1 pendant2 secondes. L’indicateur “verrouillé” apparaît à l’écran (en 1), indiquant que leverrouillage est enclenché.* Si le verrouillage a été désactivé pour la sélection des fonctions, l’écran affichera
le message “indisponible” quand vous appuyez sur les boutons de la manièreindiquée ci-dessus.
• Si vous appuyez sur un bouton bloqué, l’indication “Verrouillé” (en 1) clignoteraà l’écran.
˚C
˚C
FUNCTION1
˚C
˚C
FUNCTION1
<Comment débloquer les boutons>1. Tout en pressant le bouton Filter 4, maintenez appuyé le bouton ON/OFF 1 pendant
2 secondes—de manière à ce que l’indication “verrouillé” disparaisse de l’écran (en1).
˚C
˚C
1

– 66 –
(5) Autres indications<Commande centralisée>
ON/OFF TEMP.
˚C
˚C
� S’affiche lorsque le fonctionnement est contrôlé par un contrôleur central, etc.Les fonctionnements réduits sont illustrés ci-dessous.• ON/OFF (y compris le fonctionnement de la minuterie)• Mode de fonctionnement• Réglage de la température
Remarque :Peut aussi être réduit de manière individuelle.
<Indicateur de mode clignotant>
ON/OFF TEMP.
˚C
˚C
� Lorsqu’il clignote de manière continueS’affiche lorsqu’un autre appareil intérieur connecté à l’appareil extérieur fonctionnedéjà dans un autre mode.Correspond au mode de fonctionnement de l’autre appareil intérieur.
� Si le mode est activé après le clignotement de l’affichageS’affiche si le mode de fonctionnement est réduit pour chaque saison par uncontrôleur central, etc.Utilisez un autre mode de fonctionnement.
<“Filtre” clignotant>
ON/OFF TEMP.
˚C
˚CFILTER
� Affiche qu’il faut nettoyer le filtre.Nettoyez le filtre.
� Pour réinitialiser l’affichage “FILTER” (filtre)Si vous appuyez deux fois successives sur la touche [FILTER] (filtre) après avoirnettoyé le filtre, l’affichage s’éteint puis est réinitialisé.
Remarque :� Si deux types d’appareils intérieurs (ou plus) sont contrôlés, la période entre les
nettoyages dépend du type de filtre. Si vous devez nettoyer le filtre de l’appareilprincipal, “FILTER” (filtre) s’affiche. Si l’affichage s’éteint, la période cumulée estréinitialisée.
� “FILTER” (filtre) indique la période entre les nettoyages en heure si le climatiseur estutilisé dans des conditions d’air intérieur normales. Toutefois, le degré d’encrasse-ment du filtre dépend des conditions environnementales ; nettoyez-le donc enconséquence.
� La période cumulée avant le nettoyage du filtre varie selon les modèles.

– 67 –
<Codes d’erreur clignotants>
Sur les modèles CITY MULTI Sur les modèles Mr. Slim
ON/OFF
ERROR CODE
ON/OFF
ERROR CODE
Témoin demarche(clignotant)
Code d’erreurN° d’unitéintérieure
� Si le témoin de marche et le code d’erreur clignotent tous les deux : Cela signifie que le conditionneur d’air est hors service et que le fonctionnement est arrêté (et qu’il ne peutêtre relancé). Notez le numéro d’unité et le code d’erreur, puis éteignez l’alimentation du conditionneur et appelez votre fournisseur ou votre technicien de maintenance.
Si vous avez entré un numéro de téléphone à appeler en cas de problème, l’écran affiche ce numéro. (Vouspouvez effectuer ce réglage sous la sélection des fonctions. Pour de plus amples informations, reportez-vous section 6.)
Adresse du réfrigérantde l’unité intérieure
Code d’erreur N° d’unité intérieure
Affichage alternant
Témoin demarche(clignotant)
Sur les modèles CITY MULTI Sur les modèles Mr. Slim Quand on appuie sur le bouton Check :
� Si seul le code d’erreur clignote (alors que le témoin de marche reste allumé) : L’opération continue, mais il se peut que le système ait un problème. Dans ce cas, vous deveznoter le code d’erreur, puis appeler votre fournisseur ou votre technicien pour lui demander son avis.
* Si vous avez entré un numéro de téléphone à appeler en cas de problème, appuyez sur le bouton Check pour l’afficher à l’écran. (Vous pouvez effectuer ce réglage sous lasélection des fonctions. Pour de plus amples informations, reportez-vous section 6.)
ON/OFF
˚C
˚C
ERROR CODE
ON/OFF
˚C
˚C
ERROR CODE
ON/OFF
CALL:XXXXXXX:XXX
Code d’erreur Code d’erreur

– 68 –
6 Sélection des fonctionsSélection des fonctions de la commande à distanceLe réglage des fonctions de la commande suivantes peut être modifié à l’aide du mode de sélection des fonctions de la commande à distance. Modifiez le réglage au besoin.
Elément 1
1. Modification de lalangue(“CHANGE LANGUAGE”)
2. Limitation desfonctions(“SELECTIONFONCTIONS”)
3. Sélection desmodes(“SELECTION DUMODE”)
4. Modification del’affichage(“AFFICHAGESOUS MENU”)
Elément 2
Réglage des langues d’affichage
(1) Réglage de la limitation des fonctions de fonctionnement (ver-rouillage de fonctionnement) (“BLOCAGE FONCTIONS”)
(2) Utilisation du réglage du mode automatique (“SELECTION DUMODE AUTO”)
(3) Réglage de la limitation de la plage de températures (“LIMITA-TION TEMPERATURE”)
(1) Réglage de la commande à distance principale/secondaire(“TELCOMMANDE MAITRE/ESCLAVE”)
(2) Utilisation du réglage de l’horloge (“AFFICHAGE HORLOGE”)
(3) Réglage de la fonction de minuterie (“PROG HEBDO MADAIRE”)
(4) Réglage du numéro à contacter en cas d’erreur (“CALL.”)
(1) Réglage de l’affichage de la température °C/°F (“TEMPERA-TURE °C/°F”)
(2) Réglage de l’affichage de la température de l’air d’aspiration(“TEMPERATURE AMBIANTE”)
(3) Réglage de l’affichage du refroidissement/chauffage automati-que (“AFFICHAGE AUTO F/C”)
Elément 3 (contenu de réglage)
• L’affichage en plusieurs langues est possible
• Réglage de la plage de limitation de fonctionnement (verrouillage defonctionnement)
• Activation ou désactivation du mode de fonctionnement “automatique”
• Réglage de la plage de températures ajustable (maximum, minimum)
• Sélection de la commande à distance principale ou secondaire* Lorsque deux commandes à distance sont connectées à un groupe, l’une
des deux doit être réglée en tant que commande secondaire.
• Activation ou désactivation de la fonction d’horloge
• Réglage du type de minuterie
• Affichage du numéro à contacter en cas d’erreur• Réglage du numéro de téléphone
• Réglage de l’unité de température (°C ou °F) à afficher
• Activation ou désactivation de l’affichage de la température de l’air (d’aspi-ration) intérieur
• Activation ou désactivation de l’affichage “Cooling” (Refroidissement) ou“Heating” (Chauffage) pendant le fonctionnement en mode automatique

– 69 –
→→
[Organigramme de sélection des fonctions][1] Arrêtez le climatiseur pour activer le mode de sélection des fonctions de la commande à distance. → [2] Sélectionnez l’élément 1. → [3] Sélectionnez l’élément 2. →[4] Effectuez le réglage (vous trouverez plus de détails dans la colonne Elément 3). → [5] Réglage terminé. → [6] Repassez à l’affichage normal (fin).
(Maintenez la touche E enfoncée et appuyez sur la touche D pendantdeux secondes.)* L’affichage ne peut pas être modifié pendant la sélection des fonc-
tions de l’appareil, l’essai de fonctionnement et l’auto-diagnostic.
(Maintenez la touche E enfoncée et appuyezsur la touche D pendant deux secondes.)* De la sorte, la commande à distance enre-
gistre les réglages effectués.
Appuyezsur latouche G.
Reportez-vousau point [4]–1
Elément 3(contenu de réglage)Reportez-vous aupoint [4]–2. (1)
Reportez-vous aupoint [4]–2. (2)
Reportez-vous aupoint
[4]–2. (3)
Reportez-vous aupoint [4]–3. (1)
Reportez-vous aupoint [4]–3. (2)Reportez-vous aupoint [4]–3. (3)Reportez-vous aupoint [4]–3. (4)
Reportez-vous aupoint [4]–4. (1)
Reportez-vous aupoint [4]–4. (2)Reportez-vous aupoint [4]–4. (3)
Elément 1 Mode de sélection des fonctionsde la commande à distance
Elément 2
Sélection des modes(“SELECTION DU
MODE”)
Affichage normal (affichage lorsquele climatiseur ne fonctionne pas)
PAR-21MAA
ON/OFF
FILTER
CHECK
OPERATION CLEAR
TEST
TEMP.
MENU
BACK DAYMONITOR/SET
CLOCK
ON/OFF
F
G
C D
B
I
A
H
E
Change Language(“CHANGE LANGUAGE”)
Limitation des fonctions(“SELECTION FONCTIONS”)
Modification de l’affichage(“AFFICHAGE SOUS
MENU”)
REMARQUELe fonctionnement de la minuterie est in-terrompu lorsque l’affichage de sélectiondes fonctions de la commande à distancepasse à l’affichage normal.
Appuyez sur la touche G.
Appuyez sur latouche E.
Appuyez surla touche E.
Appuyezsur latouche E.
Appuyezsur latoucheE.
Appuyez surla touche G.
Appuyez surla touche G.
Appuyez surla touche D.
Appuyez surla touche D.
Appuyez surla touche D.
→→
→→
→
→ Réglage de la limitation des fonctions de fonctionnement (“BLOCAGE FONCTIONS”)Appuyez sur la touche G.
Réglage de la limitation de la plage de températures (“LIMITATION TEMPERATURE”)
Utilisation du réglage du mode automatique (“SELECTION DU MODE AUTO”)
→ Réglage de l’affichage de la température °C/°F (“TEMPERATURE °C/°F”)Appuyez sur la touche G.
Réglage de l’affichage du refroidissement/chauffage automatique (“AFFICHAGE AUTO F/C”)
Réglage de l’affichage de la température de l’air d’aspiration (“TEMPERATURE AMBIANTE”)
→ Réglage de la commande à distance principale/secondaire (“TELCOMMANDE MAITRE/ESCLAVE”)Appuyez sur la touche G.
Réglage de la fonction de minuterie (“PROG HEBDO MADAIRE”)
Utilisation du réglage de l’horloge (“AFFICHAGE HORLOGE”)
Réglage du numéro à contacter en cas d’erreur (“CALL.”)
Ecran à pixelsCet écran s’affiche dans la lan-gue sélectionnée dans le modeCHANGE LANGUAGE (Modifi-cation de la langue). L’anglaisest sélectionné dans ce manuel.

– 70 –
[Réglage détaillé]
[4]–1. Réglage CHANGE LANGUAGE (Modification de la langue)
La langue d’affichage de l’écran à pixels peut être sélectionnée.• Appuyez sur la touche [ MENU] G pour modifier la langue.
1 Japonais (JP), 2 Anglais (GB), 3 Allemand (D), 4 Espagnol (E),5 Russe (RU), 6 Italien (I), 7 Chinois (CH), 8 Français (F)
[4]–2. Limitation des fonctions
(1) Réglage de la limitation des fonctions de fonctionnement (verrouillage defonctionnement)• Pour commuter le réglage, appuyez sur la touche [ ON/OFF] D.
1 no1 : Le réglage du verrouillage de fonctionnement est appliqué à toutesles touches autres que la touche [ ON/OFF].
2 no2 : Le réglage du verrouillage de fonctionnement est appliqué à toutesles touches.
3 OFF (valeur de réglage initial) :Le réglage du verrouillage de fonctionnement n’est pas appliqué.
* Pour appliquer le réglage du verrouillage de fonctionnement à l’écran normal,il est nécessaire d’appuyer sur les touches (Appuyez simultanément sur lestouches [FILTER] et [ ON/OFF] en même temps et les maintenir enfoncéespendant deux secondes.) sur l’écran normal après avoir effectué le réglage ci-dessus.
(2) Utilisation du réglage du mode automatiqueLorsque la commande à distance est connectée à l’appareil disposant du modede fonctionnement automatique, les réglages suivants peuvent être effectués.• Pour commuter le réglage, appuyez sur la touche [ ON/OFF] D.
1 ON (valeur de réglage initial) : Le mode automatique s’affiche lorsque cemode de fonctionnement est sélectionné.
2 OFF : Le mode automatique ne s’affiche pas lors-que ce mode de fonctionnement est sélec-tionné.
(3) Réglage de la limitation de la plage de températuresUne fois ce réglage effectué, la température peut être modifiée dans la plagedéfinie.• Pour commuter le réglage, appuyez sur la touche [ ON/OFF] D.
1 LIMITE TEMP MODE FROID :Le mode de la plage de températures peut être modifié en mode refroidis-sement/déshumidification.
2 LIMITE TEMP MODE CHAUD :Le mode de la plage de températures peut être modifié en mode chauffage.
3 LIMITE TEMP MODE AUTO :Le mode de la plage de températures peut être modifié en mode automa-tique.
4 OFF (programmation initiale) :La limitation de la plage de températures n’est pas active.
* Lorsqu’un réglage autre que OFF est sélectionné, le réglage de la limitation dela plage de températures des modes refroidissement, chauffage et automati-que s’effectue en même temps. Toutefois, la plage ne peut pas être limitéelorsque la plage de températures réglée n’a pas été modifiée.
• Pour augmenter ou diminuer la température, appuyez sur la touche [ TEMP.( ) ou ( )] F.
• Pour commuter entre le réglage maximal et minimal, appuyez sur la touche[ ] H. Le réglage sélectionné clignote et la température peut être réglée.
• Plage réglableMode refroidissement/déshumidification :
ULimite inférieure : 19°C à 30°C Limite supérieure : 30°C à 19°CMode chauffage :
Limite inférieure : 17°C à 28°C Limite supérieure : 28°C à 17°CMode automatique :
Limite inférieure : 19°C à 28°C Limite supérieure : 28°C à 19°C* La plage réglable varie en fonction de l’appareil à connecter (Mr. Slim,CITY
MULTI et à température intermédiaire)
[4]–3. Réglage de la sélection des modes
(1) Réglage de la commande à distance principale/secondaire• Pour commuter le réglage, appuyez sur la touche [ ON/OFF] D.
1 Maitre : La commande devient la commande principale.2 Esclave : La commande devient la commande secondaire.
(2) Utilisation du réglage de l’horloge• Pour commuter le réglage, appuyez sur la touche [ ON/OFF] D.
1 ON : La fonction d’horloge peut être utilisée.2 OFF : La fonction d’horloge ne peut pas être utilisée.
(3) Réglage de la fonction de minuterie• Pour commuter le réglage, appuyez sur la touche [ ON/OFF] D (Choisissez
l’une des fonctions suivantes.).1 PROG HEBDO MADAIRE (Valeur de réglage initial):
La minuterie hebdomadaire peut être utilisée.

– 71 –
2 PROG HORAIRE ARRET AUTO:L’arrêt différé automatique peut être utilisé.
3 PROG HORAIRE SIMPLIFIE:La minuterie simple peut être utilisée.
4 PROG HORAIRE INACTIF:Le mode de minuterie ne peut pas être utilisé.
* Lorsque l’utilisation du réglage de l’horloge est définie sur OFF, la fonction“PROG HEBDO MADAIRE” ne peut pas être utilisée.
(4) Réglage du numéro à contacter en cas d’erreur• Pour commuter le réglage, appuyez sur la touche [ ON/OFF] D.
1 CALL OFF : Les numéros à contacter définis ne s’affichent pas encas d’erreur.
2 CALL **** *** **** : Les numéros à contacter définis s’affichent en casd’erreur.
CALL_ : Le numéro à contacter peut être réglé lorsque l’affi-chage est tel qu’illustré à gauche.
• Réglage des numéros à contacterPour régler les numéros à contacter, effectuez la procédure suivante.Déplacez le curseur clignotant sur les numéros réglés. Appuyez sur latouche [ TEMP. ( ) et ( )] F pour déplacer le curseur vers la droite(gauche). Appuyez sur la touche [ CLOCK ( ) et ( )] C pour régler lesnuméros.
[4]–4. Réglage de l’affichage
(1) Réglage de l’affichage de la température °C/°F• Pour commuter le réglage, appuyez sur la touche [ ON/OFF] D.
1 °C : L’unité de température °C est utilisée.2 °F : L’unité de température °F est utilisée.
(2) Réglage de l’affichage de la température de l’air d’aspiration• Pour commuter le réglage, appuyez sur la touche [ ON/OFF] D.
1 ON : La température de l’air d’aspiration s’affiche.2 OFF : La température de l’air d’aspiration ne s’affiche pas.
(3) Réglage de l’affichage du refroidissement/chauffage automatique• Pour commuter le réglage, appuyez sur la touche [ ON/OFF] D.
1 ON : L’une des fonctions “Automatic cooling” (Refroidissement automati-que) ou “Automatic heating” (Chauffage automatique) s’affiche enmode automatique.
2 OFF : Seule la fonction “Automatic” (Automatique) s’affiche en modeautomatique.

– 72 –
7 Spécifications
Elément Détails
Dimensions 120 (H) × 130 (W) × 19 (D) mm
Poids 0,2 kg
Alimentation 10 à 13V CC (fourni par l’unité intérieure)
Consommation 0,3 W
Environnement compatible 0°C à 40°C, humidité relative 30% à 90%
Composition PS

Sistema de control CITY MULTIy acondicionador-es de aire Mr. SLIM de Mitsubishi
Controlador remoto MAPAR-21MAALibro de instrucciones
ON/OFF TEMP.
Lea detenidamente las instrucciones y procure utilizar este equipo correctamente.Conserve estas instrucciones en un lugar seguro para futura referencia.Asegúrese de entregar estas instrucciones y las instrucciones de instalacióncorrespondientes a cualquier persona encargada de realizar el mantenimiento deeste equipo. La instalación y reubicación de este equipo deben ser realizadasexclusivamente por personas cualificadas. Los intentos de los usuarios finales deinstalar o trasladar este equipo pueden llevar a condiciones inseguras o funciona-miento inadecuado.
ÍNDICE1. Precauciones de seguridad ......................................................... 74
2. Nombres de las piezas ................................................................ 76
3. Configuración de la pantalla ........................................................ 78
4. Configuración de día de la semana y hora .................................. 78
5. Utilización del mando a distancia ................................................ 79(1) Cómo poner en marcha, detener, cambiar el modo y ajustar la
temperatura .................................................................................. 79(2) Velocidad del ventilador, dirección de circulación del aire y
ventilación .................................................................................... 81(3) Utilización del temporizador ......................................................... 83
1 Utilización del temporizador semanal ..................................... 832 Utilización del temporizador simple ........................................ 853 Utilización del temporizador de apagado automático ............. 87
(4) Bloqueo de los botones del mando a distancia(límite de función de Operación) .................................................. 89
(5) Otras indicaciones ........................................................................ 90
6. Selección de función ................................................................... 92
7. Especificaciones .......................................................................... 96
Español

– 74 –
1 Precauciones de seguridad� Según el nivel de posibles daños, las advertencias se clasifican según se indica a continuación.
Indica una condición o funcionamiento que, tratado de manera incorrecta, puede provocar lesiones graves o la muerte.
Indica una condición o funcionamiento que, tratado de manera incorrecta, puede provocar lesiones corporales o dañosmateriales.
ADVERTENCIA
PRECAUCIÓN
ADVERTENCIA
No intente instalar este equipo usted mismo.Pida que lo instale su distribuidor o un ingeniero cualificado. Una instala-ción incorrecta puede provocar incendios, electrocución u otros acciden-tes graves.
Asegúrese de que el equipo se haya fijado de manera segura.Asegúrese de que el equipo esté bien fijo en un soporte resistente para queno exista riesgo de caída.
Asegúrese de suministrar el voltaje nominal.El suministro de un voltaje incorrecto puede provocar incendios o fallos enel equipo.
Desconecte el equipo inmediatamente si el funcionamiento es anó-malo.Continuar su uso puede provocar fallos, electrocución o incendios.Si observa olor a quemado u otra anomalía, desconecte inmediatamentela alimentación y consulte a su distribuidor.
No intente reubicar este equipo usted mismo.Una reinstalación incorrecta puede resultar en incendios, electrocución uotros accidentes graves.Pida que su distribuidor o a un ingeniero cualificado realicen la reubicación.
No se deshaga de este equipo usted mismo.Consulte a su distribuidor cuando deba desechar ese equipo.
No intente modificar o reparar este equipo usted mismo.Intentar su modificación o reparación puede provocar incendios, electro-cución u otros accidentes graves. Consulte a su distribuidor si necesitareparación.
Deje de utilizar este equipo si existen fallos de funcionamiento (si serepiten los mensajes de error y la unidad no funciona como se prevé).Si continúa utilizándose o intentándolo, pueden provocarse incendios ofallos en el equipo. Consulte a su distribuidor para obtener consejo.

– 75 –
Mantenga los materiales peligrosos alejados de este equipo.No instale este equipo en lugares donde exista riesgo de pérdida de gascombustible. La presencia de gas combustible puede provocar explosio-nes o incendios.
No lave este equipo con agua.Un lavado con agua puede provocar electrocución o fallos del equipo.
No toque los botones con las manos húmedas.Hacerlo así puede provocar electrocución o fallos del equipo.
No utilice este equipo para fines no previstos.Este equipo se utiliza con los sistemas Mitsubishi de control de aire enedificios. No lo utilice con ningún otro sistema o fin, ya que dicha utilizaciónpuede resultar en un funcionamiento incorrecto.
No rocíe repelente para insectos o sustancias combustibles sobre elequipo.Mantenga los aerosoles y sustancias combustibles alejados de esteequipo y nunca los rocíe directamente sobre él. El contacto con dichassustancias o su proximidad constituye un riesgo de explosiones o incen-dios.
No utilice este equipo en ambientes inapropiados.No debe utilizarse en áreas donde puede haber grandes cantidades deaceite (aceite de máquinas, etc.), gases de escape o gas sulfuro. Dichosambientes pueden reducir el rendimiento o causar fallos del equipo.
PRECAUCIÓN
No utilice objetos puntiagudos para pulsar los botones.La utilización de objetos puntiagudos puede provocar electrocución ofallos del equipo.
No debe utilizarse en temperaturas extremas.Utilícese solamente cuando la temperatura ambiente se encuentre dentrode los límites indicados en las instrucciones. (Si las instrucciones noindican límites, utilícese solamente a temperaturas de entre 0 °C y 40 °C).La utilización de este equipo a temperaturas fuera de este rango puedeprovocar fallos graves del equipo.
No tire ni retuerza los cables de comunicación.Si se tiran o tuercen los cables, pueden provocarse incendios o fallos delequipo.
No debe desmontarse.Los intentos de desmontaje pueden provocar lesiones por contacto conpiezas internas, incendios o fallos del equipo.
No limpie este equipo con benceno, diluyente para pinturas o pañosde limpieza química.Estas sustancias pueden provocar decoloración o fallos del equipo. Si elequipo se ensucia visiblemente, límpielo con un paño escurrido, previa-mente humedecido con un solvente neutro diluido en agua y luego límpielocon un paño seco.
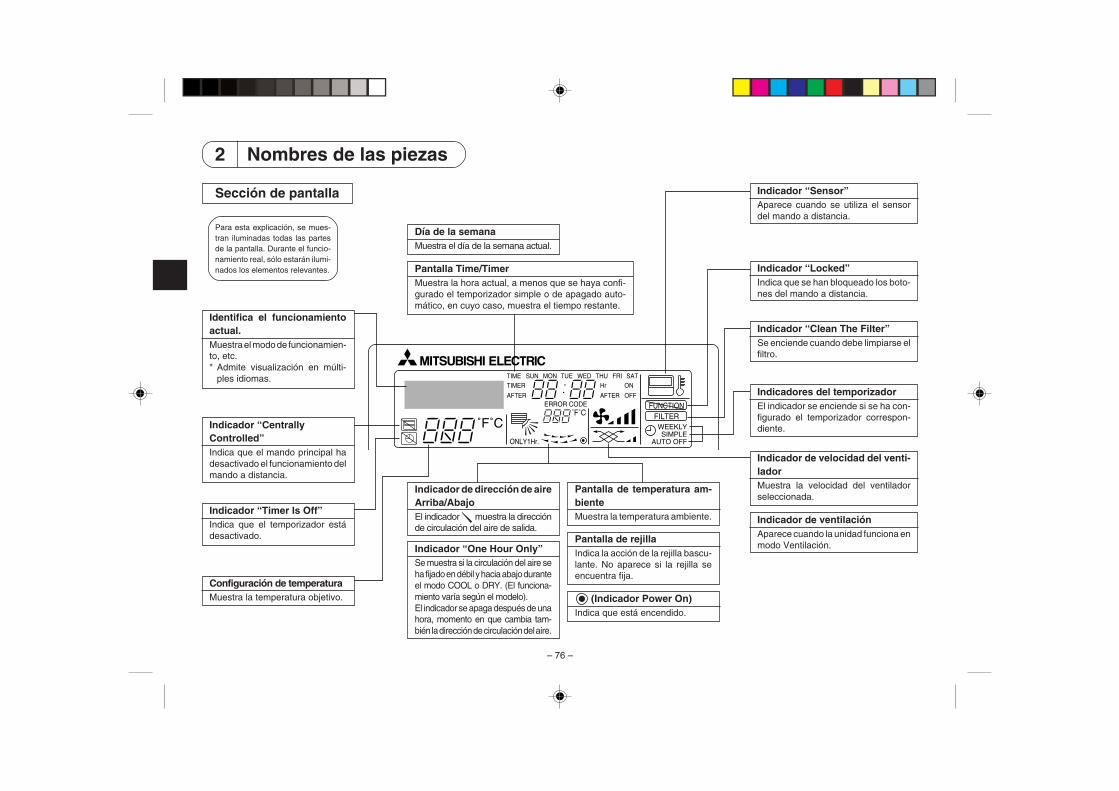
– 76 –
2 Nombres de las piezas
Sección de pantalla
Para esta explicación, se mues-tran iluminadas todas las partesde la pantalla. Durante el funcio-namiento real, sólo estarán ilumi-nados los elementos relevantes.
˚F˚C
˚F˚C
ERROR CODEAFTER
TIMERTIME SUN MON TUE WED THU FRI SAT
ON
OFF
Hr
AFTER
FILTERFUNCTION
ONLY1Hr.
WEEKLYSIMPLE
AUTO OFF
Identifica el funcionamientoactual.Muestra el modo de funcionamien-to, etc.* Admite visualización en múlti-
ples idiomas.
Indicador “CentrallyControlled”Indica que el mando principal hadesactivado el funcionamiento delmando a distancia.
Indicador “Timer Is Off”Indica que el temporizador estádesactivado.
Configuración de temperaturaMuestra la temperatura objetivo.
Día de la semanaMuestra el día de la semana actual.
Pantalla Time/TimerMuestra la hora actual, a menos que se haya confi-gurado el temporizador simple o de apagado auto-mático, en cuyo caso, muestra el tiempo restante.
Indicador “Sensor”Aparece cuando se utiliza el sensordel mando a distancia.
Indicador “Locked”Indica que se han bloqueado los boto-nes del mando a distancia.
Indicador “Clean The Filter”Se enciende cuando debe limpiarse elfiltro.
Indicadores del temporizadorEl indicador se enciende si se ha con-figurado el temporizador correspon-diente.
Indicador de dirección de aireArriba/AbajoEl indicador muestra la direcciónde circulación del aire de salida.
Indicador “One Hour Only”Se muestra si la circulación del aire seha fijado en débil y hacia abajo duranteel modo COOL o DRY. (El funciona-miento varía según el modelo).El indicador se apaga después de unahora, momento en que cambia tam-bién la dirección de circulación del aire.
Pantalla de temperatura am-bienteMuestra la temperatura ambiente.
Pantalla de rejillaIndica la acción de la rejilla bascu-lante. No aparece si la rejilla seencuentra fija.
(Indicador Power On)Indica que está encendido.
Indicador de velocidad del venti-ladorMuestra la velocidad del ventiladorseleccionada.
Indicador de ventilaciónAparece cuando la unidad funciona enmodo Ventilación.

– 77 –
Sección de control
PAR-21MAA
ON/OFF
FILTER
CHECK
OPERATION CLEAR
TEST
TEMP.
MENU
BACK DAYMONITOR/SET
CLOCK
ON/OFF
Botones Set Temperature
Down (Abajo)
Up (Arriba)
Botón Timer Menu(botón Monitor/Set )
Botón Mode (botón Return)
Botones Set Time
Back (Atrás)
Ahead (Adelante)
Botón Timer On/Off(botón Set Day)
Apertura dela puerta.
Botón Start/Stop
Botón Fan Speed
Botón Filter(Botón )
Botón Test Run
Botón Check (botón Clear)
Botón Airflow Up/Down
Botón Louver(Botón Operation)
Al número de funciona-miento anterior.
Botón Ventilation(botón Operation)
Al número de funciona-miento posterior.
Nota:� Si presiona un botón para una función que no está instalada en la unidad interior, el mando a distancia mostrará el mensaje
“Not Available” (no disponible).Si está utilizando un mando a distancia para controlar múltiples unidades interiores, este mensaje aparecerá sólo si la funciónno está presente en la unidad principal.
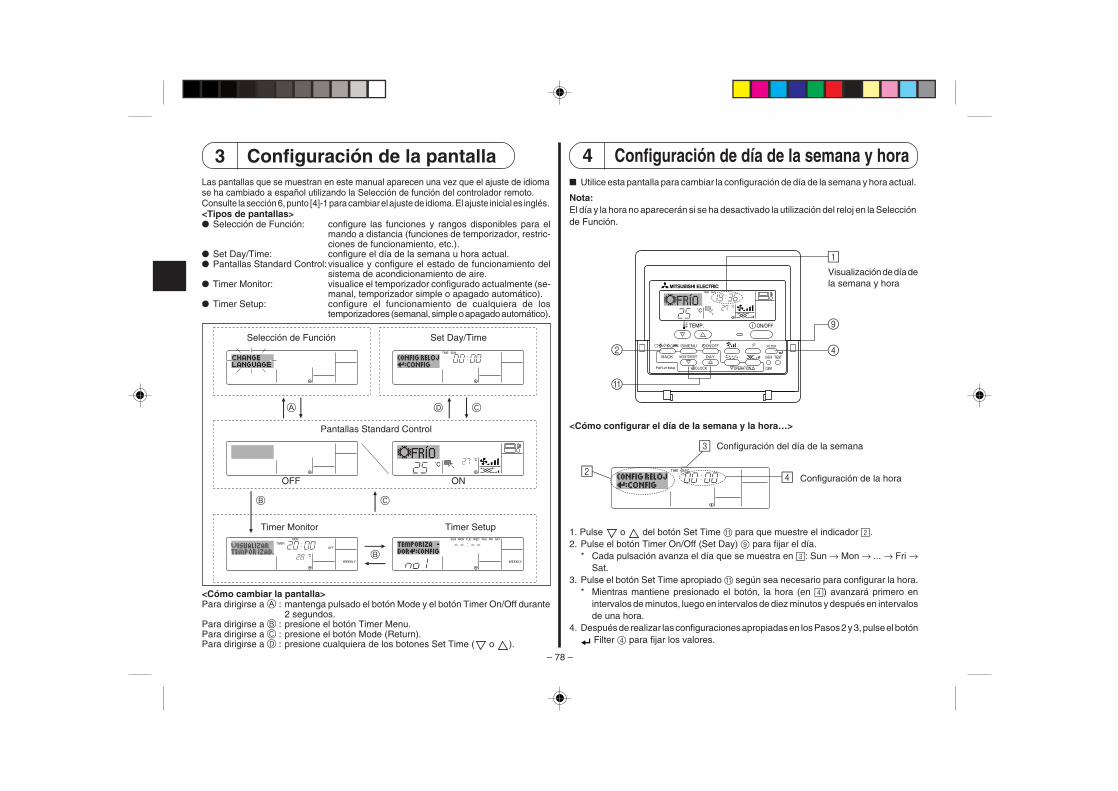
– 78 –
3 Configuración de la pantallaLas pantallas que se muestran en este manual aparecen una vez que el ajuste de idiomase ha cambiado a español utilizando la Selección de función del controlador remoto.Consulte la sección 6, punto [4]-1 para cambiar el ajuste de idioma. El ajuste inicial es inglés.<Tipos de pantallas>� Selección de Función: configure las funciones y rangos disponibles para el
mando a distancia (funciones de temporizador, restric-ciones de funcionamiento, etc.).
� Set Day/Time: configure el día de la semana u hora actual.� Pantallas Standard Control: visualice y configure el estado de funcionamiento del
sistema de acondicionamiento de aire.� Timer Monitor: visualice el temporizador configurado actualmente (se-
manal, temporizador simple o apagado automático).� Timer Setup: configure el funcionamiento de cualquiera de los
temporizadores (semanal, simple o apagado automático).
˚F˚C
TIMERMON
OFF
WEEKLY
SUN MON TUE WED THU FRI SAT
WEEKLY
˚F˚C
˚C
TIME SUN
Selección de Función Set Day/Time
Pantallas Standard Control
OFF ON
Timer Monitor Timer Setup
A D C
B C
B
<Cómo cambiar la pantalla>Para dirigirse a A : mantenga pulsado el botón Mode y el botón Timer On/Off durante
2 segundos.Para dirigirse a B : presione el botón Timer Menu.Para dirigirse a C : presione el botón Mode (Return).Para dirigirse a D : presione cualquiera de los botones Set Time ( o ).
4 Configuración de día de la semana y hora� Utilice esta pantalla para cambiar la configuración de día de la semana y hora actual.
Nota:El día y la hora no aparecerán si se ha desactivado la utilización del reloj en la Selecciónde Función.
Visualización de día dela semana y hora
˚C
˚C
TIME SUN
PAR-21MAA
ON/OFF
FILTER
CHECK
OPERATION CLEAR
TEST
TEMP.
MENU
BACK DAYMONITOR/SET
CLOCK
ON/OFF
2 4
9
1
A
<Cómo configurar el día de la semana y la hora…>
Configuración de la horaTIME SUN2
3
4
1. Pulse o del botón Set Time A para que muestre el indicador 2.2. Pulse el botón Timer On/Off (Set Day) 9 para fijar el día.
* Cada pulsación avanza el día que se muestra en 3: Sun → Mon → ... → Fri →Sat.
3. Pulse el botón Set Time apropiado A según sea necesario para configurar la hora.* Mientras mantiene presionado el botón, la hora (en 4) avanzará primero en
intervalos de minutos, luego en intervalos de diez minutos y después en intervalosde una hora.
4. Después de realizar las configuraciones apropiadas en los Pasos 2 y 3, pulse el botón Filter 4 para fijar los valores.
Configuración del día de la semana

– 79 –
Nota:Sus nuevas entradas en los Pasos 2 y 3 se cancelarán si presiona el botón Mode(Return) 2 antes de presionar el botón Filter 4.
5. Pulse el botón Mode (Return) 2 para completar el procedimiento de configuración.Esto volverá a la pantalla de control estándar, donde 1 mostrará ahora el día y lahora recientemente configurados.
5 Utilización del mando a distancia(1) Cómo poner en marcha, detener, cambiar el modo y ajustar la
temperatura
˚C
˚C
PAR-21MAA
ON/OFF
FILTER
CHECK
OPERATION CLEAR
TEST
TEMP.
MENU
BACK DAYMONITOR/SET
CLOCK
ON/OFF
2
7
2
33
8
6
4
58
7
1156
<Para poner en marcha>
� Pulse el botón Start/Stop 1.• Se encienden la lámpara de encendido
1 y la pantalla.
Nota:� Cuando se reinicia la unidad, las configura-
ciones iniciales son las siguientes.
<Para detener el funcionamiento>
� Pulse de nuevo el botón Start/Stop1.• Se oscurecen la lámpara de
encendido 1 y la pantalla.
Modo
Configuración dela temperaturaVelocidad delventilador
Circulacióndel aire haciaArriba/Abajo
Configuraciones del Mando adistancia
Último valor configurado
Último valor configurado
Último valor configurado
COOL o DRY
Modo HEAT
FAN
Salidahoriz.
Último valorconfigurado
Salidahoriz.

– 80 –
<Selección de Modo>
� Con la unidad en funcionamiento, pulse el botón Mode 2 tantas veces como seanecesario.• Cada pulsación cambia el funcionamiento al modo siguiente en la secuencia que
se muestra a continuación.El modo seleccionado actualmente se muestra en 2.
→ COOL → DRY → FAN → AUTO → HEAT → Ventilate*1 *1,*3,*4 *1 *1,*2
Nota:*1 La disponibilidad de este modo depende del tipo de unidad conectada.*2 Aparece sólo en unidades Mr. Slim con funcionalidad de ventilación instalada.*3 No aparece si se ha desactivado el Modo Automático en Selección de Función. Para
más información sobre cómo configurar esta función, consulte la sección 6, punto[4]–2 (2).
*4 HEAT (calentar) y COOL (enfriar) no aparecen durante el modo AUTOMÁTICO si seha desactivado el indicador de modo Automático en Selección de Función. Para másinformación sobre cómo configurar esta función, consulte la sección 6, punto [4]–4 (3).
<Para cambiar la configuración de temperatura de la habitación...>
� Para reducir la temperatura:Pulse el botón Set Temperature 3.� Para elevar la temperatura: Pulse el botón Set Temperature 3.
• Cada pulsación cambia la configuración en 1 °C. La configuración actual semuestra en 3.
• Los rangos disponibles son los siguientes. *1, *2
COOL o DRYmode
FANAUTO modeHEAT mode
19 - 30 °C(67 - 87 °F) *3
19 - 28 °C(67 - 83 °F) *3
17 - 28 °C(63 - 83 °F) *3
No puedeconfigurarse.
Nota:*1 Los rangos disponibles varían según el tipo de unidad conectada (Mr.Slim, CITY
MULTI, etc.).*2 Si los límites del rango de temperatura se han fijado en la Selección de Función, los
rangos disponibles serán más reducidos que los mostrados anteriormente. Si intentafijar un valor que se encuentre fuera del rango restringido, la pantalla mostrará unmensaje indicando que el rango está restringido en este momento.Para más información sobre cómo configurar y borrar estos límites de rango,consulte la sección 6, punto [4]–2 (3).
*3 Si las Selecciones de Función están configuradas para indicar la temperatura engrados Fahrenheit. Para más información sobre cómo seleccionar °C o °F, consultela sección 6, punto [4]–4 (1).
<Pantalla de temperatura ambiente>
Durante el funcionamiento, la temperatura de entrada de aire se muestra en 4.
Nota:� El rango de visualización es de 8 °C a 39 °C. Si la temperatura está por debajo de
8 °C o por encima de 39 °C, el valor correspondiente (8 °C o 39 °C) parpadeará enla pantalla.
� Si está utilizando el mando a distancia para controlar múltiples unidades interiores,la pantalla mostrará la temperatura en la unidad principal.
� Puede seleccionar el sensor de temperatura utilizado para detectar la temperatura:bien el sensor en la unidad interior (“At Unit”) o el del mando a distancia (“At Remote”).La configuración por defecto es “At Unit”.Para cambiar la ubicación del sensor a la unidad interior:
• Modelos CITY MULTI: Consulte a su distribuidor.• Modelos Mr.Slim: Consulte las instrucciones de instalación.
� Si el indicador de la temperatura ambiente se encuentra desactivada en la Selecciónde Función, no se mostrará dicha temperatura. Para obtener información sobrecómo habilitar o deshabilitar este opción, consulte la sección 6, punto [4]–4 (2).
� Si se selecciona la visualización en grados Fahrenheit en Selección de Función, lapantalla mostrará la marca °F. Para obtener información sobre cómo seleccionar °Co °F, consulte la sección 6, punto [4]–4 (1).

– 81 –
(2) Velocidad del ventilador, dirección de circulación del aire y ventila-ción
<Para cambiar la velocidad del ventilador...>
� Pulse el botón Fan Speed 5 tantas veces como sea necesario con el sistema enfuncionamiento.• Cada pulsación cambia la potencia. La velocidad seleccionada actualmente se
muestra en 5.• La secuencia de cambio y las configuraciones disponibles son las siguientes.
FANSPEED
Pantalla
Modelo de 4velocidades
Modelo de 2velocidades
Modelo de 3velocidades
Nota:� El número de velocidades del ventilador disponibles depende del tipo de unidad
conectada. Recuerde, además, que algunas unidades no ofrecen ajuste “Automá-tico”.
� En los siguientes casos, la velocidad real del ventilador generada por la unidaddiferirá de la velocidad mostrada en la pantalla del mando a distancia.1. Mientras la pantalla muestra “STAND BY” o “DEFROST”.2. Inmediatamente después de iniciar el modo HEAT (mientras el sistema espera
que se efectúe el cambio de modo).3. En modo HEAT, cuando la temperatura ambiente de la habitación es superior al
valor de configuración de la temperatura.4. Cuando la unidad esté en modo DRY.
<Para cambiar la dirección de circulación del aire hacia Arriba/Abajo>� Con la unidad en funcionamiento, pulse el botón Airflow Up/Down 6 tantas veces
como sea necesario.• Cada pulsación cambia la dirección. La dirección actual se muestra en 6.• La secuencia de cambio y las configuraciones disponibles son las siguientes.
Auto Horiz. 1 2 3 4 Oscilación
Pantalla
* Recuerde que durante el funcionamiento oscilante (Swing), la indicación direccionalen la pantalla no cambia en sincronización con los álabes direccionales en launidad.
* Algunos modelos no admiten configuraciones direccionales.
Nota:� Las direcciones disponibles dependen del tipo de unidad conectada. Recuerde,
además, que algunas unidades no ofrecen una configuración “Auto”.� En los siguientes casos, la dirección real del aire diferirá de la dirección indicada en
la pantalla del mando a distancia.1. Mientras la pantalla muestra “STAND BY” o “DEFROST”.2. Inmediatamente después de iniciar el modo calentador (durante la espera para la
realización del cambio).3. En modo calentador, cuando la temperatura ambiente de la sala sea superior a
la configuración de la temperatura.
<Para cambiar la dirección del aire Derecha/Izquierda>
� Pulse el botón Louver 7 según sea necesario.• Aparece la imagen de la rejilla 7.
Cada pulsación del botón, cambia la configuración según se muestra a continua-ción.
(ON) (OFF)
Durante el funcionamiento basculante, lavisualización de la flecha se mueve a iz-quierda y derecha.
Sin indicador(Stop)
Automático Velocidad 1 Velocidad 2 Velocidad 3 Velocidad 4

– 82 –
�
<Utilización de la ventilación>
En modelos Mr.Slim
� Para hacer funcionar el renovador de aire junto con la unidad interior:� Pulse el botón Start/Stop 1.
• El indicador Vent aparece en la pantalla (en 8). Ahora el renovador de airefuncionará automáticamente cuando funcione la unidad interior.
� Para hacer funcionar el renovador de aire de modo independiente:
� Pulse el botón Mode 2 hasta que aparezca en la pantalla . Esto hará que
el renovador de aire comience a funcionar.
� Para cambiar la potencia del renovador de aire:� Pulse el botón Ventilation 8 según sea necesario.
• Cada pulsación cambia la configuración según se muestra a continuación.�
Baja Alta
En modelos CITY MULTI
� Para hacer funcionar el renovador de aire junto con la unidad interior:� Pulse el botón Start/Stop 1.
• El indicador Vent aparece en la pantalla (en 8). Ahora el renovador de airefuncionará automáticamente cuando funcione la unidad interior.
� Para hacer funcionar sólo el renovador de aire cuando la unidad interior no estéfuncionando:� Pulse el botón Ventilation 8 mientras la unidad interior se encuentre apagada.
• La lámpara de encendido (On) (en 1) y el indicador de Ventilación (en 8) seencenderán.
� Para cambiar la potencia del renovador de aire:� Pulse el botón Ventilation 8 según sea necesario.
• Cada pulsación cambia la configuración según se muestra a continuación.
(Baja) (Alta)
� ��
Sin indicador (Stop)
(OFF)
Nota:� En las configuraciones de algunos modelos, el ventilador en la unidad interior
puede activarse aun cuando se configure el renovador de aire para que funcioneindependientemente.

– 83 –
(3) Utilización del temporizadorEsta sección explica cómo configurar y utilizar el temporizador. Puede utilizar la Selección de Función para seleccionar cuál de los tres tipos de temporizador utilizar: 1 temporizadorsemanal, 2 temporizador simple o 3 temporizador automático.Para obtener información sobre cómo configurar la Selección de Función, consulte la sección 6, punto [4]–3 (3).
1 Utilización del temporizador semanal� El temporizador semanal puede utilizarse para configurar hasta ocho funciones para cada día de la semana.
• Cada función puede consistir en cualquiera de las siguientes: hora de encendido y apagado junto a una configuración de la temperatura, sólo hora de encendido y apagadoo sólo configuración de la temperatura.
• Cuando la hora actual alcanza la hora configurada en este temporizador, el acondicionador de aire realiza la acción configurada por el temporizador.� El tiempo necesario para la configuración de la hora para este temporizador es de 1 minuto.
Nota:*1. El temporizador semanal, el temporizador simple y el temporizador automático no pueden utilizarse al mismo tiempo.*2. El temporizador semanal no funcionará si se da alguna de las siguientes condiciones.
La función de temporizador está desactivada; el sistema se encuentra en un estado anómalo; hay una sesión de prueba en curso; se está llevando a cabo una autoprueba o una pruebadel mando a distancia; el usuario está configurando una función; el usuario está configurando el temporizador; el usuario está configurando el día actual de la semana o la hora; el sistemase encuentra bajo el control central. En concreto, el sistema no llevará a cabo operaciones (encendido o apagado de la unidad, configuración de la temperatura) que estén desactivadascuando se produzcan estas condiciones.
˚C
SUNON
WEEKLY
PAR-21MAA
ON/OFF
FILTER
CHECK
OPERATION CLEAR
TEST
TEMP.
MENU
BACK DAYMONITOR/SET
CLOCK
ON/OFF
2
4 2 3
A 9 78
0
4
13
B
1
N° de Funcionamiento
Configuración del día
<Cómo configurar el temporizador semanal>1. Asegúrese de que se encuentra en la pantalla de control estándar y de que el indicador del temporizador
semanal 1 se muestra en la pantalla.2. Pulse el botón Timer Menu B, de modo que aparezca en la pantalla “Set Up” (en 2). (Recuerde que cada
pulsación del botón cambia la pantalla entre “Set Up” y “Monitor”).3. Pulse el botón Timer On/Off (Set Day) 9 para configurar el día. Cada pulsación avanza la pantalla 3 a la
próxima configuración en la secuencia que se indica a continuación: “Sun Mon Tues Wed Thurs Fri Sat” → “Sun”→ … (Domingo Lunes Martes Miércoles Jueves Viernes Sábado → Domingo) → “Fri” → “Sat” → “Sun Mon TuesWed Thurs Fri Sat”… (Viernes → Sábado → Domingo Lunes Martes Miércoles Jueves Viernes Sábado).
4. Pulse el botón o Operation (7 o 8) según sea necesario para seleccionar el número de operaciónapropiado (1 a 8) 4.* La información introducida en los Pasos 3 y 4 seleccionará una de las celdas de la matriz ilustrada a continuación
(La pantalla del mando a distancia en la izquierda muestra cómo se mostraría la pantalla cuando se configuraOperación 1 para el domingo con los valores indicados a continuación).
Sunday Monday … Saturday
Nota:Configurando el día a “Sun Mon Tues Wed Thurs Fri Sat”, puede configurar la misma operación ala misma hora todos los días.(Por ejemplo: la Operación 2 arriba mencionada es la misma para todos los días de la semana).
No. 1
No. 2
…
No. 8
• 8:30• ON• 23 °C
• 10:00• OFF
• 10:00• OFF
• 10:00• OFF
• 10:00• OFF
�
Matriz de configuración
<Valores de Operación 1 para eldomingo>Iniciar el funcionamiento del acon-dicionador de aire a las 8:30, con latemperatura fijada en 23 °C.
<Valores de Operación 2 paratodos los días>Apagar el acondicionador deaire a las 10:00.
�
N° de op.

– 84 –
<Configuración del temporizador semanal>
5. Pulse el botón Set Time apropiado A según sea necesario para fijar la hora deseada (en 5).* Durante su pulsación, la hora avanza primero en intervalos de un minuto, luego en
intervalos de diez minutos y finalmente en intervalos de una hora.6. Pulse el botón ON/OFF 1 para seleccionar la operación deseada (encendido o apagado),
en 6.* Cada pulsación cambia al siguiente valor en la secuencia que se indica a continuación:
sin indicación (sin configuración) → “ON” → “OFF”.7. Pulse el botón Set Temperature apropiado 3 para fijar la temperatura deseada (en 7).
* Cada pulsación cambia la configuración en la secuencia que se indica a continuación: sinindicación (sin configuración) ⇔ 24 ⇔ 25 ⇔ ... ⇔ 29 ⇔ 30 ⇔ 12 ⇔ ... ⇔ 23 ⇔ sinindicación.(Rango disponible: el rango de configuración es de 12 °C a 30 °C. El rango real de controlde temperatura, sin embargo, variará según el tipo de unidad conectada).
8. Después de realizar las configuraciones apropiadas en los Pasos 5, 6 y 7, pulse el botón Filter 4 para guardar los valores.Para borrar los valores actualmente configurados para la operación seleccionada, pulse ysuelte rápidamente el botón Check (Clear) 1 una vez.* El valor de la hora mostrada cambiará a “—:—” y desaparecerán tanto los valores de
encendido/apagado como el de temperatura.(Para borrar todas las configuraciones del temporizador semanal de una vez, mantengapulsado el botón Check (Clear) 0 durante dos o más segundos. La pantalla comenzaráa parpadear, indicando que se han borrado todos los valores fijados).
Nota:Sus datos nuevos se cancelarán si pulsa el botón Mode (Return) 2 antes de pulsar el botón
Filter 4.Si ha configurado dos o más operaciones diferentes para la misma hora exactamente, sólo serealizará la operación con el número más elevado.9. Repita los Pasos 3 a 8 según sea necesario para completar tantas celdas disponibles como desee.10. Pulse el botón Mode (Return) 2 para regresar a la pantalla de control estándar y completar
el procedimiento de configuración.11. Para activar el temporizador, pulse el botón Timer On/Off 9, de modo que el indicador “Timer Off”
desaparezca de la pantalla. Asegúrese de que ya no se muestre el indicador “Timer Off”.* Si no hay valores fijados del temporizador, el indicador “Timer Off” parpadeará en la pantalla.
Muestra la temperatura fijada* No aparece si no se ha fijado la temperatura.
˚C
SUNON
WEEKLY
6
7
5Muestra la configu-ración de la hora
Muestra la operación seleccionada (encendido o apa-gado)* No aparece si no se ha configurado la operación.
<Cómo visualizar los valores fijados del temporizador semanal>
1. Asegúrese de que se muestra en la pantalla el indicador del temporizadorsemanal (en 1).
2. Pulse el botón Timer Menu B de modo que se indique en la pantalla“Monitor” (en 8).
3. Pulse el botón Timer On/Off (Set Day) 9 según sea necesario paraseleccionar el día que desea visualizar.
4. Pulse el botón Operation o (7 o 8) según sea necesario paracambiar el funcionamiento del temporizador mostrado en la pantalla (en 9).* Cada pulsación, avanzará a la próxima operación del temporizador, en
el orden de configuración de la hora.5. Para cerrar el monitor y regresar a la pantalla Standard Control, pulse el
botón Mode (Return) de 2.
˚C
TIMERSUN
ON
OFF
WEEKLY 1
98
<Para desactivar el temporizador semanal>
Pulse el botón Timer On/Off 9 de modo que aparezca “Timer Off” en 0.
˚C
˚C
TIME SUN
WEEKLY
0
˚C
˚C
TIME SUN
WEEKLY
0
<Para activar el temporizador semanal>Pulse el botón Timer On/Off 9 de modo que el indicador “Timer Off” (en 0)se oscurezca.
Valores fijados del temporizador

– 85 –
2 Utilización del temporizador simple� Puede configurar el temporizador simple de cualquiera de las tres formas siguientes.
• Sólo hora de puesta en marcha:el acondicionador de aire comenzará a funcionar cuandohaya transcurrido el tiempo fijado.
• Sólo hora de parada: el acondicionador de aire se detendrá cuando haya trans-currido el tiempo fijado.
• Horas de puesta en marcha y de parada:el acondicionador de aire comienza a funcionar y se detienecuando hayan transcurrido las horas respectivas.
� El temporizador simple (puesta en marcha y parada) puede configurarse sólo una vez enun periodo de 72 horas. La configuración de la hora se realiza en aumentos de una hora.
Nota:*1. El temporizador semanal, el temporizador simple y el temporizador automático no
pueden utilizarse al mismo tiempo.*2. El temporizador simple no funcionará si se da cualquiera de las condiciones siguientes.
El temporizador está desactivado, el sistema está en estado anómalo, estárealizándose una prueba de funcionamiento, el mando a distancia está realizandouna autoevaluación o diagnóstico, el usuario está seleccionando una función oconfigurando el temporizador, el sistema está bajo control central. (En estascondiciones, la operación de encendido y apagado está deshabilitada).
ONHr
AFTER
SIMPLE
PAR-21MAA
ON/OFF
FILTER
CHECK
OPERATION CLEAR
TEST
TEMP.
MENU
BACK DAYMONITOR/SET
CLOCK
ON/OFF
2 A 9
0
4
1
B
<Cómo configurar el temporizador simple>
ONHr
AFTER
SIMPLE
4
1
3
2
1. Asegúrese de que se encuentra en una pantalla de control estándar y de que elindicador de temporizador simple se muestra en la pantalla (en 1).Cuando aparezca una indicación distinta de la del temporizador simple, cámbielo aSIMPLE TIMER (TEMPORIZADOR SIMPLE) utilizando la selección de funciones de laconfiguración de funciones del temporizador del mando a distancia (véase 6.[4]–3 (3)).
2. Pulse el botón Timer Menu B, de modo que aparezca en la pantalla “Set Up” (en 2).(Recuerde que cada pulsación del botón cambia la pantalla entre “Set Up” y“Monitor”).
3. Pulse el botón ON/OFF 1 para mostrar los valores configurados actuales deencendido o apagado del temporizador simple. Pulse el botón una vez para ver eltiempo restante hasta el encendido y luego de nuevo para ver el tiempo restantehasta el apagado. (El indicador ON/OFF aparece en 3).• Temporizador “ON”: el acondicionador de aire comenzará a funcionar cuando
haya transcurrido el número de horas especificado.• Temporizador “OFF”: el acondicionador de aire se detendrá cuando haya trans-
currido el número de horas especificado.4. Mostrando “ON” u “OFF” en 3: pulse el botón Set Time A apropiado según sea
necesario para fijar las horas hasta el encendido (si se muestra “ON”) o las horashasta el apagado (si se muestra “OFF” en 4).• Rango disponible: 1 a 72 horas
5. Para fijar las horas hasta el encendido y el apagado, repita los Pasos 3 y 4.* Recuerde que las horas de encendido y apagado no pueden fijarse en el mismo
valor.6. Para borrar la configuración de encendido o apagado actual: Muestre el valor
configurado de encendido o apagado (véase el paso 3) y luego pulse el botón Check(Clear) 0 para borrar la configuración de la hora a “—” en 4. (Si desea utilizar sóloun valor de configuración de encendido o una configuración de apagado, asegúresede que la configuración que no desea utilizar se muestra como “—”).
7. Después de completar los Pasos 3 y 6 arriba mencionados, pulse el botón Filter4 para fijar el valor.
Nota:Sus configuraciones nuevas se cancelarán si pulsa el botón Mode (Return) 2 antes depulsar el botón Filter 4.
8. Pulse el botón Mode (Return) 2 para regresar a la pantalla de control estándar.9. Pulse el botón Timer On/Off 9 para iniciar la cuenta atrás del temporizador. Cuando
el temporizador está funcionando, su valor es visible en la pantalla. Asegúrese deque el valor del temporizador sea visible y apropiado.
Configuración del temporizador
Acción (encendido o apagado)* Se muestra “— —” si no hay confi-
guración.

– 86 –
<Visualización de las configuraciones actuales del temporizador simple>
1. Asegúrese de que el indicador del temporizador simple está visible en lapantalla (en 1).
2. Pulse el botón Timer Menu B, para que aparezca “Monitor” en la pantalla(en 5).• Si el temporizador simple de encendido o apagado está funcionando, su
valor actual aparecerá en 6.• Si se han fijado ambos valores, encendido y apagado, aparecen alterna-
tivamente ambos valores.3. Pulse el botón Mode (Return) 2 para cerrar la pantalla del monitor y
regresar a la pantalla de control estándar.
TIMER ON
OFF
Hr
AFTER
SIMPLE 1
65 Configuración del temporizador
<Para desactivar el temporizador simple...>Pulse el botón Timer On/Off 9 para que la configuración del temporizador yano aparezca en la pantalla (en 7).
<Para iniciar el temporizador simple…>
Pulse el botón Timer On/Off 9 para que la configuración del temporizador seavisible en 7.
˚C
˚CSIMPLE
7
˚C
˚C
ONHr
AFTER
SIMPLE
7
EjemplosSi se han configurado las horas de encendido y apagado en el temporizador simple, elfuncionamiento y la pantalla son según se indica a continuación.
Ejemplo 1:Inicie el temporizador, con la hora de encendido fijada más temprano que la hora de apagado.Configuración de encendido: 3 horasConfiguración de apagado: 7 horas
ONHr
AFTER
SIMPLE
˚C
˚C
OFF
Hr
AFTER
SIMPLE
SIMPLE
˚C
˚C
OFF
Hr
AFTER
SIMPLE
ONHr
AFTER
SIMPLE
˚C
˚CSIMPLE
Ejemplo 2:Inicie el temporizador, con la hora de apagado fijada más temprano que la hora de encendidoConfiguración de encendido: 5 horasConfiguración de apagado: 2 horas
�
�
�
�
3 horas despuésdel inicio deltemporizador
Al inicio deltemporizador
7 horas despuésdel inicio deltemporizador
La pantalla muestra la configura-ción de encendido del temporiza-dor (las horas restantes para lle-gar al encendido).
La pantalla cambia para mostrar elvalor de apagado del temporizador(las horas restantes para el apagado).La hora mostrada es el valor configu-rado de apagado (7 horas) “- el valor”configurado de encendido (3 horas) =4 horas.
El acondicionador de aire sedesactiva y permanecerá desacti-vado hasta que alguien lo reinicie.
2 horas despuésdel inicio deltemporizador
Al inicio deltemporizador
5 horas despuésdel inicio deltemporizador
La pantalla muestra el valor deapagado del temporizador (lashoras restantes para el apagado).
La pantalla cambia para mostrar elvalor de encendido del temporizador(las horas restantes para el encendi-do).La hora indicada es el valor configura-do de encendido (5 horas) “- el valor”configurado de apagado (2 horas) = 3horas.
El acondicionador de aire comienzaa funcionar y continuará funcionan-do hasta que alguien lo detenga.

– 87 –
3 Utilización del temporizador de apagado automático� Este temporizador comienza la cuenta atrás cuando el acondicionador de aire
comienza a funcionar y apaga el acondicionador cuando haya transcurrido el tiempofijado.
� Los valores disponibles abarcan desde 30 minutos a 4 horas, en intervalos de 30minutos.
Nota:*1. El temporizador semanal, el temporizador simple y el temporizador automático no
pueden utilizarse al mismo tiempo.*2. El temporizador Auto Off no funcionará si se dan cualquiera de las siguientes
condiciones.El temporizador está desactivado, el sistema está en estado anómalo, estárealizándose una prueba de funcionamiento, el mando a distancia está realizandouna autoevaluación o diagnóstico, el usuario está seleccionando una función oconfigurando el temporizador, el sistema está bajo control central. (En estascondiciones, la operación de encendido y apagado está deshabilitada).
AFTER OFF
AUTO OFF
PAR-21MAA
ON/OFF
FILTER
CHECK
OPERATION CLEAR
TEST
TEMP.
MENU
BACK DAYMONITOR/SET
CLOCK
ON/OFF
2 A 9
4
B
<Cómo configurar el temporizador de apagado automático>
1. Asegúrese de que usted se encuentre en una pantalla de control estándar y que elindicador del temporizador de apagado automático Auto Off se muestre en la pantalla(en 1).Cuando aparezca una indicación distinta de la del temporizador de apagado automático,cámbielo a AUTO OFF TIMER (TEMPORIZADOR DE APAGADO AUTOMÁTICO)utilizando la selección de funciones de la configuración de funciones del temporizadordel mando a distancia (véase 6.[4]–3 (3)).
2. Mantenga pulsado el botón Timer Menu B durante 3 segundos, para que aparezca “SetUp” en la pantalla (en 2).(Recuerde que cada pulsación del botón cambia la pantalla entre “Set Up” y “Monitor”).
3. Pulse el botón Set Time apropiado A según sea necesario para configurar la hora deapagado (en 3).
4. Pulse el botón Filter 4 para fijar la configuración.
Nota:Los datos introducidos se cancelarán si pulsa el botón Mode (Return) 2 antes de pulsarel botón Filter 4.
5. Pulse el botón Mode (Return) 2 para completar el procedimiento de configuracióny regresar a la pantalla de control estándar.
6. Si el acondicionador de aire ya está funcionando, el temporizador comienzainmediatamente la cuenta atrás. Asegúrese de comprobar que el valor fijado deltemporizador aparece correctamente en la pantalla.
<Comprobación de la configuración actual del temporizador de apagado automático>
AFTER OFF
AUTO OFF
3
1
2 Configuración del temporizador
AFTER
TIMER
OFF
AUTO OFF
5
1
4 Configuración del temporizador
1. Asegúrese de que “Auto Off” esté visible en la pantalla (en 1).2. Mantenga pulsado el botón Timer Menu B durante 3 segundos, para que se indique
en la pantalla “Monitor” (en 4).• El tiempo restante para el apagado aparece en 5.
3. Para cerrar el monitor y regresar a la pantalla Standard Control, pulse el botón Mode(Return) de 2.

– 88 –
<Para desactivar temporizador de apagado automático...>
� Mantenga pulsado el botón Timer On/Off 9 durante 3 segundos para que aparezca“Timer Off” (en 6) y desaparezca el valor del temporizador (en 7).
� Alternativamente, desconecte el acondicionador de aire. El valor del temporizador(en 7) desaparecerá de la pantalla.
<Para iniciar el temporizador de apagado automático...>
� Mantenga pulsado el botón Timer On/Off 9 durante 3 segundos. Desaparece laindicación “Timer Off” (en 6) y la configuración del temporizador aparece en lapantalla (en 7).
� Alternativamente, encienda el acondicionador de aire. El valor del temporizadoraparecerá en 7.
˚C
˚CAUTO OFF6
7
˚C
˚C
AFTER OFF
AUTO OFF6
7
AUTO OFF
7

– 89 –
(4) Bloqueo de los botones del mando a distancia (límite de función deOperación)
� Si lo desea, puede bloquear los botones del mando a distancia. Puede utilizar laselección de funciones del mando a distancia para elegir el tipo de bloqueo quedesea usar. (Para más información sobre selección del tipo de bloqueo, consulte lasección 6, punto [4]–2 (1)).Específicamente, puede utilizar cualquiera de los dos tipos de bloqueo que seindican a continuación.
1 Bloquear todos los botones:bloquea todos los botones en el mando a distancia.2 Bloquear todo excepto ON/OFF (encendido/apagado):
bloquea todos los botones excepto el botón ON/OFF.
Nota:Aparece en la pantalla el indicador “Locked” (bloqueado) para indicar que los botonesestán bloqueados en este momento.
˚C
˚C
TIME SUN
FUNCTION
PAR-21MAA
ON/OFF
FILTER
CHECK
OPERATION CLEAR
TEST
TEMP.
MENU
BACK DAYMONITOR/SET
CLOCK
ON/OFF
4
1
1
Indicadorde bloqueo
<Cómo bloquear los botones>
1. Mientras pulsa el botón Filter 4, pulse y mantenga pulsado el botón ON/OFF 1durante 2 segundos. Aparece en la pantalla el indicador “Locked” (en 1) indicandoque está activado el bloqueo.* Si el bloqueo se ha deshabilitado en Function Selection, la pantalla mostrará el
mensaje “Not Available” (no disponible) cuando pulse los botones según sedescribe anteriormente.
• Si pulsa un botón bloqueado, parpadeará en la pantalla el indicador “Locked” (en1).
˚C
˚C
FUNCTION1
˚C
˚C
FUNCTION1
<Cómo desbloquear los botones>1. Mientras pulsa el botón Filter 4, pulse y mantenga pulsado el botón ON/OFF 1
durante 2 segundos para que el indicador “Locked” desaparezca de la pantalla (en1).
˚C
˚C
1

– 90 –
(5) Otras indicaciones<Centrally Controlled>
ON/OFF TEMP.
˚C
˚C
� Aparece cuando el funcionamiento se controla desde el controlador central o sistemasimilar.A continuación se muestra el funcionamiento restringido.• ON/OFF (incluyendo el funcionamiento del temporizador)• Modo de funcionamiento• Ajuste de temperatura
Nota:Es posible que se restrinjan de forma individual.
<Indicador de modo parpadeante>
ON/OFF TEMP.
˚C
˚C
� Cuando parpadea de forma continuaAparece cuando otra unidad interior conectada a la unidad exterior está en funcio-namiento en un modo de funcionamiento distinto.Iguale con el modo de funcionamiento de la unidad interior.
� Cuando cambia el modo después de que parpadee el indicadorAparece cuando el modo de funcionamiento se restringe para cada estaciónmediante el controlador central o sistema similar.Utilice otro modo de funcionamiento.
<“Filter” parpadeante>
ON/OFF TEMP.
˚C
˚CFILTER
� Indica que el filtro necesita una limpieza.Limpie el filtro.
� Cuando restablezca el indicador “FILTER” (Filtro)Cuando presiona el botón [FILTER] (Filtro) dos veces sucesivamente después dehaber limpiado el filtro, el indicador se apagará y se restablecerá.
Nota:� Cuando se controlan dos o más tipos diferentes de unidad interior, el periodo de
limpieza difiere con el tipo de filtro. Cuando llega el momento de limpiar la unidadprincipal, aparece “FILTER” (Filtro). Cuando se apague el indicador del filtro, eltiempo acumulado se reajustará.
� “FILTER” (Filtro) indica el periodo de limpieza en que se usó el acondicionador de airebajo las condiciones generales de aire interior por tiempo. Ya que el grado desuciedad depende de las condiciones ambientales, limpie el filtro de acuerdo con lascircunstancias.
� El periodo acumulado de limpieza del filtro difiere según el modelo.

– 91 –
<Códigos de error parpadeantes>
En modelos CITY MULTI En modelos Mr.Slim
ON/OFF
ERROR CODE
ON/OFF
ERROR CODE
Lámpara ON(parpadeando)
Código de errorN° de unidad interior
� Si parpadean la lámpara ON y el código de error: esto significa que el acondicionador de aire está estropeado y su funcionamiento se ha detenido (y no puede reanudarse).Tome nota del número de unidad indicado y del código de error; luego desconecte la alimentación del acondicionador de aire y llame a su distribuidor o proveedor de serviciotécnico.
Si ha introducido un número telefónico al cual llamar en caso de problemas, la pantalla mostrará estenúmero. (Puede configurarlo en la Selección de Función. Para más información, consulte la sección 6).
Dirección del proveedor de re-frigerante de la unidad interior
Código de error N° de unidad interior
Pantalla alternante
Lámpara ON(parpadeando)
En modelos CITY MULTI En modelos Mr.Slim Cuando se pulsa el botón Check:
� Si sólo parpadea el código de error (mientras la lámpara ON permanece encendida): continúa el funcionamiento, pero puede existir un problema en el sistema. En este caso,debe anotar el código de error y luego llamar a su distribuidor o proveedor de servicio técnico para asesoramiento.
* Si ha introducido un número de teléfono al cual llamar en caso de problemas, pulse el botón Check para mostrarlo en la pantalla. (Puede configurarlo en la Selección de Función.Para más información, consulte la sección 6).
ON/OFF
˚C
˚C
ERROR CODE
ON/OFF
˚C
˚C
ERROR CODE
ON/OFF
CALL:XXXXXXX:XXX
Código de error Código de error

– 92 –
6 Selección de funciónSelección de funciones del controlador remotoEl ajuste de las siguientes funciones del controlador remoto se puede cambiar utilizando el modo Selección de función del controlador remoto. Cambie el ajuste cuando seanecesario.
Ítem 1
1. Cambio de idioma(“CHANGELANGUAGE”)
2. Límite de funciones(“SELECCIÓN DEFUNCIÓNES”)
3. Selección de modo(“SELECCIÓN DEMODO”)
4. Cambio deindicador(“MOSTRARMODO”)
Ítem 2
Ajuste del idioma que aparece en el indicador
(1) Ajuste del límite de funciones (bloqueo de funciones) (“FUN-CIÓN BLOQUEADA”)
(2) Uso del ajuste de modo automático (“SELECCIÓN MODOAUTO”)
(3) Ajuste del límite de rango de temperatura (“LIMIT TEMP CON-SIGNA”)
(1) Ajuste del controlador remoto principal/secundario (“CONTROLPRINCIPAL/SECUNDARIO”)
(2) Uso del ajuste del reloj (“RELOJ”)
(3) Ajuste de la función de temporizador (“TEMPORIZA-DORSEMANAL”)
(4) Ajuste de número de contacto en caso de error (“CALL.”)
(1) Ajuste del indicador de temperatura °C/°F (“TEMP. GRADOS°C/°F”)
(2) Ajuste del indicador de temperatura del aire de aspiración(“MOSTRAR TEMP.”)
(3) Ajuste del indicador de refrigeración/calefacción automática(“MOSTRAR F/C EN AUTO”)
Ítem 3 (Contenido de ajuste)
• El indicador puede aparecer en distintos idiomas
• Ajuste del rango de límite de funcionamiento (bloqueo de funcionamiento)
• Ajuste del uso (o no) del modo de funcionamiento “automático”
• Ajuste del rango de temperatura (máximo, mínimo)
• Selección del controlador remoto principal o secundario* Si se conectan dos controladores remotos a un grupo, uno de los
controladores debe seleccionarse como secundario.
• Ajuste del uso (o no) de la función de reloj
• Ajuste del tipo de temporizador
• Indicador del número de contacto en caso de error• Ajuste del número de teléfono
• Ajuste de la unidad de temperatura (°C o °F) que debe aparecer en elindicador
• Ajuste del uso (o no) del indicador de temperatura del aire (aspiración) delinterior
• Ajuste del uso (o no) del indicador de “Cooling” (Refrigeración) o “Heating”(Calefacción) durante el funcionamiento en modo automático

– 93 –
→→
[Diagrama de flujo de selección de función][1] Apague el acondicionador de aire para iniciar el modo Selección de función del controlador remoto. → [2] Seleccione del Ítem1. → [3] Seleccione del Ítem2. → [4] Realice elajuste. (Los detalles se especifican en el Ítem 3) → [5] Ajuste finalizado. → [6] Cambie el indicador al modo normal. (Fin)
(Mantenga pulsado el botón E y presioneel botón D durante dos segundos).* El controlador remoto registra el ajuste
que se hace de esta forma.
Presione elbotón G.
Vea [4]–1Ítem 3 (Contenido
de ajuste)Vea [4]–2. (1)
Vea [4]–2. (2)
Vea [4]–2. (3)
Vea [4]–3. (1)
Vea [4]–3. (2)
Vea [4]–3. (3)
Vea [4]–3. (4)
Vea [4]–4. (1)
Vea [4]–4. (2)
Vea [4]–4. (3)
Ítem 1 Modo de selección de funcióndel controlador remoto
Ítem 2
Selección de modo(“SELECCIÓN DE
MODO”)
Indicador normal (Indicador que aparece cuan-do el acondicionador de aire está apagado)
PAR-21MAA
ON/OFF
FILTER
CHECK
OPERATION CLEAR
TEST
TEMP.
MENU
BACK DAYMONITOR/SET
CLOCK
ON/OFF
F
G
C D
B
I
A
H
E
Cambio de idioma(“CHANGE LANGUAGE”)
Límite de funciones(“SELECCIÓN DE
FUNCIÓNES”)
Cambio de indicador(“MOSTRAR MODO”)
NOTAEl funcionamiento del temporizador sedetiene cuando se cambia al modo Normalel indicador de selección de función delcontrolador remoto.
Presione el botón G.
Presione elbotón E.
Presione elbotón E.
Presione elbotón E.
Presioneel botónE.
Presione elbotón G.
Presione elbotón G.
Presione elbotón D.
Presione elbotón D.
Presione elbotón D.
→→
→→
→
→ Ajuste del límite de funciones (“FUNCIÓN BLOQUEADA”)Presione el botón G.
Ajuste del límite de rango de temperatura (“LIMIT TEMP CONSIGNA”)
Uso del ajuste de modo automático (“SELECCIÓN MODO AUTO”)
→ Ajuste del indicador de temperatura °C/°F (“TEMP. GRADOS °C/°F”)Presione el botón G.
Ajuste del indicador de refrigeración/calefacción automática (“MOSTRAR F/C EN AUTO”)
Ajuste del indicador de temperatura del aire de aspiración (“MOSTRAR TEMP.”)
→ Ajuste del controlador remoto principal/secundario (“CONTROL PRINCIPAL/SECUNDARIO”)Presione el botón G.
Ajuste de la función de temporizador (“TEMPORIZA-DOR SEMANAL”)
Uso del ajuste del reloj (“RELOJ”)
Ajuste de número de contacto en caso de error (“CALL.”)
Indicador de puntosEl idioma que se selecciona en elmodo Cambio de idioma apareceen este indicador. En este ma-nual se ha seleccionado el inglés.
(Mantenga pulsado el botón E y presione el botón D durante dossegundos).* El indicador no se puede cambiar durante la selección de función
de la unidad, la prueba de funcionamiento y el autodiagnóstico.

– 94 –
[Ajuste detallado]
[4]–1. Ajuste de Cambio de idioma
Se puede seleccionar el idioma que aparece en el indicador de puntos.• Presione el botón [ MENU] G para cambiar el idioma.
1 Japonés (JP), 2 Inglés (GB), 3 Alemán (D), 4 Español (E),5 Ruso (RU), 6 Italiano (I), 7 Chino (CH), 8 Francés (F)
[4]–2. Límite de funciones
(1) Ajuste del límite de funciones (bloqueo de funciones)• Para cambiar el ajuste, presione el botón [ ON/OFF] D.
1 no1 : Se realiza el ajuste de bloqueo de funcionamiento en todos losbotones salvo en el botón [ ON/OFF].
2 no2 : Se realiza el ajuste de bloqueo de funcionamiento en todos losbotones.
3 OFF (Valor del ajuste inicial) : No se realiza el bloqueo de funcionamiento.* Para que el bloqueo de funcionamiento sea válido en la pantalla normal, hay
que presionar los botones (Presione y mantenga pulsados a la vez los botones[FILTER] y [ ON/OFF] durante dos segundos) en la pantalla normal una vezque se ha realizado el ajuste anterior.
(2) Uso del ajuste de modo automáticoCuando se conecta el controlador remoto a la unidad que tiene ajustado el modofuncionamiento automático, se pueden realizar los siguientes ajustes.• Para cambiar el ajuste, presione el botón [ ON/OFF] D.
1 ON (Valor del ajuste inicial): Aparece el modo automático cuando se se-lecciona el modo de funcionamiento.
2 OFF : No aparece el modo automático cuando seselecciona el modo de funcionamiento.
(3) Ajuste del límite de rango de temperaturaUna vez que se realiza el ajuste, se puede cambiar la temperatura dentro delrango establecido.• Para cambiar el ajuste, presione el botón [ ON/OFF] D.
1 LIMIT TEMP MODO FRÍO : El rango de temperatura se puede cambiaren modo refrigeración/secado.
2 LIMIT TEMP MODO CALOR : El rango de temperatura se puede cambiaren modo calefacción.
3 LIMIT TEMP MODO AUTO : El rango de temperatura se puede cambiaren modo automático.
4 OFF (ajuste inicial) : No está activo el límite de rango de tempe-ratura.
* Cuando se ajusta una posición distinta de la de desactivación (OFF), se ajustaa la vez el límite de rango de temperatura en modo refrigeración, calefaccióny automático. No obstante, no se puede limitar el rango cuando no hacambiado el rango de temperatura establecido.
• Para disminuir o aumentar la temperatura, presione el botón [ TEMP. ( )o ( )] F.
• Para cambiar el ajuste de límite superior y el ajuste de límite inferior, presioneel botón [ ] H. El ajuste seleccionado parpadeará y ya se puede ajustar latemperatura.
• Rango ajustableModo Refrigeración/Secado :
Límite inferior: 19°C a 30°C Límite superior: 30°C a 19°CModo Calefacción :
Límite inferior: 17°C a 28°C Límite superior: 28°C a 17°CModo Automático :
Límite inferior: 19°C a 28°C Límite superior: 28°C a 19°C* El rango ajustable varía en función de la unidad que hay que conectar
(unidades Mr. Slim, CITY MULTI y de temperatura intermedia)
[4]–3. Ajuste de selección de modo
(1) Ajuste del controlador remoto principal/secundario• Para cambiar el ajuste, presione el botón [ ON/OFF] D.
1 Principal : El controlador será el principal.2 Secundario : El controlador será el secundario.
(2) Uso del ajuste del reloj• Para cambiar el ajuste, presione el botón [ ON/OFF] D.
1 ON : Se puede usar la función de reloj.2 OFF : No se puede usar la función de reloj.
(3) Ajuste de la función de temporizador• Para cambiar el ajuste, presione el botón [ ON/OFF] D (Elija una de las
siguientes funciones).1 TEMPORIZADOR SEMANAL (Valor del ajuste inicial) :
Se puede usar el temporizador semanal.2 APAGADO AUTOMÁTICO :
Se puede usar el temporizador de desactivaciónautomática.
3 TEMPORIZADOR SIMPLE : Se puede usar el temporizador simple.4 TEMPORIZADOR APAGADO :
No se puede usar el modo temporizador.

– 95 –
* Cuando el uso del ajuste de reloj está desactivado (OFF), no se puede usarel “TEMPORIZADOR SEMANAL”.
(4) Ajuste de número de contacto en caso de error• Para cambiar el ajuste, presione el botón [ ON/OFF] D.
1 CALL OFF : Los números de contacto establecidos no aparecenen el indicador en caso de error.
2 CALL **** *** **** : Los números de contacto establecidos aparecen en elindicador en caso de error.
CALL_ : El número de contacto se puede ajustar cuando elindicador aparece según se muestra a la izquierda.
• Ajuste de los números de contactoPara ajustar los números de contacto, proceda del siguiente modo.Mueva el cursor parpadeante para ajustar los números. Presione el botón[ TEMP. ( ) y ( )] F para mover el cursor a la derecha (izquierda).Presione el botón [ CLOCK ( ) y ( )] (Reloj) C para ajustar losnúmeros.
[4]–4. Ajuste del cambio de indicador
(1) Ajuste del indicador de temperatura °C/°F• Para cambiar el ajuste, presione el botón [ ON/OFF] D.
1 °C : Se utiliza la unidad de temperatura en °C.2 °F : Se utiliza la unidad de temperatura en °F.
(2) Ajuste del indicador de temperatura del aire de aspiración• Para cambiar el ajuste, presione el botón [ ON/OFF] D.
1 ON : Aparece la temperatura del aire de aspiración.2 OFF : No aparece la temperatura del aire de aspiración.
(3) Ajuste del indicador de refrigeración/calefacción automática• Para cambiar el ajuste, presione el botón [ ON/OFF] D.
1 ON : Aparece la posición “Automatic cooling” (Refrigeración automática)o “Automatic heating” (Calefacción automática) en el modo automá-tico.
2 OFF : Sólo aparece la posición “Automatic” (Automático) en el modoautomático.

– 96 –
7 Especificaciones
Ítem Detalles
Dimensiones 120 (H) × 130 (W) × 19 (D) mm
Peso 0,2 kg
Fuente de alimentación Corriente directa de 10 a 13 voltios (suministrada desde la unidad interior)
Consumo de energía eléctrica 0,3 W
Condiciones medioambientales 0 °C a 40 °C, 30% a 90% de humedad relativa
Composición PS

Sistema controllo di CITY MULTIe climatizzatori Mitsubishi Mr. SLIM
Comando a distanza MAPAR-21MAAManuale di istruzioni
ON/OFF TEMP.
Leggere e seguire attentamente queste istruzioni per usare correttamente l’appa-recchio. Conservare queste istruzioni per un’eventuale futura consultazione.Assicurarsi di consegnare queste istruzioni e le istruzioni di installazione corri-spondenti a chiunque sia successivamente incaricato della manutenzione dell’ap-parecchio. L’installazione e lo spostamento dell’apparecchio dovrebbero essereeffettuati esclusivamente da personale qualificato. L’eventuale tentativo da partedell’utente finale di installare o spostare l’apparecchio potrebbe comprometternela sicurezza o determinarne il funzionamento scorretto.
INDICE1. Precauzioni di sicurezza .............................................................. 98
2. Nomenclatura delle parti ........................................................... 100
3. Configurazione schermo ............................................................ 102
4. Impostazione del giorno della settimana e dell’ora .................... 102
5. Uso del telecomando ................................................................. 103(1) Come Avviare, Arrestare, Modificare la modalità, e Regolare la
temperatura ................................................................................ 103(2) Fan Speed (Velocità ventola), Airflow Direction
(Direzione flusso d’aria), e Ventilation (Ventilazione) ................. 105(3) Utilizzo del timer ......................................................................... 107
1 Utilizzo del timer settimanale ................................................ 1072 Utilizzo del timer semplice .................................................... 1093 Utilizzo del Timer di arresto automatico (Auto Off) ............... 111
(4) Blocco dei pulsanti del telecomando(limite di funzionamento) ............................................................ 113
(5) Altre indicazioni .......................................................................... 114
6. Selezione delle funzioni ............................................................. 116
7. Dati tecnici ................................................................................. 120
Italiano

– 98 –
1 Precauzioni di sicurezza� Le misure di precauzione sono classificate nel modo seguente, a seconda del livello di potenziale pericolo.
Indica una condizione o un funzionamento che, se gestiti nel modo sbagliato, potrebbero causare lesioni gravi o addiritturaletali.Indica una condizione o un funzionamento che, se gestiti nel modo sbagliato, potrebbero causare lesioni personali o dannimateriali.
ATTENZIONE
CAUTELA
ATTENZIONE
Non tentare di installare l’apparecchio da soli.Far installare l’apparecchio al proprio rivenditore o ad un tecnico qualifica-to. L’installazione non corretta dell’apparecchio potrebbe causare incendi,scosse elettriche o altri incidenti gravi.
Assicurarsi che l’apparecchio sia stato fissato in modo sicuro.Verificare che l’apparecchio sia fissato saldamente ad un supporto robu-sto, che sia in grado di prevenirne l’eventuale caduta.
Assicurarsi che la tensione di alimentazione corrisponda alla capa-cità nominale.Una tensione di alimentazione scorretta può causare incendi o il guastodell’apparecchio.
Spegnere immediatamente l’apparecchio se si riscontra un funziona-mento anomalo.Continuare ad usare l’apparecchio potrebbe causare guasti, scosseelettriche o incendi.Se si sente odore di bruciato o si riscontrano altre anomalie, spegnereimmediatamente l’interruttore di alimentazione e rivolgersi subito al pro-prio rivenditore.
Non tentare di spostare l’apparecchio da soli.La reinstallazione non corretta dell’apparecchio potrebbe causare incendi,scosse elettriche o altri incidenti gravi.Affidare la reinstallazione dell’apparecchio al proprio rivenditore o ad untecnico qualificato.
Non provvedere da soli allo smaltimento dell’apparecchio.Rivolgersi al rivenditore quando si rende necessario lo smaltimentodell’apparecchio.
Non tentare di modificare o riparare l’apparecchio da soli.Se si tenta di modificare o riparare da soli l’apparecchio si potrebberocausare incendi, scosse elettriche o altri incidenti gravi. Consultarsi con ilproprio rivenditore per eventuali riparazioni.
Sospendere l’uso dell’apparecchio in caso di funzionamento anomalo (sesi ripetono messaggi di errore e l’unità non funziona nel modo previsto).Continuare ad usare l’apparecchio potrebbe causare incendi o guasti.Contattare il rivenditore per una consulenza.

– 99 –
Tenere eventuali materiali pericolosi lontano dall’apparecchio.Non installare l’apparecchio in luoghi dove si potrebbero verificare perditedi gas infiammabile. La presenza di gas infiammabili potrebbe causareesplosioni o incendi.
Non usare acqua per lavare l’apparecchio.Il lavaggio con acqua potrebbe causare scosse elettriche o un guastodell’apparecchio.
Non toccare i pulsanti se si hanno le mani bagnate.Il mancato rispetto di questa precauzione potrebbe causare scosseelettriche o un guasto dell’apparecchio.
Non destinare l’apparecchio ad usi diversi da quelli previsti.Questo apparecchio è da utilizzare con gli impianti di condizionamentodell’aria per edifici Mitsubishi. Non usarlo con altri sistemi o per altri scopi;diversamente l’apparecchio potrebbe funzionare in modo anomalo.
Non spruzzare sull’apparecchio DDT o sostanze combustibili.Tenere gli spray e le sostanze combustibili lontani dall’apparecchio, edevitare di spruzzarli direttamente sull’apparecchio. Il contatto o la vicinan-za con questo tipo di sostanze potrebbe provocare esplosioni o incendi.
Non usare l’apparecchio in ambienti non adeguati.Non usarlo in ambienti in cui vi potrebbero essere grandi quantità di olio(olio per macchine, ecc.), gas di scarico o gas solforico. Questo tipo diambienti potrebbero comportare una riduzione delle prestazioni o il guastodell’apparecchio.
CAUTELA
Non usare oggetti acuminati per premere i pulsanti.L’uso di punte acuminate potrebbe causare scosse elettriche o il guastodell’apparecchio.
Non usare in presenza di temperature estreme.Usare soltanto quando la temperatura ambiente è compresa entro i limitiindicati nelle istruzioni. (Se sulle istruzioni non vi sono riferimenti alimitazioni di temperatura, usare l’apparecchio soltanto a temperaturecomprese tra 0 °C e 40 °C). L’uso dell’apparecchio a temperature al di fuoridi questo intervallo potrebbe causare gravi danni all’apparecchio.
Non tirare né torcere i cavi di comunicazione.Tirando o torcendo un cavo si potrebbero causare incendi o un guastodell’apparecchio.
Non smontare l’apparecchio.Tentando di smontare l’apparecchio si potrebbero causare lesioni dovuteal contatto con parti interne, oppure incendi o guasti dell’apparecchio.
Non lavare l’apparecchio con benzene, diluente per vernici o panniimbevuti di detergenti chimici.Queste sostanze possono far scolorire l’apparecchio, o farlo guastare. Sel’apparecchio è sporco, strizzare bene un panno inumidito con del solventeneutro diluito in acqua, pulire l’apparecchio e asciugarlo.
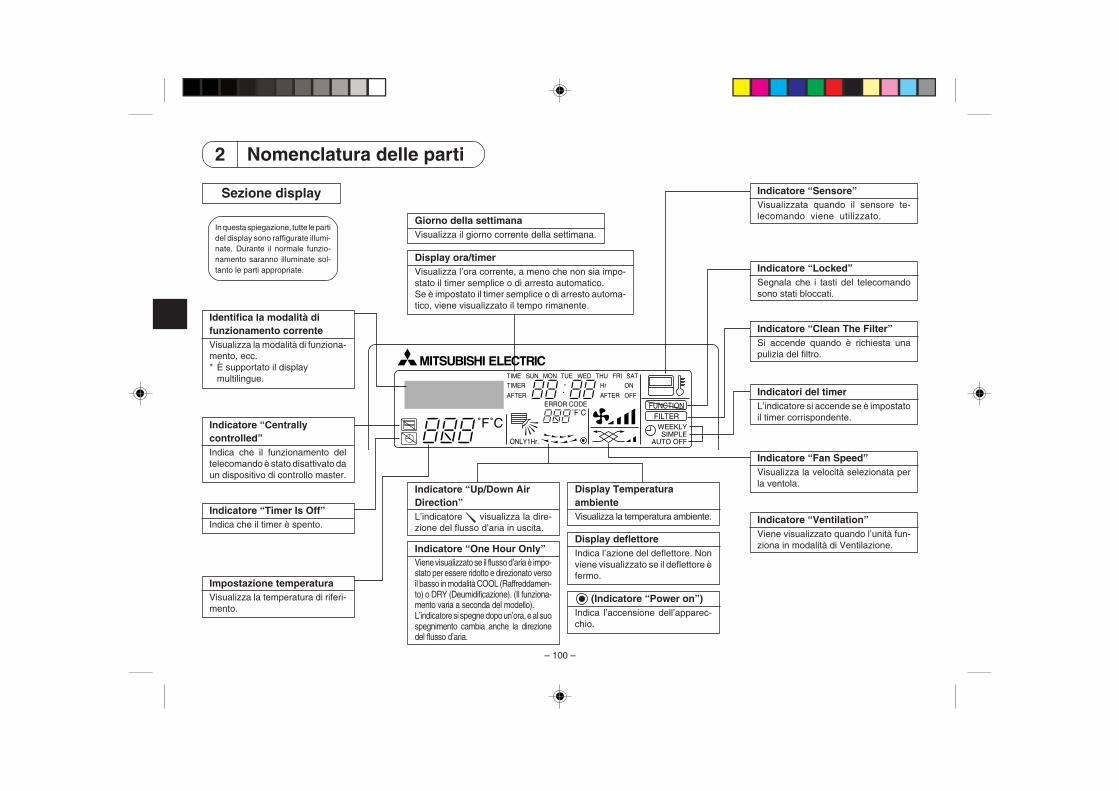
– 100 –
2 Nomenclatura delle parti
Sezione display
In questa spiegazione, tutte le partidel display sono raffigurate illumi-nate. Durante il normale funzio-namento saranno illuminate sol-tanto le parti appropriate.
˚F˚C
˚F˚C
ERROR CODEAFTER
TIMERTIME SUN MON TUE WED THU FRI SAT
ON
OFF
Hr
AFTER
FILTERFUNCTION
ONLY1Hr.
WEEKLYSIMPLE
AUTO OFF
Identifica la modalità difunzionamento correnteVisualizza la modalità di funziona-mento, ecc.* È supportato il display
multilingue.
Indicatore “Centrallycontrolled”Indica che il funzionamento deltelecomando è stato disattivato daun dispositivo di controllo master.
Indicatore “Timer Is Off”Indica che il timer è spento.
Impostazione temperaturaVisualizza la temperatura di riferi-mento.
Giorno della settimanaVisualizza il giorno corrente della settimana.
Display ora/timerVisualizza l’ora corrente, a meno che non sia impo-stato il timer semplice o di arresto automatico.Se è impostato il timer semplice o di arresto automa-tico, viene visualizzato il tempo rimanente.
Indicatore “Sensore”Visualizzata quando il sensore te-lecomando viene utilizzato.
Indicatore “Locked”Segnala che i tasti del telecomandosono stati bloccati.
Indicatore “Clean The Filter”Si accende quando è richiesta unapulizia del filtro.
Indicatori del timerL’indicatore si accende se è impostatoil timer corrispondente.
Indicatore “Up/Down AirDirection”L’indicatore visualizza la dire-zione del flusso d’aria in uscita.
Indicatore “One Hour Only”Viene visualizzato se il flusso d’aria è impo-stato per essere ridotto e direzionato versoil basso in modalità COOL (Raffreddamen-to) o DRY (Deumidificazione). (Il funziona-mento varia a seconda del modello).L’indicatore si spegne dopo un’ora, e al suospegnimento cambia anche la direzionedel flusso d’aria.
Display TemperaturaambienteVisualizza la temperatura ambiente.
Display deflettoreIndica l’azione del deflettore. Nonviene visualizzato se il deflettore èfermo.
(Indicatore “Power on”)Indica l’accensione dell’apparec-chio.
Indicatore “Fan Speed”Visualizza la velocità selezionata perla ventola.
Indicatore “Ventilation”Viene visualizzato quando l’unità fun-ziona in modalità di Ventilazione.

– 101 –
Sezione di controllo
PAR-21MAA
ON/OFF
FILTER
CHECK
OPERATION CLEAR
TEST
TEMP.
MENU
BACK DAYMONITOR/SET
CLOCK
ON/OFF
Pulsanti per l’impostazione della temperatura
Giù
Su
Pulsante “Timer menu”(Pulsante “Monitor/Set”)
Pulsante “Mode”(Pulsante “Return”)
Pulsanti per l’impostazione dell’ora
Avanti
Indietro
Pulsante “Timer On/Off”(Pulsante “Set Day”)
Apertura dellosportellino.
Pulsante “Start/Stop”
Pulsante “Fan Speed”
Pulsante “Filter” (pulsante )
Pulsante “Test Run”
Pulsante “Check”(Pulsante “Clear”)
Pulsante “Airflow Up/Down”
Pulsante “Louver”(Pulsante “Operation” )
Al numero di operazioneprecedente.
Pulsante “Ventilation”(Pulsante “Operation” )
Al numero di operazionesuccessivo.
Nota:� Se si preme un pulsante che corrisponde ad una funzione non installata presso l’unità interna, il telecomando visualizzerà il
messaggio “Not available” (Non disponibile).Se si usa il telecomando per controllare più unità interne, il messaggio sarà visualizzato soltanto se la funzione non è disponibilesull’unità principale.

– 102 –
3 Configurazione schermoGli esempi di display mostrati nel presente manuale si ottengono dopo impostazionedella lingua italiana tramite Selezione funzioni dal telecomando.Per modificare la lingua, vedere la sezione 6, elemento [4]-1. L'impostazione iniziale è inglese.<Tipi di schermate>� Selezione funzioni: Impostazione delle funzioni e degli intervalli disponibili sul
telecomando (funzioni del timer, limitazioni di funziona-mento, ecc.)
� Imposta giorno/ora: Impostazione del giorno corrente della settimana.� Schermate di controllo standard: Visualizzazione e impostazione dello stato di funziona-
mento dell’impianto di condizionamento� Controllo timer: Visualizzazione del timer correntemente impostato (timer
settimanale, timer semplice, o timer di arresto automatico)� Impostazione timer: Impostazione del funzionamento di qualsiasi timer (timer
settimanale, timer semplice, o timer di arresto automatico)
˚F˚C
TIMERMON
OFF
WEEKLY
SUN MON TUE WED THU FRI SAT
WEEKLY
˚F˚C
˚C
TIME SUN
Selezione funzioni Imposta giorno/ora
Schermate di controllo standard
OFF ON
Controllo timer Impostazione timer
A D C
B C
B
<Come modificare la schermata>Per andare su A : Tenere premuti per 2 secondi il pulsante “Mode” e il pulsante “Timer On/Off”.Per andare su B : Premere il pulsante “Timer Menu”.Per andare su C : Premere il pulsante “Mode” (“Return”).Per andare su D : Premere uno dei due pulsanti “Set Time” ( o ).
4 Impostazione del giorno della settimana e dell’ora� Usare questa schermata per modificare il giorno corrente della settimana e
l’impostazione dell’ora.
Nota:Il giorno e l’ora non saranno visualizzati se in Selezione funzioni è stato disattivato l’usodell’orologio.
Display Giorno dellasettimana e ora
˚C
˚C
TIME SUN
PAR-21MAA
ON/OFF
FILTER
CHECK
OPERATION CLEAR
TEST
TEMP.
MENU
BACK DAYMONITOR/SET
CLOCK
ON/OFF
2 4
9
1
A
<Come impostare il giorno della settimana e l’ora…>
Impostazione dell’oraTIME SUN2
3
4
1. Premere il pulsante “Set Time” o A per visualizzare il display 2.2. Premere il pulsante “Timer On/Off” (Set Day) 9 per impostare il giorno.
* Ad ogni pressione del pulsante si passa al giorno successivo a quello visualizzatoin 3 : Dom → Lun → ... → Ven → Sab.
3. Premere il pulsante “Set Time” appropriato A per regolare l’ora nel modo desiderato.* Tenendo premuto il pulsante, l’ora (v. 4) aumenterà prima ad intervalli di un
minuto, poi ad intervalli di dieci minuti, e quindi ad intervalli di un’ora.4. Dopo aver effettuato le impostazioni appropriate ai passaggi 2 e 3 premere il pulsante
4 “Filter” per confermare i valori.
Impostazione del giorno della settimana

– 103 –
Nota:I nuovi valori immessi nei passaggi 2 e 3 saranno cancellati se si preme il pulsante“Mode” (Return) 2 prima di premere il pulsante 4 “Filter” .
5. Premere il pulsante 2 “Mode” (Return) per completare la procedura di impostazione.Premendo questo pulsante il display visualizzerà nuovamente la schermata dicontrollo standard; in 1 saranno visualizzati il giorno e l’ora appena impostati.
5 Uso del telecomando(1) Come Avviare, Arrestare, Modificare la modalità, e Regolare la
temperatura
˚C
˚C
PAR-21MAA
ON/OFF
FILTER
CHECK
OPERATION CLEAR
TEST
TEMP.
MENU
BACK DAYMONITOR/SET
CLOCK
ON/OFF
2
7
2
33
8
6
4
58
7
1156
<Per avviare il funzionamento>
� Premere il pulsante “Start/Stop” 1.• L’indicatore ON 1 e l’area display sono
illuminate.
Nota:� Quando si riavvia l’unità, sono attive le
seguenti impostazioni.
<Interrompere il funzionamento>
� Premere nuovamente il pulsante“Start/Stop” 1.• L’indicatore ON 1 e l’area
display si spegneranno.
Modalità
Impostazione del-la temperaturaVelocità dellaventola
Flusso d’ariaverso l’alto/ilbasso
Impostazioni deltelecomando
Ultima impostazione
Ultima impostazione
Ultima impostazione
COOL o DRY
Modalità HEAT
FAN
Uscitaorizz.Ultima
impostazioneUscitaorizz.

– 104 –
<Selezione della modalità>� Quando l’unità è in funzione, premere il pulsante “Mode” 2 il numero di volte
necessario.• Ad ogni pressione del pulsante si passa alla modalità di funzionamento succes-
siva, in base alla sequenza illustrata di seguito.La modalità correntemente selezionata è illustrata in 2.
→ COOL → DRY → FAN → AUTO → HEAT → Ventilazione*1 *1,*3,*4 *1 *1,*2
Nota:*1 La disponibilità di questa modalità dipende dal tipo di unità collegata.*2 Viene visualizzato soltanto nelle unità “Mr. Slim” che hanno installata la funzionalità
di ventilazione.*3 Non viene visualizzata se in Selezione funzioni si è disattivata la modalità Automa-
tica. Per informazioni su come impostare questa funzione, fare riferimento allasezione 6, punto [4]–2 (2).
*4 Quando in Selezione funzioni si è disabilitato il display di modalità Automatica lescritte HEAT (Riscaldamento) e COOL (Raffreddamento) non vengono visualizzatequando è attiva la modalità AUTO (Automatica). Per informazioni su come impostarequesta funzione, fare riferimento alla sezione 6, punto [4]–4 (3).
<Per modificare le impostazioni sulla temperatura ambiente...>� Per abbassare la temperatura: Premere il pulsante 3 “Set Temperature” .� Per aumentare la temperatura: Premere il pulsante 3 “Set temperature” .
• Ad ogni pressione del pulsante le impostazioni correnti vengono modificate di 1 °C.Le impostazioni correnti sono visualizzate in 3.
• Sono disponibili i seguenti intervalli. *1, *2
COOL o DRYmode
FANAUTO modeHEAT mode
19 - 30 °C(67 - 87 °F) *3
19 - 28 °C(67 - 83 °F) *3
17 - 28 °C(63 - 83 °F) *3
Non può essereimpostato.
Nota:*1 Gli intervalli disponibili variano a seconda del tipo di unità collegata (Mr.Slim, CITY
MULTI, ecc.).*2 Se i limiti di temperatura sono stati impostati in Selezione funzioni, gli intervalli
disponibili saranno più ridotti di quelli riportati qui sopra. Se si tenta di impostare unvalore al di fuori dell’intervallo, il display visualizzerà un messaggio in cui si indica chel’intervallo è attualmente limitato.Per informazioni su come impostare e annullare questi intervalli limitati, fare riferi-mento alla sezione 6, punto [4]–2 (3).
*3 Se in Selezione funzioni si è impostata la visualizzazione della temperatura in gradiFahrenheit. Per informazioni su come selezionare i gradi °C o °F, fare riferimento allasezione 6, punto [4]–4 (1).
<Display Temperatura ambiente>
Durante il funzionamento, la temperatura di ingresso è visualizzata in 4.
Nota:� L’intervallo sul display è compreso tra 8 °C e 39 °C. Se la temperatura è inferiore a
8 °C o superiore a 39 °C, il valore corrispondente (8 °C o 39 °C) lampeggerà suldisplay.
� Se si usa il telecomando per controllare più unità interne, sul display sarà visualizzatala temperatura presso l’unità principale.
� Si può scegliere quale sensore temperatura utilizzare per rilevare la temperatura: ilsensore dell’unità interna (“At Unit”), o il sensore del telecomando (“At Remote”).L’impostazione predefinita è “At Unit”.Per cambiare la posizione del sensore dell’unità interna:
• Modelli CITY MULTI: Rivolgersi al rivenditore.• Modelli Mr.Slim: Fare riferimento alle istruzioni per l’installazione.
� Se il display temperatura ambiente è disattivato in Selezione funzioni, la temperaturaambiente non sarà visualizzata. Per informazioni su come attivare o disattivarequesta funzione, fare riferimento alla sezione 6, punto [4]–4 (2).
� Se in Selezione funzioni è selezionato il display Fahrenheit, sul display saràvisualizzato il simbolo °F. Per informazioni su come selezionare i gradi °C o °F, fareriferimento alla sezione 6, punto [4]–4 (1).

– 105 –
(2) Fan Speed (Velocità ventola), Airflow Direction (Direzione flussod’aria), e Ventilation (Ventilazione)
<Cambiare la velocità della ventola...>
� Premere il pulsante “Fan Speed” 5 il numero di volte necessario quando l’impiantoè in funzione.• Ad ogni pressione sarà modificata la potenza. La velocità correntemente selezio-
nata è illustrata in 5.• Di seguito sono riportate le sequenze di cambiamento e le impostazioni disponibili.
FANSPEED
Display
Modello a4 velocità
Modello a2 velocità
Modello a3 velocità
Nota:� Il numero di velocità ventola disponibili dipende dal tipo di unità collegata. Tenere
presente anche che su alcune unità non è disponibile l’impostazione “Auto”.� Nei seguenti casi, la velocità effettiva della ventola generata dall’unità sarà diversa
dalla velocità visualizzata sul display del telecomando.1. Quando sul display sono visualizzati i messaggi “STAND BY” o “DEFROST”
(Sbrinamento).2. Subito dopo aver avviato la modalità HEAT (quando il sistema è in attesa
dell’attivazione della nuova modalità).3. Nella modalità HEAT (Riscaldamento), quando la temperatura ambiente è supe-
riore a quella impostata.4. Quando sull’unità è attiva la modalità DRY (deumidificazione).
<Per modificare la direzione verso l’alto/il basso del flusso d’aria>� Quando l’unità è in funzione, premere il pulsante “Airflow Up/Down” 6 il numero di
volte necessario.• Ad ogni pressione sarà modificata la direzione. La direzione attualmente imposta-
ta è visualizzata in 6.• Di seguito sono riportate le sequenze di cambiamento e le impostazioni disponibili.
Auto Oriz. 1 2 3 4 Oscillazione
Display
* Tenere presente che durante l’oscillazione, l’indicazione direzionale sulla schermatanon viene modificata in sincronia con la posizione dei deflettori sull’unità.
* Alcuni modelli non supportano le impostazioni direzionali.
Nota:� Le direzioni disponibili dipendono dal tipo di unità collegata. Tenere presente anche
che su alcune unità non è disponibile l’impostazione “Auto”.� Nei seguenti casi, la direzione effettiva dell’aria sarà diversa da quella indicata sul
display del telecomando.1. Quando sul display sono visualizzati i messaggi “STAND BY” o “DEFROST”
(Sbrinamento).2. Subito dopo aver avviato la modalità di riscaldamento (quando il sistema è in
attesa dell’attivazione della nuova modalità).3. Nella modalità di riscaldamento, quando la temperatura ambiente è superiore a
quella impostata.
<Per modificare l’orientamento a destra/sinistra del flusso d’aria>
� Premere il pulsante “Louver” 7 secondo necessità.• Viene visualizzata l’immagine corrispondente al deflettore 7.
Ad ogni pressione del pulsante le impostazioni saranno modificate nel modoseguente.
(ON) (OFF)
Durante l’oscillazione, la freccia sul displaysi sposta da sinistra a a destra.
Nessun display(Stop)
Auto Velocità 1 Velocità 2 Velocità 3 Velocità 4
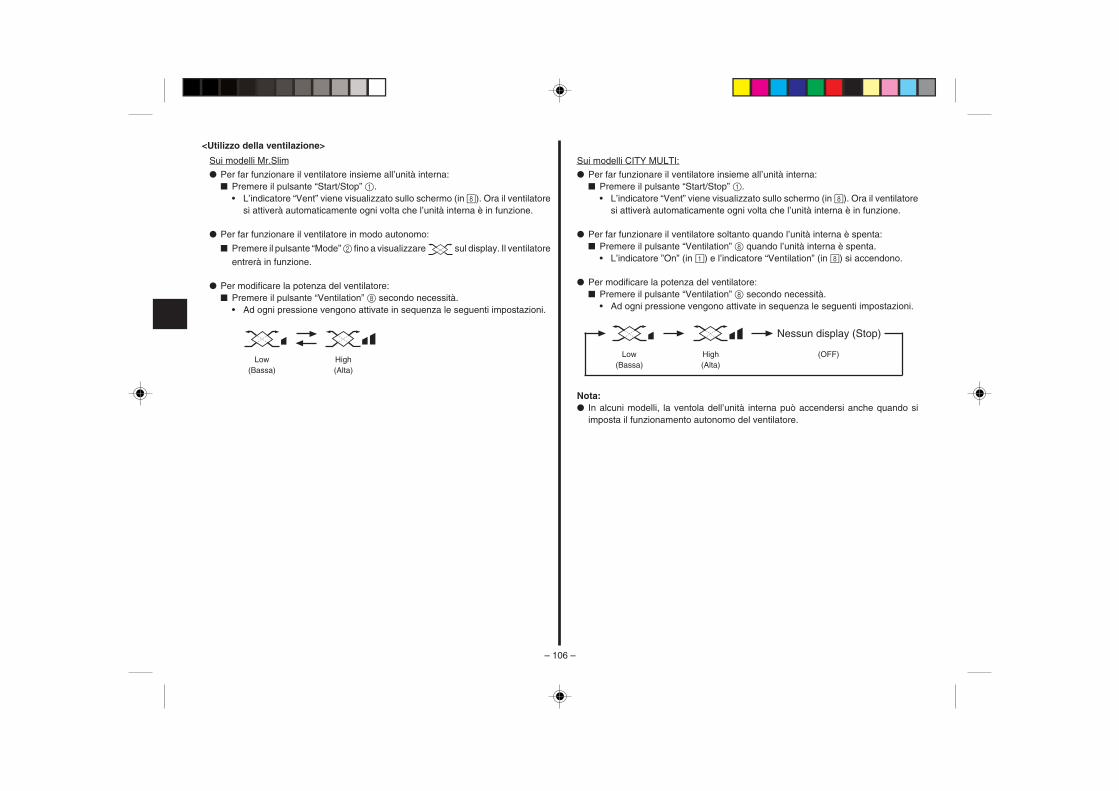
– 106 –
�
<Utilizzo della ventilazione>
Sui modelli Mr.Slim
� Per far funzionare il ventilatore insieme all’unità interna:� Premere il pulsante “Start/Stop” 1.
• L’indicatore “Vent” viene visualizzato sullo schermo (in 8). Ora il ventilatoresi attiverà automaticamente ogni volta che l’unità interna è in funzione.
� Per far funzionare il ventilatore in modo autonomo:
� Premere il pulsante “Mode” 2 fino a visualizzare sul display. Il ventilatore
entrerà in funzione.
� Per modificare la potenza del ventilatore:� Premere il pulsante “Ventilation” 8 secondo necessità.
• Ad ogni pressione vengono attivate in sequenza le seguenti impostazioni.�
Low(Bassa)
High(Alta)
Sui modelli CITY MULTI:
� Per far funzionare il ventilatore insieme all’unità interna:� Premere il pulsante “Start/Stop” 1.
• L’indicatore “Vent” viene visualizzato sullo schermo (in 8). Ora il ventilatoresi attiverà automaticamente ogni volta che l’unità interna è in funzione.
� Per far funzionare il ventilatore soltanto quando l’unità interna è spenta:� Premere il pulsante “Ventilation” 8 quando l’unità interna è spenta.
• L’indicatore ”On” (in 1) e l’indicatore “Ventilation” (in 8) si accendono.
� Per modificare la potenza del ventilatore:� Premere il pulsante “Ventilation” 8 secondo necessità.
• Ad ogni pressione vengono attivate in sequenza le seguenti impostazioni.
Low(Bassa)
High(Alta)
� ��
Nessun display (Stop)
(OFF)
Nota:� In alcuni modelli, la ventola dell’unità interna può accendersi anche quando si
imposta il funzionamento autonomo del ventilatore.
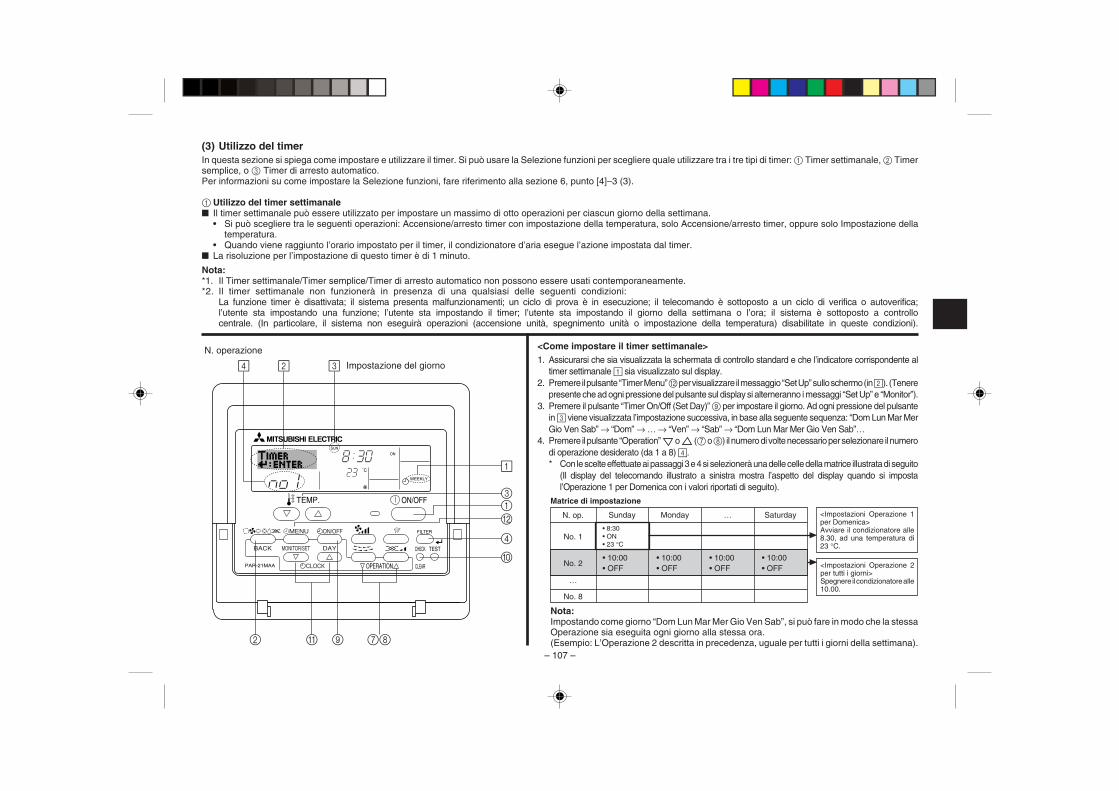
– 107 –
(3) Utilizzo del timerIn questa sezione si spiega come impostare e utilizzare il timer. Si può usare la Selezione funzioni per scegliere quale utilizzare tra i tre tipi di timer: 1 Timer settimanale, 2 Timersemplice, o 3 Timer di arresto automatico.Per informazioni su come impostare la Selezione funzioni, fare riferimento alla sezione 6, punto [4]–3 (3).
1 Utilizzo del timer settimanale� Il timer settimanale può essere utilizzato per impostare un massimo di otto operazioni per ciascun giorno della settimana.
• Si può scegliere tra le seguenti operazioni: Accensione/arresto timer con impostazione della temperatura, solo Accensione/arresto timer, oppure solo Impostazione dellatemperatura.
• Quando viene raggiunto l’orario impostato per il timer, il condizionatore d’aria esegue l’azione impostata dal timer.� La risoluzione per l’impostazione di questo timer è di 1 minuto.
Nota:*1. Il Timer settimanale/Timer semplice/Timer di arresto automatico non possono essere usati contemporaneamente.*2. Il timer settimanale non funzionerà in presenza di una qualsiasi delle seguenti condizioni:
La funzione timer è disattivata; il sistema presenta malfunzionamenti; un ciclo di prova è in esecuzione; il telecomando è sottoposto a un ciclo di verifica o autoverifica;l’utente sta impostando una funzione; l’utente sta impostando il timer; l’utente sta impostando il giorno della settimana o l’ora; il sistema è sottoposto a controllocentrale. (In particolare, il sistema non eseguirà operazioni (accensione unità, spegnimento unità o impostazione della temperatura) disabilitate in queste condizioni).
˚C
SUNON
WEEKLY
PAR-21MAA
ON/OFF
FILTER
CHECK
OPERATION CLEAR
TEST
TEMP.
MENU
BACK DAYMONITOR/SET
CLOCK
ON/OFF
2
4 2 3
A 9 78
0
4
13
B
1
N. operazione
Impostazione del giorno
<Come impostare il timer settimanale>1. Assicurarsi che sia visualizzata la schermata di controllo standard e che l’indicatore corrispondente al
timer settimanale 1 sia visualizzato sul display.2. Premere il pulsante “Timer Menu” B per visualizzare il messaggio “Set Up” sullo schermo (in 2). (Tenere
presente che ad ogni pressione del pulsante sul display si alterneranno i messaggi “Set Up” e “Monitor”).3. Premere il pulsante “Timer On/Off (Set Day)” 9 per impostare il giorno. Ad ogni pressione del pulsante
in 3 viene visualizzata l’impostazione successiva, in base alla seguente sequenza: “Dom Lun Mar MerGio Ven Sab” → “Dom” → … → “Ven” → “Sab” → “Dom Lun Mar Mer Gio Ven Sab”…
4. Premere il pulsante “Operation” o (7 o 8) il numero di volte necessario per selezionare il numerodi operazione desiderato (da 1 a 8) 4.* Con le scelte effettuate ai passaggi 3 e 4 si selezionerà una delle celle della matrice illustrata di seguito
(Il display del telecomando illustrato a sinistra mostra l’aspetto del display quando si impostal’Operazione 1 per Domenica con i valori riportati di seguito).
Sunday Monday … Saturday
Nota:Impostando come giorno “Dom Lun Mar Mer Gio Ven Sab”, si può fare in modo che la stessaOperazione sia eseguita ogni giorno alla stessa ora.(Esempio: L’Operazione 2 descritta in precedenza, uguale per tutti i giorni della settimana).
No. 1
No. 2
…
No. 8
• 8:30• ON• 23 °C
• 10:00• OFF
• 10:00• OFF
• 10:00• OFF
• 10:00• OFF
�
Matrice di impostazione
<Impostazioni Operazione 1per Domenica>Avviare il condizionatore alle8.30, ad una temperatura di23 °C.
<Impostazioni Operazione 2per tutti i giorni>Spegnere il condizionatore alle10.00.
�
N. op.

– 108 –
<Impostazione del timer settimanale>
5. Premere il pulsante “Set Time” A appropriato fino a impostare l’ora desiderata (in 5).* Tenendo premuto il pulsante, l’ora aumenta prima ad intervalli di un minuto, poi ad intervalli
di dieci minuti, e quindi ad intervalli di un’ora.6. Premere il pulsante “ON/OFF” 1 per selezionare l’operazione desiderata (ON o OFF) in 6.
* Ad ogni pressione del pulsante si passa all’impostazione successiva, in base allaseguente sequenza: nessun display (nessuna impostazione) → “ON” → “OFF”
7. Premere il pulsante “Set Temperature” 3 appropriato fino a impostare la temperaturadesiderata (in 7).* Ad ogni pressione del pulsante si passa all’impostazione successiva, in base alla
seguente sequenza: nessun display (nessuna impostazione) ⇔ 24 ⇔ 25 ⇔ ... ⇔ 29 ⇔30 ⇔ 12 ⇔ ... ⇔ 23 ⇔ nessun display.(Intervallo disponibile: L’intervallo disponibile per questa impostazione è compreso tra12 °C e 30 °C. Tuttavia l’intervallo effettivo per il controllo della temperatura varia aseconda del tipo di unità collegata).
8. Dopo aver effettuato le impostazioni appropriate ai passaggi 5, 6 e 7, premere il pulsante 4“Filter” per confermare i valori.Per cancellare i valori correntemente impostati per l’operazione selezionata, premere unavolta e rilasciare rapidamente il pulsante “Check (Clear)” 1.* L’impostazione dell’ora visualizzata diventerà “—:—”, e le impostazioni di accensione/
spegnimento (on/off) e di temperatura si spegneranno.(Per annullare in una sola operazione tutte le impostazioni del timer settimanale, tenerepremuto il pulsante “Check (Clear)” 0 per due o più secondi. Il display inizierà alampeggiare per segnalare la cancellazione di tutte le impostazioni).
Nota:Le nuove impostazioni immesse saranno cancellate se si preme il pulsante “Mode” (Return) 2prima di premere il pulsante 4 “Filter” .Se si sono impostate due o più operazioni diverse per la stessa ora, sarà eseguita soltantol’operazione corrispondente al N. Operazione più alto.9. Ripetere i passaggi da 3 a 8 fino a riempire tutte le celle disponibili desiderate.10. Premere il pulsante “Mode” (Return) 2 per tornare alla schermata di controllo standard e
completare la procedura di impostazione.11. Per attivare il timer, premere il pulsante “Timer On/Off” 9 per far scomparire dallo schermo
l’indicatore “Timer Off”. Assicurarsi che l’indicatore “Timer Off” non sia più visualizzato.* Se non sono attive delle impostazioni timer, l’indicatore “Timer Off” inizierà a lampeggiare
sullo schermo.
Visualizza la temperatura impostata* Non viene visualizzato se non si è impostata
la temperatura.
˚C
SUNON
WEEKLY
6
7
5Visualizza l’ora impostata Visualizza l’operazione selezionata (ON o OFF)* Non viene visualizzato se non si è impostata un’operazione.
<Come visualizzare le impostazioni del timer settimanale>
1. Assicurarsi che l’indicatore corrispondente al timer settimanale siavisibile sullo schermo (in 1).
2. Premere il pulsante “Timer Menu” B per visualizzare il messaggio“Monitor” sullo schermo (in 8).
3. Premere il pulsante “Timer On/Off (Set Day)” 9 il numero di voltenecessarie per selezionare il giorno desiderato.
4. Premere il pulsante “Operation” o (7 o 8) per modificarel’operazione timer visualizzata sul display (in 9).* Ad ogni pressione del pulsante si passerà all’operazione timer
successiva, seguendo l’ordine di impostazione.5. Per chiudere il monitor e tornare alla schermata di controllo standard,
premere il pulsante “Mode” (Return) 2.
˚C
TIMERSUN
ON
OFF
WEEKLY 1
98
<Per disattivare il timer settimanale>
Premere il pulsante “Timer On/Off” 9 per visualizzare il messaggio “Timer Off”0.
˚C
˚C
TIME SUN
WEEKLY
0
˚C
˚C
TIME SUN
WEEKLY
0
<Attivare il timer settimanale>Premere il pulsante “Timer On/Off” 9 per spegnere l’indicatore “Timer Off” (in0).
Impostazioni del timer

– 109 –
2 Utilizzo del timer semplice� Il timer semplice può essere impostato in uno dei tre modi seguenti.
• Start time only (Solo ora di avvio):Il condizionatore d’aria si mette in funzione all’ora impostata.
• Stop time only (Solo ora di spegnimento):Il condizionatore d’aria smette di funzionare all’ora impostata.
• Start & stop times (Ore di accensione e spegnimento):Il condizionatore d’aria si avvia e si spegne agli orari rispettivamenteimpostati.
� Il timer semplice (avvio e arresto) può essere impostato soltanto una volta nell’arcodi 72 ore. L’impostazione dell’ora viene effettuata con incrementi di un’ora.
Nota:*1. Il Timer settimanale/Timer semplice/Timer di arresto automatico non possono
essere usati contemporaneamente.*2. Il timer semplice non funzionerà in presenza di una qualsiasi delle seguenti condizioni:
Il timer è disattivato; presenza di una condizione anomala dell’impianto; è in corsoun test; il telecomando sta effettuando un controllo o una diagnosi; l’utente staselezionando una funzione; l’utente sta impostando il timer; sull’impianto è imposta-to il controllo centralizzato. (In presenza di queste condizioni, l’operazione “On/Off”viene disattivata).
ONHr
AFTER
SIMPLE
PAR-21MAA
ON/OFF
FILTER
CHECK
OPERATION CLEAR
TEST
TEMP.
MENU
BACK DAYMONITOR/SET
CLOCK
ON/OFF
2 A 9
0
4
1
B
<Come impostare il timer semplice>
ONHr
AFTER
SIMPLE
4
1
3
2
1. Assicurarsi che sia visualizzata la schermata di controllo standard e che l’indicatorecorrispondente al timer semplice 1 sia visualizzato sul display.Se il display visualizza informazioni diverse da Simple Timer, impostare su SIMPLE TIMERutilizzando la selezione delle funzioni (vedi 6.[4]–3 (3)) per l’impostazione della funzione timer.
2. Premere il pulsante “Timer Menu” B per visualizzare il messaggio “Set Up” sulloschermo (in 2). (Tenere presente che ad ogni pressione del pulsante sul display sialterneranno i messaggi “Set Up” e “Monitor”).
3. Premere il pulsante “ON/OFF” 1 per visualizzare le impostazioni correnti perl’accensione (ON) o lo spegnimento (OFF) del timer semplice. Premere una volta ilpulsante per visualizzare quanto tempo rimane prima dell’accensione (ON), epremerlo nuovamente per visualizzare quanto tempo rimane prima dello spegnimen-to (OFF). (L’indicatore “ON/OFF” viene visualizzata in 3).• Timer di accensione (ON): Il condizionatore d’aria si metterà in funzione una
volta trascorso il numero di ore specificato.• Timer di spegnimento (OFF): Il condizionatore d’aria smetterà di funzionare una
volta trascorso il numero di ore specificato.4. Con “ON” o “OFF” visualizzati in 3: Premere il pulsante “Set Time” A appropriato per
impostare l’orario di accensione (se è visualizzato “ON”) o l’orario di spegnimento (sein 4 è visualizzato “OFF”).• Intervalli disponibili: da 1 a 72 ore
5. Per impostare l’orario di accensione (ON) e spegnimento (OFF), ripetere i passaggi 3 e 4.* Tenere presente che non si può impostare lo stesso valore come orario di
accensione e spegnimento.6. Per annullare le impostazioni di accensione e spegnimento correnti: Visualizzare
l’impostazione di accensione (ON) o spegnimento (OFF) (v. passaggio 3) e quindipremere il pulsante “Check (Clear)” 0; l’impostazione dell’ora sarà cancellata e saràvisualizzato “—” in 4. (Per usare soltanto un’impostazione di accensione (ON) ospegnimento (OFF), assicurarsi che per l’impostazione che non si desidera utilizzaresia visualizzato “—” sul display).
7. Dopo aver completato i passaggi da 3 a 6, premere il pulsante 4 “Filter” perconfermare il valore.
Nota:Le nuove impostazioni immesse saranno cancellate se si preme il pulsante “Mode”(Return) 2 prima di premere il pulsante 4 “Filter” .
8. Premere il pulsante 2 “Mode” (Return) per tornare alla schermata di controllo standard.9. Premere il pulsante “Timer On/Off” 9 per avviare il conto alla rovescia del timer.
Quando il timer è in funzione, il valore del timer viene visualizzato sul display.Assicurarsi che il valore del timer sia visibile e corretto.
Impostazione del timer
Azione (On o Off)* “— —” viene visualizzato se non si
sono effettuate impostazioni.

– 110 –
<Visualizzazione delle impostazioni correnti del timer semplice>
1. Assicurarsi che l’indicatore corrispondente al timer semplice sia visibilesullo schermo (in 1).
2. Premere il pulsante “Timer Menu” B per visualizzare il messaggio “Monitor”sullo schermo (in 5).• Se è in funzione il timer semplice di accensione (ON) o spegnimento
(OFF), il valore del timer corrente sarà visualizzato in 6.• Se si sono impostati entrambi i valori di accensione e spegnimento (ON/
OFF), i due valori vengono visualizzati in sequenza.3. Premere il pulsante “Mode” (Return) 2 per chiudere il display del monitor
e tornare alla schermata di controllo standard.
TIMER ON
OFF
Hr
AFTER
SIMPLE 1
65 Impostazione del timer
<Per disattivare il timer semplice...>Premere il pulsante “Timer On/Off” 9 in modo che l’impostazione timer non siapiù visualizzata sullo schermo (in 7).
<Per avviare il timer del semplice…>
Premere il pulsante “Timer On/Off” 9 per visualizzare l’impostazione timer in7.
˚C
˚CSIMPLE
7
˚C
˚C
ONHr
AFTER
SIMPLE
7
EsempiSe gli orari di accensione (ON) e spegnimento (OFF) sono stati impostati sul timer semplice,l’operazione e il display si presenteranno nel modo seguente.
Esempio 1:Avvio del timer, con orario di accensione (ON) impostato prima dell’orario di spegnimento (OFF)Impostazione di accensione (ON): 3 oreImpostazione di spegnimento (OFF): 7 ore
ONHr
AFTER
SIMPLE
˚C
˚C
OFF
Hr
AFTER
SIMPLE
SIMPLE
˚C
˚C
OFF
Hr
AFTER
SIMPLE
ONHr
AFTER
SIMPLE
˚C
˚CSIMPLE
Esempio 2:Avvio del timer, con orario di spegnimento (OFF) impostato prima dell’orario di accensione (ON)Impostazione di accensione (ON): 5 oreImpostazione di spegnimento (OFF): 2 ore
�
�
�
�
3 ore dopol’avvio del timer
All’avvio del timer
7 ore dopo l’avviodel timer
Sul display viene visualizzatal’impostazione di accensione (ON)del timer (il numero di ore chemanca all’accensione del timer).
Sul display viene visualizzatal’impostazione di spegnimento(OFF) del timer (il numero di oreche manca allo spegnimento)L’ora visualizzata è l’impostazionedi spegnimento (OFF - 7 ore) – diavvio (ON - 3 ore) = 4 ore.
Il condizionatore d’aria si spegne erimane spento fino a quando qual-cuno lo riaccende.
2 ore dopol’avvio del timer
All’avvio del timer
5 ore dopo l’avviodel timer
Sul display viene visualizzatal’impostazione di spegnimento(OFF) del timer (il numero di oreche manca allo spegnimento).
Sul display viene visualizzatal’impostazione di accensione (ON)del timer (il numero di ore chemanca all’accensione).L’ora visualizzata è l’impostazionedi avvio (ON - 5 ore) – di spegni-mento (OFF - 2 ore) = 3 ore.
Il condizionatore d’aria si accendee rimane acceso fino a quandoqualcuno lo spegne.
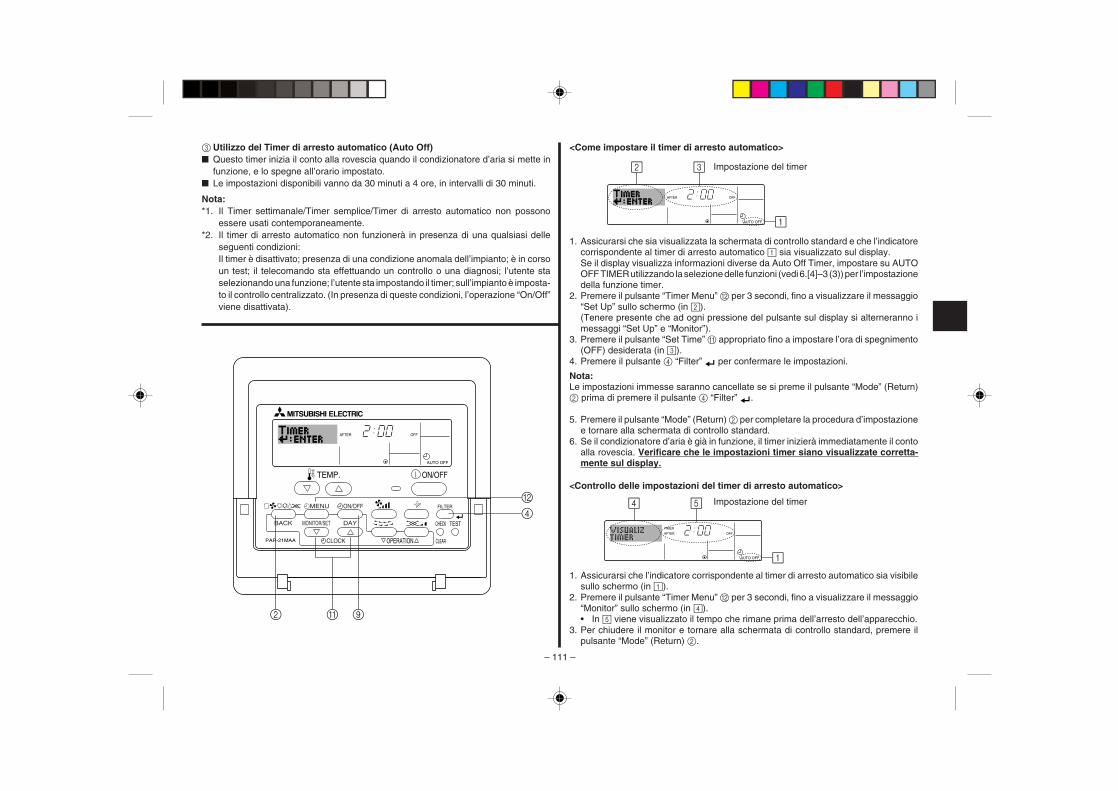
– 111 –
3 Utilizzo del Timer di arresto automatico (Auto Off)� Questo timer inizia il conto alla rovescia quando il condizionatore d’aria si mette in
funzione, e lo spegne all’orario impostato.� Le impostazioni disponibili vanno da 30 minuti a 4 ore, in intervalli di 30 minuti.
Nota:*1. Il Timer settimanale/Timer semplice/Timer di arresto automatico non possono
essere usati contemporaneamente.*2. Il timer di arresto automatico non funzionerà in presenza di una qualsiasi delle
seguenti condizioni:Il timer è disattivato; presenza di una condizione anomala dell’impianto; è in corsoun test; il telecomando sta effettuando un controllo o una diagnosi; l’utente staselezionando una funzione; l’utente sta impostando il timer; sull’impianto è imposta-to il controllo centralizzato. (In presenza di queste condizioni, l’operazione “On/Off”viene disattivata).
AFTER OFF
AUTO OFF
PAR-21MAA
ON/OFF
FILTER
CHECK
OPERATION CLEAR
TEST
TEMP.
MENU
BACK DAYMONITOR/SET
CLOCK
ON/OFF
2 A 9
4
B
<Come impostare il timer di arresto automatico>
1. Assicurarsi che sia visualizzata la schermata di controllo standard e che l’indicatorecorrispondente al timer di arresto automatico 1 sia visualizzato sul display.Se il display visualizza informazioni diverse da Auto Off Timer, impostare su AUTOOFF TIMER utilizzando la selezione delle funzioni (vedi 6.[4]–3 (3)) per l’impostazionedella funzione timer.
2. Premere il pulsante “Timer Menu” B per 3 secondi, fino a visualizzare il messaggio“Set Up” sullo schermo (in 2).(Tenere presente che ad ogni pressione del pulsante sul display si alterneranno imessaggi “Set Up” e “Monitor”).
3. Premere il pulsante “Set Time” A appropriato fino a impostare l’ora di spegnimento(OFF) desiderata (in 3).
4. Premere il pulsante 4 “Filter” per confermare le impostazioni.
Nota:Le impostazioni immesse saranno cancellate se si preme il pulsante “Mode” (Return)2 prima di premere il pulsante 4 “Filter” .
5. Premere il pulsante “Mode” (Return) 2 per completare la procedura d’impostazionee tornare alla schermata di controllo standard.
6. Se il condizionatore d’aria è già in funzione, il timer inizierà immediatamente il contoalla rovescia. Verificare che le impostazioni timer siano visualizzate corretta-mente sul display.
<Controllo delle impostazioni del timer di arresto automatico>
AFTER OFF
AUTO OFF
3
1
2 Impostazione del timer
AFTER
TIMER
OFF
AUTO OFF
5
1
4 Impostazione del timer
1. Assicurarsi che l’indicatore corrispondente al timer di arresto automatico sia visibilesullo schermo (in 1).
2. Premere il pulsante “Timer Menu” B per 3 secondi, fino a visualizzare il messaggio“Monitor” sullo schermo (in 4).• In 5 viene visualizzato il tempo che rimane prima dell’arresto dell’apparecchio.
3. Per chiudere il monitor e tornare alla schermata di controllo standard, premere ilpulsante “Mode” (Return) 2.

– 112 –
<Disattivare il timer di arresto automatico...>
� Tenere premuto il pulsante “Timer On/Off” 9 per 3 secondi, fino a quando vienevisualizzato “Timer Off” (in 6) e scompare il valore timer (in 7).
� In alternativa, spegnere il condizionatore d’aria. Il valore timer (in 7) scomparirà dalloschermo.
<Avviare il timer di arresto automatico...>� Tenere premuto il pulsante “Timer On/Off” 9 per 3 secondi. L’indicazione “Timer off”
scompare (in 6), e l’impostazione timer viene visualizzata sul display (in 7).� In alternativa, accendere il condizionatore d’aria. Il valore timer sarà visualizzato in
7.
˚C
˚CAUTO OFF6
7
AUTO OFF
7
˚C
˚C
AFTER OFF
AUTO OFF6
7

– 113 –
(4) Blocco dei pulsanti del telecomando (limite di funzionamento)� Se lo si desidera, è possibile bloccare i pulsanti del telecomando. È possibile usare
la Selezione Funzioni del telecomando per scegliere il tipo di blocco da utilizzare. (Perinformazioni sulla selezione del tipo di blocco, vedere la sezione 6, punto [4]–2 (1)).Più precisamente, si possono usare i seguenti due tipi di blocco.
1 Blocca tutti i pulsanti: Blocca tutti i pulsanti del telecomando.2 Blocca tutti tranne ON/OFF: Blocca tutti i pulsanti tranne il pulsante ON/OFF.
Nota:L’indicatore “Locked” viene visualizzato sullo schermo per segnalare il blocco deipulsanti.
˚C
˚C
TIME SUN
FUNCTION
PAR-21MAA
ON/OFF
FILTER
CHECK
OPERATION CLEAR
TEST
TEMP.
MENU
BACK DAYMONITOR/SET
CLOCK
ON/OFF
4
1
1
Indicatore“Lock”
<Come bloccare i pulsanti>
1. Tenendo premuto il pulsante “Filter” 4, premere e tenere premuto il pulsante ON/OFF 1 per 2 secondi. L’indicazione “Locked” si accende sullo schermo (in 1), persegnalare l’attivazione del blocco.• Se il blocco è stato disattivato in Selezione funzioni, quando si premeranno i
pulsanti nel modo descritto in precedenza sullo schermo sarà visualizzato ilmessaggio “Not available”.
• Se si preme un pulsante bloccato, l’indicazione “Locked” (in 1) lampeggerà suldisplay.
˚C
˚C
FUNCTION1
˚C
˚C
FUNCTION1
<Come sbloccare i pulsanti>1. Tenendo premuto il pulsante “Filter” 4, premere e tenere premuto il pulsante ON/
OFF 1 per 2 secondi; l’indicazione “Locked” scomparirà dallo schermo (in 1).
˚C
˚C
1

– 114 –
(5) Altre indicazioni<Centrally Controlled (Controllo centralizzato)>
ON/OFF TEMP.
˚C
˚C
� Viene visualizzato quando il funzionamento è controllato dal sistema di controllocentrale, ecc.Le operazioni limitate sono indicate sotto.• ON/OFF (incluso il funzionamento del timer).• Modalità di funzionamento• Temperatura impostata
Nota:Si possono anche limitare individualmente.
<Indicatore “Mode” lampeggiante>
ON/OFF TEMP.
˚C
˚C
� Lampeggiamento continuoViene visualizzato quando un’altra sezione interna collegata alla sezione esterna ègià in funzione in una diversa modalità operativa.Far corrispondere con la modalità di funzionamento dell’altra sezione interna.
� Lampeggiamento display “Modalità modificata dopo”Viene visualizzato quando la modalità di funzionamento è limitata in ogni stagione dalsistema di controllo centrale, ecc.Utilizzare un’altra modalità di funzionamento.
<Indicatore “Filter” lampeggiante>
ON/OFF TEMP.
˚C
˚CFILTER
� Indica che il filtro deve essere pulito.Pulire il filtro.
� Reset display “FILTER” (FILTRO)Quando si preme due volte successivamente il pulsante [FILTER] (FILTRO) dopo lapulizia del filtro, il display si spegne e viene ripristinato.
Nota:� Quando vengono controllati due o più tipi di sezioni interne, il periodo di pulizia
differisce a seconda del tipo di filtro. Quando arriva il momento di pulire l’unitàprincipale, viene visualizzato “FILTER” (FILTRO). Quando si spegne il display delfiltro, viene ripristinato il periodo di tempo cumulativo.
� “FILTER” (FILTRO) indica il periodo di pulizia quando è stato utilizzato il climatizzatoresecondo le condizioni generali dell’aria interna. Poiché il grado di sporcizia dipendedalle condizioni ambientali, pulire il filtro in conseguenza.
� Il periodo di tempo cumulativo per la pulizia del filtro varia a seconda del modello.

– 115 –
<Codici di errore lampeggianti>
Sui modelli CITY MULTI: Sui modelli Mr.Slim
ON/OFF
ERROR CODE
ON/OFF
ERROR CODE
Indicatore ON(Lampeggiante)
Codice di erroreN. unità interna
� Se lampeggiano sia l’indicatore ON, sia il codice di errore: Significa che il condizionatore d’aria è guasto e il funzionamento è stato interrotto (e non può essere ripristinato).Prendere nota del numero unità indicato e del codice di errore, quindi togliere l’alimentazione al condizionatore d’aria e contattare il proprio rivenditore o tecnico.
Se si è fornito un recapito telefonico di riferimento per eventuali problemi, il numero viene visualizzato sulloschermo. (Questa impostazione può essere effettuata in Selezione funzioni. Per informazioni, fareriferimento alla sezione 6.)
Indirizzo refrigeranteunità interna
Codice di errore N. unità interna
Display alternato
Indicatore ON(Lampeggiante)
Sui modelli CITY MULTI: Sui modelli Mr.Slim Quando è abbassato il pulsante “Check”:
� Se lampeggia soltanto il codice di errore (e l’indicatore ON rimane acceso): L’apparecchio continua a funzionare, ma c’è un problema nell’impianto. In questo caso, prenderenota del codice di errore e contattare il proprio rivenditore o tecnico per una consulenza.
* Se si è immesso un recapito telefonico di riferimento per eventuali problemi, premere il pulsante “Check” per visualizzarlo sullo schermo. (Questa impostazione può essereeffettuata in Selezione funzioni. Per informazioni, fare riferimento alla sezione 6.)
ON/OFF
˚C
˚C
ERROR CODE
ON/OFF
˚C
˚C
ERROR CODE
ON/OFF
CALL:XXXXXXX:XXX
Codice di errore Codice di errore

– 116 –
6 Selezione delle funzioniSelezione delle funzioni del comando a distanzaL’impostazione delle funzioni del comando a distanza elencate di seguito può essere modificata mediante la modalità di selezione delle funzioni del comando a distanza. Modificarel’impostazione se necessario.
Elemento 1
1. Modifica lingua(“CHANGELANGUAGE”)
2. Limite funzioni(“SELEZIONEFUNZIONI”)
3. Selezione modalità(“SELEZIONEMODO”)
4. Modifica display(“IMPOSTAZIONEMODO DISPLAY”)
Elemento 2
Impostazione lingua visualizzata sul display
(1) Impostazione limite funzioni di funzionamento (blocco funzio-namento) (“BLOCCO FUNZIONI”)
(2) Uso impostazione modalità automatica (“SELEZIONE MODOAUTO”)
(3) Impostazione limite intervallo temperatura (“LIMITAZIONETEMPAERATURA”)
(1) Impostazione comando a distanza principale/asservito (“CON-TROLLO MAIN/SUB”)
(2) Uso impostazione orologio (“OROLOGIO”)
(3) Impostazione funzione timer (“TIMER SETTIMANALE”)
(4) Impostazione numero da chiamare in caso di errore (“CALL.”)
(1) Impostazione display temperatura °C/°F (“TEMPERATURA°C/°F”)
(2) Impostazione display temperatura aria aspirata (“TEMPERA-TURA AMBIENTE”)
(3) Impostazione display raffreddamento/riscaldamento automati-co (“AUTO C/H”)
Elemento 3 (descrizione dell’impostazione)
• La visualizzazione in più lingue è possibile
• Impostazione dell’intervallo del limite di funzionamento (blocco funziona-mento)
• Impostazione dell’uso o meno della modalità di funzionamento “automati-ca”
• Impostazione dell’intervallo regolabile della temperatura (massima, mini-ma)
• Selezione del comando a distanza principale o asservito* Se due comandi a distanza sono collegati a un unico gruppo, un comando
a distanza deve essere impostato come asservito.
• Impostazione dell’uso o meno della funzione orologio
• Impostazione del tipo di timer
• Visualizzazione del numero da chiamare in caso di errore• Impostazione del numero di telefono
• Impostazione dell’unità di temperatura (°C o °F) visualizzata
• Impostazione dell’uso o meno del display della temperatura dell’aria interna(aspirata)
• Impostazione dell’uso o meno del display “Cooling” (Raffreddamento) o“Heating” (Riscaldamento) durante il funzionamento nella modalità auto-matica

– 117 –
→
[Flusso di selezione delle funzioni][1] Arrestare il climatizzatore per avviare la modalità di selezione delle funzioni del comando a distanza. → [2] Selezionare una voce dell’elenco Elemento 1. → [3] Selezionareuna voce dell’elenco Elemento 2. → [4] Eseguire l’impostazione. (I dettagli sono specificati nell’elenco Elemento 3.) → [5] Impostazione completata. → [6] Reimpostare il displaynormale. (Fine)
(Tenere premuto il pulsante E, quindi preme-re il pulsante D per due secondi.)* In questo modo il comando a distanza
registra l’impostazione eseguita.
Premere ilpulsante G.
Vedere [4]–1Elemento 3 (descrizione
dell’impostazione)Vedere [4]–2. (1)
Vedere [4]–2. (2)
Vedere [4]–2. (3)
Vedere [4]–3. (1)
Vedere [4]–3. (2)
Vedere [4]–3. (3)
Vedere [4]–3. (4)
Vedere [4]–4. (1)
Vedere [4]–4. (2)
Vedere [4]–4. (3)
Elemento 1 Modalità di selezione dellefunzioni del comando a distanza
Elemento 2
Selezione modalità(“SELEZIONE
MODO”)
Display normale (quando ilclimatizzatore non è in funzione)
PAR-21MAA
ON/OFF
FILTER
CHECK
OPERATION CLEAR
TEST
TEMP.
MENU
BACK DAYMONITOR/SET
CLOCK
ON/OFF
F
G
C D
B
I
A
H
E
Modifica lingua(“CHANGE LANGUAGE”)
Limite funzioni(“SELEZIONEFUNZIONI”)
Modifica display(“IMPOSTAZIONEMODO DISPLAY”)
NOTAIl funzionamento del timer si arresta quan-do il display di selezione delle funzioni delcomando a distanza viene sostituito con ildisplay normale.
Premere il pulsante G.
Premere ilpulsante E.
Premere ilpulsante E.
Premere ilpulsanteE.
Premereil pulsanteE.
Premere ilpulsante G.
Premere ilpulsante G.
Premere ilpulsante D.
Premere ilpulsante D.
Premere ilpulsante D.
→→
→→
→→
→ Impostazione limite funzioni di funzionamento (“BLOCCO FUNZIONI”)Premere il pulsante G.
Impostazione limite intervallo temperatura (“LIMITAZIONE TEMPAERATURA”)
Uso impostazione modalità automatica (“SELEZIONE MODO AUTO”)
→ Impostazione display temperatura °C/°F (“TEMPERATURA °C/°F”)Premere il pulsante G.
Impostazione display raffreddamento/riscaldamento automatico (“AUTO C/H”)
Impostazione display temperatura aria aspirata (“TEMPERATURA AMBIENTE”)
→ Impostazione comando a distanza principale/asservito (“CONTROLLO MAIN/SUB”)Premere il pulsante G.
Impostazione funzione timer (“TIMER SETTIMANALE”)
Uso impostazione orologio (“OROLOGIO”)
Impostazione numero da chiamare in caso di errore (“CALL.”)
Display a matrice di puntiLa lingua selezionata mediante lafunzione CHANGE LANGUAGE(Cambia lingua) viene visualizzata inquesto display. Nel presente ma-nuale è impostata la lingua inglese.
(Tenere premuto il pulsante E, quindi premere il pulsante D perdue secondi.)* Non è possibile modificare il display durante la selezione delle
funzioni dell’unità, la prova di funzionamento e l’autodiagnosi.

– 118 –
[Impostazione dettagliata]
[4]–1. Impostazione CHANGE LANGUAGE (Cambia lingua)
La lingua visualizzata nel display a matrice di punti può essere selezionata.• Per cambiare lingua, premere il pulsante [ MENU] G.
1 Giapponese (JP), 2 Inglese (GB), 3 Tedesco (D), 4 Spagnolo (E),5 Russo (RU), 6 Italiano (I), 7 Cinese (CH), 8 Francese (F)
[4]–2. Limite funzioni
(1) Impostazione limite funzioni di funzionamento (blocco funzionamento)• Per attivare o disattivare l’impostazione, premere il pulsante [ ON/OFF] D.
1 no1 : L’impostazione di blocco del funzionamento viene eseguita per tuttii pulsanti, tranne il pulsante [ ON/OFF].
2 no2 : L’impostazione di blocco del funzionamento viene eseguita per tuttii pulsanti.
3 OFF (Impostazione iniziale) : L’impostazione di blocco del funzionamen-to non viene eseguita.
* Per rendere effettiva l’impostazione di blocco del funzionamento nel displaynormale, è necessario premere e tenere premuti contemporaneamente perdue secondi i pulsanti [FILTER] e [ ON/OFF] sul display normale dopo avereeseguito la suddetta impostazione.
(2) Uso impostazione modalità automaticaQuando il comando a distanza è collegato a un’unità che funziona in modalitàautomatica, è possibile eseguire le impostazioni seguenti.• Per attivare o disattivare l’impostazione, premere il pulsante [ ON/OFF] D.
1 ON (Impostazione iniziale): Quando viene selezionata la modalità di fun-zionamento, la modalità automatica vienevisualizzata.
2 OFF : Quando viene selezionata la modalità di fun-zionamento, la modalità automatica non vienevisualizzata.
(3) Impostazione limite intervallo temperaturaUna volta eseguita questa impostazione, è possibile modificare la temperaturaentro l’intervallo impostato.• Per attivare o disattivare l’impostazione, premere il pulsante [ ON/OFF] D.
1 LIMITAZIONE MODO COOL : L’intervallo di temperatura può essere mo-dificato nella modalità di raffreddamento/deumidificazione.
2 LIMITAZIONE MODO HEAT : L’intervallo di temperatura può essere mo-dificato nella modalità di riscaldamento.
3 LIMITAZIONE MODO AUTO : L’intervallo di temperatura può essere mo-dificato nella modalità automatica.
4 OFF (impostazione iniziale) : Il limite dell’intervallo di temperatura non èattivo.
* Quando viene eseguita un’impostazione diversa da OFF, contemporanea-mente viene impostato il limite dell’intervallo di temperatura nelle modalità diraffreddamento, riscaldamento e automatica. Tuttavia, tale intervallo non puòessere limitato se l’intervallo di temperatura impostato non è stato modificato.
• Per aumentare o ridurre la temperatura, premere il pulsante [ TEMP. ( )o ( )] F.
• Per impostare il limite superiore e il limite inferiore, premere il pulsante [ ]H. L’impostazione selezionata lampeggia ed è possibile impostare la tempe-ratura.
• Intervallo impostabileModalità di raffreddamento/deumidificazione :
Limite inferiore: 19°C a 30°C Limite superiore: 30°C a 19°CModalità di riscaldamento :
Limite inferiore: 17°C a 28°C Limite superiore: 28°C a 17°CModalità automatica :
Limite inferiore: 19°C a 28°C Limite superiore: 28°C a 19°C* L’intervallo impostabile varia a seconda dell’unità da collegare (unità Mr. Slim,
unità CITY MULTI o unità a temperatura intermedia).
[4]–3. Selezione della modalità
(1) Impostazione comando a distanza principale/asservito• Per attivare o disattivare l’impostazione, premere il pulsante [ ON/OFF] D.
1 Main : Il comando a distanza viene impostato come principale.2 Sub : Il comando a distanza viene impostato come asservito.
(2) Uso impostazione orologio• Per attivare o disattivare l’impostazione, premere il pulsante [ ON/OFF] D.
1 ON : La funzione orologio può essere utilizzata.2 OFF : La funzione orologio non può essere utilizzata.
(3) Impostazione funzione timer• Per attivare o disattivare l’impostazione, premere il pulsante [ ON/OFF] D
(Scegliere una delle impostazioni seguenti.)1 TIMER SETTIMANALE (Impostazione iniziale) :
È possibile utilizzare il timer settimanale.2 AUTO OFF TIMER : È possibile utilizzare il timer a disattivazione automa-
tica.

– 119 –
3 TIMER SEMPLIFICATO :È possibile utilizzare il timer semplice.
4 TIMER OFF : Non è possibile utilizzare la modalità timer.* Se l’orologio è impostato in modo da non essere usato (OFF), non è possibile
utilizzare il “TIMER SETTIMANALE”.
(4) Impostazione numero da chiamare in caso di errore• Per attivare o disattivare l’impostazione, premere il pulsante [ ON/OFF] D.
1 CALL OFF : I numeri da chiamare impostati non vengono visualizzatiin caso di errore.
2 CALL **** *** **** : I numeri da chiamare impostati vengono visualizzati incaso di errore.
CALL_ : Quando il display è come quello mostrato a sinistra, èpossibile impostare i numeri da chiamare.
• Impostazione dei numeri da chiamarePer impostare i numeri da chiamare, attenersi alla procedura seguente.Spostare il cursore lampeggiante per impostare i numeri. Premere i pulsanti[ TEMP. ( ) e ( )] F per spostare il cursore verso destra e versosinistra. Premere i pulsanti [ CLOCK ( ) e ( )] C per impostare inumeri.
[4]–4. Impostazione del display
(1) Impostazione display temperatura °C/°F• Per attivare o disattivare l’impostazione, premere il pulsante [ ON/OFF] D.
1 °C : Viene utilizzata l’unità di temperatura °C.2 °F : Viene utilizzata l’unità di temperatura °F.
(2) Impostazione display temperatura aria aspirata• Per attivare o disattivare l’impostazione, premere il pulsante [ ON/OFF] D.
1 ON : La temperatura dell’aria aspirata viene visualizzata.2 OFF : La temperatura dell’aria aspirata non viene visualizzata.
(3) Impostazione display raffreddamento/riscaldamento automatico• Per attivare o disattivare l’impostazione, premere il pulsante [ ON/OFF] D.
1 ON : Nella modalità automatica vengono visualizzati “Automatic cooling”(Raffreddamento automatico) e “Automatic heating” (Riscaldamentoautomatico).
2 OFF : Nella modalità automatica viene visualizzato solo “Automatic” (Auto-matica).

– 120 –
7 Dati tecnici
Elemento Dettagli
Dimensioni 120 (H) × 130 (W) × 19 (D) mm
Peso 0,2 kg
Alimentazione da 10 a 13V CC (alimentata dall’unità interna)
Potenza assorbita 0,3 W
Ambiente d’uso da 0 °C a 40 °C, dal 30% a 90% di umidità relativa
Composizione PS

CITY MULTI bedieningssysteemen Mitsubishi Mr. SLIM airconditioners
MA-afstandsbedieningPAR-21MAAHandleiding
ON/OFF TEMP.
Lees deze aanwijzingen zorgvuldig door en zorg dat u deze apparatuur op de juistewijze gebruikt. Bewaar deze aanwijzingen goed zodat u ze op een later tijdstip kuntraadplegen.Zorg ervoor dat u deze aanwijzingen en de bijbehorende installatieaanwijzingendoorgeeft aan iedereen die u vervolgens met het onderhoud van de apparatuur belast.Deze apparatuur mag alleen worden geïnstalleerd en verplaatst door gekwalificeerdepersonen. Pogingen van eindgebruikers om deze apparatuur te installeren of teverplaatsen kunnen leiden tot onveilige situaties of een onjuiste werking.
INHOUDSOPGAVE1. Voorzorgsmaatregelen ............................................................... 122
2. Onderdelen ................................................................................ 124
3. Schermconfiguratie .................................................................... 126
4. De dag van de week en de tijd instellen .................................... 126
5. De afstandsbediening ................................................................ 127(1) Starten, stoppen, de modus wijzigen en de
temperatuur aanpassen ............................................................. 127(2) Ventilatorsnelheid, luchtuitstroomrichting en ventilatie ............... 129(3) De timer ...................................................................................... 131
1 De Weekly Timer (Schakelklok) ............................................ 1312 De Simple Timer (Enkelvoudige timer) ................................. 1333 Automatisch uitschakelen (de Auto Off-timer) ...................... 135
(4) De knoppen van de afstandsbediening vergrendelen(functiebeperking van Operation) ............................................... 137
(5) Andere indicaties ........................................................................ 138
6. Functiekeuze ............................................................................. 140
7. Specificaties .............................................................................. 144
Nederlands

– 122 –
1 Voorzorgsmaatregelen� De voorzorgsmaatregelen zijn gerangschikt op gevaarniveau.
Waarschuwt voor een situatie of handeling die, als het apparaat niet op de juiste wijze wordt gebruikt, de dood ofernstig persoonlijk letsel tot gevolg kan hebben.Waarschuwt voor een situatie of handeling die, als het apparaat niet op de juiste wijze wordt gebruikt, letsel ofschade aan het eigendom tot gevolg kan hebben.
WAARSCHUWING
VOORZICHTIG
WAARSCHUWING
Probeer nooit om de apparatuur zelf te installeren.Laat dit over aan de leverancier of een gekwalificeerde technicus. Eenonjuiste installatie kan leiden tot brand, elektrische schokken of andereernstige ongevallen.
Zorg dat de apparatuur veilig is bevestigd.Zorg dat de apparatuur veilig is bevestigd aan een robuuste steun zodatdeze niet kan vallen.
Zorg dat het apparaat de juiste spanning krijgt.Aansluiten op een onjuiste spanning kan leiden tot brand of mankementenaan de apparatuur.
Zet deze apparatuur onmiddellijk uit bij een abnormale werking.Wanneer u het apparaat blijft gebruiken kan dit leiden tot schade aan deapparatuur, elektrische schokken of brand.Als u een brandgeur ruikt of een andere abnormaliteit constateert, zet u dehoofdschakelaar direct uit en raadpleegt u de leverancier.
Probeer nooit om deze apparatuur zelf te verplaatsen.Een onjuiste herinstallatie kan leiden tot brand, elektrische schokken ofandere ernstige ongevallen.Laat de verplaatsing over aan de leverancier of een gekwalificeerdetechnicus.
Voer deze apparatuur niet zelf af.Raadpleeg de leverancier als u deze apparatuur wilt verwijderen.
Probeer deze apparatuur niet zelf te wijzigen of te repareren.Een poging tot wijziging of reparatie kan leiden tot brand, elektrischeschokken of andere ernstige ongevallen. Raadpleeg de leverancier alsreparatie noodzakelijk is.
Gebruik de apparatuur niet meer als deze niet meer correct werkt (alsfoutmeldingen verschijnen en de unit niet meer werkt zoals verwacht).Wanneer u het apparaat blijft gebruiken of probeert te blijven gebruiken,kan dit leiden tot schade aan de apparatuur of brand. Neem voor adviescontact op met de leverancier.

– 123 –
Houd gevaarlijke materialen uit de buurt van deze apparatuur.Installeer deze apparatuur niet op plaatsen waar gevaar voor lekkage vanbrandbare gassen bestaat. De aanwezigheid van brandbaar gas kanleiden tot explosies of brand.
Maak deze apparatuur niet schoon met water.Schoonmaken met water kan leiden tot elektrische schokken of manke-menten aan de apparatuur.
Raak de knoppen niet aan met natte handen.Dit kan leiden tot elektrische schokken of mankementen aan de appara-tuur.
Gebruik deze apparatuur niet voor doeleinden waarvoor deze niet isbedoeld.Deze apparatuur is bedoeld voor gebruik in combinatie met Mitsubishiluchtbehandelingssystemen voor gebouwen. Gebruik deze niet in combi-natie met andere systemen, of voor andere doeleinden. Dit kan namelijkleiden tot een onjuiste werking.
Spuit geen insectenverdelger of andere brandbare zaken op deapparatuur.Houd spuitbussen met brandbare gassen en andere brandbare zaken uitde buurt van deze apparatuur en spuit nooit direct op deze apparatuur.Contact met of nabijheid van dergelijke zaken brengt risico op explosies ofbrand met zich mee.
Gebruik deze apparatuur niet in een ongeschikte omgeving.Gebruik deze niet op plaatsen met grote hoeveelheden olie (machineolieen dergelijke), uitlaatgassen en zwavelhoudende gassen. Dergelijke om-gevingen kunnen de prestaties negatief beïnvloeden of storing aan deapparatuur veroorzaken.
VOORZICHTIG
Bedien de knoppen niet met scherpe voorwerpen.Het gebruik van scherpe voorwerpen kan leiden tot elektrische schokkenof mankementen aan de apparatuur.
Gebruik de apparatuur niet bij extreme temperaturen.Gebruik de apparatuur alleen als de omgevingstemperatuur binnen deaangegeven grenzen ligt. (Als er in de aanwijzingen geen grenzen staanaangegeven, gebruikt u de apparatuur alleen bij temperaturen tussen de0 °C en 40 °C.) Het gebruik van deze apparatuur bij temperaturen buitendit bereik kan leiden tot ernstige mankementen aan de apparatuur.
Trek niet aan de communicatiekabels en zorg dat deze niet gedraaidzijn.Het trekken aan of draaien van een kabel kan leiden tot brand ofmankementen aan de apparatuur.
Haal de apparatuur niet uit elkaar.Een poging tot uit elkaar nemen kan leiden tot letsel vanwege contact metinterne delen of tot brand of mankementen aan de apparatuur.
Reinig deze apparatuur niet met doeken, gedrenkt in benzeen, thinnerof chemische reinigingsmiddelen.Deze middelen kunnen verkleuring of mankementen aan de apparatuurveroorzaken. Als de apparatuur erg vuil is geworden, reinigt u deze meteen doek, die bevochtigd is met een in water opgelost neutraal reiniging-smiddel en daarna is uitgewrongen. Wrijf de apparatuur daarna droog meteen droge doek.

– 124 –
2 Onderdelen
Weergave
In deze uitleg worden alleoplichtendelen van het displayweergegeven. Tijdens de werkingvan het apparaat branden alleende relevante onderdelen.
˚F˚C
˚F˚C
ERROR CODEAFTER
TIMERTIME SUN MON TUE WED THU FRI SAT
ON
OFF
Hr
AFTER
FILTERFUNCTION
ONLY1Hr.
WEEKLYSIMPLE
AUTO OFF
Huidige werkingToont de werkingsmodus, enz.* Weergave in meerdere talen
wordt ondersteund.
Indicator “Centrally Controlled”(Centrale bediening)Geeft aan dat de werking van deafstandsbediening is uitgescha-keld door een centrale regeling.
Indicatie “Timer Is Off” (Timerstaat uit)Geeft aan dat de timer is uitge-schakeld.
TemperatuurinstellingToont de doeltemperatuur.
Dag van de weekToont de huidige dag van de week.
Weergave Tijd/TimerToont de huidige tijd, tenzij de simple timer (enkelvoudigetimer) of de Auto Off timer (automatische uitschakeling) isingesteld.Als de enkelvoudige timer of automatische uitschakelingis ingesteld, wordt de resterende tijd weergegeven.
Indicatie “Sensor”Wordt weergegeven als de sensor opde afstandsbediening wordt gebruikt.
Indicator “Locked” (Vergrendeld)Geeft aan dat de knoppen of de af-standsbediening zijn vergrendeld.
Indicator “Filter”Gaat branden als het filter moet wor-den gereinigd.
TimerindicatorenDe indicator gaat branden als de bijbe-horende timer is ingesteld.
Indicator Luchtrichting naarboven/benedenDe indicator geeft de richtingvan de luchtuitstroom aan.
Indicator “One Hour Only”(Slechts een uur)Wordt weergegeven als de luchtstroom isingesteld op zwak en neerwaarts in demodus COOL of DRY (de werking ver-schilt al naargelang het model).De indicator schakelt na een uur uit, waarnade luchtstroomrichting ook verandert.
Weergave omgevings-temperatuurToont de omgevingstemperatuur.
Weergave lamellenToont de stand van het uitblaas-rooster. Wordt niet weergegevenals het uitblaasrooster niet beweegt.
(Indicator On)Geeft aan dat de stroom is inge-schakeld.
Indicator VentilatorsnelheidToont de gekozen ventilatorsnelheid.
Indicator VentilatieVerschijnt als de unit in de Ventilatie-modus draait.

– 125 –
Bediening
PAR-21MAA
ON/OFF
FILTER
CHECK
OPERATION CLEAR
TEST
TEMP.
MENU
BACK DAYMONITOR/SET
CLOCK
ON/OFF
Knoppen voor instellen temperatuur
Lager
Hoger
Knop Timermenu(Knop Monitor/Set)
Knop Mode (Knop Return)
Knoppen voor instellen tijd
Achteruit
Vooruit
Knop Timer On/Off(Knop Set Day)
Deuropenen.
Knop Start/Stop
Knop Ventilatorsnelheid
Knop Filter (knop )
Knop Test Run
Knop Check(Knop Clear)
Knop Luchtstroom naarboven/beneden
Knop Uitblaasrooster(knop Werking )
Vorige werkingsnummer.
Knop Ventilatie(knop Operation )
Volgende werkings-nummer.
Opmerking:� Als u op een knop drukt voor een functie die niet is geïnstalleerd op de binnenunit, verschijnt op de afstandsbediening de
melding “Not Available” (Niet beschikbaar).Als u met behulp van de afstandsbediening meerdere binnenunits aanstuurt, verschijnt deze melding alleen als de functie nietaanwezig is op de hoofdunit.

– 126 –
3 SchermconfiguratieDe displaytaal kan niet worden ingesteld op Nederlands. Daarom wordt de oorspronke-lijk ingestelde taal, Engels, weergegeven op de displays in deze handleiding.<Schermtypen>� Function Selection (Functie selecteren):
de beschikbare functies en bereiken instellen op deafstandsbediening (timerfuncties, beperkingen, enz.).
� Dag/tijd instellen: de huidige dag van de week of tijd instellen.� Standaard bedieningsschermen:de werkingsstatus van het airconditioningssysteem weer-
geven en instellen.� Timermonitor: de momenteel ingestelde timer weergeven (schakelklok,
enkelvoudige timer of automatisch uitschakelen).� Timer instellen: de werking van de timers instellen (schakelklok, enkel-
voudige timer of automatisch uitschakelen).
˚F˚C
TIMERMON
OFF
WEEKLY
SUN MON TUE WED THU FRI SAT
WEEKLY
˚F˚C
˚C
TIME SUN
Function Selection (Functie selecteren) Dag/tijd instellen
Standaard bedieningsschermen
OFF ON
Timermonitor Timer instellen
A D C
B C
B
<Het scherm wijzigen>Naar A : houd zowel de knop Mode als Timer On/Off twee seconden lang ingedrukt.Naar B : druk op de knop Timer Menu.Naar C : druk op de knop Mode (Return).Naar D : druk op een van de knoppen Set Time ( of ).
4 De dag van de week en de tijd instellen� Via dit scherm wijzigt u de huidige dag van de week en de tijd.
Opmerking:De dag en tijd worden niet weergegeven als de klok is uitgeschakeld bij FunctionSelection.
Weergave dag van deweek en tijd
˚C
˚C
TIME SUN
PAR-21MAA
ON/OFF
FILTER
CHECK
OPERATION CLEAR
TEST
TEMP.
MENU
BACK DAYMONITOR/SET
CLOCK
ON/OFF
2 4
9
1
A
<De dag van de week en de tijd instellen…>
Tijd instellenTIME SUN2
3
4
1. Druk op of op van Set Time A zodat 2 wordt weergegeven.2. Druk op Timer On/Off (Set Day) 9 om de dag in te stellen.
* Met elke druk op de knop schuift de weergegeven dag bij 3 een dag op: Sun →Mon → ... → Fri → Sat (Zo, ma, …. vr, za).
3. Druk zo vaak als nodig is op Set Time A om de tijd in te stellen.* Als u de knop ingedrukt houdt, neemt de tijd (bij 4) eerst toe in minuten, dan met
een interval van tien minuten en tenslotte met een interval van een uur.4. Nadat u bij de stappen 2 en 3 de juiste instellingen hebt ingevoerd, drukt u op Filter
4 om de waarden te vergrendelen.
Dag van de week instellen

– 127 –
Opmerking:De nieuwe waarden die u hebt ingevoerd bij de stappen 2 en 3 worden geannuleerd alsu op Mode (Return) 2 drukt voordat u op Filter 4 hebt gedrukt.
5. Druk op Mode (Return) 2 om de instelprocedure te voltooien. Het standaardbedieningsscherm wordt weer weergegeven. Bij 1 wordt nu de zojuist ingesteldedag en tijd weergegeven.
5 De afstandsbediening(1) Starten, stoppen, de modus wijzigen en de temperatuur aanpassen
˚C
˚C
PAR-21MAA
ON/OFF
FILTER
CHECK
OPERATION CLEAR
TEST
TEMP.
MENU
BACK DAYMONITOR/SET
CLOCK
ON/OFF
2
7
2
33
8
6
4
58
7
1156
<De werking starten>
� Druk op Start/Stop 1.• Het ON-lampje 1 gaat aan en het
schermgebied licht op.
Opmerking:� Nadat de unit opnieuw is gestart, zijn dit de
begininstellingen.
<De werking stoppen>
� Druk nogmaals op Start/Stop 1.• Het ON-lampje 1 gaat uit en
het schermgebied wordt don-ker.
Modus
Temperatuur-instellingVentilator-snelheid
Luchtstroomnaar boven/beneden
Instellingen op deafstandsbediening
Last setting (Laatste instelling)
Last setting (Laatste instelling)
Last setting (Laatste instelling)
COOL of DRY
Modus HEAT
FAN
Horiz. Outlet(Hor. Uitblazen)
Last setting(Laatste instelling)
Horiz. Outlet(Hor. Uitblazen)

– 128 –
<De modus selecteren>
� Druk, als de unit aan staat, zo vaak als nodig is op Mode 2.• Met elke druk op de knop wordt geschakeld naar de volgende modus, in de
hieronder aangegeven volgorde.De momenteel geselecteerde modus wordt weergegeven bij 2.
→ COOL → DRY → FAN → AUTO → HEAT → Ventilate*1 *1,*3,*4 *1 *1,*2
Opmerking:*1 De beschikbaarheid van deze modus hangt af van het type unit dat is aangesloten.*2 Komt alleen voor op Mr. Slim-units waarbij de ventilatiefunctionaliteit is geïnstalleerd.*3 Komt niet voor als Auto Mode is uitgeschakeld bij Function Selection. Zie paragraaf
6 onder [4]–2 (2) als u meer wilt weten over het instellen van deze functie.*4 HEAT en COOL komen niet voor in de Auto Mode als Auto Mode is uitgeschakeld bij
Function Selection. Zie paragraaf 6 onder [4]–4 (3) als u meer wilt weten over hetinstellen van deze functie.
<De instelling van de kamertemperatuur wijzigen...>
� De temperatuur verlagen: druk op Set Temperature 3.� De temperatuur verhogen: druk op Set Temperature 3.
• Met elke druk op de knop verandert de instelling met 1 °C. De huidige instellingwordt weergegeven bij 3.
• Dit zijn de beschikbare bereiken. *1,*2
COOL of DRYmode
FANAUTO modeHEAT mode
19 - 30 °C(67 - 87 °F) *3
19 - 28 °C(67 - 83 °F) *3
17 - 28 °C(63 - 83 °F) *3
Kan niet wordeningesteld.
Opmerking:*1 Het beschikbare bereik verschilt al naargelang het aangesloten type unit (Mr. Slim,
CITY MULTI, enz.).*2 Als er grenzen aan het temperatuurbereik zijn ingesteld bij Function Selection, zijn
de beschikbare bereiken kleiner dan hierboven aangegeven. Probeert u toch eenwaarde buiten dit beperkte bereik in te stellen, dan verschijnt op het display eenbericht met de melding dat het bereik momenteel is verkleind.Zie paragraaf 6 onder [4]–2 (3) als u meer wilt weten over het instellen en wissen vandeze bereikgrenzen.
*3 Het kan ook zijn dat de temperatuur in Fahrenheit is ingesteld bij Function Selection.Zie paragraaf 6 onder [4]–4 (1) als u wilt weten hoe u °C of °F instelt.
<Weergave omgevingstemperatuur>
Tijdens de werking wordt de aanvoertemperatuur weergegeven bij 4.
Opmerking:� Het weergavebereik is 8 °C tot en met 39 °C. Als de temperatuur beneden de 8 °C
of boven de 39 °C komt, knippert de bijbehorende waarde (8 °C of 39 °C) op hetdisplay.
� Als u met behulp van de afstandsbediening meerdere binnenunits aanstuurt,verschijnt op het display de temperatuur bij de hoofdunit.
� U kunt kiezen welke temperatuursensor u wilt gebruiken om de temperatuur op tenemen: de sensor op de afstandsbediening (“At Remote”) of de sensor op debinnenunit (“At Unit”). De standaardinstelling is “At Unit”.Wilt u de locatie van de sensor op de binnenunit wijzigen?
• CITY MULTI-modellen: raadpleeg de leverancier.• Mr.Slim-modellen: zie de installatieaanwijzingen.
� Als de omgevingstemperatuur is uitgeschakeld bij Function Selection wordt deomgevingstemperatuur niet weergegeven. Zie paragraaf 6 onder [4]–4 (2) als u meerwilt weten over het in- of uitschakelen van deze functie.
� Als u bij Function Selection hebt gekozen voor een weergave in Fahrenheit,verschijnt op het display het teken °F. Zie paragraaf 6 onder [4]–4 (1) als u wilt wetenhoe u °C of °F instelt.

– 129 –
(2) Ventilatorsnelheid, luchtuitstroomrichting en ventilatie<Zo wijzigt u de ventilatorsnelheid...>
� Druk, als de unit is ingeschakeld, zo vaak op de knop voor de ventilatiesnelheid 5als nodig is.• Met elke druk op de knop wijzigt u de kracht. De momenteel geselecteerde
snelheid wordt weergegeven bij 5.• Dit is de wijzigingsvolgorde en de beschikbare instellingen.
FANSPEED
Display
Model met 4snelheden
Model met 2snelheden
Model met 3snelheden
Opmerking:� Het aantal ventilatorsnelheden is afhankelijk van het type unit dat is aangesloten.
Sommige units bevatten geen instelling “Auto”.� In de volgende gevallen verschilt de daadwerkelijke ventilatorsnelheid van de
snelheid die op het display van de afstandsbediening wordt aangegeven.1. Als op het display “STAND BY” of “DEFROST” wordt getoond.2. Direct na het starten van de modus HEAT (als het systeem wacht tot de
moduswijziging van kracht wordt).3. In de modus HEAT, als de omgevingstemperatuur hoger is dan de ingestelde
temperatuur.4. Als de unit in de modus DRY staat.
<De richting van de luchtuitstroom wijzigen naar beneden of naar boven>� Druk, als de unit is ingeschakeld, zo vaak op Airflow Up/Down 6 als nodig is.
• Met elke druk op de knop wijzigt u de richting. De huidige richting wordtweergegeven bij 6.
• Dit is de wijzigingsvolgorde en de beschikbare instellingen.
Auto Horiz. 1 2 3 4 Swing
Display
* Tijdens de “swing”-handeling wijzigt de richtingsindicatie op het scherm nietsynchroon met de richting van de ventilatorbladen.
* Op sommige modellen worden richtingsaanduidingen niet ondersteund.
Opmerking:� De beschikbare richtingen zijn afhankelijk van het type unit dat is aangesloten.
Sommige units bevatten geen instelling “Auto”.� In de volgende gevallen verschilt de daadwerkelijke luchtrichting van de richting die
op het display van de afstandsbediening wordt aangegeven.1. Als op het display “STAND BY” of “DEFROST” wordt getoond.2. Direct na het starten van de modus HEAT (als het systeem wacht tot de
moduswijziging van kracht wordt).3. In de modus HEAT, als de omgevingstemperatuur hoger is dan de ingestelde
temperatuur.
<De richting van de luchtuitstroom wijzigen naar links of naar rechts>
� Druk indien nodig op de knop voor het uitblaasrooster 7.• De afbeelding met het uitblaasrooster 7 verschijnt.
Met elke druk op de knop wijzigt u de instelling als volgt.
(ON) (OFF)
Als de swingfunctie actief is, bewegen depijlen op het display van links naar rechts.
Geen weergave(Stop)
Auto Speed 1 Speed 2 Speed 3 Speed 4

– 130 –
�
<Ventileren>
Op Mr.Slim-modellen
� De ventilator in combinatie met de binnenunit laten werken:� Druk op Start/Stop 1.
• De indicatie Vent wordt weergegeven op het scherm (bij 8). De ventilatorwerkt nu automatisch als de binnenunit is ingeschakeld.
� De ventilator onafhankelijk laten werken:
� Druk op Mode 2 totdat op het display wordt weergegeven. Daardoor start
de ventilator.
� De ventilatorkracht wijzigen:� Druk, voor zover nodig, op Ventilation 8.
• Met elke druk op de knop schakelt u tussen de verschillende instellingen,zoals hieronder vermeld.
�
Low(Laag)
High(Hoog)
Op CITY MULTI-modellen
� De ventilator in combinatie met de binnenunit laten werken:� Druk op Start/Stop 1.
• De indicatie Vent wordt weergegeven op het scherm (bij 8). De ventilatorwerkt nu automatisch als de binnenunit is ingeschakeld.
� De ventilator alleen laten werken als de binnenunit is uitgeschakeld:� Druk, terwijl de binnenunit is uitgeschakeld, op Ventilation 8.
• Het ON-lampje (bij 1) gaat aan en de indicatie Ventilation (bij 8) licht op.
� De ventilatorkracht wijzigen:� Druk, voor zover nodig, op Ventilation 8.
• Met elke druk op de knop schakelt u tussen de verschillende instellingen,zoals hieronder vermeld.
Low(Laag)
High(Hoog)
� ��
Geen weergave (Stop)
(OFF)
Opmerking:� Bij sommige modelconfiguraties draait de ventilator op de binnenunit zelfs als u de
ventilator zo instelt dat deze onafhankelijk draait.

– 131 –
(3) De timerHieronder wordt uitgelegd hoe u de timer instelt en gebruikt. Met behulp van Function Selection kunt u aangeven welk van de drie typen timers u wilt gebruiken: 1 Weekly timer(schakelklok), 2 Simple timer (enkelvoudige timer) of 3 Auto Off timer (automatisch uitschakelen).Zie paragraaf 6 onder [4]–3 (3) als u meer wilt weten over het instellen van Function Selection.
1 De Weekly Timer (Schakelklok)� Met de schakelklok kunt u maximaal acht handelingen opgeven voor elke dag van de week.
• Elke handeling kan bestaan uit: aan/uit-tijd in combinatie met een temperatuur, alleen de aan/uit-tijd of alleen de temperatuur.• Als de huidige tijd op de ingestelde tijd van deze timer komt, wordt de op de timer ingestelde handeling op de airconditioner uitgevoerd.
� De minimale tijd die u kunt instellen op de timer is 1 minuut.
Opmerking:*1. De schakelklok, enkelvoudige timer en automatisch uitschakelen kunnen niet tegelijkertijd worden gebruikt.*2. De schakelklok werkt niet als aan een van de volgende voorwaarden is voldaan.
De timerfunctie is uitgeschakeld; het systeem bevindt zich in een abnormale staat; er is een testrun gaande; op de afstandsbediening wordt een zelftest of controle uitgevoerd;de gebruiker schakelt op dit moment een functie of timer in of stelt de huidige dag van de week of de tijd in; het systeem wordt centraal bestuurd. (Op het systeem wordenmet name geen handelingen uitgevoerd (unit aan, unit uit, temperatuur instellen) die tijdens deze omstandigheden zijn uitgeschakeld.)
˚C
SUNON
WEEKLY
PAR-21MAA
ON/OFF
FILTER
CHECK
OPERATION CLEAR
TEST
TEMP.
MENU
BACK DAYMONITOR/SET
CLOCK
ON/OFF
2
4 2 3
A 9 78
0
4
13
B
1
Werkingsnummer (No.)
Dag instellen
<Schakelklok instellen>1. Zorg dat u het standaard bedieningsscherm voor u hebt en dat de indicator van de
schakelklok 1 op het display wordt weergegeven.2. Druk op Timer Menu B, zodat “Set Up” op het scherm verschijnt (bij 2). (Met elke druk op
de knop schakelt u tussen “Set Up” en “Monitor”.)3. Druk op Timer On/Off (Set Day) 9 om de dag in te stellen. Met elke druk op de knop schuift
de weergegeven dag bij 3 een dag op, in de onderstaande volgorde: “Sun Mon Tues WedThurs Fri Sat” → “Sun” → … → “Fri” → “Sat” → “Sun Mon Tues Wed Thurs Fri Sat” …
4. Druk zo vaak als nodig op of voor Operation (7 of 8) om het juiste werkingsnummerte selecteren (1 tot en met 8) 4.* Door middel van uw keuze bij de stappen 3 en 4 wordt een van de cellen uit de
onderstaande matrix geselecteerd (op het display van de afstandsbediening links wordtweergegeven wat op het display komt te staan als u Operation 1 voor Sunday (Werking1 voor zondag) op de onderstaande warden instelt).
Sunday Monday … Saturday
Opmerking:Als u de dag instelt op “Sun Mon Tues Wed Thurs Fri Sat”, kunt u elke dag dezelfdehandelingen laten uitvoeren op dezelfde tijd.(Bijvoorbeeld: Operation 2 hierboven, die voor alle dagen van de week gelijk is.)
No. 1
No. 2
…
No. 8
• 8:30• ON• 23 °C
• 10:00• OFF
• 10:00• OFF
• 10:00• OFF
• 10:00• OFF
�
Instellingsmatrix
<Operation 1-instellingen voorzondag>Start de airconditioner om 8.30uur, met een ingestelde tem-peratuur van 23 °C.
<Operation 2-instellingen voorelke dag>Zet de airconditioner uit om10.00 uur.
�
Op No.

– 132 –
<Schakelklok instellen>
5. Druk zo vaak als nodig op de betreffende Set Time-knop A om de gewenste tijd in te stellen(bij 5).* Als u de knop ingedrukt houdt, neemt de tijd eerst toe in minuten, dan met een interval van
tien minuten en tenslotte met een interval van een uur.6. Druk op ON/OFF 1 om de gewenste handeling te selecteren (ON of OFF), bij 6.
* Met elke druk op de knop wijzigt de volgende instelling, in de onderstaande volgorde: geenweergave (geen instelling) → “ON” → “OFF”
7. Druk zo vaak als nodig op de betreffende Set Temperature-knop 3 om de gewenstetemperatuur in te stellen (bij 7).* Met elke druk op de knop wijzigt u de instelling, in de onderstaande volgorde: geen
weergave (geen instelling) ⇔ 24 ⇔ 25 ⇔ ... ⇔ 29 ⇔ 30 ⇔ 12 ⇔ ... ⇔ 23 ⇔ geenweergave.(Beschikbaar bereik: het instellingsbereik varieert van 12 °C tot 30 °C. Het daadwerkelijkebereik voor de temperatuurregeling is echter afhankelijk van het type unit dat is aangesloten.)
8. Nadat u bij de stappen 5, 6 en 7 de juiste instellingen hebt ingevoerd, drukt u op Filter 4om de waarden te vergrendelen.Als u de huidige reeks waarden voor de geselecteerde handeling wilt verwijderen, drukt ueenmaal op Check (Clear) 1 en laat deze snel weer los.* De weergegeven tijd verandert in “—:—” en de instellingen On/Off en temperatuur
verdwijnen allemaal.(Als u alle schakelklokinstellingen in een keer wilt wissen, houdt u Check (Clear) 0 tweeseconden of langer ingedrukt. Het display begint te knipperen ter aanduiding dat alleinstellingen zijn gewist.)
Opmerking:De nieuwe waarden worden geannuleerd als u op Mode (Return) 2 drukt voordat u op Filter 4 hebt gedrukt.Als u twee of meer verschillende handelingen voor precies dezelfde tijd hebt ingesteld, wordtalleen de handeling met het hoogste Operation No. uitgevoerd.9. Herhaal, indien nodig, de stappen 3 tot en met 8, om alle gewenste cellen te vullen.10. Druk op Mode (Return) 2 om terug te keren naar het standaard bedieningsscherm en de
instelprocedure te voltooien.11. Voor het activeren van de timer drukt u op Timer On/Off 9, zodat de indicatie “Timer Off” van
het scherm verdwijnt. Controleer of de indicatie “Timer Off” niet langer wordt weergegeven.* Als er geen timerinstellingen meer zijn, knippert de indicatie “Timer Off” op het scherm.
De ingestelde temperatuur* Wordt niet weergegeven als de temperatuur
niet is ingesteld.
˚C
SUNON
WEEKLY
6
7
5De ingestelde tijd De geselecteerde handeling (ON of OFF)* Wordt niet weergegeven als de handeling niet is ingesteld.
<Schakelklokinstellingen weergeven>
1. Controleer dat de schakelklokindicator zichtbaar is op het scherm (bij 1).2. Druk op Timer Menu B, zodat “Monitor” op het scherm verschijnt (bij 8).3. Druk zo vaak als nodig op Timer On/Off (Set Day) 9 om de dag weer te
geven waarvan u de instellingen wilt bekijken.4. Druk zo vaak als nodig op of voor Operation (7 of 8) om het juiste
werkingsnummer op het display weer te geven (bij 9).* Met elke druk op de knop wordt geschakeld naar de volgende
timerhandeling, in volgorde van de ingestelde tijd.5. Als u de monitor wilt sluiten en terug wilt keren naar het standaard
bedieningsscherm drukt u op Mode (Return) 2.
˚C
TIMERSUN
ON
OFF
WEEKLY 1
98
<De schakelklok uitschakelen>
Druk op Timer On/Off 9, zodat de indicatie “Timer Off” verschijnt bij 0.
˚C
˚C
TIME SUN
WEEKLY
0
˚C
˚C
TIME SUN
WEEKLY
0
<De schakelklok inschakelen >Druk op Timer On/Off 9, zodat de indicatie “Timer Off” donker wordt (bij 0).
Timerinstellingen

– 133 –
2 De Simple Timer (Enkelvoudige timer)� U kunt de enkelvoudige timer op drie manieren instellen.
• Alleen begintijd: de airconditioner wordt ingeschakeld als de ingestelde tijdis verstreken.
• Alleen eindtijd: de airconditioner wordt uitgeschakeld als de ingestelde tijdis verstreken.
• Begin- en eindtijden: de airconditioner wordt in- en uitgeschakeld als de inge-stelde tijdstippen zijn verstreken.
� De enkelvoudige timer (starten en stoppen) kan slechts eenmaal binnen een periodevan 72 uur worden ingesteld. De tijd kan worden ingesteld in intervallen van een uur.
Opmerking:*1. De schakelklok, enkelvoudige timer en automatisch uitschakelen kunnen niet
tegelijkertijd worden gebruikt.*2. De enkelvoudige timer werkt niet als aan een van de volgende voorwaarden is
voldaan.De timerfunctie is uitgeschakeld; het systeem bevindt zich in een abnormale staat; eris een testrun gaande; op de afstandsbediening wordt een zelftest of diagnoseuitgevoerd; de gebruiker stelt op dit moment een functie in; het systeem wordt centraalbestuurd. (Onder deze voorwaarden is de On/Off-handeling uitgeschakeld.)
ONHr
AFTER
SIMPLE
PAR-21MAA
ON/OFF
FILTER
CHECK
OPERATION CLEAR
TEST
TEMP.
MENU
BACK DAYMONITOR/SET
CLOCK
ON/OFF
2 A 9
0
4
1
B
<Enkelvoudige timer instellen>
ONHr
AFTER
SIMPLE
4
1
3
2
1. Zorg dat u het standaard bedieningsscherm voor u hebt en dat de indicator van deenkelvoudige timer 1 op het display wordt weergegeven.Als niet de enkelvoudige timer wordt weergegeven, maar iets anders, stelt u deSIMPLE TIMER in via Function Selection (zie 6.[4]–3 (3)) timerfunctie inschakelen.
2. Druk op Timer Menu B, zodat “Set Up” op het scherm verschijnt (bij 2). (Met elkedruk op de knop schakelt u tussen “Set Up” en “Monitor”.)
3. Druk op ON/OFF 1 om de huidige instelling van de enkelvoudige timer weer te geven(ON of OFF). Druk eenmaal op de knop om de resterende tijd voor ON weer te gevenen druk dan nogmaals op de knop om de resterende tijd voor OFF weer te geven. (deindicatie ON/OFF ziet u bij 3).• “ON”-timer: de airconditioner wordt ingeschakeld als het opgegeven aantal uren
is verstreken.• “OFF”-timer: de airconditioner wordt uitgeschakeld als het opgegeven aantal uren
is verstreken.4. “ON” of “OFF” wordt weergegeven bij 3: Druk zo vaak als nodig op de betreffende
Set Time-knop A om de uren ON in te stellen (als “ON” wordt weergegeven) of deuren OFF (als “OFF” wordt weergegeven bij 4).• Beschikbaar bereik: 1 tot 72 uur
5. Als u zowel de ON- als de OFF-tijden wilt instellen, herhaalt u de stappen 3 en 4.* De ON- en OFF-tijden kunnen echter niet op dezelfde waarde worden ingesteld.
6. Zo wist u de huidige ON- of OFF-instelling: Geef de ON- of OFF-instelling weer (ziestap 3) en druk vervolgens op Check (Clear) 0 zodat de tijd op “—” komt te staan bij4. (Wilt u alleen een ON-instelling of alleen een OFF-instelling gebruiken, controleerdan of de instelling die u niet wilt gebruiken als “—” wordt weergegeven.)
7. Nadat u de stappen 3 tot en met 6 hebt ingevoerd, drukt u op Filter 4 om dewaarden te vergrendelen.
Opmerking:De nieuwe waarden worden geannuleerd als u op Mode (Return) 2 drukt voordat u opFilter 4 hebt gedrukt.
8. Druk op Mode (Return) 2 om terug te keren naar het standaard bedieningsscherm.9. Druk op Timer On/Off 9 om het aftellen te starten. Als de timer aftelt, is de waarde
zichtbaar op het display. Controleer of de timerwaarde zichtbaar en goed wordtweergegeven.
Timer instellen
Handeling (On of Off)* “— —” wordt weergegeven als
er niets is ingesteld.

– 134 –
<De huidige instellingen van de enkelvoudige timer weergeven>
1. Controleer dat de indicator van de enkelvoudige timer zichtbaar is op hetscherm (bij 1).
2. Druk op Timer Menu B, zodat “Monitor” op het scherm verschijnt (bij 5).• Als de ON- of OFF-enkelvoudige timer wordt uitgevoerd, verschijnt de
huidige timerwaarde bij 6.• Als zowel de ON- als de OFF-waarden zijn ingesteld, worden de beide
warden om en om weergegeven.3. Druk op Mode (Return) 2 om de monitorweergave te sluiten en terug te
keren naar het standaard bedieningsscherm.
TIMER ON
OFF
Hr
AFTER
SIMPLE 1
65 Timer instellen
<De enkelvoudige timer uitschakelen...>Druk op Timer On/Off 9, zodat de timerinstelling niet meer op het scherm wordtweergegeven (bij 7).
<De enkelvoudige timer starten…>
Druk op Timer On/Off 9, zodat de timerinstelling verschijnt bij 7.
˚C
˚CSIMPLE
7
˚C
˚C
ONHr
AFTER
SIMPLE
7
VoorbeeldenAls zowel de ON- als de OFF-tijden zijn ingeschakeld voor de enkelvoudige timer, is de werkingen weergave als volgt.
Voorbeeld 1:Start de timer, waarbij de ON-tijd vroeger is dan de OFF-tijdON-instelling: 3 uurOFF-instelling: 7 uur
ONHr
AFTER
SIMPLE
˚C
˚C
OFF
Hr
AFTER
SIMPLE
SIMPLE
˚C
˚C
OFF
Hr
AFTER
SIMPLE
ONHr
AFTER
SIMPLE
˚C
˚CSIMPLE
Voorbeeld 2:Start de timer, waarbij de OFF-tijd vroeger is dan de ON-tijdON-instelling: 5 uurOFF-instelling: 2 uur
�
�
�
�
3 uur na hetstarten van de
timer
Bij het starten vande timer
7 uur na het star-ten van de timer
Display toont de ON-instelling vande timer (resterende uren tot ON).
Display toont de OFF-instelling vande timer (resterende uren tot OFF).De weergegeven tijd is OFF (7uur) – ON (3 uur) = 4 uur.
De airconditioner wordt uitgescha-keld en blijft uitgeschakeld totdatiemand anders deze opnieuw in-schakelt.
2 uur na hetstarten van de
timer
Bij het starten vande timer
5 uur na het star-ten van de timer
Display toont de OFF-instelling vande timer (resterende uren tot OFF).
Display toont de ON-instelling vande timer (resterende uren tot ON).De weergegeven tijd is ON (5 uur)– OFF (2 uur) = 3 uur.
De airconditioner wordt ingescha-keld en blijft ingeschakeld totdatiemand anders deze uitschakelt.
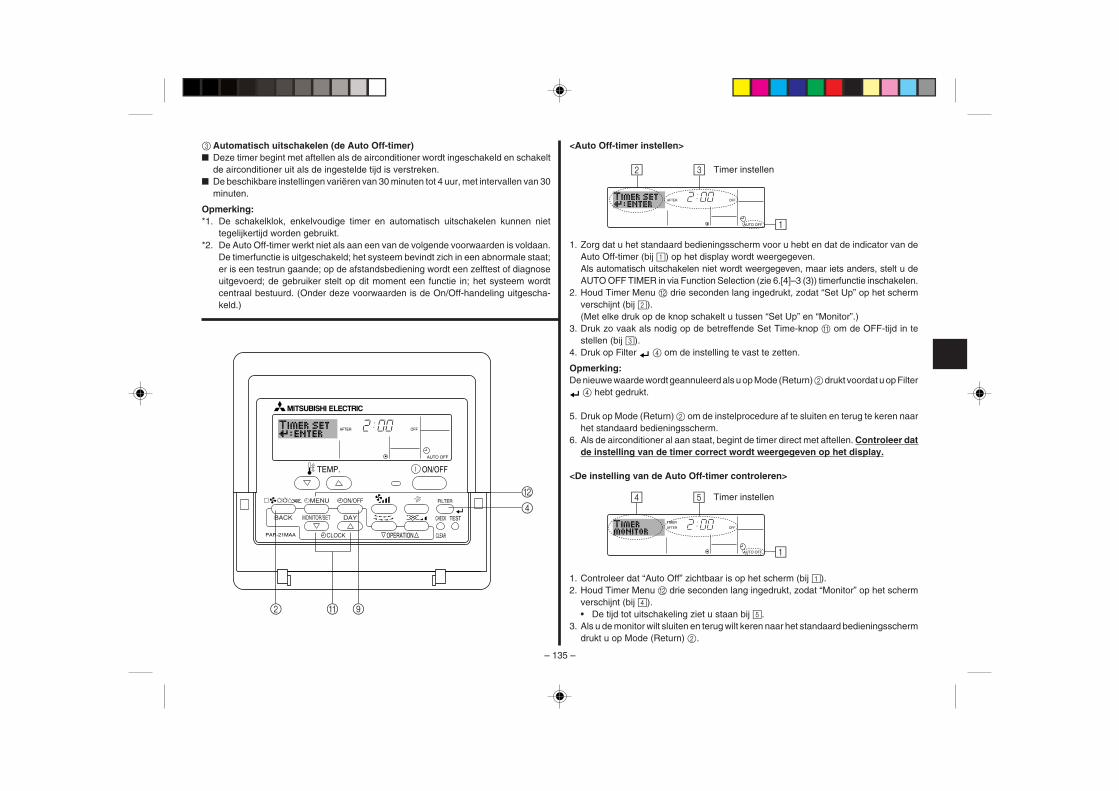
– 135 –
3 Automatisch uitschakelen (de Auto Off-timer)� Deze timer begint met aftellen als de airconditioner wordt ingeschakeld en schakelt
de airconditioner uit als de ingestelde tijd is verstreken.� De beschikbare instellingen variëren van 30 minuten tot 4 uur, met intervallen van 30
minuten.
Opmerking:*1. De schakelklok, enkelvoudige timer en automatisch uitschakelen kunnen niet
tegelijkertijd worden gebruikt.*2. De Auto Off-timer werkt niet als aan een van de volgende voorwaarden is voldaan.
De timerfunctie is uitgeschakeld; het systeem bevindt zich in een abnormale staat;er is een testrun gaande; op de afstandsbediening wordt een zelftest of diagnoseuitgevoerd; de gebruiker stelt op dit moment een functie in; het systeem wordtcentraal bestuurd. (Onder deze voorwaarden is de On/Off-handeling uitgescha-keld.)
AFTER OFF
AUTO OFF
PAR-21MAA
ON/OFF
FILTER
CHECK
OPERATION CLEAR
TEST
TEMP.
MENU
BACK DAYMONITOR/SET
CLOCK
ON/OFF
2 A 9
4
B
<Auto Off-timer instellen>
1. Zorg dat u het standaard bedieningsscherm voor u hebt en dat de indicator van deAuto Off-timer (bij 1) op het display wordt weergegeven.Als automatisch uitschakelen niet wordt weergegeven, maar iets anders, stelt u deAUTO OFF TIMER in via Function Selection (zie 6.[4]–3 (3)) timerfunctie inschakelen.
2. Houd Timer Menu B drie seconden lang ingedrukt, zodat “Set Up” op het schermverschijnt (bij 2).(Met elke druk op de knop schakelt u tussen “Set Up” en “Monitor”.)
3. Druk zo vaak als nodig op de betreffende Set Time-knop A om de OFF-tijd in testellen (bij 3).
4. Druk op Filter 4 om de instelling te vast te zetten.
Opmerking:De nieuwe waarde wordt geannuleerd als u op Mode (Return) 2 drukt voordat u op Filter
4 hebt gedrukt.
5. Druk op Mode (Return) 2 om de instelprocedure af te sluiten en terug te keren naarhet standaard bedieningsscherm.
6. Als de airconditioner al aan staat, begint de timer direct met aftellen. Controleer datde instelling van de timer correct wordt weergegeven op het display.
<De instelling van de Auto Off-timer controleren>
AFTER OFF
AUTO OFF
3
1
2 Timer instellen
AFTER
TIMER
OFF
AUTO OFF
5
1
4 Timer instellen
1. Controleer dat “Auto Off” zichtbaar is op het scherm (bij 1).2. Houd Timer Menu B drie seconden lang ingedrukt, zodat “Monitor” op het scherm
verschijnt (bij 4).• De tijd tot uitschakeling ziet u staan bij 5.
3. Als u de monitor wilt sluiten en terug wilt keren naar het standaard bedieningsschermdrukt u op Mode (Return) 2.

– 136 –
<De Auto-Off timer uitschakelen...>
� Houd Timer On/Off 9 drie seconden lang ingedrukt, zodat “Timer Off” op het schermverschijnt (bij 6) en de timerwaarde (bij 7) verdwijnt.
� Of zet de airconditioner zelf uit. De timerwaarde (bij 7) verdwijnt van het scherm.
<De Auto-Off timer starten...>
� Houd Timer On/Off 9 drie seconden lang ingedrukt. De indicatie “Timer Off”verdwijnt (bij 6) en de timerinstelling licht (bij 7) op het display op.
� Of zet de airconditioner aan. De timerwaarde wordt weergegeven bij 7.
˚C
˚CAUTO OFF6
7
AUTO OFF
7
˚C
˚C
AFTER OFF
AUTO OFF6
7

– 137 –
(4) De knoppen van de afstandsbediening vergrendelen (functie-beperking van Operation)
� Als u dat wilt, kunt u de knoppen van de afstandsbediening vergrendelen. Met behulpvan Function Selection of de afstandsbediening kunt u aangeven welk type vergren-deling u wilt gebruiken. (Zie paragraaf 6 onder [4]–2 (1) als u meer wilt weten over hetselecteren van het type vergrendeling.)U hebt met name de keuze uit de onderstaande twee vergrendelingstypen.
1 Lock All Buttons: hiermee vergrendelt u alle knoppen op de afstandsbe-diening.
2 Lock All Except ON/OFF: hiermee vergrendelt u alle knoppen op de afstandsbe-diening, behalve de knoppen On en Off.
Opmerking:De indicatie “Locked” (Vergrendeld) verschijnt op het scherm om aan te geven dat deknoppen momenteel zijn vergrendeld.
˚C
˚C
TIME SUN
FUNCTION
PAR-21MAA
ON/OFF
FILTER
CHECK
OPERATION CLEAR
TEST
TEMP.
MENU
BACK DAYMONITOR/SET
CLOCK
ON/OFF
4
1
1
Vergrendelingsindicator
<De knoppen vergrendelen>
1. Druk, terwijl u de knop Filter 4 ingedrukt houdt, op ON/OFF 1 en houd deze tweeseconden ingedrukt. De indicatie “Locked” (Vergrendeld) verschijnt op het scherm(bij 1) om aan te geven dat de vergrendeling actief is.* Als de vergrendeling is uitgeschakeld in Function Selection verschijnt op het
scherm de melding “Not Available” (Niet beschikbaar) als u op de hierbovengenoemde knoppen drukt.
• Als u op een vergrendelde knop drukt, knippert de indicatie “Locked” (Vergren-deld) op het display (bij 1).
˚C
˚C
FUNCTION1
˚C
˚C
FUNCTION1
<De knoppen ontgrendelen>1. Druk, terwijl u de knop Filter 4 ingedrukt houdt, op ON/OFF 1 en houd deze twee
seconden ingedrukt, zodat de indicatie “Locked” (Vergrendeld) verdwijnt van hetscherm (bij 1).
˚C
˚C
1
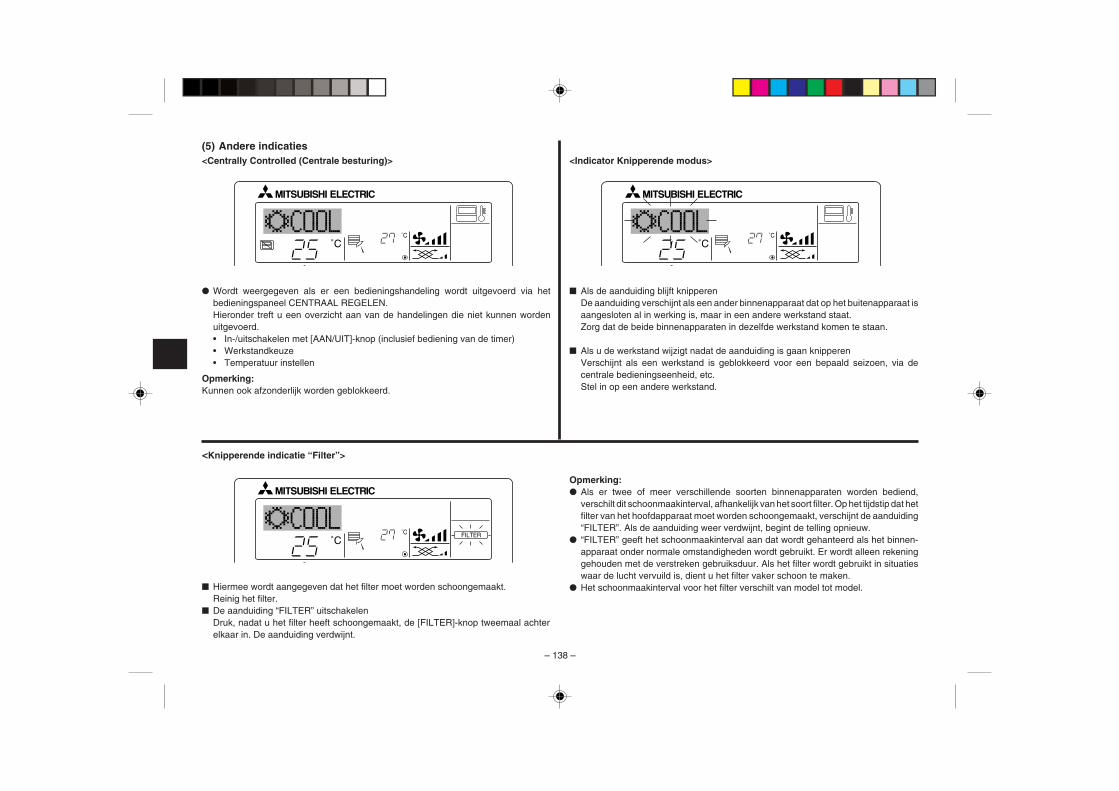
– 138 –
(5) Andere indicaties<Centrally Controlled (Centrale besturing)>
ON/OFF TEMP.
˚C
˚C
� Wordt weergegeven als er een bedieningshandeling wordt uitgevoerd via hetbedieningspaneel CENTRAAL REGELEN.Hieronder treft u een overzicht aan van de handelingen die niet kunnen wordenuitgevoerd.• In-/uitschakelen met [AAN/UIT]-knop (inclusief bediening van de timer)• Werkstandkeuze• Temperatuur instellen
Opmerking:Kunnen ook afzonderlijk worden geblokkeerd.
<Indicator Knipperende modus>
ON/OFF TEMP.
˚C
˚C
� Als de aanduiding blijft knipperenDe aanduiding verschijnt als een ander binnenapparaat dat op het buitenapparaat isaangesloten al in werking is, maar in een andere werkstand staat.Zorg dat de beide binnenapparaten in dezelfde werkstand komen te staan.
� Als u de werkstand wijzigt nadat de aanduiding is gaan knipperenVerschijnt als een werkstand is geblokkeerd voor een bepaald seizoen, via decentrale bedieningseenheid, etc.Stel in op een andere werkstand.
<Knipperende indicatie “Filter”>
ON/OFF TEMP.
˚C
˚CFILTER
� Hiermee wordt aangegeven dat het filter moet worden schoongemaakt.Reinig het filter.
� De aanduiding “FILTER” uitschakelenDruk, nadat u het filter heeft schoongemaakt, de [FILTER]-knop tweemaal achterelkaar in. De aanduiding verdwijnt.
Opmerking:� Als er twee of meer verschillende soorten binnenapparaten worden bediend,
verschilt dit schoonmaakinterval, afhankelijk van het soort filter. Op het tijdstip dat hetfilter van het hoofdapparaat moet worden schoongemaakt, verschijnt de aanduiding“FILTER”. Als de aanduiding weer verdwijnt, begint de telling opnieuw.
� “FILTER” geeft het schoonmaakinterval aan dat wordt gehanteerd als het binnen-apparaat onder normale omstandigheden wordt gebruikt. Er wordt alleen rekeninggehouden met de verstreken gebruiksduur. Als het filter wordt gebruikt in situatieswaar de lucht vervuild is, dient u het filter vaker schoon te maken.
� Het schoonmaakinterval voor het filter verschilt van model tot model.

– 139 –
<Knipperende foutcodes>
Op CITY MULTI-modellen Op Mr.Slim-modellen
ON/OFF
ERROR CODE
ON/OFF
ERROR CODE
ON-lampje(knippert)
FoutcodeNummer binnenunit
� Het ON-lampje en de foutcode knipperen allebei: dit betekent dat de airconditioner defect is en de werking is onderbroken (kan niet worden hervat). Schrijf het aangegevenunitnummer en de foutcode op, schakel de stroom van de airconditioner uit en bel de leverancier of de onderhoudstechnicus.
Als u een telefoonnummer hebt opgegeven dat moet worden gebeld in geval van problemen, wordt ditnummer op het scherm weergegeven. (U kunt dit nummer instellen onder Function Selection. Zie paragraaf6 voor meer informatie.)
Adres koelmiddelbinnenunit
Foutcode Nummer binnenunit
Wisselende weergave
ON-lampje(knippert)
Op CITY MULTI-modellen Op Mr.Slim-modellen Na het drukken op de Check-knop:
� Alleen de foutcode knippert (terwijl het ON-lampje blijft branden): het apparaat blijft werken, hoewel er mogelijk een probleem is ontstaan. Schrijf in dit geval de foutcode op enbel de leverancier of de onderhoudstechnicus voor advies.
* Als u een telefoonnummer hebt opgegeven dat moet worden gebeld in geval van problemen, drukt u op Check om dit nummer op het scherm weer te geven. (U kunt dit nummerinstellen onder Function Selection. Zie paragraaf 6 voor meer informatie.)
ON/OFF
˚C
˚C
ERROR CODE
ON/OFF
˚C
˚C
ERROR CODE
ON/OFF
CALL:XXXXXXX:XXX
Foutcode Foutcode
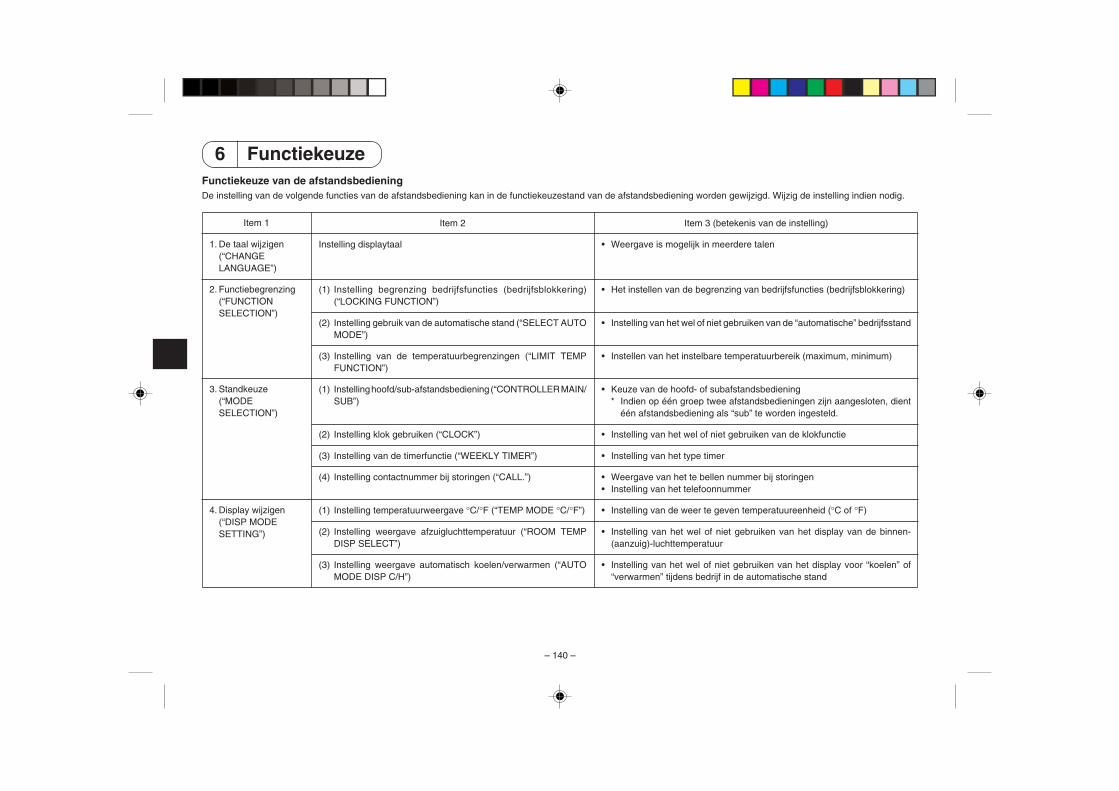
– 140 –
6 FunctiekeuzeFunctiekeuze van de afstandsbedieningDe instelling van de volgende functies van de afstandsbediening kan in de functiekeuzestand van de afstandsbediening worden gewijzigd. Wijzig de instelling indien nodig.
Item 1
1. De taal wijzigen(“CHANGELANGUAGE”)
2. Functiebegrenzing(“FUNCTIONSELECTION”)
3. Standkeuze(“MODESELECTION”)
4. Display wijzigen(“DISP MODESETTING”)
Item 2
Instelling displaytaal
(1) Instelling begrenzing bedrijfsfuncties (bedrijfsblokkering)(“LOCKING FUNCTION”)
(2) Instelling gebruik van de automatische stand (“SELECT AUTOMODE”)
(3) Instelling van de temperatuurbegrenzingen (“LIMIT TEMPFUNCTION”)
(1) Instelling hoofd/sub-afstandsbediening (“CONTROLLER MAIN/SUB”)
(2) Instelling klok gebruiken (“CLOCK”)
(3) Instelling van de timerfunctie (“WEEKLY TIMER”)
(4) Instelling contactnummer bij storingen (“CALL.”)
(1) Instelling temperatuurweergave °C/°F (“TEMP MODE °C/°F”)
(2) Instelling weergave afzuigluchttemperatuur (“ROOM TEMPDISP SELECT”)
(3) Instelling weergave automatisch koelen/verwarmen (“AUTOMODE DISP C/H”)
Item 3 (betekenis van de instelling)
• Weergave is mogelijk in meerdere talen
• Het instellen van de begrenzing van bedrijfsfuncties (bedrijfsblokkering)
• Instelling van het wel of niet gebruiken van de “automatische” bedrijfsstand
• Instellen van het instelbare temperatuurbereik (maximum, minimum)
• Keuze van de hoofd- of subafstandsbediening* Indien op één groep twee afstandsbedieningen zijn aangesloten, dient
één afstandsbediening als “sub” te worden ingesteld.
• Instelling van het wel of niet gebruiken van de klokfunctie
• Instelling van het type timer
• Weergave van het te bellen nummer bij storingen• Instelling van het telefoonnummer
• Instelling van de weer te geven temperatuureenheid (°C of °F)
• Instelling van het wel of niet gebruiken van het display van de binnen-(aanzuig)-luchttemperatuur
• Instelling van het wel of niet gebruiken van het display voor “koelen” of“verwarmen” tijdens bedrijf in de automatische stand
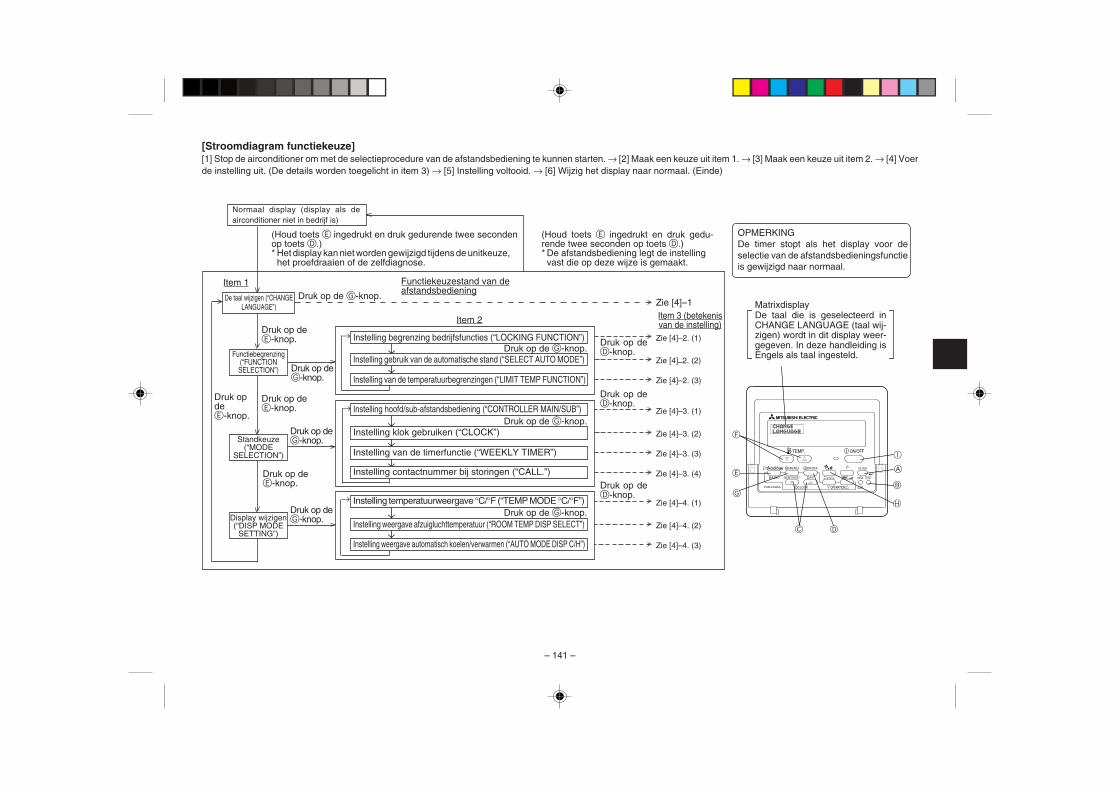
– 141 –
→→
[Stroomdiagram functiekeuze][1] Stop de airconditioner om met de selectieprocedure van de afstandsbediening te kunnen starten. → [2] Maak een keuze uit item 1. → [3] Maak een keuze uit item 2. → [4] Voerde instelling uit. (De details worden toegelicht in item 3) → [5] Instelling voltooid. → [6] Wijzig het display naar normaal. (Einde)
(Houd toets E ingedrukt en druk gedurende twee secondenop toets D.)* Het display kan niet worden gewijzigd tijdens de unitkeuze,
het proefdraaien of de zelfdiagnose.
(Houd toets E ingedrukt en druk gedu-rende twee seconden op toets D.)* De afstandsbediening legt de instelling
vast die op deze wijze is gemaakt.
Druk op deG-knop.
Zie [4]–1Item 3 (betekenisvan de instelling)
Zie [4]–2. (1)
Zie [4]–2. (2)
Zie [4]–2. (3)
Zie [4]–3. (1)
Zie [4]–3. (2)
Zie [4]–3. (3)
Zie [4]–3. (4)
Zie [4]–4. (1)
Zie [4]–4. (2)
Zie [4]–4. (3)
Item 1 Functiekeuzestand van deafstandsbediening
Item 2
Standkeuze(“MODE
SELECTION”)
Normaal display (display als deairconditioner niet in bedrijf is)
PAR-21MAA
ON/OFF
FILTER
CHECK
OPERATION CLEAR
TEST
TEMP.
MENU
BACK DAYMONITOR/SET
CLOCK
ON/OFF
F
G
C D
B
I
A
H
E
De taal wijzigen (“CHANGELANGUAGE”)
Functiebegrenzing(“FUNCTIONSELECTION”)
Display wijzigen(“DISP MODE
SETTING”)
OPMERKINGDe timer stopt als het display voor deselectie van de afstandsbedieningsfunctieis gewijzigd naar normaal.
Druk op de G-knop.
Druk op deE-knop.
Druk op deE-knop.
Druk op deE-knop.
Druk opdeE-knop.
Druk op deG-knop.
Druk op deG-knop.
Druk op deD-knop.
Druk op deD-knop.
Druk op deD-knop.
→→
→→
→
→ Instelling begrenzing bedrijfsfuncties (“LOCKING FUNCTION”)Druk op de G-knop.
Instelling van de temperatuurbegrenzingen (“LIMIT TEMP FUNCTION”)
Instelling gebruik van de automatische stand (“SELECT AUTO MODE”)
→ Instelling temperatuurweergave °C/°F (“TEMP MODE °C/°F”)Druk op de G-knop.
Instelling weergave automatisch koelen/verwarmen (“AUTO MODE DISP C/H”)
Instelling weergave afzuigluchttemperatuur (“ROOM TEMP DISP SELECT”)
→ Instelling hoofd/sub-afstandsbediening (“CONTROLLER MAIN/SUB”)Druk op de G-knop.
Instelling van de timerfunctie (“WEEKLY TIMER”)
Instelling klok gebruiken (“CLOCK”)
Instelling contactnummer bij storingen (“CALL.”)
MatrixdisplayDe taal die is geselecteerd inCHANGE LANGUAGE (taal wij-zigen) wordt in dit display weer-gegeven. In deze handleiding isEngels als taal ingesteld.

– 142 –
[Details van de instellingen]
[4]–1. Instelling CHANGE LANGUAGE (taal wijzigen)
De taal in het matrixdisplay kan worden geselecteerd.• Druk op de [ MENU]-toets G om de taal te wijzigen.
1 Japans (JP), 2 Engels (GB), 3 Duits (D), 4 Spaans (E),5 Russisch (RU), 6 Italiaans (I), 7 Chinees (CH), 8 Frans (F)
[4]–2. Functiebegrenzing
(1) Instelling begrenzing bedrijfsfuncties (bedrijfsblokkering)• Om de instelling te wijzigen drukt u op de [ ON/OFF]-knop D.
1 no1 : Voor de instelling van de bedrijfsblokkering worden alle toetsenbehalve de [ ON/OFF]-knop gebruikt.
2 no2 : De bedrijfsblokkering wordt via alle toetsen ingesteld.3 OFF (Initiële instelling) : De bedrijfsblokkering wordt niet ingesteld.
* Om de instelling van de bedrijfsblokkering op het normale scherm van krachtte laten worden, moeten de [FILTER]- en de [ ON/OFF]-knoppen gedu-rende twee seconden tegelijkertijd worden ingedrukt, bij het normale schermen nadat de bovenstaande instelling is uitgevoerd.
(2) Instelling gebruik van de automatische standIndien de afstandsbediening aangesloten is op een unit met automatischebedrijfsstand, kunnen de volgende instellingen worden uitgevoerd.• Om de instelling te wijzigen drukt u op de [ ON/OFF]-knoppen D.
1 ON (Initiële instelling) : Als de bedrijfsstand wordt geselecteerd, wordt deautomatische stand getoond.
2 OFF : Als de bedrijfsstand wordt geselecteerd, wordt deautomatische stand niet getoond.
(3) Instelling van de temperatuurbegrenzingenNadat deze instelling is gemaakt, kan de temperatuur binnen het ingesteldebereik worden gewijzigd.• Om de instelling te wijzigen drukt u op de [ ON/OFF]-knoppen D.
1 LIMIT TEMP COOL MODE : Het temperatuurbereik kan in de koel/droog-stand worden gewijzigd.
2 LIMIT TEMP HEAT MODE : Het temperatuurbereik kan in deverwarmingsstand worden gewijzigd.
3 LIMIT TEMP AUTO MODE : Het temperatuurbereik kan in de automati-sche stand worden gewijzigd.
4 OFF (initiële instelling) : De begrenzing van het temperatuurbereik isniet geactiveerd.
* Indien de instelling wordt gemaakt (behalve bij OFF (uit)), wordt tegelijkertijdde temperatuurbegrenzing bij koelen, verwarmen en automatisch ingesteld.Het bereik kan echter niet worden begrensd als het ingestelde temperatuur-bereik niet is gewijzigd.
• Om de temperatuur hoger of lager te maken, drukt u op [ TEMP. ( ) of( )] F.
• Om naar de instelling van de bovenste en onderste begrenzing te schakelen,drukt u op [ ] H. De geselecteerde instelling zal knipperen waarna hettemperatuurbereik kan worden ingesteld.
• Instelbaar bereikKoel/droogstand :
Ondergrens: 19°C t/m 30°C Bovengrens: 30°C t/m 19°CVerwarmingsstand :
Ondergrens: 17°C t/m 28°C Bovengrens: 28°C t/m 17°CAutomatische stand :
Ondergrens: 19°C t/m 28°C Bovengrens: 28°C t/m 19°C* Het instelbare gebied varieert afhankelijk van de aan te sluiten unit (Mr. Slim-
units, CITY MULTI-units, en tussenliggende-temperatuur-units)
[4]–3. Standkeuze-instelling
(1) Instelling hoofd/sub-afstandsbediening• Om de instelling te wijzigen drukt u op de [ ON/OFF]-knop D.
1 Main : De afstandsbediening is de hoofd-afstandsbediening.2 Sub : De afstandsbediening is de sub-afstandsbediening.
(2) Instelling klok gebruiken• Om de instelling te wijzigen drukt u op de [ ON/OFF]-knop D.
1 ON : De klokfunctie kan worden gebruikt.2 OFF : De klokfunctie kan niet worden gebruikt.
(3) Instelling van de timerfunctie• Om de instelling te wijzigen drukt u op de [ ON/OFF]-knop D (Kies één van
de volgende.)1 WEEKLY TIMER (Initiële instelling) :
De weektimer kan worden gebruikt.2 AUTO OFF TIMER : De auto-uit-timer kan worden gebruikt.3 SIMPLE TIMER : De eenvoudige timer kan worden gebruikt.4 TIMER MODE OFF : De timer kan niet worden gebruikt.
* Indien de instelling voor het gebruik van de klok OFF (uit) is, kan de “WEEKLYTIMER” niet worden gebruikt.

– 143 –
(4) Instelling contactnummer bij storingen• Om de instelling te wijzigen drukt u op de [ ON/OFF]-knop D.
1 CALL OFF : De ingestelde te bellen nummers worden bij eenstoring niet getoond.
2 CALL **** *** **** : De ingestelde te bellen nummers worden bij eenstoring getoond.
CALL_ : Het te bellen nummer kan worden ingesteld als hetdisplay verschijnt dat links wordt getoond.
• Het instellen van de te bellen nummersOm de te bellen nummers in te stellen dient u de onderstaande procedureste volgen.Verplaats de knipperende cursor naar de in te stellen nummers. Druk op[ TEMP. ( ) en ( )]-knoppen F om de cursor naar rechts of links teverplaatsen. Druk op [ CLOCK ( ) en ( )]-knoppen C om de num-mers in te stellen.
[4]–4. Displayweergave-instelling
(1) Instelling temperatuurweergave °C/°F• Om de instelling te wijzigen drukt u op de [ ON/OFF]-knop D.
1 °C : Voor de temperatuur wordt de eenheid °C gebruikt.2 °F : Voor de temperatuur wordt de eenheid °F gebruikt.
(2) Instelling weergave afzuigluchttemperatuur• Om de instelling te wijzigen drukt u op de [ ON/OFF]-knop D.
1 ON : De afzuigluchttemperatuur wordt weergegeven.2 OFF : De afzuigluchttemperatuur wordt niet weergegeven.
(3) Instelling weergave automatisch koelen/verwarmen• Om de instelling te wijzigen drukt u op de [ ON/OFF]-knop D.
1 ON : Bij automatisch bedrijf wordt “automatisch koelen” of “automatischverwarmen” weergegeven.
2 OFF : Bij automatisch bedrijf wordt alleen “automatisch” getoond.

– 144 –
7 Specificaties
Item Details
Afmetingen 120 (H) × 130 (W) × 19 (D) mm
Gewicht 0,2 kg
Voeding 10 tot 13 V DC (geleverd door de binnenunit)
Stroomverbruik 0,3 W
Gebruiksomgeving 0 °C tot en met 40 °C, 30% tot en met 90% relatieve vochtigheid
Samenstelling PS

WT04474X01
HEAD OFFICE: MITSUBISHI DENKI BLDG., 2-2-3, MARUNOUCHI, CHIYODA-KU, TOKYO 100-8310, JAPAN