Panasonic Omnivision - Appliance Parts · Panasonic Omnivision ... 4, 6, and 8 hour VCR ... Any...
36
Thank you for choosing Panasonic Omnivision MODEL PV.4625S/PV-4655S/PV-4665S Video Cassette Recorder Changer Operating Instructions Please read these instructions carefully before attempting to connect, operate or adjust this product and save this manual. Spanish Quick Use Guide is included. Gu{a para r&pida consulta en espa,_ol est& includo. VQTS3260 (A)
Transcript of Panasonic Omnivision - Appliance Parts · Panasonic Omnivision ... 4, 6, and 8 hour VCR ... Any...

Thank you for choosing
PanasonicOmnivision
MODEL PV.4625S/PV-4655S/PV-4665S
Video Cassette Recorder
Changer
OperatingInstructions
Please read these instructions carefully before attempting to connect,
operate or adjust this product and save this manual.Spanish Quick Use Guide is included. Gu{a para r&pida consulta enespa,_ol est& includo.
VQTS3260 (A)

Thin s You Should KnowIIIII1[
Congratulationson your purchase of one of the most sophisticated andreliable products on the market today. Used properly,we're sure it will bring you and your family years ofenjoyment. Please take time to fill in the information atright. The serial number is on the tag located on theback of your VCR. You'll want to keep this manualhandy as your convenient VCR information source.
Safety Precautions
_Date of Purchase ....Dealer Purchased From
1
Dealer AddressDealer Phone NoModel NoSerial No.
Warning: To prevent fire or shock hazard, do not expose this equipment to rain or moisture.This video recorder, equipped with the HQ (High Quality) System, is compatible with existingVHS equipment.Only use those tapes with the _ mark. It is recommended that only cassette tapes that havebeen tested and inspected for use in 2, 4, 6, and 8 hour VCR machines be used.
FCC Warning: Any unauthorized changes or modifications to this equipment would void the user's authority to operate. I
CAUTION: 'TO REDUCE THE RISK OF ELECTRIC SHOCK,
DO NOT REMOVE COVER (OIL BACK)
NO USER-SERVICEABLE PARTS INSIDE
REFER $_ RVICING TO QUALIFIED SERVICE PERSONNEL
This symbol warns the user that uninsulated voltage withinthe unit may have sufficient magnitude to cause electricshock. Therefore, it is dangerous to make any kind ofcontact with any inside part of this unit.
This symbol alerts the user that important literatureconcerning the operation and maintenance of this unit hasbeen included. Therefore, it should be read carefully in orderto avoid any problems.
Table of Contentsii i
Important Safeguards and Precautions ..................................................................................... 3Unpacking Your VCR and Features ................................................................................... 4VCR and Cassette Information (Record Tab, Tape Speeds, Tape Cleaning, Specifications) ................. 5
Basic Connection (Antenna and VCR, VCR and TV) ............................................................... 6, 7Additional Connections (CATV, Audio/Video) .................................................................................................. 8, 9
One Time VCR Setup(On-screen Language, Cable Box/DSS Receiver Setup, Channel Memory, Auto Clock Set) ................ 10 ",, 15
On Screen Displays (OSD) (Function, Channel, Menu, VCR Status & Clock, Warning, Instruction) ................ 16
Playback a Tape (Main Operation, Special Effects, Quality Picture Features) ................................... 17Tape Operation (Repeat Play, Zero Search, One Minute Skip, Shuttle Search, Auto Functions) ....... 1 8, 19Record On a Tape {MainOperation,OneTouch Record,ChannelSelection,RapidTune(PV-4625SandPV-4655Sonly)}.. 20
Copying Your Tapes (Dubbing) (Connection, Main Operation, Monitoring, Select Input Mode) ..................... 21Timer Recording (Main Operation, Cancel-Clear or Replace, Program Contents) ................................ 22, 23Timer Recording Using VCR Buttons ..................................................................................... 23MTS Broadcast/VHS Hi-Fi Stereo System (PV-4655S and PV-4665S only)
{Stereo/SAP/Mono Broadcast, Select Audio Mode, Spatializer(PV-4665S only)} ............................ 24, 25VCR Plus+ Set Up (VCR Plus+ Channel Set Up) ..................................................................... 26VCR Plus+ Programming (Main Operation, Make Corrections) ................................................... 27Special VCR Features (VCR Lock, Warning Beeper) .................................................................................. 28Multi-Brand Control Feature ............................................................................................ 29
2
Before Requesting Service (Self-check items) ............................................................................................ 30
Spanish Quick Use Guide/Guia para r&pida consulta .................................................... 31 ~ 34Index of Controls (Remote Control, VCR) .......................................................... 35, Back Cover

ImportantSafeguards andPrecautionsI INTRODUCTION
Careful attention has been given to this Video product to assurea quality standard devoted to your safety and enjoyment. Thisquality standard together with your personal responsibility forthe safety of yourself and others, will contribute to yourenjoyment. This Video product uses electrical energy andrequires proper handling at all times.
]CAUTION IREAD AND RETAIN THE SAFETY AND OPERATING INSTRUCTIONSTo make full use of the safeguards incorporated in this unit, readand follow this basic guide, adopted in part from Underwriter'sLaboratories Standard 1409, Second Edition, before operatingthis Video product.FOLLOW THE INSTRUCTIONS AND BE SURE TO HEED ALLWARNINGS on unit and in the manual, for easy maintenance,proper and trouble free operation of this Video product.
I INSTALLATION I1. OPERATE FROM A POWER SOURCE INDICATED on this
Video product, or in this Manual. Your Electric Utility ServiceCompany or Video Products Dealer will be happy to verifythe power source in your home.
2. THE GROUNDED OR POLARIZEDPLUG IS A SAFETY FEATUREThis Video product may be equipped with either a polarized
,/_ 2-wire AC line plug or a 3- wire grounding type plug. The twowire polarized plug (having one blade wider than the other)will fit into the power outlet only one way. If it is a three wiregrounding type plug (having a third pin), itwill fit into agrounding type outlet.DO NOT DEFEAT THE SAFETY PURPOSE OF THE GROUNDEDOR POLARIZED PLUG by tampering with it. If the plug doesnot fit fully into the socket, try reversing it. If you should stillbe unable to fully insert the plug into the socket, you mayfind that a proper outlet is needed to meet today's ElectricalStandards. An electrician will replace your outlet safely.
3. POWER SUPPLY CORDS SHOULD BE PROTECTED androuted so that they are not likely to have anything rest onAthem, roll over them, or be subject to walking traffic orabuse: particularly at plug-ins, convenience receptacles, orcord exit points from the unit. Where an extension isneeded, use a grounded or polarized cord.HAZARDOUS FRAYED CORDS OR DAMAGED PLUGSSHOULD BE REPLACED BY A QUALIFIED SERVICETECHNICIAN.OVERLOADED WALL OUTLETS AND EXTENSIONCORDS PRESENT DANGEROUS RISKS OF FIRE ORELECTRICAL SHOCK.
4. AVOID BLOCKING VENTILATION HOLES
Z_ Your video unit has ventilation openings in itscabinet torelease heat generated during operation. Blocking theseopening can cause heat build-up inside the unit, causingfailure that may result in a fire hazard or heat damage tocassettes. For protection:a. Never cover the bottom ventilation slots or the unit with
soft material, or operate the unit placed on a bed, sofa,rug, or soft accessory.
b. Avoid built-in installations, such as a bookcase or rack,unless proper ventilation is provided.
5. AVOID EXTREMELY HOT LOCATIONS OR SUDDENCHANGES IN TEMPERATURE such as placing the unit
Z_ near or over a radiator, in direct sunlight, closed vehicles, ortransporting it suddenly between areasof extreme temperature variation.If the unit is suddenly moved from a coldplace to a warm place, moisture mayform on the tape and inside the unit.
6. TO AVOID INJURY TO A CHILD, ADULT;OR COSTLY DAMAGE:,A
a. Do not place unsecured equipment on a sloping surfaceor any heavy object or unit.(Use the unit in a horizontal position and do not placeanything heavy on it.)
b. Support for the unit should be adequately firm, level, andstrong. Replace any unstable cart, tab.le or support. Anappliance and cart combination should be moved withcare. Quick stops, excessive force, and uneven surfacesmay cause the appliance and cart combination to overturn.
c. Carefully follow all operating instructions and use themanufacturer's recommended accessories whenoperating this unit or connecting it to any other equipment.
I IOUTSIDEANTENNA, EQUIPMENT, AND POWERLINEEXPOSURE
NEC- NATIONAL "_
ELECTRICAL CODE
GROUND I_" CLAMP_ _ l % ANTENNA
_/F _ "_ DISCHARGE UNIT(NEC SECTION B10-20)
] _,_,'_ _ I._ J..* _ CONDUCTORS
o.oo. .....-_-4_----PI )WER SERVICE
GROUNOINGELECTRODE SYSTEM
(NEC ART 250, PART H)
2,
LE
I1. INSURE SAFE ANTENNA
,_ AND CABLE CONNECTIONSANTENNA-'-"_.EAD_N If an outside antenna or cableZ._W_RE system is connected to the
equipment, be sure theantenna or cable system isgrounded so as to providesome protection against builtup static charges and voltagesurges. Part I of the CanadianElectrical Code, in USASection 810 of the NationalElectrical Code, ANSI/NFPA
70, provides information with respect to proper grounding of themast and supporting structure, grounding of the lead-in wire to anantenna discharge unit, size of grounding conductors, location ofantenna discharge unit, connection to grounding electrodes andrequirements for the grounding electrode.ELIMINATE ANTENNA PROXIMITY TO HIGH VOLTAGE POWERSOURCES, OR CHANCE OF ACCIDENTAL CONTACT BY INSTALLERAn outside antenna system should be located where it will never bereached by power lines, electdc light or power circuits and where itwill never contact these power sources if it falls. Installer should useextreme care to avoid possible fatal contact by touching power lines,circuits or other power sources when installing an outside antenna.
3.
/k
[USE ]
AFTER STORING OR WHEN MOVING THE UNIT, REFER TO THEINSTALLATION SECTION OF THE SAFEGUARDS.
DO NOT USE THIS VIDEO UNIT NEAR WATER: around bathtubs,sinks, laundry, wet basement, swimming pool or any water source.USE ACCESSORIES RECOMMENDED ONLY BY THEMANUFACTURER to avoid risk of fire, shock or other hazards.UNPLUG ALL EQUIPMENT EXPOSED TO RAIN, MOISTURE, ORSTRONG IMPACT AND GET A QUALIFIED INSPECTIONIf your unit has been exposed to rain, water, excessive moisture, orsubjected to strong impact, unplug it and have it inspected by aservice technician before use.
4. UNPLUG UNUSED UNIT, AND ALL EQUIPMENT DURING A STORM
Z_ During a lightning storm, when indoors or outdoors, or beforeleaving unit unused for extended periods of time, disconnect allequipment from power source, antenna and cable system.
5. UNPLUG ALL EQUIPMENT BEFORE CLEANING. After unit has
Z_ been unplugged use a dry, clean, chemically untreated cloth. Useno cleaning fluids, aerosols, or forced air that could over-spray, orsoak into the unit, and cause electrical shock. Any substance suchas wax, adhesive tape, etc. may affect the cabinet surface.Exposure to greasy, humid, or dusty areas may affect internal parts.
6. WHEN PLUGGED-IN: KEEP WATER AWAY; NO FINGERSINSIDE NOR ANY OBJECTS INSIDE; AND NO MAGNETS OR
Z_ ELECTRICAL INTERFERENCE NEARBY.a. Never operate the unit if liquid has been spilled into it.
Immediately unplug the unit, and have it inspected by a servicetechnician. Fire and shock hazards can result from electricalshorts caused by liquid contact inside.
b. Caution the children about dropping or pushing objects into theunit. Some parts inside carry hazardous voltages and contact cancause electric shock. Objects dropped in electrical equipment cancause fire hazards.
c. Separate the unit from any interference causing appliances.Placing the unit directly above or below your "IV set may causeelectrical interference. Keep all magnets away from electronicequipment.
I SERVICE I
1. DO NOT ATTEMPT TO SERVICE THIS PRODUCT YOURSELF. If
Z_ this Video productdoes not operate as described, when the detailedOperating Instructions are followed, do not attempt to open orremove covers, or make any adjustments not described in themanual. Attempting to service this unit yourself may expose you todangerous voltage or other hazards. Refer all servicing to qualifiedservice personnel.
2. CHECK ON REPLACEMENT PARTS REQUIRED. Be sure theservice technician has used replacement parts specified by the
Z_ manufacturer or having the same characteristics as the original
part.Unauthorizedsubstitutesmayresultinfire,electricshockorother hazards.
3. HAVE TECHNICIAN PERFORM SAFETY CHECK described in
,/_ the manufacture's service literature, after any service or repairs, todetermine that the Video unit is in safe operating order.
3

Unpacking Your VCR and Features
Unpacking Your VCRThe accessories shown below are provided to helpyou use or set up your VCR.Optional accessories are also listed.
Accessories
_-115 _' 6Yi
oooog
Remote ControlVSQS1460 (PV-4625S)VSQS1464 (PV-4655S)VSQS1465 (PV-4665S)
I
Model PV-4665S remoteIs shown here.
3 "AAA"¢F-----b Batteries
RF CoaxialCableVJAS0183
Optional Accessories
• 1/2" Video Cassette Tape
Load the batteries in the Remote Control
1 Lift off the lid afterpressing in and up onthe latch with your thumbnail or other narrow object.
Install three batteriesas indicated inside the
Battery Compartment.
Fit the lid's hinge pieceinto the indent on thecase, and snap lid into place.
Battery replacement caution• Do not mix old and new batteries, (Also, never mix
alkaline with manganese batteries.)
Product Features
All Channel Auto Set/181-CH TV/CATV Tuner ......................................................................... 12
Advanced Noise Reduction (For Model PV-4665S only) ........................................................... 17Auto Clock Set ............................................................................................................... 12, 13, 14
Auto Daylight Saving Time ........................................................................................................... 5Auto Operation Functions (Auto Playback, Rewind, Tape Eject, Power off) ................................................... 19Auto Repeat Function ................................................................................................................ 18Cable Box Channel Control ....................................................................................................... 11
Color Noise Reduction (For Model PV-4665S only) .................................................................. 17Digital Auto Picture .................................................................................................................... 17DynAmorphous TM Metal Head (For Model PV-4665S only) ....................................................... 17Easy-to-Read English/Spanish/French On Screen Displays ................................... 12-14, 22, 23MTS BroadcastSystem (For Models PV-4655Sand PV-4665Sonly) (Multi-channelTelevisionSound-Stereo,SAP,Mono).... 24Multi Brand TV/Cable Box Remote Control ............................................................................... 29One Minute Skip ........................................................................................................................ 19One Month, 8 Program Timer Recording ............................................................................. 22, 23One Touch Recording (OTR) ..................................................................................................... 20Program Director Remote Control ....................................................................................... 22, 23Quick Play Mechanism .............................................................................................................. 30Rapid Tune (For Models PV-4625S and PV-4655S only) .......................................................... 20Shuttle Search ........................................................................................................................... 19
Spatializer (For Model PV-4665S only) ...................................................................................... 25Special Effects Playback ............................................................................................................ 17Special VCR Features (VCR Lock, Warning Beeper) ...................................................................................... 28VCR Plus+ Recording .......................................................................................................... 26, 27VHS Hi-Fi Stereo System .......................................................................................................... 25Zero Search ............................................................................................................................... 18
4
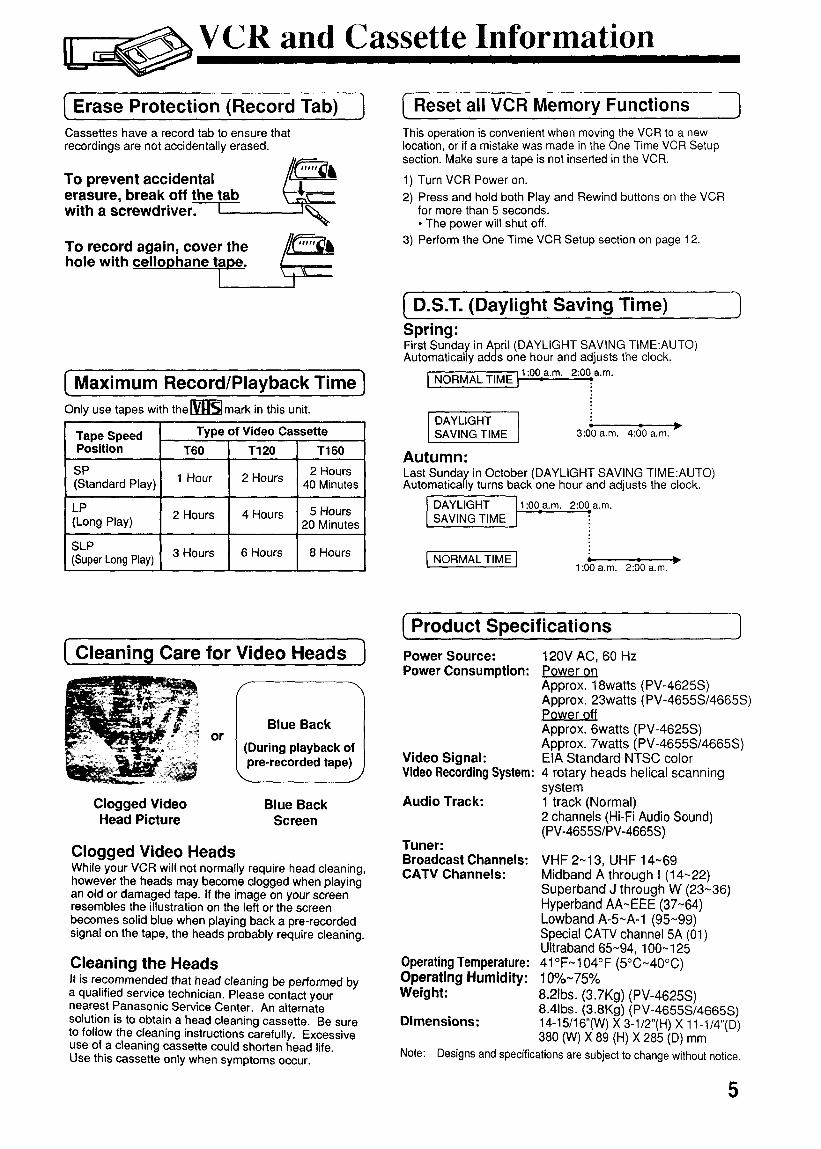
II VCR and Cassette Information
IErase Protection (Record Tab) 1Cassettes have a record tab to ensure thatrecordings are not accidentally erased.
To prevent accidental /=//_&erasure, break off the tab _-_with a screwdriver. T
To record again, cover thehole with cellophane tape.
I
I Maximum Record/Playback Time)Only use tapes with the_--_-'_ mark in this unit.
Tape SpeedPosition
SP(Standard Play) 1 Hour
LP2 Hours
(Long Play)
SLP3 Hours
(SuperLongPlay)
[ Cleaning Care for Video Heads )
Type of Video Cassette
T60 T120 T160
2 Hours2 Hours
40 Minutes
4 Hours 5 Hours20 Minutes
6 Hours 8 Hours
I Reset all VCR Memory Functions
This operation is convenient when moving the VCR to a newlocation, or if a mistake was made in the One Time VCR Setupsection. Make sure a tape is not inserted in the VCR.
1) Turn VCR Power on.
2) Press and hold both Play and Rewind buttons on the VCRfor more than 5 seconds.• The power will shut off.
3) Perform the One Time VCR Setup section on page 12.
I D.S.T. (Daylight Saving Time)Spring:First Sunday in Apri! (DAYLIGHT SAVING TIME:AUTO)Automatically adds one hour and adjusts the clock.
[1:00 a.m. 2:00 a.m.[ NORMAL TIME I :
I DAYuGHT I ::SAVING TIME 3:00 a.m. 4:(_0a.m. "
Autumn:Last Sunday in October (DAYLIGHT SAVING TIME:AUTO)Automatically turns back one hour and adjusts the clock.
DAYLIGHT 11:00a.m.: 2:00 a.m.SAVING TIME
[ I :NORMAL TIME 1:00 a.m. 2:00 a.m.
orBlue Back
I (During playback of
pre-recorded tape)
Clogged Video Blue BackHead Picture Screen
Clogged Video HeadsWhile your VCR will not normally require head cleaning,however the heads may become clogged when playingan old or damaged tape. If the image on your screenresembles the illustration on the left or the screen
becomes solid blue when playing back a pre-recordedsignal on the tape, the heads probably require cleaning.
Cleaning the HeadsIt is recommended that head cleaning be performed bya qualified service technician. Please contact yournearest Panasonic Service Center. An alternatesolution is to obtain a head cleaning cassette. Be sureto follow the cleaning instructions carefully. Excessiveuse of a cleaning cassette could shorten head life.Use this cassette only when symptoms occur.
[ Product Specifications
Power Source:Power Consumption:
Video Signal:Video RecordingSystem:
Audio Track:
Tuner:Broadcast Channels:CATV Channels:
OperatingTemperature:Operating Humidity:Weight:
Dimensions:
Note:
120V AC, 60 HzPower onApprox. 18watts (PV-4625S)Approx. 23watts (PV-4655S/4665S)Power offApprox. 6watts (PV-4625S)Approx. 7watts (PV-4655S/4665S)EIA Standard NTSC color4 rotary heads helical scanningsystem1 track (Normal)2 channels (Hi-Fi Audio Sound)(PV-4655S/PV-4665S)
VHF 2~13, UHF 14~69Midband A through I (14~22)Superband J through W (23_36)Hyperband AA~EEE (37~64)Lowband A-5~A-1 (95~99)Special CATV channel 5A (01)Ultraband 65~94, 100~12541°F~104°F (5°0~40oC)10%~75%
8.21bs. (3.7Kg) (PV-4625S)8.41bs. (3.SKg) (PV-4655S/4665S)14-15/16"(W) X 3-1/2"(H) X 11-1/4"(D)380 (W) X 89 (H) X 285 (D) mm
Designsandspecificationsaresubjectto changewithoutnotice.
5

Basic Connection
INDOOR _ _r_-,./--1 OUTDOOR
ANTENNA (_) ANTENNA
or
\
or
Cable -I-V
Disconnect the antenna or cable
from your TV and connect it to the
VCR (IN FROM ANT.)
(VCR) \
Set the Output Channelof your VCRto channel 3 or 4 (whichever is not beingtransmittedonby a LocalTV broadcast).
Antenna Cable
RF Coaxial Cable(VGR-'I'V Connection Cable) (supplied)
Connect the VCR to your TV
with the RF Coaxial Cable (OUT TO TV).
6

Case 1- Twin Lead Cable Only
(Flat) Twin Lead 300Ohm Cable
To VCR Terminal
300-75 ohm Transformer(not supplied)
Case 1: Screw & Plug Type Terminal
UHF/VHF Band Separator TV(not supplied)
RF Coaxial Cable
VHF
UHF
Case 2: Twin Lead & Coaxial Cables
_........--._/(o_ II Ir_l/ UHF/VHF..,,_'_ )_ "_-JL.-.J_ Band Mixer
_not supplied)
(Round) 75 Ohmcoaxial Cable To VCR Terminal
Case 2: Screw Type Terminal
75-300 ohm Transformer(not supplied)
TV
Case 3: Double Screw Type Terminal
UHF/VHF Band Separator(not supplied)
TV
/HF
or
UHF
Case 3: Two Twin Lead Cables
_=__-- Hn_iFer
-I (not supplied)300-75 ohm Transformer(not supplied)
To VCR Terminal
• If your TV has both post and screw-type VHFterminals, using the post connection isrecommended to minimize signal loss.
Case 4: Complex TV Terminal
TERMINALS ON BACK OF TV SET
Split out --
ANT1 --
ANT2
TV
UHF
• Connect to one of the ANT terminals and selectthe same antenna number on the TV.
7
Additional Connections
All connections on this page are made with 75 Ohm coaxial cables.
-[ Without a Converter/Descrambler Box 1
You can:
1) Use your VCR Remote Control to select channels.
2) Program one or more unscrambled channels forunattended recording.
NOTE: You cannot record or view scrambledchannels with this connection.
VCR
IN fromCABLE
IN FROM ANT. TV
VHF/UHF
-_With a (CABLE to VCR) Converter/Descrambler Box t
You can: Cable "IVConverterBox
1) Record and view any channel includingscrambled channels; channel selectionmust be made at the Cable TV ConverterBox.
2) Program one channel for unattendedrecording.
IN fromCABLE
VCR OUT TO TV
FROM ANT.
TV
VHF/UHF
-_ With a (VCR to TV) Converter/Descrambler Box t
You can: VCR
1) Use your VCR Remote Control to select channels.
2) Program unattended recordings of more thanone unscrambled channel. IN from
CABLE
NOTE: You cannot record scrambled channels withthis connection. Cable TV
ConverterBox
IN FROM ANT. TV
INOUT VHF/UHF
-_ With Two Converter/Descrambler Boxes t
If you want to record and viewa combination of scrambledand unscrambled channels,you will need additionalequipment.This connection requirestwo converter boxes,an A/B switch, anda 2-way splitteras shown here.
IN fromTV CABLE
2-WaySplitter
OUT A/B Switch
OUT 1
Converter Box 1
IN FROM ANT.VCR
OUT TO TV
8

[With a DSS Receiver t
You can:
1) Record and view any channel includingscrambled channels; channel selectionmust be made at the DSS Receiver.
2) Program one channel for unattendedrecording.
NOTE: The DSS receiver must be turnedoff to view programs from a cablebox or antenna. See the DSSmanual for details.
IN FROMCABLE orAntenna
DSS
IN FROMSatellite Dish OUT TO TV
VHFIUHF
TV
If your TV has AUDIO IN and VIDEO IN terminals, you can connect your VCR to them to receive a higher qualitypicture and sound. The antenna-VCR and VCR-TV connection is as shown.
-_ AudioNideo Connections J
TV VCRIN FROM ANT
VIDEO I1_
1 Connect the VIDEO OUT terminal on the
VCR to the VIDEO IN terminal of your TV.2 Connect the "L" and "R" AUDIO OUT terminals on
the VCR to the "L" and "R" AUDIO IN terminals of your TV.3 Set the VIDEO/TV selector of your TV (Monitor/Receiver) to "VIDEO."
NOTE: To use your TV as a VCR monitor, set the VlDEO/TV selector on the TV (Monitor/Receiver) to "VIDEO."
t Stereo Amplifier Connections t
When you connect your VCR to aStereo Component System, you canview the picture from the VCR whileenjoying stereo from your audiosystem.Connect the "L" and "R" AUDIO OUTterminals on the VCR to the "L" and "R"AUDIO IN terminals of your stereo.
Stereo Amplifier VCR
**DSS® is a registered trademark of DIRECTV, INC., a unit of GM Hughed Electronics.
Note to CATV system installer:
This reminder is provided to call the CATV system instaUer's attention to Article 820-40 of the NEC in USA (and to theCanadian Electrical code in Canada) that provides guidelines for proper grounding and, in particular, specifies that the cableground shall be connected to the grounding system of the building, as close to the point of cable entry as practical.
9
One Time VCR SetupThe setup on pages 12 through 14 is vital for proper VCR operation.
Please read the instructions carefully and in the order presented.
NOTE: These first two pages contain reference material needed for setup on pages 12 ~ 14. Please lookover the information before you begin setup procedure.
Setup OverviewYou will be performing the following tasks:
a Setting the language you want on-screen displays to appear in (English, Spanish, French).• Telling the VCR what kind of equipment you are using to receive channels and how it is connected.
• Entering pertinent cable box or DSS receiver information if used.• Entering a local PBS channel so that the VCR can receive auto clock set data. (Not available in all areas.)
• Placing channels in memory and setting the clock.
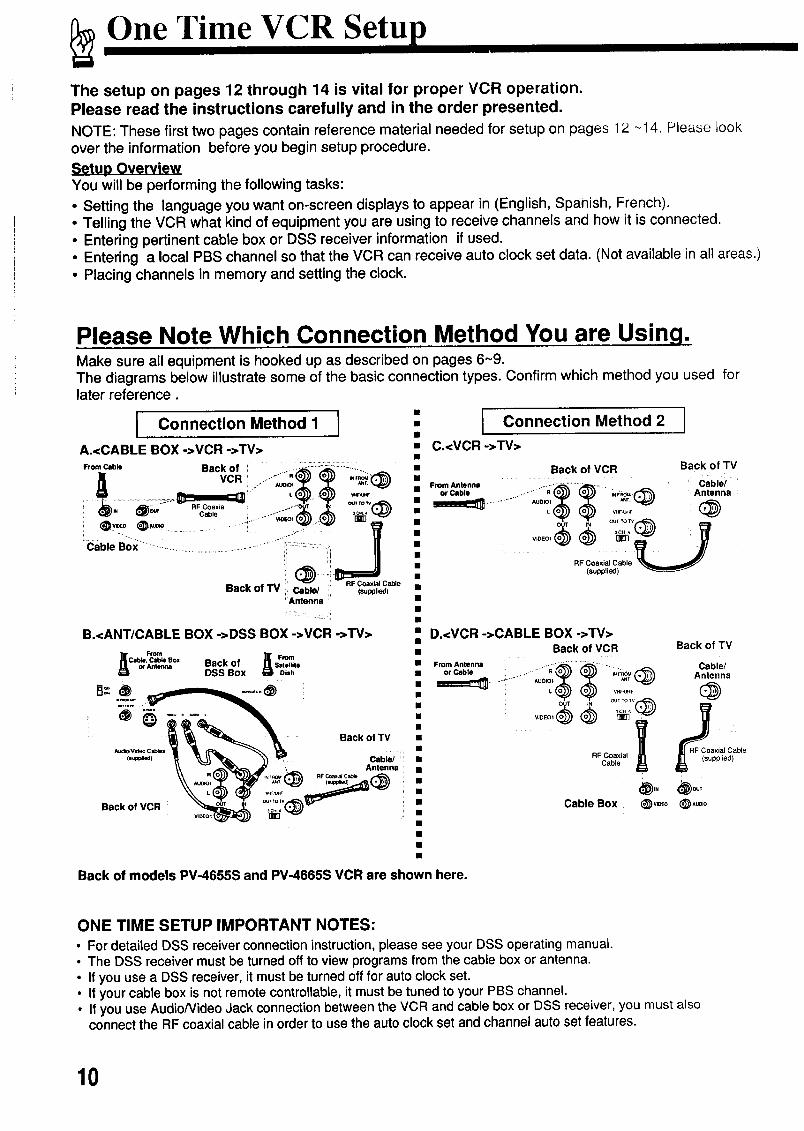
Please Note Which Connection Method You are Using.Make sure all equipment is hooked up as described on pages 6~9.The diagrams below illustrate some of the basic connection types. Confirm which method you used forlater reference.
Connection Method I
A.<CABLE BOX ->VCR ->TV>
From Cable Back of ......-_-_'""-=....................
_ .......... v_-o, _ :,_,!j uau
!Cable B;x .......... i ......................................... Back of TV (_i ' RF Coaxial Cable
Cable/ i (a._ol_)Antenna
B.<ANT/CABLE BOX ->DSS BOX ->VCR ->TV>
From_Cable, Cable Box
or Antenna _1_ FromBack of s_e..eDSS Box Oimh
Back of VCR
Back of TV
Cable/Antenna
RF Ccaxl_ Cable
J Connection Method 2 [
C.<VCR ->TV>
Back of VCR Back of TV
From Antenna ....... _'""" :_._ ..... Cable,'or Cable .......... R _ 0_._ _;;,o_,(:_ Antenna
IN OUT tO TV
RF Coaxial Cable(supplied)
D.<VCR->CABLE BOX ->TV>Back of VCR Back of TV
From Antenna ......... _ ""_ ......... Cable/
OrCable .......... Ro(,,_.)_o_)Jj ,,F.0_A.t_ Antenna!.......uo,o, ...... ®out to w
VIDE01 (_
RFcableCoaxialI (suppliedC)able
Cable Box _)_o _),u=o
Back of models PV-4655S and PV-4665S VCR are shown here.
ONE TIME SETUP IMPORTANT NOTES:
• For detailed DSS receiver connection instruction, please see your DSS operating manual.• The DSS receiver must be turned off to view programs from the cable box or antenna.• If you use a DSS receiver, it must be turned off for auto clock set.• If your cable box is not remote controllable, it must be tuned to your PBS channel.• If you use Audio/Video Jack connection between the VCR and cable box or DSS receiver, you must also
connect the RF coaxial cable in order to use the auto clock set and channel auto set features.
10

Cable Box/DSS Receiver Code Number List
If your cable box or DSS receiver is remote controllable, refer to this list during setup on page 13.
Cable BoxBrand Code Numbers
Archer ............................................... 29, 44, 88, 91Cableview ............................. 30, 42, 44, 52, 63, 88Citizen .................................. 30, 42, 44, 52, 63, 88Curtis ........................................ 8, 9, 56, 61, 87, 90Diamond ....................................... 1,29, 44, 88, 91Drake ...................................................... 37, 67, 71Eagle .............................. 13, 20, 22, 26, 40, 58, 62Eastern ............................................................... 28GC Brand ............................. 30, 42, 44, 52, 63, 88Gemini ............................................................ 4, 85General Electric .................................................. 57General Instruments
.................. 1,2, 3, 4, 34, 55, 83, 85, 91, 93, 95Hamlin .............................................. 14, 15, 28, 41Jerrold ............ 1, 2, 3, 4, 34, 55, 83, 85, 91,93, 95Macom, Hitachi ............................................. 31,79Magnavox ..................................................... 25, 26Movietime ............................................... 32, 38, 40Movietime ............................. 29, 32, 39, 42, 44, 88NSC ........................................................ 32, 38, 40Oak ............................................................... 11,46Panasonic ..................................................... 16, 17Philips ......................................... 13, 20, 23, 24, 96Pioneer ..................................................... 5, 06, 78Pulser ................................... 30, 42, 44, 52, 63, 88RCA .............................................................. 16, 17Realistic .................................................. 44, 51,88Regal ............................................................ 14, 41
Brand Code Numbers
Regency ............................................................. 28Rembran ............................... 29, 32, 39, 42, 44, 88Salora ........................................................... 68, 72Samsung .................................... 32, 40, 42, 78, 94Scientific Atlantic ...................... 8, 9, 56, 61,87, 90Sheritech ............................................................ 27SL Marx ...................................... 32, 40, 42, 78, 94
Sprucer ......................................................... 16, 17Stargate ...................................... 32, 40, 42, 78, 94Stargate ................................ 30, 42, 44, 52, 63, 88Sylvania .............................................................. 19Telecaption ................................................... 77, 92Teknika ............................................................... 74Teleview ..................................... 32, 40, 42, 78, 94Texscan ........................................................ 18, 19Tocom .............................. 1,33, 34, 42, 48, 49, 91Toshiba ............................................................... 36Uniden Satellite ............................................ 65, 69Unika ............................................ 1,29, 44, 88, 91Universal .............................. 42, 43, 44, 52_63, 88Viewstar .......................... 13, 20, 22, 26, 40, 58, 62Vid Tech ............................................................. 64Vidter .................................................................. 64Videoway .................................................. 7, 23, 50Zenith ....................................................... 7, 23, 50
DSS (Digital Satellite System Receiver)Sony ................................................................... 98RCA .................................................................... 99Panasonic ......................................................... 100
Note: During setup you will be instructed to enter your brand code number. As some brands havemultiple codes, it may be necessary to try different codes to attain the proper results.These codes are for Cable box or DSS Box setup for Auto Clock and VCR Plus+ recording only.For TV/Cable Box Universal Remote Control operation, please see page 41.
Positioning Your Cable Box or DSS ReceiverIf your cable box or DSS receiver is remote controllable, place it on or near the VCR as shownin the example below. The VCR transmits an infrared signal from two locations. Be sure not tocover the transmitter windows.
."::::....,.VCR's Signal
Wall
11

One Time VCR SetupWhen the VCR power is first turnedon, the language select screenautomatically appears.Follow along in the manual as you areguided through the setup procedureon the screen.
[_Check list before you begin.
[] All "IV and VCR connections are made.(See pages 6~9.)
0n-ScreenLanguage,Cablebox/DSSreceiverSetup,ChannelMemory,andAutoClock
Turn the TV and VCRpower on.
Tune your TV to the VCR channel (the same channel youset on the back of the VCR, CH3 or CH4). (see page6.)
POWER
I" I
VCRFrV CHANNELUp/Down
0
Model PV-4665S remote is shown here.
Using the Select/Set Wheelii
There are basically two types ot Wheel operation.• Selecting items from an on-screen display.• Entering information, such as setting the clock.
OPERATION
Rotate (_) Push(up or down) (like a button)P,OTAT_ TOSEL£CT ROTAT£ TO SELECT
PtJSH TO PUSH TOSET SET
to make selection to enter selection
12
VCR •eor
or
Push VCR CH A forEnglish on-screendisplays.
Push VCR CH • forSpanish on-screendisplays.
Push VCRiTV forFrench on-screendisplays.
SELECTLANGUAGEI
PUSH VCR CH &: ENGLISH I
PULSE VCR CH v: ESPANOL I
APP. VCR/TV : FRANOAIS /
JIf you set the wronglanguage,see the "Reset all VCRMemory Functions"section on page 5.
• You can also set byusing the samebuttons on the VCR.
This screen appearsa few seconds later.
O _MENU
orPROG
Push MENU for YES orPROG for NO.
If YES, continue with next step.If NO, go to AlternateInstructions on page 14.
ARE YOU USING A CABLEBOX OR DSS RECEIVER?
PUSH MENU KEY :YESPUSH PROG. KEY :NO
Rotate and push the f- cAB,E/oss_oxSETUPq
WHEEL to select your [SELECT YOUR CABLE BOX OR /
equipment connection oss2_EI_R _ UP. /method. (Refer to page 10.) VCR-CABLE/DSS BOX-TV [
If "CABLE/DSS BOX- VCR- TV," SELECTROTATEWHEEL/SET PUSH WHEEL /
go to step 6. END PUSH MENU KEY J
If not, go to AlternateInstructions on page 14.
Rotate and push theWHEEL to set your Cablebox or DSS receiveroutput channel. (thechannelyou tune the TV to in order towatch cable or DSS stations).
- CABLE/DSS BOX SET UP -]ENTER CABLE BOX OR DSS /
RECEIVER OI_PUT CHANNEL' I
SELECT ROTATE WHEEL |SET PUSH WHEEL /END PUSH MENU KEY J
• If both a cable box and DSS receiver is used, set the
output channel of the DSS receiver.• Ifyou are using Audio/Videoiack connections,set
VIDEO OUT as the output channel.
Rotate and push the i- CAI_LE/DSSBOXSETUP--_IOOESYOURCABLEBOXOR /
DSS RECEIVER HAVE
WHEELorNO. to select YES /_,_E_E_ _O_E _o"_o_1
If YES continue with next step. | NO |/ SELECT ROTATE WHEEL /If NO, go to Alternate /SET PUSHWHEEL /
Instructions on page 14. [EN_ PUSHMENUKEY J
Continued on the next page.

Rotate and push the WHEELto set the Cable box or DSSreceiver code number thatmatches your brand fromthe list on page 11.• This determines whether the
VCR will control your cable boxor DSS receiver.
- CABLE_0SSBOXSETUP-1CHOOSEA COOSNUMBERFORICABLE BOX/OSS RECEIVER IFROM THE LIST IN OWNER'SI
MANUAL ANDI_NTER NUMBER. I
SELECT ROTATE WHEEL ISET PUSH WHEEL |
END PUSH MENU KEY J
If you use a cable box, tune it tochannel 02.If you use a DSS receiver, tuneit to any channel other than 200.
_i_! :! _ Push WHEEL to continue.
If Cable Box
- CABLE/DSS BOX SET UP-
PLEASE TUNE YOUR CABLE |
BOX TO CliO2. II
If DSS Receiver
|PLEASE TUNE YOUR DSS
_IRECE|VERTOCH 270.
®
VCR
CH o
Rotate andpush the WHEELto select YES or NO.If you use a cable box andselected YES, go to step 11.
If you use a DSS receiver andselected YES, go to the AlternateInstructions on page 14.
If NO, the screen in step 8 willreappear. Try entering adifferent code assigned to yourbrand and/or repositioning theequipment (see page 11).If the answer is still NO, cablebox or DSS receiver control isnot available. Push MENU andgo to the Alternate Instructionson page 14.
If Cable Box
- CABLE/DSS BOX SET UP -1IS YOUR CABLE BOX I
RECEIVING_O9 ? I
NO IIf DSS Receiver
ItS YOUR DSS RECEIVER
I RECE IV INGN.C_ 200?
I SELECT _oOTATE WHEEL
|SET PUSH WHEEL
lEND PUSH MENU KEY
Rotate and push the WHEELto select and set the localPBS channel number youreceive on your cable box.• If you live near a different time
zone, enter the channel inyourtime zone.
- SET CLOCK l
PLEASE ENTER YOUR LOCAL I
PBS CHANN_CABLE BOx I
SELECT : ROTATE WHEEL ISET : PUSH WHEEL I
END : PUSH MENU KEY J
Confirm that your cable box ison and that your DSS Box is off.Push WHEEL to startCHANNEL AUTO SET andAUTO CLOCK SET.
The following displays appear in sequence:"CH AUTO SET PROCEEDING""CH AUTO SET COMPLETED""AUTO CLOCK SET PROCEEDING"
This display appears whenauto clock set is completed.Confirm that the time iscorrect and push CH •to exit.
12/25/1996WED12:00PM1
DST : ON
SE'I-t't_G : CHO2
AUTO CLOCK SET
COMPLETED
END : PUSH CH UP KEY
If the Auto Clock Setdisplayed time is incorrect
If you use a cable box andreceive more than one PBSstation, try auto clock set again.Follow the Set or Reset AutoClock Set steps and when theinstructions call for you to entera PBS station, make sure toenter the one you have nottried yet.
If AUTO CLOCK SETINCOMPLETE appears
The screen below will appearon-screen if auto clock setdata is not available in yourarea.
AUTO CLOCK SET
IS INCOMPLETE
PUSH MENU TO SET CLOCK
Push MENU to displaythe manual clock setscreen. (See the"Manual Clock Set"section on page 14.)
Note:If you use a cable box andreceive more than one PBSstation, you may exit themanual clock set screen andtry auto clock set again.Follow the Set or Reset AutoClock Set steps and when theinstructions call for you toenter a PBS station, makesure to enter the one youhave not tried yet.
Auto clock set will be performedwhen the VCR is turned off forthe first time each day. If youuse a cable box and you wantauto clock set to be performed,the cable box must be left on atthe time the VCR power isturned off.
13

One Time VCR Setup
Alternative InstructionsComplete the following steps if, during one timesetup, any of the following applies:
A You selected NO in step 4 on page 12 (you do notuse a cable box or DSS receiver).
B You selected connection method 2 (VCR-CABLEDSS BOX- TV) in step 5 on page 12.
C You selected NO in step 7 on page 12 (your cablebox or DSS receiver is not remote controllable).
D You use a DSS receiver and selected YES in step10 on page 13.
E Cable Box or DSS receiver can not be controlledin step 10 on page 13.
Turn on the cable box and setit to the local PBS channel.• If you live near a different time
zone, make sure to set thechannel in your time zone.
• If you use a DSS receiver, itmust be turned off.
CHANNEL/CLOCKAUTOSETCONNECT ANTENNA CABLEAND IF YOU USE A CABLEBOX, TUNE IT TO YOURLOCAL PBS CH THEN...
PLEASE PUSH CH UP KEY
Push CH • to startCHANNEL AUTOSET and AUTOCLOCK SET.
The following displays will appear in sequence."CH AUTO SET PROCEEDING""CH AUTO SET COMPLETED""AUTO CLOCK SET PROCEEDING"
This screen appears to confirm thatauto clock set is completed.
MENU
CLEAR /
NUMBEREDkeys
100 key /
,,,, ,,
,_R, oouf,n_R000
e__ o E)
c E_ _
_oo o e,
Confirm that thetime is correct andpush CH • to exitthis screen.
If this screen appears,auto clock set is notavailable in your area.Please set the clockmanually as describedat right.
12/25/1996WED12:00PMDST:ON
SETTING : OH02
AUTO CLOCK SET
COMPLETED
END : PUSH CH UP KEY
I AUTO CLOCK SET
IS INCOMPLETE
PUSH MENU TO SET CLOCK
If the displayed auto clock set time andD.S.T, are not correctIf you live close to two different time zones, the VCR mayrecognize the wrong PBS station as the setting channel. If thishappens, please complete the following steps.
1 Make a note of the SETTING: CH number on screen andpush CH • to exit.
2 Delete the settingchannel form channel memory. (See theAdd or Delete a Channel section on page 15.)
3 Push MENU button to display the menu.Use the Wheel to select "SET CLOCK" and then to select"AUTO SET."• If you use a cable box and have multiple PBS stations, tune
the cable box to a different PBS station and try auto clockset again using the menu.
14
fj_ Q i
_!i!:iiii!i_i_!ii_!!:_
Model PV-4665S remote is shown here.
Manual Clock Set(In case Auto Clock Set could notbe performed)
-- WHEEL
I Push MENU todisplay the setclock screen.
2 Rotate and pushthe Wheel to selectand enter the month,date, year, time andD.S.T. (DaylightSaving Time).
• "DST:ON" automatically adjusts fordaylight saving time. (See page 5.)
O
ADD/DELETE
I ..... SET CLOCK......................_1 •. ,
ITO CORRECTIPUSH WHEEL OR CLEAR KEY
[TO START PUSH MENU KEY
3 Push MENU twice tostart the clock andexit this mode.
To Make Corrections,push the Wheel or CLEAR buttonrepeatedly to move back or forward tothe desired item.
-_J>........... _Y:-:P_-II
BY ROTATING WHEEL II
:PUSH WHEEL_/
TO END PUSH MENU KEY I

To
1
2
3
Change On Screen Display Language
Push MENU to display the menu. {.........SETUPvcRMENU......... '
Rotate the Wheel to select the SETCLOCKSET UP CHANNEL
language selection item. _: ENGLISH(English: LANGUAGE, Spanish: SELECTROTATEWHEELIDIOMA, French: LANGUE) SET PUSHWHEELEND PUSH MENU KEY
Push the Wheel to change the language.• Each Push will change the languagein the ordershown.
English -_ Spanish _ French -7
4 Push MENU to exit this mode.
To Add or Delete a ChannelZ
2
Select a channel using theNUMBERED keys.
CHANNEL 08 DELETED
[ orADDED
Push ADD/DLT to add ordelete the channel.
• To select a deleted channel,use the NUMBERED keyson the remote control. Deleted channels will flashin the Multi Function Display when selected.
When Using the 100 key
When selecting CATV channels 100 to 125 with theNUMBERED keys, first push the 100 key and thenenter the remaining two digits.For example, to select channel 125:Push NUMBERED keys 100, then 2, then 5.
To Set or Reset the ClockIn case the clock is wrong, or a power failure occurred.
1 Push MENUto display the menu.
2 Rotate and push the Wheel to:
(A) Select SET CLOCK(B) Select MANUAL SET(C) Set the date, time, and
D.S.T. (Daylight SavingTime).
3 Push MENU twice to sta_ theclock and exit this mode.
......... MENU .........
SET UP VCR
SET UP CHANNEL
IDIOMA/LANGUE:ENGLISH
..... SET CLOCK ......
AUTO SET
8ELECT ROTATE WHEELSET PUSH WHEEL
END PUSH MENU KEY
-%_-- SET CLOCK I
IltJ__ I...........
IBY ROTATING WHEEL I
I÷PUSH CLEAR::PUSH WHEEL-'> I
TO START PUSH MENU KEY J
To Set or Reset Auto Clock Set
Complete the following steps if:• Auto clock set displayed time was incorrect.• Auto clock set was not available at the time one
time setup was done, but is available now.• The PBS channel over which clock data is sent
was changed by the broadcast company•
] Push MENU to display the menu.
2 Rotate and push the Wheel toselect SET CLOCK and thenselect AUTO SET.
3 Follow the one time setupinstructions on page 12~14.
..... SET CLOCK ......
MANUAL SET
SELECT ROTATE WHEELSET PUSH WHEEL
END PUSH MENU KEY
To Replace Channels in MemoryExample,if youhave cableinstalled,etc.
.{ Push MENU to display the menu.
2 Rotate and push the Wheel toselect SET UP CHANNEL frommenu, and then push to setyour antenna system (TV orCATV).
3 Rotate and push the Wheel toselect AUTO SET.
• To exit this mode, push MENUtwice.
4 Follow the one time setup_nstruct_ons on page 12~14.
I ........ MENU .........
SET UP VCR
IDIOMA/LANGUE:ENGLISH
SELECT ROTATE WHEEL
SET PUSH WHEEL
END PUSH MENU KEY
--- SET UP CHANNEL ---
: CATV
AUTO SET
CABLE/OSS BOX SET UP
VCR Plus+ CH SET UP
SELECT ROTATE WHEEL
SET PUSH WHEEL
END PUSH MENU KEY
Whenever channels are replaced in memory, autoclock set is also reprogrammed.
To setup the VCR in case a cable box orDSS receiver was installed or replaced
1
2
Push MENU to display the menu. I MENU.........
.......... I ID IOMA/LANGUEENGLISH
Idotate ancl push the wneel to ISELECTROTATEWHEELselect SET UP CHANNEL from ISET PUSHWHEELmenu lEND PUSH MENU KEY
3
4
I'--- SET UP CHANNEL --"
Rotate and push the Wheel to I ANTENNASYSTEM: CATVselect CABLE/DSS BOX SET uP.I A_._,_T.:,- ,-• VCR Plus+ CH SET UPTo exit this mode, push MENU I
twinA ISELECT ROTATE WHEEL
....... ISET PUSH WHEEL_END PUSH MENU KEY
Rotate and push the Wheel to {--CABLE/O_BOXSETUP--/
select "YES and continue w_th \&_ _&uous'"%_,c_%Ess.e \steps 5-10 on pages 12 and 13.
/ SELECT : ROTATE WHEEL /
1 SET : PUSH WHEEL /
I [ END : PUSH MENU KEY J
This VCR wil accurately maintain its calendar up to Dec. 31,2014, t 1:59PM. ..... .
NormalTVorCablechannelsareautomaticallyselectedandplacedinmemorydepending6nhow_ourVCRis hookedup: 'BypushingtheWheelorCLEARbuttonrepeatedly,youcanskipforwardorbackwardovercorrectentriesandgodirectlytoaspecificitem.
15

On Screen Displays (OSD)
Channel & Function Display
Whenever the channel is /changed, the Channelnumber will appear for afew seconds on-screen.(Some station names mayalso appear.)
When a function button ispushed (PLAY, FF, etc.)the VCR mode will bedisplayed.
08I
WNET I
Warning and Instruction Displays
Thesedisplayswillalertyouto a missedoperationorprovidefurther instructions.
If no active channels arefound for CHANNELMEMORY...
NO CH FOUND
PLEASE CHECK ANTENNA
CABLE CONNECTION THEN
PUSH VCR CH UP KEY AGAIN
Menu Screen
] PushMENU to displaythemenu.
2 Rotate and push the wheelto make your selection(see page 12).
I ........ MENU .........
SET UP CHANNEL
IDIOMA/LANGUE:ENOLISH
SELECT ROTATE WHEELSET PUSHWHEEL
EN0 PUSH MENU KEY
• To get the mostfrom eachfeature, it isrecommendedthat youreadthe OperationManualbeforeattemptingany operation.
If you attempt to set orreview a Timer Recordingand the Clock is not set...
If a Timer Program was notcompleted before exitingthe Program mode...
PLEASE SET CLOCK
BEFORE PROGRAMMING
I PROGRAM IS INCOMPLETE
VCR Status & Clock Display
Push DISPLAY to display and remove theoverlay shown below.
After a Timer Programhas been set...
TURN VCR OFFFOR TtMER RECORDING
FunctionStatus TimeI I
REC 12 : 00AM CH08Rec Time _ -0:25 o:oo:ooRemaining STEREO
• SAP
(OTRmodeonly ",ONOseepage20.)
Channel &Call Letter
If you push REC on theremote control or RECand PLAY on the VCR,and a cassette is insertedwith no record tab...
CHECK CASSETTE
RECORD TAB
ReceivableBroadcast Types(See page 24.)(Models PV-4655Sand PV-4665S only)
CounterTape Speed
If you push PLAY, FF, REW,or REC on the remote controlor if you push REC andPLAY, PLAY, FF, REW, orREC on the VCR without acassette inserted...
NO CASSETTE 1
PLEASE INSERT A CASSETTE
Blank Tape and will be Blue Screen
If a blank section of tape is encountered in the Playmode or the channel you select has no broadcast,the TV screen will change to a solid blue field.The screen will remain blue until a recorded signalis again detected or an active channel is selected.
If you push POWER orSTOP during a TimerRecording...(visible in VCR mode only)
16

Playback a Tape
[_Check list before you begin
[] All connections are made.(See pages 6~9.)
[] TV and VCR are plugged in.
[] TV is turned on and set to the VCRchannel (CH 3 or 4).
O.
•- /Multi Function TRACKING/Display V-LOCK
Insert a cassette.• VCR power comes on automatically.
This indicator lights in the --_VCR/--- IMulti Function Display. / _ " I
@r_ Push PLAYto start playback.• Playback begins automatically ifcassette has no record tab.
(VCR or Remote Control)
(VCR or Remote Control)
Push REW or FF toquickly locate a scene.• SP mode tapes have a search speed o1
9 times and SLP mode tapes 27 timesthe normal speed.
• Some noise bars will appear during search.
Q _ Push STOP to stop playback.
(VCR or Remote Control)
ooo !Q®Q -oo °'
0
PLAY
--TRACKING/V-LOCK
Model PV-4665S remote is shown here.
Caution:
Please inspect your cassette tape forany loose or peeling labels as it maybecome jammed in your unit.
J
O_ Push STOP/EJECT to eject the cassette.• This button only on VCR.
i
Special Effects During PlaybackThese features work best in SP or SLPmode. The sound will be muted.(After the VCR is in the Still or Slow mode for 3 minutes, it will go into the Stopmode automatically to protect the tape and video head.)
Slow Motion PlaybackPush SLOW to start and PLAY or SLOW to release the Slow mode.
Still (Freeze) Frame PicturePush PAUSE to freeze and release the picture.• To reduce picture noise:
Place the VCR in Slow motion mode. Use TRACKING A/V to clear upthe picture, then Push PAUSE.
Frame by Frame AdvanceWhile in Still mode, hold down SLOW to advance the still picture oneframe at a time. Push PAUSE to release.
Feature for a Quality pictureDigital Auto Picture
This feature automatically controls the video output signal for less noisedepending on the tape condition.
Digital A_to TrackingThis feature continuously analyzes the signal and adjusts foroptimum picture quality.
Marius| "t'rackino ControtUse during Playback and Stow Motion mode to reduce picture noise.Push VCR CH (TRACKING) A/V buttons until the picture clears up.To return to Auto Tracking mode, push VCR POWER off and then on again.
In Still mode, the VCR CH (TRACKING) A/T buttons operate as aV-Lock control to reduce jitter. Push A/Tuntil the picture is stabilized.
DynAmor0hous TM Metal Head/CNR (Color Noise Reduction)/ANR (Advanced Noise Reduction_ (Model PV-4665S only)
DynAmorphous TM Metal Head increases playback and record picturequality. Color Noise Reduction reduces the color noise. AdvancedNoise Reduction reduces the Luminance noise.
17

J( q _)A|nlo.rvooo,,°.I|
:ion
Your VCR is equipped with several timesaving features as well as convenientautomatic functions which make tapeoperation easier than ever.
O_
OboAI o® ®"b_'
O
O
Model PV-4665S remote is shown here.
Repeat PlayYou can set your VCR up to play a recording over and over.
O Push MENU toC_ME._ displaythe menu.
_ Rotate and push theWHEEL to select SETUP VCR.
MENU /
/ s_,c_oo_ // SET UP CHANNEL /I ID IOMA/LANGUE:ENGL' SIllISELECT ROTATE WHEEL /ISET PUSHWHEEL /tEND PUSH MENU KEY J
Rotate the WHEEL to r SETuPVCR...... 1select "REPEAT PLAY", | _ : ON /then push to select / BEEpP_%E'ECT::O_"E" /"ON" or OFF." / - I
/SEI ...... SET UP VCR ......
l INPUT SELECT : TUNER
SET AUDIO MODE
Models PV-4655S ISELECT ROTATEWHEEL
and pVI4665S onlyly[SET PUSHWHEELKEY
• The VCR plays to the end of a tape, or until a blank portion of 30seconds or more is reached. (Erased portions of tape are notconsidered blank.) The tape is then automatically rewound andplayed again and again until Repeat Play is cancelled. All functionbuttons (REW, FF, etc.) are operational during Repeat Play.
i__ii:i Push MENU twice toleave this screen.
Zero SearchYou can reset the Time Counter to zero and then return to that point.
O DISPLAY
O
Push DISPLAY todisplay the TimeCounter overlay.
STOP 12:00AM CH080:00:30
SLP
Push COUNTER RESETto reset the Time Counter.
• This may be done at as manyplaces as you wish on the tape.
STOP 12:00AM CH080:00:00
SLP
O ZERO/1MIN
0
Push ZERO/1MINin Stop mode.• The VCR will go into FF or HEW mode and stop at the
last point the Time Counter was set to 0:00:00.
18

I I
O
6oo
QQQ_eee !
Model PV-4665S remote is shown here.
One Minute SkipWith this feature, you can skip over commercials recorded on a tape.
0 ZERO/1 MIN
0Push ZERO/1 MINin Play mode.
• The VCR will go into FF search mode and skip over60 seconds of recorded time. Then, normal playbackwill resume.
Shuttle Variable Speed SearchThe SHUTTLE Ring allows you to smoothly control the tape speed duringspecial effects playback in both forward or reverse.
oo Turn SHUTTLE Ring on the remotewhile in Play or Still mode to place theVCR in Shuttle mode and start aforward or reverse search.• The more you turn the Ring, the faster the search
speed will be.
e Push a function button such as: PLAY, STOP, etc.on the VCR or remote to release the Shuttle mode.• The VCR performs the function of the button pushed.
.: ':_*; ;Y':+";,When the SHUTTLE Ring is turned'rnore than half wayin Stop mode, normal Fast Forward or Rewind will begin.
° Some noise bars are normal during Shuttle operation.• After 3 minutes in Still or Slow, the VCR will go into Stop
mode.° When the SHUTTLE Ring is released, the VCR goes into
° Still mode.
Auto Operation Functions
Auto PlaybackWhen a tape is inserted, the power comes on (Auto). If the recordtab* is removed, playback begins (Auto).
Auto RewindAfter a tape reaches its end during playback, fast forward or manualrecord, the VCR will rewind and go into Stop mode.
Playback Auto EjectAfter a tape without a record tab* is played to its end, the VCR willrewind and then eject the tape.
Memory Rewind OffWhen the POWER button is pushed during rewind, the VCR will turnoff after rewind is complete.
Eject CassetteA cassette may be ejected with power on or off.
* For record tab information, see page 5.
19

Record On a Tape[_Check list before you begin.
[] All connectionsare made. (See pages 6~9.)[] VCR is Plugged in.[] TV is turned on and set to the VCR
channel (CH3 or CH4).
Multi Function ODisplay
=VCR/TV
OCHANNEL OSTO PUp/Down
r v
r
vcFw-v _ _'Z_ °
DISPLAY_ -_'W--
o o 0"6;eeeS{
o o _,_ .
.-0
0
/Down
RapidTune
Model PV-4655S remote is shown here.
Insert a cassette with record tab.
• VCR power comes on automatically. II
1
Push VCR CH A/v orNUMBERED keys toselect a channel.• Or, push CHANNEL &/Y
on the VCR.
• To record from an outsidesource, push VCR CH &/Tto select "LINE" (see page 21 ).
STOP CH02
Push SPEED to changecurrent recording speed.• SP = Standard Play, LP = Long
Play, SLP = Super Long Play.
SLP
Push REC/TIMEto start recording.
• Or, push PLAY andREC/TIME on VCR.
/One Touch Timer Recording (OTR)The VCR starts recording and turns itself offat a preset time.
Continue to push REC/TIME to set (+Normalaec_0:30_l:00_the recording length. Each Push will L )change the stop time as shown. 4:004-3:00<--2:00<-1:30<-,"
• =TIMER" lights inthe Multi Function Display.
Push STOP tostop recording.
• Or, push STOP on the VCR.
Watching Another TV Program
Push VCR/TV while recordingis in progress to turn off theVCR indicator in the MultiFunction Display.
2 Use the TV channel controls toselect a program. The MCR wirlcontinue to record your programwhile you watch any channelyou choose.• Switchback andforthbetween
the recordingandviewingchannelwiththe VCR/TVselector.
Selecting Channels at the VCR
1 Turn TV on.
--_VCR_- I Multi- Function/ ' _ I Display
If indicator doesn't light,push VCFI/-FV to turn it on.
2 Use VCR CH &/Y buttons toselect channels for viewing orrecording.
• To resume TV control channelselection, push VCR/TVto turn VCRindicator off, or simply turn VCR off.
Rapid Tune(Models PV-4625S and PV-4655S only)
Push R-TUNE to display the lastchannel you were watching.
Previous PresentChannel Channel
CH08.,_.----_CH10
• When selecting channels with theVCR CH A/Y buttons, channelsmust be displayed for at least 4seconds in order for the VCR torecognize them as a new selection.
• HoldingdowntheVCR CH &iT buttonswillincreasethe channelsearchspeed.
• PushPAUSE to pausea recordinginprogress.(Afterthe VCR has been inPause modeautomaticallyto protectthetape and videohead.) ....
• The recordingtimeremainingappearsif the DISPLAYbuttonIs pushedduringOTR mode(See page i6):
2O

Co "n Your Ta es (Dubbin)Connections you'll Audio Inneed to make.
° For ModelPV-4625S
• For ModelsPV-4655S/PV-4665S
Playing (Source) VCR
udio Out
Recording (Editing) VCR TV for Monitoring
_ nsert a pre-recordedtape into the Playing(Source) VCR.
(_ Insert a blank tapewith record tab into theRecording (Editing) VCR.
===
® Select Input "LINE" on theRecording (Editing) VCR.(See "Selecting the InputMode" at right.)
Push PLAY on Playing VCR.Push PAUSE at the point youwant to start copying.
Push REC and PLAYsame time on Recording VCR.Push PAUSE immediately,
(_ Push PAUSE on bothVCRs (at the same time),tobegin copying.
Edit Out Unwanted Partsof the original recording by using the PAUSE button(on the Recording unit) while copying is in progress.
Push STOP on bothVCRs to _.t,Qg_G.Q_LJ_
To Monitor the Re-Recording
I Turn the TV on and select its VCR channel(CH3 or CH4) on the Recording VCR.
2 Set the VCR/TV selector on the RecordingVCR to the "VCR" position.
,, ,, i ii i i ii i i i
Selecting the Input Mode
1 Push MENU to display themenu.
2 Rotate and push the Wheelto selectSET UP VCR.
IE ........ MENU .........
_ET UP CHANNEL
(OIOMA/LANGUE:_GL{SH
SELECT RO3A3£ W_EELSE_ PUSH WHEEL
NO PUSH MENU KEY
3 Rotate the Wheel toselect "INPUT SELECT",and then push tochoose TUNER or LINE.• You can also select
"LINE" using the VCRCH &/_r buttons.The numbers will changein the order shown.
(CATV} (TV_,_,---L,NF_.,_,--_-- 125 or 69)-_
-'- ... S_T UP VOR ...... ]
REPEAT PLAY : ON I
s_T / ._PE,TPLA_: O_ /BEEPER : ON /
/SELECT ROTATe. _tfH_EL |/SET PUS._._L /tEN{) PUSH MENU KEY ]
(Models PV-4655Sand PV-4665S only)
_l =1
• When LINE +s se+ected, "L" _s d+spIaye+ +n theMulti Function Display for about 4 seconds.
_ Caution: _Unauthorized exchanging and/or copying of /copyrighted recordings may be copyright infringement.
21

Timer RecordingYour VCR can be set up to do a recordingwhile you are away or otherwise occupied.Up to 8 programs can be placed inmemory. You can choose to record onetime, daily, or weekly.
[_Check list before you begin.[] All connections are made.
(See pages 6~9.)[] TV and VCR are plugged in and turned on.[] VCR/TV selector is set to "VCR."[] Clock is set to correct time.
[] Record tab in place. (See page 5.)
PROGPush PROG to displaythe program screen.• If a program is already in
memory, use the Wheel toselect an unused programnumber.
I "°T T'NGW"E L IITOENO OSH;P SHWHE.J
Rotate and push theWHEEL to select andset the DATE.
Today's DateI
WEEKL¥(sA'r_-,--7.-_8-g....3_
"' Example --1WEEKLY
WheelSelet:tionOrder I_MON;=
2_"',=,- WEEKL'f(SUN)_ DAILY_ 6""" "°''
i_ '---J'=' IPOWER Multi Function STOP
O Display
VCRPOWER
Q
CLEAR
PROG
@
e
_ =oe_lR
6_'_ o
e__eeII
000e e e..6o.
STOP
WHEEL
Og
Dally and Weekly Timer RecordingIf youwantthe programto be recordeddaily(Monthru Fri), enter DAILYinplaceof theDATE instep 2. If youwantthe recordingtobe ona weeklybasis, enterWEEKLY MON,TUE, etc..
iBv-_-_l"I" /I I-_-°-"L!-_-......... -_-_-_IITO EI_, • .- , I
_"_] BY ROTATING WHEEL J
J : PUSH WHEEL-)|
[TO END PUSH pRO(; KEY ]
Rotate and push theWHEEL to selectand set remainingitems at right.
Remaining Itemsto be set:• START time• STOP time• CH(annel) number,
or LINE for outside
source recording.• Speed (SP, LP, SLP).
To Make CorrectionsRepeatedly push the Wheel to move forward, or the CLEARbutton to move back to the desired item.
O Push the WHEEL when program is completed."PROGRAM COMPLETED" will appear on-screen.
• If "PROGRAM IS INCOMPLETE" appears on-screen,check all entries and make necessary corrections.
• If you enter a channel numberof 100~125, the screen at rightappears a few seconds later.
Rotate and push theWHEEL to select "DSS"or "CABLE."
IS IT CABLE CHANNEL
OR DSS REI_VER CHANNEL?
SELECT: _;;LA_E WHEEL
SET : PUSH WHEEL
Model PV-4665S remote is shown here.
Important notes whenusing a DSS receiver.• When recording programs via a
DSS receiver the DSS receivermust be left on.
m
• When recording programs via anantenna or cable, the DSSreceiver must be turned off.
22
Push PROG to endthe program.• If you want to enter more
programs, select a blankprogram number with Wheeland repeat steps 2 and 3.
r_ 1:.... : .....
ISELECT 1-8 :ROTATE WHEEL /IENTER :PUSH WHEEL //CANCEL :PUSH CLEAR KEY /lEND :PUSH PROG KEY )
_ Push PROG to exitthis mode.
VCRPush VCR POWERoff to set the timer.• When recording programs via a
cable box, make sure the cablebox is left on. If the cable boxcannot be controlled with theVCR, you must manually selectthe desired channel.
Multi Function Display

Cancel a Timer Recording:Recording is in progress
Z Push the VCR POWER button to releasethe VCR from timer mode.
2 Push the STOP button within 10 secondsof pushing the VCR Power button tocancel the recording. The TIMER indicatorgoes out in the Multi Function Display•
Replace Program Contents:Recording is not in progress
] Push the PROG IP DTSTRATSTOPCHSPD|button to display 11 -_ -;---";;- -- -:1all currently set 13 10 8:00P 9:00P 10 SP I
r r m " 14 su 9:OOPlO:OOP L SLP/p og a s. ISELECT_-8:ROTATEWHEELI
I ENTER :PUSH WHEEL I
2, Rnt_t,_ _nd n=_eh the ICANCEL :PUSH CLEAR KEY I...... v _,,w f.,w_,, IEN0 :PUSH PROG KEY IWheel to select and '_"enter the desired
timer recording• Iq_7_I. START STOP CH|
(See page 22•)I/IX/l\ SLPI
3 Rotate and push the I;;, ...... .--,-. ......... IWheel to select and IeYROTATINGWHEEL I_.nte.rrP.nl_P._.m_.nt I_PUSHCLEAR :PUSH WHEEL_I........ IT............ ITO END PUSH PROG KEY |
informat=on. -- "
4 Push the PROG button to exit this mode
and retrun to the normal TV screen.
Review or Clear Program Contents:inRecording isnot progress
[P DT STRAT STOP OH SPD" I
.1 Push the PROG ='_"a1;r="_:H0--'0P'=112:I_4R010PI'_25 SL_"IPMI
• 3 10 8:00P 9:00PR'IEr_ SPbutton to display I, su 9 ooP_oooP L SLP/
all currently set ISELECT1-8:ROTATEWHEEL Iprograms IENTER :PUSH WHEEL I
• ICANCEL :PUSH CLEAR KEY I
2 Rotate the Wheel to END :PUSHPROGKEY
select the desired [P DTSTRATSTOPCHSPDIprogram number Iil ......... :...... I
• 12 8 10:00P12:OOP125 SLPI
3 CLEAR 13 lO 8:ooP9:00PI_ SP/Push the 14su 9:OOPlO:OOPLSLP/hllffnn fn ISELECT 1-8 :ROTATE WHEEL /
......... clear the IENTER:PUSHWHEEL Iprogram. _END :PUSH PROG KEY
4 Push the PROG button to exit this modeand return to the normal TV screen.
• If a DSS channelis selected,the channelwill appearasblue
[NOTES| numberson white background.• If the cassetterecordtab is
_ JF
_.. J missingat thetimethe VCRpoweris turnedOF;F,thetape
ejects andthe TIMER indicatorflashes inthe_ Multi FunctionDisplay._, If the starttimesof two programsoverlap,the
lowernumberedprogramwillhave priority.
• If the starttimefor a timerrecordingcomesup duringa normalrecordingorOne TouchRecording(page 20),the timerrecordingwillnotbe performed.
•. Timer Recording•" Using VCR Buttons
o• Hold down• RECFFIME.O i
• a• nd
If the lock i.,• buttor willdi:
• scree_ In this• 2 and toset• 2~6 tc _eta ti
• , Once "_eVC• and F !W bu
• r
• o• (f r down) (for up)
•"• _ _.l ar_ nov,• _ th_ exti• .PJshSE (FF) .= }.tedlyl• p_lrticula temfi r 1ingot
• W ,en I pro
•.-• :n,
A timer recording can be set up using the buttons on theVCR. If necessary, the clock can also be set.
. i
_FSELECTA SET PROGRAM
STOP CH
BY SELECT _/V KEY
Push FF to ?_XT_USu"sSeT"%_KO_'_b.._ enter the
r_ program mode.
. If the clock isnotset, pushingthese I_., ____s_T.?N.buttonswilldisplaytheSET CLOCK I_screen.In thiscase,proceedwithsteps I_Y SELECT&/T KEY2 and3 to set the clockandthensteps hNoEXETNPUpSuHsSETRKEYKEOyR2~6 to set a timer recording. _ -
• Once the VCR is in the Program mode, the PLAY, REC, FF,and REW buttons on the VCR operate only as specified above.
Push REW or PLAY tomake your selection•
Push FF to setand move on tothe next item.
• PushSET (FF)repeatedlyto moveto aparticular itemfor setting orcorrection.
Items to be Set:
• recording DATE• START time• STOP time
• CH(annel), or LINE• SPEED (SP, LP, SLP)
When the program is completed...
Push REC/TIMEand FF to displayprogram contents.
(at the same time)
To set the next program,repeat steps 2, 3, and 4 before continuing with step 5.
5_ and _)
(at the same time)
Push REC/TIME andFF to exit this mode•
Push POWER offto set the timer•
i
Multi Function Display
• It is not possible to clear a timer program using the VCR buttons.Please use the Remote Control.
• When recording programs via a cable box, make sure the cablebox is left on. If the Cable boxcannot be controlled with the VCR,youmust manuallyselect the desired channel.
23
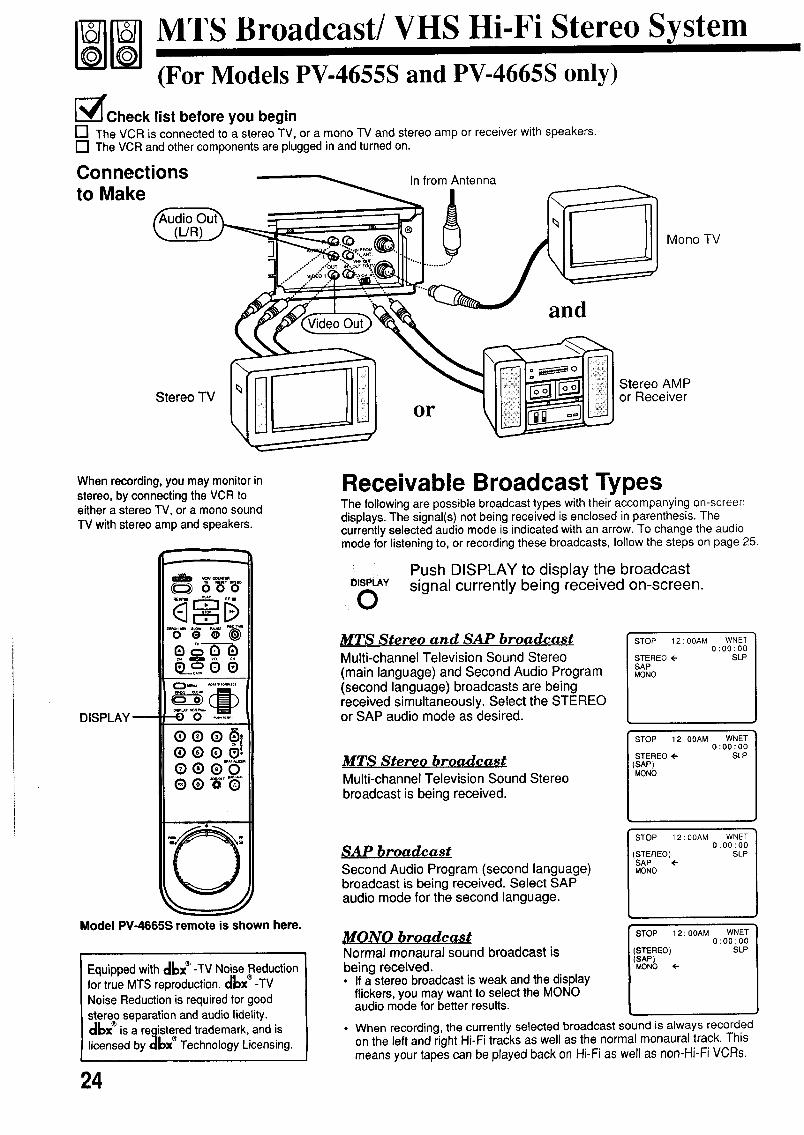
I QiI I MTS Broadcast/VHS Hi-Fi Stereo System(For Models PV-4655S and PV-4665S only)
[_Check list before you begin
[] The VCR is connected to a stereo TV, or a mono TV and stereo amp or receiver with speakers.
[] The VCR and other components are plugged in and turned on.
Connections In from Antenna
,o°a e• "'"'_
and
When recording, you may monitor instereo, by connecting the VCR toeither a stereo TV, or a mono sound
TV with stereo amp and speakers.
DISPLAY--
0";-13--0
000o® ®'B°'
Model PV-4665S remote is shown here.
Equipped with cl_x _ -TV Noise Reductionfor true MTS reproduction, d_x _ -TV
Noise Reduction is required for goodstereo separation and audio fidelity.
®. ,
d_x tsa registered trademark, and tscensed by ¢]_x Technology Ltcensmg.
24
Receivable Broadcast TypesThe following are possible broadcast types with their accompanying on-screendisplays. The signal(s) not being received is enclosed in parenthesis. Thecurrently selected audio mode is indicated with an arrow. To change the audiomode for listening to, or recording these broadcasts, follow the steps on page 25.
DISPLAY
OPush DISPLAY to display the broadcastsignal currently being received on-screen.
MTS Stereo and SAP broadcast
Multi-channel Television Sound Stereo(main language) and Second Audio Program(second language) broadcasts are beingreceived simultaneously, Select the STEREOor SAP audio mode as desired.
STOP 12:00AM WNET0:00:00
STEREO _ SLPSAPMONO
MTS Stereo broadcast
Multi-channel Television Sound Stereobroadcast is being received.
SAP broadcast
Second Audio Program (second language)broadcast is being received. Select SAPaudio mode for the second language.
MONO broadcastNormal monaural sound broadcast is
being received.• If a stereo broadcast is weak and the display
flickers, you may want to select the MONOaudio mode for better results.
STOP 12 :00AM WNET0:00:00
/ STEREO <- SLP
I STOP 12 : 00AM WNET0:00:00
/(STEREO) SLP
o
STOP 12:00AM WNET0:00:00/(STEREO) SLP
• When recording, the currently selected broadcast sound is always recordedon the left and right Hi-Fi tracks as well as the normal monaural track. Thismeans your tapes can be played back on Hi-Fi as well as non-Hi-Fi VCRs.
With the proper audio modesetting, your VCR can:1) record and playback an MTS stereo
broadcast (main language) in stereo Hi-Fi.2) record and playback a monaural
broadcast (main language) or SecondAudio Program (second language) onthe Hi-Fi tracks for better qualitymonaural sound.
3) playback non Hi-Fi tapes in monaural.
Selecting the Audio Mode for RecordingSelect the type of broadcast and sound track you wish to record.
_ _!_: 'i!;:i!!i$AP/Hi-R
Push SAP/Hi-Fi repeatedly(each press within 5seconds) to select thedesired audio mode(STEREO/SAP/MONO).• Please refer to "Receivable
Broadcast Types" section onprevious page.
STEREO <-SAPMONO
The currently selectedaudio mode is indicatedwith an arrow.
O Do a recording.See the "Record On a Tape" section on page 20.
z.5
ii Ir
e c_
_,o_,
ooo !Q®Q
4
Model PV-4665S remote is shown here.
O
• When purchastngof "
rentingprerecordedtapes,rememberthat onlythose
[NOTES) recordedin Hi-Fistereowillplaybackwithtrue stereo
sound.Standardstereotapeswillplayback withmonauralsound,
• In orderto listen to Hi-Fi stereoplayback,the VCR AUDIO (L/R) jacks mustbeconnectedto a stereoTV orstereoampand speakers. (Seepreviouspage.)
• When adjustingthe trackingduringplayback,the Hi-Fi audiosoundmay revertto normal audiosound.Thisis normal.
• There maybe a differencein audiolevelbetweenHi-Fi andnormalaudioplayback.
Selecting the Audio Mode for PlaybackSelect the type of sound track you desire for playback.
Push SAP/Hi-Fi repeatedly(each press within 5seconds) to select thedesired audio mode(HIFI/NORMAL).• Please select HIFI to listen to
your stereo recordings withstereo sound or MONO formonaural sound.
HIFINORMAL
The currently selectedaudio mode is indicatedwith an arrow.
Playback the tape.See the "Playback a Tape" section on page 17.
Spatializer Feature (For Model PV-4665S only)This feature allows you to enhance the stereo sound so that it seems tocompletely surround you.Note: Your VCR needs to be hooked up to a stereo TV or stereo amp/receiverwith speakers (see page 24). For playback, tapes must be recorded in Hi-Fistereo. For TV viewing, programs must be broadcast in stereo.
Push SPATIALIZER SPATIALIZER HIGH<'-ISPA_AL'Zd"repeatedly to choose ,1, LOW /the desired setting. SPATIALIZER
• Each push will change the SPATIALIZER OFF .-Jdisplay in the order shown.
Portions of this product manufactured under a licence from Desper Products,Inc. SPATIALIZER, and the circle-in-square device are trademarks owned byDesper Products, Inc.
To Select Audio Mode From Menu
1 Push MENU to display the menu.
2
3
4
Rotate and push Wheel to selectSET UP VCR from menu.
Rotate and push the Wheel to select SET AUDIO MODE.
Push the Wheel to set the desired audio for
listening or recording.• For recording, set to "STEREO", "SAP", or "MONO".• For playback, set PLAY AUDIO to "Hi-Fi", or "MONO".
5 Push MENU three times to exit this mode.
--- SET AUDIO MODE ....
_ : STEREO
p_Y AUDIO: HIFIELECT ROTATE WHEEL
ET PUSH WHEEL
ND PUSH MENU KEY
25

VCR Plus+ Setprogramming only.
VCR Plus+ programming allows you to set most items of a timer recording by simply entering a special code found in TV GUIDEmagazine as well as the TV listings in selected newspapers. In order for the VCR to read this special code, some set up is required.A Guide (VCR Plus+) channel number is assigned to each local broadcast and cable station. Because this number sometimesdiffers from the channel your TV receives the station on, it is necessary to program the VCR with local channel information.
00
Model PV-4665Sremote is shownhere.
00CLEAR /
Channel Set Up Preparations
NOTE: Complete the steps on this page ifyou are usingConnection Method 2 on page 10 for VCR hookup.
Prepare a list like the example below.This list will help you smoothly enter the informationneeded in step 4 at right.
You will need the following to complete the list:
• A line up of normal and/or cable stations youreceive along with the channel numbers your TVreceives them on. A cable channel line-up chart issupplied by your cable company.
• A list of Guide (VCR Plus+) channel numbersassigned to the stations you receive. This list isavailable in TV Guide and the TV listings found inselected newspapers.
1 Make a chart with 3 columns like the examplebelow. In the left column, fill in the name or callletters of the stations you receive.
2 In the middle column, fill in each station'sassigned Guide (VCR Plus+) number found in TVGuide, newspapers, etc.
3 In the right column, fill in the channel number thatyour TV receives the station on from your channel,ne-up.
EXAMPLE ONLY
Assigned Channel no.Broadcast or Cable Guide your TV
Station Name (VCR Plus+) receives thechannel no. station on
HBO 33 15Nickelodeon 38 20
CBS 04 04
FOX 11
26
VCR Plus+ Channel Set Up(Connection Method 2 on page 10)
Push MENUC_)ME"U to display the
menu.
Rotate and pushthe WHEEL toselect SET UPCHANNEL.
......... MENU .........
SET UP VCR
IDIOMA/LANGUE:ENGLISH
SELECT ROTATE WHEELSET PUSH WHEELEND PUSH MENU KEY
O Rotate and push [ ___SETUP'CHANNEL---
the WHEEL to I ANTENNA SYSTEM : CATV
select VCR Plus+ AUTOSETCH SET UP.
SELECT : ROTATE WHEELISET PUSH WHEEL
[END PUSH MENU KEY
IMPORTANT NOTE:
For this step, use the list you prepared. You may leave linesblank if, you don't receive that station, or the GUIDE OHnumber and the CATV (or TV) OH numbers are the same.
O Push WHEELto move theshaded area onthe right side.
VCR Plus+ CH SET UP
GUIDE CH CATV CH
-> [] --
02 --
SELECT ROTATE WHEELSET PUSH WHEEL
END PUSH MENU KEY
Then, rotate the Wheelto change CATV or TV CH number.
Next, push the Wheelto enter CATV or TV CH number.
Now, rotate the Wheel to continue.Repeat this operation until the list is complete.
To Make CorrectionsRotate and push the Wheel to select the incorrect CATV or TVCH number. Then, Push CLEAR to delete the numbers.Now, use the Wheel to re-enter the channel.
Push MENU twice toexit the VCR Plus+CH SET UP mode.
i i !Make your entries within 60 Seconds or the VCR will
leave this mode
Once local channels have been programmed, _hey willstay in memory, even in the case of a power failure.
VCR Plus+C_ and PlusCode are trademarks of Gemstar
Development Corporation. The VCR Plus+ and INDEX Plus+ |systems are manufactured under license from Gemstar |
ent Corporation and Index Systems Inc. J

[_Check list before you begin.[] The clock is set.
[] One Time VCR Setup is complete.(See pages 10~14.)
[] VCR Plus+ Set Up is complete. (See page 26.)
VGR Plus+
OPush VCR Plus+to display the VCRPlus+ screen.
vo.:.::i....[ EN,_IVOR_LUSCO_E
L TO END PUSH VCR Plus+
II
eI° [ °Multi Function Diaplay
) Push the Numbered Keys to I voRP,us+
enter the PlusCode number. ENTERVCR_LUSOOOE
• Refer to your local TV listings. _234_6
TO CORRECT PUSH CLEARTO ENTER PUSH VCR Plus+
CLEAR
_ooo-
i1 , .................,,[Iooooe ®"i5°"e e
_SPEED
OO
Model PV-4665Sremote is shownhere.
Use normal Timer Recording steps if:• the PlusCode for a program is not listed.
• you anticipate the program, such as a sportingevent, to run over the scheduled stop time.
See page 23 to:• Cancel a timer recording in progress• Replace program contents• Review or Clear program contents once set
Important notes when usinga DSS receiver.• When recording proojrams via a E)SS rece'tver
the DSS receiver must be left on.
• When recording programs via an antenna orcable, the DSS receiver must be turned off.
To make correctionsPush the CLEAR button repeatedly to delete the PlusCode number.Then, enter the correct number.
Push VCR Plus+vcRms+ to lock in your
O program.
Push 1, 2 or 3 Key toselect the program type.
I VCR Plus+
1 ONE TIME
2 DAILY (MON-FR_)3 WEEKLY
TO SELECT PUSH 1 , 2 OR 3
TO END PUSH VCR Plus+
,oc.an0e,.erecor°,n0s.ee0;IDA,,,TA TS,OPPush the SPEED button for SP, LP or LP. lflB'{_}__
TO cancel program contents: PushSPEEDKEY /
TO CANCEL PUSH CLEAR /Push the CLEAR button. TO END PUSH VCR Plus÷ J
• If you use Connection Method 1 on page 10, the channelshown in the on-screen display in this step will always bethe cable box output channel number.
Push VCR Plus+VCRP,us+ to complete the
0 program.
• When recording programs via a cablebox, make sure the cable box is left on.If the cable box can not be controlled
with the VCR, you must manually selectthe desired channel.
TURN VOR OFF
FOR TIMERRDECORDING
LEAVE CABLE BOX POWER ON
• This display may differdepending on yourcable box hook-up.
•.,c_ PUS_'I _--__R Multi Function Display
sett et,merp_Q_r_4 _ POWER o_i to
,4 i
• Fora list of p_blicationS_i_{ _n;y tlie PiusCodenumbersin your area, cal 1 - 800- 258- 4827.• You can obtainunlistedPlusCodenumbersby calling1 - 900- 454- 7587. Call costsapproximately$.95 pe_minute.
VCR PlusCodescan not be usedto programtheVCR to recordDSS channels.=
_ Avoidoverlappingprogramtimes. .....An on-screendisplaywill indicate if an invalid PlusCodenumberhas been entered.
• An on-screendisplaywiltindicate whenall timerprogramsareMI.
27

Special VCR Features
_'Check list before you begin.
[] All connections are made.(See pages 6~9.)
[] VCR is Plugged in.[] TV is turned on and set to the VCR
channel (CH3 or CH4).
VCR Lock FeatureWhen activated, this feature prohibits all operations except for timerrecording, and tape eject. This is useful to prevent misoperation andprotect your VCR from curious children.
Hold down STOP/EJECT onthe VCR for 7 secondsduring Stop, or Power OFFmode.
VCR LOCK ACTIVATED
....STOP/EJECT
To Cancel the VCR Lock feature,
Hold down STOP/EJECT onthe VCR for 7 seconds againduring Stop, or Power OFFmode.
VCR LOCK OFF
• VCR Lock mode is cancelled automaticallyafter 24 hours when the clock is set.
O0
0 o @
o___oo
ooo !0®®oo ®'i__'
Model PV-4665S remote is shown here.
Warning Beeper FeatureWhen you select BEEPER ON as described below, a short warning will soundeach time an invalid entry or operation is made and a timer program is set.
O Push MENU to display(_"_,u the menu.
Rotate and push theWHEEL to select"SET UP VCR".
......... MENU .........
SET ( _CKSET ' CHN IIIEL
IDI( _ LAN(ilIE: EIIGLI =
SELECT IIOTA"I WH !ELSET lUSH _tHEEI
END PUSH MENU KEY
LtJ_l_o]_SET CLOCKSET UP CHANNELIDIOMA/LANGUE:ENGLI SH
ROTATE WHEELPUSH WHEEL
O Rotate the WHEEL [...... SETuPvCR......to select"BEEPER", I REPEATPLA¥: O,
I re.ae_ : oNthen push to seect I _MPUTSELECT: TUNER"ON" or "OFF." I , 1
ISELECTI ...... SET UP VCR -/ISET t LI_n | REPEAT PLAY : ON
_=--I_SELECT;_;,ERSET AUDIO MODE
(Models PV-4655_ _SELECT : ROTATE WHEEL
and PV-4665S onlv_ |SET : PUSHWHEEL"" _END : PUSH MENU KEY
O Push MENU twice to exit(_.,,u this screen.
28

Multi-Brand Control FeatureThe Remote Control may be set up to controlsome of the functions on your TV or Cable Box.
TV Brand Code Numbers
Panasonic .................................................... 01,02Quasar ......................................................... 01,02RCA .................................................................... 03GE ...................................................................... 03Zenith ................................................................. 04Magnavox ........................................................... 05Sylvania .............................................................. 05Sharp ............................................................ 06, 07Sony ................................................................... 08Toshiba .............................................................. 09Sanyo ................................................................. 10Fisher ................................................................. 10JVC .................................................................... 11Hitachi ................................................................ 12Mitsubishi ........................................................... 13Samsung ............................................................ 14Gold Star ................................................ 15, 16, 17
Cable Box Brand Code Numbers
Archer ........................................ 01,29, 44, 88, 91Cableview ................... 4, 30, 42, 44, 52, 63, 85, 88Citizen ......................... 4, 30, 42, 44, 52, 63, 85, 88Curtis .................................... 08, 09, 56, 61,87, 90Diamond ..................................... 01, 29, 44, 88, 91Drake .................................................................. 37
Eagle ......................... 13, 20, 22, 26, 40, 58, 62, 98Eastern ............................................................... 28GC Brand .................... 4, 30, 42, 44, 52, 63, 85, 88Gemini .......................................................... 04, 85General Electric .................................................. 57General Instruments................ 01,02, 03, 04, 34, 55, 83, 85, 91, 93, 95Hamlin ........................................ 14, 15, 28, 41,97Hitachi .......................................................... 31,79Jerrold .... 01,02, 03, 04, 34, 55, 83, 85, 91, 93, 95Macom .......................................................... 31,79Magnavox ..................................................... 25, 26Matsushita .................................................... 16, 17Movietime ............................................... 32, 38, 40Movietime ............................. 29, 32, 39, 42, 44, 88NSC ........................................................ 32, 38, 40Oak ..................................................................... 46Panasonic ..................................................... 16, 17Philips ......................................... 13, 20, 23, 24, 96Pioneer ................................................... 05, 06, 78Pulser .......................... 4, 30, 42, 44, 52, 63, 85, 88RCA .............................................................. 16, 17Realistic ........................................................ 44, 88Regal ............................................................ 14, 41Regency ............................................................. 28Rembrandt ............................ 29, 32, 39, 42, 44, 88Samsung .................................... 32, 40, 42, 78, 94Scientific Atlanta ................... 08, 09, 56, 61,87, 90Sheritech ............................................................ 27SL Marx ...................................... 32, 40, 42, 78, 94Sprucer ......................................................... 16, 17Stargate ...................................... 32, 40, 42, 78, 94Stargate ...................... 4, 30, 42, 44, 52, 63, 85, 88Sylvania .............................................................. 19Telecaption ................................................... 77, 92Teleview ...................................... 32, 40, 42, 78, 94Texscan ........................................................ 18, 19Tocom ............................. 01,33, 34, 42, 48, 49, 91Toshiba ............................................................... 36Unika .......................................... 01,29, 44, 88, 91Universal ............................... 42, 43, 44, 52, 63, 88Viewstar .................... 13, 20, 22, 26, 40, 58, 62, 98Videoway ................................................ 07, 23, 50Zenith ..................................................... 07, 23, 50
CATVCHANNELUP/DOWN
OCATV POWER
NUMBEREDKeys
O
TV POWER
O
TV CHANNELUP/DOWN
O,TV VOLUME
UP/DOWN
Model PV-4665Sremote is shown here.
O ind your TV or Cable Box BrandCode Numbers.
• See left chart for TV or Cable Box Brand Code Numbers.
O_ °r CAViTy
Hold Down TV POWERor CATV POWER.
and
Use the NUMBERED keysto enter code number.
Enter your "IV or Cable Box brand code number.
Due to changes in infra-red commands used by somemanufacturers, some TV or Cable Box brands are listed morethan once. If your TV or Cable Box does not respond in step3 with the first code, please try entering the next code.
l_Try each of the followingfunctions.
• Some TV and Cable Box brands require you to turnon the power manually.
(TM) (Cable Box)POWER ON/OFF POWER ON/OFFCHANNEL UP/DOWN CHANNEL UP/DOWNVOLUME UP/DOWN
• Depending on your TV or Cable Box model, not allfunctions listed may be controlled by this remote.
(NOTES}
• Please repeattheTV/Cable BoxSet Up procedurewhen youreplacethe remote'sbatteries.
• The remotecontrolisdesignedto control thebrandslisted.However,itwillnotoperateallTVs or CableBoxesmadeby thesemanufacturers.If youget noresults,your particularproductbrandcannotbecontrolled by thisremote.
29

Before Requestin Service• Check the following points once again if you are having some trouble with your VCR.
"IV program can't be recorded...
Timer recording can't be performed...
There is no playback picture, or the playback pictureis noisy or contains streaks..
During special effects playback, the picture maycontain some vertical jitter when using a "IV whichhas an Automatic Vertical Hold Control...
If the top of your playback picture waves back andforth excessively...
VCR can't be controlled...
VCR can't be remote controlled...
You can't view programs normally orl I V...
Video cassette can't be inserted...
Video cassette can't be removed...
Video cassette ejects when the REC and PLAYbuttons are pushed or when the POWER button ispushed off to set the Timer...
In the stop mode, the motor (CYLINDER) continuesto rotate...
VCR can't be controlled...
° Check that the Power Plug is completely inserted to an AC outlet.• Check that the POWER button is set to on.
• Check the connections between the VL;H, the external antenna,and your TV.
• Check that the band selected matches your antenna or cable TVsystem. (P.15)
• Make sure that the record tab on the back of the cassette is stillintact. (P.5)
Set the recording start/stop times correctly. (P.22)Make sure that the POWER button is set to off. (P.22)Timer recording may not be performed or continued if a powerinterruption of more than 1 minute occurs before, or during,Timer Recording, even if power resumes thereafter.
• Select the same channel on your TV as that of the Channel 3/4switch located on the rear panel of the VCR. (P.6)
• Set the VCR/TV selector to "VCR". (P.17)• Check that channel 3 or 4 of the TV is properly adjusted.• Adjust the TRACKING control slowly in either direction. (P.17)
Set the TV's Vertical Hold Control to "MANUAL" and then adjust it.
Because the VCR playback signal is not as stable as an off-the-airTV signal, the top of your TV screen may be bent or unstableduring playback. To solve this problem, slowly turn the horizontalhold control on your TV to correct the wavy picture. If your TVdoes not have a horizontal hold control or adjusting the controldoes not help, please contact your local TV service center.
• Make sure that VCR LOCK is set to off. (P. 28)
• Aim the Remote Control directly at the Eel,Jote 5elliot or_theVCR. (Refer to Back Cover.)
• Avoid all obstacles which may interfere with the signal path.• Inspect or replace the batteries (P.4).• Make sure that VCR LOCK is set to off. (P. 28)• Exposing theVCR remote sensor to direct fluorescent or outdoor
light may cause signal interference.
• Set the VCR/TV selector tu "1V'. (1_.20)
• Insert the cassette with the window side up a_ld the =uc(Jrd tabfacing you.
• Check that the power plug is completely connected to an AC outlet.
• Make sure the record tab on the back of the cassette is still intact.(P.5)
• To enable the quick play mechanism, the cylinder will rotate forabout 5 minutes.
• The quick play mechanism reduces response time from stop toPLAY mode from PLAY to REWIND search mode.
Make sure that VCR LOCK is set to off. (P. 28)
3O
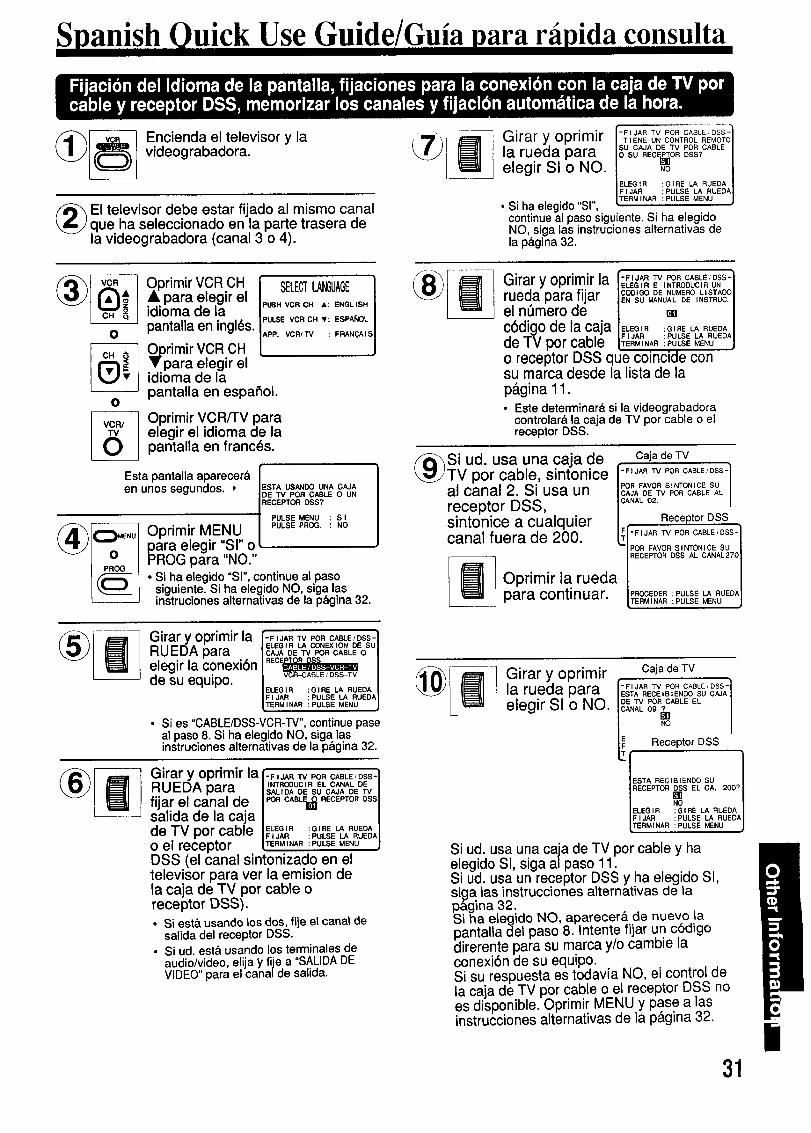
Spanish Quick Use Guide/Guia para r ipida consulta
(__ Encienda el televisor y lavideograbadora.
(_)EI televisor debe estar fijado al mismo canalque ha seleccionado en la parle trasera dela videograbadora (canal 3 o 4).
O
O
r,m,rVCRC.I SELECT GO,GEIparR elegir el IPUSNVCRC..: EN_..S.I
idioma de la IPULSEvc.C.• ESPA OLIpantalla en ingles. IAPP.vcA,TV : FF=N_A,SJOprimir VCR CH• parR elegir elidioma de lapantalla en espaSol.
Oprimir VCR/TV parRelegir el idioma de lapantalla en frances.
Esta pantalla aparecer& Ien unos segundos.-, IESTAUSANDOUNACAJA
|DE TV POR CABLE O UN
RECEPTOR DSS?| PULSE MENU : S I
Oprimir MENU [ PULSEP,OG: "Oara elegir "SI" oROG parR "NO."
• Si ha elegido "SI", continue al pasosiguiente. Si ha elegido NO, siga lasinstruciones alternativas de la p&gina 32.
Girar y oprimir laRUEDA paraelegir la conexibnde su equipo.
-F,.AR_VPC"CA=E,OSS-IELEe,R_CONEX,ONOESO,C..AOETV.ORC.0LEO,VCR_Z;ABLE / DSS-TV I
IELEGIR :GIRL LA RUEDA IFIJAR :PULSE LA RUEDA|
TERMINAR :PULSE MENU J
• Si es "CABLE/DSS-VCR-TV", continue paseal paso 8. Si ha elegido NO, siga lasinstruciones alternativas de la p&gina 32.
Girar y oprimir la ['F I JAR 13/ POR CABLE/DSS-)
RH_nA "_r_ IINTRODUCIR EL CANAL DE IVL--L.In pnf,.._ r._ ISALIOA DE SU CAJA DE TV I
fi ar el canal de I _ I"j POR CARL RECEPTOR DSS
salida de la caja I I_,_ TV nnr t",_Pil_ I ELEGIR :GIRE LA RUEDA I'_,_ ---- I,,.v. v_._ IFIJAR :PULSE LA RUEDAI
o el receptor _u_s___..u jDSS (el canal sintonizado en eltelevisor para ver la emision dela caja de TV pot cable oreceptor DSS).• Si est& usando los dos, file el canal de
salida del receptor DSS.• Si ud. est&usandolosterminalesde
audio/video, el|jRy fije a "SALIDA DEVIDEO"parRel canal de salida.
Girar y oprimir -FIJAR TV POR CABLE,'DSSqT 'ENE UN CONTROL REMOTOI
la rueda parR su CAJA DE TV POR CABLE /Io_uRECTOROS_?/elegir Sl o NO. IELE_'" _,,E L_RUEDA/
I F I JAR : PULSE LA RUEDAI
• Si ha elegido "SI", [TERM INAR : PULSEMENU j
continue al paso siguiente. Si ha elegidoNO, siga las instruciones alternativas dela p&gina 32.
Girar y oprimir la [-FIJAR"iVPORCABLE/DSS-ihELEn'"E,NTRO_UC,RON ||CODIGO DE NUMERO LISTADOIruedaparRfijar ENSu.ANOOE,.STROC
el n_mero de t _ [cbdigo de la caja ,ELEe,R:_,,E_ RUEOA,
|FIJAR :PULSE LA RUEDAIde TV por cable tTER.,NAR:RULSEMENUo receptor DSS que coincide consu marca desde la lista de lap&gina 11.• Este determinar& si la videograbadora
controlar& la caja de TV por cable o elreceptor DSS.
Si ud. usa una caja de caja deTVTV por cable, sintonice [-F,_AR_' POR_AB'E_OS_-_1 _,-,,_1 _'_ _' , ,,.,,.., , ,,,_ /POR FAVOR SINTONICE SUd,I _,/C:l.I li_l.I _--., OI UO_l. IIII /CAJA DE TV POR CABLE AL
receptor DSS, /C,NALo_sintonice a cualquier / ReceptorDSS.... ,=.... .J_ _ ITF[-F_JARTV PeR CABLE/DSS-1
C_I.H_I lU{gr_ u_ /uu. !_'/PORFAVORSINTONICESU [
IRECEPTO"DSSALCANAL270I
I I1_1IOprimirla rueda / II _ I parR continuar IPROCEDER:PULSELARUEDA|I_ _ ' [TERM[NAR :PULSE MENU J
Girar y oprimirla rueda paraelegir SIo NO.
Caja de TV
I:.;_A.Eg';o;0_%_ss;
_[NA_;OR_A=EEL
Receptor DSS
ESTA RECIBIENDO SU I
RECEPTOR _.NoSSEL CA" 2oo?IELEG IR : GI RE LA RUEDA IFIJAR :PULSE LA RUEDAITERMINAR : PULSE MENU
Si ud. usa una caja de TV por cable y haelegido SI, siga al paso 11.Si ud. usa un receptor DSS y ha elegido SI,siga las instrucciones alternativas de lap&gina 32.Si ha etegido NO, aparecer& de nuevo lapantalla del paso 8. Intente fijar un cbdigodirerente parR su marca y/o cambie laconexi6n de su equipo.Si su respuesta es todav[a NO, el control dela caja de TV por cable o el receptor DSS noes disponible. Oprimir MENU y pase alasinstrucciones alternativas de la p&gina 32.
31Ii
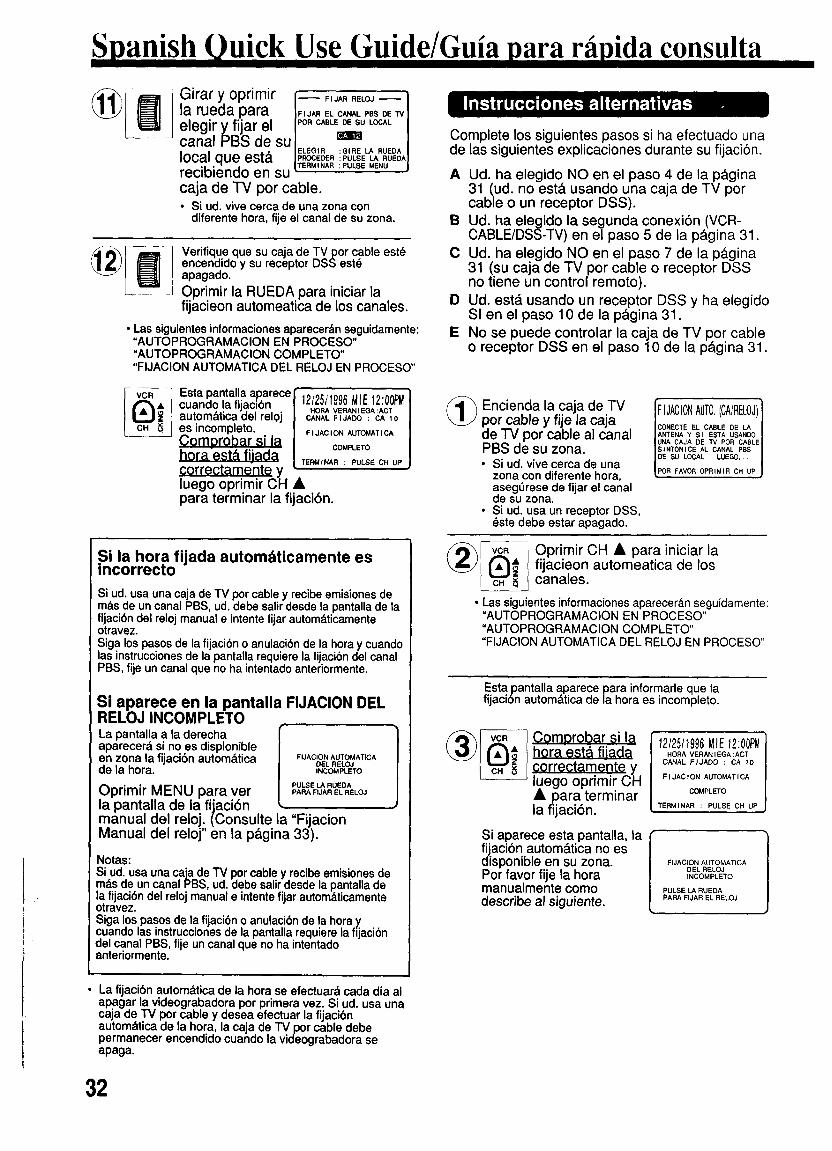
Spanish Quick Use Guide/Guia para r ,pida consulta
Girar y oprimir [-- F,JA..E_ -- Ila rueda para IF.J•,E,cAN•,,.soE_1
elegir y fijar el r" C._L_O LOCALIcanal PBS de su iE,Ea,. :o,.__..O.DAIlocal que est& J..OCE_R:PULSE_. RUEOAJrecibiendo en su FE""'NAR:PULSE"ENU J
caja de TV por cable.• Si ud. rive cerca de una zona con
diferente hora, fije el canal de su zona.
Verifique que su caja de TVpor cable est6encendido y su receptor DSS est_apagado.
Oprimir la RUEDA para iniciar lafijacieon automeatica de los canales.
• Las siguientes informaciones aparecer_m seguidamente:"AUTOPROGRAMACION EN PROCESO""AUTOPROGRAMACION COMPLETO""FIJAClON AUTOMATICA DEL RELOJ EN PROCESO"
Complete los siguientes pasos si ha efectuado unade las siguientes explicaciones durante su fijaci6n.
A Ud. ha elegido NO en el paso 4 de la p&gina31 (ud. no est& usando una caja de TV porcable o un receptor DSS).
BUd. ha elegido la segunda conexibn (VCR-CABLE/DSS-TV) en el paso 5 de la p&gina 31.
C Ud. ha elegido NO en el paso 7 de la p&gina31 (su caja de TV por cable o receptor DSSno tiene un control remoto).
D Ud. est& usando un receptor DSS y ha elegidoSI en el paso 10 de la p&gina 31.
E No se puede controlar la caja de TV por cableo receptor DSS en el paso 10 de la pdgina 31.
Esta pantalla aparecel 12/25/1996MIE12:00PM]cuando la fijaci6n Iautomdtica del reloj I .OR•VERANtEGA:ACTI
CANAL F I JADO : CA 10 [
esincompleto. I F_JAC_ONALrroMAT_CA]Comorobar si la [ CO.FL,TO [horaest_, fiiad_ [ TE_,A, : PULSEC, UPIcorrectame-nte y 'luego oprimir CH •para terminar la fijacibn.
Si la hora fijada autom_ticamente esincorrecto
Si ud. usa una caja de TV por cable y recibe emisiones dembs de un canal PBS, ud. debe salir desde la pantalla de lafijaci6n del reloj manual e intente fijar automdticamenteotravez.
Siga los pasos de la fijaci6n o anulaci6n de la hora y cuandolas instrucciones de la pantalla requiere la fijacibn del canalPBS, fije un canal que no ha intentado anteriormente.
Si aparece en la pantalla FIJACION DELRELOJ INCOMPLETOLa pantalla a la derechaaparecerd si no es displonibleen zona la fijacibn automdtica _,JAC_ONAUTOMATICA
OEL RELOJde la hora. INCOMPMETO
Oprimir MENU para ver P_S_.UEOAPAR• FIJAR EL RELOJ
la pantalla de la fijaci6nmanual del reloj. (Consulte la "FijacionManual del reloj"en la p&gina 33).
Notas:Si ud.usaunacajadeTV porcabley recibeemisionesderodsde uncanalPBS,ud.debesalirdesdela pantalladela fijaci6ndel relojmanualeintentefijarautom_.ticamenteotravez.Sigalospasosde lafijaci6no anulaci6nde la horay.cuandolasinstruccionesde lapantallarequierelafijaci6ndelcanalPBS, fije uncanalqueno ha intentadoanteriormente.
(_ Encienda la caja de TVpor cable y fije la cajade TV por cable al canalPBS de su zona.• Si ud. vive cerca de una
zona con diferente hora,aseg0rese de fijar el canalde su zona.
• Si ud. usa un receptor DSS,_ste debe estar apagado.
FIJACIONAUTO.(OA RELOJI1CONECTE EL CABLE DE LA IANTENA Y S I ESTA USAND0 [
UNA CAJA DE "IV POR CABLE|SINTONICE AL CANAL PBS |
DE SU LOCAL LUEGO,.. J1
POR FAVOR 0PRIMIR CH UP
(__10primir OH • para iniciar lafijacieon automeatica de los
canales.
• Las siguientes informaciones aparecer,_n seguidamente:"AUTOPROGRAMACION EN PROCESO""AUTOPROGRAMAClON COMPLETO""FIJACION AUTOMATICA DEL RELOJ EN PROCESO"
Estapantalla aparece para informarle que lafijacibn autom&tica de la hora es incompleto.
(_)_ ComDrob_,r _i I_hora estd fi!adacorrectamente yluego oprimir CH• para terminarla fijacibn.
Si aparece esta pantalla, lafijacibn autom&tica no esdisponible en su zona.Por favor fije la horamanualmente comodescribe al siguiente.
12/25/1996M/Ef2:00PMHORA VERANIEGA:ACT
CANAL FIJADO : CA fO
FIJACION ALrrOMATICA
COMPLETO
TERMINAR : PULSE CH UP
FUACION AUTOMATICAOEL RELOJtNCOMPLETO
PULSE LARUEDAPARA FIJAR EL RELOJ
La fijaci6n automdtica de la hora se efectuara cada dia alapagar la videograbadora por primera vez. Si ud. usa unacaja de TV por cable y desea efectuar la fijacibnautombtica de la hora, la caja de TV por cable debepermanecer encendido cuando la videograbadora seapaga.
32
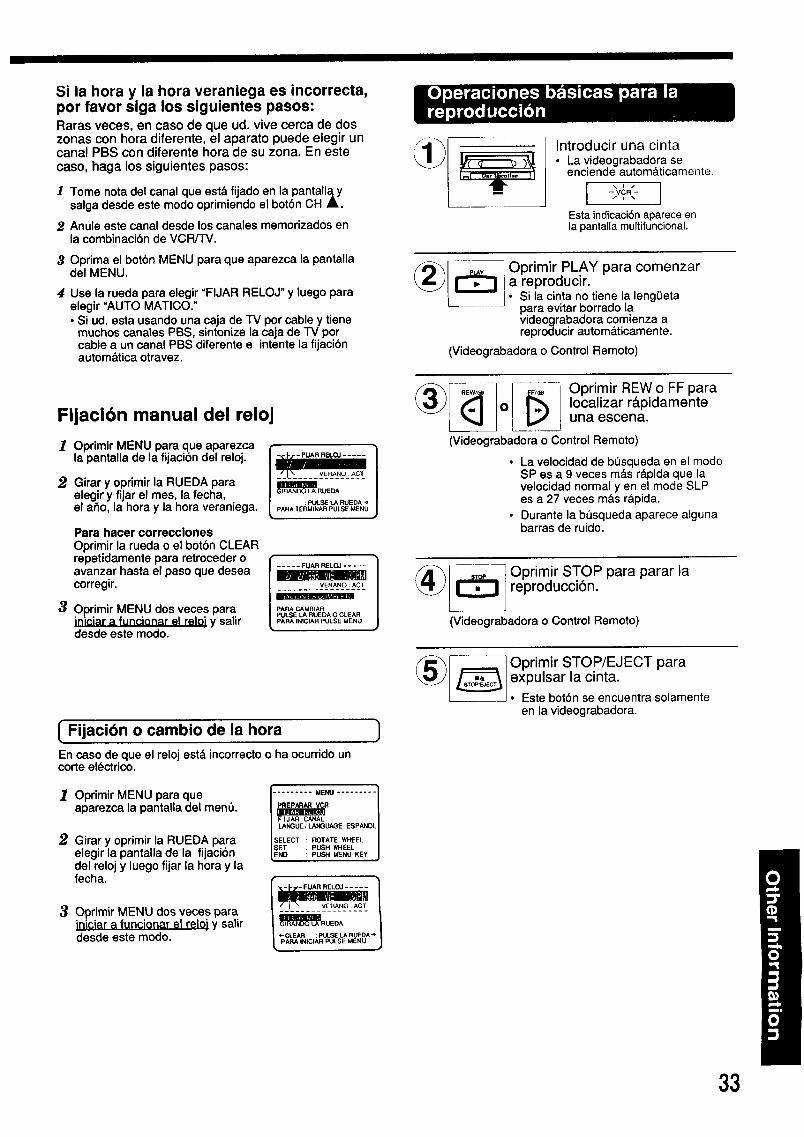
Si la hora y la hora veraniega es incorrecta,por favor siga los siguientes pasos:Raras veces, en caso de que ud. vive cerca de doszonas con hora diferente, el aparato puede elegir uncanal PBS con diferente hora de su zona. En este
caso, haga los siguientes pasos:
I Tome nota del canal que est& fijado en la pantalla ysalga desde este modo oprimiendo el bot6n CH A.
2 Anule este canal desde los canales memorizados enla combinaci6n de VCR/TV.
30prima el bot6n MENU para que aparezca la pantalladel MENU.
4 Use la rueda para elegir "FIJAR RELOJ" y luego paraelegir "AUTO MATICO."• Si ud. esta usando una caja de IV por cable y tiene
muchos canates PBS, sintonize la caja de TV porcable a un canal PBS diferente e intente la fijaci6nautomdtica otravez.
Fijacibn manual del reloj
_/ Oprimir MENU para que aparezcala pantalla de la fijacibn del reloj.
2 Girar y oprimir la RUEDA paraelegir y fijar el mes, la fecha,el aSo, la hora y la hora veraniega.
Para hacer correccionesOprimir la rueda o el botbn CLEARrepetidamentepara retrocederoavanzar hastael pasoquedeseacorregir.
30primir MENU dos veces parainiciar a funcionar el relo] y salirdesde este modo.
"_1_"..... v_j__N_o__Ac_L
_RUEDA
........ _vE_EA_N_O_:_ACT
[ Fijacibn o cambio de la hora
En caso de que el reloj estb incorrecto o ha ocurrido uncorte el6ctrico.
]
10primir MENU para queaparezca la pantalla del menQ.
2 Girar y oprimir la RUEDA paraelegir la pantalla de la fijaci6ndel reloj y luego fijar la hora y lafecha.
Oprimir MENU dos veces parainiciar a funcionar el relo! y salirdesde este modo.
I ......... MENU
F I JAR CANAL
LANGUE/LANGUAGE: ESPANOL
SELECT ROTATE WHEELSET PUSH WHEEL
END PUSH MENU KEY
Introducir una cinta• La videograbadora se
enciende autom&ticamente.
Esta indicaci6n aparece enla pantalla multifuncional.
(_ Oprimir PLAY para comenzara reproducir.• Si la cinta no tiene la lengeeta
para evitar borrado lavideograbadora comienza areproducir automdticamente.
(Videograbadora o Control Remoto)
(__ _ OprimirREWoFFparao Iocalizar rdpidamente
una escena.
(Videograbadora o Control Remoto)
• La velocidad de besqueda en el modoSP as a 9 veces m&s r&pida que lavelocidad normal yen el mode SLPes a 27 veces mds r&pida.
• Durante la b_squeda aparece algunabarras de ruido.
Oprimir STOP para parar laE_ reproducci6n.
(Videograbadora o Control Remoto)
Oprimir STOP/EJECT para
expulsar la cinta.Este bot6n se encuentra solamenteen la videograbadorao
33

Spanish Quick Use Guide/Guia para rfipida consulta
f4 _lntroducir una cinta ............. _-1-_ p,,,_____Oprimir PROG para
- "_"-_/_1 que aparezca laI_._)con la lena0eta. _/_"_ )_ [_
Ir]' _ " pantallade laprogramaci6n. I _,,A,oo_ RuEoA
• La videograbadora se t / :PULSE_ RUEOA',• Si ya existe una programaci6n, L PARATERMINARPULSEPROG
enciende autom&ticamente, elija usando la rueda unnumero sin programaci6n.
(_)_---q_-,--_ Oprimir VCR PA,ADAI L_J._ LCH &IT para
i i_ le,egirel canal.
• U oprimir CH A/V en lavideograbadora.
• Para grabar desde una fuenteexterna, oprimir VCR CH A/Vpara elegir "LINEA"
CA 02
(__ OprimirSPEED paracambiar lavelocidad dela cinta.
• SP = Reproduccibn est__ndar,LP = Larga duraci6n,SLP = Superlarga duraci6n.
SLP
_)_ primir REC/TIME con el controlremoto para emDezar a arabar.
• U oprimir PLAY y REC/TIME en lavideograbadora.
Grabacibn de un toque (OTR)La videograbadora termina la grabacibn auna hora programada
Oprima sucesivamente REC/I'IME para fijarel tiempo de la grabacibn.Cada presibn cambiar& la hora de paradacomo demuestra al siguiente.
• La indicaci6n TIMER aparece en la pantallamultifuncional.
® Oprimir STOP para.oarar la arabaci6n.
• U oprimir STOP en lavideograbadora.
• Si mantiene oprimiendo el bot6n de VCR CH A/Vaumentar& la velocidad del cambio del canal.
• Oprimir PAUSE para hacer una pausa en lagrabaci6n en progreso.
34
__ irar y oprimir la RUEDA para elegiry fijar la fecha.
Fecha de hoy1
f. SEMANAL(SAB)<'---7 .,--D-8--9.- -" 31 "_•." 1
SEMA_ Ordendeseleccibn I(LUN) conlarueda 2
_'_SEM_AL(DOM)_ DIAR__ 6"'""
Grabacibn diarla y $emanal
Si ud. desea programar una grabacibndiaria (lunes a viernes), elija DIARIOen vez de la fecha en el paso 2 Sidesea una grabacibn semanal, elijaSEMANAL LUN, MAR, etc
[ XlF_/INICIO PARADA CA
GIRANDO LA RUEDA Jt-A 1
:PU_.SE t_ RUEDA-OPARA TERMINAR PULSE PROG
:PULSE LA RUEDA-_PARA TERMINAR PULSE
(__ Girar y oprimir la RUEDA para elegir yfijar las fijaciones que sobran.
FiJaciones:• Hora de inicio * Hora de parada• Canal o LINEA para una fuente externa.• Velecidad de la cinta (SP, LP, SLP).
Para hacer correccionesOprimir la rueda sucesivamente para avanzar u oprimirCLEAR para retroceder hasta el paso que desea corregir.
_)_ Oprimir PROGpara terminar laprogramaci6n.
• Si desea hacer rodsprogramaciones, elija un n0merode programa en blanco con larueda y repita los paso 2 y 3.
ELEGIR 1-8 : GIRE LA RUEDAENTRAR : PULSE LA RUEDAANULAR : PULSE CLEAR
TERMINAR : PULSE PROG
(__ Oprimir PROG parasalir desde este modo.
0primir POWER yI_-_ apaque el aparato
_ para la grabaci6n contemporizador.
• Si la fuente de la grabacibn es unacaja de TV por cable, asegSrese deque la caja de TV por cable est_encendido y est(_ sintonizado al canalque desea grabar.
IPantalla
multifuncional

Index of Controls I Ill
Power IndicatorThis indicator lightswhen power is turned on.
VCR IndicatorAppears when the VCR/TVselector is set to VCR.
Hi-Fi IndicatorWhen Hi-Fi audio is monitored or played
_ back, this indicator appears.(For Models PV-4655S and PV-4665S only)
JVCR Hi-Fi _
-LTI. -/_3.,9o Timer IndicatorThis indicator lights when the VCRis set for a Timer Recording, or if alength is set for normal recording.It flashes when a Timer Recordinghas been set, but a tape has notbeen inserted into the VCR.
Clock/Status/Channel DisplayDisplays the current time.Briefly displays VCR status when function button is pressed.Also, briefly displays the channel number selected, "L" whenchannel button is pressed or select a line input.
• For Model PV-4625S
AC Power PlugWhen plugged into an AC outlet, the VCRconsumes 6W of electric power in OFF condition.
/
Audio Output ConnectorSee page 21.
Audio Input ConnectorSee page 21.
__._1 IIIIll
Video Output Connector Channel 3/4 SwitchSee page 21. See pages 6, 12.
Video Input ConnectorSee page 21.
VHF/UHF AntennaInput TerminalSee pages 6~10.
VHF/UHF AntennaOutput TerminalSee pages 6~10.
• For Models PV-4655S and PV-4665S
AC Power PlugWhen plugged into an AC outlet, the VCRconsumes 7W of electric power in OFF condition.
Audio Input Connector (L/R)See pages 10, 24.
VHF/UHF Antenna
Input TerminalSee pages 6~ 10, 24.
VHF/UHF Antenna
Output TerminalSee pages 6~10, 24.
Audio OutputConnector (L/R)See pages 21,24.
Video Output ConnectorSee pages 21, 24.
Video Input ConnectorSee pages 10, 21.
Channel3/4 SwitchSeepages6, 12.
35

Index of Controls
VCR/-I-VSee pages 12, 20, 21.
VCR POWERSee pages 12, 22, 23, 27.
PLAYSee pages 17, 21.
REWIND/SEARCHSee page 17.
ZERO SEARCH/1 MINUTE SKIPSee pages 18,19.
SLOWSee page 17.
CATV CHANNEL UP/DOWNSee page 29.
TV POWERSee page 29.
MENUSee pages 12~16,18,21 25, 26, 28.
PROGRAMSee pages 12, 22, 23.
DISPLAYSee pages 16,18, 20, 24.
VCR Plus+See page 27.
NUMBERED KEYSSee pages 15,20,27,29.
ADD/DELETESee page 15.
SHU'n'LE RingSee page 19.
QQE ©QQ
Q
Model PV-4665S remoteis shown here.
COUNTER RESETSee page 18.
SPEEDSee pages 20, 27.
FAST FORWARD/SEARCHSee page17.
STOPSee pages 17, 20, 22, 23.
RECORD/TIMESee pages 20, 21.
PAUSESee pages 17, 20, 21.
-- TV CHANNEL UP/DOWNSee page 29.
TV VOLUME UP/DOWNSee page 29.
CA'rVPOWERSee page 29.
SELECT/SETWHEELSee pages 12~16,18, 20, 21,
22,23,25,26,28.
CLEARSee pages 14, 15, 22, 23, 26, 27.
IP/DOWN(TRACKING UP/DOWN)
See pages12, 13, 14, 17, 20,21.
;PATIALIZER (PV-4665S only)See page 25.
Rapid Tune (PV-4625S andPV-4655S only)
See page 20.
SAP/Hi-Fi(PV-4655S and PV-4665S only)
See page 25.
Cassette CompartmentSee pages 17, 20, 21.
REWIND/SEARCHSee pages 17, 23.
PLAYSee pages 17, 20, 21,23.
RECORD/TIMESee pages20,21,23.
POWERSee pages12, 22, 23, 27.
VCR/TV SelectorSee pages 12, 20, 21.
/Multi Function DisplaySee pages 17, 20~23, 27, 35.
REMOTESENSOR
FAST FORWARD/SEARCH
See pages 17, 23.
STOP/EJECTSee pages17,20,21,22,23,28.
CHANNEL UP/DOWNSee pages 12~14,17, 20, 21.
Matsushita Consumer ElectronicsCompany, Division of MatsushitaElectric Corporation of AmericaOnePanasonicWaySecaucus,NewJersey07094
Printed in JapanVQTS3260 (A)
Panasonic Sales Company,Division of Matsushita Electric ofPuerto Rico, Inc. ("PSC")Ave. 65 de Infanteria.Km. 9.5San Gabriel Industrial Park, Carolina,Puerto Rico 00985