
Panasonic KX-TDA100 200 600 KX-TDE100 200 600 … Affected: KX-TDA 100/200/600, KX-TDE 100/200/600...
13
Technical Information DATE: FRIDAY, JUNE 19, 2009 DOCUMENT NO. TN-KXTPRI23-061909 Title: ISDN PRI Setup Systems Affected: KX-TDA 100/200/600, KX-TDE 100/200/600 Associated Tech Notes: None Applications: • Installing and Programming PRI23 Card. What is covered: After reviewing this technical note you will know the following: • Installing PRI Card • Perform an ISDN/QSIG Protocol Trace. • Assigning DID to ring at specific destinations • Outgoing Caller ID control based on Extension or PRI Channel *Before programming make sure PRI23 card is physically installed in system. *Refer to the Provider Check List at the end of this technical note for specific settings coinciding to each PRI port property tab. Panasonic Telephone Systems www.voicesonic.com Phone 877-289-2829 KX-TDA100 KX-TDA200 KX-TDA600 KX-TDE100 KX-TDE200 KX-TDE600 Panasonic KX-TDA100, TDA100, KX-TDA200, TDA200, KX-TDA600, TDA600, KX-TDE100, TDE100, KX-TDE200, TDE200, KX-TDE600, TDE600
Transcript of Panasonic KX-TDA100 200 600 KX-TDE100 200 600 … Affected: KX-TDA 100/200/600, KX-TDE 100/200/600...

Technical Information
DATE: FRIDAY, JUNE 19, 2009
DOCUMENT NO. TN-KXTPRI23-061909 Title: ISDN PRI Setup Systems Affected: KX-TDA 100/200/600, KX-TDE 100/200/600 Associated Tech Notes: None Applications:
• Installing and Programming PRI23 Card. What is covered: After reviewing this technical note you will know the following:
• Installing PRI Card • Perform an ISDN/QSIG Protocol Trace. • Assigning DID to ring at specific destinations • Outgoing Caller ID control based on Extension or PRI Channel
*Before programming make sure PRI23 card is physically installed in system. *Refer to the Provider Check List at the end of this technical note for specific settings coinciding to each PRI port property tab.
Panasonic Telephone Systems
www.voicesonic.comPhone 877-289-2829
KX-TDA100KX-TDA200KX-TDA600
KX-TDE100KX-TDE200KX-TDE600
Panasonic KX-TDA100, TDA100, KX-TDA200, TDA200, KX-TDA600, TDA600, KX-TDE100, TDE100, KX-TDE200, TDE200, KX-TDE600, TDE600

Step 1: Connect to the Phone System with the appropriate programming console software. Click on 1.Configuration, 3. Option. Set the ISDN Standard Mode for PRI23 Card to T1-LCOT Mode.
ISDN Standard mode: Used when connecting multiple systems together with PRI23 cards. Centralized VM features are supported. T1-LCOT mode: DID call distribution are available for all 23B channels. Centralized VM features are not available in this mode

Go to 1. Configuration, 4. Clock Priority. Assign the PRI23 Card as Priority 1 to set the Clocking Source to External. Leaving it set to None sets the Clocking Source to internal.

Step 2: Physically install the PRI23 card into a free slot. Then go to 1. Configuration, 1. Slot, move you mouse over the PRI23 card and click on Port Property.

On the following Tabs you will have to match the settings provided by your PRI Carrier. Please refer to the last page of this document for a check list of settings required by the Carrier. All other settings are optional. Main Tab:
Port Type: CO: For connecting to public network Extension: For connecting to extension QSIG-Slave: For connecting to private network (slave port) QSIG-Master: For connecting to private network (master port)

CO Setting Tab:
ISDN In/Out Call Type: En-bloc: The PBX sends all of the dialed digits at once after the extension user completes dialing. The PBX recognizes the end of dialing when (1) # is dialed, or, (2) a preprogrammed telephone number is dialed matching the dialing plan explained in Step 5 of this technical document. *En-Bloc is normally used. Refer to your carriers specific requirements.* Overlap: The PBX sends dialed digits one at a time.

Network Configuration Tab: .
Network Types: (2 UK (Domestic), 5 Netherlands, 6 SwissNET2, 7 SwissNET3, 8 Euro ISDN (Standard), 14 France (Domestic), 19 Finland, 20 Norway, 27 Australia, 51 US National ISDN 2)

Note: The following settings on this screen may need to be adjusted if you can not make outgoing calls. By going under Utility, then ISDN QSIG Protocol Trace, you can see what the Carrier requires by starting a trace then place an incoming call. Look in the Setup portion of the trace for Numbering Plan ID, and Type of number. Example: SETUP crn:4CE6 (O) Bearer Capability: 80 90 A2 (Speech Mu-Law) Channel Identity: A1 83 81 (channel=B1 pref.) Calling Party Number: 81 32 30 31 33 39 32 36 36 33 37 Type of Number=National Number, Numbering Plan= ISDN/Telephony Number= 2013924843 Called Party Number: A1 34 38 34 33 Type of Number= National Number, Numbering Plan= ISDN/Telephony Number= 4843 Once you run the trace change the Public fields to match what the Carrier is providing. Network Numbering Plans Tab:

Step 3: Go to 10.CO Line Settings, 3.DID Table. On this screen you will assign where each did will ring on the system. In this example the Carrier is sending us 4 digit DIDs. Enter the last 4 digits of the phone number in the DID Number column. Then under DID Destination assign where you want the DID to ring. The destination can be an Extension, ICD Group, VM floating number, PS Ring Group, OGM(Disa), or External Pager.
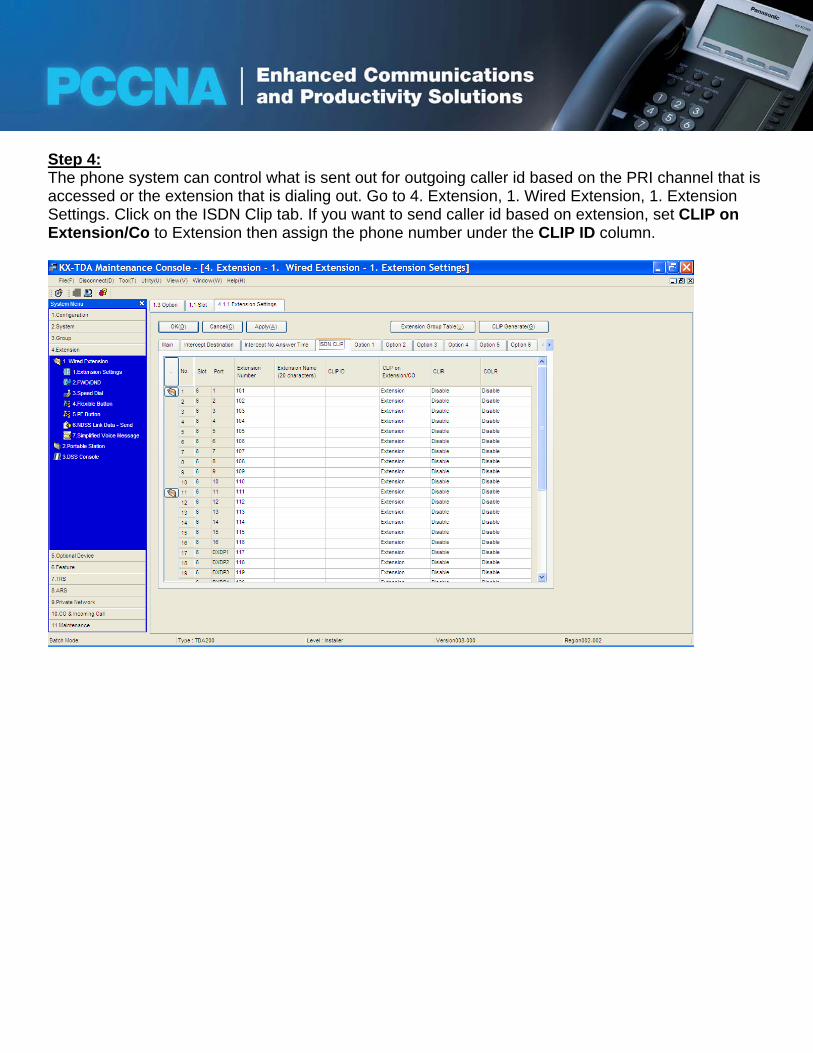
Step 4: The phone system can control what is sent out for outgoing caller id based on the PRI channel that is accessed or the extension that is dialing out. Go to 4. Extension, 1. Wired Extension, 1. Extension Settings. Click on the ISDN Clip tab. If you want to send caller id based on extension, set CLIP on Extension/Co to Extension then assign the phone number under the CLIP ID column.

If you want to send caller id based on PRI channel set CLIP on Extension/CO to CO. Then go to 1. Configuration, 1. Slot. Go back to the Port Property screen of the PRI23 card and click on the CO Setting tab. Then under the Subscriber Number column assign a phone number to each PRI port.

Step 5: Make an outgoing call, if it takes a few seconds for call to start ringing after dialing, go to 3. Group, 1. Trunk Group, 4. Dailing plan. You must specify which dialing plan you are using. Click on the Auto Assign button. Assign Type A for 7 digit local dialing or Type E for 10 digit local dialing.
Note: Type A: 1:N11, 2:NXX XXXX, 3:1NXX NXX XXXX, 4-50: Not stored Type B: 1:N11, 2:NNX XXXX, 3:1NPX NXX XXXX, 4-50: Not stored Type C: 1:N11, 2:NXX XXXX, 3:1NNX XXXX, 4:1NPX NXX XXXX, 5-50: Not stored Type D: 1-47: Not stored, 48:N11, 49:NXX XXXX, 50:1NXX NXX XXXX Type E: 1:N11, 2:NXX NXX XXXX, 3:1NXX NXX XXXX, 4-50: Not stored

Provider Check List Network Type
• National ISDN 2 Framing Type
• Extended Super Frame (ESF) - Default • 4- Frame Multi frame (F4) • 12- Frame Multi Frame (F12)
Line Coding (or Suppression)
• Binary Zero Code Suppression (B8ZS) - Default • Alternate Mark Inversion (AMI)
Status Message • No Transmission - Default • When error detection (Mandatory) • When error detection (Option/Mandatory)
Status Receive
• Ignore – Default • Disconnect
ISDN In/Out Call Type
• En-bloc – Default • Overlap
Clock Synchronization
• Internal • External (Telco Provided) (Default)
Panasonic Telephone Systems
See MorePanasonic Manuals www.voicesonic.com
Phone 877-289-2829