Page 1 of 23 - avinetworks.com · Vantage optimizes core web functions, including SSL termination...
23
Page 1 of 23
Transcript of Page 1 of 23 - avinetworks.com · Vantage optimizes core web functions, including SSL termination...

Page 1 of 23

Avi Networks — Technical Reference (18.1)Installing Avi Vantage for VMware vCenter
Copyright © 2018 Avi Networks, Inc. Page 2 of 23
view onlineInstalling Avi Vantage for VMware vCenter
This guide explains how to integrate Avi Vantage into a VMware vCenter cloud. A single Avi Controller cluster supports multiple concurrent vCenter clouds.
Avi Vantage is a software-based solution that provides real-time analytics and elastic application delivery services. Avi Vantage optimizes core web functions, including SSL termination and load balancing.
Points to ConsiderWrite access is the recommended deployment mode. It is the quickest and easiest way to deploy and offers highest levels of automation between Avi Vantage and vCenter.After completing the deployment process, click for more information on creating virtual services.hereAvi Vantage can be deployed with a VMware cloud in either no access, read access, or write access mode. Each mode is associated with different functionality and automation, and also requires different levels of privileges for Avi Controller within VMware vCenter. For complete information, refer to Avi Vantage Interaction with vCenter.The Avi Vantage administrator needs to download only one Service Engine image for each type of image needed (ova
). The same Service Engine image can be then used to deploy Service Engines in any tenant and /qcow2/docker
cloud configured in the system. For more information, refer to Manually Deploy Service Engines in Non-Default Tenant/Cloud.Avi Vantage does not support vMotion. It is recommended that the built-in functionality be Virtual Service Migrationused instead.
Integrating Avi Vantage with vCenterAvi Vantage runs on virtual machines (VMs) managed by VMware vCenter. When deployed into a vCenter-managed VMware cloud, Avi Vantage performs as a fully distributed, virtualized system consisting of the Avi Controller and Avi Service Engines each running as a VM.

Avi Networks — Technical Reference (18.1)Installing Avi Vantage for VMware vCenter
Copyright © 2018 Avi Networks, Inc. Page 3 of 23
The Avi Vantage Platform is built on software-defined architectural principles which separates the data plane and control plane. The product components include:
Avi Controller (control plane) The Avi Controller stores and manages all policies related to services and management. Through vCenter, the Avi Controller discovers VMs, data centers, networks, and hosts. Based on this auto-discovered information, virtual services can quickly be added using the web interface. To deploy a virtual service, the Avi Controller automatically selects an ESX server, spins up an Avi SE (described below), and connects it to the correct networks (port groups).
Note: Avi Controllers need access to the desired ESXi hosts (over port 443) to allow the Avi Controller-to-vCenter communication.
The Avi Controller can be deployed as a single VM or as a high availability cluster of 3 Avi Controller instances, each running on a separate VM.
Avi Service Engines (data plane) Each Avi Service Engine runs on its own virtual machine. The Avi SEs provide the application delivery services to end-user traffic, and also collect real-time end-to-end metrics for traffic between end-users and applications.
Deployment PrerequisitesVirtual Machine Requirements
Refer to the document for the minimum hardware requirements required to install Avi Controller Hardware Requirementsand Service Engines.

Avi Networks — Technical Reference (18.1)Installing Avi Vantage for VMware vCenter
Copyright © 2018 Avi Networks, Inc. Page 4 of 23
Avi Controller can also be deployed as a three-node cluster for redundancy. A separate VM is required for each of the three Avi Controller nodes. However, the requirements for each VM would remain the same. Refer to Overview of Avi Vantage
for more information on High Availability. Ensure that the ESX host has the required physical resources. High AvailabilityWHAT ARE THESE APPROPRIATE PHYSICAL RESOURCES. Service Engine creation will fail in the absence of these resources.
Service Engine VM requirements
RAM ? Add 1 GB of RAM to the SE configuration for each additional vCPU.CPU socket affinity ? Select this option for SEs within their group to allocate vCPU core to the same CPU socket as that of the multi-socket CPU.Dedicated dispatcher CPU ? Select this option for SEs within their group to dedicate a single CPU thread to dispatch data flows to other vCPU threads. This is relevant for SEs with three or more CPUs.Disk ? Set the disk value to a minimum of (2*RAM_size) + 5 GB to ensure 10GB.
For more details on the Service Engine VM requirements, refer to Service Engine Capacity and Limit Settings.
Software Requirements
Component Version
Avi Controller 18.1.X
VMware vCenter
5.1, 5.5, 6.0, or 6.5
The Avi Controller OVA contains the images files for the Avi Controller and Avi SEs.
VMware vCenter is required for write access mode deployment or read access mode deployment.
IP Address Requirements
The Avi Controller requires only one management IP address. Administrative commands are configured on the Controller by accessing it using this IP address. The management IP address is also used by the Controller to communicate with other Service Engines. This IP address for all Controllers within a cluster should belong to the same subnet. For more information, refer to the document.Controller Cluster IP
Each Avi Service Engine require one management IP address, a virtual service IP address, and an IP address that faces the pool network.
For quick deployments, DHCP is recommended over static assignment for Avi SE management and the pool network IP address allocation.
Note: Use a static IP for Avi Controller management address, unless your DHCP server can preserve the assigned IP address permanently.
The virtual service IP address is manually specified while creating the load balancing application. You can automate the virtual service IP address allocation by integrating it with an IPAM service. For more information, refer to IPAM and DNS Support.
Avi Vantage load balances the traffic with VIP address:port as its destination across the members (servers) within the pool.
vCenter Account Requirements
During the initial Controller setup, a vCenter account must be entered to allow communication between the Controller and the vCenter. The vCenter account must have the privileges to create new folders in the vCenter. This is required for Service Engine creation, which then allows virtual service placement. The required privileges for vCenter are as depicted below.

Avi Networks — Technical Reference (18.1)Installing Avi Vantage for VMware vCenter
Copyright © 2018 Avi Networks, Inc. Page 5 of 23

Avi Networks — Technical Reference (18.1)Installing Avi Vantage for VMware vCenter
Copyright © 2018 Avi Networks, Inc. Page 6 of 23
1. 2. 3. 4.
1. 2.
3.
1.
For complete information on VMware user role and privileges, refer to .VMware User Role for Avi Vantage
Modes of DeploymentDepending on the level of vCenter access provided, Avi Vantage can be deployed in a VMware cloud in the following modes:
Write access mode ? This mode requires a vCenter user account with write privileges. Avi Controller automatically spins up Avi Service Engines as needed, and accesses vCenter to discover information about the networks and VMs.Read access mode ? This mode requires a vCenter user account with read privileges. Avi Controller accesses vCenter to discover information about the networks and VMs. Avi Service Engines are spun up and connected to the networks by Avi Vantage and the vCenter administratorNo access mode ? Avi Controller does not access vCenter. The Avi Vantage and vCenter administrator manually deploy Avi Service Engines, define networks and interface IP addresses, and map the Service Engines to the correct networks.
Note: Starting with release 18.1.2, IPv6 is supported for VMware vCenter in Avi Vantage.
Deploying Avi Vantage in Write Access ModeFollow the steps given below to deploy Avi Vantage in a vCenter managed VMware cloud in write access mode:
Deploying Avi Controller OVAPerforming the Avi Controller initial setup(For static IP assignment) Configuring IP address poolsVerifying Installation
Deploying Avi Controller OVA
Log into the vCenter server through a vCenter client. Use the client to deploy Avi Controller OVA file by following the steps mentioned below:
Click on in the top menu and choose .File Deploy OVF TemplateFollow the instructions:Deploy OVA Template wizard
Choose Thick Provision Lazy Zeroed for disk format.Choose a port group for Destination Networks in Network Mapping. This port group will be used by the Avi Controller to communicate with vCenter.Specify the management IP address and default gateway. In the case of DHCP, leave this field empty.
Power on the VM.
Performing the Avi Controller Initial setup
You can change or customize settings following initial deployment using the Avi Controller?s web interface.
Navigate to the Avi Controller on your browser.
Note: While the system is booting up, a blank web page or a 503 status code may appear. Wait for about 5 to 10 minutes and then follow the instructions below for the setup wizard.
Configure the basic system settings:Administrator account

Avi Networks — Technical Reference (18.1)Installing Avi Vantage for VMware vCenter
Copyright © 2018 Avi Networks, Inc. Page 7 of 23
1.
DNS and NTP server informationEmail or SMTP information
CHANGE THE IMAGE => 18.1 VERSION

Avi Networks — Technical Reference (18.1)Installing Avi Vantage for VMware vCenter
Copyright © 2018 Avi Networks, Inc. Page 8 of 23
1.
2. Set the infrastructure type to VMware.

Avi Networks — Technical Reference (18.1)Installing Avi Vantage for VMware vCenter
Copyright © 2018 Avi Networks, Inc. Page 9 of 23
2.
3. Enter the vCenter settings.vCenter credentials ? To create Service Engines, the vCenter account must have privileges to create new folders in vCenter.vCenter IP addressPermissions ? Select Write.Integration with Cisco APIC ? Leave unselected or disabled.Data center ? Avi Vantage will be deployed here.IP allocation method for the networks where the pools and virtual services will be located ? DHCP or Static. (Wizard screen example below shows DHCP.)

Avi Networks — Technical Reference (18.1)Installing Avi Vantage for VMware vCenter
Copyright © 2018 Avi Networks, Inc. Page 10 of 23
3.

Avi Networks — Technical Reference (18.1)Installing Avi Vantage for VMware vCenter
Copyright © 2018 Avi Networks, Inc. Page 11 of 23
3.
4. Configure Avi Service Engine Settings.Management networkIP allocation method for management networkSupport Multiple Tenants ? Select .No

Avi Networks — Technical Reference (18.1)Installing Avi Vantage for VMware vCenter
Copyright © 2018 Avi Networks, Inc. Page 12 of 23
4.
1. 2. 3. 4. 5. 6.
One vNIC out of the 10 Avi Service Engine vNIC is for management network connection. The other vNICs are data vNICs. For IP allocation method, enter a subnet address and a range of host addresses within the subnet, in the case of static address assignment. Avi Vantage will assign addresses from this range to the Avi Service Engine data interfaces.
If the management and pool networks use DHCP, the deployment procedure is complete with this step. In case of static IP address allocation, you need to configure an IP address pool as explained in the next section.
Configuring IP address pools
Note: This section is applicable only for static IP address allocation.
Configure IP address pools for networks hosting Avi Service Engines by following the steps mentioned below:
Navigate to > > > .Infrastructure Cloud Default-Cloud NetworkFind a port group and IP subnet on which the DHCP service is not available.Select the port group by clicking on the edit icon.Select under .Static Network IP Address ManagementSelect the by clicking on the edit icon.IP SubnetEnter the static IP address or the range of IP addresses.
Verifying the Configuration
To verify the installation, navigate to > and click on . Click on the button. If the Infrastructure Clouds Default-Clouds Statusstatus is green, then the installation is a success.

Avi Networks — Technical Reference (18.1)Installing Avi Vantage for VMware vCenter
Copyright © 2018 Avi Networks, Inc. Page 13 of 23
Controller and VMware Communication
The Avi Controller must be able to communicate with vCenter and all ESX hosts that contribute to the deployment. If the communication fails, then the Avi Controller will not be able to spawn Service Engines.
Similarly, if the ESX hosts have DNS names, then the Avi Controller must point to the DNS server used by the ESX hosts to avoid the names resolving to different IP addresses.
Deploying Avi Vantage in Read and No Access ModeIn read access mode, * The Controller can discover networks and VMs. * The Controller does not automatically deploy Avi Service Engines or connect them to the networks. * The Controller can provide the analytics. * properties of the SE VMvCenter's OVF property must be set for the SEs to connect to the correct Controller cluster UUID for Avi ControllerController cluster. Navigate to > and click on the key icon, as shown in the screenshot below, to retrieve Infrastructure Cloudsthe Controller cluster UUID.
In no access mode, * The Controller does not access vCenter and does not automatically deploy Avi SEs or connect them to the networks. * The SE deployment and network placement are performed by Avi Vantage and vCenter administrators. * The Controller does not provide the analytics. However, it continues to provide VM properties of the SE VM virtual serviceanalytics. * vCenter's OVF property must be left blank. In the screenshot below, Controller cluster UUID for Avi Controllerthe parameter is left blank for an Avi Service Engine .Avi-se-umxxb

Avi Networks — Technical Reference (18.1)Installing Avi Vantage for VMware vCenter
Copyright © 2018 Avi Networks, Inc. Page 14 of 23
1. 2. 3. 4. 5. 6. 7.
1. 2.
3.
1.
Follow the steps given below to deploy Avi Vantage in a vCenter managed VMware cloud in read or no access mode:
Deploying Avi Controller OVAPerforming initial Avi Controller setupInstalling Avi Service EngineDownloading Avi Service Engine on OVADeploying Avi Service Engine OVA file(For no access mode) Configuring Service Engine interfaces(For static IP assignment) Configuring IP address pools for networks
Deploying Avi Controller OVA
Log into the vCenter server through a vCenter client. Use the client to deploy Avi Controller OVA file by following the steps mentioned below:
Click on in the top menu and choose .File Deploy OVF TemplateFollow the instructions:Deploy OVA Template wizard
Choose Thick Provision Lazy Zeroed for disk format.Choose a port group for Destination Networks in Network Mapping. This port group will be used by the Avi Controller to communicate with vCenter.Specify the management IP address and default gateway. In the case of DHCP, leave this field empty.
Power on the VM.
Performing the Avi Controller Initial Setup
You can change or customize settings following initial deployment using the Avi Controller?s web interface.
Navigate to the Avi Controller on your browser.
Note: While the system is booting up, a blank web page or a 503 status code may appear. Wait for about 5 to 10 minutes and then follow the instructions below for the setup wizard.
Configure the basic system settings:Administrator accountDNS and NTP server informationEmail or SMTP information CHANGE THE IMAGE => 18.1 VERSION

Avi Networks — Technical Reference (18.1)Installing Avi Vantage for VMware vCenter
Copyright © 2018 Avi Networks, Inc. Page 15 of 23
1.

Avi Networks — Technical Reference (18.1)Installing Avi Vantage for VMware vCenter
Copyright © 2018 Avi Networks, Inc. Page 16 of 23
1.
2.
3.
Set the infrastructure type.No access mode: Select Orchestrator to end the installation wizard. No more information is required.Read access mode: Select VMware and continue with rest of the steps.
(For read access mode) Enter the vCenter settings.

Avi Networks — Technical Reference (18.1)Installing Avi Vantage for VMware vCenter
Copyright © 2018 Avi Networks, Inc. Page 17 of 23
3.
vCenter credentials ? To create Service Engines, the vCenter account must have privileges to create new folders in vCenter.vCenter IP addressPermissions ? Select Read.Integration with Cisco APIC ? Leave unselected or disabled.Data center ? Avi Vantage will be deployed here.IP allocation method for the networks where the pools and virtual services will be located.

Avi Networks — Technical Reference (18.1)Installing Avi Vantage for VMware vCenter
Copyright © 2018 Avi Networks, Inc. Page 18 of 23
3.
4. To verify vCenter resources discovery by Avi Controller, navigate to > > . The Administration Settings Infrastructurediscovery status should be 100% complete.
If the management and pool networks use DHCP, then the deployment procedure is complete. If static address allocation is used, then an additional step as explained at is required.Configuring IP address pools for networks
Installing Avi Service Engine
Service Engine installation in write access mode is automatic. Download and deploy the Avi Service Engine to install it.
Downloading Avi Service Engine on OVA
The OVA image file for Service Engines is embedded in the Avi Controller image. The Avi SE OVA image can be downloaded using the web interface or the API.
Using the web interface ? Navigate to > , click on the button (as shown in the screenshot below) Infrastructure Cloudand select se.ova to download the OVA image.

Avi Networks — Technical Reference (18.1)Installing Avi Vantage for VMware vCenter
Copyright © 2018 Avi Networks, Inc. Page 19 of 23
1.
2.
1. 2. 3.
4.
5.
3.
4.
Using the API ? Navigate to http:// /api/fileservice/seova, where is the IP address of the Avi avi-ctrl-ip avi-ctrl-ipController.
Deploying Avi Service Engine OVA file
Note: For high availability, use a minimum of two Avi Service Engines for deployment.
In vCenter, click on in the top menu and choose .File Deploy OVF Template
Follow the instructions:Deploy OVA Template wizard
Choose Thick Provision Lazy Zeroed for disk format.
Choose the port groups for the Avi SE network connections. The Avi SE has ten vNICs. Connect the first vNIC to the management network. Connect the other vNICs to the data network.
For the management connection, choose a port group that will allow the Avi SEs to communicate with the Avi Controller. An Avi SE can be connected to up to nine data networks. Choose a port group in the destination networks for each source network, where you can host the virtual services and pools. The Avi Controller expects the Avi SE's data vNICs to be connected to virtual service and pool networks.
Specify the Avi Controller IP address.
Enter the Avi Controller's authentication token key:Log into Avi Controller.Navigate to > Infrastructure CloudClick on the key icon to view the authentication token key.
Copy the authentication token.
Paste the authentication token key into the for Avi field.Authentication Token
Specify the management IP address and default gateway. In the case of DHCP, leave this field empty.
Note: In read access mode, the Controller cluster UUID field must be filled in, so that the Service Engine can connect to the correct Controller cluster. In no access mode, the field must be left blank.
In the VM properties menu, connect the Avi SE data vNICs that are required to reach a virtual service network and pool network to the port groups. Leave the unused vNICs disconnected.

Avi Networks — Technical Reference (18.1)Installing Avi Vantage for VMware vCenter
Copyright © 2018 Avi Networks, Inc. Page 20 of 23
4.
5.
1.
(For no access mode only) Note down the following information:MAC address of the vNICsIP subnet of the port group
This information will be used to identify the Avi SE interfaces, as the Controller does not have access to vCenter and so cannot associate the Avi SE's interface names with VMware's interface names.
Power on the VM.
Repeat the above steps for at least one more Service Engine. By default, two Avi SEs are required for deploying a virtual service.
Configuring Avi Service Engine Interfaces
Note: This step is applicable only for no access mode.
Avi Service Engine requires an IP address in each of the virtual service networks and server networks. This process is automatic in write access and read access mode. For no access mode, follow the steps below:
Avi Networks — Technical Reference (18.1)Installing Avi Vantage for VMware vCenter
Copyright © 2018 Avi Networks, Inc. Page 21 of 23
1.
2. 3.
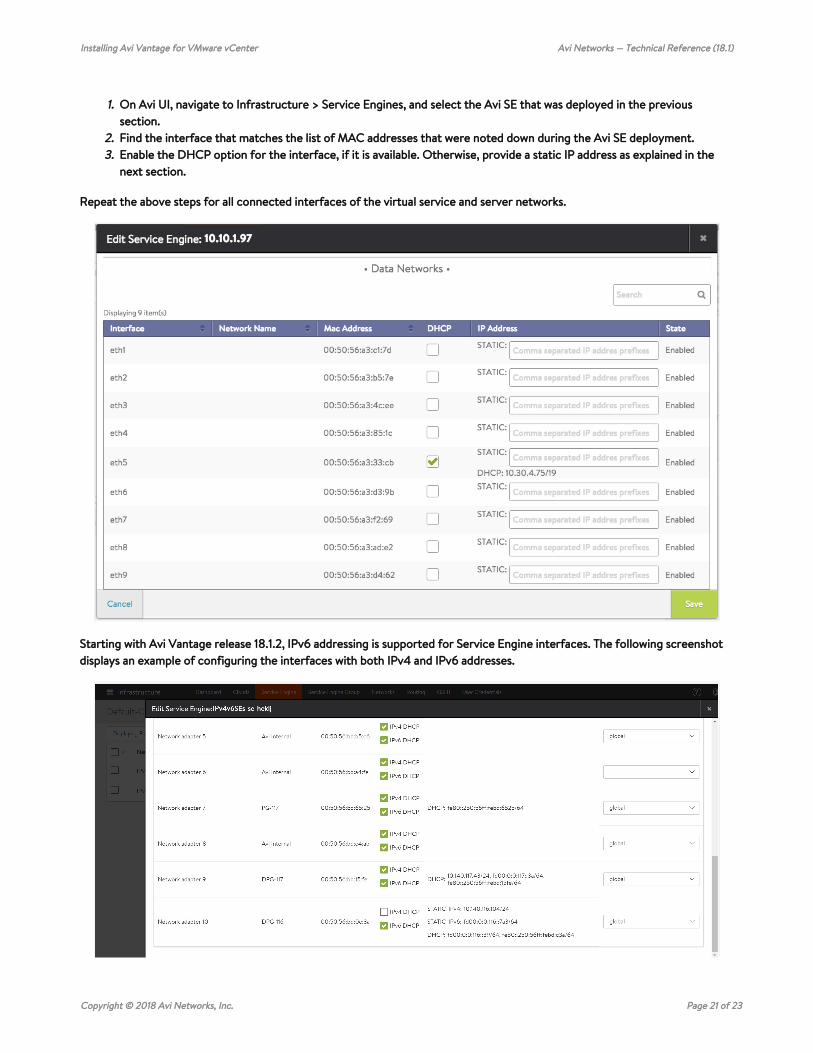
On Avi UI, navigate to > , and select the Avi SE that was deployed in the previous Infrastructure Service Enginessection.Find the interface that matches the list of MAC addresses that were noted down during the Avi SE deployment.Enable the DHCP option for the interface, if it is available. Otherwise, provide a static IP address as explained in the next section.
Repeat the above steps for all connected interfaces of the virtual service and server networks.
Starting with Avi Vantage release 18.1.2, IPv6 addressing is supported for Service Engine interfaces. The following screenshot displays an example of configuring the interfaces with both IPv4 and IPv6 addresses.

Avi Networks — Technical Reference (18.1)Installing Avi Vantage for VMware vCenter
Copyright © 2018 Avi Networks, Inc. Page 22 of 23
1. 2. 3. 4. 5. 6.
Configuring IP address pools
Note: This section is applicable only for static IP address allocation.
Each Avi SE deployed in a VMware cloud has 10 vNICs. The first vNIC is the management vNIC using which the Avi SE communicates with the Avi Controller. The other vNICs are data vNICs and are used for end-user traffic.
After spinning up an Avi SE, the Avi Controller connects the Avi SE?s management vNIC to the management network specified during initial configuration. The Avi Controller then connects the data vNICs to virtual service networks according to the IP and pool configuration of the virtual services.
The Avi Controller builds a table that maps port groups to IP subnets. With this table, the Avi Controller connects Avi SE data vNICs to port groups that match virtual service networks and pools.
After a data vNIC is connected to a port group, it needs to be assigned an IP address. For static allocation, assign a range of IP addresses to the applicable port group. The Avi Controller selects an IP address from the specified range and adds the address to the data vNIC connected to the port group.
Configure IP address pools for networks hosting Avi Service Engines by following the steps mentioned below:
Navigate to > > > .Infrastructure Cloud Default-Cloud NetworkFind a port group and IP subnet on which the DHCP service is not available.Select the port group by clicking on the edit icon.Select under .Static Network IP Address ManagementSelect the by clicking on the edit icon.IP SubnetEnter the static IP address or the range of IP addresses.

Avi Networks — Technical Reference (18.1)Installing Avi Vantage for VMware vCenter
Copyright © 2018 Avi Networks, Inc. Page 23 of 23
Recommended ReadingVirtual Service CreationTroubleshooting Avi Vantage Deployment into VMware