Package Contents Configure the VPN Firewall for Internet ...€¦ · Installation Guide ProSafe...
2
Installation Guide ProSafe 8-Port Gigabit VPN Firewall FVS318G Follow these instructions to set up your VPN firewall. • For cable modem service. You must set up the VPN firewall using the same computer you used when you first set up your internet connection. • For DSL service. To set up the VPN firewall, you might need information such as your DSL service login name and password. Package Contents The VPN firewall package contains: • FVS318G VPN Firewall • Ethernet cable • Rubber feet • Power adapter • Installation guide • Resource CD Connect the VPN Firewall 1. Connect the cables between the VPN Firewall, computer, and modem. a. Turn off your computer. b. Turn off and unplug the modem. c. Locate the cable (modem cable in the diagram) that connects your modem and computer. d. Disconnect the cable at the computer end only , point A in the diagram. e. Insert the cable from your modem into the WAN port of the VPN firewall as shown in point B of the second diagram. f. Insert the cable that came with your VPN firewall (the NETGEAR cable in the next diagram) into a LAN port on the VPN firewall, such as LAN port 1 (point C in the diagram). Insert the other end into the LAN port of your computer (point D in the diagram). Your cables are connected, and you are ready to restart your network. 2. Restart your network in the correct sequence. WARNING: Failure to restart your network in the correct sequence could prevent you from connecting to the Internet. a. Pug in the power cord to your modem, turn it on, and wait 2 minutes. b. Plug in the power cord to your VPN firewall, turn it on, and wait 1 minute. c. Turn on your computer. Modem Modem cable Internet Computer A Computer C D B LAN ports VPN Firewall NETGEAR cable Internet Modem WAN port Note: For DSL customers, if ISP-provided software logs you in to the Internet, do not run that software. You might need to disable auto dialing in your browser. d. To verify that the VPN network is operating correctly check the VPN firewall LEDs:.Power . The Power LED should turn solid green. If it does not turn solid green, check that the power adapter is connected to an AC outlet. • Test. The Test LED lights when the router is first turned on and then goes off. If after 2 minutes it is still lit, see the Troubleshooting Tips in this guide. • WAN. The WAN port LED should be lit. If it is not, make sure that the Ethernet cable is attached to the VPN firewall WAN port and the modem. Also, make sure that the modem is powered on. • LAN. Each LAN port has two LEDs. The green LED on the upper left indicates network activity. The right LED indicates communication speed. It is green for 1000 Mbps, amber for 100 Mbps, and off for 10 Mbps. If the LAN port LED is not on, check that the Ethernet cable from the computer to the firewall is attached at both ends, and that the computer is on. Configure the VPN Firewall for Internet Access Use your browser to access and configure the VPN firewall. 1. From the computer, open a browser such as Internet Explorer. With the VPN firewall in its factory default state, type http://192.168.1.1 in the browser address bar and click Enter . The login screen displays. Power LAN Ports WAN Test FVS318G_IG.fm Page 1 Thursday, December 20, 2012 10:42 AM
Transcript of Package Contents Configure the VPN Firewall for Internet ...€¦ · Installation Guide ProSafe...
Installation Guide
FVS318G_IG.fm Page 1 Thursday, December 20, 2012 10:42 AM
ProSafe 8-Port Gigabit VPN Firewall FVS318G Follow these instructions to set up your VPN firewall.• For cable modem service. You must set up the VPN firewall using the same
computer you used when you first set up your internet connection.• For DSL service. To set up the VPN firewall, you might need information such
as your DSL service login name and password.
Package ContentsThe VPN firewall package contains:• FVS318G VPN Firewall• Ethernet cable• Rubber feet• Power adapter• Installation guide• Resource CD
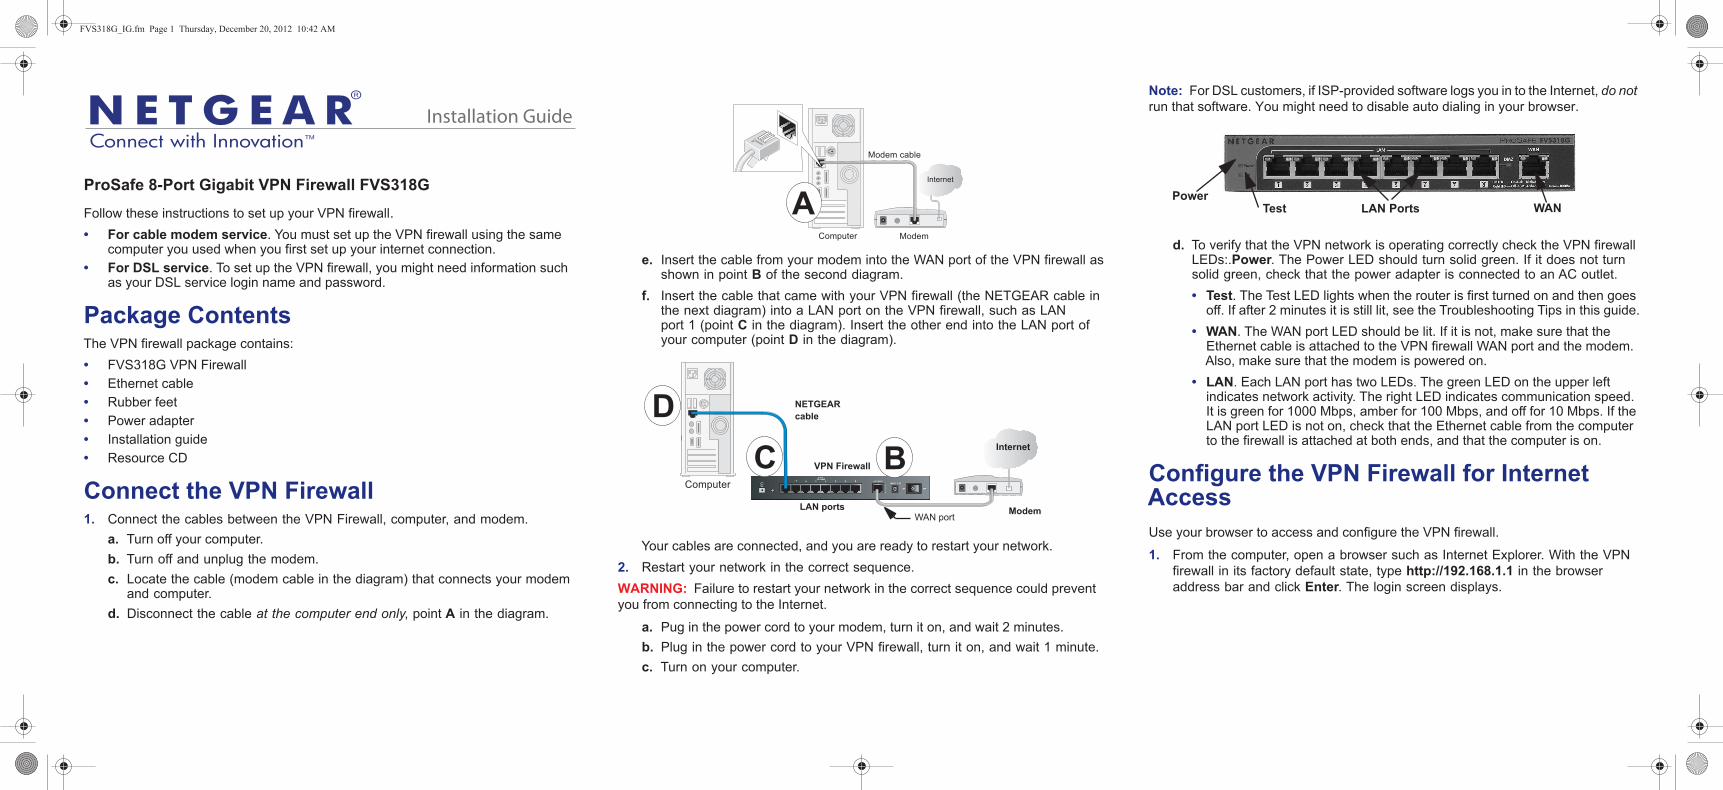
Connect the VPN Firewall 1. Connect the cables between the VPN Firewall, computer, and modem.
a. Turn off your computer.b. Turn off and unplug the modem.c. Locate the cable (modem cable in the diagram) that connects your modem
and computer.d. Disconnect the cable at the computer end only, point A in the diagram.
e. Insert the cable from your modem into the WAN port of the VPN firewall as shown in point B of the second diagram.
f. Insert the cable that came with your VPN firewall (the NETGEAR cable in the next diagram) into a LAN port on the VPN firewall, such as LAN port 1 (point C in the diagram). Insert the other end into the LAN port of your computer (point D in the diagram).
Your cables are connected, and you are ready to restart your network.2. Restart your network in the correct sequence.WARNING: Failure to restart your network in the correct sequence could prevent you from connecting to the Internet.
a. Pug in the power cord to your modem, turn it on, and wait 2 minutes.b. Plug in the power cord to your VPN firewall, turn it on, and wait 1 minute. c. Turn on your computer.
Modem
Modem cable
Internet
Computer
A
Computer
CD
BLAN ports
VPN Firewall
NETGEARcable
Internet
ModemWAN port
Note: For DSL customers, if ISP-provided software logs you in to the Internet, do not run that software. You might need to disable auto dialing in your browser.
d. To verify that the VPN network is operating correctly check the VPN firewall LEDs:.Power. The Power LED should turn solid green. If it does not turn solid green, check that the power adapter is connected to an AC outlet.• Test. The Test LED lights when the router is first turned on and then goes
off. If after 2 minutes it is still lit, see the Troubleshooting Tips in this guide.• WAN. The WAN port LED should be lit. If it is not, make sure that the
Ethernet cable is attached to the VPN firewall WAN port and the modem. Also, make sure that the modem is powered on.
• LAN. Each LAN port has two LEDs. The green LED on the upper left indicates network activity. The right LED indicates communication speed. It is green for 1000 Mbps, amber for 100 Mbps, and off for 10 Mbps. If the LAN port LED is not on, check that the Ethernet cable from the computer to the firewall is attached at both ends, and that the computer is on.
Configure the VPN Firewall for Internet AccessUse your browser to access and configure the VPN firewall.
1. From the computer, open a browser such as Internet Explorer. With the VPN firewall in its factory default state, type http://192.168.1.1 in the browser address bar and click Enter. The login screen displays.
PowerLAN Ports WANTest
FVS318G_IG.fm Page 2 Thursday, December 20, 2012 10:42 AM
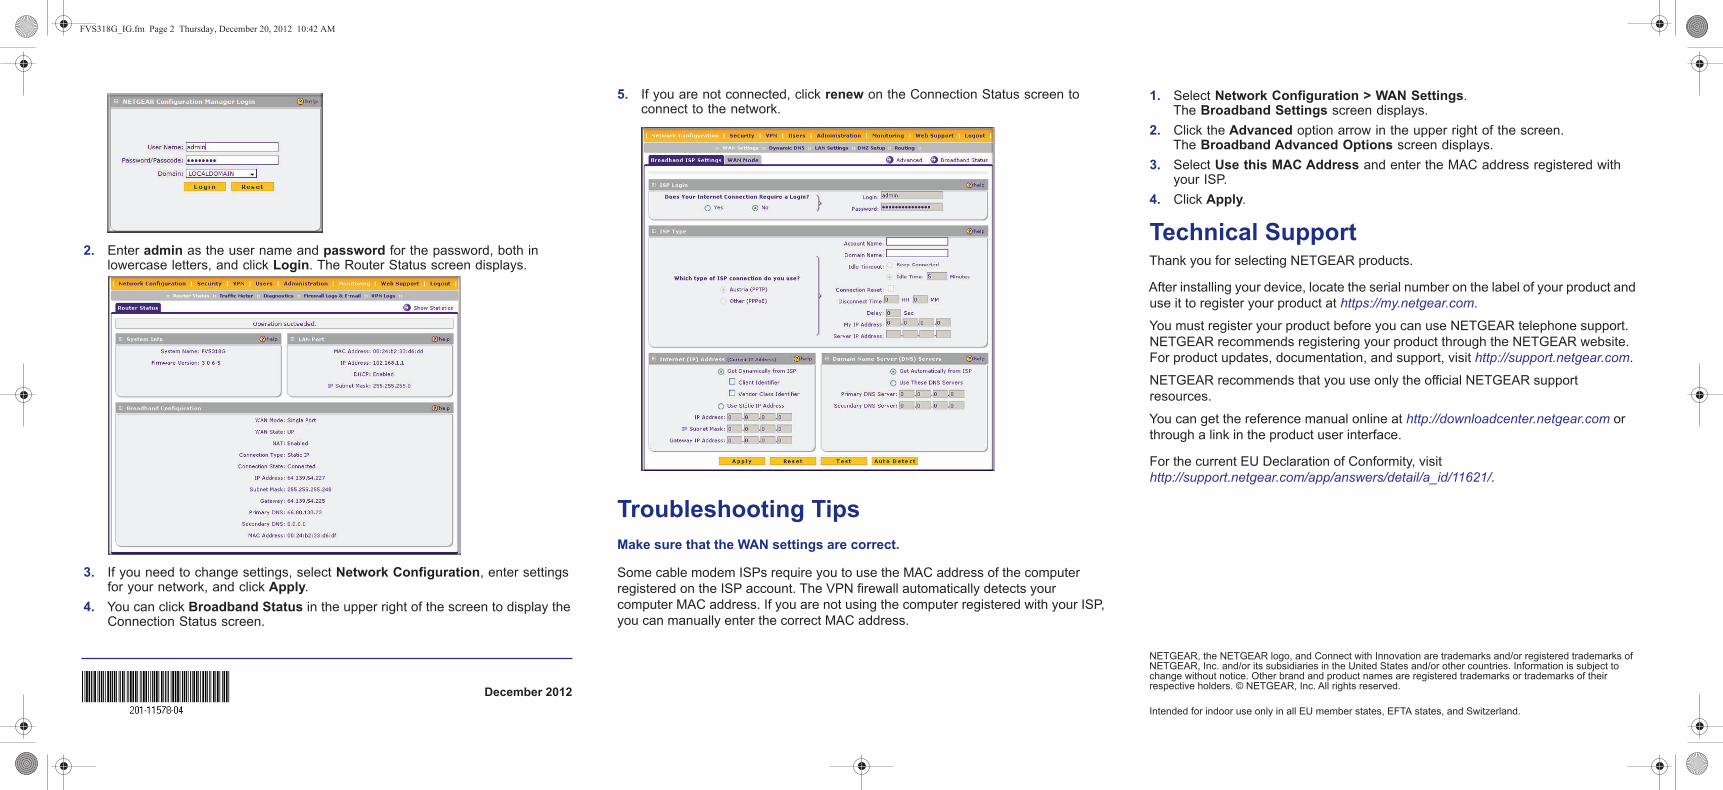
2. Enter admin as the user name and password for the password, both in lowercase letters, and click Login. The Router Status screen displays.
3. If you need to change settings, select Network Configuration, enter settings for your network, and click Apply.
4. You can click Broadband Status in the upper right of the screen to display the Connection Status screen.
December 2012
NETGEAR, the NETGEAR logo, and Connect with Innovation are trademarks and/or registered trademarks of
5. If you are not connected, click renew on the Connection Status screen to connect to the network.
Troubleshooting TipsMake sure that the WAN settings are correct.
Some cable modem ISPs require you to use the MAC address of the computer registered on the ISP account. The VPN firewall automatically detects your computer MAC address. If you are not using the computer registered with your ISP, you can manually enter the correct MAC address.
1. Select Network Configuration > WAN Settings.The Broadband Settings screen displays.
2. Click the Advanced option arrow in the upper right of the screen.The Broadband Advanced Options screen displays.
3. Select Use this MAC Address and enter the MAC address registered with your ISP.
4. Click Apply.
Technical SupportThank you for selecting NETGEAR products.
After installing your device, locate the serial number on the label of your product and use it to register your product at https://my.netgear.com.
You must register your product before you can use NETGEAR telephone support. NETGEAR recommends registering your product through the NETGEAR website. For product updates, documentation, and support, visit http://support.netgear.com.
NETGEAR recommends that you use only the official NETGEAR support resources.
You can get the reference manual online at http://downloadcenter.netgear.com or through a link in the product user interface.
For the current EU Declaration of Conformity, visit http://support.netgear.com/app/answers/detail/a_id/11621/.
NETGEAR, Inc. and/or its subsidiaries in the United States and/or other countries. Information is subject to change without notice. Other brand and product names are registered trademarks or trademarks of their respective holders. © NETGEAR, Inc. All rights reserved.
Intended for indoor use only in all EU member states, EFTA states, and Switzerland.