P r o t a S - images-na.ssl-images-amazon.com file(* only for Prota S) P r o t a S h a s a pr ox i...
16
Prota S Getting started Visit https://support.prota.info To learn more how to use your Prota check our Frequently Asked Questions.
Transcript of P r o t a S - images-na.ssl-images-amazon.com file(* only for Prota S) P r o t a S h a s a pr ox i...

Prota SGetting started
Visit https://support.prota.infoTo learn more how to use your Prota check our Frequently AskedQuestions.

1. Installation
Layout / Device layout
Step1. Requirements
Step2. Downloading Prota Space App
Step3. Setup Prota
Step4. Proximity Sensor
2. First time con�guration
Step5. Select your Prota to con�gure
Step6. Email registration
Step7. Con�gure the network
Step8. Connect with Prota
Step9. Set Prota name/password
Step10. Initialize Prota
Step11. Access your Prota
Table of contentProta S - Getting started

Layout / Device layoutProta S
1. Proximity sensor2. Status LED3. Reset button4. Micro HDMI port5. Micro USB port6. Power port (5V-2A)

PreparationStep1. Requirements
1. Prota S2. Micro USB cable3. Power supply unit (sold separately)
Please make sure to use a 5V2A PSU; otherwise, it might randomly malfunction (stablePSUs available on our o�cial website).
*

InstallationStep2. Downloading Prota Space App
Download Prota Space App to start using the Prota.

InstallationStep3. Setup Prota
Plug a power supply unit to the power port and wait until the LED alternatesbetween red and blue (it can take up to 5-10 minutes).
LED status guide
Blue blinking: Booting -
Red/Blue alternating: AP mode -
No network connection*
Green/Blue alternating: Connected to network, but not fully con�gured -
Red: No network connection -
Green: Operational -
Green blinking: Updating -
Red blinking: Resetting -
Blue or red frozen at booting/updating: Error (please reboot) -

InstallationStep4. Proximity Sensor(* only for Prota S)
Prota S has a proximity sensor integrated on its top. It is able to detectmovements without physical contact. Simply hover over the top of the Protabelow 1 cm interval.
Use the sensor to
1. Check Prota’s LED status2. Activate AP mode
a. Pass over the sensor by handb. Hover the sensor again (within 1 second).
Wait until the LED blinks in blue/red*
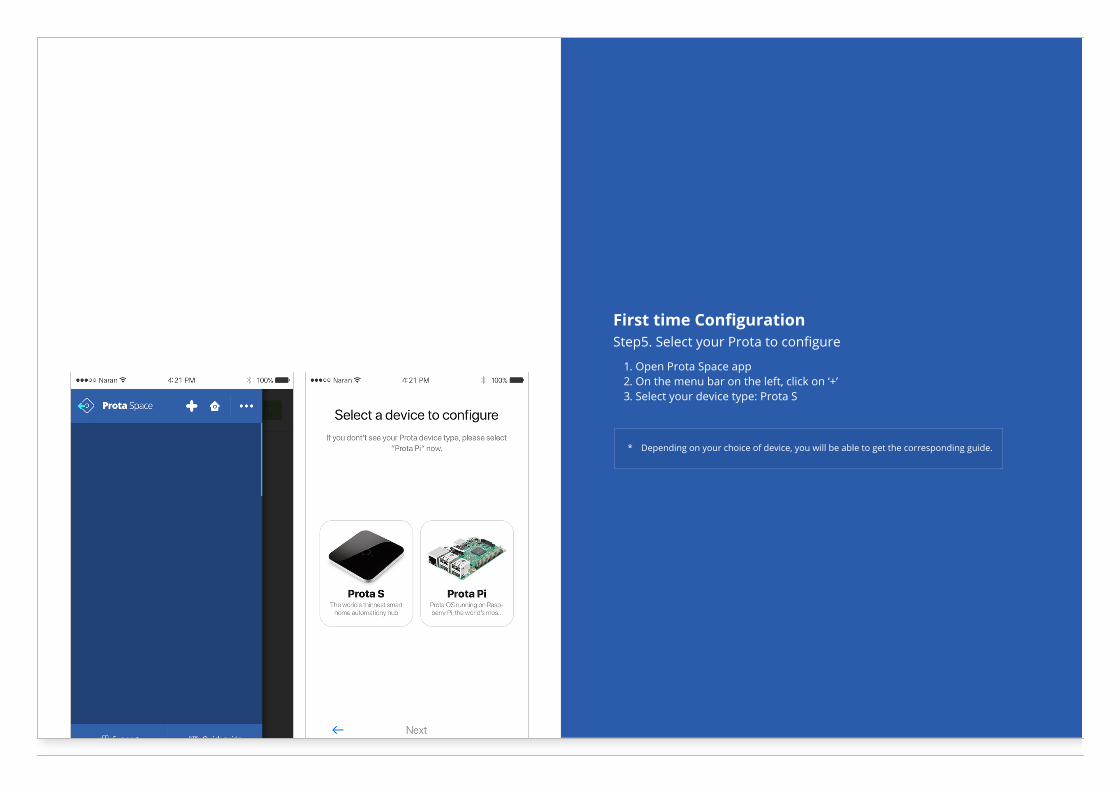
First time ConfigurationStep5. Select your Prota to con�gure
1. Open Prota Space app2. On the menu bar on the left, click on ‘+’3. Select your device type: Prota S
Depending on your choice of device, you will be able to get the corresponding guide.*

First time ConfigurationStep6. Register your email
Add your email address
This email will be used to receive essential information from your Prota or from us.Moreover, to get bene�ts of Prota membership or useful apps, please use the account youare mainly using.
*

First time ConfigurationStep7. Con�gure the network
Enter your WiFi’s SSID and password in order to connect your Prota to yournetwork.
Caution
Prota might be unable to connect if the network SSID contains special characters including ‘and “.
*
Prota only connects to the network that has a password due to security issue.*If your network doesn’t have a password, please set one before connecting it to Prota.*

First time ConfigurationStep8. Connect with Prota
Make sure your Prota is in AP mode (LED blinking red and blue)
1. Go to Settings → Wi-Fi2. Select a Prota to con�gure (e.g. prota-xxxx)
What is AP mode?
When Prota is in AP mode, it generates its own local network. In this case, you can �ndProta’s SSID from the Wi-Fi network list and access Prota directly.
*

First time ConfigurationStep8. Connect with Prota
1. Come back to the Prota Space app after connecting to Prota SSID.2. Your Prota will automatically connect to the network you previously
entered.3. It can take up to 5 minutes to connect. If the connection is successful, LED
status alternates between green and blue.
If the LED status remains red and blue, Prota may have failed to connect. Please follow theinstructions and try again or choose another network.
*

First time ConfigurationStep9. Set Prota name/password
1. Name your Prota. For the Prota name, you cannot use any specialcharacters except hyphens.
2. Set password. It should be at least 8 characters long. The password will beused for the AP mode connection.
Because Naran doesn’t save personal information, you have to reset your Prota if youforget your password.
*

First time ConfigurationStep10. Initialize Prota
Initialize your Prota as the last step of con�guration.
Initialization might take 5-10 minutes.
You will get a noti�cation from mobile app as soon as Prota �nishinitializing.
If the LED light continues to blink in green or blue over 30 mins, please reconnect thepower cable. Update will begin automatically.
*

First time ConfigurationStep11. Access your Prota
Once the initialization is complete, the device you’re using will automaticallyhave access to Prota Space.
At the same time, an email will be sent to you with your Access Link. This willallow you to access Prota Space from a di�erent device (desktop,smartphone, tablet).
Do not share your access link, as it puts your Prota’s credentials andpersonal information at risk.