OWNER’S SAFETY MANUAL - Walker Bay · DESIGN CATEGORIES ... This Owner’s Safety Manual is not a...
26
1 For Customer Service or Technical Support visit www.walkerbay.com OWNER’S SAFETY MANUAL
Transcript of OWNER’S SAFETY MANUAL - Walker Bay · DESIGN CATEGORIES ... This Owner’s Safety Manual is not a...
1For Customer Service or Technical Support visit www.walkerbay.com
OWNER’S SAFETY MANUAL

2
DECLARATION OF CONFORMITY
International standards to which conformity is declared:Recreational Craft Directive, RCD: 94/25/EC, Module AInternational Organization for Standardization, ISO: 6185-2American Boat and Yacht Council, ABYC: H-28National Marine Manufacturers Association, NMMA: H-28
CERTIFYING BODIES
CE/Europe United States of AmericaICNN (ISO# 0607) National Marine Manufacturers Assn.52 rue Sénac de Meilhan Suite 5100-200 E. Randolph Dr.17000 La Rochelle, France Chicago, IL 60601-6528, USATel: 33 (0) 5 46 28 32 24 Tel: 1 (312) 946-6214Fax: 33 (0) 5 46 34 04 66 Fax: 1 (312) 946-0388
MANUFACTURER Walker Bay Boats LLC. 3555 Bay St., Union Gap, WA 98903-1887, USA
email: [email protected]
TYPE OF EQUIPMENT
Inflatable Boat
HULL IDENTIFICATION NUMBER
HIN / CIN (Found on boat): US-EWV___________________
IMPORTER
®Walker Bay is a registered trade mark and/or service mark of Walker Bay Boats Inc. All rights reserved.
Tel: 1 (604) 682-5699Fax: 1 (312) 683-1877

3
TABLE OF CONTENTS DECLARATION OF CONFORMITY ................................................................................ 2TABLE OF CONTENTS ................................................................................................ 3INTRODUCTION ........................................................................................................ 4BOATING SAFETY SIGNS & SYMBOLS ......................................................................... 5SPECIFICATIONS AND MAXIMUM CAPACITIES ............................................................ 6DESIGN CATEGORIES ................................................................................................ 7FEATURES AND DECK PLANS ...................................................................................... 8MATERIALS ............................................................................................................... 9OPERATOR INSTRUCTIONS ....................................................................................... 10MAINTENANCE ......................................................................................................... 11ENVIRONMENT ......................................................................................................... 12STORAGE ................................................................................................................. 13MOTORING .............................................................................................................. 13SAFETY EQUIPMENT ................................................................................................ 14CHECKLIST BEFORE OPERATING .............................................................................. 15EMERGENCY PROCEDURES ....................................................................................... 15 TOWING ................................................................................................................. 16BEACHING .............................................................................................................. 17ANCHORING - MOORING ......................................................................................... 17DAVITS - CRADLES .................................................................................................. 17TRANSPORTING BY ROAD ........................................................................................ 18INFLATION .............................................................................................................. 18OPERATION OF VALVES ............................................................................................ 19ELECTRICAL SYSTEMS .............................................................................................. 19NAVIGATION LIGHTS ................................................................................................ 20STEERING SYSTEM ................................................................................................... 20FUEL SYSTEM ........................................................................................................... 20REPAIRS .................................................................................................................. 21TROUBLE-SHOOTING ................................................................................................ 23WARRANTY .............................................................................................................. 24
ATTACHMENTS:MANUFACTURER’S STATEMENT OF ORIGINWARRANTY REGISTRATION FORM

4
INTRODUCTION
Congratulations on your purchase of a Generation Rigid Inflatable Boat (RIB) by Walker Bay! The Generation redefines the benchmark in RIB luxury craft. With elegant European styling and a sporty wide-body frame, this boat is sure to exceed your expectations in comfort and performance. A precisely constructed deep-V fiberglass hull provides a smooth ride, facilitates early planing and prevents potential issues of cavitation, while the spacious interior of the wide-body hull affords ample space for cargo and crew. Every Generation RIB is backed by a 5-year limited hull warranty and a 10-year limited warranty on the ORCA CSM tubes.
Welcome to the next Generation of luxury RIBs!
ABOUT THE OWNER’S MANUAL
This manual has been compiled to help you to operate your craft with safety and pleasure. It contains details of the craft; the equipment supplied or fitted, its systems and information on their operation. Please read it carefully and familiarize yourself with the craft before using it.
This Owner’s Safety Manual is not a course on boating safety or seamanship. If this is your first craft or inflatable, or if you are changing to a type of craft you are not familiar with, for your own comfort and safety, please ensure that you obtain handling and operating experience before “assuming command” of the craft. Your dealer or national boating/sailing federation or yacht club will be pleased to advise you of local sea schools or competent instructors.
Ensure that the anticipated wind and sea conditions will correspond to the design category of your craft (see DESIGN CATEGORIES) and that you and your crew are able to handle the craft in these conditions. Even when your boat is categorized for them, the sea and wind conditions corresponding to the design categories A, B, and C range from severe storm conditions for category A, to strong conditions for the top of category C, open to the hazards of a freak wave or gust. These are therefore dangerous conditions, where only a competent, fit and trained crew using a well maintained craft can satisfactorily operate.
This Owner’s Safety Manual is not a detailed maintenance or trouble-shooting guide. In case of difficulty, contact Walker Bay or its national representatives.
Always use trained and competent people for maintenance, fixing or modifications. Modifications that may affect the safety of the craft must be assessed, executed and documented by competent people. Walker Bay or its representative cannot be held responsible for modifications that Walker Bay® has not approved. Modifications or attachment of items to the hull or tube may affect your warranty (see LIMITED WARRANTY).
In some countries a driving license, boating license, certification, or authorization are required, or specific regulations are in force for operating a marine craft. Check with your local boating safety office.
Always maintain your craft properly and make allowances for the deterioration that will occur over time and as a result of heavy use or misuse of the craft. Any craft, no matter how strong it may be, can be severely damaged if not used properly. This is not compatible with safe boating (see OPERATOR INSTRUCTIONS). Always adjust the speed and direction of the craft to sea conditions.
The craft should have onboard the appropriate safety equipment (see SAFETY EQUIPMENT) according to the type of craft, weather conditions etc. This equipment is mandatory in some countries. The crew should be familiar with the use of all safety equipment and emergency maneuvering (see SAFETY EQUIPMENT & EMERGENCY PROCEDURES). Contact your local boating/sailing organization for information, lessons or drill sessions.
All persons should wear a suitable Coast Guard approved buoyancy aid (life jacket/personal floatation device). Note that in some countries, it is a legal requirement to wear a buoyancy aid that complies with their national regulations at all times.
PLEASE KEEP THIS OWNER’S MANUAL AND YOUR MSO IN A SECURE PLACE AND HAND IT OVER TO THE NEW OWNER WHEN YOU SELL THE CRAFT.

5
BOATING SAFETY SIGNS AND SYMBOLS
This is the safety alert symbol. It is used to alert you to potential personal injury hazards. Obey all safety messages that follow this symbol to avoid possible injury or death.
DANGER
Indicates an imminently hazardous situation which, if not avoided, will result in death or serious injury or substantial property damage.
WARNING
Indicates an imminently hazardous situation which, if not avoided, could result in death or serious injury or property damage.
CAUTION
Indicates an imminently hazardous situation which, if not avoided, may result in property damage.
CAUTIONUsed without the safety alert symbol indicates a potentially hazardous situation, which, if not avoided, may result in property damage.
NOTICE Indicates installation, operation or maintenance information which is important but not haz-ard related.
REGISTRATION AND REGULATION
REGISTER YOUR BOAT (USING YOUR MANUFACTURING STATEMENT OF ORIGIN OR MSO, AND YOUR HULL IDENTIFICATION NUMBER OR HIN) WITH YOUR STATE OR PROVINCE IF REQUIRED. REGULATIONS VARY BY JURISDICTION SO CONTACT YOUR LOCAL REGISTRATION OFFICE DIRECTLY.
WARRANTY
For information on the Limited Warranty and Extended Warranty coverage see the Limited Warranty in this manual. Activate your warranty by completing the Warranty Registration Card included with this manual and sending it to Walker Bay®. We recommend you retain a copy for yourself.

6
SPECIFICATIONS* AND MAXIMUM CAPACITIES Safety Standards:
MODELISO 6185
CEPART CATEGORY
Generation 400 II C A EWV 08 022 P
Generation 450 II C A EWV 08 023 P
Maximum Capacities:
MODEL
X 75 KG KG LB KG LB L KW HP KT BAR PSI
Generation 400 7 753 1660 357 785 L 36.8 50 0.25 3.5
Generation 450 8 866 1910 451 992 L 55.94 75 0.25 3.5
Specifications:
MODEL
A B C D E a b cham-bersM FT M IN M IN KG LB CM IN M IN M IN
Generation 400 4.00 13’1” 1.97 6’5” 1.25 49 259 571 48 19 2.43 96 0.97 38 3
Generation 450 4.50 14’9” 2.14 7’ 1.30 51 287 633 51 20 2.81 111 1.06 42 5
Packing dimensions:
MODEL
X Y Z
M FT M FT M IN
Generation 400 3.96 13’
Generation 450 4.90 16’1” * Specifications subject to change without notice.
A
B DE
C a b
X Y
Z
Generation 360 5 599 1321 317 701 L 30 40 0.25 3.5
Generation 360 3.63 11’11” 1.83 6’0” 1.02 40 220 487 48 19 2.14 84 0.89 35 3
Generation 360 3.50 11’’6” 1.73 5’8” 1.12 3’8”
Generation 360 II C INFBWALKER001
5’8”
5’8”
1.73
1.73
3’8”
3’8”
1.12
1.12

7
WARNING
Do not exceed maximum recommended number of persons and maximum recommended load. Regardless of number of persons on board, total weight of persons and equipment must not exceed maximum recommended load. Always use seat(s) / seating spaces provided.
Always load craft carefully and distribute loads appropriately to maintain design trim (approxi-mately level). Avoid standing or placing heavy weights high up.
DESIGN CATEGORIES A - Ocean - Designed for extended voyages where conditions may exceed wind force 8 (Beaufort scale) and significant wave heights of 4 meters and above, and vessels largely self-sufficient;
B - Offshore - Designed for offshore voyages where conditions up to, and including, wind force 8 and significant wave heights up to, and including, 4 meters may be experienced;
C - Inshore - Designed for voyages in coastal waters, large bays, estuaries, lakes and rivers where conditions up to, and including, wind force 6 and significant wave heights up to, and including, 2 meters may be experienced;
D - Sheltered waters - Designed for voyages on small lakes, rivers, and canals where conditions up to, and including, wind force 4 and significant wave heights up to, and including, 0.5 meters may be experienced.

8
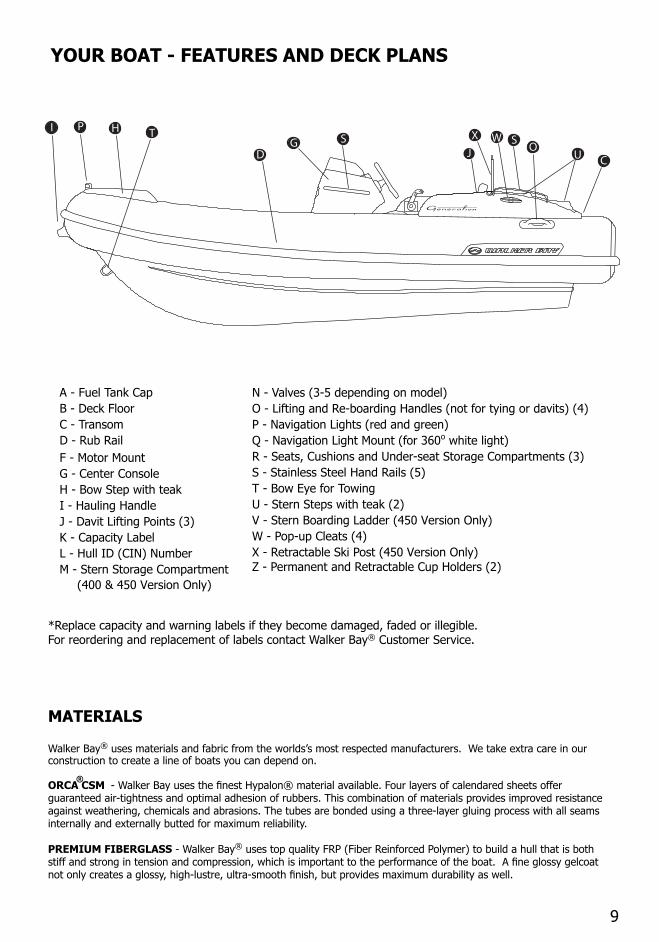
YOUR BOAT - FEATURES AND DECK PLANS
A
B
C
D
E
F
G
H
I
J
K
J
L
M
N
N
O
O
O
P
Q
R
R
R
S
U
V
W
W
S
X
Z
9
A - Fuel Tank Cap B - Deck FloorC - TransomD - Rub RailF - Motor MountG - Center Console
H - Bow Step with teak I - Hauling Handle
J - Davit Lifting Points (3)K - Capacity LabelL - Hull ID (CIN) NumberM - Stern Storage Compartment
N - Valves (3-5 depending on model) O - Lifting and Re-boarding Handles (not for tying or davits) (4)P - Navigation Lights (red and green)Q - Navigation Light Mount (for 360o white light)R - Seats, Cushions and Under-seat Storage Compartments (3) S - Stainless Steel Hand Rails (5)T - Bow Eye for Towing U - Stern Steps with teak (2)V - Stern Boarding Ladder (450 Version Only)W - Pop-up Cleats (4)X - Retractable Ski Post (450 Version Only)Z - Permanent and Retractable Cup Holders (2)
*Replace capacity and warning labels if they become damaged, faded or illegible. For reordering and replacement of labels contact Walker Bay® Customer Service.
CDG
HI
J O
PST
UWXS
YOUR BOAT - FEATURES AND DECK PLANS
MATERIALS
Walker Bay® uses materials and fabric from the worlds’s most respected manufacturers. We take extra care in our construction to create a line of boats you can depend on.
ORCA CSM®
- Walker Bay uses the finest Hypalon® material available. Four layers of calendared sheets offer guaranteed air-tightness and optimal adhesion of rubbers. This combination of materials provides improved resistance against weathering, chemicals and abrasions. The tubes are bonded using a three-layer gluing process with all seams internally and externally butted for maximum reliability.
PREMIUM FIBERGLASS - Walker Bay® uses top quality FRP (Fiber Reinforced Polymer) to build a hull that is both stiff and strong in tension and compression, which is important to the performance of the boat. A fine glossy gelcoat not only creates a glossy, high-lustre, ultra-smooth finish, but provides maximum durability as well.
(400 & 450 Version Only)

10
OPERATOR INSTRUCTIONS
LOADING - BOARDING
WEATHER AND HAZARDS
All boats in this owner’s manual are ISO design category “C” Inshore - Designed for voyages in coastal waters, large bays, estuaries, lakes and rivers where conditions up to, and including, wind force 6 and significant wave heights up to, and including, 2m. may be experienced.
WARNINGRead Operator Instructions. Risk of drowning, injury or loss of life
WARNINGDo not exceed maximum recommended number of persons.
Do not exceed maximum weight capacity. Regardless of number of persons on board, total weight of persons and equipment must not exceed maximum weight capacity.
Step or climb into boat. Do not jump into boat. Board one person at a time. Load gear after boarding.
Load and board craft carefully. Distribute loads to maintain design trim (approximately level). Avoid placing heavy weights high up or standing.
Sit inside boat. When motoring all passengers should sit inside boat or on seat(s) provided, not on tubes. Passengers sitting on tubes can fall overboard.
Use handholds provided. When operating boat all passengers should use handholds provided. Passengers not using handholds can fall overboard.
Children and non-swimmers must wear lifejackets or PFDs when boarding and when onboard.
CAUTION
Inspect and monitor onboard loads to prevent chafing or puncture of tube.
WARNINGBEWARE OF OFFSHORE WINDS AND CURRENTS
Check weather forecasts and obtain local knowledge of marine environment and weather conditions prior to and during voyage.
Carry appropriate safety equipment (see SAFETY EQUIPMENT). Marine weather can change quickly.
Use extreme caution when motoring in darkness. Turn on your navigation lights in low light conditions. Check with local marine authorities on regulations on navigation lights.
CAUTION
Wrecks, reefs, rocky shores, sandbars, and shallows are hazardous and should be avoided or approached with extreme caution.
11
MAINTENANCE
FRP (FIBERGLASS) HULL AND GELCOAT - Use a mild boat cleaning agent or cleaner mixed with fresh water. Make sure the cleaning agent you use does not contain ammonia or chlorine. Ammonia or abrasive type cleaners will dull and discolor the surface of the gelcoat.
Use a fiberglass wax that is capable of filling gelcoat pores, and screening out harmful ultraviolet rays that may cause the gelcoat to fade. Wax at least twice every season.
On heavily used areas such as the deck, fiberglass surfaces may be severely scratched by dirt, sand or footwear. To prevent surface damages, keep it as clean as possible.
At the start and the end of your boating season check the condition of fasteners, screws, bolts, nuts, rivets and other fittings. Tighten or replace if necessary. For information contact Walker Bay® customer service.
TUBES - After use, rinse boat with mild liquid soap and fresh water, rinse away sand and debris.
Apply 303 Aerospace Protectant at least once per season to protect tube from UV (ultra violet) rays. Walker Bay® rec-ommends 303 because it is free of silicone oils, waxes, glycerin, or petroleum distillates unlike many other protectants. 303 leaves a like-new, non-oily, anti-static finish that does not attract dust. 303 can be purchased through the manu-facturer’s website: www.303products.com
VALVES - Tighten air valves several times per season. Loose valves may result in air leaks or loss of pressure in the tube. Tighten valves with the tool provided in the repair kit.
Valve replacement should be done by a trained professional. Contact your dealer to replace valves.
TEAK WOOD - Use a teak cleaner that can penetrate the pores of the wood and cleanse them of dirt and stains. Avoid caustic cleaners since they could damage the wood. Immediately after cleaning, apply an oil sealer with soft cloth. Allow a couple of hours for the oil to soak into the wood and apply a second coat. Wipe off excess oil.
METAL - To prevent corrosion, Walker Bay uses only stainless steel and anodized or powder coated aluminum metal parts.
Stainless steel nuts and bolts may show signs of corrosion. This is due to metallic residue from contact with non-stain-less metal items like screwdrivers or wrenches.
Rinse metal parts with fresh water when cleaning the rest of the boat.
To replace metal parts or add components containing metal, use stainless steel and anodized or powder coated alumi-num to prevent corrosion.
CAUTION
Do not use oily or abrasive substances.
Do not use products that contain phosphates, chlorine, solvents, non-biodegradable or petroleum based products.
Do not use Armor All® automotive cleaning agent and preservative on tube.
Use only diluted citrus-based cleaners. They are excellent for marine cleaning purposes, and safe to use. Full strength citrus-based cleaners can discolor PVC.
Use household cleaners sparingly and do not discharge them into waterways.
Avoid contact of the tubes’ fabric with hazardous or harmful materials such as: battery acid, oil, gasoline, vinyl preserving agents, or alcohol based cleaning solutions, waxes, or solvents.
Avoid contact of sharp or abrasive objects with the tube. They can puncture the tube.
Do not mix cleaners and work in a well ventilated area.

12
NAVIGATION
WARNINGDo not operate the boat under the influence of drugs or alcohol or any other impairment or disability.
CAUTION
Carry, read and understand navigation charts.
Observe right-of-way as defined by “Rules of the Road” and required by COLREGS.
Obey signs for restricted areas designated for swimming, bathing or other forms of recreation.
Learn to control your boat and know the limitations of your capabilities and the capabilities of your boat. If necessary take a boating course to learn these limitations.
Inform someone of your Float Plan including time and place of departure, proposed route and expected time of return.
PROTECT THE ENVIRONMENT - BE A CLEAN BOATERThe practice of clean boating and good environmental stewardship make sense economically, for our family’s health and safety, for the environment, and for the future of recreational boating. Clean Boating includes all aspects of boat maintenance, operation, and housekeeping. Care must be taken during cleaning, fueling, motoring, pumpout, and trash disposal to minimize potential effects on the aquatic environment.
Cleaning Your Boat:When washing a boat’s deck and hull surface, people often use products that contain toxic ingredients. See MAINTE-NANCE for guidelines on how cleaning agents should be chosen.
Fueling and Bildge Maintenance:Take precautions not to overfill your fuel tank. If you overflow onto the boat or dock, wipe up the spill with a rag; do not hose it into the water. If you do spill fuel or oil into the water, do not disperse it with detergent or soap! That only sends the problem down to the seafloor where it becomes more toxic and more difficult to clean up. If the spill is large or if it discolors the surface of the water, you must report it to the local authorities. Failure to do so is illegal and can cost you civil penalties and/or criminal sanctions.
Exhaust Emission:Increased exhaust emissions (hydrocarbons) cause water and air pollution. To achieve the highest efficiency, have the engine properly tuned and the hull cleaned regularly. See the engine manufacturer’s manual for engine tuning direc-tions.
Clean Motoring:If you become grounded, do not attempt to motor your way out. This could cause serious damage not only to your mo-tor and propellers, but also to the seafloor and local marine organisms. If you sight a marine mammal such as a mana-tee, dolphin or whale, slow down and keep a safe distance of at least 100 yards. It is illegal to feed, harass, molest or injure a marine mammal.
Clean Trash Discharge:Stow all loose items, plastic bags, drink cans, and other articles properly so they do not blow overboard. Never discard your garbage overboard. Whatever you take aboard, bring back.

13
Rinse boat with mild soap and fresh water after use. Rinse away sand or debris.
Dry boat before storing to prevent accumulation of mould.
Store boat in a cool and dry place.
STORAGE
CAUTION
Risk of fire. Do not store fuel, fuel tanks, fuel lines or any fuel related components in direct sunlight. Read Owner’s Manual provided with your outboard motor for storage information.
Avoid storing boat in water when not in use to prevent contact with hazardous chemicals due to pollution, abrasion from foreign objects and accumulation of marine growth.
Use a boat cover or storage bag. Avoid unnecessary exposure of the tubes to direct sunlight. If a bag or cover is not provided with your boat, accessory covers are available. For information contact Walker Bay® customer service.
Do not store boat where it may come in contact with sharp or abrasive objects.
Do not store boat where rodents may have access, they can chew through the tube’s fabric creating a leak.
Do not place heavy objects on boat in storage.
Tie boat down if you keep it in a potentially windy area.
MOTORING
WARNINGRisk of injury. Propeller can cut, injure and kill.
Avoid moving parts of engine and propeller.
Read Motor Owner’s Manual provided with motor, fuel tank, lines and system.
Use an emergency switch or lanyard attached to your wrist. This will stop motor when lanyard is pulled. Check motor shuts off when lanyard is pulled. The stop/kill switch should activate.
Do not motor near swimmers or divers.
Do not allow swimmers to approach stern or propeller while motor is running.
CAUTION
Risk of capsizing, loss of control or falling overboard. Sit forward when motoring boat alone.
Do not make sharp turns at high speeds. Sharp turns can cause loss of control. See SPECIFICATIONS AND MAXIMUM CAPACITIES for maximum recommended speeds.
Shift engine gear lever to neutral before starting. Unexpected movement can make occupants fall overboard.
Before starting motor, check motor bracket screws are securely fastened. Loose motor bracket screws can result in loss of control or loss of motor.
Pay attention to winds, water conditions, currents and tides. They can affect fuel consumption.
Allow sufficient distance to stop or maneuver if required to avoid collisions.

14
MOTOR TRIM
MOTOR SELECTION
Trim motor properly. Correct trim is essential to optimum motoring performance. A general rule is the axis of the propeller should be parallel to surface of water.
Motor trimmed too positively: boat may porpoise or ride “bow high”.
Motor trimmed too negatively: boat may ride nose down and have difficulty planing.
SAFETY EQUIPMENT
CAUTION
Reduce speed in waves. Avoid excessive speeds and sharp turns in rough weather.
Avoid rapid acceleration. Rapid acceleration can make operator or passengers fall overboard.
Do not reverse quickly. Reversing quickly can cause swamping.
CAUTION
Do not under power. A motor too small for boat size or load may not have adequate power to navigate currents or headwinds.
Do not use a motor not approved for use with the boat.
WARNINGDo not overpower. Do not use a motor with a higher horse power, or kilowatts than the capacity label states. Overpowering can result in severe handling or stability problems.
Do not use fuel tank, fuel lines or fuel system components not approved for use with the boat.
CAUTION
Motoring into wind: adjust trim down and keep weight forward to prevent possible capsize.
Motoring in same direction as waves or swell, adjust trim up and keep weight back to prevent bow from submerging.
CAUTION
Carry appropriate safety equipment* such as but not limited to: - Coast Guard approved lifejackets or personal flotation devices for each passenger**- charts - EPIRB device- tool kit/ spare parts kit - protective clothing in case of weather change- flares - whistle- fire extinguisher - First Aid kit - anchor - navigation lights(to be continued on next page)

15
CAUTION
(continuing from previous page)
- flashlight - mobile phone- tow line(s) - tube repair kit- pump - bailer- oars/paddles
*Note: Specific safety equipment is mandatory in some countries. Failure to carry safety equipment onboard could result in fines or other penalties. Crew should be familiar with use of all safety equipment and emergency maneuvering (re-boarding, towing, etc.). Contact your local boating or sailing organization for information, lessons or drill sessions.
**Note: All persons should wear a Coast Guard approved buoyancy aid (life jacket/personal floatation device). In some countries, it is a legal requirement to wear a buoyancy aid at all times that complies with national regulations.
CHECKLIST BEFORE OPERATING
CAUTION
Perform checklist actions before operating.
- Documents including registration and licenses on board.- Federal/state/local regulations concerning operation requirements and safety equipment.- Weather forecast.- Local area and conditions.- Inform someone of your intended route and return time.- Surrounding area for swimmers or divers.- Surrounding area for hazards such as submerged rocks.- Tube pressure is correct and valves are securely fastened (see INFLATION & VALVES).- Drain plug is closed (see FEATURES & DECK PLANS).- Fuel lines are intact and connections are secure.- Adequate fuel for the return journey. Consider extra fuel for delays due to weather or currents.- Engine is securely fastened to motor mount and gear lever is in “Neutral” position.- People and cargo are correctly and evenly distributed and do not exceed maximum capacity.- Propeller is clear of obstructions.- Safety equipment on board (see SAFETY EQUIPMENT).- Review the section on OPERATOR INSTRUCTIONS if necessary.
EMERGENCY PROCEDURES
WARNINGPUNCTURE OR LOSS OF PRESSUR TO AIR CHAMBER• Shift weight to opposite side of boat (use caution when shifting weight). • Secure leaking or deflated chamber by tying or holding up. • Immediately proceed to nearest safe land.
LOSS OF POWER• Drop anchor.• Attempt to fix problem (carry motor owner’s manual, spare parts/tool kit).• Signal for help.• Stay with boat.(to be continued on next page)
16
Obtain knowledge of accident reporting requirements for the United States Coast Guard. Copies of the U.S. Coast Guard Boating Accident Report are available by calling the U.S. Coast Guard Boating Safety Hotline at 1 (800) 368-5647.
RENDERING ASSISTANCE (USA)United States Code, Title 46 states that “The owner operator of a vessel is required by law to render assistance to any individual or vessel in distress, so long as his vessel is not endangered in the process.”U.S. Coast Guard Boating Safety Hotline: 1 (800) 368-5647 or 1 (202) 267-1070
ACCIDENT REPORTING (USA)
WARNING(continuing from previous page)
PERSON OVERBOARD PROCEDURE• Throw life jacket.• Come around into wind and waves.• Cut engine.
RE-BOARDING WITHOUT CAPSIZE OR SWAMPING• Turn motor off for re-boarding. Do not approach transom or motor while motor is running.• Use handles for re-boarding. • Use caution when assisting re-boarding passenger. • Distribute weight while re-boarding to prevent capsizing. • To avoid falling overboard, when operating boat do not stand, sit inside not on tubes, and use handles.
SWAMPING• Bail boat using a bailer or,• Open drain plug and motor. Water should drain out when boat is moving forward. Close drain plug when
water has drained.
TOWING
WARNINGKeep clear of tow line. If tow line comes free or breaks, recoil can cause injury.
Do not tow with people in boat. They can fall overboard.
CAUTION
When towing inflatable behind another boat, use the bow eye on hull (see FEATURES & DECK PLANS). Do not tow with the bow handle.
Use a double tow line when towing behind another boat. The second line acts as a backup in case one line breaks or comes undone.
Allow at least two boat lengths between boats.
Use line intended for towing, ask your dealer to select correct line for your application (Do not tow with three stranded nylon).
(to be continued on next page)

17
CAUTION
Towing line should have minimum breaking strength equal to 4 times weight boat being towed.
Fasten boat securely and observe continuously. Do not attach tow line to fixtures not intended for towing, such as handles.
Avoid towing tender long distances. When traveling long distances or in rough weather stow boat on deck.
Empty inflatable before towing.
Do not use a tow line with signs of wear. Check tow lines for wear with each use.
Keep tow lines clear of propellers.
Keep hands and feet clear of tow lines. Do not hold tow line while towing.
Be prepared to cast loose or cut tow line if necessary.
Do not tow at high speeds or while planing.
BEACHING
CAUTION
Approach land slowly with extreme caution.
Avoid hazards below water surface such as rocks. Hazards can damage hull, tube, motor, or propeller.
Do not power boat onto land. You can damage hull or tube.
Do not drag boat across rocks, pavement, or sand. You can damage hull or tube.
ANCHORING - MOORING
CAUTION
Anchoring and mooring lines should be attached to metal bow eye on hull.
Fasten boat securely. Failure to do so could result in loss of boat.
DAVITS - CRADLES
CAUTION
Use metal lifting rings identified in FEATURES AND DECK PLANS figure.
Elevate bow and open drain plug to prevent accumulation of water.
DAVITS: • Do not attach lifting device to handles or features not intended for lifting. • Do not lift boat with people onboard.
CRADLES: • Cradle must provide adequate support or hull can be damaged or deformed. • Tie boat down securely.

18
TRANSPORTING BY ROAD
WARNINGRisk of automobile accident, injury or loss of life in case of loss of control of trailer or boat while driving.
ROOF RACK• Do not attempt to use a roof rack to transport the Generation.
TRAILER• Read Owner’s Manual provided with trailer.• Use a BUNK trailer. Do not use a ROLLER trailer. Rollers do not provide adequate support for hull.• Use a trailer suitable for the type of craft and its mass.• Secure boat to trailer and stop frequently to check boat is securely fastened while driving.• Do not exceed maximum capacity of trailer.• Do not trailer boat with objects inside hull.
Check with trailer manufacturer if weight and shape of boat is sufficient for control at driving speeds.
INFLATIONFirst time inflation - When inflating your boat for the first time, inflate all air chambers evenly as directed in INFLATION SEQUENCE. Once the boat is completely inflated release 50% of the air pressure in all chambers and re-inflate all chambers to working pressure. This will allow fabric to settle from packaging.
INFLATION SEQUENCEUsing foot pump provided, inflate each chamber to approximately 50%. This will protect the baffles which separate the chambers from unnecessary distortion and potential harm.
Finish inflating each chamber. The tubes should be “drum tight”. Working pressure of tubes is 0.25bar or 3.5psi.
CAUTION
Do not use a compressed air source (ie. automotive tire air compressor) to inflate boat/tubes. Over-inflation by a compressed air source can rupture seams and/or bulkheads.
When using an electric pump to inflate your boat, finish inflation procedure with manual foot pump provided.
Air chambers must be inflated evenly and to correct working pressure (0.25bar/3.5psi).
Over a period of days tubes may lose pressure. Check pressure before use and re-inflate chambers to working pressure if necessary. Failure to do so could result in chafing or damage to tube or other parts of boat.
CAUTION
Do not exceed working pressure of tubes. Exceeding working pressure can damage fabric, baffles, or seams and cause loss of pressure.

19
If this is the first time inflating tubes and/or floor, check that valves are tight. Use tool provided in repair kit and gently tighten valves.
INFLATING - To retain air when inflating, release valves to “out” position by pushing center button (a) and turning approximately 90 degrees counter clockwise.
Secure valve with “cap” (b) when finished inflating.
DEFLATING - To release air from tubes remove “cap” (b) and position valve in “in” position by pushing center button (a) in and turning approximately 90 degrees clockwise. Valve should remain in the “in” position.
OPERATION OF VALVES
CHANGES IN PRESSURE - ALTITUDE
a b
CAUTION
Changes in air temperature will affect air pressure in tubes. Monitor air pressure in tubes and adjust to maintain working pressure.
Changes in elevation or altitude will affect air pressure. In case of changes of elevation or altitude, adjust air pressure in tubes and/or floor to maintain working pressure. To prevent over-inflation, decrease air pressure before transporting boat to higher elevation.
CAUTION
Do not force valves. They may break.
ELECTRICAL SYSTEMS
WARNINGBe careful in handling the battery, because the elctrolyte of it is acid. If your skin or other body parts are exposed to the electrolyte, clean with fresh water and seek medical assistance.
Be careful when connecting or disconnecting the battery. Do not charge the battery on the boat.
Keep the battery terminals cleaned, tightened and isolated, to prevent arc discharges, short circuits, explosion, or fire.
Keep good ventilation in the battery compartment. Make sure that the battery is securely fastened.
The boat is equipped with a 12V electrical system, powered by the battery. An electrical switch panel on the center console distributes the power to the given components. The direct current system supplies all circuits on the boat, including navigation lights, pumps, ignition, etc. The battery must be secured on the boat and terminals covered. Terminals must be kept clean and checked regularly.

20
NAVIGATION LIGHTSThe Generation is equipped with navigation lights.
The side lights are installed at the center of the bow step. A green light is illuminated towards the port (left) side, and a red light is illuminated towards the starboard (right) side.
A mast with a white light may be mounted to the transom (see FEATURE & DECK PLANS) to provide 360o lighting.
All navigation lights are to be controlled by the switch panel on the center console.
CAUTION
Do not use the boat between sunset and sunrise, or in low-light conditions, without turning on navigation lights. The lights are important means for boaters to provide current locations and to indicate directions of movement at night.
STEERING SYSTEMThe Generation is equipped with a mechanical steering system.
To assure safety and trouble-free use, the steering system requires periodic maintenance. Contact a dealer for maintenance services.
CAUTION
Improperly maintained controls could cause accidents. Make sure regular maintainance is carried out.
The steering system on Generation is not self-centering. To assure complete control of the boat, always grip the steering wheel firmly.
FUEL SYSTEMThe Generation has an internal fuel system. The fuel tank is located below the deck near the console.
WARNINGDanger of fire, explosion and open flame.
Be extremly careful when operating the fuel system, e.g. refueling, installing, uninstralling or cleaning.
Fuel fumes may ignite from a static spark and cause serious injury and damage. Do not smoke, allow open flame, or spark within 15 meters of fuelling location.
REFUELING: - Before refueling, stop the engine. - The fuel tank cap is located on the starboard (right) side, right behind the driver’s seat. - Do not overfill fuel tank. Allow at least 6% allowance in space for the fuel to expand. - Refuel in permitted refueling areas, such as fuel docks in the harbour or gas stations. These locations include precautions that lower the probability of static explosion. - Read all warnings on the fuel distributor and around. Act accordingly. - Do not board the boat while refueling. Boarding and disembarking may creat a static charge that may ignite the fumes over the intake pipe. - When filling for the first time, and during successive refueling, check the entire fuel system of the boat for leaks or damage. If any leaking or damaged parts is found, repair immediately, and ventilate the area to remove explosive fumes. - Dry spilled fuel thoroughly. Dispose of rags on-shore, according to regulations. - Before starting the engine or any equipment, check for fuel fumes.

21
For repairs, parts, or service contact your local dealer or Walker Bay® customer service at:email: [email protected]
GELCOAT REPAIR:
Gelcoat gets chalked or faded over time if it is not taken care properly. And scratches or cuts could happen.Here below are some instructions on gelcoat repair.
Surface scratches can be buffed out of gelcoat with polishing compound, but deep scratches must be filled. When the gelcoat surrounding a scratch is in good condition, the filler of choice is gelcoat paste, which could be purchased from marine supply stores. Repair kits are comprised of a small amount of gelcoat paste and hardener, a selection of pigments, mixing sticks, and sealing film. Also, buy a flexible plastic spreader if you don’t already have one. You will also need sheets of 150-, 220-, 400-, and 600-grit wet-or-dry sandpaper.
If you are repairing several scratches, add a small bottle of styrene to your list of supplies. Wiping each scratch with styrene just prior to filling it partially reactivates the old gelcoat, resulting in some chemical bonding between the old gelcoat and the new.
Preparing the Scratch Never try to repair a scratch by simply painting over it with gelcoat. To get a permanent repair, draw the cor-ner of a scraper or screwdriver down the scratch to open it into a wide vee. This is the time to wipe the open scratch with styrene to reactivate the old gelcoat.
CatalyzingThe hardener for gelcoat is the same as for any polyester resin-methyl ethyl ketone peroxide, or MEKP. Gelcoat resin usually requires 1 to 2 percent of hardener by volume (follow the manufacturer’s instructions). The mix shouldn’t kick (start to harden) in less than 30 minutes. Hardening in about two hours is probably ideal. Always err on the side of too little hardener. Also be certain to stir in the hardener thoroughly.
Spreading Gelcoat PasteWork the gelcoat paste into the scratch with a flexible plastic spreader. Let the putty bulge a little behind the spreader; polyester resin shrinks slightly as it cures, and you’re going to sand the patch anyway. Scrape up any excess paste beyond the patch area.
Covering the RepairGelcoat will not fully cure in air. To seal the surface of a scratch repair, cover it with a sheet of plastic film. The kit may include sealing film. Otherwise a section of kitchen “zipper” bag works especially well because it tends to remain smooth and the gelcoat will not adhere to it. Tape one edge of the plastic to the surface just beyond the repair, then smooth the plastic onto the gelcoat and tape down the remaining sides.
Sanding and PolishingAfter 24 hours, peel away the plastic. A 5 1/2-inch length of 1 x 2 makes a convenient sanding block for a scratch repair. Wrap the block with a quarter sheet of 150-grit paper, and use the edge of the block to confine your sanding to the new gelcoat. Use short strokes, taking care that the paper is sanding only the patch and not the surrounding surface. Never do this initial sanding without a block backing the paper.
When the new gelcoat is flush, put 220-grit wet-or-dry paper on your block and wet sand the repair, this time with your block flat. Use a circular motion and keep a trickle of water running on the sanding area. Feather the repair into the old gelcoat until your fingertips cannot detect a ridge.
Abandon the block and switch to 400-grit wet-or-dry paper. Wet sand the surface until the repair area has a uniform appearance. Follow this with 600-grit wet-or dry.
Dry the area and use rubbing compound to give the gelcoat a high gloss. Buff it with a circular motion, using heavy pressure initially, then progressively reduce the pressure until the surface becomes glassy. If the gelcoat shows swirl marks, buff them out with a very fine finishing compound.
Finish the job by giving the repair area a fresh coat of wax. If your color match is reasonably good, the repair will be virtually undetectable.
REPAIRS
CAUTION
In the event of more serious hull damage such as a hole or crack do not use the boat. Contact Walker Bay® customer service for repair information.

22
FINDING SMALL LEAKS
LARGE REPAIRS TO SKIN - SEAMS BULKHEADS - TRANSOM
TUBESMALL TEARS, CUTS, PUNCTURESTears, leaks, or punctures less than 0.5 inches or 1cm can be repaired with the repair kit provided.
1. Prepare a round patch no less than 3 inches or 7 centimeters in diameter.
2. Clean the patch and the area surrounding the leak with Isopropyl Alcohol. IMPORTANT: patch and tube must be clean or the patch may not adhere properly.
3. Mildly rough the patch surface area of the tube using a small square of sand paper.
4. To contain excess glue, use masking tape to tape off the area around the patch. Excess glue will discolor.
5. Apply 3 thin, even coats of repair kit adhesive to both the surface of the tube and the patch. Wait 5 minutes between each coat.
6. After the 3rd coat, wait 10-15 minutes before applying the patch. Use a hand roller to apply the patch evenly. Pay special attention to the edges.
7. Wait 24 hours before re-inflating tube. Inflate air chamber(s) to working pressure and check water-tightness and/or air-tightness before using.
1. Mix a solution of 4 cups of fresh water and 1 cup of mild non-anti-bacterial liquid soap. Do not use a spray bottle containing any household cleaners.
2. Inflate tube approximately to working pressure.
3. Spray the soapy solution over suspected area of leak.
4. Look for air bubbles. Bubbles around an air valve indicate it is probably loose. Use the tool included in the repair kit and gently tighten valve. Bubbles on the surface of the tube indicate a puncture or leak.
5. Repair the tube by following the procedure for SMALL TEARS - CUTS - PUNCTURES or contact Walker Bay® customer service for Return Authorization, Repair Service and Freight Rates.
CAUTION
For large tears or repairs to seams, bulkheads or transom it is recommended that the boat be returned to Walker Bay® or your dealer for repair by a trained professional. Contact Walker Bay® customer service for return authorization, Repair Service and Freight Rates.

23
TROUBLESHOOTING
PROBLEM
Buoyancy chamber loses air:
Boat does not get on plane:
Boat porpoises:
Boat rides bow down:
Water accumulates in hull:
POSSIBLE CAUSE
- Tube valve is loose.
- There is a leak.
- Motor is improperly trimmed.
- There is too much load.
- Motor is too small.
- Motor is improperly trimmed.
- Boat is loaded incorrectly.
- Motor is improperly trimmed.
- Boat is loaded incorrectly.
- Drain plug is open.
POSSIBLE SOLUTION
- Tighten valve (see OPERATION OF VALVES).
- Repair leak (see REPAIRS).
- Adjust motor trim (see MOTOR TRIM).
- Adjust load (see LOADING).
- Change motor size (see MOTOR SELECTION).
- Adjust motor trim (see MOTOR TRIM).
- Adjust load (see LOADING).
- Adjust motor trim (see MOTOR TRIM).
- Adjust load (see LOADING).
- Close drain plug (see FEATURES & DECK PLANS).
24
WALKER BAY® GENERATION LIMITED WARRANTYINTERNATIONAL
1. Nature and Extent of Warranty: Walker Bay Boats, Inc. (“Manufacturer”) warrants to the original retail purchaser (“Purchaser”) that any Walker Bay® Generation boat or component (“Product”) shall be free from defects in workmanship and/or materials for a period of one (1) year after the date of original retail purchase. In the event of such a defect, Manufacturer will, at its option, repair or replace the defective Product or part thereof without charge (excluding shipping expenses) subject to the following terms.
2. Extended Warranty. Purchaser upon receipt by Manufacturer of a completed Warranty Registration Card (provided with boat) within 30 days of the date of purchase will be entitled to the following specific warranties, subject to the exclusions, conditions and terms of this Limited Warranty:
2.1. Generation FRP hull is covered under warranty for a period of five (5) years from date of original retail purchase.2.2. Hypalon® fabric and seams are covered against delaminating under warranty for a period of ten (10) years from
date of original retail purchase, prorated as in the Walker Bay® Generation Limited Warranty Dealer Service Guide. Note: The fabric is considered delaminated when the outer coating separates from the fabric base or the seam looses its structural strength.
3. Exclusions. In the case of Walker Bay® Generation boats this warranty does NOT cover:3.1. Normal color fading, or discoloration;3.2. Normal wear and tear;3.3. Abrasions, tears or punctures;3.4. Damage caused by abuse, neglect or accident;3.5. Damage caused by improper assembly, service or maintenance in accordance with the Owner’s Safety Manual
provided with each Walker Bay® Generation boat;3.6. Damage caused by the installation or use of an accessory or parts not manufactured or sold by Walker Bay®;3.7. Damage caused by alteration or removal of parts;3.8. Incorrect towing and/or lifting;3.9. Expenses related to hauling out, launch, towing, storage, loan payments, loss of time, loss of income, or any other
type of incidental or consequential damages;3.10. Shipping costs. All shipping expenses and risks related to a warranty claim are the Purchaser’s responsibility.
4. Non-recreational Use. If any Walker Bay® Generation Product is purchased or used for racing, rental or other commercial purposes, or for/by a corporation, partnership, company, organization or association including without limitation camps, resorts, schools, or the like, then the term of this Limited Warranty is limited to a period of ninety (90) days after the date of original retail purchase, and Section 2 (Extended Warranty) shall not apply.
5. Life of Warranty Coverage. The repair and/or replacement of parts or the performance of service under this warranty does not extend the life of this warranty beyond its original expiration date.
6. Transfer of Unexpired Warranty Coverage. Unexpired warranty coverage can only be transferred to a subsequent purchaser upon proper re-registration of the product through the Manufacturer using the Manufacturer’s Statement of Origin provided with each Walker Bay® Generation boat.
7. Conditions to Be Met. 7.1. Warranty coverage becomes available upon proper registration of the Product by the authorized dealer and Purchaser. 7.2. Routine and timely maintenance outlined in the Owner’s Manual must be performed in order to maintain warranty
coverage. Note: Manufacturer reserves the right to make warranty coverage available only upon proof of proper maintenance.
8. How to Obtain Warranty Coverage. To obtain warranty coverage, claims shall be made by delivering the Product for inspection to a Walker Bay® dealer authorised to service the Product. The Purchaser must provide the Dealer with the boat or claimed defective part and proof of purchase (Bill of Sale) within 30 days of occurrence of the claimed defect. Purchaser must provide the Manufacturer with reasonable opportunity and access to the Product for repair and/or service.
9. Manufacturer’s Obligation. The sole obligation of the Manufacturer under this warranty is limited to, at its option, repairing a defective part, replacing such part or parts with new or Walker Bay® certified re-manufactured parts, or refunding the purchase price of the Walker Bay® Product. Manufacturer’s sole obligation against fabric delaminating under the prorated Walker Bay® Generation Limited Warranty is the replacement of the boat and/or tube at the percentages identified on the prorated Walker Bay® Generation Limited Warranty Dealer Service Guide.

25

26