OWNER’S MANUAL -...
12
Made in USA with globally sourced components. Crosman Corporation 7629 Rts. 5 & 20 Bloomfield, NY 14469 United States of America 1-800-724-7486 • www.crosman.com OWNER’S MANUAL READ ALL INSTRUCTIONS AND WARNINGS IN THIS MANUAL BEFORE USING THIS AIRBOW
Transcript of OWNER’S MANUAL -...

Made in USA with globally sourced components.Crosman Corporation7629 Rts. 5 & 20 Bloomfield, NY 14469United States of America1-800-724-7486 • www.crosman.com
OWNER’S MANUALREAD ALL INSTRUCTIONS AND WARNINGS IN THIS MANUAL BEFORE USING THIS AIRBOW

2
Welcome to the world of AIRBOW hunting and congratulations on being an owner of a Benjamin Pioneer AIRBOW. The Benjamin Pioneer AIRBOW was designed with the hunter in mind. Its light weight, short overall length, excellent balance and remarkable power will make for an enjoyable hunting experience. Please accept our thanks for choosing Benjamin and the Pioneer AIRBOW.
May your hunting experiences be safe and successful!
CAUTION: This product left the factory with some compressed air in its reservoir. The residual compressed air is sufficient enough air to discharge an arrow. Read all instructions before using.
THE AIRBOW IS A HIGH POWERED AIRGUN THAT SHOOTS ARROWS. AS SUCH, EXTREME CAUTION MUST BE TAKEN WITH REGARD TO HANDLING AND SHOOTING. CONVENTIONAL AIRGUN BACKSTOPS, AND PELLET TRAPS WILL NOT BE SUITABLE BACKSTOPS. USE OF ARCHERY BACKSTOPS SUITED FOR HIGH VELOCITY CROSSBOWS (MINIMUM 450 FPS) IS HIGHLY RECOMMENDED.
NOT A TOY. THIS PRODUCT IS RECOMMENDED FOR ADULT USE ONLY. MISUSE OR CARELESS USE MAY CAUSE SERIOUS INJURY OR DEATH. MAY BE DANGEROUS UP TO 800 YARDS (732 METERS).
YOU AND OTHERS WITH YOU SHOULD ALWAYS WEAR SHOOTING GLASSES TO PROTECT YOUR EYES.READ ALL INSTRUCTIONS BEFORE USING.
BUYER AND USER HAVE THE DUTY TO OBEY ALL LAWS ABOUT THE USE AND OWNERSHIP OF THIS AIRBOW.
DO NOT BRANDISH OR DISPLAY THE PRODUCT IN PUBLIC—IT MAY CONFUSE PEOPLE AND MAY BE A CRIME. POLICE AND OTHERS MAY THINK IT IS A FIREARM. DO NOT CHANGE THE COLORATION AND MARKINGS TO MAKE IT LOOK MORE LIKE A FIREARM. THAT IS DANGEROUS AND MAY BE A CRIME.
THIS PRODUCT CONTAINS LEAD, A CHEMICAL KNOWN TO THE STATE OF CALIFORNIA TO CAUSE CANCER AND BIRTH DEFECTS (OR OTHER REPRODUCTIVE HARM.)
EXPLOSION DANGER. USE ONLY COMPRESSED AIR IN THIS AIRBOW. USE NO OTHER GASSES—INCLUDING OXYGEN, WHICH CAN CAUSE A FIRE OR EXPLOSION THAT MAY RESULT IN SERIOUS INJURY OR DEATH.
REMEMBER, THIS AIRBOW IS NOT A TOY. ALWAYS TREAT THE AIRBOW AS THOUGH IT IS LOADED AND WITH THE SAME RESPECT YOU WOULD A FIREARM.
CAUTION: This product is recommended for adult use only, it is exempt from specific types of trigger pull, safety mechanism and drop test.
Please read this owner’s manual completely. And remember that the AIRBOW is not a toy. Always carefully follow the safety instructions found in this owner’s manual and keep the manual in a safe place for future use. If you have any questions about this product or need some help, do not return the product to the store before talking with Crosman. Feel free to visit us at crosman.com, or speak with one of our friendly customer service representatives Monday through Friday between the hours of 8AM and 4:30PM EST at 1-800-724-7486.
Contents1.0 Safety First2.0 Learning the parts of your new AIRBOW3.0 Operating the Trigger Safety4.0 Loading/Unloading an arrow5.0 Cocking/Uncocking the AIRBOW6.0 Pressurizing/Depressurizing the AIRBOW7.0 Trigger8.0 Optics package9.0 Quiver Assembly and Mounting10.0 Firing the AIRBOW11.0 Maintenance12.0 Trouble Shooting13.0 Specifications14.0 Warranty

3
1.0 Safety First1.1 Target Safety:
• ALWAYS treat the AIRBOW as though it is loaded and ready to fire. • ALWAYS treat AIRBOW with the same respect you would a firearm. • ALWAYS store the AIRBOW unloaded and away from children. • ALWAYS keep the muzzle of the AIRBOW pointed in a SAFE DIRECTION. • ALWAYS keep your finger off the trigger and out of the trigger guard until you are ready to shoot. • ALWAYS check to see if the AIRBOW is “ON SAFE” and unloaded when removing it from storage. • ALWAYS check to see if the AIRBOW is “ON SAFE” and unloaded when handing it to, or receiving it from another person.
• ALWAYS be sure of your target and what is beyond. • ALWAYS check your archery backstop for wear before and after each use. All backstops are subject to wear and will eventually fail. Replace your backstop if the surface is worn or damaged.
• NEVER point the AIRBOW at any person or at anything you do not intend to shoot.1.2 AIRBOW Safety:
• ALWAYS use arrows designed for use with the AIRBOW. • ALWAYS inspect your arrows regularly. NEVER use arrows with any sign of damage. A cracked or split arrow can suffer catastrophic failure upon release and cause severe injury to yourself or others in the area and damage your AIRBOW. Any nicked, dented, split, or splintered arrows should be discarded immediately (See Section 11.2).
• ALWAYS have you and others wear shooting glasses to protect your eyes. • ALWAYS wear shooting glasses over eye glasses or prescription glasses. • ALWAYS keep your hands behind the shroud and away from the arrow rest. • ALWAYS keep your face and body parts away from the arrow’s broadhead or field tip. • ALWAYS keep your hands clear of the broadhead or field tip when loading an arrow. • NEVER shoot anything in the AIRBOW except for arrows designed specifically for the AIRBOW. Shooting other than recommended arrows could result in injury or damage to the AIRBOW.
• NEVER attempt to disassemble or tamper with your AIRBOW. Use an Authorized Service Station. Using an unauthorized service or repair center, or modifying the function of your AIRBOW in any way, may be unsafe and will void your warranty.
• Store this AIRBOW charged with air to keep the valves closed against dirt.
2.0 Learning the parts of your new AIRBOW:
A. StockB. Barrel ShroudC. TriggerD. Safety LeverE. Bleed Screw CoverF. Cocking HandleG. Arrow Rest/Barrel
H. Pressure GaugeI. Fill Nipple PortJ. Sling Swivel StudK. 6x40 mm ScopeL. High RingsM. 20 MOA BaseN. Quiver
O. Quick Detach Quiver Mount
P. Quiver/Picatinny Accessory Adaptor
Q. AIRBOW 250 Arrows R. Fill NippleS. Degassing Tool

4
3.0 Operating the Trigger Safety:CAUTION: Like all devices, an AIRBOW safety can fail. Even when the safety is “ON SAFE”, you should continue to handle the AIRBOW in a safe manner.
1. Locate the Safety lever in front of the Trigger.2. The words “Fire” and “Safe” appear with arrows above the
Safety lever indicating the direction to pull or push the Safety lever for each function. The condition of the safety is indicated by the position of the Safety Lever.
3.1 To Put the AIRBOW “ON SAFE”:1. Pull the Safety lever rearward (towards the trigger) to put
the safety “ON SAFE”.2. The safety is in the SAFE position, and the AIRBOW is “ON
SAFE” when the Safety lever is in the rear position “Safe” (near trigger), and it cannot move backward any further. (Fig. 2A).
3.2 Disengage the Trigger Safety:1. Push the Safety lever forward (away from the trigger) for
FIRE or “OFF SAFE”. 2. The Safety lever is in the FIRE position and “OFF SAFE” when
the Safety lever is in the forward position “FIRE”, and it cannot move forward any further (Fig. 2B).
KEEP THE AIRBOW IN THE “ON SAFE” POSITION UNTIL YOU ARE ACTUALLY READY TO SHOOT. THEN PUSH THE SAFETY LEVER TO THE “OFF SAFE” POSITION.
4.0 Loading/Unloading the AIRBOW:CAUTION: Use only BENJAMIN AIRBOW arrows with this product.
• Use of any other brand arrows may be unsafe and will void your warranty. • Impact with hard objects, other arrows, or being shot into a game animal can all cause damage. We recommend flexing each arrow and inspecting for any sign of cracks or splits before each use. See Section 11.2 for details on how to inspect your arrows.
• If your arrow has a broadhead attached, always grab the shaft of the arrow and keep your fingers away from the broadhead when loading and unloading an arrow.
4.1 Loading an Arrow:1. Make sure the AIRBOW is “ON SAFE”, UNCOCKED and pointed in a SAFE DIRECTION (refer to Section
5.2 for uncocking the AIRBOW).2. Slide the open end of the arrow over
the arrow rest fully toward the rear of the AIRBOW until you feel the arrow lock into place (Fig 3).
3. After following these steps and reading the entire manual, including the section on reviewing safety pro-cedures, your AIRBOW is now loaded and ready to be cocked and fired.
4.2 Unloading an Arrow:1. Make sure the AIRBOW is “ON SAFE”, UNCOCKED and pointed in a SAFE DIRECTION (refer to Section
5.2 for uncocking the AIRBOW).2. To unload the AIRBOW, remove the arrow by pulling up
on the arrow until it clears the arrow rest of the AIRBOW.
5.0 Cocking/Uncocking the AIRBOW:5.1 Cocking the AIRBOW:
1. Make sure the AIRBOW is “ON SAFE” and pointed in a SAFE DIRECTION.
2. To cock the AIRBOW, grasp the top cocking lever and pull upward and rearward (Fig. 4), until an audible click is heard and the lever cannot be pulled any further.
Fig. 2A
SAFE FIRE
Fig. 2A
SAFE FIRE
Fig. 2B
SAFE FIRE
Fig. 3
Fig. 4

5
3. Close the top cocking lever by pushing the lever forward and down until the lever comes to rest against the top of the AIRBOW.
4. The AIRBOW is now cocked.
5.2 Uncocking the AIRBOW:1. Make sure the AIRBOW is "UNLOADED" and in a SAFE DIRECTION.2. Grasp the top cocking lever and pull upward and rearward until it cannot move any further. 3. While holding the cocking lever in this position, take the AIRBOW “OFF SAFE”.4. Keep the AIRBOW pointed in a SAFE DIRECTION and pull and hold the trigger.5. While continuing to hold the trigger, slowly move the top cocking lever forward and down until the
lever comes to rest against the side of the AIRBOW. CAUTION: Letting go of the cocking lever during this step may cause the AIRBOW to discharge.
6. Release the trigger.7. The AIRBOW is now Uncocked.8. Put the AIRBOW on “ON SAFE”.
6.0 Pressurizing/Depressurizing the AIRBOW:
EXPLOSION DANGER. USE ONLY COMPRESSED AIR IN THIS AIRBOW. USE OF OTHER GASSES, INCLUDING OXYGEN, CAN CAUSE A FIRE OR EXPLOSION MAY RESULT IN SERIOUS INJURY OR DEATH.
DO NOT DISCONNECT THE FILL HOSE BEFORE FIRST BLEEDING THE AIR. FAILURE TO FOLLOW THESE INSTRUCTIONS MAY CAUSE THE HOSE TO WHIP FROM PRESSURE BUILT UP IN THE FILL HOSE AND MAY RESULT IN SERIOUS INJURY OR DEATH.
NOTE: Use clean, dry, compressed air ONLY.NOTE: Refer to the owner’s manual provided with your filling equipment for proper use of the filling equipment
6.1 Pressurizing the AIRBOW:Your new AIRBOW is unique because it operates on compressed air. This owner’s manual describes operating the AIRBOW with compressed air only.
1. Make sure the AIRBOW is “UNLOADED”, “UNCOCKED”, “ON SAFE” and pointed in a SAFE DIRECTION.
2. With the AIRBOW in a secure position, attach the fill nipple (located separately in package) to the fill nipple port on the front of your AIRBOW (Fig. 5A).
3. Attach the quick disconnect fitting from your filling equipment to the fill nipple (Fig. 5B). Note: Before filling, make sure both fittings have a secure connection.
4. Fill the AIRBOW slowly to eliminate heat buildup and chance for overfill-ing. If the AIRBOW is overfilled, past 3000 psi (207 bar), refer to Section 6.2 for depressurizing.
5. Once filled, depressurize the hose from your filling equipment before removing the fill nipple (still attached to quick disconnect fitting) from your AIRBOW.
6. Remove quick disconnect fitting from the fill nipple.6.2 Depressurizing the AIRBOW:
1. Make sure the AIRBOW is “UNLOADED”, “UNCOCKED”, “ON SAFE” and pointed in a SAFE DIRECTION.
2. Remove the Bleed Screw Cover by applying pressure to the front tab with a fingertip.
3. Rotate the Cover away from the AIRBOW. Lift and move the Cover for-ward to allow the retaining tab to exit the AIRBOW stock (Fig. 6A). Stow for replacement later.
4. Locate the bleed screw.5. Using a 3/32” Allen Wrench, loosen the bleed screw by rotating count-
er-clockwise for a maximum of 1 ½ full turns (Fig. 6B).6. Watch the pressure gauge and listen as the air is expelled past the bleed
screw until the desired pressure is achieved. Then tighten the bleed screw firmly.
7. Replace the Bleed Screw Cover in the reverse order.
Fig. 5A
Fig. 5B
Fig. 6B
Fig. 6A

6
7.0 Trigger:The Trigger of your AIRBOW is a 2 stage unit. The purpose of a 2 stage trigger is to provide feedback to the shooter when pulling the trigger up to the point just before the trigger breaks and the AIRBOW fires. This provides for a very controlled release of the trigger. The trigger is factory set for safe and reliable use. No maintenance should be required. The trigger is designed to have approximate pull weights of 2 lbs on the 1st stage and break at 3 lbs on the 2nd stage.
1. While pointed at a SAFE DIRECTION, pull the trigger slowly until a solid resistance is felt. This is the 1st stage of the trigger and is sometimes referred to as “take-up”’. This is also the point at which the 2nd stage begins. Any additional pull of the trigger beyond this point WILL fire the AIRBOW.
2. While holding the trigger against the 2nd stage, adjust your aim on the target and, when ready to fire, pull the trigger the final portion through the 2nd stage. This WILL fire the AIRBOW.
NOTE: While holding the trigger against the 2nd stage, if the shooter decides NOT to fire the AIRBOW, the trigger can be released and the trigger will reset to the original position.
8.0 Optics Package:Your AIRBOW comes equipped with a CENTERPOINT 6x40 mm scope, 2pc extra-high Picatinny rings and a 20 MOA Picatinny base rail.The 20 MOA Picatinny base rail has a built-in 20 MOA cant. When mounted to the Picatinny rail of the AIRBOW, it will provide an additional 20 MOA of upward elevation adjustment
DIRECT VIEWING OF THE SUN CAN CAUSE PERMANENT EYE DAMAGE. DO NOT ATTEMPT TO VIEW THE SUN THROUGH THIS RIFLESCOPE OR ANY OTHER OPTICAL INSTRUMENT.
ALWAYS FOLLOW ALL RULES OF FIREARM AND GUN SAFETY WHEN USING THIS SCOPE.
8.1 Eyepiece Focusing:Without using your scope, look at a distant object for several seconds. Then look through the scope at a plain white background or the blue sky and quickly look away. Turn the fast-focus eyepiece clockwise or counter clockwise to adjust to your eyes. The reticle should be sharp and clear before your eye can refocus. After you have made your adjustment, with a quick glance, re-check your image.
8.2 Mounting your sight package:
ALWAYS ENSURE YOUR AIRBOW IS “ON SAFE”, UNLOADED AND UNCOCKED BEFORE FITTING THE SCOPE. ALWAYS PRACTICE SAFE HANDLING OF FIREARMS AND GUNS AT ALL TIMES.
1. Lay the 20 MOA base rail on a flat surface with raised bridge in the front2. Remove the top portion of the scope rings, by removing the 4 hex screws from each one. 3. Attach ring bases to your 20 MOA base rail; tighten ring mounting screws using the hex wrench.4. Set the scope onto the ring bases with
the objective bell towards the front of the raised sight bridge (Fig. 7).
5. Replace the ring top to each mount and loosely install the screws so the scope can still move freely.
6. Attach the 20 MOA base rail (with scope and rings mounted) to your AIRBOW, with the objective bell of the scope towards the front of the AIRBOW.
7. Put the AIRBOW to your shoulder, in your natural shooting position, and adjust the scope’s eye relief by moving the scope back and forth in the rings, until you achieve a full field of view.
NOTE: Make sure the scope is far enough forward so that the top cocking bolt can clear the rear, ocular bell of the scope when raised (Fig. 8).
8. When you have found the ideal eye relief, rotate the scope so the reticle crosshairs are level with the horizon.
9. Tighten the ring top screws evenly; making sure each side is evenly gapped. Do not over tighten.
8.3 Adjusting Parallax:Rotate the parallax adjustment ring until the target is in the sharpest focus and the center of the crosshair stays on the target while you examine the image by slightly moving your head.
Fig. 7
Fig. 8

7
8.4 Sighting-in your scope:Sighting-in of your AIRBOW should be done at 30 yards using the center crosshairs.
1. Remove the covers from your windage and elevation dials.2. Stabilize your AIRBOW and shoot a group at your target.3. Adjust the windage for left/right and elevation for up/down. One click of adjustment will change the
arrows’s point of impact ¼ MOA OR ¼” at 100 yards, 1/8” at 50 yards.4. Take a follow up shot and continue to adjust until your reticle and groups are aligned.
HELPFUL TIP: Before sighting, turn the elevation adjustment knob all the way in the “up” direction, then turn back in the "down" direction 1½ turns. This will get you close to the correct sight-in position
8.5 Reticle Map:The reticle pattern corresponds to the following yardages (yardages are only approximate, bolt/arrow weight, velocity, etc., can all affect aiming points and yardages).
9.0 Quiver Assembly:Your AIRBOW comes equipped with a quiver, quiver mount and picatinny accessory mount. See figures 10 and 11 for assembly instructions.
10.0 Firing Safely:1. Always point your AIRBOW in a SAFE DIRECTION.2. Follow the instructions for pressurizing the AIRBOW
(Section 6.1) and loading an arrow (Section 4.1).3. Cock the AIRBOW (See Section 5.1).4. Once you have the proper sight picture on your target,
push the safety lever to the “fire” position. 5. Pull the trigger (See Section 7.0).
30
353943
50 47
54
61
67
73
24
30
353943
50 47
54
61
67
73
24
Fig. 10 Fig. 11

8
11.0 Maintenance:
EXPLOSION DANGER. DO NOT INTRODUCE PETROLEUM-BASED LUBRICANTS INTO THE HIGH PRESSURE RESERVOIR, OR IT MAY CAUSE AN EXPLOSION. FAILURE TO FOLLOW THESE INSTRUCTIONS MAY RESULT IN SERIOUS INJURY OR DEATH.
• DO NOT MODIFY OR ALTER YOUR AIRBOW. Attempts to modify the AIRBOW in any way inconsistent with this manual may make your AIRBOW unsafe to use, cause serious injury or death, and will void the warranty.
• If you drop your AIRBOW, visually check to see that it works properly before you use it again. • If anything seems changed, like a shorter or weaker trigger pull or if any arrow cannot be loaded freely over the barrel, this may mean worn out or broken parts. Call Crosman customer service for assistance before using your AIRBOW again.
NOTE: Store this AIRBOW charged with air to keep the valves closed against dirt.11.1 Lubricating the Bolt:
The BENJAMIN PIONEER AIRBOW requires minimal maintenance. However, there are areas where periodic lubrication is recommended depending on frequency of use.
1. With the AIRBOW “UNLOADED”, “UNCOCKED”, “ON SAFE” and pointed in a SAFE DIRECTION,
2. Cock the AIRBOW and leave the cocking lever in the upward position.
3. Use a cotton swab to apply a graphite moly grease to the bolt and receiver where the bolt rides (Fig. 12). MOLY-GRAPH by CRC Industries is suitable grease for this application.
4. Perform this procedure at approximately 200 shot intervals.
11.2 Arrow Maintenance:When hunting, the possibility of arrow damage increases significantly. This is due to the high likelihood of the arrow impacting various things (roots, trees, fences, posts, rocks, hard ground, bone, etc.), possible misuse (improper maintenance, abuse or care), impact with other arrows, or the angle in which it impacts/passes through the animal. Damage to the arrow can result in sharp and/or splintered carbon fragments which are harmful to humans, especially if ingested. If there is ANY suspected carbon damage, please utilize the guidelines listed below.
Thoroughly inspect the entrance wound, exit wound and surrounding area prior to removing the carbon arrow in order to determine whether or not there are splinters/fragments embedded in the game animal.
1. Use extreme caution when removing the broken segments of the carbon arrow shaft. 2. While field dressing game animals, use care to avoid splinters/fragments of carbon fiber. 3. Carefully remove and dispose of any flesh that has the presence or suspected presence of carbon
fiber splinters or fragments.
NEVER ATTEMPT TO SHOOT A DAMAGED ARROW. INSPECT ARROWS FOR DAMAGE PRIOR TO EVERY SHOT Impact with hard objects, other arrows, or being shot into a game animal can all cause damage. We recommend flexing each arrow and inspecting for any sign of cracks or splits before each use.
4. Grasp the arrow firmly with both hands between the point and the notching.
5. Twist, flex and squeeze the shaft while listening for cracking (Fig. 13).
NEVER USE ARROWS WITH ANY SIGN OF DAMAGE. A CRACKED OR SPLIT ARROW CAN SUFFER CATASTROPHIC FAILURE UPON RELEASE AND CAUSE SEVERE INJURY TO YOURSELF OR OTHERS IN THE AREA AND DAMAGE YOUR AIRBOW.
12.0 Trouble Shooting your AIRBOW:1. Arrow is difficult to load over barrel
This problem may exist if the AIRBOW has a bent barrel or the arrow bushing is damaged. This could occur if the AIRBOW was mishandled or dropped or an arrow ruptured while on the barrel. To resolve this issue, inspect your arrow and bushing to ensure it is not damaged. If it is not an issue with the arrow bushing, your barrel may need to be replaced, call Crosman Customer Service.
Fig. 12
Fig. 13
9
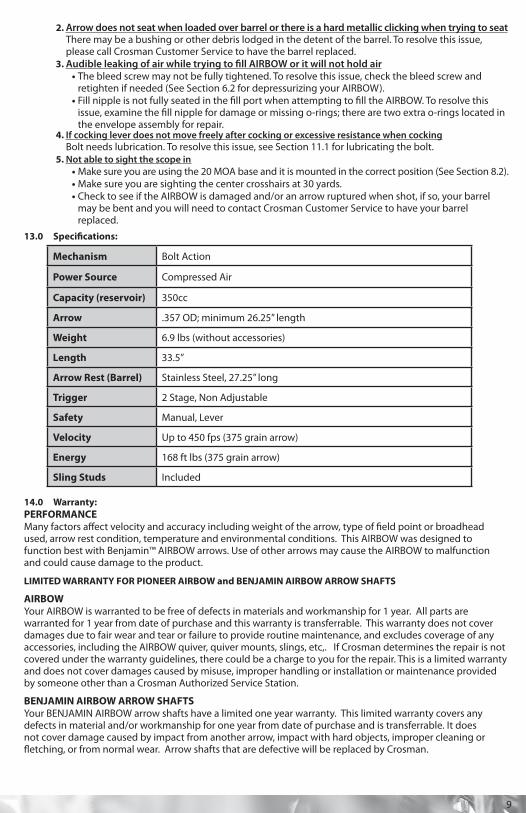
2. Arrow does not seat when loaded over barrel or there is a hard metallic clicking when trying to seat There may be a bushing or other debris lodged in the detent of the barrel. To resolve this issue, please call Crosman Customer Service to have the barrel replaced.
3. Audible leaking of air while trying to fill AIRBOW or it will not hold air • The bleed screw may not be fully tightened. To resolve this issue, check the bleed screw and retighten if needed (See Section 6.2 for depressurizing your AIRBOW).
• Fill nipple is not fully seated in the fill port when attempting to fill the AIRBOW. To resolve this issue, examine the fill nipple for damage or missing o-rings; there are two extra o-rings located in the envelope assembly for repair.
4. If cocking lever does not move freely after cocking or excessive resistance when cocking Bolt needs lubrication. To resolve this issue, see Section 11.1 for lubricating the bolt.
5. Not able to sight the scope in • Make sure you are using the 20 MOA base and it is mounted in the correct position (See Section 8.2). • Make sure you are sighting the center crosshairs at 30 yards. • Check to see if the AIRBOW is damaged and/or an arrow ruptured when shot, if so, your barrel may be bent and you will need to contact Crosman Customer Service to have your barrel replaced.
13.0 Specifications:
Mechanism Bolt Action
Power Source Compressed Air
Capacity (reservoir) 350cc
Arrow .357 OD; minimum 26.25” length
Weight 6.9 lbs (without accessories)
Length 33.5”
Arrow Rest (Barrel) Stainless Steel, 27.25” long
Trigger 2 Stage, Non Adjustable
Safety Manual, Lever
Velocity Up to 450 fps (375 grain arrow)
Energy 168 ft lbs (375 grain arrow)
Sling Studs Included
14.0 Warranty:PERFORMANCEMany factors affect velocity and accuracy including weight of the arrow, type of field point or broadhead used, arrow rest condition, temperature and environmental conditions. This AIRBOW was designed to function best with Benjamin™ AIRBOW arrows. Use of other arrows may cause the AIRBOW to malfunction and could cause damage to the product.
LIMITED WARRANTY FOR PIONEER AIRBOW and BENJAMIN AIRBOW ARROW SHAFTS
AIRBOWYour AIRBOW is warranted to be free of defects in materials and workmanship for 1 year. All parts are warranted for 1 year from date of purchase and this warranty is transferrable. This warranty does not cover damages due to fair wear and tear or failure to provide routine maintenance, and excludes coverage of any accessories, including the AIRBOW quiver, quiver mounts, slings, etc,. If Crosman determines the repair is not covered under the warranty guidelines, there could be a charge to you for the repair. This is a limited warranty and does not cover damages caused by misuse, improper handling or installation or maintenance provided by someone other than a Crosman Authorized Service Station.
BENJAMIN AIRBOW ARROW SHAFTSYour BENJAMIN AIRBOW arrow shafts have a limited one year warranty. This limited warranty covers any defects in material and/or workmanship for one year from date of purchase and is transferrable. It does not cover damage caused by impact from another arrow, impact with hard objects, improper cleaning or fletching, or from normal wear. Arrow shafts that are defective will be replaced by Crosman.

10
For warranty information regarding your CENTERPOINT 6x40 mm scope, please read your scope’s owner’s manual.
STOP – BEFORE YOU RETURN THIS PRODUCT TO THE STORESave on gas and avoid the trip back to the store. Contact our Customer Service/Technical Support
representatives for information and trouble-shooting help at 1-866-726-1122 or visit our web site at crosman.com.
WARRANTY CLAIM AND REPAIR SERVICEIf your product needs repair, DO NOT ATTEMPT TO DISASSEMBLE IT! Any disassembly or modification not performed by a Crosman Authorized Service Station will void the warranty.U.S. Customers - Contact Crosman Customer Service – 800-724-7486 or email us at crosman.com. You will be instructed where and how to send your product in for repair/replacement under warranty or referred an authorized service center.
Crosman CorporationAttn: Warranty Dept.
7629 Route 5 & 20Bloomfield, NY 14469
Include with your product a copy of your receipt and a brief description of the problem. Be sure to indicate your name, mailing address, email address and telephone number. Allow 2-4 weeks for product repair/replacement. We recommend you use a method of shipping that provides you with a tracking number and insurance options. Crosman is not liable for any merchandise damaged, lost or stolen during shipping to and from Crosman.Canadian Customers - Contact the Gravel Agency, in Quebec at 866-662-4869.Outside U.S. Customers - Please contact your point of purchase dealer/distributor. If you do not know your dealer/distributor, contact our International Dept. for assistance at 585-657-6161 or email us at crosman.com.
AIRBOW, BENJAMIN and CENTERPOINT are trademarks of Crosman Corporation in the United States
MOLY-GRAPH is a trademark of CRC Industries, Inc.
© 2016 Crosman Corporation03-16_OM
THIS LIMITED WARRANTY DOES NOT INCLUDE CONSEQUENTIAL DAMAGES, INCIDENTAL DAMAGES, OR INCIDENTAL EXPENSES, INCLUDING DAMAGE TO PROPERTY OR ANY OTHER EXPENSE. CROSMAN DISCLAIMS ANY IMPLIED WARRANTIES, INCLUDING THE IMPLIED WARRANTIES OF MERCHANTABILITY AND FITNESS. SOME STATES DO NOT ALLOW THE EXCLUSION OR LIMITATION OF INCIDENTAL OR CONSEQUENTIAL DAMAGES, OR ALLOW LIMITATIONS ON IMPLIED WARRANTIES SO THE ABOVE LIMITATIONS OR EXCLUSIONS MAY NOT APPLY TO YOU. TO THE EXTENT ANY PROVISION OF THIS WARRANTY IS PROHIBITED BY FEDERAL, STATE OR MUNICIPAL LAW, WHICH CANNOT BE PREEMPTED, IT SHALL NOT BE APPLICABLE. THIS WARRANTY GIVES YOU SPECIFIC LEGAL RIGHTS, AND YOU MAY ALSO HAVE OTHER RIGHTS, WHICH VARY FROM STATE TO STATE AND COUNTRY TO COUNTRY.

Notes

BABPNBX-515