
OWNER’S MANUAL - ePVision.com manual_PHD-205v0.5.pdfPrimeDTV Technologies, Inc. Anaheim, CA 92807...
28
DIGITAL HDTV TUNER OWNER’S MANUAL MODEL : PHD-205 ©Copyright 2007, PrimeDTV Technologies, Inc.
Transcript of OWNER’S MANUAL - ePVision.com manual_PHD-205v0.5.pdfPrimeDTV Technologies, Inc. Anaheim, CA 92807...

PrimeDTV Technologies, Inc. Anaheim, CA 92807 Tel: (714) 630-6899 www.primedtv.com DOC# 205-v0.5
DIGITAL HDTV TUNER OWNER’S MANUAL MODEL : PHD-205
©Copyright 2007, PrimeDTV Technologies, Inc.
2
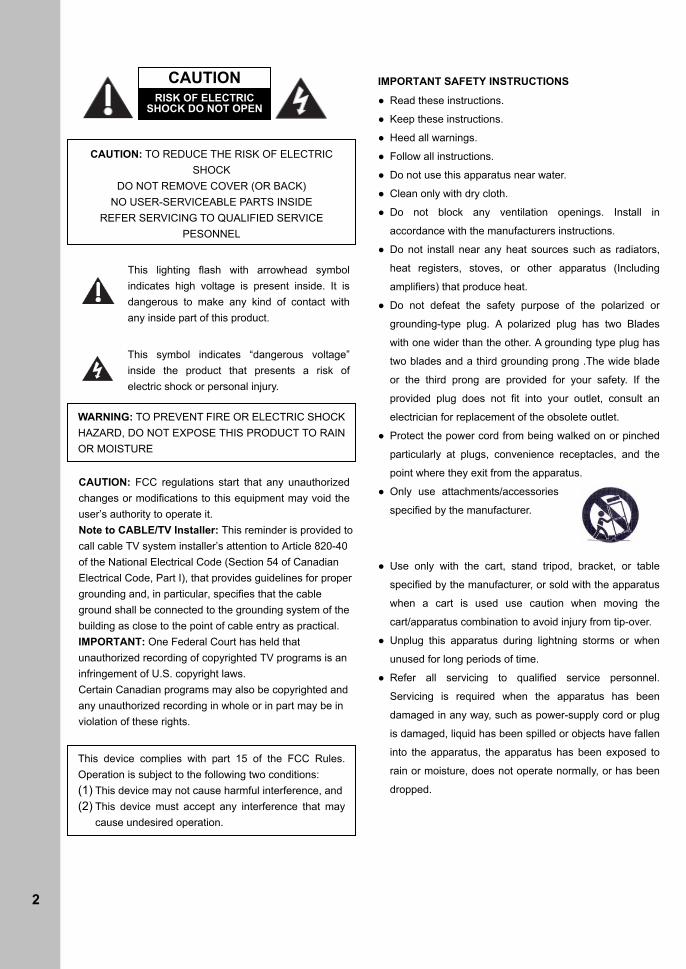
WARNING: TO PREVENT FIRE OR ELECTRIC SHOCK HAZARD, DO NOT EXPOSE THIS PRODUCT TO RAIN OR MOISTURE
This device complies with part 15 of the FCC Rules. Operation is subject to the following two conditions: (1) This device may not cause harmful interference, and (2) This device must accept any interference that may
cause undesired operation.
This lighting flash with arrowhead symbol indicates high voltage is present inside. It is dangerous to make any kind of contact with any inside part of this product.
This symbol indicates “dangerous voltage” inside the product that presents a risk of electric shock or personal injury.
CAUTION: FCC regulations start that any unauthorized changes or modifications to this equipment may void the user’s authority to operate it. Note to CABLE/TV Installer: This reminder is provided to call cable TV system installer’s attention to Article 820-40 of the National Electrical Code (Section 54 of Canadian Electrical Code, Part I), that provides guidelines for proper grounding and, in particular, specifies that the cable ground shall be connected to the grounding system of the building as close to the point of cable entry as practical. IMPORTANT: One Federal Court has held that unauthorized recording of copyrighted TV programs is an infringement of U.S. copyright laws. Certain Canadian programs may also be copyrighted and any unauthorized recording in whole or in part may be in violation of these rights.
IMPORTANT SAFETY INSTRUCTIONS
● Read these instructions.
● Keep these instructions.
● Heed all warnings.
● Follow all instructions.
● Do not use this apparatus near water.
● Clean only with dry cloth.
● Do not block any ventilation openings. Install in
accordance with the manufacturers instructions.
● Do not install near any heat sources such as radiators,
heat registers, stoves, or other apparatus (Including
amplifiers) that produce heat.
● Do not defeat the safety purpose of the polarized or
grounding-type plug. A polarized plug has two Blades
with one wider than the other. A grounding type plug has
two blades and a third grounding prong .The wide blade
or the third prong are provided for your safety. If the
provided plug does not fit into your outlet, consult an
electrician for replacement of the obsolete outlet.
● Protect the power cord from being walked on or pinched
particularly at plugs, convenience receptacles, and the
point where they exit from the apparatus.
● Only use attachments/accessories
specified by the manufacturer.
● Use only with the cart, stand tripod, bracket, or table
specified by the manufacturer, or sold with the apparatus
when a cart is used use caution when moving the
cart/apparatus combination to avoid injury from tip-over.
● Unplug this apparatus during lightning storms or when
unused for long periods of time.
● Refer all servicing to qualified service personnel.
Servicing is required when the apparatus has been
damaged in any way, such as power-supply cord or plug
is damaged, liquid has been spilled or objects have fallen
into the apparatus, the apparatus has been exposed to
rain or moisture, does not operate normally, or has been
dropped.
CAUTION RISK OF ELECTRIC
SHOCK DO NOT OPEN
CAUTION: TO REDUCE THE RISK OF ELECTRIC SHOCK
DO NOT REMOVE COVER (OR BACK) NO USER-SERVICEABLE PARTS INSIDE
REFER SERVICING TO QUALIFIED SERVICE PESONNEL
27
Ref
eren
ce
Specification
Section Contents Spec.
Video System NTSC-M, ATSC
MPEG-2 MP@HL compliant video decoder Video System (ATSC)
Video Type: 480i, 480p, 720p, 1080i
Dolby Digital Sound System (ATSC)
PCM
Auto Channel Search (Analog / Digital )
Supported
EPG (Electronic Program Guide) with ATSC PSIP(Program and Service Information Protocol)
Closed Caption EIA-608A/EIA-708B Supported
TV
V-Chip and MPAA Parental Guide Rating Support
AUDIO MTS Mono / Stereo / SAP
GRAPHIC Aspect ratio Normal / Direct / Zoom / Stretch / Stretch Edges
Multi language OSD English, Spanish, French OSD
Program list/edit Supported
SPDIF (Optical) Dolby Digital or PCM
TV Antenna Antenna In (75ohm Coaxial cable) (F-connector)
Audio Line Out (RCA) 1 x RCA Stereo (L/R) Out
Composite output (RCA) 1 x RCA Video Out (480i)
S-video output 1 x S-video Out (480i)
Component output (RCA) 1 x Component Out (1080i, 720p, 480p)
RGB (D-Sub) output 1 x D-Sub (15 Pin) Out (1080i, 720p, 480p)
DVI-HDTV (DVI-D Single Link) output
1 x DVI Out(1080i, 720p, 480p)
Service PORT 1 x USB v.2.0 Jack for Service (ATSC Module)
Screen saver Supported
External connection
Power supply AC 120V, 60Hz
consumption 15W
Power
standby mode 0.8W
products Size (mm) Size (inch)
360(W) mm×50(H) mm×250(D) mm 14.17”(W)×1.96”(H)×9.84”(D)
Net weight 2.5kg (5.5lb)

26
Reference Troubleshooting No power
Is the AC power cord plugged in? No signal
Check your antenna input or location. Check your cable input. Check your RF connection or set up.
No picture Make sure that the correct format is selected. Adjust the “RESOLUTION” switch on the rear panel to change formats.
Make sure that the right component type is selected.
If the PHD-205 Digital HDTV Tuner is connected to your monitor or TV via Y/Pb/Pr port on the back panel, the “DTV SELECT” switch must be flipped to the right. If the PHD-205 Digital HDTV Tuner is connected to your monitor or TV via DVI port on the back panel, the “DTV SELECT” switch must be flipped to the left.
Make sure the Initial Setup process has been performed. Select the correct antenna type to Auto Scan Channels if you have not already done so.
Check to make sure all the cables are installed correctly and that the proper source is selected on your TV.
The digital TV signal strength may be low. Check the signal strength and adjust the off-air antenna.
Make sure the broadcaster or service provider is supplying programming on the selected channel. Use the SIGNAL button to check for digital video signals.
You may be trying to access a pay-per-view program. Follow the on-screen instructions to order the program.
Due to copyright restrictions, you may not be able to view some high definition programs in the high-definition format.
Cannot receive high-definition channels Make sure there is a good signal strength on available off-air antenna
Normal picture but no sound Make sure the TV or Amp is not muted. Check that the Digital HDTV Tuner is connected properly
Picture is distorted.
Make sure the proper format is selected. Make sure the proper aspect ratio is selected. Adjust the aspect ratio setting of your TV or monitor if available.
Video image does not fill the TV screen Check the Digital HDTV Tuner’s Aspect Ratio setting, press the ASPECT button on the remote control, or check your TV’s aspect ratio setting.
Check with your service provider or local broadcaster to confirm if a full video image is broadcast.
Channels are missing If you changed the type of antenna, please select a correct tuner option in menu and Auto scan channel again.
The remote control is not responding Make sure the batteries are fresh and installed properly.
Point the remote control unit at the remote control sensor.
The timer does not work After a power failure or disconnection of the power, the clock settings will be lost.
Closed captions are not displayed Depending on broadcast provider, different types of captioning may be available. According to your preferences, you will need to set your Caption settings for Analog and Digital modes.
Check your CC mode and Closed Caption options.
Try to change your advanced settings (for instance, Text and Background) and CC Preference (for instance, Automatic).
3
Contents
INTRODUCTION...................................................... 5
TECHNICAL OVERVIEW............................................. 5 What are Analog TV, Digital TV, NTSC, ATSC, SDTV, and HDTV? ................................................5 What kinds of TV programming can I watch with the Digital HDTV Tuner? .......................................5 What equipment is required to view HDTV programming? .......................................................5 Resolution an interlacing .......................................6 Video output ..........................................................6 Aspect ratio ...........................................................6 Screen formats ......................................................7
UNPACKING............................................................ 8 FRONT PANEL......................................................... 9 REAR PANEL ........................................................ 10 REMOTE CONTROL .................................................11
CONNECTIONS AND SETUP ............................... 12
CONNECTIONS ...................................................... 12 Connecting Air/Cable antenna ....................... 12 Connect to HD Ready TV or HDTV Monitor .. 12 Connecting to Conventional Analog TV ......... 13 Connect to Home Theater.............................. 13 DVI to HDMI Connection................................ 14
INITIAL SETTINGS.................................................. 15
OPERATION .......................................................... 16
WATCHING TV ...................................................... 16 Turning on or off the Digital HDTV Tuner....... 16 Changing the channels .................................. 16 Adjust volume ................................................ 17 Using MUTE................................................... 17 Seeing the Closed Caption ............................ 17 Displaying the channel information................ 17
Displaying the GUIDE .................................... 18 Audio Preference............................................ 18
USING THE MENU ................................................ 19 Set up ............................................................. 19
Language ............................................................19 Aspect Ratio ........................................................19 Reset All ..............................................................20 System Information .............................................20
Audio .............................................................. 20 Digital Audio ........................................................20
Time................................................................ 21 Time Zone ...........................................................21 DST (Daylight Saving Time) ................................21 Date and Time.....................................................21
Channels ........................................................ 21 Tuner ...................................................................21 Auto Scan............................................................21 Manual Scan .......................................................21 Master List...........................................................22 Favorites..............................................................22
Caption ........................................................... 22 CC Mode .............................................................22 Analog Caption....................................................23 DTV Caption........................................................23 DTV Caption Style ...............................................23 CC Preference.....................................................23
Parental Control (V-Chip) ............................... 24 Change PIN.........................................................24 MPPA-Rating.......................................................24 TV-USA ...............................................................25 CA English Rating ...............................................25 CA French Rating ................................................25
REFERENCE.......................................................... 26
TROUBLESHOOTING............................................... 26 SPECIFICATION...................................................... 27
Congratulations on choosing PrimeDTV PHD-205 Digital HDTV Tuner. Please read this manual carefully before operation. For your convenience, this manual will provide pictures and descriptions to make operation as easy as possible. In order to use and maintain the set better, please follow its operating instructions. Thanks for your cooperation.

4
25
Ope
ratio
n
TV-USA
The TV Parental Guidelines work in conjunction with the V-CHIP to help parents screen out inappropriate television shows from their children. *Restriction Categories based on six aged base.
Hierarchy of Age-based Ratings TV-Y All Children TV-Y7 7 years old and above TV-G General audience TV-PG Parental guidance TV-14 14 years old and above TV-MA Mature audience only
If you block TV-Y, TV-Y7 will automatically be
blocked and similarly. And you block TV-G, TV-PG, TV-14 and TV-MA will be blocked.
If you unblock TV-V7, TV-Y will automatically be unblocked and similarly. And you unblock TV-MA, TV-G, TV-PG and TV-14 will be unblocked.
Each Restriction Category has additional options.
sub-ratings ALL All restriction FV Fantasy Violence D Sexually Suggestive Dialog L Adult Language S Sexual Situation V Violence
V-Chip will automatically block certain sub-categories that are more restrictive. For example, if you block “L” sub-rating in TV-PG, then the “L” sub ratings in TV-14 and TV-MA will automatically be blocked. TV Parental Guidelines
ALL FV D L S V TV-Y TV-Y7 TV-G TV-PG TV-14 TV-MA : Content rating can be set
CA English Rating
Restriction Categories based on five aged base.
Hierarchy of Age-based Ratings G General programming. 8 ans+ Not recommended for young children. 13 ans+ Not recommended for ages under 13. 16 ans+ Not recommended for ages under 16. 18 ans+ Programming restricted to adults.
CA French Rating
Restriction Categories based on six aged base.
Hierarchy of Age-based Ratings C All Children. C8+ Children 8 years and above. G General programming. PG Parental guidance 14+ 14 years old and above. 18+ Adults programming.

24
Parental Control (V-Chip) In this item, you can use Ratings locks (V-CHIP), Channel locks and change PIN after setting your password. When you first enter into this menu, setup your password. 1. Press MENU and “MENU” screen display. 2. Press ▲/▼ to select “Parental” item. 3. Press OK or ► into the New PIN item. 4. Select and enter PIN (4 digits) using the number
buttons (0-9). 5. Enter same PIN (4 digits) again and access the
Parental menu.
In screen, appears instead of the number. As a precautionary measure, make a note of
your password (PIN) and keep it in a familiar place.
System default PIN number is 2273.
6. Press ▲/▼ to highlight the item: Change PIN, MPPA-Rating, TV-USA, CA English Rating, CA French Rating.
7. Press OK or ► to select an option. 8. Press EXIT to exit. V-CHIP is an electronic filtering device built into this Digital HDTV Tuner. This tool gives parents a great degree of control over broadcasts accessed by their children. It allows parents to select programs judged suitable for child viewing while blocking ones judged not suitable. It does so automatically once you activate the V-CHIP feature in your equipment.
IMPORTANT Two conditions must be met to enable the V-CHIP.
Password (PIN) is registered. V-CHIP settings have been made.
Change PIN
You can change the lock PIN. 1. Enter New PIN. 2. Confirm New PIN. 3. Select “Done” to confirm it. 4. Than your New PIN is configured. MPPA-Rating
Movie ratings are used for original movies rated by the Motion Picture Association of America (MPAA) as watched on cable TV and not edited for television. The V-CHIP can also be set to block MPAA-rated movies. *Restriction Categories based on six aged base.
Voluntary movie rating system (MPPA) G General Audience (No Restrictions). PG Parental guidance Suggested. PG-13
Parental guidance for children under 13.
R
Restricted. Children under 17 should be accompanied by an adult
NC-17 17 years old and above. X Adults Only
If you block G, other will automatically be blocked
and similarly. If you unblock X, other will automatically be
unblocked and similarly.
Set up
Audio
Time
Channel
Caption
Parental
Change PIN MPAA Rating TV-USA CA English Rating CA French Rating Unrated Show Off
New PIN Enter: Confirm:
Done
5
Intr
oduc
tion
Introduction To ensure proper use of this product, please read this owner’s manual carefully and retain for future reference. This manual provides information on the operation and maintenance of your PHD-205 Digital HDTV Tuner. This chapter explains the Technical overview, unpacking, front panel, Rear panel, and Remote control.
Technical overview This paragraph explains the technical capabilities of the PHD-205 Digital HDTV Tuner, and provides background information on digital television. Topics covered here include:
What are Analog TV, Digital TV, NTSC, ATSC, SDTV, and HDTV?
What kinds of TV programming can I watch with the Digital HDTV Tuner?
What equipment is required to view HDTV programming?
Video output options Aspect ratio Screen formats
What are Analog TV, Digital TV, NTSC, ATSC,
SDTV, and HDTV?
Analog TV Analog TV is the TV you’re probably most familiar with. Most of the TV broadcasts you receive via a standard off-air antenna or from your local cable company are analog TV broadcasts. Digital TV Digital television (sometimes called DTV) is a newer method of broadcasting TV signals that delivers higher quality audio and video. Digital TV is broadcast in two sets of formats, SDTV and HDTV. NTSC NTSC (National Television Standards Committee) refers to the group that first established the standards used for conventional analog television broadcasts and TV equipment. ATSC ATSC (Advanced Television Systems Committee) is the group who has been working to establish the standards for digital television broadcasts and digital television equipment – including both SDTV and HDTV.
SDTV SDTV (Standard-Definition TV) is a digital TV format that provides a high quality picture at resolutions that can be displayed on standard TV sets (see more on resolutions later in this chapter). HDTV HDTV (High-Definition TV) is a digital TV format that provides the highest quality picture at resolutions that can be displayed on HDTV-ready TV displays, HDTV Monitors and, computer monitors. What kinds of TV programming can I watch with
the Digital HDTV Tuner?
The PHD-205 Digital HDTV Tuner provides you with the ability to receive television programs from a wide range of sources, and to display them on general HDTV or monitor. Using the Air/Cable jack on the back of the Digital HDTV Tuner, you can receive local analog and digital television programs.
To view cable TV programming, programming
subscriptions are also required. What equipment is required to view HDTV
programming?
To view HDTV programming, an addition to your PHD-205 Digital HDTV Tuner, you will need an HDTV monitor or television set. To receive analog and digital off-air television broadcasts, you’ll need an off-air antenna. To receive cable TV programming, you’ll need a cable TV connection (provided by your local cable TV service provider).

6
Resolution an interlacing
Two of the elements that determine the quality of a TV picture are resolution and interlacing. Resolution For TV equipment and broadcasts, resolution is defined by the number of horizontal lines displayed to make up each frame of a video image. The more lines of resolution used to draw each frame of video, the more detailed and sharp the picture will be. Standard TV resolution uses 480 horizontal lines to make up each of video. HDTV uses either 720lines, or 1080 lines to make each video frame. Interlacing When TVs display video, they display a new video frame at a rate that is faster than your eye can see (from 24 to 60 frames per second, depending on the TV and broadcast). Interlacing refers to whether each of those frames contains all of the lines of video for each frame or every other line. Interlaced signals take every other line frame 2 frames of video (each lasting 1/60th of a second), and combine them into one frame lasting 1/30th of a second. In this way, interlacing tricks your eye into thinking it is seeing twice the resolution that is actually being displayed. In non-interlaced video, (referred to as progressive scan video), video frames are displayed every 1/60th of a second containing all of the lines of video information for each frame.
The specifications for video resolutions are usually stated by giving the number of horizontal lines, followed by either the letter I, for interlaced video, or p for progressive scan video. Some DVDs and non-HDTV digital TV broadcasts use 480p. The ATSC specification for HDTV broadcasts and equipment requires either 1080i or 720p. While there is some debate as to whether it is better to have more lines that are interlaced that 1080i is highest quality video format.
Video output
The PHD-205 Digital HDTV Tuner is able to receive broadcasts in any of the resolutions mentioned above. It can also display programs on TVs capable of displaying any of those resolutions. To set up your PHD-205 to handle the combinations of incoming video formats and TV display capabilities, you simply set the Resolution Switch on the rear panel to match the highest resolution your TV is capable of displaying. (If you’re not sure about your TV’s resolution, see your TV’s manual for this specification.) PHD-205 will then do the appropriate conversion from input signal format to display format. Video output formats
Output Connection Available Formats S-VIDEO 480i VIDEO 480i YPbPr 1080i/720p/480p DTV(RGB) 1080i/720p/480p DVI 1080i/720p/480p
Aspect ratio
In addition to resolution and interlacing, HDTV is also defined by the aspect ratio of its broadcasts. Aspect ratio means the shape of the screen as defined by the ratio of the screen’s width to its height. For analog TV and SDTV, the aspect ratio is 4 units wide by 3 units high (usually written 4:3). This is familiar shape of conventional TVs----slightly wider than they are tall. For HDTV broadcasts, the aspect ratio is 16:9 (nearly twice as wide as it is tall). This is, not coincidentally, more like the shape of movies shown in theaters. This makes HDTV an ideal format for broadcasting and viewing movies on a TV. But what happens if you are watching a nearly square-shaped 4:3 broadcast on a rectangular 16:9 TV. The PHD-205 Digital HDTV Tuner allows you to choose from a variety of screen formats to help you dealing with those scenarios.
23
Ope
ratio
n
Analog Caption
You can select an available in these options.
CC1: The Primary Synchronous Caption Service. These are captions in the primary language that must be in sync with the sound, preferably matched to a specific frame. CC2: The Special Non-Synchronous Use Captions. This channel carries data that is intended to augment information carried in the program. CC3: Secondary Synchronous Caption Service. Alternate program-related caption data, typically second language captions. CC4: Special Non-Synchronous Use Captions. Similar to CC2. Text1: First Text Service. This may be various non-program related data. Text2: Second Text Service. Additional data, usually not program related. Text3/Text4: Third Text Service. These data channels should be used only if Text1 and Text2 are not sufficient.
DTV Caption
You can select an available advance caption in DTV Caption. This item include
Advanced CC1 Advanced CC2 Advanced CC3 Advanced CC4 Advanced CC5 Advanced CC6
DTV Caption Style
This will adjust advanced settings such as text style and size and etc. It can be used into digital channel. Text Style
Typewriter/Storybook/ Computer/Modern/ Formal/ Cursive/Casual/ As Broadcast
Color White/Red/Green/Blue/Black/Yellow/ Magenta/Cyan/ As Broadcast
Size Small/ Standard Size/ Large/ As Broadcast
Opacity Solid/ Translucent/ Transparent/ Flashing/ As Broadcast
Background Color
White/Red/Green/Blue/Black/Yellow/ Magenta/Cyan/ As Broadcast
Opacity
Solid/ Translucent/ Transparent/ Flashing/ As Broadcast
Edge Style
None/ Raised /Depressed/ Uniform/ Shadow left/ Shadow Right/ As Broadcast
Color
White/Red/Green/Blue/Black/Yellow/ Magenta/Cyan/ As Broadcast
*Factory default: As Broadcast CC Preference
Choose whether to use “basic”, “advanced” or “Automatic” closed caption setting for digital TV channels. (Advanced closed caption is the priority)
When an Analog signal is received, you can choose CC1, CC2, CC3, CC4, TEXT1, TEXT2, TEXT3, TEXT4 and OFF. When a Digital signal is received, you can choose from Adv.CC1, Adv.CC2, Adv.CC3, Adv.CC4, Adv.CC5, Adv.CC6, CC1, C2, C3, C4, TEXT1, TEXT2, TEXT3, TEXT4, and OFF. Depending on the broadcast signal, some Analog Captions will function with a Digital broadcast signal.

22
Master List
Edit the master list of all your channels. You can add or remove some channels from the master list.
When you press CH+/CH- button to watch TV,
your TV will stop only on the channels you have programmed into the TV’s channels master list.
Removed channels in the master list will select by pressing number button only.
Favorites
Edit the list of channels in your favorites. Favorite Channel Function is for the convenience of channel change among your frequent watching or favorite channels by separately memorizing them in FAV. You can mark to add the favorite channel in each FAV. You can use “name” item to rename the FAV name also.
FAV name default FAV1 List FAV2 Sports FAV3 News
Using FAV1 FAV2 FAV3 button You can use FAV1 FAV2 or FAV3 button to add or remove the channels also. 1. Press CH+/CH- buttons to select the channel you
would like to register. 2. Press FAV1 FAV2 or FAV3 button on the remote
control to register it as a favorite channel, select “Add” to register it.
3. In the favorite channel, you can press FAV1 FAV2 or FAV3 button to remove it.
4. After you finish favorite channel registration, by each pressing of FAV1 FAV2 or FAV3 button, you can change the channels between them.
Caption Closed Caption feature is to display On Screen Text Messages during watching TV. This feature is available in both analog and digital broadcast. The PHD-205 Digital HDTV Tuner is equipped with an internal Closed Caption decoder. It allows you to view conversations, narration and sound effects as subtitles on your TV. Digital Closed Caption service is a new caption service available only on digital TV programs (also at the discretion of the service provider). It is a more flexible system than the original Closed Caption system, because it allows a variety of caption sizes and font styles. When the Digital Closed Caption service is in use, it will be indicated by the appearance of a 3-letter abbreviation that also indicates the language of the Digital Closed Captions: ENG (English), SPA (French), FRA (French) or other language codes.
Closed captioning is not available on all
channels at all times. Only specific programs encoded with closed-captioning information are applicable.
1. Highlight “Caption” on the MENU control panel and
press OK or ►. 2. Press ▲ /▼ to highlight the item: CC Mode,
Analog Caption, DTV Caption, DTV Caption Style, CC Preference.
3. Press OK or ► to select an option. 4. Press EXIT to exit. CC Mode
You can select the CC Mode from ON and OFF. You can also press CC button on the remote control. (See page 17)
Set up
Audio
Time
Channel
Caption
Parental
CC Mode Off
Analog Caption TEXT1
DTV Caption Adv.CC1
DTV Caption Style
CC Preference Automatic
Closed caption Setting
On
Off
7
Intr
oduc
tion
Screen formats
To deal with the mismatches that can occur between the shapes of TVs and the aspect ratios of program broadcasts, the Digital HDTV Tuner provides you with a set of screen format controls. These controls allows you to pick a format to use for both 4:3 TVs showing 16:9 programs, and for 16:9 TVs showing 4:3 programs. Here is an explanation of the options. (Details for setting this preference are included in page 19). 16:9 TVs showing 4:3 programs
Standard definition
Normal
Direct
Zoom
Stretch
Stretch Edges
4:3 TVs showing 16:9 programs
Standard definition
Normal
Direct
Zoom
Stretch
Stretch Edges

8
7
FAV3
1
4
7
2
5
8
0
3
6
9
·
Unpacking Make sure you have received all these items listed below with the PHD-205 Digital HDTV Tuner.
PHD-205 Digital HDTV Tuner
Remote Control Batteries
Component Video Cable (red, blue, green)
Composite A/V Cable (red, white, yellow)
Owner’s Manual
Digital HDTV Tuner PHD-205
POWER
CH+/UP CH-/DOWN LEFT RIGHT MENU ENTER STANDBY ON OFF
21
Ope
ratio
n
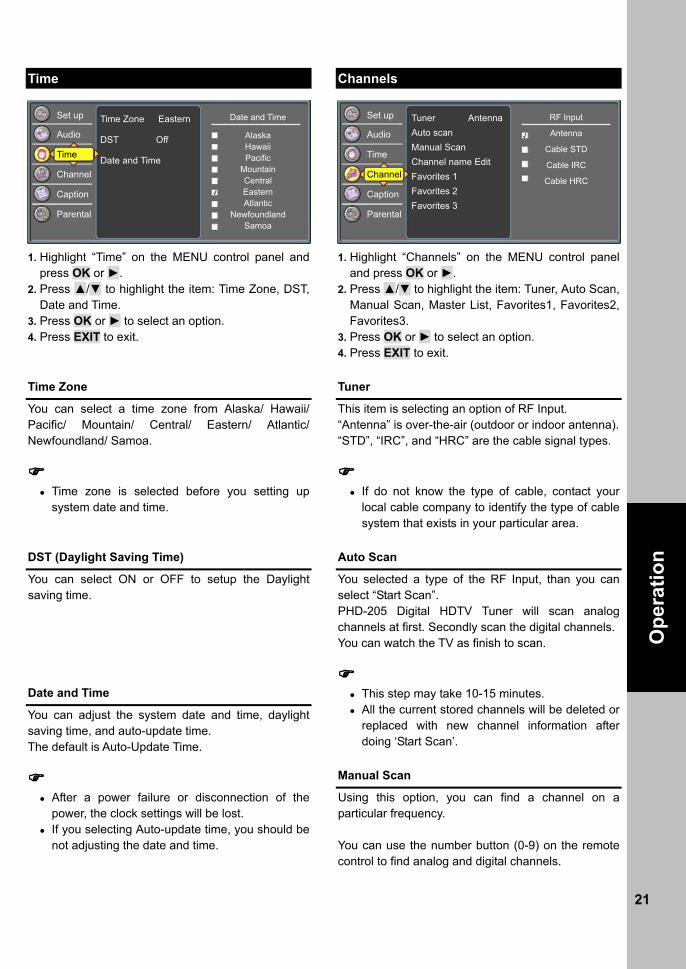
Time 1. Highlight “Time” on the MENU control panel and
press OK or ►. 2. Press ▲/▼ to highlight the item: Time Zone, DST,
Date and Time. 3. Press OK or ► to select an option. 4. Press EXIT to exit. Time Zone
You can select a time zone from Alaska/ Hawaii/ Pacific/ Mountain/ Central/ Eastern/ Atlantic/ Newfoundland/ Samoa.
Time zone is selected before you setting up
system date and time. DST (Daylight Saving Time)
You can select ON or OFF to setup the Daylight saving time. Date and Time
You can adjust the system date and time, daylight saving time, and auto-update time. The default is Auto-Update Time.
After a power failure or disconnection of the
power, the clock settings will be lost. If you selecting Auto-update time, you should be
not adjusting the date and time.
Channels 1. Highlight “Channels” on the MENU control panel
and press OK or ►. 2. Press ▲/▼ to highlight the item: Tuner, Auto Scan,
Manual Scan, Master List, Favorites1, Favorites2, Favorites3.
3. Press OK or ► to select an option. 4. Press EXIT to exit. Tuner
This item is selecting an option of RF Input. “Antenna” is over-the-air (outdoor or indoor antenna). “STD”, “IRC”, and “HRC” are the cable signal types.
If do not know the type of cable, contact your
local cable company to identify the type of cable system that exists in your particular area.
Auto Scan
You selected a type of the RF Input, than you can select “Start Scan”. PHD-205 Digital HDTV Tuner will scan analog channels at first. Secondly scan the digital channels. You can watch the TV as finish to scan.
This step may take 10-15 minutes. All the current stored channels will be deleted or
replaced with new channel information after doing ‘Start Scan’.
Manual Scan
Using this option, you can find a channel on a particular frequency. You can use the number button (0-9) on the remote control to find analog and digital channels.
Set up
Audio
Time
Channel
Caption
Parental
Time Zone Eastern
DST Off
Date and Time
Date and Time
Alaska Hawaii Pacific
Mountain Central Eastern Atlantic
Newfoundland Samoa
Set up
Audio
Time
Channel
Caption
Parental
Tuner Antenna Auto scan Manual Scan Channel name Edit Favorites 1 Favorites 2 Favorites 3
RF Input
Antenna
Cable STD
Cable IRC
Cable HRC

20
Reset All
With one fell swoop you can reset all settings back to factory settings. This includes the channel map, all Program Info, Favorite channel lists, etc. The TV should display the Setup Wizard following reset, just as if it was turned on out-of-the-box.
If a PIN is set, the PIN entry dialog is displayed
before the Reset All Settings dialog box, even if Locks are temporarily off. If no PIN is set, the dialog is displayed immediately.
System Information
Display important system information. The information is including:
Chipset Demod Remote Code Version
Audio 1. Highlight “Audio” on the MENU control panel and
press OK or ►. 2. Press OK or ► into “Digital Audio”. 3. Press EXIT to exit. Digital Audio
You can output digital audio to home theater or similar device whose DIGITAL AUDIO INPUT terminal is connected to the DOLBY DIGITAL OUT (OPTICAL) terminal on the Digital HDTV Tuner. Please select an audio of the program you are watching and the equipment connected. You can change the optical output to Dolby Digital or PCM.
Item Description PCM The coaxial digital audio output
terminal outputs audio signal in PCM form. If your digital audio system does not support Dolby Digital, select ”PCM”
Dolby Digital
The optical digital audio output terminal outputs audio signal in Dolby Digital form. It reproduces sound from surround program of digital.
Set up
Audio
Time
Channel
Caption
Parental
Digital Audio Dolby Digital Audio Output
Dolby digital
PCM
9
Intr
oduc
tion
Front Panel
Digital HDTV Tuner PHD-205 POWER
CH+/UP CH-/DOWN LEFT RIGHT MENU ENTER STANDBY ON OFF
Display Window Display information about DigitalTuner Receiver.
ENTER Chooses the items highlighted.
MENU Display the Main Menu.
CH-/DOWN Cycles through programmed channels andmove the on-screen highlight down.
RIGHT Move the on-screen highlight to right.
Power Switch the Tuner ON and OFF.
STANDBY Turn on / off the Tuner.
CH+/UP Cycle through programmed channels and move the on-screen highlight up.
LEFT Move the on-screen highlight to left.
10
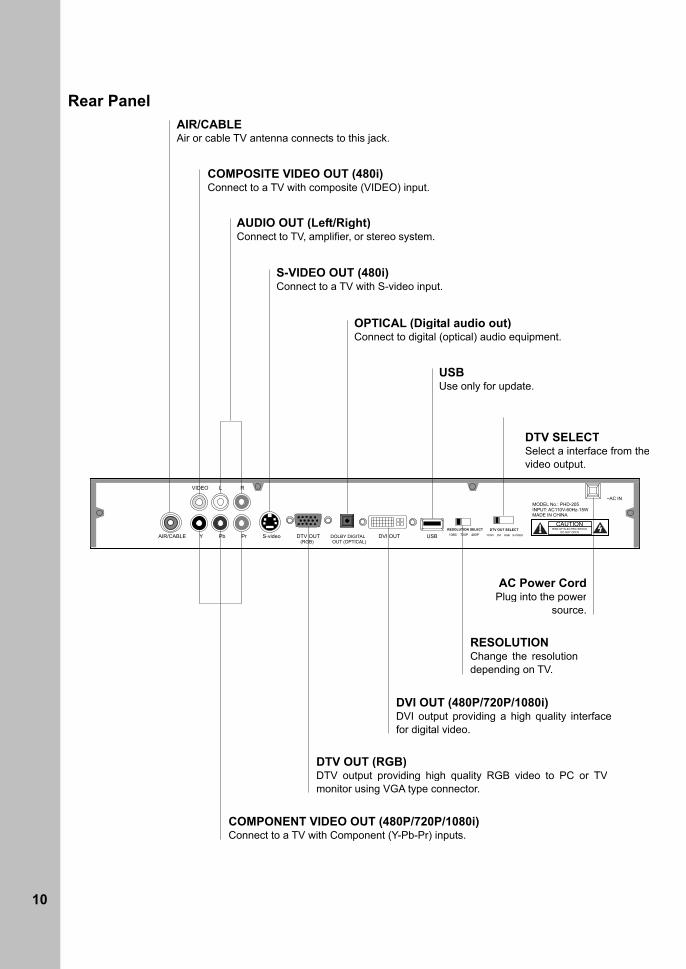
Rear Panel
AIR/CABLE Y Pb Pr S-video DTV OUT DOLBY DIGITAL DVI OUT USB (RGB) OUT (OPTICAL)
VIDEO L R
DTV OUT SELECT YPbPr DVI RGB S/VIDEO
RESOLUTION SELECT 1080i 720P 480P
CAUTION RISK OF ELECTRIC SHOCK
DO NOT OPEN
MODEL No.: PHD-205 INPUT: AC110V-60Hz-15W MADE IN CHINA
~AC IN
AUDIO OUT (Left/Right) Connect to TV, amplifier, or stereo system.
COMPONENT VIDEO OUT (480P/720P/1080i) Connect to a TV with Component (Y-Pb-Pr) inputs.
DVI OUT (480P/720P/1080i) DVI output providing a high quality interfacefor digital video.
OPTICAL (Digital audio out) Connect to digital (optical) audio equipment.
RESOLUTION Change the resolutiondepending on TV.
DTV OUT (RGB) DTV output providing high quality RGB video to PC or TVmonitor using VGA type connector.
AIR/CABLE Air or cable TV antenna connects to this jack.
AC Power CordPlug into the power
source.
COMPOSITE VIDEO OUT (480i) Connect to a TV with composite (VIDEO) input.
S-VIDEO OUT (480i) Connect to a TV with S-video input.
USB Use only for update.
DTV SELECT Select a interface from thevideo output.
19
Ope
ratio
n
Set up Language…………….……….Page19 Aspect ratio………………......Page19 Reset All……………………..page20 System Information..…..…….Page20
Audio Digital Audio……..…….…….Page20
Caption CC Mode……..…….…….......Page22 Analog Caption……….….......Page23 DTV Caption..………….....….Page23 DTV Caption Style…..….…....Page23 CC Preference..……….……..Page23
Time Time Zone….…..……..….......Page21 DST (Daylight Saving Time)…...page21 Date and Time………………..page21
Channel Tuner……………….……........Page21 Manual Scan……….…......….Page21 Master List………….…......….Page22 Favorites………….…......….Page22
Parental Control Change PIN……….……........Page24 MPAA Rating……….…......….Page24 TV – USA………….…......….Page25 CA English Rating...……...….Page25 CA French Rating….…......….Page25
Using the MENU MENU provides one button access for controlling your PHD-205 Digital HDTV Tuner. It enables you to perform a variety of tasks intuitively with a control panel on the screen rather than a variety of remote control button presses. 1. Press MENU on the remote or front panel. MENU
control panel appears. 2. Press ▲/▼ to highlight the item. 3. Press OK or ► into an option. 4. Press MENU or EXIT to exit. Menus items
Set up This item can adjust menu’s language, picture’s aspect ratio, and system information. 1. Highlight “Set up” on the MENU control panel and
press OK or ►. 2. Press ▲/▼ to highlight the item: Language, Aspect
Ratio, system Information. 3. Press OK or ► to select an option. 4. Press EXIT to exit. Language
You can select the language of the menu from English, French and Spanish. Aspect Ratio
You can select an aspect ratio of the “Normal”, “Direct”, “Zoom”, “Stretch”, and “Stretch Edges”. You can press ASPECT button on the remote control to select the aspect ratio.
The picture size mode see page 7.
Set up
Audio
Time
Channel
Caption
Parental
Language English Aspect Ratio Normal Reset All System Information
Menu Language Setting
English
French
Spanish
Aspect Normal Direct Zoom
Stretch Stretch Edges

18
Sun Jan 18 12:00AM
Displaying the GUIDE Show program information for the current channel. 1. Press GUIDE button on the remote control once,
the information will appear. Date and clock; Channel number; Channel label (if preset) Broadcast program name Program name
2. Press GUIDE button again, more information will
appear. Signal strength; Signal format; Audio format; V-CHIP mark Closed Caption mark
3. Press GUIDE again to clear the display.
Audio Preference In analog channel The Digital HDTV Tuner has feature that allows reception of sound other than the audio for the program. This feature is called Multi-channel Television Sound (MTS). The TV with MTS can receive mono sound, stereo sound and Secondary Audio Programs (SAP). The SAP feature allows a TV station to broadcast other information, which could be audio in another language or something completely different like weather information.
Stereo/Mono You can select between ’Stereo’ and ’Mono’ when the Stereo broadcasting is received. -Stereo: Two speakers are used for 2 tracks -Mono: Two speakers out both channel has the same signal (the identical sound) SAP (Separate Audio Program) You can select the SAP mode which is ‘Man sound’ or ‘’Main+Sub sound’ when the SAP broadcasting, which is usually a foreign translation, is received. -Main sound: Listen to main sound or language. -Sub sound: Listen to secondary sound or language instead of the main.
In digital channel The digital-TV transmission system is capable of simultaneous transmission of many audio tracks (for example, simultaneous translations of the program into foreign languages). The availability of these additional “multi-tracks” depends upon the program. Method 1. You can select the audio preference by pressing
AUDIO button on the remote control. 2. Press ▲/▼button to highlight the item.
Select an audio preference or turn on SAP in
analog channels. Select a language from English, French and
Spanish in digital channels. Analog channels digital channels 3. Press OK to select an option.
Sun Jan 18 12:00AM
SIGNAL ( TV-Y, CC, Digital ) 1080i Stereo
12:45AM 2.10 WGBH-Dx WGBH HDTV Broadcast Signal
Audio Digital Track 1 : English Track 2 : French Track 3 : Spanish
Audio Mono Stereo SAP
12:45AM 2.10 WGBH-Dx WGBH HDTV Broadcast Signal
11
Intr
oduc
tion
Power Turn Digital HDTV Tuner on and off.
NUMBERPush to change channel.
ASPECT Screen Size Change.
P+ / P- Choose the next or previouschannel.
MENU Display on Screen Display Menu.
GUIDE (Electronic Program Guide) Weekly Program Guide Display withreference to date, time andchannels
GO BACKMove to the previous channel.
MUTETemporarily cut off the sound. AUDIO
Sound mode change to Stereo,Mono, or Separate Audio Program(SAP Broadcast) V+/V-
Increase or decrease the volume.
Direction & OKAdjust navigate the menu.
INFODisplay the source and channel
information.
EXITTerminate the menu.
FAV1 FAV2 FAV3 Change among the favoritechannels assigned.
CCClosed Caption on /off.
Remote control
Remote Control Operation Point the Remote Control at the remote sensor and press the buttons.
Do not mix old and new batteries and never mix
different types of batteries such as standard, alkaline, etc.
Installing Batteries Before the remote control can be used, the two Batteries (size AAA) need to be installed. First, unsnap the battery cover from the back of the remote control. Install each fresh battery, making sure that the ○+ and ○- on each battery line up with the marks in the battery compartment. Next, snap the cove back onto the remote control.
1
MUTE ASPECT
GO BACK
AUDIO
INFO MENU
EXIT GUIDE
2 3
4 5 6
7 8 9
0
V+
V-
P+
P-
OK
CC
FAV1
FAV2
FAV3

12
AIR/CABLE Y Pb Pr
VIDEO L R
Antenna
AIR/CABLE Y Pb Pr
VIDEO L R
CATV
AIR/CABLE Y Pb Pr S-video DTV OUT DOLBY DIGITAL DVI OUT (RGB) OUT (OPTICAL)
VIDEO L R
Connections and Setup This chapter tells you everything you need to know start setting up and using your PHD-205 Digital HDTV Tuner. It includes information on Connections and Initial Settings. Connections This paragraph tells you connecting the PHD-205 Digital HDTV Tuner, and connects to TV, Display, the home theater and DVI to HDMI Connection. Connecting Air/Cable antenna
1. Connect an outdoor or indoor Antenna directly to
this jack with a coaxial RF cable. This is to receive analog and Digital TV signals from TV broadcasters.
DTV signal is 8VSB signal, which is RF
modulation format utilized by ATSC.
2. Connect to Cable signal source using a coaxial RF cable.
The PHD-205 Digital HDTV Tuner can
receive analog cable signal as well as cable DTV signal in the event that a local cable provider is passing 8VSB through their system. This 8VSB signal can not be encrypted by Cable Company. And we call it Clear QAM signal from cable.
Connect to HD Ready TV or HDTV Monitor HD Ready TV is a HDTV monitor, which can accept and display progressive video and higher resolutions video format on the screen. HD Digital Ready TV is typically including Plasma Display Panel (PDP) TV, Liquid Crystal Display (LCD) TV, DLP (Digital Light Processor) TV and High-end progressive Projection/CRT TV or Projector.
1. Connect antenna cable to AIR/CABLE jack of the
Digital HDTV Tuner unit. Refer to previous section “Antenna /RF Connections”.
2. Connect video component cable (Y-Pb-Pr cable) from DTV OUT (Component) jack of PHD-205 Digital HDTV Tuner to your HD ready TV component video connector inputs.
3. Or, you can connect RGB video from DTV OUT (RGB) jack to your HD ready TV or RGB video monitor (for ex. like PC monitor) from VGA connector.
4. If your HD ready TV equips the digital DVI input, you can connect DVI cable from DVI OUT jack to your HD ready TV.
5. If your HD ready TV equips the HDMI input, you can connect DVI to HDMI cable from DVI OUT jack of PHD-205 to your HD ready TV.
6. Connect an audio cable from L-AUDIO-R jacks to your HD ready TV L/R audio inputs.
Set DTV OUT SELECT switch to proper
position for correct video format output. Devices don’t connect “S-VIDEO, RGB and
YPbPr” at the same time.
17
Ope
ratio
n
Sun Jan 18 12:00AM
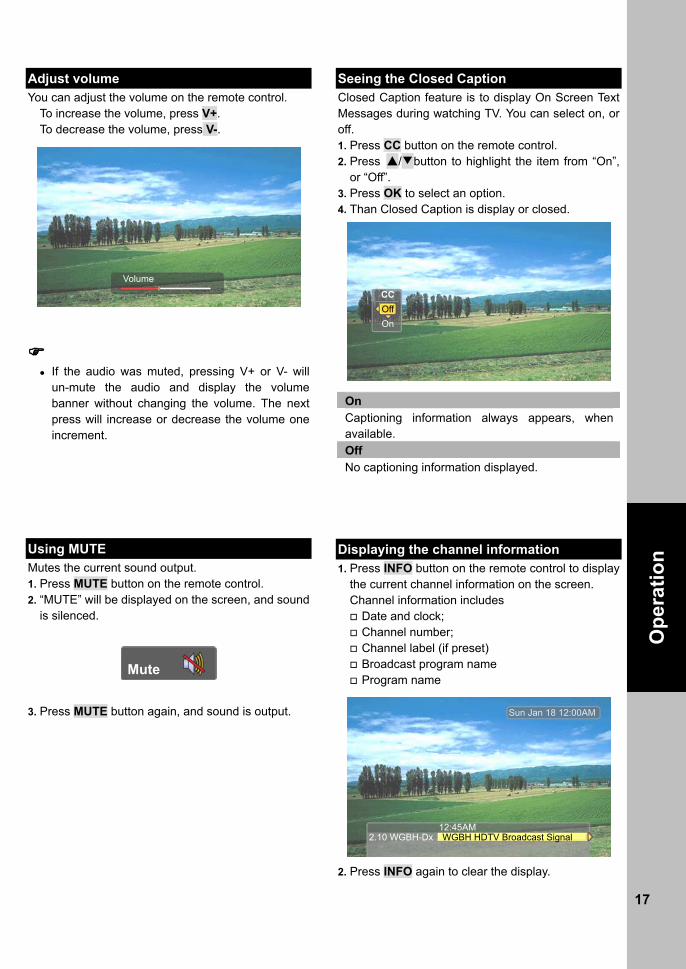
Adjust volume You can adjust the volume on the remote control.
To increase the volume, press V+. To decrease the volume, press V-.
If the audio was muted, pressing V+ or V- will
un-mute the audio and display the volume banner without changing the volume. The next press will increase or decrease the volume one increment.
Using MUTE Mutes the current sound output. 1. Press MUTE button on the remote control. 2. “MUTE” will be displayed on the screen, and sound
is silenced. 3. Press MUTE button again, and sound is output.
Seeing the Closed Caption Closed Caption feature is to display On Screen Text Messages during watching TV. You can select on, or off. 1. Press CC button on the remote control. 2. Press ▲/▼button to highlight the item from “On”,
or “Off”. 3. Press OK to select an option. 4. Than Closed Caption is display or closed.
On Captioning information always appears, when available. Off No captioning information displayed.
Displaying the channel information 1. Press INFO button on the remote control to display
the current channel information on the screen. Channel information includes
Date and clock; Channel number; Channel label (if preset) Broadcast program name Program name
2. Press INFO again to clear the display.
Mute
Volume
CC Off On
12:45AM 2.10 WGBH-Dx WGBH HDTV Broadcast Signal

16
Operation This chapter covers all of the things you can do with the Guides and other features that let you control the way you use PHD-205 Digital HDTV Tuner. It includes watching TV and using menu.
Watching TV This paragraph explains simple operations for watching a TV program. It includes:
Turning on or off the PHD-205 Digital HDTV Tuner Changing the channels Adjust volume Using the MUTE Seeing the Closed Caption Displaying the channel information Displaying the GUIDE (EPG) Audio Preference
Turning on or off the Digital HDTV Tuner Preparation Perform the following steps before you turning on the PHD-205 Digital HDTV Tuner. 1. Insert the batteries into the remote control unit.
(See page 11.) 2. Connect the antenna/cable signal to the PHD-205
Digital HDTV Tuner. (See page 12) 3. Plug in the AC cord to the AC outlet. Turning on the power 1. Press the POWER switch on the front panel. 2. Press the STANDBY button on the front panel or
press the POWER button on the remote control.
Power indicator
ON Lighting(Green) OFF/Standby Lighting(Red)
Turning off the power 1. Press the STANDBY button on the front panel or
POWER on the remote control. 2. If you are not going to use this PHD-205 Digital
HDTV Tuner for a long period of time, you can press the POWER switch on the front panel to switch off power.
Changing the channels You can change channels in several ways. Method 1 Press P+/P- button on the remote control or CH+/CH- button on the front panel to change the channels. Method 2 Using remote control buttons 0-9, and · (DOT) to select a channel program. e.g., channel 8: Press 8 → OK e.g., channel 15.1: Press 1 → 5 → · →1 → OK Method 3 1. Press GO BACK to switch to the previously tuned
channel. 2. Press GO BACK again to switch back to the
currently tuned channel. GO BACK will not work if no channel has been
changed after the PHD-205 is turned on.
! The channel number and name are displaying on the screen
2.10 WGBH-Dx
Tune to: 15.1_
13
Con
nect
ions
and
Set
up
AIR/CABLE Y Pb Pr S-video DTV OUT DOLBY DIGITAL DVI OUT (RGB) OUT (OPTICAL)
VIDEO L R
AIR/CABLE Y Pb Pr S-video DTV OUT DOLBY DIGITAL DVI OUT (RGB) OUT (OPTICAL)
VIDEO L R
Connecting to Conventional Analog TV 1. Connect antenna cable to AIR/CABLE jack of
PHD-205 unit. Refer to previous section “Antenna /RF Connections”.
2. Connect video cable from VIDEO jack to the TV video (CVBS) input.
3. Or, connect S-Video cable from S-VIDEO jack to TV S-video input for a better video displaying.
4. Connect audio cable from L-AUDIO-R jacks to the TV stereo (L/R) audio inputs.
Connecting conventional video signal to
analog TV, you need to set “DTV OUT SELECT” switch to S/VIDEO position.
Devices don’t connect “S-VIDEO, RGB and YPbPr” at the same time.
Connect to Home Theater. The optical digital audio output provides the highest quality audio. You can connect it to your home theater. Connect an optical cable (not include) to the back of the PHD-205 Digital HDTV Tuner using the connector marked DOLBY DIGITAL OUT. Connect the other end of this cable to the optical input on the back of your Home Theater. Check the Owner’s Guide for the Home Theater for proper set-up and operation.

14
AIR/CABLE Y Pb Pr S-video DTV OUT DOLBY DIGITAL DVI OUT (RGB) OUT (OPTICAL)
VIDEO L R
AUDIO HDMI
DVI to HDMI Connection This is applicable if there only HDMI input exists on your HD Ready TV. In this case DVI to HDMI Cable can be used to connect each other. But DVI does not deliver sound signal. Additional sound connection should be done.
15
Con
nect
ions
and
Set
up
Initial Settings After you finish connecting your PHD-205 Digital HDTV Tuner, you need to run initial setup, which automatically sets up available channels. The initial setup appears when you turn on your Digital HDTV Tuner for the first time. If you do not want to set up the channels at this time, you can do it later by selecting the CHANNEL of the MENU (see page 21). 1. Plug the Power Cable into AC In on the back of the
TV 2. Press Power button on the Remote Control or
Front Panel of PHD-205. 3. Press the▼or▲ button to select language, then
press OK button. 4. Press the▼or▲ button to select Time Zone, then
press OK button.
5. Press the▼or▲ button to select Daylight Saving, then press OK button.
6. Press the▼or▲ button to select television signal,
then press OK button
In Cable mode, you can select the correct signal source among “Cable STD”, “Cable IRC”, and “Cable HRC” by pressing the ▼ or ▲ button, then press OK button.
Contact your local cable company to identify the type of cable system that exists in your particular area.
7. Press the OK button to finish the Channel scan.
8. Change Channel by pushing CH+/CH- button or number keys on the Remote Control.
The channel number is shown up in the
top-left corner of the screen. Check the Antenna and Power Cable
Connection if there is no display.

16
Operation This chapter covers all of the things you can do with the Guides and other features that let you control the way you use PHD-205 Digital HDTV Tuner. It includes watching TV and using menu.
Watching TV This paragraph explains simple operations for watching a TV program. It includes:
Turning on or off the PHD-205 Digital HDTV Tuner Changing the channels Adjust volume Using the MUTE Seeing the Closed Caption Displaying the channel information Displaying the GUIDE (EPG) Audio Preference
Turning on or off the Digital HDTV Tuner Preparation Perform the following steps before you turning on the PHD-205 Digital HDTV Tuner. 1. Insert the batteries into the remote control unit.
(See page 11.) 2. Connect the antenna/cable signal to the PHD-205
Digital HDTV Tuner. (See page 12) 3. Plug in the AC cord to the AC outlet. Turning on the power 1. Press the POWER switch on the front panel. 2. Press the STANDBY button on the front panel or
press the POWER button on the remote control.
Power indicator
ON Lighting(Green) OFF/Standby Lighting(Red)
Turning off the power 1. Press the STANDBY button on the front panel or
POWER on the remote control. 2. If you are not going to use this PHD-205 Digital
HDTV Tuner for a long period of time, you can press the POWER switch on the front panel to switch off power.
Changing the channels You can change channels in several ways. Method 1 Press P+/P- button on the remote control or CH+/CH- button on the front panel to change the channels. Method 2 Using remote control buttons 0-9, and · (DOT) to select a channel program. e.g., channel 8: Press 8 → OK e.g., channel 15.1: Press 1 → 5 → · →1 → OK Method 3 1. Press GO BACK to switch to the previously tuned
channel. 2. Press GO BACK again to switch back to the
currently tuned channel. GO BACK will not work if no channel has been
changed after the PHD-205 is turned on.
! The channel number and name are displaying on the screen
2.10 WGBH-Dx
Tune to: 15.1_
13
Con
nect
ions
and
Set
up
AIR/CABLE Y Pb Pr S-video DTV OUT DOLBY DIGITAL DVI OUT (RGB) OUT (OPTICAL)
VIDEO L R
AIR/CABLE Y Pb Pr S-video DTV OUT DOLBY DIGITAL DVI OUT (RGB) OUT (OPTICAL)
VIDEO L R
Connecting to Conventional Analog TV 1. Connect antenna cable to AIR/CABLE jack of
PHD-205 unit. Refer to previous section “Antenna /RF Connections”.
2. Connect video cable from VIDEO jack to the TV video (CVBS) input.
3. Or, connect S-Video cable from S-VIDEO jack to TV S-video input for a better video displaying.
4. Connect audio cable from L-AUDIO-R jacks to the TV stereo (L/R) audio inputs.
Connecting conventional video signal to
analog TV, you need to set “DTV OUT SELECT” switch to S/VIDEO position.
Devices don’t connect “S-VIDEO, RGB and YPbPr” at the same time.
Connect to Home Theater. The optical digital audio output provides the highest quality audio. You can connect it to your home theater. Connect an optical cable (not include) to the back of the PHD-205 Digital HDTV Tuner using the connector marked DOLBY DIGITAL OUT. Connect the other end of this cable to the optical input on the back of your Home Theater. Check the Owner’s Guide for the Home Theater for proper set-up and operation.
12
AIR/CABLE Y Pb Pr
VIDEO L R
Antenna
AIR/CABLE Y Pb Pr
VIDEO L R
CATV
AIR/CABLE Y Pb Pr S-video DTV OUT DOLBY DIGITAL DVI OUT (RGB) OUT (OPTICAL)
VIDEO L R
Connections and Setup This chapter tells you everything you need to know start setting up and using your PHD-205 Digital HDTV Tuner. It includes information on Connections and Initial Settings. Connections This paragraph tells you connecting the PHD-205 Digital HDTV Tuner, and connects to TV, Display, the home theater and DVI to HDMI Connection. Connecting Air/Cable antenna
1. Connect an outdoor or indoor Antenna directly to
this jack with a coaxial RF cable. This is to receive analog and Digital TV signals from TV broadcasters.
DTV signal is 8VSB signal, which is RF
modulation format utilized by ATSC.
2. Connect to Cable signal source using a coaxial RF cable.
The PHD-205 Digital HDTV Tuner can
receive analog cable signal as well as cable DTV signal in the event that a local cable provider is passing 8VSB through their system. This 8VSB signal can not be encrypted by Cable Company. And we call it Clear QAM signal from cable.
Connect to HD Ready TV or HDTV Monitor HD Ready TV is a HDTV monitor, which can accept and display progressive video and higher resolutions video format on the screen. HD Digital Ready TV is typically including Plasma Display Panel (PDP) TV, Liquid Crystal Display (LCD) TV, DLP (Digital Light Processor) TV and High-end progressive Projection/CRT TV or Projector.
1. Connect antenna cable to AIR/CABLE jack of the
Digital HDTV Tuner unit. Refer to previous section “Antenna /RF Connections”.
2. Connect video component cable (Y-Pb-Pr cable) from DTV OUT (Component) jack of PHD-205 Digital HDTV Tuner to your HD ready TV component video connector inputs.
3. Or, you can connect RGB video from DTV OUT (RGB) jack to your HD ready TV or RGB video monitor (for ex. like PC monitor) from VGA connector.
4. If your HD ready TV equips the digital DVI input, you can connect DVI cable from DVI OUT jack to your HD ready TV.
5. If your HD ready TV equips the HDMI input, you can connect DVI to HDMI cable from DVI OUT jack of PHD-205 to your HD ready TV.
6. Connect an audio cable from L-AUDIO-R jacks to your HD ready TV L/R audio inputs.
Set DTV OUT SELECT switch to proper
position for correct video format output. Devices don’t connect “S-VIDEO, RGB and
YPbPr” at the same time.
17
Ope
ratio
n
Sun Jan 18 12:00AM
Adjust volume You can adjust the volume on the remote control.
To increase the volume, press V+. To decrease the volume, press V-.
If the audio was muted, pressing V+ or V- will
un-mute the audio and display the volume banner without changing the volume. The next press will increase or decrease the volume one increment.
Using MUTE Mutes the current sound output. 1. Press MUTE button on the remote control. 2. “MUTE” will be displayed on the screen, and sound
is silenced. 3. Press MUTE button again, and sound is output.
Seeing the Closed Caption Closed Caption feature is to display On Screen Text Messages during watching TV. You can select on, or off. 1. Press CC button on the remote control. 2. Press ▲/▼button to highlight the item from “On”,
or “Off”. 3. Press OK to select an option. 4. Than Closed Caption is display or closed.
On Captioning information always appears, when available. Off No captioning information displayed.
Displaying the channel information 1. Press INFO button on the remote control to display
the current channel information on the screen. Channel information includes
Date and clock; Channel number; Channel label (if preset) Broadcast program name Program name
2. Press INFO again to clear the display.
Mute
Volume
CC Off On
12:45AM 2.10 WGBH-Dx WGBH HDTV Broadcast Signal

18
Sun Jan 18 12:00AM
Displaying the GUIDE Show program information for the current channel. 1. Press GUIDE button on the remote control once,
the information will appear. Date and clock; Channel number; Channel label (if preset) Broadcast program name Program name
2. Press GUIDE button again, more information will
appear. Signal strength; Signal format; Audio format; V-CHIP mark Closed Caption mark
3. Press GUIDE again to clear the display.
Audio Preference In analog channel The Digital HDTV Tuner has feature that allows reception of sound other than the audio for the program. This feature is called Multi-channel Television Sound (MTS). The TV with MTS can receive mono sound, stereo sound and Secondary Audio Programs (SAP). The SAP feature allows a TV station to broadcast other information, which could be audio in another language or something completely different like weather information.
Stereo/Mono You can select between ’Stereo’ and ’Mono’ when the Stereo broadcasting is received. -Stereo: Two speakers are used for 2 tracks -Mono: Two speakers out both channel has the same signal (the identical sound) SAP (Separate Audio Program) You can select the SAP mode which is ‘Man sound’ or ‘’Main+Sub sound’ when the SAP broadcasting, which is usually a foreign translation, is received. -Main sound: Listen to main sound or language. -Sub sound: Listen to secondary sound or language instead of the main.
In digital channel The digital-TV transmission system is capable of simultaneous transmission of many audio tracks (for example, simultaneous translations of the program into foreign languages). The availability of these additional “multi-tracks” depends upon the program. Method 1. You can select the audio preference by pressing
AUDIO button on the remote control. 2. Press ▲/▼button to highlight the item.
Select an audio preference or turn on SAP in
analog channels. Select a language from English, French and
Spanish in digital channels. Analog channels digital channels 3. Press OK to select an option.
Sun Jan 18 12:00AM
SIGNAL ( TV-Y, CC, Digital ) 1080i Stereo
12:45AM 2.10 WGBH-Dx WGBH HDTV Broadcast Signal
Audio Digital Track 1 : English Track 2 : French Track 3 : Spanish
Audio Mono Stereo SAP
12:45AM 2.10 WGBH-Dx WGBH HDTV Broadcast Signal
11
Intr
oduc
tion
Power Turn Digital HDTV Tuner on and off.
NUMBERPush to change channel.
ASPECT Screen Size Change.
P+ / P- Choose the next or previouschannel.
MENU Display on Screen Display Menu.
GUIDE (Electronic Program Guide) Weekly Program Guide Display withreference to date, time andchannels
GO BACKMove to the previous channel.
MUTETemporarily cut off the sound. AUDIO
Sound mode change to Stereo,Mono, or Separate Audio Program(SAP Broadcast) V+/V-
Increase or decrease the volume.
Direction & OKAdjust navigate the menu.
INFODisplay the source and channel
information.
EXITTerminate the menu.
FAV1 FAV2 FAV3 Change among the favoritechannels assigned.
CCClosed Caption on /off.
Remote control
Remote Control Operation Point the Remote Control at the remote sensor and press the buttons.
Do not mix old and new batteries and never mix
different types of batteries such as standard, alkaline, etc.
Installing Batteries Before the remote control can be used, the two Batteries (size AAA) need to be installed. First, unsnap the battery cover from the back of the remote control. Install each fresh battery, making sure that the ○+ and ○- on each battery line up with the marks in the battery compartment. Next, snap the cove back onto the remote control.
1
MUTE ASPECT
GO BACK
AUDIO
INFO MENU
EXIT GUIDE
2 3
4 5 6
7 8 9
0
V+
V-
P+
P-
OK
CC
FAV1
FAV2
FAV3

10
Rear Panel
AIR/CABLE Y Pb Pr S-video DTV OUT DOLBY DIGITAL DVI OUT USB (RGB) OUT (OPTICAL)
VIDEO L R
DTV OUT SELECT YPbPr DVI RGB S/VIDEO
RESOLUTION SELECT 1080i 720P 480P
CAUTION RISK OF ELECTRIC SHOCK
DO NOT OPEN
MODEL No.: PHD-205 INPUT: AC110V-60Hz-15W MADE IN CHINA
~AC IN
AUDIO OUT (Left/Right) Connect to TV, amplifier, or stereo system.
COMPONENT VIDEO OUT (480P/720P/1080i) Connect to a TV with Component (Y-Pb-Pr) inputs.
DVI OUT (480P/720P/1080i) DVI output providing a high quality interfacefor digital video.
OPTICAL (Digital audio out) Connect to digital (optical) audio equipment.
RESOLUTION Change the resolutiondepending on TV.
DTV OUT (RGB) DTV output providing high quality RGB video to PC or TVmonitor using VGA type connector.
AIR/CABLE Air or cable TV antenna connects to this jack.
AC Power CordPlug into the power
source.
COMPOSITE VIDEO OUT (480i) Connect to a TV with composite (VIDEO) input.
S-VIDEO OUT (480i) Connect to a TV with S-video input.
USB Use only for update.
DTV SELECT Select a interface from thevideo output.
19
Ope
ratio
n
Set up Language…………….……….Page19 Aspect ratio………………......Page19 Reset All……………………..page20 System Information..…..…….Page20
Audio Digital Audio……..…….…….Page20
Caption CC Mode……..…….…….......Page22 Analog Caption……….….......Page23 DTV Caption..………….....….Page23 DTV Caption Style…..….…....Page23 CC Preference..……….……..Page23
Time Time Zone….…..……..….......Page21 DST (Daylight Saving Time)…...page21 Date and Time………………..page21
Channel Tuner……………….……........Page21 Manual Scan……….…......….Page21 Master List………….…......….Page22 Favorites………….…......….Page22
Parental Control Change PIN……….……........Page24 MPAA Rating……….…......….Page24 TV – USA………….…......….Page25 CA English Rating...……...….Page25 CA French Rating….…......….Page25
Using the MENU MENU provides one button access for controlling your PHD-205 Digital HDTV Tuner. It enables you to perform a variety of tasks intuitively with a control panel on the screen rather than a variety of remote control button presses. 1. Press MENU on the remote or front panel. MENU
control panel appears. 2. Press ▲/▼ to highlight the item. 3. Press OK or ► into an option. 4. Press MENU or EXIT to exit. Menus items
Set up This item can adjust menu’s language, picture’s aspect ratio, and system information. 1. Highlight “Set up” on the MENU control panel and
press OK or ►. 2. Press ▲/▼ to highlight the item: Language, Aspect
Ratio, system Information. 3. Press OK or ► to select an option. 4. Press EXIT to exit. Language
You can select the language of the menu from English, French and Spanish. Aspect Ratio
You can select an aspect ratio of the “Normal”, “Direct”, “Zoom”, “Stretch”, and “Stretch Edges”. You can press ASPECT button on the remote control to select the aspect ratio.
The picture size mode see page 7.
Set up
Audio
Time
Channel
Caption
Parental
Language English Aspect Ratio Normal Reset All System Information
Menu Language Setting
English
French
Spanish
Aspect Normal Direct Zoom
Stretch Stretch Edges

20
Reset All
With one fell swoop you can reset all settings back to factory settings. This includes the channel map, all Program Info, Favorite channel lists, etc. The TV should display the Setup Wizard following reset, just as if it was turned on out-of-the-box.
If a PIN is set, the PIN entry dialog is displayed
before the Reset All Settings dialog box, even if Locks are temporarily off. If no PIN is set, the dialog is displayed immediately.
System Information
Display important system information. The information is including:
Chipset Demod Remote Code Version
Audio 1. Highlight “Audio” on the MENU control panel and
press OK or ►. 2. Press OK or ► into “Digital Audio”. 3. Press EXIT to exit. Digital Audio
You can output digital audio to home theater or similar device whose DIGITAL AUDIO INPUT terminal is connected to the DOLBY DIGITAL OUT (OPTICAL) terminal on the Digital HDTV Tuner. Please select an audio of the program you are watching and the equipment connected. You can change the optical output to Dolby Digital or PCM.
Item Description PCM The coaxial digital audio output
terminal outputs audio signal in PCM form. If your digital audio system does not support Dolby Digital, select ”PCM”
Dolby Digital
The optical digital audio output terminal outputs audio signal in Dolby Digital form. It reproduces sound from surround program of digital.
Set up
Audio
Time
Channel
Caption
Parental
Digital Audio Dolby Digital Audio Output
Dolby digital
PCM
9
Intr
oduc
tion
Front Panel
Digital HDTV Tuner PHD-205 POWER
CH+/UP CH-/DOWN LEFT RIGHT MENU ENTER STANDBY ON OFF
Display Window Display information about DigitalTuner Receiver.
ENTER Chooses the items highlighted.
MENU Display the Main Menu.
CH-/DOWN Cycles through programmed channels andmove the on-screen highlight down.
RIGHT Move the on-screen highlight to right.
Power Switch the Tuner ON and OFF.
STANDBY Turn on / off the Tuner.
CH+/UP Cycle through programmed channels and move the on-screen highlight up.
LEFT Move the on-screen highlight to left.
8
7
FAV3
1
4
7
2
5
8
0
3
6
9
·
Unpacking Make sure you have received all these items listed below with the PHD-205 Digital HDTV Tuner.
PHD-205 Digital HDTV Tuner
Remote Control Batteries
Component Video Cable (red, blue, green)
Composite A/V Cable (red, white, yellow)
Owner’s Manual
Digital HDTV Tuner PHD-205
POWER
CH+/UP CH-/DOWN LEFT RIGHT MENU ENTER STANDBY ON OFF
21
Ope
ratio
n
Time 1. Highlight “Time” on the MENU control panel and
press OK or ►. 2. Press ▲/▼ to highlight the item: Time Zone, DST,
Date and Time. 3. Press OK or ► to select an option. 4. Press EXIT to exit. Time Zone
You can select a time zone from Alaska/ Hawaii/ Pacific/ Mountain/ Central/ Eastern/ Atlantic/ Newfoundland/ Samoa.
Time zone is selected before you setting up
system date and time. DST (Daylight Saving Time)
You can select ON or OFF to setup the Daylight saving time. Date and Time
You can adjust the system date and time, daylight saving time, and auto-update time. The default is Auto-Update Time.
After a power failure or disconnection of the
power, the clock settings will be lost. If you selecting Auto-update time, you should be
not adjusting the date and time.
Channels 1. Highlight “Channels” on the MENU control panel
and press OK or ►. 2. Press ▲/▼ to highlight the item: Tuner, Auto Scan,
Manual Scan, Master List, Favorites1, Favorites2, Favorites3.
3. Press OK or ► to select an option. 4. Press EXIT to exit. Tuner
This item is selecting an option of RF Input. “Antenna” is over-the-air (outdoor or indoor antenna). “STD”, “IRC”, and “HRC” are the cable signal types.
If do not know the type of cable, contact your
local cable company to identify the type of cable system that exists in your particular area.
Auto Scan
You selected a type of the RF Input, than you can select “Start Scan”. PHD-205 Digital HDTV Tuner will scan analog channels at first. Secondly scan the digital channels. You can watch the TV as finish to scan.
This step may take 10-15 minutes. All the current stored channels will be deleted or
replaced with new channel information after doing ‘Start Scan’.
Manual Scan
Using this option, you can find a channel on a particular frequency. You can use the number button (0-9) on the remote control to find analog and digital channels.
Set up
Audio
Time
Channel
Caption
Parental
Time Zone Eastern
DST Off
Date and Time
Date and Time
Alaska Hawaii Pacific
Mountain Central Eastern Atlantic
Newfoundland Samoa
Set up
Audio
Time
Channel
Caption
Parental
Tuner Antenna Auto scan Manual Scan Channel name Edit Favorites 1 Favorites 2 Favorites 3
RF Input
Antenna
Cable STD
Cable IRC
Cable HRC

22
Master List
Edit the master list of all your channels. You can add or remove some channels from the master list.
When you press CH+/CH- button to watch TV,
your TV will stop only on the channels you have programmed into the TV’s channels master list.
Removed channels in the master list will select by pressing number button only.
Favorites
Edit the list of channels in your favorites. Favorite Channel Function is for the convenience of channel change among your frequent watching or favorite channels by separately memorizing them in FAV. You can mark to add the favorite channel in each FAV. You can use “name” item to rename the FAV name also.
FAV name default FAV1 List FAV2 Sports FAV3 News
Using FAV1 FAV2 FAV3 button You can use FAV1 FAV2 or FAV3 button to add or remove the channels also. 1. Press CH+/CH- buttons to select the channel you
would like to register. 2. Press FAV1 FAV2 or FAV3 button on the remote
control to register it as a favorite channel, select “Add” to register it.
3. In the favorite channel, you can press FAV1 FAV2 or FAV3 button to remove it.
4. After you finish favorite channel registration, by each pressing of FAV1 FAV2 or FAV3 button, you can change the channels between them.
Caption Closed Caption feature is to display On Screen Text Messages during watching TV. This feature is available in both analog and digital broadcast. The PHD-205 Digital HDTV Tuner is equipped with an internal Closed Caption decoder. It allows you to view conversations, narration and sound effects as subtitles on your TV. Digital Closed Caption service is a new caption service available only on digital TV programs (also at the discretion of the service provider). It is a more flexible system than the original Closed Caption system, because it allows a variety of caption sizes and font styles. When the Digital Closed Caption service is in use, it will be indicated by the appearance of a 3-letter abbreviation that also indicates the language of the Digital Closed Captions: ENG (English), SPA (French), FRA (French) or other language codes.
Closed captioning is not available on all
channels at all times. Only specific programs encoded with closed-captioning information are applicable.
1. Highlight “Caption” on the MENU control panel and
press OK or ►. 2. Press ▲ /▼ to highlight the item: CC Mode,
Analog Caption, DTV Caption, DTV Caption Style, CC Preference.
3. Press OK or ► to select an option. 4. Press EXIT to exit. CC Mode
You can select the CC Mode from ON and OFF. You can also press CC button on the remote control. (See page 17)
Set up
Audio
Time
Channel
Caption
Parental
CC Mode Off
Analog Caption TEXT1
DTV Caption Adv.CC1
DTV Caption Style
CC Preference Automatic
Closed caption Setting
On
Off
7
Intr
oduc
tion
Screen formats
To deal with the mismatches that can occur between the shapes of TVs and the aspect ratios of program broadcasts, the Digital HDTV Tuner provides you with a set of screen format controls. These controls allows you to pick a format to use for both 4:3 TVs showing 16:9 programs, and for 16:9 TVs showing 4:3 programs. Here is an explanation of the options. (Details for setting this preference are included in page 19). 16:9 TVs showing 4:3 programs
Standard definition
Normal
Direct
Zoom
Stretch
Stretch Edges
4:3 TVs showing 16:9 programs
Standard definition
Normal
Direct
Zoom
Stretch
Stretch Edges

6
Resolution an interlacing
Two of the elements that determine the quality of a TV picture are resolution and interlacing. Resolution For TV equipment and broadcasts, resolution is defined by the number of horizontal lines displayed to make up each frame of a video image. The more lines of resolution used to draw each frame of video, the more detailed and sharp the picture will be. Standard TV resolution uses 480 horizontal lines to make up each of video. HDTV uses either 720lines, or 1080 lines to make each video frame. Interlacing When TVs display video, they display a new video frame at a rate that is faster than your eye can see (from 24 to 60 frames per second, depending on the TV and broadcast). Interlacing refers to whether each of those frames contains all of the lines of video for each frame or every other line. Interlaced signals take every other line frame 2 frames of video (each lasting 1/60th of a second), and combine them into one frame lasting 1/30th of a second. In this way, interlacing tricks your eye into thinking it is seeing twice the resolution that is actually being displayed. In non-interlaced video, (referred to as progressive scan video), video frames are displayed every 1/60th of a second containing all of the lines of video information for each frame.
The specifications for video resolutions are usually stated by giving the number of horizontal lines, followed by either the letter I, for interlaced video, or p for progressive scan video. Some DVDs and non-HDTV digital TV broadcasts use 480p. The ATSC specification for HDTV broadcasts and equipment requires either 1080i or 720p. While there is some debate as to whether it is better to have more lines that are interlaced that 1080i is highest quality video format.
Video output
The PHD-205 Digital HDTV Tuner is able to receive broadcasts in any of the resolutions mentioned above. It can also display programs on TVs capable of displaying any of those resolutions. To set up your PHD-205 to handle the combinations of incoming video formats and TV display capabilities, you simply set the Resolution Switch on the rear panel to match the highest resolution your TV is capable of displaying. (If you’re not sure about your TV’s resolution, see your TV’s manual for this specification.) PHD-205 will then do the appropriate conversion from input signal format to display format. Video output formats
Output Connection Available Formats S-VIDEO 480i VIDEO 480i YPbPr 1080i/720p/480p DTV(RGB) 1080i/720p/480p DVI 1080i/720p/480p
Aspect ratio
In addition to resolution and interlacing, HDTV is also defined by the aspect ratio of its broadcasts. Aspect ratio means the shape of the screen as defined by the ratio of the screen’s width to its height. For analog TV and SDTV, the aspect ratio is 4 units wide by 3 units high (usually written 4:3). This is familiar shape of conventional TVs----slightly wider than they are tall. For HDTV broadcasts, the aspect ratio is 16:9 (nearly twice as wide as it is tall). This is, not coincidentally, more like the shape of movies shown in theaters. This makes HDTV an ideal format for broadcasting and viewing movies on a TV. But what happens if you are watching a nearly square-shaped 4:3 broadcast on a rectangular 16:9 TV. The PHD-205 Digital HDTV Tuner allows you to choose from a variety of screen formats to help you dealing with those scenarios.
23
Ope
ratio
n
Analog Caption
You can select an available in these options.
CC1: The Primary Synchronous Caption Service. These are captions in the primary language that must be in sync with the sound, preferably matched to a specific frame. CC2: The Special Non-Synchronous Use Captions. This channel carries data that is intended to augment information carried in the program. CC3: Secondary Synchronous Caption Service. Alternate program-related caption data, typically second language captions. CC4: Special Non-Synchronous Use Captions. Similar to CC2. Text1: First Text Service. This may be various non-program related data. Text2: Second Text Service. Additional data, usually not program related. Text3/Text4: Third Text Service. These data channels should be used only if Text1 and Text2 are not sufficient.
DTV Caption
You can select an available advance caption in DTV Caption. This item include
Advanced CC1 Advanced CC2 Advanced CC3 Advanced CC4 Advanced CC5 Advanced CC6
DTV Caption Style
This will adjust advanced settings such as text style and size and etc. It can be used into digital channel. Text Style
Typewriter/Storybook/ Computer/Modern/ Formal/ Cursive/Casual/ As Broadcast
Color White/Red/Green/Blue/Black/Yellow/ Magenta/Cyan/ As Broadcast
Size Small/ Standard Size/ Large/ As Broadcast
Opacity Solid/ Translucent/ Transparent/ Flashing/ As Broadcast
Background Color
White/Red/Green/Blue/Black/Yellow/ Magenta/Cyan/ As Broadcast
Opacity
Solid/ Translucent/ Transparent/ Flashing/ As Broadcast
Edge Style
None/ Raised /Depressed/ Uniform/ Shadow left/ Shadow Right/ As Broadcast
Color
White/Red/Green/Blue/Black/Yellow/ Magenta/Cyan/ As Broadcast
*Factory default: As Broadcast CC Preference
Choose whether to use “basic”, “advanced” or “Automatic” closed caption setting for digital TV channels. (Advanced closed caption is the priority)
When an Analog signal is received, you can choose CC1, CC2, CC3, CC4, TEXT1, TEXT2, TEXT3, TEXT4 and OFF. When a Digital signal is received, you can choose from Adv.CC1, Adv.CC2, Adv.CC3, Adv.CC4, Adv.CC5, Adv.CC6, CC1, C2, C3, C4, TEXT1, TEXT2, TEXT3, TEXT4, and OFF. Depending on the broadcast signal, some Analog Captions will function with a Digital broadcast signal.

24
Parental Control (V-Chip) In this item, you can use Ratings locks (V-CHIP), Channel locks and change PIN after setting your password. When you first enter into this menu, setup your password. 1. Press MENU and “MENU” screen display. 2. Press ▲/▼ to select “Parental” item. 3. Press OK or ► into the New PIN item. 4. Select and enter PIN (4 digits) using the number
buttons (0-9). 5. Enter same PIN (4 digits) again and access the
Parental menu.
In screen, appears instead of the number. As a precautionary measure, make a note of
your password (PIN) and keep it in a familiar place.
System default PIN number is 2273.
6. Press ▲/▼ to highlight the item: Change PIN, MPPA-Rating, TV-USA, CA English Rating, CA French Rating.
7. Press OK or ► to select an option. 8. Press EXIT to exit. V-CHIP is an electronic filtering device built into this Digital HDTV Tuner. This tool gives parents a great degree of control over broadcasts accessed by their children. It allows parents to select programs judged suitable for child viewing while blocking ones judged not suitable. It does so automatically once you activate the V-CHIP feature in your equipment.
IMPORTANT Two conditions must be met to enable the V-CHIP.
Password (PIN) is registered. V-CHIP settings have been made.
Change PIN
You can change the lock PIN. 1. Enter New PIN. 2. Confirm New PIN. 3. Select “Done” to confirm it. 4. Than your New PIN is configured. MPPA-Rating
Movie ratings are used for original movies rated by the Motion Picture Association of America (MPAA) as watched on cable TV and not edited for television. The V-CHIP can also be set to block MPAA-rated movies. *Restriction Categories based on six aged base.
Voluntary movie rating system (MPPA) G General Audience (No Restrictions). PG Parental guidance Suggested. PG-13
Parental guidance for children under 13.
R
Restricted. Children under 17 should be accompanied by an adult
NC-17 17 years old and above. X Adults Only
If you block G, other will automatically be blocked
and similarly. If you unblock X, other will automatically be
unblocked and similarly.
Set up
Audio
Time
Channel
Caption
Parental
Change PIN MPAA Rating TV-USA CA English Rating CA French Rating Unrated Show Off
New PIN Enter: Confirm:
Done
5
Intr
oduc
tion
Introduction To ensure proper use of this product, please read this owner’s manual carefully and retain for future reference. This manual provides information on the operation and maintenance of your PHD-205 Digital HDTV Tuner. This chapter explains the Technical overview, unpacking, front panel, Rear panel, and Remote control.
Technical overview This paragraph explains the technical capabilities of the PHD-205 Digital HDTV Tuner, and provides background information on digital television. Topics covered here include:
What are Analog TV, Digital TV, NTSC, ATSC, SDTV, and HDTV?
What kinds of TV programming can I watch with the Digital HDTV Tuner?
What equipment is required to view HDTV programming?
Video output options Aspect ratio Screen formats
What are Analog TV, Digital TV, NTSC, ATSC,
SDTV, and HDTV?
Analog TV Analog TV is the TV you’re probably most familiar with. Most of the TV broadcasts you receive via a standard off-air antenna or from your local cable company are analog TV broadcasts. Digital TV Digital television (sometimes called DTV) is a newer method of broadcasting TV signals that delivers higher quality audio and video. Digital TV is broadcast in two sets of formats, SDTV and HDTV. NTSC NTSC (National Television Standards Committee) refers to the group that first established the standards used for conventional analog television broadcasts and TV equipment. ATSC ATSC (Advanced Television Systems Committee) is the group who has been working to establish the standards for digital television broadcasts and digital television equipment – including both SDTV and HDTV.
SDTV SDTV (Standard-Definition TV) is a digital TV format that provides a high quality picture at resolutions that can be displayed on standard TV sets (see more on resolutions later in this chapter). HDTV HDTV (High-Definition TV) is a digital TV format that provides the highest quality picture at resolutions that can be displayed on HDTV-ready TV displays, HDTV Monitors and, computer monitors. What kinds of TV programming can I watch with
the Digital HDTV Tuner?
The PHD-205 Digital HDTV Tuner provides you with the ability to receive television programs from a wide range of sources, and to display them on general HDTV or monitor. Using the Air/Cable jack on the back of the Digital HDTV Tuner, you can receive local analog and digital television programs.
To view cable TV programming, programming
subscriptions are also required. What equipment is required to view HDTV
programming?
To view HDTV programming, an addition to your PHD-205 Digital HDTV Tuner, you will need an HDTV monitor or television set. To receive analog and digital off-air television broadcasts, you’ll need an off-air antenna. To receive cable TV programming, you’ll need a cable TV connection (provided by your local cable TV service provider).

4
25
Ope
ratio
n
TV-USA
The TV Parental Guidelines work in conjunction with the V-CHIP to help parents screen out inappropriate television shows from their children. *Restriction Categories based on six aged base.
Hierarchy of Age-based Ratings TV-Y All Children TV-Y7 7 years old and above TV-G General audience TV-PG Parental guidance TV-14 14 years old and above TV-MA Mature audience only
If you block TV-Y, TV-Y7 will automatically be
blocked and similarly. And you block TV-G, TV-PG, TV-14 and TV-MA will be blocked.
If you unblock TV-V7, TV-Y will automatically be unblocked and similarly. And you unblock TV-MA, TV-G, TV-PG and TV-14 will be unblocked.
Each Restriction Category has additional options.
sub-ratings ALL All restriction FV Fantasy Violence D Sexually Suggestive Dialog L Adult Language S Sexual Situation V Violence
V-Chip will automatically block certain sub-categories that are more restrictive. For example, if you block “L” sub-rating in TV-PG, then the “L” sub ratings in TV-14 and TV-MA will automatically be blocked. TV Parental Guidelines
ALL FV D L S V TV-Y TV-Y7 TV-G TV-PG TV-14 TV-MA : Content rating can be set
CA English Rating
Restriction Categories based on five aged base.
Hierarchy of Age-based Ratings G General programming. 8 ans+ Not recommended for young children. 13 ans+ Not recommended for ages under 13. 16 ans+ Not recommended for ages under 16. 18 ans+ Programming restricted to adults.
CA French Rating
Restriction Categories based on six aged base.
Hierarchy of Age-based Ratings C All Children. C8+ Children 8 years and above. G General programming. PG Parental guidance 14+ 14 years old and above. 18+ Adults programming.

26
Reference Troubleshooting No power
Is the AC power cord plugged in? No signal
Check your antenna input or location. Check your cable input. Check your RF connection or set up.
No picture Make sure that the correct format is selected. Adjust the “RESOLUTION” switch on the rear panel to change formats.
Make sure that the right component type is selected.
If the PHD-205 Digital HDTV Tuner is connected to your monitor or TV via Y/Pb/Pr port on the back panel, the “DTV SELECT” switch must be flipped to the right. If the PHD-205 Digital HDTV Tuner is connected to your monitor or TV via DVI port on the back panel, the “DTV SELECT” switch must be flipped to the left.
Make sure the Initial Setup process has been performed. Select the correct antenna type to Auto Scan Channels if you have not already done so.
Check to make sure all the cables are installed correctly and that the proper source is selected on your TV.
The digital TV signal strength may be low. Check the signal strength and adjust the off-air antenna.
Make sure the broadcaster or service provider is supplying programming on the selected channel. Use the SIGNAL button to check for digital video signals.
You may be trying to access a pay-per-view program. Follow the on-screen instructions to order the program.
Due to copyright restrictions, you may not be able to view some high definition programs in the high-definition format.
Cannot receive high-definition channels Make sure there is a good signal strength on available off-air antenna
Normal picture but no sound Make sure the TV or Amp is not muted. Check that the Digital HDTV Tuner is connected properly
Picture is distorted.
Make sure the proper format is selected. Make sure the proper aspect ratio is selected. Adjust the aspect ratio setting of your TV or monitor if available.
Video image does not fill the TV screen Check the Digital HDTV Tuner’s Aspect Ratio setting, press the ASPECT button on the remote control, or check your TV’s aspect ratio setting.
Check with your service provider or local broadcaster to confirm if a full video image is broadcast.
Channels are missing If you changed the type of antenna, please select a correct tuner option in menu and Auto scan channel again.
The remote control is not responding Make sure the batteries are fresh and installed properly.
Point the remote control unit at the remote control sensor.
The timer does not work After a power failure or disconnection of the power, the clock settings will be lost.
Closed captions are not displayed Depending on broadcast provider, different types of captioning may be available. According to your preferences, you will need to set your Caption settings for Analog and Digital modes.
Check your CC mode and Closed Caption options.
Try to change your advanced settings (for instance, Text and Background) and CC Preference (for instance, Automatic).
3
Contents
INTRODUCTION...................................................... 5
TECHNICAL OVERVIEW............................................. 5 What are Analog TV, Digital TV, NTSC, ATSC, SDTV, and HDTV? ................................................5 What kinds of TV programming can I watch with the Digital HDTV Tuner? .......................................5 What equipment is required to view HDTV programming? .......................................................5 Resolution an interlacing .......................................6 Video output ..........................................................6 Aspect ratio ...........................................................6 Screen formats ......................................................7
UNPACKING............................................................ 8 FRONT PANEL......................................................... 9 REAR PANEL ........................................................ 10 REMOTE CONTROL .................................................11
CONNECTIONS AND SETUP ............................... 12
CONNECTIONS ...................................................... 12 Connecting Air/Cable antenna ....................... 12 Connect to HD Ready TV or HDTV Monitor .. 12 Connecting to Conventional Analog TV ......... 13 Connect to Home Theater.............................. 13 DVI to HDMI Connection................................ 14
INITIAL SETTINGS.................................................. 15
OPERATION .......................................................... 16
WATCHING TV ...................................................... 16 Turning on or off the Digital HDTV Tuner....... 16 Changing the channels .................................. 16 Adjust volume ................................................ 17 Using MUTE................................................... 17 Seeing the Closed Caption ............................ 17 Displaying the channel information................ 17
Displaying the GUIDE .................................... 18 Audio Preference............................................ 18
USING THE MENU ................................................ 19 Set up ............................................................. 19
Language ............................................................19 Aspect Ratio ........................................................19 Reset All ..............................................................20 System Information .............................................20
Audio .............................................................. 20 Digital Audio ........................................................20
Time................................................................ 21 Time Zone ...........................................................21 DST (Daylight Saving Time) ................................21 Date and Time.....................................................21
Channels ........................................................ 21 Tuner ...................................................................21 Auto Scan............................................................21 Manual Scan .......................................................21 Master List...........................................................22 Favorites..............................................................22
Caption ........................................................... 22 CC Mode .............................................................22 Analog Caption....................................................23 DTV Caption........................................................23 DTV Caption Style ...............................................23 CC Preference.....................................................23
Parental Control (V-Chip) ............................... 24 Change PIN.........................................................24 MPPA-Rating.......................................................24 TV-USA ...............................................................25 CA English Rating ...............................................25 CA French Rating ................................................25
REFERENCE.......................................................... 26
TROUBLESHOOTING............................................... 26 SPECIFICATION...................................................... 27
Congratulations on choosing PrimeDTV PHD-205 Digital HDTV Tuner. Please read this manual carefully before operation. For your convenience, this manual will provide pictures and descriptions to make operation as easy as possible. In order to use and maintain the set better, please follow its operating instructions. Thanks for your cooperation.
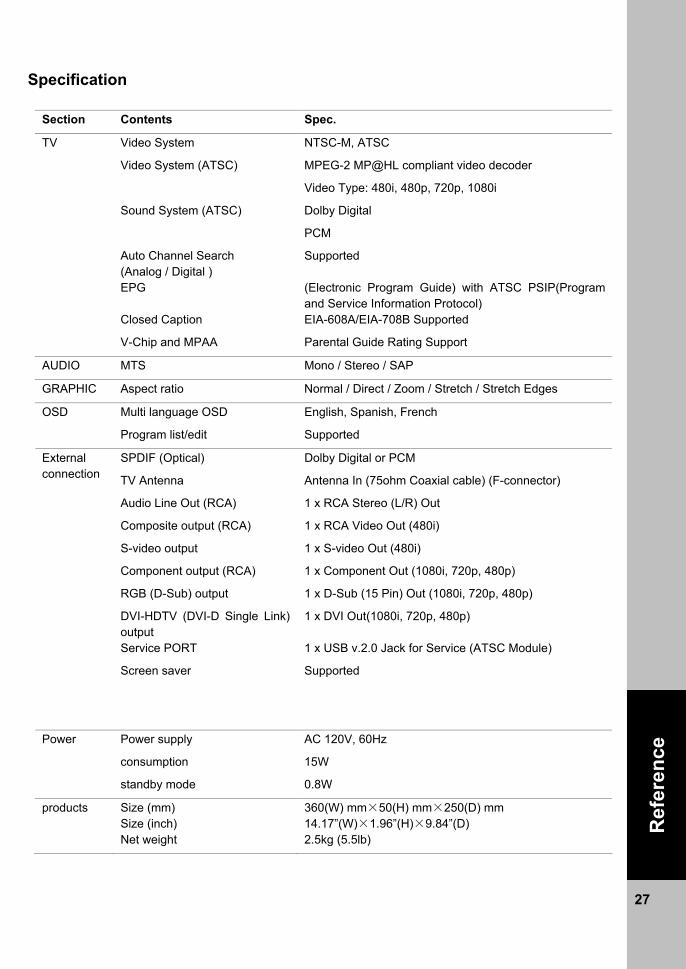
2
WARNING: TO PREVENT FIRE OR ELECTRIC SHOCK HAZARD, DO NOT EXPOSE THIS PRODUCT TO RAIN OR MOISTURE
This device complies with part 15 of the FCC Rules. Operation is subject to the following two conditions: (1) This device may not cause harmful interference, and (2) This device must accept any interference that may
cause undesired operation.
This lighting flash with arrowhead symbol indicates high voltage is present inside. It is dangerous to make any kind of contact with any inside part of this product.
This symbol indicates “dangerous voltage” inside the product that presents a risk of electric shock or personal injury.
CAUTION: FCC regulations start that any unauthorized changes or modifications to this equipment may void the user’s authority to operate it. Note to CABLE/TV Installer: This reminder is provided to call cable TV system installer’s attention to Article 820-40 of the National Electrical Code (Section 54 of Canadian Electrical Code, Part I), that provides guidelines for proper grounding and, in particular, specifies that the cable ground shall be connected to the grounding system of the building as close to the point of cable entry as practical. IMPORTANT: One Federal Court has held that unauthorized recording of copyrighted TV programs is an infringement of U.S. copyright laws. Certain Canadian programs may also be copyrighted and any unauthorized recording in whole or in part may be in violation of these rights.
IMPORTANT SAFETY INSTRUCTIONS
● Read these instructions.
● Keep these instructions.
● Heed all warnings.
● Follow all instructions.
● Do not use this apparatus near water.
● Clean only with dry cloth.
● Do not block any ventilation openings. Install in
accordance with the manufacturers instructions.
● Do not install near any heat sources such as radiators,
heat registers, stoves, or other apparatus (Including
amplifiers) that produce heat.
● Do not defeat the safety purpose of the polarized or
grounding-type plug. A polarized plug has two Blades
with one wider than the other. A grounding type plug has
two blades and a third grounding prong .The wide blade
or the third prong are provided for your safety. If the
provided plug does not fit into your outlet, consult an
electrician for replacement of the obsolete outlet.
● Protect the power cord from being walked on or pinched
particularly at plugs, convenience receptacles, and the
point where they exit from the apparatus.
● Only use attachments/accessories
specified by the manufacturer.
● Use only with the cart, stand tripod, bracket, or table
specified by the manufacturer, or sold with the apparatus
when a cart is used use caution when moving the
cart/apparatus combination to avoid injury from tip-over.
● Unplug this apparatus during lightning storms or when
unused for long periods of time.
● Refer all servicing to qualified service personnel.
Servicing is required when the apparatus has been
damaged in any way, such as power-supply cord or plug
is damaged, liquid has been spilled or objects have fallen
into the apparatus, the apparatus has been exposed to
rain or moisture, does not operate normally, or has been
dropped.
CAUTION RISK OF ELECTRIC
SHOCK DO NOT OPEN
CAUTION: TO REDUCE THE RISK OF ELECTRIC SHOCK
DO NOT REMOVE COVER (OR BACK) NO USER-SERVICEABLE PARTS INSIDE
REFER SERVICING TO QUALIFIED SERVICE PESONNEL
27
Ref
eren
ce
Specification
Section Contents Spec.
Video System NTSC-M, ATSC
MPEG-2 MP@HL compliant video decoder Video System (ATSC)
Video Type: 480i, 480p, 720p, 1080i
Dolby Digital Sound System (ATSC)
PCM
Auto Channel Search (Analog / Digital )
Supported
EPG (Electronic Program Guide) with ATSC PSIP(Program and Service Information Protocol)
Closed Caption EIA-608A/EIA-708B Supported
TV
V-Chip and MPAA Parental Guide Rating Support
AUDIO MTS Mono / Stereo / SAP
GRAPHIC Aspect ratio Normal / Direct / Zoom / Stretch / Stretch Edges
Multi language OSD English, Spanish, French OSD
Program list/edit Supported
SPDIF (Optical) Dolby Digital or PCM
TV Antenna Antenna In (75ohm Coaxial cable) (F-connector)
Audio Line Out (RCA) 1 x RCA Stereo (L/R) Out
Composite output (RCA) 1 x RCA Video Out (480i)
S-video output 1 x S-video Out (480i)
Component output (RCA) 1 x Component Out (1080i, 720p, 480p)
RGB (D-Sub) output 1 x D-Sub (15 Pin) Out (1080i, 720p, 480p)
DVI-HDTV (DVI-D Single Link) output
1 x DVI Out(1080i, 720p, 480p)
Service PORT 1 x USB v.2.0 Jack for Service (ATSC Module)
Screen saver Supported
External connection
Power supply AC 120V, 60Hz
consumption 15W
Power
standby mode 0.8W
products Size (mm) Size (inch)
360(W) mm×50(H) mm×250(D) mm 14.17”(W)×1.96”(H)×9.84”(D)
Net weight 2.5kg (5.5lb)
PrimeDTV Technologies, Inc. Anaheim, CA 92807 Tel: (714) 630-6899 www.primedtv.com DOC# 205-v0.5
DIGITAL HDTV TUNER OWNER’S MANUAL MODEL : PHD-205
©Copyright 2007, PrimeDTV Technologies, Inc.


![October 2018 Newsletter[1]€¦ · October 2018 Canyon High School Canyon High School I 220 S. Imperial Hwy., Anaheim, Ca 92807 714-532-8000 I If you are not currently a CHS family](https://static.fdocuments.in/doc/165x107/5f9951749ca54b3076141428/october-2018-newsletter1-october-2018-canyon-high-school-canyon-high-school-i.jpg)