OWNER'S MANUAL DieHard - Appliance · PDF fileOWNER'S MANUAL DieHard 10/2/60 AMP FULLY...
16
OWNER'S MANUAL DieHard 10/2/60 AMP FULLY AUTOMATIC BATTERY CHARGER ENGINE STARTER Model No. 200.713101 CAUTION: Before first use of charger, read this manual, and follow all its Safety and Operating Instructions with every charger use. Save these instructions. Made in U.S.A. of U.S. and imported parts. Sears, Roebuck and Co., Hoffman Estates, IL 60179 U.S.A. 597-198
Transcript of OWNER'S MANUAL DieHard - Appliance · PDF fileOWNER'S MANUAL DieHard 10/2/60 AMP FULLY...

OWNER'S MANUAL
DieHard10/2/60 AMPFULLY AUTOMATICBATTERY CHARGERENGINE STARTER
Model No.200.713101
CAUTION:Before first use of charger, read this manual, and
follow all its Safety and Operating Instructions with
every charger use.
Save these instructions.
Made in U.S.A. of U.S. and imported parts.
Sears, Roebuck and Co., Hoffman Estates, IL 60179 U.S.A.597-198

WARRANTY ............................................................................................................... 2
SAFETY ..................................................................................................................... 3
Important Safety Instructions .................................................................................... 3
OPERATION .............................................................................................................. 5
Before Using Your Battery Charger .......................................................................... 5
Assembling your charger ..................................................................................... 5
Plugging it in ........................................................................................................ 5
Using an extension cord ...................................................................................... 5
Preparing Your Battery to be Charged ...................................................................... 6
Using Your Battery Charger ...................................................................................... 6
Setting the controls .............................................................................................. 6
Charging your battery ........................................................................................... 8
Inside vehicle ................................................................................................... 8
Outside vehicle ............................................................................................... 9
Using the Engine Start Feature .............................................................................. 10
Calculating Charge Time ......................................................................................... 11
MAINTENANCE AND CARE .................................................................................... 12
TROUBLESHOOTING ............................................................................................ 13
PARTS ..................................................................................................................... 14
Wiring Diagram ................................................................................................. 15
Please read this Owner's Manual before using your Battery Charger
The DieHard model 200.713101, Fully Automatic Battery Charger/Engine Starter,
offers a wide range of features for home or light commercial use. This manual will
show you how to use your charger safely aod effectively. Please read and follow
these instructions and precautions carefully.
FULL THREE YEAR WARRANTY
Within three years from the date of purchase, if this battery charger fails due to a defect
in materials or workmanship, RETURN IT TO THE PLACE OF PURCHASE, and it will
be repaired or replaced free of charge.
This warranty gives you specific legal rights, and you may also have other rights whichvary from state to state.
Sears, Roebuck and Co., Dept 817WA, Hoffman Estates, IL 60179
2

WARNING: To reduce the risk of
explosion, explosive gases, or injury
while using your battery charger, followthe precautions listed below:
• Read all instructions and cautions
printed on the battery charger, battery,
and vehicle or equipment using battery.
• Use charger only on lead-acid typerechargeable batteries, such as those
used in cars, trucks, tractors, airplanes,
vans, RV's, trolling motors, etc.
This charger is not intended to supplypower to a low voltage electrical system.
• Use only attachments recommended or
sold by manufacturer. The use of
attachments not recommended by themanufacturer may result in fire, electric
shock, or injury.
• Do not disassemble charger. Take it to a
qualified service professional if service
or repair is required. Incorrect assemblymay result in fire or electrical shock.
• To reduce risk of electrical shock,
unplug the charger from the outlet before
attempting any maintenance or cleaning.
• Always charge battery in a well ventilatedarea.
• Battery chargers get hot during operationand must have proper ventilation. Air
needs to flow around entire charger.
• Do not set charger on flammablematerials like carpeting, upholstery,
paper, cardboard etc. Charger may
damage leather and melt plastic andrubber.
HELPUSHELPYOU
Remember:
• Place charger as far away from batterybeing charged as the charger cableswill permit.
• Do not expose charger to rain or snow.
• Never charge a frozen battery. Ifbattery fluid (electrolyte) becomes
frozen, bring battery into a warm area
to thaw before you begin charging.
• Never allow battery acid to drip on
charger when reading specific gravityor filling battery.
• Never set a battery on top of thecharger.
• Never place charger directly above
battery being charged. The gases
from the battery will corrode anddamage the charger.
• Never use charger for charging dry-
cell batteries that are commonly usedwith home appliances like radios,
stereos, remote controls, etc. These
batteries may burst and cause personal
injury.
• Never touch the battery clamps
together when the charger is on. Youwill cause a spark.
• Never operate charger if it has received
a hard blow, been dropped, or otherwisedamaged. Take it to a qualified profes-
sional for inspection and repair.
• Be sure to position the charger power
cord to prevent it from being steppedon, tripped over, or damaged.
• Never pull out the plug by the cord
when unplugging the charger. Pulling
on the cord may cause damage to thecord or the plug.
• Do not operate the charger if it has a
damaged power cord or plug. Havethe cord replaced.
3

Personal Safety Precautions
For your own personal safety, please follow the following precautions:
• Wear complete eye and clothing • Remove all personal metal items
protection when working with lead-acid batteries.
• Be sure that someone is within
range of your voice to come to youraid if needed while you work with or
are near a lead-acid battery.
• Have plenty of fresh water and soap
nearby for use in case battery acidcontacts your eyes, skin, or clothing.
If this happens, wash immediately
with soap and water. Then getmedical attention.
• Avoid touching youreyes while
working with a battery. Acid particles
(corrosion) may get into your eyes. If
this occurs, flush eyes immediatelywith running cold water for at least 10
minutes. Then immediately getmedical attention.
from your body, such as rings, brace-lets, necklaces, and watches while
working with a lead-acid battery. A
battery can produce a short circuitcurrent high enough to weld a ring (or
the like) to metal, causing a severeburn.
• Take care not to drop any metal tool or
metal object onto the battery. This may
spark or short circuit the battery or
another electrical device that may cause
an explosion.
• Always operate your battery charger inan open, well ventilated area.
• Never smoke or allow a spark or flamein the vicinity of the battery or engine.
Batteries generate explosive gases.
• Neutralize any acid spills thoroughly
with baking soda before attempting to
clean up.
4

It is importantto understandyour charger's requirements.This section will tell youabout your charger's electrical requirementsand how to preparea battery forcharging.
ASSEMBLINGYOURCHARGER
Included with your battery charger are twocord wrap posts for storage of the clampcables.
To install, align the three tabs to corre-spond with the three receptacles andpush until you hear a snap.
Wrap clamp cord after unplugging thepower cord and store your charger in adry location.
[_ (--Cord Wrap Cleat
PLUGGING IT IN
WARNING: Electrical Shock Hazard.
Be sure that the power cord fits properlyinto the outlet. If not, have a qualifiedtechnician install a proper outlet. Never
alter the AC cord or plug provided.
Improper connection can result inelectrical shock.
Your charger requires a 120V receptacleinstalled according to all local codes andordinances.
USING AN EXTENSION CORD
The use of an extension cord is not
recommended. If you must use anextension cord, please make sure
that you follow these guidelines:
• Make sure that the pins on charger'spower cord fit firmly into the extensioncord, and that the extension cord fits
firmly into the receptacle.
• Check that the extension cord is
properly wired and in good electricalcondition.
Make sure that the wire size is largeenough for its length and for the AC
ampere rating as specified in the chartbelow.
i_iii!iiiiiii!!iiiiiiiiiiiii iifi i i ¸ i il _ iiiiiii :_ i¸ i iii_
Length of Cord, in Feet 25 50 100 150
AWG* Size of Cord 18 16 12 10
"AWG=AmericanWireGauge
5

It is important that you read and follow these guidelineswhile you are preparingtochargeyour battery.
• Make sure that you have a 12 volt or 6
volt lead-acid battery. Set the selectorswitch to match the voltage rating of the
battery to be charged.
• Clean the battery terminals. Be carefulto keep corrosion from getting in or
around your eyes.
• For batteries with removable cell caps, if
required, add distilled water to each cell
until the battery acid reaches the level
recommended by the manufacturer.
This will help purge excessive gasesfrom the cells. Be careful not to overfill. If
you have a sealed battery without cell
caps, no action is necessary. Continue
to the next step listed below.
• Take time to read all battery
manufacturer's specific precautions,
cell caps while charging, and recom-
mended rates of charge.
• Wear safety glasses. See additional"Personal Safety Precautions" on
page 4.
• Be sure that the area around the
battery is well ventilated while it is
being charged.
If it is necessary to remove the battery
from the vehicle to charge it, always
remove the grounded terminal from the
battery first. Turn off all vehicle
accessories to avoid sparks from
occurring.
NOTE: A marine battery installed in aboat must be removed and charged onshore.
such as removing or not removing
To obtain the best results from your battery charger, you must know how to use itproperly. This section will tell you how to set the controls, how to charge a battery in orout of a vehicle, and how to use the engine st-arf feature.
SETTING THE CONTROLSAll controls are located on the front of
the charger. Follow these instructionsto obtain the correct charge level foryour battery.
SELECTOR SWITCHES:
Your charger has three switches:
• Use the left switch to match the
battery voltage--either 6 or 12 volt.
• Use the center switch to select a
charge type---MANUAL, AUTOMATICDEEP CYCLE or AUTOMATICREGULAR.
• Use the right switch to select a chargerate---2 AMP charge, 10 AMP charge,or 60 AMP ENGINE START.
Battery Voltage:Select the voltage of your battery. Themost common applications will be 12 volt.
6 VOLT _ 12 VOLT
6

Charge Type:• Use the MANUAL setting only if you
check the charging progress frequently.The charger will not stop chargingwhen the battery reaches full charge,possibly damaging the battery it left ontoo long. You must monitor and unplugthe charger when battery is fullycharged.
• Use the AUTOMATIC DEEP CYCLE
setting for all deep cycle batterycharging. The charger will automaticallystop charging when the battery reachesfull charge and begin charging againwhen battery requires.
• Use the AUTOMATIC REGULAR
setting for all but deep cycle batteries.The charger will automatically stopcharging when the battery reaches fullcharge and begin charging again whenbattery requires.
• A severely discharged battery may nothave enough charge to start the controlcircuit in an automatic setting. In thiscase, charge on manual until the
battery has enough charge to acceptan automatic setting.
Charge Rate:• Use the 2 AMP charge rate setting for
charging small batteries and warminglarge battedes.The lower the chargerate, the longer it will take to charge thebattery.
• Use the 10 AMP rate setting for
automotive, deep cycle and other largebattedes.
Use the 60 AMP ENGINE START
setting only to assist in cranking the
engine. 10 AM P
2 AMP ENGINESTART
AMMETER:
The ammeter indicates the measured
amount of amperes being drawn by the
battery. When you first start charging abattery, the reading will be high, withthe needle near 10 using the 10 amp
charging rate.
• In the MANUAL setting, as the batterycharges, the needle will fall to about 4or 5 amps, indicating a charged battery.
In both AUTOMATIC settings, theneedle will fall to zero and the charger
will shut off when the charger's controlcircuit senses a full charge. A freshly
charged battery's voltage will dropshortly after charging stops, and thecharger, if left connected, may resumecharging. This off-and-on cycling willcontinue until the battery's voltage nolonger drops enough to restart thecharger.
At the 2 amp charging rate you willnotice very little needle movement.
When cranking the engine while usingthe ENGINE START feature, the needle
will swing into the Start (red) area of thescale.
DC AMPS
CHARGE % 100 75 50 25 0
0 2 4 6 8 10 12
FULL CHARGE
LED INDICATOR:
The green LED INDICATOR will glowwhen the charger senses that the
battery has reached a full charge.
• When using the MANUAL chargerate, discontinue charging when the
LED glows and the AMMETERneedle is about 4 to 5 amps in the 10
Amp setting.
• For deep cycle batteries, you maywish to allow the battery another oneor two hours of charging after the
LEO glows to obtain a maximumcharge.

• WhenusingAUTOMATICchargerates,the LEDwill cycleonand off indicatingthe chargeris maintainingthebattery'sstate-of-charge.
CHARGING YOUR BAI-I'ERY
Charging your battery insidethe vehicle:
.
.
.
,
.
Arrange the power cord and charg-ing leads carefully to avoid damagethat could be caused by the hood,door, or moving engine parts.
Keep clear of fan blades, belts,pulleys, and other parts that cancause injury.
Check the polarity of the batteryposts as indicated on the batterycase: POSITIVE (POS, P, or +) andNEGATIVE (NEG. N or-). NOTE:The positive post on top-postbatteries is usually larger than thenegative post.
Identify which battery post is theground or connected to the chassis.THE NEGATIVE POST ISNORMALLY THE ONE THAT ISGROUNDED.
To charge a negative groundedpost system: Connect the red(POSITIVE) battery charger clampto the ungrounded POSITIVE(POS, P, +) post of the battery.Rock or twist the clamps backand forth to make a solid connection.
Then connect the black (NEGATIVEclamp to a heavy, unpainted metalpart of the chassis or engine block,away from the battery. DO NOTconnect clamp to carburetor, fuellines or sheet metal parts. (SeeFigure A.)
To charge a positive groundedpost system: Connect the black(NEGATIVE) battery charger clampto the ungrounded NEGATIVE(NEG, N, -) post of the battery. Thenconnect the red (POSITIVE) clampto a heavy, unpainted metal part ofthe chassis or engine block, awayfrom the battery. DO NOT connect
8
,
.
o
9.
10.
11.
NEGATIVE GROUNDED SYSTEM
Figure A
clamp to carburetor, fuel lines, orsheet metal parts. IMPORTANT:Wear safety glasses and turn faceaway from the battery when makingconnections.
For automatic charging, selectAUTOMATIC DEEP CYCLE orAUTOMATIC REGULAR as a
charge type then, select a chargerate. The charger will stop chargingwhen the battery is fully charged.
For manual charging, select MANUALas a charge type then select acharge rate. The charger will notstop charging when the battery isfully charged--you must monitor andunplug charger when battery is fullycharged. Avoid over charging,monitor the AMMETER frequentlywhen in the MANUAL mode.
Plug the power cord into anAC outlet.
When the battery is fully charged, inthe MANUAL mode, the AMMETER
pointer will fall to about half thecharge rate selected. For specificpositions, refer to the "Ammeter"section in "Using Your BatteryCharger" on page 6.
When the battery is fully charged,first unplug the charger power cord.Then, standing away from the
battery, remove the charger clampfrom the chassis first, then from the
battery post.
Clean and store the battery chargerin a dry location.

Charging your batteryoutside the vehicle:
. Remove the battery from vehicle,making sure to disconnectgrounded terminal first with allaccessories and lights turnedoff in the vehicle.
. Check the polarity of the batteryposts as indicated on the batterycase: POSITIVE (POS, P, +)and NEGATIVE (NEG, N, -). NOTE:On top-post batteries, the positive
battery terminal usually has a largerdiameter post than the negativeone.
. Connect the red (POSITIVE)charger clamp to the POSITIVEpost of the battery. Be sure to rockthe clip back and forth to make asolid connection.
. Attach a 6-gauge (AWG) or a 4-gauge (SAE) insulated battery cable
at least 24-inches long to the
NEGATIVE battery post. This cable
will provide a safer connection,
if arcing and sparking occur, it will be
at a distance from the battery. NOTE:The battery cable is not provided with
the charger, but may be purchased atmost automotive stores.
,
.
Take the other end of the 6-gaugeAWG) or a 4-gauge (SAE) insulated24-inch cable and, standingas far away from the battery aspossible, connect the black(NEGATIVE) lead of the charger tothe free end of the cable. Rock the
clamp to make a solid connection.IMPORTANT: Wear safety glassesand face away from the batterywhile making this connection.
For automatic charging, selectAUTOMATIC REGULAR orAUTOMATIC DEEP CYCLE
depending on the type of battery, thenselect a charge rate. The charger willquit when the battery is fully chargedand will restart if the battery voltagedrops too low.
9
POSITIVE NEGATIVE
C.,ROER
' IPOWER24", 6 GAUGE CORD
CABLE
GROUNDEDPOWER
Figure B OUTLEr
.
.
9.
10.
For manual charging, select MANUALas a charge type then select a chargerate. The charger will not stopcharging when the battery is fullycharged; you must monitor and
unplug charger when battery is fullycharged. Avoid over charging;monitor the AMMETER frequentlywhen in the manual mode.
Plug the power cord into an AC outlet.
When the battery is fully charged inthe MANUAL mode, the AMMETER
pointer will fall to about half the chargerate selected. For specific positions,refer to the "Ammeter" section in
"Using Your Battery Charger" onpage 6.
When the battery is fully charged,unplug the charger power cordbefore attempting to disconnectcharger clamps.
11. Standing awayfrom the battery,remove the negative lead from theinsulated cable connected to the
NEGATIVE post first. Then remove
the lead from the POSITIVE post.
12. Clean and store the battery chargerin a dry location.
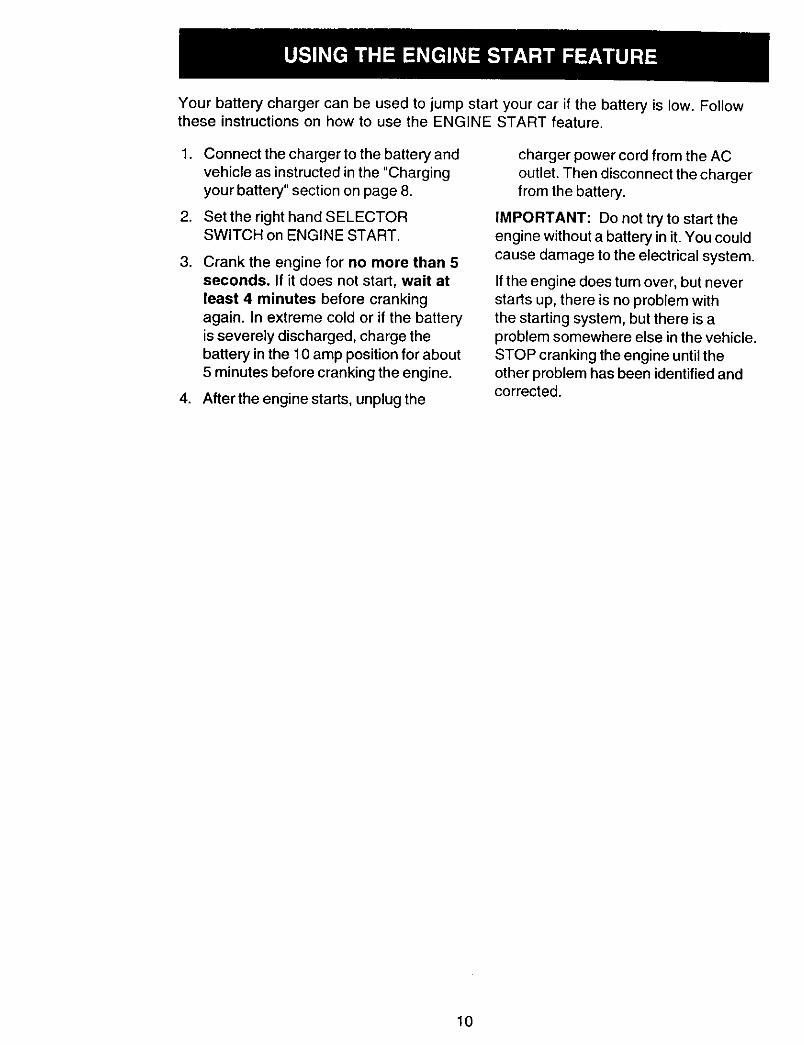
Your battery charger can be used to jump start your car if the battery is low. Followthese instructionson how to use the ENGINE STARTfeature.
1. Connect thechargerto the batteryandvehicleas instructedin the "Chargingyourbattery"sectiononpage8.
2. Setthe righthandSELECTORSWITCHon ENGINESTART.
, Crank the engine for no more than 5seconds. If it does not start, wait at
least 4 minutes before crankingagain. In extreme cold or if the batteryis severely discharged, charge thebattery in the 10 amp position for about5 minutes before cranking the engine.
4. After the engine starts, unplug the
charger power cord from the AC
outlet. Then disconnect the chargerfrom the battery.
IMPORTANT: Do not try to start theengine without a battery in it. You couldcause damage to the electrical system.
If the engine does turn over, but neverstarts up, there is no problem withthe starting system, but there is aproblem somewhere else in the vehicle.STOP cranking the engine until theother problem has been identified andcorrected.
10

Battery Rating Method
Use the following table to more accurately determine the time it will take to fully charge abattery that is initially at 50% State-of-Charge. Identify you rbattery type and itsassociatedCharge Time in the table. Common battery types are:
• Small batteries, motorcycles, garden tractors, etc., are usually rated in Amp-Hours
(AH).
• Car and truck batteries, usually rated in Reserve Capacity (RC), Cold-Cranking Amps(CCA).
• Marine, or deep cycle batteries are usually rated in either Amp-Hours or ReserveCapacity (RC).
Charge Time Table for Batteries at 50% State-of-Charge
Battery Battery Rating Charge-Time (Hours)
Type AH RC CCA 2 AMP 10 AMP 60 AMP
Motorcycle 6 - 12 2 - 4 NA NAand Tractor 12 - 32 4 - 10 NA NA
Car and 40 - 60 200 - 315 8- 11 1 - 2 NA
Truck 60 - 85 315 - 550 11 - 16 2 - 3 NA
85 -190 550- 1000 16-35 3-7 NA
Marine and 40 80 15 3 NA
Deep Cycle 80 140 26 5 NA
95 160 30 6 NA
105 180 33 7 NA
NA = Not Allowed. DO NOT charge at this setting.
Voltmeter Method
To find the time needed to fully charge your battery, determine the battery's charge level
with a voltmeter or electronic State-of-Charger Tester. Use the table below to convert
Voltmeter and State-of-Charge readings at room temperature to the appropriate Charge
Factor. Then use the formulas that follow the table to determine the approximate chargetime.
Charge Factor Table
12 Volt Battery
12.67
12.45
12.25
12.06
11.86
6 Volt Battery
6.34
6.22
6.12
6.03
5.93
State-of.ChargeReading
100%
75%
50%
25%
O%
0
0.25
0.50
0.75
1
11

Charge Time Needed if Amp-Hours is Known
• Find the Charge Factor for your battery in the table on page 11.
• Multiply by the Amp-Hour rating of the battery.
• Divide by the Charger Setting (either 2 Amp or 10 Amp.)
• Multiply by 1.25 to get the approximate Hours Neededto bring the battery to fullcharge.
Example: 15 Amp-Hour (AH) Battery, 50% State-of-Charge,2 Amp Charger Setting
[(AH x Charge Factor) + Charger Setting] x 1.25 = Hours Needed
(15 x 0.5 + 2) x 1.25 = 4.7 Hours
Charge Time Needed if Reserve Capacity is Known
• Find the Charge Factor for your battery in the table on page 11.
• Multiply the Reserve Capacity rating of the battery.
• Divide by the Charger Setting (either 2 Amp or 10 Amp).
• Multiply by 0.73 to get the approximate Hours Needed to bring the battery to fullcharge.
Example: 95-Minute Reserve Capacity (RC) Battery, 25%State-of-Charge, 10 Amp charger Setting
[(RC x Charge Factor) + Charger Setting] x 0.73 = Hours Needed
[(95 x 0.75) + 10] x 0.73 = 5.2 Hours
To keep your battery charger working properly for years:
, Clean the clamps each time youare finished charging. Wipe off any
battery fluid that may have come in
contact with the clamps to preventcorrosion.
. Coil the input and output cords
neatly when storing the charger.
This will help prevent accidental
damage to the cords and charger.
12

Performance problems often result from little things ahat you can't fix yourself. Pleaseread through this chart for a possible solution if a I
PROBLEM POSSIBLE CAUSE
No ammeter reading. Clamps not making goodconnection.
Circuit breaker incharger cycles on andoff with a clickingsound in the MANUAL
setting.
Ammeter reads less
than selected chargerate when charging.
Charger makes a loudbuzz or hum.
Short start cyclewhen crank ngengine.
2-amp charge rate.
No AC power reachingcharger.
Shorted battery clamps.
Shorted battery.
Charger leads reversedon battery.
Extension cord too long orgauge too small.
Battery has weak cell orsulfated plate.
Battery is partially charged.
Transformer laminationsvibrate (buzz).
Shorted diode (hum).
Drawing more than 60 ampsfor 7 seconds or less.
Failure to wait for 4 minutes(240 seconds) betweencranks.
)roblem occurs.
SOLUTION/REASONS
Check for poor connection at battery.Make sure clamps and posts are clean.Battery may not accept an AUTOMATICcharge if severely discharged. UseMANUAL setting, see "Using Your Bat-tery Charger" on page 6.
Ammeter needle will indicate little activ-ity at the 2-amp charge rate.
Check AC outlet and extension cordsfor loose fitting plug.
Check for open fuse or circuit breaker sup-plying AC outlet.
Separate the clamps. Circuit breakercycles when current draw is too high.Check for worn cables and replace ifneeded.
Have a Sears technician test the battery.
Correct connections.
Use shorter or heavier extension cord.
Sulfated battery will eventually take anormal charge if left connected. If thebattery will not take a charge, have ittested by a Sears technician.
Continue charging battery.
Continue charging. Buzz is not abnormal
Have a Sears technician test charger.
Crank time varies with the amount of
current drawn from the charger. Ifcranking draws more than 60 amps,crank time may be less than 7 seconds.
Wait 4 minutes before next crank.
ff the above solutions do not eliminate the problem...call toll4ree from anywhere in the U.S.A.
1-800-SEARS-64 • (1-800-732-7764) 7 AMto d:30PMCSTMondaythroughFriday
13

This section shows an illustration of your battery charger. Use it to become familiar with
where all the parts are located, and what they look like.
Item Description Part Number
1 Transformer 93026484
2 Diode Asm Kit 2299000976
3 PC Board Asm 2299000966
4 Circuit Breaker 3999000088
5 DC Cable Asm 3899000850
6 SCR55A 3100300017
7 Power Cord 90026105
713101
Item Description
8 Handle
9 Switch-left DPDT
10 Switch- right DPDT11 Meter
12 Cord Wrap Cleats
13 Owner's Manual
14 Faceplate
Part Number
3599000270
O499OOO06O
0499000068
5399100093
1199004390
0000000597
0899001075
14

BRN
15

For information about troubleshootingCall toll-freefrom anywhere in the U.S.A.7 am to 4:30 pm CST Monday through Friday
1-800-732-7764(1-800-732-7764)
For the repair or replacementparts you needCall 7 am - 7 pro, 7 days a week
1-800-366-PART(1-800-366-7278)
For the location of an authorized
Sears Service Center in your areaCall 24 hours a day, 7 clays a week
1-800-488-1222
When requesting service orordering parts, always providethe following information:
• Product Type: 1012/60 AMP
Fully Automatic Battery Charger• Model Number: 200.713101
• Part Number (See Page 14)
• Part Description (See Page 14)