Owner’s Manual - Cloud Object Storage | Store & Retrieve …€¦ · · 2017-11-29Owner’s...
40
(Neapolitan, Traditional, Enclosed Façade, Due Bocca) Owner’s Manual 10310 Southard Drive I Beltsville, MD 20705 I www.marraforni.com I 888.239.0575 Updated May 2017
Transcript of Owner’s Manual - Cloud Object Storage | Store & Retrieve …€¦ · · 2017-11-29Owner’s...

(Neapolitan, Traditional, Enclosed Façade, Due Bocca)
Owner’s Manual
10310 Southard Drive I Beltsville, MD 20705 I www.marraforni.com I 888.239.0575 Updated May 2017

DO NOT THROW THIS MANUAL AWAY.REVIEW WARRANTY BEFORE INSTALLING OVEN.

3
Manual Contents
Warnings..............................................................................................................4
Clearances and Requirements............................................................................5
Lifting and Moving Your Oven.............................................................................6
Oven Installation..................................................................................................7
Ventilation............................................................................................................8
Gas Instructions...................................................................................................9
Operation Instructions.........................................................................................10
Controller Console - Default Screen....................................................................12
Controller Console - Language, Time, and Date Setup......................................13
Intro to Curing......................................................................................................14
Controller Console - Start Curing Process.........................................................15
Controller Console - Confirm Curing...................................................................16
Controller Console - Curing: Day 1 - 5.................................................................17
Controller Console - Select Mode.......................................................................18
Controller Console - User Recipe........................................................................19
Controller Console - Manual Mode.....................................................................20
Auto ON/OFF Settings ........................................................................................21
Guidelines for Oven Use......................................................................................22
Wood Fire Maintenance Instructions.................................................................23
To Ignite/Shut Down Oven..................................................................................24
Gas Burner Maintenance....................................................................................25
Thermal Cleaning Procedures............................................................................25
Oven Cleaning, Maintenance..............................................................................26
Gas Burner Specifications..................................................................................27
Wiring Schematics..............................................................................................28
Burner Diagram...................................................................................................29
Troubleshooting..................................................................................................30
Troubleshooting Chart and Recommendations................................................31
Ignition Control Troubleshooting Flowchart......................................................32
Gas Burner Parts.................................................................................................33
Oven Fan..............................................................................................................34
UL, CSA, ETL & CE Fact Sheet............................................................................36
Warranty...............................................................................................................38

4
Thank You for Purchasing a Marra Forni OvenOur Neapolitan ovens are available in four different standard sizes: 90cm,110cm,140cm, and 150cm. Ovens are available outside of these dimensions (by custom order) to suit your restaurant’s needs. This oven has been extensively tested and approved by the ETL and NSF. As an added option available to you, this versatile oven may be converted from wood-burning to gas, or converted for dual usage. A Marra Forni oven from Euro Restaurant Solutions enhances your menu and decor, while always providing dependable service and performance.
The guidelines found in this manual for the venting system are intended for solid fuel appliances, although they may also be referenced for gas ovens. If preferred, you may also burn a small amount of wood on the opposite side of our gas burner (if equipped) for aesthetic value and to add smoky flavor.
WARNINGSImproper installation, adjustment, alteration, service or maintenance can cause property damage, injury or death. Read the installation, operating and maintenance instructions thoroughly before installing or servicing this equipment.
• A major cause of oven related fires is failure to maintain required clearances (air spaces) to combustible materials. It is of utmost importance that this oven be installed only in accordance with these instructions.
• Never use this appliance as a space heater to heat or warm the room. Doing so will result in carbon monoxide poisoning and overheating of the oven.
• Never cover any openings in the oven bottom or cover an entire rack with materials such as aluminum foil. Doing so blocks air flow through the oven and may cause carbon monoxide poisoning. Aluminum foil linings may also trap heat and cause a fire hazard.
• Do not store or use gasoline or other flammable
vapors or liquids in the vicinity of this or any other appliance.
• If using gas as your source of heat, you must post a statement in a prominent location for the event that the user smells gas. This information can be obtained by consulting your local gas supplier.
Please keep this manual for future reference for operating your oven. If you are in need of maintenance and/or repairs, please contact us directly at 1.888.239.0575.

5
Important Information
Minimum clearances for combustible and non-combustible construction: Combustibles: Sides: 2” Back: 2” Non-Combustibles: Sides: 0” Back: 0”On the bottom half of the oven there must be a minimum opening of 24” x 24” to allow air to enter the burner housing for proper combustion. If this opening is not sized to accommodate proper combustion, it may cause damage to the burner system. Installation of a sealed enclosure around the oven shell may also cause starv-ing of the burner system. The use of return air or other ventilation systems within a sealed enclosure surround-ing the oven can also disturb operations. For more information, please call 1.888.239.0575. Never obstruct the flow of combustion and ventilation air to the oven.
This appliance must be electrically grounded in accordance with local codes or in the absence of local codes, with the national electrical code ansi/nfpa 70, or with the Canadian electrical code csa c22.1, as applicable. In-stallation must conform with local codes, or with the national fuel gas code ansi z223.1, the natural gas instal-lation code can/cga-b149.1o including:
• 1. The appliance and its individual shut off valve must be disconnected from the gas supply piping sys-tem during any testing of that system at pressures in excess of 1/2 psi (3.45 kpa).
• 2. The appliance must be isolated from the gas supply piping system by closing its individual manual shutoff valve during any pressure testing of the gas supply piping system at test pressures equal or less than 1/2 psi (3.45 kpa).
Requirements for Proper Use of Gas Burner for Oven
• 120 VAC - 2.5 AMP outlet, 3/4” gas outlet• Gas inlet pressure to oven: 10”-14” inches W.C. • Gas manifold pressure is factory set to 3.5 inches W.C. for natural gas• Gas regulating valve (i.e. Maxitrol RV 48, 3-6) and shut off valve are by others• All models have a rating of 84,000-BTU’s
Requirements for Oven Installation
Following instructions on page 7, move oven to desired location and SLOWLY lower oven. It is imperative that your oven is level, thus a level floor is preferred. If necessary, shim oven until firm. Once oven is securely placed and level, remove the horizontal front angle. Use Ramset Redheads that are a minimum of three inches in length to insert through base plates. Complete oven installation instructions are shown on page 8. Exercise caution when moving the oven; it is top heavy.

6
LIFTING & MOVING YOUR OVENIMPORTANT: Only trained professionals using the proper machinery and handling equipment should lift and move the oven. Damage to the appliance, voiding of warranty, and personal injury may occur due to improper handling.Forklift ovens from sides. For Model 90, pick up from center crossbars.
A. USING A FORKLIFT
Ensure that the pallet jack capacity DOES accommodate the oven’s weight, and that the jack is long enough to se-curely lift the oven with BOTH horizontal bottom steel tubes. The oven should be approached from either the front or back to ensure an even weight distribu-tion. Guide the pallet jack through the inside of the bottom of the steel support legs and carefully position underneath previously mentioned horizontal steel tubes. Proceed to lift slowly and move oven as needed. Use 21” wide pallet jack for the Model 90. For all other models use regular pallet jacks that meet the necessary capacity.
Before attempting to lift or move the oven, ensure that the forklift capacity can accommodate the weight of the oven, and that the forks are long enough to securely lift the oven with BOTH horizontal steel tubes, ensuring that no contact with the oven shell is made. The oven should be approached from either the front or the back to ensure even weight distribution. BE SURE TO KEEP FORKLIFT STRAIGHT. Guide forks through the inside of the steel support legs and carefully position underneath the horizontal steel tube members. Pro-ceed to lift and move oven slowly.
B. USING A PALLET JACK
Proper Lifting for Model 90 Proper Lifting for Models110, 140, 150

7
OVEN INSTALLATION INSTRUCTIONS1. Select location for oven to be installed, marking an outline on the floor to ensure that you have adequate space. Floor space must extend to longest points of oven (circumference).WARNING: INSULATION & OTHER MATERIALS MUST BE KEPT OUT OF THE CLEARANCE SPACES SURROUND-ING THE OVEN.
2. Ensure that there is plenty of clearance between the ceiling and your oven. A basic installation with direct venting requires a minimum height of 83 inches. All combustible sidewalls projecting beyond the front of the oven opening must be given a clearance of 30” from the side of the oven door opening, and 36” from the front of the oven door, as shown.
3. OPTIONAL: After completing steps 1-3, drill holes for the anchor bolts at a minimum of 3 inches deep using the base plates as a guide. Insert Ramset Redheads to fasten plates to concrete floor.
4. Non-combustible materials such as brick, ceramic tile, stainless steel, marble and other decorative metals may be used to face the outside surface of the oven dome if desired. NOTE: NEVER USE COMBUSTIBLE MA-TERIALS OR ADHESIVE TO DECORATE THE FACADE OF YOUR OVEN.

8
STRUCTURAL BUILD OF OVEN / VENTING
A UL-listed grease or building heating appliance chimney installation (referred to as direct venting), and Type I exhaust hood installed per NFPA 96 and UMC standards for Ventilation Control and Fire Protection of Com-mercial Cooking Operations are the only two methods of venting permitted for commercial Marra ovens. Of the two options, direct venting is more common, although an exhaust hood is required in some areas (consult local ordinances). Venting must comply with ETL regulations. For gas ovens, always ensure that there are no obstructions to the flow of combustion and ventilation, including the cylinder enclosures. Please refer to your exhaust hood manufacturer’s guidelines for inspection, maintenance and sanitation procedures.
A UL Listed Grease Duct/Building Chimney Heating Appliance can be connected to the chimney opening of the oven. A minimum 500 C.F.M.-listed power ventilator for restaurant exhaust appliances is required. A minimum temperature rating of 300°F is required for the power ventilator.
Type I Exhaust hood standards for ventilation control and fire protection of commercial cooking operations are as follows: Steel baffle (NOT MESH) grease filters must be used and placed at the rear of the hood. The follow-ing specifications must also be met:• There must be at least 10” between the front of the oven face and the front of the hood.• According to UMC there must be 42” between the oven heart and the face of the filter.• The side of the hood must extend a minimum of 6” to either side of the oven door opening.• If required, a type 1 hood must be placed above the cooking opening and set atop the oven. Minimum
hood dimensions are 36” wide and 37” deep, 22” high for Models 90 and 110, and 40” wide, 37” deep and 22” high for 140 and 150. Duct Velocity = 1500-2500 FPM - Vol.: 800-1000 CFM
Refer to Marra Forni instructions for specific Direct Venting installation requirements. A field-built duct, con-structed and installed to NFPA 96 or International Mechanical Code grease duct specifications, may also be used. Volume: 150-200 CFMwww.SecurityChimneys.com
From Inside to Outside:• 8 cm thick bricks layered over metal mesh• 3 cm refractory mortar sprayed over mesh• 4 cm Fyrewrap insulation• 6 cm Thermafiber mineral wool insulation• 3 cm refractory mortar• 6 cm refractory brick• 1 cm refractory mortar• 6 cm refractory brick• 3 cm Thermafiber mineral wool• 4 cm Fyrewrap insulation• 2 mm metal

9
DIRECT VENTING - NEAPOLITAN MODEL
Grease Duct Heating Appliance Lennox Secure Stack CIXThe above diagram depicts the installation required for a direct venting application that complies with ETL guidelines.
Be sure to contact your local authorities to explore local jurisdiction regarding fire rated duct shafts.
Note: The chimney must be installed in accordance with the manufacturer’s grease duct installation instruc-tions. To maintain the ETL listing of the oven, the system must be a UL listed fire-wrapped grease duct in either stainless steel, black iron, or a listed building heating appliance duct.
Diameter of inside grease duct by oven size: .90M (6” duct), 1.10M (8”duct), 1.40M (8” duct), 1.50M (8” duct).

GAS INSTALLATION1. A gas oven should only be connected to the type of gas for which it is equipped.
2. Before operating the oven, please ensure that there are no leaks in any of the pipes or joints by using a soap and water solution. DO NOT CHECK FOR LEAKS UTILIZING AN OPEN FLAME.
3. To check the manifold pressure, a 1/8 pressure tap can be found on the combustion gas control. For the proper setting, refer to the nameplate. This control is preset at the factory before shipping.
4. Connect a 3/4” gas supply to oven. On all threaded joints, be sure to use a pipe joint compound that is non-reactive to gas. We recommend that you have a service shutoff valve installed outside of the oven at the time of installation.
5. Connect your gas burner control box to your 120 VAC, 60hz, 2.5 AMP, 1 PH power supply. ALWAYS BE SURE THAT THE SYSTEM IS PROPERLY GROUNDED.
OPERATING INSTRUCTIONS (FOR WOOD OR GAS OVENS)1. READ INSTRUCTIONS CAREFULLY. Improper use of this oven may result in fire and/or personal injury. All operators and supervising personnel MUST READ AND THOROUGHLY UNDERSTAND THESE INSTRUCTIONS. This oven is to be operated by trained and qualified personnel only and never left unattended. This oven is a heat-producing appliance and may cause severe burns if the inside is touched.
2. This unit is designed to be used as a gas or wood-fired oven. Only pizza and/or bread products should directly touch the hearth. Please refer to the manufacturer’s operation guidelines for instructions on cooking other foods. 3. DO NOT OVER-FIRE. If flames spill out from the door opening or the oven temperature exceeds 1000°F, you are over-firing. DO NOT fully close the door while a fire is in the oven. This cuts off oxygen, causing the fire to erupt when the door is removed.
4. Keep a wood fire-rated fire extinguisher close to the oven at all times. Ensure that all personnel and supervi-sors are aware of its location and use, as well as what to do in case of a fire emergency. DO NOT use liquid fuels to begin a fire, DO NOT use liquids to extinguish a fire.
5. The fire may be poked and stirred with a wood handling tool whenever you add fuel. Doing so will help air to move through the fuel bed for proper combustion.
6. After the oven has reached cooking temperature, clean your cooking area as described in the DISPOSAL OF ASHES section before commencing cooking procedures. Non-dough based foods must be placed on appropri-ate cookware before being set in the oven.
7. To prevent sparks from entering duct work, exhaust systems serving Solid Fuel equipment MUST NOT be combined with exhaust systems serving other (non-solid fuel) cooking equipment. Consult local authorities for regulations concerning proper exhaust installation.
10

Operation Instructions
Light:OFF
Control Box-Controls oven functions.
ON/OFF Button-Turns oven ON/OFF.
11

Light:OFF
Controller Console - Default Screen
Marra Forni Welcome Screen
N/A
Technical Service Button
Home Button - Prompts user to Select Mode Screen
12

Controller Console - Language, Time, and Date Setup
Light:OFF
English Button-Sets language to English
Spanish Button-Sets language to Spanish
Italian Button-Sets language to Italian
French Button-Sets language to French
German Button-Sets language to German
Time/Date Button-Sets Time/Date
13

Intro to Curing
Do not speed up curing Process. Follow exact instructions above. Do not shut off or unplug the oven. The oven will turn on by itself every day and it will complete the 5 day cycle. If the oven is turned off or unplugged you will have to cure manually.
Oven temperature will increase above set temperature. Oven is not built for low temperature. Temperature increase is normal.
Curing is necessary to ensure that your oven is free of moisture. The interior of the oven will appear dry upon arrival, but there is still a small amount of moisture in the bricks and mortar. If you neglect to cure your oven, the oven will become damaged during use. If you do not have your oven delivered pre-cured, you MUST follow these steps. The curing process takes a total of 5 days to complete.
300°F 400°F 600°F500°F 700°F
GAS OVEN CURING
TO OPEN THE CURING PAGE • Press PID Button
• Press SECURITY MANAGER.
• Enter username, type MF and press enter.
• Enter Password 4321 and press enter.
• Press Bypass Curing.
• Press test burner. /For Manual Mode Press Bypass Curing
again.
• Press Go To Curing./Press Manual Mode.
• Press Start Curing Process.• Day 1: Burn at 300°F for 3 hours, turn oven off.• Day 2: Repeat process at 400°F.• Day 3: Repeat process at 500°F.• Day 4: Repeat process at 600°F.• Day 5: Repeat process at 700°F.
IMPORTANT: NEVER burn liquid fuel, or any treated, coated, or laminated woods. The ONLY acceptable type of wood to use is dry, medium, or hard firewood.
WOOD-FIRED OVEN CURING
• Day 1: Burn two pieces of wood until they disintegrate.• Day 2: Follow Day 1 procedure, then add a third piece of wood.
Allow to burn completely. • Day 3: Follow Day 2 procedure, then add a fourth piece. Allow
to burn down, then add a fifth. Burn completely.• Day 4: Burn two pieces, followed by one piece of wood at a
time until you reach your desired temperature• Day 5: Oven is now cured, add wood as necessary until you
reach desired temperature.
14

Controller Console - Start Curing Process
Curing is necessary to ensure that your oven is free of moisture. The interior of the oven will appear dry upon arrival, but there is still a small amount of moisture in the bricks and mortar. If you neglect to cure your oven, the oven will become damaged during use. If you do not have your oven delivered pre-cured, you MUST follow the following steps. The curing process takes a total of 5 days to complete.
IMPORTANT: NEVER burn liquid fuel, or any treated, coated, or laminated woods. The ONLY acceptable type of wood to use is dry, medium, or hard firewood.
Start Curing Process Button - Press Start Curing Process to commence the 5-day curing process.
PID Button - Allows you to adjust PID settings.
15

Controller Console - Confirm Curing
No Button-Aborts curing process
Yes Button-Confirms and initiates curing process.
16
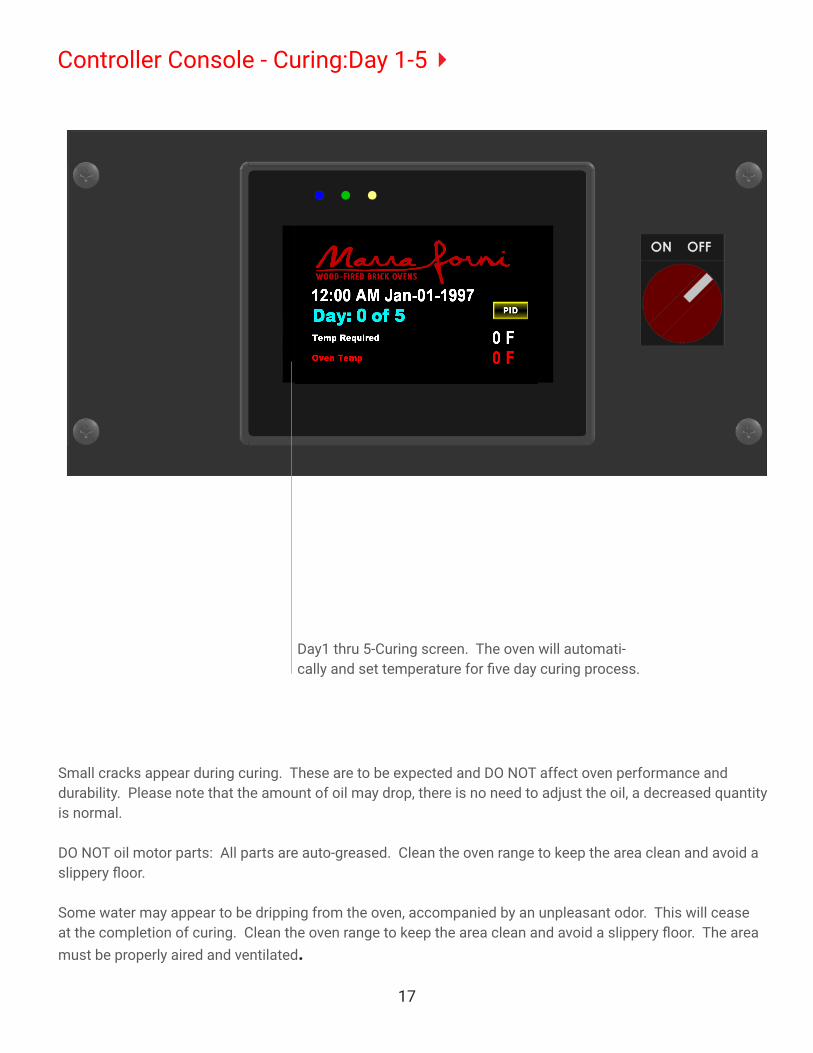
Controller Console - Curing:Day 1-5
Small cracks appear during curing. These are to be expected and DO NOT affect oven performance and durability. Please note that the amount of oil may drop, there is no need to adjust the oil, a decreased quantity is normal.
DO NOT oil motor parts: All parts are auto-greased. Clean the oven range to keep the area clean and avoid a slippery floor.
Some water may appear to be dripping from the oven, accompanied by an unpleasant odor. This will cease at the completion of curing. Clean the oven range to keep the area clean and avoid a slippery floor. The area must be properly aired and ventilated.
Day1 thru 5-Curing screen. The oven will automati-cally and set temperature for five day curing process.
17

Controller Console - Select Mode
Light:OFF
User Recipe Button-Directs user to page where the user cus-tomizes recipes.
Manual Mode Button- Di-rects user to manual mode.
Settings Button-Directs user to update language, time, and date.
18

Create Recipe Button-Creates a new customized recipe and prompts user to recipe setup screen.
Controller Console - User Recipe
Blank Recipe Button-Recipe to be created.
Light:OFF
Oven Temp 0 F Time Required 0 F
Customized Recipe complete. Once recipe is created, recipe will automaticallybe added to your recipe menu. User has the capability of creating sixteen customized recipes.
19

20
Controller Console - Manual Mode
Auto ON/OFF Button-Automatically turns oven on or off.
Burner ON/OFF-Button for left and right burner, turns burners ON/OFF.
Temperature Button-Increases and decreases oven temperature.
Temperature
21
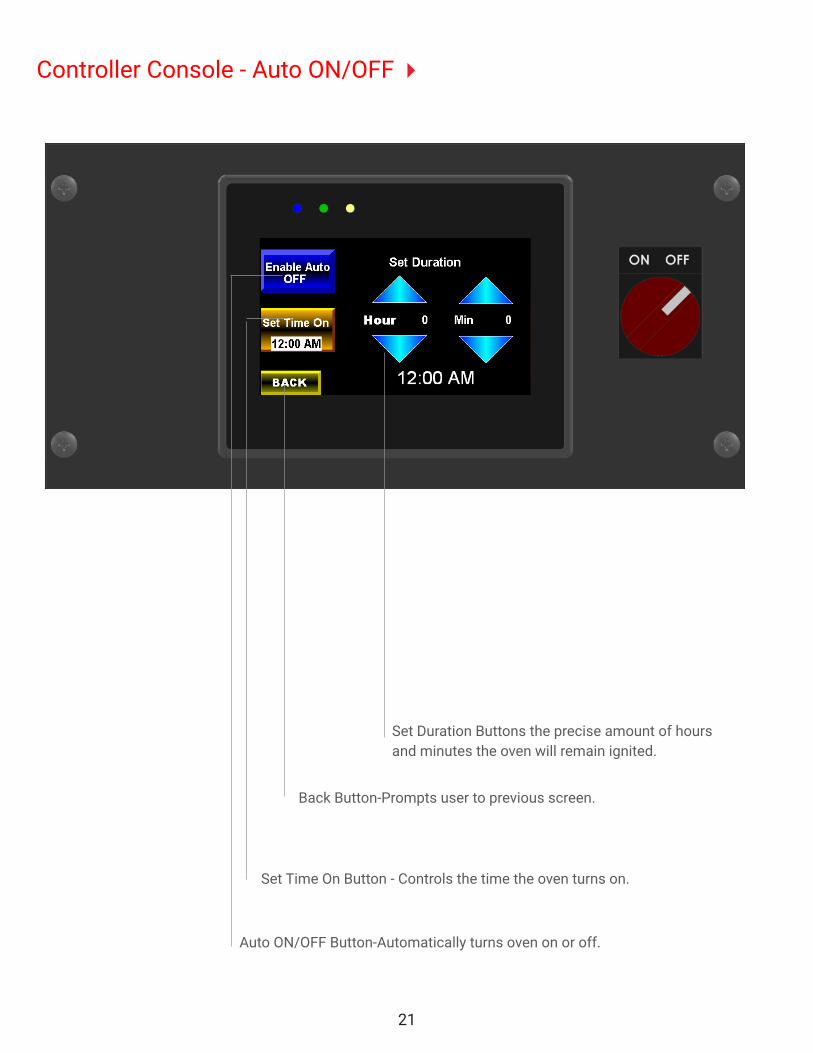
Controller Console - Auto ON/OFF
Back Button-Prompts user to previous screen.
Set Time On Button - Controls the time the oven turns on.
Set Duration Buttons the precise amount of hours and minutes the oven will remain ignited.
Auto ON/OFF Button-Automatically turns oven on or off.

1. DO NOT USE PRODUCTS NOT SPECIFIED FOR USE WITH THIS OVEN.
2. Be sure to only burn seasoned or dried, untreated solid wood fuel in the oven. NEVER BURN OTHER FUELS IN THE OVEN SUCH AS LIQUIDS, CHARCOALS OR GARBAGE.
3. Firewood stored in the vicinity of the oven must be kept in a tightly sealed metal container; see maintenance instructions and NFPA 96 guidelines. Keep the container closed at all times when not adding or removing wood. Store the container a considerable distance from the oven and far away from sources of heat or igni-tion. The container must be a minimum of 6” off of the floor. DO NOT STORE EASILY IGNITED ITEMS WITH FIREWOOD.
4. If installed WITH an exhaust hood, provisions must be made to supply sufficient combustion air into the oven during use. Combustion air must be supplied in accordance with local codes and the Uniform Mechani-cal Code, as well as NFPA 96. The exhaust hood and make-up air blowers must be on at all times when firing. If the exhaust hood power ventilator fails, close the oven door to extinguish the fire and prevent temperature buildup in the hood duct, which can activate the emergency suppression system. Exhaust hoods must extend a minimum of 12” from the opening of the oven. NEVER close the oven door fully unless there is an emergen-cy.
5. Use only non-combustible hearth tools and cooking implements inside the oven (we offer an entire line of Marra Forni pizza making tools).
6. NEVER ELEVATE THE FIRE. Fires should always be built directly on the hearth.
WOOD FIRE MAINTENANCE INSTRUCTIONSWARNING: READ ALL INSTRUCTIONS CAREFULLY. IMPROPER USE OR MAINTENANCE OF THIS APPLIANCE MAY RESULT IN A BUILDING FIRE OR PERSONAL INJURY
1. Always be sure to keep all fuel, furnishings, and other combustible objects away from the oven (refer to the combustible clearance distances found on page 8 of this manual).
2. DISPOSAL OF ASHES – Using a metal container with a tight-fitting lid, ashes from the ash pan should be placed away from all combustible materials (including floors and walls) until ready for final disposal. Be sure to keep ashes in the closed container until all of the cinders have completely cooled. Once cool, ashes can be disposed of by burying in soil or dispersing locally.
3. After ashes have been removed, the hearth may be wiped down with clean damp cloths.
4. Always be sure to store your wood away from any source of heat or flame in a cool, dry place. If you decide to store your wood outside, be sure to keep it covered to protect it from precipitation. If you store your wood in-side, it must be kept in a covered metal container at least 6 inches off of the floor. Always be sure to keep any combustible materials (paper, rags, etc.) away from the wood. Refer to NFPA 96 for wood storage procedures.
22
Guidelines for Oven Use

Wood Fired Maintenance Instructions(CONTINUED)5. Be sure to thoroughly clean the area around the oven of all wood, wood shavings, embers, ashes and other refuse at the end of each shift. Also make sure that all floor mats (mats must be non-combustible), are picked up and carefully swept, as well as the floor. After you have swept around the unit, dampen the brooms to en-sure that any hot coals are extinguished and then store away from any combustible materials.
6. FORMATION/REMOVAL OF CREOSOTE- Tar and organic vapors produced when wood burns slowly can combine with moisture to form creosote. Creosote vapors condense in the comparatively cool oven flue and exhaust hood duct of a slow burning fire, resulting in the accumulation of creosote residue in these places. Creosote makes an extremely hot fire when ignited.
At least twice monthly the oven flue, exhaust duct and power ventilator should be inspected to determine if creosote buildup has occurred. If any creosote and/or grease has accumulated, it should be immediately removed to reduce the risk of fire. You should only hire experienced duct servicing personnel (qualified in the removal of both creosote and grease from flues and ducts) to perform the inspection and cleaning. You should adjust the inspection and cleaning schedule as needed to prevent the buildup of creosote and/or grease. If excessive buildup is found to occur between inspections, more frequent inspections and cleaning are needed. Increases in the rate of the creosote and grease accumulation can be caused by a change in the use of the oven, changes in the type or moisture content of the firewood that you are using, etc.
Clean the oven, exhaust hood, and grease filters on a daily basis. Grease filters can be removed and cleaned in a dishwasher or sink. For inspection, maintenance, and cleaning of the venting system, please refer to the NFPA 96 requirements and/or the manufacturer’s instructions for the exhaust hood or grease duct.
NEVER CLEAN OR INSPECT OVEN UNIT, HOOD, OR VENT WHILE THE OVEN IS BEING FIRED OR IS STILL HOT!
7. The entire unit and vent system should be inspected frequently to ensure proper fit, operation and sound-ness of parts. If there are malfunctioning parts, leakages, deterioration, or any other problems, contact Marra Forni to schedule a time to inspect and repair the unit. If there is a problem with the ventilation system, contact a qualified ventilation repair service to inspect and repair the system. IF THERE ARE ANY PROBLEMS DO NOT OPERATE THE UNIT. Only qualified personnel should perform any maintenance on this oven.
8. For solid fuel cooking, refer to NFPA 96 for proper inspection, cleaning and maintenance procedures. Save these instructions.
If you choose to burn both wood and gas, ensure that your wood is burned on the opposite side of the oven from the gas burner. WOOD AND GAS MUST NOT BE BURNED SIMULTANEOUSLY. Your main source of heat should be the gas burner, wood should be burned exclusively for flavoring and aesthetic value.
23
Guidelines for Oven Use

24
TO IGNITE OVEN (GAS)
DOOR MUST BE REMOVED BEFORE OPERATING OVEN
1. Turn On exhaust and make-up air blowers (if applicable).
2. Turn the service shut-off valve On.
3. Turn combination gas control knob to On.
4. Set thermostat to desired temperature setting (500 to 600 degrees Fahrenheit).
5. Turn on electrical switch. This generates a spark that ignites the gas at the main burner.
SHUTTING DOWN OVEN (GAS)
1. For TEMPORARY shut down, turn off electrical switch.
2. For COMPLETE shut down, turn combustion gas control knob to Off.
TO FIRE OVEN (WOOD)
1. Turn On exhaust fan and make-up blowers (if applicable).
2. Place a firestarter block on the hearth with a small amount of wood and kindling overtop. Light your fire-starter and be sure that you never use more than four pieces of wood.
CAUTION: FLAMMABLE LIQUIDS, SUCH AS GASOLINE-TYPE LANTERN FUEL, KEROSENE, CHARCOAL LIGHTER FLUID AND SIMILAR PRODUCTS SHOULD BE KEPT AWAY FROM THE OVEN WHEN IN USE AND NEVER USED TO START OR “FRESHEN UP” A FIRE.
3. Add larger pieces of firewood (WELL-SEASONED OR DRIED WOOD ONLY) when the kindling is burning well.
4. Maintain your desired heat rate by adding wood as needed, being careful to never over-fire the unit. Signs of over-firing include temperatures in excess of 1000°F and having flames spill out of the oven door.
25
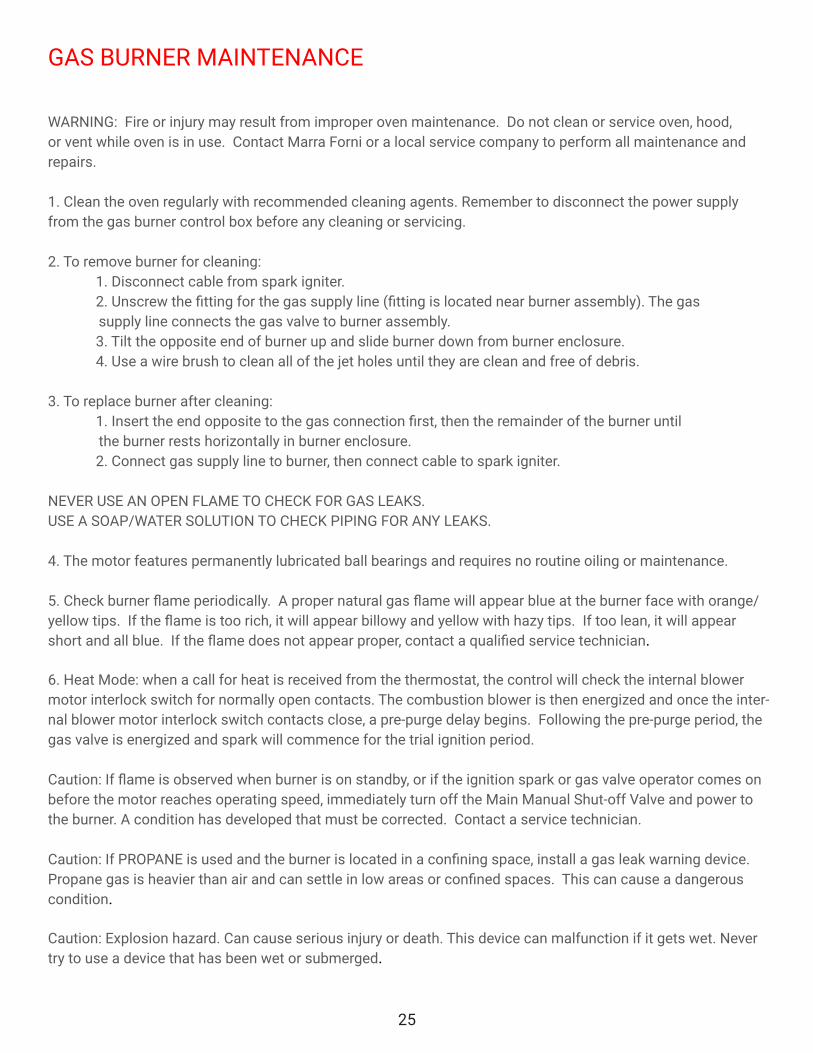
GAS BURNER MAINTENANCE
WARNING: Fire or injury may result from improper oven maintenance. Do not clean or service oven, hood, or vent while oven is in use. Contact Marra Forni or a local service company to perform all maintenance and repairs.
1. Clean the oven regularly with recommended cleaning agents. Remember to disconnect the power supply from the gas burner control box before any cleaning or servicing.
2. To remove burner for cleaning: 1. Disconnect cable from spark igniter. 2. Unscrew the fitting for the gas supply line (fitting is located near burner assembly). The gas supply line connects the gas valve to burner assembly. 3. Tilt the opposite end of burner up and slide burner down from burner enclosure. 4. Use a wire brush to clean all of the jet holes until they are clean and free of debris.
3. To replace burner after cleaning: 1. Insert the end opposite to the gas connection first, then the remainder of the burner until the burner rests horizontally in burner enclosure. 2. Connect gas supply line to burner, then connect cable to spark igniter.
NEVER USE AN OPEN FLAME TO CHECK FOR GAS LEAKS. USE A SOAP/WATER SOLUTION TO CHECK PIPING FOR ANY LEAKS.
4. The motor features permanently lubricated ball bearings and requires no routine oiling or maintenance.
5. Check burner flame periodically. A proper natural gas flame will appear blue at the burner face with orange/yellow tips. If the flame is too rich, it will appear billowy and yellow with hazy tips. If too lean, it will appear short and all blue. If the flame does not appear proper, contact a qualified service technician.
6. Heat Mode: when a call for heat is received from the thermostat, the control will check the internal blower motor interlock switch for normally open contacts. The combustion blower is then energized and once the inter-nal blower motor interlock switch contacts close, a pre-purge delay begins. Following the pre-purge period, the gas valve is energized and spark will commence for the trial ignition period.
Caution: If flame is observed when burner is on standby, or if the ignition spark or gas valve operator comes on before the motor reaches operating speed, immediately turn off the Main Manual Shut-off Valve and power to the burner. A condition has developed that must be corrected. Contact a service technician.
Caution: If PROPANE is used and the burner is located in a confining space, install a gas leak warning device. Propane gas is heavier than air and can settle in low areas or confined spaces. This can cause a dangerous condition.
Caution: Explosion hazard. Can cause serious injury or death. This device can malfunction if it gets wet. Never try to use a device that has been wet or submerged.
26
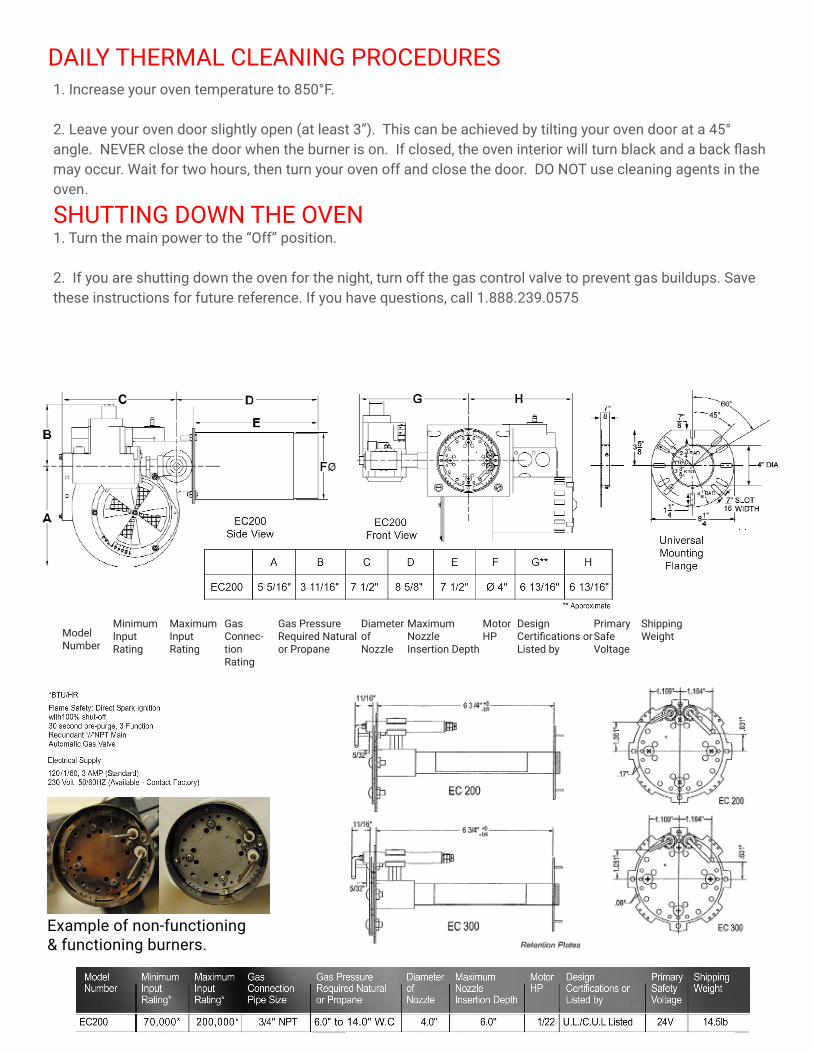
1. Increase your oven temperature to 850°F.
2. Leave your oven door slightly open (at least 3”). This can be achieved by tilting your oven door at a 45° angle. NEVER close the door when the burner is on. If closed, the oven interior will turn black and a back flash may occur. Wait for two hours, then turn your oven off and close the door. DO NOT use cleaning agents in the oven.
SHUTTING DOWN THE OVEN1. Turn the main power to the “Off” position.
2. If you are shutting down the oven for the night, turn off the gas control valve to prevent gas buildups. Save these instructions for future reference. If you have questions, call 1.888.239.0575
DAILY THERMAL CLEANING PROCEDURES
Example of non-functioning & functioning burners.
ModelNumber
MinimumInputRating
MaximumInputRating
Gas Connec-tionRating
Gas PressureRequired Naturalor Propane
Diameterof Nozzle
Maximum Nozzle Insertion Depth
MotorHP
Design Certifications orListed by
PrimarySafeVoltage
ShippingWeight

27
GAS BURNER SPECIFICATIONSGas ovens feature an EC200 gas burner that maximizes usable deck space with its compact design. The burner has an adjustable external air shutter with a visual indication of the air shutter position.
OVEN CARE & CLEANINGOven Floor: As needed, brush stray debris from the oven floor using a long-handled floor brush. If something spills on the floor of the oven, allow it to burn and dry up, then remove residue with the floor brush. Speed up drying by placing hot coals onto the spill. For the removal of fine particles (ex. flour, ash), wrap a warm, damp cloth around the brush head and briskly wipe the floor. Do not scrape the oven with metal tools. Sharp edges or corners will damage the oven.
For Stainless Steel Surfaces: The oven tools, mantle, door(s) and doorway must be cleaned using warm soapy water. Do not use abrasive metal scouring pads as they will scratch the stainless steel. Avoid the use of excess water when cleaning the face of the digital readout or oven controller.
Duct: Regular cleaning and maintenance of the exhaust system are necessary to prevent hood and/or duct fires. The frequency of inspection and cleaning will depend upon hours of use and type and moisture content of the wood used for fuel. Avoid flue fires by maintaining a set cleaning schedule.
Door: This is used for heat retention. Spread out the coals before putting the door in place.
GAS BURNER FULL SPECIFICATIONSBelow are the full factory specifications for the type of burner used on Marra ovens. This gas burner features a 3/4” NPT connection and is capable of 200,000 BTU/h output. It is UL and CUL listed, and works with both natural gas and propane models.
Note: If any of the original wire as supplied with the burner must be replaced, it must be replaced with a type TFF or its equivalent.
US
European Models Only
10”
220/240 volts 50/80 hz ****110

28
WIRING SCHEMATICS

29
BURNER DIAGRAM

30
Problem Solution1. The flame is blue. 1. Check to make sure that the shutter is closed. The
shutter should remain closed at all times. See Figure One.
2. The flame is stuck on “High” or “Low” setting. 2. Make sure the blue & black wires are connected to the gas valve. After you are sure that all wires are properly connected, test the temp. control dial.
3. The burner shuts itself off. 3. Check the low flame. See Figure 2 for details on how to do this. You may need to adjust the low flame regulator.
4. The burner will not light, and there is no flame in the oven.
4. Is the gas in the oven turned on? Turn the oven off, and then on again to reset. Make sure that the combination gas valve is turned ON.
5. The control box will not turn on. 5. This means that no power is connected to the oven. Check for blown fuses on the back of the control box. If the control box still does not turn on, please contact a Marra Forni representative.
6. The display reads “Open.” 6. Make sure that the Thermocouple is plugged into the control box.
7. The display reads “Open.” 7. Adjust the high and low flame regulators.
8. The spark igniter does not work. 8. Light the end of a piece of paper on fire and hold over the burner to light the oven. Use this process to light the oven until you are able to call Marra Forni and be issued a replacement burner.
Figure 1.Shutter is set to 2.5. Figure 2. Regulators H
igh
Flam
e
Lo
w F
lam
e
Low
High
TROUBLESHOOTING

TROUBLE CHART AND RECOMMENDATIONS
TESTING THE GAS SUPPLY SYSTEM
Make sure prior turning the oven on, that the gas supply pressure is above or equal to 0.35 Psi (10 WC) and do not ex-ceed 0.5 Psi (14 WC),
NOTE: ELECTRICAL AND FLAME CHECKS MUST BE MADE IN ORDER LISTED.
1. Check status of electronic burner control diagnostic indictor LED, (refer to IGNITION CONTROL TROUBLESHOOT-ING FLOWCHART)
2. Confirm that both main manual shut off valve and manual gas cock knob on combination gas valve is in the ON position. Make sure that the thermostat, operating controls and safety controls are calling for heat. Defective wiring or loose connections can simulate malfunctioning components: or any of the conditions below. Check associated wiring and connectors before replacing a component. Whenever the burner fails to light during the seven second trial for ignition, or if the flame is lost during the burner run cycle and not re-established within 37 seconds (30 second pre-purge), the electronic burner control will shut OFF the combination gas valve and lockout the burner. To reset, the burner turn OFF the main knob (switch) on the front of the control, wait 10 seconds and turn knob (switch) ON. Navigate to MANUAL MODE and turn the burner ON. Note; (Have the Set Point 20 de-grees above the oven temperature. If the oven temperature is 30 degrees above the Set Point the burner will not turn ON) Not recommended for ground-fault circuit-interrupter (GFCI) 125-volt, single-phase, 15- and 20-am-pere receptacle. Electronic burner ignition systems are prone to nuisance tripping and possible ignition failure.
3. Confirm that Oven is properly grounded. (Appliances equipped with a flexible electric supply cord are provided with a three prong grounding plug. It is imperative that this plug be connected into a properly grounded three prong receptacle (recommended dedicated ground). If the receptacle is not the proper grounding type, contact an electrician. Do not remove the grounding prong from this plug)
4. Verify L1 and L2 are not reversed. L1 and L2 are not reversed.
5. Verify there is no voltage present between L2 (White wire) and Ground (Green wire)
6. Blower motor should now be ON. If ON, proceed to step 7. If not ON: Confirm that L1 HOT power is present at BLOWER (ORANGE) wires at the electronic burner control
7. After 30 second blower motor pre-purge, confirm 24V power at GND (24V) terminal on electronic burner control and Ground. If power is not present, replace electronic burner control. NOTE: After the 30 seconds pre-purge period, the controller will simultaneously energize the gas valve and send power to the spark rod, causing an ignition spark at the end of the rod. CAUTION: Spark generating circuit is HIGH VOLTAGE! If an ignition spark is not present at the tip of the spark rod, turn the power supply OFF. Inspect Burner surface for debris and carbon buildup: (If debris and carbon buildup are detected on the burner surface, clean Flame Rod Assembly and Spark Rod Assembly). Inspect ignition wire/connectors, spark rod, spark rod positioning, spark rod gap and spark rod ceramic insulator. Adjust, repair or replace as necessary. If an ignition spark is still not present, perform a spark test on the electronic burner control per the electronic burner control manufacturers’ recommendations. If spark test fails, replace electronic burner control.
8. Once ignition spark is present, main flame should be present. If not present. Confirm that there is no air in gas line. If so, purge air from gas line. Confirm that 24V power is being delivered to the gas valve (GND (24V) and VALVE on electronic burner control)
9. Check for adequate fame current signal strength with an electrical meter.
31

IGNITION CONTROL TROUBLESHOOTING FLOWCHART
Turn OFF Manual Override toggle switch(s) on the left side of the motor box.
Note: Carbon builds up inside of the dome.
Check that the right gas is being used. Make sure Air Shutter Assembly is open to the manufacture recommen-dation. Clean the Inlet Ring and Air Screen. If using propane have to clear the carbon buildup run oven at 850F for three hours.
Temperature exceeding 30F above the set point: Adjust low flame setting for the temperature to drop down 1 degree for every 30 seconds.
32
33
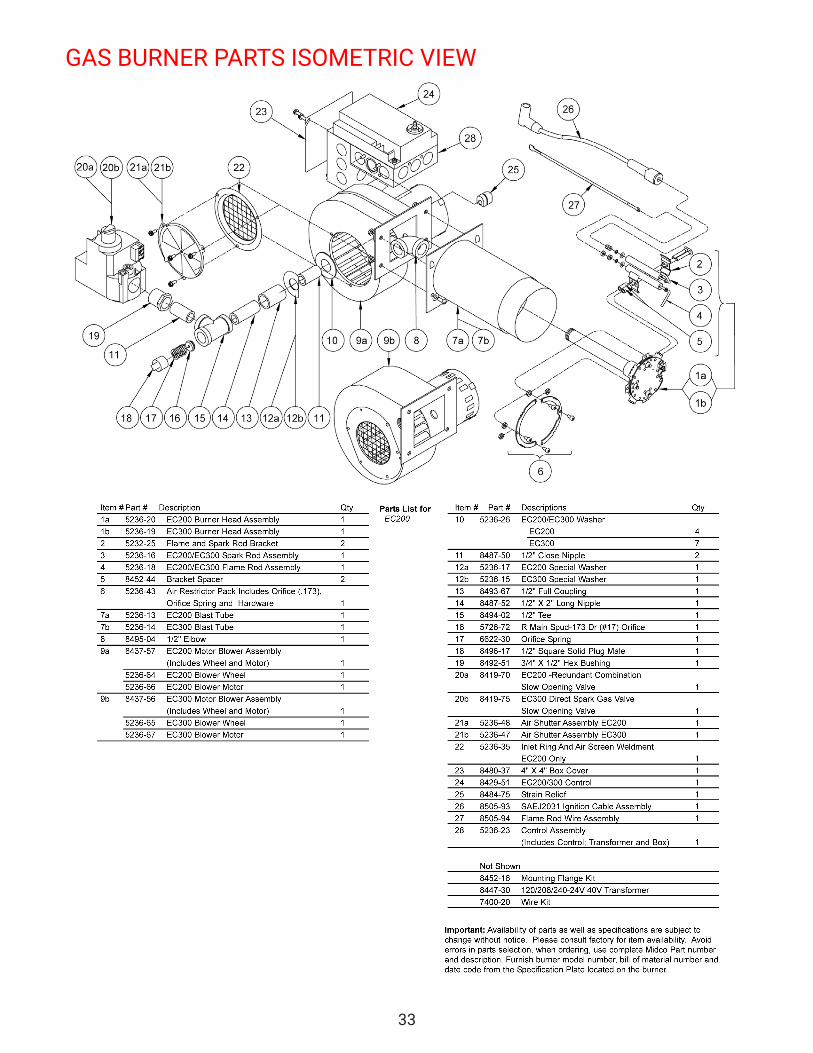
GAS BURNER PARTS ISOMETRIC VIEW

34
OVEN FAN GSV 009-016DescriptionExhaust fan for installation at the chimney terminationpoint, vertically or as side-wall venting. Assures anegative pressure in the entire chimney or stack system.Discharges vertically (horizontally if side-wall venting)at a high velocity. The fan housing is hinged and the top can be opened for easy service/access to stack.
MaterialThe housing is made of cast aluminum with athickness of 3/16” and is corrosion resistant. One coat of gray hammerpaint finish is applied.Axial vanes in stainless steel, dynamically and statically balanced to assure low noise levels andvibration-free operation.
MotorIt features a split capacitor motor which is totally enclosed. Class H insulated, IP54 Protection Class. Sealed ball bearings. Variable Speed. Thermal overload protection.
Standard Equipment2”x4” or 4”x4” junction box with cover and conduit Bird Screen
Optional Equipment5amp or 8amp fan speed control. Gasket.Fan proving switch.
ListingsETL listed to:UL705 - Standard for Power VentilatorsUL762 - Standard for Power Roof Ventilators for Restaurant Exhaust AppliancesULC-S645-93 - Standard for Power Roof Ventilators and Commercial/Institutional Kitchen Exhaust Systems
ApprovalsCE Compliant
Warranty2 year factory warranty on the entire fan10 year warranty against corrosion perforationManufactured at an ISO9001 certified plant

35
Product Information
EXHAUSTO Inc.1200 Northmeadow Pkwy.Suite 180Roswell, GA 30076
P: 770.587.3238F: 770.587.4731T: [email protected]
3922001 02.01
V E N T I N G D E S I G N S O L U T I O N S
Specifications
a Top Sectionb Bottom Sectionc Motord Axial Vanee Inlet for Axial Vanef Locking Hingeg Bird Screenh Carrying Handlei Wiring Conduit
Sound Diagram
Capacity Plume Height
�
�
�
�
Model GSV 009 GSV 012 GSV 014 GSV 016Discharge VerticalFan Type Axial VaneMax. Discharge Velocity FPM 2,351 2,592 2,593 2,169Actual Discharge Velocity FPM 5.9 x CFM 2.9 x CFM 1.9 x CFM 1.2 x CFMVoltage V AC 1 x 120RPM 1600Amps A 0.5 1.4 2.9 5.8Power Ratings kW 0.025 0.10 0.16 0.35Weight lbs 28 46 60 86
kg 12 18 26 35Dimensions A in 9.85 11.03 13.20 14.97
mm 250 280 335 380B x B in 12.21 15.37 19.11 22.85
mm 310 390 485 580C x C in 9.46 12.22 15.17 18.32
mm 240 310 385 465D Ø in 8.63 10.72 13.04 14.26
mm 219 272 331 362E in 2.76 3.15 3.94 4.53
mm 70 80 100 115Temperature Rating Interm. 575°F/300°C
Cont. 482°F/250°CMotor Starter Required No No No NoVariable Speed Motor Yes Yes Yes Yes
Model Lw dB (measured in accordance with ISO 3744) Lp dB(A)125Hz 250Hz 500Hz 1000Hz 2000Hz 4000Hz 8000Hz
GSV 009 57 55 54 49 40 35 26 26GSV 012 64 62 61 55 51 46 40 33GSV 014 71 70 68 61 56 50 44 40GSV 016 76 76 70 65 60 55 49 44
OVEN FAN GSV 009-016 Specifications

36
UL, CSA, ETL & CE FACT SHEET Marra Forni products that feature these logos meet rigorous standards for electrical safety and electromag-netic emissions. The acronyms are as follows:
UL: Underwriters Laboratories, Inc.CSA: Canadian Standards AssociationETL: Formerly ETL Testing Laboratories, now Intertek Testing ServicesCE: Conformance European
Underwriters Laboratories, Inc. is an independent nonprofit organization that tests products for safety and certifies them. UL has developed more than 800 standards for safety, and millions of products and their com-ponents are tested to UL’s safety standards. If a Marra Forni product is UL listed, you know it has passed UL’s stringent tests for electrical safety. UL’s web site can be found at http://www.ul.com.
The Canadian Standards Association is a nonprofit association serving business, industry, government and consumers in Canada as well as the global marketplace. Along with their other duties, CSA develops stan-dards that enhance public safety. A Nationally Recognized Testing Laboratory (NRTL), CSA also familiarizes themselves with U.S. requirements. According to OSHA regulations, the CSA-US mark qualifies as an alterna-tive to the UL mark. The ETL mark is an alternative to both the CSA and UL marks.
Intertek Testing Services, formerly known as ETL, has been conducting electrical performance and reliability tests since 1896. Intertek Testing Services acquired ETL in 1996. ITS is recognized by OSHA as a Nationally Recognized Testing Laboratory, just like UL, CSA and several other independent organizations. ITS tests prod-ucts according to nearly 200 safety and performance standards. The ETL listed mark and C-ETL listed mark are accepted throughout the U.S. and Canada when denoting compliance with nationally recognized standards such as ANSI, IEC, UL and CSA. This mark indicates that the product has been tested to and has met the mini-mum requirements of a widely recognized (concensus) U.S. product safety standard, that the manufacturing site has been audited, and that the applicant has agreed to a program of periodic factory follow-up inspections to verify continued conformance. If the mark includes a small “US” or “C,” it follows product safety standards of the United States and/or Canada, respectively.
The European Commission describes the CE mark as a “passport” that allows manufacturers to circulate in-dustrial products freely within the internal market of the European Union. The CE mark certifies that the prod-ucts have met E.U. health, safety and environmental requirements that ensure workplace and consumer safety. All manufacturers in the E.U. and abroad must affix the CE mark to those products covered by the “New Ap-proach” directives in order to market their products in Europe. Once a product receives the CE mark, it can be marketed throughout the E.U. without undergoing further modification. An important document related to CE is the Declaration of Conformity (DOC). It is a statement that a company authority must sign to say that their device meets the requirements of the directive. The DOC must include a list of any standards used to justify the claim of compliance with the directive.
If a Marra Forni product is stamped “CE,” the product does not emit excessive radiation (microwave or RF), and is not overly sensitive to picking up radiation. In summary, the certification marks on our products are your assurance that the product meets rigorous standards for electrical safety and electromagnetic emissions. It poses no shock hazard (except as noted on the product or manual), and it will not cause EM interference with other devices beyond a certain distance.

Ten Things That Make Us Great
1. Our Italian-style prep tables are drafted by designers who understand the needs of Neapolitan pizza mak-ers and have taken care to organize the space to meet those specifications.
2. All of our ovens are produced and fully assembled in the United States. They are not shipped in loose pieces and then assembled in the United States.
3. Our decks do not crack. Many brick oven owners know that at some point their deck will crack and require costly repairs or replacement (customers will not be pleased to bite down on a pebble of cement during their meal). Marra Forni uses refractory bricks that allow for expansion and contraction during the frequent temperature shifts which happen thousands of times over the life of the oven.
4. Our ovens are some of the lightest weight brick ovens in the industry, yet do not sacrifice quality. Many people never take weight load into consideration, but a lighter oven allows for greater flexibility when looking into leasing a new space.
5. Our products are preferred by professionals as well as teachers of the industry, including but not limited to Verace Pizza Neapolitana, all of the American Pizza Team, Whole Foods, and the Tony Gemignani School of Pizza.
6. Marra Forni forked dough mixers “fold” the dough rather than mixing it. This prevents the dough from becoming heated from the friction of being mixed, guaranteeing you a “cleaner” dough and a fresher-tasting end result. Let your oven cook your dough, not the mixer!
7. Our company is based in the United States and we stock all of our units, which means a faster ship time for our customers.
8. We offer our clients the option to fully customize the outside of their oven with an endless variety of tile colors and textures. We can even apply patterns, or the name of your restaurant on the front of your oven. With Marra Forni, your oven is more than just an appliance, it is a work of art.
9. Unprecedented technological advances enable our curing cases to boast “One Touch” salami making. Our Stagionello and Maturmeat curing cases are unmatched for their hygiene, speed and authentic pre-pro-grammed recipes that allow you to broadly expand your culinary offerings.
10. We offer a wide variety of oven sizes and styles. Every kitchen deserves to reap the benefits of wood fired oven ownership, which is why we strive to design ovens that accommodate any volume of pizzamak-ing.


39
This is to Certify that Marra Forni products have been received by:
__________________________________________________________
Located at:
__________________________________________________________
Date of Receipt:
__________________________________________________________
Product Serial Number(s):
__________________________________________________________
Description of Equipment
______________________________________________________________________________________________________________________________________________________________________________
Thank you for choosing that Marra Forni line to fulfill your restaurant equipment needs. Please return this warranty registration form within 30 days of receipt of purchase. If you have any questions, please contact us during regular business hours ( 9am to 5pm, Monday through Friday) at 888.239.0575.
1 Year Limited Warranty Registration Complete this form and return it to Marra Forni within 30 days of receipt of purchase.

10310 Southard Drive I Beltsville, MD 20705 I www.marraforni.com I 888.239.0575 Updated April 2017