
OWNER’S MANUAL - Baja S MANUAL WD250UR / WD250U ATV REV. B 022108 WD250U CAMO WD250UR RED II...
82
Always wear a helmet; It could save your Life! Do not remove this operator’s manual from this vehicle. Please obtain, review, and follow provincial / municipal government acts and regulations pertaining to owning and operating an off-road vehicle. Minimum Age Requirement 16 Read this manual carefully. It contains important safety information. No one under the age of 16 should operate this ATV OWNER’S MANUAL WD250UR / WD250U ATV REV. B 022108 WD250U CAMO WD250UR RED
Transcript of OWNER’S MANUAL - Baja S MANUAL WD250UR / WD250U ATV REV. B 022108 WD250U CAMO WD250UR RED II...

Always wear a helmet; It could save your Life!
Do not remove this operator’s manual from this vehicle.Please obtain, review, and follow provincial / municipal government acts and regulations pertaining to owning and operating an off-road vehicle.
Minimum Age Requirement 16
Read this manual carefully. It contains important safety information.No one under the age of 16 should operate this ATV
OWNER’S MANUAL
WD250UR / WD250U ATV
REV. B022108
WD250UCAMO
WD250URRED

II
Congratulations on your purchase of the Baja Motorsports WD250UR / WD250U ATV.
Congratulations on your purchase of the WD250UR / WD250U ATV. The period of warranty for the vehicle shall be 90 days from the date of purchase and the warranty covers the manufacturer’s faulty workmanship and materials. During the warranty period BAJA, INC. will at its option, repair, provide replacement parts or replace your Baja Motorsports 250cc ATV at no charge. This warranty does not cover normal wear items or damage caused by neglect or misuse of the product.
Engine Warranty – 90 daysFrame Warranty – 90 days
Warranty is void if:
Frame is bent or broken due to abuse.Wheels are bent or broken.Fender bent or broken due to abuse.Any sign of impact, accident, jumping, spin-outs or roll over.
BAJA MOTORSPORTS INC. is not liable for any damage claim or liability claim personal or otherwise resulting from the operation of this product in any way.
Should you experience a problem or need to return your Baja Motorsports 250cc ATV for repair, please call the BAJA MOTORSPORTS customer service department TOLL FREE at 1-866-250-7155 between the house of 7am and 5pm
Monday thru Friday PST. You will be instructed how to proceed.
A COPY OF THE SALES RECEIPT IS REQUIRED.
III
This manual should be considered as a permanent part of the vehicle and should remain with the
vehicle when resold or otherwise transferred to a new user or operator. The manual contains important safety information and instructions
which should be read carefully before operating the vehicle.
WARNING
The engine exhaust from this product contains chemicals known to the State of California to cause
cancer, birth defects or other reproductive harm.
CALIFORNIA PROPOSITION 65
!
WARNING!

1
IMPORTANT ...................................................................................................................... 2FOREWORD ...................................................................................................................... 3NOTICE TO THE USER ..................................................................................................... 3BAJA WD250UR / WD250U ATV ...................................................................................... 7FUEL AND OIL ................................................................................................................... 8LOCATION OF LABELS .................................................................................................... 9INDICATOR LIGHTS AND MAIN KEY SWITCH ASSEM.(W/ Speedometer) .................. 11HANDLEBAR & SWITCH .................................................................................................. 12
LEFT HANDLEBAR .................................................................................................. 12RIGHT HANDLEBAR ................................................................................................ 13REAR FOOT BRAKE ................................................................................................ 13FUEL VALVE ............................................................................................................. 14FUEL TANK CAP ...................................................................................................... 14SEAT LOCK .............................................................................................................. 1512V UTILITY SOCKET .............................................................................................. 16
RIDING YOUR ATV ............................................................................................................ 17BEFORE RIDING ...................................................................................................... 17INSPECTION BEFORE RIDING ............................................................................... 18SAFETY GEAR ......................................................................................................... 20BREAK-IN ................................................................................................................. 21STARTING THE ENGINE .......................................................................................... 22STARTING OFF ........................................................................................................ 26SHIFTING .................................................................................................................. 27 BRAKING .................................................................................................................. 29TURNING .................................................................................................................. 30SKIDDING OR SLIDING ........................................................................................... 31OPERATION ON HILLS ............................................................................................ 31RIDING OVER OBSTACLES .................................................................................... 35RIDING THROUGH WATER ..................................................................................... 36RIDING IN COLD WEATHER.................................................................................... 37RIDING ON SNOW OR ICE ...................................................................................... 39
ACCESSORY USE AND VEHICLE LOADING .................................................................. 40
Table of Contents

2
VEHICLE WEIGHT LIMITS ................................................................................................ 41 INSPECTION AND MAINTENANCE ................................................................................. 42
TOOLS ...................................................................................................................... 44SPARK PLUG ........................................................................................................... 44BATTERY INSTALLATION ....................................................................................... 46FUSE REPLACEMENT ............................................................................................. 50HEADLIGHT/TAILLIGHT REPLACEMENT .............................................................. 50THROTTLE LEVER ADJUSTMENT ......................................................................... 51IDLE SPEED ADJUSTMENT .................................................................................... 52FUEL HOSE .............................................................................................................. 52ENGINE OIL/OIL STRAINER/OIL FILTER ............................................................... 53AIR FILTER ............................................................................................................... 55CLUTCH ADJUSTMENT ........................................................................................... 57REAR GEAR CASE LUBRICATION ......................................................................... 58TIRES ........................................................................................................................ 59BRAKES .................................................................................................................... 61HYDRAULIC FRONT BRAKES ............................................................................... 61REAR DRUM BRAKE .............................................................................................. 62MUFFLER/ SPARK ARRESTER ............................................................................... 64GENERAL LUBRICATION ........................................................................................ 66
TROUBLESHOOTING ....................................................................................................... 67TRANSPORTING ............................................................................................................... 69CLEANING PROCEDURE ................................................................................................. 70STORAGE PROCEDURE .................................................................................................. 72SERIAL NUMBER LOCATION .......................................................................................... 73SPECIFICATIONS .............................................................................................................. 74EMISSION CONTROL CYCTEM WARRANTY ................................................................. 76
Table of Contents

3
Please read this manual and follow all instructions carefully. To emphasize the special information, the symbol and the words WARNING or CAUTION have some special meanings. Pay great attention to the messages.
NOTE: Indicates special information which is to make maintenance easier or instructions clearer.
WARNING and CAUTION are arranged like this:
This user’s manual contains important safety and maintenance information. Read it carefully before riding. Failing to follow the warnings contained in this manual could result in INJURY or DEATH.
It is important that this manual remain with the vehicle when you transfer it to another user or owner.
All information, illustrations, photographs and specifications contained in this manual are based on the latest product information available at the time of publication. Due to improvements or other changes, there will be some discrepancies in this manual. We reserve the right to make product changes at any time, without notice and without incurring any obligation to make the same or similar changes to the vehicles previously built or sold.
WARNING-or-CAUTION
The first part will identify a POTENTIAL HAZARD.The second part will describe WHAT COULD HAPPEN if you ignore the WARNING or CAUTION.The third part will describe HOW TO AVOID THE HAZARD.
CAUTIONIndicates a potential hazard that could result in vehicle damage.
WARNINGIndicates a potential hazard that could result in death or injury.

4
We believe in conservation and protection of the earth’s natural resources. We encourage every vehicle owner and operator to do the same by obeying posted signs and riding only in areas designated and approved for off-road recreational use.
NOTICE TO USERS
THIS ATV IS NOT A TOY. IT COULD BE HAZARDOUS TO THE OPERATOR. An ATV is different from other vehicles including motorcycles and cars. A collision or rollover could occur quickly, even during routine maneuvers such as turning and driving on hills or over obstacles if you fail to take proper precautions.
· Read this manual and labels on the ATV carefully and follow the operations procedures as described.
· Never operate the ATV without proper instruction. Take a training course. Beginners should be trained by a licensed instructor. Always follow the age recommendations
· Never carry a passenger on an ATV.
· Always avoid operating an ATV on paved surfaces, including: sidewalks, paths, parking lots, driveways, streets, roads, and highways. Never operate this or any ATV on a public street, road or highway where motor vehicles are in operation.
· Never operate an ATV without wearing a DOT approved motorcycle helmet which fits properly. Operators should also wear eye protection (goggles or face shield), gloves, boots, long-sleeved shirt or jacket, and long pants.
WARNINGSEVER INJURY OR DEATH can result if you do not follow these instructions.

5
· Never operate this ATV at excessive speeds. Always operate at a speed that is proper for the terrain, visibility, operating conditions, and the operator’s skill / experience.
· Never attempt wheelies, jumps, or other stunts.
· Always inspect the ATV each time before use to ensure it is in a safe operating condition. Always follow the inspection and maintenance procedures and schedule described in this manual.
· Always keep both hands on the handlebar and both feet on the footrests of the ATV during operation.
· Always go slowly and be extremely careful when operating on unfamiliar terrain. Always be alert to the changing terrain conditions when operating the ATV.
· Never operate on excessively rough, slippery or loose terrain until you have learned and practiced the necessary skills to control the ATV on such terrain.
· Always follow proper procedures for turning as described in this manual. Practice turning at low speeds before attempting to turn at faster speeds. Do not turn at excessive speeds.
· Never operate the ATV on hills that are too steep for the ATV or for the operator’s ability. Practice on smaller hills before attempting larger hills.
· Always follow the proper procedures for climbing hills as described in this manual. Check the terrain carefully before you start up any hill. Never climb hills with excessively slippery or loose surfaces. Shift your weight forward. Never open the throttle suddenly. Never go over the top of a hill at high speeds.
· Always follow proper procedures for going down hills as described in this manual. Check the terrain carefully before starting to go down any hill. Shift your weight backward. Never go down a hill at an angle that would cause the vehicle to lean sharply to one side. Go straight down the hill if possible.
· Always follow proper procedures for crossing the side of a hill as described in this manual. Avoid operation on hills with excessively slippery or loose surfaces. Shift your weight to the uphill side of the ATV. Never attempt to turn the ATV around on any hill until you have mastered the turning technique described in this manual on level ground. Avoid crossing the side of a steep hill if possible.

6
· Always use proper procedures if you stall or roll backwards when climbing a hill. To avoid stalling, maintain a steady speed when climbing a hill. If you stall or roll backwards, follow the special procedure for braking described in this manual. Dismount on the uphill side or to a side if pointed straight to uphill. Turn the ATV around and remount, following the procedure described in this manual.
· Always check for obstacles before operating in a new area. Never attempt to operate over large obstacles, such as large rocks or fallen trees. Always follow proper procedures when operating over obstacles as described in this manual.
· Always be careful when skidding or sliding. Learn to safely control skidding or sliding by practicing at low speeds and on level, smooth terrain. On extremely slippery surfaces, such as ice, go slowly and be very cautious in order to avoid going out of control when skidding or sliding.
· Never operate an ATV in fast flowing water or in water deeper than that specified in this manual. Remember that wet brakes can reduce stopping ability. Test your brakes after leaving water. If necessary, apply them for several times to let friction linings dry out.
· Always use the tires with proper size and type tires specified in this manual. Always maintain proper tire pressure as described in this manual.
· Never modify an ATV through improper installation of accessories.
· Never exceed the stated load capacity for an ATV. Cargo should be distributed properly and attached securely. Reduce speed and follow instructions in this manual for carrying cargo. Allow longer distance for breaking.
· Never ride drive the vehicle at night with night defined as the period of time 30 minutes before sunset to 30 minutes after sunrise.
· The combined weight of the rider and any accessories or cargo plus the vertical weight on trailer hitch must never exceed the vehicle’s load capacity of 165 Kg (364 lbs.)

7
WD250UR / WD250U
RIGHT
LEFT
Rear wheel
Manual pull start
Drive select lever
Taillight
Gear shift lever
Front wheel
Front rackRear rack
Mirrors
SeatGas cap
Control panel
Front shocks
Foot brakeOill fill cap/dipstick
Rear shock

8
FUEL AND OIL
FUELProper fuel is very important for the engine. Ensure there is no dust, dirt, or water which has mixed in the fuel. Use regular unleaded gasoline.
ENGINE OILYour 250cc ATV has a four-stroke engine. Please use oil as described in the chart below. By using the prescribed oil, you will realize the best lubrication for the engine.
Use the chart to select a viscosity rating based on the temperature range in your area.
NOTE: In very cold weather (below 5°F (-15°C), use SAE10W-50 for good starting and smooth operation.
SAE 10W-30
SAE 10W-40 10W-50ENGINE
TEMP.°C
°F
-30
-22
40
104
-20
-4
-10
14
0
32
10
50
20
68
30
86

9
LOCATION OF WARNING LABELSRead and follow all of the warnings labels on your ATV. Make sure you understand all the labels. Keep the labels on the ATV. Do not remove them for any reason. If a label comes off or becomes difficult to read, you should get a replacement by contacting Baja Motorsports.
2-
WARNINGUNDER
16Operation of the ATV by children under
the age of 16 increases the risk of severeinjury or death.
NEVER permit children under age 16 to operate this ATV.
WARNING
NEVER ride as a passenger.Passenger can cause a lossof control, resulting inSEVERE INJURY or DEATH.
Improper ATV use can result in SEVERE INJURY or DEATH
ALWAYS USE ANAPPROVED HELMETAND PROTECTIVE
GEAR
NEVER OPERATE :
another vehicle.
ALWAYS :
NEVER USEON PUBLIC
ROADS
NEVER CARRYPASSENGERS
NEVER USEWITH DRUGSOR ALCOHOL
Without proper training or instruction.At speeds too fast for your skills or the condition.On public roads, a collision can occur with
With passenger-passengers affect balance and steering and increase risk of losing control.
Use proper riding techniques to avoid vehicleoverturns on hills and rough terrain and in turns.Avoid paved surfaces-pavement may seriously affecthandling and control.
LOCATE AND READ OWNER’S MANUAL CAREFULLY BEFORE OPERATING.FOLLOW ALL INSTRUCTIONS AND WARNINGS.
WARNING
Read owner’s manual carefully before operating. ATV MUST be stopped and be in first gear before shifting the drive select lever into or from reverse.
GEAR SHIFT Pattern DRIVE SELECT LEVER
54321N
1-
3-
4-
1
4
67
9
3
2
10
8
5

10
LOADINGdislodge from the rim.
Maximum vehicle capacity is: 165Kg (364 lbs.)
Maximum capacity includes the weight of the operator, cargo, and accessories plus the veritcalweight on trailer hitch.
WARNING IMPROPER TIRE PRESSURE OR
OVERLOADING CAN CAUSE LOSS OF CONTROL.
LOSS OF CONTROL CAN RESULT IN SEVERE INJURY OR DEATH.
COLD TIRE PRESSURE:Recommended: Minimum Front: 17kpa (2.5psi)
Maximum Front: 23kpa (3.3psi)
Never set tire pressure below the recommended level. It could cause the tire to
Minimum Rear: 22kpa (3.2psi)Maximum Rear: 28kpa (4psi)
WARNINGLOAD LIMIT30kg (66lbs) NEVER sit here
WARNINGLOAD LIMIT45kg (99lbs) NEVER sit here
SHIFTING INTO OR FROM REVERSE CAN ONLY BE DONE IN FIRST GEAR. YOU MUST COME TO A COMPLETE STOP BEFORE SHIFTING INTO OR FROM REVERSE.
WARNING
CAUTION· Accessories connected to utility socket should not exceed 100 watts.· Make sure accessories are firmly plugged in utility socket before use. · Using utility socket more than 10 minutes, without engine running, will drain battery.
WARNING!
THIS VEHICLE IS AN ALL-TERRAIN VEHICLE AND IS NOT INTENDED FOR USE ON PUBLIC HIGHWAYS
5-
6-
7-
8-
9-
10-

11
1. Speedometer Indicates speed of ATV
2. Odometer Indicates total mileage driven.
3. Reverse indicator Illuminates when ATV is in reverse.
4. Km/h indicator Illuminates when speedometer is in Km/h
5. High beam indicator Illuminates when high beam is on.
6. Lights indicator Illuminates when headlights or taillights are on.
7. M/h (mph) indicator Illuminates when speedometer is in M/h.
8. Neutral indicator Illuminates when ATV is in Neutral.
9. Km/h - M/h (mph) toggle button Depressing Button toggles between Km/h and M/h
10. Ignition key switch Turn right (CW) “ON”, Turn left (CCW) “OFF”. ATV will only start when ignition key is turned to the “ON” Position Make sure ignition key switch is in the “OFF” position when not in use.
SPEEDOMETER, INDICATOR LIGHTS AND MAIN KEY SWITCH
3
1
2
46
7
8
10
5
9

12
1 - Engine Stop Switch With the Engine stop switch in the “OFF” position the engine cannot be started. With the Engine stop in the “RUN” position the engine can be started.
2 - Rear brake lever Rear brake is applied by squeezing the rear brake lever towards the grip.
3 - Electric start button Depressing the electric start button will start the engine while the Ignition Key Switch is in the “ON” and Engine Stop Switch is in the “RUN” position.
4 - Light switch. There are 3 positions on the light switch: “OFF”, “Daytime running lights” and “Headlights”.
5 - High beam / low beam switch.
6 - Parking Brake Lock. While starting the engine or parking the machine, especially on a slope, apply the parking brake by squeezing the rear brake lever and pushing down the Parking Brake Lock.
7 - Manual Choke Lever. When engine is cold, place the choke lever to the ON position. When engine has warmed up, place lever back to the OFF position.
LEFT HANDLEBAR SWITCHES: REAR BRAKE LEVER AND PARKING BRAKE LOCK
6
2
1
3
4
7Choke lever
ON OFF
5

13
RIGHT HANDLEBAR: FRONT BRAKE LEVER AND THUMB THROTTLE
Rear foot brake
REAR FOOT BRAKEFoot brake Located on the right hand side of the ATV. Foot brake stops the rear wheels.
2
1
4
3
5
1 - Throttle lever Controls engine and ATV speed. Operate this lever with your thumb. Push it forward to increase engine and ATV speed. Release it to decrease engine and ATV speed.
2- Front brake lever Squeeze lever toward hand grip to apply front brakes.
3- Speed limiter screw The speed limiter keeps the throttle from fully opening, even when the throttle is pushed to the maximum. Turning the speed limiter screw clockwise limits the maximum engine power available and decreases the maximum speed. Adjust this limiter screw according to the rider’s skill and experience.
4 - Brake fluid reservoir Use DOT3 or DOT4 brake fluid. Do not mix brake fluid types.
5 - Front brake adjustment screw

14
Fuel levelFiller neck
FUEL VALVEThis vehicle has one manually operated fuel valve. There are 3 positions
“ON” “OFF” “RESERVE”
“ON” position In this position, fuel is allowed to flow into the carburetor when the engine is running or being started.
“OFF” position In this position the fuel is shut off from the carburetor. The fuel valve needs to be placed in this position when the ATV is not in use
“RESERVE” position If the fuel level in the fuel tank becomes to low for the engine to stay running while the fuel valve is in the “ON” position, turn the fuel valve to “RESERVE”. This will allow the engine to begin using the reserve fuel supply. You will need to re-fuel as soon as possible. Once re-fueled, turn the valve back to the “ON “ Position .
FUEL TANK CAPTo open the fuel tank cap, take the end of the vent tube out from the vehicle body; turn the fuel tank cap counterclockwise. To close the fuel tank cap, turn it clockwise and tighten it securely. Be sure that the vent tube is securely connected to the cap as shown.

15
SEAT LOCKTo remove the seat, move the seat lock lever backward. Raise the rear end of the seat and slide it back.
To lock the seat, slide the seat lever into its retainer and push the seat down firmly.
WARNING
Overfilling the fuel tank could be hazardous.
If you overfill the fuel tank, fuel may overflow when it expands. Expanding is due to heat from engine or sun. Overheated fuel could easily catch fire.
Stop adding fuel when the fuel level reaches the bottom of the filler neck.
WARNING
Improper fueling of the ATV could be hazardous.
Failing to follow safety precautions when refueling could result in a fire or let you to breathe toxic fumes.
Refuel in a well ventilated area. Make sure the engine is off and avoid spilling fuel on a hot engine. Do not smoke, and make sure there are no open flames or sparks in the area. Avoid breathing gasoline vapors. Keep children and pets away when you are refueling the ATV.
WARNING
Improperly installing the seat could be hazardous.
Failing to install the seat properly could allow the seat to move and cause the rider to lose control.
Make sure seat is in proper position and attached securely when you install it.

16
12V Utility Socket
CAUTIONUsing Accessories with wattage requirements over 100 watts could damage ATV
Using Accessories with wattage requirements over 100 watts could cause wiring and electrical components to overheat causing failure.
Check accessory wattage requirements before plugging in to 12V electrical socket.
12V Utility socket Use:
1. Remove 12V utility socket accessory cap.2. Plug in accessory making sure plug is pushed all the way in socket.Note: Do not use accessory more than 10 minutes without engine running, doing so will drain battery. 3. After use, make sure cap is placed back on socket.

17
RIDING YOUR ATVWHAT YOU SHOULD KNOW BEFORE RIDINGBefore riding, you should read all the following information carefully. If you are properly prepared, you will have a more enjoyable ride.
Before riding, you should find a good place to practice the skills. Find a flat, open area with enough space to practice the new skills.
Make sure that it is legal to ride in the area you selected. Review the local laws and make sure you are not trespassing. Call the police if you don’t know where you can ride.
Protect your riding areas. When you are riding, remember to keep the terrain in good condition. Don’t destroy plants, trees or other vegetation. Don’t litter and don’t bother wildlife. With your help, your riding area can remain open for use in the future.
After you have found a good place to practice, review the control system on your ATV before riding. Learn to find these controls without looking for them, because you will not have time to look for them when you are riding.
Canadian residents must obtain, review, and follow all provincial, municipal and governmental acts and regulations pertaining to owning and operating an off-road vehicle.
WARNING
Operating this ATV without proper instruction could be hazardous.
The risk of riding could increase greatly if you do not know how to operate the ATV properly under different situations and in different types of terrain.
Beginners and inexperienced operators should complete a certified training course. You should regularly practice the skills learned in the course and the operating techniques described in this user’s manual. For more information about the training course, visit www.svia.org or call 800-887-2887.
For more information on ATV safety and other provincial, municipal and governmental acts and regulation pertaining to owning and operating an off-road vehicle visit one of the following web-sites:
www.svia.orgwww.cpsc.govwww.mmic.ca/CATV/
18
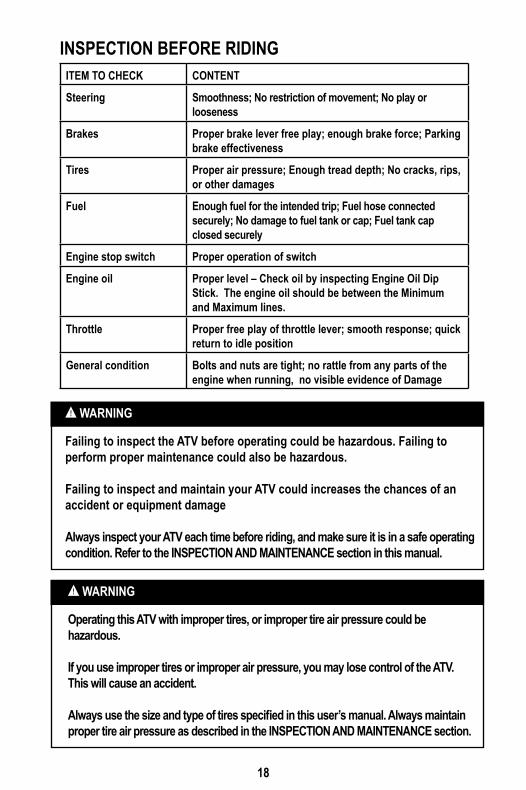
INSPECTION BEFORE RIDING
WARNING
Failing to inspect the ATV before operating could be hazardous. Failing to perform proper maintenance could also be hazardous.
Failing to inspect and maintain your ATV could increases the chances of an accident or equipment damage
Always inspect your ATV each time before riding, and make sure it is in a safe operating condition. Refer to the INSPECTION AND MAINTENANCE section in this manual.
ITEM TO CHECK CONTENT
Steering Smoothness; No restriction of movement; No play or looseness
Brakes Proper brake lever free play; enough brake force; Parking brake effectiveness
Tires Proper air pressure; Enough tread depth; No cracks, rips, or other damages
Fuel Enough fuel for the intended trip; Fuel hose connected securely; No damage to fuel tank or cap; Fuel tank cap closed securely
Engine stop switch Proper operation of switch
Engine oil Proper level – Check oil by inspecting Engine Oil Dip Stick. The engine oil should be between the Minimum and Maximum lines.
Throttle Proper free play of throttle lever; smooth response; quick return to idle position
General condition Bolts and nuts are tight; no rattle from any parts of the engine when running, no visible evidence of Damage
WARNING
Operating this ATV with improper tires, or improper tire air pressure could be hazardous.
If you use improper tires or improper air pressure, you may lose control of the ATV. This will cause an accident.
Always use the size and type of tires specified in this user’s manual. Always maintain proper tire air pressure as described in the INSPECTION AND MAINTENANCE section.

19
Check the condition of the ATV to make sure that the ATV does not have mechanical problems or you could get stranded when you ride. Before riding the ATV, be sure to check the above items. Be sure your ATV is in good condition to ensure the safety of the rider.
WARNING
Overloading could be hazardous.
Overloading could cause changes in vehicle handling and could lead to an accident.
Never exceed the stated load capacity for this ATV. Refer to the ACCESSORY USE AND VEHICLE LOADING section in this manual.
WARNING
Operating this ATV with improper modifications could be hazardous.
Improper installation of accessories or modifications to this vehicle may cause changes in handling. In some situations, this could lead to an accident.
Never modify this ATV through improper installation or use of accessories. Refer to the ACCESSORY USE AND VEHICLE LOADING section in this manual.
WARNING
Checking maintenance items when the engine is running could be hazardous.
You could be severely injured if your hands or clothing get caught in moving ATV parts.
Shut the engine off when performing maintenance checks, except checking the engine stop switch and throttle.

20
SAFETY GEARA DOT approved motorcycle helmet is the most important part of you safety gear. A DOT approved motorcycle helmet can help prevent a serious head injury. Choose a helmet that fits snugly. Motorcycle dealers can help in selecting a good quality helmet which fits properly.
You should wear eye protection when you ride. If a rock or a branch hits your eyes, you could be severely injured. Wear goggles or a face shield.
Wear proper clothing when you ride. The proper clothes can protect you from injury. Wear a good pair of gloves, strong boots that are over the ankle, long pants, and a long sleeve shirt.
WARNING
Operating this ATV without wearing an approved DOT motorcycle helmet, eye protection, and protective clothing could be hazardous.
Operating without an approved DOT motorcycle helmet or eye protection increases your chances of a severe head injury or death in an accident. Operating without protective clothing also increases your chances of severe injury in an accident.
Always wear an approved DOT motorcycle helmet which fits properly. Always wear eye protection (goggles or face shield). You should also wear gloves, boots, long sleeve shirt or jacket, and long pants.

21
BREAK-INThe first month is the most important in the life of your vehicle. Proper operation during this break-in period will be helpful for assuring maximum life and performance of your new vehicle. The following guidelines explain proper break-in procedures.
Maximum Throttle Opening RecommendationDuring the first 10 hours of operation, you should always use less than ½ throttle opening.
Vary the Engine Rotating SpeedVary the engine rotating speed during the break-in period. This allows the parts to “load” and then “unload” (allowing the parts to cool). Although it is essential to place some stress on the engine components during break-in, you must be careful not to load the engine too much.
Avoid Constant Low Rotating SpeedOperating the engine at constant low rotating speed (light load) can cause parts to glaze and not seal properly. Allow the engine to accelerate freely without exceeding the maximum throttle limit.
Allow the Engine Oil to Circulate Before RidingAllow enough idling time after warm or cold engine starting. This allows the lubricating oil to reach all critical engine components.
Observe Your Initial and Most Critical ServiceThe initial service (break-in maintenance) is the most important service that your vehicle will receive. Observing a proper break-in operation, will help engine components seal properly. Maintenance required as part of the initial service includes proper adjustments, tightening of all bolts & nuts, and replacement of dirty oil. Timely performance of this service will help you get the best service life and performance of the engine.

22
STARTING THE ENGINEBefore attempting to start the engine, make sure to follow these steps.1. Turn the fuel valve to the “ON” position2. Turn the key switch to the “ON” position.3. Set the engine stop switch to the “RUN“ position.4. Set the thumb lever choke to the “ON” position5. Apply the rear brake lever and make sure that the rear wheels are in
locking condition.6. Press the starter button “START” to start the engine, if battery is dead,
use the pull cord to start the engine.7. Allow engine to warm up then place the thumb lever for the choke to the
“OFF” position.
WARNING
The ATV could start moving as soon as you start the engine.
Unexpected movement could cause you to lose control of the ATV.
Be sure to set the parking brake before you start the engine.
WARNING
Running your ATV indoors where there is little or no ventilation could be hazardous.
Breathing in exhaust gases from the ATV could cause severe injury.
Always run your ATV outdoors where there is fresh air.
WARNING
Carrying a passenger on this ATV could be hazardous.
Carrying a passenger could greatly reduce your ability to keep balance. If you carry a passenger, you could lose control, and both you and the passenger could be severely injured.
Never carry a passenger. The ATV has a long seat so you can change positions to handle the ATV. It is not for carrying passengers.

23
WARNING
Operating this ATV on paved surfaces, including sidewalks, paths, parking lots, driveways and streets could be hazardous.
ATV tires are designed for off-road use. Paved surfaces may seriously affect handling and control of the ATV, and may cause the vehicle to lose control.
Avoid operating the ATV on paved surfaces if possible. If you must ride on a paved surface, go slowly and do not make sudden turns or stops.
WARNING
Operating this ATV on public streets, roads or highways could be hazardous.
You may collide with another vehicle if you ride on the public roads.
Never operate this ATV on any public street, road or highway, even dirt or gravel street, roads, or highway. In many states is it illegal to operate ATVs on public streets, roads and highways.
WARNING
Operating this ATV at excessive speeds could be hazardous.
Riding at excessive speeds increases your chances of losing control of the ATV, which could result in an accident.
Always go at a speed that is proper for the terrain, visibility, operating conditions, operator skills, and operator experience.
24
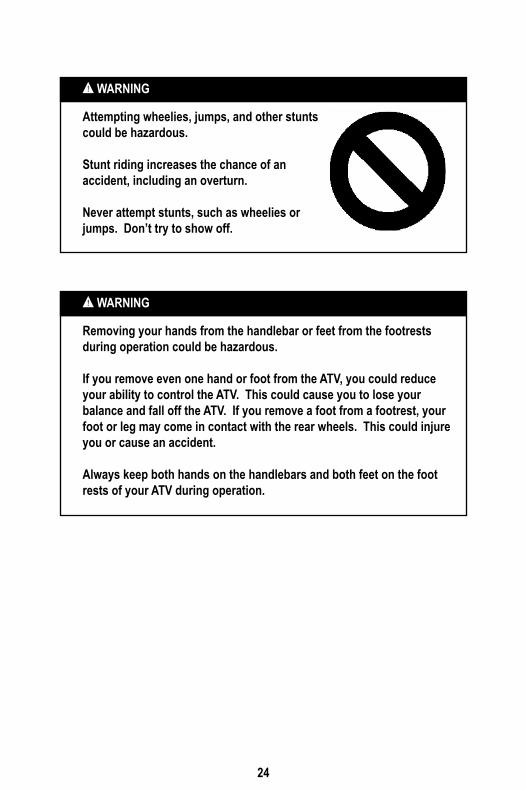
WARNING
Attempting wheelies, jumps, and other stunts could be hazardous.
Stunt riding increases the chance of an accident, including an overturn.
Never attempt stunts, such as wheelies or jumps. Don’t try to show off.
WARNING
Removing your hands from the handlebar or feet from the footrests during operation could be hazardous.
If you remove even one hand or foot from the ATV, you could reduce your ability to control the ATV. This could cause you to lose your balance and fall off the ATV. If you remove a foot from a footrest, your foot or leg may come in contact with the rear wheels. This could injure you or cause an accident.
Always keep both hands on the handlebars and both feet on the foot rests of your ATV during operation.

25
WARNING
Never operate this ATV at night. Night is defined as the period of time 30 minutes before sunset to 30 minutes after sunrise.
You may collide with another vehicle, a stationary object, or hazard found in the terrain.
WARNING
Failing to use extra care when operating on excessively rough, slippery, or loose terrain could be hazardous.
Failing to use extra care could cause loss of traction. This could result in an accident, including an overturn.
Do not operate under these conditions until you have learned and practiced the skills necessary to control the ATV on such terrain. Always be especially cautious on this kind of terrain.
WARNING
Failing to use extra care when operating this ATV on unfamiliar terrain could be hazardous.
You could come upon hidden rocks, bumps, or holes, without enough time to react. This could cause the ATV to overturn or go out of control.
Go slowly and be extra careful when operating on unfamiliar terrain. Always be alert to changing terrain conditions when operating the ATV.

26
WARNING
The ATV may start moving as soon as you release the parking brake.
Unexpected movement could cause you to lose control of the ATV.
WARNING
Opening the throttle suddenly could be hazardous.
The front wheels could leave off the ground and cause loss of control of the ATV.
Always open the throttle gradually when you want to accelerate.
Parking brake
Throttle
When you are sure that the engine is warm release parking brake.Release brake lever and open the throttle gradually to move forward.

27
SHIFTING:This ATV has a 5 speed transmission with a centrifugal automatic clutch.
To shift vehicle in neutral while driving, repeatedly depress the gear shift lever. The green indicator light will illuminate when in neutral.
To shift the vehicle through gears 1-5
1. Release the throttle lever. 2. Shift into first gear by lifting up once on the gear shift lever from neutral.3. Open throttle gradually. Once vehicle has reached adequate speed, release throttle and shift into 2nd gear.4. Open throttle gradually then repeat procedure for the remaining gears. When slowing down or stopping, release the throttle and apply the brakes smoothly. As the ATV slows down, shift to a lower gear by depressing the gear shift lever.
Gear Shift Lever
DRIVE SELECT LEVERThe drive select lever shifts the ATV in either forward or reverse
To shift ATV in either forward or reverse: 1. Release throttle2. Apply brakes until you come to a complete stop.3. Shift transmission into first gear. 4. Lift up on lock button on drive select lever and pull back for reverse making sure lever is locked in place. NOTE: When in reverse, the reverse indicator light should illuminate on the console, if light does not come on, check to see if vehicle is in first gear.5. Check for people or obstacles behind you.6. Open the throttle gradually continuing to watch to the rear while backing.
Lock button
Drive select lever
When slowing down or stopping, release the throttle and apply the brakes smoothly . As the ATV slows down shift to a lower gear by depressing the shift lever

28
CAUTION
Do not coast for long periods of time with the engine not running, and do not tow the machine a long distance.
Even when the machine is in neutral, the gears are not properly lubricated unless the engine is running. Towing the machine with the engine not running could cause damage to the drive train.
Be sure to check for leaks in the gear case and keep oil up to the prescribed level.
CAUTION
Always release the throttle before shifting gears.
Failure to release the throttle before shifting gears could cause damage to the engine and drive train.
WARNING
Not looking behind vehicle before and while going in reverse could be hazardous.
Failure to look behind while backing could cause the ATV to run into an obstacle or person resulting in an injury and/or property damage.
Before going in reverse and while backing, look behind the vehicle for any obstacles or people to avoid.

29
To stop the ATV, first release the throttle lever. And then apply the rear and front brakes smoothly.
WARNING
Braking while turning the ATV could be hazardous.
Use of the brake when turning could cause the ATV to slide or roll over.
Use the brake to slow down before you begin to turn.
BRAKING
WARNING
Braking hard on slippery surfaces could be hazardous.
The ATV could skid and go out of control if you brake too hard.
Apply the brakes lightly and carefully on slippery surfaces.
WARNING
Operating the parking brake when the ATV is moving could be hazardous.
The front wheels could lock, and it will cause a skid and an accident.
Use the parking brake only after you stop the ATV.
Rear hand brake Rear foot brake Front hand brake

30
TURNINGTo turn the ATV, the rider must use the proper technique. Because this vehicle has a solid rear axle, both rear wheels always turn at the same speed. This means that if the rear wheels are getting equal traction, the vehicle will tend to move straight ahead. This is because the rear wheels will travel the same distance. For the vehicle to turn, the outside rear wheel must travel a longer distance that the inside rear wheel. To make this happen, the rider must create less traction for the inside wheel, allowing it to skid. This allows it to travel a shorter distance than the outside wheel. This happens even though both wheels are still turning at the same speed.
FOR HIGHER SPEEDS OR SHARPER TURNSUse the same technique that you use when you move your body weight farther toward the inside of the turn to maintain your balance. Natural turning forces (which can push the vehicle to the outside of the turn) increase as the speed or the turn sharpness increases. This means you must lean your body farther into the turn as you go faster or turn more sharply. This prevents the vehicle from tipping over to the outside of the turn. If your ATV starts to tip while turning, lean your body farther into the turn while gradually reducing the throttle and making the turn wider, if possible.
WARNING
Turning the ATV improperly could be hazardous.
If you turn the ATV improperly, it may cause a collision or overturn.
Always follow proper procedures for turning as described in this section. Practice turning at low speeds before attempting to turn at faster speeds. Never turn at excessive speeds.
To turn the ATV, using the following technique:
· Move your body weight forward and to the inside of the turn.
· Turn the handlebar while looking in the direction of the turn.

31
SKIDDING OR SLIDINGYou may experience skidding or sliding when you are not braking. You may be able to overcome it by using the techniques listed below.
If your front wheel skids:Gain front wheel traction by reducing the throttle opening and leaning your body slightly forward.
If your rear wheel skids:If space permits, steer in the direction of the skid. Shift your body away from the skid slightly. Avoid using the throttle or brakes until you regain directional control of the vehicle.
OPERATION ON HILLS
WARNING
Skidding or sliding improperly could be hazardous.
You may lose control of your ATV when you regain traction unexpectedly. This may cause the ATV to overturn.
Learn to safely control skidding or sliding by practicing at low speeds and on level, smooth terrain.
On extremely slippery surfaces, such as ice, go slow and be very cautious in order to reduce the chance of skidding or sliding.
WARNING
Operating this ATV on excessively steep hills could be hazardous.
The ATV could overturn more easily on extremely steep hills than on level surfaces or small hills.
Never operate the ATV on hills which are too steep for the ATV or for your abilities. Practice on smaller hills before trying larger hills.

32
CLIMBING A HILL WARNING
Climbing hills improperly could be hazardous.
Climbing hills improperly could cause loss of control or cause the ATV to overturn.
Always follow the proper procedures for climbing hills as described in this section. Always check the terrain carefully before you start up any hill.
Never climb hills with excessively slippery or loose surfaces.
Shift your body forward.
Never open the throttle suddenly. The ATV could flip over backwards.
Never go over the top of any hill at a high speed. An obstacle, a sharp drop, or another vehicle or person could be on the other side of the hill.
To climb a hill with the ATV, follow the directions below.1. Speed up and maintain a steady speed
before reaching the top of the hill. Remember that you must ride at a steady speed all the way to the top of the hill.
2. Shift your body forward by sliding forward on the seat. Lean slightly forward. For steep hills, stand on the footrests and lean forward.
3. Maintain a steady speed while climbing the hill.
4. Slow down gradually when you reach the top of the hill.
OK

33
If climbing a hill and are unable to make it to the top, use the correct procedure described below to turn around to get down the hill.If you still have forward movement and enough space to turn around safely, follow these instructions.
1. Turn around on the hill before you lose forward speed. As you turn on the side of the hill, lean your body weight uphill.
2. Once you have turned around, ride down the hill as described in the DESCENDING A HILL section.
If you lose forward movement, or begin to roll backwards, follow these instructions.
1. Lean farther forward, uphill.2. Never apply the rear brake if the vehicle has begun to roll backwards. Use the front brake.3. Gradually back down the hill with body weight leaning forward while apply-ing front brake. Use extreme caution when backing down a hill.4. Or, if you can stop the vehicle, apply the rear brake.5. Set the parking brake and dismount to the left while still leaning uphill.6. To turn the vehicle around, drag the rear end of the ATV until the vehicle points downhill. Stay on the uphill side of the vehicle while dragging it around.7. Remount the vehicle once it is facing downhill, apply the rear brake and ride down the hill as instructed in the DESCENDING A HILL section.
WARNING
Stalling, rolling backwards or improperly dismounting the ATV while climbing a hill could be hazardous.
The ATV could overturn if you do not climb a hill properly.
Maintain a steady speed when climbing the hill. Always follow the proper procedures for climbing hills as described in this section.

34
To ride down a hill with the ATV, follow the instructions below.1. Check the terrain carefully for any
obstacles before you go down the hill.
2. Point the ATV straight down the hill.3. Transfer body to the rear by sliding
back on the seat.4. Ride down the hill slowly with the
throttle released.5. Apply the rear brake to control the
speed.6. Avoid going down a hill at an angle
that would cause the vehicle to lean sharply to one side. Go straight down the hill if possible.
WARNING
Going down a hill improperly could be hazardous.
Going down a hill improperly could cause loss of control or cause the ATV to overturn.
Always follow the proper procedures for going down hills as described in this section.
DESCENDING A HILL

35
When traversing a slope, you should:1. Lean your body uphill.2. Steer slightly uphill, if necessary, to maintain
a straight course.
RIDING OVER OBSTACLES
WARNING
Crossing hills or turning on hills improperlycould be hazardous.
Crossing hills or turning on hills improperly could cause loss of control or overturn.
Never attempt to turn the ATV around on any hill until you have mastered the turning technique as described in the CLIMBING A HILL section. Practice this technique on level ground. Be very careful when turning on any hill. Avoid crossing the side of a steep hill if possible.
TRAVERSING A SLOPE
WARNING
Operating this ATV over obstacles improperly could be hazardous.
Improperly crossing obstacles could cause loss of control or a collision. It could also cause the ATV to overturn.
If you come to an obstacle that you cannot avoid, you may be able to cross over it by using the following procedure.
1. If the obstacle is in front of you, approach at walking speed.2. Rise up slightly on the footrests.3. Pull up on the handlebar and apply a little throttle as the front wheels reach the obstacle.4. Lean forward and release the throttle after the front wheels are over the obstacle.
Remember that some obstacles are too high for your ATV or for your abilities. If you are not sure that you can safely cross over an obstacle, back up and ride around the obstacle.

36
RIDING THROUGH WATERYou can ride the ATV through shallow water. Make sure it is not more than 10cm (4 inches) deep and is not moving fast. Choose a good place to cross before you ride through the water. Look for a spot where the banks are gently sloped on both sides and the bottom of the stream is hard. If you are unfamiliar with the area, park the ATV and inspect the stream first to find a suitable spot for crossing. When crossing, operate the ATV at a slow, steady speed. Be careful not to damage banks when crossing.
WARNING
Operating this ATV through deep or fast flowing water could be hazardous.
The ATV tires may float losing traction and then loss of control. This could lead to an accident.
Never operate this ATV in fast flowing water or in water deeper than described in this section. Remember that wet brakes may reduce the stopping ability. Test your brakes after leaving the water. If necessary, apply the brakes several times to let friction dry out the linings.
CAUTION
Operating the ATV in water, sand, or mud causes rapid brake wear.
Excessive brake wear could cause the brakes to be less effective.
After repeated operation of the ATV in these conditions, bring it to your authorized service center to have the brakes inspected and cleaned.

37
RIDING IN COLD WEATHERPre-ride InspectionCheck that the throttle and all control levers move freely. Make sure that the footrests are free of ice or snow.Move the ATV forward and backward to check that the wheels roll freely. If you cannot move the ATV, the tires may be frozen to the ground, or the brakes may be frozen to the wheels. If the tires are frozen to the ground, pour warm water around them to melt the ice. If the brakes are frozen, bring the ATV to a warmer area to thaw out the brakes.After the engine has warmed up, check the brakes. Do this inspection on level ground and do not exceed the walking speed. Be sure to check the operation of both front and rear brakes. If the brakes do not work adequately, stop riding the ATV.
Bring the ATV to a warmer area to allow the brakes to thaw out. After the brakes thaw, dry them by applying them several times before riding. If the brakes do not regain full stopping power, ask your authorized service center to check them before you continue riding your ATV.
Water that enters the brakes may freeze after you park your ATV. The frozen water can prevent wheels from turning or the brakes from working. After riding through water, mud, snow or slush, it is important to dry the brakes before parking the ATV. To dry the brakes, apply them several times while riding slowly. Before your next ride, be sure to do a Pre-ride inspection as described earlier in this section.
WARNING
Operating the ATV without a properly functioning brake system could be hazardous.
Wet or frozen brakes will increase stopping distance. This will increase your chance of having an accident.
Be sure to inspect the brakes before riding the vehicle in cold weather as described above.
CAUTION
Using engine power to free up frozen wheels could damage your ATV.
Severe damage to the drive train may occur if you use engine power to free frozen wheels.
Before riding, manually move the ATV forward and backward to make certain that all wheels roll freely.

38
DRESSING FOR COLD WEATHER RIDING
Riding in cold weather can be hazardous. At a temperature of 10°F (-12°C), the wind chill created by going just 10 mph (16km/h) makes you as cold as if you were standing still at a temperature of -9°F (-23°C). At this temperature, exposed flesh will freeze in just a few minutes.
Continued exposure in the cold weather could lead to hypothermia. Hypothermia occurs when your body’s inner temperature drops. Symptoms include numbness in the extremities (hands, feet, arms, and legs), and shivering. Damp clothing contributes to hypothermia because cold water on your skin will drain heat from your body’s core.
We strongly recommend that if you do any cold-weather riding, that you familiarize yourself with the symptoms, treatment, and prevention of hypothermia. Information is available at libraries and through government agencies.
Plan your winter rides with safety and comfort in mind. Dress for the worst conditions you might encounter. Be prepared for bad weather and ATV breakdowns. Wear warm, water-resistant clothing such as thermal underwear, snowmobile suits, lined gloves and boots, and wool socks.
WARNING
Operating your ATV in cold weather without proper clothing could be hazardous.
Continued exposure in the cold weather could lead to hypothermia. Hypothermia is a condition where your body’s inner temperature drops low enough to cause injury or death.
Always dress for the worst weather conditions you might encounter. Be prepared for bad weather and ATV breakdowns.
WARNING
Wearing loose clothing when riding your ATV could be hazardous.
Loose clothing, such as a long scarf or shawl, could get caught in an ATV’s moving parts.
Never wear loose clothing when riding your ATV.

39
RIDING YOUR ATV ON SNOW AND ICE
Practice riding your ATV in an open snow- or ice-covered area, at slow speeds, before handling out on snow- or ice-covered trails. Learn how your ATV responds to steering and braking on the type of terrain you will encounter on your ride.
Your eyes may be sensitive to sunlight when you ride over snow or ice on a bright, sunny day. Snow and ice reflects more light into your eyes than dirt or grass. Tinted eye protection will reduce the amount of light reaching your eyes. On overcast days, you may find it helpful to use yellow-tinted eye protection.
WARNING
Riding on snow-covered terrain, even with care, could be hazardous.
The snow may be covering rocks, holes, ice or other hazards that can cause loss of control. Severe injury or death could occur if you lose control of the ATV.
Go slowly and be careful when riding on snow-covered terrain. Always be alert to changing terrain conditions.
WARNING
Riding on a frozen lake or river could be hazardous.
Serious injury or death could occur if the ice breaks and you could fall into the cold water.
Check with local authorities to verify the thickness of the ice and areas to avoid.
WARNING
Failing to use extra care when operating on slippery surfaces such as hard-packed snow and ice could be hazardous.
Failing to use extra care could cause loss of traction or loss of vehicle control. This could result in an accident, including an overturn.
Do not operate on slippery surfaces until you have learned and practiced the skills necessary to control the ATV on such terrain. Always use extra care on slippery surfaces. Avoid riding on the snow or ice covered hills whenever possible.

40
ACCESSORY USE AND VEHICLE LOADINGThere are many types of accessories for sale. However, we cannot have direct control over their quality or suitability. We cannot test each accessory that is available. If you add the wrong accessories or misuse the vehicle with some accessories installed, it can make the ATV less safe to ride.
Be cautious when choosing and installing accessories to your vehicle. Your retailer may be able to help you choose accessories and install them correctly. The guidelines below should help you to decide how to equip your ATV and how to use it correctly when you use accessories.
Accessory Use and Vehicle Loading Guidelines1. The combined weight of the rider, tools, and any accessories or cargo plus the
vertical weight on trailer hitch must never exceed the vehicle’s load capacity of 165 Kg (364 lbs.).
2. Check accessory mounting brackets and other attachments to make sure they provide a rigid non-movable mount.
3. Accessories added to the handlebar of the ATV should be as light as possible. The extra weight would cause the vehicle to be harder to steer.
4. Do not add accessories or cargo which interferes with controls or other equipment.
5. Do not carry heavy or bulky cargo.6. Distribute cargo weight evenly between the front and rear of the vehicle as well
as both sides of the vehicle. Locate cargo weight as close to the center of the vehicle if possible.
7. Secure your load well. Shifting weight can affect your ability to handle the vehicle safely.8. Ride at slow speeds and avoid hills when carrying cargo. Carrying loads would
affect the stability and handling of your ATV.9. Allow enough stopping distance. Stopping distance increases if you carry loads.
Use engine braking as much as possible.
WARNING
Operating this ATV with improper modifications could be hazardous.
Improper installation of accessories or modifications of the vehicle may cause changes in handling which could lead to an accident.
Never modify the ATV with improper installation or use of improper accessories. All parts and accessories added to the ATV should be genuine parts or their equivalent designed for use on this ATV. Install and use them according to their instructions. If you have any questions, contact your retailer or Baja Motorsports.

41
WD250UR / WD250U WEIGHT LIMITS
Never exceed the weight limits shown
1. Total weight limit is 165 Kg (364 lbs); this limit includes rider, accessories, vertical weight on trailer hitch and cargo.2. Front rack - 30 Kg (66 lbs.)3. Rear rack - 45 Kg (99 lbs.)4. Tool kit compartment - 2 Kg (4.5 lbs.)5. Vertical weight on trailer hitch - 15 Kg (33 lbs.) 6. Pulling load (total weight of trailer, cargo and rider) - 330Kg (728 lbs.)
2
5
4
31
42
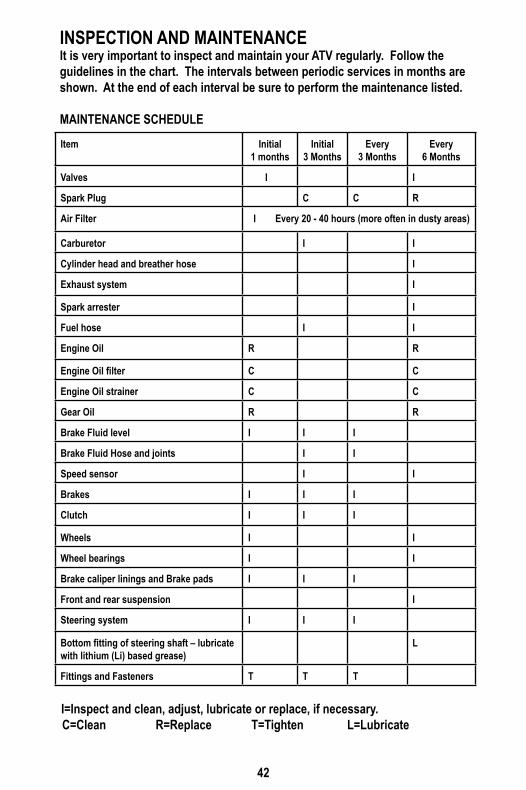
Item Initial1 months
Initial3 Months
Every 3 Months
Every6 Months
Valves I I
Spark Plug C C R
Air Filter I Every 20 - 40 hours (more often in dusty areas)
Carburetor I I
Cylinder head and breather hose I
Exhaust system I
Spark arrester I
Fuel hose I I
Engine Oil R R
Engine Oil filter C C
Engine Oil strainer C C
Gear Oil R R
Brake Fluid level I I I
Brake Fluid Hose and joints I I
Speed sensor I I
Brakes I I I
Clutch I I I
Wheels I I
Wheel bearings I I
Brake caliper linings and Brake pads I I I
Front and rear suspension I
Steering system I I I
Bottom fitting of steering shaft – lubricate with lithium (Li) based grease)
L
Fittings and Fasteners T T T
I=Inspect and clean, adjust, lubricate or replace, if necessary.C=Clean R=Replace T=Tighten L=Lubricate
INSPECTION AND MAINTENANCEIt is very important to inspect and maintain your ATV regularly. Follow the guidelines in the chart. The intervals between periodic services in months are shown. At the end of each interval be sure to perform the maintenance listed.
MAINTENANCE SCHEDULE

43
WARNING
Improper maintenance or failing to perform recommended maintenance could be hazardous.
If you perform improper maintenance or do not maintain your ATV you may have an accident.
Keep your ATV in good condition. Ask your authorized service center or a qualified mechanic to do the maintenance items marked with an asterisk (*). You may perform the unmarked maintenance items by referring to the instructions in this section if you have mechanical experience. If you are not sure how to do the maintenance ask your authorized service or call Baja Motorsports.
CAUTION
If you use your ATV under severe conditions, it will need maintenance more often than shown in the chart.
Operating your ATV under severe conditions causes more wear on your ATV. Severe conditions include operating under frequent full throttle, or in dusty, wet, sandy, or muddy areas. These conditions could cause the ATV to wear more quickly.
Perform maintenance more often than shown in the chart. If you have any questions regarding maintenance intervals, consult your authorized service center or call Baja Motorsports.
CAUTION
Using poor quality replacement parts could damage your ATV.
Poorly-made replacement parts could cause your ATV to wear more quickly and shorten its useful life.
When replacing parts on your vehicle, use only genuine replacement parts or their equivalent.

44
TOOLS
A tool kit is provided with your ATV.
SPARK PLUGYour ATV is equipped with a D8RTC spark plug. To determine if the standard spark plug is in good condition, check the color of the plug’s center electrode insulator after vehicle operation. A brown color indicates that the plug is correct. A white or dark insulator indicates that the engine may need adjustment, or another plug type may be needed. Consult your authorized dealer or Baja Motorsports if your plug insulator is not a light brown color.
CAUTION
Failing to use the proper spark plug could damage your ATV.
An improper spark plug may have an incorrect fit or heat range for your engine. This may cause severe engine damage which voids the warranty.
Use only the spark plug recommended for this engine. Call Baja Motorsports if you are not sure which spark plug is correct for you vehicle.

45
NOTE: This ATV uses resistor-type spark plug to avoid jamming electronic parts. Improper spark plug selection may cause electronic interference with your ATVs ignition system, resulting in the vehicle performance problems. Use recommended spark plugs.
To install a spark plug turn it in as far as possible with your fingers, then tighten it with a wrench.
CAUTION
Improper installation of the spark plug could damage your ATV.
An overly tight or cross threaded spark plug will damage the aluminum threads of the cylinder head.
Carefully install spark plug by hand. If the spark plug is new, tighten it with a wrench about ½ turn past finger tight. If you are reusing the old spark plug, tighten it with a wrench about 1/8 turn past finger tight.
CAUTION
Dirt could damage your ATV if it entered an open spark plug hole of cylinder head.
Dirt could damage engine parts that move.
Cover the spark plug hole while the spark plug is out of the hole.
To maintain a proper functioning spark plug, keep the plug free of carbon. Remove carbon from the plug with a wire or pin, and adjust the gap to 0.6~0.7mm (.024 - .028 in) for good ignition. Use a thickness gauge to check the gap.
Spark Plug Cross Reference:NGK DR8EA, CHAMPION RA8YC, MEIYA (JC) D8RTC, DENSO X24ESR-U

46
BATTERY INSTALLATIONINITIAL SERVICE AND INSTALLATION OF BATTERY:
WARNING
The following procedure is very dangerous and should be performed with utmost care and attention. Wear protective eye wear, rubber gloves, and have water available should electrolyte come in contact with skin or eyes. KEEP ALL CHILDREN AWAY FROM THE AREA WHILE THIS PROCEDURE IS BEING PERFORMED.
POISON – CAUSES SEVERE BURNSContains sulfuric acid.Avoid contact with skin, eyes, or clothingTo prevent accidents, rinse empty container with water.
ANTIDOTE:External – flush with waterInternal – Call physician immediately. Drink large quantities of water or milk.Follow with milk of magnesia, beaten eggs or vegetable.Eyes – Flush with water for 15 minutes and get prompt medical attention.
KEEP OUT OF REACH OF CHILDREN.

47
Note: The following page is for vehicles with battery’s containing separate electrolyte pack. Most battery’s will come with the electrolyte already sealed into the battery.
Preparing the battery:· Place battery on level surface. Remove sealing
tape from top. (see figure 20)· Take the electrolyte container out of the plastic
bag.· Place electrolyte container upside down with the
sealed silver mouths of the electrolyte bottles in line with the six filler holes of the battery. (see figure 21)
· Push the container down strongly enough to break the silver seals.
· As electrolyte starts flowing into battery, air bubbles will come up from the mouths of the plastic electrolyte bottles.
· Leave bottles upside down in battery holes until electrolyte is completely drained.
· Never leave children unattended around battery.· If air bubbles cease to float to the top of the
electrolyte bottles, tap lightly on top.· DO NOT remove container from battery while it is
draining.· Never cut or pierce electrolyte container.· After all the electrolyte has drained from the
bottles into the battery, pull plastic electrolyte bottles gently out of the battery.
· Discard empty electrolyte bottles in a waste area that is inaccessible to children and animals.
· After filling let battery stand for at least 30 minutes before charging. This allows the electrolyte to penetrate plates for optimum performance and ensures longer battery life.
· After 30 minutes the battery is ready for its initial charge. Place cap strip loosely over the filling holes as shown in the picture. (see figure 22)
Figure 20
Figure 21
Figure 22

48
Figure 26
Red +
Black -Battery bracket
How to Initially Charge the battery:1. Connect the red positive (+) cable to the red
positive (+) pole of the battery. (see figure 23)
2. Connect the black negative (-) cable to the black negative (-) pole of the battery. (see figure 24)
Note: The red positive (+) cable has a larger diameter than the black negative (-) cable.
3. Charging rate: Charge battery @ 0.7 Amps for 5 ~ 10 hours.• After charging is complete, press down
firmly with both hands to seat the caps. (Do not pound or hammer see figure 25) The battery is now sealed.
• Locate battery compartment on ATV. The battery compartment is located under the seat. Battery terminals should be facing the front (see figure 26).
• Once battery is firmly seated in battery compartment, attach red positive (+) cable to positive (+) terminal on battery. Then attach black negative (-) cable to negative (-) terminal on battery (see figure 26).
• Secure battery with battery bracket (see figure 26).
WARNINGNEVER REMOVE THE STRIP OF CAPS NOR ADD ANY WATER OR ELECTROLYTE.
Figure 25
Figure 24
Figure 23

49
Battery Replacement:· Remove old battery from under seat. The battery bracket will need to be
removed (see figure 28). Mark which cable is connected to the positive terminal (+) and which cable is connected to the negative (-) terminal.
· Clean cable connectors with wire brush or sandpaper to remove oxidation.
· After charging, install new battery. Put dielectric grease on the battery terminals to avoid corrosion. Connect cables to the proper terminals. Positive cable to positive terminal Å and negative cable to negative terminal y.
· Positive (+) cable is red and larger in diameter. Negative y cable is black and smaller of the two in diameter. CONNECT NEGATIVE CABLE LAST.
· Torque terminal bolts to 40 in. / lbs.· Securely fasten battery to the vehicle using metal battery strap.
WARNING
· DO NOT open sealed caps to add water to battery.· Always wear safety glasses and charge in a ventilated area.· If battery gets hot to the touch, discontinue charging and allow
battery to cool down.· Do not use fast charging unless it is an emergency.· At the beginning or end of charging, turn off the charger first, in
order to prevent electric spark and explosion.· Charge in a well ventilated area.· DO NOT smoke around batteries and keep away from open flame.
WARNING
· To avoid possibility of explosion, always connect battery cable in the order specified: RED first; BLACK last. An exploding battery can cause serious injury or death.
· Batteries contain sulfuric acid.· Always shield eyes with protective eyewear when working around
battery acid.· Battery acid is poisonous and can cause severe burns.· DO NOT smoke around batteries and keep away from open flame.

50
HEADLIGHT AND TAILLIGHT REPLACEMENT
Headlight bulb replacement.Turn off main key switchLocate headlights under front fender and slide back rubber moisture protector from headlight housingPush in bulb holder and turn left (CCW) until tabs line up with groves .Remove bulb.
••
••
FUSE REPLACEMENT
Fuse may be bad if there is no spark while trying to start the ATV. The fuse box is located under the seat directly in front of the battery.
To check fuse follow the instructionsTurn off main key switchLift seat and locate fuse boxRemove fuse box capRemove fuse and check. If fuse is bad, replace with 15 Amp fuse.
••••
Moisture protector Bulb holder Bulb
Taillight replacementTurn off main key switchLocate screw holes in rear lensRemove lensRemove bulb by pushing in and turning left (CCW).
••••
Fuse boxFuse cap
Fuse 15A
Good Bad
Screw holes Bulb

51
THE ADJUSTMENT OF THROTTLE LEVER
To adjust the throttle lever play:1. Remove the adjuster cover (slide back on cable).2. Loosen the throttle lever lock nut.3. Turn the large adjustment nut in or out to obtain the correct play.4. Tighten the throttle lever lock nut.5. Recheck the throttle lever free distance.
Re-adjust it if it is not within the correct limits.
WARNING
Operating the vehicle with an inadequate throttle lever free play distance could be hazardous.
Inadequate throttle lever free distance could cause engine speed to rise suddenly when you turn the handlebars. This can lead the rider to lose control.
Adjust the throttle lever free distance so that engine idle speed does not rise due to handlebar movement.
3.0~5.0mm(0.12~0.20in)
Measure the throttle lever play.3.0~5.0mm (0.12~0.20in) as shown
Adjuster cover
Throttle lever lock nut
Adjustment nut
52
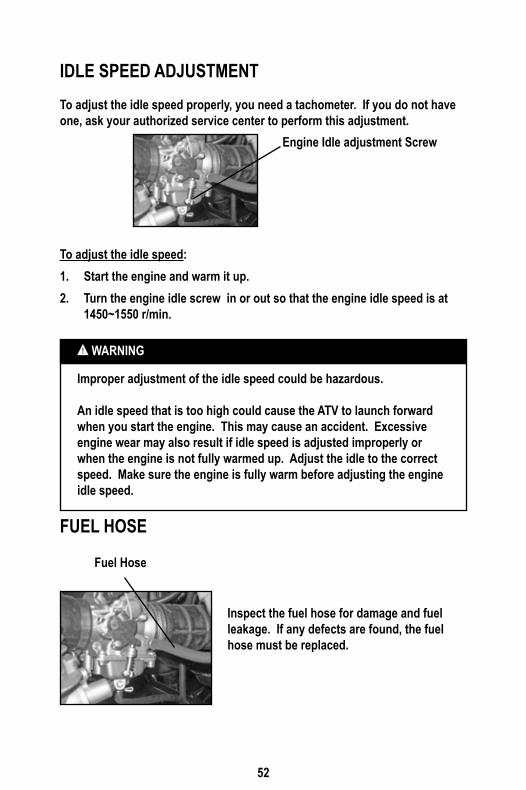
IDLE SPEED ADJUSTMENTTo adjust the idle speed properly, you need a tachometer. If you do not have one, ask your authorized service center to perform this adjustment.
To adjust the idle speed:1. Start the engine and warm it up.2. Turn the engine idle screw in or out so that the engine idle speed is at
1450~1550 r/min.
FUEL HOSE
WARNING
Improper adjustment of the idle speed could be hazardous.
An idle speed that is too high could cause the ATV to launch forward when you start the engine. This may cause an accident. Excessive engine wear may also result if idle speed is adjusted improperly or when the engine is not fully warmed up. Adjust the idle to the correct speed. Make sure the engine is fully warm before adjusting the engine idle speed.
Inspect the fuel hose for damage and fuel leakage. If any defects are found, the fuel hose must be replaced.
Engine Idle adjustment Screw
Fuel Hose

53
ENGINE OILTo check oil level:1. Park vehicle on level ground.
2. Remove dip stick and wipe off with a clean rag. Insert the dipstick in the filler hole.3. Remove the dipstick and inspect the oil level.4. Oil level should be in between the minimum and maximum marks on the dipstick.5. Add oil if oil is below minimum mark on dipstick . Do Not fill above maximum mark. Refer to page 8 for correct engine oil type.
Engine oil replacement and oil filter element cleaning:The engine oil should be changed every 20 to 40 hours of operation. It should be changed more often in dirty and dusty areas.
1. Park vehicle on level ground.2. Remove oil dipstick
Dipstick
Minimum Maximum
Oil cap and dipstick
Oil drain plug
Spring Oil Strainer

54
4. Remove oil filter cap 5. Remove oil filter
6. Clean oil strainer and oil filter with solvent.7. Inspect rubber O-ring on the oil filter cap and replace if damaged.8. Reinstall oil filter, O-ring and oil filter cover. 9. Reinstall oil strainer, spring and cap.10. Torque drain plug to 18 ft.lbs. (24Nm) and reinstall oil filter cap. 11. Fill crankcase with specified oil. Refer to Pg.8 for correct oil.
WARNING
New and used oil could be hazardous.
Children and pets may be harmed by swallowing new or used oil. Continuous contact with used oil can cause skin cancer in laboratory animals. Brief contact with the used oil may irritate the skin.
Keep new and used oil away from children and pets. To minimize your exposure to used oil, wear a long-sleeve shirt and moisture-proof gloves (such as dish washing gloves) when changing oil. If oil contacts your skin, wash thoroughly with soap and water. Launder any clothing or rags if wet with oil. Recycle or properly dispose of used oil.
CAUTION
Failure to use the correct oil could harm your ATV.
Be sure to use the oil specified in the FUEL AND OIL section.
CAUTION
Running the engine without an adequate amount of engine oil could cause severe engine damage.
Running the engine without any engine oil could cause engine overheating.
Always check the amount of engine oil before starting the engine.
Oil filter cap Oil filterRubber O Ring

55
AIR FILTERThe air filter element must be kept clean to provide good engine power. If you use your vehicle under normal, low-tension conditions, you should service the air filter at the intervals specified. If you ride in dusty, wet, or muddy conditions, you will need to inspect the air filter element much more frequently. Use the following procedures to remove the element, inspect it and clean it.
WARNING
Operating the engine without the air filte element in place could be hazardous.
If the air filter element did not filter dirt, severe engine damage would occur if the dirt entered the running engine.
Never run the engine without the air filter element in place.
CAUTION
Failing to inspect the air filter element frequently if the vehicle is used in dusty, wet, or muddy conditions could damage your ATV.
The air filter element could become clogged under these conditions, and engine damage may result.
Always check the air filter element after riding in severe conditions. Clean or replace the elements as necessary. If water gets in the air filter case, immediately clean the element and the inside of the case.
AIR FILTER CHECKING
There is a clear air filter check cap at the bottom of the air filter case. If there is dust or water in this cap, empty the cap and clean the air filter element and case.
Air filter check cap

56
AIR FILTER REMOVAL AND CLEANING
1. Locate Air Filter Box under seat and remove cover.2. Remove air filter.3. Remove foam cover from Air filter element.4. Tap the Air filter element gently to remove most of the dust and dirt. Blow out remaining dust with compressed air. If the element is damaged, replace it.5. Wash the foam cover per instructions below.6. Reinstall foam cover to the air filter element.7. Reinstall air filter and close cover. Make sure that the element is securely
in position and the air filter is properly sealed.
WASHING FOAM COVER OF AIR FILTER ELEMENT
To wash the foam cover: 1. Remove foam cover from air filter
element.2. Wash foam cover gently in water
or a mild non flammable solvent3. Squeeze water out of foam cover
and let dry.4. Reinstall foam cover over air filter
element
Cover Air Filter
Air filter elementFoam cover
Squeeze out excess water
Wash with water

57
WARNING
Oil and solvent could be hazardous.
Children and pets could be harmed if they have access to oil or solvent.
Be sure to keep oil and solvent away from children and pets. Dispose of used oil and solvent properly.
CAUTION
A torn air filter could damage your ATV.
Dirt and dust may get inside of the engine if the element is torn.
Examine carefully the element for tears before and after cleaning it. Replace the element with a new one if it is torn.
CLUTCH ADJUSTMENT1. Loosen lock nut
2..Slowly rotate adjusting bolt left (CCW) until resistance is felt., then rotate 1/8 turn 45 deg. right (CW).
3. Tighten the lock nut to the specified value 15Nm (10.8 ft.lb).
Lock nut Adjusting bolt
CAUTION
Failing to position the air cleaner element properly could damage your ATV.
Air will bypass the air cleaner element if the element is not positioned properly. This will cause the engine parts to wear more rapidly.
Be sure to position the air cleaner element properly.

58
REAR GEAR CASE LUBRICATIONTo check rear gear case oil:
1. Place vehicle on level ground2. Remove gear case fill cap.3. Inspect oil level. Oil level should be up to the brim of the hole.4. If oil is low, add specified oil (SAE 80 API G- 4 Hypoid gear oil).5. Tighten fill cap to 23Nm (17ft.lb)
To change gear oil:
1. Place vehicle on level ground2. Remove gear case cover.3. Place container under gear case.4. Remove fill cap.5. Remove oil plug.6. Let oil drain out completely7. Install the drain plug and tighten 24Nm (18 ft lb).8. Install gear cover and tighten bolts9. Add gear oil (SAE 80 API G-4 Hypoid Gear oil) fill to brim of hole approx. 9 oz (266ml10. Install fill cap and tighten to 23Nm (17 ft lb.)
Fill cap
Drain plug
Gear cover
CAUTION
Failing to have the proper amount of gear oil in the rear transfer case will damage your ATV.
Low or no gear oil will cause wear on the gears causing gears to seize.
Be sure to check for leaks in the gear case and keep oil up to the prescribed level.

59
TIRESThe ATV is equipped with low pressure tubeless tires of the size and type listed below:
Tire Tread Condition
Tire Air PressureCheck the air pressure in all tires before riding. Improper air pressure would effect handling, steering response, traction, tire life and rider comfort. Be sure that the tires are inflated to the pressures shown below. Tire pressure should only be measured or adjusted when the tires are cold.
Recommended pressure
Minimum Maximum
Front 20kpa (3psi) 17kpa (2.5psi) 23kpa (3.3psi)Rear 24kpa (3.5psi) 23kpa (3.3psi) 28kpa (4.0psi)
WARNING
Operating this ATV with improper tires, or even improper tire air pressure could be hazardous.
If you use improper tires or improper tire air pressure, you may lose control of the ATV.
Always use the size and type tires specified. Always maintain proper tire air pressure as described in this section.
WARNING
Using worn tires could be hazardous.
The traction of the vehicle will be decreased. This increases your risk of having an accident.
Replace the front and rear tires when the depth on the tread is 4.0 mm (0.16 in) or less.
Front Rear
Size AT22 x 8 - 10 AT22x11-10
4.0 mm (0.16 in)

60
Tire ReplacementYour ATV has low-pressure tubeless tires. Air is sealed by the contact surfaces of the inner wheel rim and the tire bead. If the inner wheel rim or tire bead is damaged, air may leak. Be extremely careful not to damage these sections when replacing tires.
It is very important to use the proper tools when repairing or replacing tires in order to protect the tire bead or wheel rims. Have this work done by your authorized service center or a qualified tire repair station.
When breaking the tire bead loose from the wheel, be extremely careful not to damage the inner wheel rim surface or the tire bead.
Tubeless Tire RepairIf a leak or flat tire occurs due to a puncture, the tire may be repaired using a plug type patch. If the damage is from a cut, or if the puncture cannot be repaired using a plug, the tire should be replaced. When operating your ATV in areas here transportation or service facilities are not readily available, it is strongly recommended that you bring a plug type repair kit and a tire air pump with you.
WARNING
Overfilling the tires with air could be hazardous.
If you put too much air into the tire, the tire may burst causing severe injury.
Check the air pressure from time to time while gradually inflating the tire, until the specified air pressure is obtained.
WARNING
Using tires that have been installed incorrectly could be hazardous.
The ATV may have unusual handling if the tires are installed incorrectly.
The tires are intended to rotate in a specific direction, as indicated by the arrows on the sidewall of each tire. Install tires correctly so they rotate in the proper direction.

61
BRAKINGThe ATV has two front disk brakes and one rear drum brake.
HYDRAULIC FRONT BRAKES
WARNING
Failing to inspect and maintain your ATV’s brake system properly could be hazardous.
Improper maintenance of the brake increases your chance of having an accident.
Be sure to inspect the brake before riding according to the INSPECTION BEFORE RIDING section. Always maintain your brakes according to the MAINTENANCE SCHEDULE.
WARNING
Operating the ATV in harsh conditions could be hazardous if you do not inspect brake wear often.
Operating in mud, water, sand, or other extreme conditions can cause accelerated brake wear. This could lead to an accident.
If you operate your vehicle under these conditions, the brake must be inspected more often than recommended in the MAINTENANCE SCHEDULE.
Front hand brake adjustment 1. Try to move the vehicle backward and
forward when the front hand brake is applied. If the front wheels can turn, adjust the brake to lock the wheels securely.
2. Measure the amount of free play in the front brake lever. The free play should be about 5~7mm (0.2~0.3in).
3. After any adjustment of the brake adjustment screw, check again to make sure the front wheels cannot turn when the brake is applied.
5~7mm free play(0.2~0.3in)
Adjustment screw

62
REAR BRAKES
Rear foot brake located on right side of ATV
FRONT HYDRAULIC DISK BRAKE INSPECTION
Brake fluid level
Brake fluid cap
Brake hose
Front disk brake caliper
Brake disk Brake hose
Lower markBrake fluid reservoir
5~7mm free play(0.2~0.3in) Adjusting nut
Rear hand brake located on left side of handlebar
1. Inspect the front disk brake caliper and brake fluid reservoir for leakage. If brake fluid leaks, the safety of riding could be affected.2. Inspect the brake hose for cracks, and the joint for leakage.3. Check the brake fluid level in the brake fluid reservoir, if level is at or below the LOWER mark, inspect brake pads for wear and hydraulic system for leaks.4. To add brake fluid, unscrew the 4 screws on top of the bake fluid container. Add DOT3 or DOT4 brake fluid. Do not mix brake fluid types.
Foot brake

63
REAR BRAKE SHOE INSPECTION1. Locate brake wear indicator on outside of brake drum.2. Check the position of the needle to see if it has reached the maximum wear limit.3. If maximum wear limit has been reached (needle is at the end of the brake wear indicator), replace brake shoes as a set.
Maximum wear limit
Brake wear needle
Wear tab
Brake cable adjustment nut (hand brake) Brake rod adjustment
nut (foot brake)
REAR HAND AND FOOT BRAKE ADJUSTMENT
1. Try to move the vehicle backward and forward when the rear hand brake is applied. If the rear wheels can turn, adjust the brake to lock the wheels securely.
2. Measure the amount of free play in the rear hand brake lever. The free play should be about 5~7mm (0.2~0.3in).
3. Try to move the vehicle backward and forward when the rear foot brake is applied. If the rear wheels can turn, adjust the brake to lock the wheels securely.
4. After any adjustment of the brake adjustment nuts, check again to make sure the front rear wheels cannot turn when the brake is applied.
Brake wear indicator

64
WARNING
Failing to maintain the brake shoes, the brake pads and the calipers could be hazardous. Riding with worn brake shoes or pads, will increase your chance of having an accident. If you need to replace brake shoe or pads, have your authorized service center do the work. Inspecting and maintaining the brake shoes, the brake pads and the calipers is recommended. Replace the shoe and the pads in sets.
SPARK ARRESTER CLEANING
Periodically the spark arrestor will need cleaning.
1. Select a well ventilated area and make sure the exhaust pipe is cool.
2. Remove the drain bolt.
3. Start the engine, block the end of the exhaust pipe with a dowel; this will increase the speed of the engine because of back pressure.
4. Stop the engine and let the exhaust pipe cool.
5. Install the drain bolt back into the exhaust pipe and tighten.
Drain bolt
65
WARNING
Running the engine indoors or in a garage could be hazardous.
Exhaust gas contains carbon monoxide that is colorless and odorless. It could cause serious injury or death.
Only run the engine outdoors where there is fresh air.
WARNING
The hot exhaust muffler could burn you.
The muffler will be hot enough to burn you after stopping the engine.
Wait until the exhaust muffler cools to remove the dowel.
WARNING
Riding an ATV with improperly tightened drain bolt could be hazardous.
Running the engine with a loose drain bolt or without a drain bolt will let hot carbon particles to escape. This can cause a fire.
Tighten the drain bolt securely.

66
GENERAL LUBRICATIONProper lubrication is important for safe, smooth operation and long life of your vehicle. Be sure that all lubrication is performed during periodic maintenance on the vehicle. Increase number of intervals when you use your ATV in severe conditions. Your authorized service center should do general lubrication as shown in the MAINTENANCE CHART. The authorized service center will do general lubrication. This includes the lubrication of wheel bearings, swing arm bearings, steering shaft holder, cables, etc.
O ……………OilG ……………Grease
1 Bottom fitting of steering shaft – lubricate with lithium (Li) based grease) 2 Brake cable3 Throttle cable4 Throttle lever
1L
H
H
H
2
3
4

67
TROUBLESHOOTINGThis troubleshooting guide is provided to help you to find the cause of some common complaints.
COMPLAINT: Engine is hard to start or does not start at all. Something is probably wrong with the fuel system or ignition system.
Fuel Supplying Check1. Make sure there is adequate fuel in the fuel tank.2. Check that the engine stop switch is in the “RUN “ position. 3. Check that the fuel valve is in the “ON” position.4. Make sure there is enough fuel reaching the carburetor from the fuel tank.
a. Loosen the drain screw which is located under the carburetor. Drain the fuel from the carburetor into a container.
b. Tighten the drain screw.c. Run the engine for a few seconds. Shut off engine.d. Loosen the drain screw and check that the carburetor is filled back up
with fuel.e. If fuel is reaching the carburetor, the ignition system should be checked
next.
WARNING
Draining fuel from the carburetor could be hazardous.
Fuel could catch fire if you do not handle it properly.
When draining the carburetor, be sure to shut the engine off. Do not smoke, and never drain or refuel in an area where there are open flames or sparks. Do not spill the fuel or you may create a fire hazard. Dispose of drained fuel properly.
CAUTION
Failing to troubleshoot a problem correctly would damage your ATV.
Improper repairs or adjustments may damage the vehicle. Such damage may not be covered under warranty. If you are not sure about the proper action, consult your authorized service center or Baja Motorsports about the problem.

68
Ignition System Check1. Remove the spark plug and reattach it to the spark plug lead.
2. Apply the rear brake lever to make sure the rear wheels are locked. Turn ignition key to the “ON” position. Slide the engine stop switch to the “RUN” position. Push the electric button “START “(yellow button). If the ignition system is operating properly, a blue spark should jump across the spark plug gap. If there is no spark, take your machine to your service center.
COMPLAINT: Engine stalls1. Make sure there is enough fuel in the fuel tank.2. Check to see that the spark plug is not fouled. Remove the spark plug
and clean it. Replace it, if necessary.3. Make sure the fuel valve is not clogged, and the fuel tank is not clogged,
either.4. Check the idle speed. If necessary, adjust it using a tachometer. The
correct idle speed is 1400~1600 r/min.5. Make sure the air filter is clean.
WARNING
Performing the spark test improperly could be hazardous.
You could get a high voltage electrical shock if you are not familiar with this procedure.
Do not perform this check if you are not familiar with the procedure. Do not hold the spark plug near the spark plug hole during this test. Do not do this test if you have a heart condition or wear a pacemaker. Do not perform this test is any near any open fuel containers for near fuel which has spilled on the ground, on the engine, or any part of the ATV.

69
TRANSPORTINGIt is best to transport the ATV in the normal position.
Before transporting the ATV drain the fuel from the carburetor as follows:1. Drain fuel from carburetor into an empty container by loosening the
carburetor drain screw.2. When the fuel has been drained, retighten the drain screw.
WARNING
Draining fuel from the carburetor could be hazardous.
Fuel could catch fire if you do not handle it properly.
When draining fuel from the carburetor, be sure to shut the engine off. Do not smoke, and never drain or refuel in an area where there are open flames or sparks. Do not spill the fuel or you may create a fire hazard. Dispose of the drained fuel properly.
CAUTION
Failing to secure the ATV properly could be hazardous.
Failing to secure the vehicle properly may result in an accident or damage to the vehicle.
When transporting the ATV, lock the parking brake lever and tie down the vehicle securely with straps, rope, or some other suitable means. Use extra tie downs when you transport the vehicle in the standing position.
Le bouchon de vidange du carburateur se trouve à la partie inferieure du carburateur.

70
CLEANING PROCEDUREA thorough cleaning of your ATV is a necessary part of maintenance. It will help keep your ATV looking and performing best. Proper cleaning can also extend the life of your ATV.
It is important to clean and inspect your ATV after every ride, especially if it is used in mud, brush, grass, water, salt water, or very dusty conditions
The build-up of mud, brush, grass, etc. especially on the engine and exhaust system, can reduce engine cooling ability, conceal damage, or increase wear of certain parts. It is important to remove all debris during cleaning.
PREPARATION FOR CLEANINGWash the ATV before any mud dries on the ATV.
Block or seal the end of the exhaust pipe (muffler) using a piece of plastic wrap, cloth rag or another method to prevent water from entering engine.
CAUTION
High pressure washers could damage your ATV.
High pressure washers such as those found at coin-operated car washes have enough pressure to damage the parts of your ATV. It may cause rust, corrosion and increase wear.
Do not use high pressure washers to clean your ATV.

71
WASHING YOUR ATVWith some care, your ATV can be washed in a similar manner to washing an automobile.
NOTE: Avoid spraying or allowing water to flow over the following places:• Ignition switch• Spark plug• Fuel tank cap• Carburetor• Air filter
Use a garden hose at low pressure to remove the majority of dirt or other debris. Hand wash your ATV with mild soap or detergent and water. Try to thoroughly remove all dirt and debris without excessive water pressure, even at remote areas such as between engine cooling fins, linkages or mounting brackets. Cloth rags, washing mitts or cleaning brushes can be used. Be careful with brushes as they may scratch plastic or painted surfaces. Rinse the ATV thoroughly with clean water. Dry all areas using a chamois or soft absorbent cloth.
INSPECTION AFTER CLEANING
Remove the rags or wrapping from the exhaust pipe. For extended life of your ATV, lubricate according to GENERAL LUBRICATION section.
Follow the procedures in the INSPECTION BEFORE RIDING section to check your ATV for any problems that may have occurred during your last ride.
WARNING
Operating the ATV with wet brakes could be hazardous.
Wet brakes may not provide as much stopping power as dry brakes. This could lead to an accident.
Test your brakes after washing the ATV, riding at a slow speed. If necessary, apply brake several times to let the friction dry out the linings.

72
STORAGE PROCEDUREIf you do not use your ATV for a long time, it will need special service requiring appropriate materials, equipment and skill. For this reason, we recommend that you trust this maintenance work to your authorized service center. If you wish to service the machine for storage yourself, follow the general guidelines below:
VEHICLEPlace the vehicle on level ground and wash the entire vehicle.
FUELDrain the fuel from the fuel tank by a hand pump. Drain the fuel from the carburetor by releasing the carburetor drain screw.
TIRESInflate tires to the normal pressure.
EXTERNAL1. Spray all vinyl and rubber parts with rubber protection.2. Spray unpainted surfaces with rust preventative. 3. Coat painted surfaces with car wax.
PROCEDURE FOR RETURNING TO SERVICE1. Clean the entire vehicle.2. Make sure that the vehicle is properly lubricated.3. Perform the INSPECTION BEFORE RIDING as listed in this manual.4. Start the vehicle as outlined in this manual.
WARNING
Draining the fuel could be hazardous.
Fuel could catch fire if you do not handle it properly.
When draining the fuel from the fuel tank, be sure to shut the engine off. Do not smoke, and never drain fuel in an area where there are open flames or sparks. Keep pets and children away from the fuel, and dispose of the drained fuel properly.

73
SERIAL NUMBER LOCATIONYou need to know the frame and engine serial numbers to get title documents for your ATV. You also need these numbers to help your authorized service center or Baja Motorsports order parts.
The frame/VIN number is stamped on the front of the ATV frame as shown in the photograph. The engine serial number is located on the right side of the engine housing.
Write down the serial numbers here for your future reference
Frame No.:
Engine No.:
Engine serial number
Frame number

74
SPECIFICATIONS WD250UR / WD250UDIMENSIONS AND DRY MASSOverall length............................................................................1940mm (76.38 in)Overall width.............................................................................1050mm (41.34 in)Overall height............................................................................1160mm (45.67 in)Wheelbase.................................................................................1160mm (45.67in)Ground clearance......................................................................155mm (6.10 in)Minumum turning radius..........................................................2913mm (114.17 in)Seat height810mm ...................................................................(31.89 in)Dry weight 220Kg .....................................................................(485 lbs)
ENGINEType............................................................................................four stroke, air cooledNumber of cylinders.................................................................1Bore X Stroke............................................................................71mm x 58mmDisplacement............................................................................229.6 cm3Compression ratio...................................................................8.7:1Carburetor.................................................................................Vacume film pieceAir cleaner.................................................................................Paper with Polyurethane Foam Element
TRANSMISSIONPrimary reduction system........................................................Spur GearPrimary reduction ratio.............................................................73/22 (3.318)Secondary reduction system...................................................Shaft DriveSecondary reduction ratio........................................................19/18 X 46/11(4.414)Transmission Type....................................................................Constant Mesh, 5 - speed forward, 1 - speed reverseOperation...................................................................................Left foot
GEAR RATIO:
1st...............................................................................................34/12 (2.833)2nd..............................................................................................34/19 (1.789)3rd...............................................................................................29/22 (1.318)4th...............................................................................................26/25 (1.040)5th...............................................................................................23/28 (0.821)Reverse......................................................................................73/22 x 34/12x19/18 x 46/11 (41.5)

75
ELECTRICALIgnition type................................................................................CDIGenerator system.......................................................................A.C. MagnetoBattery type, voltage, capacity..................................................12N14-BS/12V,14AHHeadlight.....................................................................................12V, 30w/30w x 2Taillight........................................................................................12V, 21w/15w x 1Neutral indicator.........................................................................12V, 3w x 1Reverse indicator.......................................................................12V, 3w x 1High beam indicator...................................................................12V, 3w x 1
OILPeriodic engine oil change........................................................53 oz (1.5L)with oil filter replacement..........................................................56 oz (1.6L)Total amount of engine oil.........................................................63 oz (1.8L)Total amount of gear oil.............................................................9 oz (0.266L)
FUELMain fuel tank capacity..............................................................2.64 gallons (9L)Reserve fuel tank capacity........................................................0.35 gallons (1.3L)
BRAKESFront brake type.........................................................................Hydraulic disc brakeOperation....................................................................................Right hand operationRear brake type..........................................................................Drum brakeOperation....................................................................................Right foot operation
SUSPENSIONFront............................................................................................2 Spring oil dampener shocksRear.............................................................................................1 Spring oil dampener shockFront suspension travel............................................................12.5mm (0.49 in)Rear suspension travel.............................................................13.5mm (0.53 in)
TIRESSize Front....................................................................................AT22x8-10Size Rear.....................................................................................AT22x11-10
FRAMEFrame type..................................................................................Steel TubeCaster angle................................................................................4 deg.

BAJA INC. – EMISSION CONTROL SYSTEM WARRANTY
YOUR WARRANTY RIGHTS AND OBLIGATIONS
The emission control system warranty period for this vehicle begins on the date the vehicle is delivered to the first purchaser other than an authorized dealer, or the date it is first used as a demonstrator, lease, or company vehicle, whichever comes first and continues for 60 months after that date, or 5,000km, whichever comes first, provided there has been no abuse, neglect or improper maintenance of your vehicle. Where a warrantable condition exists, the Distributor will repair your vehicle at no cost to you, including diagnosis, parts and labor. If an emission-related part on your vehicle is defective, the part will be repaired or replaced by the Distributor. This is your emission control defects warranty.
OWNER’S WARRANTY RESPONSIBILITIES
As the vehicle owner, you are responsible for the performance of the required maintenance. You should maintain a record of all maintenance performed on your vehicle and retain all receipts covering maintenance on your vehicle. You may not be denied a warranty claim solely because of your failure to ensure the performance of all scheduled maintenance or lack of maintenance records or receipts. You are responsible for presenting your vehicle to an authorized dealer as soon as a problem exists. The warranty repairs should be completed in a reasonable amount of time, not to exceed 30 days.
As the vehicle owner, you should be aware that you may be denied your warranty coverage if your vehicle or a part has failed due to abuse, neglect, improper maintenance, or unapproved modifications.
WARRANTY COVERAGE
The Distributor warrants that each new 2009 and later vehicle:● is designed, built, and equipped so as to conform at the time of initial retail purchase with all applicable regulations of the United States Environmental Protection Agency, and the California Air Resources Board; and● is free from defects in material and workmanship which cause such vehicle to fail to confirm with applicable regulations of the United States Environmental Protection Agency or the California Air Resources Board for the periods specified above.

Your emission control system warranty covers components whose failure would increase an engine’s emission, including electronic controls, fuel injection system, carburetor, the ignition system, catalytic converter, or any other system utilized in this vehicle to control emission if it is originally equipped. Also included may be hoses, connectors and other emission-related assemblies. Replacing or repairing other components (including parts, labor, and other costs) not covered by this emission control system warranty or the standard warranty is the responsibility of the owner.
Coverage of repairs under this warranty applies only when repairs are completed at an authorized dealer or repair facility. The Distributor will not cover repairs performed outside of an authorized dealer or repair facility. The use of replacement parts not equivalent to the original parts may impair the effectiveness of your vehicle’s emission control system. If such a replacement part is used and an authorized dealer determines it is defective or causes a failure of a warranted part, your claim for repair to bring your vehicle into compliance with applicable standards may be denied.
This Emission Control System Warranty is in addition to the standard Limited Warranty.
EXCLUSIONS AND LIMITATIONS
This warranty does not cover the following:1. Failures or malfunctions of the emission control systems caused by abuse, alteration, accident, misuse, the use of leaded gasoline.2. Replacement of expendable maintenance items unless they are original equipment defective in material or workmanship under normal use, and the first required replacement interval for the item has not been reached. Expendable maintenance items include but not limited to spark plugs, filters, coolant, lubricants, gaskets, hoses, and belts.3. Replacements of parts and other services and adjustments for required maintenance.4. Any vehicle equipped with an odometer or hour meter where the reading is altered so that actual mileage cannot be readily determined.5. Repairs or replacements as a result of:o Accidento Misuseo Use of replacement parts or accessories not conforming to the original specifications which adversely affect performance

6. Physical damage, corrosion, or defects caused by fire, explosions or similar causes beyond the control of the Distributor.7. Failures not caused by a defect in material or workmanship.
Use of the vehicle in any type of competitive racing or related events immediately and completely voids this and all other warranties.
LIMITED LIABILITY
The liability of the Distributor under this Emission Control System Warranty is limited solely to the remedying of defects in material workmanship by an authorized dealer at its place of business during customary business hours. This warranty does not cover inconvenience or loss of use of the vehicle or transportation of the vehicle to/from the authorized dealer. The Distributor is not liable to any person for incidental, consequential or special damages of any description, whether arising out of express or implied warranty or any other contract, negligence or other tort or otherwise.
No express emission control system warranty is given by the Distributor except as specifically set forth herein. Any emission control system warranty implied by law, including any warranty of merchantability or fitness for a particular purpose is limited to the express emission control system warranty terms stated in this warranty. The foregoing statements of warranty are exclusive and in lieu of all other remedies. All express warranties not stated in this warranty are disclaimed. Some states do not allow limitations on how long an implied warranty lasts, so the above limitations may not apply if it is inconsistent with the controlling state law.
No dealer is authorized to modify this Emission Control System Warranty. If you have any questions regarding your warranty rights and responsibilities, you should contact BAJA INC. (888) 863-2252.

78
Baja INC.
P.O. Box 61150
Phoenix, AZ. 85082
Toll Free: 866-250-7155
Service Center Line: 866-401-2252


![[Please list the analysis conducted] - Baja SAE Baja SAE Redesign Comparison... · Web view2016 Baja SAE Design Comparison Document 2016 Baja SAE Design Comparison Document 2016 Baja](https://static.fdocuments.in/doc/165x107/5ab1e61b7f8b9a284c8d112e/please-list-the-analysis-conducted-baja-baja-sae-redesign-comparisonweb-view2016.jpg)