Owner’s Booklet Manual del propietario - Advanced … del propietario Pruebas prácticamente Sin...
41
Owner’s Booklet Virtually Pain-Free Testing Manual del propietario Pruebas prácticamente Sin Dolor
Transcript of Owner’s Booklet Manual del propietario - Advanced … del propietario Pruebas prácticamente Sin...

Owner’sBooklet
Virtually Pain-Free Testing
Manual del propietario
Pruebas prácticamenteSin Dolor

Table of Contents
Important Information About YourFreeStyle Freedom™ Blood Glucose Monitoring System ............................... 3Important Health Related Information ........................................................ 4-5The FreeStyle Freedom Meter and FreeStyle® Test StripThe FreeStyle Freedom Meter and How It Works ...................................... 6-7 The FreeStyle Freedom Meter Display ........................................................ 8-9 The FreeStyle Test Strip ....................................................................................10The FreeStyle Control Solution The FreeStyle Control Solution ................................................................. 11-12 Performing a Control Solution Test.......................................................... 13-14The FreeStyle Lancing DeviceUsing the Lancing Device .......................................................................... 15-16Testing Your Blood GlucoseTesting Your Blood Glucose .... .......................................................................17 Performing a Blood Glucose Test ............................................................. 18-23 LO and HI Readings .........................................................................................24 Meter Set-UpSetting Up Your Meter ......................................................................................25 Setting the Alarms ....................................................................................... 25-26 Setting the Sound, Time, Time Format .........................................................27 Setting the Date, Date Format ........................................................................28 Unit of Measurement, Software Version Display ..........................................29Meter ResultsMeter Memory, 14 Day Average......................................................................30Test Results (Blood Glucose, Control Solution), Transferring Data .... 30-31Meter MaintenanceBattery ................................................................................................................32Replacing the Battery .................................................................................. 32-33Caring for Your Meter ......................................................................................33System TroubleshootingError Messages ............................................................................................. 34-37Troubleshooting .................................................................................................38FreeStyle Freedom System Specifications ......................................................39
ART06690-Rev-B-EN.indd 1 11/17/05 6:11:38 PM

� Call Customer Care Toll Free at 1-888-522-5226 www.AbbottDiabetesCare.com
ENG
LISH
The FreeStyle Freedom™ System Uses the World’s Smallest Sample So You Can Test on a Variety of Locations
The human figure above shows the areas where you can test with all the FreeStyle Blood Glucose Monitoring Systems. Avoid moles, veins, bones and tendons.
WARNING:We recommend that you test on your fingers or palm (at the base of the thumb) if you are testing for hypoglycemia (low blood glucose) or if you suffer from hypoglycemia unawareness.
Upper arm
Forearm
HandFingertips
Thigh
Calf
Suggested Test Areas for the Hand
Most Test Sites Available
ART06690-Rev-B-EN.indd 2 11/17/05 6:11:38 PM
�
ENG
LISH
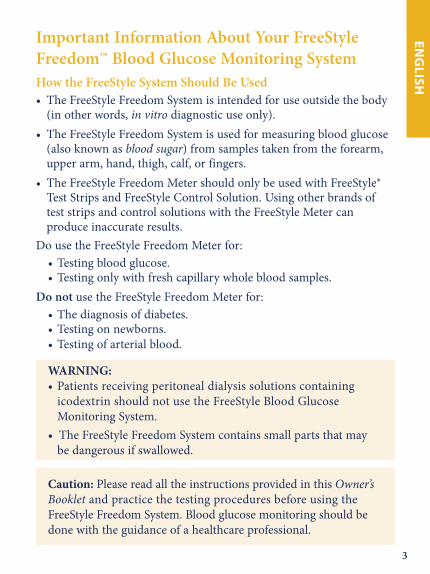
Important Information About Your FreeStyle Freedom™ Blood Glucose Monitoring System How the FreeStyle System Should Be Used• The FreeStyle Freedom System is intended for use outside the body (in other words, in vitro diagnostic use only).• The FreeStyle Freedom System is used for measuring blood glucose (also known as blood sugar) from samples taken from the forearm, upper arm, hand, thigh, calf, or fingers.• The FreeStyle Freedom Meter should only be used with FreeStyle® Test Strips and FreeStyle Control Solution. Using other brands of test strips and control solutions with the FreeStyle Meter can produce inaccurate results. Do use the FreeStyle Freedom Meter for: • Testing blood glucose. • Testing only with fresh capillary whole blood samples.Do not use the FreeStyle Freedom Meter for: • The diagnosis of diabetes. • Testing on newborns. • Testing of arterial blood.
WARNING: • Patients receiving peritoneal dialysis solutions containing icodextrin should not use the FreeStyle Blood Glucose Monitoring System.• The FreeStyle Freedom System contains small parts that may be dangerous if swallowed.
Caution: Please read all the instructions provided in this Owner’s Booklet and practice the testing procedures before using the FreeStyle Freedom System. Blood glucose monitoring should be done with the guidance of a healthcare professional.
ART06690-Rev-B-EN.indd 3 11/17/05 6:11:39 PM
� Call Customer Care Toll Free at 1-888-522-5226 www.AbbottDiabetesCare.com
ENG
LISH
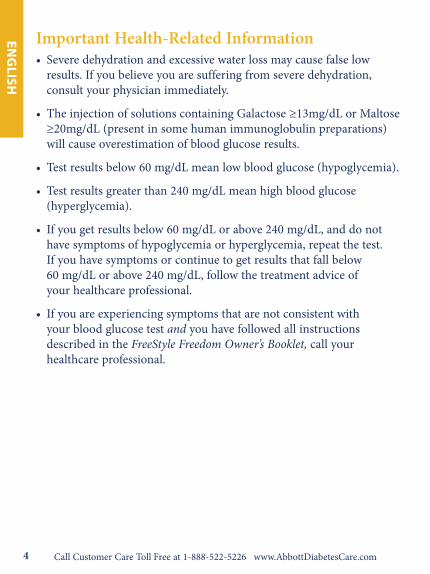
Important Health-Related Information• Severe dehydration and excessive water loss may cause false low results. If you believe you are suffering from severe dehydration, consult your physician immediately.
• The injection of solutions containing Galactose ≥13mg/dL or Maltose ≥20mg/dL (present in some human immunoglobulin preparations) will cause overestimation of blood glucose results.
• Test results below 60 mg/dL mean low blood glucose (hypoglycemia).
• Test results greater than 240 mg/dL mean high blood glucose (hyperglycemia).
• If you get results below 60 mg/dL or above 240 mg/dL, and do not have symptoms of hypoglycemia or hyperglycemia, repeat the test. If you have symptoms or continue to get results that fall below 60 mg/dL or above 240 mg/dL, follow the treatment advice of your healthcare professional.
• If you are experiencing symptoms that are not consistent with your blood glucose test and you have followed all instructions described in the FreeStyle Freedom Owner’s Booklet, call your healthcare professional.
ART06690-Rev-B-EN.indd 4 11/17/05 6:11:39 PM

�
ENG
LISH
WARNING: We recommend that you test on your fingers or palm (at the base of the thumb) if you are testing for hypoglycemia (low blood glucose) or if you suffer from hypoglycemia unawareness.
Important Health-Related Information• Changes in blood glucose may be observed in finger or palm (at the base of the thumb) blood samples sooner than blood samples from the forearm and other alternative sites. Vigorous rubbing of the alternative test sites before lancing will help to minimize the difference between finger or palm (at the base of the thumb) and alternative site test results. The palm (at the base of the thumb) is an alternative site that does not require vigorous rubbing before testing.• Physiologic differences in the circulation between the finger or palm (at the base of the thumb) and other test sites like the forearm, upper arm, top of hand, thigh, and calf may result in differences in blood glucose measurements from these test sites and your finger or palm (at the base of the thumb). Differences in blood glucose measurement between the other test sites and your finger or palm (at the base of the thumb) may be observed after eating, insulin medication, or exercise.
ART06690-Rev-B-EN.indd 5 11/17/05 6:11:39 PM
� Call Customer Care Toll Free at 1-888-522-5226 www.AbbottDiabetesCare.com
ENG
LISH
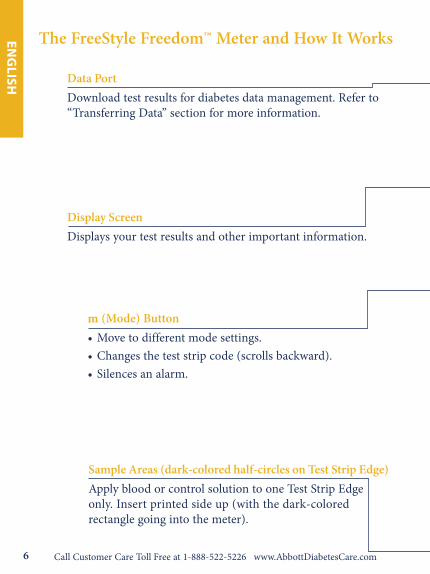
The FreeStyle Freedom™ Meter and How It Works
Data PortDownload test results for diabetes data management. Refer to “Transferring Data” section for more information.
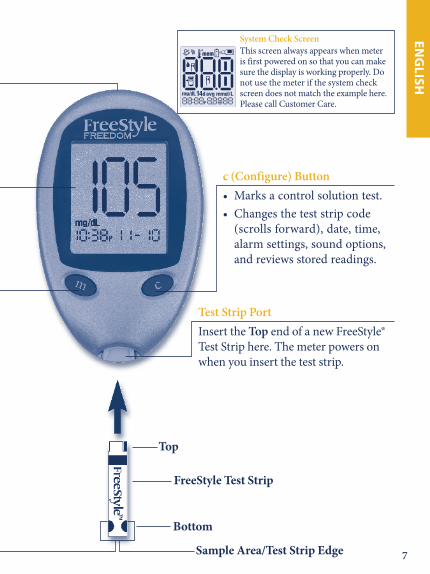
Display ScreenDisplays your test results and other important information.
m (Mode) Button• Move to different mode settings.• Changes the test strip code (scrolls backward).• Silences an alarm.
Sample Areas (dark-colored half-circles on Test Strip Edge)Apply blood or control solution to one Test Strip Edge only. Insert printed side up (with the dark-colored rectangle going into the meter).
ART06690-Rev-B-EN.indd 6 11/17/05 6:11:40 PM
�
ENG
LISH
c (Configure) Button• Marks a control solution test.• Changes the test strip code
(scrolls forward), date, time, alarm settings, sound options, and reviews stored readings.
Test Strip PortInsert the Top end of a new FreeStyle® Test Strip here. The meter powers on when you insert the test strip.
Bottom
FreeStyle Test Strip
Sample Area/Test Strip Edge
Top
System Check Screen This screen always appears when meter is first powered on so that you can make sure the display is working properly. Do not use the meter if the system check screen does not match the example here. Please call Customer Care.
ART06690-Rev-B-EN.indd 7 11/17/05 6:11:42 PM
� Call Customer Care Toll Free at 1-888-522-5226 www.AbbottDiabetesCare.com
ENG
LISH
The
Free
Styl
e Fr
eedo
m™
Met
er D
ispl
ay
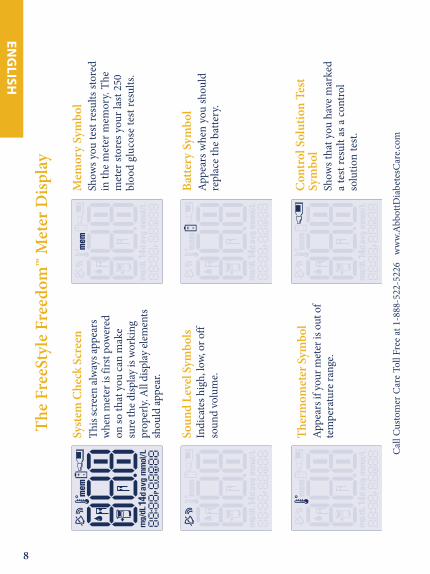
Syst
em C
heck
Scr
een
This
scre
en al
way
s app
ears
w
hen
met
er is
firs
t pow
ered
on
so th
at y
ou ca
n m
ake
sure
the d
ispla
y is
wor
king
pr
oper
ly. A
ll di
spla
y ele
men
ts
shou
ld ap
pear
.
Soun
d Le
vel S
ymbo
ls
Indi
cate
s hig
h, lo
w, o
r off
soun
d vo
lum
e.
Ther
mom
eter
Sym
bol
Appe
ars i
f you
r met
er is
out
of
tem
pera
ture
rang
e.
Mem
ory
Sym
bol
Show
s you
test
resu
lts st
ored
in
the
met
er m
emor
y. Th
e m
eter
stor
es y
our l
ast 2
50
bloo
d gl
ucos
e te
st re
sults
.
Batte
ry S
ymbo
l Ap
pear
s whe
n yo
u sh
ould
re
plac
e th
e ba
ttery
.
Con
trol
Sol
utio
n Te
st
Sym
bol
Show
s tha
t you
hav
e m
arke
d a
test
resu
lt as
a c
ontr
ol
solu
tion
test
.
Cal
l Cus
tom
er C
are
Toll
Free
at 1
-888
-522
-522
6 w
ww.
Abb
ottD
iabe
tesC
are.c
om
ART06690-Rev-B-EN.indd 8 11/17/05 6:11:43 PM
�
ENG
LISH
The
Free
Styl
e Fr
eedo
m™
Met
er D
ispl
ay
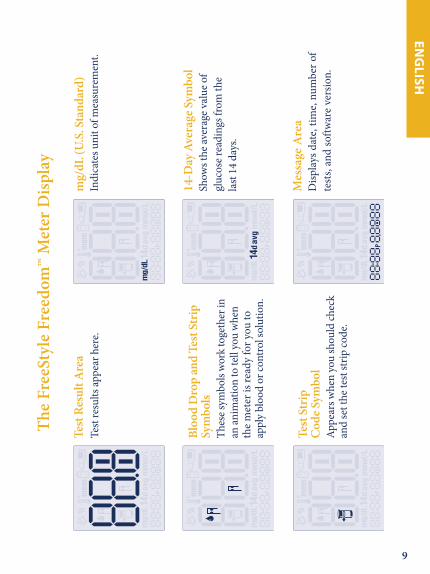
Test
Res
ult A
rea
Test
resu
lts ap
pear
her
e.
Bloo
d D
rop
and
Test
Str
ip
Sym
bols
Th
ese s
ymbo
ls w
ork
toge
ther
in
an an
imat
ion
to te
ll yo
u w
hen
the m
eter
is re
ady
for y
ou to
ap
ply
bloo
d or
cont
rol s
olut
ion.
Test
Str
ip
Cod
e Sym
bol
Appe
ars w
hen
you
shou
ld ch
eck
and
set t
he te
st st
rip co
de.
mg/
dL (U
.S. S
tand
ard)
In
dica
tes u
nit o
f mea
sure
men
t.
1�-D
ay A
vera
ge S
ymbo
l Sh
ows t
he av
erag
e val
ue o
f gl
ucos
e rea
ding
s fro
m th
e la
st 1
4 da
ys.
Mes
sage
Are
a D
ispla
ys d
ate,
time,
num
ber o
f te
sts,
and
softw
are
vers
ion.
ART06690-Rev-B-EN.indd 9 11/17/05 6:11:45 PM

10 Call Customer Care Toll Free at 1-888-522-5226 www.AbbottDiabetesCare.com
ENG
LISH
The FreeStyle® Test Strip Apply blood or control solution to only one Test Strip Edge per test. Important: Use only one Test Strip Edge per test. Do not apply blood to both edges. Test strips may be used only once. Discard used test strips. You can continue to fill the test strip for up to 60 seconds. Be sure to reapply the sample to the same Test Strip Edge. Test Strip Edge
WARNING: The vial cap is a choking hazard. The cap or vial contains drying agents that may be harmful if inhaled or swallowed and may cause skin or eye irritation.
Important Test Strip Information• The FreeStyle Freedom™ System has an operating range of 40º to
104º F (4º to 40º C).• Store the test strip package in a cool, dry place between 37º to 86º F
(3º to 30º C).• Use test strips only within the system operating temperature range.• Keep away from direct sunlight and heat.• Store your test strips in their original vial only; never transfer them to another vial or any other container.• Never store individual test strips outside the vial.• After removing a FreeStyle Test Strip from the vial, immediately
replace the vial cap and close tightly.• With clean, dry hands, you may gently touch the test strip
anywhere when removing it from the vial or inserting it into the meter.
• Do not use test strips beyond the expiration date. This may cause inaccurate results.
• Do not bend, cut, or alter FreeStyle Test Strips in any way.Note: For further information, refer to the FreeStyle Test Strip package insert.
ART06690-Rev-B-EN.indd 10 11/17/05 6:11:45 PM

11
ENG
LISH
The FreeStyle® Control Solution FreeStyle Control Solution is a red liquid that contains a fixed amount of glucose that is used to: • Practice testing without having to use your own blood. • Ensure that your meter and test strips are working together properly.
A control solution test should be performed • When you question your results and want to confirm that your monitor and test strips are working properly. For information on how to obtain Control Solution, call Customer Care at 1-888-522-5226.
Important Control Solution Information FreeStyle Control Solution is good for three months after opening the bottle or until the expiration date printed on the label, whichever comes first. Important: Count forward three months from the date you open a new bottle of control solution. This is your discard date. Write this date on the side of the control solution bottle. Example: You open the control solution on January 15th. Count forward three months to April 15th. This is the discard date that you record on the bottle.
ART06690-Rev-B-EN.indd 11 11/17/05 6:11:46 PM

1� Call Customer Care Toll Free at 1-888-522-5226 www.AbbottDiabetesCare.com
ENG
LISH
Ensuring Accurate Control Solution Results • Use only FreeStyle® Control Solution with your FreeStyle Freedom™ System. • Replace the cap on the control solution bottle immediately after using. • Do not use control solution past the expiration date, this may cause inaccurate results. • Do not add water or any liquid to control solution. • Control solution tests are specified to be accurate only when performed between 59º to 104º F (15º to 40º C). • The control solution test results should fall within the range printed on the test strip vial label.
Important: The control solution range is a target range for control solution test results only. It is not a target range for your blood glucose level or blood glucose test results.
• If control solution results are out of this range, repeat the test. • If your control solution test results continue to fall out of range, do not use the FreeStyle Freedom System to test your blood glucose. Contact Customer Care at 1-888-522-5226.
Caution: Results from FreeStyle Control Solution tests do not reflect your blood glucose level.
ART06690-Rev-B-EN.indd 12 11/17/05 6:11:46 PM

1�
ENG
LISH
�
1
�
Performing a Control Solution Test
Insert the top of the test strip into your meter until it stops. This will power on the meter.
The code number on the display must match the code number on the side of your test strip vial. (Refer to “Setting the Test Strip Code”)
Wait for the meter to display the Blood Drop and Test Strip Symbols.
Note: Be ready to adjust the code on the meter to match the code number on the test strip vial.
Gently touch only the Sample Area of the Test Strip Edge to the control solution.
Important: Do not apply control solution to both Test Strip Edges.
When the test strip is full. A short line moves clockwise around the display screen while the sample is processing. If the sound volume is on, your meter will beep.
ART06690-Rev-B-EN.indd 13 11/17/05 6:11:48 PM

1� Call Customer Care Toll Free at 1-888-522-5226 www.AbbottDiabetesCare.com
ENG
LISH
The result will appear on the display screen and if the sound is on, your meter will beep twice. To mark the result as a control solution test result, press and hold the “c” button for two seconds until the control solution symbol ( ) appears at the top of the display screen. If you have marked a result as a control solution test by mistake, you can unmark it by pressing and holding the “c” button again for two seconds.
Compare your control solution test result to the range printed on your test strip vial. Your control solution test results should fall within this range. The range shown in picture is only an example.
�
Out of range test results may be caused by:• Expired or bad control solution • Expired or bad test strip• Error in performing test• Watered-down control solution• Code on test strip vial does not match code set in meter• Meter malfunction• Control solution test done outside 59º to 104º F (15º to 40º C)
To power off the meter, remove the test strip.
ART06690-Rev-B-EN.indd 14 11/17/05 6:11:49 PM
1�
ENG
LISH
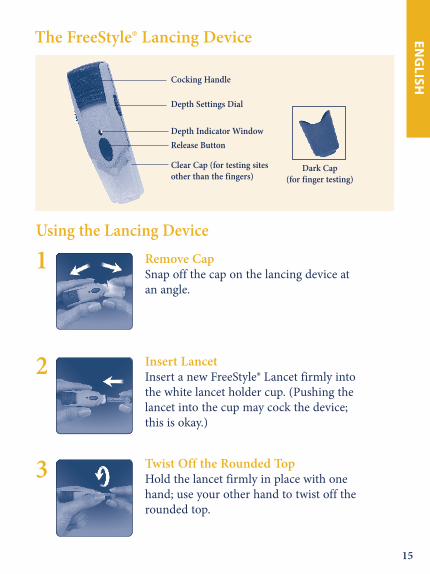
The FreeStyle® Lancing Device
Dark Cap (for finger testing)
Cocking Handle
Depth Settings Dial
Depth Indicator Window Release Button
Clear Cap (for testing sites other than the fingers)
Using the Lancing Device
1
�
Remove Cap Snap off the cap on the lancing device at an angle.
Insert Lancet Insert a new FreeStyle® Lancet firmly into the white lancet holder cup. (Pushing the lancet into the cup may cock the device; this is okay.)
Twist Off the Rounded Top Hold the lancet firmly in place with one hand; use your other hand to twist off the rounded top.
�
ART06690-Rev-B-EN.indd 15 11/17/05 6:11:52 PM
1� Call Customer Care Toll Free at 1-888-522-5226 www.AbbottDiabetesCare.com
ENG
LISH
�
�
�
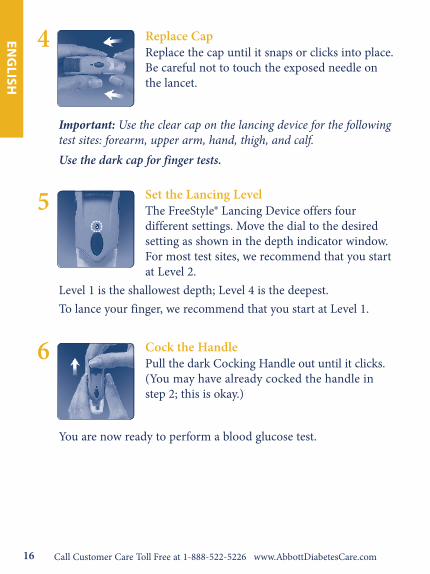
Replace Cap Replace the cap until it snaps or clicks into place.
Be careful not to touch the exposed needle on the lancet.
Important: Use the clear cap on the lancing device for the following test sites: forearm, upper arm, hand, thigh, and calf. Use the dark cap for finger tests.
Set the Lancing Level The FreeStyle® Lancing Device offers four different settings. Move the dial to the desired
setting as shown in the depth indicator window. For most test sites, we recommend that you start at Level 2. Level 1 is the shallowest depth; Level 4 is the deepest. To lance your finger, we recommend that you start at Level 1.
Cock the Handle Pull the dark Cocking Handle out until it clicks.
(You may have already cocked the handle in step 2; this is okay.)
You are now ready to perform a blood glucose test.
ART06690-Rev-B-EN.indd 16 11/17/05 6:11:54 PM

1�
ENG
LISH
• With the FreeStyle Freedom™ Meter, you can test your blood glucose on your forearm, fingers, upper arm, hand, thigh, or calf. • Testing with the FreeStyle Freedom Meter requires a very small sample size, just 0.3 microliter of blood; about the size of a pinhead (example: ). • Most healthcare professionals recommend testing when blood glucose values are stable: before meals and before bedtime. However, when blood glucose is changing, blood from the fingertips or palm (at the base of the thumb) may show these changes sooner than blood from other sites.
Testing Your Blood Glucose
WARNING: We recommend that you test on your fingers or palm (at the base of the thumb) if you are testing for hypoglycemia (low blood glucose) or if you suffer from hypoglycemia unawareness.
Times when you may be checking for low blood glucose include: • When you are feeling symptoms such as weakness, sweating, nervousness, headache, or confusion. • When you have delayed a meal after taking insulin. • When your healthcare professional advises you to do so.
Important: To ensure accurate results, wash your hands and test site (for example, your forearm) with soap and water. Make sure there is no cream or lotion on the test site. Thoroughly dry your hands and test site.
ART06690-Rev-B-EN.indd 17 11/17/05 6:11:54 PM
1� Call Customer Care Toll Free at 1-888-522-5226 www.AbbottDiabetesCare.com
ENG
LISH
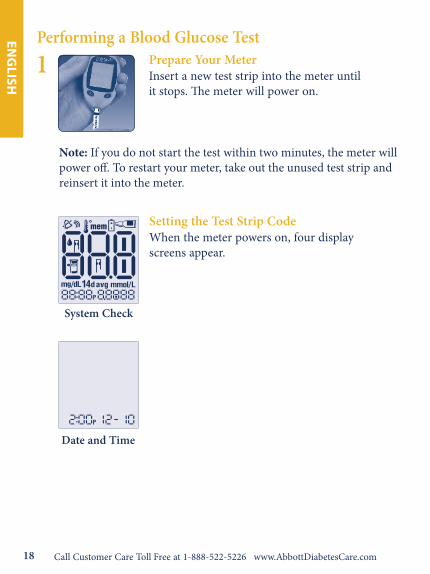
1 Prepare Your Meter Insert a new test strip into the meter until it stops. The meter will power on.
Performing a Blood Glucose Test
System Check
Setting the Test Strip Code When the meter powers on, four display screens appear.
Note: If you do not start the test within two minutes, the meter will power off. To restart your meter, take out the unused test strip and reinsert it into the meter.
Date and Time
ART06690-Rev-B-EN.indd 18 11/17/05 6:11:55 PM

1�
ENG
LISH
Caution: Take care to not press the “c” or “m” buttons when you are holding the meter while performing the blood test. If you do, you might change the code and get an incorrect reading or an Error 6.
Note: To ensure accurate test results, make sure the code number on your meter always matches the number in the box outlined in blue, located on the side of the test strip vial.
Setting the Test Strip Code (cont) • When you see the word “COdE” and a code
number on the display screen, use the “c” (configure) button to scroll forward or the “m” (mode) button to scroll backward until the number matches the number on your test strip vial. The FreeStyle Freedom™ Meter has a total of 50 codes.
• After you set your code number, the Blood Drop and Test Strip symbols will appear on the display screen.
• If you want to return to the code number display screen after the Blood Drop and Test Strip symbols appear, press the “c” button.
Code Number
Blood Drop and Test Strip
Symbols
ART06690-Rev-B-EN.indd 19 11/17/05 6:11:56 PM
�0 Call Customer Care Toll Free at 1-888-522-5226 www.AbbottDiabetesCare.com
ENG
LISH
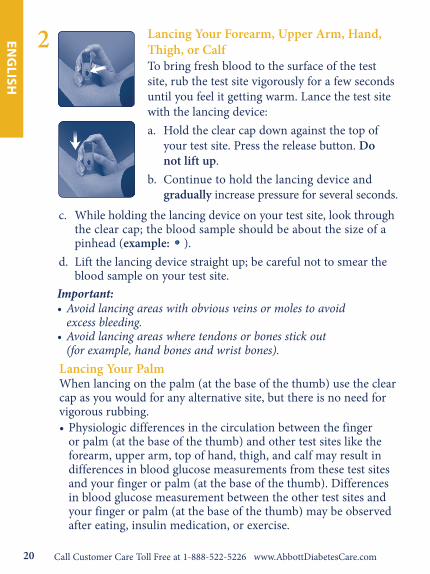
Lancing Your Forearm, Upper Arm, Hand, Thigh, or CalfTo bring fresh blood to the surface of the test site, rub the test site vigorously for a few seconds until you feel it getting warm. Lance the test site with the lancing device: a. Hold the clear cap down against the top of your test site. Press the release button. Do not lift up.b. Continue to hold the lancing device and gradually increase pressure for several seconds.
�
Important: • Avoid lancing areas with obvious veins or moles to avoid excess bleeding. • Avoid lancing areas where tendons or bones stick out (for example, hand bones and wrist bones).Lancing Your Palm When lancing on the palm (at the base of the thumb) use the clear cap as you would for any alternative site, but there is no need for vigorous rubbing. • Physiologic differences in the circulation between the finger or palm (at the base of the thumb) and other test sites like the forearm, upper arm, top of hand, thigh, and calf may result in differences in blood glucose measurements from these test sites and your finger or palm (at the base of the thumb). Differences in blood glucose measurement between the other test sites and your finger or palm (at the base of the thumb) may be observed after eating, insulin medication, or exercise.
c. While holding the lancing device on your test site, look through the clear cap; the blood sample should be about the size of a pinhead (example: ).d. Lift the lancing device straight up; be careful not to smear the blood sample on your test site.
ART06690-Rev-B-EN.indd 20 11/17/05 6:11:56 PM
�1
ENG
LISH
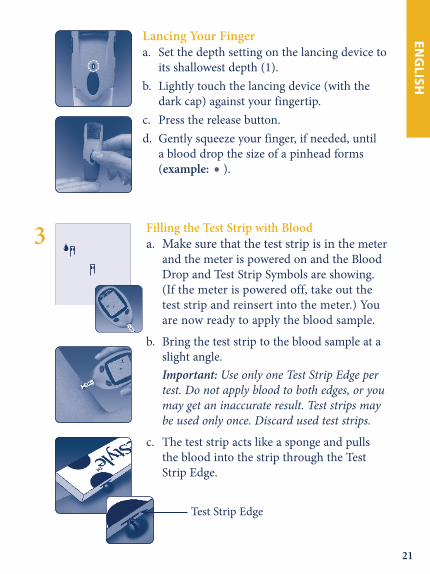
Lancing Your Fingera. Set the depth setting on the lancing device to its shallowest depth (1).b. Lightly touch the lancing device (with the dark cap) against your fingertip.c. Press the release button.d. Gently squeeze your finger, if needed, until a blood drop the size of a pinhead forms (example: ).
� Filling the Test Strip with Blooda. Make sure that the test strip is in the meter and the meter is powered on and the Blood Drop and Test Strip Symbols are showing. (If the meter is powered off, take out the test strip and reinsert into the meter.) You are now ready to apply the blood sample.
b. Bring the test strip to the blood sample at a slight angle. Important: Use only one Test Strip Edge per test. Do not apply blood to both edges, or you may get an inaccurate result. Test strips may be used only once. Discard used test strips.
c. The test strip acts like a sponge and pulls the blood into the strip through the Test Strip Edge.
Test Strip Edge
ART06690-Rev-B-EN.indd 21 11/17/05 6:11:57 PM
�� Call Customer Care Toll Free at 1-888-522-5226 www.AbbottDiabetesCare.com
ENG
LISH
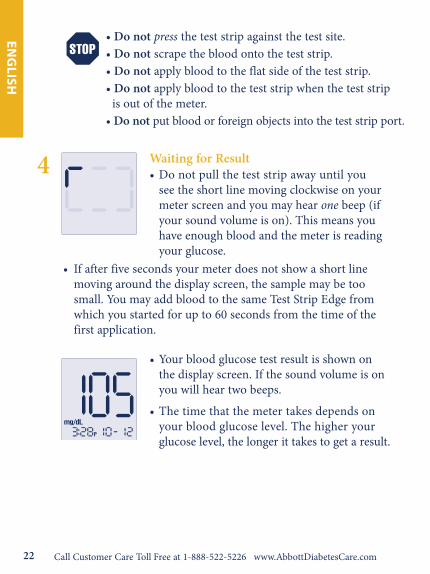
Waiting for Result • Do not pull the test strip away until you see the short line moving clockwise on your meter screen and you may hear one beep (if your sound volume is on). This means you have enough blood and the meter is reading your glucose.• If after five seconds your meter does not show a short line moving around the display screen, the sample may be too small. You may add blood to the same Test Strip Edge from which you started for up to 60 seconds from the time of the first application.
• Your blood glucose test result is shown on the display screen. If the sound volume is on you will hear two beeps.
• The time that the meter takes depends on your blood glucose level. The higher your glucose level, the longer it takes to get a result.
�
• Do not press the test strip against the test site. • Do not scrape the blood onto the test strip. • Do not apply blood to the flat side of the test strip. • Do not apply blood to the test strip when the test strip is out of the meter. • Do not put blood or foreign objects into the test strip port.
ART06690-Rev-B-EN.indd 22 11/17/05 6:11:58 PM

��
ENG
LISH
� Removing the Lancet When you have finished testing, snap off the cap from the lancing device. Pinch the white clip that holds the lancet until the lancet falls out.
• Do not press the test strip against the test site. • Do not scrape the blood onto the test strip. • Do not apply blood to the flat side of the test strip. • Do not apply blood to the test strip when the test strip is out of the meter. • Do not put blood or foreign objects into the test strip port.
Potential BruisingIt is possible you may experience bruising at the test site. If bruising does occur, you may choose to lance another test site.
MaintenanceUse isopropyl alcohol or soap and water to wipe the outside of the lancing device. If you wish, remove the cap, wash it in warm water and rinse well.
Important:Do not immerse the body of the lancing device in water or any other liquid.
ART06690-Rev-B-EN.indd 23 11/17/05 6:11:58 PM
�� Call Customer Care Toll Free at 1-888-522-5226 www.AbbottDiabetesCare.com
ENG
LISH
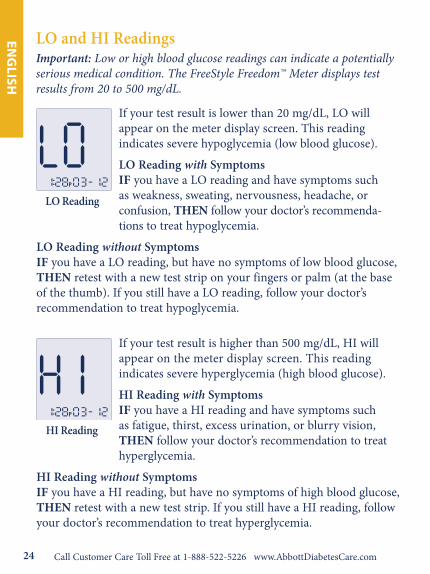
LO and HI Readings Important: Low or high blood glucose readings can indicate a potentially serious medical condition. The FreeStyle Freedom™ Meter displays test results from 20 to 500 mg/dL.
If your test result is lower than 20 mg/dL, LO will appear on the meter display screen. This reading indicates severe hypoglycemia (low blood glucose).
LO Reading with Symptoms IF you have a LO reading and have symptoms such
as weakness, sweating, nervousness, headache, or confusion, THEN follow your doctor’s recommenda-
tions to treat hypoglycemia.
LO Reading without Symptoms IF you have a LO reading, but have no symptoms of low blood glucose, THEN retest with a new test strip on your fingers or palm (at the base of the thumb). If you still have a LO reading, follow your doctor’s recommendation to treat hypoglycemia.
If your test result is higher than 500 mg/dL, HI will appear on the meter display screen. This reading indicates severe hyperglycemia (high blood glucose).
HI Reading with Symptoms IF you have a HI reading and have symptoms such
as fatigue, thirst, excess urination, or blurry vision, THEN follow your doctor’s recommendation to treat
hyperglycemia.
HI Reading without Symptoms IF you have a HI reading, but have no symptoms of high blood glucose, THEN retest with a new test strip. If you still have a HI reading, follow your doctor’s recommendation to treat hyperglycemia.
LO Reading
HI Reading
ART06690-Rev-B-EN.indd 24 11/17/05 6:11:58 PM
��
ENG
LISH
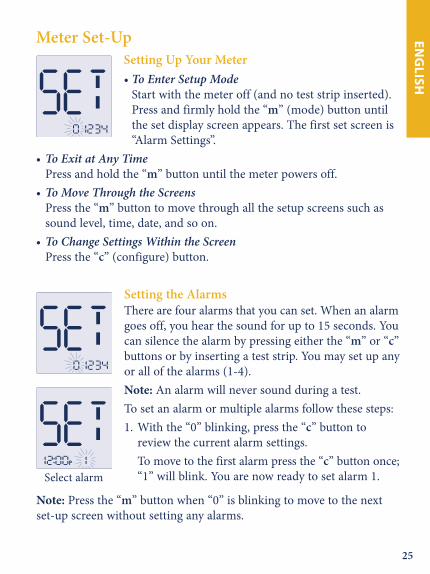
Meter Set-Up
Setting Up Your Meter • To Enter Setup Mode Start with the meter off (and no test strip inserted). Press and firmly hold the “m” (mode) button until the set display screen appears. The first set screen is “Alarm Settings”. • To Exit at Any Time Press and hold the “m” button until the meter powers off. • To Move Through the Screens Press the “m” button to move through all the setup screens such as sound level, time, date, and so on. • To Change Settings Within the Screen Press the “c” (configure) button.
Select alarm
Setting the Alarms There are four alarms that you can set. When an alarm goes off, you hear the sound for up to 15 seconds. You can silence the alarm by pressing either the “m” or “c” buttons or by inserting a test strip. You may set up any or all of the alarms (1-4). Note: An alarm will never sound during a test. To set an alarm or multiple alarms follow these steps: 1. With the “0” blinking, press the “c” button to review the current alarm settings. To move to the first alarm press the “c” button once; “1” will blink. You are now ready to set alarm 1.
Note: Press the “m” button when “0” is blinking to move to the next set-up screen without setting any alarms.
ART06690-Rev-B-EN.indd 25 11/17/05 6:11:59 PM

�� Call Customer Care Toll Free at 1-888-522-5226 www.AbbottDiabetesCare.com
ENG
LISH
2. Press the “m” button to move to the hour setting. 3. With the hour blinking, press the “c” button until the correct hour appears.
4. Press the “m” button to move to the minute setting. 5. With the minute blinking, press the “c” button until the correct minute appears.
6. Press the “m” button to move to the alarm volume setting. Default setting is off. 7. Press the “c” button to select the desired volume setting: low, high, or off. 8. Press the “m” button to finalize your alarm setting. This will bring you back to the alarm setting mode.
If you wish to set multiple alarms press “c” to move to alarm 2. Repeat steps 2-8 to set each of the 4 alarms.
Select hour
Select minute
Select alarm volume
Note: Press the “m” button when “0” is blinking to move to the next set-up screen without setting any alarms.
ART06690-Rev-B-EN.indd 26 11/17/05 6:12:00 PM
��
ENG
LISH
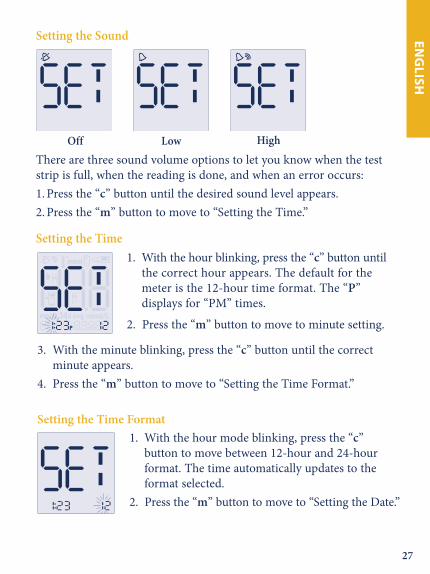
Setting the Sound
There are three sound volume options to let you know when the test strip is full, when the reading is done, and when an error occurs: 1. Press the “c” button until the desired sound level appears. 2. Press the “m” button to move to “Setting the Time.”
LowOff High
Setting the Time1. With the hour blinking, press the “c” button until
the correct hour appears. The default for the meter is the 12-hour time format. The “P” displays for “PM” times.
2. Press the “m” button to move to minute setting.
3. With the minute blinking, press the “c” button until the correct minute appears.
4. Press the “m” button to move to “Setting the Time Format.”
Setting the Time Format1. With the hour mode blinking, press the “c”
button to move between 12-hour and 24-hour format. The time automatically updates to the format selected.
2. Press the “m” button to move to “Setting the Date.”
ART06690-Rev-B-EN.indd 27 11/17/05 6:12:01 PM

�� Call Customer Care Toll Free at 1-888-522-5226 www.AbbottDiabetesCare.com
ENG
LISH
Year-Month-Day
Year-Day-Month
Setting the Date Format 1. With the date blinking, press the “c” button to select month-day or day-month format. The date automatically updates to the format selected. 2. Press the “m” button to move to the “Unit of Measurement.”
Setting the Date 1. With the month blinking, press the “c” button until the correct month appears. 2. Press the “m” button to move to the day setting.
3. With the day blinking, press the “c” button until the correct day appears. 4. Press the “m” button to move to the year setting. 5. With the year blinking, press the “c” button until the correct year appears.6. Press the “m” button to move to “Setting the Date Format.”
ART06690-Rev-B-EN.indd 28 11/17/05 6:12:01 PM

��
ENG
LISH
Unit of Measurement1. The Unit of Measurement for your FreeStyle Freedom™ Meter is milligrams per deciliter (mg/dL).2. Press the “m” button to move to “Software Version Display.”
Software Version Display This is the software version programmed in your FreeStyle Freedom™ Meter. It is for display only, and cannot be changed. The picture here is an example. Your meter may have a different number.
You have completed Meter Set-Up. • To move to “Setting the User Alarms” press the “m” button. • To exit press and hold the “m” button.
ART06690-Rev-B-EN.indd 29 11/17/05 6:12:02 PM
�0 Call Customer Care Toll Free at 1-888-522-5226 www.AbbottDiabetesCare.com
ENG
LISH
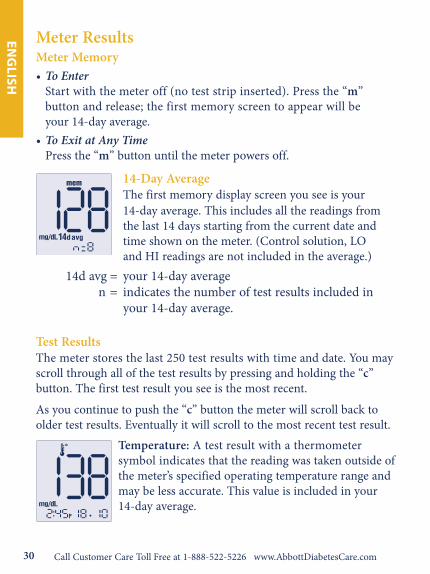
14d avg = your 14-day average n = indicates the number of test results included in your 14-day average.
Meter Results Meter Memory• To Enter Start with the meter off (no test strip inserted). Press the “m” button and release; the first memory screen to appear will be your 14-day average. • To Exit at Any Time Press the “m” button until the meter powers off.
Test Results The meter stores the last 250 test results with time and date. You may scroll through all of the test results by pressing and holding the “c” button. The first test result you see is the most recent.
As you continue to push the “c” button the meter will scroll back to older test results. Eventually it will scroll to the most recent test result.
1�-Day Average The first memory display screen you see is your 14-day average. This includes all the readings from the last 14 days starting from the current date and time shown on the meter. (Control solution, LO and HI readings are not included in the average.)
Temperature: A test result with a thermometer symbol indicates that the reading was taken outside of the meter’s specified operating temperature range and may be less accurate. This value is included in your 14-day average.
ART06690-Rev-B-EN.indd 30 11/17/05 6:12:02 PM

�1
ENG
LISH
Blood Glucose Test A test result without a control solution symbol ( ) indicates that it is a blood glucose reading. The date and time of the test will appear on the bottom of the screen.
Control Solution Test A value with a control solution symbol ( ) indicates that you have marked this reading as a control solution test.
This result is not included in your 14-day average. The date and time of the control solution reading will appear on the bottom of the screen.
Transferring Data The “PC” symbol displays when a data cable is inserted in the meter data port. You cannot perform a test while the data cable is in the meter data port.
The meter will display “PC” until the cable is removed from the data port. (Requires FreeStyle Data Cable and FreeStyle data management software or other software programs that accept FreeStyle Freedom data.)
For more information, please go to our website or call Customer Care.
Test Results (cont) LO Reading: A LO reading (under 20 mg/dL) is included in the memory; it is not included in your 14-day average. Values under 20 mg/dL are recorded in memory as LO. HI Reading: A HI reading (over 500 mg/dL) is included in the memory; it is not included in your 14-day average. Values over 500 mg/dL are recorded in memory as HI.
ART06690-Rev-B-EN.indd 31 11/17/05 6:12:03 PM

�� Call Customer Care Toll Free at 1-888-522-5226 www.AbbottDiabetesCare.com
ENG
LISH
Meter MaintenanceBattery Your FreeStyle Freedom™ Meter comes with one #2032, 3 volt, lithium battery installed. The battery provides enough power to perform about 1,000 tests. If your battery runs low, the battery symbol ( ) appears on every display screen until you change the battery.
Important: When this symbol appears, you should replace the battery immediately.• To avoid losing the time and date settings, replace the battery within one (1) minute of removing the old battery. • If you take more than one (1) minute to replace the battery, you must reset the time and date to get the correct 14-day average. • If the time and date settings are not reset, test results will be stored in memory with a time of 12:00 a.m. (00:00) and a date of 00-00. • Removing the battery does not affect the meter’s memory log or previously-stored user settings (for example, the calibration code and date format).
1 Replacing the BatteryTurn the meter over. Slide the battery door to the right to open.
ART06690-Rev-B-EN.indd 32 11/17/05 6:12:04 PM

��
ENG
LISH
To close, slide the battery door in until it snaps into place.
�
Caring for Your MeterAvoid getting dirt, dust, blood, control solution, water or any other liquid in the meter’s test strip and data ports. Clean the outside of the meter using a cloth dampened with one of the following: • Mild detergent/mild soap and water. • 70% isopropyl alcohol. • A mix of one part household bleach, nine parts water.
Important:Never the immerse the meter in water or any other liquid.
Install the battery with the positive (+) sign facing up towards you.�
ART06690-Rev-B-EN.indd 33 11/17/05 6:12:04 PM
�� Call Customer Care Toll Free at 1-888-522-5226 www.AbbottDiabetesCare.com
ENG
LISH
System Troubleshooting
Error Messages
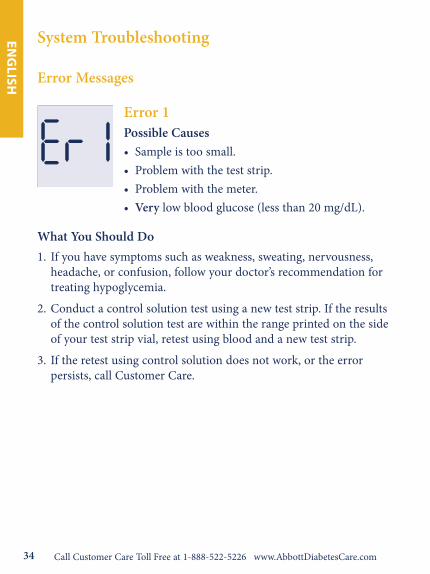
Error 1 Possible Causes • Sample is too small. • Problem with the test strip. • Problem with the meter. • Very low blood glucose (less than 20 mg/dL).
What You Should Do1. If you have symptoms such as weakness, sweating, nervousness, headache, or confusion, follow your doctor’s recommendation for treating hypoglycemia.
2. Conduct a control solution test using a new test strip. If the results of the control solution test are within the range printed on the side of your test strip vial, retest using blood and a new test strip.
3. If the retest using control solution does not work, or the error persists, call Customer Care.
ART06690-Rev-B-EN.indd 34 11/17/05 6:12:05 PM

��
ENG
LISH
Error � Possible Causes • Problem with the test strip. • Problem with the meter. • Very high glucose (above 500 mg/dL). • HIGH control solution applied when temperature is too cold. (This applies only to control solution that is labeled as HIGH.)
What You Should Do1. If you have symptoms such as thirst, fatigue, excess urination, or blurry vision, follow your doctor’s recommendation for treating hyperglycemia.
2. Conduct a control solution test using a new test strip. If the results of the control solution test are within the range printed on the side of your test strip vial, retest using blood and a new test strip.
3. If the retest using control solution does not work, or the error persists, call Customer Care.
ART06690-Rev-B-EN.indd 35 11/17/05 6:12:05 PM

�� Call Customer Care Toll Free at 1-888-522-5226 www.AbbottDiabetesCare.com
ENG
LISH
Error �
Possible Causes • Incorrect test procedure. For example, putting blood on the test strip before inserting the test strip into the meter, or blood applied before the Blood Drop and Test Strip Symbols display. • Problem with the test strip. • Problem with the meter.
What You Should Do1. Be sure you see the Blood Drop and Test Strip Symbols on the display screen before you apply blood or control solution. 2. Conduct a control solution test using a new test strip. If the results of the control solution test are within the range printed on the side of your test strip vial, retest using blood and a new test strip. 3. If the retest using control solution does not work, or if the error persists, call Customer Care.
Error � Possible Causes • Problem with test strip. • Problem with the meter.
What You Should Do1. Conduct a control solution test using a new test strip. If the results of the control solution test are within the range printed on the side of your test strip vial, retest using blood and a new test strip. 2. If the retest using control solution does not work, or if the error persists, call Customer Care.
ART06690-Rev-B-EN.indd 36 11/17/05 6:12:05 PM
��
ENG
LISH
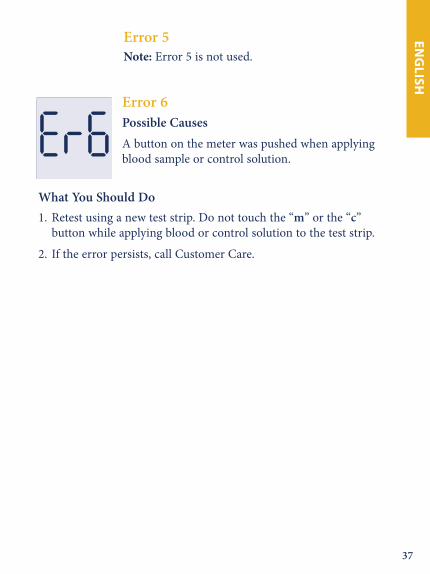
Error � Possible Causes A button on the meter was pushed when applying blood sample or control solution.
What You Should Do1. Retest using a new test strip. Do not touch the “m” or the “c” button while applying blood or control solution to the test strip.
2. If the error persists, call Customer Care.
Error � Note: Error 5 is not used.
ART06690-Rev-B-EN.indd 37 11/17/05 6:12:06 PM
�� Call Customer Care Toll Free at 1-888-522-5226 www.AbbottDiabetesCare.com
ENG
LISH
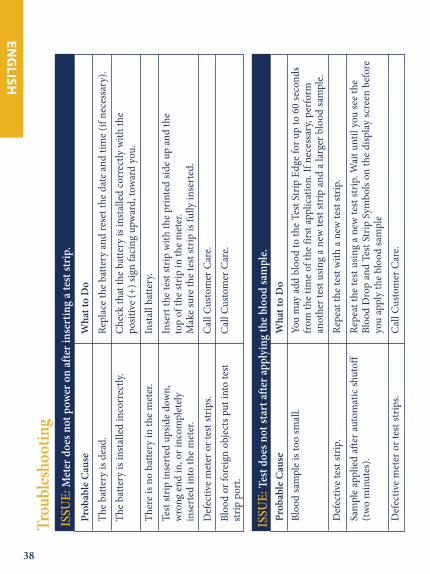
ISSU
E: T
est d
oes n
ot st
art a
fter a
pply
ing
the
bloo
d sa
mpl
e.
Trou
bles
hoot
ing
ISSU
E: M
eter
doe
s not
pow
er o
n af
ter i
nser
ting
a te
st st
rip.
Pr
obab
le C
ause
W
hat t
o D
o
Th
e ba
ttery
is d
ead.
Re
plac
e th
e ba
ttery
and
rese
t the
dat
e an
d tim
e (if
nec
essa
ry).
Th
e ba
ttery
is in
stal
led
inco
rrec
tly.
Che
ck th
at th
e ba
ttery
is in
stal
led
corr
ectly
with
the
posit
ive
(+) s
ign
faci
ng u
pwar
d, to
war
d yo
u.
Th
ere
is no
bat
tery
in th
e m
eter
. In
stal
l bat
tery
.
Test
strip
inse
rted
ups
ide
dow
n,
Inse
rt th
e te
st st
rip w
ith th
e pr
inte
d sid
e up
and
the
w
rong
end
in, o
r inc
ompl
etel
y to
p of
the
strip
in th
e m
eter
.
inse
rted
into
the
met
er.
Mak
e su
re th
e te
st st
rip is
fully
inse
rted
.
Def
ectiv
e m
eter
or t
est s
trip
s. C
all C
usto
mer
Car
e.
Bloo
d or
fore
ign
obje
cts p
ut in
to te
st
Cal
l Cus
tom
er C
are.
st
rip p
ort.
Pr
obab
le C
ause
W
hat t
o D
o
Bloo
d sa
mpl
e is
too
smal
l. Yo
u m
ay a
dd b
lood
to th
e Te
st S
trip
Edg
e fo
r up
to 6
0 se
cond
s
fr
om th
e tim
e of
the
first
app
licat
ion.
If n
eces
sary
, per
form
an
othe
r tes
t usin
g a
new
test
strip
and
a la
rger
blo
od sa
mpl
e.
Def
ectiv
e te
st st
rip.
Repe
at th
e te
st w
ith a
new
test
strip
.
Sam
ple
appl
ied
afte
r aut
omat
ic sh
utof
f Re
peat
the
test
usin
g a
new
test
strip
. Wai
t unt
il yo
u se
e th
e
(t
wo
min
utes
). Bl
ood
Dro
p an
d Te
st S
trip
Sym
bols
on th
e di
spla
y sc
reen
bef
ore
yo
u ap
ply
the
bloo
d sa
mpl
e
Def
ectiv
e m
eter
or t
est s
trip
s.
Cal
l Cus
tom
er C
are.
ART06690-Rev-B-EN.indd 38 11/17/05 6:12:06 PM
��
ENG
LISH
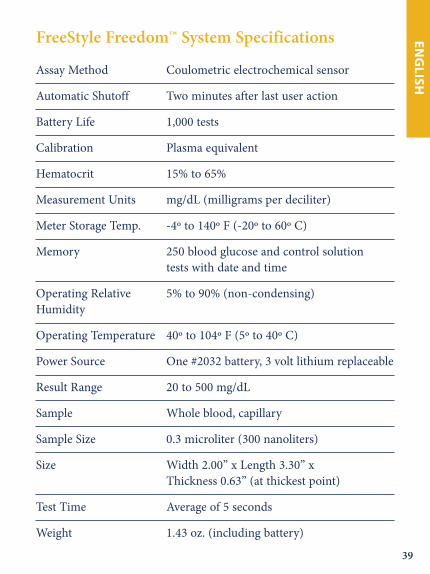
FreeStyle Freedom™ System Specifications
Assay Method Coulometric electrochemical sensor
Automatic Shutoff Two minutes after last user action
Battery Life 1,000 tests
Calibration Plasma equivalent
Hematocrit 15% to 65%
Measurement Units mg/dL (milligrams per deciliter)
Meter Storage Temp. -4º to 140º F (-20º to 60º C)
Memory 250 blood glucose and control solution tests with date and time
Operating Relative 5% to 90% (non-condensing)Humidity
Operating Temperature 40º to 104º F (5º to 40º C)
Power Source One #2032 battery, 3 volt lithium replaceable
Result Range 20 to 500 mg/dL
Sample Whole blood, capillary
Sample Size 0.3 microliter (300 nanoliters)
Size Width 2.00” x Length 3.30” x Thickness 0.63” (at thickest point)
Test Time Average of 5 seconds
Weight 1.43 oz. (including battery) Pr
obab
le C
ause
W
hat t
o D
o
Bloo
d sa
mpl
e is
too
smal
l. Yo
u m
ay a
dd b
lood
to th
e Te
st S
trip
Edg
e fo
r up
to 6
0 se
cond
s
fr
om th
e tim
e of
the
first
app
licat
ion.
If n
eces
sary
, per
form
an
othe
r tes
t usin
g a
new
test
strip
and
a la
rger
blo
od sa
mpl
e.
Def
ectiv
e te
st st
rip.
Repe
at th
e te
st w
ith a
new
test
strip
.
Sam
ple
appl
ied
afte
r aut
omat
ic sh
utof
f Re
peat
the
test
usin
g a
new
test
strip
. Wai
t unt
il yo
u se
e th
e
(t
wo
min
utes
). Bl
ood
Dro
p an
d Te
st S
trip
Sym
bols
on th
e di
spla
y sc
reen
bef
ore
yo
u ap
ply
the
bloo
d sa
mpl
e
Def
ectiv
e m
eter
or t
est s
trip
s.
Cal
l Cus
tom
er C
are.
ART06690-Rev-B-EN.indd 39 11/17/05 6:12:06 PM

www.AbbottDiabetesCare.com
Call Customer Care Toll Free at 1-888-522-5226
Llame al teléfono gratuito de atención al cliente: 1-888-522-5226
Abbott Diabetes Care Inc.1360 South Loop Road
Alameda, CA 94502
Customer Care is available 24 hours a day, 7 days a week.El departamento de atención al cliente está disponible las 24 horas
del día, 7 días a la semana.
Covered by one or more of the following U.S. Patents: Amparado por una o varias de las siguientes patentes estadounidenses:D424,696; D426,638; 6,071,391; 6,120,676; 6,143,164; 6,299,757; 6,338,790; 6,071,391; 6,143,164; 6,299,757; 6,338,790; 6,461,496; 6,503,381; 6,591,125; 6,592,745; 6,616,819; 6,618,934; 6,676,816; 6,749,740; 6,893,545; 6,942,518; 6,156,051, 6,749,618 © 2005 Abbott Printed in U.S.A. ART06690-Rev. B 11/05