Overflow Box - Aqua One · connector if an extension cord used. ... Disconnect the fuse or circuit...
12
Overflow Box Complete step by step instruction booklet
Transcript of Overflow Box - Aqua One · connector if an extension cord used. ... Disconnect the fuse or circuit...

Overflow Box
Complete step by step instruction booklet

Important Safeguards
This appliance is not intended for use by children or infirm persons without supervi-sion. Young children should be supervised to ensure that they do not play with the appliance.
Warning: To guard against injury, basic safety precautions should be observed, including the following:
1. Read and follow all safety instructions before using this appliance.
2. Danger: To avoid possible electric shocks, special care should be taken since water is employed in the use of aquarium equipment. For each of the following situations do not attempt repairs yourself. Return the appliance to an authorised service facility for service or discard the appliance.
a) If the electrical components of the appliance get wet, unplug the appliance immediately (non immersible equipment only).
b) If the overflow box or priming pump show any sign of abnormal water leakage, immediately unplug it from the power source.
c) Carefully examine the overflow box and priming pump after installation. They should not be plugged in when there is water on parts which are not intended to be wet.
d) Do not operate any aquarium accessory if it has a damaged cord or plug, or if it is malfunctioning, or dropped or damaged in any manner.
A “drip loop” (See the diagram) should be arranged by the user for each cord connecting an aquarium component to a receptacle. The drip loop is the part of the cord below the level of the receptacle or the connector if an extension cord used. It is used to prevent water traveling along the cord and coming in contact with the receptacle. If the plug or receptacle does get wet, do not unplug the appliance. Disconnect the fuse or circuit breaker that supplies the power to the appliance, then unplug and examine for presence of water in the receptacle.
3. Close supervision is necessary when the appliance is used by or near children.
4. Always unplug the priming pump from the electri-cal outlet; when not in use, before putting on or taking off parts, before any type of maintenance, or cleaning.
Never yank the cord to pull it from the outlet. Grasp the plug and unplug to disconnect.
5. Do not use the overflow box or priming pump for reasons other than the intended use. The use of attachments that are not recommended or sold by the manufacturer may cause the product to be unsafe. This is not recommended.
6. Do not install or store the overflow box or priming pump where they will be exposed to weather or temperatures below freezing.
7. Make sure any component mounted on a tank is securely installed before operating it.
8. Read and observe all the important notices on the unit.
9. Ensure input voltage is the same voltage as your local power supply.
10. If an extension cord is necessary, a cord with a proper rating should be used. Care should be taken to arrange the cord so that it will not be tripped or pulled.
11. A G.F.C.I (Ground fault circuit interrupter) & surge protector is recommended for all electrical appliances.
12. Ensure your hand is dry when turning the power switch on/off and when inserting/removing the power cord from the receptacle.
13. If you are in any doubt about the electrical installation or safety of this product you must consult a qualified electrician.
For Guarantee Conditions, please refer to the Guarantee form at the back of this instruction booklet.
Drip loop
2
Before First Use / Preparation
Know Your Filter
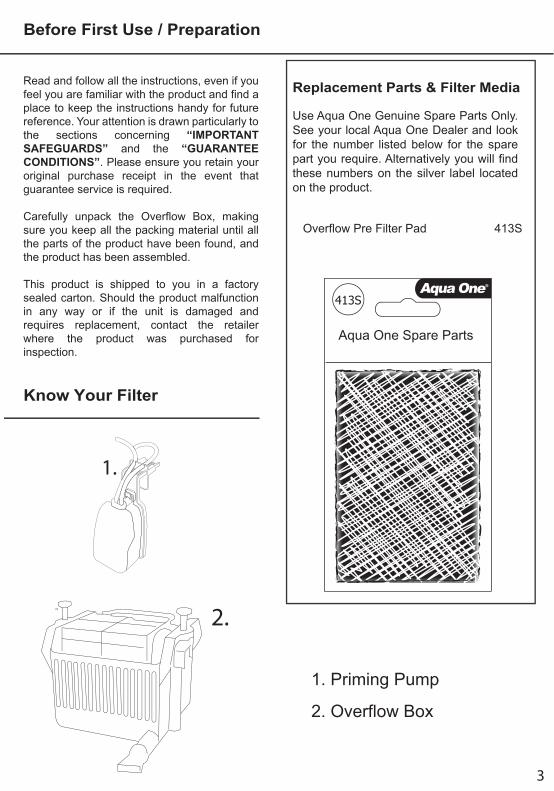
Read and follow all the instructions, even if you feel you are familiar with the product and find a place to keep the instructions handy for future reference. Your attention is drawn particularly to the sections concerning “IMPORTANT SAFEGUARDS” and the “GUARANTEECONDITIONS”. Please ensure you retain your original purchase receipt in the event that guarantee service is required.
Carefully unpack the Overflow Box, making sure you keep all the packing material until all the parts of the product have been found, and the product has been assembled.
This product is shipped to you in a factory sealed carton. Should the product malfunction in any way or if the unit is damaged and requires replacement, contact the retailer where the product was purchased for inspection.
Replacement Parts & Filter Media
Use Aqua One Genuine Spare Parts Only. See your local Aqua One Dealer and look for the number listed below for the spare part you require. Alternatively you will find these numbers on the silver label located on the product.
Overflow Pre Filter Pad 413S
Aqua One Spare Parts
413S
1. Priming Pump
2. Overflow Box
1.
2.
3

4
6. Water In9. Water Out(Return to Aquarium)
10. Water out(To Filter) 10. Water return
(Back to tank)
5. Priming Pump
8 Water Bridge
11. Priming Chamber
Duck Bill Outlet
7. V-Joint
1. Complete Overflow Box. Diagram 1
2. Water Level Adjuster
4. Screw Adjuster
1. Adjusting Screws 2. Diagram 2

3. Priming Pump. Diagram 4
2. Overflow Box. Front Diagram 3
5
V - Joint
Duckbill Outlet
Water Bridge
Outlet (to filter)
Overflow Box
Outlet to tankAdjustment
Hanging Bracket
Priming Pump
3. Inlet Grid / Pre Filter Pad
Return (to tank)
To Priming Pump
Inlet From Overflow Box
Airline Supports

Set Up Instructions
Take the utility knife and cut the Large and Small Flexible Hosing (10) to the desired length.
The Flexible Hosing must follow a straight path from the Overflow Box to the filter unit. There can be a little slack but not too much or the filter will not operate correctly.
8. Place a Hose Clamp over the end of each piece of Flexible Hose and slide the Flexible Hosing over the outlet and inlet, located on the base of the Overflow Box. Do not tighten the Hose Clamps yet.
9. Do the same for the connections at the top of the filter unit.
10. Once every thing is in position tighten the hose clamps so it is a snug fit. DO NOT OVER TIGHTEN them as you may crack the plastic.
Starting the Filter
1. Ensure you aquarium is full of water.
2. Fill the Priming Chamber (11) of the Overflow Box with water until the water begins to travel down the Flexible Hosing and into the filter unit.
3. Fill the filter unit with water until it is about 1cm above the maximum water level indicator.
4. Plug in the two power cords
a. return pump andb. Priming Pump
into a standard power board. Be sure to form a “drip loop”. (Refer to page 2)
Turn the power on.
The Overflow Box will automatically start drawing water and the filter box will begin to fill with water. Check for leaks at this time.
5. Check the water level in the filter unit. If the water level is lower than the minimum Level, add water to bring it back up to the Maximum level. When the water level is below the minimum mark the return pump will start to draw air and propel too many air bubbles back into the aquarium.
Setting up the Overflow Box For the following section refer to Diagrams 1,2 & 3 on pages 4 & 5 of this instruction booklet.
1. Position the filter unit in the stand / cabinet under the aquarium or to the side next to the stand.
2. Place the Overflow Box on the rear or side of the aquarium. Initially the height of the box should be at its lowest setting. The two Adjusting Screws (1) on each side will allow for the Overflow Box to be raised or lowered.
To lower the aquarium’s water level, turn the adjusting screws anti-clockwise, this will reduce the height of the Overflow Box To raise the water level in the aquarium, turn the adjusting screws clockwise to move the box back up.
The aquarium’s water level can also be raised or lowered by adjusting the Water Level Adjuster. (2) Raising the tube will cause the aquarium’s water level to rise and lowering the Water Level Adjuster will cause the aquarium’s water level to drop.
3. Remove the Pre Filter Pad (3), rinse it under water and place back into the Overflow Box.
4. Turn the Screw Adjuster (4) located at the bottom of the Overflow Box to level it.
5. Position the Priming Pump (5) with hanger next to the Overflow Box on the aquarium’s rim. Connect one end of the airline tubing to the Priming Pump “in” (6) port (indicated by the arrow which points towards the Priming Pump on the red connection adapter). Connect the other end of the airline tubing to the V-Joint (7) located at the top of the Water Bridge. (8)
6. Connect the second piece of airline tubing to the “out” (9) port of the Priming Pump (indicated by the arrow pointing away from the Priming Pump on the red connection adapter) and secure the other end of the airline back into the aquarium. It is very important to ensure this hose does not dislodge as it will drain the aquarium.
7. Measure the distance from the Overflow Box to the filter unit. Be accurate so you do not cut the hose too short. (Measure twice and cut once)
6

Maintenance
To ensure optimum filter performance, routine maintenance should be performed monthly or less depending on size of tank, amount of fish and number of daily feeding. If the filter and media are neglected, the filter media will become clogged and unable to collect waste material. This can affect aquarium water quality and possibly the health of the tank inhabitants. Grimy waste can also damage the Priming Pump, return pump and also diminish the filter efficiency.
Please Note: It is best to turn the system off whenever any maintenance is performed on the filter box or Overflow Box.
Do not use soap or detergents that can harm the tank inhabitants.
The Pre Filter Pad should be changed or rinsed every two to three weeks or as needed.
Priming Pump Maintenance
1. Flush the Priming Pump at least once a mounth.
2. Disconnect the Pump from the V - Joint on top of the Water Bridge, leave the Air line attached to the Pump.
3. Fill a small container with clean fresh tap water.
4. Set the Pump up so that both of the air line ends are in the water.
5. Turn the Pump on and allow it to circulate with for around 10 minute.
6. After 10 Minutes switch the Pump off and reconnect it to the system.
7
Notes
Notes
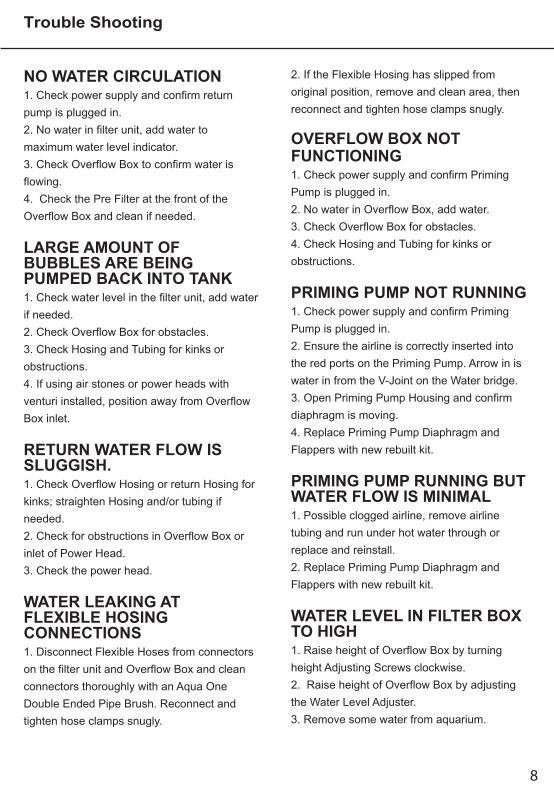
NO WATER CIRCULATION 1. Check power supply and confirm return pump is plugged in. 2. No water in filter unit, add water to maximum water level indicator. 3. Check Overflow Box to confirm water is flowing.4. Check the Pre Filter at the front of the Overflow Box and clean if needed.
LARGE AMOUNT OF BUBBLES ARE BEING PUMPED BACK INTO TANK 1. Check water level in the filter unit, add water if needed. 2. Check Overflow Box for obstacles. 3. Check Hosing and Tubing for kinks or obstructions.4. If using air stones or power heads with venturi installed, position away from Overflow Box inlet.
RETURN WATER FLOW IS SLUGGISH.1. Check Overflow Hosing or return Hosing for kinks; straighten Hosing and/or tubing if needed.2. Check for obstructions in Overflow Box or inlet of Power Head. 3. Check the power head.
WATER LEAKING AT FLEXIBLE HOSING CONNECTIONS1. Disconnect Flexible Hoses from connectors on the filter unit and Overflow Box and clean connectors thoroughly with an Aqua One Double Ended Pipe Brush. Reconnect and tighten hose clamps snugly.
2. If the Flexible Hosing has slipped from original position, remove and clean area, then reconnect and tighten hose clamps snugly.
OVERFLOW BOX NOT FUNCTIONING1. Check power supply and confirm Priming Pump is plugged in. 2. No water in Overflow Box, add water. 3. Check Overflow Box for obstacles. 4. Check Hosing and Tubing for kinks or obstructions.
PRIMING PUMP NOT RUNNING 1. Check power supply and confirm Priming Pump is plugged in. 2. Ensure the airline is correctly inserted into the red ports on the Priming Pump. Arrow in is water in from the V-Joint on the Water bridge. 3. Open Priming Pump Housing and confirm diaphragm is moving. 4. Replace Priming Pump Diaphragm and Flappers with new rebuilt kit.
PRIMING PUMP RUNNING BUT WATER FLOW IS MINIMAL 1. Possible clogged airline, remove airline tubing and run under hot water through or replace and reinstall.2. Replace Priming Pump Diaphragm and Flappers with new rebuilt kit.
WATER LEVEL IN FILTER BOX TO HIGH 1. Raise height of Overflow Box by turning height Adjusting Screws clockwise. 2. Raise height of Overflow Box by adjusting the Water Level Adjuster. 3. Remove some water from aquarium.
Trouble Shooting
8

Congratulations on your purchase of a quality Aqua One product. This product will last for many years under normal usage the guarantee commences from the day of purchase. You must provide proof of purchase when you submit your equipment for repair under guarantee.
The benefits given to the purchaser by the manufacturers guarantee are in addition to all other rights and remedies which the purchaser has in respect of the equipment under the legislation of the appropriate country of purchase.
Your 2 year guarantee can be extended by a further 2 years upon registration with the distributor. This can be done online at the address below or by completing the extended guarantee registration card and returning by post to the address of your country of purchase.
www.aquaone.com.au
General Guarantee Conditions:
1. All claims for guarantee service should be made to the place of purchase.
2. You must provide proof of purchase when you submit your equipment for repair under guarantee.
3. This guarantee extends only to defects occurring in materials or workmanship under normal use of the equipment when operated in accordance with the supplied instructions.
4. Replacement equipment is guaranteed for the remainder of the original manufacturer’s guarantee period.
Guarantee does not cover:
a. Cost of freight, postage or the cost of insurance.
b. Service costs arising from failure to correctly adjust the controls of the product or to clean the hoses, filter media, impellers, power heads, failure to observe the manufacturer’s instructions or inspections that reveal that the equipment is in normal working order.
c. Equipment failures caused by misuse, neglect, normal wear and tear, accidental breakage, repairs or modification by unauthorised persons, lightning strikes, mains voltage fluctuation, earthquakes, vermin infestation or liquid spillage.
d. Consumables, such as filter pads, filter media, sponges, diaphragms and flapper valves.
e. In no event will the manufacturer or distributor of that country be liable for any consequential or incidental damage including, but not limited to loss of livestock, property damage, damage to equipment, appliances or furnishings arising from the use of this product or from failure of this product.
f. Damaged incurred in transit resulting from inadequate packing.
5. It is recommended that all equipment subject to claim should be prepared for transportation in its original packaging or other suitable packaging which offers the same degree of protection.
Aqua One - Guarantee 2 + 2 Year
9

Specifications
Model: MariSys Overflow Box Overflow Box Dimensions: 21L x 65W x 18cm H Max Suitable For Aquarium Glass: 4mm - 38mm Thick Maximum Pump Operating Flow Rate*: 1000L\hr Hose Length: 1M Outlet Hose: 29mmReturn Hose: 19mmPower Requirements: 220 ~ 240V Power Consumption: 3.4W Suitable: Coldwater, Tropical, Marine
Precision Manufactured in the P.R.C.Designed in Australia by Aqua OneDistributed in Australia by: Kong's (Aust.) Pty. Limited48 Williamson Rd. Ingleburn.2565 NSW Australia.
Distributed in New Zealand by:Kong's (NZ) Limited 52 Glenlyon Avenue. Greerton.Tauranga New Zealand.
Distributed in Hong Kong by:Kong’s Aquarium Supplies Co., LtdNo 31, 3/F Thriving Industrial Centre26-38 Sha Tsui Road, Tsuen Wan,Hong Kong.
Distributed in the UK by:Kong’s (UK) Limited,C/O Aqua Pacific UK Ltd.PO Box 268Romsey HampshireSO51 0WWUnited Kingdom.
www.aquaone.com.au® Aqua One and Kong’s are registered trademarks.
* Maximum Pump Operating flow rates are based on a typical set-up with a filter box placed under the aquarium, in a cabinet complete with filter media, pumping to a total height of 120cm. for example, a return pump may have a maximum flow rate of 2800L\hr. How-ever at 1.2M high its flow rate is only 1000Lhr. this would be a suitable pump for this system.
Notes
10

Instruction Version 30/10/06
www.aquaone.com.au