Outpost PMM
36
4/9/2020 Outpost PMM And ICS 213 Messaging User Guide April 2020 Version 3.2
Transcript of Outpost PMM
4/9/2020
Outpost PMM And ICS 213 Messaging
User Guide
April 2020
Version 3.2

ICS 213 Messaging v3.2 Users Guide
4/9/2020 ii
Contents
1 ABOUT ICS213MM ........................................................................................................................ 1
1.1 INTRODUCTION ..................................................................................................................................... 1 1.2 WHAT IS ICS 213? ............................................................................................................................... 1 1.3 ICS 213 AND OUTPOST .......................................................................................................................... 2 1.4 AN ICS213MM SESSION ......................................................................................................................... 3 1.5 WHY USE ICS213MM? ........................................................................................................................... 4 1.6 ICS213MM FEATURES ............................................................................................................................ 4 1.7 NOTES, ASSUMPTIONS, AND DISCLAIMERS .................................................................................................. 5 1.8 FIND AN ERROR?................................................................................................................................... 5
2 GETTING STARTED ........................................................................................................................ 6
2.1 INTRODUCTION ..................................................................................................................................... 6 2.2 THE MAIN ICS213MM FORM ................................................................................................................... 7 2.3 MENUS AND TOOLBARS .......................................................................................................................... 7 2.4 MESSAGE STATUS BAR ........................................................................................................................... 9 2.5 MESSAGE FIELDS ................................................................................................................................. 10
3 SETUPS ....................................................................................................................................... 13
3.1 ICS 213 PROPERTIES ........................................................................................................................... 13 3.2 USER IDENTIFICATION .......................................................................................................................... 17 3.3 OUTPOST / OPDIRECT SETUP ................................................................................................................. 18 3.4 CHECKING THE ICS213MM‐OPDIRECT CONNECTION .................................................................................. 19
4 ICS213MM MESSAGES ................................................................................................................ 20
4.1 CREATING AN ICS 213 MESSAGE ............................................................................................................ 20 4.2 BROWSING FOR MESSAGES .................................................................................................................... 21 4.3 RETRIEVING SENT MESSAGES ................................................................................................................. 21 4.4 FINISHING UP A SENT MESSAGE WITH OUTPOST ........................................................................................ 22
5 SENDING MESSAGES ................................................................................................................... 23
5.1 SENDING MESSAGES TO A REMOTE SITE ................................................................................................... 23 5.2 SENDING MESSAGES TO A LOCAL USER (KEEP LOCAL) ................................................................................. 31
Revision History Date Revision Release Notes
2‐April‐2012 Original v2.6 Updated for this release
19‐Sep‐2013 v2.8 Updated for this release
23‐Mar‐2015 V3.0 Updated for this release
8‐Mar‐2017 V3.2 Updated for this release

ICS 213 Messaging v3.2 Users Guide
4/9/2020 1
1 About ICS213mm
1.1 Introduction
This guide will introduce you to Outpost’s ICS 213 program and describe how to create ICS messages that interact with the Outpost Packet Message Manager program.
1.2 What is ICS 213?
The following are excerpts from http://www.ics213.com/
“The ICS 213 General Message Form was originally designed as a multipart self‐copying form for use as an interoffice memo. Since its inception, both the usage and physical embodiment have changed significantly.
“The ICS 213 General Message Form is now increasingly used for messages between parties who are not in the same location. Because the nature of incident communications is generally urgent, the form is often originated in one location and transmitted electronically to another location. The reply from that location is returned electronically and the two "parts" of the form are matched together.

ICS 213 Messaging v3.2 Users Guide
4/9/2020 2
“Because of the General Message Form's increased usage between often physically distant locations, the information for an ICS 213 General Message Form is often transcribed onto a blank form or entered electronically via a computer word processing program.”
1.3 ICS 213 and Outpost
This implementation of ICS 213 Messaging is designed to improve the message handling efficiency of communications teams who work closely with served agencies that use the ICS 213 message form.
There are three components of ICS 213 Messaging:
▪ Ics213mm.exe. This is a standalone program that presents the user with a computer‐based fill‐in‐the‐blank form with fields that align with the ICS 213 message form. It guides the user in creating a message using some pre‐defined message fields values or by direct entry, saving a local copy, and exchanging messages with Outpost.
▪ Opdirect.exe. Opdirect EMS (External Message Service) is a program that listens on the local area network port for and receives messages from Outpost Addons, essentially remote message sources. Once the message is received, Opdirect processes and writes the message to the Outpost message database. Opdirect EMS listens for, captures, and stores messages from Ics213mm in Outpost, as well as sending back ICS 213 messages received by Outpost from a remote station.

ICS 213 Messaging v3.2 Users Guide
4/9/2020 3
1. Outpost. Outpost continues to be the program that interacts with the BBS for sending and retrieving packet messages. Once an Ics213 message arrives, the Outpost operator completes the message and presses Send.
1.4 An Ics213mm session
Ics213mm helps the user compose a message and get it sent by packet. Here’s what a user needs to do:
1. At the Outpost computer, verify Opdirect.exe is running. See Section 3.3 Outpost / Opdirect Setup for details.
2. Run Ics213mm.exe.
3. Enter a user identifier (you define it, such as BOB, DAVEF, CTYOPS, etc.).
4. Check the default field settings (optional).
5. Press New. The program pre‐populates the message form with any default field settings and opens all message fields for editing.
6. Fill in the subject and the body of the message. When done, press Send. Ics213mm stores the message locally for retrieving and updating later.
7. At this point, Ics312mm automatically does the following:
a. Connects and logs on to Opdirect.
b. Formats any outgoing messages into a user‐readable text message.
c. Sends the formatted message to Opdirect (which subsequently stores the message in the Outpost Draft folder).
d. Requests any messages intended for this user ID. Ics213mm stores any retrieved messages, and then pops up a notification window letting the user know that an incoming message has arrived.
e. Logs off Opdirect when done.

ICS 213 Messaging v3.2 Users Guide
4/9/2020 4
1.5 Why use Ics213mm?
• Keeps the focus on the message – Ics213mm is exclusively aimed at ICS 213 message management: creating, sending, receiving, printing, storing.
• Reduce transcription errors – Instead of writing a message down on paper and handing it to a packet operator, the Ics213mm program can be given to the individuals who need to create the message thereby eliminating the possibility of interpretation problems and transcription errors.
• Receives new messages and create replies – Ics213mm can also retrieve messages that Outpost received thereby closing the loop from message creation to reply.
• Deployable anywhere on the same LAN as Outpost – Ics213mm interacts with Outpost through Opdirect MCS (delivered with Outpost) using standard networking to interact with Opdirect. As a result, Ics213mm can be deployed either on the local PC where Outpost is installed, or anywhere on the local area network.
• Multiple copies of Ics213mm can be deployed and interact with a single copy of Outpost. Essentially, Ics213mm can be placed throughout the EOC on the same LAN as Outpost thereby empowering the users to manage their own message traffic. Packet radio room operators retain control operator responsibilities since they complete the message and press Outpost’s Send/Receive button.
1.6 Ics213mm Features
Some of the key features of Outpost’s Ics213mm Messaging are:
Message Management
• Message Types. Ics213mm supports 2 message types: (i) a Message is what the originator creates, (ii) a Reply is what the recipient sends back. Both the Message and Reply are linked and managed within a single message structure. Ics213mm tracks what it is looking at and ensures the right message control actions are allowed.
• Message Creation. Ics213mm allows messages to be created from scratch, importing text from an ASCII file, cut and pasted in from other applications, or by Replying to a previously received message.
• Text Message Formatting. Messages can be entered in a free‐form text area. Simple formatting can be performed, errors corrected, and text can be added and deleted prior to sending the message.
• Storage. All messages and replies are stored locally. This allows the user to create messages with Ics213mm even if the network or Opdirect is down. Once up, Ics213mm forwards all pending messages to Outpost.
• Printing. Ics213mm can print a message in the standard ICS 213 format.
• ICS 213 message outside of Outpost. Ics213mm messages sent by Outpost are formatted in a human‐readable and ICS 213‐like format for retrieval and use by non‐Outpost users.
Keep Local
• With version 3.2, Ics213mm messages can now be set to Keep Local, that is, messages can be exchanged between Ics213mm users on the same network with Outpost acting as the local mail drop. In this mode, there is no interaction

ICS 213 Messaging v3.2 Users Guide
4/9/2020 5
by the Outpost packet operator thereby allowing for timely and seamless message passing within an EOC or ICP.
Configurations and Setups
• Default fields. Some message fields can be defaulted to predefined values, particularly if they are the same from message to message. For instance, the FROM: and FROM POSITION may be set to your name and preloaded at message creation time.
• Network parameters. Because Ics213mm talks to Opdirect through a network connection, the user defines the IP address and Port where Opdirect is listening. Once set, it is always used when Ics213mm runs.
1.7 Notes, assumptions, and disclaimers
▪ The program attempts to guide the user through the process of creating, sending, reviewing, retrieving, and printing messages. If you observe obvious problems, please let me know
▪ Error handling will continue to evolve over time. Most of the errors are properly trapped and reported, however, it is not 100% foolproof.
1.8 Find an Error?
If you find an error or unsure how Outpost’s ICS 213 Messaging is supposed to work, post a message to the Outpost Users Group or send me email to [email protected].
ICS 213 Messaging v3.2 Users Guide
4/9/2020 6
2 Getting Started
All ICS 213 Messaging activities are managed and controlled by the Ics213mm.exe program. This section provides an overview of the program.
2.1 Introduction
The following are basic concepts to help get you started.
User Identification. Because more than one instance of Ics213mm could be installed on the LAN, a User ID is stamped on each outgoing message so that the reply message knows the route back to this user (and copy of Ics213mm).
Message Storage. Ics213mm will locally store messages (independently of Outpost) that you create, or that are received from Outpost. This allows the user to start a message or reply, but not send it because of some missing information, as well as editing a previously sent message thereby creating an update.
Any viewed message can also be printed as desired.
While there may be a tendency to keep messages forever, this is not the intent of Ics213mm.
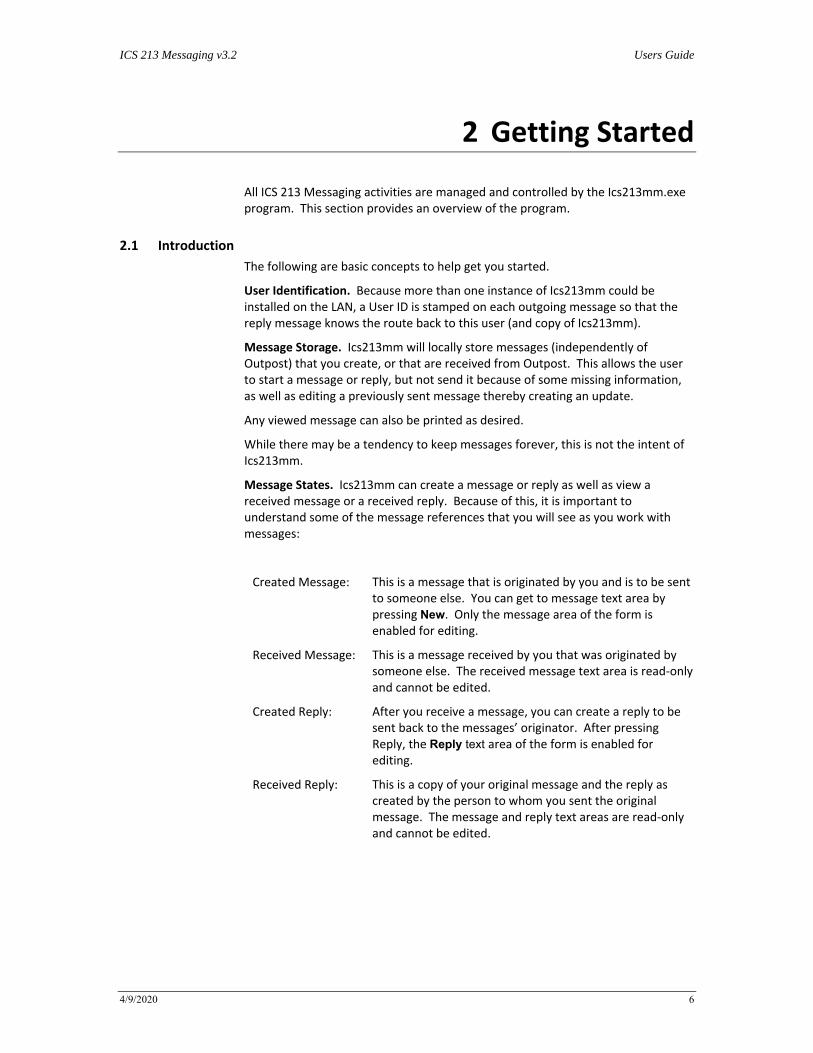
Message States. Ics213mm can create a message or reply as well as view a received message or a received reply. Because of this, it is important to understand some of the message references that you will see as you work with messages:
Created Message: This is a message that is originated by you and is to be sent to someone else. You can get to message text area by pressing New. Only the message area of the form is enabled for editing.
Received Message: This is a message received by you that was originated by someone else. The received message text area is read‐only and cannot be edited.
Created Reply: After you receive a message, you can create a reply to be sent back to the messages’ originator. After pressing Reply, the Reply text area of the form is enabled for editing.
Received Reply: This is a copy of your original message and the reply as created by the person to whom you sent the original message. The message and reply text areas are read‐only and cannot be edited.
ICS 213 Messaging v3.2 Users Guide
4/9/2020 7
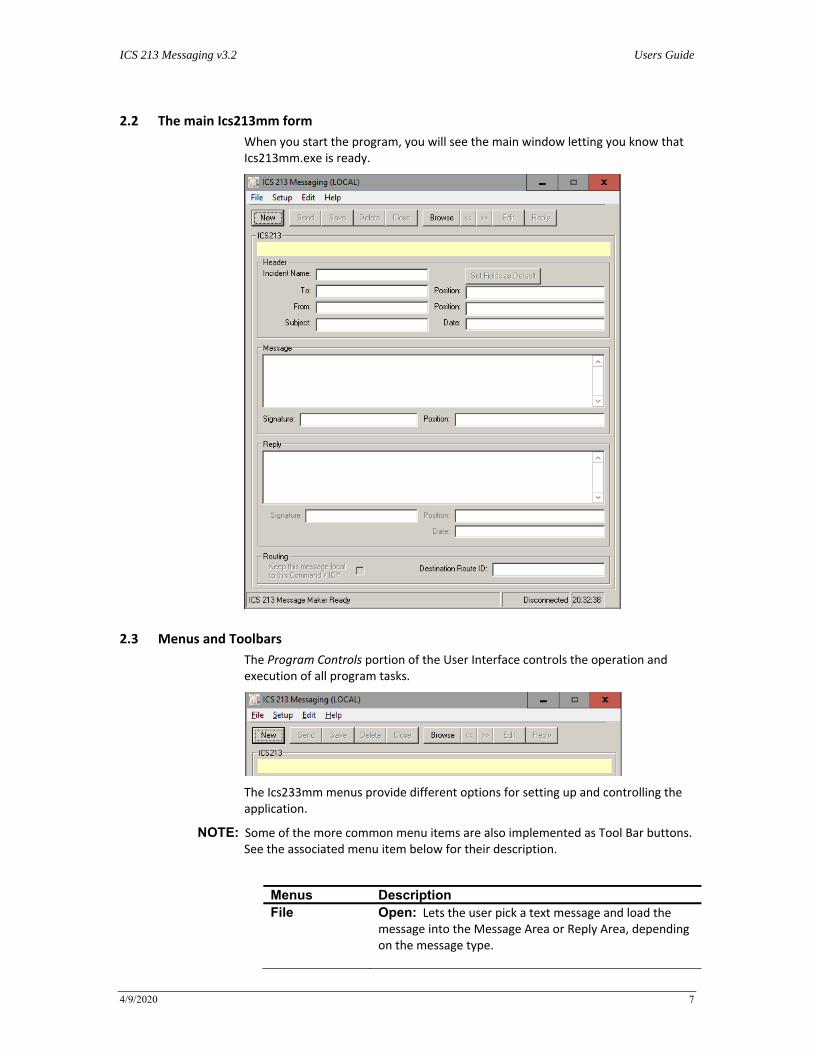
2.2 The main Ics213mm form
When you start the program, you will see the main window letting you know that Ics213mm.exe is ready.
2.3 Menus and Toolbars
The Program Controls portion of the User Interface controls the operation and execution of all program tasks.
The Ics233mm menus provide different options for setting up and controlling the application.
NOTE: Some of the more common menu items are also implemented as Tool Bar buttons. See the associated menu item below for their description.
Menus DescriptionFile Open: Lets the user pick a text message and load the
message into the Message Area or Reply Area, depending on the message type.

ICS 213 Messaging v3.2 Users Guide
4/9/2020 8
Menus DescriptionSave: Saves the message back to the local Ics213mm message store. Print Setup. Allows the user to select a default printer.
Print. Allows the user to select a printer, and then print the message in an ICS 213 format.
Exit: Exits the program. If a connection with Opdirect is in progress, the connection will end first, then the program will exit.
Setup Properties: Sets various parameters to control the
behavior of the program:
Formatting. Allows the user to set up some message fields as defaults. Additionally, the date and time format can be specified.
Remote Access. Sets up the IP address and Port number for Opdirect. Also, defines the polling interval that Ics213mm uses to poll for incoming messages from Outpost.
See Section 3.1 ICS 213 properties for more information.
Identifier: opens a box for entering the User ID.
Edit Cut: Copies and deletes any highlighted text from any text area of the form. The text is placed in the MS‐Windows clipboard. Copy: Copies any highlighted text in any from any text area of the form. The text is placed in the MS‐Windows clipboard. Paste: Inserts text from the clipboard at the position where the cursor is located.
Help About: Lists information about Ics213mm.
The following are other controls found on the main form.
Controls Description
New This option is enabled at startup. Sets up Ics213mm for entering a new message.
Send This option is enabled whenever you are editing a message or reply. On pressing Send, the message is saved and locked, and Ics213mm attempts to deliver the message to Opdirect.
Save This option is enabled whenever you are editing a message or reply. On pressing Save, the message is

ICS 213 Messaging v3.2 Users Guide
4/9/2020 9
Controls Description
saved and locked.
Delete This option is enabled whenever you are viewing any message. On pressing Delete, the message is deleted from the Ics213mm local message store.
Close This option is enabled whenever you are viewing or editing any message. On pressing Close, the message is cleared and the New and Browse buttons are enabled.
Browse This option allows the user to Browse the messages found in the Ics213mm local message store. The number of messages and the position of the message in the store is shown to the Right of the buttons.
<< Browse “left”. This option brings up earlier created messages for display.
>> Browse “right”. This option brings up a later created messages for display.
Edit This option is enabled whenever you are browsing messages. On pressing Edit, you can edit the message text area of Created Messages or edit the reply text area of Created Replies.
Pressing this button for sent messages allows you to update the message thereby letting it be sent again.
Reply This option is enabled only when viewing a Received Message.
On pressing this option, the status bar will be listed as... Locally created reply, status is Draft.
Set Fields As Default
Takes the current set of header fields and makes them the current default fields on all subsequent messages.
Keep this message local to this Command / ICP
Checking this box turns on “Keep Local” for this message.
Keep Local sets up the message so cannot be transmitted by Outpost, but can be picked up by another local Ics213mm instance. This control works in conjunction with the field Destination Route ID.
2.4 Message Status Bar
The message status bar is just below the control buttons. This field describes the type and state of the message that is currently being displayed.
You may see one of these Status line messages:

ICS 213 Messaging v3.2 Users Guide
4/9/2020 10
Status Line Messages Meaning
Locally created message, status is Draft
A message that you are creating is not complete or ready to send. This is primarily due to a missing field.
Locally created message, status is Ready/Not Sent
A message that you created. It is ready to send, but for some reason, has not been transferred to Opdirect.
Locally created message, status is Sent A message that you created. It has been transferred to Opdirect.
Received message, status is Unread This is a message received by you, and you are seeing it for the first time.
Received message, status is Read This is a message received by you, and you have already read it.
Locally created reply, status is Draft A reply to someone else’s message that you are creating. It is not complete or ready to send
Locally created reply, status is Ready/Not Sent
A reply that you created. It is ready to send, but for some reason, has not been transferred to Opdirect.
Locally created reply, status is Sent A reply that you created. It has been transferred to Opdirect.
Received reply, status is Unread This is a reply sent to you for a message that you originated, and you are seeing it for the first time.
Received reply, status is Read This is a reply sent to you for a message that you originated, and you have already read it.
2.5 Message Fields
Field Description
Incident Name Name of the incident as assigned by the agency that activates the event.
Default: Blank, or loaded with the value defined from Setup > Properties, first tab.
To Name of the individual to whom this message is intended. This person would be the likely individual to create the reply.
Default: Blank, or loaded with the value defined from Setup > Properties, first tab.
(To) Position The organizational position of the message recipient.
Default: Blank, or loaded with the value defined from Setup > Properties, first tab.
From Name of the individual that is originating this message.
Default: Blank, or loaded with the value defined from Setup > Properties, first tab.

ICS 213 Messaging v3.2 Users Guide
4/9/2020 11
Field Description
(From) Position The organizational position of the message author.
Default: Blank, or loaded with the value defined from Setup > Properties, first tab.
Subject For new messages, enter a subject for this message.
When viewing an existing message, this field contains the subject of the message. The subject will be used by Outpost when it sends this as a packet message.
Date The date that this message is created and sent.
Default: Set with the current date and time based on the date/time format as defined from Setup > Properties, first tab.
Message This is a free‐form text field for creating the message to be sent to the recipient. The message size is limited to 4000 characters.
Default: Blank
Signature On the standard ICS 213 form, this is the signature of the individual creating this message.
Default: The content of the From: field is copied here. However, it can be overridden if necessary.
Position On the standard ICS 213 form, this is the position of the individual creating this message.
Default: The content of the From Position: field is copied here. However, it can be overridden if necessary.
Reply This is a free‐form text field for creating the reply to the above message to be sent back to the originator. The reply size is limited to 4000 characters.
Default: Blank
Signature (Reply) On the standard ICS 213 form, this is the signature of the individual replying to this message.
Default: The content of the To: field is copied here. However, it can be overridden if necessary.
Position (reply) On the standard ICS 213 form, this is the position of the individual replying to this message.
Default: The content of the To Position: field is copied here. However, it can be overridden if necessary.
Date The date that this reply is created and sent.
Default: Set with the current date and time based on the date/time format as defined from Setup > Properties, first tab.
Destination Route ID
When set, the Ics213mm message is passed to Outpost with the Destination Route already configured. This is ideal when the originator of the message knows to whom the message needs to be routed on the receiving end.

ICS 213 Messaging v3.2 Users Guide
4/9/2020 12
When a message is being edited, Ics213mm unlocks the necessary fields so that they can be changed. The field text is colored BLACK. When viewing a message that is not editable, the message text is colored BLUE. This helps the user identify which fields are changeable depending on whether they are creating or editing a Message or a Reply.
ICS 213 Messaging v3.2 Users Guide
4/9/2020 13
3 Setups
There is a mix of optional and required setups available that should be considered before starting to use Ics213mm. This section describes these setups.
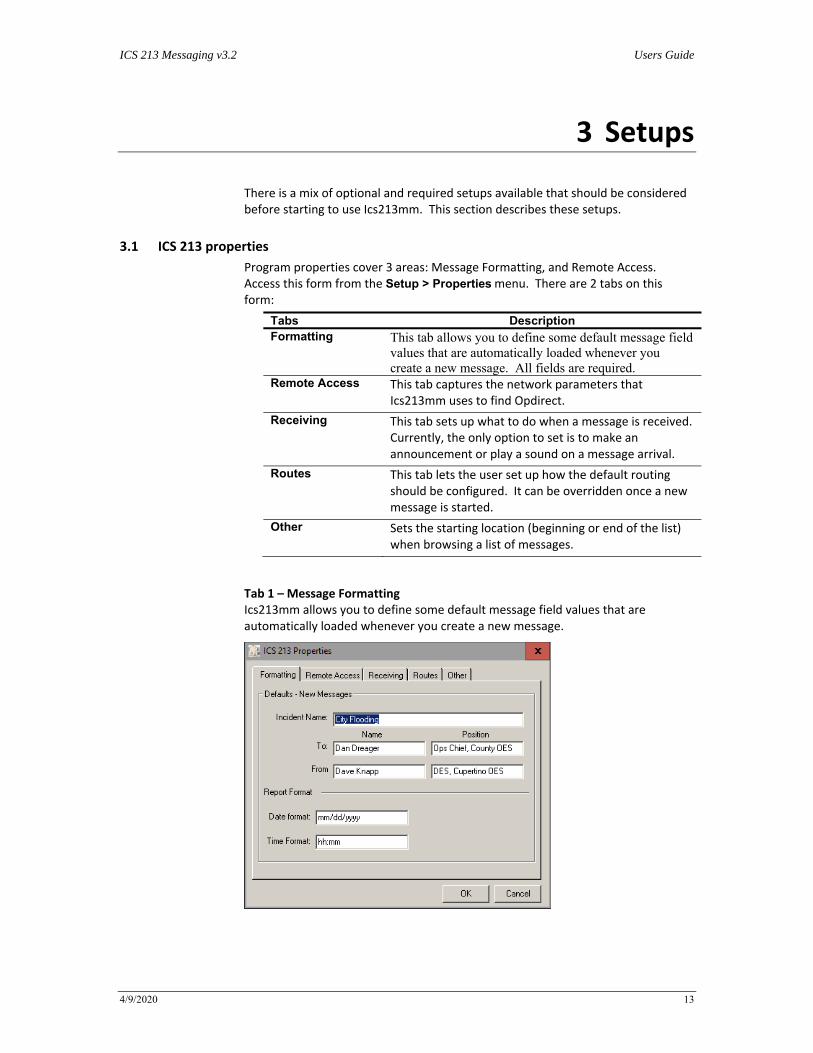
3.1 ICS 213 properties
Program properties cover 3 areas: Message Formatting, and Remote Access. Access this form from the Setup > Properties menu. There are 2 tabs on this form:
Tabs Description Formatting This tab allows you to define some default message field
values that are automatically loaded whenever you create a new message. All fields are required.
Remote Access This tab captures the network parameters that Ics213mm uses to find Opdirect.
Receiving This tab sets up what to do when a message is received. Currently, the only option to set is to make an announcement or play a sound on a message arrival.
Routes This tab lets the user set up how the default routing should be configured. It can be overridden once a new message is started.
Other Sets the starting location (beginning or end of the list) when browsing a list of messages.
Tab 1 – Message Formatting Ics213mm allows you to define some default message field values that are automatically loaded whenever you create a new message.

ICS 213 Messaging v3.2 Users Guide
4/9/2020 14
These fields are:
Fields DescriptionIncident Name
Name of the incident.
Default: blank
To: Name Name of the individual to which this message is intended. This person would be the likely individual to perform any reply to you.
Default: blankTo: Position The organizational position of the message recipient.
Default: blank
From: Name Name of the individual that is originating this message.
Default: blankFrom: Position
The organizational position of the message originator.
Default: blank
Date Format The format of the date. This can take many forms, including:
mm/dd/yy 11/24/09 mm/dd/yyyy 11/24/2009 dd‐mmm‐yyyy 24‐Nov‐2009 d‐mmm 24‐Nov
Default: mm/dd/yy
Time Format The format of the time. This can take many forms including:
hh:mm 13:05 h:mm AM/PM 1:05 PM h:mm:ss 13:05:47
Default: hh:mm
The 2 controls at the bottom of the form apply to both tabs.
Controls DescriptionOK Saves the settings and closes the form.
Cancel Ignores any changes and closes the form
To make message format setup changes, do the following:
1. Determine the names and positions of the To: and From: individuals that will be getting these messages. Any field left blank must be filled in at message creation time.
2. Change the date and time format if necessary. It is recommended that this format remain the same, or be set to whatever standard format is used.
3. Press OK when done.

ICS 213 Messaging v3.2 Users Guide
4/9/2020 15
Tab 2 – Remote Access This tab allows you to configure Ics213mm networking. The goal is to point to the PC where Ics213mm can find Opdirect on the network.
Fields, Controls Description
Remote Host The IP Address or host name of the PC where Opdirect is running.
The default setting tells Ics213mm to look for the Opdirect on the PC where Ics213mm is running.
Default: 127.0.0.1
Remote Port Ports are used with TCP to name the logical connection on a specific network node. This setting must match what is set up in the Opdirect Winsock Interface form.
Default: 9334 (DO NOT CHANGE: must match the Opdirect default port number)
Network Timeout
The network timeout tells Ics213mm how long to wait for a network interaction with Opdirect before giving up and reporting an error. A setting of 5000 milliseconds (5 seconds) is plenty, particularly if Opdirect is operating on the same PC as Ics213mm.
For remote instances of Opdirect, the timeout may need to be longer depending on the network traffic.
Default: 5000
Send/Receive Interval
Ics213mm will poll Opdirect for any incoming messages at this interval.
See Section 3.4 Checking the Ics213mm‐Opdirect connection for a description of how to perform
Default: 60 seconds
Opdirect Link Test
Performs a test network connection with Opdirect.
1. A successful test is indicated by a pop‐up box stating Link test to Opdirect passes.

ICS 213 Messaging v3.2 Users Guide
4/9/2020 16
Fields, Controls Description
2. An unsuccessful test is indicated by a pop‐up box stating Link test to Opdirect failed. Check the following: 1. Confirm that Host Name and Port number match Opdirect. 2. Confirm that Opdirect is running
Tab 3 – Receiving This tab lets you configure how Ics213mm will notify you when a message arrives.
Operation DescriptionPlay this sound on arrival
This option allows you to select a .wav file to be played when a message is saved in Outpost.
The user can browse for a .wav file, select it, and test it to confirm that it is suitable for their environment.
Play on Arrival Considerations This feature requires that an operational Sound Card is installed in the Outpost PC. Once you choose a .wav file, pressing the “Test” button will cause the .wav file to play. If there is a problem with the file or the sound card, a sound card is not installed or enabled, then Ics213mm will issue a “beep” instead.
While any .wav file can be used or created, two three .wav files are included with the Outpost distribution as examples for how this feature could be used.
Sound38.wav – a very obnoxious alarm. If you use this file with the sound turned up, you will definitely know when a message arrives.
Sound136.wav – used for Notifications.
incoming.wav – a spoken notification. The phrase “Attention, incoming packet message” is spoken.

ICS 213 Messaging v3.2 Users Guide
4/9/2020 17
Tab 4 – Receiving This tab lets you configure how Ics213mm will notify you when a message arrives.
Fields, Controls DescriptionKeeps all messages local…
Checking this box turns on “Keep Local” for all subsequent messages. It can be disabled on a message by message basis on the message form if needed.
Destination Route ID
When set, all Ics213mm messages are passed to Outpost with the Destination Route already set. This can be cleared on a message by message basis on the message form if needed.
Tab 5 – Other This tab lets you set up which end of the message list the program will show on pressing the Browse button.
3.2 User Identification
Multiple copies of Ics213mm could be deployed on the same LAN with all feeding Outpost via Opdirect. To ensure messages are routed to and from the right owner, Ics213mm “tags” all messages with a User ID or Routing Identifier.
This routing identifier is the same as the User ID. The User ID form is presented each time Ics213mm runs, as well as from the Setup > Identification menu.

ICS 213 Messaging v3.2 Users Guide
4/9/2020 18
The Identifier must be unique for all Ics213mm’s that connect to a specific instance of Outpost. No unique ID checking is performed.
This form has only one field. If there are no changes, just press OK or Enter to continue.
3.3 Outpost / Opdirect Setup
For Ics213mm to complete the message transfer to Outpost, it needs the help of the Opdirect.exe program.
Opdirect listens on a specific network port for message requests from Ics213mm. When a connect request is detected and a message is sent, Opdirect creates a valid Outpost message and writes it to the Outpost message database.
Opdirect must be running for Ics213mm to exchange messages with Outpost. The best way to do this is to set up Opdirect to run automatically from Outpost.
1. In Outpost, go to Tools > Message Settings menu, select the Adv Tab.
2. Check the bottom Box to “… Automatically start Opdirect External Message Service”. Press OK.
3. Exit and restart Outpost. Opdirect will start up, and you will see the following window open.
The benefit of using this approach is that, on exiting Outpost, Outpost will also shut down Opdirect as well. To manually start the Opdirect.exe, navigate to the Outpost programs directory and double‐click on Opdirect.exe.

ICS 213 Messaging v3.2 Users Guide
4/9/2020 19
4. As Opdirect starts up, it will report that it is listening on Port 9334. This is the default port number that Opdirect, Ics213mm, and PacFORMS use for passing external message traffic.
NOTE: Some PCs may have firewalls with port blocking turned on and you may be prompted to Continue Blocking or Unblock. For Opdirect to work, click on Unblock.
NOTE: There should never be a reason to change the port number that these 3 programs use. PacFORMS is hard‐coded to use this port number. However, if you must change the port number, then it must be changed for Opdirect and for Ics213mm. The Opdirect.ini file (in the Outpost data directory) has an entry that defines the Port Number.
[Opdirect ECS] ConnectNum=302 PortNumIn=9334 Pausev=100
When you start Outpost, Opdirect will also start up. As you exit Outpost, Opdirect will be terminated. Outpost is now ready to interact with Ics213mm.
3.4 Checking the Ics213mm‐Opdirect connection
To verify that Opdirect and Ics213mm are set up correctly, run the Link Test from Ics213mm.
1. Start Opdirect as described above.
2. Start Ics213mnm if it is not already running. Select Tools > Properties, then Tab 2 named Remote Access.
3. Press the Opdirect Link Test button. A short connection test is made with Opdirect and a pop‐up message box indicates the state of the test.
4. If the test fails, check that the Host Name/IP address and Port Number match what is set up on Opdirect, and that Opdirect is running.

ICS 213 Messaging v3.2 Users Guide
4/9/2020 20
4 Ics213mm Messages
Ics213mm relies on Outpost for getting an ICS 213 formatted message sent by packet to its destination.
▪ Ics213mm creates and formats the ICS 213 message.
▪ The Opdirect program listens for and receives message requests from Ics213mm, and then writes the message to the Outpost message database.
▪ The Outpost operator performs the final steps to get the message on its way.
This section describes how to use ICS 213 messaging and what you will se as it interacts within the rest of the Outpost environment.
4.1 Creating an ICS 213 message
The steps for creating a new ICS 213‐based message includes:
1. Configure and start up Outpost and Opdirect (see Section 3.3 Outpost / Opdirect Setup).
2. Set up any common message field defaults (Setups > Properties).
3. Set or change the Ics213mm User ID (Setups > Identification). The user ID will be displayed in the Program’s Header line in parentheses.
4. Press New to load the message field defaults, set the Signature and Position to the From/Position fields, and enable the messages fields for editing.
5. Fill in the blank message fields. Since you are creating a Message and not a Reply, the reply fields are locked and will not take any text input.
Pressing New, then Save
6. Pressing Save causes Ics213mm to validate that all fields are filled in. If they are not, the user is prompted whether they want to continue to Save and edit it, or send it later.
7. If the user pressing OK, the message is saved, and the fields are locked (formatted in BLUE TEXT).

ICS 213 Messaging v3.2 Users Guide
4/9/2020 21
Pressing New, then Send
8. Pressing Send causes Ics213mm to perform a Save (see the validation description above), and then attempts to pass the message to Outpost via Opdirect.
9. If Opdirect is running, it loads the message into Outpost and Ics213mm flags the local message as being sent.
10. If Opdirect is not running, Ics213mm flags the local message as ready, but not sent.
11. Regardless of whether Opdirect is running, the message is saved, and the fields are locked (colored BLUE).
4.2 Browsing for messages
Because Ics213mm can save messages locally, the Browse function allows you to review what messages have been created and in what state the messages are in.
Messages are stored in the order in which they were created or loaded. Browsing lets you step through the list of messages from first to last and select an additional action to perform on them. Browse can be used as long as there is at least one message present.
After pressing Browse, the first message is loaded into the message form, is shown as locked (colored BLUE), and the following actions can be applied to it:
1. Delete. The user can delete the message from Ics213mm. Once deleted, it is gone.
2. Close. After pressing Close, browsing is ended and the base set of controls is enabled: New and Browse.
3. << (Browse Left). The previous message in the list is reloaded.
4. >> (Browse Right). The next message in the list is reloaded.
5. Edit. Editing causes all eligible fields to be available for editing. For instance,
a. For a previously saved message that was not completed, the message can be opened, edited, and completed. The user can press Send to save and send it.
b. For a previously sent message, the message can be opened and updated with new information. The user can press Send to save and send this updated message. NOTE: this overwrites the original local message copy that was previously sent.
c. For a previously saved reply message that was not completed, the reply message area can be opened, edited, and completed. Note that the main message area is still locked (colored BLUE). The user can then press Send to save and send it.
6. Reply. This option is only enabled when you find a message that was received from Opdirect. When pressing Reply, The original message area remains locked (colored BLUE). However, the message reply area is eligible for editing and updating.
4.3 Retrieving sent messages
There is no automated way to retrieve a message you may have accidentally sent once it is transferred to Outpost. The best you can do is to contact the Outpost

ICS 213 Messaging v3.2 Users Guide
4/9/2020 22
packet operator as soon as you discover that the wrong message was sent, and ask him/her to delete the message before Outpost attempts to transmit it to the BBS. If Outpost already posted the message to the BBS, then the Ics213mm user or Outpost operator should send a follow‐up message requesting that message be ignored or deleted.
4.4 Finishing up a Sent message with Outpost
Outpost assumes that any message created and stored in its message database is a valid message.
One of the side benefits of setting Outpost’s option to run Opdirect on startup (Tools > Message Settings menu, Advanced Tab) is that, once the message is sent from Ics213mm, Outpost automatically opens it so that the operator can complete the packet message.
Ics213mm formats an ASCII message that can be imported by another Outpost and Ics213mm program as well as read by a non‐Outpost / non‐Ics213mm user.
With the above example, here are some things to note:
▪ The !ICS213! and !/ICS213! tags begin and end the message.
▪ You can add other text either before the !ICS213! tag or after the !/ICS213! tag. While this text will show up in the Outpost message, it will not show up in the Ics213mm message.
▪ DO NOT add any text in between the tags: This will change the content and possibly the meaning of the message.
To complete the message, the Packet Operator enters the destination address in the To: field, and then presses Send.
Note the format of the message. Because Outpost sends text messages in the clear, Ics213mm formats the message so that it is user‐readable even if the recipient is not an Outpost/Ics213mm user.

ICS 213 Messaging v3.2 Users Guide
4/9/2020 23
5 Sending Messages
5.1 Sending Messages to a remote site
Because of the network interconnectivity between Ics213mm and Opdirect, Ics213mm does not necessarily need to be installed in the radio room. Instead, it can be installed anywhere on the local area network PROVIDED Ics213mm is on the same LAN as Outpost.
To get the right message or reply to the right user, Ics213mm needs to perform a certain amount of message routing, particularly if there is more than one instance of Ics213mm deployed.
To help explain routing, let’s assume the following scenario.
Disaster County has its’ share of problems and responds whenever a disaster strikes within its jurisdiction. Most of the problems come from River City which is located on the Fullbanks River that flows though the county.
At the River City EOC, they have implemented the following:
1. In the Radio Room, the Communications Team has a laptop loaded with Outpost and an instance of Ics213mm. Because this is the ICS 213 central node for their EOC, they set the User ID to the default “LOCAL”. Their Outpost PC is on the City’ EOC LAN.
2. There are 2 PCs in the EOC also on the same LAN. The Planning and Intelligence (P&I) Section has Ics213mm installed on their PC. This user, Bob Johnson, decided on a User ID of “PNI”.
3. The other EOC PC is run by the Logistics Section. Bill Collins is the PC user and decided on an Ics213mm User ID of “BCOLLINS”.
TNCAntenna
BBS
TNCAntenna
BBS
River City EOC Disaster County EOC
Radio RoomOutpost &Ics213mm
UserID = LOCAL
Radio RoomOutpost &Ics213mm
UserID = LOCAL
P&I SectionIcs213mmUserID = PNI
Logistics SectionIcs213mmUserID = BCOLLINS
Ops SectionIcs213mmUserID = CTYOPS
Logistics SectionIcs213mmUserID = FRED
Local Area Network Local Area Network
TNCAntenna
BBS
TNCAntenna
BBS
River City EOC Disaster County EOC
Radio RoomOutpost &Ics213mm
UserID = LOCAL
Radio RoomOutpost &Ics213mm
UserID = LOCAL
P&I SectionIcs213mmUserID = PNI
Logistics SectionIcs213mmUserID = BCOLLINS
Ops SectionIcs213mmUserID = CTYOPS
Logistics SectionIcs213mmUserID = FRED
Local Area Network Local Area Network

ICS 213 Messaging v3.2 Users Guide
4/9/2020 24
At the Disaster County EOC, they have implemented the following:
1. In the County Radio Room, the Communications Team also has a PC loaded with Outpost and an instance of Ics213mm. Because this is the ICS 213 central node for the county EOC, they also set the User ID to the default “LOCAL”. Their Outpost PC is on the County EOC’s LAN.
2. They also have 2 PCs in the EOC. The Operations Section has Ics213mm installed on their PC, and the PC user decided on a User ID of “CTYOPS” (abbreviation for County OPS).
3. The other EOC PC is run by the Logistics Section. Fred Jones is the PC user and decided to set the Ics213mm User ID to “FRED”.
River City EOC: Sending a Message to County
Today, it’s raining hard in River City and NOAA reports the river will crest later this afternoon. River City’s EOC just activated and their Logistics Section needs to send a message to County Logistics requesting more sand bags.
1. Bill Collins (River City Logistics Section Chief), creates the message in Ics213mm by pressing New, then filling in the Subject and Message. All other fields were automatically filled in. He then presses Send.
2. Bill’s Ics213mm program connects to Opdirect, passes the message to Outpost, and checks for any incoming messages. Opdirect writes the message to the Outpost message database, and then tells Outpost that a new outgoing message is there. Outpost detects this message and automatically opens it.

ICS 213 Messaging v3.2 Users Guide
4/9/2020 25
River City Radio Room: Completing the Message to County
3. The Packet Operator in the radio room sees Bill’s message pop up and fills in the To: field indicating that this message needs to go to the County EOC (either the County’s call sign or tactical call).
4. When done, the Packet Operator presses Send. Because Outpost is set up to check the BBS every 5 minutes, the message is automatically sent on its way.
Note the Route line at the bottom of the above message. The format is as follows:
ROUTE: BCOLLINS:15:LOCAL:0 \ \ \ \ \ \ _ TO: User ID/destination at County \ \______ Bill’s local Ics213mm message number \____________ FROM: Bill’s User ID
More on this as the scenario unfolds.

ICS 213 Messaging v3.2 Users Guide
4/9/2020 26
Disaster County Radio Room: receives the message
5. At the County EOC, Outpost polls the BBS as usual, retrieves this message, and indicates that the message arrived (some type of audio message or tone is heard).
6. The County packet operator opens the message in Outpost, sees that it is an ICS 213 message, and it is addressed to Fred Jones, the County Logistics guy. Because the County packet operator was helping the EOC staff with Ics213mm, he knows that Fred’s Ics213mm User ID is “FRED”. With the message open, he selects Actions > Change Route. The sending station originally set the Destination Route to LOCAL causing the message to load into the Radio Room’s copy of Ics213mm (who’s User ID is LOCAL).
7. The County packet operator changes the Route to match what Fred set up on his Ics213mm, which is, “FRED”, presses OK, and then presses Close to close the message.

ICS 213 Messaging v3.2 Users Guide
4/9/2020 27
Disaster County EOC: receiving the message
8. Shortly thereafter, Fred’s Ics213mm program automatically polls Outpost for any incoming messages with a routing for “FRED”, and finds one. At Fred’s PC, Ics213mm pops up the notification letting him know that a message arrived.
9. Fred presses Open, and the message is loaded for him to review. This what he sees…
Some things to note:
▪ The Message status is listed as Received message, status is New.
▪ The message is listed in BLUE meaning that it is currently READ ONLY.
▪ Because this is an incoming message, the only actions allowed are to DELETE or REPLY.
▪ Fred wants to print this; he uses the menu File > Print so his team can see if they can meet he request. Fred prints 2 copies (not shown here).

ICS 213 Messaging v3.2 Users Guide
4/9/2020 28
Disaster County EOC: Replies to the message
10. County has 1000 sandbags that they can deliver. Fred presses Reply and fills in the Reply section of the message letting Bill know that they can be there in 3 hours.
Note that the original message text area remains locked (BLUE) while the reply text area is open for editing (BLACK). The reply signature, position, and date that the reply was created are automatically filled in.
11. When done, Fred presses Send and the reply is sent back to the County Outpost system.
The message status is now updated to Locally created reply, status is Sent.

ICS 213 Messaging v3.2 Users Guide
4/9/2020 29
Disaster County Radio Room: Complete the reply
12. Back in County’s Radio Room, the reply message pops up and the County packet operator completes the message by filling in the To: field.
13. When done, the County packet operator presses Send and Outpost sends it to the BBS.
Note the Route. It shows it is from “FRED” and to “BCOLLINS”. This ensures that the reply gets back to the originator without any packet operator intervention.

ICS 213 Messaging v3.2 Users Guide
4/9/2020 30
River City Radio Room: Receives the reply message
14. River City’s Outpost retrieves the message. As described above, because the route is set to BCOLLINS, there is no need for any interaction with the message.
15. Finally, Bill Collins’ Ics213mm automatically polls Outpost for any messages and retrieves the reply from County. The program opens a notification window letting the PC operator know that a reply message has been received.
16. Bill clicks on Open and sees his original message, plus Fred’s reply.
Note that the message status is Received reply, status is New. Because this completes the entire exchange, the message cannot be edited. If a new message is needed, the user presses New and creates a new message.

ICS 213 Messaging v3.2 Users Guide
4/9/2020 31
5.2 Sending Messages to a local user (Keep Local)
Ics213mm also lets you send ICS213 messages to other positions within the EOC or Command Post that are on the Local Area Network.
Building on the previous scenario, let’s suppose the following is needed.
At the River City EOC, the setup is the same as it was before…
1. In the Radio Room, the Communications Team has a laptop loaded with Outpost and an instance of Ics213mm, with the User ID set to the default “LOCAL”.
2. Bob Johnson, the Planning and Intelligence (P&I) Section Chief, has Ics213mm installed on their PC with a User ID of “PNI”.
3. Bill Collins, the Logistics Section Chief, set up his Ics213mm with a User ID of “BCOLLINS”.
Sending an ICS213 message and keeping it local
Bill Collins needs to keep the City’s Planning and Intel Section informed of the County’s plan for sandbags. The best way to document this is to send an ICS 213 message to P&I.
4. Bill creates the message in Ics213mm by pressing New. He then fills in the Header, Subject and Message. In some cases, he may need to override some of the default fields that were automatically filled in.
5. Bill yells across the room to Bob (it’s a small EOC) and asks him for his Ics213 User ID. Bob replies “PNI”.
6. At the bottom of the form in the Routing area, Bill then does the following:
a) checks the box Keep this message local to this Command / ICP , and
b) fills in the Destination Route ID field with PNI.
TNCAntenna
BBS
TNCAntenna
BBS
River City EOC Disaster County EOC
Radio RoomOutpost &Ics213mm
UserID = LOCAL
Radio RoomOutpost &Ics213mm
UserID = LOCAL
P&I SectionIcs213mmUserID = PNI
Logistics SectionIcs213mmUserID = BCOLLINS
Ops SectionIcs213mmUserID = CTYOPS
Logistics SectionIcs213mmUserID = FRED
Local Area Network Local Area Network
TNCAntenna
BBS
TNCAntenna
BBS
River City EOC Disaster County EOC
Radio RoomOutpost &Ics213mm
UserID = LOCAL
Radio RoomOutpost &Ics213mm
UserID = LOCAL
P&I SectionIcs213mmUserID = PNI
Logistics SectionIcs213mmUserID = BCOLLINS
Ops SectionIcs213mmUserID = CTYOPS
Logistics SectionIcs213mmUserID = FRED
Local Area Network Local Area Network

ICS 213 Messaging v3.2 Users Guide
4/9/2020 32
7. Finally, he presses Send.
8. Bill’s Ics213mm program connects to Opdirect, passes the message to Outpost, and checks for any incoming messages. Because this is a “Keep Local” message and already set up to route to PNI, the message saved into the In‐Tray and is ready for Bob’s Program to pick it up.
Unlike a regular BBS message that has information about the BBS, the From call sign and To call sign, an Ics213mm Keep Local message does the following
a. It sets the Message From: field to the sender’s Ics213mm User ID.
b. It sets the Message To: field to the recipient’s Ics213mm User ID.
c. It sets the BBS to the value “LOCAL_LAN”.
From Outpost’s point of view, Keep Local forces this message to look like an Ics213mm message that was just received and is ready to be picked up by the recipient. Opening the message shows all the fields set correctly and non‐editable (like all received messages).

ICS 213 Messaging v3.2 Users Guide
4/9/2020 33
In this manner, Outpost acts as a Message drop for all locally passed Ics213mm messages.
Sending an ICS213 message and keeping it local
9. Shortly thereafter, Bob Johnson’s Ics213mm program connects, polls Outpost, and retrieves the message that was addressed to him as “PNI”.

ICS 213 Messaging v3.2 Users Guide
4/9/2020 34
10. After the message is retrieved from Outpost, Outpost then moves the message to the Sent folder indicating that it has been delivered.
11. Back at Bob’s PC, he presses Reply, then enters a reply message to Bob. The Signature and Position fields are automatically filled in from the message header, and the Date field is the time now.
12. When done with the reply, he presses Send to send his reply back.
Essentially, this is another Keep Local message that the system processes and the reverse of the above occurs.
What does Outpost do with Keep Local Messages?
Essentially, Outpost is the mail drop for Keep Local Ics213mm messages.
1. On receiving a Keep Local message, Outpost places it in the In Tray in a message state similar to when a message is retrieved from the BBS.
2. Once a Keep Local message is retrieved, Outpost moves it to the Sent Folder. These messages can always be opened and reviewed.
3. Outpost will also create all log entries for Keep Local messages to be included in the Ics309clb Communications Log. Note that the first 10 characters of the senders and recipient’s name will be listed in the From and To columns.