Oracle E-Business Suite Patching Procedures - Oracle Documentation

Executive Overview
There are two basic alternative presented to Oracle database administrators for installing
Oracle database binaries in Real Application Clusters (RAC) configurations. Oracle
database homes may be created on each node of the cluster (node local) or one shared
Oracle database home may be created on an Oracle ASM Cluster File System (ACFS)
and be available on all nodes of the cluster.
Installing a Shared Oracle database home has many management advantages in a multi
node cluster environment. The key objection to deploying shared Oracle database homes
have been the challenges for on-line patching in an efficient manner while maintaining
high availability. Oracle ACFS point in time read-write snapshot functionality is leveraged
to address this objection and make it easier and faster to manage the Oracle optach
process while increasing availability.
Out-of-place patching with ACFS snapshots significantly improves the patching process.
It eliminates database downtime when coupled with the on-line migration feature of RAC
and minimized downtime otherwise. Therefore, the patch process is streamlined and the
management overhead is significantly reduced. With Oracle ACFS RW snapshots, a
history of patched Oracle DATABASE homes can also be maintained with efficiency and
very little incremental storage needed. This simplifies the Patch Roll Back process as well
as having the added benefit of being able to quickly restore to any previous point-in-time
version with simplicity.
This document describes the procedure for out-of-place patching, roll back and restore
with ACFS snapshots targeted for shared Oracle database homes that are installed on
ACFS file systems.
Introduction to Oracle Cloud File System
Oracle Cloud File System provides unprecedented simplicity in storage management,
automation and storage consolidation for general purpose volumes and files. When
combined with Oracle ASM, it enables private storage cloud deployments with resource
pooling, network accessibility, rapid elasticity and rapid provisioning that are key cloud
computing requirements. Oracle Cloud File System is a general purpose file system with
an integrated volume manager. It includes the following software components:
Oracle ASM Dynamic Volume Manager
Oracle ASM Dynamic Volume Manager (Oracle ADVM) provides common volume
management services and a standard device driver interface for system administrators to

manage volumes across different platforms. A device file is created automatically when a
volume is created in an ASM disk group. This allows Oracle ASM Cluster File System
and 3rd party file systems to use this device interface to create and manage file systems
on Oracle ASM Dynamic Volumes.
Oracle ASM Cluster File System
Oracle ASM Cluster File System (Oracle ACFS) is a general-purpose POSIX, X/OPEN
and Windows compliant file system designed for single node and cluster configurations. It
supports advanced value-added data services including read-write copy-on-write
Snapshots, asynchronous file system Replication, Tagging, as well as file system
Security and Encryption. It is managed using native operating system commands, acfsutil
command line tool and the Oracle Enterprise Manager.
The combination of Oracle Cloud File System, Oracle ASM and Oracle Clusterware make
up the Oracle Grid Infrastructure (GI). This creates a tightly integrated foundation to
manage databases, volumes and file systems in cluster and single node configurations.
Oracle Grid Infrastructure eliminates the need for multiple 3rd
party software layers that
results in simplified storage and clusterware management, and greatly reducing
complexity and cost.
Oracle ACFS supports consolidated database and application executables, database
trace files, database alert logs, application reports, BFILEs, and configuration files. ACFS
supports all general purpose file types such as video, audio, text, images, engineering
drawings, and other application file data. Starting with Oracle ACFS 11gR2 version
11.2.0.3, there are three types of Oracle DATABASE file types are also supported,
namely: backupsets, archive logs and dumpsets that provide management flexibility.
Simple Point-in-Time Read-Write Snapshots
An Oracle ACFS snapshot is an online, read-only or read-write, point-in-time copy of an
Oracle ACFS file system. The snapshot copy is space-efficient and uses Copy-On-Write
functionality. Before an Oracle ACFS file extent is modified or deleted, its current value is
preserved in the snapshot to maintain the point-in-time view of the file system. Oracle
ACFS supports 63 snapshots per file system. These snapshots can be any combination
of read-only and read-write.
Oracle ACFS snapshot storage is maintained within the file system, eliminating the
management of separate storage pools for file systems and snapshots. All ACFS
snapshots are always available when the ACFS file system is mounted. Oracle ACFS file
systems can be dynamically resized online to accommodate additional file and snapshot
storage requirements.
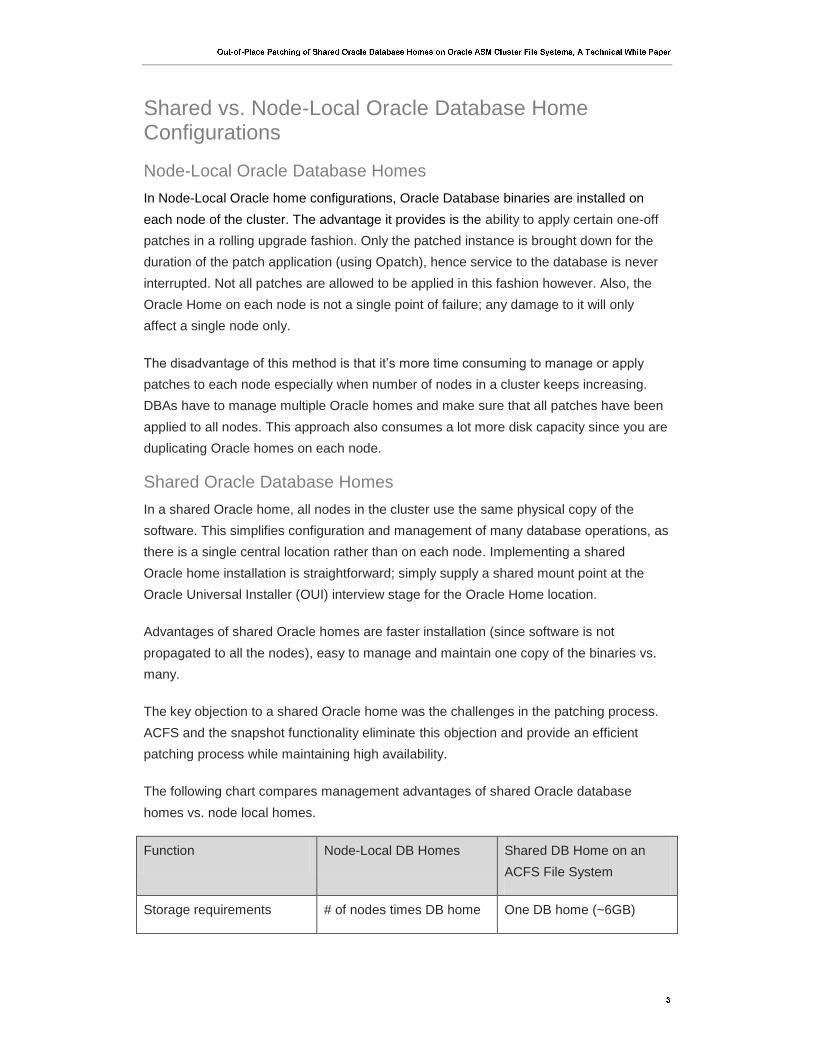
Shared vs. Node-Local Oracle Database Home Configurations
Node-Local Oracle Database Homes
In Node-Local Oracle home configurations, Oracle Database binaries are installed on
each node of the cluster. The advantage it provides is the ability to apply certain one-off
patches in a rolling upgrade fashion. Only the patched instance is brought down for the
duration of the patch application (using Opatch), hence service to the database is never
interrupted. Not all patches are allowed to be applied in this fashion however. Also, the
Oracle Home on each node is not a single point of failure; any damage to it will only
affect a single node only.
The disadvantage of this method is that it’s more time consuming to manage or apply
patches to each node especially when number of nodes in a cluster keeps increasing.
DBAs have to manage multiple Oracle homes and make sure that all patches have been
applied to all nodes. This approach also consumes a lot more disk capacity since you are
duplicating Oracle homes on each node.
Shared Oracle Database Homes
In a shared Oracle home, all nodes in the cluster use the same physical copy of the
software. This simplifies configuration and management of many database operations, as
there is a single central location rather than on each node. Implementing a shared
Oracle home installation is straightforward; simply supply a shared mount point at the
Oracle Universal Installer (OUI) interview stage for the Oracle Home location.
Advantages of shared Oracle homes are faster installation (since software is not
propagated to all the nodes), easy to manage and maintain one copy of the binaries vs.
many.
The key objection to a shared Oracle home was the challenges in the patching process.
ACFS and the snapshot functionality eliminate this objection and provide an efficient
patching process while maintaining high availability.
The following chart compares management advantages of shared Oracle database
homes vs. node local homes.
Function Node-Local DB Homes Shared DB Home on an
ACFS File System
Storage requirements # of nodes times DB home One DB home (~6GB)

(~ 6GB)
Number of db homes to
manage and patch
As many as nodes in the
cluster.
Only one!
Installation time Relatively slow since OUI
needs to copy the binaries
to each node of the cluster
and run localization scripts
(clone.pl &root.sh) that
typically take about 10
minutes on each node.
DB home is installed only
once.
Starting with Oracle ACFS 11.2.0.3, the customer can leverage the Oracle ACFS
Snapshot feature to facilitate Oracle opatch and restore process back to original if the
patch does not work, while maintain high availability multiple version of home. Oracle
ACFS and its snapshot functionality provide three significant management benefits:
- Significant reduction in Oracle Database installation time
- Significant reduction in management complexity and overhead
- Reducing the time to patch an Oracle database home from hours to minutes in a
cluster configuration
The following is a comparison chart:
Function Opatch with Node-Local DB
Homes
Opatch with Shared Oracle
DB Homes using ACFS
Snapshots
Storage requirements Double the storage on each
node: Make a physical
backup copy
Uses snapshot technology
to maintain backup for
restore (Typically 5-10%
more)
Number of homes to patch As many as nodes in the Only one!
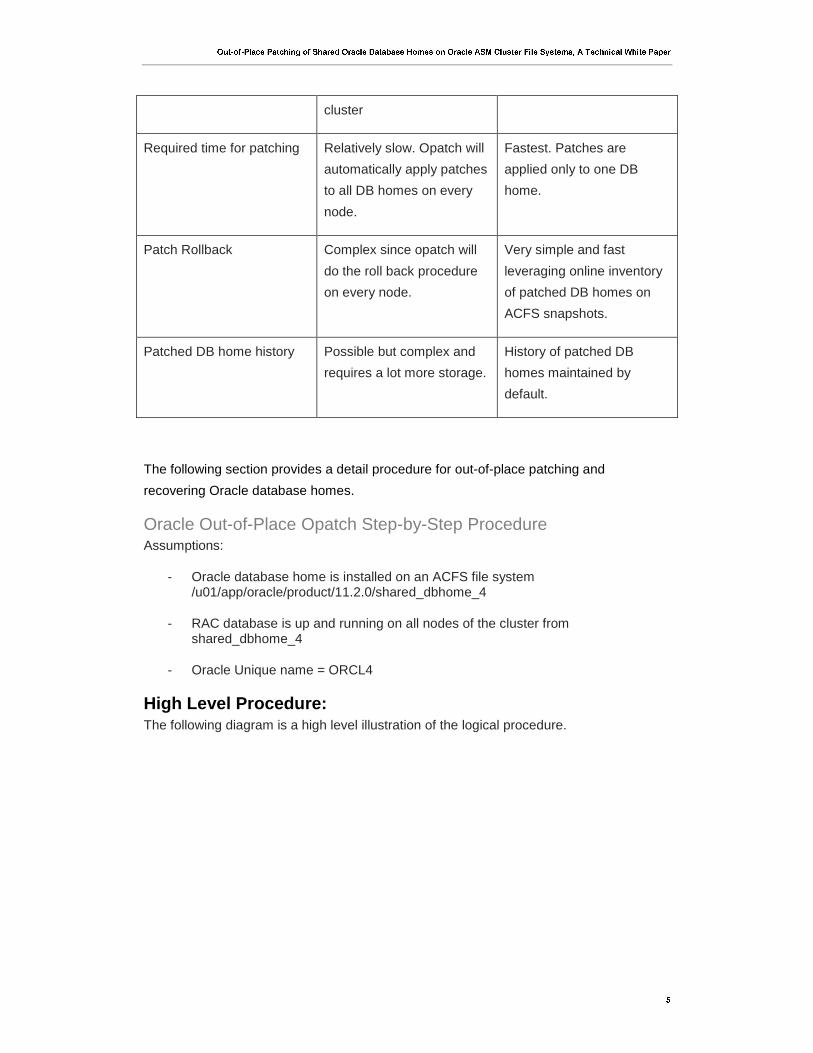
cluster
Required time for patching Relatively slow. Opatch will
automatically apply patches
to all DB homes on every
node.
Fastest. Patches are
applied only to one DB
home.
Patch Rollback Complex since opatch will
do the roll back procedure
on every node.
Very simple and fast
leveraging online inventory
of patched DB homes on
ACFS snapshots.
Patched DB home history Possible but complex and
requires a lot more storage.
History of patched DB
homes maintained by
default.
The following section provides a detail procedure for out-of-place patching and
recovering Oracle database homes.
Oracle Out-of-Place Opatch Step-by-Step Procedure Assumptions:
- Oracle database home is installed on an ACFS file system /u01/app/oracle/product/11.2.0/shared_dbhome_4
- RAC database is up and running on all nodes of the cluster from shared_dbhome_4
- Oracle Unique name = ORCL4
High Level Procedure:
The following diagram is a high level illustration of the logical procedure.

Patch the Oracle database home (OH) for the 1st time with a p1 patch:
1. Start with Oracle database home (OH) and create a snapshot as backup of the original home (OH0)
2. To apply patch p1, create a rw snapshot (OH-S1), and patch this home using opatch to get OH-S1 (p1).
3. Switch the database to run from the new patched home.
Subsequent patching of Oracle database homes:
1. Re-sync OH with the current patched home (OH-S1(p1))
2. To apply patch p2, create a rw snapshot (OH-S2), and patch this home using opatch to get OH-S2 (p1+p2).
3. Switch the database to run from the new patched home.
Following this process of applying patches to snapshots database homes, a history of patched Oracle database homes are created as a result (OH, OH-S1 (p1), OH-S2 (p1+p2), and OH-S2 (p1+p2+n). This means that you can restore to any one of these versions quickly for the purpose of testing and verification or production.
You can also take advantage of Oracle ACFS NFS/CIFS and export functionality and provision database homes to other servers in the network to offload test and verification without impacting the production environment.
Detailed Step-by-Step Out-of-Place Patch Procedure:
Out-of-Place Patching Procedure Using ACFS Snapshots
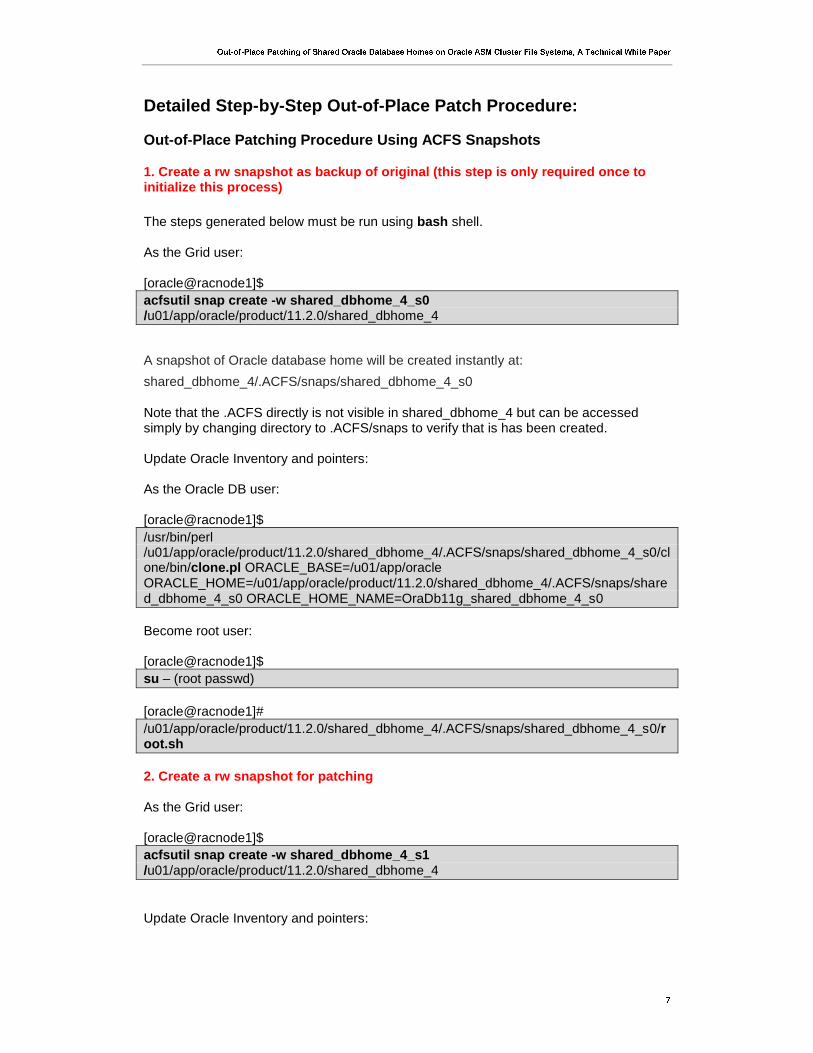
1. Create a rw snapshot as backup of original (this step is only required once to initialize this process)
The steps generated below must be run using bash shell. As the Grid user: [oracle@racnode1]$
acfsutil snap create -w shared_dbhome_4_s0 /u01/app/oracle/product/11.2.0/shared_dbhome_4
A snapshot of Oracle database home will be created instantly at:
shared_dbhome_4/.ACFS/snaps/shared_dbhome_4_s0
Note that the .ACFS directly is not visible in shared_dbhome_4 but can be accessed simply by changing directory to .ACFS/snaps to verify that is has been created. Update Oracle Inventory and pointers: As the Oracle DB user: [oracle@racnode1]$
/usr/bin/perl /u01/app/oracle/product/11.2.0/shared_dbhome_4/.ACFS/snaps/shared_dbhome_4_s0/clone/bin/clone.pl ORACLE_BASE=/u01/app/oracle ORACLE_HOME=/u01/app/oracle/product/11.2.0/shared_dbhome_4/.ACFS/snaps/shared_dbhome_4_s0 ORACLE_HOME_NAME=OraDb11g_shared_dbhome_4_s0 Become root user: [oracle@racnode1]$
su – (root passwd)
[oracle@racnode1]#
/u01/app/oracle/product/11.2.0/shared_dbhome_4/.ACFS/snaps/shared_dbhome_4_s0/root.sh
2. Create a rw snapshot for patching As the Grid user: [oracle@racnode1]$
acfsutil snap create -w shared_dbhome_4_s1 /u01/app/oracle/product/11.2.0/shared_dbhome_4
Update Oracle Inventory and pointers:

As the Oracle DB user: [oracle@racnode1]$
/usr/bin/perl /u01/app/oracle/product/11.2.0/shared_dbhome_4/.ACFS/snaps/shared_dbhome_4_s1/clone/bin/clone.pl ORACLE_BASE=/u01/app/oracle ORACLE_HOME=/u01/app/oracle/product/11.2.0/shared_dbhome_4/.ACFS/snaps/shared_dbhome_4_s1 ORACLE_HOME_NAME=OraDb11g_shared_dbhome_4_s1 Become root user: [oracle@racnode1]$
su – (root passwd)
[oracle@racnode1]#
/u01/app/oracle/product/11.2.0/shared_dbhome_4/.ACFS/snaps/shared_dbhome_4_s1/root.sh
3. Run the pre-script for DB component of the patch Refer to the patch README document for patch specific instructions. This typically involves running a ‘prepatch’ script as the database user. 4. Apply patch to the snapshot home Again, refer to the patch README document for patch specific instructions. This typically involves running the opatch apply command. Example:
As the DB user:
[oracle@racnode1]$
/u01/app/oracle/product/11.2.0/shared_dbhome_4/.ACFS/snaps/shared_dbhome_4_s1/OPatch/opatch apply <patch_loc> -oh /u01/app/oracle/product/11.2.0/shared_dbhome_4/.ACFS/snaps/shared_dbhome_4_s1
5. Switch Oracle home to snapshot patched version
The following are the steps required to migrate all RAC nodes to the patched version in a rolling manner. The rolling migration is supported with RAC 11.2.0.2 and beyond. [oracle@racnode1]$
su – (root passwd)
[oracle@racnode1]#

export ORACLE_HOME=/u01/app/oracle/product/11.2.0/shared_dbhome_4/.ACFS/snaps/shared_dbhome_4_s1
Modify database home path name: [oracle@racnode1]#
$ORACLE_HOME/bin/srvctl modify database -d ORCL4 -o /u01/app/oracle/product/11.2.0/shared_dbhome_4/.ACFS/snaps/shared_dbhome_4_s1
[oracle@racnode1]#
$ORACLE_HOME/bin/srvctl config database -d ORCL4 –a
6. Perform Rolling Migration
Stop database instance: [oracle@racnode1]#
$ORACLE_HOME/bin/srvctl stop instance –d ORCL4 –n <rac_node_name>
Start database and instance: [oracle@racnode1]#
$ORACLE_HOME/bin/srvctl start instance -d ORCL4 –n <rac_node_name>
7. Patch post installation procedure Refer to the patch README document for patch specific instructions. This typically involves running a post-patch script as the database user. 8. Add newly patched database home to /etc/oratab
Change any scripts that may have the previous ORACLE_HOME configured inside the script.
Repeat step #6 on all other RAC nodes.
If happy with this patch, then you are done!
9. If not happy with this patch, you need to restore back to previous snapshot version Identify the name of the previous database home that you need to go back to. Do step # 5 to bring up all RAC nodes using the desired patched database home. Become Grid user and delete the snapshot database home that you no longer need: [oracle@racnode1]$
acfsutil snap delete shared_dbhome_4_s1
/u01/app/oracle/product/11.2.0/shared_dbhome_4

Oracle DB home has been restored and you are done!
The Recursive Process of Applying a New Patch on a Snapshot Home In this example, let assume that we already have a patched home shared_dbhome_4_s1 that contains p1 patches. Now, we want to apply p2 patches on top of p1. Re-sync the changes in shared_dbhome_4_s1 back on shared_dbhome_4 (the physical copy) to establish a base to snapshot.
As the Oracle DB user:
[oracle@racnode1]$
rsync –rlpgoDv --size-only /u01/app/oracle/product/11.2.0/shared_dbhome_4/.ACFS/snaps/shared_dbhome_4_s1/ /u01/app/oracle/product/11.2.0/shared_dbhome_4/
Note: please do not omit the ‘/’ in the above command line since this would not work without it.
Repeat from step #2 with appropriate patch version numbers.
Roll Back Step-by-Step Procedure
High Level Procedure
The following diagram illustrates the functional steps needed for a patch roll back process.
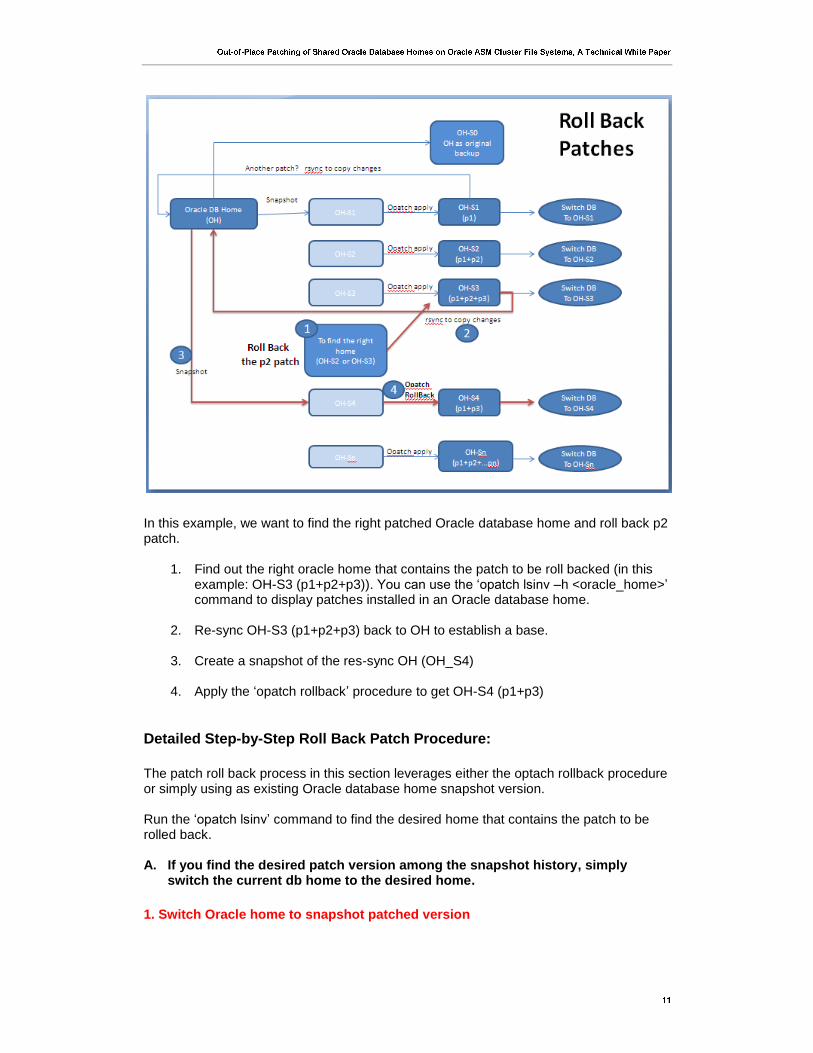
In this example, we want to find the right patched Oracle database home and roll back p2 patch.
1. Find out the right oracle home that contains the patch to be roll backed (in this example: OH-S3 (p1+p2+p3)). You can use the ‘opatch lsinv –h <oracle_home>’ command to display patches installed in an Oracle database home.
2. Re-sync OH-S3 (p1+p2+p3) back to OH to establish a base.
3. Create a snapshot of the res-sync OH (OH_S4)
4. Apply the ‘opatch rollback’ procedure to get OH-S4 (p1+p3)
Detailed Step-by-Step Roll Back Patch Procedure:
The patch roll back process in this section leverages either the optach rollback procedure or simply using as existing Oracle database home snapshot version. Run the ‘opatch lsinv’ command to find the desired home that contains the patch to be rolled back. A. If you find the desired patch version among the snapshot history, simply
switch the current db home to the desired home.
1. Switch Oracle home to snapshot patched version

The following are the steps required to migrate all RAC nodes to the patched version in a rolling manner. The rolling migration is supported with RAC 11.2.0.2 and beyond (previous version of rdbms may work too but is not officially supported by the opatch). [oracle@racnode1]$
su – (root passwd)
[oracle@racnode1]#
export ORACLE_HOME=/u01/app/oracle/product/11.2.0/shared_dbhome_4/.ACFS/snaps/shared_dbhome_4_s1
Modify database home path name: [oracle@racnode1]#
$ORACLE_HOME/bin/srvctl modify database -d ORCL4 -o
/u01/app/oracle/product/11.2.0/shared_dbhome_4/.ACFS/snaps/shared_dbhome_4_s1
[oracle@racnode1]#
$ORACLE_HOME/bin/srvctl config database -d ORCL4 –a
2. Perform Rolling Migration
Stop database instance: [oracle@racnode1]#
$ORACLE_HOME/bin/srvctl stop instance –d ORCL4 –n <rac_node_name>
Start database and instance: [oracle@racnode1]#
$ORACLE_HOME/bin/srvctl start instance -d ORCL4 –n <rac_node_name>
Repeat step # A2 for all rac nodes.
B. If you don’t the desired home, then select your current db home to rollback the
patches. Follow the procedure for opatch rollback:
1. Rsync the snapshot version of database home to create a new base
As the Oracle DB user:
[oracle@racnode1]$
rsync –rlpgoDv --size-only /u01/app/oracle/product/11.2.0/shared_dbhome_4/.ACFS/snaps/shared_dbhome_4_s3/ /u01/app/oracle/product/11.2.0/shared_dbhome_4/

Note: please do not omit the ‘/’ in the above command line since this would not work without it.
2. Create a new snapshot
As the Grid user: [oracle@racnode1]$
acfsutil snap create -w shared_dbhome_4_s4 /u01/app/oracle/product/11.2.0/shared_dbhome_4
Update Oracle Inventory and pointers: As the Oracle DB user: [oracle@racnode1]$
/usr/bin/perl /u01/app/oracle/product/11.2.0/shared_dbhome_4/.ACFS/snaps/shared_dbhome_4_s4/clone/bin/clone.pl ORACLE_BASE=/u01/app/oracle ORACLE_HOME=/u01/app/oracle/product/11.2.0/shared_dbhome_4/.ACFS/snaps/shared_dbhome_4_s4 ORACLE_HOME_NAME=OraDb11g_shared_dbhome_4_s4 Become root user: [oracle@racnode1]$
su – (root passwd)
[oracle@racnode1]#
/u01/app/oracle/product/11.2.0/shared_dbhome_4/.ACFS/snaps/shared_dbhome_4_s4/root.sh
3. Execute the ‘opatch –rollback -id’ procedure
The following is an example of the command to use. Please refer to the opatch README for details on the optach rollback procedure.
As the DB user: [oracle@racnode1]$
/u01/app/oracle/product/11.2.0/shared_dbhome_4/.ACFS/snaps/shared_dbhome_4_s4/OPatch/opatch rollback –id <patch id> -oh /u01/app/oracle/product/11.2.0/shared_dbhome_4/.ACFS/snaps/shared_dbhome_4_s4
4. Switch home to the new snapshot home
Perform steps A1 and A2 (page 11 & 12) to do a rolling migration of the database instance.
5. Done!
Conclusion
Out-of-place patching with ACFS snapshots decreases storage requirements, allows
managing one home vs. multiple homes, eliminates the need for complex patching
processes, and significantly improves the process to restore an Oracle database home
while maintaining an inventory of patched Oracle database homes for provisioning and/or
restoration.