OSP Quick Start Guide
10
1 | Page OSP Quick Start Guide Table of Contents Notes ..........................................................................................................................................................................1 Overview.....................................................................................................................................................................1 Site Information..........................................................................................................................................................2 Login to Portal ............................................................................................................................................................2 Activity Setup..............................................................................................................................................................3 Add Activity ............................................................................................................................................................3 Activity Lookup .......................................................................................................................................................4 Edit Activity.............................................................................................................................................................4 Remove Activity ......................................................................................................................................................4 View Statement ..........................................................................................................................................................5 Activity Reports ..........................................................................................................................................................5 Viewing Reports......................................................................................................................................................6 Printing Reports ......................................................................................................................................................7 Returns .......................................................................................................................................................................8 Lookup ........................................................................................................................................................................9 Enter Statement in Accounting System ................................................................................................................... 10 Notes This manual is to be used as a quick reference guide. For more detailed information and steps on the OSP solution please consult the OSP User Guide. Overview Online School Payments (OSP) is a school activity funds payment solution that allows parents, students, and guardians to pay with a credit or debit card online using a web browser from any location, 24 hours a day. The system allows for school bookkeepers to easily set up school activities, events and other activity items online for purchase from within an easy to use web based portal.
Transcript of OSP Quick Start Guide

1 | P a g e
OSP Quick Start Guide
Table of Contents Notes ..........................................................................................................................................................................1
Overview .....................................................................................................................................................................1
Site Information ..........................................................................................................................................................2
Login to Portal ............................................................................................................................................................2
Activity Setup ..............................................................................................................................................................3
Add Activity ............................................................................................................................................................3
Activity Lookup .......................................................................................................................................................4
Edit Activity .............................................................................................................................................................4
Remove Activity ......................................................................................................................................................4
View Statement ..........................................................................................................................................................5
Activity Reports ..........................................................................................................................................................5
Viewing Reports......................................................................................................................................................6
Printing Reports ......................................................................................................................................................7
Returns .......................................................................................................................................................................8
Lookup ........................................................................................................................................................................9
Enter Statement in Accounting System ................................................................................................................... 10
Notes This manual is to be used as a quick reference guide. For more detailed information and steps on the OSP solution please consult the OSP User Guide.
Overview Online School Payments (OSP) is a school activity funds payment solution that allows parents, students, and
guardians to pay with a credit or debit card online using a web browser from any location, 24 hours a day. The
system allows for school bookkeepers to easily set up school activities, events and other activity items online for
purchase from within an easy to use web based portal.

2 | P a g e
Site Information Parent Site Were parents make purchases
OSP Portal Where activities are created by the Bookkeeper
Portal Login User Name
Password
Support The email will notify all support staff on call. [email protected]
Login to Portal 1. Open your internet browser and enter the web address of the OSP Management Portal.
2. Enter your login credentials and click Next.
3. Select your school from the dropdown and click Login.
4. If you see a school in the right corner, you are now logged into the OSP Management Portal
3 | P a g e
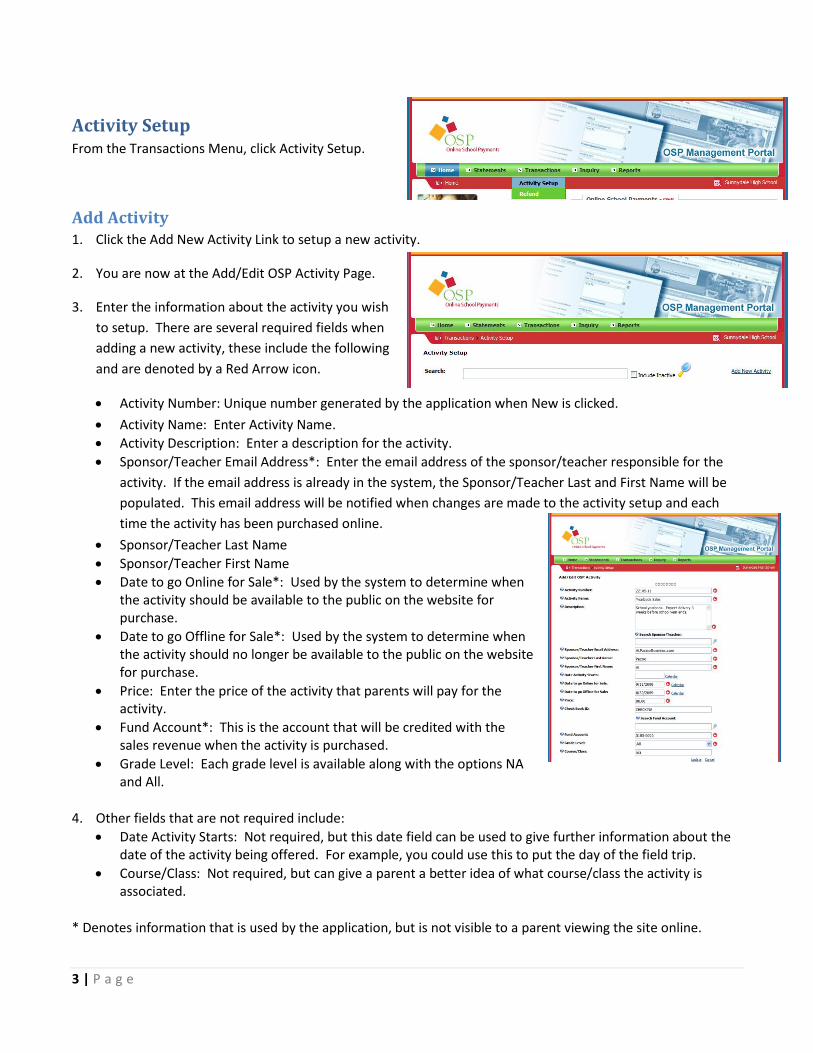
Activity Setup From the Transactions Menu, click Activity Setup.
Add Activity 1. Click the Add New Activity Link to setup a new activity.
2. You are now at the Add/Edit OSP Activity Page.
3. Enter the information about the activity you wish
to setup. There are several required fields when
adding a new activity, these include the following
and are denoted by a Red Arrow icon.
Activity Number: Unique number generated by the application when New is clicked.
Activity Name: Enter Activity Name.
Activity Description: Enter a description for the activity.
Sponsor/Teacher Email Address*: Enter the email address of the sponsor/teacher responsible for the
activity. If the email address is already in the system, the Sponsor/Teacher Last and First Name will be
populated. This email address will be notified when changes are made to the activity setup and each
time the activity has been purchased online.
Sponsor/Teacher Last Name
Sponsor/Teacher First Name
Date to go Online for Sale*: Used by the system to determine when the activity should be available to the public on the website for purchase.
Date to go Offline for Sale*: Used by the system to determine when the activity should no longer be available to the public on the website for purchase.
Price: Enter the price of the activity that parents will pay for the activity.
Fund Account*: This is the account that will be credited with the sales revenue when the activity is purchased.
Grade Level: Each grade level is available along with the options NA and All.
4. Other fields that are not required include:
Date Activity Starts: Not required, but this date field can be used to give further information about the date of the activity being offered. For example, you could use this to put the day of the field trip.
Course/Class: Not required, but can give a parent a better idea of what course/class the activity is associated.
* Denotes information that is used by the application, but is not visible to a parent viewing the site online.

4 | P a g e
5. Click Update Link to create the activity. If you do not want to setup the activity, simply click the Cancel Link and you will be returned to the Activity Setup Page.
6. If you remain at the Add/Edit OSP Activity Page, you may be missing a required field and it will be highlighted with red text indicating the field is required.
7. The activity will now show in the Activity Setup page, with other activities that have been setup.
8. Once the activity has been created, an email is sent to the Sponsor/Teacher associated with the activity.
Activity Lookup 1. To locate an Activity from the list of activities on the Activity Setup page scroll through the list of activities or
use the search field.
To use the Search feature, enter text in the search box, and then click the Magnifying Glass icon.
It may be necessary to check the box Include Inactive if the Date to Go Offline has already passed.
Edit Activity The following steps are how to make changes to information about an activity. Changes made to an activity will
immediately take place on the website. The teacher/sponsor will also get an email notification of the changes.
1. Lookup the Activity. See the Activity Lookup Section of the Manual. 2. Click the Edit link next to the activity. 3. Make required changes. 4. Click Update.
If you do not want to accept the changes, simply click the Cancel button. This will not delete the activity, but will just clear it from the window unchanged and bring you back to the Activity Setup Page.
Remove Activity The following steps are how to delete an activity.
1. Lookup the Activity. See the Activity Lookup Section of the Manual. 2. Select the Delete.
The system will not allow you to delete an activity that someone has already purchased. If you cannot delete an activity because it has already been purchased, but do not wish it to be available for further purchase online, change the date to go offline to a date in the past and click Save. Refer to the Edit Activity Section of the Manual for more information on how to change the date to go offline.

5 | P a g e
View Statement 1. Money will be deposited into your school’s
bank account based off the schedule your
district selected. An email is sent to the
bookkeeper when the statement has been
made available. To view the details, log into
the OSP Management Portal.
2. Click the Statements Menu option. Here you
will see your school’s unviewed statements.
3. To view previously viewed statements, put a
check in the Include Previously Viewed box and
click the Magnifying Glass.
4. Click the Display link to view the statement.
5. The first page of the statement is the summary. To print the statement, click the printer icon on the Report
Navigation Bar.
6. To view the other pages of the
statement, which include detail,
click the VCR Buttons (
) to navigate through the pages.

6 | P a g e
Activity Reports
Viewing Reports 1. To view reports of what students have paid for
particular activities, click the Sponsor/Teacher
Activities option from the Reports menu
dropdown.
2. Select the Teacher/Sponsor from the Drop
Down List and then click the Magnifying Glass
to view the report.
3. To view activities that are no longer for sale
online, check the Include Inactive box.
4. The report will contain all Activities
associated with the Sponsor/Teacher
selected. Each activity will have a list of
the students and parents who have
purchased the activity and total
amounts collected and count of
students.
5. Students that have had their purchase
refunded with be marked with an
asterisk (*) and will not count towards
the activity totals.
6. To navigate to other pages of the report use the VCR Buttons ( ).
7. To print or save the Statement see either the Printing Reports Section or the Exporting and Saving Reports
Section of this manual.
7 | P a g e
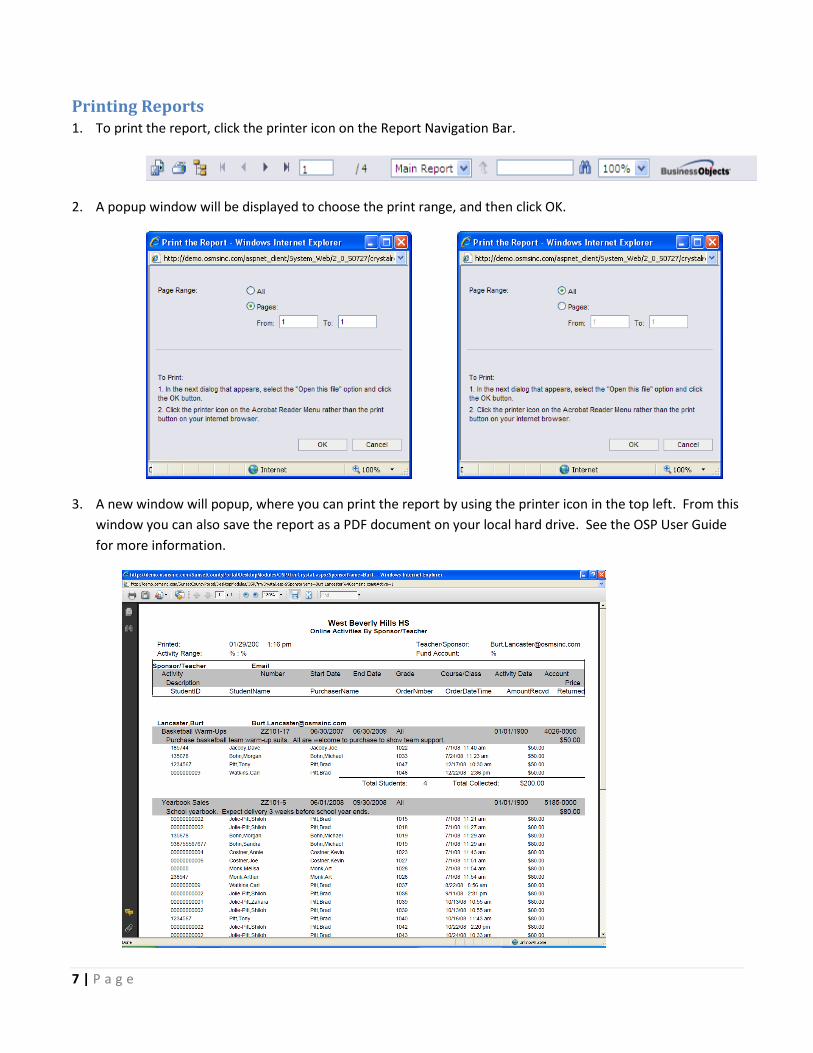
Printing Reports 1. To print the report, click the printer icon on the Report Navigation Bar.
2. A popup window will be displayed to choose the print range, and then click OK.
3. A new window will popup, where you can print the report by using the printer icon in the top left. From this
window you can also save the report as a PDF document on your local hard drive. See the OSP User Guide
for more information.

8 | P a g e
Returns 1. Choose Refund from the Transactions Menu.
2. Enter the Order Number that you would like to
return an activity from and click the Magnifying
Glass Icon.
3. The order will be displayed below. Click the
Detail button to view the activities purchased
on the order.
4. Here you will view the lines of the order.
5. Check the boxes of the lines to be returned.
When ready to return the amount, click the
Refund button in the lower right corner.

9 | P a g e
Lookup 1. Click Inquiry from the Menu bar.
2. Select how you would like to lookup the order
from the Search By dropdown box.
3. Enter the name or beginning portion of the
name and then click the Magnifying Glass.
4. Mark all schools to search for the order at other
schools in the district. This should be used in the
case that a parent may have made a purchase
from the wrong school.
5. The list below will include all orders based off the criteria entered.
6. Click the Detail button next to the order to view
the activity line items.

10 | P a g e
Enter Statement in Accounting System Your statement will be a summary of the deposit and withdrawal made for the period. The deposit will be
broken down by account and this entry should be made in your accounting system. Typically this will be handled
as a cash receipt, but your entry will depend on your district’s student activity fund accounting system. The best
analogy we can give you is the deposit is like you just received $1000 from a PE teacher and $700 of the money
is going into the General PE account, while $300 is going to the Football Team Account. The only difference is
that you now do not have to go physically deposit the money at the bank because it has already been sent there.
As for the Fees, they will automatically be withdrawn from your bank account. This will be separate from the
deposit, so your bank statement will show both a deposit and withdrawal entry. The best method to make the
entry will probably be as a cash disbursement, but again the entry will depend on your district’s student activity
fund accounting system.