OS/390 Introduction to ISPF Unit 2 Editing - IBM€¦ · COBOL. To create an edit macro, type a...
29
z/OS Learning Center: Introduction to ISPF © Copyright IBM Corp., 2005. All rights reserved. Unit 2: Editing with ISPF Module 2: Using ISPF Editing Commands
Transcript of OS/390 Introduction to ISPF Unit 2 Editing - IBM€¦ · COBOL. To create an edit macro, type a...

z/OS Learning Center: Introduction to ISPF
© Copyright IBM Corp., 2005. All rights reserved.
Unit 2: Editing with ISPFModule 2: Using ISPF Editing Commands

z/OS Basic Interfaces: Introduction to ISPF
© Copyright IBM Corp., 2005. All rights reserved. Page 2 of 29
Using ISPF Editing Commands – Introduction
This module, Using ISPF Editing Commands, introduces you to the z/OS Interactive System Productivity Facility (ISPF) editor, editing commands, and editing profiles.
Time to complete: 25 – 30 minutes

z/OS Basic Interfaces: Introduction to ISPF
© Copyright IBM Corp., 2005. All rights reserved. Page 3 of 29
Using ISPF Editing Commands – Objectives
Upon completing this unit, you should be able to:• Distinguish between ISPF primary commands and line commands• Insert, delete, copy, move, and repeat lines• Create and save new members to data sets• View and change an edit profile• Customize your editing environment

z/OS Basic Interfaces: Introduction to ISPF
© Copyright IBM Corp., 2005. All rights reserved. Page 4 of 29
Using ISPF Editing Commands – The Types of Editing Commands
In the ISPF editor, there are two places you can enter commands:• Line command fields • The command line You enter line commands by typing over the numbers in the line command area. Line commands affect the data on the corresponding individual line or block of lines. On the command line, you can enter primary edit commands, edit macro commands, and TSO commands. You can enter multiple commands separated by semicolons on the command line. This is known as stacking. Edit primary commands apply to the entire source member.

z/OS Basic Interfaces: Introduction to ISPF
© Copyright IBM Corp., 2005. All rights reserved. Page 5 of 29
Using ISPF Editing Commands – Edit Macros
You can use edit macros to extend and customize the editor. You can use edit macros to:• Perform repeated tasks• Simplify complex tasks• Pass parameters or retrieve and return information.You can write edit macros as a CLIST or REXX exec, or in a programming language such as FORTRAN, PL/I, or COBOL.To create an edit macro, type a series of commands into a data set or member. You can then run the series of commands by typing the macro name (for example, ISRDASH) on the command line and pressing the Enter key.
z/OS Basic Interfaces: Introduction to ISPF
© Copyright IBM Corp., 2005. All rights reserved. Page 6 of 29
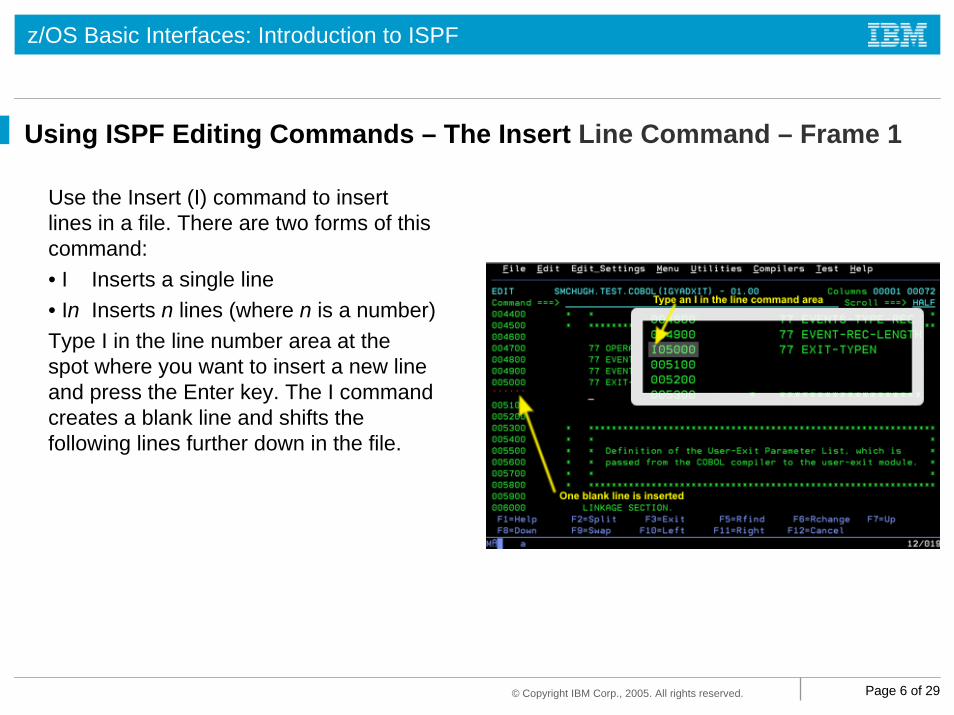
Using ISPF Editing Commands – The Insert Line Command – Frame 1
Use the Insert (I) command to insert lines in a file. There are two forms of this command:• I Inserts a single line• In Inserts n lines (where n is a number)Type I in the line number area at the spot where you want to insert a new line and press the Enter key. The I command creates a blank line and shifts the following lines further down in the file.

z/OS Basic Interfaces: Introduction to ISPF
© Copyright IBM Corp., 2005. All rights reserved. Page 7 of 29
Using ISPF Editing Commands – The Insert Line Command – Frame 2
To insert more than one line type In, where n is the number of lines you want to insert. For example, here we have typed I3 in the line number area and pressed the Enter key. This creates three blank lines and shifts the following lines further down in the file. The inserted lines contain apostrophes in the line number area until you type in the source data. When you finish typing in the new source data, press the Enter key again. The editor deletes any inserted lines that do not contain data.
z/OS Basic Interfaces: Introduction to ISPF
© Copyright IBM Corp., 2005. All rights reserved. Page 8 of 29
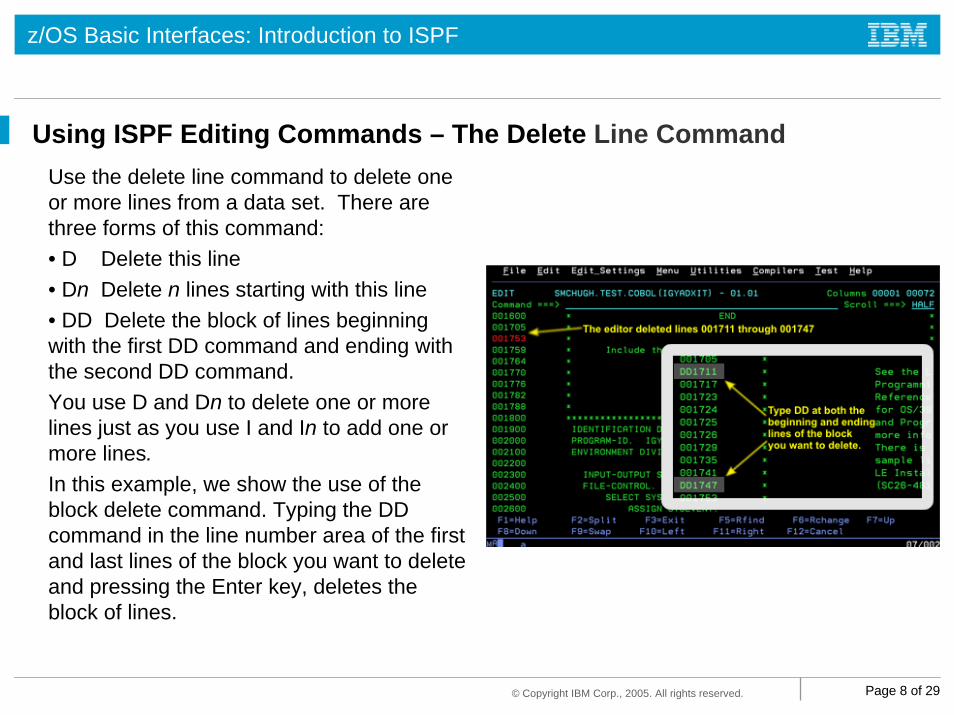
Using ISPF Editing Commands – The Delete Line CommandUse the delete line command to delete one or more lines from a data set. There are three forms of this command:• D Delete this line• Dn Delete n lines starting with this line• DD Delete the block of lines beginning with the first DD command and ending with the second DD command.You use D and Dn to delete one or more lines just as you use I and In to add one or more lines.In this example, we show the use of the block delete command. Typing the DD command in the line number area of the first and last lines of the block you want to delete and pressing the Enter key, deletes the block of lines.

z/OS Basic Interfaces: Introduction to ISPF
© Copyright IBM Corp., 2005. All rights reserved. Page 9 of 29
Using ISPF Editing Commands – The Repeat Line Command – Frame 1
Use the Repeat command to repeat a single line or a group of lines one or more times. The R command has several forms:• R Repeat this line• Rn Repeat this line n times• RR Repeat a block of linesThe repeated line falls in immediately after the original line. In this example, typing the R command in the line number area and pressing the Enter key, repeats the line directly below the line on which you entered the command.

z/OS Basic Interfaces: Introduction to ISPF
© Copyright IBM Corp., 2005. All rights reserved. Page 10 of 29
Using ISPF Editing Commands – The Repeat Line Command – Frame 2
To repeat a line multiple times, enter Rnin the line number area, where n is the number of times you want the line repeated.For example, typing R4 in the line number area and pressing the Enter key repeats the line four times directly below the original line, as shown here.

z/OS Basic Interfaces: Introduction to ISPF
© Copyright IBM Corp., 2005. All rights reserved. Page 11 of 29
Using ISPF Editing Commands – The Repeat Line Command – Frame 3
To repeat a block of lines, type RR in the line number area next to both the first line in the block and the last line in the block.For example, typing RR on line 000052 and on line 000055 and pressing the Enter key, repeats this block of lines directly below the line on which you typed the second RR command.
z/OS Basic Interfaces: Introduction to ISPF
© Copyright IBM Corp., 2005. All rights reserved. Page 12 of 29
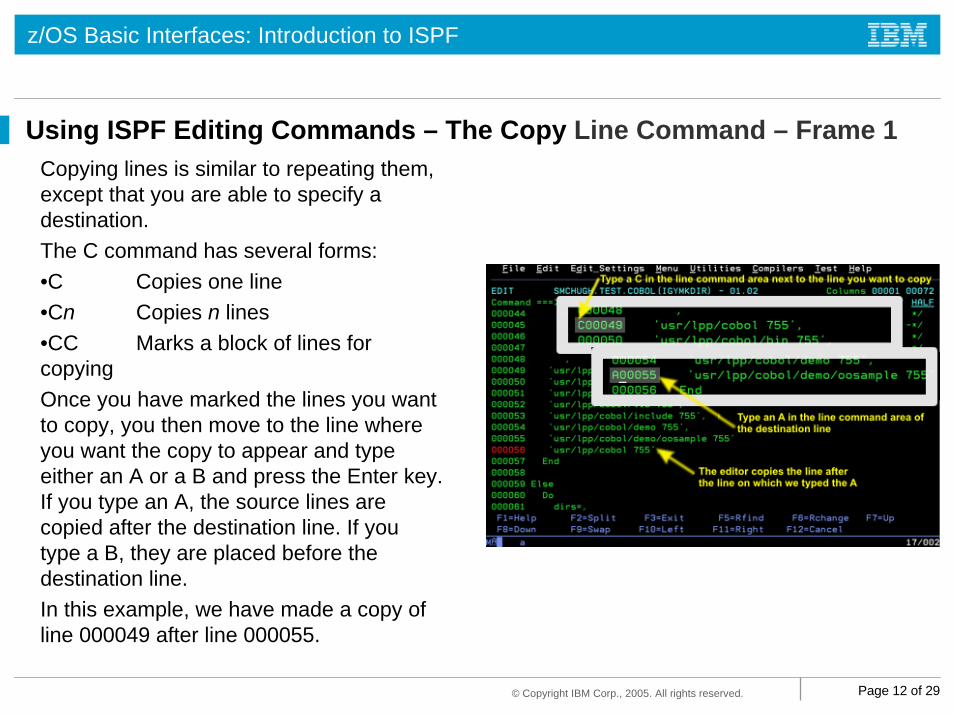
Using ISPF Editing Commands – The Copy Line Command – Frame 1Copying lines is similar to repeating them, except that you are able to specify a destination.The C command has several forms:•C Copies one line•Cn Copies n lines•CC Marks a block of lines for copyingOnce you have marked the lines you want to copy, you then move to the line where you want the copy to appear and type either an A or a B and press the Enter key. If you type an A, the source lines are copied after the destination line. If you type a B, they are placed before the destination line.In this example, we have made a copy of line 000049 after line 000055.
z/OS Basic Interfaces: Introduction to ISPF
© Copyright IBM Corp., 2005. All rights reserved. Page 13 of 29
Using ISPF Editing Commands – The Copy Line Command – Frame 2
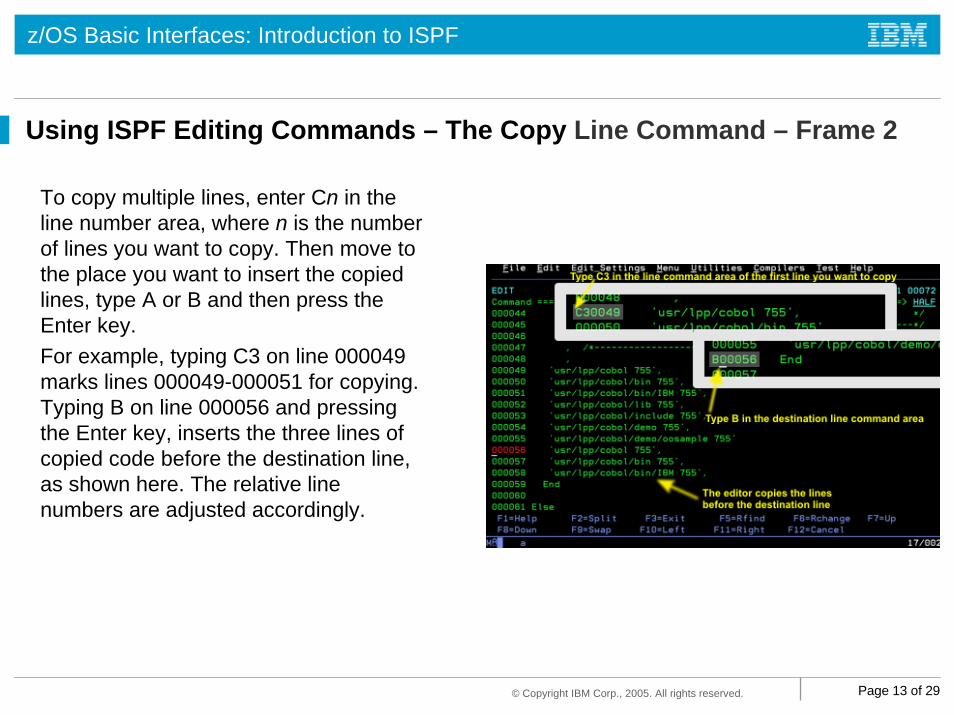
To copy multiple lines, enter Cn in the line number area, where n is the number of lines you want to copy. Then move to the place you want to insert the copied lines, type A or B and then press the Enter key.For example, typing C3 on line 000049 marks lines 000049-000051 for copying. Typing B on line 000056 and pressing the Enter key, inserts the three lines of copied code before the destination line, as shown here. The relative line numbers are adjusted accordingly.
z/OS Basic Interfaces: Introduction to ISPF
© Copyright IBM Corp., 2005. All rights reserved. Page 14 of 29
Using ISPF Editing Commands – The Copy Line Command – Frame 3
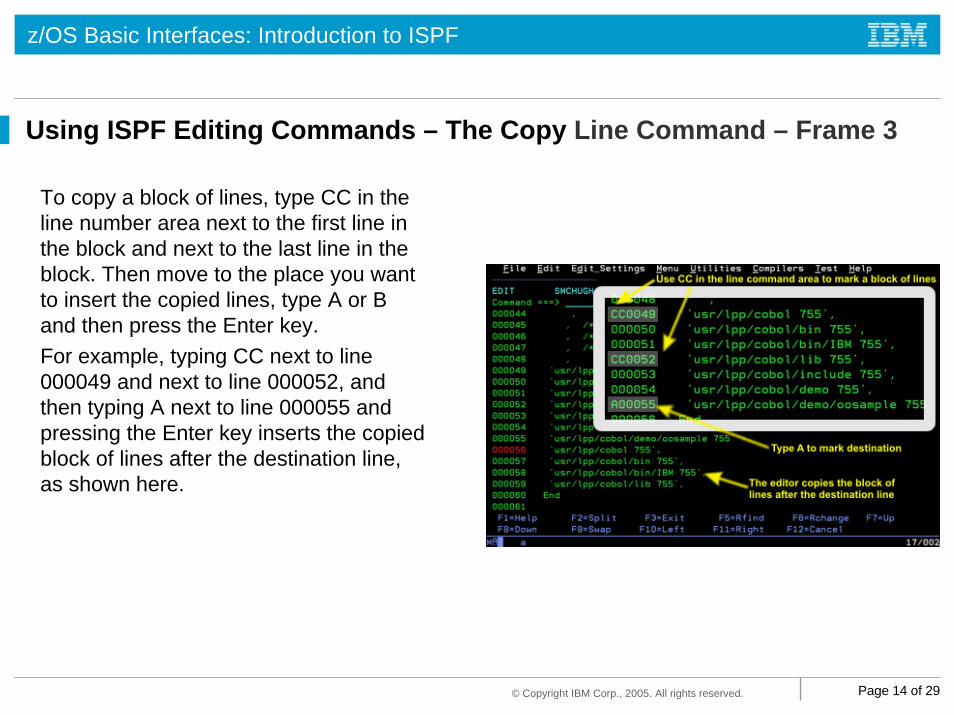
To copy a block of lines, type CC in the line number area next to the first line in the block and next to the last line in the block. Then move to the place you want to insert the copied lines, type A or B and then press the Enter key.For example, typing CC next to line 000049 and next to line 000052, and then typing A next to line 000055 and pressing the Enter key inserts the copied block of lines after the destination line, as shown here.

z/OS Basic Interfaces: Introduction to ISPF
© Copyright IBM Corp., 2005. All rights reserved. Page 15 of 29
Using ISPF Editing Commands – The Move Line CommandMoving lines is similar to copying them, except that moving also deletes the source lines from the original location once the move is complete.The M command has several forms:• M Moves one line• Mn Moves n lines• MM Marks a block of lines for movingOnce you have marked the lines you want to move, you then move to the line where you want the moved lines to appear and type either an A or a B and press the Enter key. If you type an A, the source lines are moved after the destination line. If you type a B, they are placed before the destination line. The moved lines no longer appear in their original place.

z/OS Basic Interfaces: Introduction to ISPF
© Copyright IBM Corp., 2005. All rights reserved. Page 16 of 29
Using ISPF Editing Commands – Ending and Saving Your Changes
When you have completed all editing in the ISPF Edit Panel, press the Exit key, F3. ISPF saves your changed member to the primary library and returns you to the Edit Entry Panel. If you press F3 again, ISPF returns to the ISPF Primary Option Panel.Alternatively, you can enter SAVE at the Command line to save the changed member. If you enter CANCEL on the Command line, any changes you have made will be discarded and you will return to the Edit Entry Panel.

z/OS Basic Interfaces: Introduction to ISPF
© Copyright IBM Corp., 2005. All rights reserved. Page 17 of 29
Using ISPF Editing Commands – The Edit Profile
The edit profile controls the editing environment, defining column boundaries, tab settings, line numbering, uppercase mode, and other items.You can have different edit profiles for different types of data. For example, you could have one edit profile for COBOL programs, another edit profile for memos, and a third edit profile for test data. Your installation determines how many different edit profiles are available to you. To select a profile for an edit session, enter it in the Profile Name field on the Edit Entry Panel.

z/OS Basic Interfaces: Introduction to ISPF
© Copyright IBM Corp., 2005. All rights reserved. Page 18 of 29
Using ISPF Editing Commands – Displaying the Edit Profile - Frame 1
To display the current edit profile, type PROFILE at the command line in the Editor Panel and press the Enter key. The top several lines of the display becomes shaded and =PROF> (or even =TABS> or =COLS>) appears in the line number command area for the lines displaying the profile. The profile shows the setting of various edit modes. In this example, the settings for NUMBER, CAPS, HEX, NULLS, TABS, AUTONUM, AUTOLIST, and PACK are all set to OFF, while RECOVERY, AUTOSAVE, STATS, and NOTE are set to ON. Other settings like PROFILE and IMACRO have different values.

z/OS Basic Interfaces: Introduction to ISPF
© Copyright IBM Corp., 2005. All rights reserved. Page 19 of 29
Using ISPF Editing Commands – Displaying the Edit Profile - Frame 2
You can activate an existing edit profile by typing its name in the PROFILE command. For example, here we show that typing PROFILE COB2 on the command line retrieves the profile named COB2. If the profile name you specify does not exist, a new one is created using the current profile settings. This is a way to create new profiles. You can change the profiles settings as you wish, then issue a PROFILE command specifying the new profile name. Changes you make to the PROFILE are saved when you exit the edit session. To avoid changes to the profile being saved at the end of the session, use the PROFILE LOCK command.

z/OS Basic Interfaces: Introduction to ISPF
© Copyright IBM Corp., 2005. All rights reserved. Page 20 of 29
Column boundaries control the width of the area in which source data can be placed, and the range of columns for editing data. The area within the boundaries represent the columns to which editing commands apply. The =BNDS> line illustrates the current settings. To display the column boundaries, type BNDS in the line command area.The COBOL default is 7 for the left boundary and 72 for the right boundary. For other types, such as an assembler source file (ASM), the standard left margin is 1 and the right margin is 71.
Using ISPF Editing Commands – Column Boundaries

z/OS Basic Interfaces: Introduction to ISPF
© Copyright IBM Corp., 2005. All rights reserved. Page 21 of 29
Use the BOUNDS primary command to change the BOUNDS setting in the profile. At the command prompt, type a command like BOUNDS 7 70. This will cause a new, left boundary and a new right boundary to be set to 7 and 70, respectively. To set only the left boundary, issue the same command, but use an asterisk for the right boundary. To set only the right boundary, use the asterisk in place of the left boundary. To reset to the default boundaries, issue the BOUNDS primary command with no parameters.
Using ISPF Editing Commands – Changing the BOUNDS Setting – Frame 1

z/OS Basic Interfaces: Introduction to ISPF
© Copyright IBM Corp., 2005. All rights reserved. Page 22 of 29
Using ISPF Editing Commands – Changing the BOUNDS Setting - Frame 2
You can also use the BOUNDS command as a line command. Type BOUNDS or BNDS in the line command area. The editor responds by displaying a =BNDS> line at the place where you entered the command. To set up new boundaries, delete the current boundary marks, move the cursor to the spots on the =BNDS> line where you want to set up new boundaries. Type a less-than sign (<) to mark the new left boundary, and type a greater-than sign (>) to mark a new right boundary.

z/OS Basic Interfaces: Introduction to ISPF
© Copyright IBM Corp., 2005. All rights reserved. Page 23 of 29
Using ISPF Editing Commands – Tab Stops - Frame 1
Tab stops are especially important for editing members that contain source files like COBOL or Assembler, because certain constructs must begin in specific columns. The ISPF editor supports two types of tab stops, hardware and logical. You move among hardware tab stops by pressing the Tab key on the 3270 terminal or terminal-emulator.With logical tab stops you enter a special tab character like a @ or #. The editor will take the subsequent text and align it to the closest tab stop inserting spaces as necessary to position it.
z/OS Basic Interfaces: Introduction to ISPF
© Copyright IBM Corp., 2005. All rights reserved. Page 24 of 29
Using ISPF Editing Commands – Tab Stops - Frame 2
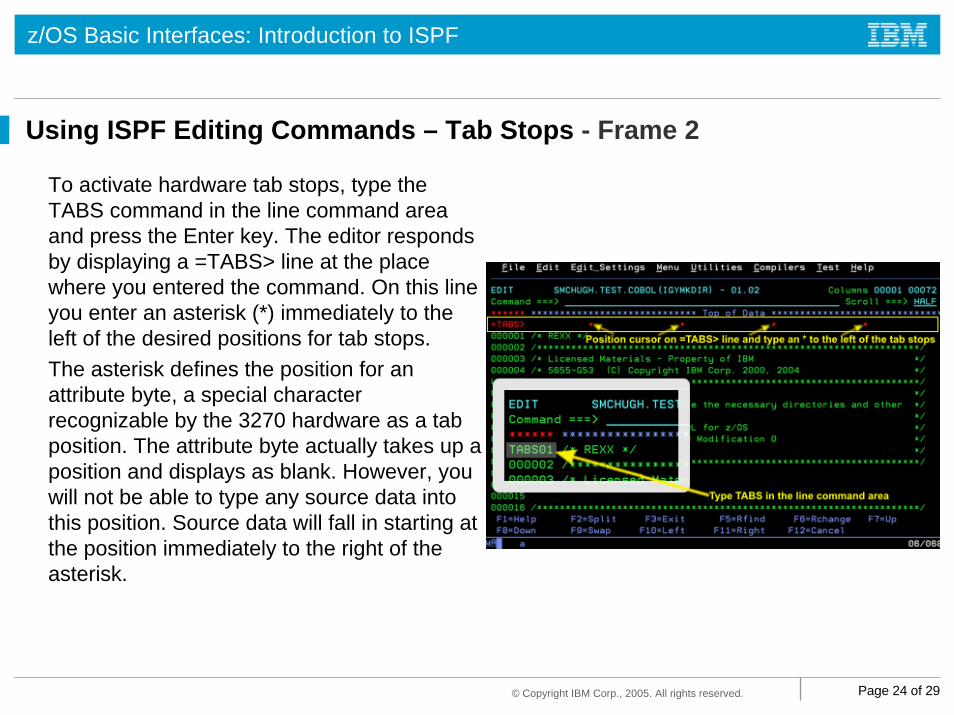
To activate hardware tab stops, type the TABS command in the line command area and press the Enter key. The editor responds by displaying a =TABS> line at the place where you entered the command. On this line you enter an asterisk (*) immediately to the left of the desired positions for tab stops.The asterisk defines the position for an attribute byte, a special character recognizable by the 3270 hardware as a tab position. The attribute byte actually takes up a position and displays as blank. However, you will not be able to type any source data into this position. Source data will fall in starting at the position immediately to the right of the asterisk.

z/OS Basic Interfaces: Introduction to ISPF
© Copyright IBM Corp., 2005. All rights reserved. Page 25 of 29
Using ISPF Editing Commands – Tab Stops - Frame 3
To activate logical tabbing, type the TAB command at the command line, followed by the character to be used to mark the tab position. From then on, you can type that character in any source line to generate the logical tabbing effect. To turn off logical tabbing, TAB with no character on the command line and press the Enter key.You can mix hardware and software tab stops. For example, in the DATA DIVISION of a COBOL program, you may want to use hardware tabbing to control the columns where level numbers, PIC, and VALUE clauses fall.

z/OS Basic Interfaces: Introduction to ISPF
© Copyright IBM Corp., 2005. All rights reserved. Page 26 of 29
Using ISPF Editing Commands – Using an Editing Mask
You can use an edit mask to predefine the initial contents of each line you insert. Start by entering the MASK command in the line command area. The editor inserts a blank line containing =MASK> in the line command area. On the =MASK> line, enter the characters you want duplicated on each new line. Each line you insert will start with the contents of the mask line.In this example, the =MASK> line includes the asterisks used to denote code comments. You can change the characters in the mask line as needed. To remove the current mask line, use the D line command to delete it. Alternatively, you can achieve the effect of a mask line by inserting one blank line, enter your data, and then repeat it using an R command.
z/OS Basic Interfaces: Introduction to ISPF
© Copyright IBM Corp., 2005. All rights reserved. Page 27 of 29
Using ISPF Editing Commands – The NUMBER Command - Frame 1
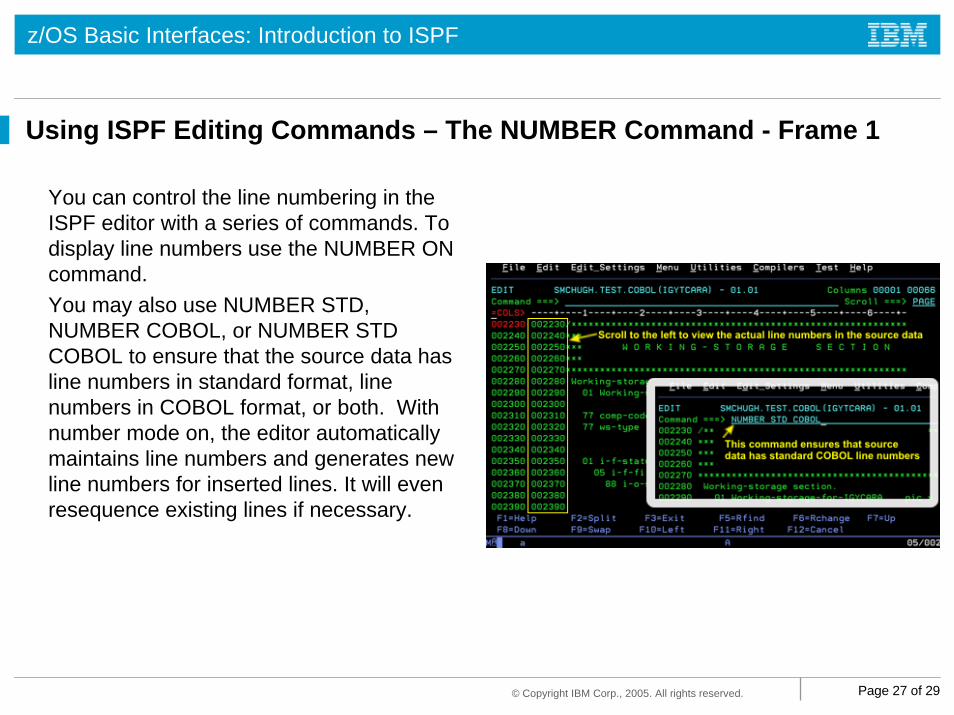
You can control the line numbering in the ISPF editor with a series of commands. To display line numbers use the NUMBER ON command.You may also use NUMBER STD, NUMBER COBOL, or NUMBER STD COBOL to ensure that the source data has line numbers in standard format, line numbers in COBOL format, or both. With number mode on, the editor automatically maintains line numbers and generates new line numbers for inserted lines. It will even resequence existing lines if necessary.
z/OS Basic Interfaces: Introduction to ISPF
© Copyright IBM Corp., 2005. All rights reserved. Page 28 of 29
Using ISPF Editing Commands – The NUMBER Command - Frame 2
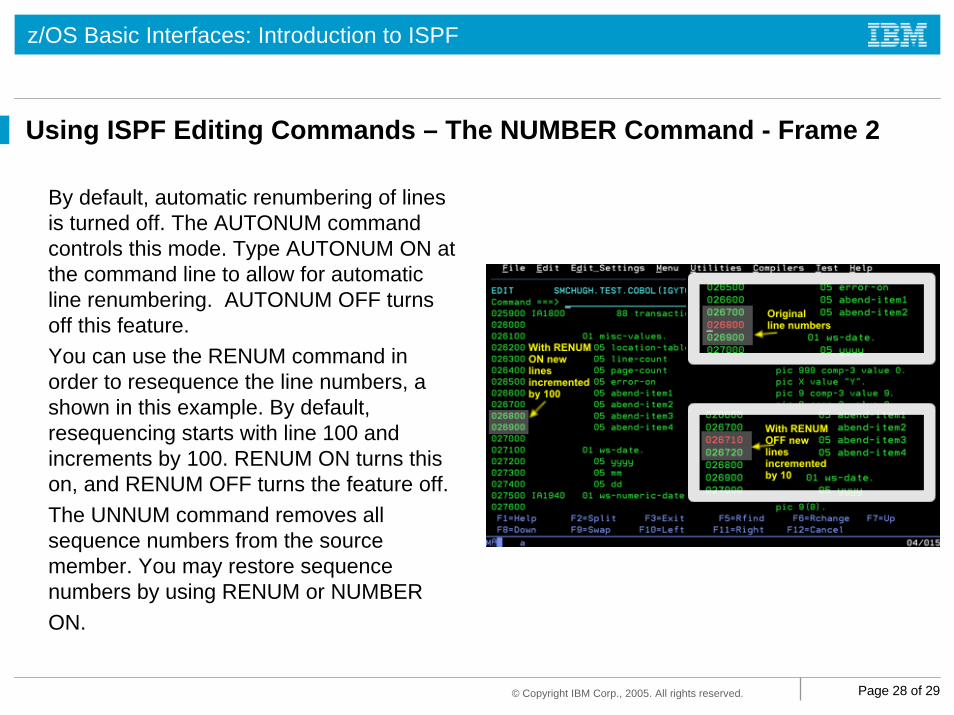
By default, automatic renumbering of lines is turned off. The AUTONUM command controls this mode. Type AUTONUM ON at the command line to allow for automatic line renumbering. AUTONUM OFF turns off this feature.You can use the RENUM command in order to resequence the line numbers, a shown in this example. By default, resequencing starts with line 100 and increments by 100. RENUM ON turns this on, and RENUM OFF turns the feature off.The UNNUM command removes all sequence numbers from the source member. You may restore sequence numbers by using RENUM or NUMBER ON.

z/OS Basic Interfaces: Introduction to ISPF
© Copyright IBM Corp., 2005. All rights reserved. Page 29 of 29
Using ISPF Editing Commands – Summary
In this module, Using ISPF Editing Commands, you learned:
• How to use the ISPF editor to make changes to a data set or data set member• The two types of editing commands: primary and line commands• How to create a new member of a partitioned data set• What edit macros are• How to insert, delete, repeat, copy, and move lines• How to use editing profiles, tabs, columns, masks, and numbering functions to customize your
editor environment