Oros Modeler Tutorial - SASftp.sas.com/techsup/download/eSupport/client... · Oros Modeler Tutorial...
109
A B C Oros Modeler Oros Lite Modeler Tutorial ™ ™
Transcript of Oros Modeler Tutorial - SASftp.sas.com/techsup/download/eSupport/client... · Oros Modeler Tutorial...
AB C
Oros Modeler Oros Lite Modeler
Tutorial
™
™
Copyright 1990–2001 ABC Technologies, Inc. All rights reserved.
ABC Technologies, Inc. 16100 N. W. Cornell Road Suite 200 Beaverton, OR 97006 Phone: 503/617-7100 Fax: 503/617-7200 Website: http://www.abctech.com
This document, and all information contained herein, is protected under the intellectual property, copyright, and trade secret laws of the United States and international treaties. The document may not be reproduced in whole or in part, stored in a retrieval system, or transmitted in any form or by any means: mechanical, electronic, photocopying, recording, or otherwise, without the express written permission of ABC Technologies, Inc. Copyright protection includes material generated from the software products of ABC Technologies, Inc. and displayed on a computer screen.
Oros® and EasyABC® are registered trademarks of ABC Technologies, Inc.
ABC Technologies™, Oros ABCPlus™, Oros ABC/M™, Oros ABC Views™, Oros Administrator™, Oros Analytics™, Oros Automation™, Oros Bridge™, Oros Bridge with SAP R/3™, Oros Bridge with SEM™, Oros Budgets™, Oros Connect™, Oros Console™, Oros Core™, Oros EIS Designer™, Oros Expansion™, Oros Framework™, Oros Links Engine™, Oros Lite ABC/M™, Oros Lite Scorecard™, Oros Modeler™, Oros Quick™, Oros Reports™, Oros Rules™, Oros Scorecard™, Oros Strategies™, Oros Surveys™, Oros Surveys Client™, Oros Yield™, EasyABC Plus™, EasyABC Quick™, As Easy As ABC™, and BetterManagement Journal™ are trademarks of ABC Technologies, Inc.
ABC UniversitySM is a service mark of ABC Technologies, Inc. Other products and corporate names may be trademarks of other companies and are used only for explanation and to the owners’ benefit without intent to infringe.
Printed in U.S.A. Oros 5.01 — January 2001 Part Number ABC501–TUT
Oros Modeler Tutorial i
Contents
Introduction ..................................................................................... 1 Scope of this tutorial ....................................................................................................................................... 1
If you’re new to activity–based management ............................................................................................ 2 If you’re experienced with activity–based management ........................................................................... 2
Before beginning this tutorial ......................................................................................................................... 2 Tutorial conventions ....................................................................................................................................... 2
Fonts .......................................................................................................................................................... 2 Procedures ................................................................................................................................................. 2 Notes.......................................................................................................................................................... 3 Illustrations................................................................................................................................................ 3 Views......................................................................................................................................................... 3
Online Help..................................................................................................................................................... 3 Technical Support ........................................................................................................................................... 3
Additional Training and Tutorials ............................................................................................................. 4 What's next?.................................................................................................................................................... 4
Introducing Activity–Based Costing (ABC) ................................... 5 The ABC model and CAM–I standards .......................................................................................................... 5
The Cost Assignment View....................................................................................................................... 6 The Process View...................................................................................................................................... 6
Basic steps to building a model ...................................................................................................................... 6 Collecting information .................................................................................................................................... 7
Tyler Electronics Company....................................................................................................................... 7 Installing product applications ........................................................................................................................ 8
Oros ........................................................................................................................................................... 8 Oros Lite.................................................................................................................................................... 8
Creating a model folder .................................................................................................................................. 8 Starting Oros Modeler .................................................................................................................................... 9 Creating the new model files ........................................................................................................................ 10 Oros Modeler main window ......................................................................................................................... 11
Properties and columns............................................................................................................................ 11 Summary center....................................................................................................................................... 11 Status bar ................................................................................................................................................. 11 Toolbars................................................................................................................................................... 11 Views....................................................................................................................................................... 12
Contents
Oros Modeler Tutorial ii
Saving the model .......................................................................................................................................... 12 Automatic saving..................................................................................................................................... 13
Exiting Oros Modeler or closing a model and opening another model......................................................... 14 Opening an existing model ........................................................................................................................... 15 What’s next? ................................................................................................................................................. 16
Constructing modules, centers, and accounts ........................... 17 Building by design ........................................................................................................................................ 17
Terminology ............................................................................................................................................ 18 Model structure ............................................................................................................................................. 18 Building the resource module structure ........................................................................................................ 19 Creating a center ........................................................................................................................................... 20 Creating an account ...................................................................................................................................... 20 Building the activities structure .................................................................................................................... 22
Adding activities...................................................................................................................................... 22 Building the cost objects structure ................................................................................................................ 23
Adding cost objects ................................................................................................................................. 24 Working with properties and columns .......................................................................................................... 25
Changing the properties in a column....................................................................................................... 26 Deleting a column ................................................................................................................................... 28
What's next?.................................................................................................................................................. 28
Building drivers ............................................................................. 29 What is a driver? ........................................................................................................................................... 29 Building a list of drivers for the model ......................................................................................................... 29 What's next?.................................................................................................................................................. 31
Creating assignment paths........................................................... 32 Selecting a default driver for assigning costs................................................................................................ 32 Building assignment paths from resources to activities ................................................................................ 34
Inserting resource accounts as source accounts....................................................................................... 34 Specifying activities to receive resource costs ........................................................................................ 36
Building assignment paths from activities to cost objects ............................................................................ 37 Inserting cost objects as destination accounts ......................................................................................... 37 Specifying cost object accounts to receive Setting Up costs ................................................................... 38 Changing the Setting Up source account driver ...................................................................................... 39 Specifying cost object accounts to receive Scheduling costs .................................................................. 41 Changing the Scheduling source account driver ..................................................................................... 41 Specifying cost object accounts to receive Inspecting costs.................................................................... 42 Changing the Inspecting source account driver....................................................................................... 42 Specifying the cost object account to receive Assembling costs ............................................................. 43
What's next?.................................................................................................................................................. 43
Contents
Oros Modeler Tutorial iii
Adding attributes and performance measures............................ 45 Attribute use and benefits ............................................................................................................................. 45 Attribute types .............................................................................................................................................. 46 Attribute hierarchy........................................................................................................................................ 46 Performance Measures.................................................................................................................................. 46 Text attributes ............................................................................................................................................... 46 Numeric attributes......................................................................................................................................... 47
Using with calculated drivers .................................................................................................................. 47 Using with calculated attributes .............................................................................................................. 47
Calculated attributes ..................................................................................................................................... 47 Center attributes............................................................................................................................................ 48 Defining attributes ........................................................................................................................................ 48 Assigning attributes ...................................................................................................................................... 54 Removing attributes ...................................................................................................................................... 56 Model Periods............................................................................................................................................... 58
Creating and selecting a model period .................................................................................................... 58 Entering attribute quantities .......................................................................................................................... 60 Adding or removing performance measures ................................................................................................. 61 What's next?.................................................................................................................................................. 63
Adding bills of cost ....................................................................... 64 What is a Bill of Cost.................................................................................................................................... 64 Using bills of cost ......................................................................................................................................... 64 Internal and external bills and units .............................................................................................................. 65 Creating and attaching external and internal units and bills of cost.............................................................. 65 Displaying or concealing bills of cost........................................................................................................... 72 What's next?.................................................................................................................................................. 72
Entering data ................................................................................. 73 Entering resource costs ................................................................................................................................. 73
Showing and hiding module summary costs ........................................................................................... 74 Assigning resource driver paths.................................................................................................................... 75 Entering resource driver quantities ............................................................................................................... 76 Assigning activity driver paths ..................................................................................................................... 78 Entering activity driver quantities................................................................................................................. 79 Entering output quantities ............................................................................................................................. 82 What's next?.................................................................................................................................................. 83
Contents
Oros Modeler Tutorial iv
Calculating costs........................................................................... 84 Calculating costs ........................................................................................................................................... 84 Interpreting the calculation summary ........................................................................................................... 86
Calculation summary error example........................................................................................................ 86 Viewing and verifying calculation results..................................................................................................... 87
Verifying the calculation results.............................................................................................................. 88 What's next?.................................................................................................................................................. 89
Activity–based vs. traditional costing.......................................... 90 Activity–based and traditional costing.......................................................................................................... 90 ABC Summary.............................................................................................................................................. 91
Generating reports ........................................................................ 93 Creating a report ........................................................................................................................................... 94 Selecting the data .......................................................................................................................................... 95
Finishing up ................................................................................... 97 Leaving Oros Modeler .................................................................................................................................. 97 Reviewing basic steps to building a model ................................................................................................... 98 Exploring other features of Oros Modeler .................................................................................................... 98 What to do next............................................................................................................................................. 99
Index............................................................................................. 100
Oros Modeler Tutorial 1
Introduction
You can begin using the Modeler application immediately. This tutorial is the best place to start if you haven’t used Oros Modeler or Oros Lite Modeler before. Although the Modeler products differ, the core functionality of each product is the same. For purposes of this tutorial, unless differences necessitate explanation, the product will be referred to as Oros Modeler, although you may be using the Oros Lite Modeler product.
In this lesson, we cover:
�� Scope of this tutorial
�� Before beginning this tutorial
�� How to use this tutorial
Scope of this tutorial This tutorial, through a series of hands–on practical exercises, presents the basic tools and tasks needed to:
�� Implement an activity–based cost model of your organization.
�� Provide a performance management framework that aligns, measures, and communicates organizational goals and strategies.
Starting with the most elementary steps, and building on them to perform increasingly complex tasks, the tutorial presents basic concepts to guide you through the process of building a simple activity–based costing (ABC) model.
To complete the model–building process, simply move through this tutorial from beginning to end — exactly as it’s presented.
If you’ve just opened the Oros Modeler package, here are some suggestions to start learning and using the software:
1 Any last–minute changes or additions to Oros Modeler are documented in the Release Notes. Read this document carefully before working with Oros Modeler.
2 Start by completing this tutorial. It is your guide to getting started with Oros Modeler.
3 To find more information, look up the topic of interest in the online Help.
Introduction
Oros Modeler Tutorial 2
If you’re new to activityIf you’re new to activityIf you’re new to activityIf you’re new to activity––––based managementbased managementbased managementbased management If you’re new to activity–based management, you may benefit more from this tutorial by first learning more about activity–based management. A number of books, articles, and videotapes present excellent overviews of this methodology. Even without this background, you’ll learn some basic activity–based management concepts by completing this tutorial.
If you’re experienced with activityIf you’re experienced with activityIf you’re experienced with activityIf you’re experienced with activity––––based managementbased managementbased managementbased management Even though you may know activity–based management, work through this tutorial to become familiar with Oros Modeler — the commands, dialog boxes, and concepts. You will most likely be able to move through the tutorial at a brisk pace easily picking up information as you go.
Before beginning this tutorial Before you begin working with Oros Modeler, you should be familiar with basic Windows operating system techniques such as:
�� Starting and quitting applications
�� Selecting commands from drop–down menus
�� Working with windows (opening, closing, scrolling, moving, minimizing, and selecting)
�� Creating directories or folders
�� Terms such as drop–down menu, window, dialog box, list box, and text box
Tutorial conventions This section discusses the conventions used throughout the tutorial.
FontsFontsFontsFonts This Font Represents Example
Typewriter Files, folders, and path names Save the model with the name Tyler.aml.
Bold Menu > Command
User Input
User interface elements such as menus, dialog boxes, buttons, or list items
Select File > Save Model As.
Type Tyler Electronics in the Title box.
Select Calculate Specific Modules.
ProceduresProceduresProceduresProcedures A procedure is a task, or “lab exercise,” that includes a set of numbered step–by–step instructions. Some steps are followed by comments or an explanation. A section with the following format convention indicates such a procedure:
Introduction
Oros Modeler Tutorial 3
��To begin this tutorial 1. Perform step one.
Explanatory comments and illustrations, explaining and displaying results of proper completion of preceding steps, are included between steps.
2. Perform step two.
NotesNotesNotesNotes A note indicates additional information that is relevant to the procedure you’re performing. This is the convention for highlighting notes:
Note: Text set off in this manner presents important information.
IllustrationsIllustrationsIllustrationsIllustrations The illustrations in this tutorial are based on Oros Modeler, version 5.0, running the Windows 98 operating system with the Display Properties Appearance set to the Windows Standard Scheme. Depending on the version of Oros Modeler you have installed, your Display settings, and the number of times you perform a step or procedure, the illustrations in the tutorial might not exactly match what you see on your screen.
ViewsViewsViewsViews The graphic views of Oros Modeler application windows may differ slightly from those presented in this tutorial. If you enter, then delete, then reenter accounts, cost elements, or objectives, the ReferenceNumber may differ from the screen view. The displayed order of accounts or objectives may differ if you close and reopen the model. Consider the screen views to be a guide.
Online Help The online Help, installed with Oros Modeler, is a comprehensive information system with full text search capabilities containing a wealth of knowledge about the software. It includes:
�� Detailed step–by–step instructions to complete specific tasks
�� Information about new features
�� Reference material about other functionality
Technical Support If you encounter problems with installation of Oros Modeler that you can’t solve by reading Help or other documentation, collect as much information about the problem as you can.
Review the pertinent sections in Help.
When you encounter an installation problem, write down the steps you performed before the problem occurred and write down any messages that appear on your screen.
When you’re ready to contact ABC Technologies, Inc., send an email to [email protected].
Introduction
Oros Modeler Tutorial 4
Additional Training and TutorialsAdditional Training and TutorialsAdditional Training and TutorialsAdditional Training and Tutorials Additional information can be found at the ABC Technologies, Inc. corporate web site, www.abctech.com, and companion web site, www.bettermanagement.com. BetterManagement.com offers in-depth content on selected management concepts aimed at improving an organization’s performance. The web site is a comprehensive source for performance management information and resources including training and tutorial materials.
Topics covered include value-based management, profitability analysis, strategic enterprise management, activity-based costing/management, business intelligence, performance measurement, and the Balanced Scorecard.
What's next? You’re ready to get acquainted with activity–based costing and Oros Modeler.
Oros Modeler Tutorial 5
Introducing Activity–Based Costing (ABC)
Activity–based costing (ABC) is a system that maintains and processes information about the activity an organization performs. With Oros Modeler, you build one or more models to maintain ABC information. You can keep all the information in one model or create many models (e.g., one for costing each department or each process). Every model includes a set of basic components: the resources, activities, and cost objects.
In this lesson, we discuss:
�� The ABC model and CAM–I (Consortium for Advanced Manufacturing International) standards
�� Basic steps to building a model
�� Collecting information
�� Creating a model folder
�� Starting Oros Modeler
�� Creating the new model files
�� Oros Modeler Main Window
�� Saving the model
�� Exiting Oros Modeler
�� Opening an existing model
The ABC model and CAM–I standards ABC assumes that activities cause expenditure of resources and that cost objects — the results of activities or products and services produced — create the demand for activities.
The Consortium for Advanced Manufacturing International (CAM–I) develops standards to define critical business issues and to model effective strategies and solutions that resolve cost and resource management issues. Oros Modeler utilizes the CAM–I standard for activity–based model development.
Introducing Activity–Based Costing (ABC)
Oros Modeler Tutorial 6
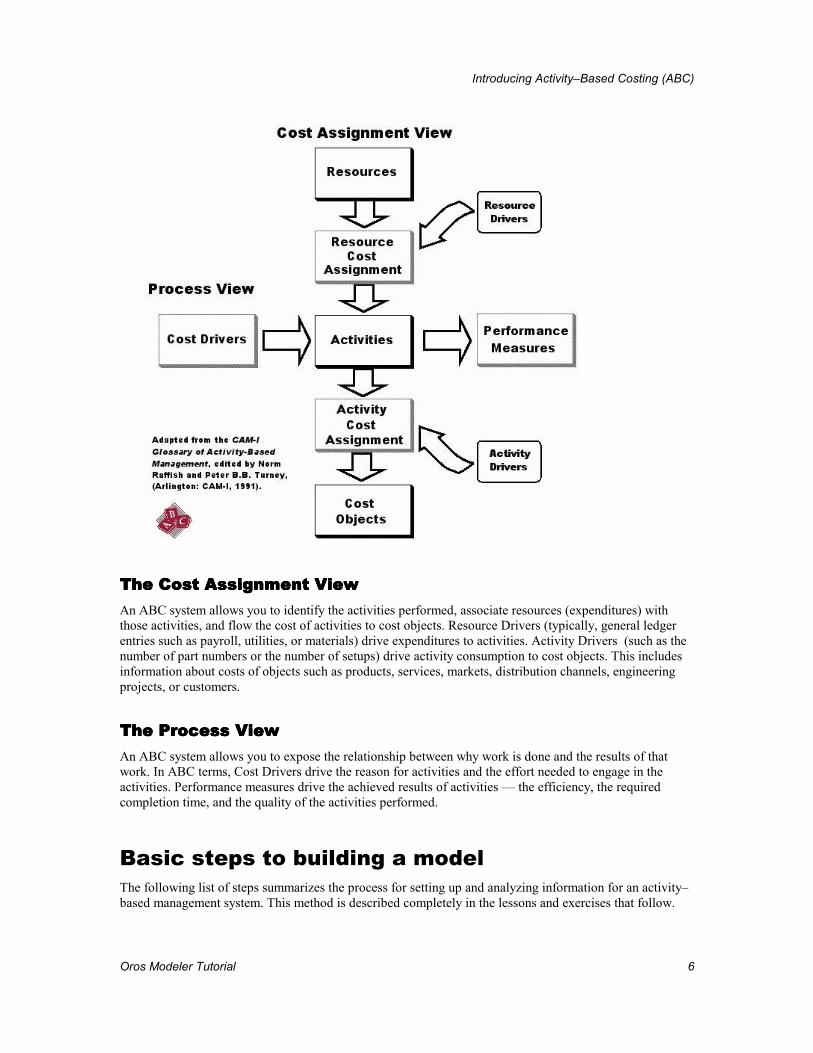
The Cost Assignment ViewThe Cost Assignment ViewThe Cost Assignment ViewThe Cost Assignment View An ABC system allows you to identify the activities performed, associate resources (expenditures) with those activities, and flow the cost of activities to cost objects. Resource Drivers (typically, general ledger entries such as payroll, utilities, or materials) drive expenditures to activities. Activity Drivers (such as the number of part numbers or the number of setups) drive activity consumption to cost objects. This includes information about costs of objects such as products, services, markets, distribution channels, engineering projects, or customers.
The Process ViewThe Process ViewThe Process ViewThe Process View An ABC system allows you to expose the relationship between why work is done and the results of that work. In ABC terms, Cost Drivers drive the reason for activities and the effort needed to engage in the activities. Performance measures drive the achieved results of activities — the efficiency, the required completion time, and the quality of the activities performed.
Basic steps to building a model The following list of steps summarizes the process for setting up and analyzing information for an activity–based management system. This method is described completely in the lessons and exercises that follow.
Introducing Activity–Based Costing (ABC)
Oros Modeler Tutorial 7
1 Collecting Information Collect resource (expenditure), activity, and cost object (products and services) information to build your ABC model.
2 Constructing modules, centers, and accounts Create three modules to organize your resource, activity, and cost object accounts. Create relevant cost accounts and organize them into centers.
3 Building drivers Build a list of drivers that measures the consumption of expenses and activities.
4 Creating assignment paths Create the paths used to assign cost among accounts and select the driver for each source account.
5 Adding attributes and performance measures Define and add attributes and performance measures to the appropriate accounts.
6 Adding Bills of Cost Define and link external and internal cost units to accounts.
7 Entering data Enter resource costs, driver qualities, output measures, and other data for a specific period of time. Create a dimensional view of your model activity and cost information.
8 Calculating costs Calculate costs with Oros Modeler and display the results.
9 Generating Reports Review, validate, and analyze activity–based costs to determine company direction.
Collecting information Activity–based management projects begin with collecting information. Information concerning resources (expenditures), activities (tasks), and cost objects (products and services produced) provides the basis for building your ABC model. The Tyler Electronics company provides this basic information for this tutorial.
Tyler Electronics CompanyTyler Electronics CompanyTyler Electronics CompanyTyler Electronics Company Tyler Electronics, a fictitious company looking to utilize activity–based information to more clearly understand costs and profitability, and wishing to use this information as a foundation for Performance Management, is used as the example throughout this tutorial.
Tyler Electronics compact disc (CD) products roll off the production line of various Tyler plants 24 hours a day. The CD manufacturing plant produces a CD changer, model XM–100, that accounts for 80% of the company’s production capacity. The remaining 20% of production capacity is absorbed by a CD specialty product, model XM–500. Film and video producers use the XM–500 CD changer as part of an advanced retrieval system for sound effects. These customers can order unique options as well.
Tyler calculates production support costs using a traditional process. The traditional company accounting system collects the production support costs for all the plants into functional responsibility centers such as Production Control, Quality Assurance, and Receiving. The system allocates production support costs to all the plants. For instance, Tyler allocated $100,000 per quarter to the CD manufacturing plant. Tyler then allocates production support costs to production based on direct labor dollars. In this case, the costs allocated to the products are: $70,000 to the XM–100 product, $30,000 to XM–500 product.
Introducing Activity–Based Costing (ABC)
Oros Modeler Tutorial 8
Despite the similarities in the products, the specialty CD changer, with all its options, has higher costs. The XM–500 requires more people for production support, for performing various manufacturing functions, and for updating and programming the corporate computer–based marketing and sales information system.
Tyler’s CD plant production manager insists that traditional cost management methods lead to inaccurate costing. The manager suspects that the XM–500 product and options actually consume more costs than reported by the current system. This is indicated by downtime on the high–priced specialty machinery, insufficient component availability, difficult and expensive testing, excess inventory, and employee overtime. The production manager contends, therefore, that Tyler Electronics is not making as much profit on the product as the traditional cost management system indicates.
Because of the trouble with this low–volume specialty product, Tyler Electronics decided to use activity–based management methods both to verify and validate their current pricing and margins and also as a basis for strategic planning. The company hopes to improve decision–making by basing its decisions on more accurate cost information.
Are Tyler’s current cost management system calculations correct? Significant product line or capacity decisions will depend on the answer.
Installing product applications
OrosOrosOrosOros The Oros product family is an enterprise–wide solution; it is modular so you can have unlimited expansion to multiple users locally or worldwide. A designated Oros Administrator typically handles system administration duties including installation and user access. If you are using the Oros product, please see your system administrator to help you get started. Your Oros Administrator can provide you with an Oros login name and password.
Oros LiteOros LiteOros LiteOros Lite The Oros Lite product family is a single-user solution that can run on a standalone or networked computer. The product user may install the software and use the Oros Administrator unless other individuals handle software installations within your organization. Your Oros Lite product package includes instructions for the Oros Administrator function.
Creating a model folder For Tyler Electronics, you’ll build a model called Tyler. You need to create a folder to hold the model.
��To create a folder 1. Open Windows Explorer.
2. Navigate to C:\Oros\Tutorial\Models (or to the location where your Oros Tutorial Models are located).
3. Create a folder named TYLER to hold the model you’re about to build.
Introducing Activity–Based Costing (ABC)
Oros Modeler Tutorial 9
Folders are synonymous with directories. If you aren’t familiar with creating folders, refer to the operating system documentation for instructions.
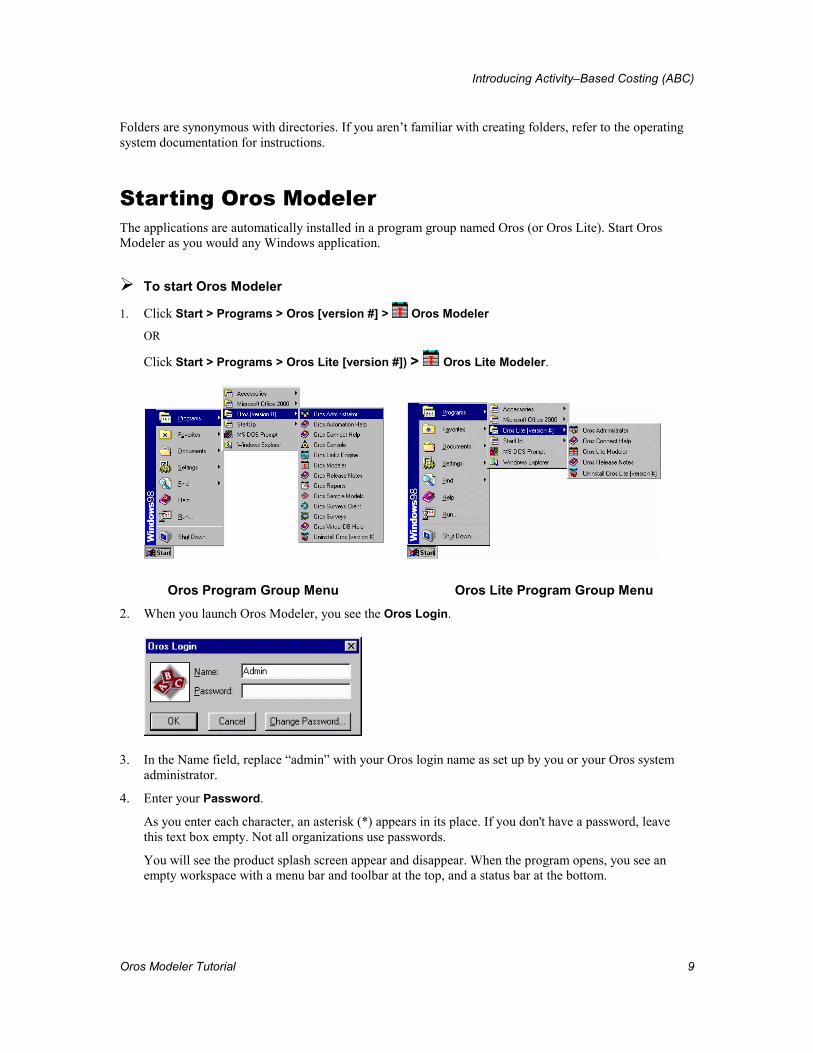
Starting Oros Modeler The applications are automatically installed in a program group named Oros (or Oros Lite). Start Oros Modeler as you would any Windows application.
��To start Oros Modeler
1. Click Start > Programs > Oros [version #] > Oros Modeler
OR
Click Start > Programs > Oros Lite [version #]) > Oros Lite Modeler.
Oros Program Group Menu Oros Lite Program Group Menu 2. When you launch Oros Modeler, you see the Oros Login.
3. In the Name field, replace “admin” with your Oros login name as set up by you or your Oros system administrator.
4. Enter your Password.
As you enter each character, an asterisk (*) appears in its place. If you don't have a password, leave this text box empty. Not all organizations use passwords.
You will see the product splash screen appear and disappear. When the program opens, you see an empty workspace with a menu bar and toolbar at the top, and a status bar at the bottom.

Introducing Activity–Based Costing (ABC)
Oros Modeler Tutorial 10
Creating the new model files The previously created TYLER folder will contain the model files you are about to create.
��To open a new model
1. Select File > New Model or click (the New Model button) on the toolbar.
You see the Model Summary with the default model Title (PLUSTEMP) highlighted.
Note: If you find New Model disabled (grayed out), see your system administrator. You need Read/Write privileges assigned to you to proceed with the tutorial.
2. Replace the default title with the following model title: Tyler Electronics.
Note: The Title of the model is not the same as the model Filename. The title appears in reports that you create with Oros Modeler and should be long enough to clearly identify the model. The filename is assigned when the model is first saved.
3. To communicate the purpose of this model to other team members, or to make a record of what you’ve created, enter a Description of the model such as:
Assigns the production support costs to the setting up, scheduling, inspecting, and assembling activities. Assigns the activity costs to the XM–100 and XM–500 products and the power supply component.
4. Click OK.
You see a module window with Resource [Period1] [Named View – Multilevel] displayed in the title bar.
Introducing Activity–Based Costing (ABC)
Oros Modeler Tutorial 11
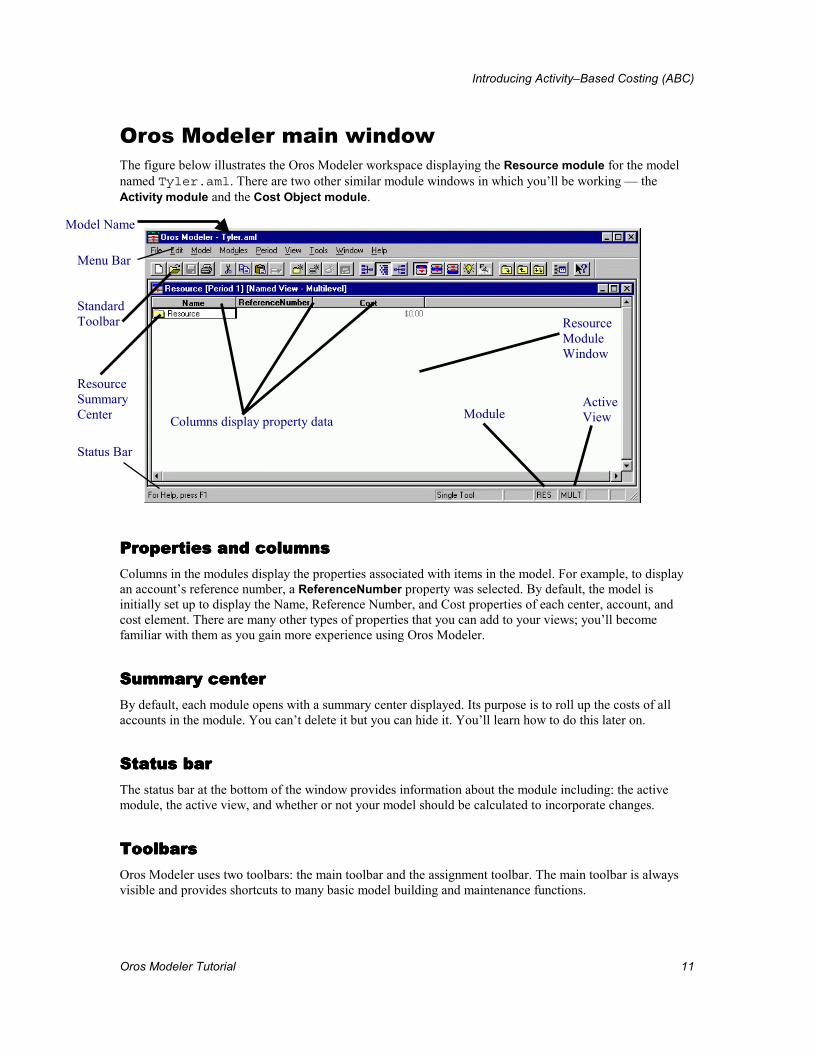
Oros Modeler main window The figure below illustrates the Oros Modeler workspace displaying the Resource module for the model named Tyler.aml. There are two other similar module windows in which you’ll be working — the Activity module and the Cost Object module.
Properties and columnsProperties and columnsProperties and columnsProperties and columns Columns in the modules display the properties associated with items in the model. For example, to display an account’s reference number, a ReferenceNumber property was selected. By default, the model is initially set up to display the Name, Reference Number, and Cost properties of each center, account, and cost element. There are many other types of properties that you can add to your views; you’ll become familiar with them as you gain more experience using Oros Modeler.
Summary centerSummary centerSummary centerSummary center By default, each module opens with a summary center displayed. Its purpose is to roll up the costs of all accounts in the module. You can’t delete it but you can hide it. You’ll learn how to do this later on.
Status barStatus barStatus barStatus bar The status bar at the bottom of the window provides information about the module including: the active module, the active view, and whether or not your model should be calculated to incorporate changes.
ToolbarsToolbarsToolbarsToolbars Oros Modeler uses two toolbars: the main toolbar and the assignment toolbar. The main toolbar is always visible and provides shortcuts to many basic model building and maintenance functions.
Columns display property data ModuleActive View
Resource Module Window
Status Bar
Menu Bar
Standard Toolbar
Resource Summary Center
Model Name
Introducing Activity–Based Costing (ABC)
Oros Modeler Tutorial 12
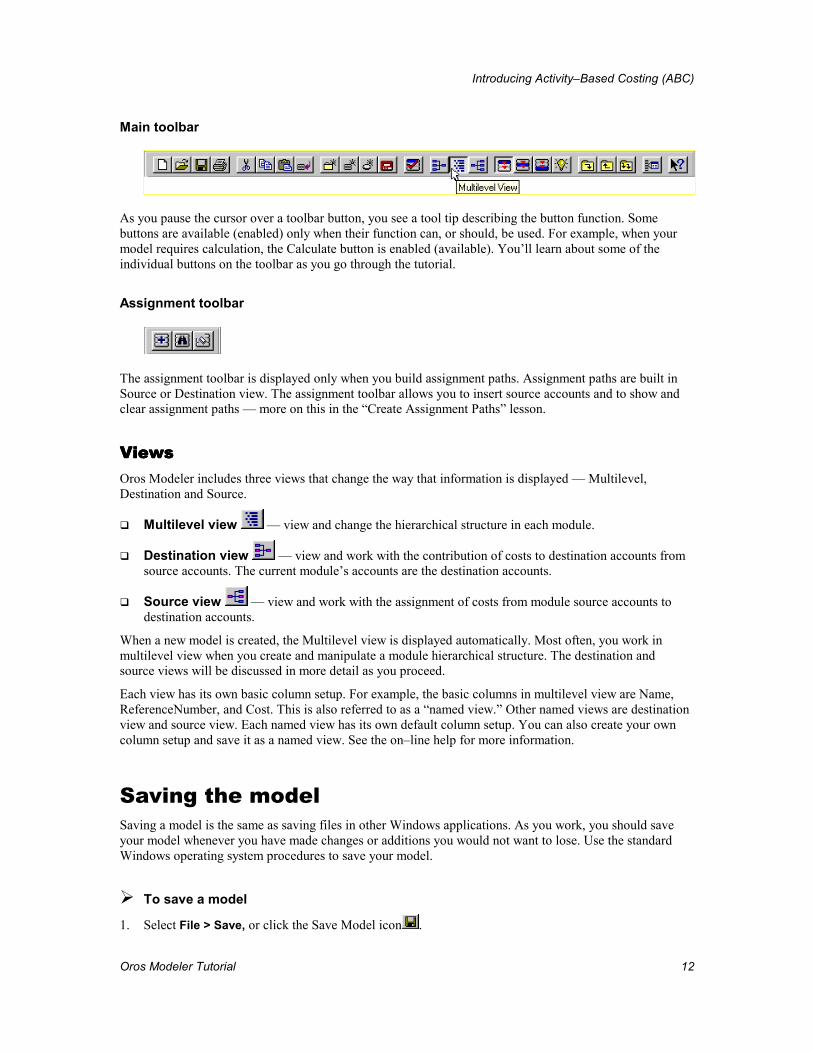
Main toolbar
As you pause the cursor over a toolbar button, you see a tool tip describing the button function. Some buttons are available (enabled) only when their function can, or should, be used. For example, when your model requires calculation, the Calculate button is enabled (available). You’ll learn about some of the individual buttons on the toolbar as you go through the tutorial.
Assignment toolbar
The assignment toolbar is displayed only when you build assignment paths. Assignment paths are built in Source or Destination view. The assignment toolbar allows you to insert source accounts and to show and clear assignment paths — more on this in the “Create Assignment Paths” lesson.
ViewsViewsViewsViews Oros Modeler includes three views that change the way that information is displayed — Multilevel, Destination and Source.
�� Multilevel view — view and change the hierarchical structure in each module.
�� Destination view — view and work with the contribution of costs to destination accounts from source accounts. The current module’s accounts are the destination accounts.
�� Source view — view and work with the assignment of costs from module source accounts to destination accounts.
When a new model is created, the Multilevel view is displayed automatically. Most often, you work in multilevel view when you create and manipulate a module hierarchical structure. The destination and source views will be discussed in more detail as you proceed.
Each view has its own basic column setup. For example, the basic columns in multilevel view are Name, ReferenceNumber, and Cost. This is also referred to as a “named view.” Other named views are destination view and source view. Each named view has its own default column setup. You can also create your own column setup and save it as a named view. See the on–line help for more information.
Saving the model Saving a model is the same as saving files in other Windows applications. As you work, you should save your model whenever you have made changes or additions you would not want to lose. Use the standard Windows operating system procedures to save your model.
��To save a model
1. Select File > Save, or click the Save Model icon .
Introducing Activity–Based Costing (ABC)
Oros Modeler Tutorial 13
Note: You can also use a keyboard shortcut, Ctrl + S, to save your model by holding down the Ctrl key while you press the S key.
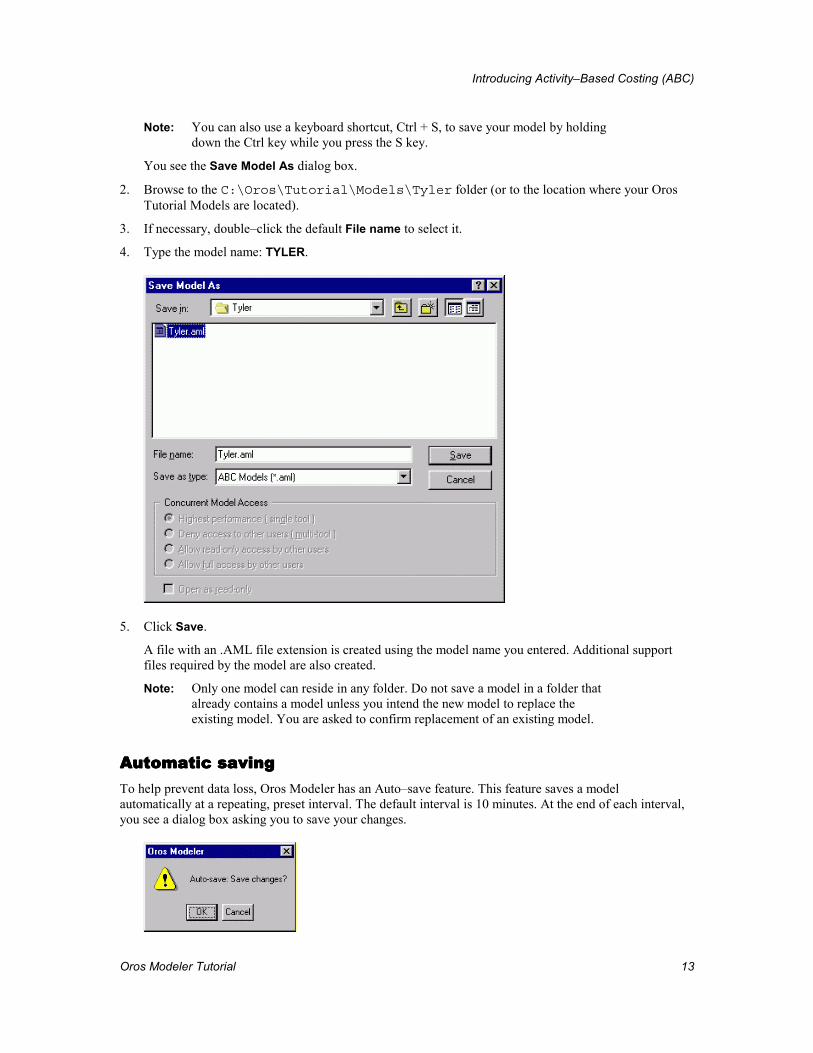
You see the Save Model As dialog box.
2. Browse to the C:\Oros\Tutorial\Models\Tyler folder (or to the location where your Oros Tutorial Models are located).
3. If necessary, double–click the default File name to select it.
4. Type the model name: TYLER.
5. Click Save.
A file with an .AML file extension is created using the model name you entered. Additional support files required by the model are also created.
Note: Only one model can reside in any folder. Do not save a model in a folder that already contains a model unless you intend the new model to replace the existing model. You are asked to confirm replacement of an existing model.
Automatic savingAutomatic savingAutomatic savingAutomatic saving To help prevent data loss, Oros Modeler has an Auto–save feature. This feature saves a model automatically at a repeating, preset interval. The default interval is 10 minutes. At the end of each interval, you see a dialog box asking you to save your changes.
Introducing Activity–Based Costing (ABC)
Oros Modeler Tutorial 14
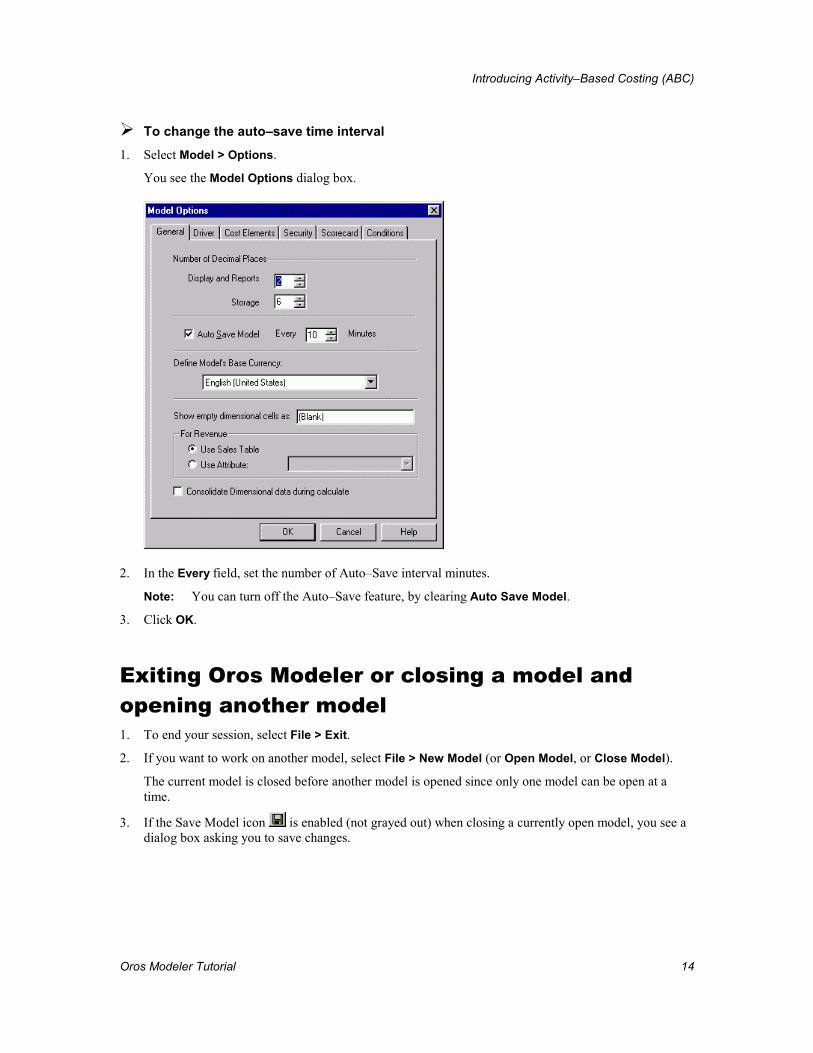
��To change the auto–save time interval 1. Select Model > Options.
You see the Model Options dialog box.
2. In the Every field, set the number of Auto–Save interval minutes.
Note: You can turn off the Auto–Save feature, by clearing Auto Save Model.
3. Click OK.
Exiting Oros Modeler or closing a model and opening another model 1. To end your session, select File > Exit.
2. If you want to work on another model, select File > New Model (or Open Model, or Close Model).
The current model is closed before another model is opened since only one model can be open at a time.
3. If the Save Model icon is enabled (not grayed out) when closing a currently open model, you see a dialog box asking you to save changes.
Introducing Activity–Based Costing (ABC)
Oros Modeler Tutorial 15
4. Click Yes to save your model.
This closes the model and, depending on your choice, either exits Oros Modeler or allows you to select another model to open.
Opening an existing model
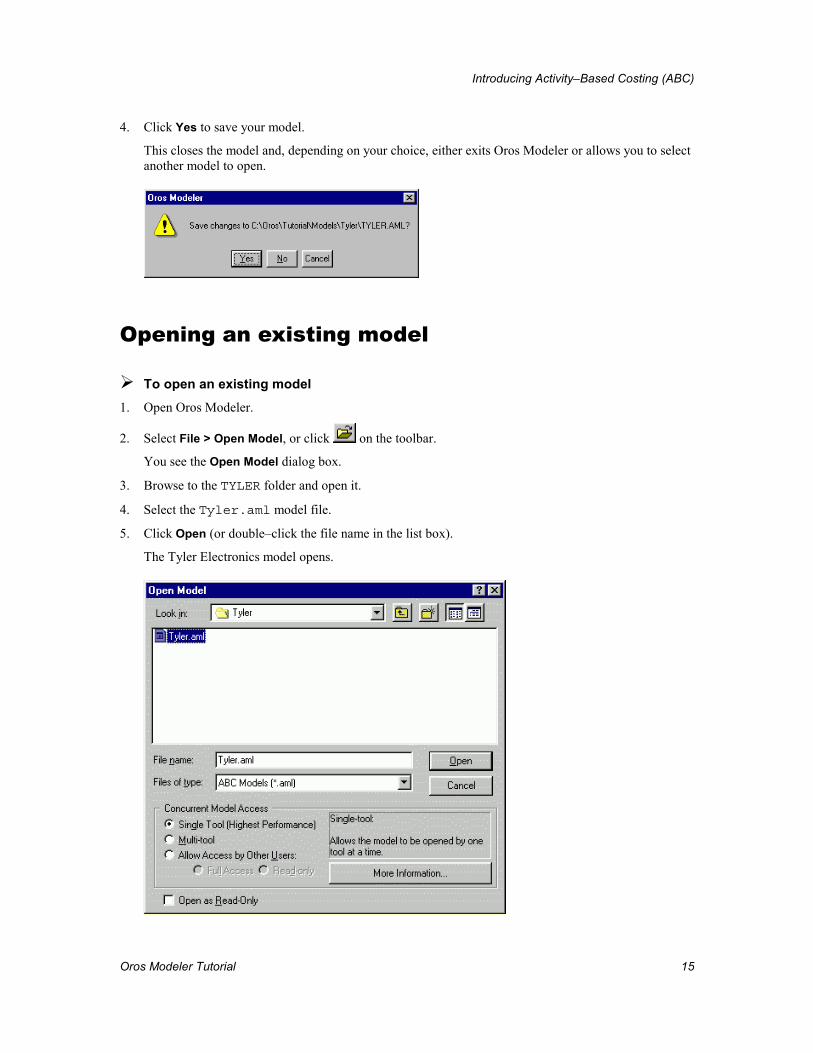
��To open an existing model 1. Open Oros Modeler.
2. Select File > Open Model, or click on the toolbar.
You see the Open Model dialog box.
3. Browse to the TYLER folder and open it.
4. Select the Tyler.aml model file.
5. Click Open (or double–click the file name in the list box).
The Tyler Electronics model opens.
Introducing Activity–Based Costing (ABC)
Oros Modeler Tutorial 16
What’s next? You’re ready to begin constructing a model.
The remaining lessons take you through the process of creating an activity–based costing model from start to finish. In the next lesson, you’ll build the three modules that make up an activity–based model.
Oros Modeler Tutorial 17
Constructing modules, centers, and accounts
Once the files have been created to contain the model, you’re ready to begin to build a model.
In this lesson, we discuss:
�� Building by design
�� Model structure
�� Building the resource structure
�� Creating a center
�� Creating an account
�� Building the activities structure
�� Building the cost objects structure
�� Working with properties and columns
Building by design Before beginning to build a model with Oros Modeler, evaluate and make preliminary decisions about the design of the model. Just as a building contractor needs a plan before beginning to build a house, a model builder needs a plan for the structure of a model before beginning to build.
Factors that influence a model’s design include the:
�� Purpose of the model — the operational or strategic questions the activity–based cost program is intended to answer.
�� Types of reports that will be needed.
�� Data already collected and their format.
�� Data needed that are not being collected.
This tutorial uses a simple design and focuses on the steps for building a model. The design of the model and the effort it takes can be simple or complex. The builder of a model will need to understand these factors, and others that are unique to each modeling situation, to arrive at a design.
Constructing modules, centers, and accounts
Oros Modeler Tutorial 18
TerminologyTerminologyTerminologyTerminology The discipline of activity–based cost management (ABC/M) has a set of specialized terms Some are used in this tutorial precisely because of their specialized meaning to the theory and practice of ABC/M. As these terms are introduced, the tutorial provides brief definitions; more complete definitions can be found in the CAM–I Glossary of Activity–Based Management. This tutorial also includes an ABC glossary.
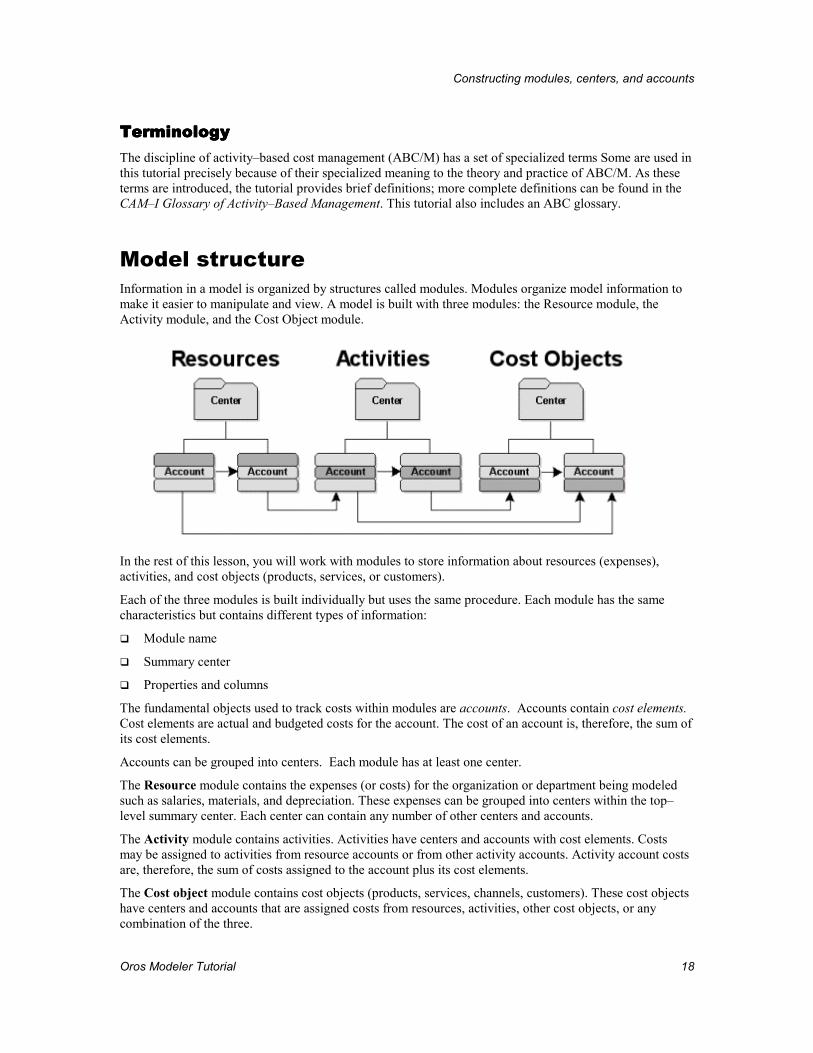
Model structure Information in a model is organized by structures called modules. Modules organize model information to make it easier to manipulate and view. A model is built with three modules: the Resource module, the Activity module, and the Cost Object module.
In the rest of this lesson, you will work with modules to store information about resources (expenses), activities, and cost objects (products, services, or customers).
Each of the three modules is built individually but uses the same procedure. Each module has the same characteristics but contains different types of information:
�� Module name
�� Summary center
�� Properties and columns
The fundamental objects used to track costs within modules are accounts. Accounts contain cost elements. Cost elements are actual and budgeted costs for the account. The cost of an account is, therefore, the sum of its cost elements.
Accounts can be grouped into centers. Each module has at least one center.
The Resource module contains the expenses (or costs) for the organization or department being modeled such as salaries, materials, and depreciation. These expenses can be grouped into centers within the top–level summary center. Each center can contain any number of other centers and accounts.
The Activity module contains activities. Activities have centers and accounts with cost elements. Costs may be assigned to activities from resource accounts or from other activity accounts. Activity account costs are, therefore, the sum of costs assigned to the account plus its cost elements.
The Cost object module contains cost objects (products, services, channels, customers). These cost objects have centers and accounts that are assigned costs from resources, activities, other cost objects, or any combination of the three.
Constructing modules, centers, and accounts
Oros Modeler Tutorial 19
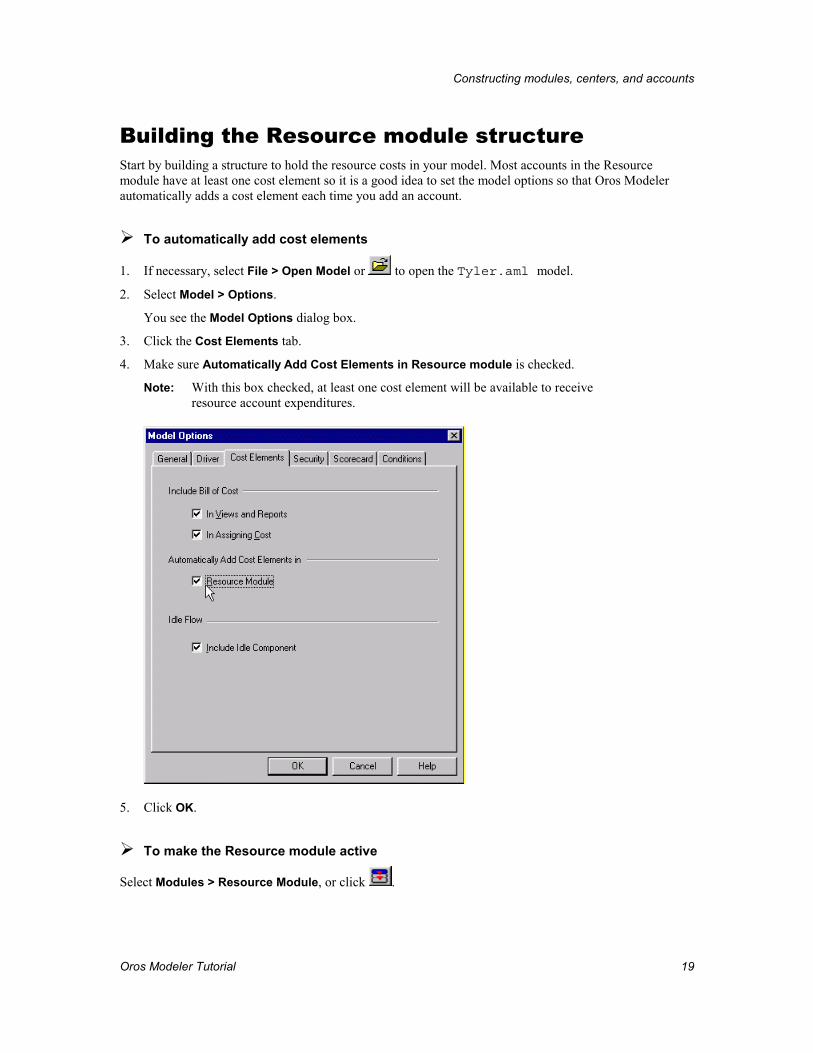
Building the Resource module structure Start by building a structure to hold the resource costs in your model. Most accounts in the Resource module have at least one cost element so it is a good idea to set the model options so that Oros Modeler automatically adds a cost element each time you add an account.
��To automatically add cost elements
1. If necessary, select File > Open Model or to open the Tyler.aml model.
2. Select Model > Options.
You see the Model Options dialog box.
3. Click the Cost Elements tab.
4. Make sure Automatically Add Cost Elements in Resource module is checked.
Note: With this box checked, at least one cost element will be available to receive resource account expenditures.
5. Click OK.
��To make the Resource module active
Select Modules > Resource Module, or click .
Constructing modules, centers, and accounts
Oros Modeler Tutorial 20
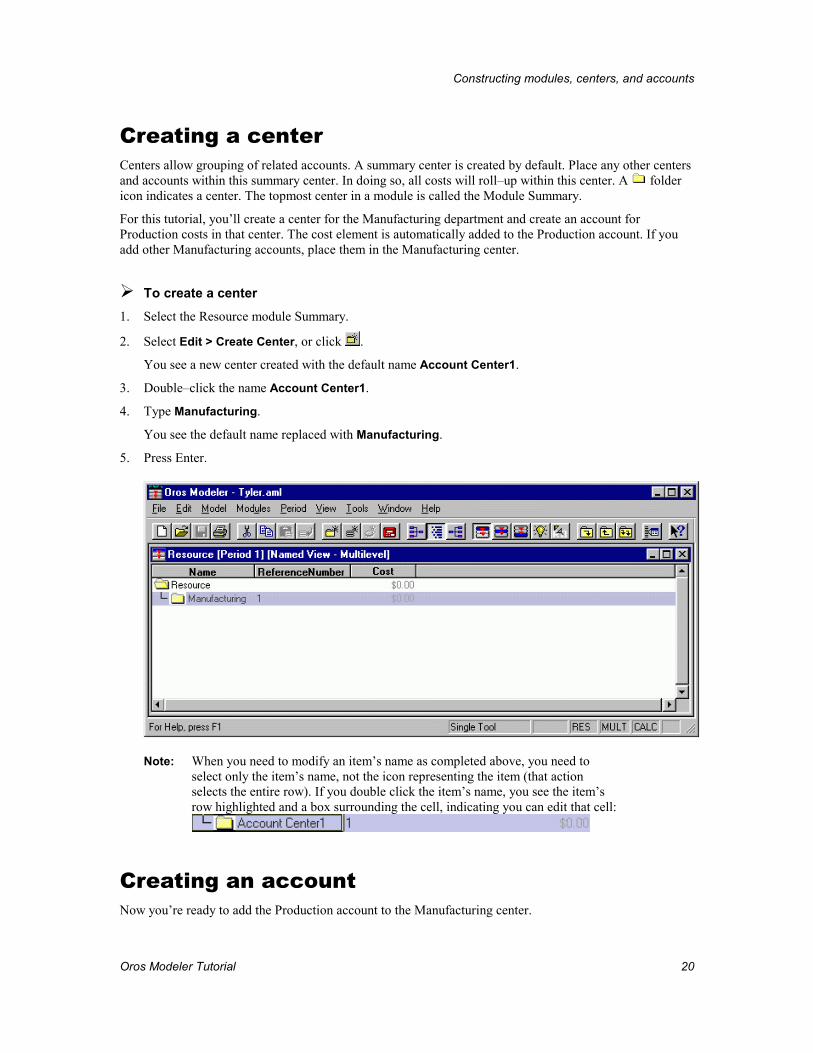
Creating a center Centers allow grouping of related accounts. A summary center is created by default. Place any other centers and accounts within this summary center. In doing so, all costs will roll–up within this center. A folder icon indicates a center. The topmost center in a module is called the Module Summary.
For this tutorial, you’ll create a center for the Manufacturing department and create an account for Production costs in that center. The cost element is automatically added to the Production account. If you add other Manufacturing accounts, place them in the Manufacturing center.
��To create a center 1. Select the Resource module Summary.
2. Select Edit > Create Center, or click .
You see a new center created with the default name Account Center1.
3. Double–click the name Account Center1.
4. Type Manufacturing.
You see the default name replaced with Manufacturing.
5. Press Enter.
Note: When you need to modify an item’s name as completed above, you need to select only the item’s name, not the icon representing the item (that action selects the entire row). If you double click the item’s name, you see the item’s row highlighted and a box surrounding the cell, indicating you can edit that cell:
Creating an account Now you’re ready to add the Production account to the Manufacturing center.
Constructing modules, centers, and accounts
Oros Modeler Tutorial 21
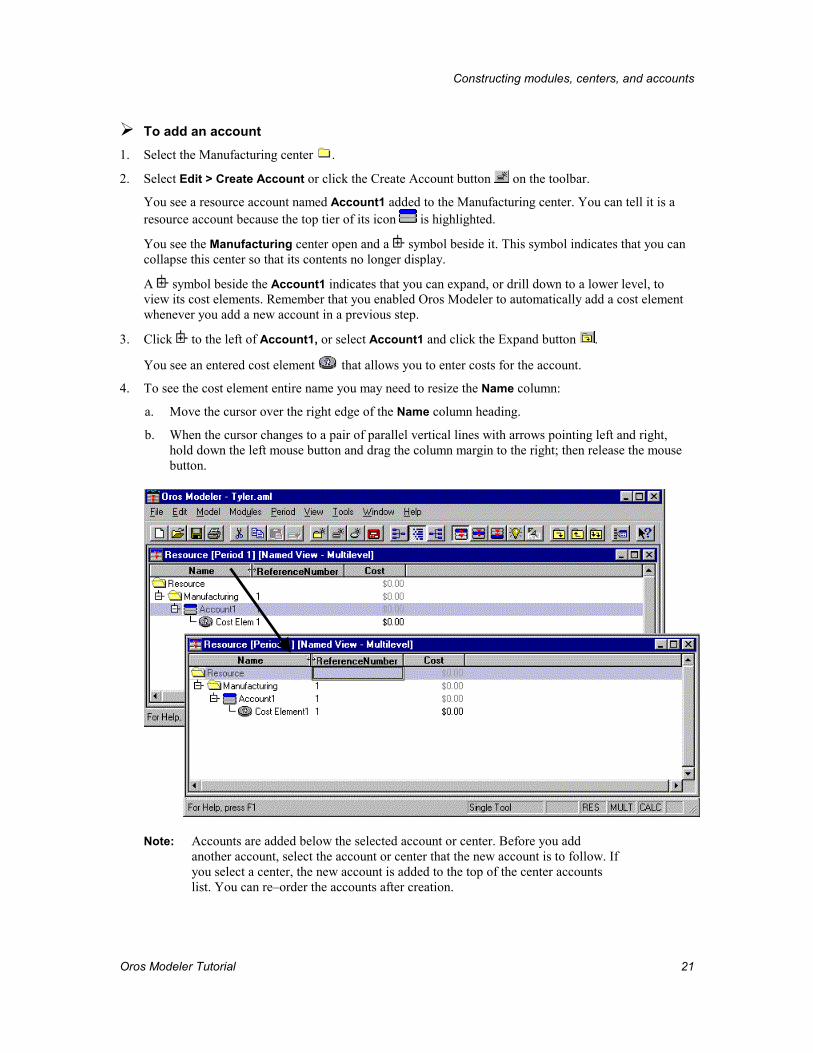
��To add an account 1. Select the Manufacturing center .
2. Select Edit > Create Account or click the Create Account button on the toolbar.
You see a resource account named Account1 added to the Manufacturing center. You can tell it is a resource account because the top tier of its icon is highlighted.
You see the Manufacturing center open and a symbol beside it. This symbol indicates that you can collapse this center so that its contents no longer display.
A symbol beside the Account1 indicates that you can expand, or drill down to a lower level, to view its cost elements. Remember that you enabled Oros Modeler to automatically add a cost element whenever you add a new account in a previous step.
3. Click to the left of Account1, or select Account1 and click the Expand button .
You see an entered cost element that allows you to enter costs for the account.
4. To see the cost element entire name you may need to resize the Name column:
a. Move the cursor over the right edge of the Name column heading.
b. When the cursor changes to a pair of parallel vertical lines with arrows pointing left and right, hold down the left mouse button and drag the column margin to the right; then release the mouse button.
Note: Accounts are added below the selected account or center. Before you add another account, select the account or center that the new account is to follow. If you select a center, the new account is added to the top of the center accounts list. You can re–order the accounts after creation.
Constructing modules, centers, and accounts
Oros Modeler Tutorial 22
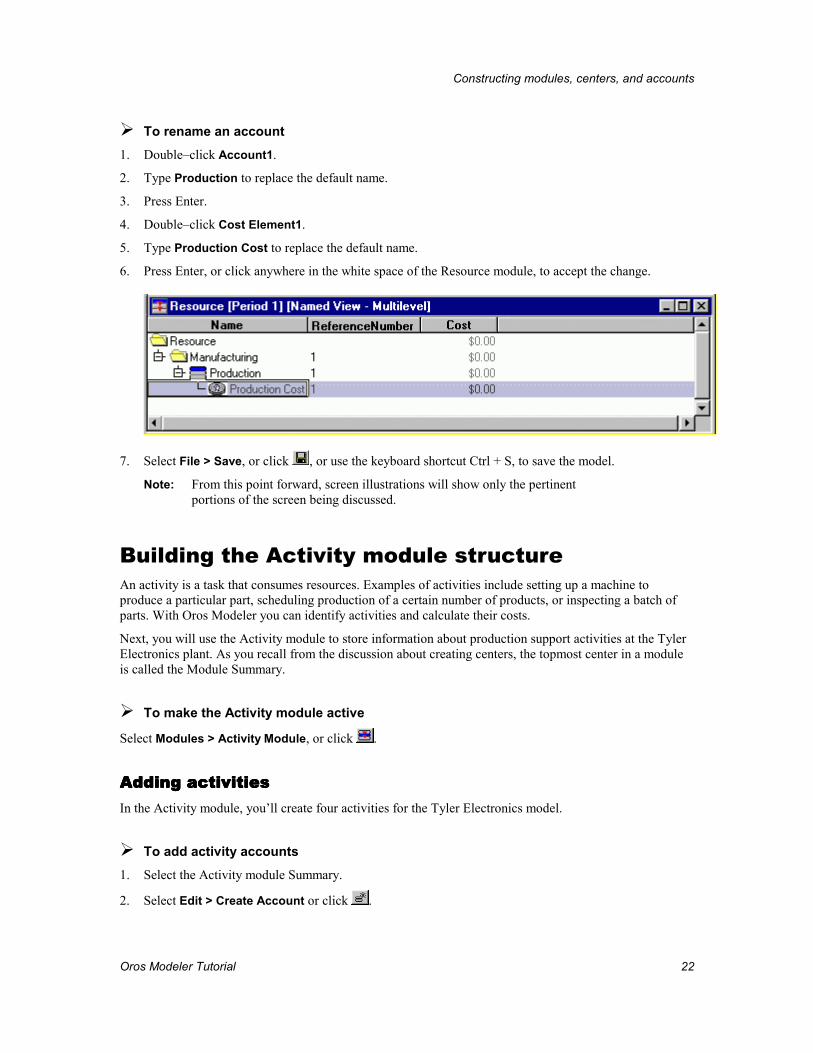
��To rename an account 1. Double–click Account1.
2. Type Production to replace the default name.
3. Press Enter.
4. Double–click Cost Element1.
5. Type Production Cost to replace the default name.
6. Press Enter, or click anywhere in the white space of the Resource module, to accept the change.
7. Select File > Save, or click , or use the keyboard shortcut Ctrl + S, to save the model.
Note: From this point forward, screen illustrations will show only the pertinent portions of the screen being discussed.
Building the Activity module structure An activity is a task that consumes resources. Examples of activities include setting up a machine to produce a particular part, scheduling production of a certain number of products, or inspecting a batch of parts. With Oros Modeler you can identify activities and calculate their costs.
Next, you will use the Activity module to store information about production support activities at the Tyler Electronics plant. As you recall from the discussion about creating centers, the topmost center in a module is called the Module Summary.
��To make the Activity module active
Select Modules > Activity Module, or click .
Adding activitiesAdding activitiesAdding activitiesAdding activities In the Activity module, you’ll create four activities for the Tyler Electronics model.
��To add activity accounts 1. Select the Activity module Summary.
2. Select Edit > Create Account or click .
Constructing modules, centers, and accounts
Oros Modeler Tutorial 23
You see a new activity account created with the default name Activity1. You can tell it is an activity account because the middle tier of its icon is highlighted.
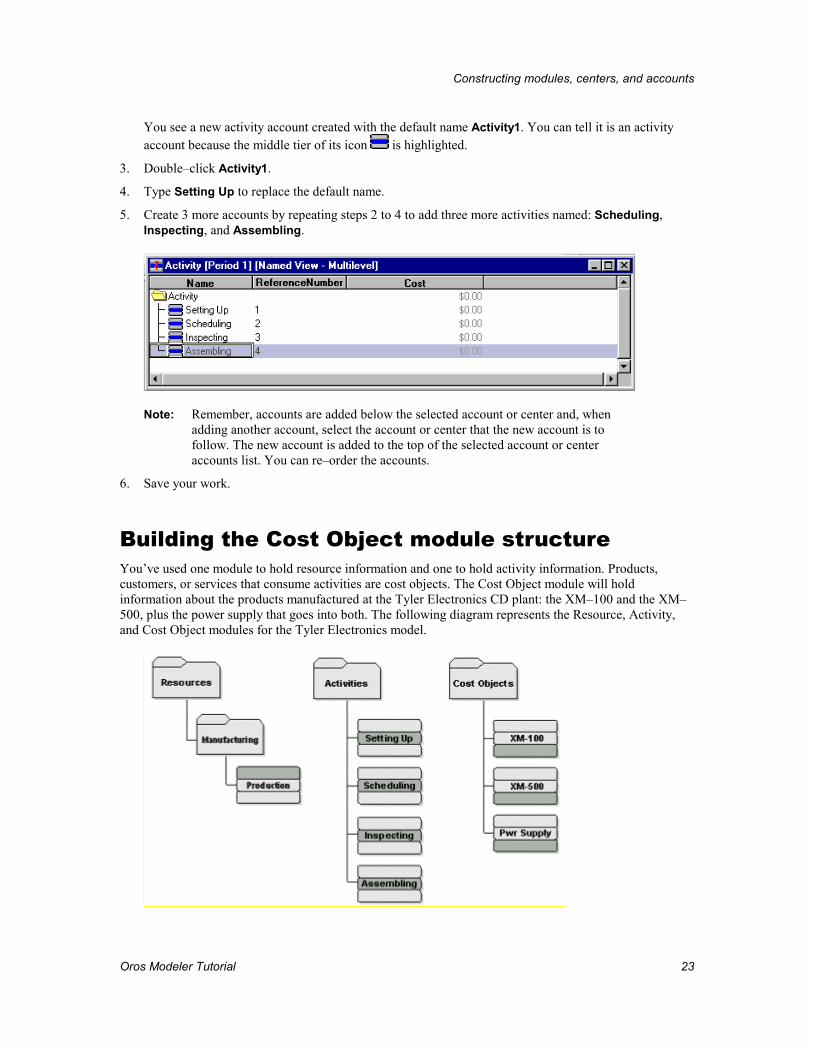
3. Double–click Activity1.
4. Type Setting Up to replace the default name.
5. Create 3 more accounts by repeating steps 2 to 4 to add three more activities named: Scheduling, Inspecting, and Assembling.
Note: Remember, accounts are added below the selected account or center and, when adding another account, select the account or center that the new account is to follow. The new account is added to the top of the selected account or center accounts list. You can re–order the accounts.
6. Save your work.
Building the Cost Object module structure You’ve used one module to hold resource information and one to hold activity information. Products, customers, or services that consume activities are cost objects. The Cost Object module will hold information about the products manufactured at the Tyler Electronics CD plant: the XM–100 and the XM–500, plus the power supply that goes into both. The following diagram represents the Resource, Activity, and Cost Object modules for the Tyler Electronics model.

Constructing modules, centers, and accounts
Oros Modeler Tutorial 24
Usually, products are grouped into centers by categories. For this tutorial you’ll simply add the products to the Cost Object summary center.
��To make the Cost Object module active
1. Select Modules > Cost Object Module, or click .
You see the Cost Object module title bar highlighted, indicating that the module is active.
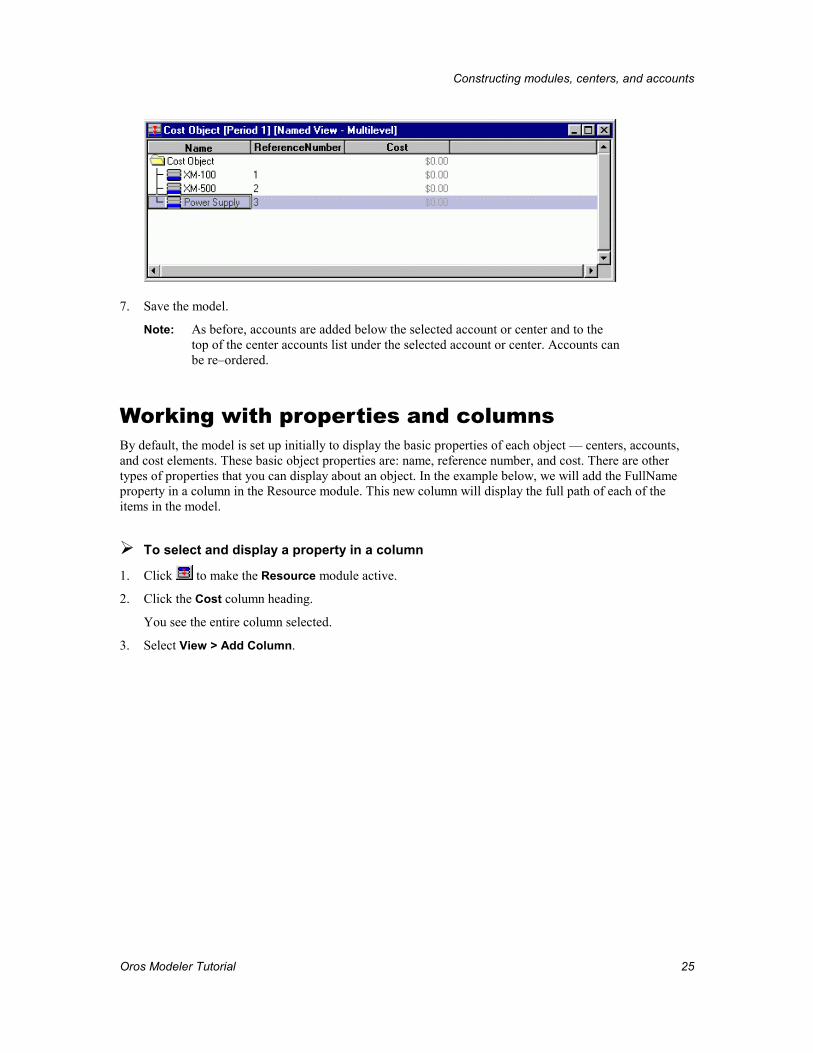
Adding cost objectsAdding cost objectsAdding cost objectsAdding cost objects Next, you’ll add two Tyler Electronics products: the XM–100 and the XM500 plus the power supply.
��To add cost object accounts 1. Select the Cost Object module Summary.
2. Select Edit > Create Account or click .
You see a new cost object account created with the default name Cost Object1. You can tell it is a resource account because the bottom tier of its icon is highlighted.
3. Double–click the name Cost Object1.
4. Type XM–100 to replace the default name.
5. Press Enter.
6. Repeat steps 2 to 5 to add two more cost objects named XM–500 and Power Supply.
Constructing modules, centers, and accounts
Oros Modeler Tutorial 25
7. Save the model.
Note: As before, accounts are added below the selected account or center and to the top of the center accounts list under the selected account or center. Accounts can be re–ordered.
Working with properties and columns By default, the model is set up initially to display the basic properties of each object — centers, accounts, and cost elements. These basic object properties are: name, reference number, and cost. There are other types of properties that you can display about an object. In the example below, we will add the FullName property in a column in the Resource module. This new column will display the full path of each of the items in the model.
��To select and display a property in a column
1. Click to make the Resource module active.
2. Click the Cost column heading.
You see the entire column selected.
3. Select View > Add Column.

Constructing modules, centers, and accounts
Oros Modeler Tutorial 26
4. On the Property tab, from the Property drop–down list, click FullName.
5. Click Add, and then Close.
You see a FullName column added to the right of the Cost column and the full association of each of the items displayed.
You may need to widen the FullName column and the module window to see the additions.
Changing the properties in a columnChanging the properties in a columnChanging the properties in a columnChanging the properties in a column You can change the type of property displayed in a column. In the following example, we will change the FullName column to display the Level property instead.
Constructing modules, centers, and accounts
Oros Modeler Tutorial 27
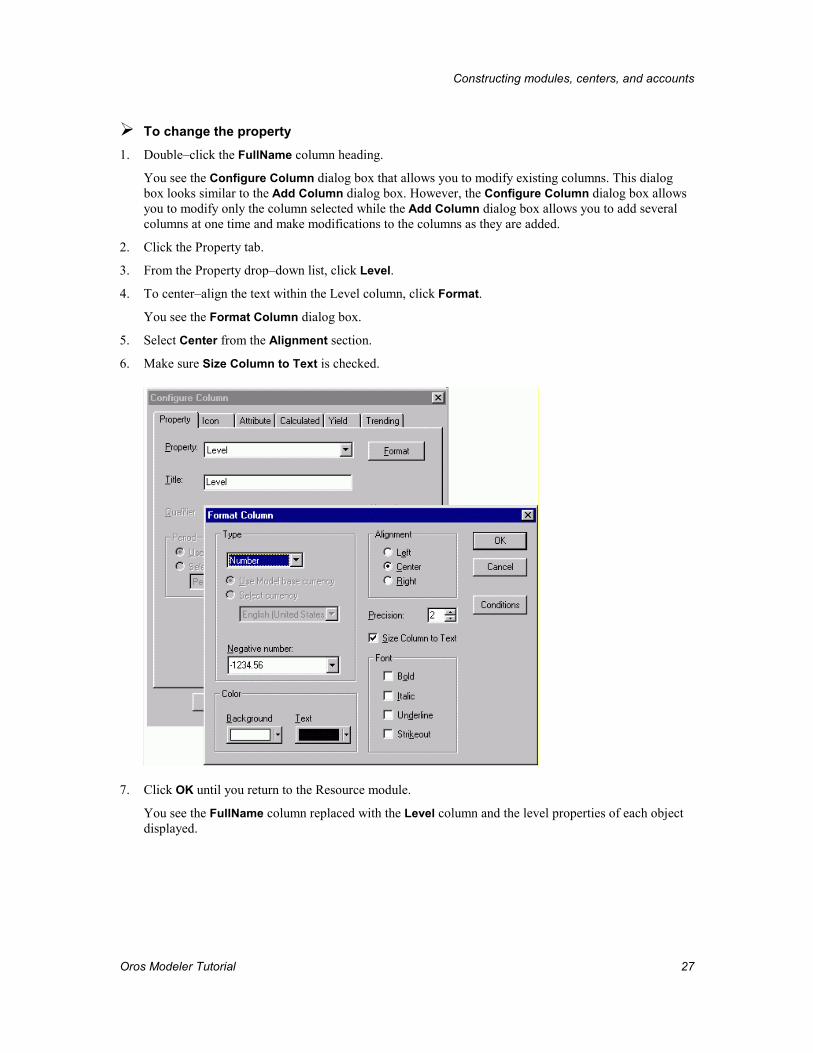
��To change the property 1. Double–click the FullName column heading.
You see the Configure Column dialog box that allows you to modify existing columns. This dialog box looks similar to the Add Column dialog box. However, the Configure Column dialog box allows you to modify only the column selected while the Add Column dialog box allows you to add several columns at one time and make modifications to the columns as they are added.
2. Click the Property tab.
3. From the Property drop–down list, click Level.
4. To center–align the text within the Level column, click Format.
You see the Format Column dialog box.
5. Select Center from the Alignment section.
6. Make sure Size Column to Text is checked.
7. Click OK until you return to the Resource module.
You see the FullName column replaced with the Level column and the level properties of each object displayed.
Constructing modules, centers, and accounts
Oros Modeler Tutorial 28
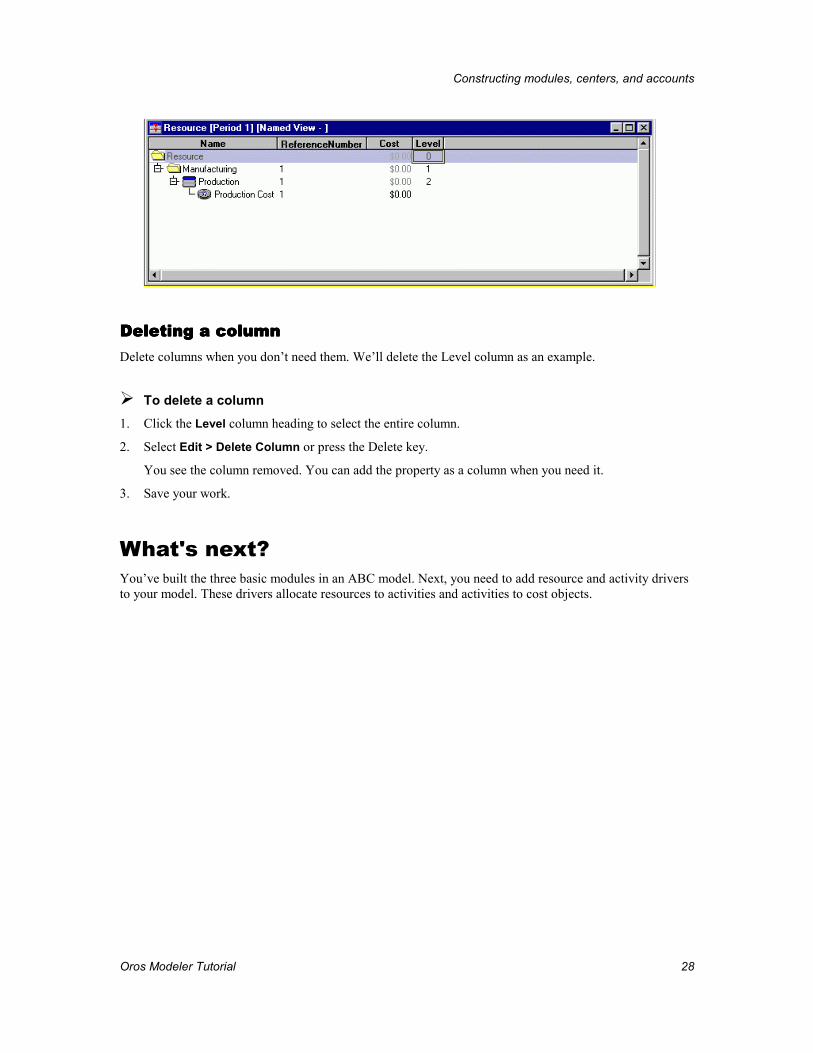
Deleting a columnDeleting a columnDeleting a columnDeleting a column Delete columns when you don’t need them. We’ll delete the Level column as an example.
��To delete a column 1. Click the Level column heading to select the entire column.
2. Select Edit > Delete Column or press the Delete key.
You see the column removed. You can add the property as a column when you need it.
3. Save your work.
What's next? You’ve built the three basic modules in an ABC model. Next, you need to add resource and activity drivers to your model. These drivers allocate resources to activities and activities to cost objects.
Oros Modeler Tutorial 29
Building drivers
An understanding of how activities in a company consume expenses, and how products consume activities, is an important aspect of activity–based management (ABC/M). Drivers measure the frequency or intensity of the cost demands placed on resources and activities.
In this lesson, we discuss:
�� Defining drivers
�� Building a list of drivers
What is a driver? A driver is any factor that causes a change in cost. Two types of drivers are used in this tutorial.
�� Resource Driver
A measure of the frequency and intensity of the demands placed on resources by activities. A resource driver assigns costs (expenditures) to activities.
�� Activity Driver
A measure of the frequency and intensity of the demands placed on activities by cost objects. An activity driver assigns costs to cost objects (products or services).
Drivers provide a measure of the consumption of costs from a source account to its destination account, such as from a resource to an activity or from an activity to products. Oros Modeler has two system–defined drivers: EVENLY ASSIGNED and PERCENTAGES.
�� EVENLY ASSIGNED
Assigns costs equally among the destination accounts from the source account.
�� PERCENTAGES
Assigns costs among destination accounts from the source account according to a percentage you specify.
User–defined drivers can be created in Oros Modeler.
Building a list of drivers for the model Building your list of drivers is the first step in linking resource costs to activities and activity costs to cost objects.
Building drivers
At Tyler Electronics, technicians set up the production line every time either the XM–100 or the XM–500 is manufactured. No. of setups measures the frequency of performing various activities connected with setting up the production line. Therefore, no. of setups is the driver for the Setting Up activity.
Schedulers receive orders from customers. To fill those orders for products, they:
�� Schedule the production capacity of the plant.
�� Determine how many units of each kind must be produced.
�� Group the products into manageable batches (lots).
Now, you will build a list of drivers for the model.
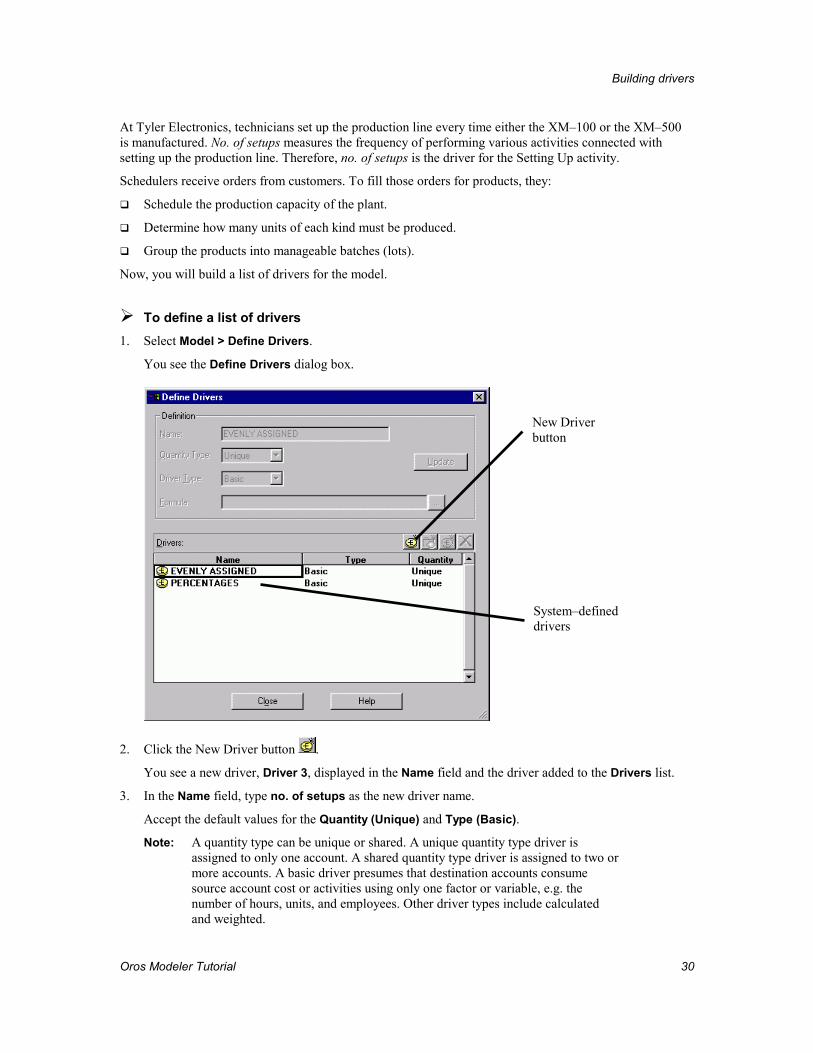
��To define a list of drivers 1. Select Model > Define Drivers.
Oros Modeler Tutorial 30
You see the Define Drivers dialog box.
2. Click the New Driver button .
You see a new driver, Driver 3, displayed in the Name field and the driver added to the Drivers list.
3. In the Name field, type no. of setups as the new driver name.
Accept the default values for the Quantity (Unique) and Type (Basic).
Note: A quantity type can be unique or shared. A unique quantity type driver is assigned to only one account. A shared quantity type driver is assigned to two or more accounts. A basic driver presumes that destination accounts consume source account cost or activities using only one factor or variable, e.g. the number of hours, units, and employees. Other driver types include calculated and weighted.
System–defined drivers
New Driver button
Building drivers
Oros Modeler Tutorial 31
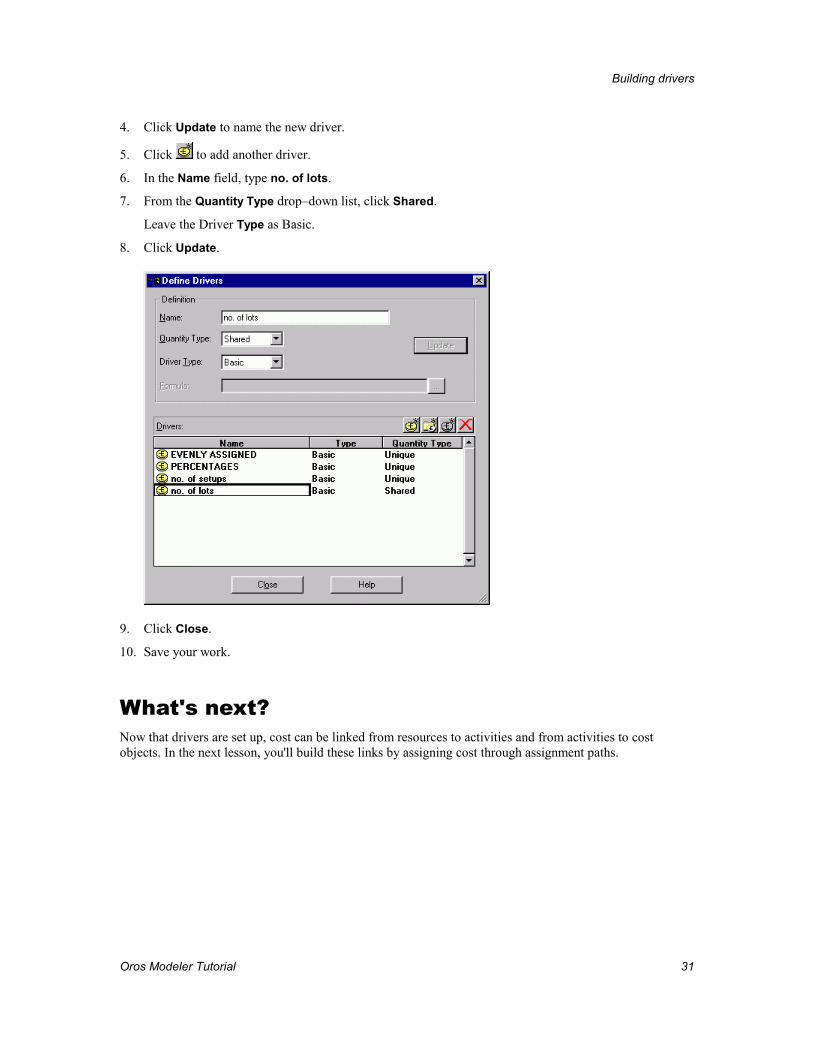
4. Click Update to name the new driver.
5. Click to add another driver.
6. In the Name field, type no. of lots.
7. From the Quantity Type drop–down list, click Shared.
Leave the Driver Type as Basic.
8. Click Update.
9. Click Close.
10. Save your work.
What's next? Now that drivers are set up, cost can be linked from resources to activities and from activities to cost objects. In the next lesson, you'll build these links by assigning cost through assignment paths.
Oros Modeler Tutorial 32
Creating assignment paths
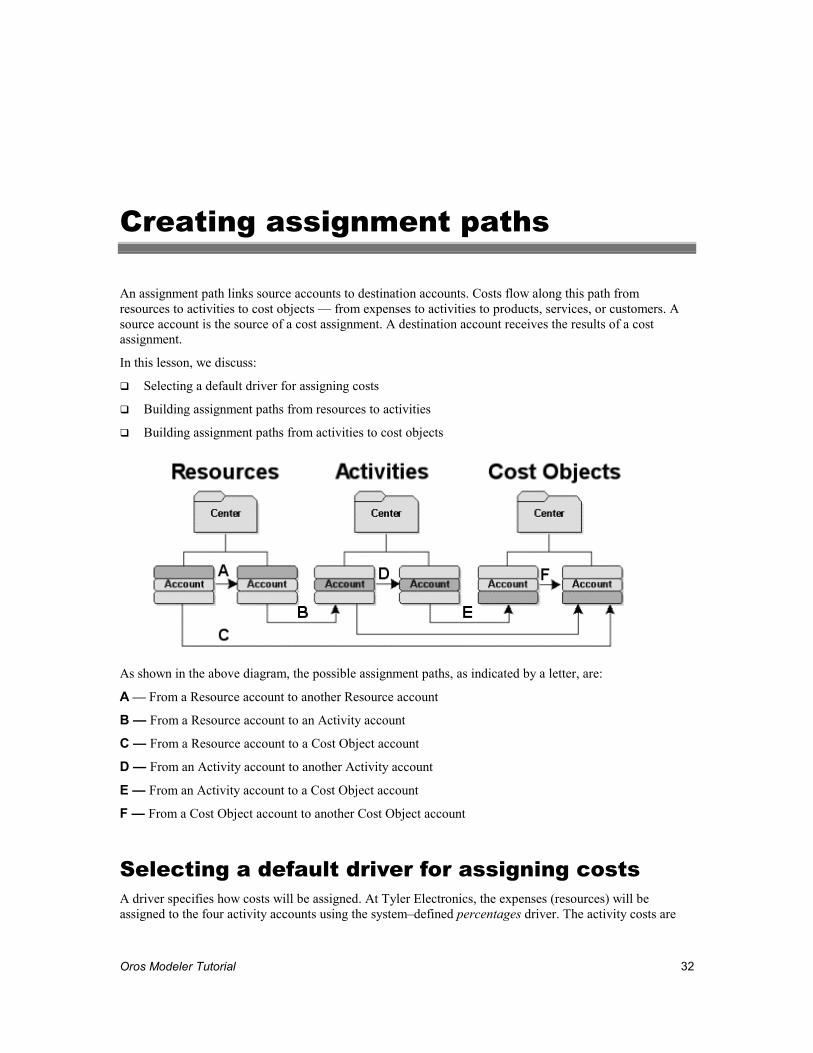
An assignment path links source accounts to destination accounts. Costs flow along this path from resources to activities to cost objects — from expenses to activities to products, services, or customers. A source account is the source of a cost assignment. A destination account receives the results of a cost assignment.
In this lesson, we discuss:
�� Selecting a default driver for assigning costs
�� Building assignment paths from resources to activities
�� Building assignment paths from activities to cost objects
As shown in the above diagram, the possible assignment paths, as indicated by a letter, are:
A — From a Resource account to another Resource account
B — From a Resource account to an Activity account
C — From a Resource account to a Cost Object account
D — From an Activity account to another Activity account
E — From an Activity account to a Cost Object account
F — From a Cost Object account to another Cost Object account
Selecting a default driver for assigning costs A driver specifies how costs will be assigned. At Tyler Electronics, the expenses (resources) will be assigned to the four activity accounts using the system–defined percentages driver. The activity costs are
Creating assignment paths
Oros Modeler Tutorial 33
then assigned to the products by the system–defined percentages driver and the drivers you defined previously: no. of setups, no. of lots.
Before specifying the drivers for the source accounts, set a default driver. Each source account will use this default driver as its initial driver. Using the default driver options saves time if many assignments use the same driver. The driver can be changed on an account-by-account basis when necessary.
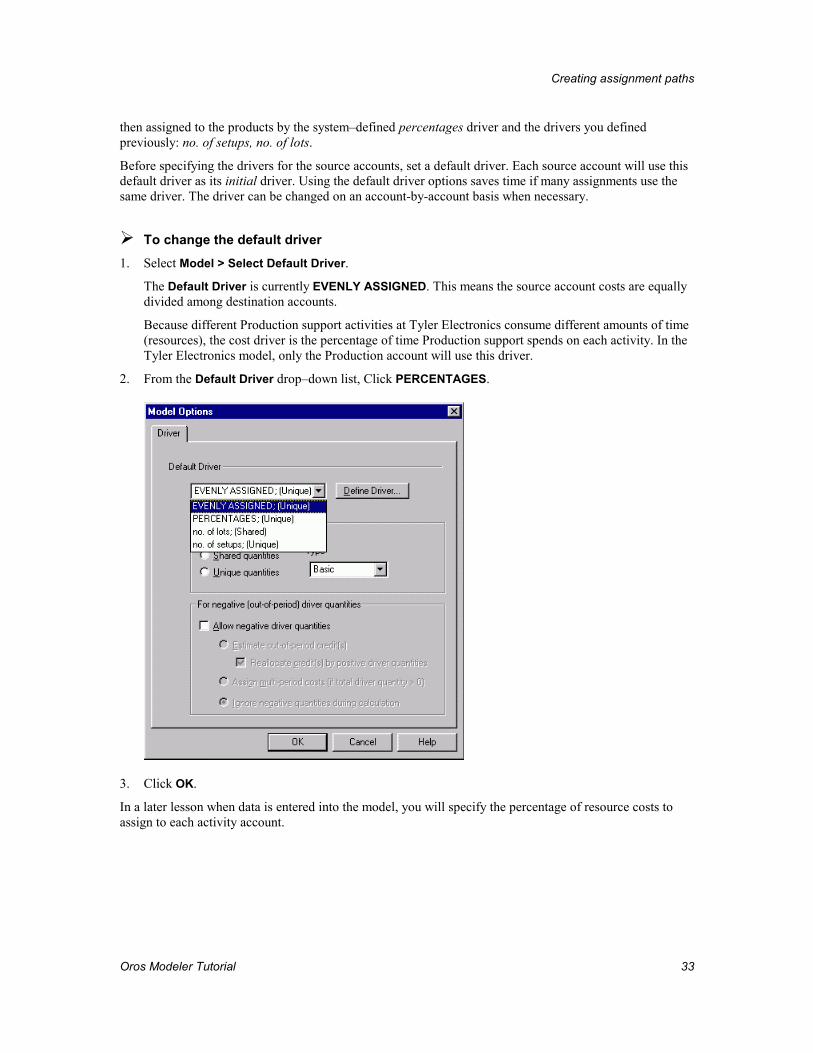
��To change the default driver 1. Select Model > Select Default Driver.
The Default Driver is currently EVENLY ASSIGNED. This means the source account costs are equally divided among destination accounts.
Because different Production support activities at Tyler Electronics consume different amounts of time (resources), the cost driver is the percentage of time Production support spends on each activity. In the Tyler Electronics model, only the Production account will use this driver.
2. From the Default Driver drop–down list, Click PERCENTAGES.
3. Click OK.
In a later lesson when data is entered into the model, you will specify the percentage of resource costs to assign to each activity account.
Creating assignment paths
Building assignment paths from resources to activities While building the model hierarchical structure, you have been working in multilevel view. To build assignment paths, you must change to either destination view or source view. In both these 2-pane views, you can see source accounts, destination accounts, assignment paths, driver names, and driver quantities. Because cost is assigned through activities across modules, you will work in the Activity module. To assign resource costs to activity accounts you will change to the destination view. To assign costs from the activity accounts to the cost object accounts you will change to the source view.
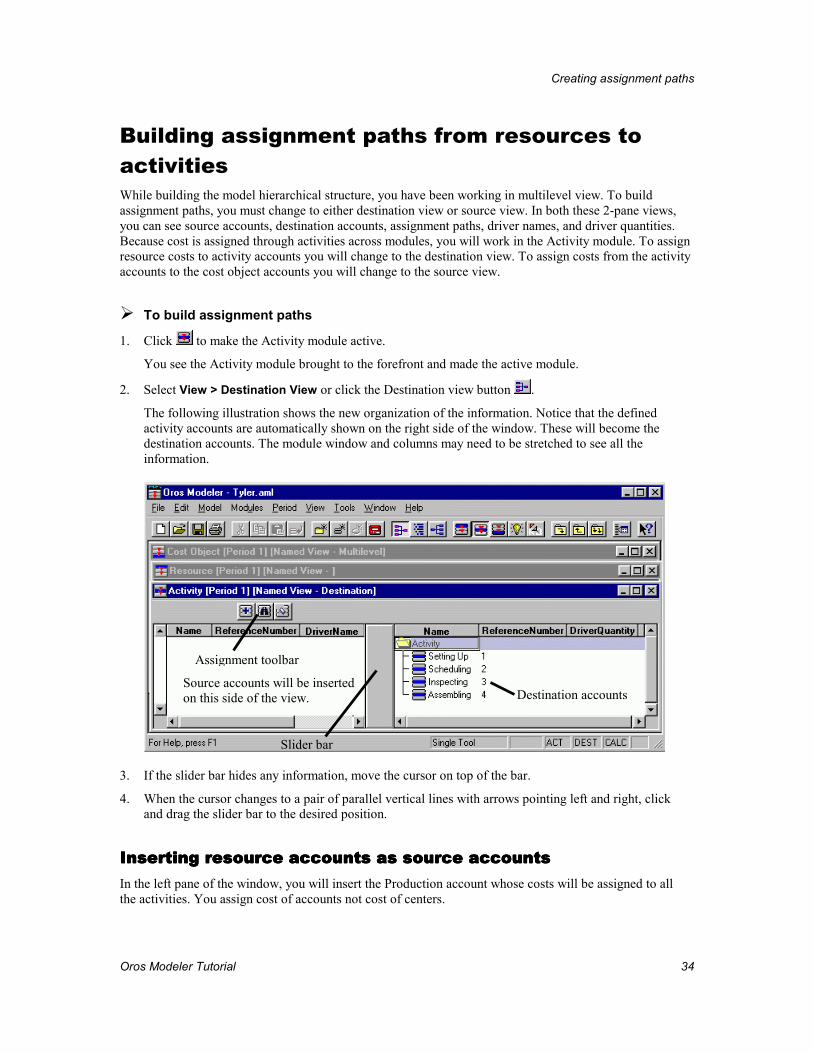
��To build assignment paths
1. Click to make the Activity module active.
Oros Modeler Tutorial 34
You see the Activity module brought to the forefront and made the active module.
2. Select View > Destination View or click the Destination view button .
The following illustration shows the new organization of the information. Notice that the defined activity accounts are automatically shown on the right side of the window. These will become the destination accounts. The module window and columns may need to be stretched to see all the information.
3. If the slider bar hides any information, move the cursor on top of the bar.
4. When the cursor changes to a pair of parallel vertical lines with arrows pointing left and right, click and drag the slider bar to the desired position.
Inserting resource accounts as source accountsInserting resource accounts as source accountsInserting resource accounts as source accountsInserting resource accounts as source accounts In the left pane of the window, you will insert the Production account whose costs will be assigned to all the activities. You assign cost of accounts not cost of centers.
Source accounts will be inserted on this side of the view.
Slider bar
Destination accounts
Assignment toolbar
Creating assignment paths
Oros Modeler Tutorial 35
��To insert source accounts for assignments
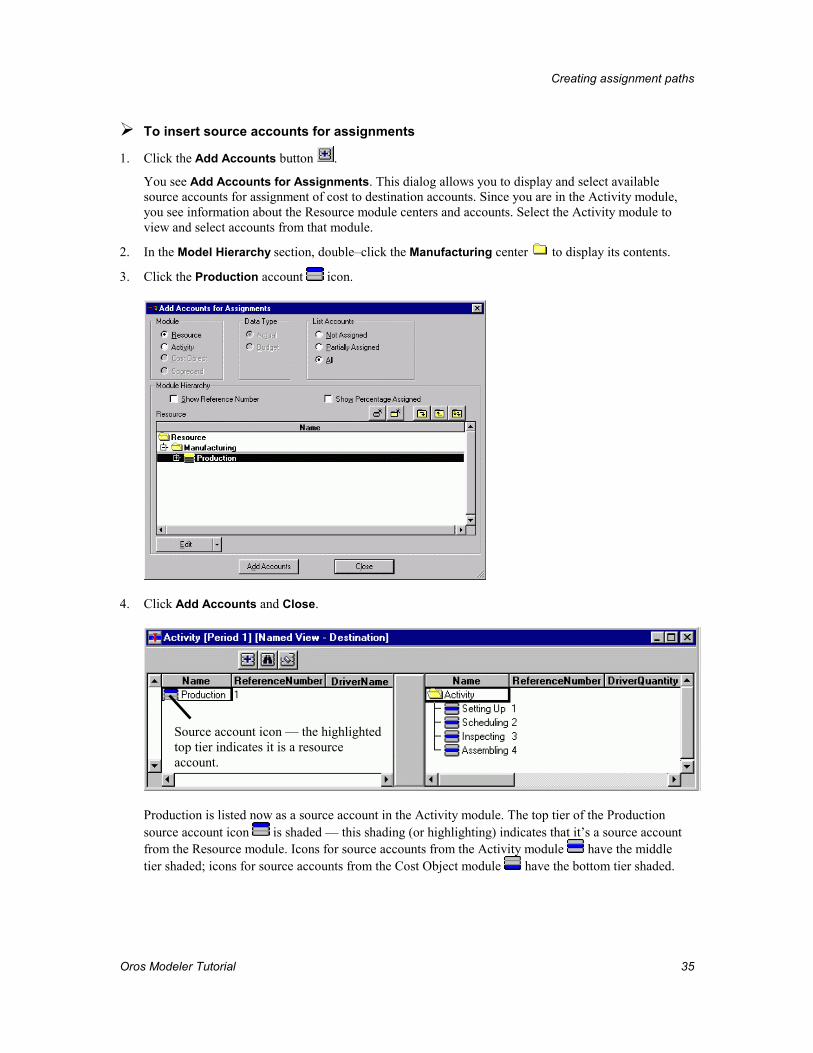
1. Click the Add Accounts button .
You see Add Accounts for Assignments. This dialog allows you to display and select available source accounts for assignment of cost to destination accounts. Since you are in the Activity module, you see information about the Resource module centers and accounts. Select the Activity module to view and select accounts from that module.
2. In the Model Hierarchy section, double–click the Manufacturing center to display its contents.
3. Click the Production account icon.
4. Click Add Accounts and Close.
Production is listed now as a source account in the Activity module. The top tier of the Production source account icon is shaded — this shading (or highlighting) indicates that it’s a source account from the Resource module. Icons for source accounts from the Activity module have the middle tier shaded; icons for source accounts from the Cost Object module have the bottom tier shaded.
Source account icon — the highlighted top tier indicates it is a resource account.
Creating assignment paths
Oros Modeler Tutorial 36
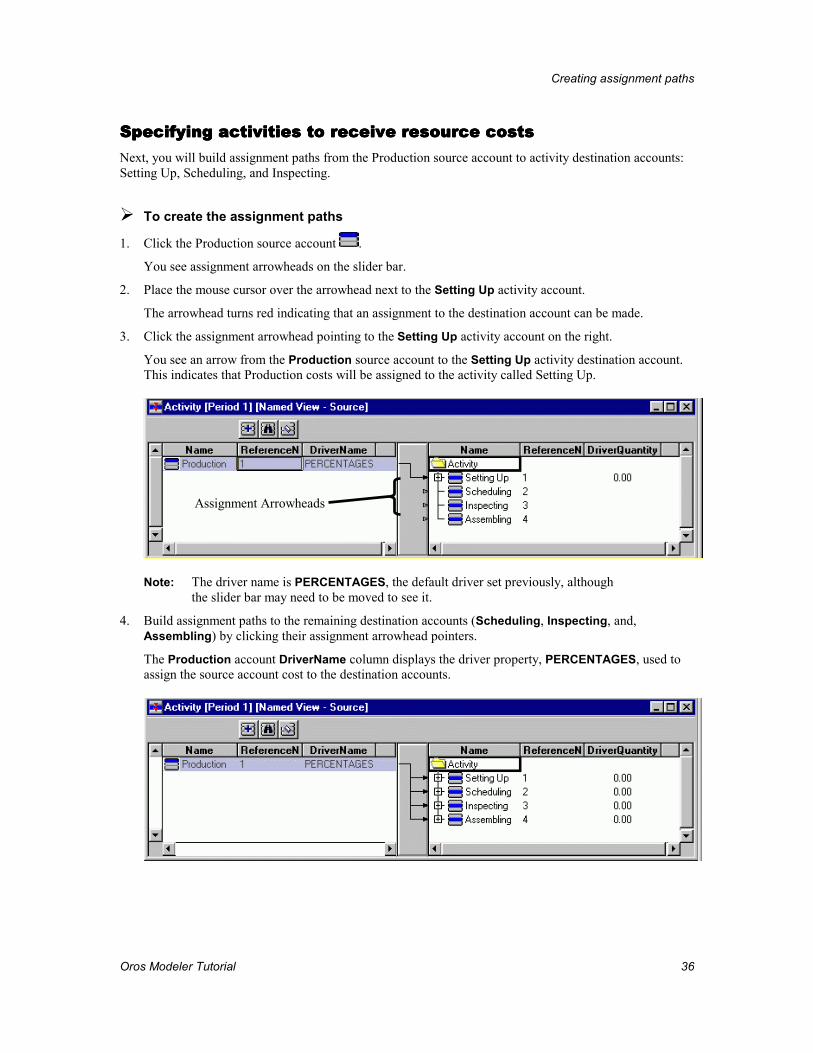
Specifying activities to receive resource costsSpecifying activities to receive resource costsSpecifying activities to receive resource costsSpecifying activities to receive resource costs Next, you will build assignment paths from the Production source account to activity destination accounts: Setting Up, Scheduling, and Inspecting.
��To create the assignment paths
1. Click the Production source account .
You see assignment arrowheads on the slider bar.
2. Place the mouse cursor over the arrowhead next to the Setting Up activity account.
The arrowhead turns red indicating that an assignment to the destination account can be made.
3. Click the assignment arrowhead pointing to the Setting Up activity account on the right.
You see an arrow from the Production source account to the Setting Up activity destination account. This indicates that Production costs will be assigned to the activity called Setting Up.
Note: The driver name is PERCENTAGES, the default driver set previously, although the slider bar may need to be moved to see it.
4. Build assignment paths to the remaining destination accounts (Scheduling, Inspecting, and, Assembling) by clicking their assignment arrowhead pointers.
The Production account DriverName column displays the driver property, PERCENTAGES, used to assign the source account cost to the destination accounts.
Assignment Arrowheads
Creating assignment paths
Oros Modeler Tutorial 37
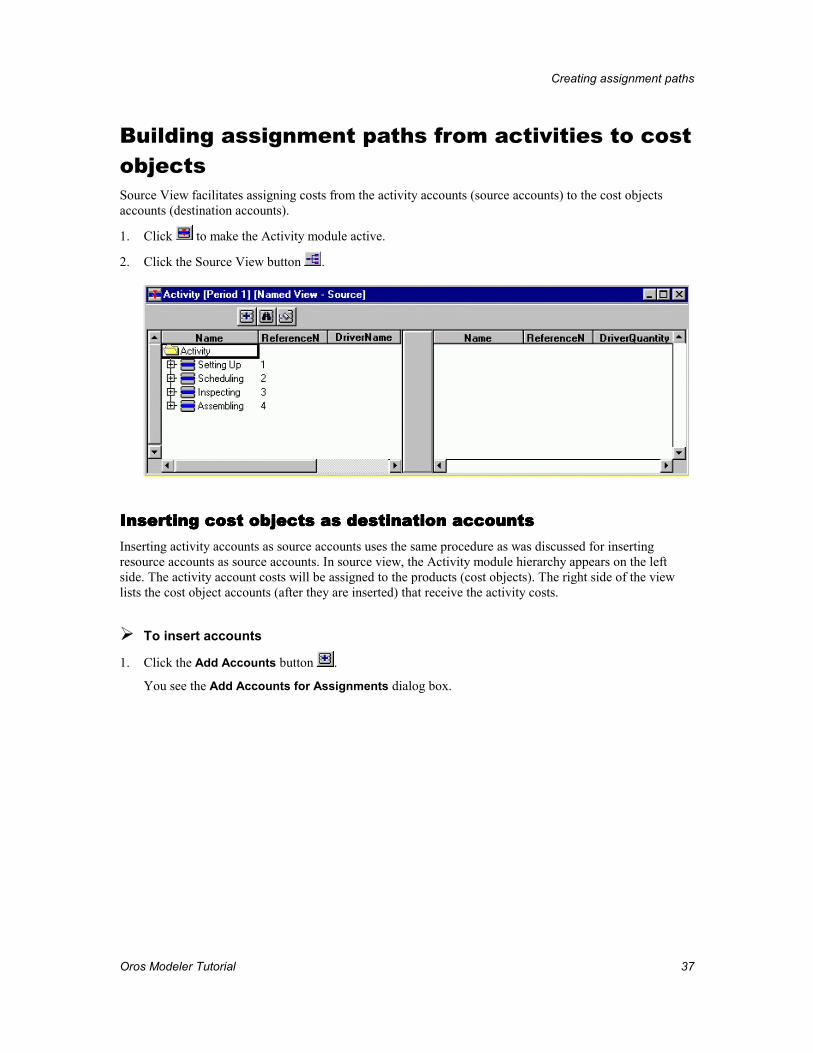
Building assignment paths from activities to cost objects Source View facilitates assigning costs from the activity accounts (source accounts) to the cost objects accounts (destination accounts).
1. Click to make the Activity module active.
2. Click the Source View button .
Inserting cost objects as destination accountsInserting cost objects as destination accountsInserting cost objects as destination accountsInserting cost objects as destination accounts Inserting activity accounts as source accounts uses the same procedure as was discussed for inserting resource accounts as source accounts. In source view, the Activity module hierarchy appears on the left side. The activity account costs will be assigned to the products (cost objects). The right side of the view lists the cost object accounts (after they are inserted) that receive the activity costs.
��To insert accounts
1. Click the Add Accounts button .
You see the Add Accounts for Assignments dialog box.
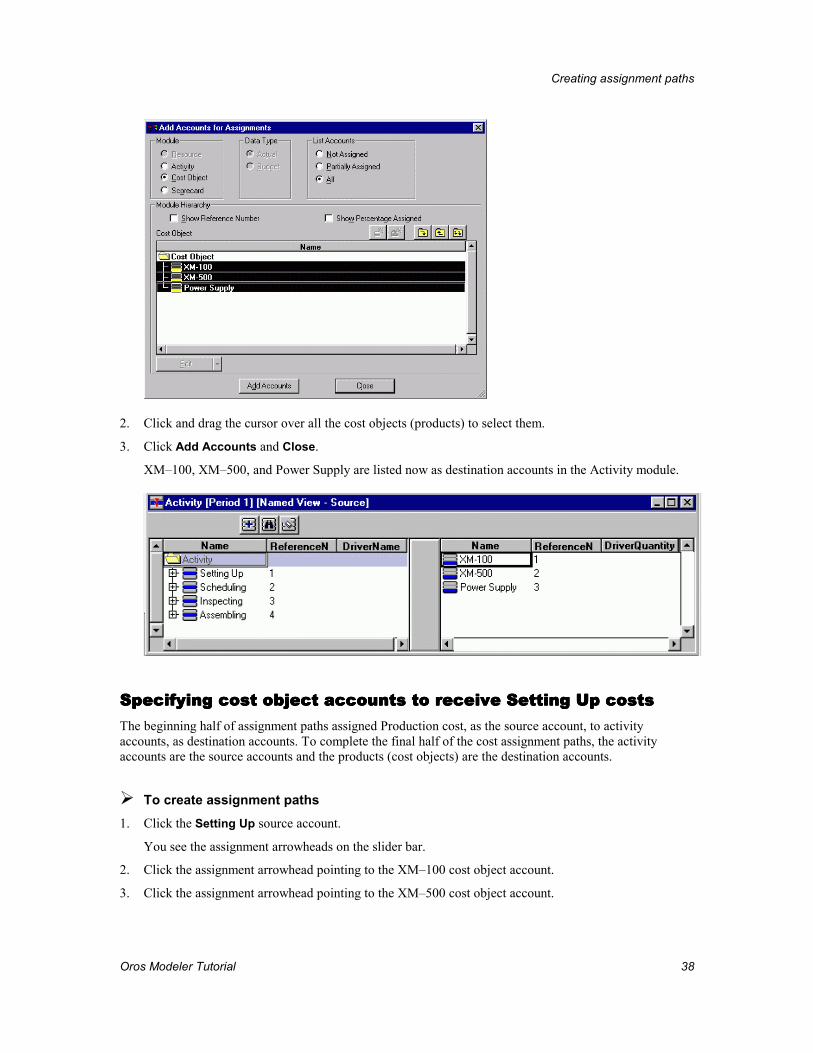
Creating assignment paths
Oros Modeler Tutorial 38
2. Click and drag the cursor over all the cost objects (products) to select them.
3. Click Add Accounts and Close.
XM–100, XM–500, and Power Supply are listed now as destination accounts in the Activity module.
Specifying cost object accounts to receive Setting Up costsSpecifying cost object accounts to receive Setting Up costsSpecifying cost object accounts to receive Setting Up costsSpecifying cost object accounts to receive Setting Up costs The beginning half of assignment paths assigned Production cost, as the source account, to activity accounts, as destination accounts. To complete the final half of the cost assignment paths, the activity accounts are the source accounts and the products (cost objects) are the destination accounts.
��To create assignment paths 1. Click the Setting Up source account.
You see the assignment arrowheads on the slider bar.
2. Click the assignment arrowhead pointing to the XM–100 cost object account.
3. Click the assignment arrowhead pointing to the XM–500 cost object account.
Creating assignment paths
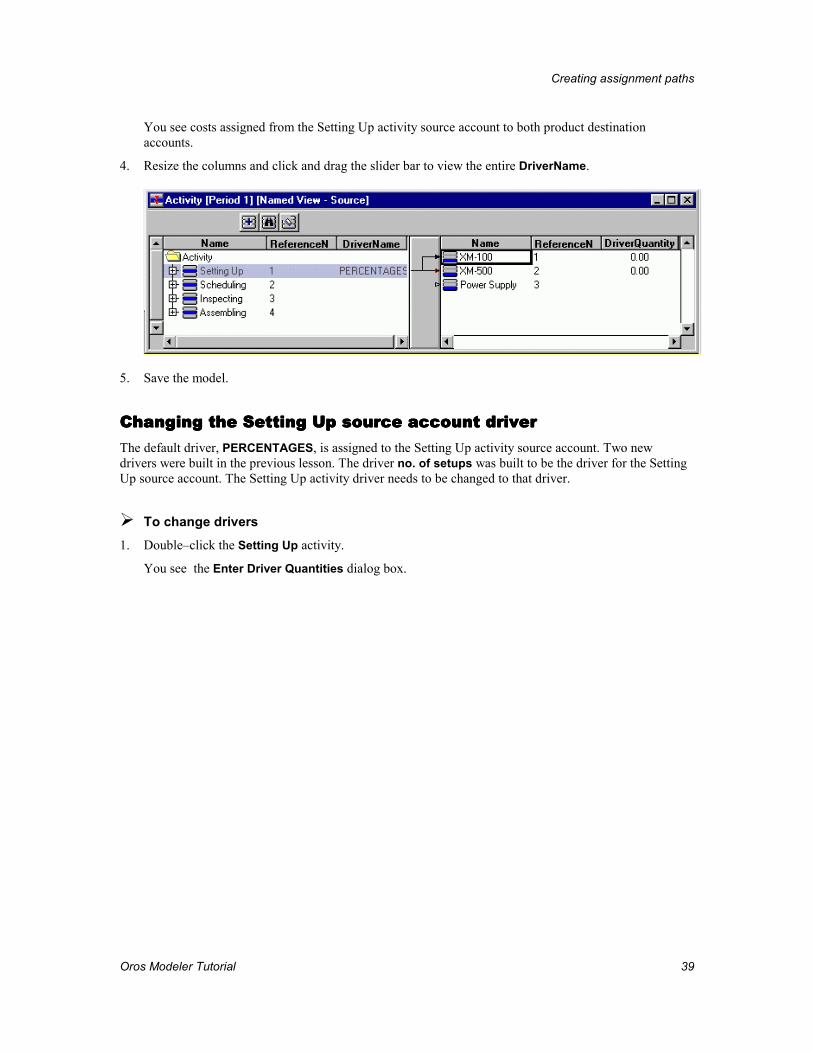
Oros Modeler Tutorial 39
You see costs assigned from the Setting Up activity source account to both product destination accounts.
4. Resize the columns and click and drag the slider bar to view the entire DriverName.
5. Save the model.
Changing the Setting Up source account driver Changing the Setting Up source account driver Changing the Setting Up source account driver Changing the Setting Up source account driver The default driver, PERCENTAGES, is assigned to the Setting Up activity source account. Two new drivers were built in the previous lesson. The driver no. of setups was built to be the driver for the Setting Up source account. The Setting Up activity driver needs to be changed to that driver.
��To change drivers 1. Double–click the Setting Up activity.
You see the Enter Driver Quantities dialog box.
Creating assignment paths
Oros Modeler Tutorial 40
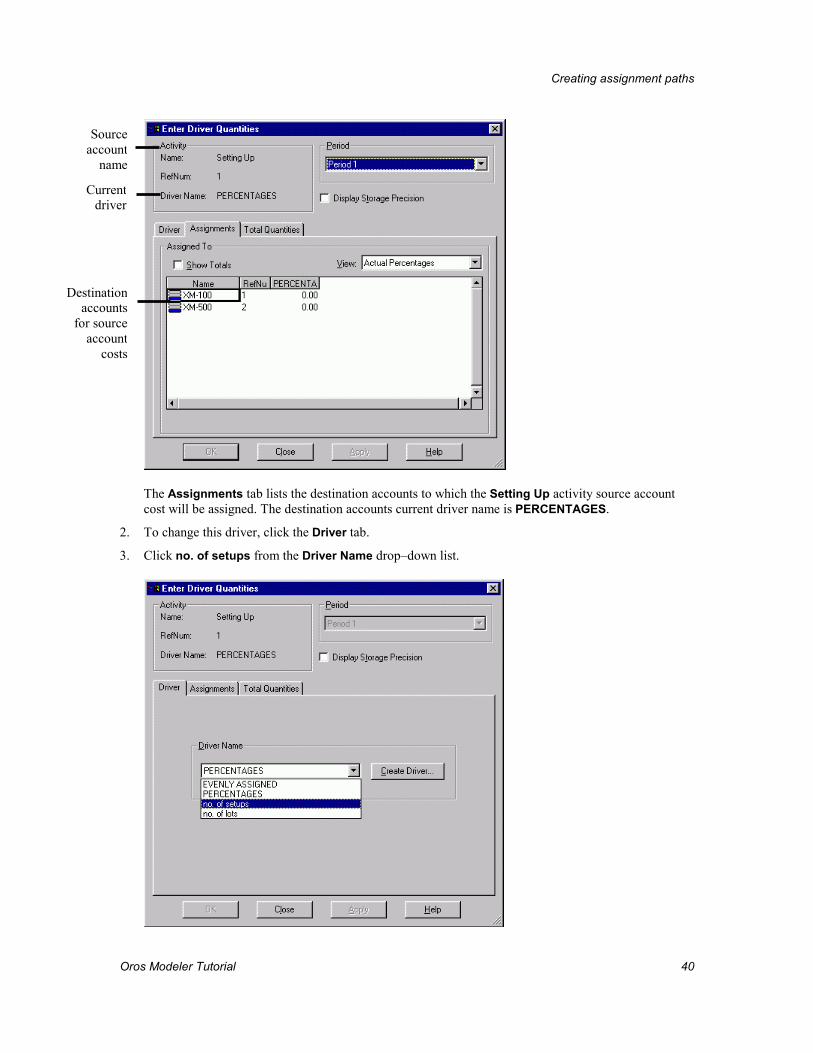
The Assignments tab lists the destination accounts to which the Setting Up activity source account cost will be assigned. The destination accounts current driver name is PERCENTAGES.
2. To change this driver, click the Driver tab.
3. Click no. of setups from the Driver Name drop–down list.
Sourceaccount
name
Current driver
Destinationaccounts
for sourceaccount
costs
Creating assignment paths
Oros Modeler Tutorial 41
4. Click OK and then Close.
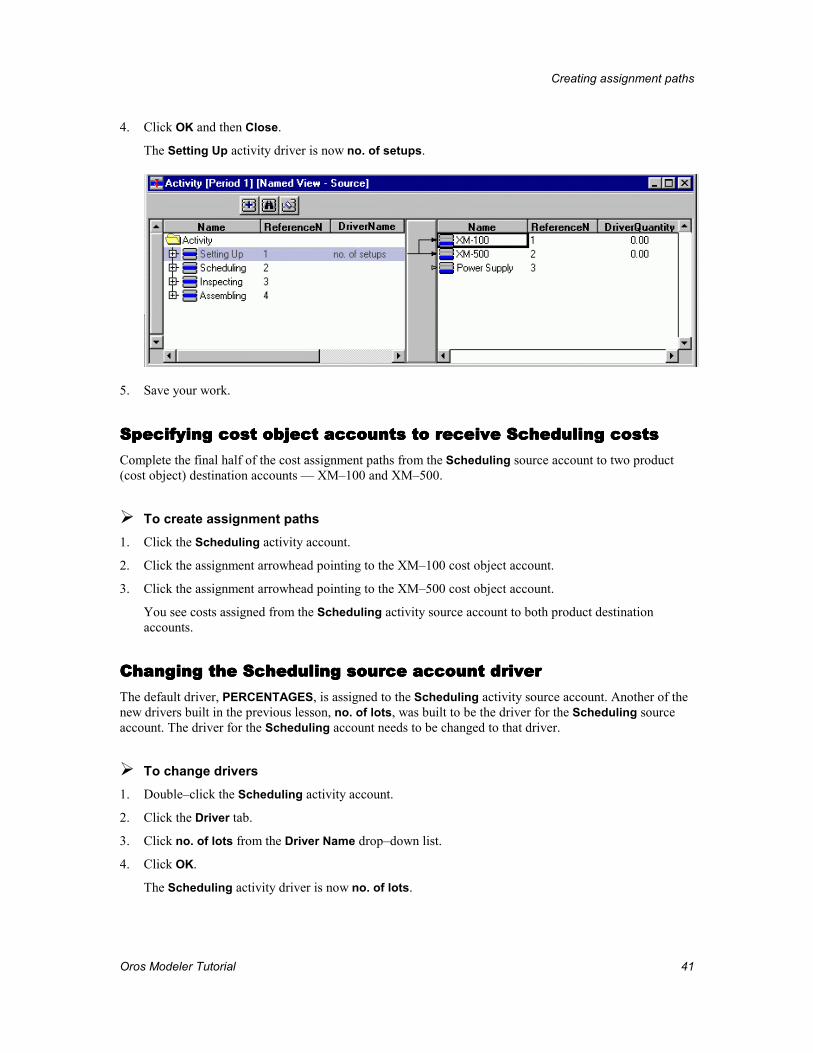
The Setting Up activity driver is now no. of setups.
5. Save your work.
Specifying cost object accounts to receive Scheduling costsSpecifying cost object accounts to receive Scheduling costsSpecifying cost object accounts to receive Scheduling costsSpecifying cost object accounts to receive Scheduling costs Complete the final half of the cost assignment paths from the Scheduling source account to two product (cost object) destination accounts — XM–100 and XM–500.
��To create assignment paths 1. Click the Scheduling activity account.
2. Click the assignment arrowhead pointing to the XM–100 cost object account.
3. Click the assignment arrowhead pointing to the XM–500 cost object account.
You see costs assigned from the Scheduling activity source account to both product destination accounts.
Changing the Scheduling source account driverChanging the Scheduling source account driverChanging the Scheduling source account driverChanging the Scheduling source account driver The default driver, PERCENTAGES, is assigned to the Scheduling activity source account. Another of the new drivers built in the previous lesson, no. of lots, was built to be the driver for the Scheduling source account. The driver for the Scheduling account needs to be changed to that driver.
��To change drivers 1. Double–click the Scheduling activity account.
2. Click the Driver tab.
3. Click no. of lots from the Driver Name drop–down list.
4. Click OK.
The Scheduling activity driver is now no. of lots.
Creating assignment paths
Oros Modeler Tutorial 42
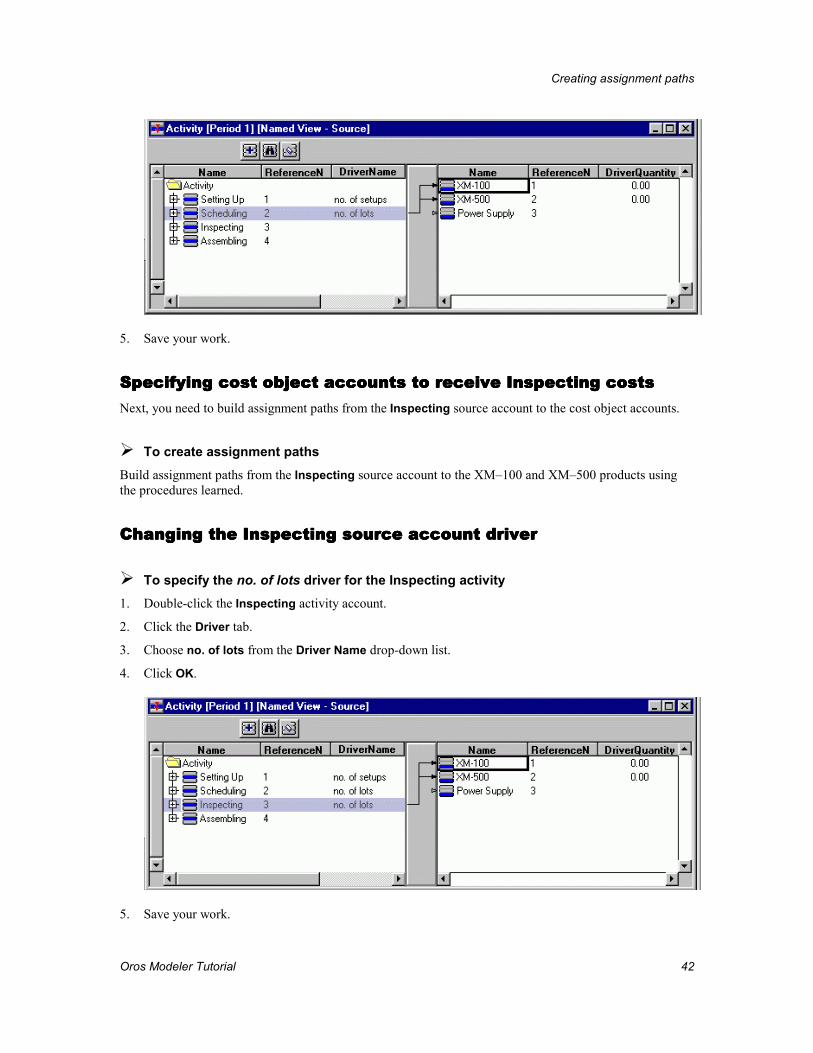
5. Save your work.
Specifying cost object accounts to receive Inspecting costsSpecifying cost object accounts to receive Inspecting costsSpecifying cost object accounts to receive Inspecting costsSpecifying cost object accounts to receive Inspecting costs Next, you need to build assignment paths from the Inspecting source account to the cost object accounts.
��To create assignment paths Build assignment paths from the Inspecting source account to the XM–100 and XM–500 products using the procedures learned.
Changing the Inspecting source account driverChanging the Inspecting source account driverChanging the Inspecting source account driverChanging the Inspecting source account driver
��To specify the no. of lots driver for the Inspecting activity 1. Double-click the Inspecting activity account.
2. Click the Driver tab.
3. Choose no. of lots from the Driver Name drop-down list.
4. Click OK.
5. Save your work.
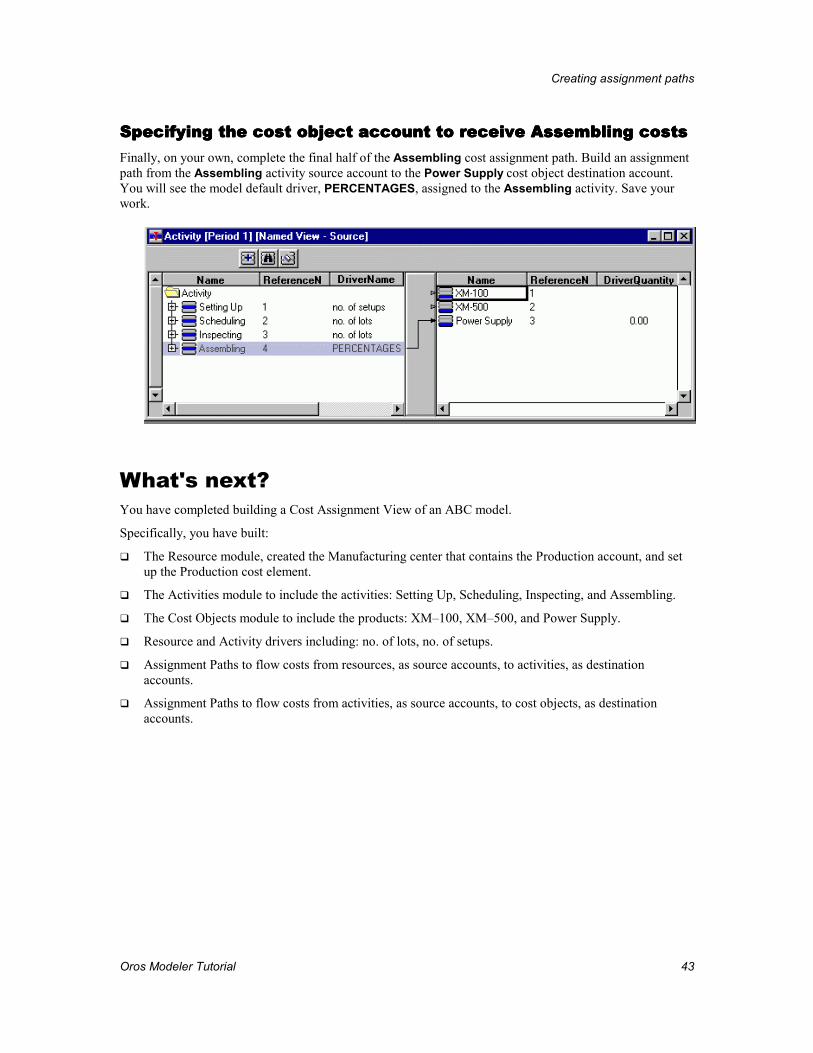
Creating assignment paths
Oros Modeler Tutorial 43
Specifying the cost object account to receSpecifying the cost object account to receSpecifying the cost object account to receSpecifying the cost object account to receive Assembling costsive Assembling costsive Assembling costsive Assembling costs Finally, on your own, complete the final half of the Assembling cost assignment path. Build an assignment path from the Assembling activity source account to the Power Supply cost object destination account. You will see the model default driver, PERCENTAGES, assigned to the Assembling activity. Save your work.
What's next? You have completed building a Cost Assignment View of an ABC model.
Specifically, you have built:
�� The Resource module, created the Manufacturing center that contains the Production account, and set up the Production cost element.
�� The Activities module to include the activities: Setting Up, Scheduling, Inspecting, and Assembling.
�� The Cost Objects module to include the products: XM–100, XM–500, and Power Supply.
�� Resource and Activity drivers including: no. of lots, no. of setups.
�� Assignment Paths to flow costs from resources, as source accounts, to activities, as destination accounts.
�� Assignment Paths to flow costs from activities, as source accounts, to cost objects, as destination accounts.
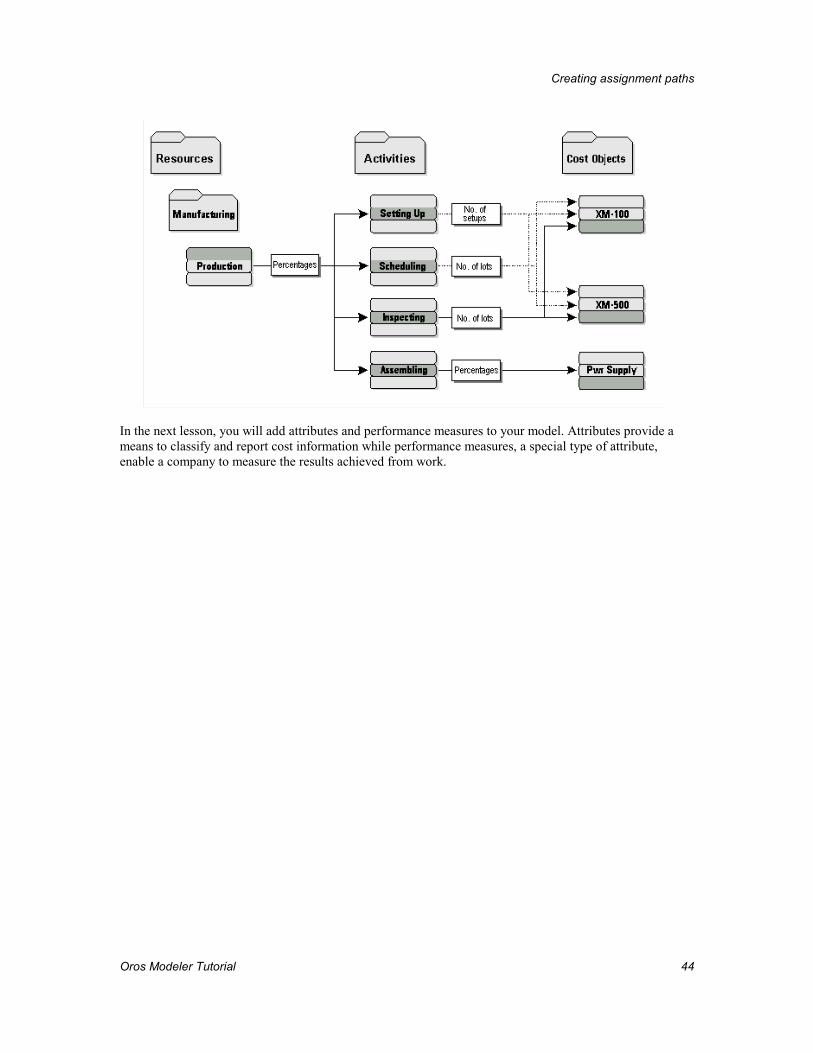
Creating assignment paths
Oros Modeler Tutorial 44
In the next lesson, you will add attributes and performance measures to your model. Attributes provide a means to classify and report cost information while performance measures, a special type of attribute, enable a company to measure the results achieved from work.
Oros Modeler Tutorial 45
Adding attributes and performance measures
An attribute is a label or identification tag attached to a center, account, or entered cost element. The attribute conveys information about the object to which it is attached.
In this lesson, we discuss:
�� Attributes and performance measures
�� Text attributes
�� Numeric attributes
�� Calculated attributes
�� Attribute centers
�� Defining attributes
�� Assigning attributes
�� Removing attributes
�� Model periods
�� Entering attribute quantities
�� Adding or removing performance measures
Attribute use and benefits Attributes have multiple purposes in Oros Modeler. They can be used to:
�� Group ABC data for reporting purposes
�� Attach numeric information to use in calculated drivers and calculated attributes
�� Link numeric information to performance measures
�� Create different dimensions of data
�� Highlight important information to extract the information you need
�� Describe how well an activity is performed, what type of activity it is, and how activity cost behaves
�� Simplify report preparation and interpretation
�� Report similar cost categories across cost centers
�� Highlight improvement opportunities
Adding attributes and performance measures
Oros Modeler Tutorial 46
�� Enhance decisions and the decision–making process
�� Classify cost components as: fixed or variable, value–added or non value–added
Attribute types Oros Modeler supports four attributes types:
�� Text
�� Numeric
�� Calculated
�� Center
Attribute hierarchy Grouping attributes organizes attributes into a hierarchy. The attribute level determines the center or attribute position in the hierarchy.
Performance Measures Performance measures indicate results achieved from work or activities performed and define how well a company accomplishes its strategies and objectives. These measures can be financial or non–financial and include three dimensions of performance:
�� Efficiency of the activity — the volume of an activity compared to the resources needed to sustain the activity measures cost indirectly. Cost–per–item is a measure of efficiency.
�� Timeliness of the activity — the elapsed time to perform an activity, or to produce a product or service, are indirect measures of cost. The average elapsed time to produce a product is a measure of time.
�� Quality of the activity — the percentage of error–free or one–time–only activities are direct measures of quality and indirect measures of cost. The percentage of rejected items and the percentage of reworked items are measures of quality.
Text attributes Text attributes, identified by , describe model information. These attributes enable you to categorize, select, and subtotal information in a report. Activities may be grouped by a summary–level processes — detailed manufacturing activities roll up to “manufacturing,” detailed distribution activities roll up to “distribution.” The names of these higher–level processes are defined as text attributes and are attached to their respective activities. You can then generate a report or export query that groups and totals detailed activity cost by text attribute.
Other examples of text attributes include:
�� Value–added categories (high, medium, low) attached to activities.
Adding attributes and performance measures
Oros Modeler Tutorial 47
�� Fixed cost/variable cost attached to resources — allows activity or cost object costs to be grouped by fixed and variable cost components.
�� Cost object groupings to roll up products by product family, brand, market segment, or package type or to group customers by region, channel, or salesperson.
�� Total Quality Management (TQM) categories — allows activities to be identified by cost of quality category such as prevention, appraisal, and internal or external repair.
Numeric attributes Numeric attributes, identified by , provide an opportunity to enter data not entered or generated otherwise in the model.
Typically, numeric attributes are measures or quantities of units contributing to the total cost of an activity such as number of cases, number of pounds, number of orders, or number of times an activity is performed.
Numeric attributes are used extensively in calculating performance measures and in the ABC scorecard. As an example, the total cost of an activity, divided by a “number of times performed” numeric attribute, provides the average cost of performing one unit of that activity — cost per order or cost per inspection for example.
You can establish numeric attributes as performance measures for special reporting purposes, to track productivity —number of inputs or rejects, cycle time, and quality, or to classify information such as level of complexity or number of sub–assemblies. Establishing a target cost–per–unit, and attaching a performance meter to the activity, provides a “scorecard” against which accomplishment of company strategies and objectives can be measured.
Using with calculated driversUsing with calculated driversUsing with calculated driversUsing with calculated drivers The variable data contained in numeric attributes can be used in calculated drivers yielding additional functionality and flexibility.
Consider a driver for assigning delivery costs to customers. It may be a function of both the number of trips (frequency) and the relative time per trip (intensity). It also may be a function of the type of product shipped to the customer — refrigerated or dry.
Numeric attributes for these multiple variables can be defined and attached to each customer to more effectively model the consumption of activities based on specific customer characteristics.
Using with calculated attributesUsing with calculated attributesUsing with calculated attributesUsing with calculated attributes You can couple numeric attributes with calculated attributes. In fact, the same numeric attribute can be used simultaneously in both a calculated driver and a calculated attribute. For example, a numeric attribute measuring inventory returns could be used in a calculated attribute measuring ROI or carrying costs while also be used as a variable in a calculated driver to assign storage costs to products.
Calculated attributes Calculated attributes, denoted by , are used to define numeric attributes built with mathematical formulas using basic arithmetic functions — addition, subtraction, multiplication, and division.
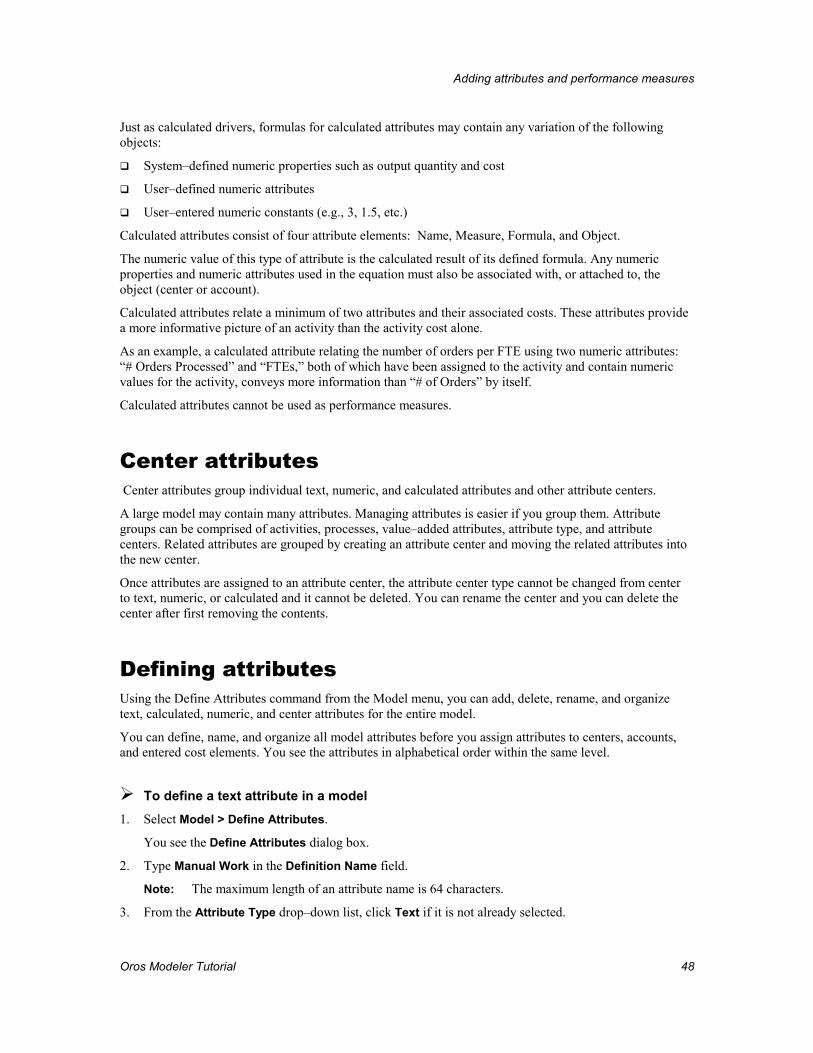
Adding attributes and performance measures
Oros Modeler Tutorial 48
Just as calculated drivers, formulas for calculated attributes may contain any variation of the following objects:
�� System–defined numeric properties such as output quantity and cost
�� User–defined numeric attributes
�� User–entered numeric constants (e.g., 3, 1.5, etc.)
Calculated attributes consist of four attribute elements: Name, Measure, Formula, and Object.
The numeric value of this type of attribute is the calculated result of its defined formula. Any numeric properties and numeric attributes used in the equation must also be associated with, or attached to, the object (center or account).
Calculated attributes relate a minimum of two attributes and their associated costs. These attributes provide a more informative picture of an activity than the activity cost alone.
As an example, a calculated attribute relating the number of orders per FTE using two numeric attributes: “# Orders Processed” and “FTEs,” both of which have been assigned to the activity and contain numeric values for the activity, conveys more information than “# of Orders” by itself.
Calculated attributes cannot be used as performance measures.
Center attributes Center attributes group individual text, numeric, and calculated attributes and other attribute centers.
A large model may contain many attributes. Managing attributes is easier if you group them. Attribute groups can be comprised of activities, processes, value–added attributes, attribute type, and attribute centers. Related attributes are grouped by creating an attribute center and moving the related attributes into the new center.
Once attributes are assigned to an attribute center, the attribute center type cannot be changed from center to text, numeric, or calculated and it cannot be deleted. You can rename the center and you can delete the center after first removing the contents.
Defining attributes Using the Define Attributes command from the Model menu, you can add, delete, rename, and organize text, calculated, numeric, and center attributes for the entire model.
You can define, name, and organize all model attributes before you assign attributes to centers, accounts, and entered cost elements. You see the attributes in alphabetical order within the same level.
��To define a text attribute in a model 1. Select Model > Define Attributes.
You see the Define Attributes dialog box.
2. Type Manual Work in the Definition Name field.
Note: The maximum length of an attribute name is 64 characters.
3. From the Attribute Type drop–down list, click Text if it is not already selected.
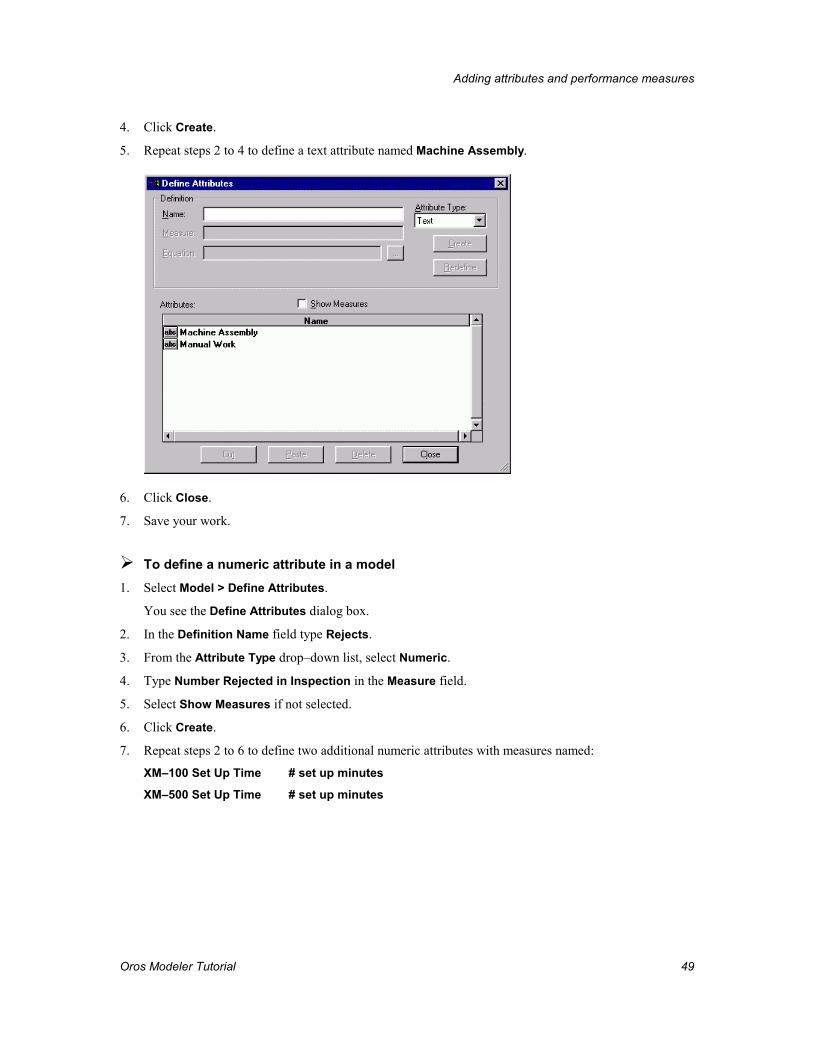
Adding attributes and performance measures
Oros Modeler Tutorial 49
4. Click Create.
5. Repeat steps 2 to 4 to define a text attribute named Machine Assembly.
6. Click Close.
7. Save your work.
��To define a numeric attribute in a model 1. Select Model > Define Attributes.
You see the Define Attributes dialog box.
2. In the Definition Name field type Rejects.
3. From the Attribute Type drop–down list, select Numeric.
4. Type Number Rejected in Inspection in the Measure field.
5. Select Show Measures if not selected.
6. Click Create.
7. Repeat steps 2 to 6 to define two additional numeric attributes with measures named:
XM–100 Set Up Time # set up minutes
XM–500 Set Up Time # set up minutes
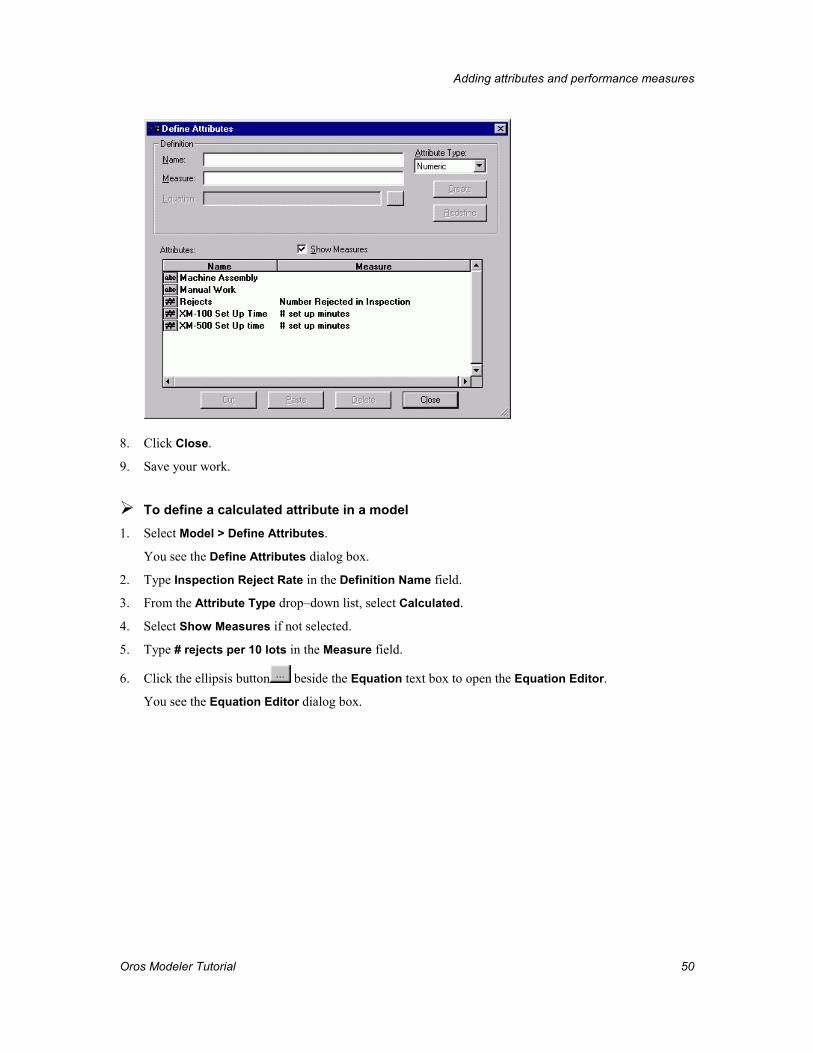
Adding attributes and performance measures
Oros Modeler Tutorial 50
8. Click Close.
9. Save your work.
��To define a calculated attribute in a model 1. Select Model > Define Attributes.
You see the Define Attributes dialog box.
2. Type Inspection Reject Rate in the Definition Name field.
3. From the Attribute Type drop–down list, select Calculated.
4. Select Show Measures if not selected.
5. Type # rejects per 10 lots in the Measure field.
6. Click the ellipsis button beside the Equation text box to open the Equation Editor.
You see the Equation Editor dialog box.
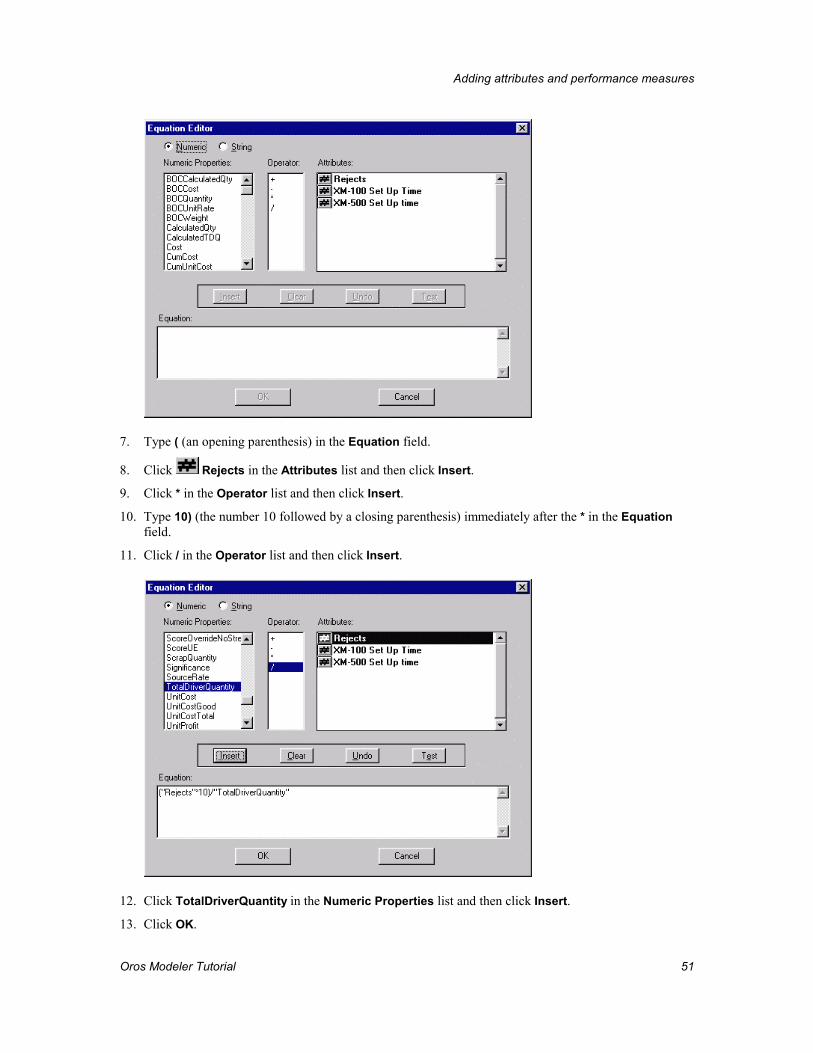
Adding attributes and performance measures
Oros Modeler Tutorial 51
7. Type ( (an opening parenthesis) in the Equation field.
8. Click Rejects in the Attributes list and then click Insert.
9. Click * in the Operator list and then click Insert.
10. Type 10) (the number 10 followed by a closing parenthesis) immediately after the * in the Equation field.
11. Click / in the Operator list and then click Insert.
12. Click TotalDriverQuantity in the Numeric Properties list and then click Insert.
13. Click OK.
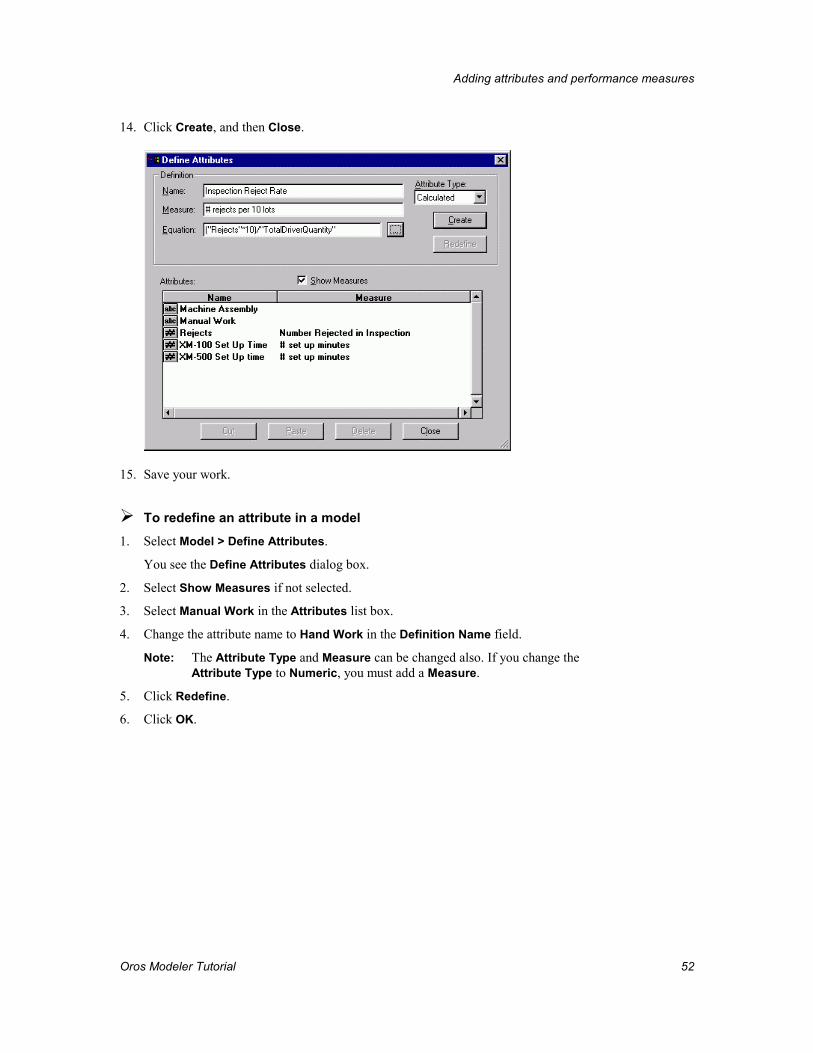
Adding attributes and performance measures
Oros Modeler Tutorial 52
14. Click Create, and then Close.
15. Save your work.
��To redefine an attribute in a model 1. Select Model > Define Attributes.
You see the Define Attributes dialog box.
2. Select Show Measures if not selected.
3. Select Manual Work in the Attributes list box.
4. Change the attribute name to Hand Work in the Definition Name field.
Note: The Attribute Type and Measure can be changed also. If you change the Attribute Type to Numeric, you must add a Measure.
5. Click Redefine.
6. Click OK.
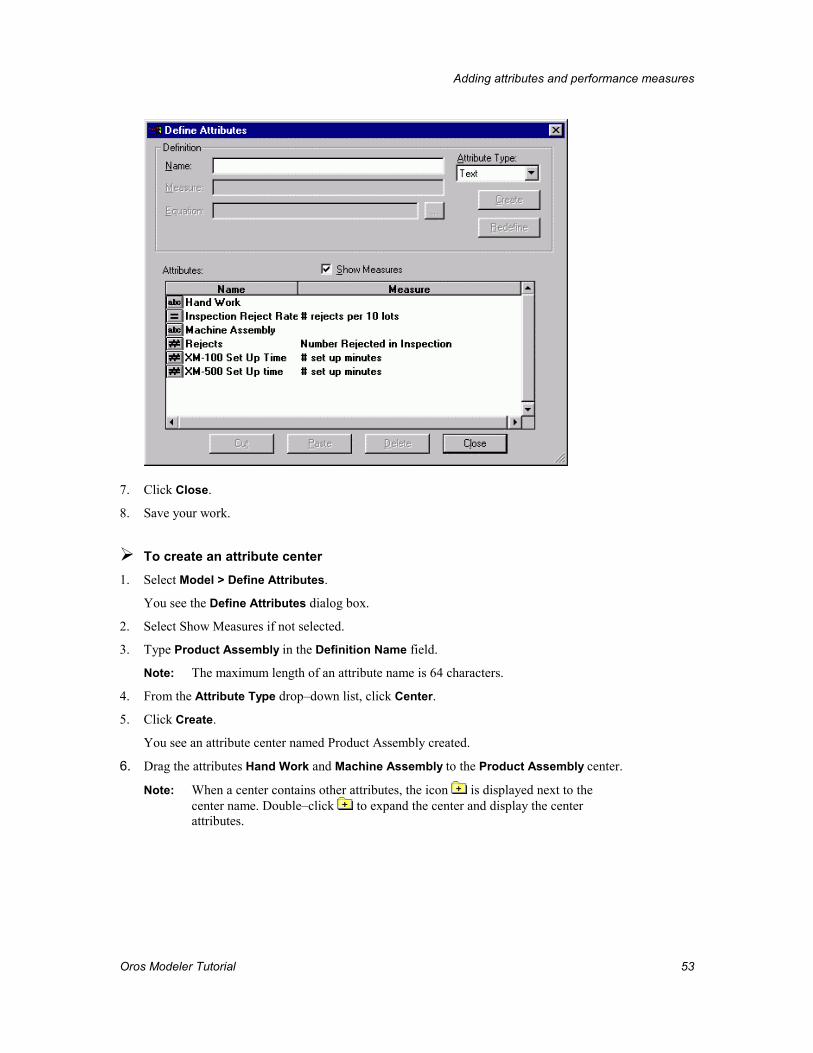
Adding attributes and performance measures
Oros Modeler Tutorial 53
7. Click Close.
8. Save your work.
��To create an attribute center 1. Select Model > Define Attributes.
You see the Define Attributes dialog box.
2. Select Show Measures if not selected.
3. Type Product Assembly in the Definition Name field.
Note: The maximum length of an attribute name is 64 characters.
4. From the Attribute Type drop–down list, click Center.
5. Click Create.
You see an attribute center named Product Assembly created.
6. Drag the attributes Hand Work and Machine Assembly to the Product Assembly center.
Note: When a center contains other attributes, the icon is displayed next to the center name. Double–click to expand the center and display the center attributes.
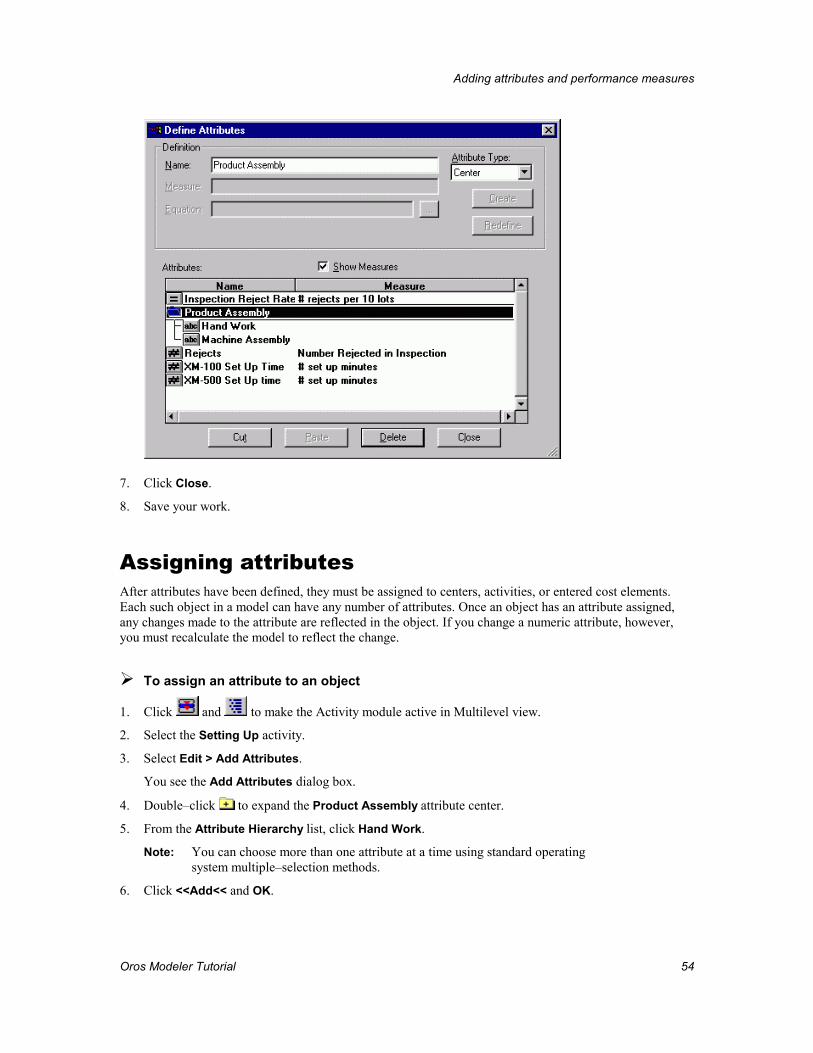
Adding attributes and performance measures
Oros Modeler Tutorial 54
7. Click Close.
8. Save your work.
Assigning attributes After attributes have been defined, they must be assigned to centers, activities, or entered cost elements. Each such object in a model can have any number of attributes. Once an object has an attribute assigned, any changes made to the attribute are reflected in the object. If you change a numeric attribute, however, you must recalculate the model to reflect the change.
��To assign an attribute to an object
1. Click and to make the Activity module active in Multilevel view.
2. Select the Setting Up activity.
3. Select Edit > Add Attributes.
You see the Add Attributes dialog box.
4. Double–click to expand the Product Assembly attribute center.
5. From the Attribute Hierarchy list, click Hand Work.
Note: You can choose more than one attribute at a time using standard operating system multiple–selection methods.
6. Click <<Add<< and OK.
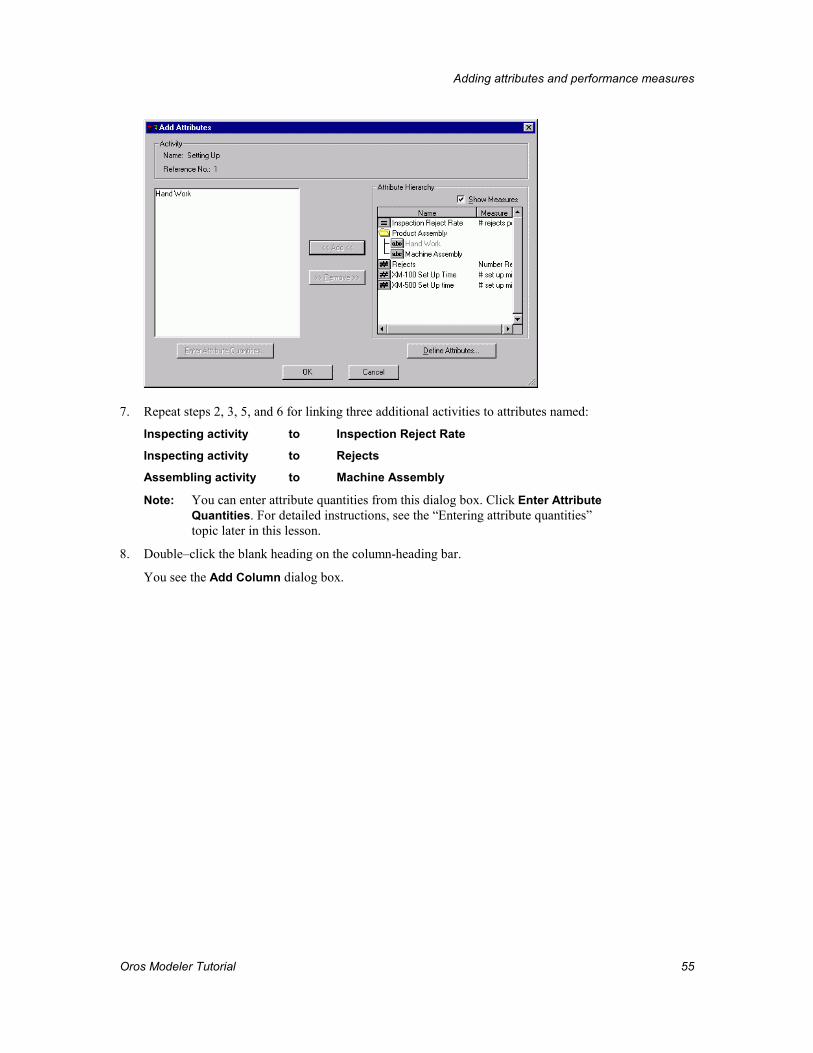
Adding attributes and performance measures
Oros Modeler Tutorial 55
7. Repeat steps 2, 3, 5, and 6 for linking three additional activities to attributes named:
Inspecting activity to Inspection Reject Rate
Inspecting activity to Rejects
Assembling activity to Machine Assembly
Note: You can enter attribute quantities from this dialog box. Click Enter Attribute Quantities. For detailed instructions, see the “Entering attribute quantities” topic later in this lesson.
8. Double–click the blank heading on the column-heading bar.
You see the Add Column dialog box.
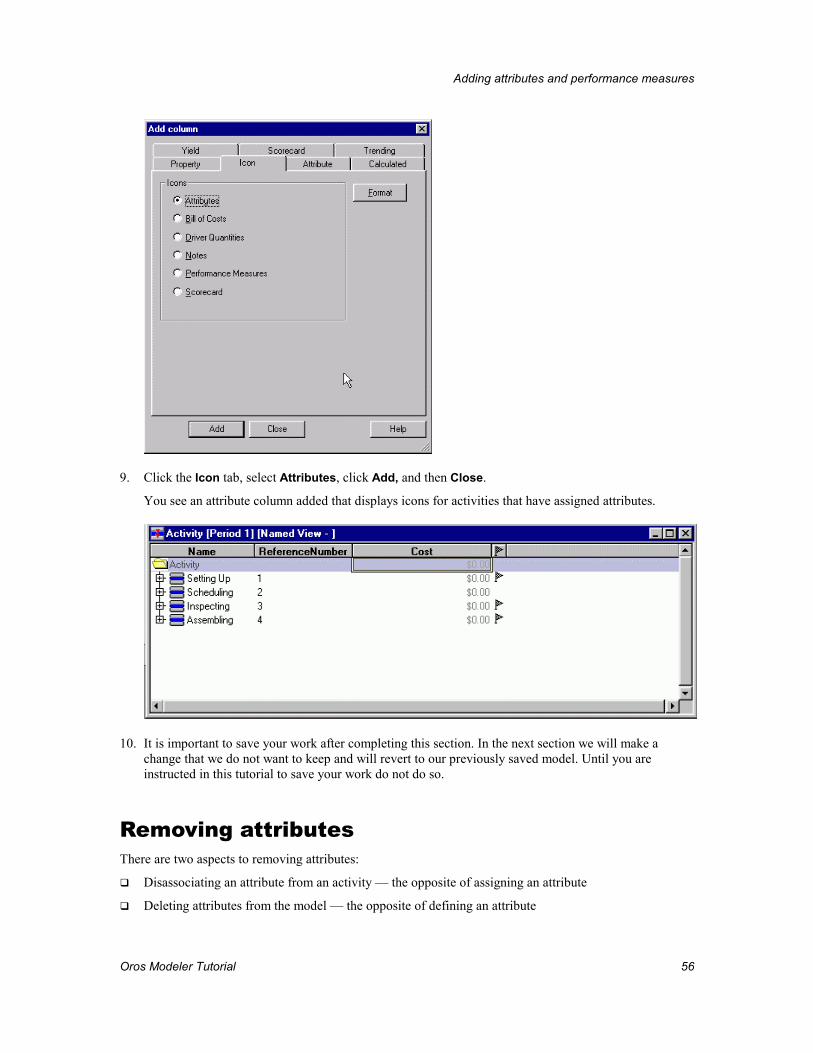
Adding attributes and performance measures
Oros Modeler Tutorial 56
9. Click the Icon tab, select Attributes, click Add, and then Close.
You see an attribute column added that displays icons for activities that have assigned attributes.
10. It is important to save your work after completing this section. In the next section we will make a change that we do not want to keep and will revert to our previously saved model. Until you are instructed in this tutorial to save your work do not do so.
Removing attributes There are two aspects to removing attributes:
�� Disassociating an attribute from an activity — the opposite of assigning an attribute
�� Deleting attributes from the model — the opposite of defining an attribute
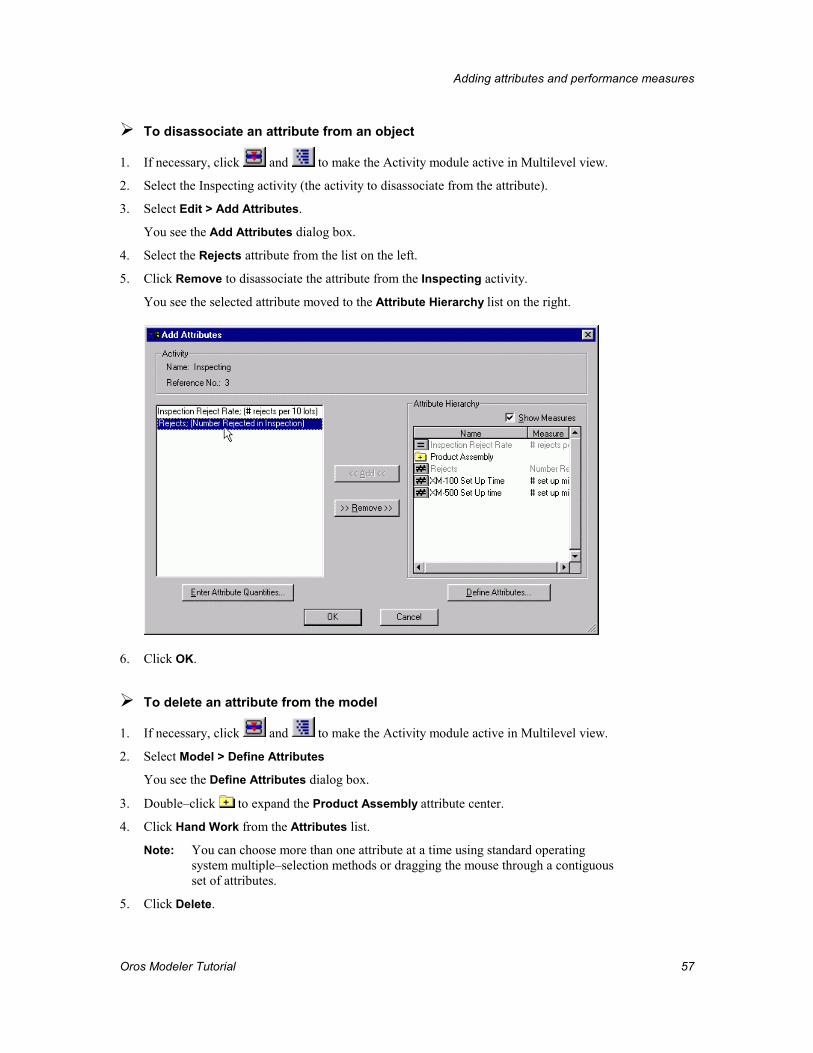
Adding attributes and performance measures
Oros Modeler Tutorial 57
��To disassociate an attribute from an object
1. If necessary, click and to make the Activity module active in Multilevel view.
2. Select the Inspecting activity (the activity to disassociate from the attribute).
3. Select Edit > Add Attributes.
You see the Add Attributes dialog box.
4. Select the Rejects attribute from the list on the left.
5. Click Remove to disassociate the attribute from the Inspecting activity.
You see the selected attribute moved to the Attribute Hierarchy list on the right.
6. Click OK.
��To delete an attribute from the model
1. If necessary, click and to make the Activity module active in Multilevel view.
2. Select Model > Define Attributes
You see the Define Attributes dialog box.
3. Double–click to expand the Product Assembly attribute center.
4. Click Hand Work from the Attributes list.
Note: You can choose more than one attribute at a time using standard operating system multiple–selection methods or dragging the mouse through a contiguous set of attributes.
5. Click Delete.
Adding attributes and performance measures
Oros Modeler Tutorial 58
You will see a message advising you that all uses of the selected attribute will be deleted.
6. Click OK.
You see the selected attribute removed.
7. Click Close to return to the model
��To revert to a previously saved model 1. Let’s assume you didn’t intend to delete the attribute as performed in the previous procedure, so select
File >Revert to Saved.
This action allows you to discard all changes made to the model since it was last saved. You see a message asking if you want to discard all changes made since the model was last saved.
2. Select OK to revert to the previous version.
You see the model close and then the last saved version of the model open.
Note: Remember that you will lose all work performed after the last save so be sure to save often in case you need to use this feature.
Model Periods A Model Period is an interval of time in which activity–based costing data is maintained. A model can hold data for different periods but only one period at a time is active. The real value of model periods is the ability to compare the model data from different periods. For example, you can enter costs into the model on a month–by–month basis and examine the costs for March or change the period and look at other months.
Oros Modeler automatically creates a default period named Period1. This period is intended to hold information that pertains to the entire model and model structure. While individual period data can be stored in Period1, it is more meaningful to store data in customary business intervals of time.
Creating and selecCreating and selecCreating and selecCreating and selecting a model periodting a model periodting a model periodting a model period Tyler Electronics analyzes production cost from quarter to quarter so the model will be structured to analyze quarter–on–quarter cost.
��To create a model period 1. Select Period > Define Periods.
You see the Define Periods dialog box.
2. Type Quarter 1 in the Name field.
3. Click Create.
You see the model period named Quarter 1 added to the Periods list.
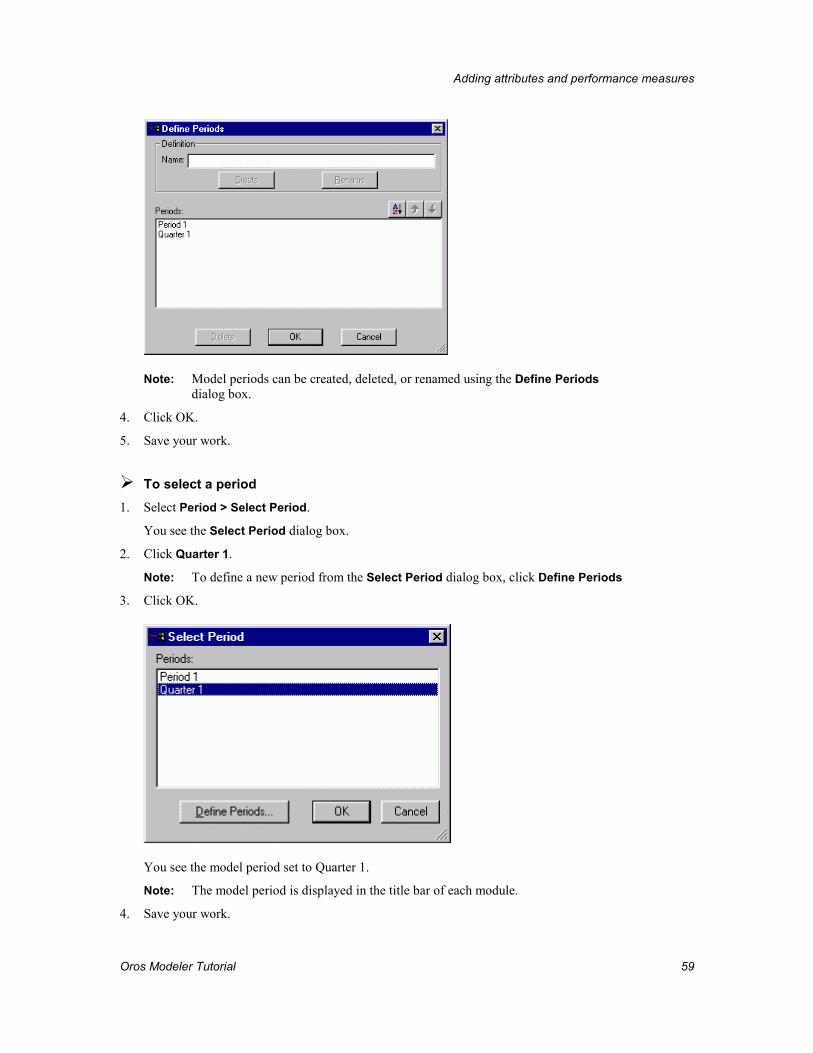
Adding attributes and performance measures
Oros Modeler Tutorial 59
Note: Model periods can be created, deleted, or renamed using the Define Periods dialog box.
4. Click OK.
5. Save your work.
��To select a period 1. Select Period > Select Period.
You see the Select Period dialog box.
2. Click Quarter 1.
Note: To define a new period from the Select Period dialog box, click Define Periods
3. Click OK.
You see the model period set to Quarter 1.
Note: The model period is displayed in the title bar of each module.
4. Save your work.
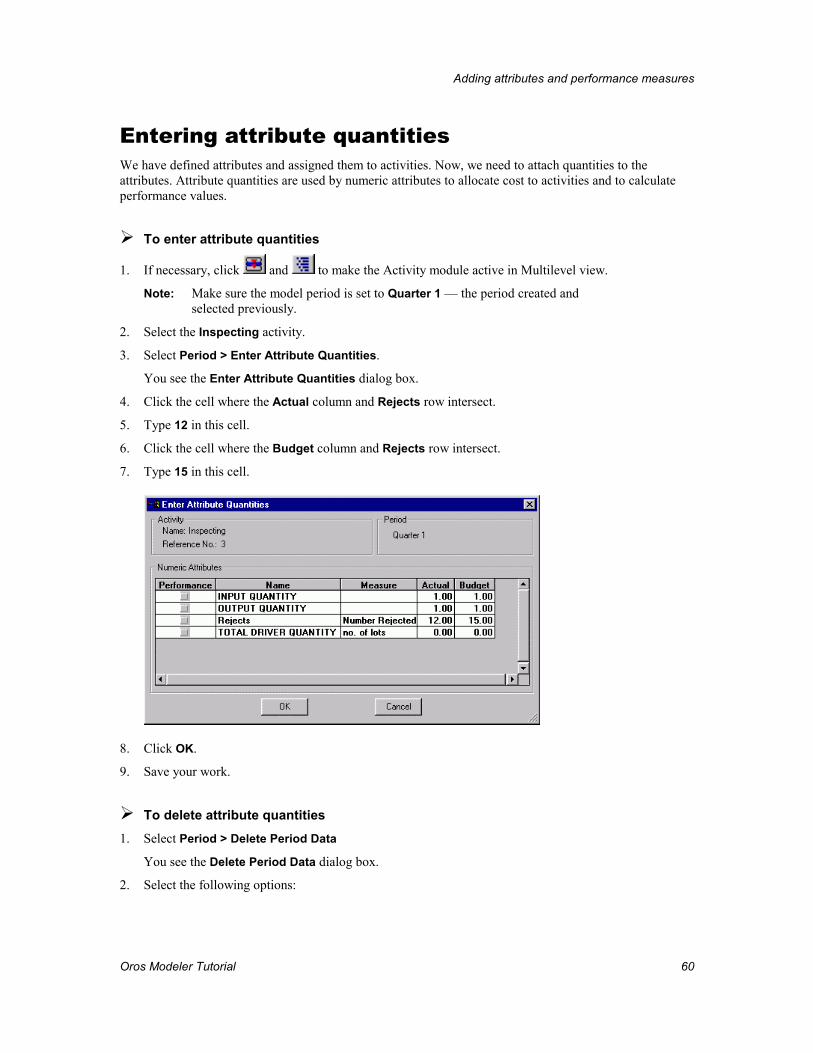
Adding attributes and performance measures
Oros Modeler Tutorial 60
Entering attribute quantities We have defined attributes and assigned them to activities. Now, we need to attach quantities to the attributes. Attribute quantities are used by numeric attributes to allocate cost to activities and to calculate performance values.
��To enter attribute quantities
1. If necessary, click and to make the Activity module active in Multilevel view.
Note: Make sure the model period is set to Quarter 1 — the period created and selected previously.
2. Select the Inspecting activity.
3. Select Period > Enter Attribute Quantities.
You see the Enter Attribute Quantities dialog box.
4. Click the cell where the Actual column and Rejects row intersect.
5. Type 12 in this cell.
6. Click the cell where the Budget column and Rejects row intersect.
7. Type 15 in this cell.
8. Click OK.
9. Save your work.
��To delete attribute quantities 1. Select Period > Delete Period Data
You see the Delete Period Data dialog box.
2. Select the following options:
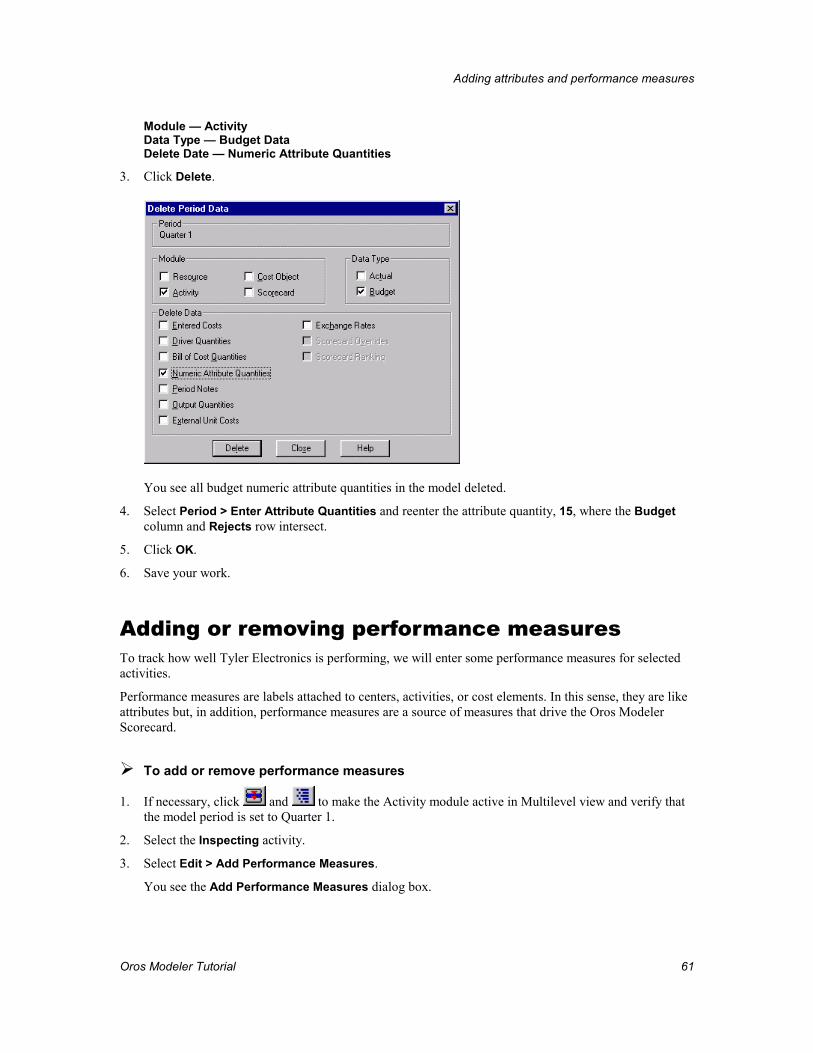
Adding attributes and performance measures
Oros Modeler Tutorial 61
Module — Activity Data Type — Budget Data Delete Date — Numeric Attribute Quantities
3. Click Delete.
You see all budget numeric attribute quantities in the model deleted.
4. Select Period > Enter Attribute Quantities and reenter the attribute quantity, 15, where the Budget column and Rejects row intersect.
5. Click OK.
6. Save your work.
Adding or removing performance measures To track how well Tyler Electronics is performing, we will enter some performance measures for selected activities.
Performance measures are labels attached to centers, activities, or cost elements. In this sense, they are like attributes but, in addition, performance measures are a source of measures that drive the Oros Modeler Scorecard.
��To add or remove performance measures
1. If necessary, click and to make the Activity module active in Multilevel view and verify that the model period is set to Quarter 1.
2. Select the Inspecting activity.
3. Select Edit > Add Performance Measures.
You see the Add Performance Measures dialog box.
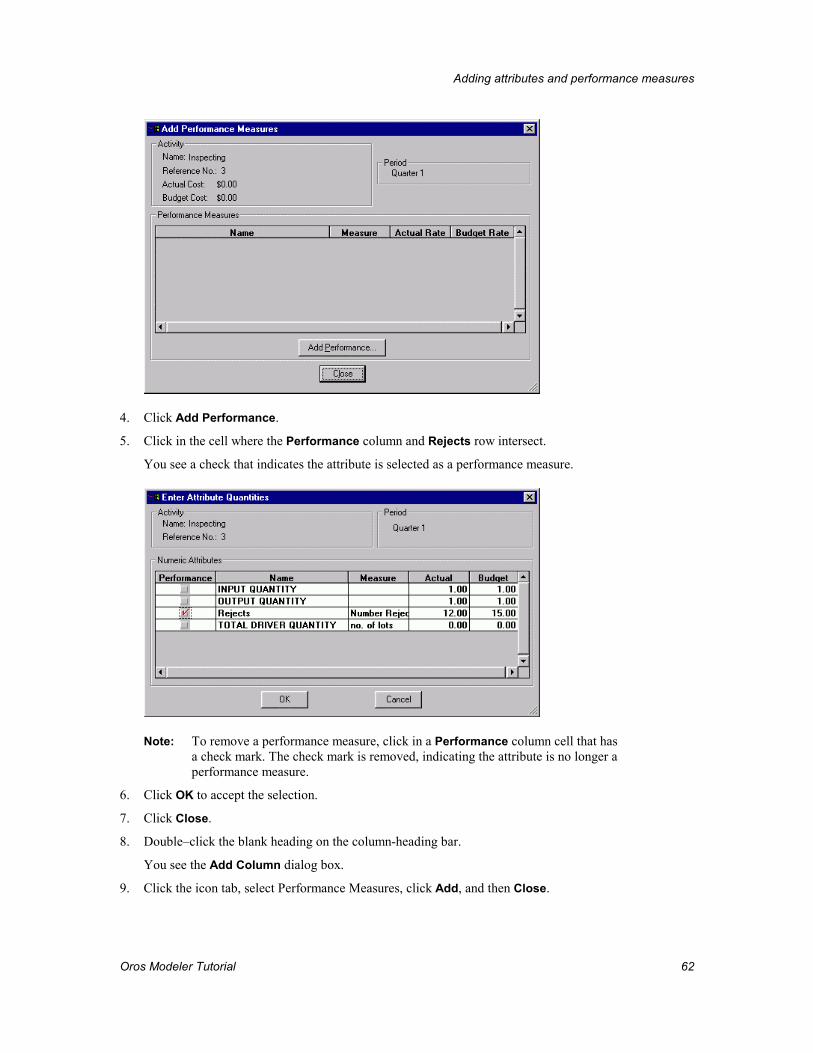
Adding attributes and performance measures
Oros Modeler Tutorial 62
4. Click Add Performance.
5. Click in the cell where the Performance column and Rejects row intersect.
You see a check that indicates the attribute is selected as a performance measure.
Note: To remove a performance measure, click in a Performance column cell that has a check mark. The check mark is removed, indicating the attribute is no longer a performance measure.
6. Click OK to accept the selection.
7. Click Close.
8. Double–click the blank heading on the column-heading bar.
You see the Add Column dialog box.
9. Click the icon tab, select Performance Measures, click Add, and then Close.
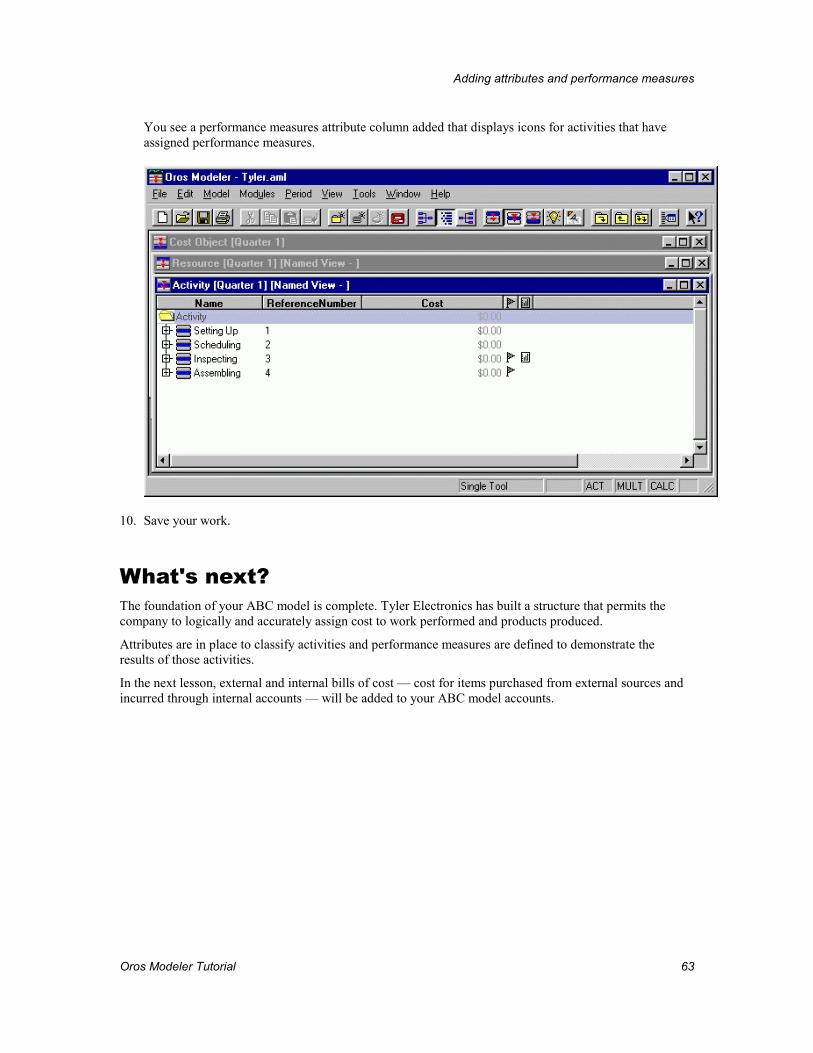
Adding attributes and performance measures
Oros Modeler Tutorial 63
You see a performance measures attribute column added that displays icons for activities that have assigned performance measures.
10. Save your work.
What's next? The foundation of your ABC model is complete. Tyler Electronics has built a structure that permits the company to logically and accurately assign cost to work performed and products produced.
Attributes are in place to classify activities and performance measures are defined to demonstrate the results of those activities.
In the next lesson, external and internal bills of cost — cost for items purchased from external sources and incurred through internal accounts — will be added to your ABC model accounts.
Oros Modeler Tutorial 64
Adding bills of cost
Not all costs assigned through an activity–based management model come from the general ledger. For example, material cost (the cost of purchased components) often comes from a Materials Requirements Planning (MRP) system. The Bill of Cost feature provides a way to add material and unit cost directly to accounts when implementing activity–based accounting.
In this lesson, we discuss:
�� What a Bill of Cost is
�� Using bills of cost
�� Internal and external bills and units
�� Creating and attaching external and internal units and bills of cost
�� Displaying or concealing bills of cost in views, calculations, and reports
What is a Bill of Cost Bills of cost are common to process-manufacturing activities. A Bill of Cost for an activity lists all the materials added at that step in the process. By adding material costs to activities that consume them, you can trace the cost of waste, as well as finished products, more accurately.
Bills of material exist in many discrete manufacturing environments. A Bill of Material can be a list of the components that make up the product, the number of units needed for the product, and the unit cost for each component.
Using Bill of Cost information, Oros Modeler calculates the cost of all the materials or components contributing to a product or process.
Oros Modeler does not reconcile the number of units used in a period with the number of units produced and remaining in inventory. However, the unit usage report lists all of the items that use each unit, and the number used, during the period. This report can be used in conjunction with an inventory control system.
Using bills of cost Bills of costs are used to find the resources consumed by an activity and consist of external or internal units. Bills of cost are used when:
�� Costs outside the general ledger must be introduced into the model.
�� Unit costs associated with product families must be tracked.
�� The cost structure of an account is incomplete in some respect.
Adding bills of cost
Oros Modeler Tutorial 65
Each Cost Property is defined with a list of internal and external units added to any account.
Internal and external bills and units In discrete-manufacturing environments, many products are components of other products. These “internal units,” produced by the company, can be used in any Bill of Cost. Units purchased by the company, with costs maintained outside the model, are used as “external units” in a Bill of Cost.
These internal and external units are another type of cost element in addition to entered and assigned cost elements.
Oros Modeler includes the unit cost contribution for an account when calculating the total account cost for a period.
Note: If your software package does not include the ABC/M solution, you will be unable to calculate the internal Bills of Cost as described in this lesson or to flow costs through your model.
Creating and attaching external and internal units and bills of cost Once you have the information for the external and internal units, you can add the external units to an account as a Bill of Cost. First, make a list of external units available to the whole model for example, the required raw materials for each product. Then select units from the list for use as a Bill of Cost to be attached to an account.
��To create external units 1. Select Model > Define External Units.
You see the Define External Units dialog box.
2. Click Create.
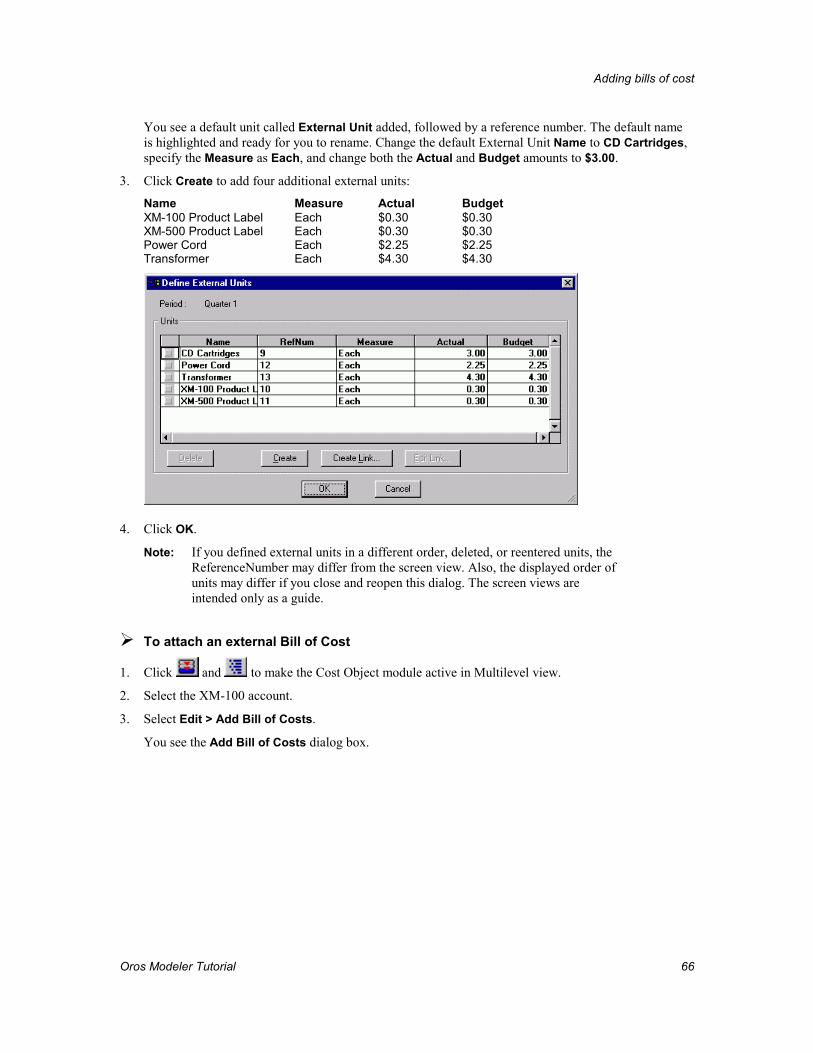
Adding bills of cost
Oros Modeler Tutorial 66
You see a default unit called External Unit added, followed by a reference number. The default name is highlighted and ready for you to rename. Change the default External Unit Name to CD Cartridges, specify the Measure as Each, and change both the Actual and Budget amounts to $3.00.
3. Click Create to add four additional external units:
Name Measure Actual Budget XM-100 Product Label Each $0.30 $0.30 XM-500 Product Label Each $0.30 $0.30 Power Cord Each $2.25 $2.25 Transformer Each $4.30 $4.30
4. Click OK.
Note: If you defined external units in a different order, deleted, or reentered units, the ReferenceNumber may differ from the screen view. Also, the displayed order of units may differ if you close and reopen this dialog. The screen views are intended only as a guide.
��To attach an external Bill of Cost
1. Click and to make the Cost Object module active in Multilevel view.
2. Select the XM-100 account.
3. Select Edit > Add Bill of Costs.
You see the Add Bill of Costs dialog box.
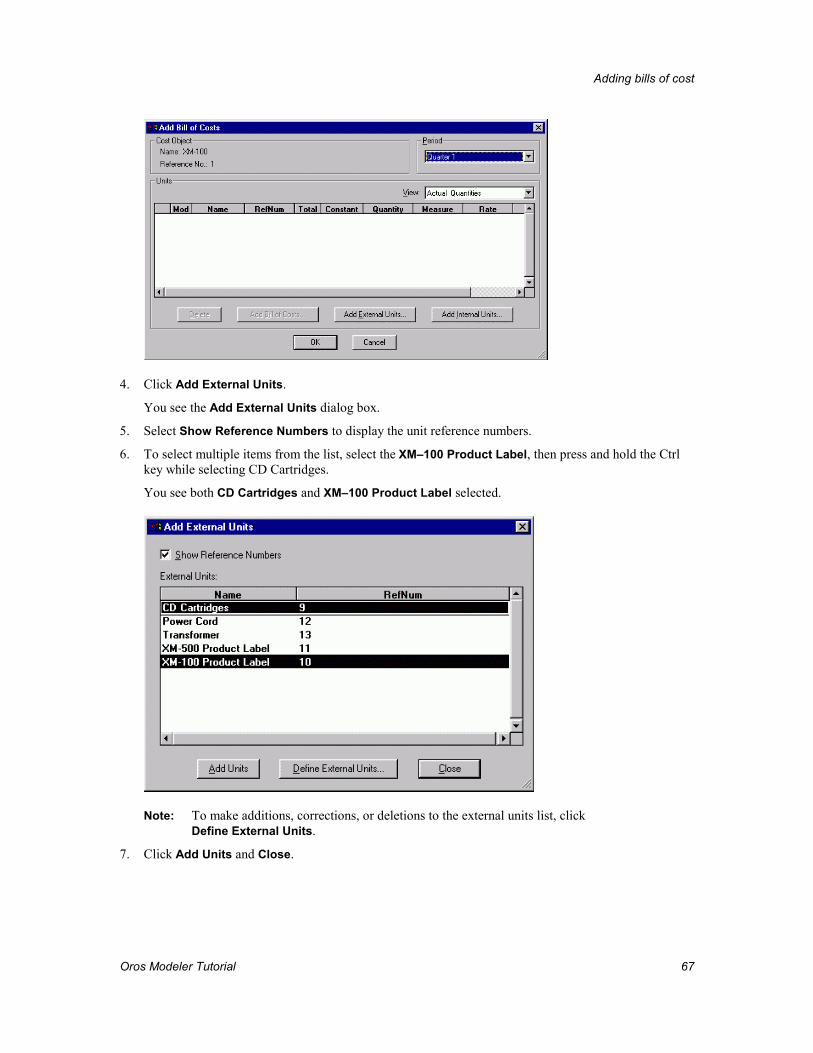
Adding bills of cost
Oros Modeler Tutorial 67
4. Click Add External Units.
You see the Add External Units dialog box.
5. Select Show Reference Numbers to display the unit reference numbers.
6. To select multiple items from the list, select the XM–100 Product Label, then press and hold the Ctrl key while selecting CD Cartridges.
You see both CD Cartridges and XM–100 Product Label selected.
Note: To make additions, corrections, or deletions to the external units list, click Define External Units.
7. Click Add Units and Close.
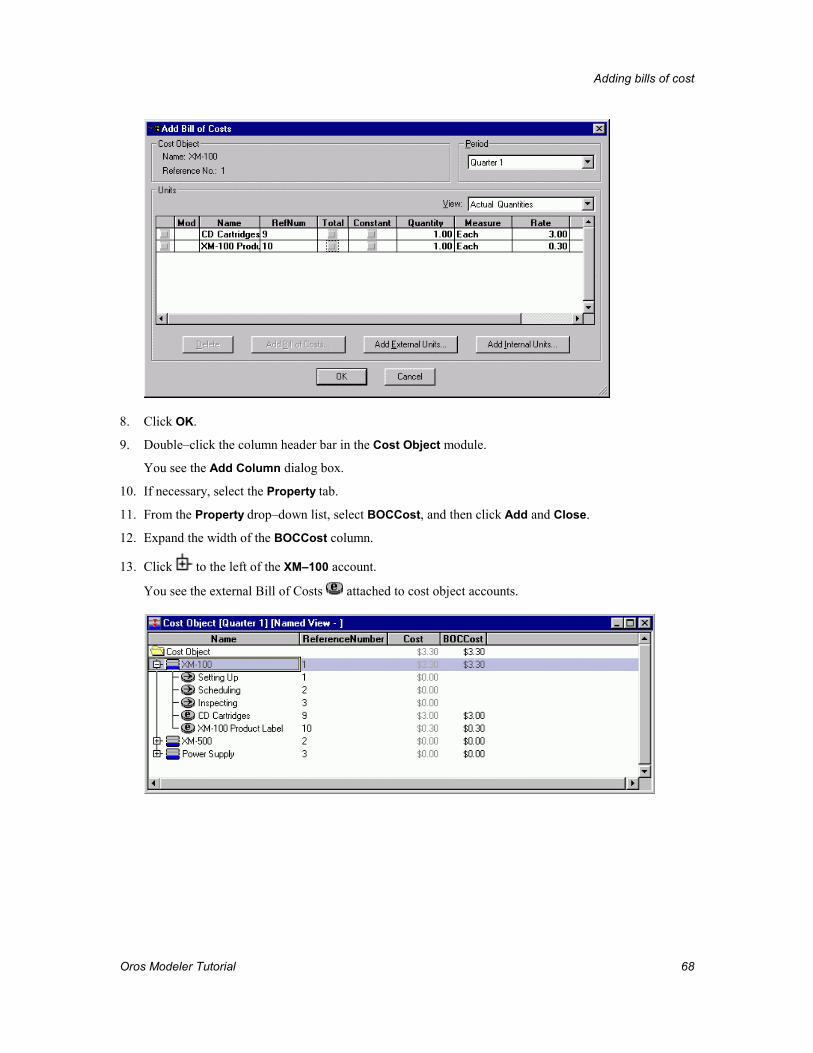
Adding bills of cost
Oros Modeler Tutorial 68
8. Click OK.
9. Double–click the column header bar in the Cost Object module.
You see the Add Column dialog box.
10. If necessary, select the Property tab.
11. From the Property drop–down list, select BOCCost, and then click Add and Close.
12. Expand the width of the BOCCost column.
13. Click to the left of the XM–100 account.
You see the external Bill of Costs attached to cost object accounts.
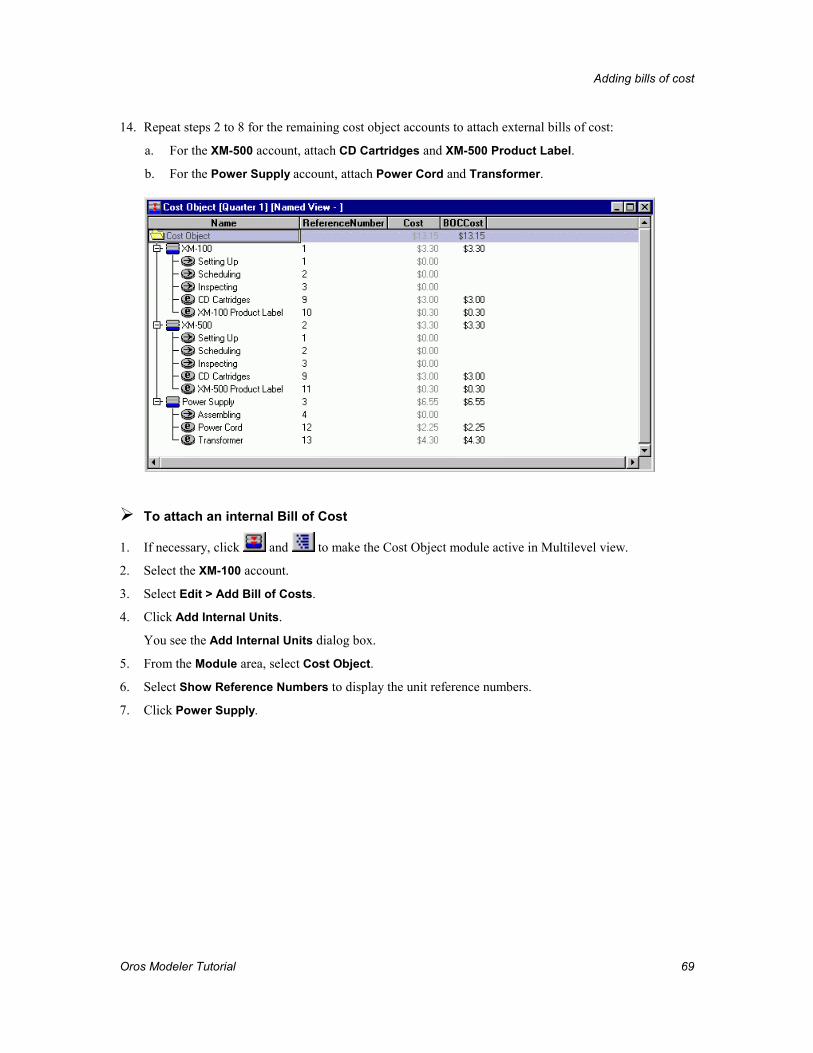
Adding bills of cost
Oros Modeler Tutorial 69
14. Repeat steps 2 to 8 for the remaining cost object accounts to attach external bills of cost:
a. For the XM-500 account, attach CD Cartridges and XM-500 Product Label.
b. For the Power Supply account, attach Power Cord and Transformer.
��To attach an internal Bill of Cost
1. If necessary, click and to make the Cost Object module active in Multilevel view.
2. Select the XM-100 account.
3. Select Edit > Add Bill of Costs.
4. Click Add Internal Units.
You see the Add Internal Units dialog box.
5. From the Module area, select Cost Object.
6. Select Show Reference Numbers to display the unit reference numbers.
7. Click Power Supply.
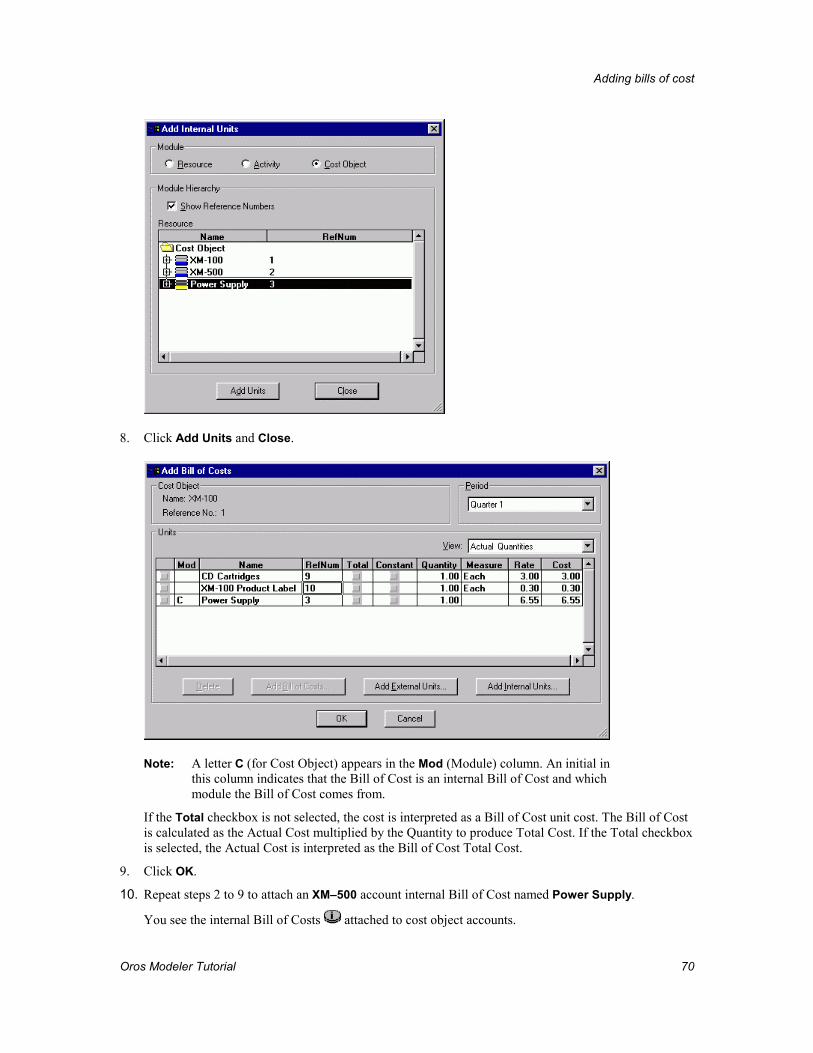
Adding bills of cost
Oros Modeler Tutorial 70
8. Click Add Units and Close.
Note: A letter C (for Cost Object) appears in the Mod (Module) column. An initial in this column indicates that the Bill of Cost is an internal Bill of Cost and which module the Bill of Cost comes from.
If the Total checkbox is not selected, the cost is interpreted as a Bill of Cost unit cost. The Bill of Cost is calculated as the Actual Cost multiplied by the Quantity to produce Total Cost. If the Total checkbox is selected, the Actual Cost is interpreted as the Bill of Cost Total Cost.
9. Click OK.
10. Repeat steps 2 to 9 to attach an XM–500 account internal Bill of Cost named Power Supply.
You see the internal Bill of Costs attached to cost object accounts.
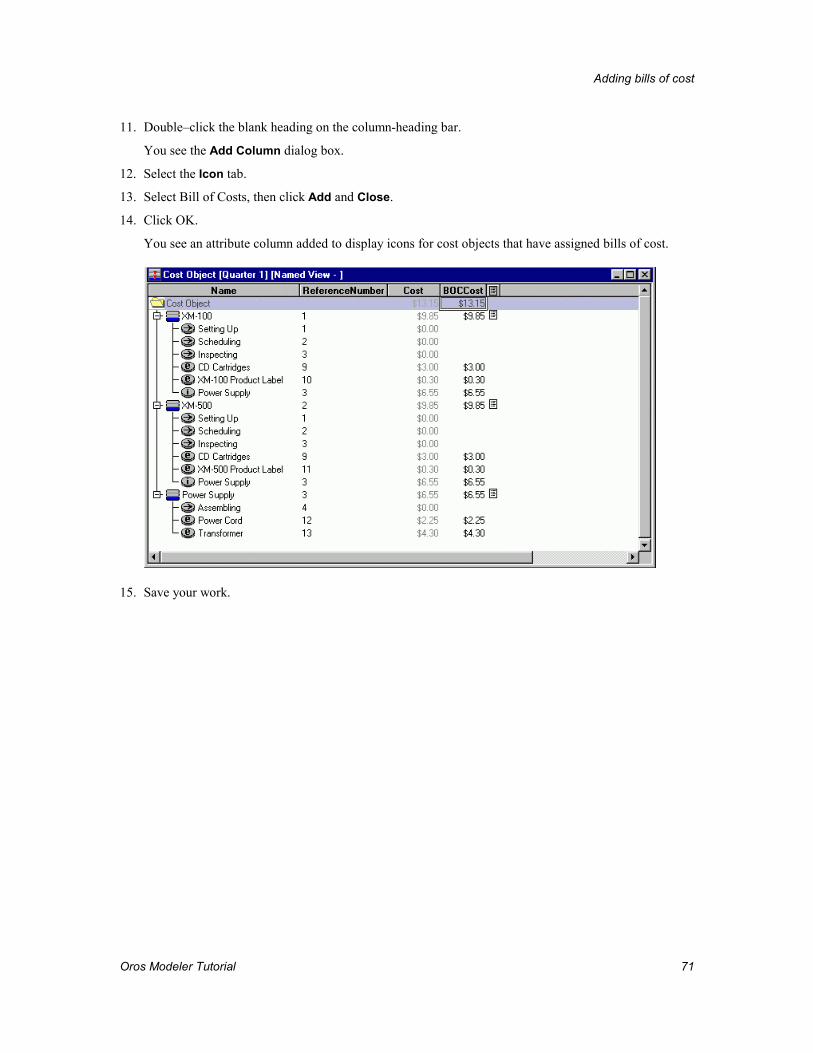
Adding bills of cost
Oros Modeler Tutorial 71
11. Double–click the blank heading on the column-heading bar.
You see the Add Column dialog box.
12. Select the Icon tab.
13. Select Bill of Costs, then click Add and Close.
14. Click OK.
You see an attribute column added to display icons for cost objects that have assigned bills of cost.
15. Save your work.
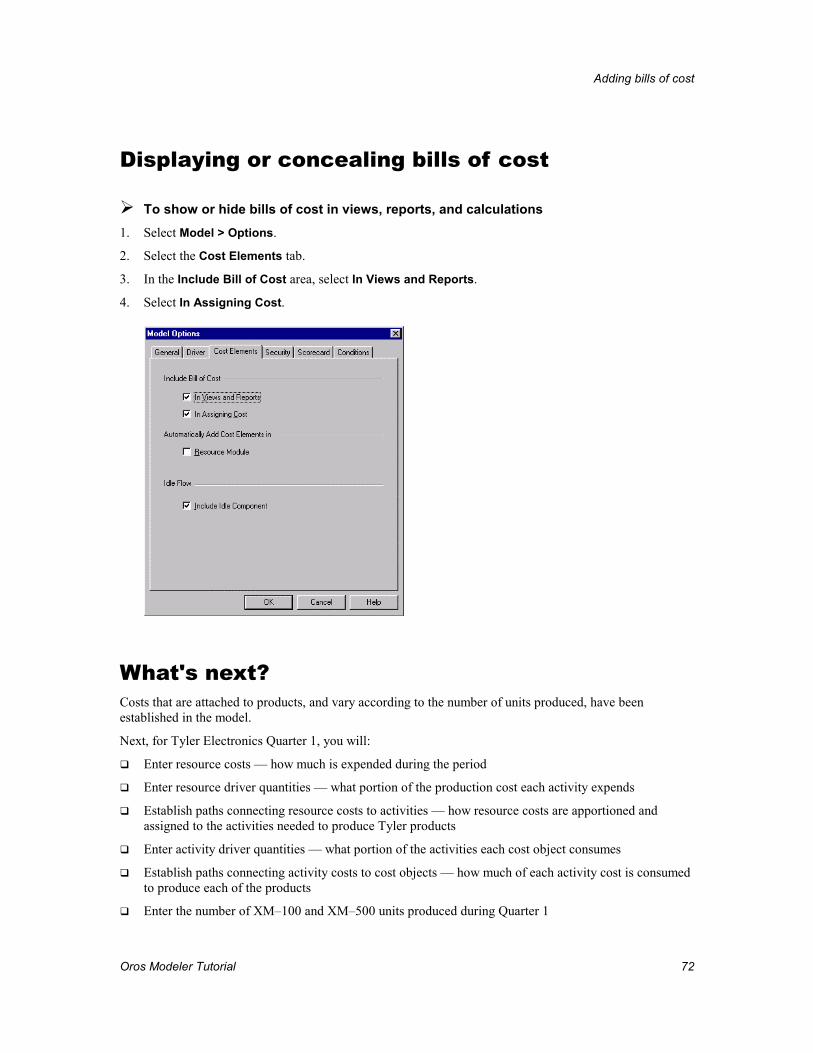
Adding bills of cost
Oros Modeler Tutorial 72
Displaying or concealing bills of cost
��To show or hide bills of cost in views, reports, and calculations 1. Select Model > Options.
2. Select the Cost Elements tab.
3. In the Include Bill of Cost area, select In Views and Reports.
4. Select In Assigning Cost.
What's next? Costs that are attached to products, and vary according to the number of units produced, have been established in the model.
Next, for Tyler Electronics Quarter 1, you will:
�� Enter resource costs — how much is expended during the period
�� Enter resource driver quantities — what portion of the production cost each activity expends
�� Establish paths connecting resource costs to activities — how resource costs are apportioned and assigned to the activities needed to produce Tyler products
�� Enter activity driver quantities — what portion of the activities each cost object consumes
�� Establish paths connecting activity costs to cost objects — how much of each activity cost is consumed to produce each of the products
�� Enter the number of XM–100 and XM–500 units produced during Quarter 1
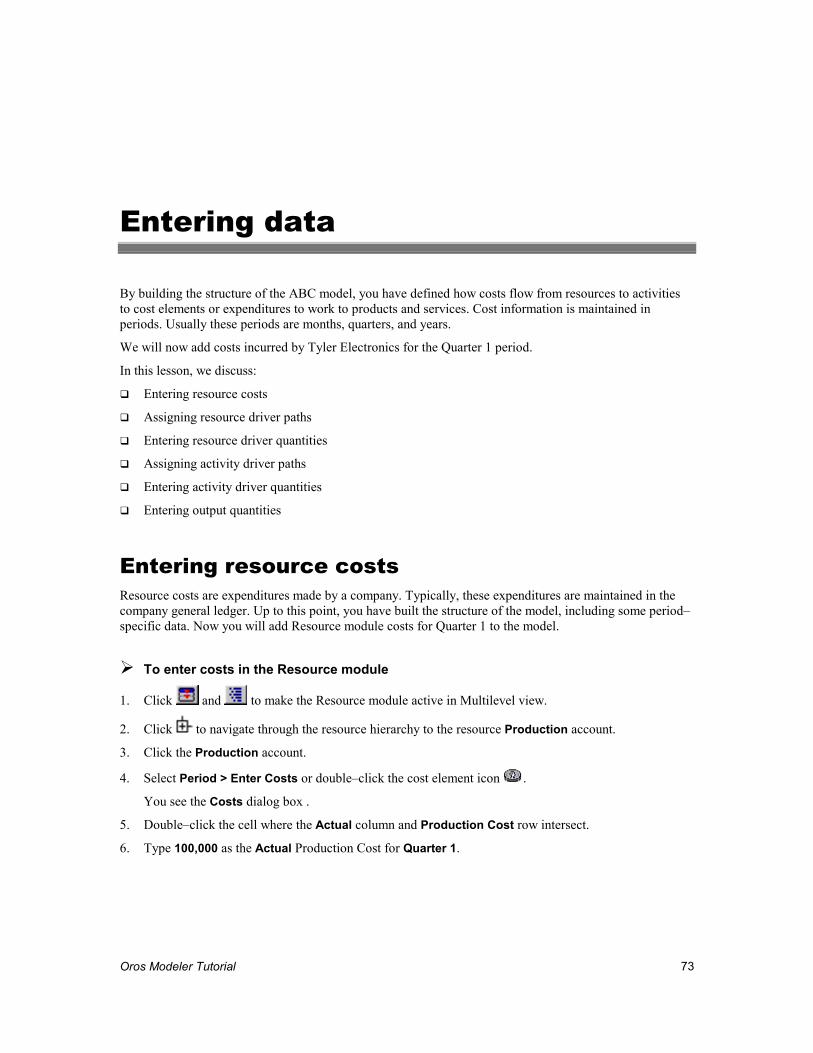
Oros Modeler Tutorial 73
Entering data
By building the structure of the ABC model, you have defined how costs flow from resources to activities to cost elements or expenditures to work to products and services. Cost information is maintained in periods. Usually these periods are months, quarters, and years.
We will now add costs incurred by Tyler Electronics for the Quarter 1 period.
In this lesson, we discuss:
�� Entering resource costs
�� Assigning resource driver paths
�� Entering resource driver quantities
�� Assigning activity driver paths
�� Entering activity driver quantities
�� Entering output quantities
Entering resource costs Resource costs are expenditures made by a company. Typically, these expenditures are maintained in the company general ledger. Up to this point, you have built the structure of the model, including some period–specific data. Now you will add Resource module costs for Quarter 1 to the model.
��To enter costs in the Resource module
1. Click and to make the Resource module active in Multilevel view.
2. Click to navigate through the resource hierarchy to the resource Production account.
3. Click the Production account.
4. Select Period > Enter Costs or double–click the cost element icon .
You see the Costs dialog box .
5. Double–click the cell where the Actual column and Production Cost row intersect.
6. Type 100,000 as the Actual Production Cost for Quarter 1.
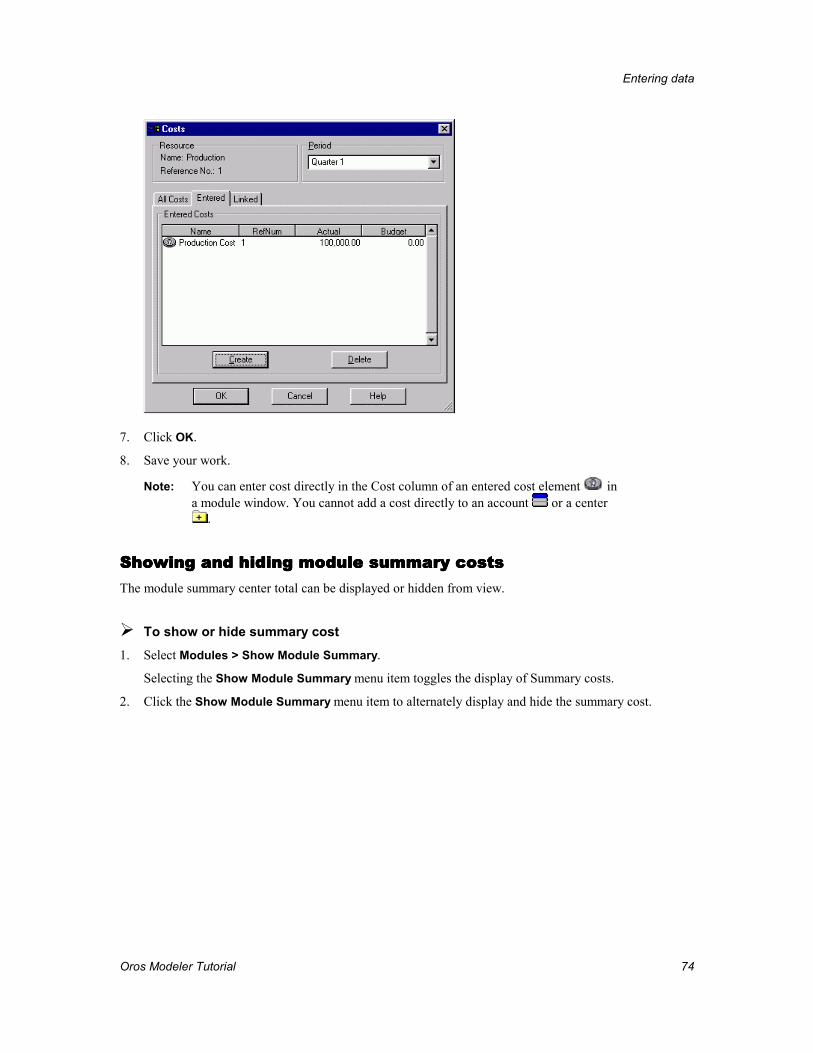
Entering data
Oros Modeler Tutorial 74
7. Click OK.
8. Save your work.
Note: You can enter cost directly in the Cost column of an entered cost element in a module window. You cannot add a cost directly to an account or a center
.
Showing and hiding Showing and hiding Showing and hiding Showing and hiding module summary costsmodule summary costsmodule summary costsmodule summary costs The module summary center total can be displayed or hidden from view.
��To show or hide summary cost 1. Select Modules > Show Module Summary.
Selecting the Show Module Summary menu item toggles the display of Summary costs.
2. Click the Show Module Summary menu item to alternately display and hide the summary cost.
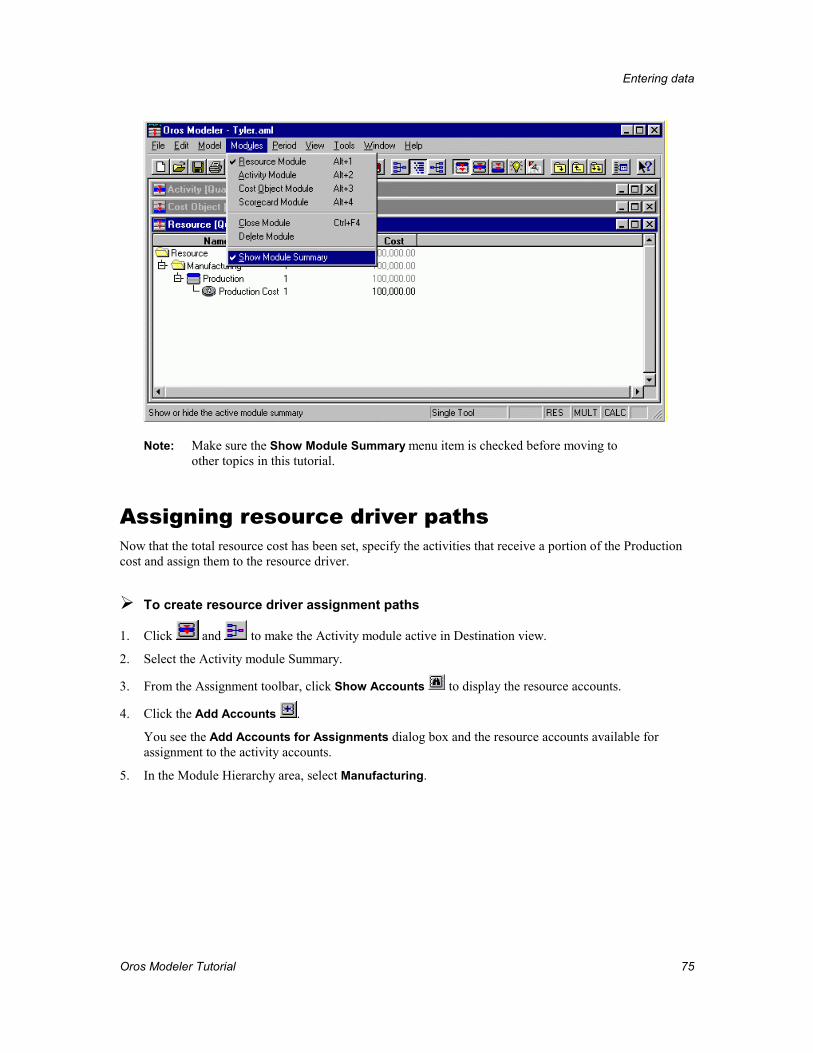
Entering data
Oros Modeler Tutorial 75
Note: Make sure the Show Module Summary menu item is checked before moving to other topics in this tutorial.
Assigning resource driver paths Now that the total resource cost has been set, specify the activities that receive a portion of the Production cost and assign them to the resource driver.
��To create resource driver assignment paths
1. Click and to make the Activity module active in Destination view.
2. Select the Activity module Summary.
3. From the Assignment toolbar, click Show Accounts to display the resource accounts.
4. Click the Add Accounts .
You see the Add Accounts for Assignments dialog box and the resource accounts available for assignment to the activity accounts.
5. In the Module Hierarchy area, select Manufacturing.
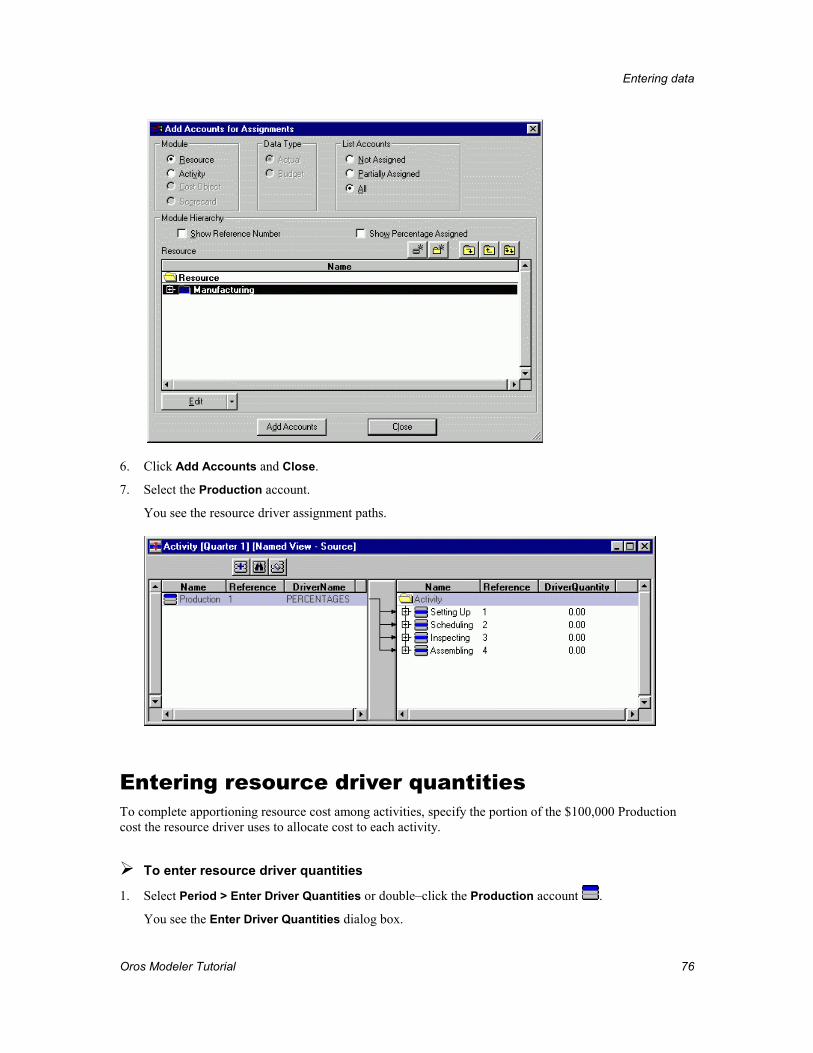
Entering data
Oros Modeler Tutorial 76
6. Click Add Accounts and Close.
7. Select the Production account.
You see the resource driver assignment paths.
Entering resource driver quantities To complete apportioning resource cost among activities, specify the portion of the $100,000 Production cost the resource driver uses to allocate cost to each activity.
��To enter resource driver quantities
1. Select Period > Enter Driver Quantities or double–click the Production account .
You see the Enter Driver Quantities dialog box.
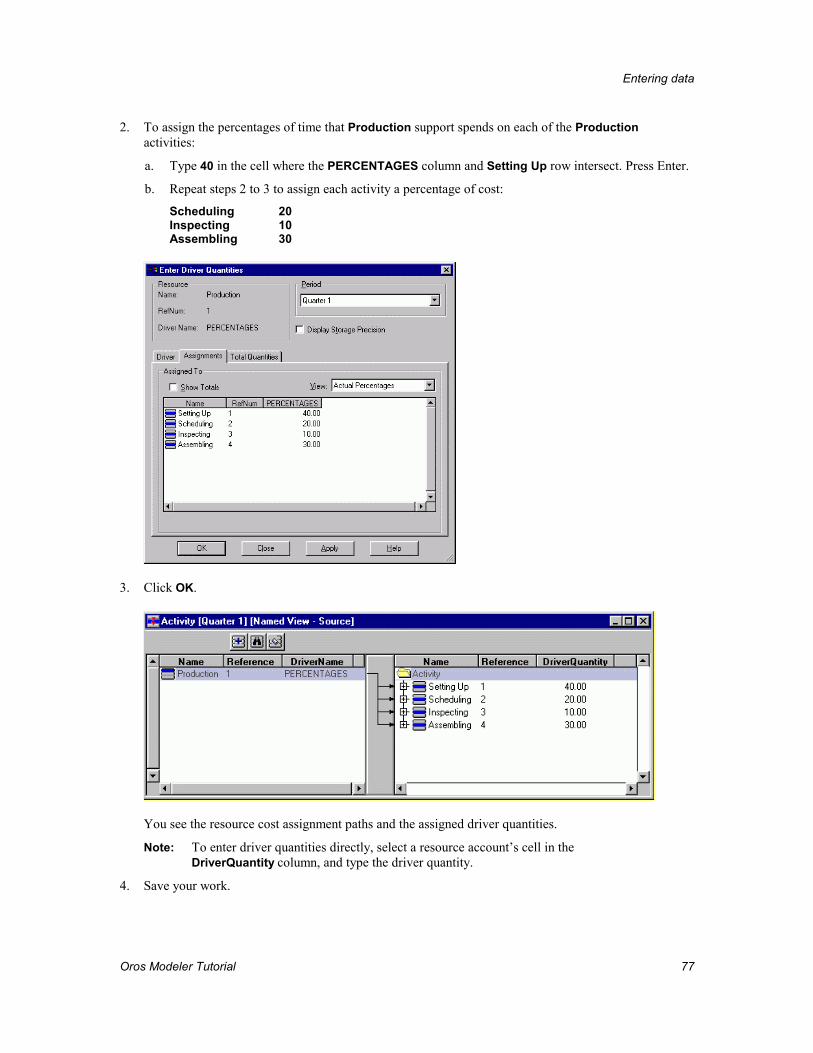
Entering data
Oros Modeler Tutorial 77
2. To assign the percentages of time that Production support spends on each of the Production activities:
a. Type 40 in the cell where the PERCENTAGES column and Setting Up row intersect. Press Enter.
b. Repeat steps 2 to 3 to assign each activity a percentage of cost:
Scheduling 20 Inspecting 10 Assembling 30
3. Click OK.
You see the resource cost assignment paths and the assigned driver quantities.
Note: To enter driver quantities directly, select a resource account’s cell in the DriverQuantity column, and type the driver quantity.
4. Save your work.
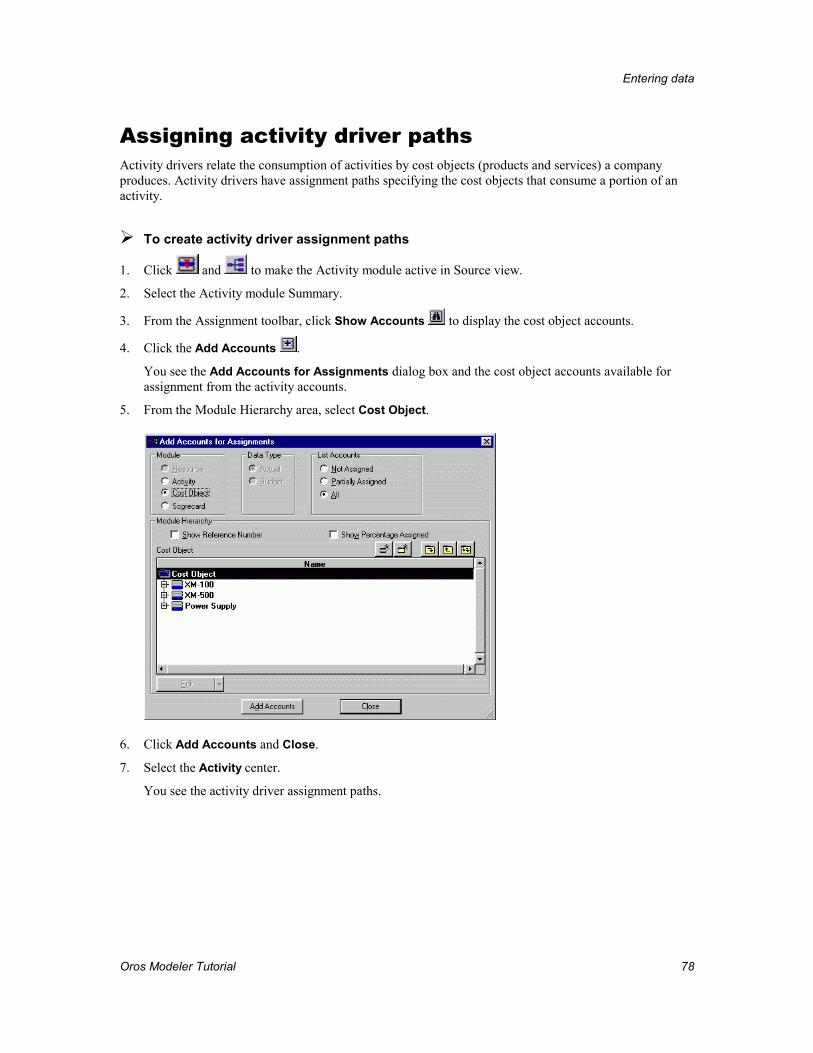
Entering data
Oros Modeler Tutorial 78
Assigning activity driver paths Activity drivers relate the consumption of activities by cost objects (products and services) a company produces. Activity drivers have assignment paths specifying the cost objects that consume a portion of an activity.
��To create activity driver assignment paths
1. Click and to make the Activity module active in Source view.
2. Select the Activity module Summary.
3. From the Assignment toolbar, click Show Accounts to display the cost object accounts.
4. Click the Add Accounts .
You see the Add Accounts for Assignments dialog box and the cost object accounts available for assignment from the activity accounts.
5. From the Module Hierarchy area, select Cost Object.
6. Click Add Accounts and Close.
7. Select the Activity center.
You see the activity driver assignment paths.
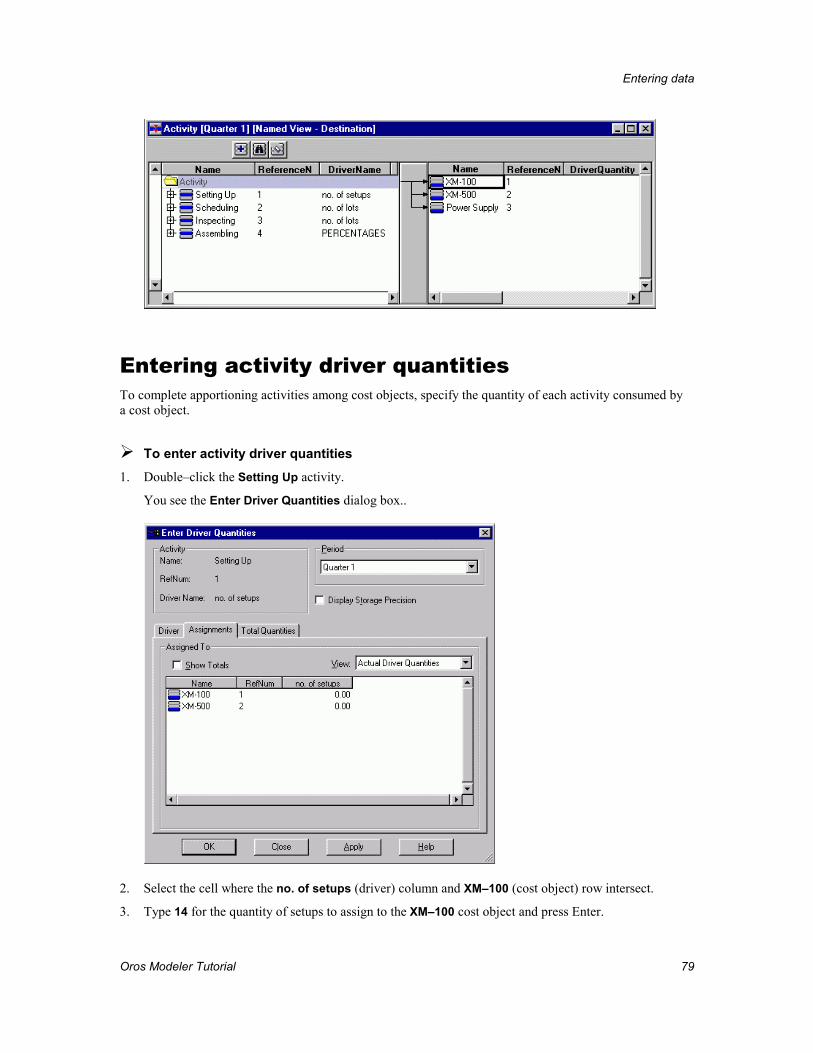
Entering data
Oros Modeler Tutorial 79
Entering activity driver quantities To complete apportioning activities among cost objects, specify the quantity of each activity consumed by a cost object.
��To enter activity driver quantities 1. Double–click the Setting Up activity.
You see the Enter Driver Quantities dialog box..
2. Select the cell where the no. of setups (driver) column and XM–100 (cost object) row intersect.
3. Type 14 for the quantity of setups to assign to the XM–100 cost object and press Enter.
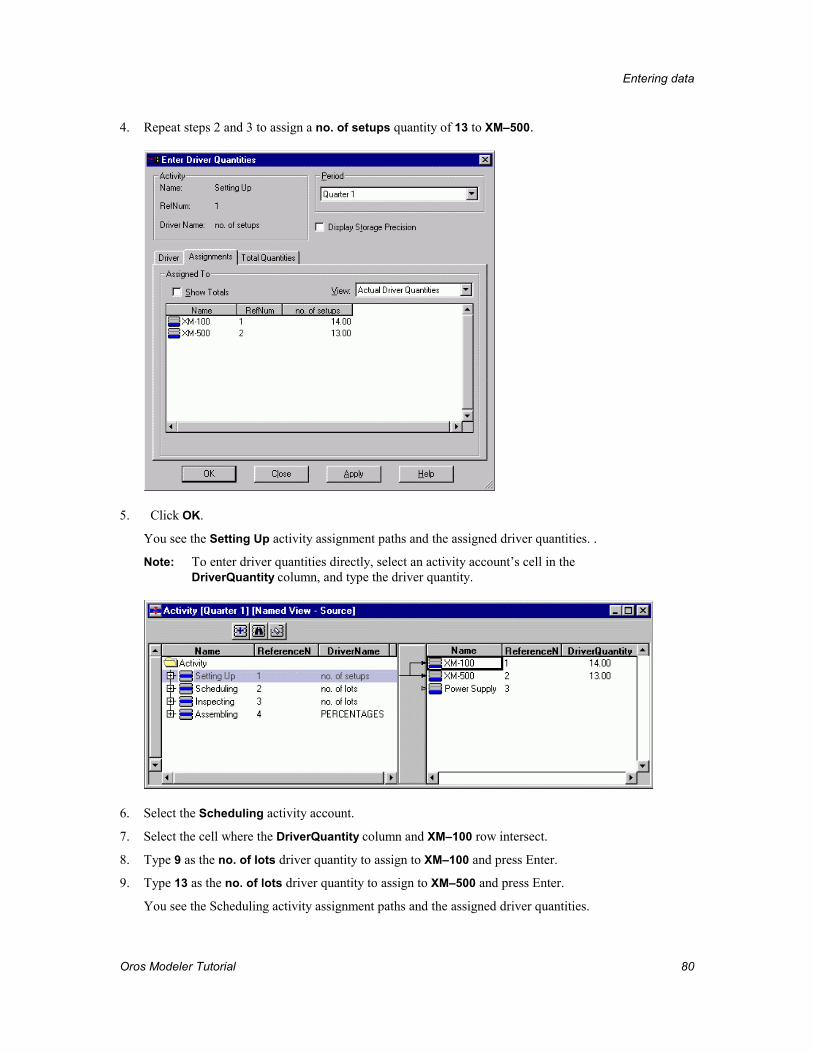
Entering data
Oros Modeler Tutorial 80
4. Repeat steps 2 and 3 to assign a no. of setups quantity of 13 to XM–500.
5. Click OK.
You see the Setting Up activity assignment paths and the assigned driver quantities. .
Note: To enter driver quantities directly, select an activity account’s cell in the DriverQuantity column, and type the driver quantity.
6. Select the Scheduling activity account.
7. Select the cell where the DriverQuantity column and XM–100 row intersect.
8. Type 9 as the no. of lots driver quantity to assign to XM–100 and press Enter.
9. Type 13 as the no. of lots driver quantity to assign to XM–500 and press Enter.
You see the Scheduling activity assignment paths and the assigned driver quantities.
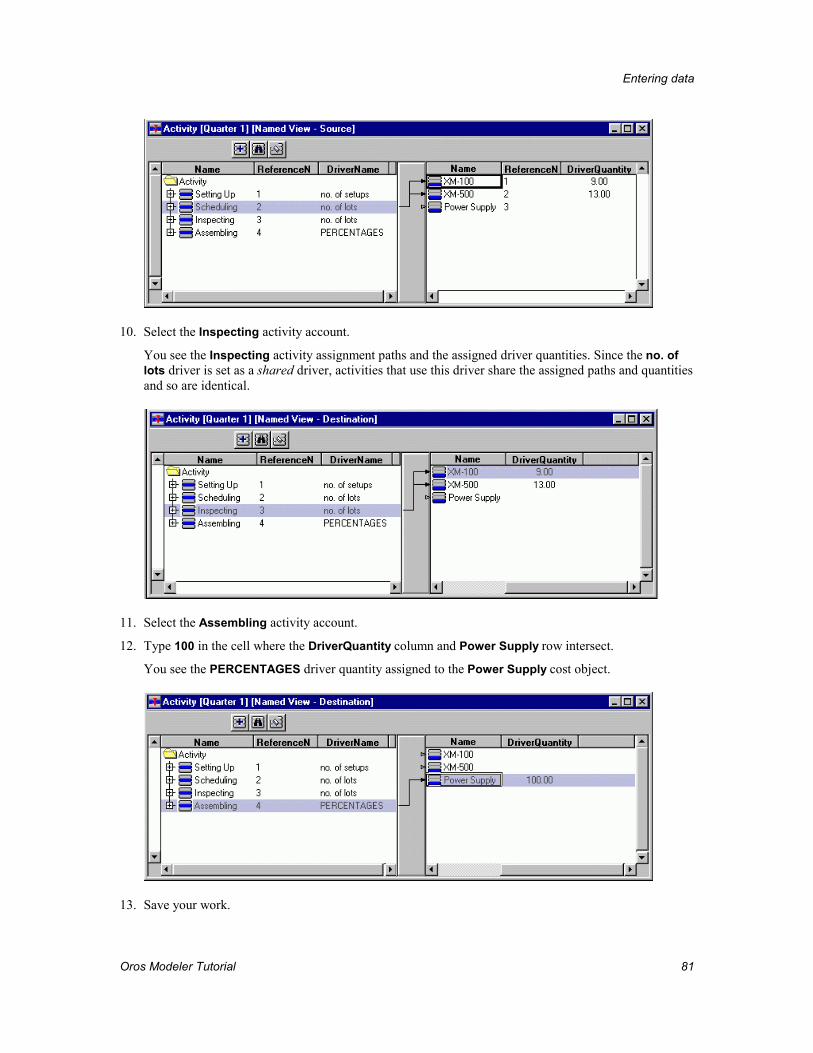
Entering data
Oros Modeler Tutorial 81
10. Select the Inspecting activity account.
You see the Inspecting activity assignment paths and the assigned driver quantities. Since the no. of lots driver is set as a shared driver, activities that use this driver share the assigned paths and quantities and so are identical.
11. Select the Assembling activity account.
12. Type 100 in the cell where the DriverQuantity column and Power Supply row intersect.
You see the PERCENTAGES driver quantity assigned to the Power Supply cost object.
13. Save your work.
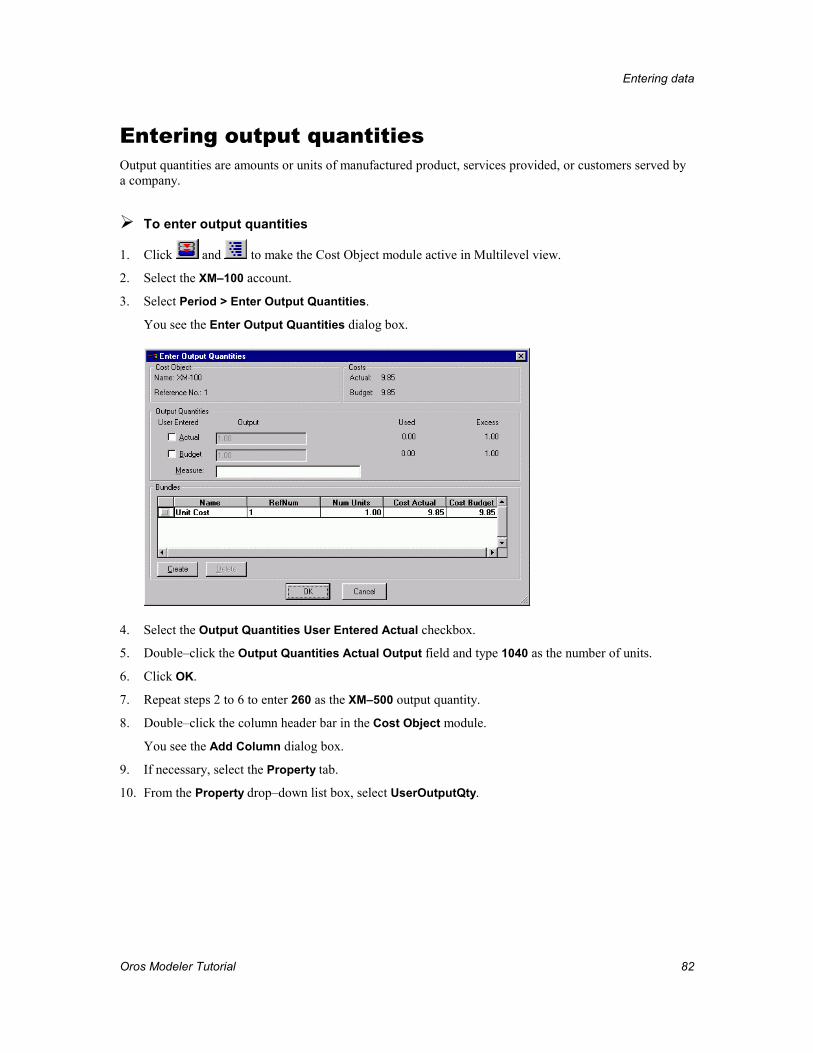
Entering data
Oros Modeler Tutorial 82
Entering output quantities Output quantities are amounts or units of manufactured product, services provided, or customers served by a company.
��To enter output quantities
1. Click and to make the Cost Object module active in Multilevel view.
2. Select the XM–100 account.
3. Select Period > Enter Output Quantities.
You see the Enter Output Quantities dialog box.
4. Select the Output Quantities User Entered Actual checkbox.
5. Double–click the Output Quantities Actual Output field and type 1040 as the number of units.
6. Click OK.
7. Repeat steps 2 to 6 to enter 260 as the XM–500 output quantity.
8. Double–click the column header bar in the Cost Object module.
You see the Add Column dialog box.
9. If necessary, select the Property tab.
10. From the Property drop–down list box, select UserOutputQty.
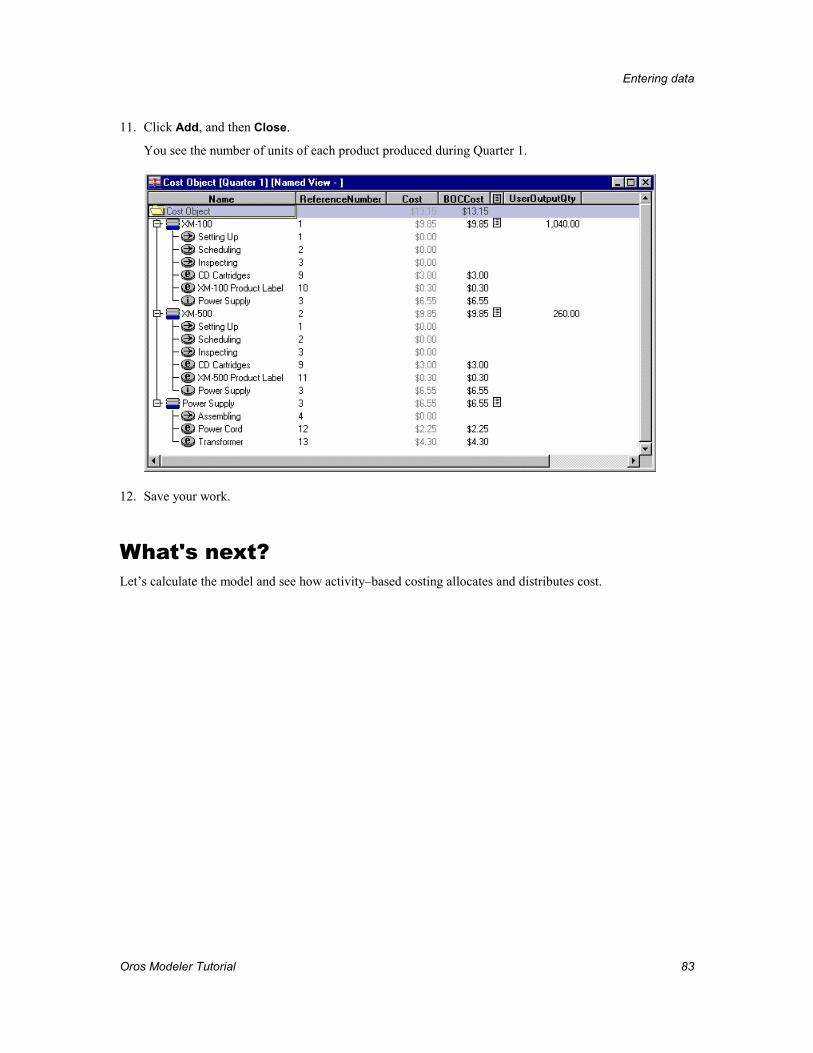
Entering data
Oros Modeler Tutorial 83
11. Click Add, and then Close.
You see the number of units of each product produced during Quarter 1.
12. Save your work.
What's next? Let’s calculate the model and see how activity–based costing allocates and distributes cost.
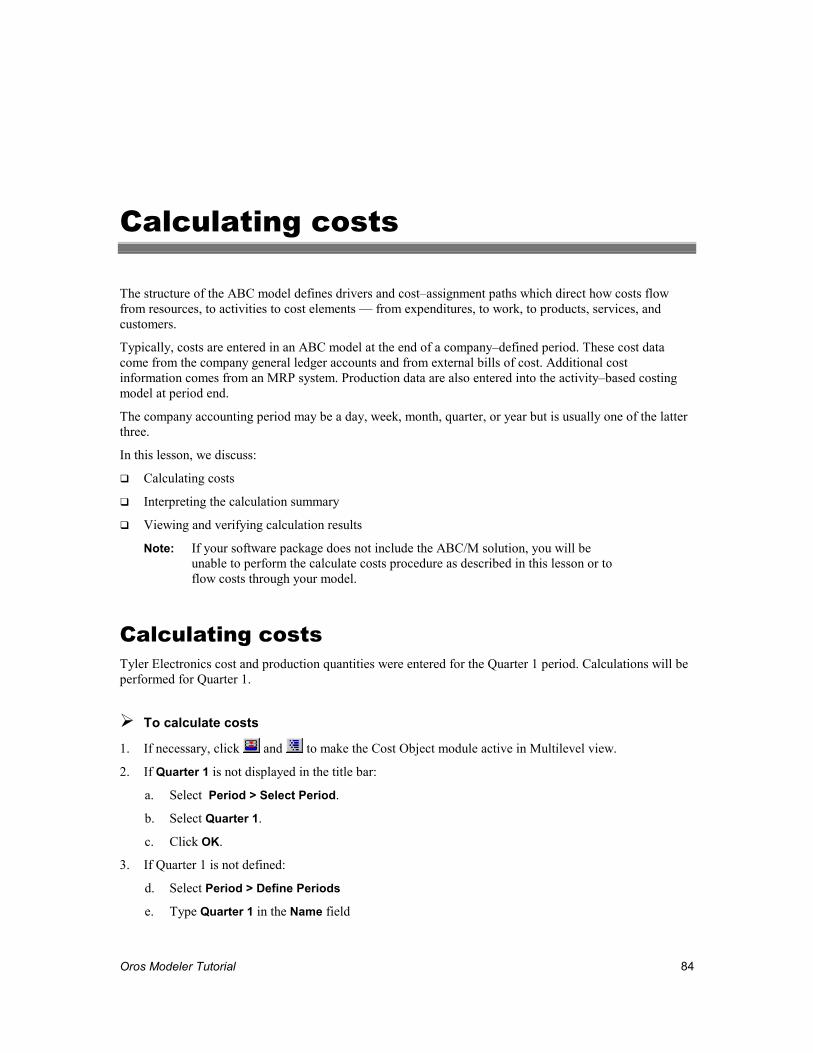
Oros Modeler Tutorial 84
Calculating costs
The structure of the ABC model defines drivers and cost–assignment paths which direct how costs flow from resources, to activities to cost elements — from expenditures, to work, to products, services, and customers.
Typically, costs are entered in an ABC model at the end of a company–defined period. These cost data come from the company general ledger accounts and from external bills of cost. Additional cost information comes from an MRP system. Production data are also entered into the activity–based costing model at period end.
The company accounting period may be a day, week, month, quarter, or year but is usually one of the latter three.
In this lesson, we discuss:
�� Calculating costs
�� Interpreting the calculation summary
�� Viewing and verifying calculation results
Note: If your software package does not include the ABC/M solution, you will be unable to perform the calculate costs procedure as described in this lesson or to flow costs through your model.
Calculating costs Tyler Electronics cost and production quantities were entered for the Quarter 1 period. Calculations will be performed for Quarter 1.
��To calculate costs
1. If necessary, click and to make the Cost Object module active in Multilevel view.
2. If Quarter 1 is not displayed in the title bar:
a. Select Period > Select Period.
b. Select Quarter 1.
c. Click OK.
3. If Quarter 1 is not defined:
d. Select Period > Define Periods
e. Type Quarter 1 in the Name field
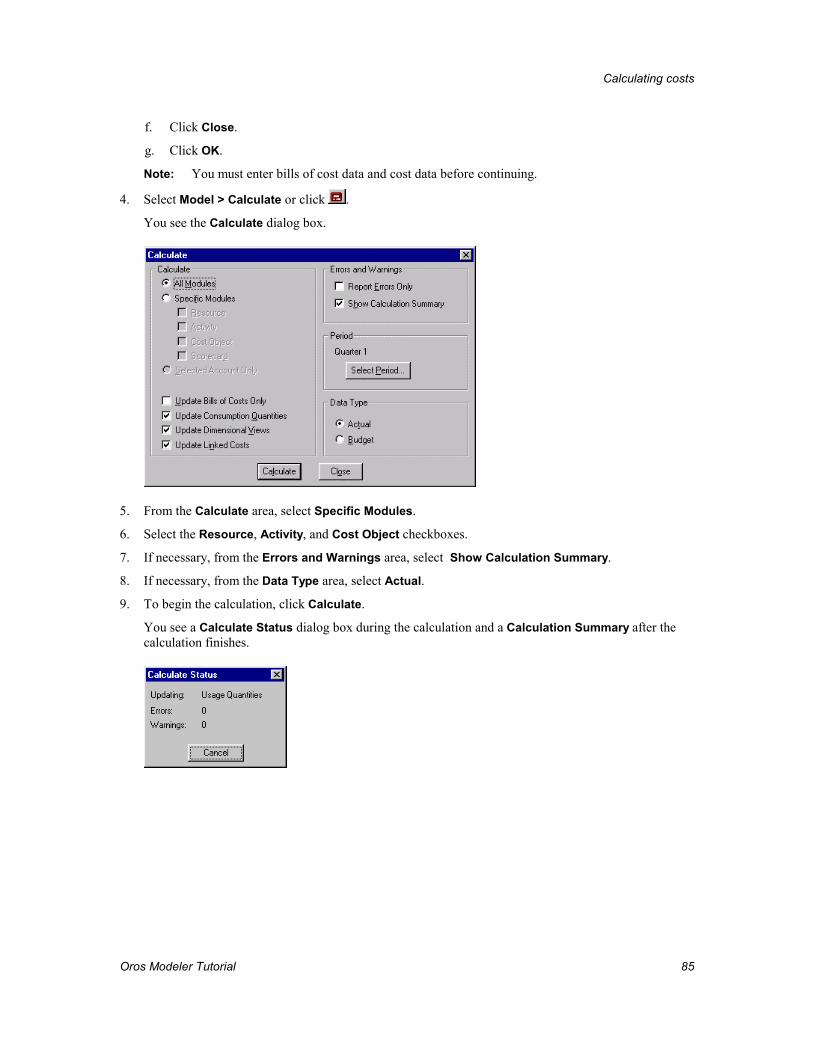
Calculating costs
Oros Modeler Tutorial 85
f. Click Close.
g. Click OK.
Note: You must enter bills of cost data and cost data before continuing.
4. Select Model > Calculate or click .
You see the Calculate dialog box.
5. From the Calculate area, select Specific Modules.
6. Select the Resource, Activity, and Cost Object checkboxes.
7. If necessary, from the Errors and Warnings area, select Show Calculation Summary.
8. If necessary, from the Data Type area, select Actual.
9. To begin the calculation, click Calculate.
You see a Calculate Status dialog box during the calculation and a Calculation Summary after the calculation finishes.
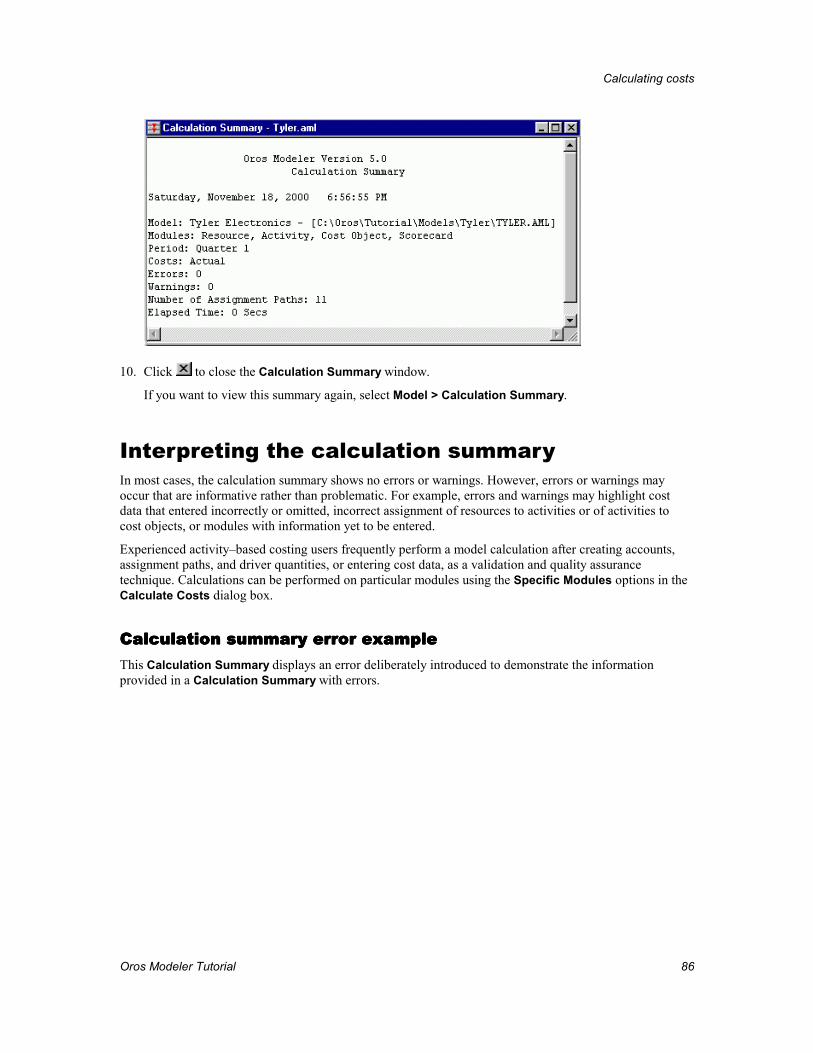
Calculating costs
Oros Modeler Tutorial 86
10. Click to close the Calculation Summary window.
If you want to view this summary again, select Model > Calculation Summary.
Interpreting the calculation summary In most cases, the calculation summary shows no errors or warnings. However, errors or warnings may occur that are informative rather than problematic. For example, errors and warnings may highlight cost data that entered incorrectly or omitted, incorrect assignment of resources to activities or of activities to cost objects, or modules with information yet to be entered.
Experienced activity–based costing users frequently perform a model calculation after creating accounts, assignment paths, and driver quantities, or entering cost data, as a validation and quality assurance technique. Calculations can be performed on particular modules using the Specific Modules options in the Calculate Costs dialog box.
Calculation summary error exampleCalculation summary error exampleCalculation summary error exampleCalculation summary error example This Calculation Summary displays an error deliberately introduced to demonstrate the information provided in a Calculation Summary with errors.
Calculating costs
Oros Modeler Tutorial 87
A fatal calculation cycle error occurred. The summary describes the problem — attaching the Scheduling activity as an internal Bill of Cost to the Production account in the Resource module was invalid.
Some of the Production account cost is assigned to the Scheduling activity and Scheduling is assigned as a unit for Production that is in the Resource module. This creates an endless calculation cycle that prevents the model from recalculating.
To correct the error, remove the Scheduling activity as an internal Bill of Cost from the Production account in the Resource module.
Viewing and verifying calculation results The calculate function flows resource costs to activities using the resource drivers and activity costs to cost objects using the activity drivers. After calculating costs, you will want to see the total production costs for each of the products for Quarter1.
��To view cost flow 1. Double–click the column header bar in the Cost Object module.
You see the Add Column dialog box.
2. Click the Property tab in the Add Column dialog box.
3. From the Property drop–down list box, select OutputQuantity .
4. Click Add, and then Close.
5. Repeat steps 4 to 5 to add another column to the Cost Object module column named UnitCost.
Note: The BOCCost and UserOutputQty columns were added in the Add Bills of Cost lesson. Complete that lesson before continuing and add the BOCCost and UserOutputQty columns to the Cost Object module display if necessary. If you
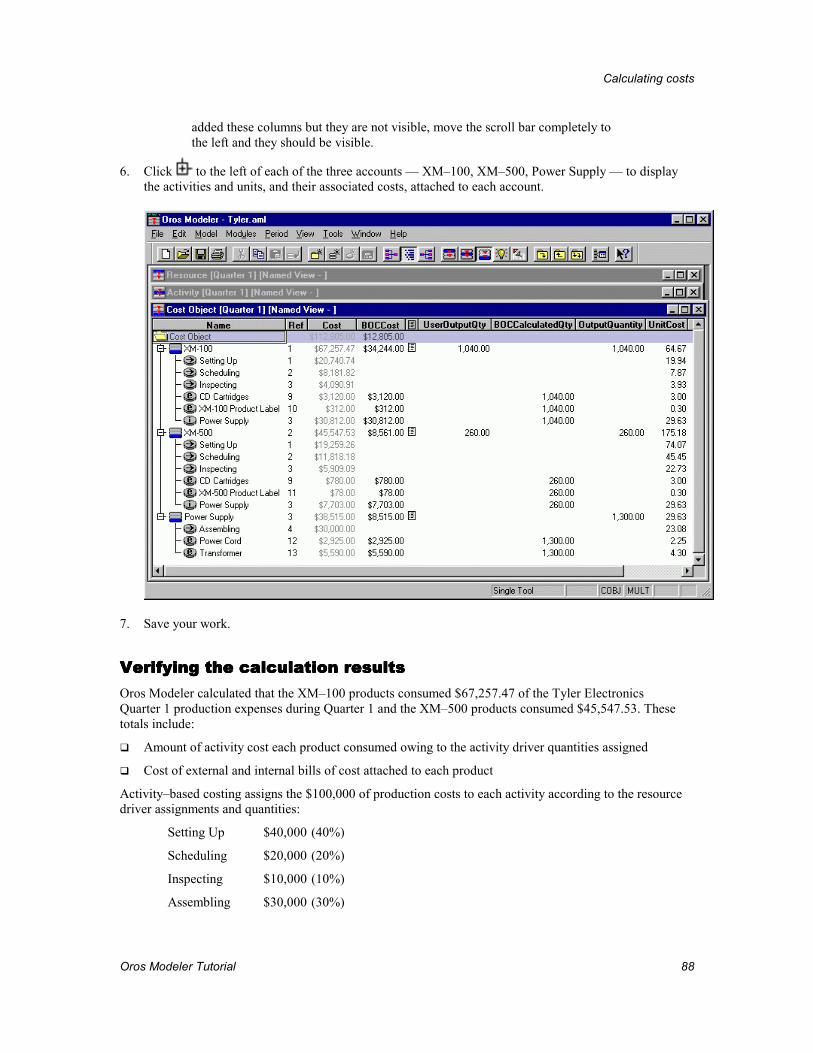
Calculating costs
Oros Modeler Tutorial 88
added these columns but they are not visible, move the scroll bar completely to the left and they should be visible.
6. Click to the left of each of the three accounts — XM–100, XM–500, Power Supply — to display the activities and units, and their associated costs, attached to each account.
7. Save your work.
Verifying the calculation resultsVerifying the calculation resultsVerifying the calculation resultsVerifying the calculation results Oros Modeler calculated that the XM–100 products consumed $67,257.47 of the Tyler Electronics Quarter 1 production expenses during Quarter 1 and the XM–500 products consumed $45,547.53. These totals include:
�� Amount of activity cost each product consumed owing to the activity driver quantities assigned
�� Cost of external and internal bills of cost attached to each product
Activity–based costing assigns the $100,000 of production costs to each activity according to the resource driver assignments and quantities:
Setting Up $40,000 (40%)
Scheduling $20,000 (20%)
Inspecting $10,000 (10%)
Assembling $30,000 (30%)
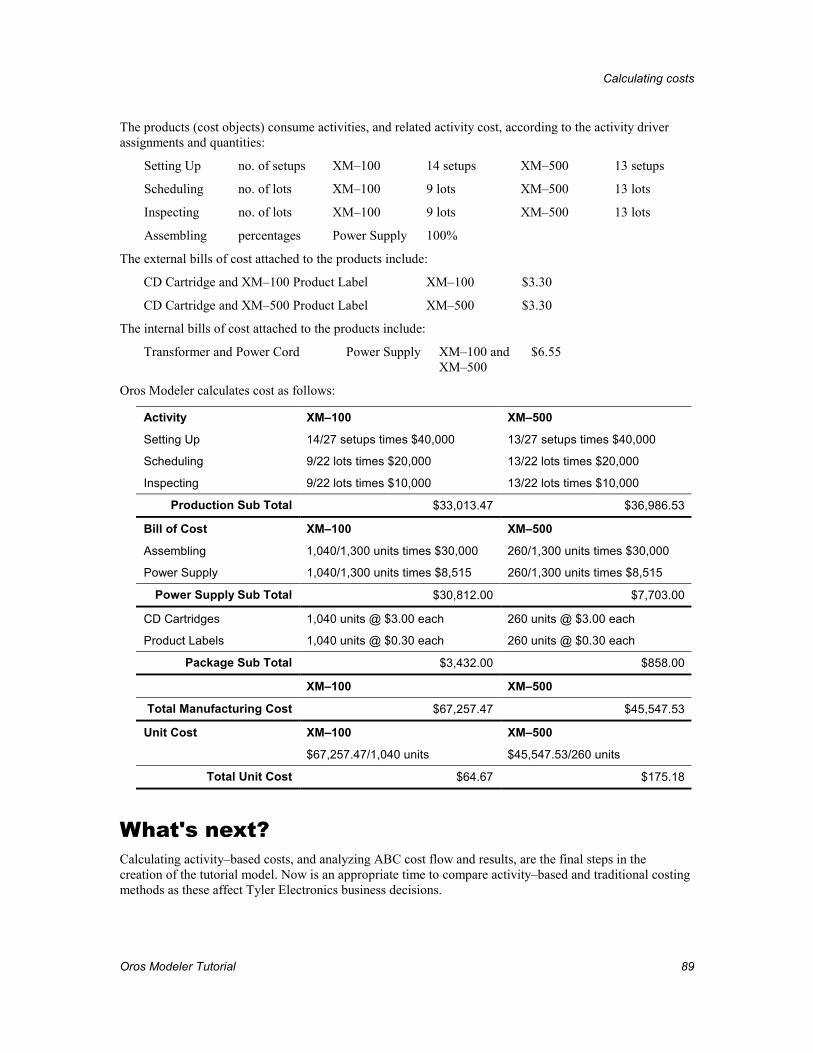
Calculating costs
Oros Modeler Tutorial 89
The products (cost objects) consume activities, and related activity cost, according to the activity driver assignments and quantities:
Setting Up no. of setups XM–100 14 setups XM–500 13 setups
Scheduling no. of lots XM–100 9 lots XM–500 13 lots
Inspecting no. of lots XM–100 9 lots XM–500 13 lots
Assembling percentages Power Supply 100%
The external bills of cost attached to the products include:
CD Cartridge and XM–100 Product Label XM–100 $3.30
CD Cartridge and XM–500 Product Label XM–500 $3.30
The internal bills of cost attached to the products include:
Transformer and Power Cord Power Supply XM–100 and XM–500
$6.55
Oros Modeler calculates cost as follows:
Activity XM–100 XM–500
Setting Up 14/27 setups times $40,000 13/27 setups times $40,000
Scheduling 9/22 lots times $20,000 13/22 lots times $20,000
Inspecting 9/22 lots times $10,000 13/22 lots times $10,000
Production Sub Total $33,013.47 $36,986.53
Bill of Cost XM–100 XM–500
Assembling 1,040/1,300 units times $30,000 260/1,300 units times $30,000
Power Supply 1,040/1,300 units times $8,515 260/1,300 units times $8,515
Power Supply Sub Total $30,812.00 $7,703.00
CD Cartridges 1,040 units @ $3.00 each 260 units @ $3.00 each
Product Labels 1,040 units @ $0.30 each 260 units @ $0.30 each
Package Sub Total $3,432.00 $858.00
XM–100 XM–500
Total Manufacturing Cost $67,257.47 $45,547.53
Unit Cost XM–100 XM–500
$67,257.47/1,040 units $45,547.53/260 units
Total Unit Cost $64.67 $175.18
What's next? Calculating activity–based costs, and analyzing ABC cost flow and results, are the final steps in the creation of the tutorial model. Now is an appropriate time to compare activity–based and traditional costing methods as these affect Tyler Electronics business decisions.
Oros Modeler Tutorial 90
Activity–based vs. traditional costing
The key to the difference between ABC and traditional costing methods lies in the ABC drivers.
Activity–based costing (ABC) relates resources through activities to product cost. Resource drivers relate how general ledger costs or expenditures are attached and apportioned to work activities. Activity drivers relate how the products produced, services performed, and customers served consume work activities and attached general ledger expenditures.
The flow of costs through the two drivers determines the final company business cost and ultimate profitability.
Viewing production cost through an ABC perspective can have a dramatic effect on company business practices.
In this lesson, we discuss:
�� Tyler Electronics costs using traditional costing methodology
�� Tyler Electronics costs using Activity–based costing methodology
�� ABC Summary
Activity–based and traditional costing The following table compares Tyler Electronics production costs from an activity–based and a traditional costing perspective.
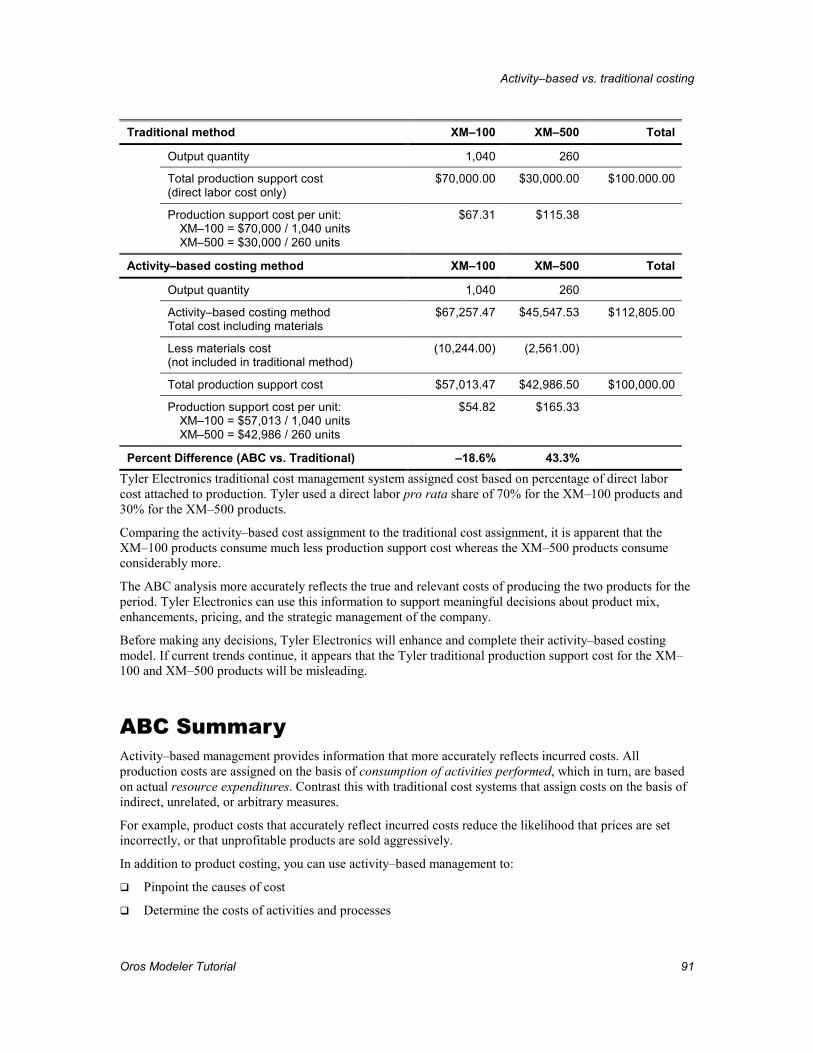
Activity–based vs. traditional costing
Oros Modeler Tutorial 91
Traditional method XM–100 XM–500 Total
Output quantity 1,040 260
Total production support cost (direct labor cost only)
$70,000.00 $30,000.00 $100.000.00
Production support cost per unit: XM–100 = $70,000 / 1,040 units XM–500 = $30,000 / 260 units
$67.31 $115.38
Activity–based costing method XM–100 XM–500 Total
Output quantity 1,040 260
Activity–based costing method Total cost including materials
$67,257.47 $45,547.53 $112,805.00
Less materials cost (not included in traditional method)
(10,244.00) (2,561.00)
Total production support cost $57,013.47 $42,986.50 $100,000.00
Production support cost per unit: XM–100 = $57,013 / 1,040 units XM–500 = $42,986 / 260 units
$54.82 $165.33
Percent Difference (ABC vs. Traditional) –18.6% 43.3%
Tyler Electronics traditional cost management system assigned cost based on percentage of direct labor cost attached to production. Tyler used a direct labor pro rata share of 70% for the XM–100 products and 30% for the XM–500 products.
Comparing the activity–based cost assignment to the traditional cost assignment, it is apparent that the XM–100 products consume much less production support cost whereas the XM–500 products consume considerably more.
The ABC analysis more accurately reflects the true and relevant costs of producing the two products for the period. Tyler Electronics can use this information to support meaningful decisions about product mix, enhancements, pricing, and the strategic management of the company.
Before making any decisions, Tyler Electronics will enhance and complete their activity–based costing model. If current trends continue, it appears that the Tyler traditional production support cost for the XM–100 and XM–500 products will be misleading.
ABC Summary Activity–based management provides information that more accurately reflects incurred costs. All production costs are assigned on the basis of consumption of activities performed, which in turn, are based on actual resource expenditures. Contrast this with traditional cost systems that assign costs on the basis of indirect, unrelated, or arbitrary measures.
For example, product costs that accurately reflect incurred costs reduce the likelihood that prices are set incorrectly, or that unprofitable products are sold aggressively.
In addition to product costing, you can use activity–based management to:
�� Pinpoint the causes of cost
�� Determine the costs of activities and processes
Activity–based vs. traditional costing
Oros Modeler Tutorial 92
�� Calculate performance measurements for activities
�� Analyze activities or policies that cause costs
�� Examine closely all the resource costs of your company
�� Scrutinize how company expenditures are assigned to activities and products
�� Estimate the cost of new products
�� Analyze business processes
�� Calculate the cost impact of proposed process improvements
�� Analyze value–added and non value–added activities in processes
�� Analyze quality
In addition to providing strategic information for manufacturing enterprises, Oros Modeler supports activity analysis in service businesses and organizations, process industries, engineering projects, and many other areas of commerce.
In the next lesson, Modeler will generate reports to show you the results of your model.
Oros Modeler Tutorial 93
Generating reports
Once the information has been entered into the activity-based management model, the costs have been calculated, and the data reviewed, the next step in analyzing the data is generating reports. Benefits of generating reports include:
�� Validate the model
�� Produce printouts that present an overall view of your data
�� Analyze costs on the screen
�� Produce files for inclusion in other programs, such as spreadsheets or word processors
�� Focus on a specific area of interest
�� Emphasize certain data in relation to other data
Oros Modeler has the ability to do all this and much more by allowing you to use report templates to determine the type of information reported and how it is presented. The report templates are:
�� Assignments
�� Attribute costs
�� Attributes
�� Bill of costs
�� Contributions
�� Drivers
�� Idle capacity
�� Module hierarchy
�� Notes
�� Performance measures
�� Process
�� Profit Accumulation
�� Reciprocal Costing
�� Resource contributions
�� Unassigned costs
�� Unit costs
�� Unit usage
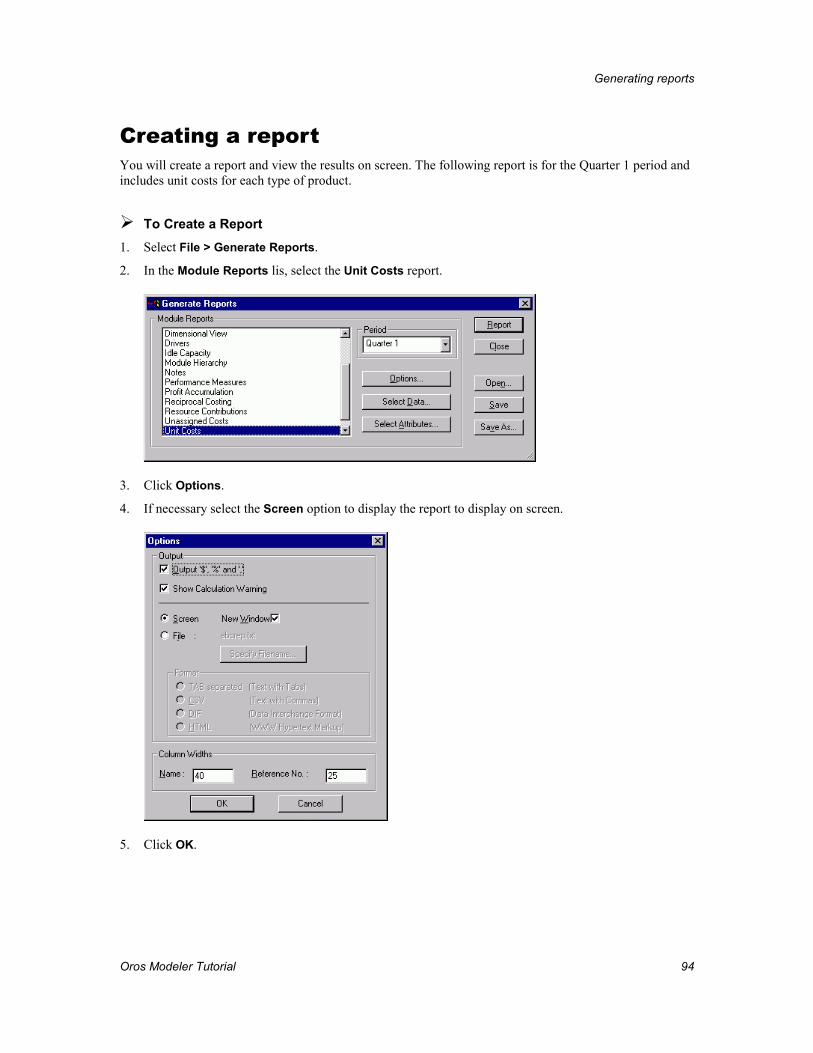
Generating reports
Oros Modeler Tutorial 94
Creating a report You will create a report and view the results on screen. The following report is for the Quarter 1 period and includes unit costs for each type of product.
��To Create a Report 1. Select File > Generate Reports.
2. In the Module Reports lis, select the Unit Costs report.
3. Click Options.
4. If necessary select the Screen option to display the report to display on screen.
5. Click OK.
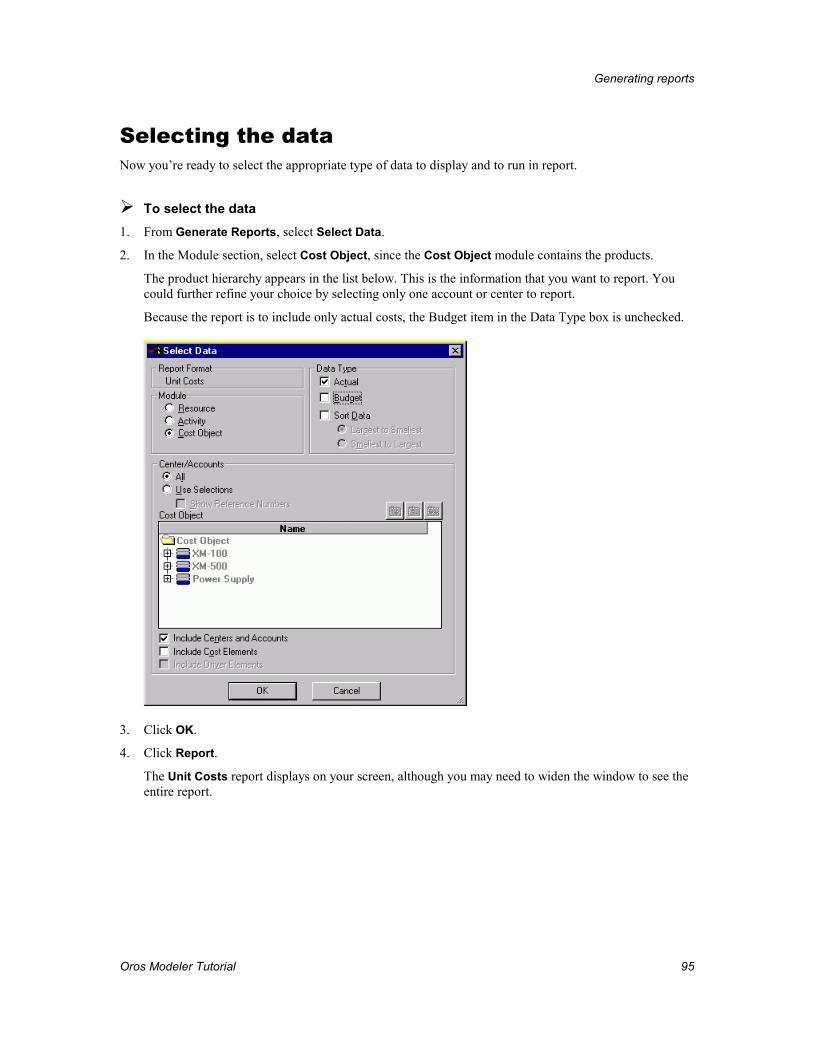
Generating reports
Oros Modeler Tutorial 95
Selecting the data Now you’re ready to select the appropriate type of data to display and to run in report.
��To select the data 1. From Generate Reports, select Select Data.
2. In the Module section, select Cost Object, since the Cost Object module contains the products.
The product hierarchy appears in the list below. This is the information that you want to report. You could further refine your choice by selecting only one account or center to report.
Because the report is to include only actual costs, the Budget item in the Data Type box is unchecked.
3. Click OK.
4. Click Report.
The Unit Costs report displays on your screen, although you may need to widen the window to see the entire report.
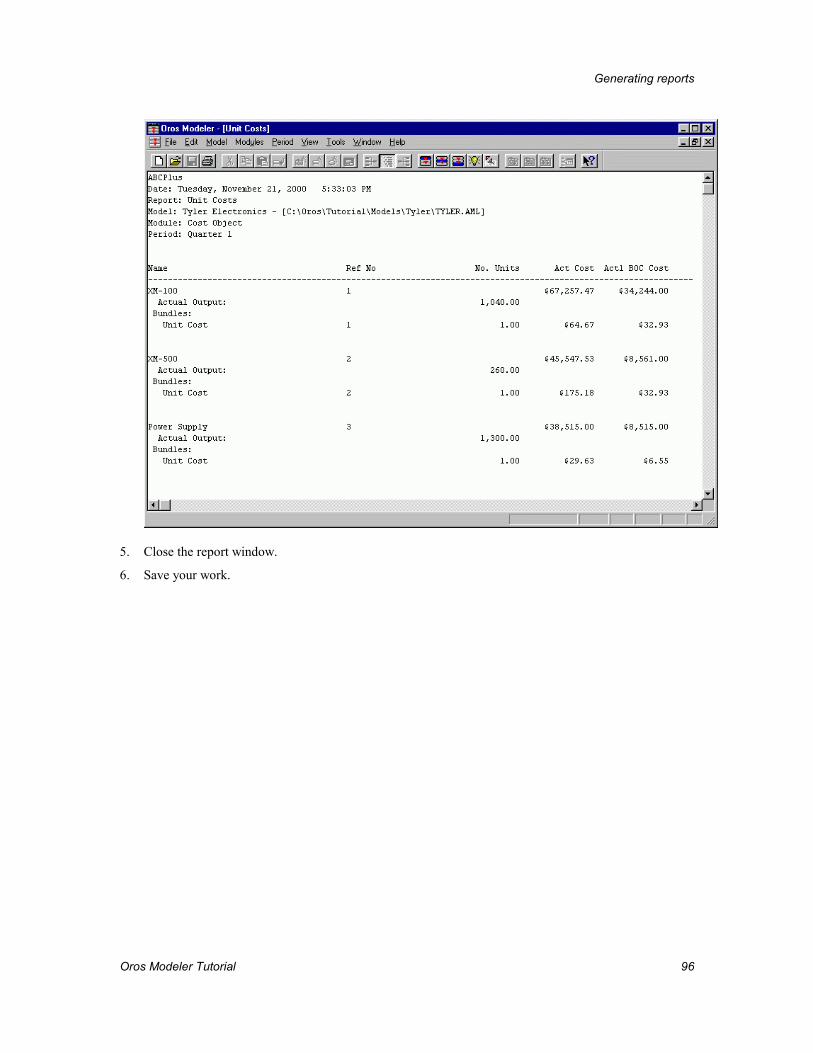
Generating reports
Oros Modeler Tutorial 96
5. Close the report window.
6. Save your work.

Oros Modeler Tutorial 97
Finishing up
This final lesson discusses closing and exiting Oros Modeler and reviews the basic steps for implementing a model.
Leaving Oros Modeler Close Oros Modeler as you would most Windows applications.
��To close Oros Modeler 1. Select File > Exit.
If any changes have been made since you last saved, you will be asked to save changes.
2. Click Yes to save your model or No to close it without saving (thereby losing the work you may have done since you last saved).
��To close a model without closing Oros Modeler 1. Select File > Close Model.
If any changes have been made since you last saved, you will be asked to save changes.
2. Click Yes to save your model or No to close it without saving (thereby losing the work you may have done since you last saved). The model you have been using closes, leaving an empty Oros Modeler workspace window.
Note: As you may recall from the lesson entitled “Introducing Activity–Based Costing,” only one model can reside in a folder. Do not save a model in a folder that already contains a model unless you intend the new model to replace the existing model. You will be asked to confirm replacement of the existing model.
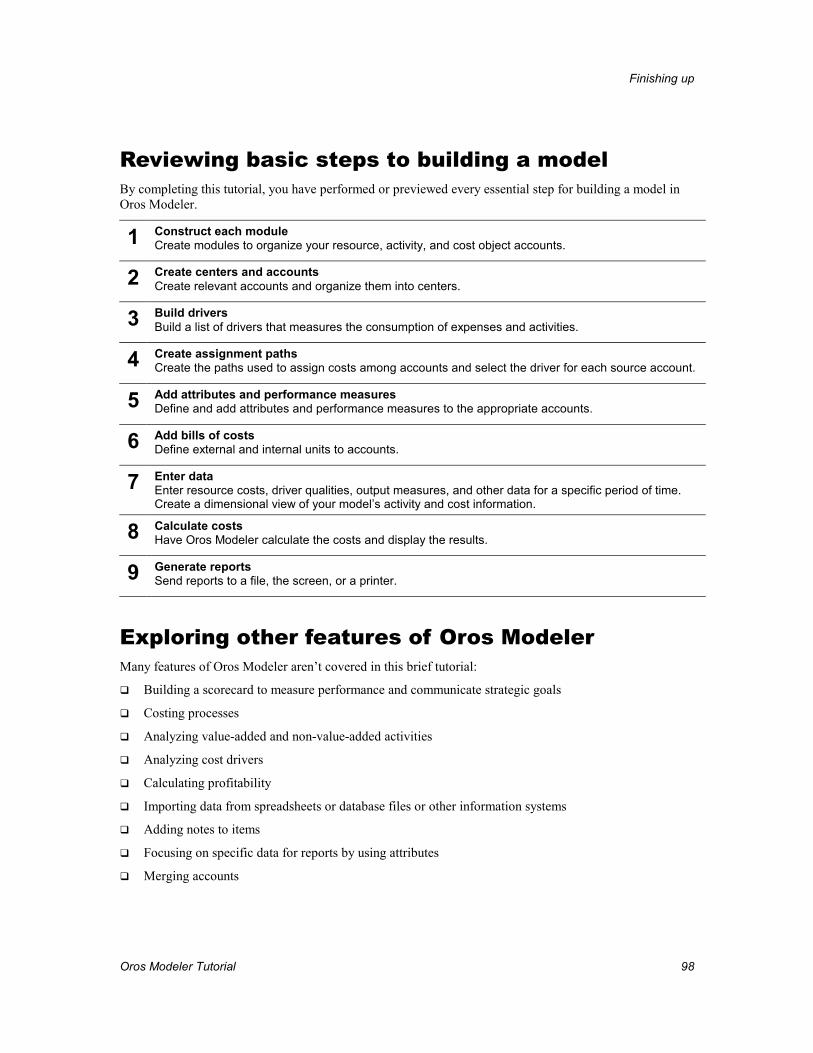
Finishing up
Oros Modeler Tutorial 98
Reviewing basic steps to building a model By completing this tutorial, you have performed or previewed every essential step for building a model in Oros Modeler.
1 Construct each module Create modules to organize your resource, activity, and cost object accounts.
2 Create centers and accounts Create relevant accounts and organize them into centers.
3 Build drivers Build a list of drivers that measures the consumption of expenses and activities.
4 Create assignment paths Create the paths used to assign costs among accounts and select the driver for each source account.
5 Add attributes and performance measures Define and add attributes and performance measures to the appropriate accounts.
6 Add bills of costs Define external and internal units to accounts.
7 Enter data Enter resource costs, driver qualities, output measures, and other data for a specific period of time. Create a dimensional view of your model’s activity and cost information.
8 Calculate costs Have Oros Modeler calculate the costs and display the results.
9 Generate reports Send reports to a file, the screen, or a printer.
Exploring other features of Oros Modeler Many features of Oros Modeler aren’t covered in this brief tutorial:
�� Building a scorecard to measure performance and communicate strategic goals
�� Costing processes
�� Analyzing value-added and non-value-added activities
�� Analyzing cost drivers
�� Calculating profitability
�� Importing data from spreadsheets or database files or other information systems
�� Adding notes to items
�� Focusing on specific data for reports by using attributes
�� Merging accounts
Finishing up
Oros Modeler Tutorial 99
What to do next If you felt comfortable using the basic tools and techniques of Oros Modeler to build the Tyler Electronics model, try them out on a simple project of your own.
ABC Technologies Inc. has a variety of products, including videotapes and training classes, that can help you learn more about activity-based costing, management, and budgeting and can help you build models for your organization. Contact your ABC Technologies, Inc. representative if you need additional information.
Index
A ABC Model Results Comparison, 91 ABC Systems
basic model, 5, 43 CAM–I model, 5 CAM–I standards, 5 Cost Assignment View, 6, 43 Process View, 6 purpose, 5, 91 summary, 91 using models, 5
ABC terminology See also Glossary, 18 ABC vs. traditional costing, 90 Accounts, 18
adding activity accounts, 22 adding cost object accounts, 24 adding resource accounts, 20 adding to account or center, 21, 23, 25 creating, 20 renaming, 22
Activity Driver, 6 Activity module, 18, 22 Assigning attributes, 54 Assignment
arrowheads, 36, 38 paths, 32, 34
Attributes assigning, 54 calculated, 47 centers, 48 defining, 48 defining attribute centers, 53 defining numeric attributes, 49, 50 defining text attributes, 48 deleting, 56 displaying, 55, 62, 71 entering quantities, 60 hierarchy, 46 numeric, 47 redefining, 52 removing, 56
text, 46 types, 46 use and benefits, 45 with calculated attributes, 47 with calculated drivers, 47
Auto–save feature, 13
B Basic steps, 6
review, 98 Bill of Cost
adding, correcting, deleting, 67 attaching external, 66 attaching internal, 69 attaching to an account, 66, 69 Bill of material, 64 defined, 64 display or conceal, 72 external, 65 external units, 65 include or exclude, 72 internal, 65 internal units, 65 materials requirement planning, 64 using, 64
C Calculating costs, 84
viewing and interpreting errors, 86 viewing and interpreting the calculation
summary, 86 CAM–I
Cost Assignment View, 6 model, 5 Process View, 6 standards, 5
Centers, 18 Changing
properties in a column, 26 Closing
model, 97
Index
Oros Modeler Tutorial 101
Oros Modeler, 97 Columns, 11, 25
change properties in a column, 26 deleting, 28
Cost Driver, 6 Cost elements, 18
automatically adding, 19 entered, 21 entering, 73, 82 external units, 65 internal units, 65 purpose, 21
Cost object module, 18 Cost Object module
entering units, 82 Costs
attach external Bill of Cost, 66 attach internal Bill of Cost, 69 Bill of Cost, 64 Bill of material, 64 calculating, 84 create external units, 65 display or conceal, 72 entering, 74 entering resource costs, 73 external units, 65 internal units, 65 summary costs show or hide, 74 viewing and interpreting calculation errors, 86 viewing and interpreting the calculation
summary, 86 viewing and verifying calculation results, 87
Create account centers, 20 accounts, 20 activities structure, 22 activity accounts, 22 assignment paths, 36, 38, 41 attribute centers, 53 attributes, 48 cost object accounts, 24 cost objects structure, 23 external units, 65 list of drivers, 29 model folder, 8 model periods, 58 new model, 10 numeric attributes, 49, 50 performance measures, 61 reports, 93, 94 resource accounts, 20 text attributes, 48
D Delete
columns, 28 model periods, 59 performance measures, 61
Delete attributes, 56 Destination view, 34, 75 Dialog box
Add Accounts for Assignments, 75, 78 Add Attributes, 54, 57 Add Bill of Costs, 66 Add External Units, 67 Add Internal Units, 69 Add Performance Measures, 61 Calculate, 85 Calculation Summary, 86 Costs, 73 Define Attributes, 48, 49, 50, 52, 53, 57 Define Drivers, 30 Define External Units, 65 Define Periods, 58 Delete Period Data, 60 Enter Attribute Quantities, 60 Enter Driver Quantities, 39, 76, 79 Enter Output Quantities, 82 Equation Editor, 50 Model Options, 19, 33, 72 Model Summary, 10 Modeler login, 9 Oros login, 9 Save changes, 58 Select Period, 59
Drivers Activity, 6 activity assigned quantities, 80, 81 activity assignment paths, 80, 81 activity driver quantities, 79 assignment paths, 75, 78 building a list, 29 Cost, 6 default, 33 definition, 29 evenly assigned, 33 percentages, 33 Resource, 6 resource assigned quantities, 77 resource assignment paths, 77 resource driver quantities, 76
E Entering attribute quantities, 60
Index
Oros Modeler Tutorial 102
M Materials Requirements Planning (MRP) system,
64 Model
account centers, 20 activities, 22 assignment paths, 32, 34 auto–save feature, 13 build drivers, 29 CAM–I, 5 closing, 15 creating a folder, 8 exiting, 15 file extension, 13 name, 10 new, 10 periods, 58 planning, 17 save model as, 13 steps to building, 6 structure, 18 title, 10
Modeler login dialog box, 9 password, 9
Modules activity, 18, 22 cost object, 18, 23 resource, 18, 23
Multilevel view, 54, 57, 60, 61, 66, 69, 73, 82, 84
N Name, model, 10 Named view, 12
O Oros
features not covered, 98 program group, 9
Oros Lite program group, 9
Oros Lite Modeler See also Oros Modeler, 1 Oros Modeler
closing, 15 exiting, 15 main window, 11 starting, 9
Output quantities entering units, 82
P Performance measures
creating or deleting, 61 displaying, 62
Performance Measures, 46 Periods, 58
creating, 58 default, 58 deleting, 59 Period1, 58 renaming, 59 selecting, 59
Planning a model, 17 Properties, 11, 25
Q Quantities
entering product units, 82
R Removing attributes, 56 Rename
model periods, 59 Reports, 93
generating, 94 sample unit costs report, 95 selecting data, 95
Resource Driver, 6 Resource module, 18
entering costs, 73
S Source view, 37, 78 Starting Oros Modeler, 9 Status bar, 11 Summary center, 11 Summary costs
show or hide, 74
T Terminology See also Glossary, 18 Title, model, 10 Toolbar
assignment, 12 main, 12
Traditional/ABC Method Results Comparison, 91
Training, 99 Tyler Electronics description, 7
Index
Oros Modeler Tutorial 103
U Units
entering quantities, 82
V Views
destination, 12, 34, 75 multilevel, 54, 57, 60, 61, 66, 69, 73, 82, 84 source, 37, 78