
Original Recipe - modafabrics.com · TV, and the idea for these "playroom pillows" was born. I knew...
13
Original Recipe can be found at www.modabakeshop.com Original Recipe Cushion Couture by Julie Herman and John Adams You know what they say about great minds, right? So I guess we shouldn't have been surprised when we found out that we were both planning pillow tutorials for the Moda Bake Shop ... using the same fabric line! We decided to join forces and create one mega tutorial. The Jaybirdquilts / Quilt Dad collaboration was born, and we were able to inspire one another to put forth the best collection of pillow patterns possible. Think of it like chocolate & peanut butter... great alone... but even better together!! So today we have tutorials for you for pillows. Lots and lots (and lots) of pillows. Why? Because we LOVE pillows! They're relatively quick and easy to make, they let you integrate your favorite quilting fabrics into your home decor, they're functional and, let's face it, they're FUN! And what could be more fun that pillows made from the awesome debut line of fabric for the design team at Sweetwater, Authentic? The best part is that these tutorials are for pillow covers -- slipcovers, if you will. They're easy to change out with your decor, so imagine sets of these covers in your favorite seasonal or holiday fabrics... or even just a new set for any reason! The other great thing is just how versatile these tutorials are. You can make multiple versions from the same tutorial.... & with different fabric selections and placement each can look totally different! We encourage you to mix & match. Most of all, have fun. We'd love to see your finished pillows. Don't forget to post them to the Moda Bake Shop Flickr pool!
Transcript of Original Recipe - modafabrics.com · TV, and the idea for these "playroom pillows" was born. I knew...
Original Recipe can be found at www.modabakeshop.com
Original Recipe
Cushion Couture by Julie Herman and John Adams You know what they say about great minds, right? So I guess we shouldn't have been surprised when we found out that we were both planning pillow tutorials for the Moda Bake Shop ... using the same fabric line! We decided to join forces and create one mega tutorial. The Jaybirdquilts / Quilt Dad collaboration was born, and we were able to inspire one another to put forth the best collection of pillow patterns possible. Think of it like chocolate & peanut butter... great alone... but even better together!! So today we have tutorials for you for pillows. Lots and lots (and lots) of pillows. Why? Because we LOVE pillows! They're relatively quick and easy to make, they let you integrate your favorite quilting fabrics into your home decor, they're functional and, let's face it, they're FUN! And what could be more fun that pillows made from the awesome debut line of fabric for the design team at Sweetwater, Authentic? The best part is that these tutorials are for pillow covers -- slipcovers, if you will. They're easy to change out with your decor, so imagine sets of these covers in your favorite seasonal or holiday fabrics... or even just a new set for any reason! The other great thing is just how versatile these tutorials are. You can make multiple versions from the same tutorial.... & with different fabric selections and placement each can look totally different! We encourage you to mix & match. Most of all, have fun. We'd love to see your finished pillows. Don't forget to post them to the Moda Bake Shop Flickr pool!
Original Recipe can be found at www.modabakeshop.com
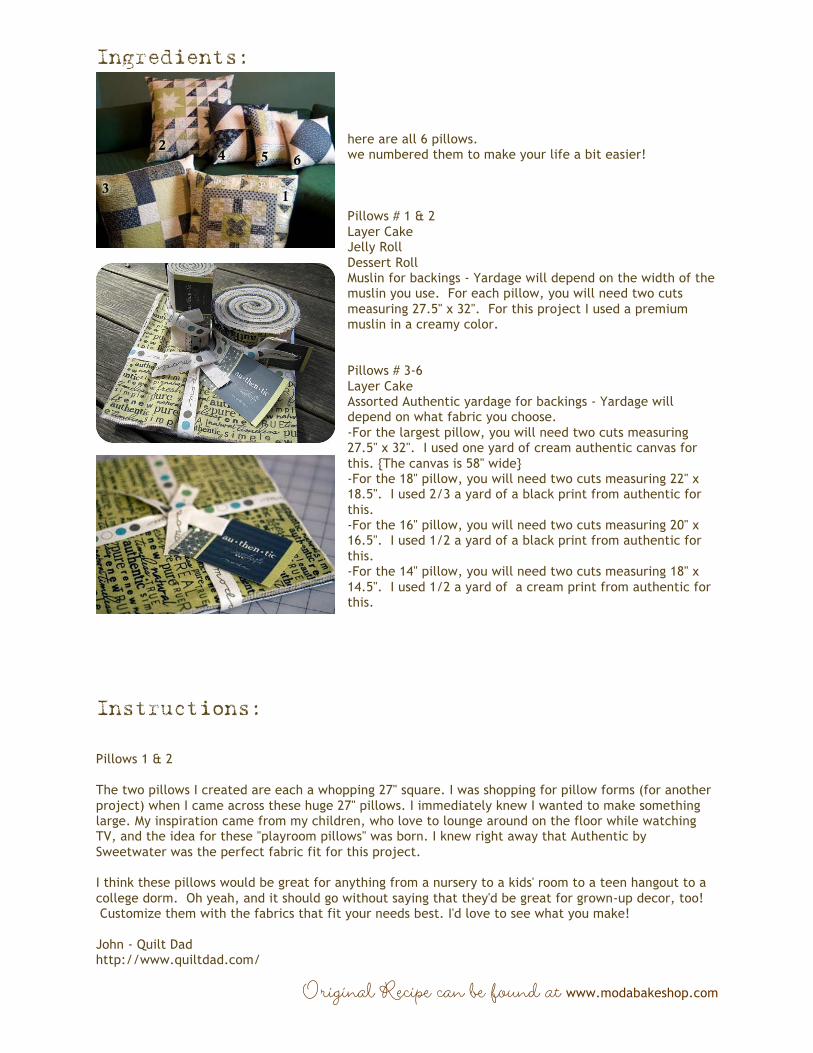
Ingredients: here are all 6 pillows. we numbered them to make your life a bit easier!
Pillows # 1 & 2 Layer Cake Jelly Roll Dessert Roll Muslin for backings - Yardage will depend on the width of the muslin you use. For each pillow, you will need two cuts measuring 27.5" x 32". For this project I used a premium muslin in a creamy color. Pillows # 3-6 Layer Cake Assorted Authentic yardage for backings - Yardage will depend on what fabric you choose. -For the largest pillow, you will need two cuts measuring 27.5" x 32". I used one yard of cream authentic canvas for this. {The canvas is 58" wide} -For the 18" pillow, you will need two cuts measuring 22" x 18.5". I used 2/3 a yard of a black print from authentic for this. -For the 16" pillow, you will need two cuts measuring 20" x 16.5". I used 1/2 a yard of a black print from authentic for this. -For the 14" pillow, you will need two cuts measuring 18" x 14.5". I used 1/2 a yard of a cream print from authentic for this.
Instructions: Pillows 1 & 2 The two pillows I created are each a whopping 27" square. I was shopping for pillow forms (for another project) when I came across these huge 27" pillows. I immediately knew I wanted to make something large. My inspiration came from my children, who love to lounge around on the floor while watching TV, and the idea for these "playroom pillows" was born. I knew right away that Authentic by Sweetwater was the perfect fabric fit for this project. I think these pillows would be great for anything from a nursery to a kids' room to a teen hangout to a college dorm. Oh yeah, and it should go without saying that they'd be great for grown-up decor, too! Customize them with the fabrics that fit your needs best. I'd love to see what you make! John - Quilt Dad http://www.quiltdad.com/

Original Recipe can be found at www.modabakeshop.com
PILLOW #1 - Modern Medallion Pillow Finished pillow size: 27" square
The first design is my modern take on a more traditional medallion-style quilt. I love the idea of building a pattern from the center, border by border and bit by bit. I updated the design a bit to include some of my favorite "building blocks" and give it a fresh look. While each component is fairly simple, the overall effect of the finished pillow looks complex. 1. Center square To begin, select two jelly roll strips: one of a featured print and one of a background print. The background print should also be one that is included in the dessert roll. Pull out the dessert roll strip that matches the background print jelly roll strip. You should now have 2 jelly roll strips and a dessert roll strip.
From the feature print jelly roll strip, cut two 2" squares and a 2" x 5" rectangle. From the background print jelly roll strip, cut four 2" squares. Arrange as follows:
Sew each row together, and then sew the three rows together into a square block. From the dessert roll strip, cut two 4.5" squares. Then cut each square in half on the diagonal, resulting in four triangles.
Arrange the four triangles as follows, and then sew the triangles to the block. I sew the triangles to two opposing sides first and press before attaching the other two.
Original Recipe can be found at www.modabakeshop.com
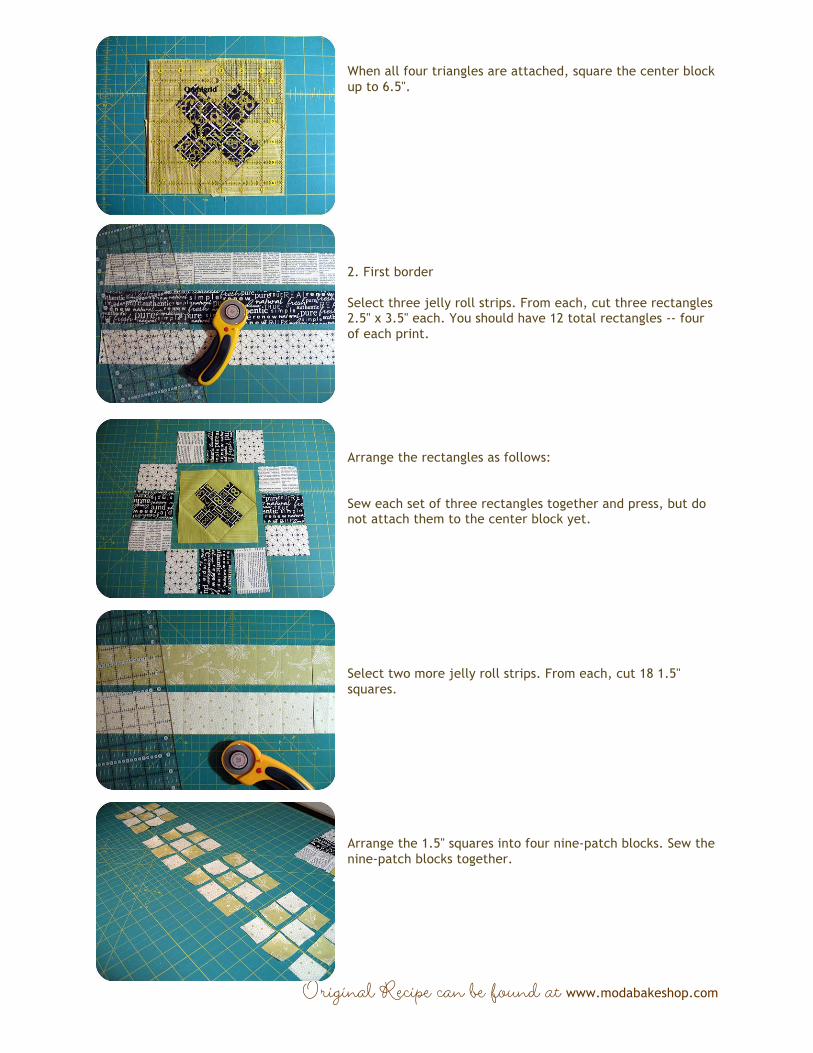
When all four triangles are attached, square the center block up to 6.5".
2. First border Select three jelly roll strips. From each, cut three rectangles 2.5" x 3.5" each. You should have 12 total rectangles -- four of each print.
Arrange the rectangles as follows: Sew each set of three rectangles together and press, but do not attach them to the center block yet. Select two more jelly roll strips. From each, cut 18 1.5" squares.
Arrange the 1.5" squares into four nine-patch blocks. Sew the nine-patch blocks together.

Original Recipe can be found at www.modabakeshop.com
You now have all of your components to assemble your first border: a top row containing two of the nine-patch blocks on its ends; a middle row with your center block in the middle position; and a bottom row that mirrors the top. Sew each row together, and then sew the rows together. Your pillow top should now measure 12.5" square.
3. Second border Your second border will be fairly simple. Select two jelly roll strips of the same print. From each, cut a 2.5" x 12.5" strip and a 2.5" x 16.5" strip, for a total of four pieces. Attach the 12.5" strips to the top and bottom of your pillow cover and press. Then attach the 16.5" strips to the left and right sides of your pillow cover and press. Your pillow cover should now measure 16.5" square. 4. Third border - Flying Geese The third border is comprised of 40 flying geese units. Each flying geese unit measures 2.5" x 4.5".
Cut 40 2.5" x 4.5" rectangles from a variety of prints from your jelly roll. These will be the prints that will be featured in your flying geese, so keep that in mind when selecting your prints. From the Authentic line, I selected the jelly roll strips featuring words, newsprint, and numbers. Cut 80 2.5" squares from a variety of prints from your jelly roll. I restricted mine to three different prints and, unlike the rectangles we just cut, these are meant to be the background against which your featured prints can pop. I selected subtle & small prints in the soft green hues.
Assemble your 40 flying geese units. I use a method similar to the one described here. http://quilting.about.com/od/quiltpatternsprojects/ss/block_one_2.htm Arrange the flying geese around your pillow cover as seen in the photo of the pillow. Sew the 8 flying geese units that border the top of the pillow together, press, and attach to the top edge of the pillow. Repeat for the 8 flying geese units that border the bottom of the pillow. Sew the 12 flying geese units that border the left side of the pillow together, press, and attach to the left edge of the pillow. Repeat for the 12 flying geese units that border the right side of the pillow. 5. Fourth (and final) border Your final border will be another fairly simple one. From a variety of your leftover jelly roll strip scraps, cut a total of 26 2.5" x 4.5" rectangles. Sew six of them together on the short ends, creating a long 2.5" x 24.5" strip. Attach it to the top edge of the pillow. Repeat with another six rectangles and attach to the bottom edge of the pillow. Repeat with another seven rectangles and attach to the left edge of the pillow. Do it one more time with the final seven rectangles and attach it to the right edge of the pillow. Your pillow cover now measures 28.5" square. Trim it down to 27.5" square.

Original Recipe can be found at www.modabakeshop.com
6. Quilt the pillow top I prefer for my pillow covers to be quilted. To do this, I cut a piece of batting 27.5" square and spray basted my pillow cover to the batting. I then free-motion quilted the entire pillow cover with an all-over meandering pattern in a coordinated thread color. You do not need a backing layer for this quilted piece -- it's just fine with the batting exposed on the back. 7. Create the envelope back Create an envelope back for your pillow using two pieces of backing fabric measuring 27.5" x 32" each. Fold each piece in half so that it measures 27.5" x 16" and press the fold. On the backing piece that will show the exposed fold, machine attach a binding strip made from a jelly roll strip that is 27.5" in length. 8. Assemble the pillow Layer the pieces with the pillow top face up first, then the backing piece with the binding next (aligning the raw edges to the top, left, and right edges of the pillow), and finally the other backing piece (aligning the raw edges to the bottom, left, and right edges of the pillow). Pin around all four sides and sew all layers together with a 1/4" seam. I like to go around the pillow twice for added reinforcement. Turn the pillow inside out through the envelope backing and insert your pillow form.
PILLOW #2 - Offset Stars Pillow Finished pillow size: 27" square
This next pillow combines two of my favorite blocks: the half-square triangle and the wonky (or liberated, or maverick) star. I love the seemingly random appearance of the two stars, slightly offset, against the backdrop of classic triangles. By chain-piecing and employing liberated block-making techniques, this pillow cover came together quickly.
1. Make your HST's.
To start select three dessert roll strips that will serve as the background for your pillow. As the background, these prints should be light & subtle. From the Authentic line, I selected three of the beige prints. From each dessert roll strip, cut 11 3 7/8" squares. You should have a total of 33 3 7/8" squares. (Note: you only need 32, so one of these squares will be leftover when you assemble your HST's.)

Original Recipe can be found at www.modabakeshop.com
Select 8 layer cake squares. Unlike the dessert roll strips, these will serve as the featured fabrics of the pillow. They should contrast nicely with the background squares that you just cut.
From each layer cake square, cut four 3 7/8" squares. You will have a total of 32 3 7/8" squares. Here's a look at what you should have cut by now:
Using 32 of your background squares and 32 of your focus fabric squares, make 64 HST units. I use this tutorial. Your HST's should finish at 3.5" each.
2. Make your star units From your layer cake & dessert roll, select two groupings of three prints to create your star units. Each grouping should contain a center print and a coordinating print for the star points (from the layer cake), and a contrasting / neutral print for the background (from the dessert roll). Here is what you will need for each (quantities are per star):
• for the star center: one 3.5" square • for the star points: four 3.5" squares, cut in half on the diagonal
• for the background: eight 3.5" squares
Assemble your wonky star units. I use the technique outlined in the tutorial found here… http://thesillyboodilly.blogspot.com/2009/02/wonky-star-tutorial.html (but with the measurements I specified above).
Original Recipe can be found at www.modabakeshop.com
3. Lay out the units and assemble Lay out the entire pillow top in an eye-pleasing way. Arrange all of the HST's with the feature fabric and the background fabric aligned in the same direction. If you think about the layout as a grid, the star units will take the place of nine HST units in your design. You can see where I placed my offset stars in my design, but I encourage you to lay it out in a way that feels right to you. Sew the pillow top together row by row. The pillow top should finish at 27.5" square. See above for instructions on quilting and backing your pillow cover. Pillows by Julie Herman… I think of pillows as if they are mini quilts... they really do offer us the ability to experiment and push ourself to try something new. At the same time... they don't have to be complicated... or take a lot of fabric! Simplicity was the inspiration for my pillows.... I like to change decor often... and having bold graphic pillows... really helps to do that! I have lots of green in my house... so authentic was the perfect fabric choice! I hope you enjoy these simple... yet bold tutorials... and that they inspire you to make some pillows! julie - jaybirdquilts
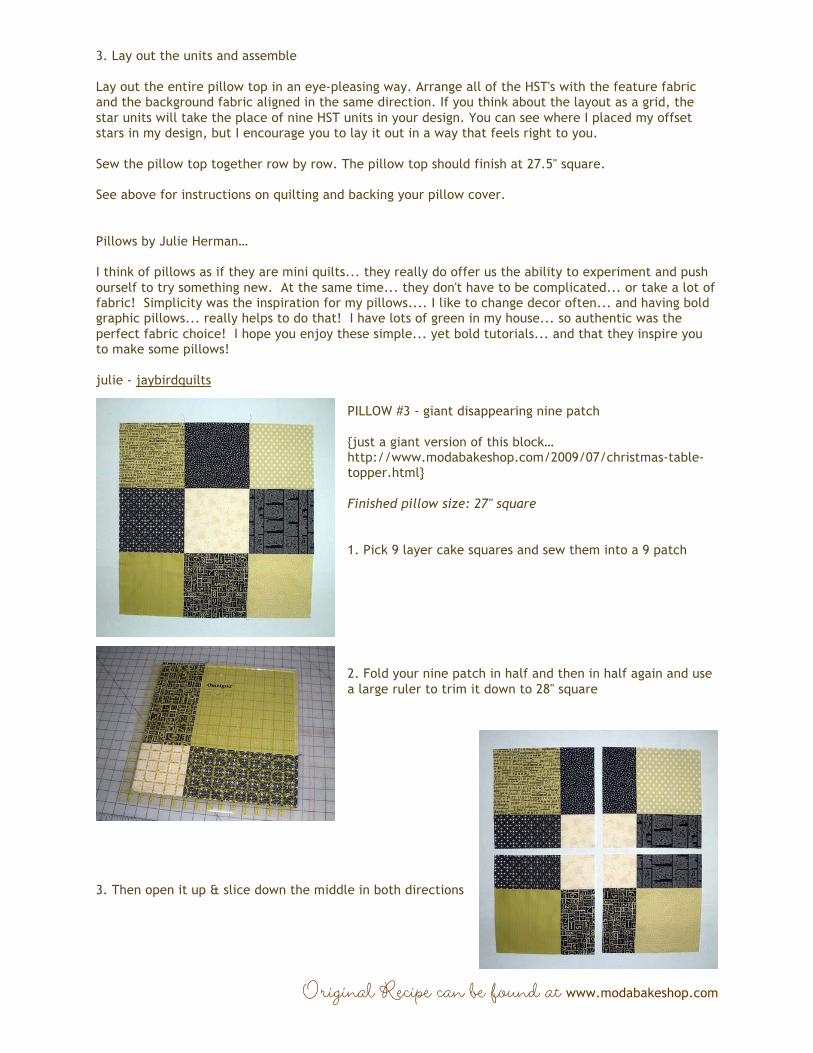
PILLOW #3 - giant disappearing nine patch {just a giant version of this block… http://www.modabakeshop.com/2009/07/christmas-table-topper.html} Finished pillow size: 27" square
1. Pick 9 layer cake squares and sew them into a 9 patch
2. Fold your nine patch in half and then in half again and use a large ruler to trim it down to 28" square
3. Then open it up & slice down the middle in both directions

Original Recipe can be found at www.modabakeshop.com
4. Rearrange your blocks like this... and sew them back together!
5. Quilt the 27.5" panel & follow john's instructions to make the back! I did an all over loopy pattern for the quilting on this pillow. Insert 27" pillow form & you are done!
---
PILLOW #4 - half square triangles Finished pillow size: 18" square
1. Pick 4 layer cake squares - two dark & two light

Original Recipe can be found at www.modabakeshop.com
2. Draw a diagonal line down the middle of the back of the light two 3. Sew a scant 1/4" seam on either side. 4. Then cut on the line & press towards the dark. 5. Trim the 1/2 square triangle units to 9.5"
6. Sew the 4 together as shown. 7. Quilt the 18.5" panel & follow john's instructions to make the back! {The two pieces should each be cut at 22" x 18.5" Fold in half to be 11" x 18.5"} I did straight line quilting on this pillow to echo the bold triangles. Insert 18" pillow form!
PILLOW #3 - half square triangles Finished pillow size: 18" square #5 - rail fence
1. Select 4 layer cake squares

Original Recipe can be found at www.modabakeshop.com
2. Cut the layer cake into 4 pieces 2.5" wide
3. Repeat for the other 3 layer cake pieces
4. Sew them into a rail fence block 5. Repeat to make 3 more. 6. Trim them to 8.5" square
7. Lay them out as shown above and sew together
8. Quilt the 16.5" panel & follow john's instructions to make the back! {The two pieces should each be cut at 20" x 16.5" Fold in half to be 10" x 16.5"} I did straight line quilting 1/4" in from each "rail" on this pillow. Insert 16" pillow form!
Original Recipe can be found at www.modabakeshop.com
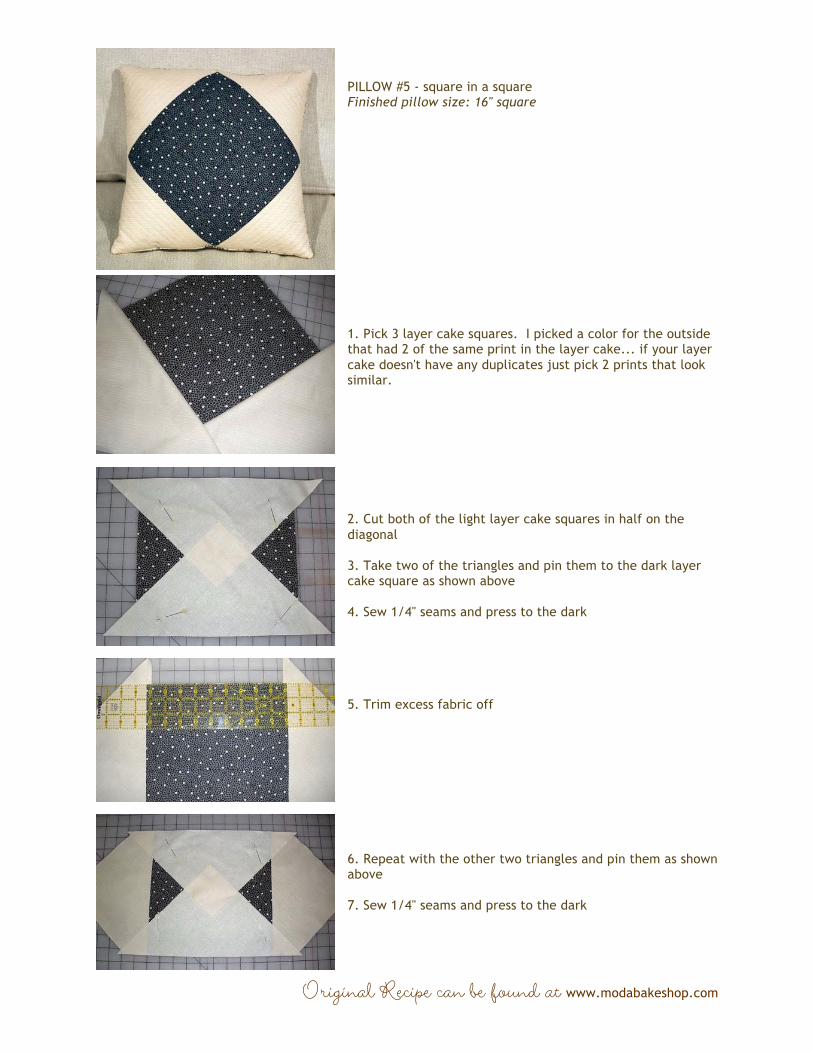
PILLOW #5 - square in a square Finished pillow size: 16" square
1. Pick 3 layer cake squares. I picked a color for the outside that had 2 of the same print in the layer cake... if your layer cake doesn't have any duplicates just pick 2 prints that look similar.
2. Cut both of the light layer cake squares in half on the diagonal 3. Take two of the triangles and pin them to the dark layer cake square as shown above 4. Sew 1/4" seams and press to the dark
5. Trim excess fabric off
6. Repeat with the other two triangles and pin them as shown above 7. Sew 1/4" seams and press to the dark

Original Recipe can be found at www.modabakeshop.com
8. Trim to 14.5" square
9. Quilt the 14.5" panel & follow john's instructions to make the back! {The two pieces should each be cut at 18" x 14.5" Fold in half to be 9" x 14.5"} I quilted lots of straight lines on the outside triangles... and also quilted squares inside of squares on the black portion. Insert 14" pillow form!
Yield:
6 amazing pillows!! We hope you enjoy our ideas... and that we have inspired you to make some pillows! John Adams of Quilt Dad http://www.quiltdad.com/ Julie Herman of Jaybird Quilts http://www.jaybirdquilts.com/