
Orca Installation Guide -...
44
Orca Orca Installation Guide Orca Version 1.7.1 Document Revision 4.0 May 2009
Transcript of Orca Installation Guide -...

OrcaInstallation GuideDocument Revision 4.0May 2009
OrcaInstallation GuideOrca Version 1.7.1Document Revision 4.0May 2009

Concept Systems Limited
1 Logie Mill, BeaverBank Business ParkLogie Green Road, EdinburghEH7 4HG, Scotland
Tel: (+44)131 557 5595 Fax: (+44)131 557 2367
Email: [email protected] Website: www.csl.co.uk
Copyright © 2009 ION Geophysical Corporation. All rights reserved. Information subject to change without notice.
Print Date May 25, 2009
Disclaimer This document is the property of Concept Systems Limited. It must not be copied, in whole or in part, or otherwise disclosed, without prior written consent. Any copies of this document, or part thereof, must also include a copy of this legend. This document is supplied without liability for errors or omissions.
Acknowledgements Orca is a product of Concept Systems Limited.
Trademarks Concept Systems Limited has attempted, throughout this book, to distinguish proprietary trademarks from descriptive terms by following the capitalisation style used by the manufacturer. All brand names and product names used in this book are trade names, service marks, trademarks, or registered trademarks of their respective owners.

iContents
Contents
Preface . . . . . . . . . . . . . . . . . . . . . . . . . . . . . . . . . . . . . . . . . . . . . . . . . . . . . . . . . . . . . . . . v
Introduction . . . . . . . . . . . . . . . . . . . . . . . . . . . . . . . . . . . . . . . . . . . . . . . . . . . . . . . . . . . . . . . . . . 1Install Red Hat Linux . . . . . . . . . . . . . . . . . . . . . . . . . . . . . . . . . . . . . . . . . . . . . . . . . . . . . . . . . . . 2
Install RedHat Linux operating System using CD-ROMS. . . . . . . . . . . . . . . . . . . . . 2Network Configuration . . . . . . . . . . . . . . . . . . . . . . . . . . . . . . . . . . . . . . . . . . . . . . . 3
Pre-Installation Set up . . . . . . . . . . . . . . . . . . . . . . . . . . . . . . . . . . . . . . . . . . . . . . . . . . . . . . . . . . 5About Pre-Installation Set up . . . . . . . . . . . . . . . . . . . . . . . . . . . . . . . . . . . . . . . . . . 5Prerequisites. . . . . . . . . . . . . . . . . . . . . . . . . . . . . . . . . . . . . . . . . . . . . . . . . . . . . . . 5Workflow. . . . . . . . . . . . . . . . . . . . . . . . . . . . . . . . . . . . . . . . . . . . . . . . . . . . . . . . . . 5Task 1: Identify machines for Orca roles . . . . . . . . . . . . . . . . . . . . . . . . . . . . . . . . . 5Task 2: Set up users and permissions . . . . . . . . . . . . . . . . . . . . . . . . . . . . . . . . . . . 6Task 3: Check Partitions. . . . . . . . . . . . . . . . . . . . . . . . . . . . . . . . . . . . . . . . . . . . . . 7Task 4: Check cross-mounts . . . . . . . . . . . . . . . . . . . . . . . . . . . . . . . . . . . . . . . . . . 7
Install Orca using Installation Scripts . . . . . . . . . . . . . . . . . . . . . . . . . . . . . . . . . . . . . . . . . . . . . 8About Installing Orca . . . . . . . . . . . . . . . . . . . . . . . . . . . . . . . . . . . . . . . . . . . . . . . . 8Prerequisites. . . . . . . . . . . . . . . . . . . . . . . . . . . . . . . . . . . . . . . . . . . . . . . . . . . . . . . 8
Post-Installation Set up . . . . . . . . . . . . . . . . . . . . . . . . . . . . . . . . . . . . . . . . . . . . . . . . . . . . . . . . 10About Post-Installation Set up . . . . . . . . . . . . . . . . . . . . . . . . . . . . . . . . . . . . . . . . 10Prerequisites. . . . . . . . . . . . . . . . . . . . . . . . . . . . . . . . . . . . . . . . . . . . . . . . . . . . . . 10Power RTNU Configuration . . . . . . . . . . . . . . . . . . . . . . . . . . . . . . . . . . . . . . . . . 10Task 1: Configure PowerRTNU . . . . . . . . . . . . . . . . . . . . . . . . . . . . . . . . . . . . . . . 11Task 2: Configure Network Time Protocol (NTP) . . . . . . . . . . . . . . . . . . . . . . . . . . 11Create Database and Import Configuration Files . . . . . . . . . . . . . . . . . . . . . . . 11Task 1: Create Database . . . . . . . . . . . . . . . . . . . . . . . . . . . . . . . . . . . . . . . . . . . . 11Task 2: Import xml files. . . . . . . . . . . . . . . . . . . . . . . . . . . . . . . . . . . . . . . . . . . . . . 11Assign Orca Roles . . . . . . . . . . . . . . . . . . . . . . . . . . . . . . . . . . . . . . . . . . . . . . . . 11Task 1: Check Roles . . . . . . . . . . . . . . . . . . . . . . . . . . . . . . . . . . . . . . . . . . . . . . . 12Task 2: Change Roles . . . . . . . . . . . . . . . . . . . . . . . . . . . . . . . . . . . . . . . . . . . . . . 12Task 3: Change Roles of Slave Vessel Machines . . . . . . . . . . . . . . . . . . . . . . . . . 14

ii Contents
Workstation Parameters . . . . . . . . . . . . . . . . . . . . . . . . . . . . . . . . . . . . . . . . . . . . 14Reflex Configuration . . . . . . . . . . . . . . . . . . . . . . . . . . . . . . . . . . . . . . . . . . . . . . . 15Task: Update Reflex Setup File . . . . . . . . . . . . . . . . . . . . . . . . . . . . . . . . . . . . . . . . 15Set up Authentication . . . . . . . . . . . . . . . . . . . . . . . . . . . . . . . . . . . . . . . . . . . . . . 15Task: Set up Authentication . . . . . . . . . . . . . . . . . . . . . . . . . . . . . . . . . . . . . . . . . . . 15Sprint Configuration . . . . . . . . . . . . . . . . . . . . . . . . . . . . . . . . . . . . . . . . . . . . . . . 17Install Adobe® Reader® . . . . . . . . . . . . . . . . . . . . . . . . . . . . . . . . . . . . . . . . . . . . . . . . . . . . . . . . 17
Upgrading to a New Version of Orca . . . . . . . . . . . . . . . . . . . . . . . . . . . . . . . . . . . . . . . . . . . . . . 18About Upgrading . . . . . . . . . . . . . . . . . . . . . . . . . . . . . . . . . . . . . . . . . . . . . . . . . . . 18Prerequisites . . . . . . . . . . . . . . . . . . . . . . . . . . . . . . . . . . . . . . . . . . . . . . . . . . . . . . 18Upgrade Procedure from 1.6.1 to 1.7.1 . . . . . . . . . . . . . . . . . . . . . . . . . . . . . . . . 18Copy Existing Configuration. . . . . . . . . . . . . . . . . . . . . . . . . . . . . . . . . . . . . . . . . . . 18Create and Activate Transition Survey . . . . . . . . . . . . . . . . . . . . . . . . . . . . . . . . . . 18Unpack and Patch the Base Release . . . . . . . . . . . . . . . . . . . . . . . . . . . . . . . . . . . 19Upgrade the Configuration. . . . . . . . . . . . . . . . . . . . . . . . . . . . . . . . . . . . . . . . . . . . 19Create and Activate Production Survey . . . . . . . . . . . . . . . . . . . . . . . . . . . . . . . . . . 19Upgrade Procedure from 1.5.1 to 1.7.1 . . . . . . . . . . . . . . . . . . . . . . . . . . . . . . . . 20Copy Existing Configuration. . . . . . . . . . . . . . . . . . . . . . . . . . . . . . . . . . . . . . . . . . . 20Create and Activate a New Survey . . . . . . . . . . . . . . . . . . . . . . . . . . . . . . . . . . . . . 20Assign Roles to Machines During Upgrade . . . . . . . . . . . . . . . . . . . . . . . . . . . . . . . 20Install New Software . . . . . . . . . . . . . . . . . . . . . . . . . . . . . . . . . . . . . . . . . . . . . . . . 20Upgrade the Configuration. . . . . . . . . . . . . . . . . . . . . . . . . . . . . . . . . . . . . . . . . . . . 20Complete Post-Installation Set up . . . . . . . . . . . . . . . . . . . . . . . . . . . . . . . . . . . . . . 21
Installing an Orca Base Release . . . . . . . . . . . . . . . . . . . . . . . . . . . . . . . . . . . . . . . . . . . . . . . . . 22About Orca Base Releases . . . . . . . . . . . . . . . . . . . . . . . . . . . . . . . . . . . . . . . . . . . 22Prerequisites . . . . . . . . . . . . . . . . . . . . . . . . . . . . . . . . . . . . . . . . . . . . . . . . . . . . . . 22Workflow . . . . . . . . . . . . . . . . . . . . . . . . . . . . . . . . . . . . . . . . . . . . . . . . . . . . . . . . . 22Task 1: Stop Orca Services . . . . . . . . . . . . . . . . . . . . . . . . . . . . . . . . . . . . . . . . . . 22Task 2: Unpack the New Software. . . . . . . . . . . . . . . . . . . . . . . . . . . . . . . . . . . . . . 22Task 3: Update the Symbolic Link . . . . . . . . . . . . . . . . . . . . . . . . . . . . . . . . . . . . . . 23Task 4: Install on Other Orca machines. . . . . . . . . . . . . . . . . . . . . . . . . . . . . . . . . . 23Task 5: Restart Orca Services . . . . . . . . . . . . . . . . . . . . . . . . . . . . . . . . . . . . . . . . . 23
Installing Orca Patches. . . . . . . . . . . . . . . . . . . . . . . . . . . . . . . . . . . . . . . . . . . . . . . . . . . . . . . . . 24About Orca Patches. . . . . . . . . . . . . . . . . . . . . . . . . . . . . . . . . . . . . . . . . . . . . . . . . 24Beta Patches . . . . . . . . . . . . . . . . . . . . . . . . . . . . . . . . . . . . . . . . . . . . . . . . . . . . . . 24Mirroring Setup . . . . . . . . . . . . . . . . . . . . . . . . . . . . . . . . . . . . . . . . . . . . . . . . . . . . 25Task 1: Mirror the CSL ftp directory . . . . . . . . . . . . . . . . . . . . . . . . . . . . . . . . . . . . 25Task 2: Mirror all Orca vessels with local vessel . . . . . . . . . . . . . . . . . . . . . . . . . . . 25Task 3: Run orca_patch. . . . . . . . . . . . . . . . . . . . . . . . . . . . . . . . . . . . . . . . . . . . . . 26Manual installation . . . . . . . . . . . . . . . . . . . . . . . . . . . . . . . . . . . . . . . . . . . . . . . . . . 28Uninstall a Patch . . . . . . . . . . . . . . . . . . . . . . . . . . . . . . . . . . . . . . . . . . . . . . . . . . . 28

iii
Contents
Appendix A. Installation Script Processes A-1Installation script processes . . . . . . . . . . . . . . . . . . . . . . . . . . . . . . . . . . . . . . . . . .A-1
Appendix B. Clone an Existing Vessel Configuration B-1Clone an Existing Configuration . . . . . . . . . . . . . . . . . . . . . . . . . . . . . . . . . . . . . . .B-1

iv Contents
v
Preface
Overview Orca Installation Guide is part of the Orca task-based series of guides which cover the tasks most commonly performed when using Orca during a marine seismic survey.
How to Use This Guide
This guide describes the process of installing Orca in a series of logical tasks.
There are two types of hyperlinks:
Link to another part of this document:“Pre-Installation Set up” on page 5
Link to another document:Orca Guide: Acquire a Line
Who Should Use This Guide
This guide is designed to assist CSL Engineers in the installation of the Orca application.
Concept Systems Customer Support
For Orca Customer Support:
Phone: 07836 647805
E-mail: [email protected]

vi

1
Introduction
Orca Installation Guide
Introduction
This document describes the installation of:
• Red Hat® Linux® Operating System • Orca application
Install the Operating System first, and then install Orca using supplied installation scripts. The installation of Orca is divided into three sections:
• Pre-installation Set up• Installation• Post-installation Set up
This document also covers
• Upgrading to a new version of Orca• Installing a base release• Installing patches

2
Install Red Hat Linux
Orca Installation Guide
Install Red Hat Linux
Install RedHat Linux operating System using CD-ROMS
To perform the installation of the Red Hat Linux Operating System, complete the following steps.
NoteDuring installation, select the default options unless otherwise specified.
1. Boot the machine from the CD-ROM. If necessary, alter the boot sequence within the BIOS set-up menu or Boot Device menu to ensure that the CD-ROM is the primary boot device.
2. When the machine has booted, the installation interface is displayed. On the first page of the interface, select the option to Install or Upgrade in a Graphical Mode and then press Enter.
3. At the first Welcome screen, click Next.4. From the Installation Process Language screen, select the appropriate
language for the installation process, and click Next.5. The Keyboard Configuration screen is displayed. From the options
available, select the appropriate keyboard layout, e.g. ‘United Kingdom’ or ‘U.S. English’ and click Next.
6. The Disk Partitioning Setup screen is shown. From the provided options, select Manually Partition with Disk Druid and click Next.
7. The Disk Druid tool allows the manual partitioning of the disks within the machine. It is up to the user to decide the required partition, but the following should be defined as a minimum:
It is strongly recommended that Orca is installed within a clean installation of the Red Hat Linux Operating System. However, if existing partitions other than the root (/) partition must be retained, this is acceptable.
When the disks are partitioned and configured, click Next.8. The installer interface then prompts for the Boot Loader configuration.
Use the default settings and click Next.9. The Network Configuration screen allows the configuration of the
settings for the installed network devices. The configuration should be set
Partition Type Mount Point Suggested Size
Root / At least 20 GbHome Directory /home Remaining disk spaceSwap swap For systems with physical memory up to 2Gb swap
size should be set as double the size of physical memory (e.g. for a system with 2Gb of physical space, set the swap size to 4Gb). For systems with physical memory greater than 2Gb, the swap should be equal to the size of the physical memory plus a further 2Gb (e.g. for a system with 8Gb of physical space, set the swap size to 10Gb).
Boot /boot 100 Mb
3
Install Red Hat Linux
Orca Installation Guide
as appropriate for the network in which the machines are to run. When the configuration is complete, click Next.
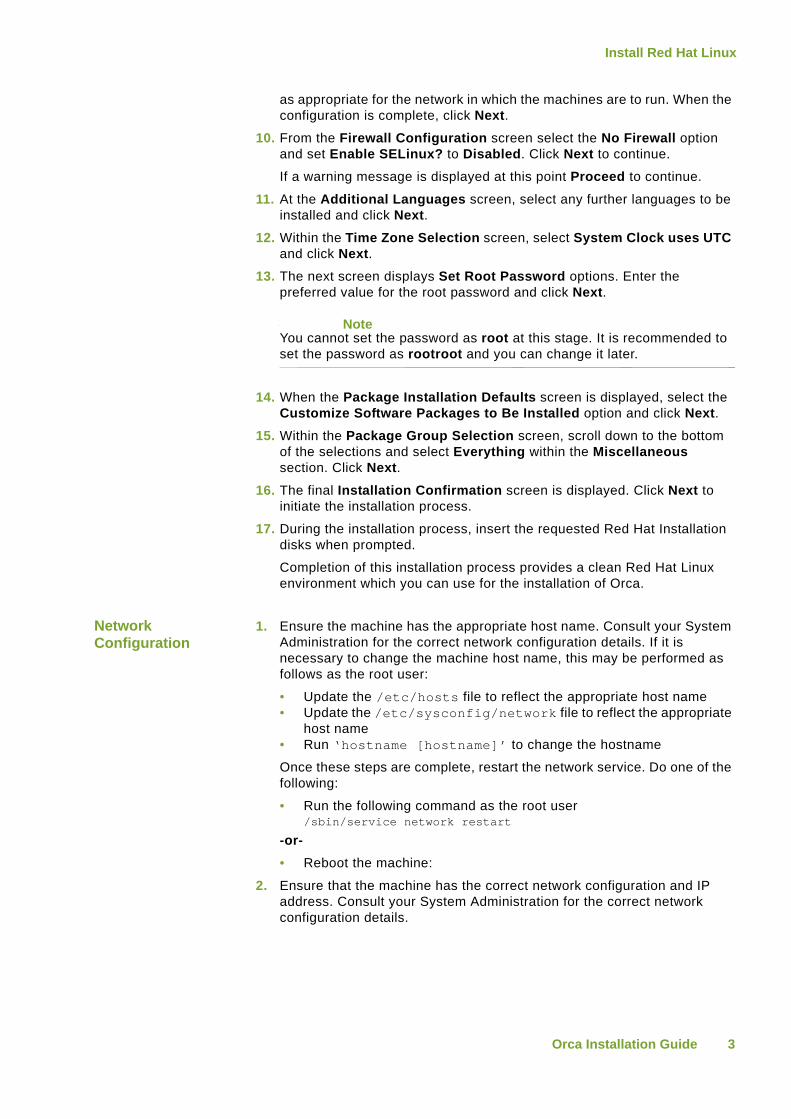
10. From the Firewall Configuration screen select the No Firewall option and set Enable SELinux? to Disabled. Click Next to continue.
If a warning message is displayed at this point Proceed to continue.
11. At the Additional Languages screen, select any further languages to be installed and click Next.
12. Within the Time Zone Selection screen, select System Clock uses UTC and click Next.
13. The next screen displays Set Root Password options. Enter the preferred value for the root password and click Next.
NoteYou cannot set the password as root at this stage. It is recommended to set the password as rootroot and you can change it later.
14. When the Package Installation Defaults screen is displayed, select the Customize Software Packages to Be Installed option and click Next.
15. Within the Package Group Selection screen, scroll down to the bottom of the selections and select Everything within the Miscellaneous section. Click Next.
16. The final Installation Confirmation screen is displayed. Click Next to initiate the installation process.
17. During the installation process, insert the requested Red Hat Installation disks when prompted.
Completion of this installation process provides a clean Red Hat Linux environment which you can use for the installation of Orca.
Network Configuration
1. Ensure the machine has the appropriate host name. Consult your System Administration for the correct network configuration details. If it is necessary to change the machine host name, this may be performed as follows as the root user:
• Update the /etc/hosts file to reflect the appropriate host name• Update the /etc/sysconfig/network file to reflect the appropriate
host name• Run ‘hostname [hostname]’ to change the hostname
Once these steps are complete, restart the network service. Do one of the following:
• Run the following command as the root user/sbin/service network restart
-or-• Reboot the machine:
2. Ensure that the machine has the correct network configuration and IP address. Consult your System Administration for the correct network configuration details.
4
Install Red Hat Linux
Orca Installation Guide
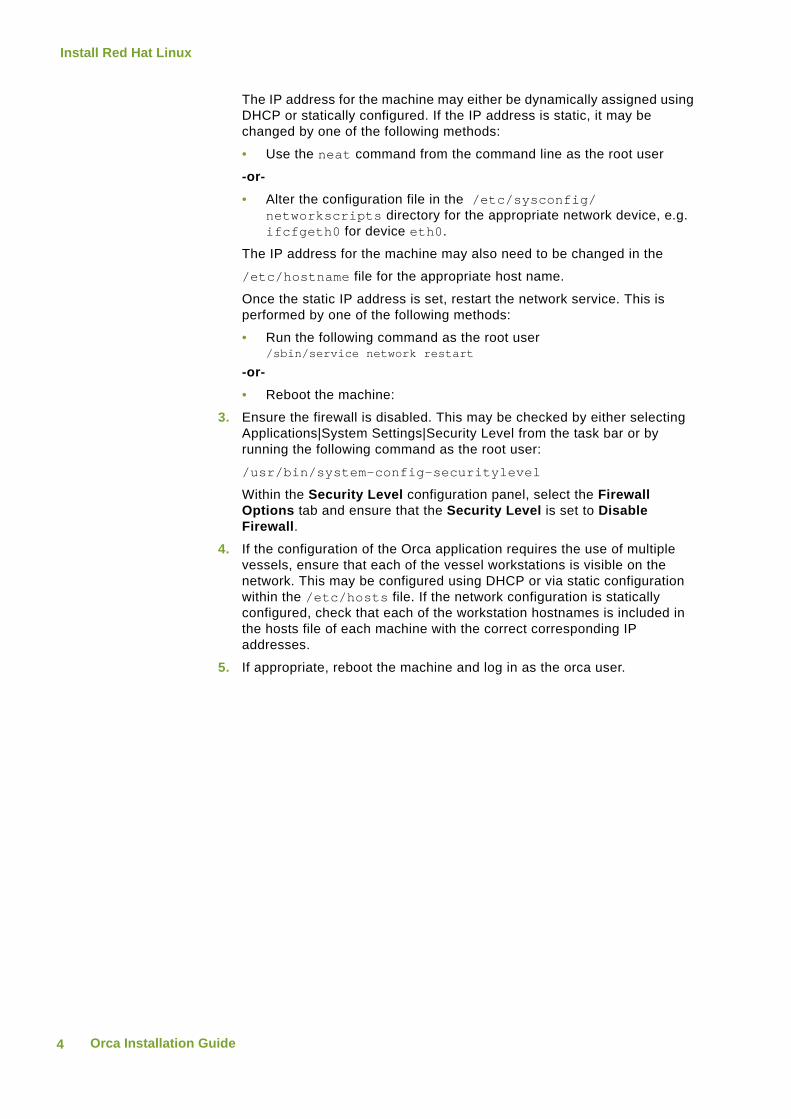
The IP address for the machine may either be dynamically assigned using DHCP or statically configured. If the IP address is static, it may be changed by one of the following methods:
• Use the neat command from the command line as the root user
-or-• Alter the configuration file in the /etc/sysconfig/
networkscripts directory for the appropriate network device, e.g. ifcfgeth0 for device eth0.
The IP address for the machine may also need to be changed in the
/etc/hostname file for the appropriate host name.
Once the static IP address is set, restart the network service. This is performed by one of the following methods:
• Run the following command as the root user/sbin/service network restart
-or-• Reboot the machine:
3. Ensure the firewall is disabled. This may be checked by either selecting Applications|System Settings|Security Level from the task bar or by running the following command as the root user:
/usr/bin/system-config-securitylevel
Within the Security Level configuration panel, select the Firewall Options tab and ensure that the Security Level is set to Disable Firewall.
4. If the configuration of the Orca application requires the use of multiple vessels, ensure that each of the vessel workstations is visible on the network. This may be configured using DHCP or via static configuration within the /etc/hosts file. If the network configuration is statically configured, check that each of the workstation hostnames is included in the hosts file of each machine with the correct corresponding IP addresses.
5. If appropriate, reboot the machine and log in as the orca user.

5
Pre-Installation Set up
Orca Installation Guide
Pre-Installation Set up
About Pre-Installation Set up
The tasks in this section cover the steps necessary to set up your system before installing Orca version 1.7.1 on machines that have not previously been running Orca. For tasks specific to upgrading Orca from a previous version, refer to “Upgrading to a New Version of Orca” on page 18.
Prerequisites The Red Hat Linux operating system should be installed as detailed in “Install Red Hat Linux” on page 2.
Workflow
Task 1: Identify machines for Orca roles
In order to spread Orca’s processing load, provide automatic back up of logged data, and allow easier recovery from machine failure, Orca processes are organised into four ’roles’.
The four roles are:
• Control• Logging• Processing• Coverage
Each role has a set of processes and datastores associated with it. When a workstation takes on a role, it is responsible for managing all resources associated with that role.
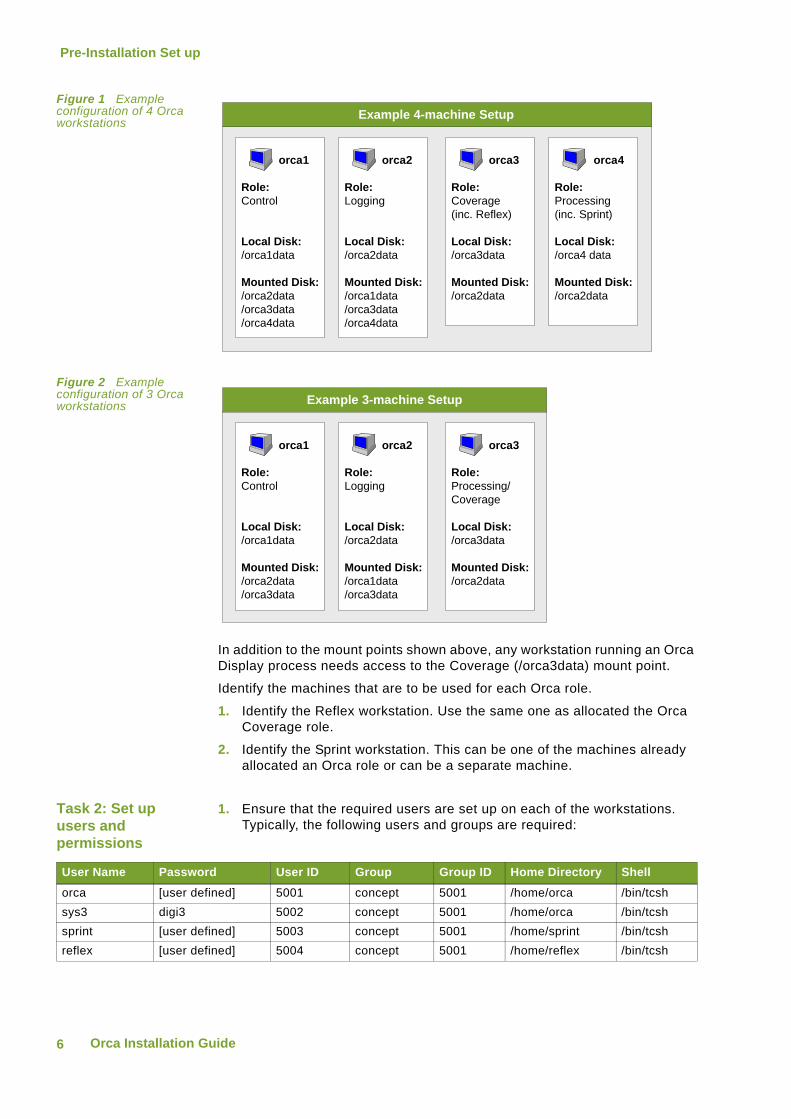
Figure 1 on page 6 shows an example configuration for four Orca workstations. Each machine has an assigned role, a local data disk and can mount disks from other workstations.
Figure 2 on page 6 show an example configuration using only three workstations.
Check NFS cross-mounts
Pre-Installation Tasks
Check partitions
Set up ssh authentication
Set up users and check
permissions
Identify machine roles
6
Pre-Installation Set up
Orca Installation Guide
Figure 1 Example configuration of 4 Orca workstations
Figure 2 Example configuration of 3 Orca workstations
In addition to the mount points shown above, any workstation running an Orca Display process needs access to the Coverage (/orca3data) mount point.
Identify the machines that are to be used for each Orca role.
1. Identify the Reflex workstation. Use the same one as allocated the Orca Coverage role.
2. Identify the Sprint workstation. This can be one of the machines already allocated an Orca role or can be a separate machine.
Task 2: Set up users and permissions
1. Ensure that the required users are set up on each of the workstations. Typically, the following users and groups are required:
Example 4-machine Setup
orca1
Role: Control
Local Disk:/orca1data
Mounted Disk:/orca2data/orca3data/orca4data
orca2
Role: Logging
Local Disk:/orca2data
Mounted Disk:/orca1data/orca3data/orca4data
orca3
Role: Coverage (inc. Reflex)
Local Disk:/orca3data
Mounted Disk:/orca2data
orca4
Role: Processing(inc. Sprint)
Local Disk:/orca4 data
Mounted Disk:/orca2data
Example 3-machine Setup
orca1
Role: Control
Local Disk:/orca1data
Mounted Disk:/orca2data/orca3data
orca2
Role: Logging
Local Disk:/orca2data
Mounted Disk:/orca1data/orca3data
orca3
Role: Processing/Coverage
Local Disk:/orca3data
Mounted Disk:/orca2data
User Name Password User ID Group Group ID Home Directory Shellorca [user defined] 5001 concept 5001 /home/orca /bin/tcshsys3 digi3 5002 concept 5001 /home/orca /bin/tcshsprint [user defined] 5003 concept 5001 /home/sprint /bin/tcshreflex [user defined] 5004 concept 5001 /home/reflex /bin/tcsh

7
Pre-Installation Set up
Orca Installation Guide
NoteIf the workstation is to be setup and added to an existing Orca system, check the user Ids and group Ids for the existing users and ensure that these match on the new workstation.
The name of the group to which each of the users belongs is optional but for ease of use should be consistent for all of the users defined above.
The sprint user is required on both of the Orca workstations performing the Control and Processing roles in order to configure the passwordless ssh authentication allowing the Orca system to create the NRT Sprint database on the Sprint workstation (see task 1 on page 11).
2. Ensure the postgres user has been created. Go to the /etc/passwd file, search for the user name and attempt to switch to the postgres user. This user is automatically created when PostgreSQL is initially installed during the Redhat installation.
Task 3: Check Partitions
Ensure that the disks required for the Orca data are configured and mounted correctly on each of the workstations (e.g. /orca1data, /orca2data, etc).
Task 4: Check cross-mounts
Ensure that the appropriate NFS cross mounts are set up on each of the Orca workstations. These cross-mounts between the workstations are required by the Orca Admin Agent and for the display of Coverage on machines running display processes. Using the example shown in Figure 1 on page 6, the required cross mounts used by each workstation are as shown in the table below:
Workstation Name Workstation Role Local Disk Mounted Diskorca1 Control /orca1data /orca2data
/orca3data/orca4data
orca2 Logging /orca2data /orca1data/orca3data/orca4data
orca3 Coverage /orca3data /orca2dataorca4 Processing /orca4data /orca2data

8
Install Orca using Installation Scripts
Orca Installation Guide
Install Orca using Installation Scripts
About Installing Orca
The tasks in this section cover installing Orca version 1.7.1 on machines that have not previously been running Orca. For tasks specific to upgrading Orca from a previous version, refer to “Upgrading to a New Version of Orca” on page 18.
Prerequisites The Red Hat Linux operating system should be installed as detailed in “Install Red Hat Linux” on page 2.
You should have completed the pre-installation set up tasks as detailed in “Pre-Installation Set up” on page 5.
NoteComplete these steps on each of the Orca workstations, i.e. the Control, Logging, Processing and Coverage machines.
1. As the root user, copy the ORCAinstall_1-7-1.tar.bz2 compressed archive file containing the installation to the root directory (/).
2. From the root directory, extract the contents of the Orca installation archive file:cd /tar xvjf /ORCAinstall_1-7-1.tar.bz2
3. When the extraction is complete, a directory called ORCAinstall_1-7-1 is present in the root directory (/). This directory contains the following files and subdirectories:
4. Change directory to the installation directory and ensure the installation script has sufficient execute permissions.
You must run the installation script as the root user.
5. Run the script, using the name of the compressed Orca base release tar archive as a parameter, as shown in the example below:cd /ORCAinstall_1-7-1./orca_install_run.bsh orca_1-7-1.10.mar09.tar.bz2
Substitute the name of the most recent base release archive or the file you have been advised to use.
Directory/File Name Descriptionorca_install_run.bsh Installation scriptorca_1-7-1.10mar09.tar.bz2(example only)
Compressed archive file containing the Orca base release. This filename is an example only. Choose the most recently dated file unless advised otherwise.
pgsql_ref PostgreSQL reference filesrpm Required RPM filesscripts Supporting scriptstar Additional archive filesmisc Miscellaneous files including example .cshrc
file

9
Install Orca using Installation Scripts
Orca Installation Guide
6. When you run the script, the first messages displayed detail the prerequisites for the Orca installation environment. Confirm these prerequisites are fulfilled and continue.
7. Whilst the script is run, the following information is prompted for and is required. It may be useful to complete this table before running the installation to ensure the necessary information is available when needed:
8. When the orca user home directory and orca data directory are confirmed, the installation script proceeds with the required installation steps, detailed in Appendix A, "Installation Script Processes".
9. During the installation of the required RPMs, log files in the installation directory are generated containing the output from the RPM installation commands. These are named as follows:
10. When the installation processes completes, the script prompts for the required data for the completion of the Orca bootstrap.xml file (located by default in the /etc/orca directory).
11. As shown in the required information table in step 7, the three letter vessel abbreviation is requested. This should match the prefix defined for the vessel in the /etc/orca/all_vessels_directory.xml file.
12. Following the vessel abbreviation, the Database Server host is requested. This is set to the local machine.
13. When this is set, the script prompts for the machine name for the Message Server host and the Data Server host. Typically, these are set to the hostname of the machine taking the Control role in the Orca set up.
14. Having completed the server configuration, specify the number of machines making up the Orca installation and their hostnames. When prompted, enter the number of workstations, along with their hostnames.
15. When the configuration of the bootstrap.xml file is complete, the Orca services restart in order to read the updated configuration and the Orca installation script completes.
16. When the installation script completes, proceed to the post-installation procedures - “Post-Installation Set up” on page 10.
Required Information Default Comments ValuesOrca user home directory
/home/orca -
Orca data directory /orca1data -Vessel Abbreviation 3-letter abbreviation -Database Server Host [local machine] -Message Server Host [local machine] Control machineData Server Host [local machine] Control machineMachine Names [local machine] All Orca machines
in bootstrap Sprint Host [local machine] Processing machine
Log File Name Descriptionrpm_install_pgsql.txt PostgreSQL RPM installation log filerpm_install_perl.txt Perl installation log filerpm_install_misc.txt Miscellaneous RPM installation log filerpm_install_slony.txt Slony RPM installation log file

10
Post-Installation Set up
Orca Installation Guide
Post-Installation Set up
About Post-Installation Set up
The tasks in this section cover post-installation tasks for Orca version 1.7.1 on machines that have not previously been running Orca. For tasks specific to upgrading Orca from a previous version, refer to “Upgrading to a New Version of Orca” on page 18.
Prerequisites The Red Hat Linux operating system should be installed as detailed in “Install Red Hat Linux” on page 2.
You should have completed the pre-installation set up tasks as detailed in “Pre-Installation Set up” on page 5.
You should have completed the Orca Installation tasks as detailed in “Install Orca using Installation Scripts” on page 8.
Power RTNU ConfigurationRefer to the PowerRTNU User Manual for full details of the PowerRTNU hardware and software specification and configuration.
The PowerRTNU boot file is called orcartnu1.rc and, by default, is located in /etc/orca/PowerRTNU/boot.
Example PowerRTNU boot file# stop the logging process from startingtd tLogTask
# set up the host addresses for the dataserver and message server # processeshostAdd("dsnhost", "10.220.24.20")hostAdd("messagehost", "10.220.24.20")hostAdd("msvchost","10.220.24.20")
# specify the location of the Orca PowerRTNU object filescd "/home/orca/CURRENT_VERSION/PowerRTNU/obj"
# load the PowerRTNU object fileld 1,0,"powerrtnu.o"
# load the NTP processld 1,0,"xntpd"
# set the UDP port numbers for the cardsUdpPrintfInit( 29000+sysProcNumGet() )
# Configure the PowerRTNU to connect directly to the Orca dataserverpcpDisable( "dsnStart" )pcpDisable( "drnStart" )pcpDisableAutoBoot
# start the PCP processpcpStart()
# sleep whilst PCP process starts msleep 300
11
Post-Installation Set up
Orca Installation Guide
# start the NTP processmstart 0, "xntpdmain -c /etc/orca/PowerRTNU/boot/ntp.conf"
Task 1: Configure PowerRTNU
1. Update the IP addresses for the servers. Consult your System Administration to confirm the correct IP address values.
2. Check that the path for the PowerRTNU object files is correctly set.
Task 2: Configure Network Time Protocol (NTP)
When the PowerRTNU configuration is complete, configure the NTP service on all Orca workstations.
Ensure that the NTP service on each of the Orca workstations is using the PowerRTNU as its NTP source. The IP address of the PowerRTNU must be set in the /etc/ntp.conf file.
Create Database and Import Configuration FilesIt may be necessary to create an empty Postgres database. Once this is in place you can import the initial configuration files. The source of the xml files is from one of the following:
• Spectra SCN (Refer to Orca Guide: Vessel Setup from Spectra SCN).
• Cloned from another vessel (See Appendix B, "Clone an Existing Vessel Configuration")
• Upgraded from a previous version (1.7.1)
NoteIf an import from SCN was performed by following the steps in the Orca Guide: Vessel Setup from Spectra SCN then the database and XMLs have already been imported. Proceed to "Assign Orca Roles.".
Task 1: Create Database
To create an empty Postgres database run the following command:
orca_db_create -survey [survey name] -active
This command checks for the presence of a database and if one is not found creates an empty Postgres database.
Task 2: Import xml files
In the directory which contains the xml files run the following command:
importconfig
The initial configuration files are imported.
Assign Orca Roles If a database has been created using orca_db_create, you must first create a new survey based on it via Orca Process.
During pre-installation roles were assigned to workstations. See “Identify machines for Orca roles” on page 5

12
Post-Installation Set up
Orca Installation Guide
Task 1: Check Roles
To see which roles are currently assigned to which workstations:
1. Launch the Orca Process (OP) window:
orca_op -vessel [vessel prefix]
2. Select Admin from the System menu to start Orca Configuration in Admin mode.
3. Select the vessel from the tree menu on the left to show the currently selected roles for each of the configured workstations.
Figure 1.1 Allocation of four roles between configured workstations
The current assignment of roles over the available workstations is shown via the drop-down menus.
Task 2: Change Roles
To change the assigned roles:
1. Follow the instructions given in "Check Roles" on page 1-12.
2. Use the Workstation menus to make new selections.
Processing is inactive as it must be on the same machine as Logging. The workstation for both roles is set via Logging.
3. Click Apply.
A warning is given that you must restart Orca for the changes to take effect and, in the case of changes to the allocation of the Control role, you must edit all relevant bootstrap files to give the correct location of the dataserver (see step 7).
4. When you move roles between workstations, Orca moves the associated processes. Go to the Processes section and confirm the changes using Jump and Confirm.
13
Post-Installation Set up
Orca Installation Guide
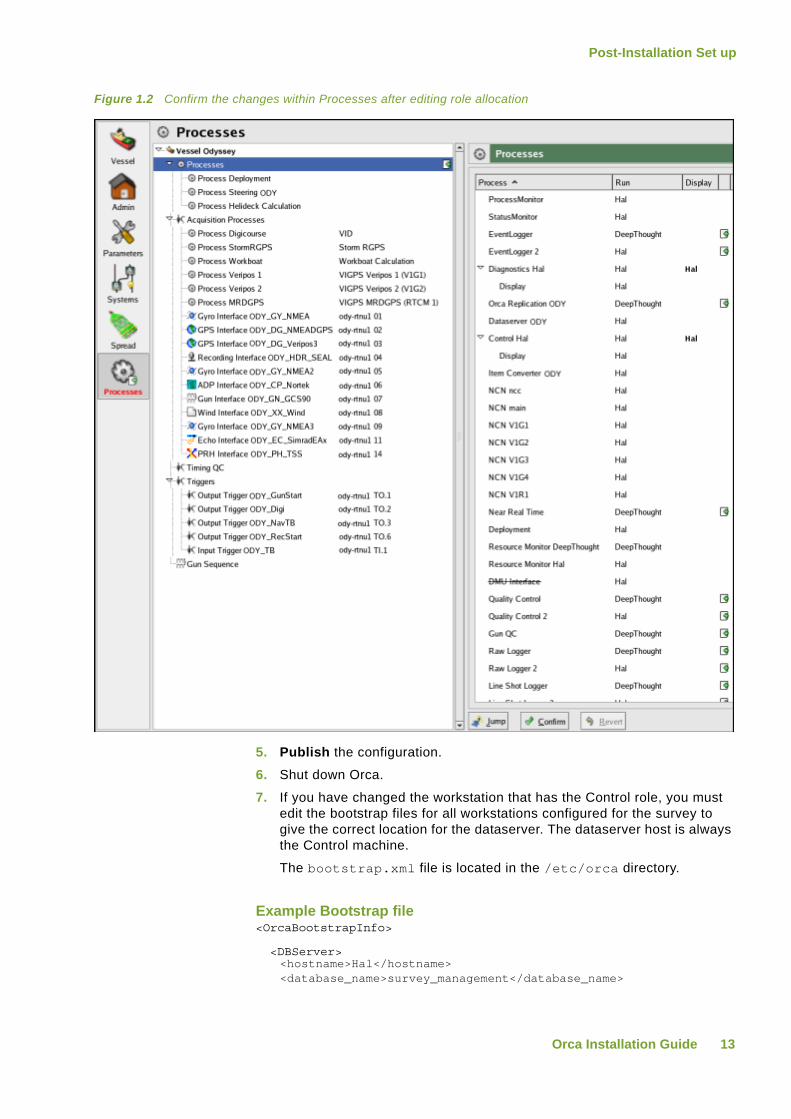
Figure 1.2 Confirm the changes within Processes after editing role allocation
5. Publish the configuration.
6. Shut down Orca.
7. If you have changed the workstation that has the Control role, you must edit the bootstrap files for all workstations configured for the survey to give the correct location for the dataserver. The dataserver host is always the Control machine.
The bootstrap.xml file is located in the /etc/orca directory.
Example Bootstrap file<OrcaBootstrapInfo>
<DBServer> <hostname>Hal</hostname> <database_name>survey_management</database_name>

14
Post-Installation Set up
Orca Installation Guide
<username>orca</username> </DBServer>
<MessageServer> <host>DeepThought</host> <port>25099</port>
</MessageServer>
<DataServer> <host>DeepThought</host> <port>25000</port>
</DataServer>
<vessel_id>ODY</vessel_id>
<machine_ids> <name>Hal</name> <value>1</value>
</machine_ids> <machine_ids> <name>DeepThought</name> <value>2</value>
</machine_ids>
</OrcaBootstrapInfo>
8. Restart Orca.
Result: Orca restarts with new allocation of roles. PowerRTNUs are linked to roles, not machines, so have moved with the reallocated roles.
Task 3: Change Roles of Slave Vessel Machines
To change the assigned roles on a slave vessel from the master vessel you do not need to be in Admin mode:
1. In Orca Configuration select the slave vessel from the tree menu on the left to show the currently selected roles for the slave vessel workstations.
Only the Control and Logging roles are available on a slave vessel configuration.
2. Use the Workstation menus to make new selections.
3. Publish the configuration.
4. When the changes are received on the slave vessel, from the slave vessel, select Synchronise... from the System menu on the Orca Process (OP) window.
5. You are warned that this involves shutting down Orca completely. Provided this is feasible at the current time, click OK.
6. Orca shuts down and a Progress bar shows the various system update tasks completing. When finished, Orca services restart automatically.
7. Restart Orca.
Result: Orca restarts with new allocation of roles.
Workstation ParametersIf running 64 bit version of PostgreSQL then include
/home/orca/CURRENT_VERSION/rhel4_64/shared
as the first path in the LD_LIBRARY_PATH variable.
15
Post-Installation Set up
Orca Installation Guide
Reflex ConfigurationThe current recommended version of Reflex for use with Orca version 1.7.1 is version 1.10.2.
Orca automatically creates the required directory structures to use Reflex with Orca coverage.
Task: Update Reflex Setup File
1. In order to access the Orca coverage, update the Reflex setup file (/home/reflex/.reflex_setup) on the Coverage machine.
2. Confirm the local environment settings in the Reflex setup file as followssetenv REFLEX_DATA_DIR /[coverage data]/[survey name]/db_binningsetenv REFLEX_SAMPLE_DIR /[coverage data]/[survey name]/db_binningsetenv REFLEX_DISPLAY_FILE_DIR /[coverage data]/[survey name]/db_binningsetenv PN_HOST [control machine]
3. Replace [coverage data] with the name of the mounted disk which holds the coverage (e.g. orca3data).
4. Replace [survey name] with the name of the current survey.
5. Replace [control machine] with the hostname of the control machine.
Set up AuthenticationThe current recommended version of Sprint for use with Orca version 1.7.1 is version 4.3.7 including the latest patches.
When lines require reprocessing in Sprint, this allows Orca automatically to create appropriately named PostgreSQL databases on the Sprint machine.
This procedure describes the steps required to set up and test the necessary ssh authentication process.
In this procedure, the Orca Logging machine hostname is orca2 and the Sprint machine is given the hostname sprint1. It is recommended you set up authentication on all Orca machines at this time in case machine roles need to be swapped.
Task: Set up Authentication
1. On the Orca Logging machine, log on as a sprint user and generate public and private keys for user ’sprint’:su - sprintssh-keygen -t dsa -b 1024 -N "" -f sprinthost-sshkey
Two files are created:
• sprinthost-sshkey• sprinthost-sshkey.pub
2. As root user, move the private key to /etc/orca:su - mv /home/sprint/sprinthost-sshkey /etc/orca
3. Change the ownership and permissions of the file:chown orca:concept /etc/orca/sprinthost-sshkeychmod 400 /etc/orca/sprinthost-sshkey
4. On the Sprint workstation check that the following directory exists:
16
Post-Installation Set up
Orca Installation Guide
/home/sprint/.ssh/
If this does not exist use the following command to create the directory:
mkdir /home/sprint/.ssh/
5. As sprint user, copy the public file to the sprint machine:exitscp /home/sprint/sprinthost-sshkey.pub sprint1:/home/sprint/.ssh/
If the following message is not displayed then proceed to step 6:The authenticity of host ’sprint1 (10.100.74.68)’ can’t be establishedRSA key fingerprint is 2a:4e:23:4f:18:27:3e:32:4a:12:5f:67:11:27:6b:46Are you sure you want to continue connecting (yes/no)?
Choose yes and the following message should confirm that the host has been added to the authentication:
Warning: Permanently added ’sprint1,10.100.74.68’ (RSA) to the list of known hosts.
6. Log on to the sprint machine and append your public key to the list of authorised keys:
NoteYou must use the American spelling of ’authorized’ with a ’z’.
Ensure that the double redirection characters (>>) is used. This ensures that the ssh key is appended to any existing authorized_keys file.
ssh sprint@sprint1cd .sshcat sprinthost-sshkey.pub >> authorized_keysexit
7. Check permissions. The sprint user must have read-write permission for the authorized_keys file and the .ssh directory must not be world-readable:chmod 700 /home/sprint/.ssh/authorized_keyschmod 700 /home/sprint/.ssh
The sprint home directory must be readable and writable for the sprint user only. chmod 711 /home/sprint
8. In order to verify that the orca_create_db exists and is operational on the Sprint workstation, run the following command from orca2 as the orca user. ssh -i /etc/orca/sprinthost-sshkey sprint@sprint1 -o "PasswordAuthentication no" orca_create_db test_sprintdb
For the initial run of this command, the system may require confirmation of the user and host permissions but should not prompt for the sprint user password. On subsequent runs of this command, the script should complete with no user input required.
To check that the command has run successfully and the test database has been created, use the following command to list the databases on the Sprint workstation:

17
Post-Installation Set up
Orca Installation Guide
psql –h sprint1 -l | grep test_sprintdb
If the test database appears in the list then the creation has been successful.
Sprint ConfigurationOrca NRT creates and writes in real time to the Sprint database. In order for this to work you must complete the procedure detailed in “Set up Authentication” on page 15
NRT runs on the Logging machine. NRT Replay runs on the Processing machine. Both of these processes write to local directories on their workstations, which they create if required.
Assuming the Logging machine is orca2, NRT writes to the /orca2data/nrtsprintdir/ directory. If the Processing machine is orca3, NRT Replay writes to the /orca3data/nrtsprintdir/ directory.
You must also ensure that both of these directories are mounted and available on the Sprint workstation.
Install Adobe® Reader®
Adobe Acrobat Reader is required for the display of Orca Web reports and online documentation in an embedded Acrobat Reader within the Firefox browser.
Go to http://www.adobe.com, download the latest version of the Acrobat Reader and follow the on-screen instructions for installing it.
18
Upgrading to a New Version of Orca
Orca Installation Guide
Upgrading to a New Version of Orca
About Upgrading The upgrade procedure differs, depending upon the version you are upgrading from. Follow the instructions for the relevant upgrade route.
• 1.6.1 to 1.7.1• 1.5.1 to 1.7.1
These sections detail the procedure for upgrading to a newly issued (un-patched) complete version 1.7.1of the Orca software.
For details of how to install base releases with pre-installed patches, refer to “Installing an Orca Base Release” on page 22.
Prerequisites It is recommended that software version upgrades are performed in down-time between surveys.
You should have downloaded the appropriate new software version (in the form of a compressed archive) from Concept’s ftp site to your main Orca workstation.
NoteWhen following the steps detailed below to upgrade the Orca software, it is critical that each step is performed as the appropriate user (orca user or root user) otherwise the procedure will fail.
Upgrade Procedure from 1.6.1 to 1.7.1
Copy Existing Configuration
On the Logging workstation (to check which workstation this is go to the Admin section in Orca Configuration and select the vessel), back up the current configuration XMLs using the exportconfig command as shown below: $ mkdir config161$ cd config161$ exportconfig
Running this command extracts a set of XML configuration files from the configuration datastore to allow a rollback of configuration in the event of any problems with the upgrade.
Create and Activate Transition Survey
1. Prior to the upgrade, start the Orca Process (orca_op) window and create a new transition survey for the upgrade named ‘161_backup’ by selecting New Survey from the System menu.
2. Using the OP window, change to the newly created transition survey (161_backup) by selecting Change survey from the System menu.
3. Shutdown Orca from the OP window by selecting Shutdown from the System menu.
4. On each of the Orca workstations, stop the Orca core services as the root user as follows: # /sbin/service orca stop

19
Upgrading to a New Version of Orca
Orca Installation Guide
Unpack and Patch the Base Release
1. On each of the Orca workstations, unpack the Orca 1.7.1 base release in the Orca home directory (/home/orca) and change the CURRENT_VERSION symbolic link to point to the new base release directory, e.g. $ tar xvjf orca_1-7-1.13mar09.tar.bz2$ rm CURRENT_VERSION$ ln –s /home/orca/orca_1-7-1.13mar09.tar.bz2 CURRENT_VERSION
2. At this point, it is recommended that the newly installed base release is upgraded using the usual patching mechanism (e.g. mirrorFTP, orca_patch, etc). Alternatively, this may be performed when the upgrade is completed.
Upgrade the Configuration
1. Restart the Orca core services on each of the workstations as the root user as follows: # /sbin/service orca start
2. On the Logging workstation, upgrade the existing configuration contained in the transition survey using the following commands run as the orca user: $ mkdir upg_config$ cd upg_config$ orca_upgrade_config_db 1.6.1-1.7.1
A new directory is created for this step as the upgrade script creates XML backup versions of the upgraded configuration sections.
Create and Activate Production Survey
1. Restart the OP window and create a new survey based on the upgraded transition survey (161_backup) by selecting New Survey from the System menu. This new survey may be used as the final production survey.
2. Change to this new survey by selecting Change Survey from the System menu.
3. When the new survey has been loaded, start Orca Configuration in Admin mode by selecting Admin from the System menu of the OP window.
4. Check the configuration, Publish and Exit from Orca Configuration.
5. Restart Orca from the OP window by clicking on the Start button.
When Orca starts, it may only get as far as the Item Converter process and go no further. If this happens, manually start Orca Planner from the Processes section of Orca Diagnostics, add a step and then Publish. Then restart Orca.
When Orca has restarted correctly and all processes are running, the usual survey setup procedures may be followed. Refer to the Orca Guide: Basic Survey Setup for details.
20
Upgrading to a New Version of Orca
Orca Installation Guide
Upgrade Procedure from 1.5.1 to 1.7.1
Copy Existing Configuration
1. Back up the existing /etc/orca directory so that you can roll back if required. Copy the directory on all Orca machines.
2. Also for back up purposes, generate a full set of XML configuration files for the existing configuration using the following command:dumpwholeconfig
3. To use an existing survey configuration to create a new 1.7.1 survey configuration, take a copy of the existing configuration:
As orca user:mkdir existing161configcd existing161configdumpconfig
This generates a full set of Orca XML configuration files from the previous survey configuration which can be updated and used as a starting point for further survey configurations.
Create and Activate a New Survey
Refer to Chapter 2 of Orca Guide: Basic Survey Setup for detailed steps on how to create and activate a new survey via the Orca Process (OP) window.
Orca automatically restarts after selecting the new active survey.
Assign Roles to Machines During Upgrade
When identifying which machines to use for each of Orca’s four roles (see “Identify machines for Orca roles” on page 5) a typical configuration when upgrading from 1.6.1 to 1.7.1 would be:
• Control - typically the primary Orca workstation under the previous Orca 1.6.1 configuration.
• Logging/Processing - typically the secondary Orca workstation under the previous Orca 1.6.1 configuration.
• Coverage - typically the Reflex workstation under the previous Orca 1.6.1 configuration.
• Sprint - typically the Sprint workstation under the previous Orca 1.6.1 configuration.
This assignment of roles assumes that the Orca 1.6.1 primary and secondary workstations shared the same hardware configurations.
Install New Software
The procedure, with the addition of the above considerations, is the same as the standard installation procedure. Refer to:
• “Pre-Installation Set up” on page 5• “Install Orca using Installation Scripts” on page 8
Upgrade the Configuration
1. Create a clean directory from which to run the upgrade script. As orca user:mkdir /home/orca/tmpFilescd /home/orca/tmpFiles
2. Run the configuration upgrade script, specifying the old and new versions. If upgrading by more than one version, you will need to run scripts multiple times, specifying intermediate versions at each stage.

21
Upgrading to a New Version of Orca
Orca Installation Guide
orca_upgrade_config_db 1.6.1-1.7.1
3. Reload the Orca Diagnostics contexts configuration. This step is only necessary if the contexts have changed since the last software release. If this step is required, a configuration file named DiagnosticContexts.xml is included with the release. Load the file by running the following commands as orca user:cd /home/orca/CURRENT_VERSION/etc/orcaocu get contexts contexts.xmlocu-contexts put contexts.xml DiagnosticContexts.xmlocu put contexts contexts.xml
Complete Post-Installation Set up
Refer to “Post-Installation Set up” on page 10.
22
Installing an Orca Base Release
Orca Installation Guide
Installing an Orca Base Release
About Orca Base Releases
Between full version releases, a series of software patches may be issued. They can be installed individually (see “Installing Orca Patches” on page 24) or installed as a complete Orca software version with all up-to-date patches pre-installed.
This process is equivalent to upgrading to a new version release of Orca but without the need to allow for major configuration or data store format changes.
Prerequisites It is recommended that base releases are installed either during a line change or other down-time.
You should have downloaded the base release (in the form of a compressed archive) from Concept’s ftp site to your main Orca workstation.
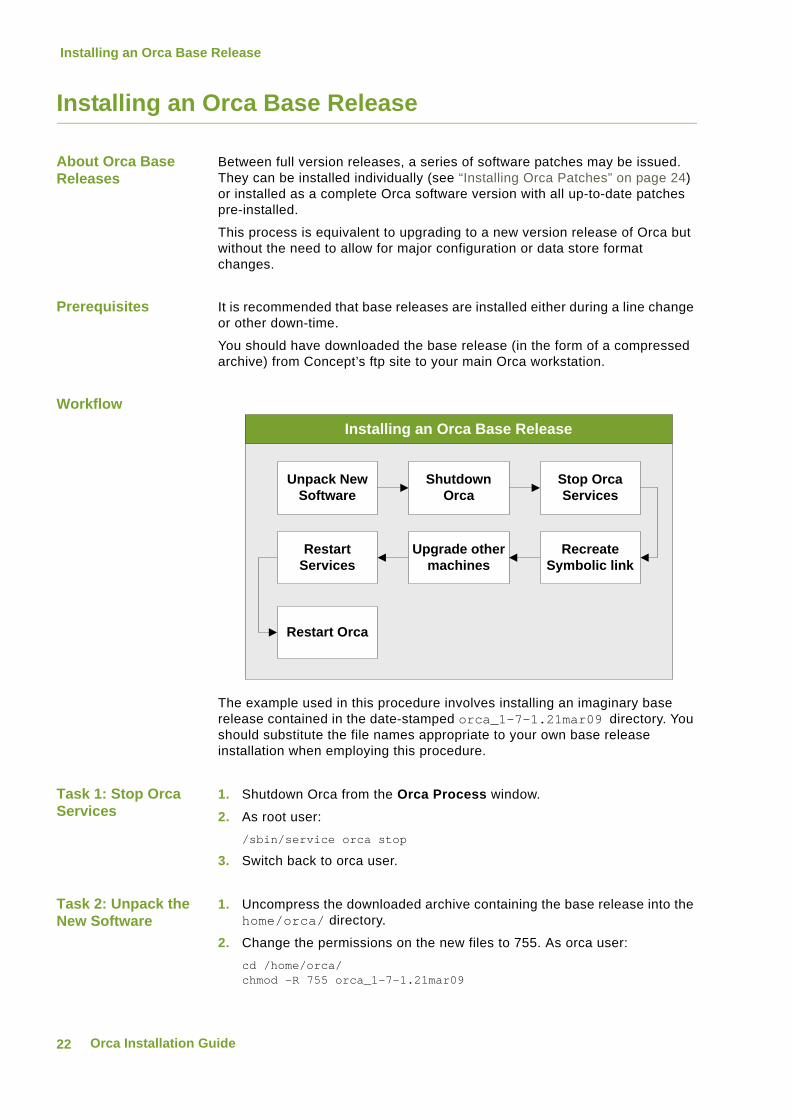
Workflow
The example used in this procedure involves installing an imaginary base release contained in the date-stamped orca_1-7-1.21mar09 directory. You should substitute the file names appropriate to your own base release installation when employing this procedure.
Task 1: Stop Orca Services
1. Shutdown Orca from the Orca Process window.
2. As root user:/sbin/service orca stop
3. Switch back to orca user.
Task 2: Unpack the New Software
1. Uncompress the downloaded archive containing the base release into the home/orca/ directory.
2. Change the permissions on the new files to 755. As orca user:cd /home/orca/chmod -R 755 orca_1-7-1.21mar09
Stop Orca Services
Installing an Orca Base Release
Shutdown Orca
Unpack New Software
Restart Services
Recreate Symbolic link
Upgrade other machines
Restart Orca

23
Installing an Orca Base Release
Orca Installation Guide
Task 3: Update the Symbolic Link
1. Remove the old symbolic link first. As orca user:rm -f CURRENT_VERSION
2. Create a new symbolic link. As orca user:ln -s /home/orca/orca_1-7-1.21mar09 CURRENT_VERSION
Task 4: Install on Other Orca machines
Repeat tasks 1-3 on all other Orca machines.
Task 5: Restart Orca Services
Restart the Orca services from the command line.
1. As root user:/sbin/service orca start
2. Switch back to orca user.

24
Installing Orca Patches
Orca Installation Guide
Installing Orca Patches
About Orca Patches
Software patches for Orca are issued by Concept Systems from time to time either to resolve bugs or enable enhancements. A patch may involve updating individual or multiple files. In the case of multiple files you will need to change all the files when installing the patch.
In order to simplify the process and remove a margin of error from the manual installation and naming of patches, it is possible to automate much of the process. This can be achieved in two stages
• Setting up a mirroring process which ensures all workstations on a vessel have a current copy of the latest patches available.
• Running the orca_patch script to install patches and update softlinks within a standardised naming convention.
NoteThe automated patching mechanism uses specific procedures for naming and softlinking files. When the automated patching mechanism is in use, manually applied patches must use exactly the same procedure. Failure to do this may break the automated patching mechanism.
Details of each of the patches available for an Orca version are contained in the HISTORY file. This file is available following the mirroring of the patches with the ftp server and is found in the /home/orca/ftp/orca_[version] directory.
Within the HISTORY file, each patch set is described, including details of the files to be installed, a description of the problem that the patch addresses and any further installation requirements. It is recommended that prior to running the orca_patch script, the HISTORY file is consulted to ensure that any additional requirements are known.
Beta Patches Under certain circumstances, CSL will release new Orca patches with a beta status in order to control the installation using the orca_patch script.
Such patches are intended for installation on a particular vessel to allow confirmation of the correct operation of the patch in a production environment before the patch is issued generally to all vessels.
All such patches will have gone through internal testing and it would be expected that a patch would only remain in this state for a short period.
Within the HISTORY file, beta patches appear in the usual format, but contain the following warning message:BETA: DO NOT INSTALL THIS PATCH UNLESS INSTRUCTED BY CSL
When the orca_patch script is run with the -latest flag, all patches are installed until the first instance of a beta patch in the HISTORY file. The first instance of a beta patch encountered is not installed. No further patches, including those not with a beta status, will be installed.
This is to ensure that dependencies between patches are respected. If a particular patch is required for installation but is either in a beta state or appears in the HISTORY file after a beta patch, it would be possible to install using the mechanism for installing a subset of patches as described below.

25
Installing Orca Patches
Orca Installation Guide
However, this should only be performed under instruction from CSL support personnel.
Mirroring Setup
NoteThis first stage of this setup involves mirroring part of the CSL ftp site which may raise issues regarding network security and bandwidth availability. This procedure may not be suitable in all cases, please contact CSL support if you have concerns in this area.
Task 1: Mirror the CSL ftp directory
One machine on the vessel should have a directory which is mirrored with the CSL ftp directory. This machine will normally be orca1.
On the vessel’s orca1 machine, run the command:
mirrorFTP
This mirrors the CSL ftp directory /pub/orca/orca_<current_version> with the local /home/orca/ftp/orca_<current_version> directory.
It is advisable to run this process at short, regular intervals at a time of low bandwidth demand to ensure that the local ftp directory is kept up to date and to avoid delays when installing new patches.
Task 2: Mirror all Orca vessels with local vessel
The machine used to mirror the CSL ftp directory (see above) can now be used as a mirror for all other Orca machines. The rsync command can be used.
For example, to mirror /home/orca/ftp/orca_1-7-1 on orca1 to orca2, on the orca2 command line:
cd /home/orca/
Orca Mirroring Setup for Patches
orca1
CSL ftp site
orca4 orca3 orca2
lftp
rsync

26
Installing Orca Patches
Orca Installation Guide
rsync -avz orca1:/home/orca/ftp/ ftp
Note that the ’/’ at the end of orca1:/home/orca/ftp/ is important.
Again, it is advisable to run this process at regular intervals after the initial mirroring of the ftp directory so that all workstations have a current copy of the latest available patches.
Task 3: Run orca_patch
The patches are now copied to local machines but are not activated until you run the orca_patch script. This task is performed manually so that it can be completed at an appropriate time (e.g. during a line change).
When software patches are released to address current issues, you will receive an email from Concept Systems giving details of the patch, any interdependancies and any specific recommendations related to the patch.
Run orca_patch on every machine that runs orca processes (i.e. each workstation assigned an Orca role in Orca Configuration). This installs the patches to the appropriate directories and re-names softlinks to link to the latest versions.
Generally, patches should be installed on line changes or when the system is shut down. It may be possible to install some patches by stopping certain processes using Orca Diagnostics, running orca_patch and then restarting the process. Where appropriate, CSL support staff may provide procedures for this, or details will be provided in the latest HISTORY file.
There are three methods of installing patches:
• Install all the latest patches• Install a subset of patches• Install a beta patch set
Install all the latest patchesThe usual scenario is to install all the latest patches in single step. Prior to performing this it is recommended that the latest version of the HISTORY file is consulted, giving details of the patches to be installed and any additional procedures required. To do this,
1. Run:orca_patch -latest
2. The number of patches there are to unpack is displayed. Type c to continue.
3. The following type of message may appear:java/lib/orca_reporter.jar should be called java/lib/orca_reporter.jar.1.7.1.01 and java/lib/orca_reporter.jar should be a symbolic link to it
followed by this question: There are 23 name(s) to fix.This is an essential step. It will not change the versions of the running software.(L)ist/(C)ontinue/E(x)it: c
Press c to continue.
4. The number of patches for installation is displayed. Type either c to continue or l to list the patches and check they match up with the patches you are expecting to install, then c to continue.

27
Installing Orca Patches
Orca Installation Guide
Result: All the available patches are installed.
Install a subset of patchesPatches grouped together in a set are interdependent and must be installed together. Subsequent patches to a particular module also require previous interdependent patches, unless explicitly stated otherwise.
To install only a selection of the available patches, run orca_patch twice: once to list the available patches and once more to install your selection.
1. Run:orca_patch
This lists all the available patch sets, for example:Set 240 good orca_java.jar:13Set 241 good orca_diagnostics:10Set 242 good Survey_005fexport_jsp.class:03 Set 243 good orca_p1generateor:15 liborca_UKOOAlog:21
2. Run the command again appending the set number as an argument. For example to install only set 243:orca_patch 243
NoteIf there are many files in a set then you can run multiple sets, for example orca_patch 243 244 245
Result: The specified patch set is installed.
Install a Beta Patch SetIn the special case of installing a beta patch, if we have sets:Set 242 goodSet 243 goodSet 244 betaSet 245 good
orca_patch -latest will install all sets up to but not including set 244. It will unpack and have set 244 and set 245 ready for use.
If the set 244 beta patch is then installed:
orca_patch 244
this will install set 244.
Once this beta patch has been confirmed as working then CSL should be informed and the beta status will be removed from this patch set. This will be reflected when the next mirror from CSL ftp site happens.
After that has taken place then running orca_patch -latest will see that set 244 is installed and nothing needs to be done, but will offer set 245 and above to be installed.
As mentioned above it is not expected that users would run for a long period with a beta patch installed. It should be noted that if a beta set is installed then running orca_patch -latest, it will see from the HISTORY file that set 244 is an active beta. It will suggest to revert back to the last version prior to the beta. So basically while running with any beta patches then orca_patch -latest should not be used until beta status lifted.
28
Installing Orca Patches
Orca Installation Guide
Manual installation If the mirroring process has not worked correctly, you need to download and install the patch manually.
In order to ensure the orca_patch script can still work smoothly in future, manually update the local ftp copy with the relevant patches, the HISTORY file and all MD5SUMS.* from the CSL ftp site, then run orca_patch to install the files.
Carry out these steps on the orca1 machine and then use the rsync command on the other workstations. If the rsync command fails, manually copy the downloaded files to each workstation before running orca_patch.
Uninstall a Patch Whenever orca_patch is used to install a patch, it creates both an ’undo’ and a ’redo’ script which can be used to backout a patch or re-install it.
They are stored in /home/orca/CURRENT_VERSION/patches/ and are named, for example:2007-08-29-14-23-23.redo2007-08-29-14-23-23.undo2007-08-29-14-24-02.redo2007-08-29-14-24-02.undo

A-1Orca Installation Guide
Appendix A Installation Script Processes
In this appendix This appendix lists the automatic checks and setup procedures performed by the Orca Installation script after you have confirmed details of the required prerequisites for the installation. When these steps have completed, return to step 10 on page 9.
Installation script processes
• Checks the required runtime parameter is specified and exists. This parameter is the name of the compressed base release tape archive (e.g. orca_1-7-1.12mar09.tar.bz2) and should exist in the current directory. If the base release archive does not exist, the script exits with an error message.
• Checks the script is being run by the root user. If the user is not root, the script exits with an error message.
• Checks if SELinux is current configured and if it is, exits with an error message
• Checks the workstation architecture (32/64 bit) for RPM installation
• Shuts down the Postgresql service if currently running.
• Shuts down orca services if currently running.
• Checks for the existence of the orca user home directory (default: /home/orca, variable: HOME_DIR). Prompts for the location. If the specified directory does not exist, the script exits with an error message.
• Checks for the existence of the orca data directory (default: /orca1data, variable: DATA_DIR). The user is prompted for the location. If the specified directory does not exist, the script exits with an error message.
• Checks for the existence of the /etc/orca directory. If the directory does not exist, the directory is created and the appropriate ownership/permissions are set.
• Checks the existence of the postgres user (checks the /etc/passwd file). If the user does not exist, the script exits with an error message.
• Checks the existence of the orca user (checks the /etc/passwd file). If the user does not exist, the script exits with an error message.

A-2
Appendix A: Installation Script Processes
Orca Installation Guide
• Determines the group id of the orca user for future changes of file/directory ownership.
• Checks for the existence of the orca log file directory (/home/orca/log). If the directory does not exist, creates it and sets appropriate ownership and permissions for the orca user.
• Checks for the existence of the orca debug directory (/etc/orca/debug). If the directory does not exist, creates it and sets appropriate ownership and permissions for the orca user.
• Unpacks the compressed base release tape archive as passed in the runtime parameter (e.g. orca_1-7-1.12mar09.tar.bz2) to the orca user home directory (HOME_DIR).
• Creates the CURRENT_VERSION symbolic link in the orca user home directory to the unpackaged base release e.g. orca_1-7-1.12mar09.tar.bz2).
• Sets permissions for the orca user home directory:
• Recursively changes owner of HOME_DIR/CURRENT_VERSION/ to orca:[gid]
• Changes owner for orca data directory (DATA_DIR) to orca:[gid]
• Changes owner for DATA_DIR/config_db_home to orca:[gid]
• Installs packaged Postgresql RPMs.
• Installs packaged Perl RPMs.
• Installs packaged Misc RPMs.
• Installs packaged Slony RPMs.
• Backs up and copies into place the following Orca configuration files from HOME_DIR/CURRENT_VERSION/resources/install:
• /etc/init.d/orca• /etc/logrotate.d/orca• /etc/orca/bootstrap.xml• /etc/orca/parse_bootstrap.xml• /etc/orca/all_vessels_directory.xml• /etc/sysconfig/orca• /home/orca/.cshrc• /etc/orca/PowerRTNU/boot• /etc/orca/PowerRTNU/kernel
• Checks for the existence of the DATA_DIR/pgsql directory and creates if it doesn't exist.
• Changes the ownership and permissions for the postgres user.
• As the postgres user, runs the Postgresql setup scripts as follows:
• Creates postgres database cluster (initdb)• Installs the Postgresql configuration files as supplied within the
installation package, e.g.DATA_DIR/pgsql/data/pg_hba.confDATA_DIR/pgsql/data/postgresql.conf

A-3
Appendix A: Installation Script Processes
Orca Installation Guide
• Configures Postgresql auto-start, completing the following steps:
• Creates the directory /etc/sysconfig/pgsql if it doesn't exist.• Backs up the existing postgresql file if it exists.• Copies the new version from the installation package, updating the
default database location (/orca1data) based on the DATA_DIR variable
• Sets up the auto-start of the postgresql service using /sbin/chkconfig.
• Starts the postgresql service
• As the postgres user, creates the orca pgsql user (e.g. createuser -a -d orca)
• Sets up the auto-start of the orca service using /sbin/chkconfig.
• Sets correct user permissions for the ports.
• Sets local bootstrap file (/etc/orca/bootstrap.xml) based on user inputs.
• Restarts the orca services.

A-4
Appendix A: Installation Script Processes
Orca Installation Guide
B-1Orca Installation Guide
Appendix B Clone an Existing Vessel Configuration
In this appendix Under certain circumstances, it may be required that existing configuration for another vessel is used for the setup of a new vessel. Concept Systems Ltd. provides a tool that allows the cloning of XML configurations in such scenarios. The use of this tool is described in this appendix.
Task: Clone an Existing Configuration
1. Ensure that the vessels configuration file all_vessels_directory.xml is located in the /etc/orca directory and contains the necessary configuration for the vessel for which the configuration is to be cloned.
2. Make a note of the vessel prefixes contained within the vessels configuration file for both the source vessel and the vessel for which the configuration is to be cloned.
3. Ensure that a set of configuration files from the source vessel are available. To generate the files, run the following command on the source vessel:
exportconfig
4. Within the directory containing the XML configuration files for the source vessel, run the following command to generate the new XML configuration files. The script uses the 3-letter vessel prefix for both the source vessel and new vessel as a parameter, as shown:
orca_clone_config_xmls OIL=GAS
In this example, the configuration for the vessel with the prefix OIL is being cloned for the vessel with the GAS prefix.
As a result of running the script, a set of XML configuration files for the new vessel is created. These configuration files will contain appropriate

B-2
Appendix B. Clone an Existing Vessel Configuration
Orca Installation Guide
SUID and vessel references for the new vessel. The source XML configuration files will be backed up.
NoteIn some circumstances, workstations that include the vessel prefix as part of their machine name may also be updated.


![[Papercraft] Orca](https://static.fdocuments.in/doc/165x107/552887e04a7959d8448b4789/papercraft-orca.jpg)

